1
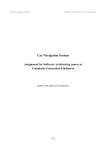
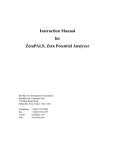
y
Safety instructions
Moisture in the drum is
due to end inspection.
Scope of delivery
– The washing machine is heavy - lift with caution.
– Frozen hoses can tear/burst. Do not install the washing machine outdoors or in an area exposed
to freezing conditions.
– These installation instructions are intended for use by qualified installers. In addition to these
instructions, if installing the washing machine:
In the United States comply with the National Electric Code, ANSI/NFPA70 - latest edition/State
and municipal and/or local regulations.
In Canada comply with the Canadian Electric Code C22.1 - latest edition/provincial and municipal
and/or local regulations.
– If the washing machine is located in a room which will be exposed to temperatures below freezing,
or if it is located in a cabin that is being shut down for the winter, any residual water in the pump
or water inlet hose(s) must be drained.
– Take care not to damage the washing machine. Do not hold on to protruding parts (e.g. door)
when lifting.
– In addition to the safety information listed here, the local water end electricity supplier may have
special requirements.
– If in doubt, have the appliance connected by an authorized technician.
Standard
Power cord
Water supply hoses
Drainage hose
Water connection l
– The washing machine must only be operated with cold and hot (max. 140 °F/60°C) tap water. Do
not connect the appliance to the mixer tap of an unpressurized hot-water boiler.
– To prevent water damage, the hot and cold water valves should be accessible when the washing
machine is in place and should always be turned off when the washing machine is not in use!
– If installing the washing machine in a new building or a building in which the plumbing system was
recently installed or upgraded, flush the lines before installing the washing machine to remove any
sand, dirt or residue.
– The connection points are under full water pressure. Check seal with tap fully open.
– To prevent leakage or water damage, follow the instructions in this chapter!
– Do not use a used inlet hose. Only use the inlet hose supplied or one which was purchased from
an authorized dealer.
– If in doubt, have the appliance connected by a technician.
– Before first use be sure to completely remove the 4 shipping locks and
keep them.
– All four hose guides need to be installed to prevent access to moving
parts.
– For later shipping be sure to reinstall the shipping locks - prevents
damage to the machine a Page 6.
– Save screws and sleeves.
1. Take the hoses out of the holder and the elbow.
Remove elbow.
Water supply
Wrench
Water inlet hose:
Covers with
hose holders
Proper disposal
– All packaging materials are non-polluting and recyclable. Please contribute to a better environment
by disposing of packaging materials in environmentally friendly manner. Please ask your dealer or
local authority about the best means of disposal.
Old appliances are not worthless rubbish. Valueable raw materials can be reclaimed from
environmentally friendly recycling.
Removing shipping locks
Attention: Do not kink, crush, modify or cut through (strength is no longer guaranteed).
Optimum water pressure should be between: 14.5 to 145 p.s.i. (1-10 bar)
– When the tap is turned on, the water flow is at least 2.2 U.S. gallons (8 liters) per minute.
– If the water pressure is higher, install a pressure reducing valve.
Elbow
for fixing the waste
water hose
2. Loosen and remove all 4 transportation protection devices.
1. Connect water supply hoses to the taps.
Additionally needed depending on connection
2. Carefully turn on the taps and check the connection
Useful tool
Installation surface
points are not leaking.
Attention: screw connection is under water mains
pressure.
– Level for alignment.
3. Take the power cord out of the holders. Remove sleeves.
– Stability is important to that the machine does not "walk"!
– The installation surface must be solid and level.
– Soft floors/floor coverings are not suitable.
Hose and cable lengths
or
Left-side connection
For installation on a base
Right-side connection
– Fasten the washing machine feet with retaining tabs* (*Order no. WMZ 2200, WX 9756).
Water drainage
For installation on a wooden joist floor
Water drainage hose:
4. Fit the covers.
Lock securely by pressing on the locking hook!
– Install the washing machine in a corner if at all possible.
– Screw a waterproof wooden plate (min. 1.18 in. thick) on the floor.
– Fasten the washing machine feet with retaining tabs* (*Order no., see above).
3/4”
Tighten plastic screw-fittings by hand only.
– 1 hose clamp Ø 0.94 in.-1.57 in. (commercially available) for connectiong to siphon
a Page 4; Water connection.
51 in.
41 in.
Attention: Do not kink or stretch.
Height difference between installation area and outlet:
0 - max. 39 in.
47 in.
28 in.
Drainage into a sink/bath tub:
Attention: Secure the drainage hose to prevent it from slipping out of the sink.
Attention: The plug must not be in the plug hole. When the water is being
pumped out of the washing machine, check that the water drains away quickly
enough. Do not insert the end of the drainage hose into the pumped off water!
There is a risk that water will be drawn back into the washing machine!
max. 39 in.
Under-counter/closet installation of the machine
Under-counter / in-cabinet installation before connecting to power supply.
37 in.
Installation in kitchen cabinets (under-counter or in-cabinet)
– Cubicle width of 23.62 in. is required.
– Only install the washing machine under a continuous counter top which is securely fastened
to the neighboring cabinets.
– If installing the washer in a closet, observe the minimum distances:
Side: 0 in., rear: 1.97 in., top: 0 in., front: 2.76 in.
55 in.
Drainage into a siphon:
Attention: Secure connection point with hose clip,
Ø 0.9 in. - 1.6 in. (dealer).
Note: When using the hose holder, possible hose lengths are reduced!
Available commercially or from customer service:
– Longer supply hose (approx. 86.61 in.), for standard model.
.
5. Fix hoses in the hose holders. Fit the hose clips.
Drainage into a standpipe or in wall installation:
Use the U-bracket. Attach the U-bracket to the end of the hose and insert end of
hose into standpipe or wall drain. Use a strap or cable tie connected to U-bracket
to hold hose in place.
1
2
3
4
Alignment
Strong odor, vibrations and "walking" can be the result of incorrect alignment!
Transportation, e.g. if moving house
Customer Service
1. Before transporting the washing machine:
ʑ
Align washing machine with a level
1. Turn off the tap.
2. Release the water pressure In the supply hose. a Operating instructions, Page 9; Filter In
the water supply.
3. Drain any residual detergent solution. a Operating instructions, Page 9, Detergent solution
pump.
4. Isolate the washing machine from the power supply.
5. Remove the hoses.
1. Loosen counter nut with wrench counterclockwise.
2. Change height by turning the machine feet.
All four machine feet must stand firmly on the floor
The washing machine must not rock!
Check alignment of the washing machine with level and correct if
necessary.
2.
ʑ
ʑ
If you cannot resolve a problem by yourself a Operating instructions: Troubleshooting,
page 12/13, please contact our Customer Service. We will always find the right solution and
can even help you avoid an unnecessary service call.
You will find the contact information for your nearest Customer Service here or in the
Customer Service directory (depending on model).
When contacting Customer Service, please provide the Model Number and Serial Number of
the appliance.
Model Number
Installing transportation protection devices:
ʑ
1. Remove the covers.
Washing machine
Serial Number
You will find this information in the following
locations:
On the inside of the loading door* / service
cover when open* and on the back of the
appliance.
Put your trust in the manufacturer's expertise. By consulting us, you can rest assured that
your appliance will be repaired by trained service technicians using only original replacement
parts.
Installation
instructions
ʑ
ʑ
ʑ
ʑ
ʑ
ʑ
ʑ
ʑ
This appliance must be grounded. In the event of a malfunction or breakdown, grounding
will reduce the risk of electrical shock by providing a path of least resistance for the electric
current. This appliance features a cord with an equipment-grounding conductor and a
grounding plug. The plug must be plugged into an appropriate outlet which has been
properly installed and grounded in accordance with all local regulations and ordinances.
Improper connection of the equipment grounding conductor may result in electric shock.
Have the appliance checked by a qualified electrician or service technician if you are in
doubt as to whether the washer has been properly grounded.
Do not modify the plug provided with the appliance - if it will not fit in the outlet, have a
proper outlet installed by a qualified electrician.
The washing machine must only be connected to an individual branch circuit via a socket
which has been properly installed and grounded.
The household electrical voltage must correspond to the voltage specifications on the
washing machine. Connection specifications as well as the required fuses are stipulated
on the appliance rating plate. Volts: 208 - 240; Hertz: 60; Amperes: 12
0110 / 9000534780
Electrical connection
*534780*
3. Tighten the counter nut against the housing.
– Hold the feet while doing this and do not change the height.
The counter nuts of all four machine feet must be screwed tightly
against the housing!
Make sure that:
– the power plug fits into the socket.
– the wire size is sufficient.
– the grounding system is properly installed:
The power cord may be replaced by an electrician only. Replacement power cords are
available from Customer Service. To reduce the risk of fire or electrical shock, DO NOT
use an extension cord or an adapter to connect the washing machine to the power supply.
If a ground fault circuit breaker is to be used, only use types marked with the following
symbol: ‚. Only this symbol can guarantee compliance with all current regulations.
Electrical plug:
– do not insert/pull out of the socket with damp hands.
– do not pull the plug out of the socket by tugging the power cord.
– Never pull out the plug while the appliance is operating.
Manufacturer a Operating instructions
5
2. Insert all 4 sleeves.
Clamp the power cord into the holders.
Insert the screws and tighten.
Contents
ʋ
ʋ
ʋ
ʋ
ʋ
ʋ
ʋ
ʋ
ʋ
ʋ
ʋ
ʋ
ʋ
The transportation protection devices must be removed after transportation! a Page 3.
To prevent unused detergent from flowing Into the outlet during the next wash:
Pour 1 litre of water into dispenser II and start the Empty programme.
Technical specifications
ʑ
ʑ
ʑ
ʑ
Dimensions (width x depth x height)
23.6 x 23.2 x 33.2 in.
Weight
169.8 lbs
Power supply
Nominal voltage 208-240 V, 60 Hz
Nominal current 12 A
Water pressure
14.5 to 145 p.s.i. (1-10 bar)
Safety instructions . . . . . . . . . . . . . . . . . .
Proper disposal . . . . . . . . . . . . . . . . . . . .
Installation surface. . . . . . . . . . . . . . . . . .
Under-counter and in-cabinet installation
Scope of delivery. . . . . . . . . . . . . . . . . . .
Hose and cable lengths . . . . . . . . . . . . .
Removing shipping locks . . . . . . . . . . . .
Water connection . . . . . . . . . . . . . . . . . .
Alignment . . . . . . . . . . . . . . . . . . . . . . . .
Electrical connection . . . . . . . . . . . . . . . .
Transporting, e.g. when moving . . . . . . .
Technical specifications. . . . . . . . . . . . . .
Customer Service . . . . . . . . . . . . . . . . . .
.
.
.
.
.
.
.
.
.
.
.
.
.
..
..
..
..
..
..
..
..
..
..
..
..
..
Page
..1
..1
..1
..1
..2
..2
..3
..4
..5
..5
..6
..6
..7
First operate the washing machine after reading these instructions!
Also follow the separate operating instructions.
Save all the documents for later use or for subsequent owner.
6
7
en
y
Safety instructions
Moisture in the drum is
due to end inspection.
Scope of delivery
– The washing machine is heavy - lift with caution.
– Frozen hoses can tear/burst. Do not install the washing machine outdoors or in an area exposed
to freezing conditions.
– These installation instructions are intended for use by qualified installers. In addition to these
instructions, if installing the washing machine:
In the United States comply with the National Electric Code, ANSI/NFPA70 - latest edition/State
and municipal and/or local regulations.
In Canada comply with the Canadian Electric Code C22.1 - latest edition/provincial and municipal
and/or local regulations.
– If the washing machine is located in a room which will be exposed to temperatures below freezing,
or if it is located in a cabin that is being shut down for the winter, any residual water in the pump
or water inlet hose(s) must be drained.
– Take care not to damage the washing machine. Do not hold on to protruding parts (e.g. door)
when lifting.
– In addition to the safety information listed here, the local water end electricity supplier may have
special requirements.
– If in doubt, have the appliance connected by an authorized technician.
Standard
Power cord
Water supply hoses
Drainage hose
Wrench
Covers with
hose holders
Proper disposal
– All packaging materials are non-polluting and recyclable. Please contribute to a better environment
by disposing of packaging materials in environmentally friendly manner. Please ask your dealer or
local authority about the best means of disposal.
Old appliances are not worthless rubbish. Valueable raw materials can be reclaimed from
environmentally friendly recycling.
Elbow
for fixing the waste
water hose
Additionally needed depending on connection
– 1 hose clamp Ø 0.94 in.-1.57 in. (commercially available) for connectiong to siphon
a Page 4; Water connection.
Useful tool
Installation surface
– Level for alignment.
– Stability is important to that the machine does not "walk"!
– The installation surface must be solid and level.
– Soft floors/floor coverings are not suitable.
Hose and cable lengths
or
Left-side connection
For installation on a base
Right-side connection
– Fasten the washing machine feet with retaining tabs* (*Order no. WMZ 2200, WX 9756).
For installation on a wooden joist floor
– Install the washing machine in a corner if at all possible.
– Screw a waterproof wooden plate (min. 1.18 in. thick) on the floor.
– Fasten the washing machine feet with retaining tabs* (*Order no., see above).
51 in.
41 in.
47 in.
28 in.
max. 39 in.
Under-counter/closet installation of the machine
Under-counter / in-cabinet installation before connecting to power supply.
37 in.
Installation in kitchen cabinets (under-counter or in-cabinet)
– Cubicle width of 23.62 in. is required.
– Only install the washing machine under a continuous counter top which is securely fastened
to the neighboring cabinets.
– If installing the washer in a closet, observe the minimum distances:
Side: 0 in., rear: 1.97 in., top: 0 in., front: 2.76 in.
1
55 in.
Note: When using the hose holder, possible hose lengths are reduced!
Available commercially or from customer service:
– Longer supply hose (approx. 86.61 in.), for standard model.
2
Water connection l
Removing shipping locks
– The washing machine must only be operated with cold and hot (max. 140 °F/60°C) tap water. Do
not connect the appliance to the mixer tap of an unpressurized hot-water boiler.
– To prevent water damage, the hot and cold water valves should be accessible when the washing
machine is in place and should always be turned off when the washing machine is not in use!
– If installing the washing machine in a new building or a building in which the plumbing system was
recently installed or upgraded, flush the lines before installing the washing machine to remove any
sand, dirt or residue.
– The connection points are under full water pressure. Check seal with tap fully open.
– To prevent leakage or water damage, follow the instructions in this chapter!
– Do not use a used inlet hose. Only use the inlet hose supplied or one which was purchased from
an authorized dealer.
– If in doubt, have the appliance connected by a technician.
– Before first use be sure to completely remove the 4 shipping locks and
keep them.
– All four hose guides need to be installed to prevent access to moving
parts.
– For later shipping be sure to reinstall the shipping locks - prevents
damage to the machine a Page 6.
– Save screws and sleeves.
1. Take the hoses out of the holder and the elbow.
Remove elbow.
Water supply
Water inlet hose:
Attention: Do not kink, crush, modify or cut through (strength is no longer guaranteed).
Optimum water pressure should be between: 14.5 to 145 p.s.i. (1-10 bar)
– When the tap is turned on, the water flow is at least 2.2 U.S. gallons (8 liters) per minute.
– If the water pressure is higher, install a pressure reducing valve.
2. Loosen and remove all 4 transportation protection devices.
1. Connect water supply hoses to the taps.
3/4”
Tighten plastic screw-fittings by hand only.
2. Carefully turn on the taps and check the connection
points are not leaking.
Attention: screw connection is under water mains
pressure.
3. Take the power cord out of the holders. Remove sleeves.
Water drainage
Water drainage hose:
4. Fit the covers.
Lock securely by pressing on the locking hook!
Attention: Do not kink or stretch.
Height difference between installation area and outlet:
0 - max. 39 in.
Drainage into a sink/bath tub:
Attention: Secure the drainage hose to prevent it from slipping out of the sink.
Attention: The plug must not be in the plug hole. When the water is being
pumped out of the washing machine, check that the water drains away quickly
enough. Do not insert the end of the drainage hose into the pumped off water!
There is a risk that water will be drawn back into the washing machine!
Drainage into a siphon:
Attention: Secure connection point with hose clip,
Ø 0.9 in. - 1.6 in. (dealer).
.
5. Fix hoses in the hose holders. Fit the hose clips.
Drainage into a standpipe or in wall installation:
Use the U-bracket. Attach the U-bracket to the end of the hose and insert end of
hose into standpipe or wall drain. Use a strap or cable tie connected to U-bracket
to hold hose in place.
3
4
Alignment
Transportation, e.g. if moving house
Strong odor, vibrations and "walking" can be the result of incorrect alignment!
1. Before transporting the washing machine:
Align washing machine with a level
1. Turn off the tap.
2. Release the water pressure In the supply hose. a Operating instructions, Page 9; Filter In
the water supply.
3. Drain any residual detergent solution. a Operating instructions, Page 9, Detergent solution
pump.
4. Isolate the washing machine from the power supply.
5. Remove the hoses.
1. Loosen counter nut with wrench counterclockwise.
2. Change height by turning the machine feet.
All four machine feet must stand firmly on the floor
The washing machine must not rock!
Check alignment of the washing machine with level and correct if
necessary.
2. Installing transportation protection devices:
1. Remove the covers.
ʑ
This appliance must be grounded. In the event of a malfunction or breakdown, grounding
will reduce the risk of electrical shock by providing a path of least resistance for the electric
current. This appliance features a cord with an equipment-grounding conductor and a
grounding plug. The plug must be plugged into an appropriate outlet which has been
properly installed and grounded in accordance with all local regulations and ordinances.
ʑ
ʑ
ʑ
ʑ
ʑ
Improper connection of the equipment grounding conductor may result in electric shock.
Have the appliance checked by a qualified electrician or service technician if you are in
doubt as to whether the washer has been properly grounded.
ʑ
The power cord may be replaced by an electrician only. Replacement power cords are
available from Customer Service. To reduce the risk of fire or electrical shock, DO NOT
use an extension cord or an adapter to connect the washing machine to the power supply.
If a ground fault circuit breaker is to be used, only use types marked with the following
symbol: ‚. Only this symbol can guarantee compliance with all current regulations.
ʑ
Electrical plug:
– do not insert/pull out of the socket with damp hands.
– do not pull the plug out of the socket by tugging the power cord.
– Never pull out the plug while the appliance is operating.
Do not modify the plug provided with the appliance - if it will not fit in the outlet, have a
proper outlet installed by a qualified electrician.
The washing machine must only be connected to an individual branch circuit via a socket
which has been properly installed and grounded.
The household electrical voltage must correspond to the voltage specifications on the
washing machine. Connection specifications as well as the required fuses are stipulated
on the appliance rating plate. Volts: 208 - 240; Hertz: 60; Amperes: 12
0110 / 9000534780
Electrical connection
*534780*
3. Tighten the counter nut against the housing.
– Hold the feet while doing this and do not change the height.
The counter nuts of all four machine feet must be screwed tightly
against the housing!
Make sure that:
– the power plug fits into the socket.
– the wire size is sufficient.
– the grounding system is properly installed:
Manufacturer a Operating instructions
5
2. Insert all 4 sleeves.
Clamp the power cord into the holders.
Insert the screws and tighten.
The transportation protection devices must be removed after transportation! a Page 3.
To prevent unused detergent from flowing Into the outlet during the next wash:
Pour 1 litre of water into dispenser II and start the Empty programme.
Technical specifications
ʑ
ʑ
ʑ
ʑ
Dimensions (width x depth x height)
23.6 x 23.2 x 33.2 in.
Weight
169.8 lbs
Power supply
Nominal voltage 208-240 V, 60 Hz
Nominal current 12 A
Water pressure
14.5 to 145 p.s.i. (1-10 bar)
6
Customer Service
ʑ
If you cannot resolve a problem by yourself a Operating instructions: Troubleshooting,
page 12/13, please contact our Customer Service. We will always find the right solution and
can even help you avoid an unnecessary service call.
ʑ
ʑ
You will find the contact information for your nearest Customer Service here or in the
Customer Service directory (depending on model).
When contacting Customer Service, please provide the Model Number and Serial Number of
the appliance.
Model Number
ʑ
Washing machine
Serial Number
You will find this information in the following
locations:
On the inside of the loading door* / service
cover when open* and on the back of the
appliance.
Put your trust in the manufacturer's expertise. By consulting us, you can rest assured that
your appliance will be repaired by trained service technicians using only original replacement
parts.
Installation
instructions
Contents
ʋ
ʋ
ʋ
ʋ
ʋ
ʋ
ʋ
ʋ
ʋ
ʋ
ʋ
ʋ
ʋ
Safety instructions . . . . . . . . . . . . . . . . . .
Proper disposal . . . . . . . . . . . . . . . . . . . .
Installation surface. . . . . . . . . . . . . . . . . .
Under-counter and in-cabinet installation
Scope of delivery. . . . . . . . . . . . . . . . . . .
Hose and cable lengths . . . . . . . . . . . . .
Removing shipping locks . . . . . . . . . . . .
Water connection . . . . . . . . . . . . . . . . . .
Alignment . . . . . . . . . . . . . . . . . . . . . . . .
Electrical connection . . . . . . . . . . . . . . . .
Transporting, e.g. when moving . . . . . . .
Technical specifications. . . . . . . . . . . . . .
Customer Service . . . . . . . . . . . . . . . . . .
.
.
.
.
.
.
.
.
.
.
.
.
.
Page
....1
....1
....1
....1
....2
....2
. ...3
....4
....5
....5
.. ..6
....6
....7
First operate the washing machine after reading these instructions!
Also follow the separate operating instructions.
Save all the documents for later use or for subsequent owner.
7
en