1
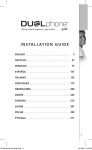
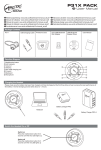
VoSKY Exchange Pro VIT1/E1
Quick Start Guide
Before You Begin
•• Make sure you meet all hardware requirements (Monitor,
Keyboard, Mouse, Network cable).
•• Make sure you have a dedicated broadband connection (uplink/
downlink ≥1Mbps) for VoSKY Exchange Pro VIT1/E1.
•• Make sure you have created 23/30(T1/E1) Skype accounts with
a recommended sequential naming convention, such as “Prefix1Prefix30” or “Prefix1- Prefix23”. If the Skype accounts are random,
please use the import account file method to launch the Skype
accounts.
•• One free E1 or T1 trunk port with Auto-Attendant capability for up
to 23/30 Skype lines.
•• Make sure you have assigned a Hunting Group Number for the
E1/T1 port of your PBX and record this number.
•• Make sure you have obtained the settings of the E1/T1 card from
your PBX specification.
A. Configure the PBX
Please send the following parameters to your PBX technician for
configuration.
English 1
Parameters
E1 settings
T1 settings
Tone zone
US
US
Timing (Clock source)
0
0
LBO
0
0
Framing
ccs
esf
Coding
hdb3
b8zs
CRC4 enabled
Enabled
Disabled
B-channels
1-15,17-31
1-23
D-channels
16
24
Switchtype
euroisdn
national
Signalling (Termination side)
pri_net(only
supports pri_
net)
pri_net(only
supports pri_net)
Group
1
1
Language
EN
EN
Receive Wink Timing
300
300
B. Connect Exchange Pro VIT1/E1 to the PBX
1. Connect the E1/T1 port on the Exchange Pro VIT1/E1 backplate
to the E1/T1 port on the PBX using the provided RJ-48 cable as
shown below:
2. If the provided cable is not applicable to your PBX, please refer to
Appendix D in the user manual to make an appropriate interface
or ask your reseller.
2 English
C. Set up VIT1/E1
Network Settings(Refer to section 2.5 for
details)
You can skip this section if your network is DHCP (VIT1/E1 will
receive IP settings automatically).
1. Plug in the power, monitor, mouse, keyboard, and network cables
into the VoSKY Exchange Pro VIT1/E1 system.
2. Turn on the system. Click on System ->Administration ->
Networking to launch the Network settings. In the Connections
English 3
section, select the interface you want to configure and click the
Properties button to configure the settings.
The following screenshot shows the interface “eth0” and “eth1” in
Exchange Pro VIT1/E1.
3. Choose a connection configuration type: DHCP or Static IP
Address. You can get IP settings assigned automatically if your
network supports this capability.
4 English
4. If you choose the Static IP Address option, specify an IP address
in the IP address field, type the subnet mask number obtained
from your network administrator or Internet service provider, and
type the IP address for the default gateway that you want to add.
English 5
5. In the General section, type the hostname or domain name
(default: VIT1/E1).
6. In the DNS section, type the new DNS IP address in the DNS text
box and click Add button.
6 English
Activate VIT1/E1
1. Open your browser (default: http://localhost:8080 ).Enter the
Username (default: admin) and Password (default: password) of
the administrator in the login page. Select “Remember me if you
want to login automatically later.” Click Login to enter the VoSKY
Exchange Pro VIT1/E1 Web Console.
Note: For security reasons, change your administrator
password after logging in.
2. Fill in the appropriate fields and click on Activate to activate your
Exchange.
English 7
Note: You only can obtain Exchange Pro VIT1/E1 updates
once it is activated.
Configuration Wizard
1. Setting up the SkypeOut settings.
2. Setting up the SkypeOut call availability.
8 English
3. Setting up the two-segment “X+Y” dialing scheme, the default
format is 2+2 (2-digit PIN + 2-digit key).
4. Setting up the administrator’s profile information.
English 9
5. Click OK button to complete the configuration wizard.
Set up the E1/T1 Card Type
1. Choose a card type: E1 or T1. This depends on the E1/T1 card in
your PBX. Select E1 if you have an E1 card in your PBX, or select
T1 if you have a T1 card in your PBX.
Note: If the card is configured as E1, it will launch 30 Skype
accounts. If configured as T1, it will launch 23 Skype
accounts. Once the configuration is complete you may
not switch card types. You must use the Recovery DVD
to restore the system to change the card type settings.
10 English
Launch Skype Accounts
Select an option to launch the Skype accounts: Rapid Launch or File
imported.
a. Rapid Launch
This option restricts you to use a uniform password for all Skype
accounts. Select the Fixed Prefix+serial number option and
enter the Skype IDs’ prefix, such as lexis30sh00. Then enter the
uniform password in the Password field. Click the Next button to
continue.
Exchange Pro VIT1/E1 will list the 30 Skype accounts such as
lexis30sh001, lexis30sh002 …lexis30sh0030. Click the Back
button to return to the previous page to revise. Otherwise, click
the Start button to start the Skype launch process.
English 11
Note: The process will take about 15-20 minutes
(depending on network conditions) to complete.
During the process please do not use the keyboard
and mouse to avoid the interruption or error.
b. File Imported
If you use random Skype accounts with different passwords, we
recommend that you import an account file to launch the Skype
accounts.
First, open the Exchange Pro VIT1/E1 desktop / VoSKY /
Documents / Skype.csv. Using this template, the left column
in the figure below are Skype IDs and the right column are the
corresponding passwords. You can edit this template with the
Skype accounts and passwords you would like to use.
12 English
Select Import list of accounts option and click the Browse
button to select the account file. Click the Next button to continue.
English 13
Exchange Pro VIT1/E1 will list the imported 30 Skype accounts.
Click the Back button to return to the previous page to revise.
Otherwise, click the Start button to start the Skype launch
process.
Note: The process will take about 15-20 minutes (depending
on network conditions) to complete. During the
process please do not use the keyboard and mouse
to avoid the interruption or error.
When complete, a message window will pop up to notify you.
14 English
Click the Ok button to close it.
Note: If the imported account password is not correct, a
message window will pop up to notify you to relaunch the
Skype accounts using the correct passwords.
The Skype ID of the first port on Exchange Pro VIT1/E1 will be
used as the Company Skype ID.
English 15
Set up E1/T1
The E1/T1 parameters of both units should be consistent when
connecting the Exchange Pro VIT1/E1 to the PBX. Otherwise, it will
cause data transmission access issues.
16 English
In the E1/T1 page, click the Configure button.
Timing in Exchange Pro VIT1/E1 is set to “0” .
Exchange Pro VIT1/E1’s Signalling currently only supports pri_net
(Network side/Master).
If you cannot find the corresponding settings on your PBX, please
use the default settings in Exchange Pro VIT1/E1.
E1 Setting page
English 17
Following is the initial default values for E1:
Tone zone
US
Timing
0
LBO
0
Framing
ccs
Coding
hdb3
CRC4
Enabled
B-channels
1-15,17-31
D-channels
16
Switchtype
euroisdn
Signaling
pri_net(only supports pri_net)
Group
1
Language
EN
Receive Wink Timing
300
T1 Setting page
18 English
Following is the initial default values for T1:
Tone zone
US
Timing
0
LBO
0
Framing
esf
Coding
b8zs
CRC4
Disabled
B-channels
1-23
D-channels
24
Switchtype
national
Signaling
pri_net(only supports pri_net)
Group
1
Language
EN
Receive Wink Timing
300
To complete the setup, in the E1/T1 page, click the Restart
service button for the parameter changes to take effect.
English 19
D. Verify VoSKY Exchange Pro VIT1/E1 System
Extension -> Skype
1. Pick up an extension phone which is connected to the PBX, dial
the Hunting Group Number for VoSKY Exchange Pro E1/T1 and
verify you can hear the dial tone.
2. After you hear the Dial Tone or voice prompt, press “1” to make a
test call to “echo123”.
3. Follow the Skype echo test instructions and record a message for
10 seconds. Make sure you can hear the message that is played
back to you.
Skype -> Extension
1. Make an inbound call from a remote Skype to your Company
Skype ID.
2. Enter an extension number after hearing the PBX’s autoattendant.
3. Check that the call connects and both parties can talk to each
other.
20 English
English 21
P/N.0530-0584-000