1
2.
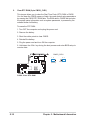
Serial connector (9-pin COM1 )
This 9-pin connector connects to the Serial COM1 bracket. Connect the
COM1 cable to this connector and install the bracket on an available slot in
the rear panel of the chassis.
P4S8L
®
COM1
P4S8L Serial COM1 Bracket
3.
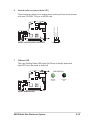
ATX power connectors (20-pin ATXPWR1, 4-pin ATX12V1)
These connectors connect to an ATX 12V power supply. The plugs from the
power supply are designed to fit these connectors in only one orientation. Find
the proper orientation and push down firmly until the connectors completely fit.
+3.3VDC
+3.3VDC
GND
+5.0VDC
GND
+5.0VDC
GND
PWR_OK
+5VSB
+12.0VDC
ATXPWR1
®
+3.3VDC
-12.0VDC
GND
PS_ON#
GND
GND
GND
-5.0VDC
+5.0VDC
+5.0VDC
P4S8L
ATX12V1
P4S8L Floppy ATX Power Connectors
GND
+12V DC
GND
+12V DC
If you will need to replace the power supply in the future, make sure that your
new ATX 12V power supply can provide 8A on the +12V lead and at least 1A on
the +5-volt standby lead (+5VSB). The minimum recommended wattage is
230W, or 300W for a fully configured system. The system may become unstable
and may experience difficulty powering up if the power supply is inadequate.
ASUS Book Size Barebone System
5-13