1
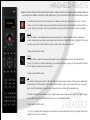
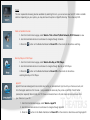
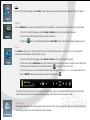
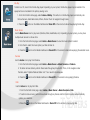
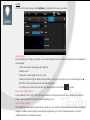
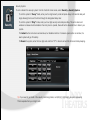
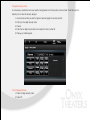
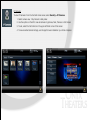
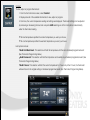
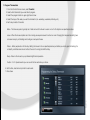
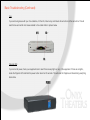
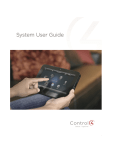
User Guide
Service: [email protected]
219 W. Wilshire Blvd. OKC, OK 73116
(405) 520-9220 ph.
(866) 376-2492 fax
HANDHELD REMOTE
Below is the user-friendly Control4 Hand Held Remote. A select few buttons are given more explanation below for
your reference in addition to simple tips and techniques to get you started with the Control4 automation system.
!
This button (red 4) turns the Control4 system on. In addition, pressing this button will return you to the home
screen on your TV no matter where you are within the on-screen navigator. Find confidence in the fact that you
cannot “mess up” the system. If you find yourself lost, simply press this button to return to the home screen.
!
Watch
Press this button to view available video sources such as local TV, cable or satellite stations on the remote
screen. Depending on your system, you may also have the option of AppleTV, Blu-Ray or Security DVR. Use the
up, down, right, left and select buttons to scroll or select which video source to watch.
!
To exit, press the CNCL button.
!
Listen
Press this button to select audio sources through the screen on the remote. Options may include Sonos,
iTunes, CD, iPod Dock, or Radio, depending on your system. Use the up, down, right, left and select buttons to
scroll or select which audio sources to listen to.
!
To exit, press the CNCL button.
!
List
This button is multi-purpose. First, it offers the ability to change the room location of the remote to adjust other
room settings. To do this, press the LIST button, select House, Location, then choose which room you would
like to control. Once selected, you will notice the remote screen will display the selected room.
!
In addition, this button functions as a way to control video sources, audio sources, comfort and lighting. Again,
the up, down, right, left and select buttons allow you to scroll through options.
!
To exit, press the CNCL button.
Tip! If you’ve changed the room locaton on the remote for a convenience task, be sure to change it back to the
original room location for next time.
LED SCREEN
Location
The room that the hand held remote is controlling will be listed on the screen of the remote. This is the Location.
Tip! Any hand held remote can control any room in the house that has Control4 userability. Always
double check that the remote screen is displaying the room that you want to control. If the room
differs, use the LIST button to select your room of choice.
Source
The current source that is playing will be displayed under the room location.
!
Time
The current time is displayed in the lower right hand corner of the screen. This is programmed by an Onyx
professional.
!
Low Battery
When “Low Battery” is displayed, it is time to replace the batteries in the remote. The battery compartment can
be found on the back of the remote. For best performance, replace batteries with new lithium batteries.
!
Tip! If the screen is black, gently shake the remote for the LED screen to wake.
These buttons correlate directly with commands from the cable provider. In addition, the blue button is
programmed to reset the AppleTV if that applies to your system.
!
! Yellow Button - “A”
! Blue Button - “B”
! Green Button - “Stretch”
! Red Button - “C”
ROOM OFF
!
!
!
!
!
!
Pressing this button to turn off all components, including TV.
Play
Skip Back
Skip Forward
Pause
Rewind
Fast Forward
!
!
!
!
!
!
DVR
Stop
Record
# - Settings
* Can be used for customization
Control4 Home Screen
On-Screen Navigators and Touchscreens display the same elements. Your options display as an icon that you select either by touch
on the touchscreen or by use of the hand-held remote, iPad, iPhone or iTouch for the on-screen navigator.
Room Change
The top center of the screen displays the current room being controlled. Press or scroll to highlight and select the room to change rooms.
Tip! When an option is unavailable in the room, the icon will not appear on the home screen.
Media Dashboard
When a source is playing, a Media Dashboard can be found at the bottom portion of the home screen or touchscreen. This provides the ability
to see at a glance what is currently playing. Also provided are shortcuts to Rewind, Fast Forward, Play and Volume.
Watch
This icon represents all viewing devices available. By selecting this icon, you can access your local TV, cable or satellite
stations. Depending on your system, you may also have the option of AppleTV, Blu-Ray, TiVo or Security DVR.
Cable or Satellite Provider
1. From the Control4 Home page, select Watch > TiVo or DirecTV, Dish Network, AT&T Universe to view.
2. Use the hand-held remote or touchscreen to navigate through channels.
3. Press the
! button on the Media Dashboard or Room Off on the remote to discontinue watching.
Blu-Ray Player or DVD Player
1. From the Control4 Home page, select Watch > Blu-Ray or DVD Player.
2. Use the hand-held remote or touchscreen to navigate through Blu-Ray or DVD Player.
3. Press the
! button on the Media Dashboard or Room Off on the remote to discontinue
watching Blu-Ray or DVD Player.
AppleTV
AppleTV has been redesigned to be small in size, but big on entertainment. Sync’d with your iTunes account, rent
from the largest selection of HD movies - many available the same day they come out on DVD. Watch Netflix
(subscription required) titles instantly, rent TV shows commercial free in HD, and stream photos and music from
your iDevices to your TV.
1. From the Control4 Home page, select Watch > AppleTV.
2. Use the hand-held remote or touchscreen to navigate through AppleTV.
3. Press the
! button on the Media Dashboard or Room Off on the remote to discontinue watching AppleTV.
Listen
From the Control4 Home page, select Listen to get started, view your options, and then select an option from below:
Stations
Use the Stations icon to play the radio (AM, FM, XM, or Satellite). In some cases, Pandora stations may be included.
1. From the Control4 Home page, select Listen > Stations to view the radio stations you want.
2. From the list, select the radio station you’d like to listen to.
3. Press the
! button on the Media Dashboard or Room Off on the remote to discontinue playing the radio.
Zones
Use Zones to play music in zones (locations or rooms). Add or remove zones in one (1) or more rooms; adjust the
volume; skip forward/back; use Room Off; or mute.
1. From the Control4 Home page, select Listen > Zones to view what is currently playing.
2. Add a zone. Select Add Rooms, and then check the rooms to which you want to send the music. Select OK.
3. Remove a zone. Select the room to delete and select
! to the right of the room name.
4. From this menu, you can also adjust the volume by pressing or selecting the + or - on the right side of each
zone. To MUTE individual zones, press or select the speaker icon ! .
Tip! Volume for the current room chosen can be adjusted by using the media dashboard at the bottom of the home
screen. Here you can also view what is currently playing, skip forward or back and pause music.
Now Playing
This displays what device is currently playing as well as what music has been selected. Here you can also choose from
music library, playlist, etc. within the device currently playing.
Blu-Ray
To listen to a CD, insert it into the Blu-Ray player. Depending on your system, the Blu-Ray player may be located in the
equipment rack or localized in the primary viewing room.
1. From the Control4 Home page, select Listen > BluRay. This will turn on the Blu-Ray player automatically. Use
the touchscreen, hand-held remote, iPhone, iPad or iTouch to navigate through tracks.
2. Press the
! button on the Media Dashboard or Room Off on the remote to discontinue playing the Blu-Ray.
Music Server
Use the Music Server icon to play music (Pandora, Rdio, iHeartRadio, etc.). Depending on your system, you may have
multiple music servers to choose from.
1. From the Control4 Home page, select Listen > Music Server to view the music options to select.
2. From the list, select the music option you’d like to listen to.
3. Press the
! button on the Media Dashboard or Room Off on the remote to discontinue playing the selected music.
Pandora
Use the Listen icon to play from Pandora.
1. From the Control4 Home page, select Listen > Music Server > Music Services > Pandora.
2. To add or remove stations, perform these tasks through any iDevice first. Then, on the navigator under
Pandora, select “Update Pandora Station List.” Your new list should appear.
3. Press the
! button on the Media Dashboard or Room Off on the remote to stop playing Pandora.
Rdio
Use the Listen icon to play from Rdio.
1. From the Control4 Home page, select Listen > Music Server > Music Services > Rdio.
2. To add or remove music, perform these tasks through any iDevice and the Control4 system will automatically
update your collection.
3. Press the
! button on the Media Dashboard or Room Off on the remote to stop playing Rdio.
iHeartRadio
Use the Listen icon to play from iHeartRadio.
1. From the Control4 Home page, select Listen > Music Server > Music Services > iHeartRadio.
2. Press the
! button on the Media Dashboard or Room Off on the remote to stop playing Pandora.
TiVo
To listen to TiVo, select Listen > TiVo. Depending on your system, the TiVo box may be located in the equipment rack
or localized in the primary viewing room.
!
Press the
! button on the Media Dashboard or Room Off on the remote to discontinue playing the TiVo.
Lighting
From the Control4 Home page, select Lighting to get started and to view your options.
Adjust Lighting
Use the Lighting icon to adjust your lights. You can view the lights in all rooms without changing the room displayed on
your Navigator.
1. From the Control4 Home page, select Lighting.
2. Select a room.
3. Single tap or select a light to turn it on or off.
4. Select and hold the light to display a Dimmer slider for ramp up or ramp down. For on-screen display use ▲
PG, ▼ PG on the hand-held remote to control dimming levels.
5. To change rooms, Select the room tab in the upper left hand corner with the
symbol.
Non-Custom Lighting Scenes
This includes the “All On” and “All Off” lighting scene found on the right hand side of the on-screen or touchscreen.
Press or select this button to control all Control4 lighting at once.
Custom Lighting Scenes
Custom lighting scenes may have been set up in advance on your system. These scenes can be found on the lighting
navigator. Additional custom lighting scenes can be programmed by an Onyx professional remotely. Just email
[email protected] with desired changes.
Security System
To arm or disarm the security system: from the Control4 Home screen, select Security > Security System.
To arm the system in “Away” mode, enter your four digit security code and press Away. A 60 second delay will
begin allowing time to exit the home through the designated delay door.
To arm the system in “Stay” mode, enter your four digit security code and press Stay. This arms doors and
windows but leaves motions disabled. If an entry door is opened, there will be the allocated time to disarm your
system.
The Instant button arms doors and windows, but disables motions. If someone opens a door or window, the
alarm system will go off instantly.
To Disarm the system, enter the four digit code and then “Off” to disarm and end the 60 second delay beeping.
Tip! If you need to get ahold of the security monitoring station, call (405) 917-8250 with your alarm password.
This is separate from your 4 digit code.
Bypass: see Bypass Security Zone below.
!
Code: see Change Security Passcode below.
!
To toggle chime, put in your security passcode and then press 9.
!
Fire, Police, Ambulance call the appropriate dispatcher immediately. Fire and Ambulance will sound your
alarm system. Police will not sound your alarm.
!
If a power outage occurs, the Reconnect button re-establishes the connection between your security system
and Control4.
!
The Ready button allows you to view the faults in your security system.
!
How to clear a Trouble signal:
1. Enter your 4 digit security code.
2. Press “Off” twice.
Tip! Security window will display the last action sensed through the security system.
To Change Security Passcode:
From the Control4 Home screen, select Security > Security System.
1. Press 8324.
2. Press 8.
3. Press 03.
4. Enter new code.
Tip! If you enter a wrong number, press
*
twice to clear and start over.
To Bypass Security Zone:
In some cases, a particular zone may need to be bypassed so that the system can be armed. To do this, use the
Security icon to view the security keypad.
1. Locate zone number you wish to bypass. See next page for security zone list.
2. Enter your four digit security code.
3. Press 6.
4. Enter the two digit zone number. For example, if zone 6, enter 06.
5. Press
*
to enable bypass.
To Omit Bypassed Zone:
1. Press four digit security code.
2. Press Off.
IP Cameras
To view IP Cameras: From the Control4 Home screen, select Security > IP Cameras.
1. Select camera view, 7 day forecast or daily radar.
2. Use the options on the left to view all cameras in grid view, Next, Previous or Full Screen.
3. To exit, select the Control4 icon in the upper left hand corner of the screen.
4. To view recorded camera footage, use the app that was installed on your home computer.
!
!
Comfort
To view, adjust or program thermostats:
1. From the Control4 Home screen, select Comfort.
2. Displayed are all of the available thermostats to view, adjust or program.
3. From here, the current temperature reading and settings are displayed. Thermostat settings can be adjusted
by increasing or decreasing the heat and cool points AND selecting one of the hold options located directly
under the thermostat reading.
!
• The heat temperature specifies the coolest temperature you want your house.
• The cool temperature specifies the warmest temperature you want your house.
Hold options include:
• Hold Until Next Event: This selection will hold the temperature until the next scheduled programmed event
(See Thermostat Programming Below).
• Hold Permanent: This selection will hold the temperature and override any scheduled programmed event (See
Thermostat Programming Below).
• Hold 2 Hours: This selection will hold the current temperature for 2 hours only. After 2 hours, the thermostat
will revert back to the original setting or scheduled programmed event (See Thermostat Programming Below).
!
To Program Thermostats:
1. From the Control4 Home screen, select Comfort.
2. Select which thermostat you would like to program.
3. Select the program button in upper right hand corner.
4. Select the days of the week you want to schedule for (i.e. weekdays, weekends, Monday, etc.)
5. Each day consists of 6 events:
!
Wake - The time everyone is typically out of bed and want the house to warm or cool to it’s daytime occupied temperature.
!
Leave - When the house empties out in the morning as everyone leaves for school or work. Changing the temperature setting here
can save money by not heating and cooling an unoccupied house.
!
Return - When people return for the day. Setting the house to its occupied temperature just before you return gives the feeling of a
constantly controlled environment without the cost of running the HVAC all day.
!
!
Sleep - Returns the house to your preferred nighttime temperature.
!
Custom 1 & 2 - Special events you can use to further customize your home.
!
!
6. Set the time, heat and cool points for each event.
7. Press Save.
!
Control4 Remote Login
The Remote Login provides the ability to remotely control the home from anywhere. Follow the instructions below to
access the Control4 Remote Login.
1. Go to My.Control4.com
2. Enter your username and password. If this is your first time to access your system through My.Control4.com, your
username will be [email protected] and your password will be control4. (You can change this by clicking
“My Profile” across the top of the page and entering your preferred email address and password.)
3. To control your system remotely, click “web navigator”. Once your system connects, an onscreen navigator will
appear that works the same as your touchscreens and on screen navigators at home.
!
4Store
The 4Store is a marketplace for apps for your Control4 system. They vary from control enhancements, to games and sports scores, to energy
management and monitoring. Onyx Theaters will set up your account, and you can browse the available apps on any navigator or
touchscreen, or by visiting www.4Store.com. There are many free apps available, but for access to paid apps you will need to enter your
payment information at www.4Store.com under My Account > set up purchasing. Some apps have features or aspects that require dealer
assistance or installation. Please contact us whenever prompted by an app or the 4Store.
To browse and download apps on a touchscreen or on screen navigator
1. Select More > 4Store > Browse.
2. Select the app you want.
3. Select buy and confirm.
4. The app will be downloaded and can be accessed in More > My Apps.
If you purchased an app online
1. Select More > 4Store > Update.
2. Select update and restart.
3. The app will be downloaded and can be accessed in More > My Apps.
!
Basic Troubleshooting
Remote:
If your remote display says “Low Battery”, replace the batteries in the back of the remote. Onyx Theaters recommends using
Lithium batteries for best results.
Tip! To ensure proper control, make sure the remote display shows the room name that you are trying to control. If the display
shows a different room, push List, select House, select Location, choose and select which room you wish to control.
TV:
In the case that you have the ability to see the Control4 navigator on the TV screen, but you are unable to watch Cox cable,
chances are that your Cox cable box has locked up. If this occurs, please call Onyx Theaters to remotely reset your Cox box to
resolve this issue.
Theater:
If the Control4 navigator does not come on the screen after selecting the red Control4 button on your remote, push ROOM OFF,
wait 60 seconds for the projector to cool down. After 60 seconds, select the red Control4 button to turn on the system. If the
problem remains, contact Onyx Theaters for troubleshooting remotely.
Tip! Issues with technology can be frustrating. It is the goal of Onyx Theaters to implement as many preventative measures as
possible to keep your system running smoothly. With this in mind, it is important to understand the every component is essentially
built like a computer. Power surges, brownouts, lighting, etc. can affect each component differently, resulting in an occasional
need for a reboot. This tip is especially true for Cox cable boxes. Onyx Theaters can remotely log in to reboot equipment in the
event your system malfunctions. We are proud of the first class customer service we provide, so do not hesitate to give us a call.
Basic Troubleshooting (Continued):
Cox:
If you are having issues with your Cox cable box, hit the Info, Volume Up, and Volume Down buttons at the same time. This will
reset the box and will fix most issues related to Cox cable. Refer to picture below.
TrippLite UPS:
If you’ve lost all power, check your equipment rack to see if there are any lights on any of the equipment. If there are no lights,
locate the TrippLite UPS and hold the power button down for 20 seconds. This will reset the TrippLite and should bring everything
back online.