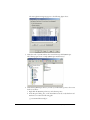
1
Installing ColdFusion MX
Trademarks
Afterburner, AppletAce, Attain, Attain Enterprise Learning System, Attain Essentials, Attain Objects for Dreamweaver, Authorware,
Authorware Attain, Authorware Interactive Studio, Authorware Star, Authorware Synergy, Backstage, Backstage Designer, Backstage
Desktop Studio, Backstage Enterprise Studio, Backstage Internet Studio, ColdFusion, Design in Motion, Director, Director
Multimedia Studio, Doc Around the Clock, Dreamweaver, Dreamweaver Attain, Drumbeat, Drumbeat 2000, Extreme 3D, Fireworks,
Flash, Fontographer, FreeHand, FreeHand Graphics Studio, Generator, Generator Developer's Studio, Generator Dynamic Graphics
Server, JRun, Knowledge Objects, Knowledge Stream, Knowledge Track, Lingo, Live Effects, Macromedia, Macromedia M Logo &
Design, Macromedia Flash, Macromedia Xres, Macromind, Macromind Action, MAGIC, Mediamaker, Object Authoring, Power
Applets, Priority Access, Roundtrip HTML, Scriptlets, SoundEdit, ShockRave, Shockmachine, Shockwave, Shockwave Remote,
Shockwave Internet Studio, Showcase, Tools to Power Your Ideas, Universal Media, Virtuoso, Web Design 101, Whirlwind and Xtra
are trademarks of Macromedia, Inc. and may be registered in the United States or in other jurisdictions including internationally. Other
product names, logos, designs, titles, words or phrases mentioned within this publication may be trademarks, servicemarks, or
tradenames of Macromedia, Inc. or other entities and may be registered in certain jurisdictions including internationally.
This product includes code licensed from RSA Data Security.
This guide contains links to third-party websites that are not under the control of Macromedia, and Macromedia is not responsible for
the content on any linked site. If you access a third-party website mentioned in this guide, then you do so at your own risk. Macromedia
provides these links only as a convenience, and the inclusion of the link does not imply that Macromedia endorses or accepts any
responsibility for the content on those third-party sites.
Apple Disclaimer
APPLE COMPUTER, INC. MAKES NO WARRANTIES, EITHER EXPRESS OR IMPLIED, REGARDING THE ENCLOSED
COMPUTER SOFTWARE PACKAGE, ITS MERCHANTABILITY OR ITS FITNESS FOR ANY PARTICULAR PURPOSE.
THE EXCLUSION OF IMPLIED WARRANTIES IS NOT PERMITTED BY SOME STATES. THE ABOVE EXCLUSION MAY
NOT APPLY TO YOU. THIS WARRANTY PROVIDES YOU WITH SPECIFIC LEGAL RIGHTS. THERE MAY BE OTHER
RIGHTS THAT YOU MAY HAVE WHICH VARY FROM STATE TO STATE.
Copyright © 1999– 2002 Macromedia, Inc. All rights reserved. This manual may not be copied, photocopied, reproduced, translated,
or converted to any electronic or machine-readable form in whole or in part without prior written approval of Macromedia, Inc.
Part Number ZCF60M100
Acknowledgments
Project Management: Stephen M. Gilson
Writing: David Golden, Kristi Jabbour
Editing: Linda Adler, Noreen Maher
First Edition: May 2002
Macromedia, Inc.
600 Townsend St.
San Francisco, CA 94103
CONTENTS
ABOUT THIS BOOK . . . . . . . . . . . . . . . . . . . . . . . . . . . . V
Developer resources . . . . . . . . . . . . . . . . . . . . . . . . . . . . . . . . . . . . . . . . . . . . . . . . . . . . . . . vi
About Macromedia ColdFusion MX documentation. . . . . . . . . . . . . . . . . . . . . . . . . . . . . . vii
Printed and online documentation set . . . . . . . . . . . . . . . . . . . . . . . . . . . . . . . . . . . . . . . vii
Viewing online documentation. . . . . . . . . . . . . . . . . . . . . . . . . . . . . . . . . . . . . . . . . . . . viii
Getting answers . . . . . . . . . . . . . . . . . . . . . . . . . . . . . . . . . . . . . . . . . . . . . . . . . . . . . . . . . viii
Contacting Macromedia . . . . . . . . . . . . . . . . . . . . . . . . . . . . . . . . . . . . . . . . . . . . . . . . . . viii
CHAPTER 1
Installing Macromedia ColdFusion MX. . . . . . . . . . . . . . 1
ColdFusion MX product editions . . . . . . . . . . . . . . . . . . . . . . . . . . . . . . . . . . . . . . . . . . . . .2
System requirements . . . . . . . . . . . . . . . . . . . . . . . . . . . . . . . . . . . . . . . . . . . . . . . . . . . . . . .3
System requirements for Windows . . . . . . . . . . . . . . . . . . . . . . . . . . . . . . . . . . . . . . . . . . .3
System requirements for UNIX . . . . . . . . . . . . . . . . . . . . . . . . . . . . . . . . . . . . . . . . . . . . .5
Installation considerations . . . . . . . . . . . . . . . . . . . . . . . . . . . . . . . . . . . . . . . . . . . . . . . . . . .7
Installation considerations for all platforms . . . . . . . . . . . . . . . . . . . . . . . . . . . . . . . . . . . .7
Installation considerations for Windows . . . . . . . . . . . . . . . . . . . . . . . . . . . . . . . . . . . . . . .8
Installation consideration for UNIX . . . . . . . . . . . . . . . . . . . . . . . . . . . . . . . . . . . . . . . . . .8
Installing ColdFusion MX . . . . . . . . . . . . . . . . . . . . . . . . . . . . . . . . . . . . . . . . . . . . . . . . . . .9
Installing ColdFusion MX in Windows . . . . . . . . . . . . . . . . . . . . . . . . . . . . . . . . . . . . . . .9
Installing ColdFusion on UNIX . . . . . . . . . . . . . . . . . . . . . . . . . . . . . . . . . . . . . . . . . . . .10
Installing Verity Locales . . . . . . . . . . . . . . . . . . . . . . . . . . . . . . . . . . . . . . . . . . . . . . . . . . . .13
ColdFusion MX directory structure . . . . . . . . . . . . . . . . . . . . . . . . . . . . . . . . . . . . . . . . . . .14
Using the ColdFusion MX web server . . . . . . . . . . . . . . . . . . . . . . . . . . . . . . . . . . . . . . . . .15
Switching the port for the ColdFusion MX web server . . . . . . . . . . . . . . . . . . . . . . . . . . .15
Switching from another web server. . . . . . . . . . . . . . . . . . . . . . . . . . . . . . . . . . . . . . . . . .15
Uninstalling ColdFusion MX . . . . . . . . . . . . . . . . . . . . . . . . . . . . . . . . . . . . . . . . . . . . . . .16
Uninstalling ColdFusion MX from Windows. . . . . . . . . . . . . . . . . . . . . . . . . . . . . . . . . .16
Uninstalling ColdFusion MX from UNIX . . . . . . . . . . . . . . . . . . . . . . . . . . . . . . . . . . . .16
CHAPTER 2
Configuring Your System . . . . . . . . . . . . . . . . . . . . . . .17
Overview of configuration tasks. . . . . . . . . . . . . . . . . . . . . . . . . . . . . . . . . . . . . . . . . . . . . .18
Managing ColdFusion MX . . . . . . . . . . . . . . . . . . . . . . . . . . . . . . . . . . . . . . . . . . . . . . . . .19
Managing ColdFusion MX services in Windows . . . . . . . . . . . . . . . . . . . . . . . . . . . . . . .19
Managing the ColdFusion MX process on UNIX. . . . . . . . . . . . . . . . . . . . . . . . . . . . . . .21
Configuring web servers. . . . . . . . . . . . . . . . . . . . . . . . . . . . . . . . . . . . . . . . . . . . . . . . . . . .22
Configuring web servers in Windows . . . . . . . . . . . . . . . . . . . . . . . . . . . . . . . . . . . . . . . .22
Configuring web servers on UNIX . . . . . . . . . . . . . . . . . . . . . . . . . . . . . . . . . . . . . . . . . .26
Enabling CORBA support. . . . . . . . . . . . . . . . . . . . . . . . . . . . . . . . . . . . . . . . . . . . . . . . . .28
System requirements. . . . . . . . . . . . . . . . . . . . . . . . . . . . . . . . . . . . . . . . . . . . . . . . . . . . .28
Installing Visibroker for CORBA connections . . . . . . . . . . . . . . . . . . . . . . . . . . . . . . . . .28
Disabling Remote Development Services (RDS) . . . . . . . . . . . . . . . . . . . . . . . . . . . . . . . . .30
Changing the ColdFusion MX user account in Windows . . . . . . . . . . . . . . . . . . . . . . . . . .31
Connecting to an external JDBC Type 4 data source . . . . . . . . . . . . . . . . . . . . . . . . . . . . . .33
INDEX . . . . . . . . . . . . . . . . . . . . . . . . . . . . . . . . . . . . . 35
iv
Contents
ABOUT THIS BOOK
Installing ColdFusion MX is intended for anyone who needs to install and configure
ColdFusion MX.
Contents
• Developer resources ................................................................................................ vi
• About Macromedia ColdFusion MX documentation............................................. vii
• Getting answers .................................................................................................... viii
• Contacting Macromedia ....................................................................................... viii
v
Developer resources
Macromedia, Inc. is committed to setting the standard for customer support in developer
education, technical support, and professional services. The Macromedia website is
designed to give you quick access to the entire range of online resources. The following
table shows the locations of these resources.
Resource
Description
URL
Macromedia
website
General information about Macromedia
products and services
www.macromedia.com
Information on
ColdFusion
Detailed product information on
ColdFusion and related topics
www.macromedia.com/coldfusion
Macromedia
ColdFusion
Support Center
Professional support programs that
Macromedia offers.
www.macromedia.com/support/coldfusion
ColdFusion
Online Forums
Access to experienced ColdFusion
developers through participation in the
Online Forums, where you can post
messages and read replies on many
subjects relating to ColdFusion.
http://webforums.macromedia.com/
coldfusion/
Installation
Support
Support for installation-related issues for
all Macromedia products
www.macromedia.com/support/coldfusion/
installation.html
Training
Information about classes, on-site training, www.macromedia.com/support/training
and online courses offered by Macromedia
Developer
Resources
All the resources that you need to stay on
the cutting edge of ColdFusion
development, including online discussion
groups, Knowledge Base, technical
papers, and more
www.macromedia.com/desdev/developer/
Reference Desk
Development tips, articles,
documentation, and white papers
www.macromedia.com/v1/developer/
TechnologyReference/index.cfm
Macromedia
Alliance
www.coldfusion.com/partners/
Connection with the growing network of
solution providers, application developers,
resellers, and hosting services creating
solutions with ColdFusion
vi
About This Book
About Macromedia ColdFusion MX documentation
The ColdFusion documentation is designed to provide support for the complete
spectrum of participants. The print and online versions are organized to let you quickly
locate the information that you need. The ColdFusion online documentation is provided
in HTML and Adobe Acrobat formats.
Printed and online documentation set
The ColdFusion documentation set consists of the following titles:
Book
Description
Installing ColdFusion
MX
Describes system installation and basic configuration for Windows
NT, Windows 2000, Solaris, Linux, and HP-UX.
Administering
ColdFusion MX
Describes how to use the ColdFusion Administrator to manage the
ColdFusion environment, including connecting to your data
sources and configuring security for your applications,
Developing ColdFusion Describes how to develop your dynamic web applications,
including retrieving and updating your data, using structures, and
MX Applications with
forms.
CFML
Getting Started
Building ColdFusion
MX Applications
Contains an overview of ColdFusion features and application
development procedures. Includes a tutorial that guides you
through the process of developing an example ColdFusion
application.
Using Server-Side
ActionScript in
ColdFusion MX
Describes how Macromedia Flash movies executing on a client
browser can call ActionScript code running on the ColdFusion
server. Includes examples of server-side ActionScript and a syntax
guide for developing ActionScript pages on the server.
Migrating ColdFusion 5 Describes how to migrate a ColdFusion 5 application to
Applications
ColdFusion MX. This book describes the code compatibility
analyzer that evaluates your ColdFusion 5 code to determine any
incompatibilities within it.
CFML Reference
Provides descriptions, syntax, usage, and code examples for all
ColdFusion tags, functions, and variables.
CFML Quick
Reference
A brief guide that shows the syntax of ColdFusion tags, functions,
and variables.
Working with Verity
Tools
Describes Verity search tools and utilities that you can use for
configuring the Verity K2 Server search engine, as well as creating,
managing, and troubleshooting Verity collections.
Using ClusterCATS
Describes how to use Macromedia ClusterCATS, the clustering
technology that provides load-balancing and failover services to
assure high availability for your web servers.
About Macromedia ColdFusion MX documentation
vii
Viewing online documentation
All ColdFusion documentation is available online in HTML and Adobe Acrobat Portable
Document Format (PDF) files. To view the HTML documentation, open the following
URL on the web server running ColdFusion: http://web_root/cfdocs/dochome.htm.
ColdFusion documentation in Acrobat format is available on the ColdFusion product
CD-ROM.
Getting answers
One of the best ways to solve particular programming problems is to tap into the vast
expertise of the ColdFusion developer communities on the ColdFusion Forums. Other
developers on the forum can help you figure out how to do just about anything with
ColdFusion. The search facility can also help you search messages from the previous 12
months, allowing you to learn how others have solved a problem that you might be
facing. The Forums is a great resource for learning ColdFusion, but it is also a great place
to see the ColdFusion developer community in action.
Contacting Macromedia
Corporate
headquarters
Macromedia, Inc.
600 Townsend Street
San Francisco, CA 94103
Tel: 415.252.2000
Fax: 415.626.0554
Web: http:// www.macromedia.com
Technical support
Macromedia offers a range of telephone and web-based
support options. Go to http://www.macromedia.com/support/
coldfusion for a complete description of technical support
services.
You can make postings to the ColdFusion Support Forum
(http://webforums.macromedia.com/coldfusion) at any time.
Sales
Toll Free: 888.939.2545
Tel: 617.219.2100
Fax: 617.219.2101
E-mail: [email protected]
Web: http://www.macromedia.com/store
viii
About This Book
CHAPTER 1
Installing Macromedia
ColdFusion MX
This chapter describes Macromedia ColdFusion MX system requirements, how to begin
the installation, and how to uninstall ColdFusion MX.
Note: In this chapter, cf_root refers to your installation directory. By default, this directory is
C:\CFusionMX in Windows, and /opt/coldfusionmx on UNIX.
Contents
• ColdFusion MX product editions ............................................................................ 2
• System requirements................................................................................................ 3
• Installation considerations ....................................................................................... 7
• Installing ColdFusion MX ....................................................................................... 9
• Installing Verity Locales ......................................................................................... 13
• ColdFusion MX directory structure ....................................................................... 14
• Using the ColdFusion MX web server ................................................................... 15
• Uninstalling ColdFusion MX ................................................................................ 16
1
ColdFusion MX product editions
The following table describes each edition of ColdFusion MX Server:
Edition
Description
Licensing
Developer
For Windows and Linux.
Free for noncommercial use,
for one processor per server,
for developing and testing
web applications on the local
host and one remote IP
address. Not licensed for
deployment.
Includes every feature in the Enterprise edition, with the
following exceptions:
• A 10K Verity™ document search
• No HTTP-based load-balancing and failover using
Macromedia ClusterCATS
• Expires after 30 days to only support requests from the
local host and one remote IP address
Professional
For Windows and Linux.
Licensed per server (up to 8
Features full ColdFusion Markup Language (CFML) support, processors per server).
including:
• Custom tags and ColdFusion Components
• Full support for server-side ActionScript and Macromedia
Flash Remoting
• Extensibility and integration with Simple Object Access
Protocol (SOAP) and Extensible Markup Language
(XML), and with Component Object Model (COM),
Enterprise Java Beans (EJBs), and Common Object
Request Broker Architecture (CORBA)
• A built-in charting and graphing engine
• Database connectivity using ODBC with a desktop
database such as Microsoft Access, and using a Type 4
driver for SQL Server or MySQL
• Database and LDAP directory authentication, and
resource security
• A 125K Verity document search
Enterprise
For Windows, Linux, Solaris, and HP-UX.
Includes every feature in the Professional edition, and also
provides:
• Database connectivity using Type 4 drivers for Oracle,
DB2, Sybase, and Informix
• The ability to import and execute Java Server Page (JSP)
servlets and JSP Tag Library imports
• Server sandbox security
• A 250K Verity document search
• Advanced server management capabilities, including
server log analysis, configurable probes and alarms, and
automated archive and deploy options
• HTTP-based load-balancing and failover using
Macromedia ClusterCATS (installed separately)
2
Chapter 1 Installing Macromedia ColdFusion MX
Licensed per server (up to 8
processors per server).
System requirements
This section lists the system requirements for ColdFusion MX for Windows and UNIX.
Note: If you use Macromedia ColdFusion Studio to develop your web applications, note
that ColdFusion MX only supports ColdFusion Studio versions 4.5.2 and 5.0.
System requirements for Windows
This section lists the Windows system requirements for the Macromedia ColdFusion MX
Server Developer, Professional, and Enterprise Editions. An “x” in the following table
means that the Edition supports the requirement in that row.
Developer
Edition
Professional
Edition
Enterprise
Edition
Windows 98*
x
x
x
Windows Millennium Edition (ME)*
x
x
Windows NT 4.0 (Workstation and Server†) SP6A
x
x
x
Windows NT 4 Server, Enterprise Edition
x
x
x
Windows 2000 (Professional SP2, Server SP2†,
Advanced Server, and Datacenter Server)
x
x
x
Windows XP (Home and Professional)
x
x
x
Requirement
Windows version
Hardware
Processor
Pentium
Pentium
Pentium
Minimum RAM (MB)
128
256
256
Recommended RAM (MB)
256
512
512
Free hard disk space (MB)
400 to install
250 to run
400 to install
250 to run
400 to install
250 to run
CD-ROM drive
x
x
x
ColdFusion MX stand-alone web server
x
x
x
Microsoft IIS 4.0, 5.x‡
x
x
x
Netscape Enterprise Server 3.6x
x
x
x
iPlanet Enterprise Server 4.x, 6.x
x
x
x
Apache web server 1.3.12–1.3.22, 2.x
x
x
x
Sun JDK/JRE 1.3.1 or later
x
x
x
IBM JVM 1.2.2–1.3 or later
x
x
x
Web servers
Java Virtual Machine (JVM)
System requirements
3
Developer
Edition
Professional
Edition
Enterprise
Edition
Internet Explorer 5.x, 6
x
x
x
Netscape Communicator 4, 6
x
x
x
Oracle 8.1.7, 9i
x
x
x
Sybase 11.9.2, 12
x
x
x
DB2 6.2, 7.2
x
x
x
Informix 9.x
x
x
x
Microsoft SQL Server 7.x, 2000
x
x
x
MySQL
x
x
x
Microsoft Access
x
x
x
SQLAnywhere£
x
x
x
PostGreSQL£
x
x
x
Requirement
Browsers
Databases
* ColdFusion MX only supports the stand-alone web server for this platform.
Macromedia does not recommend using the stand-alone web server in a
production environment.
† To install ColdFusion MX in Windows NT 4.0 Server or Windows 2000 Server,
you must already have the following components installed: MDAC 2.5 SP1
(http://www.microsoft.com/data/download.htm) and MFC/MSVC 6.0
(localdrive\ColdFusion Image\Redistrib\MSVCRT\setup.exe).
‡ The Macromedia ColdFusion MX team has tested integration with the .Net
Framework version 1 and Service Pack 1.
£ ColdFusion MX does not include the driver for this database. For more information,
see “Connecting to an external JDBC Type 4 data source,” in Chapter 2.
4
Chapter 1 Installing Macromedia ColdFusion MX
System requirements for UNIX
This section lists the UNIX system requirements for the Macromedia ColdFusion MX
Server Developer, Professional, and Enterprise Editions. An “x” in the following table
means that the edition supports the requirement in that row.
Requirement
Developer
Edition
Professional
Edition
Enterprise
Edition
x
x
x
x
x
x
UNIX distributions
Red Hat Linux 6.2–7.2
Install the latest patches (including the kernel) from
ftp://ftp.redhat.com/pub
SuSE Linux 7.2, 7.3
Install the latest patches (including the kernel) from
ftp://ftp.suse.com/pub
x
Solaris 7, 8
For Solaris 7, install the latest patch bundles from
http://sunsolve.sun.com/pub-cgi/show.pl?target=p
atches/patch-access
HP-UX 11.00
x
Install the latest patch bundles from the
Hewlett-Packard website at http://www.hp.com
Hardware
Processor
Pentium for Linux, SPARC for Solaris, and PA-RISC
version 1.1 or 2.0 for HP-UX
Minimum RAM (MB)
256
256
256
Recommended RAM (MB)
512
512
512
Free hard disk space (MB)
350 to install
250 to run
350 to install
250 to run
350 to install
250 to run
CD-ROM drive
x
x
x
ColdFusion MX internal port-based web server
x
x
x
Apache web server 1.3.12–1.3.22, 2.x
x
x
x
Netscape Enterprise Server 3.6x
x
x
x
iPlanet Enterprise Server 4.x, 6.x
x
x
x
Sun JDK/JRE 1.3.1 or later
x
x
x
IBM JVM 1.3 or later
x
x
x
Web servers
Java Virtual Machine (JVM)
System requirements
5
Developer
Edition
Professional
Edition
Enterprise
Edition
Internet Explorer 5.x, 6
x
x
x
Netscape Communicator 4, 6
x
x
x
Oracle 8.1.7, 9i
x
x
x
Sybase 11.9.2, 12
x
x
x
DB2 6.2, 7.2
x
x
x
Informix 9.x
x
x
x
MySQL
x
x
x
Microsoft SQL Server 7.x, 2000
x
x
x
Microsoft Access
x
x
x
SQLAnywhere*
x
x
x
PostGreSQL*
x
x
x
Requirement
Browsers
Databases
* ColdFusion MX does not include the driver for this database. For more information,
see “Connecting to an external JDBC Type 4 data source,” in Chapter 2.
6
Chapter 1 Installing Macromedia ColdFusion MX
Installation considerations
This section lists considerations for installing or upgrading to ColdFusion MX.
Note: To use VisiBroker for CORBA connections in ColdFusion MX, see “Enabling
CORBA support,” in Chapter 2. To install ClusterCATS, see Using ClusterCATS.
Installation considerations for all platforms
The following are installation considerations for all platforms:
• Macromedia only supports upgrading to ColdFusion MX from ColdFusion 5. If you
are upgrading, you must back up your ColdFusion MX web applications first.
• If you have previously installed a beta version of ColdFusion MX, you must uninstall
it before you install the release version.
• Macromedia recommends using the stand-alone (internal port-based) web server for
development, but not in a production environment.
• If you have ColdFusion 5 installed on your computer, you can upgrade to
ColdFusion MX (which uninstalls ColdFusion 5), or you can install ColdFusion MX
separately. If you install ColdFusion MX separately, your ColdFusion 5 installation
remains the same and ColdFusion MX installs with its built-in web server. This is
because ColdFusion MX and ColdFusion 5 cannot use the same web server.
You can switch to use a different web server for ColdFusion MX after the installation,
by following the instructions for your platform and the web server in “Configuring
web servers,” in Chapter 2. However, if you configure the web server that uses
ColdFusion 5 to use ColdFusion MX instead, ColdFusion 5 will be disabled.
• To interact with ColdFusion pages, components, and server-side ActionScript from a
Flash movie, use the Flash Remoting service in ColdFusion MX. While no special
installations are required to develop ColdFusion applications for the Flash Remoting
service, you must install the Flash Remoting Components in the Flash MX authoring
environment. The Flash MX authoring environment is required to build applications
that connect to and interact with the Flash Remoting service in ColdFusion.
For more information on Flash Remoting, see Developing ColdFusion MX Applications
with CFML.
• ColdFusion MX is built in Java. For ColdFusion MX (or any Java application) to run
on your computer, you must have the Java Runtime Environment (JRE) installed.
The installer installs the JRE that is optimal for ColdFusion MX on your platform.
• In an optimal production environment, each ColdFusion MX application is hosted
on a dedicated server; database, mail, and other servers are not on the same computer.
Installation considerations
7
Installation considerations for Windows
The following are installation considerations for Windows only:
• Do not configure the server running ColdFusion MX as a Primary Domain
Controller (PDC) or Backup Domain Controller (BDC). Macromedia follows
Microsoft’s network model, in which the first level is the PDC/BDC. These systems
only manage the network or domain and are not designed to run application servers.
ColdFusion MX should reside on the second level of Windows NT and Windows
2000 stand-alone systems. Stand-alone servers can participate in a network or
domain.
• Windows NT 4.0 Workstation and Windows 2000 Professional handle only 10
TCP/IP connections concurrently. Therefore, Macromedia does not recommend
using these operating systems in a production environment; use Window NT 4.0
Server or Windows 2000 Server instead. In addition, Macromedia does not
recommend using Windows ME, Windows 98, or Windows XP Home Edition,
because each was intended for personal use and not as a server platform in a
production environment.
• During installation, if you select the stand-alone web server, your web root directory
is C:\CFusionMX\wwwroot by default. This web server runs on the 8500 port. To
display a page, append 8500 to the end of the host name or IP address; for example,
http://localhost:8500/MyApp.cfm. (If the page still does not display, make sure that
the document is located in the ColdFusion MX web root directory; for example,
c:\cfusionmx\wwwroot\MyApp.cfm.) For more information, see “Using the
ColdFusion MX web server” on page 15.
• To configure a virtual mapping, edit the jrun-web.xml file in the
cf_root\wwwroot\WEB-INF directory. (A virtual mapping lets you map a resource
path to a physical system path that might be outside the ColdFusion MX web root.)
For example, the following entry sets a virtual path to the /usr/local/images directory
on an external UNIX computer:
<virtual-mapping>
<resource-path>/images/*</resource-path>
<system-path>/usr/local/images</system-path>
</virtual-mapping>
Installation consideration for UNIX
For troubleshooting purposes, the installer creates the following log file during an
installation or upgrade on UNIX: cf_root/Macromedia_ColdFusion_MX_install.log. If
you contact Macromedia Technical Support for installation support, you must send them
this file.
8
Chapter 1 Installing Macromedia ColdFusion MX
Installing ColdFusion MX
This section provides installation instructions for Windows and UNIX.
Installing ColdFusion MX in Windows
This section explains how to install ColdFusion MX in a Windows platform.
To install ColdFusion MX in Windows:
1 Read the online version of the Release Notes for any late-breaking information or
updates. For more information, see
http://www.macromedia.com/go/proddoc_releasenotes.
2 Make sure that your operating system meets the system requirements described in
“System requirements for Windows” on page 3.
3 Review the “Installation considerations for Windows” on page 8.
4 Close any applications that are currently running on your computer.
5 Insert the CD-ROM, or download the setup file for your locale from the
Macromedia website.
6 If you are installing from a network or a downloaded file, locate the coldfusionmx
executable file for your locale (for example, coldfusionmx-win-us.exe file), and
double-click it.
The installation wizard starts.
7 Follow the instructions in the wizard, and let it run to completion.
After the Pre-Installation Summary pane, the files are copied to your computer. After
the installation is complete, the ColdFusion MX Administrator opens.
8 If you have an existing ColdFusion 5 installation, you are prompted to migrate your
ColdFusion 5 settings to ColdFusion MX.
If you do not want to migrate now, click Skip.
To migrate later:
a
Close the ColdFusion MX Administrator, if it is not already closed.
b Change the value of the following registry key from 0 to 1:
HKEY_LOCAL_MACHINE\SOFTWARE\Macromedia\Install
Data\ColdFusionMX\migrate
c
Restart the ColdFusion MX Administrator from the Windows Start menu.
You are prompted again to migrate your ColdFusion 5 settings.
Caution: If you migrate your ColdFusion 5 settings later, you might overwrite new
ColdFusion MX settings.
9 To configure Verity to search in a language other than English, follow the instructions
in “Installing Verity Locales” on page 13.
10 Configure and manage your system, as described in Chapter 2, “Configuring Your
System” on page 17.
Installing ColdFusion MX
9
11 To learn about ColdFusion MX, read the documentation that is installed with
ColdFusion MX, or download it from the ColdFusion MX documentation website.
Installing ColdFusion on UNIX
This section explains how to install ColdFusion MX on UNIX.
By default, ColdFusion MX installs into the /opt/coldfusionmx directory. To install it
into a different directory, you must create that directory before running the installation.
To install ColdFusion MX on UNIX:
1 Read the online version of the Release Notes for any late-breaking information or
updates. For more information, see
http://www.macromedia.com/go/proddoc_releasenotes.
2 Make sure that your operating system meets the system requirements described in
“System requirements for UNIX” on page 5.
3 Review the “Installation consideration for UNIX” on page 8.
4 Log in as root.
5 (HP-UX only) Follow the instructions in “Mounting the CD-ROM drive on
HP-UX” on page 11.
6 Copy the install file that is appropriate for your platform and locale from the
CD-ROM or Macromedia website, and save it to a directory on your local disk.
The install files for supported platforms in the English (US) locale are as follows:
•
•
•
cfusionmx_linux_us.bin
cfusionmx_solaris_us.bin
cfusionmx_hp_us.bin
7 Using the cd command, go to the directory with the install file.
8 Modify the install file with the following command:
chmod 755 <filename>
9 Start the installation with the following command:
./<filename>
The installation program starts.
10 Follow the prompts, and let the installation program run to completion.
Caution:
For security reasons, it is crucial that you do not use root for the runtime user.
11 After the install file finishes, start ColdFusion MX with the following command:
/cf_root/bin/coldfusion start
To stop ColdFusion MX, use the following command:
/cf_root/bin/coldfusion stop
For more information on managing processes, see “Managing the ColdFusion MX
process on UNIX,” in Chapter 2.
10
Chapter 1 Installing Macromedia ColdFusion MX
12 (Optional) Open the ColdFusion MX Administrator in a browser, using the
following URL: http://localhost:8500/CFIDE/administrator/index.cfm.
Note: If you are accessing ColdFusion MX from a remote computer, use the previous
URL with the host name or IP address of the remote computer instead of localhost.
If you have an existing ColdFusion 5 installation, when you open the ColdFusion
Administrator for the first time, you are prompted to migrate your ColdFusion 5
settings to ColdFusion MX.
If you do not want to migrate now, click Skip.
To migrate later:
a
Close the ColdFusion MX Administrator, if it is not already closed.
b Create a file called upgrade (it can be blank) in your cf_root/bin directory.
The user account under which ColdFusion MX runs must have read/write access
to this file. (If you need to change the permissions for the file, use the chmod
command.) The file will be deleted once the migration completes.
c
Start the ColdFusion MX Administrator.
You are asked again if you want to perform the migration.
Caution: If you migrate your ColdFusion 5 settings later, you might overwrite new
ColdFusion MX settings.
13 To configure Verity to search in a language other than English, follow the instructions
in “Installing Verity Locales” on page 13.
14 Configure and manage your system, as described in Chapter 2, “Configuring Your
System” on page 17.
15 To learn about ColdFusion MX, read the documentation that is installed with
ColdFusion MX, or download it from the ColdFusion MX documentation website.
Mounting the CD-ROM drive on HP-UX
To accommodate long filenames, Macromedia writes ColdFusion MX to the CD-ROM
using the RockRidge format. This format is supported by HP-UX using the Portable File
System (PFS) commands, not the standard HP-UX mount/umount commands. For
more information on PFS commands, enter the following command: man pfs_mount.
To mount the CD-ROM drive on HP-UX using the HP PFS extensions:
1 Create a mount point for the CD-ROM drive; for example:
mkdir
/SD_CDROM
2 Create an entry in the PFS mount file, as follows:
a Create or edit the file /etc/pfs_fstab, adding an entry like the following:
/dev/dsk/c1t2d0 /SD_CDROM
pfs-rrip
xlat=unix 0
(In this example, /dev/dsk/c1t2d0 is the <device_file>, /SD_CDROM is the
<mount_point>, pfs-rrip is the <fs_type>, and xlat=unix 0 is the
<translation_method>.)
Installing ColdFusion MX
11
b In your entry, ensure that the path that you set in the device_file field is the device
name of your CD-ROM drive, and that your mount_point is the name that you
selected for the mount point in step 1.
3 Start the PFS processes, as follows:
nohup /usr/sbin/pfs_mountd &
nohup /usr/sbin/pfsd &
4 Mount the CD-ROM drive, as follows:
/usr/sbin/pfs_mount /SD_CDROM
The CD-ROM appears under /SD_CDROM.
5 When you finish using the CD-ROM, you can unmount it using the following
command:
/usr/sbin/pfs_umount /SD_CDROM
12
Chapter 1 Installing Macromedia ColdFusion MX
Installing Verity Locales
ColdFusion MX lets you do Verity searches for languages other than English. For
European languages, ColdFusion uses LinguistX™ technology from Inxight, and for
Asian languages, ColdFusion uses ICU (IBM® Classes for Unicode) technology. For
more information, see Working with Verity Tools.
This section describes how to install a Verity Locales package from the Macromedia
website, and how to switch to a different Verity Locales package.
To install Verity Locales:
1 In your browser, go to the following location on the Macromedia website:
http://www.macromedia.com/go/verity
2 Enter your ColdFusion MX license key.
3 Download the appropriate Verity Locales package (.zip file for Windows, .tar file for
UNIX), and save it to your cf_root directory.
Select from the following Verity Locales packages: Asian&European and English.
4 Extract the .zip or .tar file in your cf_root directory.
During extraction, the search files are automatically placed in the appropriate
directories under the cf_root\lib or cf_root/lib directory.
5 To use a different Verity Locales package (for example, English), repeat this procedure
for the new Verity Locales package.
Installing Verity Locales
13
ColdFusion MX directory structure
The following table describes the directories under the cf_root directory:
Directory
Description
bin
Programs for starting, stopping, and viewing information for
ColdFusion MX, and to run Crystal Reports (Windows only).
cache
Repository for temporary files from ColdFusion MX.
cfx
Sample C++ and Java CFX files with their supporting files. You can
also store your CFX files in this directory (although you can put
them in any location that is defined in your classpath).
charting
Files for the ColdFusion MX graphing and charting engine.
Custom Tags
Repository for your custom tags.
db
In Windows, the files for sample Microsoft Access databases and
ODBC services.
On UNIX, the files for the sample Pointbase databases.
jintegra
JIntegra programs, libraries, and other supporting files (for
example, to integrate Java and COM code; manage access to
ActiveX controls (OCXs) that are hosted in a graphical user
interface (GUI) container; and register the JVM and type libraries).
jre
(UNIX only) Files for the Java Runtime Environment (JRE) that is
bundled with ColdFusion MX for your UNIX distribution.
In Windows, the files for the bundled JRE are in \runtime\jre.
lib
logs
JAR, XML, property, and other files that are the foundation of
ColdFusion MX, for functionality such as queries, charting, mail,
security, Verity searches, and system probes.
Repository for ColdFusion MX log files.
JRE-specific log files are in the runtime\logs directory.
Mail
Repository for spooled mail and mail that cannot be delivered.
META-INF
XML metadata for the ColdFusion Administrator.
registry
(UNIX only) Flat file to store registry settings (this file will be
obsolete in future versions of ColdFusion MX).
runtime
Programs and supporting files for the ColdFusion MX runtime.
In Windows, the files for the bundled JRE are in runtime\jre.
14
uninstall
(UNIX only) Files to uninstall ColdFusion MX from UNIX.
verity
Verity collections. (The Verity program files are in the lib directory.)
wwwroot
Default web root directory for the stand-alone web server. When
running on other web servers, this directory contains only the
WEB-INF directory; do not remove this directory.
Chapter 1 Installing Macromedia ColdFusion MX
Using the ColdFusion MX web server
ColdFusion MX has its own web server that you can use to develop ColdFusion MX
applications, without depending on an external web server, such as Internet Information
Server (IIS), Apache, or iPlanet. Macromedia does not recommend using the ColdFusion
MX web server in a production environment. However, it is more than suitable for
development, allowing you to create virtual directories and set the default document (for
example, default.cfm or index.cfm).
During the ColdFusion MX installation, you must choose a web server. If you select the
Stand-alone server in Windows, or the Internal (Port Based) server on UNIX, then your
web root directory is located in the cf_root\wwwroot or cf_root/wwwroot directory. By
default, the web server runs on port 8500. This means that to display a page in your
application, you must append :8500 to the host name or IP address in the URL; for
example, http://localhost:8500/YourApp1/index.cfm. (If the page still does not display,
make sure that the document is located in the ColdFusion MX web root directory; for
example, C:\CFusionMX\wwwroot\MyApp.cfm.)
Switching the port for the ColdFusion MX web server
You can change the default port on which the ColdFusion MX web server runs.
To change the default port for the ColdFusion MX web server:
1 Back up the jrun.xml file.
This file is in the cf_root\runtime\servers\default\SERVER-INF directory in
Windows, and in the cf_root/runtime/servers/default/SERVER-INF directory on
UNIX.
2 Open the original jrun.xml file for editing.
3 Change the port in the following node (near the bottom of the file):
<service class="jrun.servlet.http.WebService" name="WebService">
<attribute name="port">8500</attribute>
<attribute name="interface">*</attribute>
<attribute name="deactivated">false</attribute>
</service>
Note: Make sure that the deactivated attribute is set to false.
4 Save the file.
5 Restart ColdFusion MX.
Switching from another web server
You can switch to the built-in ColdFusion MX web server without reinstalling, even if
you did not select it during installation. To run the ColdFusion Administrator, copy the
contents of your web root directory to the ColdFusion MX cf_root\wwwroot or
cf_root/wwwroot directory, and use an appropriate URL reference (for example,
http://localhost:8500/YourApp1/index.cfm).
To switch to another web server, follow the instructions for the appropriate web server on
your platform in “Configuring web servers,” in Chapter 2.
Using the ColdFusion MX web server
15
Uninstalling ColdFusion MX
The steps for uninstalling ColdFusion MX depend on your operating system. This
section contains instructions for Windows and UNIX.
Uninstalling ColdFusion MX from Windows
Uninstalling ColdFusion MX deletes all program files and related components from your
computer.
To uninstall ColdFusion MX from Windows:
1 Select Start > Settings > Control Panel > Add/Remove Programs > ColdFusion MX.
2 Click Remove, then Next.
A dialog box displays to confirm that you want to uninstall.
3 To begin uninstalling, click Yes.
4 When the program completes, restart your computer.
ColdFusion MX is deleted from your server.
Uninstalling ColdFusion MX from UNIX
Uninstalling ColdFusion MX deletes all program files and related components from your
computer.
To uninstall ColdFusion MX from UNIX:
1 Log in as root.
2 Enter the following command to go to the cf_root/uninstall directory:
cd cf_root/uninstall
3 Enter the following command:
./uninstall.sh
ColdFusion MX is deleted from your server.
16
Chapter 1 Installing Macromedia ColdFusion MX
CHAPTER 2
Configuring Your System
This chapter describes how to manage ColdFusion MX services and processes, how to
configure web servers manually, and how to change user accounts and configure
databases for ColdFusion MX.
Note: In this chapter, cf_root refers to your installation directory. By default, this directory is
C:\CFusionMX in Windows, and /opt/coldfusionmx on UNIX.
Contents
• Overview of configuration tasks............................................................................. 18
• Managing ColdFusion MX.................................................................................... 19
• Configuring web servers ........................................................................................ 22
• Enabling CORBA support..................................................................................... 28
• Disabling Remote Development Services (RDS).................................................... 30
• Changing the ColdFusion MX user account in Windows ...................................... 31
• Connecting to an external JDBC Type 4 data source ............................................. 33
17
Overview of configuration tasks
The following table describes when to do the configuration tasks that are documented in
this chapter:
Configuration task
When to do it
“Managing
ColdFusion MX” on
page 19
You must stop and restart ColdFusion MX after you enable or
disable security in the ColdFusion Administrator or change any of
the Java and JVM settings, in order for your changes to take effect.
You can do this at any time after you install ColdFusion MX.
“Configuring web
servers” on page 22
For an external web server, do this after you install ColdFusion MX
and before you send anything to your web server for rendering.
You do not need to do this if you use the built-in ColdFusion MX
web server.
“Enabling CORBA
support” on page 28
You must do this only if you need to make CORBA invocations
from ColdFusion MX. You can do this after you install ColdFusion
MX and before you make a CORBA call from ColdFusion MX.
“Disabling Remote
Development
Services (RDS)” on
page 30
For security reasons, disable RDS in a production environment,
after you install ColdFusion MX and before you deploy your
application.
“Changing the
ColdFusion MX user
account in Windows”
on page 31
You must do this only if you discover that the account under which
ColdFusion MX is running has inappropriate access rights; for
example, to interact with remote data sources, other application
pages, or COM objects. You can do this after you install
ColdFusion MX and before you deploy your application.
“Connecting to an
external JDBC Type 4
data source” on page
33
You must do this only if you use a Type 4 database driver that is not
included in ColdFusion MX. You can do this after you install
ColdFusion MX and before you set up the data source in the
ColdFusion Administrator.
For information about additional configuration tasks, see Administering ColdFusion MX.
18
Chapter 2 Configuring Your System
Managing ColdFusion MX
The ColdFusion MX installation creates a few services in Windows and a single process
on UNIX. The following sections describe how to manage them:
• “Managing ColdFusion MX services in Windows” on page 19
• “Managing the ColdFusion MX process on UNIX” on page 21
Managing ColdFusion MX services in Windows
This section describes the ColdFusion MX services and explains how to manage them. It
also describes how to run ColdFusion MX in Windows 98/ME, which does not use
services in its architecture.
Overview of services
The ColdFusion MX installation creates the following services in Windows NT,
Windows 2000, Windows XP:
Service
Purpose
ColdFusion MX
Application Server
The main ColdFusion service. ColdFusion pages cannot be
processed if this service is not running.
ColdFusion MX ODBC
Agent
The service used to configure data sources for the
ColdFusion MX ODBC Server.
ColdFusion MX ODBC
Server
The middle-tier service for ODBC connections that use the
ColdFusion MX DataDirect drivers for Microsoft Access and
ODBC Socket.
Starting and stopping services
In the ColdFusion Administrator, if you enable or disable security or change any option
in the Java and JVM Settings page, you must stop and restart ColdFusion MX for your
changes to take effect.
To start or stop a ColdFusion service:
1 Open the Services dialog box:
• In Windows NT 4.0, select Start > Settings > Control Panel > Services.
• In Windows 2000 or Windows XP, select Start > Settings > Control Panel >
Administrative Tools > Services.
• For other Windows platforms, see the Windows online Help.
If a service is running, its status appears as Started in the Status column. If it is not
running, no status appears for the service.
2 Do one of the following:
• Right-click a service and select Stop.
In Windows NT, click Yes to confirm that you want to stop the service.
•
•
Right-click a service and select Start.
Right-click a service and select Restart.
The Services window refreshes.
Managing ColdFusion MX
19
To set ColdFusion MX to start automatically or manually:
1 Open the Services dialog box:
• In Windows NT 4.0, select Start > Settings > Control Panel > Services.
• In Windows 2000 and Windows XP, select Start > Settings > Control Panel >
Administrative Tools > Services.
• For other Windows platforms, see the Windows online Help.
2 Do one of the following:
• In Windows NT, double-click the service to configure.
The dialog box for the service opens.
•
In Windows 2000 or Windows XP, right-click the service that you want to
configure and select Properties.
In the Properties dialog box, click the General tab.
3 Select one of the following options in the Startup Type frame or drop-down list box:
• Automatic Starts the service automatically when you start the computer.
• Manual Requires a user or dependent service to manually start the service.
4 Click OK.
Running ColdFusion MX in Windows 98/ME
Since Windows 98 and Windows ME do not have a services architecture, ColdFusion
MX runs as executable files. The following table describes these executable files:
Executable file
Purpose
ColdFusion Application
Server
The main ColdFusion program. ColdFusion pages cannot be
processed if this program is not running.
ColdFusion RDS
The program that provides security, directory and file
browsing, and debugging services for Remote Development
Services (RDS), which lets you access ColdFusion MX from
Dreamweaver MX, HomeSite+, and ColdFusion Studio.
When ColdFusion MX is running, two icons appear in the task bar. To stop the
ColdFusion Application Server executable, right-click the IDE service icon and select
Stop. To run ColdFusion MX at startup, place a shortcut for the ColdFusion MX icon in
the Startup program group. For instructions, see the Windows online Help.
20
Chapter 2 Configuring Your System
Managing the ColdFusion MX process on UNIX
This section describes the ColdFusion MX process and explains how to manage it.
Overview of the ColdFusion MX process
The ColdFusion MX installation creates a single process on UNIX called cfusion. To
check whether it is running, use the following command:
ps -eaf | grep cfusion
If it is running, your computer returns something similar to the following line:
nobody 4528 1 10 12:44 pts/0 00:00:07 /opt/coldfusionmx/runtime/bin/cfusion -start
Managing the process
The ColdFusion MX process starts automatically when you start your computer and
shuts down automatically when you shut down your computer.
In various situations, you might choose to manually stop and start or restart the
ColdFusion MX process. However, if you enable or disable security or change any option
in the Java and JVM Settings page in the ColdFusion Administrator, you must stop and
restart ColdFusion MX for your changes to take effect.
To manage the ColdFusion MX process on UNIX:
1 Log in as root, if you have not already done so.
2 Enter the following command:
cd cf_root/bin
3 Enter the appropriate command for what you need to do, as described in the
following table:
Task
Command to enter
Start ColdFusion MX
coldfusion start
Stop ColdFusion MX
coldfusion stop
Restart ColdFusion MX
coldfusion restart
View performance information for
ColdFusion MX
coldfusion status
Managing ColdFusion MX
21
Configuring web servers
This section describes how to configure a web server to serve ColdFusion pages, for
Windows and UNIX. Do this if you did not configure a web server automatically during
installation, or to change your web server.
Note: If you cannot verify your configuration, repeat the procedure. If the problem persists,
contact Macromedia Technical Support for assistance, or manually create the element that
you cannot verify in the configuration (for example, manually add an entry to the Apache web
server properties file, as documented in this section).
Configuring web servers in Windows
This section explains how to configure the following web servers in Windows:
• Configuring Internet Information Server (IIS) in Windows
• Configuring Netscape Enterprise or iPlanet web server in Windows
• Configuring Apache web server in Windows
Configuring Internet Information Server (IIS) in Windows
This section describes how to configure Internet Information Server (IIS) for ColdFusion
MX in Windows, and how to verify your configuration.
Note: The Macromedia ColdFusion MX team has tested integration with the .Net
Framework version 1 and Service Pack 1.
To configure IIS for ColdFusion MX in Windows:
1 Select Start > Run, and enter cmd.
2 At the command prompt, enter the following command on a single line:
cf_root\runtime\jre\bin\java -cp cf_root\runtime\lib
-jar cf_root\runtime\lib\wsconfig.jar -ws IIS -site "0"
-map .cfm,.cfc,.cfml,.jsp -v
Note: You must enter the previous command as a single (long) line.
The following is a sample command:
c:\cfusionmx\runtime\jre\bin\java -cp c:\cfusionmx\runtime\lib
-jar c:\cfusionmx\runtime\lib\wsconfig.jar -ws IIS -site "0"
-map .cfm,.cfc,.cfml,.jsp -v
This adds the appropriate IIS application mappings for ColdFusion MX.
If necessary, ColdFusion MX generates the following log file for errors:
cf_root\runtime\lib\wsconfig\wsconfig.log.
To verify your IIS configuration:
1 Verify that the following file was created: cf_root/runtime/lib/wsconfig/jrun.dll.
2 For each of your IIS websites, verify that application mappings for .cfm, .cfml, .cfc,
and .jsp were added, as follows:
a In IIS, right-click an IIS website and select Properties.
b In the Properties dialog box, on the Home Directory tab, click Configuration.
c
22
In the Application Configuration dialog box, click the App Mappings tab.
Chapter 2 Configuring Your System
The new application mappings appear, as the following figure shows:
3 Verify that each of your IIS websites has a virtual directory called JRunScripts.
The following figure shows a sample JRunScripts virtual directory:
4 Verify that the JRunScripts directory in each of your IIS websites points to the correct
location, as follows:
a Right-click the JRunScripts directory and select Properties.
b In the Properties dialog box, on the Virtual Directories tab, verify that the Local
Path text box contains the following path:
cf_root/runtime/lib/wsconfig/1/
Configuring web servers
23
The following figure shows a sample Properties dialog box for the JRunScripts
virtual directory:
Configuring Netscape Enterprise or iPlanet web server in Windows
This section describes how to configure Netscape Enterprise web server 3.6x or iPlanet
web server (4.x or 6.x) for ColdFusion MX in Windows, and how to verify your
configuration.
To configure Netscape or iPlanet for ColdFusion MX in Windows:
1 Select Start > Run, and enter cmd.
2 At the command prompt, enter the following command on a single line:
cf_root\runtime\jre\bin\java -cp cf_root\runtime\lib
-jar cf_root\runtime\lib\wsconfig.jar -ws <Iplanet or NES>
-dir <Netscape/iPlanet config directory> -v
Note: You must enter the previous command as a single (long) line.
The following is a sample command:
c:\cfusionmx\runtime\jre\bin\java -cp c:\cfusionmx\runtime\lib
-jar c:\cfusionmx\runtime\lib\wsconfig.jar -ws NES
-dir c:\netscape\server4\https-yourserver\config -v
To verify your Netscape or iPlanet configuration:
1 Verify that the following file was created:
cf_root\runtime\lib\wsconfig\1\jrun_nsapi35.dll
2 Open the Netscape configuration file, obj.conf, in the web server directory (for
example, in c:\netscape\server4\https-yourserver\config\obj.conf ).
24
Chapter 2 Configuring Your System
3 Verify that the following line was added to the file:
NameTrans fn="jrunfilter"
4 Verify that #JRun prefixes the following NameTrans line in the file:
#JRun NameTrans fn="pfx2dir" from="/servlet"
dir="e:/netscape/servers/docs/servlet"
5 Verify that the following object element is at the end of the file:
<Object name="jrun">
PathCheck fn="jrunfilter"
Service fn="jrunservice"
</Object>
Configuring Apache web server in Windows
This section describes how to configure the Apache web server for ColdFusion MX in
Windows, and how to verify your configuration.
To configure Apache for ColdFusion MX in Windows:
1 Select Start > Run, and enter cmd.
2 At the command prompt, enter the following command on a single line:
cf_root\runtime\jre\bin\java -cp cf_root\runtime\lib
-jar cf_root\runtime\lib\wsconfig.jar -ws Apache
-dir <Apache conf directory> -v
Note: You must enter the previous command as a single (long) line.
The following is a sample command:
c:\cfusionmx\runtime\jre\bin\java -cp c:\cfusionmx\runtime\lib
-jar c:\cfusionmx\runtime\lib\wsconfig.jar -ws Apache
-dir c:\Program Files\Apache Group\Apache\conf -v
To verify your Apache configuration:
1 Verify that the following file was created:
cf_root\runtime\lib\wsconfig\1\mod_jrun.so
2 Open the Apache configuration file, httpd.conf, in your Apache conf directory. By
default it is C:\Program Files\Apache Group\Apache\conf\httpd.conf.
Verify that the following code is appended to this file:
# JRun Settings
LoadModule jrun_module "c:/CFusionMX/runtime/lib/wsconfig/1/mod_jrun.so"
<IfModule mod_jrun.c>
JRunConfig Verbose false
JRunConfig Apialloc false
JRunConfig Ssl false
JRunConfig Serverstore "c:/CFusionMX/runtime/lib/wsconfig/1/
jrunserver.store"
JRunConfig Bootstrap 127.0.0.1:51000
#JRunConfig Errorurl <URL for errors>
</IfModule>
Configuring web servers
25
Configuring web servers on UNIX
This section explains how to configure the following web servers on UNIX:
• Configuring Apache web server on UNIX
• Configuring Netscape or iPlanet web server on UNIX
Configuring Apache web server on UNIX
This section describes how to configure the Apache web server for ColdFusion MX on
UNIX, and how to verify your configuration.
To configure the Apache web server for ColdFusion MX on UNIX:
• Enter the following command on a single line:
cf_root/jre/bin/java -jar cf_root/runtime/lib/wsconfig.jar -ws Apache
-dir <apache config directory> -v
Note: You must enter the previous command as a single (long) line.
The following is a sample command:
/opt/coldfusionmx/jre/bin/java -jar /opt/coldfusionmx/runtime/lib/wsconfig.jar
-ws Apache -dir /etc/httpd/conf -v
Note: For unique configurations, add the -bin and -script parameters.
To verify your Apache configuration:
1 Verify that the following file was created:
cf_root/runtime/lib/wsconfig/1/mod_jrun.so
2 Open the Apache configuration file, httpd.conf, in your Apache conf directory. By
default it is /etc/httpd/conf/httpd.conf.
Verify that the following code is appended to this file:
# JRun Settings
LoadModule jrun_module "/opt/coldfusionmx/runtime/lib/wsconfig/1/mod_jrun.so"
<IfModule mod_jrun.c>
JRunConfig Verbose false
JRunConfig Apialloc false
JRunConfig Ssl false
JRunConfig Serverstore "/opt/coldfusionmx/runtime/lib/wsconfig/1/
jrunserver.store"
JRunConfig Bootstrap 127.0.0.1:51000
#JRunConfig Errorurl <URL for errors>
</IfModule>
26
Chapter 2 Configuring Your System
Configuring Netscape or iPlanet web server on UNIX
This section describes how to configure Netscape Enterprise web server 3.6x or iPlanet
web server (4.x or 6.x) for ColdFusion MX on UNIX, and how to verify your
configuration.
To configure Netscape or iPlanet for ColdFusion MX on UNIX:
• Enter the following command on a single line:
cf_root/jre/bin/java -jar cf_root/runtime/lib/wsconfig.jar
-ws <Iplanet or NES> -dir <Netscape/iPlanet config directory> -v
Note: You must enter the previous command as a single (long) line.
The following is a sample command:
/opt/coldfusionmx/jre/bin/java
-jar /opt/coldfusionmx/runtime/lib/wsconfig.jar
-ws NES -dir /usr/netscape/server4/https-surf/config -v
To verify your Netscape or iPlanet configuration:
1 Verify that the following file was created:
cf_root/runtime/lib/wsconfig/1/jrun_nsapi35.dll
2 Open the Netscape configuration file, obj.conf, in the web server directory (for
example, in /usr/netscape/server4/https-surf/config/obj.conf ).
3 Verify that the following line is in the file:
NameTrans fn="jrunfilter"
4 Verify that #JRun prefixes the following NameTrans line in the file:
#JRun NameTrans fn="pfx2dir" from="/servlet"
dir="e:/netscape/servers/docs/servlet"
5 Verify that the following object element is at the end of the file:
<Object name="jrun">
PathCheck fn="jrunfilter"
Service fn="jrunservice"
</Object>
Configuring web servers
27
Enabling CORBA support
ColdFusion MX supports third-party Object Request Brokers (ORBs) through its
integration with Borland Visibroker. However, you must acquire the Common Object
Request Broker Architecture (CORBA) software separately from Borland.
This section describes the system requirements for enabling CORBA support, and
explains how to install and configure Visibroker to work with ColdFusion MX.
System requirements
You must have all of the following components installed on your computer before you
can make CORBA invocations from ColdFusion MX:
• Borland Visibroker 4.5.1 for Java
• Java Runtime Environment (JRE) 1.2 for the Visibroker Interface Repository
• JRE 1.3 or later for ColdFusion MX (this JRE is installed with ColdFusion MX)
Installing Visibroker for CORBA connections
To install Visibroker for CORBA connections:
1 Install Visibroker on the CORBA server side, if you have not already done so.
For more information, see the Borland Visibroker documentation.
2 Add the vbjorb.jar file to the ColdFusion MX classpath, as follows:
a In the ColdFusion Administrator, select Server Settings > Java and JVM.
b On the Java and JVM Settings page, in the Class Path text box, enter the path to
your vbjorb.jar file (for example, c:\Inprise\vbroker\lib\vbjorb.jar).
(You only need the jar file on the computer that is running ColdFusion MX; you
do not need the full Visibroker installation.)
c
Click Submit Changes.
3 Configure a Visibroker connector in ColdFusion MX, as follows:
a In the ColdFusion Administrator, select Extensions > CORBA Connectors.
b In the CORBA Connectors page, click Register CORBA Connector.
c
In the CORBA Connector page, enter information for the connector.
The following is an example of a correctly configured connector:
Field
Value
ORB Name
visibroker
ORB Class Name
coldfusion.runtime.corba.VisibrokerConnector
Classpath
(none)
ORB Property File
c:\CFusionMX\lib\vbjorb.properties
The ORB Property File points to a Java properties file that contains the correct
ORB settings for Visibroker.
28
Chapter 2 Configuring Your System
The contents of the vbjorb.properties file look like the following:
org.omg.CORBA.ORBClass=com.inprise.vbroker.orb.ORB
org.omg.CORBA.ORBSingletonClass=com.inprise.vbroker.orb.ORB
SVCnameroot=namingroot
d When you finish editing the page, click Submit.
The CORBA Connectors page appears.
e
Select the radio button to the left of your new CORBA connector and click Select
ORB Connector.
This sets the new connector to be the default.
4 Prepare your CORBA server side, as follows:
a Start your Visibroker osagent service or process, if it is not already running, by
entering the following command:
osagent
Note: If you must connect to an osagent in another subnetwork, include the following
lines in the vbjorb.properties file:
vbroker.agent.addr=<IP address of machine running OSAGENT>
vbroker.agent.port=<port>
b Start the Interface Repository and load it with the IDL file that you plan to use,
by entering an irep command, as in the following example:
irep myir MyIDLFile.idl
c
If you plan to use the Naming Service, start it by entering a command like the
following:
nameserv namingroot
Note: The name of the Naming Service (namingroot in the previous example) must
match the value for SVCnameroot in the vbjorb.properties file.
d Start Visibroker on your CORBA server.
For more information, see the Borland Visibroker documentation.
5 Restart ColdFusion MX for your changes to take effect.
For more information, see “Managing ColdFusion MX” on page 19.
You can now make CORBA invocations from ColdFusion MX. For more information
about integrating CORBA objects into ColdFusion MX, see Developing ColdFusion MX
Applications with CFML.
Enabling CORBA support
29
Disabling Remote Development Services (RDS)
If you use Dreamweaver MX, HomeSite+, or ColdFusion Studio to develop your
applications, you can access a remote ColdFusion MX server using HTTP. However, you
must configure Remote Development Services (RDS) in your integrated development
environment (IDE), and you must enable RDS in the ColdFusion MX server (which it is
by default). Using RDS, IDE users can securely access remote files and data sources,
build SQL queries from these data sources, and debug CFML code.
However, for security reasons, Macromedia recommends that you disable RDS on a
production server. To disable it, you must disable the RDSServlet mapping.
To disable the RDSServlet mapping:
1 Back up the web.xml file.
This file is in the cf_root\wwwroot\WEB-INF directory in Windows and in the
cf_root/wwwroot/WEB-INF directory on UNIX.
2 Open the original web.xml file for editing.
3 Comment out the RDSServlet mapping, as shown in the following example:
<!-<servlet-mapping>
<servlet-name>RDSServlet</servlet-name>
<url-pattern>/CFIDE/main/ide.cfm</url-pattern>
</servlet-mapping>
-->
4 Save the file.
5 Restart ColdFusion MX.
For more information, see “Starting and stopping services” on page 19 for Windows,
or “Managing the process” on page 21 for UNIX.
RDS is disabled on the ColdFusion MX Server.
30
Chapter 2 Configuring Your System
Changing the ColdFusion MX user account in Windows
If you discover that the user account under which ColdFusion MX runs has an
inappropriate level of access—for example, to interact with remote data sources, other
application pages, and COM objects—you should change the user account.
Note: You cannot follow this procedure in Windows 98 and Windows ME because they do
not use services in their architecture. For Windows NT, select Services from the Control
Panel and use the following procedure as a guideline.
To change the ColdFusion MX user account:
1 Select Start > Run.
2 In the Run dialog box, enter mmc in the Open text box and click OK.
The Microsoft Management Console (MMC) appears for a new console, labeled
Console1, as the following figure shows:
3 Select Console > Open.
4 In the Open dialog box, browse to compmgmt.msc, the Computer Management
console file (usually located in the system or system32 directory). Click Open.
The MMC for Computer Management appears, as the following figure shows:
Changing the ColdFusion MX user account in Windows
31
5 On the Tree tab, under Services and Applications, click Services.
All of the services for your computer appear in the right pane.
6 Right-click ColdFusion MX Application Server and select Properties.
The ColdFusion MX Application Server Properties (Local Computer) dialog box
appears, as the following figure shows:
7 On the Log On tab, select This account, and enter the account information.
8 Click OK.
9 In the MMC with the services displayed in the right pane, right-click ColdFusion
MX Application Server and select Restart.
Caution: Do not rename your Windows Administrator account. This will cause
problems with security policies and profiles.
32
Chapter 2 Configuring Your System
Connecting to an external JDBC Type 4 data source
ColdFusion MX includes JDBC Type 4 database drivers from Merant and MySQL, and
JDBC Type 3 database drivers from Merant and SQL Link. (JDBC is an Application
Programming Interface (API) for Java programs to access data.)
To use a JDBC driver that is not included with ColdFusion MX (such as SQLAnywhere
or PostGreSQL) you must configure it and add a data source for it.
To connect to an external JDBC data source:
1 Copy the database driver file to a directory other than the cf_root directory.
2 In the ColdFusion Administrator, open the Java and JVM Settings page.
3 In the Class Path text box, enter the directory that contains the driver file and click
Submit Changes.
4 Restart ColdFusion MX.
For more information, see “Managing ColdFusion MX” on page 19.
Note: In Windows, make sure that you restart all of the ColdFusion MX services; these
are listed in “Overview of services” on page 19.
5 In the ColdFusion Administrator, add the other JDBC Type 4 data source, selecting
Other from the Driver drop-down list box.
For more information, see the chapter on data source management in Administering
ColdFusion MX.
You can now connect to an external JDBC Type 4 data source.
Connecting to an external JDBC Type 4 data source
33
34
Chapter 2 Configuring Your System
INDEX
A
Apache web server
configuring in Windows 25
configuring on UNIX 26
C
CD-ROM drive
mounting on HP-UX 11
ColdFusion
See Macromedia ColdFusion
ColdFusion MX
process on UNIX 21
restarting on UNIX 21
services in Windows 19
starting in Windows 19
starting on UNIX 21
stopping in Windows 19
stopping on UNIX 21
configuration tasks, overview of 18
connecting to an external Type 4 data
source 33
CORBA support 28
D
data sources, connecting to external
Type 4 33
disabling RDS 30
H
HP-UX, mounting CD-ROM drive
on 11
I
IIS, configuring 22
installation, support vi
installing ColdFusion MX
considerations for UNIX 8
considerations for Windows 8
general considerations 7
in Windows 9
on UNIX 10
internal web server 15
iPlanet web server
configuring in Windows 24
configuring on UNIX 27
overview
3
T
training. See Macromedia ColdFusion
Type 4 data sources, connecting to
external 33
L
U
Linux
configuring web servers in 27
uninstalling
from UNIX 16
from Windows 16
UNIX
ColdFusion MX process 21
configuring Apache web server
on 26
configuring Netscape or iPlanet
web server on 27
installation considerations 8
managing process in 21
process for ColdFusion MX 21
restarting ColdFusion MX on 21
starting ColdFusion MX on 21
stopping ColdFusion MX on 21
user account, changing for
ColdFusion MX 31
M
Macromedia ColdFusion
developer resources vi
training resources vi
P
port-based web server 15
process for ColdFusion MX on
UNIX 21
R
RDS, disabling 30
restarting ColdFusion MX on
UNIX 21
S
services for ColdFusion MX in
Windows 19
stand-alone web server 15
starting
ColdFusion MX in Windows 19
ColdFusion MX on UNIX 21
stopping
ColdFusion MX in Windows 19
ColdFusion MX on UNIX 21
system requirements
for UNIX 5
for Windows 3
V
Verity Locales, installing 13
W
web servers
Apache in Windows 25
Apache on UNIX 26
configuring overview 22
IIS 22
internal 15
Netscape or iPlanet in
Windows 24
Netscape or iPlanet on UNIX
27
35
port-based 15
stand-alone 15
using ColdFusion MX web
server 15
Windows
ColdFusion MX services 19
installation considerations 8
managing services in 19
starting ColdFusion MX in 19
stopping ColdFusion MX in 19
Windows ME/98, running
ColdFusion MX in 20
36
Index