1
C
Y
P
O
English
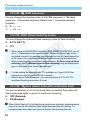
Introduction
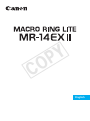
The Canon Macro Ring Lite MR-14EX II is a flash unit for shooting
close-ups with Canon EOS cameras, compatible with E-TTL II/E-TTL/
TTL autoflash systems. The flash unit is equipped with various
functions suitable for a wide range of shooting objectives, from simple
shooting to advanced shooting. It has functions to control the flash ratio
between flash tubes A and B, single-side firing, wireless multiple flash
shooting using additional slave flash units, and manual flash.
Read this instruction manual while also referring to your
camera’s instruction manual.
Before using the product, read this instruction manual and your
camera’s instruction manual to familiarize yourself with their
operations.
Y
P
O
Using the MR-14EX II with a Camera
Using with an EOS DIGITAL camera (Type-A camera)
You can use the MR-14EX II for easy macro flash shooting by
autoflash control in the same way as a camera’s built-in flash.
C
Using with an EOS film camera
Camera with an E-TTL II/E-TTL autoflash system (Type-A
camera)
You can use the MR-14EX II for easy macro flash shooting by
autoflash control in the same way as a camera’s built-in flash.
Camera with a TTL autoflash system (Type-B camera)
See page 76.
* This instruction manual assumes that the MR-14EX II is used with a
Type-A camera.
2
Item Check List
Before starting, check that all the following items are included with your
MR-14EX II. If anything is missing, contact your dealer.
Lens Cap
MR-14EX II
Case
(p.16)
* Be careful not to lose any of the above items.
C
Y
P
O
3
Conventions Used in this Manual
Icons in this Manual
9
: Indicates the Select dial.
8
: Indicates the Set button.
3/1/4/ : Indicates that the respective function remains active for
7/2
4 sec., 6 sec., 8 sec., 10 sec., or 16 sec. after you let go
of the button.
(p.**)
: Reference page numbers for more information.
: Warning to prevent shooting problems.
: Supplemental information.
M
: M shown to the right of the page title indicates that the
function is performed when the camera’s shooting
mode is set to <d/s/f/a/F> (Creative Zone
mode).
Basic Assumptions
Y
P
O
The operation procedures assume that both the camera and the
MR-14EX II’s power switches are set to <K>.
The icons used for buttons, dials and symbols in the text match the
icons found on the camera and the MR-14EX II.
The operation procedures assume that the menu and Custom
Functions of the camera, and the Custom Functions and Personal
Functions of the MR-14EX II are at their default settings.
All figures are based on the use of four AA/LR6 alkaline batteries
and Canon’s testing standards.
The operation procedures assume that a macro lens is used.
C
4
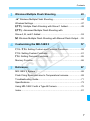
Chapters
Introduction
2
1
Getting Started with Macro Flash Shooting
2
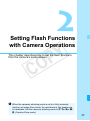
Setting Flash Functions with Camera Operations
3
Preparations for macro flash shooting and basic shooting
Setting the flash functions from the camera’s menu screen
13
37
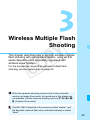
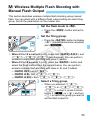
Wireless Multiple Flash Shooting
Y
P
O
Wireless multiple flash shooting using additional slave units with
optical transmission
4
Customizing the MR-14EX II
5
Reference
Customizing with Custom Functions and Personal Functions
C
System map, FAQ, use with a type-B camera
43
57
67
5
Contents
Introduction
2
Item Check List................................................................................. 3
Conventions Used in this Manual..................................................... 4
Chapters........................................................................................... 5
Nomenclature ................................................................................... 8
1
Getting Started with Macro Flash Shooting
13
Installing the Batteries .................................................................... 14
Attaching the Control Unit to the Camera ...................................... 15
Y
P
O
Attaching the Flash Unit to the Lens .............................................. 16
Turning on the Power ..................................................................... 18
Fully Automatic Flash Shooting...................................................... 20
Using E-TTL II and E-TTL Autoflash by Shooting Mode ................ 21
Effective Flash Range (Reference) ................................................ 24
C
l Setting the Flash Ratio..................................................... 25
f Flash Exposure Compensation ................................................. 27
g FEB .......................................................................................... 28
7: FE Lock .................................................................................. 29
c High-speed Sync ....................................................................... 30
r Second-curtain Sync ............................................................... 31
q: Manual Flash ............................................................................ 32
Clearing MR-14EX II Settings ........................................................ 36
2
Setting Flash Functions with Camera Operations
37
Flash Control from the Camera’s Menu Screen ............................. 38
6
Contents
3
Wireless Multiple Flash Shooting
43
: Wireless Multiple Flash Shooting............................................. 44
Wireless Settings ............................................................................ 47
a: Multiple Flash Shooting with Slave C Added ..................... 49
a: Advanced Multiple Flash Shooting with
Slave A, B, and C Added ................................................................53
q: Wireless Multiple Flash Shooting with Manual Flash Output .... 55
4
Customizing the MR-14EX II
Y
P
O
57
C / >: Setting Custom and Personal Functions..................... 58
C: Setting Custom Functions ..................................................... 61
>: Setting Personal Functions.................................................... 65
Memory Function ............................................................................ 66
5
6
Reference
C
67
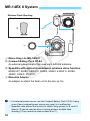
MR-14EX II System ........................................................................68
Flash Firing Restriction due to Temperature Increase.................... 69
Troubleshooting Guide....................................................................71
Specifications..................................................................................73
Using MR-14EX II with a Type-B Camera ...................................... 76
Index ............................................................................................... 81
7
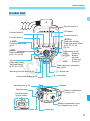
Nomenclature
Flash Unit
Front
Connecting cord
Release button (p.16)
Focusing lamp (p.22)
Flash tube B
Lens cap/
Filter thread (p.16-17)
Y
P
O
Flash tube A
Focusing lamp (p.22)
C
Rear
<h> Indicator
8
<i> Indicator
Nomenclature
Control Unit
Function button 3
LCD panel
Function button 2
Function button 4
Function button 1
<f>
Flash ratio setting/
Flash tube select button
(p.25, 32, 47, 49,
53, 55)
<d>
Focusing lamp button
(p.22)
<E>
Flash mode button
(p.20, 32, 49, 55)
<Q>
Flash-ready lamp/
Test flash button
(p.18, 50, 61-63)
C
MODE
Mounting foot lock lever (p.15)
Lock-release button (p.15)
Y
P
O
Power switch (p.18)
<K>
: Power on
<a> : Button/
dial lock
(Power on)
<J> : Power off
Flash exposure confirmation
lamp (p.20)
<9> Select dial
<8> Set button
Mounting foot (p.15)
Contacts
Terminal cover
Battery compartment
cover (p.14)
External power
source socket
Battery compartment cover
lock-release lever (p.14)
Locking pin
9
Nomenclature
LCD Panel
E-TTL II/E-TTL/TTL autoflash (p.21)
G : Battery indicator (p.18)
a : E-TTL II/E-TTL
autoflash
b : TTL autoflash
c : High-speed sync
(p.30, 40)
r : Second-curtain
sync (p.31, 40)
u: Custom
Functions
(p.61)
j: Normal shooting
t: Temperature
increase (Firing
restriction/p.69)
Flash exposure level
Y
P
O
Aperture
f : Flash exposure
compensation (p.27, 40)
Flash exposure compensation
amount
C
T: Personal
Functions
(p.65)
FEB sequence (p.62)
g : FEB (p.28, 40)
,:
Flash ratio setting
Firing group
Flash ratio
l : Fire A:B
(flash ratio control)
4 : Fire A (single-side firing)
5 : Fire B (single-side firing)
The screens shown are examples. The display will show only the settings
currently applied.
The functions, such as <=> and <@>, displayed above function
buttons 1 to 4, change according to the settings.
When a button or dial is operated, the LCD panel illuminates (p.19).
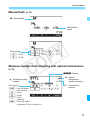
10
Nomenclature
Manual flash (p.32)
q : Manual flash
Manual flash
output
Firing group
4 : Fire A
5 : Fire B
C
Y
P
O
Wireless multiple flash shooting with optical transmission
(p.43)
g : Wireless shooting
(master)
Firing group
l : Fire A:B (flash
ratio control)
4 : Fire A
5 : Fire B
6 : Fire C
(slave C)
j : Fire A, B, and C
(only when C.Fn-15 is set to 1)
M : Master
: : Optical
transmission
wireless shooting
* : Transmission
channel
11
Cautions for firing continuous flashes
To avoid degrading and damaging the flash unit due to overheating,
do not fire more than 20 continuous flashes. After 20 continuous
flashes, allow a rest time of at least 10 min.
If you fire 20 continuous flashes, and then fire the flash again
repeatedly in short intervals, the safety function may activate and
restrict flash firing. While flash firing is restricted, the firing interval is
automatically set to a time between approx. 8 and 15 sec. If this
happens, allow a rest time of at least 10 min.
For details, see “Flash Firing Restriction due to Temperature
Increase” on page 69.
C
12
Y
P
O
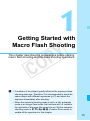
1
Getting Started with
Macro Flash Shooting
Y
P
O
This chapter describes the preparations before starting
macro flash shooting and the basic shooting operations.
C
Conditions of the subject greatly influence the exposure when
shooting close-ups. Therefore, it is recommended to shoot the
same subject with different exposures (p.27) and check the
exposure immediately after shooting.
When the camera’s shooting mode is set to a fully automatic
mode or an Image Zone mode, the functions with M added to
the right side of the page title cannot be set. Set the camera’s
shooting mode to d/s/f/a/F (Creative Zone mode) to
enable all the operations in this chapter.
13
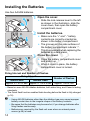
Installing the Batteries
Use four AA/LR6 batteries.
1
Open the cover.
Slide the lock-release lever to the left
as shown in the illustration, slide the
cover down, then open the battery
compartment cover.
the batteries.
2 Install
Make sure the “+” and “-” battery
contacts are correctly oriented as
shown in the battery compartment.
The grooves on the side surfaces of
the battery compartment indicate “-”.
This is convenient when replacing the
batteries in a dark place.
Y
P
O
the cover.
3 Close
Close the battery compartment cover
and slide it up.
X When it clicks in place, the battery
compartment cover is locked.
C
Firing Interval and Number of Flashes
Firing Interval
Quick Flash
Normal Flash
Approx. 0.1 to 3.3 sec. Approx. 0.1 to 5.5 sec.
Number of Flashes
Approx. 100 to 700
Based on new AA/LR6 alkaline batteries, both sides firing, and Canon’s testing
standards.
The Quick flash function enables flash shooting before the flash is fully charged
(p.18).
Using AA/LR6 batteries other than the alkaline type may cause improper
battery contact due to the irregular shape of the battery contacts.
Be aware that the batteries may become hot, if you change batteries after
firing flashes continuously.
Batteries are required by the flash unit even when an external power
source (p.68) is used.
14
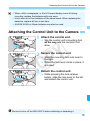
Attaching the Control Unit to the Camera
When <!> is displayed, or the LCD panel display turns off during
recycling, replace the batteries with new ones.
Use a new set of four batteries of the same brand. When replacing the
batteries, replace all four at one time.
AA/LR6 Ni-MH or lithium batteries can also be used.
Attaching the Control Unit to the Camera
1
Attach the control unit.
Slip the control unit’s mounting foot
all the way into the camera’s hot
shoe.
Y
P
O
the control unit.
2 Secure
Slide the mounting foot lock lever to
the right.
C
X When the lock lever clicks in place, it
is locked.
the control unit.
3 Detach
While pressing the lock-release
button, slide the lock lever to the left
and detach the control unit.
Be sure to turn off the MR-14EX II before attaching or detaching it.
15
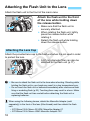
Attaching the Flash Unit to the Lens
Attach the flash unit to the front of the macro lens.
Attach the flash unit to the front
of the lens while holding down
the release button.
Make sure that the flash unit is
securely attached.
When rotating the flash unit, lightly
press the release button while
rotating it.
Detach the flash unit while holding
down the release button.
Attaching the Lens Cap
Y
P
O
Attach the provided lens cap to the flash unit when it is not used in order
to protect the lens.
A 67 mm diameter filter can also be
attached to the flash unit (p.17).
C
Be sure to attach the flash unit to the lens when shooting. Shooting while
holding the flash unit in your hand may result in a low temperature burn.
Do not touch the flash unit or batteries immediately after continuous flash
firing or modeling flash (p.23). Touching them may result in a burn. Make
sure that the flash unit has cooled before detaching the flash unit or
replacing batteries.
When using the following lenses, attach the Macrolite Adapter (sold
separately) to the front of the lens (filter thread) and then attach the flash
unit.
• EF100mm f/2.8L Macro IS USM: Macrolite Adapter 67
• EF180mm f/3.5L Macro USM: Macrolite Adapter 72C
16
Attaching the Flash Unit to the Lens
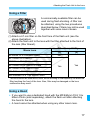
Using a Filter
A commercially-available filter can be
used during flash shooting. A filter can
be attached, using the two procedures
described below. Filters may not be used
together with some macro lenses.
(1) Attach a 67 mm filter on the front face of the flash unit (see the
above illustration).
(2) Attach the flash unit to the lens with the filter attached to the front of
the lens (filter thread).
Macro Lens
EF50mm f/2.5 Compact Macro
EF100mm f/2.8 Macro
EF100mm f/2.8 Macro USM
C
Y
P
O
EF100mm f/2.8L Macro IS USM
EF180mm f/3.5L Macro USM
EF-S60mm f/2.8 Macro USM
Filter Compatibility
(1)
(2)
No*
Yes
Yes
MP-E65mm f/2.8 1-5x Macro Photo
* The lens cannot be used with a filter, since focusing is interrupted by an attached
filter touching the front of the lens. Also, filter may be damaged or the lens
malfunction may result.
Using a Hood
If you want to use a dedicated hood with the MP-E65mm f/2.8 1-5x
Macro Photo (sold separately), attach the flash unit after attaching
the hood to the lens.
A hood cannot be attached when using any other macro lens.
17
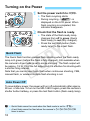
Turning on the Power
1
Set the power switch to <K>.
X The flash recycling starts.
X During recycling, <G> is
displayed on the LCD panel. When
flash recycling is completed, this
indicator disappears.
that the flash is ready.
2 Check
The state of the flash-ready lamp
changes from off to green (Quick
flash ready) to red (fully charged).
Press the test flash button (flashready lamp) to fire a test flash.
Quick Flash
Y
P
O
The Quick flash function enables flash shooting when the flash-ready
lamp is lit green (before the flash is fully charged). It is available when
the camera’s drive mode is set to single shooting. The flash output will
be approx. 1/2 to 1/5 of the full output, but it is effective for shooting with
a shorter firing interval.
Note that you cannot use Quick flash when continuous shooting, FEB,
manual flash, or wireless multiple flash shooting is set.
C
Auto Power Off
To save battery power, the power will turn off automatically after approx.
90 sec. of idle use. To turn on the MR-14EX II again, press the camera’s
shutter button halfway, or press the test flash button (flash-ready lamp).
Quick flash cannot be used when the flash mode is set to <b>.
A test flash cannot be fired when the camera’s 3/1/4/7/2
timer is active.
18
Turning on the Power
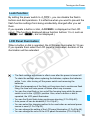
Lock Function
By setting the power switch to <a>, you can disable the flash’s
buttons and dial operations. It is effective when you want to prevent the
flash function settings from being accidentally changed after you set
them.
If you operate a button or dial, <LOCKED> is displayed on the LCD
panel. (The functions displayed above function buttons 1 to 4, such as
<=> and <@>, are not displayed.)
LCD Panel Illumination
When a button or dial is operated, the LCD panel illuminates for 12 sec.
If you operate them when the LCD panel is illuminated, duration of the
illumination will be extended.
C
Y
P
O
The flash settings will remain in effect even after the power is turned off.
To retain the settings when replacing the batteries, replace the batteries
within 1 min. after turning off the power switch and removing the
batteries.
When the temperature of the flash unit has risen due to continuous flash
firing, the time until auto power off takes effect may increase.
You can fire a test flash or turn on/off the focusing lamp while the power
switch is set to the <a> position. Also, when a button or dial is
operated, the LCD panel illuminates.
You can fire Quick flash during continuous shooting (C.Fn-06/p.62).
Auto power off can be disabled (C.Fn-01/p.61).
You can select the charging method to be used when an external power
source is used (C.Fn-12/p.63).
You can change the setting of the LCD panel illumination (C.Fn-22/p.64).
You can change the color of the LCD panel illumination (P.Fn-03/p.65).
19
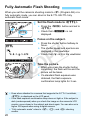
Fully Automatic Flash Shooting
When you set the camera’s shooting mode to <d> (Program AE) or a
fully automatic mode, you can shoot in the E-TTL II/E-TTL fully
automatic flash mode.
1
Set the flash mode to <a>.
Press the <E> button and set to
<a>.
Check that <M> is not
displayed.
on the subject.
2 Focus
Press the shutter button halfway to
focus.
Y
P
O
X The shutter speed and aperture are
displayed in the viewfinder.
Check that <Q> is lit in the viewfinder.
C
the picture.
3 TakeWhen
you press the shutter button
completely, the flash will fire and the
picture will be taken.
X If a standard flash exposure was
obtained, the flash exposure
confirmation lamp lights for 3 sec.
Even when attached to a camera that supports the E-TTL II autoflash,
<a> is displayed on the LCD panel.
If the flash exposure confirmation lamp does not light or if the subject is
dark (underexposed) when you check the image on the camera’s LCD
monitor, move closer to the subject and shoot again. You can also set a
higher ISO speed when using a digital camera.
“Fully automatic mode” refers to <A>, <1>, and <C> shooting
modes.
20
Using E-TTL II and E-TTL Autoflash by Shooting Mode
Simply set the camera’s shooting mode to <f> (aperture-priority AE)
or <a> (manual exposure) and you can perform advanced macro flash
shooting using E-TTL II/E-TTL autoflash.
You can perform flash shooting while obtaining a standard exposure of
both the main subject and background while considering the depth of
field.
Select this mode when you want to set the aperture manually. The
camera will then automatically set the shutter speed, matching the
aperture to obtain a standard exposure. If the scene is dark, a slow
sync speed will be used to obtain a standard exposure for both the
f main subject and background. Standard exposure of the main subject
is obtained with the flash, while a standard exposure of the background
is obtained with a long exposure using a slow shutter speed.
Since a slow shutter speed will be used for low-light scenes, using a
tripod is recommended.
If the shutter speed display blinks, it means that the background
exposure will be underexposed or overexposed. Adjust the aperture
until the shutter speed display stops blinking.
Y
P
O
Select this mode if you want to set both the shutter speed and aperture
manually.
a Standard exposure of the main subject is obtained with the flash. The
exposure of the background is obtained with the shutter speed and
aperture combination you set.
C
When the shutter speed is manually set with the shooting mode set to <s>
(Shutter-priority AE), the aperture will be set automatically. However, this is not
recommended because the aperture cannot be set manually.
If you use the <Z> or <Y> shooting mode, the result will be the same as
using the <d> (Program AE) mode.
Flash Sync Speeds and Apertures Used
Shutter Speed
Aperture
Automatically set (1/X sec. to 1/60 sec.)
Automatically set
f
Automatically set (1/X sec. to 30 sec.)
Manually set
a
Manually set (1/X sec. to 30 sec., Bulb)
Manually set
d
1/X sec. is the camera’s maximum flash sync speed.
21
Using E-TTL II and E-TTL Autoflash by Shooting Mode
Focusing Lamp
Press the <d> button to light the
focusing lamp for 20 sec., making
focusing easier. Press the button again
to turn off the lamp.
The focusing lamp turns off automatically
when you press the shutter button on the
camera completely.
C
Y
P
O
Note that looking closely at the focusing lamp may cause vision damage.
If you shoot when the focusing lamp is lit, underexposure may occur. If
necessary, set the exposure compensation or flash exposure
compensation.
Under conditions where the flash is not fired, such as in Flash Off mode
or during movie shooting, the focusing lamp will not turn off automatically
even if you press the shutter button completely.
You can change the lighting method of the focusing lamp (C.Fn-18/p.64).
You can change the brightness of the focusing lamp (P.Fn-01/p.65).
22
Using E-TTL II and E-TTL Autoflash by Shooting Mode
Modeling FlashN
When the camera’s depth-of-field preview button is pressed, the flash
fires continuously for 1 sec. This feature is called “modeling flash.” This
is effective for checking shadow effects on the subject and the lighting
balance. Modeling flash can be fired during wireless multiple flash
shooting (p.44) as well.
To avoid degrading and damaging the flash unit due to overheating, do
not fire the modeling flash more than 20 times continuously. After firing it
20 times continuously, allow a rest time for at least 10 min.
If the modeling flash is fired more than 20 times continuously, the safety
function may activate and restrict flash firing. If this happens, allow a rest
time for at least 10 min.
During Live View shooting, firing modeling flash (by operating the camera)
is not possible.
Modeling flash (by operating the camera) is disabled when using the flash
unit with EOS M2, EOS M, EOS Elan II/Elan II E/50/50E, EOS REBEL K2/
3000V, EOS REBEL XS N/REBEL G II/3000N/66, EOS REBEL 2000/300,
EOS REBEL G/500N, EOS IX, or EOS IX Lite/IX 7. Set C.Fn-02 to 1 or 2
(p.61), and fire modeling flash using the test flash button.
C
Y
P
O
Modeling flash can be fired using the test flash button (C.Fn-02/p.61).
Color Temperature Information Transmission
This function optimizes the white balance during flash shooting by
transmitting the color temperature information to the EOS DIGITAL
camera when the flash fires. When you set the camera’s white balance
to <A> or <Q>, the function is enabled automatically.
See the specifications in your camera’s instruction manual to find out if
it is compatible with this function.
23
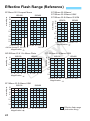
Effective Flash Range (Reference)
EF50mm f/2.5 Compact Macro
ISO100
EF100mm f/2.8 Macro/
EF100mm f/2.8 Macro USM/
EF100mm f/2.8L Macro IS USM
ISO400
Aperture
Aperture
45
32
22
16
11
8
5.6
4
3.2
2.8
2.5
1 2 3 4
Magnification
5 1
C
2
3
ISO400
Y
P
O
1
EF-S60mm f/2.8 Macro USM
ISO400
4
Aperture
Aperture
16
11
8
5.6
4
2.8
ISO100
ISO100
0.33 0.5 0.7 1 0.33 0.5 0.7
Magnification
0.13 0.2 0.3 0.5
0.13 0.2 0.3 0.5
+Life-Size Converter EF 0.5 0.67 1
0.5 0.67 1
Magnification
MP-E65mm f/2.8 1-5x Macro Photo
32
22
16
11
8
5.6
4
2.8
5
32
22
16
11
8
5.6
4
2.8
ISO100
ISO400
0.25 0.33 0.5 0.67 1 0.25 0.33 0.5 0.67 1
Magnification
EF180mm f/3.5L Macro USM
Aperture
32
22
16
11
8
5.6
4
3.5
ISO100
0.1 0.2 0.3 0.5 0.7
Magnification
24
ISO400
1 0.1 0.2 0.3 0.5 0.7
1
: Effective flash range
(both sides firing)
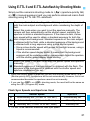
l Setting the Flash RatioN
You can adjust the flash ratio between flash tubes A and B, or fire only
one of them. This can create shadows on the subject to give a more
sculptural look. The flash ratio can be set in half-stop increments as
follows: 8:1 to 1:1 to 1:8 (13 settings).
A:B = 4:1
Flash tube B only
Y
P
O
Flash with the A:B Flash Ratio Set
1
C
Set to <l>.
Press the <,> button to display
<%> and <l>.
the <F> button.
2 Press
Press function button 3 <F>.
X The flash ratio is highlighted.
the flash ratio.
3 SetTurn
<9> to set the A:B flash ratio,
then press <8>.
25
l Setting the Flash RatioN
Single-side Firing
Set <4> or <5>.
Press the <,> button to display
<_> and <4> or
<_> and <5>.
Flash tube
A only
Flash tube
B only
C
Y
P
O
Flash ratio control is not available on the models listed below. Both sides will
fire at the same flash output, or single-side firing will apply.
EOS Elan II/Elan II E/50/50E, EOS REBEL XS N/REBEL G II/3000N/66,
EOS REBEL 2000/300, EOS REBEL G/500N, EOS IX, EOS IX Lite/IX 7
The flash ratio of 8:1 to 1:1 to 1:8 is equivalent to 3:1 to 1:1 to 1:3 (1/2stop increments) when converted to the number of f/stops.
The details of the flash ratio settings are as follows.
When <l>, <4>, or <5> is not displayed, flash tubes
A and B will fire at the same flash output.
When the flash mode is set to <a>, see pages 32-34.
26
f Flash Exposure CompensationN
In the same way as normal exposure compensation, you can set
exposure compensation for flash. The flash exposure compensation
amount can be set up to ±3 stops in 1/3-stop increments.
1
Press the <@> button or
<8>.
Press function button 2 <@> or
<8>.
X <f> is displayed and the flash
exposure compensation amount is
highlighted.
Y
P
O
the flash exposure
2 Set
compensation amount.
C
Turn <9> to set the flash exposure
compensation amount, then press
<8>.
X The flash exposure compensation
amount is set.
“0.3” indicates 1/3 stops, and “0.7”
indicates 2/3 stops.
To cancel flash exposure
compensation, return the
compensation amount to “±0”.
Generally, set an increased exposure compensation for bright subjects,
and set a decreased exposure compensation for dark subjects.
If the camera’s exposure compensation is set to 1/2-stop increments, flash
exposure compensation will be up to ±3 stops in 1/2-stop increments.
When the flash exposure compensation is set on both the flash and the
camera, priority is given to the flash setting.
The flash exposure compensation amount can be set directly with <9>
without pressing the function button 2 <@> or <8> (C.Fn-13/p.63).
27
g FEBN
You can take three shots while automatically changing the flash output.
This is called “FEB (Flash Exposure Bracketing)”. The settable range is
±3 stops in 1/3-stop increments.
1
Press the <E> button.
Press function button 3 <E>.
X <g> is displayed.
Y
P
O
the FEB level.
2 SetTurn
<9> to set the FEB level, then
press <8>.
X The FEB level is set.
C
“0.3” indicates 1/3 stops and “0.7”
indicates 2/3 stops.
When used together with flash
exposure compensation, FEB
shooting is performed based on the
flash exposure compensation
amount.
When the FEB range exceeds ±3
stops, the end of the flash exposure
level shows <I> or <J>.
After the three shots are taken, FEB is canceled automatically.
Before shooting with FEB, it is recommended to set the camera’s drive
mode to single shooting, and check that the flash is recycled for each shot.
You can use FEB together with flash exposure compensation or FE lock.
If the camera’s exposure compensation is set to 1/2-stop increments, flash
exposure compensation will be up to ±3 stops in 1/2-stop increments.
You can set FEB to remain active after shooting the three shots (C.Fn-03/p.61).
You can change the FEB shooting sequence (C.Fn-04/p.62).
28
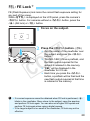
7: FE LockN
FE (Flash Exposure) lock locks the correct flash exposure setting for
any part of the scene.
While <a> is displayed on the LCD panel, press the camera’s
<B> button. For cameras without a <B> button, press the
<A> (AE lock) or <7> button.
1
Focus on the subject.
Y
P
O
the <B> button. (8)
2 Press
Aim the center of the viewfinder over
C
the subject and press the <B>
button.
X The MR-14EX II fires a preflash, and
the flash output required for the
subject is retained in the memory.
X “FEL” will be displayed in the
viewfinder for 0.5 sec.
Each time you press the <B>
button, a preflash will be fired and the
new flash output required at that time
is retained in the memory.
If a correct exposure cannot be obtained when FE lock is performed, <Q>
blinks in the viewfinder. Move closer to the subject, open the aperture,
and perform FE lock again. You can also set a higher ISO speed and
perform FE lock again when using a digital camera.
If the target subject is too small in the viewfinder, FE lock may not be
effective.
29
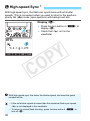
c High-speed SyncN
With high-speed sync, the flash can synchronize with all shutter
speeds. This is convenient when you want to shoot in the aperturepriority AE (f) mode (open aperture) with background blur.
Display <c>.
Press function button 4 <Y> to
display <c>.
Check that <F> is lit in the
viewfinder.
C
Y
P
O
With high-speed sync, the faster the shutter speed, the lower the guide
number will be.
If the set shutter speed is slower than the maximum flash sync speed,
<F> is not displayed in the viewfinder.
To return to normal flash shooting, press function button 4 <Y> to
turn off <c>.
30
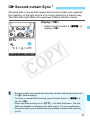
r Second-curtain SyncN
Shooting with a slow shutter speed and second-curtain sync captures
the trajectory of the light source of a moving subject in a natural way.
The flash fires right before the exposure finishes (shutter closes).
Display <r>.
Press function button 4 <Y> to
display <r>.
C
Y
P
O
Second-curtain sync works well when the camera’s shooting mode is set
to <F> (bulb shooting).
To return to normal flash shooting, press function button 4 <Y> to
turn off <r>.
When the flash mode is set to <a>, the flash fires twice. The first
flash is a preflash to determine the flash output. It is not a malfunction.
Second-curtain sync is disabled during wireless multiple flash shooting
(p.44).
31
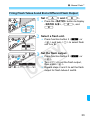
q: Manual FlashN
You can set the flash output from 1/1 full output to 1/128 power in 1/3stop increments. The flash can be fired in one of the following three
ways: Flash tubes A and B fired at the same output, A and B fired at
different outputs, Only A or B fired.
Setting the camera’s shooting mode to <f> or <a> is
recommended. First, take a test shot to check the exposure.
Firing Flash Tubes A and B at the Same Flash Output
1
Set the flash mode to <q>.
Press the <E> button and set to
<q>.
Y
P
O
off <,>.
2 TurnPress
the <,> button to turn off
C
<,>.
the flash output.
3 SetPress
function button 2 <@> or
<8>.
X The flash output level is highlighted.
Turn <9> to set the flash output,
then press <8>.
If high-speed sync is set, the setting range will be 1/1 - 1/64.
The guide number will differ between both sides firing and single-side
firing even when the flash output settings are the same (p.75).
You can set the flash output directly by turning <9>, instead of pressing
the function button 2 <@> or <8> (C.Fn-13/p.63).
32
q: Manual FlashN
Firing Flash Tubes A and B at a Different Flash Output
1
Set <4> and <5>.
Press the <,> button to display
<%>, <4>, and
5.
a flash unit.
2 Select
Press function button 3 <F> or
<8> and turn <9> to select flash
unit A or B.
Y
P
O
the flash output.
3 SetPress
function button 3 <1> or
C
<8>.
Turn <9> to set the flash output,
then press <8>.
Repeat steps 2 and 3 to set the flash
output for flash tubes A and B.
33
q: Manual FlashN
Single-side Firing
1
Flash tube
A only
Set <4> or <5>.
Press the <,> button to display
<_> and <4> or
<_> and <5>.
Flash tube
B only
Y
P
O
the flash output.
2 SetPress
function button 3 <@> or
C
34
<8>.
Turn <9> to set the flash output,
then press <8>.
q: Manual FlashN
Metered Manual Flash Exposures
When using an EOS-1D series camera, the flash exposure level can be
manually set before shooting. This is convenient for shooting at a short
distance from the subject. Use a 18% gray reflector (commercially
available) and shoot as follows.
1
Configure the camera and MR-14EX II settings.
Set the camera’s shooting mode to <a> or <f>.
Set the MR-14EX II’s flash mode to <a>.
2 Focus on the subject.
Focus manually.
Y
P
O
3 Set up an 18% gray reflector.
Place the gray reflector at the subject’s position.
Aim the camera so that the entire spot metering circle at the
viewfinder center is over the gray reflector.
4 Press the <B>, <P>, or <7> button. (8)
C
X The MR-14EX II will fire a preflash and the required flash output
for the correct flash exposure is retained in memory.
X On the right side of the viewfinder, the exposure level indicator
will show the flash exposure level against the standard exposure.
5 Set the flash exposure level.
Adjust the MR-14EX II’s manual flash level and the
aperture so that the flash exposure level aligns with
the standard exposure index.
6 Take the picture.
Remove the gray reflector and take the picture.
Metered manual flash exposure is available only with EOS-1D series
cameras.
35
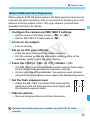
Clearing MR-14EX II SettingsN
You can return the settings of the MR-14EX II shooting functions and
wireless multiple flash shooting settings to their default settings.
Press function buttons 2 and 3
simultaneously for 2 seconds or
longer.
X The MR-14EX II settings are cleared
and the settings will return to normal
shooting and <a> flash mode.
C
Y
P
O
Even when the settings have been cleared, the transmission channel during
wireless multiple flash shooting as well as the Custom Function and
Personal Function settings (p.58) will not be canceled.
36
2
Setting Flash Functions
with Camera Operations
Y
P
O
This chapter describes how to set the flash functions
from the camera’s menu screen.
C
When the camera’s shooting mode is set to a fully automatic
mode or an Image Zone mode, the operations in this chapter are
not available. Set the camera’s shooting mode to d/s/f/a/
F (Creative Zone mode).
37
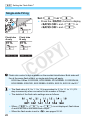
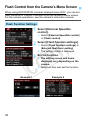
Flash Control from the Camera’s Menu Screen
When using EOS DIGITAL cameras released since 2007, you can set
flash functions or Custom Functions from the camera’s menu screen.
For the camera operations, see the camera’s instruction manual.
Flash Function Settings
1
Select [External Speedlite
control].
Select [External Speedlite control]
or [Flash control].
[Flash function settings].
2 Select
Select [Flash function settings] or
Y
P
O
[External flash func. setting].
X The setting screen is displayed.
the function.
3 SetThe
setting screen and items
C
Example 1
38
displayed vary depending on the
camera.
Select an item and set the function.
Example 2
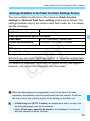
Flash Control from the Camera’s Menu Screen
Settings Available in the Flash Function Settings Screen
The main settable functions from the Camera’s [Flash function
settings] or [External flash func. setting] screen are as follows. The
settings available vary by the camera used, flash mode, etc. For details,
see the next page.
Flash firing
Enable / Disable
E-TTL II flash metering
Evaluative / Average
Flash synchronization speed in Av mode
Flash mode
E-TTL II (autoflash) / Manual flash
Shutter synchronization
1st curtain / 2nd curtain / Hi-speed
Flash exposure compensation
Y
P
O
FEB
Clear (flash) settings
Note that you cannot set “Flash ratio control” or “Wireless multiple flash
shooting” with C.Fn-15-0 setting. Set them by operating the MR-14EX II.
For details on restrictions (functions that cannot be set), see page 42.
However, you can set other functions from the screen.
C
When the flash exposure compensation is set on the flash unit, flash
exposure compensation cannot be performed from the camera. If both are
set at the same time, priority is given to the setting on the flash unit.
[Flash firing] and [E-TTL II meter.] are displayed in step 2 or step 3 on
the preceding page (vary by the camera).
When [Flash sync. speed in Av mode] is not displayed, it can be set
with the camera’s Custom Function.
39
Flash Control from the Camera’s Menu Screen
Flash firing
To perform flash shooting, set to [Enable].
E-TTL II flash metering
For normal exposures, set it to [Evaluative]. If [Average] is set, the
flash exposure will be averaged for the entire scene metered by the
camera. Flash exposure compensation may be necessary
depending on the scene. This setting is for advanced users.
Flash synchronization speed in Av mode
You can set the flash synchronization speed when shooting in
aperture-priority AE (f) mode with flash.
Flash mode
You can select [E-TTL II] or [Manual flash] according to your
shooting objective.
Y
P
O
Shutter synchronization
You can select the flash firing timing/method from [1st curtain], [2nd
curtain] and [High-speed synchronization]. To perform normal
flash shooting, set [1st curtain].
C
Flash exposure compensation
In the same way as normal exposure compensation, you can set
exposure compensation for flash. The flash exposure compensation
amount can be set up to ±3 stops in 1/3-stop increments.
FEB
You can take three shots while automatically changing the flash
output. The settable range is up to ±3 stops in 1/3-stop increments.
Clear (flash) settings
You can return the settings for flash units to their default settings.
40
Flash Control from the Camera’s Menu Screen
Flash Custom Function Settings
You can set Custom Functions for flash units from the camera’s menu
screen. The details displayed vary by the camera. If C.Fn-22 is not
displayed, set it by operating the flash unit. For the Custom Functions,
see pages 61-64.
1
Select [Flash C.Fn settings].
Select [Flash C.Fn settings] or
[External flash C.Fn setting].
X The flash Custom Function settings
screen is displayed.
Y
P
O
the Custom Function.
2 SetSelect
the Custom Function number
and set the function.
C
To clear all the Custom Function
settings, select [Clear all Speedlite
C.Fn’s] or [Clear ext. flash C.Fn
set.] in step 1.
When using a camera released in 2011 or earlier, or EOS REBEL T5/
1200D, the C.Fn-22 settings are not cleared even if [Clear all Speedlite
C.Fn’s] or [Clear ext. flash C.Fn set.] is selected. When the procedure
described in “Clearing All the Custom/Personal Functions” on page 60 is
performed, all the Custom Functions are cleared.
You cannot set or clear Personal Functions (P.Fn/p.65) from the camera’s
menu screen. Set them by operating the flash unit.
41
Flash Control from the Camera’s Menu Screen
Functions Which Cannot Be Set from the Flash Function
Settings Screen
Some of the following functions as in the tables below cannot be set
from the camera’s flash function settings screen (p.38). In such a case,
set it by operating the MR-14EX II.
When Custom Function C.Fn-15-0 is set
E-TTL autoflash
Functions Which Cannot Be Set From Camera
Operation on MR-14EX II
A:B flash ratio (control)
Page 25
Y
P
O
Wireless multiple flash shooting
• Transmission channel
• A:B flash ratio (control)
• Flash exposure compensation amount for
slave C
Manual flash
C
Pages 48-50
Functions Which Cannot Be Set From Camera
Operation on MR-14EX II
Flash output for flash tube B when tubes
A and B are fired
Page 33
Wireless multiple flash shooting
• Transmission channel
• Flash output for tube B
• Flash output for slave C
Pages 48, 55-56
When Custom Function C.Fn-15-1 is set
All the functions such as wireless multiple flash shooting can be set
from the flash function settings screen.
Single-side firing (p.26) is not possible when C.Fn-15-1 is set, since C.Fn15-1 is a setting for wireless multiple flash shooting.
For Custom Function C.Fn-15 (Macro: Wireless control), see page 63.
42
3
Wireless Multiple Flash
Shooting
Y
P
O
This chapter describes how to perform wireless multiple
flash shooting with optical transmission, using an EXseries Speedlite (sold separately) equipped with
wireless slave function.
C
For the accessories required for wireless multiple flash
shooting, see the system map on page 68.
When the camera’s shooting mode is set to a fully automatic
mode or an Image Zone mode, the operations in this chapter are
not available. Set the camera’s shooting mode to d/s/f/a/
F (Creative Zone mode).
The MR-14EX II attached to the camera is called “master”, and
the Speedlite (external flash unit) controlled wirelessly is called
“slave”.
43
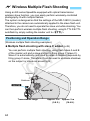
: Wireless Multiple Flash Shooting
Using an EX-series Speedlite equipped with optical transmission
wireless slave function, you can easily perform wirelessly-controlled
photography lit with multiple flashes.
The system is designed so that the settings of the MR-14EX II (master)
attached to the camera are automatically applied to the slave flash unit.
Therefore, you do not need to operate the slave unit while shooting. You
can then perform wireless multiple flash shooting, using E-TTL II/E-TTL
autoflash by simply setting the master unit to <a>.
Positioning and Operation Range
(Wireless multiple flash shooting examples)
Multiple flash shooting with slave C added (p.49)
Y
P
O
You can perform multiple flash shooting, using flash tubes A and B
of the master unit and a slave unit set to firing group C (slave C).
Slave C is automatically controlled to obtain a standard exposure by
firing group C alone. Therefore, it can be used to eliminate shadows
on the subject or create an accent light.
C
Indoors
C
Outdoors
M
Approx. 80°
Transmission range
44
Approx. 3 m
(9.8 ft.)
Approx. 5 m
(16.4 ft.)
: Wireless Multiple Flash Shooting
Advanced multiple flash shooting with slave A, B, and C added
(p.53)
This section describes multiple flash shooting with slave C where
slave A and B are also added. Slave A is controlled to fire with flash
tube A and slave B to fire with flash tube B as a group (as a single
flash unit).
C
A
Y
P
O
B
C
Shooting with firing group C pointed directly toward the main subject may
result in overexposure.
Before shooting, perform a test flash (p.18) and test shooting.
To avoid interfering with transmission, do not place any obstacles
between the master unit and slave units.
Position the sensor of the slave unit pointed toward the master unit, using
the mini stand provided with the slave flash unit.
When shooting indoors, since the transmission signal is reflected off the
walls, operation may be possible even with slightly imprecise positioning.
45
: Wireless Multiple Flash Shooting
Slave Group Control
Slave A is controlled to fire with flash tube A and slave B to fire with
flash tube B as a group (as a single flash unit). Multiple units can be
used as slave C. There is no limit for the number of units that can be
used as slave A, B, or C.
Slave C
Y
P
O
Firing group C
Slave B
C
Firing group B
Flash tube B
46
Slave A
Firing group A
Flash tube A
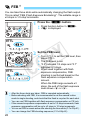
Wireless Settings
To perform wireless multiple flash shooting with E-TTL II/E-TTL
autoflash, set the master unit and slave unit with the following
procedure.
Master Unit Setting
Display <:> and <M>.
Press the <,> button to display
<:> (optical transmission wireless)
and <M>.
When C.Fn-15 is set to 0 (p.63), check that <^>,
<l>, and <6> are displayed (p.49).
When C.Fn-15 is set to 1 (p.63), press the <,> button and
select the flash method from the options below (p.53).
• <_> and <j>
• <%> and <l>
• <^> and <l> <6>
C
Slave Unit Setting
Y
P
O
Set firing groups (A, B, and C) for the slave flash units, referring to the
instruction manual of the EX-series Speedlite equipped with the slave
function.
To perform normal flash shooting, press the <,> button to clear the
settings for the master unit.
47
Wireless Settings
Transmission Channel Setting
To avoid interference with optical transmission wireless systems used
by other photographers, you can change the transmission channel. Set
the same channel for both the master unit and slave unit.
1
Press function button 4.
Press function button 4 <]> to
display <C> at the position
above function button 1.
a channel.
2 SetPress
function button 1 <C>.
Y
P
O
Turn <9> to select a channel from
1 to 4, then press <8>.
C
If the transmission channels of the master unit and slave unit are different,
the slave unit will not fire. Set both to the same number.
For information on how to configure the slave communication channel, refer
to the instruction manual of the EX-series Speedlite equipped with the slave
function.
48
a: Multiple Flash Shooting with Slave C Added
This section describes multiple flash
shooting where slave C is added to flash
tubes A and B.
C
1
Set the flash mode to <a>.
Press the <E> button and set to
<a>.
Y
P
O
<l> and <6>.
2 SetPress
the <,> button to display
C
<^>, <l>, and
<6>.
Check that <:> and <M>
are displayed.
the transmission channel.
3 Check
If the channels of the master unit and
slave unit are different, set them to
the same number (p.48).
C and position it.
4 SetSetslave
the firing group of the slave unit to
C, and position the unit within the
range shown on page 44.
49
a: Multiple Flash Shooting with Slave C Added
the A:B flash ratio.
5 SetPress
function button 3 <F>,
turn <9>, select <l>, then
press <8>.
Turn <9> to set the A:B flash ratio,
then press <8>.
the flash exposure
6 Set
compensation amount for slave C.
Turn <9>, select <6>, then
press <8>.
Turn <9> to set the flash exposure
compensation amount, then press
<8>.
Y
P
O
that the flash is ready.
7 Check
Check that the flash-ready lamp of
C
the master unit is lit.
Check that the slave unit is fully
charged.
the operation.
8 Check
Press the master unit’s test flash
button.
X Slave C fires a flash. If it does not fire,
check that it is placed within the
operation range.
picture.
9 TakeSetthe
the camera and take the picture,
in the same way as with normal flash
shooting.
X If a standard flash exposure was
obtained, the flash exposure
confirmation lamp lights for 3 sec.
50
a: Multiple Flash Shooting with Slave C Added
Shooting with firing group C pointed directly toward the main subject may
result in overexposure.
On the models listed below, wireless multiple flash shooting adding slave
C is not available when the <a> mode is set (with C.Fn-15-0). When
the <q> mode is set, wireless multiple flash shooting can be performed
on all type-A cameras (p.2).
EOS Elan II/Elan II E/50/50E, EOS REBEL XS N/REBEL G II/3000N/
66, EOS REBEL 2000/300, EOS REBEL G/500N, EOS IX, EOS IX Lite/
IX 7
If there is a fluorescent light or computer monitor near a slave unit, the
presence of the light source may cause the slave unit to malfunction and
fire inadvertently.
If you shoot or fire the test flash with slave A and B positioned when
C.Fn-15-0 is set, slave A and B may fire. Turn off the slave A and B.
Y
P
O
You can fire the modeling flash even during wireless multiple flash
shooting (p.23).
If the slave unit’s auto power off takes effect, press the master unit’s test
flash button to turn on the slave unit. Note that the test flash cannot be
fired when the camera’s 3/1/4/7/2 timer is operating.
C
51
a: Multiple Flash Shooting with Slave C Added
Multiple Flash Shooting Using Wireless Functions
Flash exposure compensation and other settings set on the master unit
will be automatically set to the slave unit(s). You do not need to operate
the slave unit. Wireless multiple flash shooting with the following
settings can be performed in the same way as normal flash shooting.
• Flash exposure compensation
(@/p.27)
• High-speed sync
(Y/p.30)
• FEB (E/p.28)
• Manual flash (p.32, 55)
• FE lock (p.29)
C
Y
P
O
<Y> and <E> are displayed when function button 4 <]> is
pressed.
52
a: Advanced Multiple Flash Shooting
with Slave A, B, and C Added
When C.Fn-15 is set to 1 (p.63), multiple
flash shooting can be performed not only
with slave C but also with slave A and B.
For an outline of controlling flash, see
“Slave Group Control” on page 46.
Multiple flash shooting can be performed
with flash tubes A and B as well as the
slave unit(s) firing at the same output, or
with only slave A or B added, regardless
of the slave’s firing group settings (p.54).
C
A
B
1
C
Y
P
O
Set <l> and <6>.
Check that the flash mode is set to
<a>.
Press the <,> button to display
<^> and <l>
<6>.
Check that <:> and <M>
are displayed.
and position slave A, B, and
2 Set
C.
Check that the same transmission
channel is set for all slave units and
the master unit.
Set slave units as A, B, or C
respectively and place them in
position.
53
a: Advanced Multiple Flash Shooting with Slave A, B, and C Added
picture.
3 TakeSetthe
the flash ratio for the firing group
(flash tube + slave) A:B and the flash
exposure compensation amount for
slave C, following the procedure
described in “Multiple Flash Shooting
with Slave C Added” (p.49), then take
the picture.
C
Y
P
O
To fire flash tubes A and B and the slave unit at the same flash output, set
<_> and <j> in step 1. You can set any of A, B, or C
as the firing group for the slave units.
To add slave A and B only, set <%> and <l> in step 1.
54
q: Wireless Multiple Flash Shooting with
Manual Flash Output
This section describes wireless multiple flash shooting using manual
flash. You can shoot with a different flash output setting for each firing
group. Set all the parameters on the master unit.
1
Set the flash mode to <q>.
Press the <E> button and set to
<q>.
the firing group.
2 SetPress
the <,> button to display
<:> (optical transmission wireless)
and <M>.
Y
P
O
When C.Fn-15 is set to 0 (p.63), check that <]> and
<4> <5> <6> are displayed. You can perform
wireless multiple flash shooting with slave C added.
When C.Fn-15 is set to 1 (p.63), press the <,> button and
select the flash method from the options below. You can perform
wireless multiple flash shooting with slave A, B, and C added.
• <_> and <j>
• <%> and <4> <5>
• <]> and <4> <5> <6>
C
a firing group.
3 Select
When you selected <4>
<5> or <4> <5>
<6> in step 2, press function
button 3 <F> or <8> and turn
<9> to select the group you want to
set the flash output for.
55
q: Wireless Multiple Flash Shooting with Manual Flash Output
the flash output.
4 SetPress
function button 3 <1> or
<8>.
Turn <9> to set the flash output,
then press <8>.
Repeat steps 3 and 4 to set the flash
output for all groups.
the picture.
5 Take
X Each group fires at the set flash
output.
C
Y
P
O
If you shoot or fire the test flash with slave A and B positioned when C.Fn15-0 is set, slave A and B may fire. Turn off the slave A and B.
When <j> is set with C.Fn-15 set to 1, you can set any of A, B, or C
as the firing group for the slave units. Each group will fire according to the
set flash output.
56
4
Customizing the
MR-14EX II
Y
P
O
This chapter describes how to customize the MR-14EX
II with the Custom Functions (C.Fn) and Personal
Functions (P.Fn).
C
When the camera’s shooting mode is set to a fully automatic
mode or an Image Zone mode, the operations in this chapter are
not available. Set the camera’s shooting mode to d/s/f/a/
F (Creative Zone mode).
57
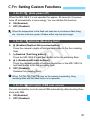
C / >: Setting Custom and Personal Functions
You can customize the MR-14EX II features to suit your shooting preferences
with Custom Functions and Personal Functions. Note that the Personal
Functions provide you with customized settings unique to the MR-14EX II.
C: Custom Functions
1
Display the Custom Functions
screen.
Hold down function button 1 <=>
until the screen is displayed.
X The Custom Functions screen is displayed.
an item to set.
2 Select
Turn <9> to select an item
Y
P
O
(number) to set.
3
Change the setting.
Press <8>.
X The setting item is displayed.
C
Turn <9> to select the setting you
want, then press <8>.
Press function button 4 <?> to
return to the shooting-ready state.
>: Personal Functions
1
Display the Personal Functions
screen.
After performing step 1 in the Custom
Functions procedure, press function
button 1 <<>.
X The Personal Functions screen is
displayed.
2 SetSetthethefunction.
Personal Function in the
same way as steps 2 and 3 for the
Custom Function.
58
C / >: Setting Custom and Personal Functions
Custom Function List
Number
Function
#
Auto power off
C.Fn-02
$
Modeling flash
C.Fn-03
(
C.Fn-01
p.61
FEB auto cancel
C.Fn-04
)
C.Fn-05
*
C.Fn-06
+
C.Fn-07
,
C.Fn-12
3
Flash recycle with external power source
C.Fn-13
6
Flash exposure metering setting
C.Fn-15
H
C.Fn-18
I
C.Fn-22
<
FEB sequence
Flash metering mode
p.62
Quick flash with continuous shot
Test firing with autoflash
Y
P
O
Macro: Focusing lamp on/off
LCD panel illumination
C
P.Fn-01
K
P.Fn-02
@
P.Fn-03
A
p.63
Macro: Wireless control
Personal Function List
Number
Page
Function
p.64
Page
Focusing lamp brightness
LCD panel display contrast
p.65
LCD panel illumination color
If the Custom Functions screen is not displayed even if you hold down the
function button 1 <=>, set the camera’s power switch to <2>, or
remove the MR-14EX II from the camera and operate.
59
C / >: Setting Custom and Personal Functions
Clearing All the Custom/Personal Functions
By pressing function button 2 <3> and then function button 1
<;> on the Custom Functions screen, you can clear the Custom
Functions that have been set.
Similarly, by performing the same operations on the Personal Functions
screen, you can clear the Personal Functions that have been set.
C
Y
P
O
If C.Fn-22 is not displayed after setting the flash unit’s Custom Functions
from the camera’s menu screen, set them using the operations described on
page 58.
You can set or clear all Custom Functions of the flash unit from the camera’s
menu screen (p.41).
60
C: Setting Custom Functions
C.Fn-01: # (Auto power off)
When the MR-14EX II is not operated for approx. 90 seconds, the power
turns off automatically to save energy. You can disable this function.
0: ON (Enabled)
1:
OFF (Disabled)
When the temperature of the flash unit rises due to continuous flash firing
etc., the time until auto power off takes effect may become longer.
C.Fn-02: $ (Modeling flash)
0:
1:
2:
3:
% (Enabled (Depth-of-field preview button))
Press the camera’s depth-of-field preview button to fire the modeling
flash.
& (Enabled (Test firing button))
Press the MR-14EX II’s test flash button to fire the modeling flash.
' (Enabled (with both buttons))
Press the camera’s depth-of-field preview button or the MR-14EX II’s
test flash button to fire the modeling flash.
OFF (Disabled)
Disables the modeling flash.
C
Y
P
O
When 3/1/4/7/2 timer on the camera is operating, firing
modeling flash with test flash button is not possible.
C.Fn-03: ( (FEB auto cancel)
You can set whether or not to cancel FEB automatically after shooting three
shots with FEB.
0: ON (Enabled)
1:
OFF (Disabled)
61
C: Setting Custom Functions
C.Fn-04: ) (FEB sequence)
You can change the shooting order of the FEB sequence: 0: Standard
exposure, -: Decreased exposure (darker) and +: Increased exposure
(brighter).
0: 0 – +
1: – 0 +
C.Fn-05: * (Flash metering mode)
You can change the automatic flash metering mode for flash shooting.
0: E-TTL II/E-TTL
1:
TTL
Y
P
O
When using an EOS DIGITAL camera or EOS REBEL T2/EOS 300X, do not
set to 1. Depending on the camera model, the flash metering may not be
controlled correctly; for example, the flash may not fire, or it may always fire
at full output. Also, wireless multiple flash shooting cannot be performed.
When setting functions from the camera’s menu, [2: Auto external flash
metering] and [3: Manual external flash metering] may be displayed in
gray. In this case, they cannot be selected.
C
1 is the setting for shooting with TTL autoflash on Type-A EOS film
cameras or using Type-B EOS film cameras.
When using a Type-B camera, you cannot perform E-TTL II/E-TTL
autoflash shooting even when 0 is set.
C.Fn-06: + (Quick flash with continuous shot)
You can set whether or not to fire Quick flash (to perform firing when the
flash-ready lamp lights in green) in continuous shooting.
0: OFF (Disabled)
1:
ON (Enabled)
When Quick flash (p.18) is fired during continuous shooting, underexposure
may occur since the effective flash range becomes shorter. Setting 1 is
recommended only when you want to shorten the shooting interval.
62
C: Setting Custom Functions
C.Fn-07: , (Test firing with autoflash)
You can change the flash output when firing the test flash in E-TTL II/
E-TTL/TTL autoflash mode.
0: 1/32 (1/32)
1:
1/1 (Full output)
C.Fn-12: 3 (Flash recycle with external power source)
0:
1:
1 (External & internal power)
Charges in parallel, using both internal and external power sources.
2 (External power only)
You can minimize the consumption of the internal power source by
using only external power source to charge for firing the flash, while
internal power source is required to control the MR-14EX II.
Y
P
O
C.Fn-13: 6 (Flash exposure metering setting)
0:
4 (Speedlite button and dial)
1:
5 (Speedlite dial only)
You can set the flash exposure compensation or flash output by directly
turning <9>, instead of pressing the <@> button.
C
C.Fn-15: H (Macro: Wireless control)
0:
1:
C (Slave C)
During wireless multiple flash shooting, slave units set in firing group C
can be wirelessly-controlled.
ALL (Slave A, B and C)
During wireless multiple flash shooting, slave units set in firing group A
and B, as well as slave units set in firing group C can be fired as a
group linked with master unit flash tube A and B, respectively.
When 1 is set, single-side firing is not possible.
63
C: Setting Custom Functions
C.Fn-18: I (Macro: Focusing lamp on/off)
0:
1:
LAMP (With focusing lamp button)
Press the <d> button to turn on/off the focusing lamp.
J (Half press shutter button twice)
Press the shutter button halfway twice quickly (double-click) to turn on/
off the focusing lamp. This function is convenient when you do not
have a free hand during shooting. You can also switch on/off the
focusing lamp by pressing the <d> button.
If you use AF to focus with this function set to 1, be careful how you press
the shutter button. The focusing lamp may turn on accidentally.
If you use this flash unit with EOS D60 or EOS D30, it will not operate
properly even if you press the shutter button halfway twice quickly
(double-click). Use the <d> button to switch on/off the lamp.
Y
P
O
C.Fn-22: B (LCD panel illumination)
When a button or dial is operated, the LCD panel illuminates. You can
change this illumination setting.
0: 12sec (On for 12 sec.)
C
1:
OFF (Disable panel illumination)
2:
ON (Illumination always on)
64
>: Setting Personal Functions
P.Fn-01: K (Focusing lamp brightness)
You can adjust the brightness of the focusing
lamp in 5 levels.
P.Fn-02: @ (LCD panel display contrast)
You can adjust the contrast of the LCD panel
in 5 levels.
Y
P
O
P.Fn-03: A (LCD panel illumination color)
C
You can select the color of the LCD panel illumination.
0: GREEN (Green)
1:
ORANGE (Orange)
65
Memory Function
You can save the settings in the MR-14EX II and recall the settings
later. The memory function can be used whenever <]> is
displayed on the screen, such as when the settings are configured to
wireless multiple flash shooting by pressing the <,> button, or
during normal shooting when flash ratio control or single-side firing is
set.
1
Press function button 4.
Press function button 4 <]> to
display <L> at the position of
function button 3.
Y
P
O
or load the settings.
2 Save
Press function button 3 <L>.
Save
Press function button 1 <V>.
X The settings are saved (stored in the
memory).
Load
Press function button 2 <J>.
X The settings that were saved are set.
C
For Custom Functions, only C.Fn-15 settings are saved. Settings for
Personal Functions are not saved.
Multiple settings cannot be saved. If you perform the saving operation
again, the new setting will overwrite the previous setting.
66
5
Reference
Y
P
O
This chapter provides a system map, FAQ, and a
description of using the MR-14EX II with a Type-B
camera.
C
67
MR-14EX II System
"
Wireless Flash Shooting
Speedlite with slave function
$
#
%
" Macro Ring Lite MR-14EX II
Y
P
O
# Compact Battery Pack CP-E4
An external power source that uses eight AA/LR6 batteries.
C
$ Speedlite with optical transmission wireless slave function
600EX-RT, 600EX, 580EX II, 580EX, 550EX, 430EX II, 430EX,
420EX, 320EX, 270EX II
% Macrolite Adapter
An adapter to attach the flash unit to the lens (p.16).
For external power source, use the Compact Battery Pack CP-E4. Using
a non-Canon external power source may result in a malfunction.
Speedlite units without the function to switch firing groups (A, B, and C)
listed in $ can be used as slave A during wireless multiple flash
shooting. (They cannot be used as slave B or C.)
68
Flash Firing Restriction due to Temperature Increase
When continuous flash or modeling flash is repeatedly fired in short
intervals, the temperature of the MR-14EX II may increase. Repeated
firings of the flash activates the flash firing restriction automatically to
avoid degrading and damaging the flash unit due to overheating. While
flash firing is restricted, the warning is displayed to indicate the increase
in temperature, and the firing interval is automatically set to approx.
from 8 up to 15 sec.
Temperature Increase Warning
When the internal temperature of the flash unit increases, the warning is
displayed in two levels.
Display
Level 1
Level 2
(Firing Interval: Approx. 8 sec.) (Firing Interval: Approx. 15 sec.)
Y
P
O
Icon
#
LCD panel
Red (lit)
f
Red (blinking)
Number of Continuous Flashes and Rest Time
C
The following table shows the number of continuous flashes until the
warning is displayed indicating the Level 1 warning, and the necessary
rest time until normal flash shooting can be performed.
Function
Continuous flash*
Modeling flash (p.23)
Number of Continuous Flashes
Necessary Rest Time
to Reach Level 1 Warning
(Guideline)
(Guideline)
48 times or more
10 min. or longer
* At full output
69
Flash Firing Restriction due to Temperature Increase
Even when Level 1 warning is not displayed, the firing interval will be
extended as the flash unit begins to heat up.
If Level 2 warning is displayed, allow a rest time for at least 15 min.
For cautions on the number of flash firings, see page 12 (continuous
flashes) or page 23 (modeling flash).
Do not touch the flash unit or batteries immediately after firing continuous
flashes or modeling flash. Touching them may result in a burn. Before
detaching the flash unit or replacing batteries, make sure that the flash
unit has cooled.
When C.Fn-22-1 is set (p.64), the warning with red illumination of LCD
panel will not be displayed even if the temperature of the flash unit rises.
C
70
Y
P
O
Troubleshooting Guide
If a problem occurs with the flash, first refer to this Troubleshooting
Guide. If this Troubleshooting Guide does not resolve the problem,
contact your dealer or nearest Canon Service Center.
Normal Shooting
The power does not turn on.
Make sure that the batteries are installed in the correct orientation (p.14).
Make sure that the battery compartment cover is closed (p.14).
Replace the batteries with new ones.
Insert batteries into the flash unit, even when using an external power
source (p.68).
Y
P
O
The MR-14EX II does not fire.
Insert the mounting foot into the camera’s hot shoe all the way, slide the
lock lever to the right, and secure the control unit to the camera (p.15).
If the <G> indication remains displayed for 30 sec. or longer,
replace the batteries (p.14).
If the electrical contacts of the control unit or camera are dirty, wipe the
contacts (p.9) using a dry cloth.
C
The power turns off by itself.
The MR-14EX II’s auto power off has activated. Press the shutter button
halfway, or press the test flash button (p.18).
Pictures are underexposed or overexposed.
If there is a highly reflective object in the picture, use FE lock (p.29).
If the main subject looks very dark or very bright, set flash exposure
compensation (p.27).
With high-speed sync, the faster the shutter speed, the lower the guide
number will be. Move closer to the subject (p.30).
Do not fire slave C directly pointing toward the main subject (p.44).
71
Troubleshooting Guide
The picture is very blurred.
When the shooting mode is set to the aperture-priority AE (f) mode
and the scene is dark, slow sync is enabled automatically (the shutter
speed becomes slower). Use a tripod, or set the shooting mode to the
program AE (d) or fully automatic mode (p.21). Note that you can also
set the sync speed in [Flash sync. speed in Av mode] (p.40).
Flash ratio, flash exposure compensation, or FEB cannot be set.
Set the shooting mode to d/s/f/a/F (Creative Zone mode) (p.13).
Wireless Multiple Flash Shooting with Optical
Transmission
Y
P
O
Wireless multiple flash shooting is disabled or
single-side firing is disabled.
Flash ratio control and wireless multiple flash shooting are disabled when
the flash mode is set to TTL autoflash. Set C.Fn-05 to 0 (p.62).
C
The slave unit does not fire.
Check that <:> and <M> are displayed on the master unit’s
screen (p.47).
Check that the firing group of the slave unit is set properly.
Set the transmission channels of the master unit and slave unit to the
same numbers (p.48).
Check that the slave unit is within the transmission range of the master
unit (p.44).
Point the wireless sensor of the slave unit toward the master unit (p.44).
If the master unit and slave unit are too close, the transmission may not
operate properly (p.74).
72
Specifications
Type
Type:
Compatible cameras:
E-TTL II/E-TTL/TTL autoflash
Ring-type flash unit for close-ups
Type-A EOS cameras (E-TTL II/E-TTL autoflash)
Type-B EOS cameras (TTL autoflash)
Flash Unit
Guide No.:
Both sides firing: Approx. 14/45.9 (ISO 100, in meters/feet)
Single-side firing: Approx. 10.5/34.4 (ISO 100, in meters/feet)
Flash coverage:
Approx. 80° vertically, 80° horizontally
Flash time:
Normal flash: Approx. 1.8 ms or shorter, Quick flash: Approx.
2.3 ms or shorter
Color temperature
Flash color temperature information transmitted to camera
information transmission: when flash is fired
Filter:
A 67 mm filter can be attached on the front face of the flash unit
Focusing lamp:
Coverage
• Upper lamp: Approx. 60° vertically and 60° horizontally
• Lower lamp: Approx. 45° vertically and 45° horizontally
Light intensity: Adjustable
Exposure Control
Y
P
O
Exposure control system: E-TTL II/E-TTL/TTL autoflash, manual flash
Effective flash range:
Normal flash: Approx. 20 mm - 5 m / 0.79 in. - 16.4 ft.
Quick flash: Approx. 20 mm - 2.7 m / 0.79 in. - 8.8 ft. (at
Guide No. 7.5/24.6, in meters/feet)
High-speed sync: Approx. 20 mm - 2.7 m / 0.79 in - 8.8 ft. (at
1/250 sec.)
* Both sides firing, with f/2.8 lens, ISO 100
* Distance from the flash unit
Flash mode:
Both sides firing, single-side firing
Flash ratio control:
8:1 - 1:1 - 1:8, 1/2-stop increments
Flash exposure
±3 stops in 1/3- or 1/2-stop increments
compensation:
FEB:
±3 stops in 1/3- or 1/2-stop increments (when used with flash
exposure compensation)
FE lock:
Enabled with the camera’s Multi-function button or FE lock/
AE lock buttons
High-speed sync:
Enabled
Manual flash:
Normal flash: 1/1 - 1/128 power (1/3-stop increments)
High-speed sync: 1/1 - 1/64 power (1/3-stop increments)
Flash exposure
Flash exposure confirmation lamp lights
confirmation:
Modeling flash:
Fired with camera’s depth-of-field preview button or
MR-14EX II’s test flash button
C
73
Specifications
Flash Recycling
Firing interval
(recycling time):
Normal flash: Approx. 0.1 - 5.5 sec.
Quick flash: Approx. 0.1 - 3.3 sec.
* When using AA/LR6 alkaline batteries
Flash-ready lamp display: Lights in red: normal flash available
Lights in green: Quick flash available
Optical Transmission Wireless Master Function
Connection method:
Channel:
Slave unit control:
Transmission range:
Optical pulse
Ch. 1 - 4
Up to 3 groups (A, B, C)
Indoors: Approx. 0.2 - 5 m / 0.66 - 16.4 ft. (at the front)
Outdoors: Approx. 0.2 - 3 m / 0.66 - 9.8 ft. (at the front)
Approx. 60° vertically and 80° horizontally
Customizable Functions
Custom Functions:
Personal Functions:
12
3
Power Source
Y
P
O
MR-14EX II power source: Four AA/LR6 alkaline batteries
* AA/LR6 Ni-MH and AA/LR6 lithium batteries also usable
Battery life
Approx. 100 - 700 flashes
(number of flashes):
* When using AA/LR6 alkaline batteries
Power saving:
Power off after approx. 90 sec. of idle operation
External power source:
Compact Battery Pack CP-E4 can be used
C
Dimensions and Weight
Dimensions (W x H x D):
Weight:
Flash unit:
Approx. 129.6 x 112.1 x 25.3 mm / 5.10 x 4.41 x 1.00 in.
Control unit:
Approx. 69.6 x 118.8 x 71.4 mm / 2.74 x 4.68 x 2.81 in.
Approx. 455 g / 16.05 oz. (MR-14EX II only, excluding
batteries)
All specifications above are based on Canon’s testing standards.
Product specifications and external appearance are subject to change without
notice.
74
Specifications
Guide Number (Approx., ISO 100, in meters/feet)
Normal Flash
Flash
Output
1/1
1/2
1/4
1/8
1/16
1/32
1/64
1/128
High-speed Sync (at full output)
Both Sides Single-side
Firing
Firing
Shutter
Speed
Both Sides
Firing
Single-side
Firing
14.0 / 45.9
9.9 / 32.5
7.0 / 23.0
4.9 / 16.2
3.5 / 11.5
2.5 / 8.1
1.8 / 5.7
1.2 / 4.1
1/125
1/160
1/200
1/250
1/320
1/400
1/500
1/640
1/800
1/1000
1/1250
1/1600
1/2000
1/2500
1/3200
1/4000
1/5000
1/6400
1/8000
8.9 / 29.2
8.5 / 27.9
8.0 / 26.2
7.6 / 24.9
6.2 / 20.3
5.5 / 18.0
4.9 / 16.1
4.4 / 14.4
3.9 / 12.8
3.5 / 11.5
3.1 / 10.2
2.7 / 8.9
2.4 / 7.9
2.2 / 7.2
1.9 / 6.2
1.7 / 5.6
1.5 / 4.9
1.4 / 4.6
1.2 / 3.9
6.6 / 21.7
6.3 / 20.7
6.0 / 19.7
5.7 / 18.7
4.6 / 15.1
4.1 / 13.5
3.7 / 12.1
3.3 / 10.8
3.1 / 10.2
2.6 / 8.5
2.3 / 7.5
2.1 / 6.9
1.8 / 5.9
1.6 / 5.2
1.5 / 4.9
1.3 / 4.3
1.2 / 3.9
1.0 / 3.3
0.9 / 3.0
10.5 / 34.4
7.4 / 24.4
5.3 / 17.2
3.7 / 12.2
2.6 / 8.6
1.9 / 6.1
1.3 / 4.3
0.9 / 3.0
C
Y
P
O
75
Using MR-14EX II with a Type-B Camera
This section describes the functions that are available or unavailable
when using the Macro Ring Lite MR-14EX II with a Type-B camera
(EOS film camera supporting TTL autoflash).
When the MR-14EX II is used with autoflash with a Type-B camera,
<b> is displayed on the flash unit’s LCD panel.
Functions Available with Type-B Cameras
TTL autoflash
Both sides/single-side firing
Flash exposure compensation
FEB
Manual flash
Second-curtain sync
Wireless multiple flash shooting: Manual flash
Y
P
O
Functions not Available with Type-B Cameras
E-TTL II/E-TTL autoflash
Flash ratio control
FE lock
High-speed sync
Wireless multiple flash shooting: Autoflash shooting
Quick flash
Modeling flash
C
When using with some Type-B EOS film cameras, flash exposure
compensation, FEB, second-curtain sync., and other functions may be
disabled.
76
This device complies with Part 15 of the FCC Rules. Operation is subject to the
following two conditions: (1) This device may not cause harmful interference,
and (2) this device must accept any interference received, including
interference that may cause undesired operation.
Do not make any changes or modifications to the equipment unless otherwise
specified in the manual. If such changes or modifications should be made, you
could be required to stop operation of the equipment.
NOTE: This equipment has been tested and found to comply with the limits for
a Class B digital device, pursuant to part 15 of the FCC Rules. These
limits are designed to provide reasonable protection against harmful
interference in a residential installation.
This equipment generates, uses and can radiate radio frequency
energy and, if not installed and used in accordance with the
instructions, may cause harmful interference to radio communications.
However, there is no guarantee that interference will not occur in a
particular installation. If this equipment does cause harmful interference
to radio or television reception, which can be determined by turning the
equipment off and on, the user is encouraged to try to correct the
interference by one or more of the following measures:
— Reorient or relocate the receiving antenna.
— Increase the separation between the equipment and receiver.
— Connect the equipment into an outlet on a circuit different from that
to which the receiver is connected.
— Consult the dealer or an experienced radio/TV technician for help.
C
CAN ICES-3 (B)/NMB-3(B)
Y
P
O
77
The apparatus shall not be exposed to dripping or splashing.
Batteries shall not be exposed to excessive heat such as sunshine, fire or the
like.
Dry batteries shall not be subjected to charging.
Only for European Union and EEA (Norway, Iceland and
Liechtenstein)
This symbol indicates that this product is not to be disposed of with
your household waste, according to the WEEE Directive (2012/19/
EU) and national legislation. This product should be handed over to
a designated collection point, e.g., on an authorized one-for-one
basis when you buy a new similar product or to an authorized
collection site for recycling waste electrical and electronic
equipment (EEE). Improper handling of this type of waste could
have a possible negative impact on the environment and human
health due to potentially hazardous substances that are generally
associated with EEE. At the same time, your cooperation in the
correct disposal of this product will contribute to the effective usage
of natural resources. For more information about where you can
drop off your waste equipment for recycling, please contact your
local city office, waste authority, approved WEEE scheme or your
household waste disposal service. For more information regarding
return and recycling of WEEE products, please visit
www.canon-europe.com/weee.
C
78
Y
P
O
MEMO
C
Y
P
O
79
MEMO
C
80
Y
P
O
Index
4 sec., 6 sec., 8 sec., 10 sec.,
Flash exposure level ................ 10, 35
16 sec. timer .....................................4
Flash firing restriction ..................... 69
A
Flash function settings.................... 37
Auto power off...........................18, 61
Flash metering mode................ 40, 62
Av (Aperture-priority AE).................21
Flash mode......................... 10, 11, 40
Flash output.............................. 32, 55
B
Batteries..........................................14
Flash positions ............................... 44
Flash ratio control
C
A:B ....................................... 25, 50
A:B and C............................. 49, 53
RATIO button ....................... 25, 33
C.Fn ..........................................58, 61
Case..................................................3
Y
P
O
Clearing settings .......................36, 40
Flash sync. shutter speed ........ 21, 40
Color temperature information
Flash sync. speed in Av mode ....... 40
transmission....................................23
Flash unit.................................... 8, 16
Creative Zone mode .............4, 13, 72
Select ................................... 26, 34
Custom Functions (C.Fn)..........58, 61
Flash-ready lamp................ 18, 50, 62
E
C
Effective flash range .......................24
E-TTL II (flash metering) .................40
E-TTL II/E-TTL autoflash ................21
External power source ..............63, 68
F
Focusing lamp .................... 22, 64, 65
Fully automatic flash shooting ........ 20
G
Guide number................................. 75
H
High-speed sync............................. 30
FE lock ............................................29
Hood............................................... 17
FEB ...........................................28, 40
Hot shoe ......................................... 15
Filter ................................................17
L
Firing group...................44, 46, 53, 55
LCD panel ...................................... 10
Firing interval ......................12, 14, 69
Flash control ...................................38
Contrast ..................................... 65
Illumination..................... 19, 64, 65
Flash exposure compensation ..27, 40
Lens cap......................................... 16
Flash exposure confirmation
Lock function .................................. 19
lamp ..........................................20, 50
81
Index
M
S
M (Manual exposure)......................21
Second-curtain sync................. 31, 40
Macrolite Adapter......................16, 68
Shutter speed................................. 21
Manual flash .............................32, 55
Shutter sync. .................................. 40
Flash output..........................32, 55
Single-side firing.........................34
Wireless multiple flash
shooting......................................55
Single-side firing....................... 26, 34
Master.......................................43, 47
Memory function .............................66
Slave flash unit............................... 43
Battery check ............................. 50
Slave unit setting ....................... 47
Slave group control ........................ 46
System ........................................... 68
Metered manual flash .....................35
N
Number of flashes...........................14
C
Optical transmission wireless .........43
P
P (Program AE) ........................20, 21
Personal Function (P.Fn) ..........58, 65
Power switch...................................18
Q
Quick flash ................................14, 18
R
Ratio .......................25, 47, 49, 53, 55
Recycling ........................................18
Release button................................16
82
Temperature increase .................... 69
Test flash ...................... 18, 50, 61, 63
Normal flash..............................14, 75
O
T
Y
P
O
Modeling flash...........................23, 61
Transmission channel .................... 48
Transmission distance.................... 44
TTL autoflash ........................... 62, 76
Tv (Shutter-priority AE) .................. 21
Type-A camera................................. 2
Type-B camera............................... 76
W
Warning .......................................... 69
Wireless multiple flash shooting..... 43
A:B C ............................. 47, 49, 53
Manual flash .............................. 55
Wireless settings ............................ 47
MEMO
C
Y
P
O
83
C
Y
P
O
The cameras and accessories referred to in this Instructions booklet are current as
of January 2014. For information on compatibility with the cameras and
accessories marketed after this date, contact your nearest Canon Service Center.
C
CPA-L109-000
Y
P
O
© CANON INC. 2014
Can .n.n
U
CANON EOS Digital Camera'M and Accessones Limited WarrantyFor U.S.A & Canada Only
Sfll forth below Is given by Canon U.S.A., Inc. (Canon U.S.A.) in the Un~ed Slales Of Canon Canada Inc. (Canon Canada) In Canada with respect to the Canon brand
EOS Digital Camera, as well as w~h respect to the accEISSOries packaged wtth this limited warranty (collectively the •products· )· , when purchased and used in I he Un~ed States or Canada
TheProductsarelheonlyProducts lowhichthislimitedwarrantyapplies.
The llmiled warranty
Your Producls. when d&liVi!red to you in new coodrtioo iro its Oliginal container. are warranted against defects in matefials orworkmanslllp as !allows: tor a period ot one {1) year from the
date ot original purchase. deleclive parts or detective Products reiUmed 10 Calion U.S.A. or Canon Canada, ()(their authorized Products service proviOOrs, as applicable, and proven to be
defective upon inspection. will be repaired with new or comparable rebui~ paris or e xchanged for refulblshed Products, as delermined by Canon U.S.A. or Canon Canada, or the ai.Jihorized
Products service provider.
THIS WARRANTY DOES NOT COVER ANY ACCESSORIES NOT MENTIONED ABOVE. This lim~ed warranty shall only apply ~ the Products are used in conjunction with compatible
computef equipment and compatible sotlware, as to which items Canon U.S.A. Of Canon Canada shall have no responsibil~y
Non-Canon brand equipment and aoftware that may be dkrtrlbuted with the Products are aold Mas Ia" and without warranty of any kind by Canon U.S.A. or Canon Canada,
Including any lmpllfld warranty ragardlr~g man::hantablllty or lhnaulor a particular purposa, and all auch warrantla-l are disclaimed. 11M
warranty,ll any, with tha rHpect
to such non-Canon bolnd hema Is given by the m anufacturer or p«KKuc•r thereof.
sc»a
This
(a)
(b)
(c)
lim~ed
warranty covers all defects encountered in normal use of the Products. and does n01 apply In the following cases:
L06S of Of damago to the Products duo to abuso, mishandling, improper packaging by you, akllfii~on. accident, eloctrical current fluctuations. failure to follow op&fating. marntonance
01 environmental instructions prescribed in Canon U.S.A.'s or canon Canada's user's manual or services performed by someone 01her than Canon U.S.A. or canon canada , or an
authorized ProdUCis service provider. Withoi.JIIimiting the foregoing . water damage. sandlcorrosioo damage. battery leakage. dropping the camera. scratches. abr8sioos or damage
to the boc:ly. loflses or LCD display or damage to any of the Acoessorlos mentiofl9d in the first paragraph above will ba presumed to have resulted lrom misuse. abuse or failure to
operatetheProductsassetforthini1'!Eroperalinginstructions.
Use of pans or supplies (other lhan those sold by Canon U.S.A. or Canon Canada) that cause damage to tho ProdUCis or cause abno<mally frequent service calls or service
problems
lflhePfOductshadhadlheirserialnumbefordatingalteredorremoved.
NO IMPLIED WARRANTY, INCLUDING ANY IMPLIED WARRANTY OF MERCHANTABILITY OR FITNESS FOR A PARTICULAR PURPOSE, APPLIES TO THE PRODUCTS AFTER
THE APPLICABLE PERIOD OF THE EXPRESS LIM ITED WARRANTY STATE D ABOVE, AND NO OTHER EXPRESS WARRANTY OR GUARANTY. EXCEPT AS MENTIONED ABOVE,
GIVEN SY ANY PERSON OR ENTITY WITH RESPECT TO THE PRODUCTS SHALL SIND CANON U.S.A. OR CANON CANADA . {SOME STATES AND PROVINCES DO NOT ALLOW
LIMITATIONS ON HOW LONG AN IM PLI ED WARRANTY LASTS . SO THE ABOVE LIMITATION MAY NOT APPLY TO YOU.) CANON U.S.A. OR CANON CANADA SHALL NOT BE
LIABLE FOR LOSS OF REVENUES OR PROF ITS , INCONVENIENCE, EXPENSE FOfl SUSSTITUTE EQUIPMENT OR SERVICE, STORAGE CH ARGES. LOSS OR CORRUPT ION OF
DATA. OR ANY OTHER SPECIAL. INCIDENTAL OR CONSEQUENTIAL DAMAGES CAUSED SY THE USE OR MISUSE OF. OR INABILITY TO USE, THE PRODUCTS. REGARDLESS
OF THE LEGAL THEORY ON WHICH THE CLAIM IS BASED, ANO EVEN IF CANON U.S.A. OR CANON CANADA HAS BEEN ADVISED OF THE POSSIBILITY OF SUCH DAMAGES
IN NO EVENT SHALL RECOVERY OF ANY KIND AGAINST CANON U.S.A. OR CANON CANADA 6E GREATER IN A MOUNT THAN THE PURCHASE PRICE OF THE PRODUCTS
SOLD SY CANON U.S.A. OR CANON CANADA AND CAUSING THE ALLEGED DAMAGE. W ITHOUT LIMITING T HE FOREGOING, YOU ASSUME All RISK AND LIA61LITY FOR
LOSS. DAMAGE OR INJURY TO YOU AND YOUR PROPERTY AND TO OTHERS AND THEIR PROf'ERTY ARISING OUT OF USE OR MISUSE OF, OR INABILITY TO USE, THE
PRODUCTS NOT CAUSED DIRECTLY 6Y THE NEGLIGENCE OF CANON U.S.A. OR CANON CANADA. {SOME STATES AND PROVINCES DO NOT ALLOW THE EXCLUSION OR
LIMITATION OF INCIDENTAL OR CONSEQUENTIAL DAMAGES, SO THE ABOVE EXCLUSION OR LIM ITATION MAY NOT APPLY TO YOU.) THIS LIMITED WARRANTY SHALL NOT
EXTEND TO ANYONE OTHER THAN THE ORIGINAL PURCHASER OF THE PRODUCTS. OR THE PERSON FOR WHOM IT WAS PURCHASED AS A GIFT. AND STATES YOUR
EXCLUSIVE REMEDY .
Canon U.S.A.
YoumayobtaintechnicalsupponforyourProductsas follows:
•Internet stoppon at www.u sa.canon.com/suppol1 (E·mail suppon also availablo)
• Telephone assistance lrom a Canon U.S.A. Customer care representative lree ol charge during regular business hours at 1-&00-QK·CANON (1-80()..652· 2666)
CanonCsnada
You may obtain technical suppon for your Products as follows:
• Internet suppon lor English at www.canon.cafenglllhlca (E-mail suppon also availablo)
• lnterne,wpponlorFrenchatwww.canon.ca/lrancaielcs (E-mailsupportaii>Oavailable)
• Telephone assistance from a Caoon Canada Customer care representative free of charge during regular business hours at 1·900-0K·CANON (1-80()..652·2666).
When you call, llave your ProdUCis serial numbers and your date of purchase available to expedite service. A Canon Customer Ca•e representative will anempt to diagnose the nature of
the problem and corre<:t it over the telephone. II the problem cannot be corrected over the telephone. you will be asked to follow the apPlicable procedures lor MAIL-IN SERVICE.
Note that a dated proof of purchase is required al the trme of service. This requiremenl will be satisfied by providing a copy of your dated bill of sale
Technical suppor1 program terms are subject to change without notice.
MAIL-IN SERVICE
MAIL·IN SERVICE is a program under which your Products are repaired by a Canon U.S.A. or a Canon Canada ai.Jihotized Products service provider. You will be given the name, address
and phone number of an authorized ProdUCis service provider. by COfltacting 1·800·0K-GANON ( t -800·652-2666) (Canon U.S.A. Customer Care representative I Canon Canada Customer
carerepresentatrve).ltisyour rasponsibilitytoprop&rty package and send the defective Products, together with aoopyofyourdatedproofol purchase, a completeercplanationollhe
problem and a relum address to the authorized Products service provider at your expense. Do not include any other items with the defeclive Products. The defective Products covored by
this llm~ed watfanty will be repaired an<l returned to you withoi.JI charge by the authorized Products service provider. Any Products received by the authorized Products service provider that
are not oovered by the lim~ed warranty will be returned unrepalred, or at the discretiOI'I of the authorized Products servtoe provider. you may receive a wrlnen estimate of repair at such 00&1
as the service provider may establish from time to ~me.
This limited wananty gives yoo specific legal rights. and you may also have other rights, which vary trom state to state {Of province to proYince ill Canada).
"Thebattetypackpackagedwitllthe PfOductscan1esaseparatenlr.ety(90)<Sayl!mitedwarranty
Canon U.S.A., Inc.
Canon Canada, Inc.
Cl 2000 canon U.S.A.. Inc. Canon is a registered trademark aod EOS is a trademark of Canon Inc.
All braod or product names are registered trademarks Of trademarks of their respective owners .
NAME
NOM
ADDRESS
ADRESSE
CITY
VILLE
POSTAL CODE
CODE POSTAL
PROVINCE
THESE ARE NOT REGISTRATION CARDS
- Retain for your Records
MODEL
MODELE
CES CARTES NE SONT PAS CELLES POUR L"ENREGISTREMENT.
- Les conserver comme reference.
BODY NO.
BOIT/ERNO
DEALER"$ NAME & ADDRESS
MARCHAND NOM & ADRESSE
-
MACRO RING LITE
MR-14EX II
PURCHASE DATE
DATE D'ACHAT
I
PRESENT OWNERSHIP AND PRODUCTS INTERESTED IN
Articles dejA en possession ou juges dignes d'inter~t
I
OWNS
INTERESTED IN
En possession Interesse par
~~~;:~~s--------,(~ca=m=e=,a~)--------<"~=n=s•)__________
-PHOTO
(Appareil)
(Camera)
(Appareil)
INTERCHANGEABLE LENS
Objectif interchangeable
(Objectif)
(Lens)
(Objeclif)
_....--w "~·"·
OWNS
INTERESTED IN _ . - - OTHER
En possession lntere~e par __........
Autres
ADDRESS
-'""''---------------- - - - - - - Adresse -----------------------------------------CITY/STATE
ZIP
PHONE
Ville/Province ----------------- - - - - - - - - - - Code postal - - - - - - - - - - -T916phone --------------
Canon
Garar'ltle I1m tee oes apparels photo numenques EOS D1g1tal Camera et des accesso1res de CANON Pour les Etats·Ums etle Canada seulement
La pr$sente 911rantklliril6e est IOI.Imie par Canon U.S.A., Inc:. (Canon U.S.A.) aux ~tal$-llnis ou Canon Caneda lne. (Canon Canada) au Canada i 1'6gard de rappaMII photo runMque EO$ de marque
Canon, ~ accessoires l:vn!s avec oene oaranli$1imil6e (<X:IIeclivemenl 1ft~ produits •)", lor$qu'~s SOill aehetes et utilisM aux Etai$.Unis 0\1 au Canaclll. Les pnxh.iiS $01'11leS seuls aw:quels ce11e garaotie
tmtees'applique.
Toot J'lrO(tlat.llwt\ a retatneuiOOns$01'1 emballage d'origllne, estgaJllllli contretout vice de rl'IEIIHire 91 de fabrication OOfflrll(l soil : pendant une p(lriodede un {1) an fl ODI\1)!er de Ia dille <Ia l'aehat ln~ial. les
pibces ou les pmduil$ dBIIIO;Iueux qui seront .etourruls a Canon U.S.A. ou Canon Canada, ou a leur.! foumiSSiltlrs de service a9rilfl de pmduits, selon lot cas, et donll'inspection confirme une .Wectuosae semnt
~saveeder"1011WIIesp;$cesou
despi$ce$ remisestneufcornparables. 0!.16chang"contre<lesprodui1sremis•neuf. telqued$1$rmin•parCanon U.S.A. ouCanon Canada,ouleb.lmis$e..-deWVioe
ag~deproduil$.
CETTE GARANTIE NE COUVRE PAS LES ACCESSOIRES OUI NE SONT PAS MENTIONN!:S CI-OESSUS. La prfl&n!e garantie ijmit6e s'applique S8IJemeo1 si les prOO.rils soot utiis8s conjoin!emeot avec
un8QuipementinloonaliQuecompatible etdeslogiciels~bles,pourlesquelsCanoo U.S.A. ouCaoon Canada n'assoooeaucooe responsabi ~e.
l'4quipllmtnt tt IMIOglcllll dl nwquM IW.. q~ canon qui PIU~ tiN dlttrltluM lvtoe let produltl 101'11 Vltldut «IN qutt. •, liM ;.r&ntll d'IUCIInl ~ plr Clnon U.S.A. ou Clnon
~ y comprit toute lillfMtll llnpllcltt; •t''elrd o. It quell" mii'CNII\dti ou dll'tptltudl• unt lin partk:ul..,.. Ll MUll garanU., tl gerantlfl It y t, tiM• un wtlcle d'..-.. marque 8UIJe que
c.non,mdonn.. perle'-~oulep<Oducteurdlmwtlcle.
Lapr8seolegarancie
(a)
(b)
(c)
~mit8eCOifllreloulestesd81eduositkoo:Klstateespendaotl"utilisation
noonaledu produit, etno
s"appiquepasau~cas
suivants
La perle ou l'endommagement des produitscauM!I par l'uaage abusil.la manipulation Mgligente. femballage inadequat lait par IIOUS, las modifications, las accidents. 1es variations de courant etectrique,
!"omission d'observer Its directives a 1'8gald du mode d'utikalioo. des condition& d'entretien et du rnitieu ambiant enon.eees dans 1e manuel d'utiliaalion de Canon U.S.A. ou Canon Canada, ou de
l"entrelioen eflectull a~l eurs que chez Canon U.S.A. ou Canon Canada. oo un foumisseurde service agree de produrts. Senos vous W m~er ace QUi prtlcede. les domrnages causes par raau.le sable et(oo)
Ia corrosion. 1es fuiles 00 pile, Ia chute de rappareil. les Ggratignures, fabrasion ou les dommages au boitief. awe objectils. il falficheur <!I oislau~ liquides ou 1es dommages causes <!I chacun des
accessoires mentioones au premier paragraphe d-<lessus. domm!llges quel"on presume d8couhn de fusage impropre. de rusage abus~ ou de l'impossibilit8 d'\ll~iselles produ~s. till qu'indiqu8 dans las
directivesdelonc1ioonement.
L'UI~isation d& pieces ou de toum~ures (autr&S quo c&l es veodues par Canon U.S.A. ou Canon Canada) ayant pour eifel d"endommaget las pr odu~s ou d'entralner una lr«tuence anormale d'appels
d'entretien ou de probtemos nOcessitBolle recours au saMce d'ootretion el eprOs·venle:
La modilication ou Ia relfa~ du rum8ro de sene ou de delation des produits.
AUCUNE GAAANTIE IMPLICITE, Y COMPRIS TOVTE OAAANTIE IMPUCITE A L'EOAAD DE LA QUALJTE MARCHAND£ OU DE L"APTITUDE A UNE FIN PAATICULIEAE, NE $' APPLIQUE AUX
PAODUITS APAES LA PEAIOOE PRESCfiiTE DE LA GARANTIE EXPRESSE LIMITEE SUSMENTIONNEE ET. A L"E)(CEPTION DE LADITE GAAANTIE EXPAESSE LIMITEE. AUCUNE AIJTFIE GARANTIE
EXPRESSE Nl AUCUNE AlJTRE OAAANTIE ACCORDEE PAR TOUTE PERSONNE OU ENllTE A L'EGARD DES PAODUITS N"AUAA POUR EFFET DE UEA CANON U.S.A. 00 CANON CANADA A
TOVTE OBLIGATION, OUELLE OU'~LLE SOIT. (CERTAINS ETATS ET CERTAINES PROVINCES N'AUTORISENT AUCUNE RESTRICTION SUR LA DUREE D"UNE GAAANTIE IMPUCI!E ; AINSI, IL EST
POSSIBLE OUE LA RESTRICTION ENONCEE CI·DESSUS NE S'Af'PUOUE PAS DANS VOTRE CAS.) CANON U.S.A. 0U CANON CANADA N"ASSUME AUCUNE AESPONSA61LITE A L'f:GAAD DE LA
PEATE DE PAODUITS D'EXPLOITATION OU DE PROfiTS, Nl A L"f:GARD DES INCONVf:NIENTS ET DES FRAIS ENGAGES POUR DE L'f:OUIPEMENT DE REMPLACEMENT, DES SERVICES
D'ENTAETIEN ET APRE5-VENTE. POUR L'ENTAEPOSAOE, LA PEATE OU LA CORRUPTION DE DONNEES, Nl A L'f:GAAO DE TOUT DOMMAGE SPECIAL. INDIRECT OU ACCESSOIRE Df:COULANT
DE L'USAOE OU DE L'USAGE IMPROPAE. 0U DE L'IMPOSSietLrrE D'UTILISER LES PRODUJTS, OOELLE OOE SOIT L"ARGUMENTATION JUAIDIOUE SUR LAOUELLE S'APPUIE LA DEMANDE, ET
MEME Sl CAI'KlN U.S. A. OU CANON CANADA A ETE INFOFIMEE DE LA POSSIBILITE DE TELS OOMMAGES. AUCUN RECOUVAEMENT, QUELLE OU'EN SOIT LA FORME. CONTRE CANON U.S.A
OU C.-.NON CANADA NE SERA SUPERIEUR AU MONT ANT 0U PRIX D'ACHAT DES PAOOUITS VENOUS PAR CANON U.S.A. OU CANON CANADA ETA L"OAIGINE DES DOMMAGES PRESUMES.
SANS VOUS LIMITER ACE 001 PRECEDE. VOUS ASSUMEZ TOUS LES AISQUES ET TOUTE LA AESPONSABILITE A L'EGARD DES PEATES, DES DOMMAGES MATERIELS ET DES BLESSUAES
CORPORELLES SUBIS PAR VOUS. VOTAE PAOPRtf:TE OU O'AUTAES PEASONNES OU LEUR PAOPAtETE EN RAISON DE L'USAGE. DE L'USAGE IMPROPAE. OU DE L' IMPQSSIBIUTE D'UTILISER
LES PAOOUITS A MOINS CUE LESOITS DOMMAGES MATERIELS. PEATES ET BLESSURES CORPOAELLES N'AIENT Elf CAUSES PAR LA NEGLIGENCE DE CANON U.S.A. OU CANON CANADA
(CERTAINS ETATS ET CERTAINES PROVINCES N'AUTOAISENT AUCUNE EXCLUSION Nl RESTRICTION DES OOMMAOES ACCESSOIAES 0U INOIAECTS: AINSI. IL EST POSSIBLE QUE LA
RESTRICTION OU L'EXCLUSION ENONCEE CI·DESSUS NE S"APPLIQUE PAS DANS VOTRE CAS.) LA PAESENTE GAAANTIE LIMJTE:E N'EST PAS .-.cCOADEE A O'AUTAES PEASONNES QUE
L'ACHETEUA INITIAL DE TOUT PROOUJT. OU LA PEASONNE QUI A AEOVU LESOITS PROOUITS EN CADEAU. ET CONSTITUE VOTRE RECOURS EXCLUSIF
Caoon U.S.A.
Des services de soutien technique pour vos produ~s soot offerts comme suit
• Soutian lntamal au moyen du site Web: www.uN.canon.comhupport (SouliEif1 par courriar llilactroniqua aussi dispooible)
• Soollen tetephoolque aupres d"un repr~ntanl du Centre de rensetgnernents clientele de Canon U.S.A.. sans frais. pendant
(1-800-652·2666)
~s
heures nomtales d"ouverture au 1·800.0K.CANON
Canon Canada
Dessarvicesdesoulientecttniquepourvosproduitssontolfertscomrnesu~ ·
• Soullen Internet en anglais au moyen du site Web : www.eanon.calenglllhfca (Soutlen par courtier l!!ilectronlque aussi dispooible)
• Soulien Internet eo frenyais au moyen du site Web : www.cenon.ca/franeals/ca (Soutien par courrier l!!ilactronique aussi disponible)
• Soullen tl!!itephonique aupr&s d"une reprl!!isentante ou d"un representant du Cen1re de renselgnernents clienl@le de Canon Canada, sans lrais. pendant las heores normales
d'ouverlure au 1-800-0K·CANON (1-800-652-2668).
Lors de l'app&l. asSo.Jrez-vous d'avoir Ia numl!!iro de sene des produils et Ia date de son achat a por11!!ie de Ia main atin d'acc~rer le service. Une rapresentante ou un representant du
Centre de renseignements clientele de Canon tentera de dl!!itermin&r Ia source du probl@me et de rl!!isoudre celui.Q par lllill!!iphone. S'il est impossible de rl!!isoudre le problema par t~phone .
on vous priera de suivre les diraclilles approplil!!ies pour te SERVICE POSTAL. Veuillez noter qu'une preuve d'achal datee est requise tors du service d'en1feljen at ~r@s·vanle. II suffit de
foumiruoeoopiedevotreectedeventedatl!!i
Lesoonditionsduprogrammedesoutientecflniquesontrnodiliablessanspreavis
SERVICE POSTAL
Le SERVICE POSTAL est un programme seton lequeltes rl!!iparalions de vos produhs son1 altectu&es par un foumisseur de service agrel!!i des produits de Canon U.S.A. ou Canon Canada
Vous obtiendrez le nom. l"adresse et te nurnero de tl!!ill!!iphor.e d"un toumlsseur de service agrl!!i~ des proOu~s. en communlquant avec t.SOO.OK-CANON (1-800-652·2666) (representant de
service cli&n!l!le Canon U.S.AJroprCsontant de sef\lice dientllle Canon Canada) . II vous incombe d'emballor adequatement vos produits d81octooll)( at de Ia faire parvenit , II vos lrais,
aocompagnl!!i d"une oopie de voue preuve d'achat dat6e, d\Jrte e~plication dBtailll!!ie du problema at de l'adresse de retour au fournisseur de seiVice agree OOS produ~s . Vous ne devez
lnclure aucun au1re article avec les produ~s dl!!ifoctueu~. Les produils couverts par Ia pn!sen1e garan~e limite& seront rCpan!s et vous seront retoum&s sans frais par Ia foumisseur de
service agree de produrts. Las produits non couverts par Ia pr~seote garantie limrtl!!ie r~us par Ia toumisseur de sef\lice agrl!!ie de produits seront retoumes sans avoir ete rl!!ipar&s ou, lila
discn!tiondufoumisseurdeserviceagret!deproduits,vouspourrezrecevoiruneeslimationecrrtedesfraisderl!!iparalionaucoUt1elqu'iles1e!abli3roocasionparlefournisseurde
~-
La pn!sente garanl ie limitl!!ievoos accordadasdroits particuliersraconnuspar Ia loi et il se peut quevous disposiezd'eutresdroilsqui peuvent varierd'un Eta! II unautre (oud'une
provlnoe3uoeau1reauCanada).
•Lebloc-batterielivrCavectesproduitscomporteunegarantielimi1e&OOpare&d"unedurl!!iedequatre·vingt-di~(90)jours
Canon U.S.A., Inc.
Canon Canada Inc.
C Canon U.S.A .. Inc.. 2000. Canon est una marq1.111 d9posl!e et EOS est une marque de commerce de Canon Inc.
Tous tes autras noms de marques ou de produrts sont des marques deposees ou des marqoos de commerce de leurs proprilitaires respectifs
REMARKS
REMARKS