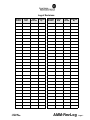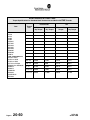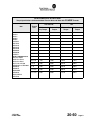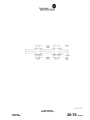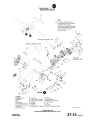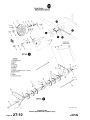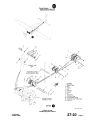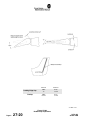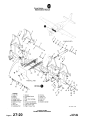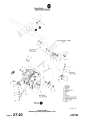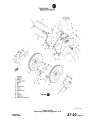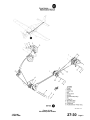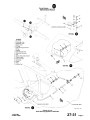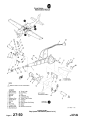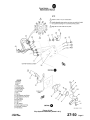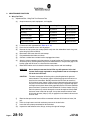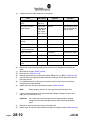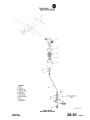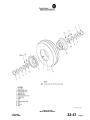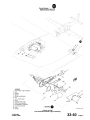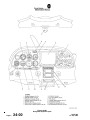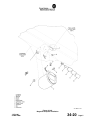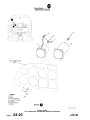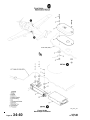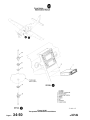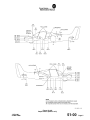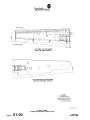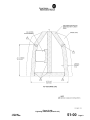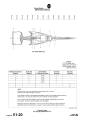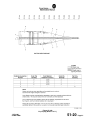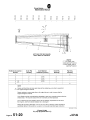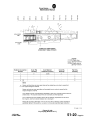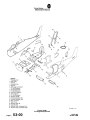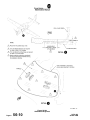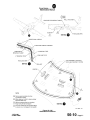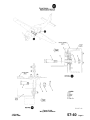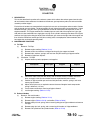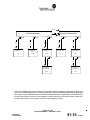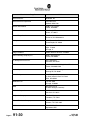
1
AIRPLANE MAINTENANCE MANUAL
For the
CIRRUS DESIGN SR22
SR
CIRRUS DESIGN INCORPORATED
4515 Taylor Circle
Duluth, MN 55811
FAA APPROVAL HAS BEEN OBTAINED ON THE TECHNICAL DATA IN THIS PUBLICATION THAT AFFECTS AIRPLANE TYPE DESIGN.
COPYRIGHT 1999 CIRRUS DESIGN CORPORATION DULUTH, MINNESOTA, USA
P/N 13773-001
ISSUED Nov 2000
REVISION 1 July 2001
Log of Revisions
Revision
Number
13773-001
30 Nov 2000
Issue
Date
Date
Inserted
Inserted
By
Revision
Number
Issue
Date
Date
Inserted
Inserted
By
AMM-RevLog
Page 1
Log of Temporary Revisions
TR
Number
13773-001
30 Nov 2000
Issue Date
Date Inserted
Inserted By
Date
Removed
Removed By
AMM-TmpRevLog
Page 1
INTRODUCTION
1. COVERAGE
This Cirrus Design SR22 Airplane Maintenance Manual was prepared by Cirrus Design Technical Publications. This manual contains information necessary to enable a trained mechanic to inspect, service, clean,
trouble shoot, functionally test, and repair systems and equipment in the Cirrus Design SR22. It also
includes information necessary for the mechanic to perform maintenance or make minor repair to units in
the airplane normally requiring such action on the flight line or in the maintenance hangar. This manual
covers the as delivered airplane configuration.
The Cirrus Design SR22 Airplane maintenance manual was prepared using GAMA Specification #2 (Specification for Manufacturers Maintenance data), Revised September 1982 as a content model and format
guide. However, as the specification is written to cover a whole class of aircraft rather than a particular
model, some deviations from the specification were made for clarity.
This Maintenance Manual does not reflect part numbers and cannot be used for ordering replacement
parts. Spares and replacement parts should be ordered using the current Cirrus Design SR22 Illustrated
Parts Catalog.
Wiring schematics within the description and operation sections of this manual are for general information
purposes only. Troubleshooting shall be performed using the Wiring Manual, and the optional avionics and
electrical wiring diagrams provided at delivery.
2. USING THE MAINTENANCE MANUAL
This Maintenance Manual is divided into four major sections, each of which is separated into chapters.
Each chapter contains its own list of effective pages and table of contents.
A. Page Numbering System
Page numbers used in this Maintenance Manual consist of two-element numbers separated by
dashes, under which the page number and date are printed.
Whenever the chapter/system element number is followed by zeros in the section/subsystem (32-00)
the information presented on the page is applicable to the entire system.
The section/subsystem number is used to identify information applicable to section or subsystems
within a chapter or system respectively. The subject/unit element number progresses from the number
‘10’ in accordance with GAMA Specification No. 2 and the number of section/subsystem units covered.
All system/subsystem data is page numbered separately.
3. WARNINGS, CAUTIONS, AND NOTES
Warnings, Cautions, and Notes are used to highlight or emphasize important points.
Warnings call attention to use of materials, processes, methods, procedures, or limits which must be followed precisely to avoid bodily injury.
Cautions call attention to methods and procedures which must be followed to avoid damage to equipment.
Notes call attention to methods which make the procedure easier.
13773-001
30 Nov 2000
AMM-Intro
Page 1
4. LIST OF PUBLICATIONS
The following publications should be used in conjunction with this manual:
Manual No.
Manual Title - Engine
Manufacture
X30568A
Model IO-550 Overhaul Manual
Teleydyne Continental Motors
X30634A
Model IO-550 Maintenance Manual
Teleydyne Continental Motors
X30569A
Model IO-550 Parts Catalog
Teleydyne Continental Motors
X30565
Maintenance and Operator’s Manual
Teleydyne Continental Motors
X30592
Starter Service Instructions
Teleydyne Continental Motors
X30593A
Fuel Injection Systems Overhaul and
Parts Catalog
Teleydyne Continental Motors
X40000
TCM Ignition Systems Master Service
Manual
Teleydyne Continental Motors
Manual No.
Manual Title - Propeller
Manufacture
115N
Propeller Owner’s Manual and Log Book Hartzell
202A
Standard Practices Manual
AW-9511-2
The Smooth Propeller: How to Perform a Chadwick Helmuth
Dynamic Propeller Balance
13841-R2
Chadwick Helmuth Vibrex 2000 Users
Guide
Manual No.
Manual Title - Avionics
Hartzell
Chadwick Helmuth
Manufacture
8747
System 55 Autopilot Pilot’s Operating
Handbook
S-TEC Corporation
190-00149-01
GMA 340 Audio Panel Installation and
Operation Manual
Garmin International
190-00140-02
GNS 430 - 400 Series Installation Manual Garmin International
190-00187-02
GTX 327 Transponder Installation and
Operation Manual
Garmin International
572-0555
ICDS 2000 Operations Handbook
ARNAV Systems
Manual No.
Manual Title - Miscellaneous
Manufacture
13772-001
Pilot’s Operating Handbook
Cirrus Design Corporation
13774-001
SR22 Illustrated Parts Catalog
Cirrus Design Corporation
Page 2
AMM-Intro
13773-001
30 Nov 2000
Manual No.
Manual Title - Miscellaneous
Manufacture
13775-001
SR22 Wiring Manual
Cirrus Design Corporation
GSM-590
Gill Battery Service Manual
Teledyne
9/94
Model E-01 ELT Installation and Operation Manual
ACK Technologies
Document No. I-194
Inspection Intervals for Filters
Brackett Aircraft Technologies
5. REVISIONS
This manual has been prepared in loose-leaf form for ease in inserting revisions. Tabbed dividers, throughout the manual, are in standard GAMA format and numbering and allow quick reference to data in each
section. Logical and convenient Tables of Contents are located at the beginning of each chapter to aid in
locating specific data within that chapter.
Numbered revisions will be issued periodically. These revisions are printed on white paper and contain a
revision instruction sheet to assist the user in filing the change.
Upon receipt of a numbered revision, file it according to the provided instructions as soon as possible.
Additionally, a record of filing must be made on the following Log of Revisions page.
6. REVISION BARS
Changes to data in an existing section will be identified by a revision bar in the outer margin of the page.
Change bars are used in figures to indicate changes.
7. TEMPORARY REVISIONS
Temporary revisions are used to provide time sensitive information and changes as they become available.
Temporary revisions provide, with the least possible delay, new information which assists in maintaining
safe and efficient flight/ground operations.Temporary revisions are incorporated at the next regularly
scheduled revision and become a permanent part of the Maintenance Manual.
Upon receipt of a Temporary Revision, file the revision in the applicable chapter in accordance with filing
instructions that appear on the Temporary Revision. Additionally, a record of filing the Temporary Revision
must be made in the Log of Temporary Revisions for that AMM chapter. Typically, the Log Of Temporary
Revisions for a chapter will be replaced by a blank log when a numbered revision for that chapter is issued.
Temporary Revisions should be removed from this manual only when removal instructions are noted on
the regular revision summary sheet or by instructions noted on a superseding Temporary Revision.
8. REVISION SERVICE
Revision Service for this manual is available from Cirrus Design Technical Publications at the address
below:
Cirrus Design
4515 Taylor Circle
Duluth, MN 55811
Phone: 218 727-2737
Fax: 218 727-2148
13773-001
31 July 2001
AMM-Intro
Page 3
CHAPTER
AIRWORTHINESS
LIMITATIONS
CHAPTER 4 - AIRWORTHINESS LIMITATIONS
LIST OF EFFECTIVE PAGES
Chapter/Section
Page
Date
4-LOEP
1
31 JULY 2001
4-TOC
1
31 JULY 2001
4-00
1
31 JULY 2001
4-00
2
31 JULY 2001
4-00
3
31 JULY 2001
13773-001
31 July 2001
4-LOEP
Page 1
CHAPTER 4 - AIRWORTHINESS LIMITATIONS
TABLE OF CONTENTS
Subject
AIRWORTHINESS LIMITATIONS
Chapter/Section
Page
4-00
General
1
Maintenance Limitations
Replacement Limitations
Structural Limitations
Description
1
1
1
2
Maintenance Limitations
Replacement Limitations
Structural Limitations
2
2
3
13773-001
31 July 2001
4-TOC
Page 1
AIRWORTHINESS LIMITATIONS
1. GENERAL
The Airworthiness Limitations Section is FAA approved and specifies inspection and maintenance required
under paragraphs 43.16 and 91.403 of the Federal Aviation Regulations unless an alternative program has
been FAA approved.
This chapter outlines the maximum replacement intervals and/or maintenance requirements for aircraft
components, systems, and structures determined to be life limited and/or require monitoring through
scheduled maintenance.
Note:
All time limits and requirements listed in this section are also covered in Chapter 5, Time
Limits and Maintenance Checks.
The following airworthiness limitations and requirements are separated into groups as described below.
A. Maintenance Limitations
Component and system checks required to be performed during airplane scheduled maintenance.
B. Replacement Limitations
Listing of time limits for replacement of specific components.
C. Structural Limitations
Damage Tolerant Limitations required by Federal Aviation Regulations for certification.
13773-001
31 July 2001
4-00
Page 1
2. DESCRIPTION
A. Maintenance Limitations
(1)
The scheduled maintenance requirements listed below are also included in AMM 5-20 (Scheduled Maintenance Checks). The following criteria must be adhered to:
(a) Paint Finish
To ensure that the temperature of the composite structure is kept below 150 degrees
Fahrenheit, the maximum allowable paint on the wing will have an absorptivity not greater
than 0.4, with an emissivity of at least 0.9. The maximum allowable paint on the fuselage
will have an absorptivity not greater than 0.6, with an emissivity of at least 0.7. (Refer to
51-30)
(2)
Cirrus Airframe Parachute System (CAPS) must be serviced and maintained by Cirrus Design
trained and authorized parachute system technicians only. Airframe and Powerplant license is
not sufficient credentials for performing maintenance on CAPS. Licensed Airframe and Powerplant mechanics may visually inspect the parachute installation and activation handle installation
only as specified in 5-20 (Scheduled Maintenance Checks).
B. Replacement Limitations
The replacement items under this section are also included in AMM 5-10 (Time Limits and Maintenance Checks - Overhaul and Replacement Schedule).
(1)
Unless otherwise specified, the following components must be replaced with new components,
overhauled components, or components which have life remaining, at the intervals specified.
Item
Page 2
Replacement Limits
1.
Engine
There are no life limits on the engine or its
components. Refer to Chapter 5, Time Limits and Maintenance Checks, for recommended overhaul schedule.
2.
Propeller
There are no life limits on the propeller or its
components. Refer to Chapter 5, Time Limits and Maintenance Checks, for recommended overhaul schedule.
3.
Cirrus Airframe Parachute System (CAPS)
Rocket Motor
Replace with new or recharged unit every
10 years. Refer to Chapter 95, Special Purpose Equipment.
4.
Cirrus Airframe Parachute System (CAPS)
Parachute
Replace with new or repacked (inspected/
repaired/repacked) unit every 10 years.
Refer to Chapter 95, Special Purpose
Equipment.
5.
Cirrus Airframe Parachute System (CAPS)
Reefing Line Cutters
Replace with new line cutters every 3 years.
Refer to Chapter 95, Special Purpose
Equipment.
4-00
13773-001
31 July 2001
C. Structural Limitations
The certification requirements of FAR 23.573 require that the composite airframe structure, cabin,
wing, empennage their carry thru, and attaching structure whose failure would be catastrophic must be
designed to damage tolerant criteria. Damage tolerant certification for the selected airframe life of
4350 flight hours has been established for all of the affected parts with no special structural limitations
or inspections.
13773-001
31 July 2001
4-00
Page 3
CHAPTER
TIME LIMITS AND
MAINTENANCE
CHECKS
CHAPTER 5 - TIME LIMITS/MAINTENANCE PRACTICES
LIST OF EFFECTIVE PAGES
Chapter/Section
Page
Date
5-LOEP
1
31 JULY 2001
5-TOC
1
31 JULY 2001
5-TOC
2
31 JULY 2001
5-00
1
30 NOV 2000
5-10
1
31 JULY 2001
5-10
2
31 JULY 2001
5-20
1
30 NOV 2000
5-20
2
30 NOV 2000
5-20
3
31 JULY 2001
5-20
4
31 JULY 2001
5-20
5
31 JULY 2001
5-20
6
31 JULY 2001
5-20
7
31 JULY 2001
5-20
8
31 JULY 2001
5-20
9
31 JULY 2001
5-20
10
31 JULY 2001
5-20
11
31 JULY 2001
5-20
12
31 JULY 2001
5-20
13
31 JULY 2001
5-30
1
30 NOV 2000
5-30
2
30 NOV 2000
5-30
3
30 NOV 2000
5-30
4
30 NOV 2000
5-50
1
30 NOV 2000
5-50
2
30 NOV 2000
5-50
3
30 NOV 2000
5-50
4
30 NOV 2000
13773-001
31 July 2001
5-LOEP
Page 1
CHAPTER 5 - TIME LIMITS/MAINTENANCE PRACTICES
TABLE OF CONTENTS
Subject
TIME LIMITS AND MAINTENANCE CHECKS
Chapter/Section
Page
5-00
General
1
Annual Inspections
1
100-Hour Inspections
1
Unscheduled Maintenance Checks
1
Special Conditions - Cautionary Notice
1
OVERHAUL AND REPLACEMENT SCHEDULE
5-10
Description
SCHEDULED MAINTENANCE CHECKS
1
5-20
Description
1
Inspection Groups and Criteria
1
Visual Inspection
Moving Parts
Composite Parts
Metal Parts
Fuel, Air, and Hydraulic Oil Lines and Hoses
Electrical Wiring
Bolts and Nuts
Filters and Screens
Wet Fuel Areas
Operational Inspection
Functional Inspection
Scheduled Inspection Report
1
1
1
2
2
2
2
2
2
2
2
3
Pre-Inspection
Engine Group
Propeller Group
Cabin Group
Radio Group
Fuselage and Empennage Group
Wing Group
Landing Gear Group
Return to Service
AIRPLANE OPERATIONAL AND FUNCTIONAL CHECK
3
4
7
7
9
10
10
11
12
5-30
Description
1
Operational Inspection Report
2
13773-001
31 July 2001
5-TOC
Page 1
CHAPTER 5 - TIME LIMITS/MAINTENANCE PRACTICES
TABLE OF CONTENTS
Subject
Chapter/Section
UNSCHEDULED MAINTENANCE CHECKS
Page
5-50
Description
1
Hard/Overweight Landings
Overspeed
Severe Air Turbulence or Severe Maneuvers
Lightning Strike
High Drag/Side Loads Due to Ground Handling
Maintenance Practices
1
1
1
1
1
2
Hard/Overweight Landing
Landing Gear
Wings
Overspeed
Landing gear
Fuselage
Cowling
Stabilizers
Wings
Severe Turbulence and/or Maneuvers
Stabilizers
Wing
Lightning Strike
Communications
Navigation
Fuselage
Stabilizers
Wings
Propeller
Powerplant
Foreign Object Damage
Landing Gear
Fuselage
Cowling
Stabilizers
Windows
Wings
Engine
High Drag/Side Loads Due to Ground Handling
Landing Gear
Wings
2
2
2
2
2
2
2
2
2
2
2
3
3
3
3
3
3
3
3
3
3
3
3
3
3
3
3
3
3
3
4
Page 2
5-TOC
13773-001
31 July 2001
TIME LIMITS AND MAINTENANCE CHECKS
1. GENERAL
This chapter outlines the recommended intervals for overhaul and replacement of components, scheduled
and unscheduled maintenance, and annual inspections. The following Scheduled Maintenance Check
table shows the recommended intervals at which items are to be inspected based on normal usage under
average environmental conditions.
2. ANNUAL INSPECTIONS
As required by Federal Aviation Regulation Part 91.409, all civil airplanes must undergo a complete
inspection each 12 calendar months. This inspection must be performed by an authorized maintenance
person as described in FAR Part 43.3. A signed and dated record must be maintained as each inspection
task is completed. When the last task of the inspection has been completed, the Inspection Report is to be
signed off in the Log Book/Maintenance Record. The inspection items to be covered in the annual inspection are identical to the 100-hour inspection items.
The inspection interval to the next annual inspection may not exceed twelve calendar months. For Example: If an inspection were signed off on 15 September 2005, the next annual inspection would be due and
must be accomplished no later than 30 September 2006. All subsequent annual inspection will be due in
September unless the schedule is reset by performing an annual inspection early.
3. 100-HOUR INSPECTIONS
In addition to the annual inspection, if the airplane is operated commercially (for hire) the airplane must
also have an inspection every 100 flight hours. The 100-hour interval between inspections should never be
exceeded by more than 10 hours, and then only if additional time is required to reach a place where the
inspection can be satisfactorily accomplished.
Additionally, the time the interval was exceeded must be included as flight hours in the next 100-hour interval. For example: If a 100-hour inspection was due at 650 flight hours and was actually signed-off at 658
flight hours, the next 100-hour inspection is due at 750 flight hours, not 758 flight hours. Inspection tolerances cannot be accumulated.
4. UNSCHEDULED MAINTENANCE CHECKS
Abnormal airplane operations require special maintenance checks. Definitions and inspection procedures
for hard/overweight landings, overspeed, severe air turbulence, lightning strike, foreign object damage,
and high drag/side loads due to ground handling are listed in Chapter 5-50.
5. SPECIAL CONDITIONS - CAUTIONARY NOTICE
Airplanes operated for Air Taxi operation or other than normal operation and airplanes operated in humid
tropics or cold and damp climates, etc., may need more frequent inspections for wear, corrosion, delamination, and/or lack of lubrication. In these areas, periodic inspections should be performed until the operator
can set his own inspection periods based on experience.
Note:
The recommended periods do not constitute a guarantee that the item will reach the period
without malfunction as in-service factors cannot be controlled by the manufacturer.
“On Condition” items are to be repaired, overhauled or replaced when inspection or performance of these items reveal a potentially unserviceable or unsafe condition.
The date on the “ORIGINAL STANDARD AIRWORTHINESS CERTIFICATE,” FAA Form No.
8100-2, which is issued with a new airplane, is to be used as the basis for all inspected components listed in the following schedules.
13773-001
30 Nov 2000
5-00
Page 1
OVERHAUL AND REPLACEMENT SCHEDULE
1. DESCRIPTION
The following components must be overhauled or replaced at the specified intervals. To ensure correct
observation of these times, the date of removal, installation, or overhaul of such components as well as the
airplanes flight hours must be entered into the Service Time Record filed in the Airplane Maintenance Log.
Item
Interval
Replc. O’haul
Notes
1. Engine
Per Manufacturer.
(Recommended 2000
Hours)
❍
Refer to Teledyne Continental Motors Service
Letter SIL 98-9.
2. Propeller Governor
Per Manufacturer.
(Recommended 2400
Hours)
❍
Refer to Woodward
Governor Company
Service Bulletin 33580F.
3. Magnetos
Per Manufacturer.
(Recommended at
Engine Overhaul)
4. Propeller
Per Manufacturer.
(Recommended 2400
Hours or 6 Years whichever comes first.)
❍
Refer to Hartzell Propeller Service Letter 61.
5. Alternator 1
Per Manufacturer.
(Recommended 500
Hours)
❍
Refer to Teledyne Continental Motors Manual
No. X30531-3.
6. Alternator 2
Per Manufacturer.
(Recommended 1700
Hours)
❍
Factory Overhaul.
7. Induction Air Filter
At Annual Inspection or ❍
200 Hours.
8. Muffler and Heat Exchanger
1000 Hours
❍
9. Flexible Fuel Lines
5 Years
❍
10. Fuel System Boost Pump
10 Years
❍
Refer to 28-20
11. Gascolator Seals
5 Years
❍
Refer to 28-20
12. Fuel System Drain Valve Seals
5 Years
❍
Refer to 28-10
13. Flexible Oil System Lines
5 Years
❍
14. Flexible Brake System Lines
5 Years
❍
15. Aileron-Rudder Interconnect
Shock Cord
5 Years
❍
13773-001
31 July 2001
❍
Refer to Teledyne Continental Motors IO-550
Overhaul Manual.
If at any time, the filter is
found to be more than
50% covered by foreign
material, the filter must
be replaced.
Refer to 78-20
Refer to 27-20
5-10
Page 1
Item (Continued)
Interval
Replc. O’haul
Notes
16. Emergency Locator Transmitter
Batteries
Batteries at 50 percent
of useful life or after 1
hour use - whichever
comes first
❍
Refer to ACK Technologies Model E-01 Installation and Operation
Manual.
17. Fire Extinguisher
20 Years
❍
Refer to Chapter 26-20.
18. Cirrus Airframe Parachute System 10 Years
(CAPS) Rocket Motor
❍
Replace with new unit.
Refer to Chapter 95
Special Purpose Equipment for CAPS maintenance practices.
19. Cirrus Airframe Parachute System 10 Years
(CAPS) Parachute
❍
Replace with new or
repacked unit. Refer to
Chapter 95, Special
Purpose Equipment for
CAPS maintenance
practices.
20. Cirrus Airframe Parachute System 3 Years
(CAPS) Reefing Line Cutters
❍
Replace with new unit.
Refer to Chapter 95,
Special Purpose Equipment for CAPS maintenance practices.
CAUTION:
Page 2
Airplane control surface balance is critical to flight safety. Removal and/or addition of any
paint or body filler to a control surface requires that the control surface be re-balanced.
(Refer to 55-00)
5-10
13773-001
31 July 2001
SCHEDULED MAINTENANCE CHECKS
1. DESCRIPTION
The owner and/or operator is primarily responsible for maintaining the airplane in an airworthy condition.
This includes compliance with all applicable Airworthiness Directives. It is further the responsibility of the
owner or operator to ensure the that the airplane is inspected as specified in Parts 43 and 91 of the Federal Aviation Regulations. This inspection guide is not intended to be all-inclusive, for no such guide can
replace the good judgment of a certified airframe and power plant mechanic. As the one primarily responsible for the airworthiness of the airplane, the owner or operator should select only qualified personnel to
maintain the airplane.
While this guide may be used as an outline, detailed information of the many systems and components in
the airplane will be found in the various chapters of the Maintenance Manual and pertinent vendor publications. It is recommended that reference be made to the applicable Maintenance Handbooks, Service
Instructions, applicable FAA Regulations and Publications, Vendor’s Bulletins and Vendor’s Specifications
for torque values, clearances, settings, tolerances, and other requirements. During the inspection it should
be verified that all interior and exterior placards are legible and in place. It is the responsibility of the owner
or operator to ensure that the airframe and power plant mechanic inspecting the airplane has access to the
previously noted documents as well as to this inspection guide.
Note:
These inspections meet the intent of FAR Part 91.409 and Part 43, Appendix D. In addition
to the inspections prescribed by this schedule, the altimeter instrument and static system
and all ATC transponders MUST be tested and inspected at 24-month intervals in compliance with the requirements specified in FAR Parts 91.411 and 91.413.
2. INSPECTION GROUPS AND CRITERIA
A. Visual Inspection
When called for by an inspection task, or any time an area is visible during an inspection or maintenance action, the following visual inspection criteria shall be accomplished without requiring disassembly or removal of adjacent equipment unless otherwise specified. The criteria will normally apply to
those areas, surfaces, or items which become visible by the removal or opening of access doors, panels, fairings, or cowlings. The visual inspection shall include an examination by area, component,
detail, assembly, or installation, as well as any associated equipment within the immediate vicinity,
using any inspection aids considered necessary. When performing an annual or 100-hour inspection,
each installed miscellaneous item not covered in the following Scheduled Inspection Report shall be
inspected for improper installation and improper operation.
Note:
All “5-20” references in the Chap-Sect Reference column of the Scheduled Inspection
Report are to be understood as references to the following criteria for visual inspection.
Visual Inspection criteria will normally consist of, but are not limited to the following criteria:
(1)
Moving Parts
Proper operation, correct alignment, security, sealing, cleanliness, lubrication, adjustment, tension, travel, condition, binding, excessive wear, cracking, corrosion, deformation, and any other
apparent damage.
(2)
Composite Parts
Security, condition, cleanliness, separation of bond, delamination, wear, cracking, obstruction of
drainage or vent holes, deformation, overheating, fluid saturation, and any other apparent damage.
13773-001
30 Nov 2000
5-20
Page 1
(3)
Metal Parts
Security, condition of finish, cleanliness, distortion, fatigue cracks, welding cracks, corrosion,
and any other apparent damage.
(4)
Fuel, Air, and Hydraulic Oil Lines and Hoses
Cracks, dents, kinks, loss of flexibility, deterioration, obstruction, chaffing, improper bend radius,
cleanliness, security, and any other apparent damage.
(5)
Electrical Wiring
Cleanliness, loose, corroded, or broken terminals, chaffed, broken, or worn insulation; security;
heat deterioration; and any other apparent damage.
(6)
Bolts and Nuts
Fretting, wear, damage, stretch, proper torque, and safety wiring.
(7)
Filters and Screens
Filters and screens shall be removed, cleaned, inspected for contamination, or replaced as
applicable.
(8)
Wet Fuel Areas
Cleanliness, bacterial growth, corrosion, delamination, separation of bond, and structural
fatigue.
B. Operational Inspection
When called for by an inspection task, a Operational Inspection is a check to determine that a component or system is fulfilling its intended purpose. The Operational Inspection does not require quantitative tolerances. In the following schedule, the appropriate Chapter and Section from the Airplane
Maintenance Manual (AMM) is defined in the Chap-Sect Reference Column.
C. Functional Inspection
When called for by an inspection task, a Functional Inspection is a quantitative check to determine if
one or more functions of a component performs within specified limits. The Functional Inspection is a
comparative examination of a component or system against a specific standard. In the following
schedule, the appropriate Chapter and Section from the Airplane Maintenance Manual (AMM) is
defined in the Chap-Sect Reference Column.
Page 2
5-20
13773-001
30 Nov 2000
Scheduled Inspection Report
Make
Cirrus Design
Model
SR22
Serial Number
Owner
Date
Type of Inspection
Hobbs Time
Note:
Registration Number
All references to “5-20” under the Chap-Sect column are to be understood as reference to Visual
Inspection criteria defined above under Inspection Groups and Criteria.
Pre-Inspection
Chap-Sect
Interval
Initials
Reference 100 Special
-
❍
2. Airplane Interior
Clean and vacuum.
12-20
❍
3. Fuselage and Empennage
Clean.
12-20
❍
4. Engine and Engine Compartment
Remove engine cowling and clean.
71-10
12-20
❍
1. Review compliance status with current Federal Aviation Regulations. This includes inspection of the following:
- Airplane Flight Manual
- Aircraft Log Book
- Registration Certificate
- Weight and Balance Record
- FAA Airworthiness Directives
- Cirrus Design Service Documents
Manual No.
5. Engine Operational Inspection
Perform an Engine Operational Inspection in accordance with Tele- X30634A
dyne Continental Motors Maintenance Manual, Section 5.
5-30
❍
7.
32-00
25-10
25-10
6-00
6-00
❍
13773-001
31 July 2001
50 Hrs
50 Hrs
6. Operational/Functional Check
Perform an airplane run-up in accordance with Operational/Functional Check in 5-30. Make a record of all malfunctions and abnormalities for reference during the inspection. After completing the
Operational/Functional Check, perform a walk around to detect fluid
leaks or other abnormalities.
- Remove Landing Gear Fairings.
- Remove Cabin Seats.
- Remove Cabin Carpet.
- Remove Cabin Access Panels.
- Remove Wing Access Panels LW1, LW2, LW4, LW5, LW6, LW7,
LW8, LW9, LW12, LW13, LW14, LW15, and RW1, RW2, RW4,
RW5, RW6, RW7, RW8, RW9, RW12, RW13, RW14.
Annual
5-20
Page 3
Chap-Sect
Reference
Engine Group
1. 25 Hour Inspection
After first 25 hours of operation on new, rebuilt, or overhauled
engine, perform complete 100-Hour Engine Inspection in accordance with Teledyne Continentals Motors Maintenance Manual,
Section 5.
Interval
Initials
100 Special
Manual No.
X30634A
1st 25
Hrs
2. Engine Cowling
Visual Inspection for cracks, distortion, and loose or missing fasteners.
5-20
❍
3. Engine Oil
Drain and change every 100 hours and after first 50 hours or 6
months of operation on new, rebuilt, or overhauled engine.
12-20
❍
4. Oil Screen
Remove and perform Visual Inspection for metal particulates.
5-20
❍
5. Oil Sump Plug
Visual Inspection for condition.
5-20
❍
6. Oil Filter
Open and perform Visual Inspection for metal particles every 100
hours and after first 50 hours or 6 months of operation on new,
rebuilt, or overhauled engine.
12-20
❍
1st 50
Hrs or
6 Mnths
7. Oil Lines and Fittings
Visual Inspection for leaks, security, chafing, dents, and cracks
every 100 hours and after first 50 hours or 6 months of operation on
new, rebuilt, or overhauled engine.
5-20
❍
1st 50
Hrs or
6 Mnths
8. Oil Cooler Fins
Clean and perform Visual Inspection for cracking, bending, and general condition.
5-20
❍
9. Battery
Perform Electrolyte Level Check.
12-10
❍
10. Battery Platform, Terminals, and Cables
Visual Inspection for security, corrosion, and general condition.
12-10
❍
11. Wiring
Visual Inspection for damaged wiring and clamps.
5-20
❍
Manual No.
X30634A
❍
12. Engine Compression
Functional Inspection in accordance with Teledyne
Continentals Motors Maintenance Manual, Section 19.
Cyl #
1
3
5
2
4
1st 50
Hrs or
6 Mnths
6
P.S.I.
Page 4
5-20
13773-001
31 July 2001
Engine Group (Continued)
Chap-Sect
Reference
Interval
Initials
100 Special
13. Spark Plugs
Manual No.
Inspect, clean, re-gap and rotate in accordance with Teledyne Conti- X30634A
nentals Motors Maintenance Manual, Section 12.
❍
14. Spark Plug Cable Leads
Visual Inspection for corrosion and deposits.
5-20
❍
15. Cylinder Cooling Fins
Visual Inspection for cracking, bending, and general condition.
5-20
❍
16. Engine Baffling and Seals
Visual Inspection for cracks, tears, and rips.
5-20
❍
50 Hrs
Manual No.
17. Ignition Harness
X40000
Inspect for high tension leaks and continuity in accordance with
Teledyne Continentals Motors Master Service Manual, Accessories,
Section 3.
❍
Manual No.
X30634A
❍
Internal
Inspect.
500 Hrs
19. Induction System Filter
Replace at Annual Inspection, at 200 hours, or when filter is more
than 50% covered by foreign material.
5-10
❍
Annual,
200 Hrs,
or 50%
used
20. Air Intake Ducts
Visual Inspection for general condition.
5-20
❍
50 Hrs
21. Alternate Air Door
Check operation of alternate air door.
71-60
❍
50 Hrs
22. Fuel Pump
Visual Inspection for leaks, security, and condition.
5-20
❍
18. Magneto
Functional Inspect magneto to engine timing in accordance with
Teledyne Continentals Motors Maintenance Manual, Section 12.
Internal Inspection every 500 Hrs.
5-20
23. Fuel Injection Nozzles
Visual Inspect nozzles and manifold valve for fuel stains, security,
and proper venting every 100 hours.
Every 300 hours and at first 100-Hour Inspection on new, rebuilt, or Manual No.
overhauled engine, remove and clean fuel injection nozzles per
X30634A
Teledyne Continentals Motors Maintenance Manual, Section 5.
❍
24. Gascolator Fuel Filter and Bowl
Drain and clean.
28-20
❍
25. Flexible Fuel Lines
Visual Inspection for leaks, security, and condition.
5-20
❍
26. Throttle, Propeller, and Mixture Control Cable
Visual Inspection for security and condition of cotter pins, castellated nuts, and oversized washers.
5-20
❍
13773-001
31 July 2001
1st 25
Hrs
300 Hrs
50 Hrs
5-20
Page 5
Engine Group (Continued)
Chap-Sect
Reference
Interval
Initials
100 Special
27. Fuel Injection System
Functional Inspection of Fuel Injection System in accordance with
Teledyne Continentals Motors Service Information Directive 97-3
every 100 hours and after engine installation or fuel system component replacement.
SID97-3
❍
Engine
Install or
Fuel Sys
Cmpnt
Rplcmnt
28. Exhaust System
Perform Inspection/Check for cracks, dents, missing parts, security,
and corrosion.
78-20
❍
50 Hrs
29. Exhaust Muffler/Heat Exchanger
Perform Inspection/Check for condition, security, and leakage.
78-20
❍
30. Cabin Heat Ducts
Visual Inspection for soot, distortion, and general condition.
5-20
❍
31. Breather Tube
Visual Inspection for obstructions and security.
5-20
❍
32. Crankcase
Visual Inspection for condition, leaks, and loose components.
5-20
❍
33. Engine Mount Weldment
Visual Inspection for weld cracks, corrosion, bending, and distortion.
5-20
❍
34. Engine Mount Isolators
Visual Inspection for cracking, splitting, and general condition.
5-20
❍
35. Firewall and Seals
Visual Inspection for cracks, condition, and security of attachments.
5-20
❍
36. Alternators
Visual Inspection for security and condition.
5-20
❍
37. Alternator 1
Functional Inspection in accordance with Teledyne Continentals
Motors Alternator Maintenance and Parts Catalog.
Manual No.
X30531-3
500 Hrs
38. Starter
Visual Inspection for security and condition.
5-20
❍
39. Brake Fluid Reservoir
Replenish.
12-10
❍
40. Engine Compartment
Visual Inspection for loose nuts, bolts, screws, and parts.
5-20
❍
Page 6
5-20
50 Hrs
50 Hrs
13773-001
31 July 2001
Propeller Group
Chap-Sect
Interval
Initials
Reference 100 Special
1. Spinner
Remove, clean and perform Visual Inspection for cracks and corrosion.
5-20
❍
2. Spinner Backing Plate
Visual Inspection for condition.
5-20
❍
3. Blades
Visual Inspection for nicks, bends, cracks, and condition of tips.
5-20
❍
4. Blades
Inspect blades for radial play or movement of blade tip.
61-10
❍
5. Propeller Assembly
Manual No.
Lubricate in accordance with Hartzell Propeller Owner’s Manual and
115N
Log Book.
❍
6. Hub
Visual Inspection for cracks, corrosion, leaking oil or grease.
5-20
❍
7. Governor
Visual Inspection for oil leaks.
5-20
❍
Cabin Group
Chap-Sect
Reference
Interval
Initials
100 Special
1. Cabin Doors and Strike Plates
Visual Inspection for damage, operation, and security.
5-20
❍
2. Door Latches
Check operation of door latch mechanism.
5-20
❍
3. Door Latches and Hinges
Lubricate.
12-20
❍
4. Cabin Windows and Windshield
Clean and Visual Inspection for cracking, crazing, and general condition.
5-20
❍
5. Upholstery
Visual Inspection for tears and fraying.
5-20
❍
6. Seats, Seat Belts, and Harness’
Visual Inspection for security of brackets and bolts.
5-20
❍
7. Seat Belt Inertia Reels
Visual Inspection for security of brackets and bolts.
5-20
8. Seat Rails and Slides
Visual Inspection for condition and lubricate.
12-20
❍
9. Brake Master Cylinders
Visual Inspection for leaks and security.
5-20
❍
13773-001
31 July 2001
6
Months
Annual
5-20
Page 7
Cabin Group (Continued)
Chap-Sect
Reference
Interval
Initials
100 Special
10. Parking Brake Valve and Control Knob
Visual Inspection for leaks, security, chafing, and condition.
5-20
❍
11. Flexible Brake Lines
Visual Inspection for leaks, security, and condition.
5-20
❍
12. Fuel Selector
Visual Inspection for operation.
5-20
❍
13. Avionics
Visual Inspection of components, wiring, and for security.
5-20
❍
14. Turn and Bank Indicator Batteries
Replace.
24-30
Annual
15. Outside Air Temperature Gage/Clock Battery
Replace.
34-10
24
Months
16. Instrument Panel
Visual Inspection for security of lines and wiring.
5-20
❍
17. Strobe, Landing, Navigation, Cabin, and Instrument Lights
Visual Inspection for condition. Operational Inspection.
5-20
❍
18. Altimeter
Visual and Functional Inspection for condition and calibration in
accordance with FAR 91.411
FAR
91.411
24
Months
19. Transponder
Visual and Functional Inspection for condition and calibration in
accordance with FAR 91.413
FAR
91.413
24
Months
20. Control Yokes
Visual Inspection for excessive play, security, and proper operation.
Verify no noticeable freeplay in elevator or aileron input.
5-20
❍
21. Rudder Pedals
Visual Inspection for excessive play, security, and proper operation.
Verify no noticeable freeplay in elevator or aileron input.
5-20
❍
22. Knobs, Switches, and Levers
Visual Inspection for security, attachment and operation.
5-20
❍
23. Cabin Heater Controls
Check operation for freedom of movement.
5-20
❍
24. Fresh Air Outlets and Heat Outlets
Visual Inspection for condition and obstruction or blockage.
5-20
❍
25. Air Ducts, Electrical Leads, and Attaching Parts
Visual Inspection for security, routing, chafing, deterioration, wear,
and correct installation.
5-20
❍
Page 8
5-20
13773-001
31 July 2001
Cabin Group (Continued)
Chap-Sect
Reference
Interval
Initials
100 Special
26. Cable Attachments, Cables, and Pulleys
Visual Inspection for security, chafing, wear, and general condition.
5-20
❍
27. Wing Attachment Bolts
Visual Inspection for condition, fit, and evidence of distress.
5-20
❍
28. Flap Actuation Motor and Attach Bracket
Visual inspection for condition and security.
5-20
❍
29. Fuselage Drainage Holes
Visual Inspection for obstructions or blockage.
5-20
❍
30. Fuel Lines, Valves, and Gages
Visual Inspection for chaffing, obstruction, security, and general condition.
5-20
❍
31. Pitot-Static System Water Trap
Drain and perform Visual Inspection for condition.
5-20
❍
FAR 91.207
❍
33. Placards and Instrument Markings
Visual Inspection for conformity, security, and condition.
11-20
❍
34. CAPS Parachute Compartment
Visual Inspection for security, leaks, and general condition.
5-20
❍
35. CAPS Activation Handle Mount and Cable
Visual Inspection security, chafing, and wear.
5-20
❍
36. Fire Extinguisher
Perform Inspection/Check for condition and weigh.
26-20
❍
32. Emergency Locator Transmitter
Functional Inspection in accordance with FAR 91.207.
Radio Group
Chap-Sect
Reference
Interval
Initials
100 Special
1. Radio and Electronic Equipment
Visual Inspection for proper installation, clearance, and security.
5-20
❍
2. Wiring
Visual Inspection for proper clearance, chafing, fraying, and routing.
5-20
❍
3. Bonding and Shielding
Visual Inspection for proper installation and condition.
5-20
❍
4. Antennas
Visual Inspection for condition and security.
5-20
❍
13773-001
31 July 2001
Monthly
5-20
Page 9
Fuselage and Empennage Group
Chap-Sect
Reference
Interval
Initials
100 Special
1. Skin
Visual Inspection for general condition, deterioration, delamination,
distortion, cracks, paint condition, and other evidence of failure.
5-20
❍
2. CAPS Exit Cover
Visual Inspection of perimeter for cracking or crazing.
5-20
❍
3. Vertical Stabilizer and Rudder Surfaces
Visual Inspection for distortion, and condition.
5-20
❍
4. Rudder System Rigging
Perform Inspection/Check for gap tolerances, cable tension, system
alignment, and security.
27-20
❍
5. Rudder Bearings, Hinges, Horn, and Attachments
Visual Inspection for security, condition, and freedom of movement.
5-20
❍
6. Rudder System
Operational Inspection for travel and freedom of movement.
5-20
❍
7. Horizontal Stabilizer and Elevator Surfaces
Visual Inspection for distortion, and condition.
5-20
❍
8. Horizontal Stabilizer to Fuselage Bondline
Visual Inspection for cracks.
5-20
❍
9. Elevator System Rigging
Perform Inspection/Check for gap tolerances, cable tension, system
alignment, and security.
27-30
❍
10. Elevator Bearings, Hinges, Horn, and Attachments
Visual Inspection for wear, condition, and freedom of movement.
5-20
❍
11. Elevator System
Operational Inspection for travel and freedom of movement.
5-20
❍
Wing Group
Chap-Sect
Reference
Interval
Initials
100 Special
1. Wing Tips
Remove and Visual Inspection for cracking and general condition.
57-20
❍
2. Wing Leading Edge and Stall Strips
Visual Inspection for foreign matter and debris.
5-20
❍
3. Main Gear Strut, Attachments, and Bolts
Visual Inspection for cracking, splintering, condition, and security.
32-10
❍
4. Skin
Visual Inspection for general condition, deterioration, delamination,
distortion, cracks, paint condition, and other evidence of failure.
5-20
❍
Page 10
5-20
13773-001
31 July 2001
Wing Group (Continued)
Chap-Sect
Reference
Interval
Initials
100 Special
5. Walkway
Visual Inspection for condition.
5-20
❍
6. Aileron Surfaces
Visual Inspection for distortion, and condition.
5-20
❍
7. Aileron System Rigging
Perform Inspection/Check for gap tolerances, cable tension, system
alignment, and security.
27-10
❍
8. Aileron Actuation Arm
Visual Inspection for safetying, and condition.
5-20
❍
9. Aileron Hinges, Hinge Bolts, Bearings, and Attachments
Visual Inspection for security, freeplay, and binding.
5-20
❍
10. Aileron System
Check operation for travel and freedom of movement.
5-20
❍
11. Flap System Rigging
Perform Inspection/Check for gap tolerances, system alignment,
and security.
27-50
❍
12. Flap Hinges, Hinge Bolts, Bearings, and Attachments
Visual Inspection for wear security, freeplay, and binding.
5-20
❍
13. Flap System
Operational Inspection for travel and freedom of movement.
5-20
❍
14. Fuel Lines
Visual Inspection for chaffing, obstruction, security, and general condition.
5-20
❍
15. Fuel Tank Vents
Visual Inspection for condition and obstruction.
5-20
❍
16. Stall Warning Water Trap
Drain and perform Visual Inspection for condition.
27-51
❍
17. Air Ducts, Electrical Leads, Lines, and Attaching Parts
Visual Inspection for security, routing, chafing, deterioration, wear,
and correct installation.
5-20
❍
18. Pitot Mast and Static Lines
Visual Inspection for security, condition, and obstruction.
5-20
❍
Landing Gear Group
1. Wheel Fairings
Remove, clean and perform Visual Inspection for cracking, rubbing,
and general condition.
13773-001
31 July 2001
Chap-Sect
Reference
32-00
Interval
Initials
100 Special
❍
5-20
Page 11
Landing Gear Group (Continued)
Chap-Sect
Reference
Interval
Initials
100 Special
2. Tires
Visual Inspection for cuts, uneven or excessive wear, and slippage.
5-20
❍
3. Tires
Inspect for proper tire pressure.
12-10
❍
4. Brake System
Check system for proper operation.
5-20
❍
5. Brake System
Perform Inspection/Check for disk and lining wear, condition, and
evidence of distress.
32-42
❍
6. Flexible Brake Lines
Visual Inspection for leaks, security, and condition.
5-20
❍
7. Wheels
Remove, Visual Inspection for condition, repack bearings.
32-41
❍
8. Wheels
Visual Inspection for cracks, corrosion, and broken bolts.
32-41
9. Polymer Shock Absorbing Pucks, Puck Tray, and Attach Bolts
Visual Inspection of pucks for cracking or splitting. Ensure attach
bolts are perpendicular to puck tray and puck stack-up is in alignment.
5-20
❍
10. Nose Gear Fork and Spindle
Visual Inspection for condition.
5-20
❍
11. Nose Gear Strut, Attachment, Bushings, and Bolts
Visual Inspection for cracking, condition, and security.
32-20
❍
12. Nose Gear Bolt Shaft and Spindle
Lubricate.
12-20
❍
13. Nose Gear Fork and Spindle
Inspect fork assembly for proper nut torque and cotter pin.
20-60
❍
14. Main Gear Assembly
Visual Inspection for condition.
5-20
❍
Page 12
5-20
Annual
13773-001
31 July 2001
Return to Service
1.
- Install Engine Cowling.
- Install Landing Gear Fairings.
- Install Fuselage Access Panels.
- Install Cabin Seats.
- Install Cabin Carpet.
- Install Cabin Access Panels.
- Install Wing Access Panels LW1, LW2, LW4, LW5, LW6, LW7,
LW8, LW9, LW12, LW13, LW14, LW15, and RW1, RW2, RW4,
RW5, RW6, RW7, RW8, RW9, RW12, RW13, RW14.
Chap-Sect
Reference
71-10
32-00
6-00
25-10
25-10
6-00
6-00
Interval
Initials
100 Special
❍
2. Perform an Engine Operational Inspection in accordance with Teledyne Continentals Motors Maintenance Manual, Section 5.
Manual No.
X30634A
50 Hrs
3. Perform an airplane run-up in accordance with Operational/Functional Check in 5-30. After completing the Operational/Functional
Check, perform a walk around to detect fluid leaks or other abnormalities.
5-30
❍
4. Verify all Airworthiness Directives complied with.
FAR 91.403
❍
5. Verify all Cirrus Design service letters, bulletins, and instructions
complied with.
FAR 91.403
❍
6. Verify airplane papers in proper order:
- Airworthiness Certificate
- Registration
- Operating Handbook
- Weight and Balance
FAR 91.203
❍
Signature of Mechanic or Inspector
Certificate Number
13773-001
31 July 2001
5-20
Page 13
AIRPLANE OPERATIONAL AND FUNCTIONAL CHECK
1. DESCRIPTION
The following check must be performed before and after the Scheduled Maintenance Inspection to detect
any airplane abnormalities or malfunctions. A portion of the check is accomplished with the engine running
and warmed up.
WARNING:
In order to perform the following check the engine must be operating. Do not stand or
let anyone else stand close to the arc of the airplane’s propeller while conducted this
check.
CAUTION:
During all engine operations outlined in this check, exercise caution to avoid harm or damage to personnel and equipment due to propeller blast and rotating propeller blades.
CAUTION:
Excessive engine temperatures must be avoided since run-up temperatures must closely
parallel in-flight temperatures.
13773-001
30 Nov 2000
5-30
Page 1
Operational Inspection Report
1.
Flight Controls
Check for full range of travel and excessive friction. Visual
Inspection for obstructions.
2.
Flaps
Operate through full extension and retraction for steady and
complete deployment. Flap position light illuminates at the
retracted, 50%, and 100% positions.
3.
Trim Controls
Aileron trim functions fully left and right without rudder movement caused by the rudder-aileron interconnect. Check for full
range of travel and excessive friction.
4.
Engine Controls
Check full range of motion without any obstruction or excessive
friction to travel. Power lever should provide a slight resistance
at detentes and have positive clearance to the console slot in
both the full forward and full aft positions
5.
Altimeter
Indicates within 50 feet of field elevation when set to correct
barometric pressure setting
6.
Vertical Speed Indicator (VSI)
Indicates zero.
7.
Battery 1 Master Switch - When switch is toggled ON the following should occur:
a. ALT 1 and ALT 2 fail lights should be on.
b. Flap position light illuminates.
c. Engine instruments operational, MAP gage should indicate
approximately the altimeter setting.
d. Ammeter select switch should show slight discharge.
5.
Battery 2 Master Switch - When switch is toggled ON the following should occur:
a. Voltmeter indicates at least 24 volts on battery 2.
b. ALT 1 and ALT 2 Caution lights illuminate.
c. Flap position light off.
d. Attitude gyro low voltage flag hidden.
e. HSI HDG flag hidden within five minutes.
f. Turn Coordinator low voltage flag hidden.
g. Autopilot ready indication after gyro spool up.
Page 2
5-30
Chk’d
Notes
13773-001
30 Nov 2000
Operational Inspection Report (Continued)
8.
Communications Transceivers
Verify the communications capability on both the high and low
ends of the VHF COM band.
9.
Start Engine (Refer to POH Section 4)
Starter spins propeller rapidly without slipping or dragging. Set
engine speed at 1000 RPM.
Chk’d
Notes
10. Oil Pressure
Indicates pressure in the green arc within 30 seconds. If
extremely cold, oil pressure may be in yellow arc for one to two
minutes.
11. Fuel Selector Valve
Move selector to RIGHT and LEFT positions. Verify fuel flow.
12. Alternator 1 Load
Increase RPM to 1700. Check that LOW VOLT light is off,
ammeter shows no current discharge with full avionics, landing
light, pitot heat, and navigation lights operating.
13. Alternator 2 Load
Increase RPM to 2100. Check that LOW VOLT light is off,
ammeter shows no current discharge with full load applied to
essential buses.
14. Propeller Governor
Set throttle to propeller check (first) detent. Propeller governor
should maintain engine RPM at approximately 2000 RPM.
15. Magneto RPM Drop
Check that a 75 to 100 RPM drop occurs while operating on one
magneto and no more than a 50 RPM drop difference between
left and right magnetos. Reduce RPM to 1000.
16. Alternate Induction Air
Pull alternate induction air knob. Engine RPM and MAP should
show a slight drop.
17. Engine Full Power
Advance throttle to full forward. Tachometer should read
between 2700 and 2625 RPM in a no wind environment.
13773-001
30 Nov 2000
5-30
Page 3
Operational Inspection Report (Continued)
Chk’d
Notes
18. Brakes
Rudder pedal brakes should hold airplane stationary with no
slipping at full power. Parking brake should hold airplane stationary with no slipping at full power.
19. Oil and Cylinder Head Temperatures
Verify temperatures indicate in the green arc.
20. Fuel Flow
Advance throttle to full forward. Verify fuel flow indicates approximately 28 gal/hr.
21. Engine Idle
Move throttle control lever to full aft. Tachometer should read
between 600 and 750 RPM with the mixture full rich
22. Magneto Grounding
Set engine speed to 1000 RPM. Engine should cease to fire
when magneto momentarily switched to OFF position.
23. Engine Cut Out and Shut Down
Move mixture control lever slowly toward idle cutoff. Engine
RPM should increase by 25 to 50 RPM before engine begins to
cut out. Move mixture control lever full aft to shut down engine.
Page 4
5-30
13773-001
30 Nov 2000
UNSCHEDULED MAINTENANCE CHECKS
1. DESCRIPTION
During operation, the airplane may be subject to:
A. Hard/Overweight Landings
A hard landing is any landing made at what is believed to be an excessive sink rate. An overweight
landing is defined as landing the airplane at any gross weight which exceeds the maximum take-off
weight as specified in the Pilot’s Operating Handbook and the Airplane Flight Manual.
B. Overspeed
Anytime an airplane has exceeded one or both of the following:
- Airplane overspeed exceeding placard speed limits of flaps.
- Airplane overspeed exceeding design speeds.
C. Severe Air Turbulence or Severe Maneuvers
Atmospheric conditions producing violent buffeting of airplane. Severe maneuvers can be defined as
any maneuvers exceeding the Pilot’s Operating Handbook and the airplane’s flight limits.
D. Lightning Strike
If flown through a region of the atmosphere where electrical discharge is occurring, the airplane may
become part of the discharge path. During a lightning strike, the current enters the airplane at one
point and exits another, usually at opposite extremities. It is in these entrance and exit points where
damage is most likely to occur. Burning and/or eroding of small surface areas of the skin and structure
may be detected during inspection. In most cases, the damage is obvious. In some cases, however,
hidden damage may result. In the case of lightning strike, this inspection must be accomplished before
returning it to service.
E. High Drag/Side Loads Due to Ground Handling
A high drag/side load condition is defined as situations when the airplane skids or overruns from a prepared surface onto an unprepared surface. This condition can also be met due to landings short of prepared surfaces, landings which cause the blowing of tires, or skidding conditions where the safety of
the airplane was in question. This covers takeoffs, landings, or unusual taxi conditions.
When any of these conditions are reported, a visual inspection of the airframe and the components
involved must be accomplished. The inspections are performed to determine the extent of damage to the
structure and components adjacent to the area of damage. In the case of lightning strike, a comprehensive
inspection of the airplane exterior is performed to locate possible damage. If foreign object damage is suspected, a visual inspection of the airplane must be accomplished before the airplane is returned to service.
13773-001
30 Nov 2000
5-50
Page 1
2. MAINTENANCE PRACTICES
A. Hard/Overweight Landing
Note:
(1)
(2)
If the hard/overweight landing is combined with high drag/side loads, additional checks
are required.
Landing Gear
(a) Main gear struts - Inspect for security of attachment, permanent deformation, delamination, and cracking or splintering of strut.
(b) Main gear attachments and supporting structure - Inspect for security loose or failed fasteners, permanent deformation, damage to fairings, tire damage, and any other evidence
of structural damage.
(c)
Nose gear and attaching structure - Inspect for security, loose or failed fasteners, permanent deformation of strut or axle, engine mount weld cracks, damage to fairing, tire damage, and any other evidence of structural damage.
Wings
(a) Wings surface - Inspect for skin cracks, loose of failed fasteners, and any evidence of
structural damage.
(b) Trailing edge - Inspect for any deformation effecting normal flap operation.
B. Overspeed
(1)
(2)
(3)
(4)
(5)
Landing gear
(a) Main gear axle and fittings - Inspect for cracks, security, and evidence of structural damage.
(b) Tires - Inspect tires for flat spots, excessive wear, and tire slippage on the wheel rim.
Fuselage
(a) Windshield and windows - Inspect for buckling, dents, loose or failed fasteners, and any
evidence of structural damage.
(b) All hinged doors - Inspect hinges, hinge attach points, latches and attachments, and any
evidence of structural damage.
Cowling
(a) Inspect for buckling, cracks, loose or failed fasteners, and indications of structural damage.
Stabilizers
(a) Stabilizers - Inspect skins, hinges and attachments, moveable surfaces, mass balance
weights, and attaching structure for cracks, dents, buckling, loose or failed fasteners, and
evidence of structural damage.
Wings
(a) Flaps - Inspect for skin buckling, cracks, loose or failed fasteners, attachments and structural damage.
(b) Fillets and fairings - Inspect for cracks, and loose or failed fasteners.
C. Severe Turbulence and/or Maneuvers
(1)
Page 2
Stabilizers
(a) Horizontal stabilizer hinge fittings, and fittings - Inspect for security, loose or failed fasteners, and any evidence of structural damage.
(b) Vertical stabilizer - Inspect for evidence of structural damage, and damage to hinges and
fittings.
5-50
13773-001
30 Nov 2000
(c)
(2)
Elevator and rudder balance weight supporting structure - Inspect for security, loose or
failed fasteners, and evidence of structural damage.
Wing
(a) Wing to body fittings and supporting structure - Inspect for security, loose or failed fasteners, and evidence of structural damage.
(b) Trailing Edge - Inspect for and deformation affecting normal operation of flap and aileron.
D. Lightning Strike
(1)
(2)
(3)
(4)
(5)
(6)
(7)
Communications
(a) Antennas - Inspect all antennas for evidence of burning or eroding. If damage is noted,
perform functional check of affected system.
Navigation
(a) Glidescope antenna - Inspect for burning and pitting. If damage is noted, perform a functional check of glidescope system.
(b) Compass should be considered serviceable if the corrected heading is within plus or
minus 10 degrees of heading indicated by the remote compass system. If remote compass is not within tolerance, remove, repair, or replace.
Fuselage
(a) Skin - Inspect surface of fuselage skin for evidence of damage.
Stabilizers
(a) Inspect surfaces of stabilizers for evidence of damage.
Wings
(a) Skin - Inspect for evidence of burning and eroding.
(b) Wing tips - Inspect for evidence of burning and pitting.
(c)
Flight surfaces and hinging mechanisms - Inspect for burning and pitting.
Propeller
(a) Propeller - Remove from service and have inspected at an authorized repair station.
Powerplant
(a) Engine - Refer to engine manufacturer’s overhaul manual for inspection procedures.
E. Foreign Object Damage
(1)
(2)
(3)
(4)
(5)
(6)
(7)
13773-001
30 Nov 2000
Landing Gear
(a) Fairings - Inspect for cracks, misalignment, and indication of structural damage.
Fuselage
(a) Skin - Inspect forward and belly areas for punctures, cracks, and any evidence of damage.
Cowling
(a) Skin - Inspect forward and belly areas for punctures, cracks, and any evidence of damage.
Stabilizers
(a) Leading edge - Inspect for punctures, cracks, scratches, and any evidence of damage.
Windows
(a) Windshield - Inspect for chipping, scratches, and cracks.
Wings
(a) Leading edge - Inspect for punctures, cracks, scratches, and any evidence of damage.
Engine
(a) Filter - Replace if contaminated.
(b) Air inlet section - Inspect for dents, cracks, scratches, punctures, blood, and feathers.
(c)
Propeller - Inspect for nicked, bent, broken, or cracked blades.
5-50
Page 3
F.
High Drag/Side Loads Due to Ground Handling
(1)
(2)
Page 4
Landing Gear
(a) Main gear and fairings - Inspect for loose or failed fasteners, buckling, security, cracks,
and evidence of structural damage.
(b) Nose gear and fairing - Inspect for loose or failed fasteners, cracks, security, buckling, and
evidence of structural damage.
Wings
(a) Wing to fuselage fittings and attaching structure - Inspect for security, loose or failed fasteners, and evidence of structural failure.
5-50
13773-001
30 Nov 2000
CHAPTER
DIMENSIONS AND
AREAS
CHAPTER 6 - DIMENSIONS AND AREAS
LIST OF EFFECTIVE PAGES
Chapter/Section
Page
Date
6-LOEP
1
30 NOV 2000
6-TOC
1
30 NOV 2000
6-00
1
30 NOV 2000
6-00
2
30 NOV 2000
6-00
3
30 NOV 2000
6-00
4
30 NOV 2000
6-00
5
30 NOV 2000
6-00
6
30 NOV 2000
6-00
7
30 NOV 2000
6-00
8
30 NOV 2000
6-00
9
30 NOV 2000
6-00
10
30 NOV 2000
13773-001
30 Nov 2000
6-LOEP
Page 1
CHAPTER 6 - DIMENSIONS AND AREAS
TABLE OF CONTENTS
Subject
DIMENSIONS AND AREAS
Chapter/Section
Page
6-00
General
1
Airplane Dimensions and Areas
1
General
Cabin
Wings
Flaps
Ailerons
Horizontal Stabilizer
Elevator
Vertical Stabilizer
Rudder
Landing Gear
Access Panels
1
1
1
1
1
2
2
2
2
2
2
Cabin Floor
Wing
Empennage
Control Surface Travels And Cable Tension Settings
2
2
2
2
Aileron
Elevator
Rudder
Flaps
13773-001
30 Nov 2000
2
2
3
3
6-TOC
Page 1
DIMENSIONS AND AREAS
1. GENERAL
This section describes those diagrams and text which shows the area, dimensions, stations, access doors,
and physical locations of the structural members of the airplane. Also included is the cardinal rigging
dimensions.
2. AIRPLANE DIMENSIONS AND AREAS
The airplane is divided into reference points in inches. These reference points provide a means of quickly
identifying the locations of components. Three axes are used as reference points.
The following terms are used for the reference points:
FS - Fuselage Station is a horizontal reference designation starting in front of the nose of the airplane
WS - Wing Station is measured outboard from the centerline of the fuselage to the wing tip.
WL - Water Line is a vertical reference designation measured parallel to the ground.
BL - Buttock Line is a horizontal reference designation starting at the airplane centerline. Right or left is
added to indicate direction from airplane centerline.
A. General
Length (Overall)................................................................................... 25.92 ft ..................... 7.90 m
Height (Maximum) ................................................................................. 4.75 ft ..................... 1.45 m
Wing Span (Overall) ............................................................................ 38.25 ft ................... 11.65 m
Propeller Diameter (Maximum) ............................................................. 6.50 ft ..................... 1.98 m
Wheel Track (Main To Main) ................................................................ 10.83 ft ..................... 3.30 m
B. Cabin
Cabin Width......................................................................................... 49.00 in. ............... 124.00 cm
Cabin Height........................................................................................ 50.00 in. ............... 127.00 cm
Cabin Length ..................................................................................... 122.00 in. ............... 309.00 cm
Cabin Volume .................................................................................... 137.00 ft³.................... 3.83 m³
Baggage Compartment Height............................................................ 39.00 in. ................. 99.00 cm
Baggage Compartment Width ............................................................. 40.00 in. ............... 101.00 cm
Baggage Compartment Length ........................................................... 36.00 in. ................. 91.00cm
Baggage Compartment Volume .......................................................... 32.00 ft³.................... 0.90 m³
C. Wings
Span .................................................................................................... 38.25 ft ................... 11.65 m
Area................................................................................................... 144.90 ft².................. 13.46 m²
Wing Loading ...................................................................................... 23.46 lb/ft² ............ 114.45 kg/m²
Aspect Ratio ........................................................................................ 10.00 ...................... 10.00
Wing Dihedral ........................................................................................ 4.50 °...................... 4.50°
D. Flaps
Span ...................................................................................................... 8.80 ft ..................... 2.68 m
Area..................................................................................................... 10.80 ft².................... 1.00 m²
E. Ailerons
Span ...................................................................................................... 4.70 ft ..................... 1.43 m
Area....................................................................................................... 4.37 ft².................... 0.41 m²
13773-001
30 Nov 2000
6-00
Page 1
F.
Horizontal Stabilizer
Span .................................................................................................... 13.17 ft ..................... 4.01 m
Area..................................................................................................... 25.75 ft².................... 2.39 m²
Aspect Ratio .......................................................................................... 5.59 ........................ 5.59
G. Elevator
Span .................................................................................................... 12.00 ft ..................... 3.66 m
Area....................................................................................................... 7.73 ft².................... 0.72 m²
H. Vertical Stabilizer
Span ...................................................................................................... 5.52 ft ..................... 1.65 m
Area..................................................................................................... 15.93 ft².................... 1.48 m²
Aspect Ratio .......................................................................................... 1.84 ........................ 1.84
I.
Rudder
Span ...................................................................................................... 5.42 ft ..................... 1.65 m
Area....................................................................................................... 5.26 ft².................... 0.49 m²
J. Landing Gear
Wheel Track (Main To Main) ................................................................ 10.50ft ...................... 3.20 m
Wheel Base (Main To Nose).................................................................. 7.26 ft ..................... 2.21 m
3. ACCESS PANELS
A. Cabin Floor (See Figure 6-005)
Maintenance practices pertinent to the cabin floor access panels are found in Chapter 53, Fuselage.
(Refer to 53-20)
B. Wing (See Figure 6-006)
Maintenance practices pertinent to the wing access panels are found in Chapter 57, Wings. (Refer to
57-30)
C. Empennage (See Figure 6-007)
Maintenance practices pertinent to the empennage access panels are found in Chapter 53, Fuselage.
(Refer to 53-30)
4. CONTROL SURFACE TRAVELS AND CABLE TENSION SETTINGS
A. Aileron
Aileron Up Travel:12.5° +/- 1.0°
Aileron Down Travel: 12.5° +/- 1.0°
Aileron Trim Deflection:6.0° +/- 1.0°
Aileron Cable Tension:30-40 lb
B.
Elevator
Elevator Up Travel:25.0° +/- 1.0°
Elevator Down Travel: 15.0° +/- 1.0°
Elevator Trim Deflection:-11.5° +/- 0.5°, +17° + 1°/-2°
Elevator Cable Tension:30-40 lb
Page 2
6-00
13773-001
30 Nov 2000
C. Rudder
Maximum Right Rudder Deflection:20.0° +/- 1.0°
Maximum Left Rudder Deflection:20.0° +/- 1.0°
D. Flaps
Flap UP:0.0° +/- 0.5°
Flap 50%:16.0° +/- 0.5°
Flap 100%32.0° +/- 0.5°
13773-001
30 Nov 2000
6-00
Page 3
Figure 6-001
Airplane Principal Dimension
Page 4
6-00
13773-001
30 Nov 2000
Figure 6-002
Fuselage Stations
13773-001
30 Nov 2000
6-00
Page 5
Figure 6-003
Wing Stations
Page 6
6-00
13773-001
30 Nov 2000
Figure 6-004
Elevator Stations
13773-001
30 Nov 2000
6-00
Page 7
Figure 6-005
Floor Access Panels
Page 8
6-00
13773-001
30 Nov 2000
Figure 6-006
Wing Access Panels
13773-001
30 Nov 2000
6-00
Page 9
Figure 6-007
Empennage Access Panels
Page 10
6-00
13773-001
30 Nov 2000
CHAPTER
LIFTING AND
SHORING
CHAPTER 7 - LIFTING AND SHORING
LIST OF EFFECTIVE PAGES
Chapter/Section
Page
Date
7-LOEP
1
30 NOV 2000
7-TOC
1
30 NOV 2000
7-00
1
30 NOV 2000
7-10
1
30 NOV 2000
7-10
2
30 NOV 2000
7-20
1
30 NOV 2000
13773-001
30 Nov 2000
7-LOEP
Page 1
CHAPTER 7 - LIFTING AND SHORING
TABLE OF CONTENTS
Subject
LIFTING AND SHORING
Chapter/Section
Page
7-00
General
JACKING
1
7-10
Description
1
Maintenance Practices
1
Jacking the Airplane
Raise Airplane
Lower Airplane
1
1
1
HOISTING
7-20
Description
1
Maintenance Practices
1
Hoisting The Airplane
Raise Airplane
Lower Airplane
13773-001
30 Nov 2000
1
1
1
7-TOC
Page 1
LIFTING AND SHORING
1. GENERAL
This chapter describes the materials necessary to lift and shore the airplane for maintenance, overhaul,
repair, and abnormal conditions such as collapsed gear. The entire airplane may be lifted by using standard aircraft hydraulic jacks in conjunction with jack pads at the jack points provided on the fuselage and
wings. The jacking site, when possible, should be on level ground and should be protected from wind, preferably inside a hanger. The airplane may be jacked with full fuel tanks. As the airplane’s empty CG is forward of the wing jack points, add 150 to 200 lb of ballast to baggage compartment to prevent airplane from
tipping forward. When possible jacks should be used in conjunction with shoring.
13773-001
30 Nov 2000
7-00
Page 1
JACKING
1. DESCRIPTION
Three jack points, located at each wing tiedown and empennage tiedown, are provided to perform maintenance operations. Tie-down rings must be removed and replaced with jack points prior to lifting. Jack
points are stowed in the baggage compartment. The airplane may be jacked using two standard aircraft
hydraulic jacks at the wing jacking points and a weighted tailstand attached to the tail tiedown.
2. MAINTENANCE PRACTICES
A. Jacking the Airplane (See Figure 7-101)
(1)
Raise Airplane
(a)
Acquire necessary tools, equipment, and supplies.
Description
(b)
(c)
(d)
(e)
13773-001
30 Nov 2000
Supplier
Purpose
Aircraft Hydraulic Jacks
-
Any Source
Jack Points
-
Cirrus Design Corp. Provide fuselage hardpoint.
Nose Wheel Block
-
Any Source
Lift the airplane.
Prevent airplane
movement.
CAUTION:
Do not jack the aircraft outside or in open hanger with winds in excess of 10
m.p.h.
CAUTION:
The empty CG is forward of the wing jacking points. To prevent airplane
from tipping forward during jacking, use a weighted tailstand (300-lb minimum) attached to the tail tiedown.
Position airplane on a hard, flat, level surface.
Remove and stow tie-down rings from wings and tail.
Attach a weighted tailstand to the tail tiedown ring.
Position jacks and jack points for jacking. Insert jack point into wing tiedown receptacle.
Holding the jack point in place, position the jack under the point and raise the jack to firmly
contact the jack point. Repeat for opposite jacking point.
Note:
(2)
P/N or Spec.
Raise airplane no more than required for maintenance being performed.
(f)
Raise the airplane keeping the airplane as level as possible.
(g) Secure jack locks.
Lower Airplane
(a) Release pressure on all jacks as simultaneously as necessary to keep airplane as level as
possible.
(b) Remove jacks, jack points, and tailstand. Stow points in baggage compartment.
(c)
Install tiedown rings in wings.
7-10
Page 1
Figure 7-101
Lifting and Jacking Points
Page 2
7-10
13773-001
30 Nov 2000
HOISTING
1. DESCRIPTION
This chapter describes those instructions necessary to support the airplane during maintenance and
repair. In some instances (i.e. off-runway landing, collapsed gear, etc.) it may be necessary to lift the airplane using hoisting straps.
2. MAINTENANCE PRACTICES
A. Hoisting The Airplane (See Figure 7-101)
(1)
Raise Airplane
(a)
Acquire necessary tools, equipment, and supplies.
Description
(b)
(c)
(d)
13773-001
30 Nov 2000
Supplier
Purpose
Hoisting Straps
-
Any Source
Lift the airplane.
Ropes
-
Any Source
Provide stability.
Aircraft Hydraulic Jacks
-
Any Source
Lift the airplane.
Place hoisting straps around fuselage at FS 289.
Attach hoisting strap to engine lifting bracket.
Attach long ropes to tie-down fittings (wing and tail). Use these ropes to stabilize and
guide the airplane during hoisting and lowering.
CAUTION:
(2)
P/N or Spec.
To assure stability and safety during hoisting operations, raise airplane
slowly.
(e) Raise airplane enough to place jacks under wings and empennage. (Refer to 7-10)
(f)
Remove hoisting lines.
Lower Airplane
(a) Lower airplane and release pressure on all jacks simultaneously as necessary to keep airplane as level as possible. (Refer to 7-10)
(b) Remove jacks, jack points, and tailstand. Stow points in baggage compartment.
7-20
Page 1
CHAPTER
LEVELING AND
WEIGHING
CHAPTER 8 - LEVELING AND WEIGHING
LIST OF EFFECTIVE PAGES
Chapter/Section
Page
Date
8-LOEP
1
30 NOV 2000
8-TOC
1
30 NOV 2000
8-00
1
30 NOV 2000
8-10
1
30 NOV 2000
8-20
1
30 NOV 2000
8-20
2
30 NOV 2000
8-20
3
30 NOV 2000
13773-001
30 Nov 2000
8-LOEP
Page 1
CHAPTER 8 - LEVELING AND WEIGHING
TABLE OF CONTENTS
Subject
LEVELING AND WEIGHING
Chapter/Section
Page
8-00
General
LEVELING
1
8-10
Description
1
Maintenance Practices
1
Leveling the Airplane
Longitudinal Leveling - Spirit Level Using Pilot’s Door Sill
Longitudinal Leveling - Optical Level Using Fuselage Leveling Points
Lateral Leveling
WEIGHING
1
1
1
1
8-20
Description
1
Maintenance Practices
1
Weighing the Airplane
Preparation
Weighing
Measuring
13773-001
30 Nov 2000
1
1
1
1
8-TOC
Page 1
LEVELING AND WEIGHING
1. GENERAL
This chapter provides information necessary to properly level and weigh the airplane for any of the various
maintenance, overhaul, or major repairs which might become necessary. To obtain the expected flight performance, flight characteristics, and flight safety, the airplane must be operated within the permissible load
and center of gravity envelope. If the airplane or its equipment is modified in a way that might influence its
weight or center of gravity, the empty weight and corresponding center of gravity must be re-measured.
13773-001
30 Nov 2000
8-00
Page 1
LEVELING
1. DESCRIPTION
This chapter provides information necessary to properly level the airplane for any of the various maintenance, overhaul, or major repairs which might become necessary. The cabin door sill edge is parallel
within 0.10° relative waterline 100. The door sill is used in conjunction with a spirit level to determine airplane ground attitude. Two forward leveling points are located on either side of the cowl at fuselage station
99.00. One aft point is located on the tailcone access flange under the horizontal stabilizer on the right
side, at fuselage station 299.00. The leveling points are used in conjunction with a transit to determine
ground attitude.
2.
MAINTENANCE PRACTICES
A. Leveling the Airplane
(1)
Longitudinal Leveling - Spirit Level Using Pilot’s Door Sill (See Figure 8-101)
(a)
Acquire necessary tools, equipment, and supplies.
Description
Spirit Level
(2)
P/N or Spec.
-
Supplier
Any Source
Purpose
Level the airplane.
(b) Open pilot side door.
(c)
Place spirit level on top and parallel to door sill, centered.
(d) To level airplane longitudinally, deflate nose gear tire to center bubble in level.
Longitudinal Leveling - Optical Level Using Fuselage Leveling Points (See Figure 8-101)
(a)
Acquire necessary tools, equipment, and supplies.
Description
Optical Level
P/N or Spec.
-
Supplier
Any Source
Purpose
Level the airplane.
(b)
(3)
Remove screws at longitudinal leveling points located on side of fuselage at FS 99, FS299, and WL 95.9.
(c)
Position and sight optical level on leveling points and observe optical level light beam.
(d) To level airplane longitudinally, deflate nose gear tire to center optical level light beam on
leveling points.
Lateral Leveling (See Figure 8-101)
(a)
Acquire necessary tools, equipment, and supplies.
Description
(b)
(c)
(d)
(e)
13773-001
30 Nov 2000
P/N or Spec.
Supplier
Purpose
Spirit Level
-
Any Source
Level the airplane.
Straight Edge
-
Any Source
Level platform.
Open both doors on airplane.
Place a straight edge on top and perpendicular to door sills, centered.
Place level on top and parallel to straight edge, centered.
To level airplane laterally, deflate main gear tire to center bubble in level.
8-10
Page 1
Figure 8-101
Airplane Leveling
Page 2
8-10
13773-001
30 Nov 2000
WEIGHING
1. DESCRIPTION
This chapter provides information necessary to properly weigh the airplane for any of the various maintenance, overhaul, or major repairs which might become necessary. To obtain the expected flight performance, flight characteristics, and flight safety, the airplane must be operated within the permissible load
and center of gravity envelope. If the airplane or its equipment is modified in a way that might influence its
weight or center of gravity, the empty weight and corresponding center of gravity must be re-measured
2. MAINTENANCE PRACTICES
A. Weighing the Airplane
(1)
(2)
Preparation
(a) Perform the following prior to weighing the airplane:
(b) Inflate tires to recommended operating pressures. (Refer to 12-10)
(c)
Service brake reservoir. (Refer to 12-10)
(d) Drain fuel. (Refer to 12-10)
(e) Service engine oil. (Refer to 12-10)
(f)
Move crew seats to the most forward position.
(g) Place all control surfaces in neutral position.
(h) Verify equipment installation and location by comparison to equipment list.
(i)
Level airplane. (Refer to 8-10)
Weighing (See Figure 8-201)
(a)
Acquire necessary tools, equipment, and supplies.
Description
P/N or Spec.
Supplier
Purpose
Scales
-
Any Source
Weigh the airplane.
Tape Measure
-
Any Source
Provide measurement for arm calculation.
Plumb Bob
-
Any Source
Aid in airplane
measurement.
Note:
Two scale of equal height must be used for the main gear wheels.
(b)
(3)
13773-001
30 Nov 2000
Place scale under each wheel (minimum scale capacity; 500 pounds for nose wheel, 1000
pounds for each main gear wheel).
(c)
With the airplane level, doors closed, and brakes released, record the weight on each
scale. Deduct the tare, if any, from each reading.
Measuring (See Figure 8-201)
(a) Obtain measurement ‘x’ by measuring horizontal along the airplane center line (BL 0) from
a line stretched between the main wheel centers to a plumb bob dropped from the forward
side of the firewall (FS 100). Add 100 to this measurement to obtain left and right weighing
point arm (dimension ‘A’).
(b) Obtain measurement ‘y’ by measuring horizontally and parallel to the airplane centerline
(BL 0), from center of nose wheel axle, left side, to a plumb bob dropped from the line
stretched between the main wheel centers. Repeat on right side and average the mea-
8-20
Page 1
(c)
(d)
(e)
(f)
(g)
(h)
Page 2
surements. Subtract this measurement from dimension ‘A’ to obtain the nose wheel
weighting point arm (dimension ‘B’).
Determine and record the moment for each of the main nose gear weighting points using
the following formula:
Moment = Net Weight x Arm
Calculate and record the as-weighed C.G. weight and moment by totaling the appropriate
columns.
Determine and record the as-weighed C.G. in inches aft of datum using the following formula:
C.G. = Total Moment/Total Weight
Add or subtract any items not included in the as-weighted condition to determine the
empty condition. Application of the above C.G. formula will determine the C.G. for this
condition.
Add the correction for engine oil (15.0 lb at FS 79.3) if the airplane was weighed with oil
drained. Add the correction for unusable fuel (18.0 lb at FS 154.9) to determine the Basic
Empty Weight and Moment. Calculate and record the Basic Empty Weight C.G. by applying the above C.G. formula.
Record the new weight and C.G. values on the Weight and Balance Record located in the
airplanes’ Pilot’s Operating Handbook.
8-20
13773-001
30 Nov 2000
Weighing
Point
Scale
Reading
= Net
Weight
- Tare
X Arm
Left Main
A=
Right Main
A=
Nose Gear
B=
Total
As Weighed
CG =
= Moment
CG = Total Moment + Total Weight
Space below provided for additions or subtractions to as weighed condition.
Empty Weight
CG =
Engine Oil (if oil drained)
15 lb at FS 79.3, Moment = 1176
Unusable Fuel
18.0
Basic Empty Weight
154.9
2788
CG =
C.G. % MAC = 100 x(C.G. Inches - LEMAC)/MAC
= 100 x(C.G. Inches - 133.1)/47.7
Figure 8-201
Airplane Weighing
13773-001
30 Nov 2000
8-20
Page 3
CHAPTER
TOWING AND
TAXIING
CHAPTER 9 - TOWING AND TAXIING
LIST OF EFFECTIVE PAGES
Chapter/Section
Page
Date
9-LOEP
1
30 NOV 2000
9-TOC
1
30 NOV 2000
9-00
1
30 NOV 2000
9-10
1
30 NOV 2000
9-10
2
30 NOV 2000
9-10
3
30 NOV 2000
9-20
1
30 NOV 2000
13773-001
30 Nov 2000
9-LOEP
Page 1
CHAPTER 9 - TOWING AND TAXIING
TABLE OF CONTENTS
Subject
TOWING AND TAXIING
Chapter/Section
Page
9-00
General
TOWING
1
9-10
Description
1
Maintenance Practices
1
Airplane Towing
Towing Manually
Towing With Tow Vehicle
TAXIING
1
1
1
9-20
Description
1
Maintenance Practices
1
Airplane Taxiing
13773-001
30 Nov 2000
1
9-TOC
Page 1
TOWING AND TAXIING
1. GENERAL
This chapter provides instructions necessary to tow and taxi the airplane. Movement of the airplane on the
ground is accomplished using the manufacturer supplied, yoke-type tow bar, power equipment that will not
damage or excessively strain the nose gear steering assembly, or by taxiing. One person is capable of
moving the airplane on a smooth, level surface using the tow bar.
13773-001
30 Nov 2000
9-00
Page 1
TOWING
1. DESCRIPTION
This chapter provides instructions necessary to tow the airplane by hand or with tow vehicle.
2. MAINTENANCE PRACTICES
A. Airplane Towing
(1)
Towing Manually
CAUTION:
(a)
During the towing operation, do not turn the nose gear beyond its steering radius
on either side of center. Exceeding the steering radius will result in damage to the
nose gear and steering mechanism. (See Figure 9-101)
Acquire necessary tools, equipment, and supplies.
Description
(b)
(c)
(d)
Purpose
-
Any Source
Tow the airplane.
Wheel Chocks
-
Any Source
Block wheels.
Insert tow bar into nose wheel towing lug.
Release parking brake.
Remove chocks.
Do not push or pull on control surfaces or propeller when maneuvering the
airplane.
(e) Move airplane to desired location.
(f)
Position chocks in front of tires.
(g) Remove tow bar.
(h) Set parking brake.
Towing With Tow Vehicle
CAUTION:
(a)
During the towing operation, do not turn the nose gear beyond its steering radius
on either side of center. Exceeding the steering radius will result in damage to the
nose gear and steering mechanism. (See Figure 9-101)
Acquire necessary tools, equipment, and supplies.
Description
Wheel Chocks
(b)
(c)
(d)
(e)
(f)
13773-001
30 Nov 2000
Supplier
Tow Bar
Note:
(2)
P/N or Spec.
P/N or Spec.
-
Supplier
Any Source
Purpose
Block wheels.
Insert tow bar into nose wheel towing lug.
Attach tow bar to tow vehicle.
Release parking brake.
Remove chocks.
Move airplane to desired location.
9-10
Page 1
(g)
(h)
(i)
Page 2
Position chocks in front of tires.
Remove tow bar from tow vehicle and airplane.
Set parking brake.
9-10
13773-001
30 Nov 2000
Figure 9-101
Minimum Turning Radius
13773-001
30 Nov 2000
9-10
Page 3
TAXIING
1. DESCRIPTION
This chapter provides instructions necessary to taxi the aircraft. The airplane is controlled with toe operated brakes during taxiing.
2. MAINTENANCE PRACTICES
A. Airplane Taxiing
Note:
Engine starting, taxiing, and shut-down may only be performed by authorized personnel.
CAUTION:
During the towing operation, do not turn the nose gear beyond its steering radius on
either side of center. Exceeding the steering radius will result in damage to the nose
gear and steering mechanism. (See Figure 9-101)
(1)
(2)
(3)
(4)
Start Engine. (Refer to Pilot’s Operating Handbook Section 4)
Advance Throttle.
Release parking brake.
Taxi a few feet forward and apply the brakes to determine brake effectiveness.
CAUTION:
Observe wing clearance when taxiing near building or other stationary object.
On uneven ground, taxi operations must be performed especially carefully to
avoid propeller ground strike.
Do not operate engine at high RPM when taxing over ground containing loose
stones, gravel, or any material that may cause damage to propeller blades.
(5)
(6)
(7)
13773-001
30 Nov 2000
Taxi airplane to desired location.
Turn off airplane.
Park, chock, and moor the airplane as required.
9-20
Page 1
CHAPTER
PARKING AND
MOORING
CHAPTER 10 - PARKING AND MOORING
LIST OF EFFECTIVE PAGES
Chapter/Section
Page
Date
10-TOC
1
30 NOV 2000
10-LOEP
1
30 NOV 2000
10-00
1
30 NOV 2000
10-10
1
30 NOV 2000
10-10
2
30 NOV 2000
10-20
1
30 NOV 2000
10-20
2
30 NOV 2000
10-30
1
30 NOV 2000
10-30
2
30 NOV 2000
10-30
3
30 NOV 2000
13773-001
30 Nov 2000
10-LOEP
Page 1
CHAPTER 10 - PARKING AND MOORING
TABLE OF CONTENTS
Subject
PARKING AND MOORING
Chapter/Section
Page
10-00
General
PARKING
1
10-10
Description
1
Maintenance Practices
1
Parking
Temporary Parking or Mild Weather
Long Term Parking or Severe Weather
MOORING
1
1
1
10-20
General
1
Maintenance Practices
1
Mooring
Temporary and Mild Weather Conditions
Mooring, Long Term and Severe Weather Conditions
STORAGE
1
1
1
10-30
General
1
Maintenance Practices
1
Storage
Temporary Storage - 30 to 90 Days
Indefinite Storage
Preparation for Service
13773-001
30 Nov 2000
1
1
1
2
10-TOC
Page 1
PARKING AND MOORING
1. GENERAL
This chapter provides instructions necessary to park and moor the aircraft in any of the probable conditions
to which it may be subjected. Mooring procedures should be followed if anticipating high winds, or when
the airplane is to remain outside for extended periods of time. In addition, this chapter also includes
instructions for short and long term storage.
13773-001
30 Nov 2000
10-00
Page 1
PARKING
1. DESCRIPTION
This chapter provides instructions necessary to park or store the airplane in any of the probable conditions
to which it may be subjected. Maintenance practices necessary to prepare the aircraft for parking and
mooring are included.
2. MAINTENANCE PRACTICES
A. Parking
(1)
Temporary Parking or Mild Weather (See Figure 10-101)
(a)
Acquire necessary tools, equipment, and supplies.
Description
(b)
(2)
Purpose
-
Any Source
Tow the airplane.
Wheel Chocks
-
Any Source
Prevent airplane
movement.
Position airplane on level surface headed into wind.
Do not set parking brake during cold weather, when accumulated moisture
may freeze brakes, or when brakes are overheated.
Set parking brake
Chock main gear wheels.
In gusty or stormy weather, moor the airplane. (Refer to 10-20)
Long Term Parking or Severe Weather (See Figure 10-201)
If the airplane is parked for long periods of time, danger of wheel bearing corrosion exists. To
prevent this, the airplane should be moved by pushing or towing. To prevent flat spots and other
deformations to tires, the wheels should be periodically re-positioned as described above. The
frequency of the movement depends on the weather conditions. Movement should be performed
daily in cold weather and weekly in warm weather.
(a)
For long term and severe weather parking, follow instructions as outlined above, except
use multiple tie-down lines.
Note:
13773-001
30 Nov 2000
Supplier
Tow Bar
CAUTION:
(c)
(d)
(e)
P/N or Spec.
Refer to 10-30 for procedures required for longer parking durations.
10-10
Page 1
Figure 10-101
Parking and Mooring - Fair Weather
Page 2
10-10
13773-001
30 Nov 2000
MOORING
1. GENERAL
This chapter provides instructions necessary to moor the airplane. Three fixed mooring points are provided
on the airplane. Two are located on the underside of the wings and a third is located on the underside of
the empennage directly below the horizontal stabilizer
2. MAINTENANCE PRACTICES
A. Mooring
(1)
Temporary and Mild Weather Conditions (See Figure 10-101)
(a)
Acquire necessary tools, equipment, and supplies.
Description
(b)
13773-001
30 Nov 2000
Purpose
-
Any Source
Prevent airplane
movement.
Inlet Cover
-
Any Source
Prevent entry of
moisture and/or foreign particles.
Pitot Tube Cover
-
Any Source
Prevent entry of
moisture and/or foreign particles.
Static Ground Cable
-
Any Source
To ground airplane.
Rope
-
Any Source
To tie-down wing
and tail.
Position airplane on level surface and headed into the wind.
Do not set parking brake during cold weather, when accumulated moisture
may freeze brakes, or when brakes are overheated.
Set parking brake.
Chock main gear wheels.
Connect mooring lines to mooring wings.
Note:
(2)
Supplier
Wheel Chocks
CAUTION:
(c)
(d)
(e)
P/N or Spec.
During gusty or high wind conditions, mooring lines may require periodic
tightening to prevent excessive movement of airplane. Use a secure antislip knot such as bowline to ensure security.
(f)
Install pitot tube cover and induction air inlet cover to prevent entry of foreign materials
(g) Attach static ground cable to tie-down ring on the wing and the ground anchor.
Mooring, Long Term and Severe Weather Conditions (See Figure 10-201)
(a) Follow instructions as outlined in Chapter 10-20 except use multiple tie down lines.
10-20
Page 1
Figure 10-201
Parking and Mooring - Long Term
Page 2
10-20
13773-001
30 Nov 2000
STORAGE
1. GENERAL
This chapter provides instruction necessary to store the airplane for temporary or long-term durations.
2. MAINTENANCE PRACTICES
A. Storage
(1)
(2)
Temporary Storage - 30 to 90 Days
(a) Parking and Mooring
1
Park and moor airplane. (Refer to 10-20)
(b) Engine Preservation
1
Refer to the Teledyne Continental Motors Maintenance and Operator’s Manual
listed in the List of Publications in the front of this publication.
(c)
Fuel Supply
1
The fuel tank must be completely filled. Check for water in tank each week. (Refer to
12-10)
(d) Landing Gear, Wheels, and Tires
1
No special procedures are required for the main and nose landing gear.
(e) Wheels
1
The wheels should be turned three to four revolutions per 30 days to prevent corrosion.
(f)
Tires
1
Wipe tires with dry cloth, and treat with tire protector spray.
2
Turn wheels. Mark tire position and date with chalk.
Air pressure: daily visual inspection, check air pressure weekly. (Refer to 12-10)
3
(g) Electrical System (Refer to 24-30)
1
Remove battery and ELT battery and store in accordance with standard practices.
Clean battery box and battery cable terminals to neutralize any battery acid that
2
may be present.
(h) Lubrication
1
Lubricate according to lubrication schedule. (Refer to 12-20)
(i)
Propeller
1
Clean propeller to remove dirt, oil, and bug accumulation. (Refer to 12-20)
(j)
Instruments
1
Clean and cover instruments and panel. Take any additional precautions according
to the manufacture.
(k)
Seats
1
Clean and install protective covers. (Refer to 12-20)
(l)
Loose Equipment
1
Remove all loose equipment and store.
(m) Windshield and Windows
1
Clean and install covers over windshield and windows. (Refer to 12-20)
Indefinite Storage
(a) Parking and Mooring
CAUTION:
13773-001
30 Nov 2000
Do not set parking brake as brake seizing can result.
10-30
Page 1
(b)
(c)
(d)
1
Park and moor airplane. (Refer to 10-20)
Engine Preservation
1
Refer to the Teledyne Continental Motors Maintenance and Operator’s Manual
listed in the List of Publications in the front of this publication.
Fuel Supply
1
Drain fuel tanks. (Refer to 12-10)
Landing Gear, Wheels, and Tires
1
Clean brake assemblies.
2
The wheels should be turned three to four revolutions per 30 days to prevent corrosion.
3
Touch up all spots where paint has been chipped from the wheels.
4
Wipe tires with dry cloth, and treat with tire protector spray.
Turn wheels. Mark tire position and date with chalk.
5
6
Check air pressure periodically and inflate tires as necessary. (Refer to 12-10)
Note:
It is advisable that unserviceable tires be used for prolonged storage.
(e)
(3)
Page 2
Electrical System (Refer to 24-30)
1
Remove battery and ELT battery and store in accordance with standard practices.
Clean battery box and battery cable terminals to neutralize any battery acid that
2
may be present.
(f)
Lubrication
1
Lubricate according to lubrication schedule. (Refer to 12-20)
(g) Propeller
1
Clean propeller to remove dirt, oil, and bug accumulation. (Refer to 12-20)
2
Coat blades with preservative oil and wrap with moisture proof material.
(h) Instruments
1
Clean and cover instruments and panel. Take any additional precautions according
to the manufacture.
(i)
Seats
1
Clean and install protective covers. (Refer to 12-20)
(j)
Loose Equipment
1
Remove all loose equipment and store.
(k)
Windshield and Windows
1
Clean and install covers over windshield and windows. (Refer to 12-20)
(l)
Airframe
1
Cover static port and all ventilation openings.
Preparation for Service
(a) Engine Preparation for Service
1
Refer to the Teledyne Continental Motors Maintenance and Operator’s Manual
listed in the List of Publications in the front of this publication.
(b) Remove all covers, tapes and tags from airplane.
(c)
Reinstall engine battery and ELT battery. (Refer to 24-30)
(d) Fill fuel tanks (if applicable). (Refer to 12-10)
(e) Thoroughly clean and visually inspect airplane. (Refer to 12-20)
10-30
13773-001
30 Nov 2000
WARNING:
(f)
(g)
(h)
13773-001
30 Nov 2000
Before rotating the propeller blades, make certain the magneto/start
switch is OFF, throttle is in CLOSED position, and the mixture control
is in the IDLE CUT-OFF position. Always stand clear while turning the
propeller.
Rotate propeller by hand through all compressions of the engine to check for liquid lock
and to clear excess preservative oil from cylinders.
Start engine in normal manner. (Refer to POH, Chapter 4)
Perform normal warm-up and Operational Check. (Refer to 5-30)
10-30
Page 3
CHAPTER
PLACARDS AND
MARKINGS
CHAPTER 11 - REQUIRED PLACARDS
LIST OF EFFECTIVE PAGES
Chapter/Section
Page
Date
11-LOEP
1
30 NOV 2000
11-TOC
1
30 NOV 2000
11-00
1
30 NOV 2000
11-20
1
30 NOV 2000
11-20
2
30 NOV 2000
11-20
3
30 NOV 2000
11-20
4
30 NOV 2000
11-30
1
30 NOV 2000
11-30
2
30 NOV 2000
11-30
3
30 NOV 2000
11-30
4
30 NOV 2000
11-30
5
30 NOV 2000
11-30
6
30 NOV 2000
11-30
7
30 NOV 2000
13773-001
30 Nov 2000
11-LOEP
Page 1
CHAPTER 11 - REQUIRED PLACARDS
TABLE OF CONTENTS
Subject
REQUIRED PLACARDS
Chapter/Section
Page
11-00
General
EXTERIOR PLACARDS
1
11-20
Description
1
Maintenance Practices
1
Exterior Placard Installation
Exterior Placard Removal
INTERIOR PLACARDS
1
1
11-30
Description
1
Maintenance Practices
1
Polycarbonate Graphic Overlay
Removal - Polycarbonate Graphic Overlay
Installation - Polycarbonate Graphic Overlay
Cast Vinyl Interior Placard
Removal - Cast Vinyl Interior Placard
Installation - Cast Vinyl Interior Placard
13773-001
30 Nov 2000
1
1
1
2
2
2
11-TOC
Page 1
REQUIRED PLACARDS
1. GENERAL
Placards are used for identification and indication purposes. Placards give operating instructions, directional movements, servicing instructions, part or position identification, escape instructions, and safety precautions. Self adhesive cast vinyl decals or polycarbonate overlays are used for all placards located on the
interior and exterior surfaces of the airplane. Missing, or placards with poor readability must be replaced.
13773-001
30 Nov 2000
11-00
Page 1
EXTERIOR PLACARDS
1. DESCRIPTION
This section describes the maintenance practices pertinent to those placards and markings which give
operating instructions, directional movements, servicing instructions, part or position identification, escape
instructions, and safety precautions. Exterior placards are printed on cast vinyl. Exterior placards include:
Door; Open & Close, Baggage Door Location, ELT Location, C.A.P.S. Location, Oil-Door Location, Fuel
Filler Location, Gnd Power Receptacle Location, No-Step, No Push, and Rescue Instruction. (See Figure
11-201)
2. MAINTENANCE PRACTICES
A. Exterior Placard Installation
(1)
Acquire necessary tools, equipment, and supplies.
Description
(2)
(3)
(4)
(5)
(6)
P/N or Spec.
Supplier
Purpose
Self adhesive vinyl decal
-
Cirrus Design Corp.
Identification/Indication
Denatured Alcohol
-
Any Source
Solvent
Water wash
-
Any Source
Cleaning of surface
Rubber Roller
-
Any Source
Application of surface
pressure.
Water wash surface where decal is to be installed.
Solvent clean surface where decal is to be installed. (Refer to 20-30)
Remove protective backing from decal using care not to contaminate adhesive surface.
Place one edge of decal on surface and work downward to eliminate wrinkles and air pockets.
Avoid stretching decal as poor adhesion will result.
Press decal firmly to surface with fingers or rubber roller. Ensure all edges are firmly adhered.
B. Exterior Placard Removal
CAUTION:
(1)
Do not allow the structure temperature to exceed 150° Fahrenheit (65.5° C) when applying heat with hot-air blower. Excessive heat may result in loss of structural integrity.
Acquire necessary tools, equipment, and supplies.
Description
(2)
(3)
(4)
13773-001
30 Nov 2000
P/N or Spec.
Supplier
Purpose
Denatured Alcohol
-
Any Source
Solvent
Water wash
-
Any Source
Cleaning of surface
Hot-air blower
-
Any Source
Removal of decal
Apply heat with hot-air blower until adhesive loosens from airplane surface.
Peel decal away from surface, using additional heat if necessary.
Solvent clean surface to remove residual adhesive. (Refer to 20-30)
11-20
Page 1
Figure 11-201
Exterior Placards (Sheet 1 of 3)
Page 2
11-20
13773-001
30 Nov 2000
Figure 11-201
Exterior Placards (Sheet 2 of 3)
13773-001
30 Nov 2000
11-20
Page 3
Figure 11-201
Exterior Placards (Sheet 3 of 3)
Page 4
11-20
13773-001
30 Nov 2000
INTERIOR PLACARDS
1. DESCRIPTION
This section describes the maintenance practices pertinent to those placards and markings which give
operating instructions, directional movements, servicing instructions, part or position identification, escape
instructions, and safety precautions. Most airplane interior placards are integral to the individual panel’s
polycarbonate graphic overlay. The remaining placards are printed on cast vinyl. Interior placards include:
CAPS Handle Cover, Engine Control Panel, Circuit Breaker Panel, Bolster Switch Panel, Instrument Panel,
Audio Panel, Yoke Grip Switch Plate, Baggage Door, ELT Location, Alternate Induction Air, and Parking
Brake Release. (See Figure 11-301)
2. MAINTENANCE PRACTICES
A. Polycarbonate Graphic Overlay
(1)
Removal - Polycarbonate Graphic Overlay
(a)
Acquire necessary tools, equipment, and supplies.
Description
(2)
Supplier
Purpose
Denatured Alcohol
-
Any Source
Solvent
Clean, white, lint free cloth
-
Any Source
Solvent Wipe
Hot-air blower
-
Any Source
Removal of panel
Putty knife
-
Any Source
Removal of panel
and residual adhesive.
(b) Remove trim panels or attaching hardware securing panel to airplane. (Refer to 25-10)
(c)
Apply heat with hot-air blower until adhesive loosens from panel surface.
(d) Peel decal away from surface, using additional heat and putty knife if necessary.
(e) Solvent clean surface to remove residual adhesive. (Refer to 20-30)
Installation - Polycarbonate Graphic Overlay
(a)
Acquire necessary tools, equipment, and supplies.
Description
(b)
(c)
(d)
13773-001
30 Nov 2000
P/N or Spec.
P/N or Spec.
Supplier
Purpose
Denatured Alcohol
-
Any Source
Solvent
Clean, white, lint free cloth
-
Any Source
Solvent Wipe
Rubber Roller
-
Any Source
Application of surface pressure.
Solvent clean surface where overlay is to be installed. (Refer to 20-30)
Remove protective backing from one half of overlay using care not to contaminate adhesive surface.
Prior to final assembly, allow 24 to 48 hours for adhesive to reach maximum bonding
strength.
11-30
Page 1
(e)
(f)
(g)
(h)
Align overlay half with protective backing still in place on panel and press exposed overlay
half onto panel.
Bend overlay back and peel remaining protective backing from overlay.
Carefully work overlay toward opposite panel edge, pressing bubbles and wrinkles out
with rubber roller. Ensure all edges are firmly adhered.
Install panel and surrounding trim (if applicable). (Refer to 25-10)
B. Cast Vinyl Interior Placard
(1)
Removal - Cast Vinyl Interior Placard
(a)
Acquire necessary tools, equipment, and supplies.
Description
(2)
Supplier
Purpose
Denatured Alcohol
-
Any Source
Solvent
Clean, white, lint free cloth
-
Any Source
Solvent Wipe
(b) Peel decal away from surface.
(c)
Solvent clean surface to remove residual adhesive. (Refer to 20-30)
Installation - Cast Vinyl Interior Placard
(a)
Acquire necessary tools, equipment, and supplies.
Description
(b)
(c)
(d)
(e)
(f)
Page 2
P/N or Spec.
P/N or Spec.
Supplier
Purpose
Denatured Alcohol
-
Any Source
Solvent
Clean, white, lint free cloth
-
Any Source
Solvent Wipe
Rubber Roller
-
Any Source
Application of surface pressure.
Water wash surface where decal is to be installed.
Solvent clean surface where decal is to be installed. (Refer to 20-30)
Remove protective backing from decal using care not to contaminate adhesive surface.
Place one edge of decal on surface and work downward to eliminate wrinkles and air
pockets. Avoid stretching decal as poor adhesion will result.
Press decal firmly to surface with fingers or rubber roller. Ensure all edges are firmly
adhered.
11-30
13773-001
30 Nov 2000
Figure 11-301
Interior Placards (Sheet 1 of 5)
13773-001
30 Nov 2000
11-30
Page 3
Figure 11-301
Interior Placards (Sheet 2 of 5)
Page 4
11-30
13773-001
30 Nov 2000
Figure 11-301
Interior Placards (Sheet 3 of 5)
13773-001
30 Nov 2000
11-30
Page 5
Figure 11-301
Interior Placards (Sheet 4 of 5)
Page 6
11-30
13773-001
30 Nov 2000
Figure 11-301
Interior Placards (Sheet 5 of 5)
13773-001
30 Nov 2000
11-30
Page 7
CHAPTER
SERVICING
CHAPTER 12 - SERVICING
LIST OF EFFECTIVE PAGES
Chapter/Section
Page
Date
12-LOEP
1
30 NOV 2000
12-TOC
1
30 NOV 2000
12-TOC
2
30 NOV 2000
12-00
1
30 NOV 2000
12-00
2
30 NOV 2000
12-00
3
30 NOV 2000
12-10
1
30 NOV 2000
12-10
2
30 NOV 2000
12-10
3
30 NOV 2000
12-10
4
30 NOV 2000
12-10
5
30 NOV 2000
12-10
6
30 NOV 2000
12-10
7
30 NOV 2000
12-20
1
30 NOV 2000
12-20
2
30 NOV 2000
12-20
3
30 NOV 2000
12-20
4
30 NOV 2000
12-20
5
30 NOV 2000
12-20
6
30 NOV 2000
12-20
7
30 NOV 2000
12-20
8
30 NOV 2000
12-20
9
30 NOV 2000
12-20
10
30 NOV 2000
12-20
11
30 NOV 2000
12-20
12
30 NOV 2000
12-20
13
30 NOV 2000
12-20
14
30 NOV 2000
12-30
1
30 NOV 2000
13773-001
30 Nov 2000
12-LOEP
Page 1
CHAPTER 12 - SERVICING
TABLE OF CONTENTS
Subject
SERVICING
Chapter/Section
Page
12-00
General
REPLENISHING
1
12-10
Description
1
Maintenance Practices
1
Fuel System
Safety Precautions
Approved Fuels and Capacities
Refueling Procedure
Oil System
Oil System Replenishing
Hydraulic Brake System
Brake Fluid Replenishing
Tires
Tire Air Pressure Replenishing
Battery System
Battery Electrolyte Level Check (Battery 1)
SCHEDULED SERVICING
1
1
1
2
3
3
5
5
5
5
6
6
12-20
Description
1
Maintenance Practices
1
Fuel System
Drain Valves
Defueling Airplane Siphoning Method
Defueling Airplane Electric Fuel Pump Method
Defueling Airplane Drain Valve Method
Hydraulic Brake System
Engine Oil System
Changing Engine Oil and Filter
Oil System Leak Inspection/Check
Oil Filter Particle Inspection/Check
Tires and Wheels
Battery
Lubrication
Cleaning
Exterior Wash
Windshield/Windows
Interior Cleaning:
13773-001
30 Nov 2000
1
1
2
3
4
4
5
6
6
7
7
7
7
9
9
10
11
12-TOC
Page 1
CHAPTER 12 - SERVICING
TABLE OF CONTENTS
Subject
Chapter/Section
Engine Cleaning:
Leather Interior
Leather Cleaning
UNSCHEDULED SERVICING
Page
11
13
13
12-30
Description
1
Maintenance Practices
1
Snow and Ice Removal:
Page 2
12-TOC
1
13773-001
30 Nov 2000
SERVICING
1. GENERAL
The information in this chapter pertains to general servicing procedures and maintenance practices used
when servicing the airplane. This chapter contains illustrations, descriptions and servicing procedures necessary to locate system or component service points and to replenish operating fluids or service the airplane as required. (See Figure 12-001)
The replenishment charts provide tank and reservoir capacities. Where applicable, capacities are listed in
U.S. Gallons, Imperial Gallons, and Liters. For additional detailed information concerning unit servicing of
the various airplane systems and components, refer to the applicable chapters. For electrical wiring diagrams, refer to the Wiring Diagram Manual.
The specified intervals in Chapter 5, are considered adequate to meet average requirements under normal
operating conditions. It is advisable, however, to shorten service and maintenance intervals when operating under abnormal environmental conditions, such as high humidity and moisture, salt water environments, dusty atmospheric conditions, extreme temperature ranges, unimproved airport facilities, or other
unusual operating requirements. In salt water areas special care should be taken to keep the engine,
accessories and airframe clean to help prevent oxidation.
CAUTION:
13773-001
30 Nov 2000
The operation of the airplane can be seriously impaired if unapproved or contaminated fuel,
oil, fluids, lubricants or materials are used. Adherence to instructions, cautions, and warnings can avoid injury to personnel and damage to the airplane or associated equipment. Mixing of various brands, types and weights of materials should be avoided. Specified
lubricants will meet requirements for extreme hot or cold temperature operations. Use of
substitutes or other lubricants may cause a malfunction when operating in extreme temperature conditions, or may cause excessive wear due to improper lubrication. As called out in
the illustration, stepping or walking on most of the airplane outer surfaces is prohibited.
12-00
Page 1
Figure 12-001
Service Points
Page 2
12-00
13773-001
30 Nov 2000
Service Capacities
Item
Fluid
Capacity
Fuel
100 LL (Blue) or 100 (Green)
42 Gallons (159 L) each wing
Oil
Mil-L-6082 Mineral Oil (1st 25 Hours)
See Approved Oil Listing
8.0 US Quarts (7.6 L)
Battery 1
Distilled Water
As Required
Brakes
Mil-H-5606 Hydraulic
0.25 US Quart (0.24 L)
Nose Tire
Dry Compressed Air
40 psi (276 kPa)
Main Tires
Dry Compressed Air
62 psi (427 kPa)
13773-001
30 Nov 2000
12-00
Page 3
REPLENISHING
1. DESCRIPTION
This section covers the replenishing of all fluids used on the airplane.
2. MAINTENANCE PRACTICES
A. Fuel System
(1)
Safety Precautions
WARNING:
A fire extinguisher must be available.
Ground exhaust pipe outlet and fuel service equipment prior to every fueling and defueling procedure.
Check wing fuel tank vents for obstruction before refueling.
Do not fill tanks within 100 feet (30.48 meters) of any energized electrical
equipment capable of producing sparks.
Do not smoke or allow smoking or open flame within 100 feet (30.48 meters)
of airplane or vehicle.
Do not operate electronic equipment or electrical switches during the fueling or defueling procedure.
Frequently check fuel for ice formation during cold weather operation.
Sample fuel after each refueling and before the first flight of the day for any
moisture or contaminates. Wait at least five minutes for any moisture and
sediment to settle before flushing fuel drain valves.
(2)
Approved Fuels and Capacities
WARNING:
Service the fuel tanks with 100 (green) or 100LL (blue) minimum grade fuel
only. The use of lower octane rated fuel can result in destruction of an
engine the first time high power is applied. If the airplane is inadvertently
serviced with the wrong grade of fuel, the fuel system must be completely
drained, properly serviced, and the proper engine inspection completed.
Engine inspection should be performed as indicated in the Teledyne Continental Motors Overhaul Manual.
Total Tank Capacity
Usable Tank Capacity
U.S. Gal.
Imp. Gal.
Liter
U.S. Gal.
Imp. Gal.
Liter
42.0
34.9
158.9
40.5
33.7
153.2
Right wing 42.0
34.9
158.9
40.5
33.7
153.2
Total
69.8
317.8
81.0
67.4
306.4
Left wing
13773-001
30 Nov 2000
84.0
12-10
Page 1
(3)
Refueling Procedure
(a)
Acquire necessary tools, equipment, and supplies.
P/N or
Spec.
Description
(b)
(c)
(d)
-
Any Source
Extinguish fire in an
emergency
Rubber protective cover
-
Any Source
Protect finish of airplane
Fuel sampler cup
50627-001* Cirrus Design
(h)
(i)
(j)
(k)
(l)
(m)
Page 2
Inspect fuel for contaminates
* or equivalent substitute
Place a fire extinguisher near the fuel tank to be serviced.
Connect ground wire from the fuel service nozzle to the engine exhaust pipe outlet.
Place a rubber protective cover over the upper portion of the wing, around the fuel tank
filler.
Do not permit the fuel nozzle to come in contact with the bottom of the fuel
tanks. Keep fuel tanks full at all times to minimize condensation and moisture accumulation in tanks. In extreme humid areas the fuel should be
checked frequently and drained of condensation to prevent potential problems.
Remove fuel cap and fill fuel tank to the desired level.
Note:
(f)
(g)
Purpose
Fire extinguisher
(Type AB or ABC)
CAUTION:
(e)
Supplier
If fuel is going to be added to only one fuel tank, the tank being serviced
should be filled to the same level as the other fuel tank. If the fuel level is
filled to the fuel level tab (inside the fuel tank), there will be approximately
23 usable gallons (87.0 Liters) of fuel left in that tank.
Remove fuel service nozzle and install fuel cap.
Move fire extinguisher, rubber protective cover and the fuel service nozzle to the remaining tank to be filled.
Place the rubber protective cover over the remaining fuel tank filler.
Remove the fuel cap and fill fuel tank to the desired level.
Remove fuel service nozzle and install fuel cap.
Remove the rubber protective cover from fuel tank servicing area.
Remove ground wire from the engine exhaust pipe outlet.
Put fire extinguisher away.
12-10
13773-001
30 Nov 2000
B. Oil System (See Figure 12-101)
The Teledyne Continental IO-550-N engine uses a wet sump pressurized lubrication system with an 8
quart (7.57 L) capacity. A filler cap with an integral dipstick is provided for determining the amount of oil
in the crankcase.
(1)
Oil System Replenishing
CAUTION:
For the first 25 hours of operation (on a new or rebuilt engine) or until oil consumption stabilizes, use straight mineral oil conforming to MIL-L-6082. If engine oil
must be added to the factory installed oil, add corrosion preventive mineral oil
conforming to MIL-L-6082. Mixing oils of various specifications should be avoided.
After 25 hours of operation and after oil consumption has stabilized, use only aviation lubricating oils which are ashless dispersant.
Straight mineral oil conforming to MIL-C-6529 with a corrosion preventive compound added, can cause coking with extended use; therefore Cirrus Design does
not recommend its use for break-in or post break-in. Oil conforming to MIL-P46002 with a corrosion preventive compound added is recommended by TCM
and Cirrus Design for indefinite storage. (Refer to 10-30)
Note:
(a)
(b)
(c)
(d)
13773-001
30 Nov 2000
Oil level should always be checked with the airplane sitting on a level surface, with
the engine off.
Open the access door on the upper left-hand side of the engine cowling. Verify engine oil
level.
If engine oil must be added, use only approved oil. Minimum oil quantity is 6 quarts (5.7
Liters).
After the oil level has been verified, install filler cap.
Secure the access door to the engine cowling.
12-10
Page 3
Average Ambient Air Temperature for
Starting (Sea Level)
Viscosity Grade
Below 40°F
SAE 30 or Multi Viscosity
Above 40°F
SAE 50 or Multi Viscosity
Brand
Page 4
Supplier
Aeroshell (R) W
Shell Australia
Aeroshell Oil W
Aeroshell Oil W 15W-50
Anti-Wear Formulation Aeroshell 15W-50
Shell Canada Ltd.
Aeroshell Oil W
Aeroshell Oil W 15W-50
Anti-Wear Formulation Aeroshell 15W-50
Shell Oil Company
Aviation Oil Type A
X/C Aviation Multi Viscosity Oil SAE 20W50, SAE 20W-60
Phillips 66 Company
BP Aero Oil
BP Oil Corporation
Castrol Aero AD Oil
Castrol
Castrol Aero AD Oil
Castrol Ltd. (Australia)
Chevron Aero Oil
Chevron U.S.A. Inc.
Conoco Aero S
Continental Oil
Delta Avoil Oil
Delta Petroleum Co.
Exxon Aviation Oil EE
Exxon Company, U.S.A.
Gulfpride Aviation AD
Gulf Oil Co.
Mobil Aero Oil
Mobil Oil Company
Pennzoil Aircraft Engine Oil
Pennzoil Company
Quaker State AD Aviation Engine Oil
Quaker State Oil & Refining Co.
Red Ram X/C Aviation Oil 20W-50
Red Ram Ltd. (Canada)
Sinclair Avoil
Sinclair Oil Company
Texaco Aircraft Engine Oil - Premium AD
Texaco Inc.
Total Aero DM 15W-50
Total France
Turbonycoil 3570
NYCO S.A.
Union Aircraft Engine Oil HD
Union Oil Company of California
12-10
13773-001
30 Nov 2000
C. Hydraulic Brake System
The main wheels have hydraulically operated, single-cylinder dual piston type disc brakes, individually
activated by floor mounted toe pedals at both pilot stations. A parking brake mechanism holds induced
hydraulic pressure on the disc brake for parking. The system is replenished by filling the hydraulic reservoir, located in the engine compartment on the upper right corner of the firewall. Replenish the system with MIL-H-5606 hydraulic fluid only.
WARNING:
(1)
Never service the hydraulic reservoir while the parking brake is activated. Fluid in
the wheel cylinders may be under high pressure due to expansion. Therefore, be
sure parking brake is released and wheel chocks are in place, prior to beginning
hydraulic system servicing. If the brake pedal feels spongy, the complete brake
system must be bled. If the system is low, the reason for fluid loss, must be determined before continued operation of the airplane. Any spilled brake fluid must be
removed immediately as it will damage any painted surface upon contact.
Remove any dirt on the brake fluid reservoir filler cap before opening.
Brake Fluid Replenishing
(a) Remove the upper engine cowling to gain access to the reservoir. (Refer to 71-10)
(b) Remove any dirt from the hydraulic brake fluid reservoir before opening the filler cap.
(c)
Remove filler cap and add hydraulic brake fluid (Type MIL-H-5606) as needed.
(d) Install the filler cap.
(e) Inspect the complete system for any obvious problems.
(f)
Install engine cowling. (Refer to 71-10)
D. Tires
The nose tire uses a 5.00 - 5 wheel with a 5.00 x 5, six-ply rated tire with tube. The main landing gear
uses 15 x 6.00 X 6 wheels with 15 x 6.00 - 6, six-ply rated tires with tubes. Always keep the tires
inflated to their rated pressure to assure maximum service and to reduce damage when landing on
stones with sharp edges. When adjusting tire pressure, inspect the tires for any signs of abnormal
wear, cuts, or bruises.
(1)
Tire Air Pressure Replenishing
(a) Acquire necessary tools, equipment, and supplies.
Description
Compressed air supply
13773-001
30 Nov 2000
P/N or Spec.
Supplier
Purpose
-
Any Source
Adding air pressure to
tires
Accurate air pressure gage -
Any Source
Checking tire pressure
Wheel chocks
Any Source
Securing airplane
-
CAUTION:
The following procedure must be performed in calm, warm weather, with the
airplane sitting on a smooth and level surface. Always check air pressure
using an accurate gage.
Note:
Always consider load factor and ambient temperature when checking air
pressure. Air pressure will increase when the tire is subjected to a load and
when the temperature increases.
12-10
Page 5
Whenever an air pressure specification is called out, but not defined as
loaded or unloaded, it should be considered as unloaded.
Always service tires in a warm environment, this will keep the valve stem
from freezing and eliminate the possibility of leaks through the valve core.
After inspecting or adjusting tire pressure, always inspect the valve core for
leaks before reinstalling the valve cap.
Always install a valve cap to prevent contaminates from entering the valve
core.
(b)
(c)
(d)
(e)
(f)
With the parking brake set and wheel chocks in position, remove the inspection plugs from
the wheel pants to gain access to the valve stems.
Release parking brake and remove the wheel chocks.
Move the airplane until the valve stem is accessible through the inspection hole. Place
wheel chocks in position.
Remove the valve cover cap and verify tire pressure using an accurate gage.
Add compressed air to the tire as required until the air pressure is at the recommended
pressure. If the tire is currently over inflated, push in on the valve core and release some
air until the correct pressure is obtained.
Note:
Nose Wheel Tire Pressure (Loaded) - 40 psi (275.6 kPa)
Main Landing Wheel Tire Pressure (Loaded) - 62 psi (427.2 kPa)
(g)
(h)
(i)
(j)
Verify that the valve core isn’t leaking, and install the valve cover cap.
Repeat the above steps for the remaining tires.
Install the inspection plugs into the wheel pants.
Reset parking brake and place the wheel chocks into position.
E. Battery System
Two batteries are used on this airplane for energy storage. Battery 1 is located in the engine compartment on the forward right side of the firewall and is the only battery which the electrolyte level can be
adjusted. Access to the battery can be accomplished by removing the upper engine cowling. With the
exception of the electrolyte level check on battery 1, there are no on-airplane replenishing requirements for the batteries. Battery 2 is located just aft of bulkhead 222 and is considered a maintenance
free battery. Proper battery charging procedures for both types of batteries, and the replenishing of
electrolyte for battery 1, along with other pertinent information can be found in Chapter 24. (Refer to
24-30)
(1)
Battery Electrolyte Level Check (Battery 1)
(a) Remove engine cowling. (Refer to 71-10)
WARNING:
(b)
Page 6
Always wear a face shield and remove all jewelry before servicing the
battery. Metal objects may fuse to electrical connections and cause
severe burns. Acid should never be added unless the electrolyte has
been lost by spillage, because the acid does not evaporate. When it is
necessary to add acid, the battery should be fully charged, on charge
and gassing freely. Specific gravity then may be adjusted by adding
acid or distilled water, or drawing off electrolyte.
Remove cover retaining bolts and cotter pins. Remove the cover.
12-10
13773-001
30 Nov 2000
(c)
(d)
(e)
(f)
(g)
Remove each cell cap and inspect each cell for the proper electrolyte level. The electrolyte should barely touch or be slightly short of the eyelet (level indicator) when the battery
is warm and in a good state of charge. As an example, this condition would exist just after
a bench charge or when the aircraft has just returned from a flight of ninety minutes or
more. At all other times, no water should be added as long as the electrolyte is about 1/4”
above the plates.
If a cell is found low, reinstall caps and service the battery in accordance with Chapter 24.
(Refer to 24-30)
Reinstall battery into airplane.
Tighten and secure bolts with new cotter pins.
Install engine cowling. (Refer to 71-10)
Figure 12-101
13773-001
30 Nov 2000
12-10
Page 7
SCHEDULED SERVICING
1. DESCRIPTION
This section contains information necessary to perform the scheduled servicing requirements of the airplane. Servicing the fuel system, lubrication system, tires, brakes, and battery are covered. Cleaning of
interior and exterior surfaces are also covered.
2. MAINTENANCE PRACTICES
A. Fuel System
(1)
Drain Valves
Five fuel drains are provided throughout the fuel system to drain fuel, water or sediment from the
fuel system. A fuel-drain valve is located on the underside of each wing, directly beneath each
fuel tank to provide drainage of moisture and sediment. The two integral collector tanks and the
gascolator also have a flush drain valve. Use the fuel sampler cup to remove fuel and any contaminates from the collector tanks and gascolator.
WARNING:
Any time the fuel system is drained or a fuel tank is empty for any reason,
air may enter the system. If the possibility that air has entered the system
does exist, start and operate the engine on the ground until all air is
removed from the system. Operate the engine for several minutes on each
tank until proper engine operation is assured. Refer to the Pilot’s Operating
Handbook before starting and operating the engine.
Ground the exhaust pipe outlet, fuel service unit, and servicing nozzle, prior
to all fueling and de-fueling operations.
Operation of any electric switch other than the master battery switch and
the electric fuel pump switch is prohibited during the de-fueling operation.
Operation of any electric switch during the fueling operation is prohibited.
Smoking or open flames within 100 feet (30.48 meters) of the aircraft or fuel
servicing vehicle are prohibited. Do not operate radios, electric system or
electronic equipment during the fueling or de-fueling operations.
Do not drain fuel tanks within 100 feet (30.48 meters) of any energized electrical equipment capable of producing sparks.
A fire extinguisher must be available.
13773-001
30 Nov 2000
12-20
Page 1
(2)
Defueling Airplane Siphoning Method
(a) Acquire necessary tools and equipment.
Description
Fire extinguisher
(Type AB or ABC)
(b)
(c)
(d)
(e)
(f)
(g)
Page 2
Supplier
Purpose
-
Any Source
Extinguish fire
Rubber protective cover -
Any Source
Protect finish of airplane
Fuel drain container
-
Any Source
Drain old fuel in
Hand operated pump
-
Any Source
Siphon fuel
Fuel sampler cup
50627-001*
Cirrus Design
Duluth, MN
Drain collector tanks and
gascolator
Fuel supply
100LL (Blue)
100 (Green)
Any Source
Fuel airplane
* or equivalent substitute
Provide a suitable fuel drain container at the fuel tank filler neck.
Ground the container to the engine exhaust pipe. Ground airplane to a suitable earth
ground.
Place a rubber protective cover over the upper portion of the wing around the fuel tank
servicing area. Remove filler cap.
Remove all fuel using a hand operated siphoning pump. Install filler cap.
To completely drain the fuel system, use the fuel sampler cup to remove all fuel and any
contaminates from the collector tanks and the gascolator.
Repeat steps 2 through 6 for the remaining fuel tank.
WARNING:
(h)
(i)
(j)
(k)
P/N or Spec.
Any time the fuel system is drained or a fuel tank is empty for any reason, air may enter the system. If the possibility that air has entered the
system exists, start and operate the engine on the ground until all air
is removed from the system. Operate the engine for several minutes
on each tank until proper engine operation is assured. Refer to the
pilot’s operating handbook before starting and operating the engine.
Fuel airplane. (Refer to 12-10)
Inspect the complete fuel system for any signs of leaks and service as required.
Ground run the engine to purge air from the fuel system.
Reinspect the complete fuel system for any signs of leaks and service as required
12-20
13773-001
30 Nov 2000
(3)
Defueling Airplane Electric Fuel Pump Method
(a) Acquire necessary tools and equipment.
Description
(b)
(c)
(d)
(e)
(f)
(g)
(h)
(j)
(k)
(l)
(m)
(n)
(o)
13773-001
30 Nov 2000
Purpose
-
Any Source
Extinguish fire
Fuel drain container
-
Any Source
Drain old fuel into
Fuel drain hose (exten- sion)
Any Source
Drain fuel
Fuel supply
100LL (Blue)
100 (Green)
Any Source
Fuel airplane
Fuel sampler cup
50627-001*
Cirrus Design
Duluth, MN
Drain collector tanks
and gascolator
* or equivalent substitute
Provide a suitable fuel drain container at the engine driven fuel pump, located aft of the
engine.
Ground the container to the exhaust outlet and airplane to a suitable earth ground.
Disconnect the fuel supply hose at the engine driven fuel pump.
Attach an auxiliary fuel drain hose (extension) to the end of the existing fuel supply hose.
Place opposing end of the fuel drain hose (extension) into a suitable fuel container.
Turn the Fuel Selector Valve to the tank to be drained.
Remove the filler cap from the fuel filler.
Never allow the electric fuel pump to run dry.
Activate electric fuel pump (Fuel Pump Switch-Boost). Allow the fuel pump to operate until
the fuel tank is empty, then set switch off immediately.
If desired, move the Fuel Selector Valve to the remaining fuel tank. Repeat steps 7 and 8
until the remaining fuel tank is drained.
To completely drain the fuel system, use the fuel sampler cup to remove all fuel and any
contaminates from the gascolator and integral collector tanks.
Remove the auxiliary fuel drain hose (extension).
Secure the fuel supply hose to the engine driven fuel pump.
Fuel airplane. (Refer to 12-10)
Inspect the complete fuel system for any signs of leaks and service as required.
WARNING:
(p)
(q)
Supplier
Fire extinguisher
(Type AB, or ABC)
WARNING:
(i)
P/N or Spec.
Any time the fuel system is drained or a fuel tank is empty for any reason, air may enter the system. If the possibility that air has entered the
system does exist, ground run the engine on the until all air is
removed from the system. Operate the engine for several minutes on
each tank until proper engine operation is assured. Refer to the Pilot’s
Operating Handbook before starting and operating the engine.
Ground run the engine to purge air from the fuel system.
Reinspect the complete fuel system for any signs of leaks and service as required.
12-20
Page 3
(4)
Defueling Airplane Drain Valve Method
(a) Acquire necessary tools and equipment.
Description
(b)
(c)
(d)
(e)
(f)
(g)
(h)
(i)
(j)
Supplier
Purpose
Fire extinguisher
(Type AB, or ABC)
-
Any Source
Extinguish fire
Fuel drain container
-
Any Source
Drain old fuel into
Fuel supply
100LL (Blue)
100 (Green)
Any Source
Fuel airplane
Fuel sampler cup
50627-001*
Cirrus Design
Duluth, MN
Drain gascolator and
integral collector tanks
Fuel drain valve o-ring
NAS 1593-015
Any Source
Replacement o-ring for
fuel drain valve
* or equivalent substitute
Provide a suitable fuel drain container under each wing tank drain valve.
Ground the container to the exhaust outlet and airplane to a suitable earth ground.
Remove the fuel drain valve to remove all fuel and any contaminates from the fuel tank.
Remove and discard the old fuel drain valve o-ring.
Install the fuel drain valve with a new o-ring.
If desired, repeat steps b through f until the remaining fuel tank is drained.
To completely drain the fuel system, use the fuel sampler cup to remove all fuel and any
contaminates from the gascolator and the integral collector tanks.
Fuel airplane.(Refer to 12-10)
Inspect the complete fuel system for any signs of leaks and service as required.
WARNING:
(k)
(l)
P/N or Spec.
Any time the fuel system is drained or a fuel tank is empty for any reason, air may enter the system. If the possibility that air has entered the
system does exist, ground run the engine on the until all air is
removed from the system. Operate the engine for several minutes on
each tank until proper engine operation is assured. Refer to the Pilot’s
Operating Handbook before starting and operating the engine.
Ground run the engine to purge air from the fuel system.
Reinspect the complete fuel system for any signs of leaks and service as required.
B. Hydraulic Brake System
The brake reservoir is located on the right side of the firewall in the engine compartment. The brake
system is filled with MIL-H-5606 (petroleum base) hydraulic brake fluid (red). The fluid level should be
checked periodically and at every inspection and replenished when necessary. If the entire system
must be filled, fill with fluid under pressure from the brake end of the system. This will eliminate air in
the system. If the system is low, the reason for loss of fluid must be determined before continued operation of the aircraft. For additional brake information refer to Chapter 32. (Refer to 32-42)
Fluid in the wheel cylinders may be under high pressure due to expansion. Therefore, be sure parking
brake is released and wheel chocks are in place, prior to beginning hydraulic system servicing. If the
brake pedal feels spongy, the complete brake system must be bled. If the system is low, the reason for
Page 4
12-20
13773-001
30 Nov 2000
fluid loss, must be determined before continued operation of the airplane. Any spilled brake fluid must
be removed immediately as it will damage any painted surface upon contact. Remove any dirt on the
brake fluid reservoir filler cap before opening.
C. Engine Oil System
Straight mineral oil (MIL-L-6082) should be used for the first initial oil change period (25 hours). After
oil consumption stabilizes the mineral oil should be drained and an approved engine oil used. (Refer to
12-10)
WARNING:
Avoid skin contact with used motor oil. In a laboratory study, mice developed skin
cancer when their skin was exposed to used engine oil twice a week, without
being washed off. Substances found to cause cancer in laboratory animals may
also cause cancer in humans.
CAUTION:
The oil level should be brought to full before each long flight. Never fly the airplane with
less than 6 quarts of oil (5.7 Liters) in the crankcase of the engine. Oil consumption
tends to be higher during break-in periods on new engines. Under no circumstances
should automotive oil be used, for such oils could cause engine damage. If the oil system becomes contaminated, the complete oil system must be flushed and the oil cooler
replaced.
Do not mix additive oil and straight mineral oil. The engine must be thoroughly warmed,
prior to draining the oil from the engine. Always change the filter when changing oil. This
is especially important when changing from straight mineral oil to compounded or additive oil. After changing from straight mineral oil to compounded or additive oil, inspect
the oil filter for evidence of sludge, if sludge is evident, replace the oil and filter more frequently. Resume normal oil drain intervals after sludge conditions improve.
Note:
13773-001
30 Nov 2000
During periods of prolonged operation in dusty areas or in cold climates, or when flights
have been of short duration with prolonged idling time, change oil and filter every 25
hours. The engine should always be brought to operating temperature prior to draining
the oil to assure complete draining of the oil. The engine oil filter and drain plug is
secured with safety wire. Check every used oil filter for metal particles and sludge.
(Refer to 12-20)
12-20
Page 5
(1)
Changing Engine Oil and Filter
Note:
(a)
The engine should be warm, prior to changing oil.
Acquire necessary tools and equipment.
Description
(b)
(c)
(g)
Snap-on Tools
Kenosha, WI
Removal of oil filter
Oil drain pan
-
Any Source
Retrieve used oil
Safety wire,.032”
MS20995
Any Source
Secure fasteners
Safety wire plier
M-84 *
Genair Ltd.
Tension safety wire
Flexible oil funnel
-
Any Source
Replace engine oil
* or equivalent substitute
Remove the upper and lower engine cowlings. (Refer to 71-10)
Place a suitable drain pan under the drain plug.
A flexible oil funnel can be used to aid the draining process.
Remove the safety wire and remove the drain plug. Allow the oil to completely drain out.
Remove the safety wire from the oil filter and remove the oil filter.
Lubricate the seal with oil and secure the new filter. Tighten the filter to 18-20 ft.lbs. (24.427.1 N-m). (Refer to 12-10)
Safety wire oil filter.
Be careful not to damage the threads on the oil filler plug or oil pan when
tightening.
(h) Install the drain plug using a new gasket. Tighten the oil drain plug to 17 ft.lbs. (23 N-m).
(i)
Safety wire drain plug. (Refer to 20-50)
(j)
Fill the engine oil sump with an approved oil.
(k)
Using the integral filler cap and dipstick, verify correct oil level exists.
(l)
Secure filler cap and dipstick assembly.
(m) Secure the access panel and install both engine cowlings. (Refer to 71-10)
(n) Perform Oil System Leak Inspection/Check. (Refer to 12-20)
Oil System Leak Inspection/Check
(a) Start the engine in accordance with Pilot’s Operating Handbook procedures and monitor
the engine oil pressure gage for proper oil pressure. Allow the engine to idle for a few minutes and shutdown the engine in accordance with POH procedures.
CAUTION:
(b)
Page 6
Purpose
GA340 *
CAUTION:
(2)
Supplier
Oil filter strap wrench
Note:
(d)
(e)
(f)
P/N or Spec.
If oil pressure is not present after 10 seconds of running time, shut the
engine down immediately.
Remove the both engine cowlings and visually check for any obvious leaks. Correct any
leaks found immediately. Verify engine oil level, add oil as needed.
12-20
13773-001
30 Nov 2000
(3)
Oil Filter Particle Inspection/Check
(a)
Acquire necessary tools and equipment.
Description
Oil filter can cutter
(b)
(c)
(d)
(e)
(f)
P/N or Spec.
CT-470 *
Supplier
Purpose
Champion Spark Plug Inspecting oil filter element
Toledo, OH
* or equivalent substitute
Secure the filter in a vise.
Using a can cutter, secure the cutter on the filter mounting plate. Tighten the knurled head
screw until the cutter blade meets the filter metal can surface.
Rotate the cutter 360° while observing that the cutter blade is penetrating the metal can
portion of the filter. Continue tightening the knurled head screw and rotating the cutter until
the filter mounting plate is free from the canister.
Carefully remove the element from the canister. Cut the filter material from the end caps.
Carefully unfold the element and inspect for abnormal metal particles trapped in the filter
element.
D. Tires and Wheels
Replace all worn tires with the correct ply, type, and size ratings. Tire servicing is covered in chapter
12-10. (Refer to 12-10)
For tire and wheel removal, installation, and inspection procedures refer to Chapter 32. (Refer to 3200)
WARNING:
Recapped tires are not approved for use on the airplane. Recapped tires have a
tendency to swell as a result of the increased temperature generated during takeoff.
Note:
If the airplane tires should ever freeze to the ground surface, use hot air or water to free
the tires before attempting to move the airplane.
E. Battery
Visual inspection of battery 1 in the aircraft should be done every month or 25 flight hours until experience indicates a longer inspection interval. Check the battery, container, cover and connections for distortion or damage. Proper battery charging procedures and the replenishing of electrolyte, along with
other pertinent information for battery 1 can be found in Chapter 24. (Refer to 24-30)
F.
Lubrication
Lubrication and cleanliness should always be considered to be of utmost importance. To prevent rapid
and unnecessary deterioration of metal components which are exposed to the elements of nature, the
following should always be clean and lubricated.
CAUTION:
13773-001
30 Nov 2000
Never mix lubricants of any kind. Only use lubricants recommended by the manufacturer. Keep threads free of grease to avoid degrading lock nut performance and torque
readings. Only use lubricants recommended by the manufacturer.
12-20
Page 7
Item
Lubricant
P/N or Spec.
Supplier
Engine cowling access 300 hours
panel door
Powdered Graphite
SS-G-659A
Any source
Cabin door hinge
Lubricating Oil Aeroshell ASF3
SAE 10W30 or
MIL-L-7870
Shell Oil Co.
Brake assembly o-rings On assembly
and cylinder bores
Dow Corning 55 Oring lubricant
MIL-G-4343
Dow Corning
Brake anchor bolts
On assembly
Silicone Spray
-
Any source
Cargo door hinge
300 hours
Powdered Graphite
-
Any source
Engine control rod end 100 hours
bearings (All)
Aeroshell 7 ASG
MIL-G-23827
Shell Oil Co.
Control column bearings and tube
200 hours
Lubricating Oil Aeroshell 3
SAE 10W30 or
MIL-L-7870
Shell Oil Co.
Battery post
200 hours
Petroleum Jelly
V V-P-236
Any source
Seat tracks
300 hours
Paraffin Wax
-
Any source
Propeller hub
6 months and Aeroshell 6
100 hours
MIL-G-24139
Shell Oil Co.
Propeller governor
shaft splines
On assembly
Engine Oil
MHS-24
MHS-25
Approved Oils
Listing
Wheel bearings
200 hours
Aeroshell ASG22
MIL-G-81322
Shell Oil Co.
Nose wheel
spindle thread
100 hours
Aeroshell ASG22
MIL-G-81322
Shell Oil Co.
Rudder pedals
200 hours
Lubricating Oil Aeroshell ASF3
SAE 10W30 or
MIL-L-7870
Shell Oil Co.
Rudder pedal rod ends 200 hours
Aeroshell ASG22
MIL-G-81322
Any source
Trim cartridge
500 hours
Dry Lube
-
Any source
Elevator bellcranks
5 years
Aeroshell ASG22
MIL-G-81322
Shell Oil Co.
Flap actuator shaft
100 hours
Lubricating Oil
Aeroshell ASF3
SAE 10W30
MIL-L-7870
Shell Oil Co.
Note:
Page 8
Interval
100 hours
Lubricate plain bearings and bushings, as required or every 500 hours with SAE 10W30
oil or Aeroshell ASF3.
12-20
13773-001
30 Nov 2000
G. Cleaning
To maintain the flying characteristics of the airplane, the external surfaces of the airplane and propeller
must remain clean, especially the leading edges of the wings. To aid in protecting the finish, insect residue should be immediately washed off after every flight. For best cleaning results on cured paint,
(paint that has been in a warm climate for at least 90 days after being applied and prior to being
washed with hot soapy water) use a generous amount of fresh warm water. If necessary, a mild nonabrasive aircraft cleaning agent may be used. Apply a heavy coating of silicone-free wax to the leading
edges of the nose section, wings and empennage. If any points of lubrication are washed away, they
must be lubricated immediately after washing. Approximately once a year, the exterior (painted) surface of the airplane should be waxed and buffed using a good quality silicone free automotive wax.
CAUTION:
Because wax seals paint from the outside air, a new paint job should not be waxed for a
period of 90 days, in order to allow the paint to fully cure. Wash uncured painted surfaces with only cold or lukewarm water and a mild non-detergent soap. Any rubbing of
the painted surface should be done gently and held to a minimum to avoid cracking the
paint film.
Always test wash an inconspicuous area first, to determine the compatibility of the
cleaning agent being used. Do not use household detergents to wash the exterior of the
airplane, or damage to the finish may occur. Do not wax, use hot water, or apply soap to
uncured paint, (paint which is less than 90 days old) or damage to the finish may occur.
Some household spray cleaners may damage aluminum and other materials, always
refer to the manufactures instructions for proper usage for the product being used.
When washing the airplane with mild soap and water, use special care to avoid washing
away grease from any lubricated area. After washing with solvent in the landing gear
area, lubricate all lubrication points. Premature wear of lubricated surfaces may result if
the above precautions are not taken. When fuel, hydraulic fluid, or other fluids containing dye are spilled on any painted surface they must be removed immediately to prevent
staining.
(1)
Exterior Wash
WARNING:
(a)
Never allow wax or any other substance to restrict either static port orifice.
Acquire necessary tools and equipment.
Description
(b)
(c)
13773-001
30 Nov 2000
P/N or Spec.
Supplier
Purpose
Mild Dishwasher Soap (abrasive free)
Any Source
Cleaning exterior of
airplane & windows
Automotive paste wax
(silicone free)
-
Any Source
Waxing exterior of airplane and acrylic windows
Cotton cloth (clean
white, lint free)
-
Any Source
General cleaning
Before washing the exterior of the airplane: cover the following to prevent any possible
damage, pitot head, brake discs and static ports.
Rinse away all loose dirt and mud prior to washing the airplane.
12-20
Page 9
(d)
(e)
(f)
(g)
Wash the airplane using plenty of clean, fresh water.
Rinse the airplane with fresh, clean water.
Dry the airplane using a soft chamois.
Remove all pitot head, brake disc and static port covers.
WARNING:
(2)
Inspect the pitot head and static port orifices for any obstructions or
restrictions. Never allow any of the aforementioned orifices to remain
obstructed or restricted. If any obstructions or restrictions are found
they must be corrected before the airplane is allowed back into service.
Windshield/Windows
Before cleaning an acrylic window, always rinse it free of all dust particles before using a clean
sponge or chamois. Never rub dry acrylic. Dull or scratched window coverings may be polished
using a special acrylic polishing paste. Only clean acrylic windows with an antistatic acrylic
cleaner. Remove grease or oil with a soft cloth saturated with kerosene.
(a)
Acquire necessary tools and equipment.
Description
(b)
(c)
(d)
(e)
Page 10
P/N or Spec.
Supplier
Purpose
Acrylic polish & sealant
SP-PL16
LP Aero Plastics, Inc. Polishing outer window
Jeannette, PA
surface
Acrylic plastic cleaner
SP-210A
LP Aero Plastics, Inc. Polishing inner window
Jeannette, PA
surface
Cotton cloth (clean white, lint free)
Any Source
General cleaning procedures
Kerosene
Any Source
Grease and oil removal
-
CAUTION:
Never use de-icing fluid, household window cleaning sprays, lacquer thinner, gasoline, acetone, carbon tetrachloride, benzene, or fire extinguisher
fluid to clean windows or windshields. The use of such chemicals will soften
or craze an acrylic surface. Never use rain repellent on acrylic surfaces.
Always cover the windshield and windows when applying any chemicals
(near the vicinity) that may damage them. Never use sun shades or allow
sun visors to remain in the lowered position when the airplane is parked in
direct sunlight or crazing and the formation of bubbles may occur.
Note:
Prior to cleaning windows, place the airplane in a shaded area to allow the
windows to cool down. When polishing an acrylic surface, use a polish
meeting Federal Specification P-P-560.
Remove any grease or oil using a soft cloth saturated with kerosene; then rinse the window with plenty of clean, fresh water.
Rinse the windshield free of all dust and contaminates with plenty of clean, fresh water.
Using a moist sponge or chamois, wipe the windows clean of all contaminates.
Dry the windows using a soft chamois.
12-20
13773-001
30 Nov 2000
(3)
Interior Cleaning:
Seats, carpet, upholstery panels, and headliners should be vacuumed at regular intervals to
remove surface dirt and dust. While vacuuming, use a fine bristle nylon brush to help loosen particles. Carpet may be cleaned like household carpet made with the same composition and similar weave. The headliner is made from polyester. The headliner can be cleaned using the same
methods for cleaning any object made out of polyester. For smudges from dirty hands or tools,
powdered laundry soap can work well. The instrument panel, control knobs, and plastic trim
need only to be wiped clean with a soft damp cloth.
CAUTION:
(a)
Never use furniture polish on interior furnishings, because most contain solvents
harmful to vinyl. Do not use alcohol or other strong solvents on interior plastics.
Never allow alcohol to enter microphone or electrical connections. The interior furnishings can be easily damaged if cleaned with Methyl Ethel Ketone (MEK), naphtha, mufti standard solvent, gasoline, lacquer thinner or other types of thinner.
Never saturate any fabric with solution which could damage the backing or padding materials. When cleaning carpet, keep the foam as dry as possible and rub
the carpet in circular motions. Never allow carpets to remain damp; always dry
them thoroughly. Always follow the manufactures instructions on proper usage of
their products. Compressed air is not recommended for cleaning the headliner.
Acquire necessary tools and equipment.
Description
(4)
13773-001
30 Nov 2000
P/N or Spec.
Supplier
Purpose
Saddle soap
-
Any Source
Clean leather surfaces
Mild dishwasher soap
(Abrasive free)
-
Any Source
Clean leather surfaces
Cotton cloth (clean white, lint free)
Any Source
General cleaning procedures
Whiskbroom
-
Any Source
General cleaning procedures
Vacuum cleaner
-
Any Source
General cleaning procedures
(b) Brush out all large pieces of dirt and other foreign matter using a whiskbroom.
(c)
Remove all small pieces of dirt and other foreign matter using a vacuum cleaner.
(d) Wipe all plastic liners and leather surfaces clean using a moist cloth.
(e) Discard all trash.
(f)
Clean leather with saddle soap or a mild hand soap and water; then dry with a soft cloth.
Engine Cleaning:
Accumulation of grease, dirt, oil, and other fluids in the engine compartment create higher
engine compartment operating temperatures and can create a fire hazard. A dirty engine compartment will also hamper the inspection process.
12-20
Page 11
CAUTION:
(a)
The engine must be cool to the touch, prior to cleaning. Always inspect engine for
leaks, loose hardware, and worn hardware prior to cleaning. Always cover all windows, magneto vents, engine electrical components and connections when washing any portion of the engine compartment. Remove the air filter and cover the air
induction inlet prior to washing the engine compartment. Never use any flammable or corrosive cleaning solvents. Never allow the airplane to sit in freezing temperatures until the airplane has thoroughly dried.
Acquire necessary tools and equipment.
Description
Stoddard solvent
P/N or Spec.
PD-680 Type ll
Cotton cloth (clean white, lint free)
(b)
(c)
(d)
(e)
(f)
(h)
Any Source
Engine degreasing
Any Source
General cleaning
Do not allow solvent to enter the alternator, starter, vacuum pump, or air
induction intakes.
Brush on a degreasing solvent; then allow the solvent to penetrate the grease and grime
as called out in the instructions.
Rinse the engine clean with additional solvent and allow it to dry.
CAUTION:
(i)
(j)
(k)
(l)
Purpose
Remove both engine cowlings. (Refer to 71-10)
Inspect engine for leaks, loose hardware, and worn hardware. Service as required.
Remove the air filter. (Refer to 71-60)
Cover the alternator, starter, vacuum pump, and air induction intakes.
Place a large catch pan under the engine.
CAUTION:
(g)
Supplier
Do not operate the engine until all solvent has evaporated or otherwise
been removed.
Remove the covers from the alternator, starter, vacuum pump, and air induction intakes.
Install and secure the air filter. (Refer to 71-60)
Remove the catch pan from under the engine.
Install and secure both engine cowlings.
H. Leather Interior
Leather is the most durable and easily maintained upholstery material available. Like most other
important investments, leather requires routine maintenance. For routine maintenance, occasional
wiping with a soft, white, damp cloth is all the care your leather will need. The approved leather care
products are available from Cirrus Design.
(1)
Leather Cleaning
The approved leather cleaner is a water based solution especially formulated to remove stains.
It will safely and effectively remove dirt, grime, and soil. It will remove some ink marks and
grease stains; however, for stubborn ink marks and stains, use the ink remover available from
Cirrus Design.
The approved leather conditioner cleans, conditions, and restores. Especially formulated to
remove surface dirt and enhance the luster of naturally tanned leather, the unique wax-free for-
Page 12
12-20
13773-001
30 Nov 2000
mulation allows leather to breath and imparts a soft and supple tone. It also provides emollients,
color restoration, water retardation, and ultraviolet ray protection, which decreases color fading.
If applied regularly, the conditioner will enhance the natural luster of fine leather, while increasing
the longevity of the product. The approved leather conditioner is safe for use on all colors.
CAUTION:
The approved leather care kit contains leather cleaner, leather conditioner, ink
remover, and a clean, soft, white cloth. Leather cleaner and leather conditioner
were developed for use on protected or semi-aniline leather. Never use leather
cleaner or leather conditioner on suede (napped) or pure aniline leathers.
Avoid using soaps as they contain alkaline which will alter the leather’s pH balance. They can also cause leather to age prematurely by causing weakness,
cracking, and discoloration. Not all cleaning products suggested for leather will
protect and preserve the life of your upholstery. To avoid problems, use the
Leather Care Kit available from Cirrus Design. Test in an inconspicuous area to
ensure colorfastness. Never apply product directly to upholstery. Some stains can
cause permanent discoloration even after cleaning. Never use the leather care kit
in conjunction with cleaning products not approved by Cirrus Design.
(a)
Acquire necessary tools, equipment, and supplies.
Description
(b)
Supplier
Purpose
House cleaning liquid
Whisk
Any Source
Remove fresh baby
oil, ketchup, grape
juice, coffee or tea
stains
Spray cleaning solution
Fantastik or
409
Any Source
Remove fresh
crayon or grease
stains
Ammonia
-
Any Source
Remove fresh lipstick or yellow mustard stains
Household Bleach
(5% sodium hypochlorite)
-
Any Source
Remove fresh lipstick or yellow mustard stains
Cotton cloth (clean white,
lint free)
-
Any Source
General cleaning
For specific types of stains and cleaning procedures, refer to the following figure.
Note:
13773-001
30 Nov 2000
P/N or Spec.
Always clean stains immediately as some inks and stains set faster than
others. Always follow the directions from the manufacture of the cleaning
agent being used.
12-20
Page 13
Approved Cleaning Products for Simulated Leather
Description
P/N or Spec.
Supplier
Purpose
Leather care kit
50689-001
Cirrus Design
General leather care
Leather cleaner
50684-001
Cirrus Design
Cleaning leather
Ink remover
50685-001
Cirrus Design
Removing ink
Leather conditioner
50686-001
Cirrus Design
Conditioning leather
Spot and stain remover
50687-001
Cirrus Design
Removing spots
Vinyl finish vinyl cleaner
50688-001
Cirrus Design
Cleaning vinyl
Approved Cleaning Procedures for Simulated Leather
Stain Type
Cleaning Procedure
Baby Oil
1
Ketchup
1
Grape Juice
1
Coffee
1
Tea
1
Crayon
2
Grease
2
Lipstick
3
Yellow Mustard
3
Procedure 1 = Remove excess spill with damp cloth. Clean with a 1:1 mixture of Whisk House
Cleaner Liquid and water. Rinse with clean water, and dry.
Procedure 2 = Use straight application of concentrated cleaners such as 409 or Fantastik Spray
Cleaner.
Procedure 3 = Use a 1:1 mix of ammonia and water or a 1:4 mix of bleach and water. Rinse with clean
water, and dry.
Page 14
12-20
13773-001
30 Nov 2000
UNSCHEDULED SERVICING
1. DESCRIPTION
This section contains information on unscheduled servicing which includes the removal of snow and ice.
2. MAINTENANCE PRACTICES
A. Snow and Ice Removal:
Snow and ice must never be allowed to remain on the airplane. If snow or ice have accumulated, it is
recommended to remove it by placing the airplane in a heated hanger. This will prevent melted snow
and ice from refreezing on the surface, or in any gaps. Never use de-icing fluids to remove snow
deposits from the airplane. Heated de-icing fluids can damage composite structures from the extreme
temperature change. Some de-icing fluids may damage acrylic windows.
WARNING:
Both upper and lower surfaces of the airplane must be completely free of ice and
snow formation.
Most anti-ice additives contain ethylene glycol monomethyl ether (EGME). Antiicing additives containing ethylene glycol monomethyl ether can be extremely
harmful if inhaled, swallowed, absorbed through the skin, or if eye contact is
allowed. Vapors from EGME are dangerous to health when breathed or allowed to
absorb into the skin. If EGME contact is experienced, the following emergency
and first aid procedures should be followed.
If EGME is inhaled, remove the person to fresh air. If the person is not breathing,
give mouth-to-mouth respiration. However, if breathing is difficult, administer
oxygen. Always call a physician.
If EGME is swallowed, drink large quantities of water, then induce vomiting by
placing a finger far back into the throat. Contact a physician immediately. If vomiting cannot be induced, or if the victim is unconscious or in convulsions, take this
person to a hospital immediately. Do not induce vomiting or give anything by
mouth to an unconscious person.
If EGME has contacted the eyes, flush with plenty of water for at least 15 minutes.
If EGME has contacted the skin, remove all contaminated clothing and wash
affected areas with soap and water; then call a physician. Wash all contaminated
clothing before re-use.
CAUTION:
13773-001
30 Nov 2000
Never use sharp objects to remove snow or ice.
12-30
Page 1
CHAPTER
STANDARD
PRACTICES:
AIRFRAME
CHAPTER 20 - STANDARD PRACTICES: AIRFRAME
LIST OF EFFECTIVE PAGES
Chapter/Section
Page
Date
20-TOC
1
30 NOV 2000
20-TOC
2
30 NOV 2000
20-TOC
3
30 NOV 2000
20-TOC
6
20-LOEP
1
30 NOV 2000
20-LOEP
2
30 NOV 2000
20-00
1
30 NOV 2000
20-10
1
30 NOV 2000
20-10
2
30 NOV 2000
20-10
3
30 NOV 2000
20-10
4
30 NOV 2000
20-10
5
30 NOV 2000
20-10
6
30 NOV 2000
20-10
7
30 NOV 2000
20-10
8
30 NOV 2000
20-10
9
30 NOV 2000
20-10
10
30 NOV 2000
20-10
11
30 NOV 2000
20-10
12
30 NOV 2000
20-10
13
30 NOV 2000
20-10
14
30 NOV 2000
20-10
15
30 NOV 2000
20-10
16
30 NOV 2000
20-10
17
30 NOV 2000
20-10
18
30 NOV 2000
20-10
19
30 NOV 2000
20-10
20
30 NOV 2000
20-10
21
30 NOV 2000
20-10
22
30 NOV 2000
20-20
1
30 NOV 2000
20-30
1
30 NOV 2000
20-30
2
30 NOV 2000
20-30
3
30 NOV 2000
20-30
4
30 NOV 2000
20-30
5
30 NOV 2000
20-30
6
30 NOV 2000
20-30
7
30 NOV 2000
20-30
8
30 NOV 2000
13773-001
30 Nov 2000
20-LOEP
Page 1
CHAPTER 20 - STANDARD PRACTICES: AIRFRAME
LIST OF EFFECTIVE PAGES
Chapter/Section
Page
Date
20-40
1
30 NOV 2000
20-40
2
30 NOV 2000
20-50
1
30 NOV 2000
20-50
2
30 NOV 2000
20-50
3
30 NOV 2000
20-50
4
30 NOV 2000
20-50
5
30 NOV 2000
20-60
1
30 NOV 2000
20-60
2
30 NOV 2000
20-60
3
30 NOV 2000
20-60
4
30 NOV 2000
20-60
5
30 NOV 2000
20-60
6
30 NOV 2000
20-60
7
30 NOV 2000
20-60
8
30 NOV 2000
20-60
9
30 NOV 2000
20-60
10
30 NOV 2000
20-60
11
30 NOV 2000
20-60
12
30 NOV 2000
20-60
13
30 NOV 2000
20-70
1
30 NOV 2000
20-70
2
30 NOV 2000
20-70
3
30 NOV 2000
20-70
4
30 NOV 2000
20-70
5
30 NOV 2000
20-70
6
30 NOV 2000
20-70
7
30 NOV 2000
20-70
8
30 NOV 2000
20-70
9
30 NOV 2000
20-70
10
30 NOV 2000
20-70
11
30 NOV 2000
20-80
1
30 NOV 2000
20-80
2
30 NOV 2000
20-90
1
30 NOV 2000
20-90
2
30 NOV 2000
Page 2
20-LOEP
13773-001
30 Nov 2000
CHAPTER 20 - STANDARD PRACTICES - AIRFRAME
TABLE OF CONTENTS
Subject
STANDARD PRACTICES - AIRFRAME
Chapter/Section
Page
20-00
General
SEALANTS
1
20-10
Description
1
Approved Sealants
Shelf Life
Storage Criteria
Refrigerated Storage - Mixed Sealants
Thawing of Frozen Sealant
Application Time / Work Life
Tack-Free Time
Cure Time
Types of Seals
Fillet Seals
Faying Surface Seals
Injection Seals
Brush Seals
Method of Application
Brush Application
Roller Application
Extrusion Application
Spatula Application
Maintenance Practices
1
1
1
1
1
3
3
3
3
3
3
4
4
4
4
4
4
4
7
Preparation for Sealing
Mixing Sealants
Application of Sealants (General Procedure)
Sealing Techniques
Repairing Faying Surface Seal
Repairing an Injection Seal
Repairing Fillet Seals
Fastener Sealing in Wet and Non-Wet Areas
Tube Fitting Seals in Fuel Tank Bulkheads
Cable Pass-Through
Reseal Integral Fuel Tank After a Structural Repair
13773-001
30 Nov 2000
7
8
11
12
12
13
14
17
17
19
21
20-TOC
Page 1
CHAPTER 20 - STANDARD PRACTICES - AIRFRAME
TABLE OF CONTENTS
Subject
Chapter/Section
ADHESIVES
Page
20-20
Description
1
Maintenance Practices
1
Adhesives
SOLVENT CLEANING
1
20-30
Description
1
Maintenance Practices
2
Solvent Cleaning Metal Parts
Solvent Cleaning Composite Materials
Cleaning Acrylic Surfaces
Cleaning Painted or Primed Surfaces for Decal Application
LOCTITE/TORQUE SEAL
2
4
6
8
20-40
Description
1
Maintenance Practices
1
Threadlock
Shelf Life
Application of Thread Lock
Torque Seal
SAFETYING
1
1
1
1
20-50
Description
1
Maintenance Practices
1
Safety Wiring
Single Wire Method
Double Wire Method
General Installation Procedures
Required Installations of Safety Wire
FASTENER IDENTIFICATION AND TORQUE DATA
1
1
1
2
2
20-60
Description
1
Maintenance Practices
1
Bolts
Calculating Torque
Requirements for Calculating Torque
Page 2
20-TOC
1
11
11
13773-001
30 Nov 2000
CHAPTER 20 - STANDARD PRACTICES - AIRFRAME
TABLE OF CONTENTS
Subject
Chapter/Section
FASTENER AND HARDWARE GENERAL REQUIREMENTS
Page
20-70
Description
1
Maintenance Practices
1
Cotter Pins
Proper Usage of Cotter Pins.
Locking Clip
Proper use of Locking Clips
Rod Ends
Inspecting
Fastener Flushness
Flush Head Screws
Driven Rivets
Blind Rivets, Screws and Hi-Loks
Camlocks
Self Locking Nuts
Restrictions of self-locking nuts
Washers
Lockwashers
Lockwasher Usage
FLARED TUBING
1
1
4
4
4
4
7
7
7
7
7
7
8
10
10
10
20-80
Description
1
Maintenance Practices
1
Hydraulic Fittings
CABLE INSPECTION
1
20-90
Description
1
Maintenance Practices
1
Control Cables
Inspecting
13773-001
30 Nov 2000
1
1
20-TOC
Page 3
STANDARD PRACTICES - AIRFRAME
1. GENERAL
This chapter contains torque factors, torque tables and measuring techniques for various components.
Instructions necessary for proper usage and identification of special tools, thread lock and fastening hardware are also provided.
13773-001
30 Nov 2000
20-00
Page 1
SEALANTS
1. DESCRIPTION
This section contains information which defines the proper usage, storage, shelf life, and application of
sealants used on the airplane. Sealant is used to prevent the spread of fire or flames from the engine compartment to the airplane, prevent air leakage, prevent fastener corrosion, prevent water or dust intrusion,
and to prevent fluid leakage. The following sealants are recommended by Cirrus Design Corporation.
A. Approved Sealants
The sealants shown in the referenced figure, when applied properly, have been approved by Cirrus
Design for use in specified applications. These sealants are available from a variety of manufacturers
and packaged in a variety of fashions - in bulk, in kits, and in premixed form.
CAUTION:
Always observe the manufacturer’s recommendations for the product being used.
B. Shelf Life
Shelf life refers to the period of time (usually from the date of manufacture) in which the sealant is
usable. Shelf life is dependent on proper storage temperature and environmental factors, such as
humidity and exposure to sunlight. Always observe the manufacturer’s instructions for recommended
use, storage, and testing of over-aged sealant.
C. Storage Criteria
All sealants must be stored under controlled temperature conditions to achieve maximum shelf life.
Unmixed sealants should be stored at a controlled temperature of between 40°F (4.5° C) and 80°F
(26.5° C). Never store sealants where the temperature exceeds 95° F or falls below 40° F. Unmixed
sealants stored at temperatures exceeding 80°F (26.5° C) should be used within five weeks. All sealants should be used on a “first in, first out” basis.
Note:
Containers must be tightly closed prior to placing them in the proper storage environment. Sealants must be stored as recommended by the manufacturer. Mixed sealants
subjected to refrigerated storage may exhibit altered application life. Mark all material
containers clearly with a “use by” date, consisting of the year and month.
(1)
Refrigerated Storage - Mixed Sealants
When desired, store mixed sealants under refrigeration. Use of a quick-freeze technique is recommended to minimize the amount of application life that would be lost in a slower cooling procedure. To quick-freeze mixed sealant, immerse the filled cartridges in a slurry of dry ice and
alcohol for 10 minutes.
(2)
Thawing of Frozen Sealant
Frozen sealant is normally thawed by exposure to ambient temperature for 20 to 30 minutes.
However, the rate of thawing may be accelerated by immersion in warm water, 120° F(49° C)
maximum, for approximately 10 minutes. Sealants are subject to excessive slumping when
heated to temperatures above 80°F (26.5° C). For best results, thawing time should be adjusted
to give an extruded or thawed sealant temperature 60 - 80° F(15.5° C - 26.5° C). The time consumed by freezing and thawing operations reduce application life by approximately 30 minutes.
Further reduction in application life may result from duration and temperature during storage. It
is recommended that all aspects of mixing, freezing, and thawing be considered before mixing
and freezing material with less than one hour application life.
13773-001
30 Nov 2000
20-10
Page 1
Approved Sealants
Item
P/N or Spec.
Supplier
Application
RTV Silicone Sealant
(high temperature)
RTV 736
Dow Corning
General fillet & faying
surface sealing.
Brushable Sealant
MIL-S-8802 Type 2 Class A*
GC408A
P/S 890A
EC1675A
CS3204 C1.A
PR1440A
Fuel tank repair surface
Goal
seal.
PRC Aerospace Sealants
3M
Chem Seal - Flame Master
PRC Aerospace Sealants
Extrusion Gun Sealant
MIL-S-8802 Type 2 Class B*
CS3204 C1.B
GC408B
P/S 890B
PR1440B
EC1675B
AC-240B
Chem Seal - Flame Master
Goal
PRC Aerospace Sealants
PRC Aerospace Sealants
3M
Dynamold Aerospace
Firewall Sealant
MIL-S-38249 Type 1
P/S 700 or P/R 812 Sealant
AMS 337413A
Dapco 2200 Sealant
PRC Aerospace Sealants
Glendale, CA
D Aircraft Products, Inc.
Anaheim, CA
Perimeter seal firewall.
Fuel flow transmitter
assembly.
Thread Sealant
56531 (50 ml tube)
Loctite
To obtain a leak-free seal
on non-fuel system
metallic pipe threads
Latex Sealant
C850A 151-8275
Sherwin Williams
Faying seal antenna.
Fillet, faying surface, and
injection seal in fuel
tanks. Install and seal
windows. Seal fuel system enclosure in cabin.
* When ordering MIL-S-8802 sealants make sure that an appropriate work life is specified. Work life is specified by
adding the desired work life in the product dash number after the Class designation, e.g. A-1/2, A-2, B-1/2, B-2, etc.
Typical Sealant Properties
Work Life
(Hours)
Sealant
Testable
Cure Time
(Hours)
Tack Free
(Hours)
Standard
Cure Time
(Days)
MIL-S-8802 A-1/2
1/2
<10
36
14
MIL-S-8802 A-2
2
<30
60
14
MIL-S-8802 B-1/2
1/2
<10
24
14
MIL-S-8802 B-1
1
<16
40
14
MIL-S-8802 B-2
2
<20
48
14
MIL-S-38249
2
<4
48
14
Above data based upon 77°F (25°C) and 50% relative humidity. Results can vary due to temperature, humidity, and
mix proportions. Testable cure time based upon a Rex Durometer reading of at least 30A to 35 A.
Page 2
20-10
13773-001
30 Nov 2000
Note:
Thawed sealant must not be re-frozen. All sealants must extrude freely before
application to any surface. Adhesion may be lowered by condensation of moisture
if the sealant is not thawed to an extruded temperature of at least 60° F.
D. Application Time / Work Life
Application time refers to the time a mixed compound remains at a consistency suitable for application.
After this point, the sealant does not “wet” properly and may fail in adhesion (sealant “rolls up” ahead
of the sealing gun or “draws up” behind the gun). Application times shown in Figure 20-1 are based
upon an ambient temperature of 77° F (25° C) and a relative humidity of 50%. For fuel tank sealants,
every 20° F (10.6° C) rise in temperature halves application time and every 20° F (10.6° C) decline in
temperature doubles application time. High humidity during the mixing process will shorten application
time.
E. Tack-Free Time
Tack-free time is the time that a sealant requires to cure sufficiently to not stick to standard polyethylene film when the film is pressed into the sealant.
F.
Cure Time
The time require to sufficiently cure applied sealant depends upon the ambient temperature and relative humidity. Always observe the manufacturer’s recommendations for cure. Low humidity will extend
the cure time. Optimum cure for most sealants will be obtained at 77° F (25° C) and 50% relative
humidity. A high state of cure is developed after 14 days at this temperature and humility. Cure may be
hastened by applying heat up to 130° F. For fuel tank sealants, every 20° F (10.6° C) rise in temperature halves cure time and every 20° F (10.6° C) decline in temperature doubles cure time. Fuel tank
sealant is considered to be sufficiently cured for pressure test when sealant is tack free, does not pit
when firmly pressed, and feels firm to the touch (Rex Durometer reading of approximately 30 A).
G. Types of Seals
(1)
Fillet Seals
Fillet sealing is the application of a bead of extrudable sealant to seams, joints, and intersecting
planes or surfaces. Fillet seals are used in the integral fuel tank along the intersection of the
wing skin ribs, along the intersection of the wing skin and the spar and aft shear web, around
fasteners and fittings protruding into the tank. Fillet seals are also used around the firewall
perimeter, and other places where weather, fume, or dust intrusion must be prevented and to
seal wetted areas. Fillet seals are accomplished using extrudable sealants in an extrusion cartridge, tube, or spatula. Fillet seals may be tooled to improve appearance, fill voids and remove
bubbles. A satisfactory fillet seal is indicated when the fillet overlaps the seam by the required
dimension, is smooth in appearance, adheres to both sides of the seam, and is free of voids,
bubbles, and overlaps. Fillet seals may be tooled immediately after application to achieve the
seal.
(2)
Faying Surface Seals
Faying surface seals are used between surfaces where an absolute seal cannot be obtained by
sealing around fasteners or by applying fillet seals. A faying surface seal around a fastener prevents fuel or liquids from reaching the fastener thread or shaft. The faying surface seal does not
completely seal the fastener which must also be sealed. Faying surface seals are used during
the manufacture of the airplane to seal areas that are difficult or impossible to seal after assembly. Faying surface seals may be applied by brushing on sealant or using and extrusion cartridge, tube, or spreading the sealant using a spatula. A satisfactory faying surface seal is
indicated when a small amount of sealant is extruded on both sides of the joint after assembly of
the faying surfaces.
13773-001
30 Nov 2000
20-10
Page 3
(3)
Injection Seals
Injection seals are used to fill holes, joggles, channels and other voids. Injection seals may be
applied to provide continuity where fillet seals are interrupted by structure. Injection sealing
forces air out of a cavity and fills the vacated space with sealant. Injection seals are accomplished by injecting the area with an extrudable sealant through an extrusion cartridge or a tube.
(4)
Brush Seals
Brush sealing is used in the fuel tank to reseal surface areas after a structural repair to the wing
exterior skins. The wet area inside the tank must be sanded, cleaned and free of all dust and
contaminates. The sealant is applied using a stiff-bristle brush to the repair and surrounding
area.
H. Method of Application
Sealants may be applied with a brush, a roller, an extrusion gun, or with a spatula. Extrusion guns are
available as either hand operated or pneumatic powered. Some extrudable sealants are also available
in squeezable tubes. Each application method has advantages in particular situations.
Page 4
(1)
Brush Application
A stiff-bristle brush (not nylon) is used to apply the sealant to the surface to be sealed. Brushed
on sealant application may be used for faying surface sealing, fastener sealing, and surface
sealing.
(2)
Roller Application
Faying surface and brushable sealant may be applied using a roller. For some applications
where a thin even coat of sealant is to applied, a roller is the preferred method of application.
(3)
Extrusion Application
Fillet and faying surface seals may be applied with an extrusion gun. Injection seals must be
applied using an injection gun. Some extrusion guns are available with a variety of nozzles for
various applications. Nozzle tips may be shaped as required by the mechanic to provide a bead
of sealant with the shape and dimensions for the specific seal.
(4)
Spatula Application
A spatula is used to spread sealant material for faying surface and fillet seals. Normally, a spatula cannot be used to provide an injection seal. Small repair fillet seals may be applied with a
spatula if an extrusion gun is not available or will not fit in the area to be sealed. Spatulas may be
manufactured by the mechanic to tool fillet seals applied with a extrusion gun to fill voids, even
the bead, and/or to remove bubbles.
20-10
13773-001
30 Nov 2000
Figure 20-101
Fillet Sealing
13773-001
30 Nov 2000
20-10
Page 5
Figure 20-102
Injection & Faying Surface Sealing
Page 6
20-10
13773-001
30 Nov 2000
2. MAINTENANCE PRACTICES
A. Preparation for Sealing
(1)
Acquire necessary tools, equipment, and supplies.
Description
(2)
(3)
(4)
13773-001
30 Nov 2000
Purpose
-
Locally
manufacture
Remove sealant
Pipe Cleaners
-
Any Source
Remove sealant in
injectable gaps
Bristle Brush
(non-nylon)
-
Any Source
Clean up
Sandpaper, Aluminum
Oxide
200 grit
Any Source
Prep composite surfaces
Cotton cloth
(clean, lint free)
-
Any Source
Surface Cleaning
Isopropyl Alcohol
TT-I-735
Grade A or B
Any Source
Surface clean acrylic
windows or composite
materials.
Acetone
ASTM D-329
Any Source
Surface clean composite materials.
Protective Gloves
-
Any Source
Protect hands from
chemicals
Goggles
-
Any Source
Protect eyes from chemicals
Determine if structural repair is required. (Refer to 51-10)
If repair is required, repair structure in accordance the standard structural repair practices.
(Refer to 51-10)
Examine seal in suspect area and determine the seal level and seal plane in adjacent structure.
The seal plane is the boundary plane through any assembly of structural items
that presents a continuous barrier to the flow of liquids or gases.
Identify the type of sealant used in the area of the defect.
CAUTION:
(6)
(7)
Supplier
Sealant Removal and Cutting Tools
Note:
(5)
P/N or Spec.
Do not interchange sealing compounds. Best results are obtained by using the
sealant compound originally applied to make repairs.
Determine the type of seal (faying surface, fillet, injection, or brushed) required for the repair.
Use sealant cutting tools to remove or notch the sealant in the defective area. Sufficient sealant
must be removed to produce a solid, intact seal on each side of the affected area.
20-10
Page 7
CAUTION:
(8)
Examine rework area for clean cuts, adequate notching, and for access. All loose pieces of sealant in the repair area must be removed. If required, the area can be lightly sanded or brushed
briskly with a stiff-bristle brush to remove sealant.
CAUTION:
(9)
Cutting tools must be made only from non-ferrous materials that are softer than
the surrounding structure. Use hardwood or acrylic tools for composite structure
and polyethylene, polypropylene, or Teflon around acrylic windows.
Use caution not to sand through resin coat exposing fibers. Sanding through the
resin coat and exposing fibers will be cause for composite repair.
Solvent clean area to be sealed. (Refer to 20-30)
B. Mixing Sealants
WARNING:
Keep all sealants away from open flames or other sources of ignition.
Mix and use sealants only in areas with adequate ventilation.
Wear protective gloves when handling sealants and cleaned parts. Do not use
protective hand creams as they can contaminate the sealant.
Avoid skin contact. If contact occurs, wash area thoroughly with soap and water.
Wear goggles for eye protection. If accidental eye contact with sealant, sealant
components, or cleaning solvent occurs, immediately flush eyes with large quantities of water and report to a doctor for further examination and/or treatment.
CAUTION:
The expiration date is stamped on each sealant container, never use expired sealant.
Do not stir air into mixture, if air bubbles appear, they must be removed. Mixing containers must be clean and free of all contaminates.
All equipment used in mixing sealant must be clean and dust free to avoid contamination of sealant. Clean equipment immediately after use.
Note:
Page 8
Proper mixing and correct proportions are extremely important to obtain optimum
results. Always observe sealant manufacturer’s recommendations for mixing sealant.
20-10
13773-001
30 Nov 2000
(1)
Acquire necessary tools, equipment, and supplies.
Description
(2)
P/N or Spec.
Supplier
Purpose
Clean, Wax Free Container
-
Any Source
Hand mix sealant
Spatula
-
Any Source
Hand mix sealant
Scales, Accuracy ± 2%
-
Any Source
Proportion sealant
Rotary Mixer
1384
Semco Application Systems
PRC-DeSoto Intl Inc.
Glendale, CA
MIx Mil-S-8802 Class
A sealant
Extrusion Gun Cartridge
-
Any Source
Load sealant
Protective Gloves
-
Any Source
Protect hands from
chemicals
Goggles
-
Any Source
Protect eyes from
chemicals
Hand Mixing Mil-S-38249, Type I Firewall Sealant.
(a) Weigh the amount of base material desired into a clean, wax free container. Mix in accordance to the noted ratios.
• For P/S 700 sealant, add accelerator to the base material at the ratio of 2.5 parts by
weight of accelerator to 100 parts by weight of the base. Application life of P/S 700 is 2
hours when used at 75° F(24° C).
• For PR-812 firewall sealant, add accelerator to the base material at a ratio of 2.5 parts by
weight of accelerator to 100 parts by weight of the base. Application life of PR-812 is 8
hours when used at 75° F (24° C).
(b)
(3)
Note:
Be sure to scrape the sides and bottom of the container in order to include
all the base material in the mixture and to ensure uniform blending. Scrape
mixing paddle on container sides periodically to ensure all material, including that on paddle, is mixed.
Note:
The MIL-S-38249 firewall sealant has a one year storage life when stored at
temperatures below 80°F(26.5° C) in their original unopened containers.
Hand Mixing Mil-S-8802, Type II, Class A Brushable Fuel Tank Sealant.
Sealant is furnished in premeasured and proportioned kits. If the entire kit is not needed they
can be proportioned by combining ten parts of the base compound with one part accelerator (by
weight). Use an accurate scale when mixing base and accelerator.
(a)
(b)
13773-001
30 Nov 2000
Stir as required to thoroughly mix the two components. After thorough and proper mixing,
the mixed sealant shall be uniform in color and viscosity.
Stir the accelerator to absorb all floating liquid before it is mixed with the sealant. The
accelerator can then be poured into the container of sealant for mixing, otherwise, a waxfree container must be used.
Thoroughly stir accelerator in its container until even consistency is obtained.
20-10
Page 9
(c)
Slowly stir accelerator into the base compound and thoroughly mix for approximately 7 to
10 minutes.
Note:
(4)
Be sure to scrape the sides and bottom of the container in order to include
all the compound in the mixture and to ensure uniform blending. Scrape
mixing paddle on container sides periodically to ensure all material, including that on paddle, is mixed.
Alternate Mixing Procedure for Mil-S-8802, Type II, Class A Brushable Sealant
(a) As an alternate procedure, a custom quantity may be mixed by weighing into a clean, waxfree container. Weigh the correct amount of base and accelerator immediately prior to mixing.
Note:
The scales and weighing procedure must be controlled within 2% to insure
good quality. A standard gallon-capacity paint shaker (1350 vibrations/
minute) may be used to mix all kit sizes. Full containers should not be mixed
on a paint shaker.
(b)
(5)
Add accelerator to the base compound, replace lid, and vibrate 3-1/2 minutes to 5 minutes
in an upright position.
(c)
Remove container, open, and scrape down the sides with a spatula or putty knife. Replace
lid and vibrate in an inverted position for 3-1/2 to 5 minutes.
(d) Use sealant or freeze for storage as required.
Mixing of Mil-S-8802, Type II, Class B Extrusion Gun Sealant
Sealant is furnished in premeasured and proportioned kits and in two-part cartridges. If the twopart cartridges are used a special extrusion gun may be required to apply sealant. If a premeasured kit is used and the entire kit is not needed, the sealant can be proportioned by combining
ten parts of the base compound with one part accelerator (by weight). Use an accurate scale
when mixing base and accelerator. Extrusion gun sealant supplied in proportioned kits may be
hand mixed as follows when suitable mechanical pressure mixers are not available.
CAUTION:
(a)
(b)
(c)
Stir the accelerator to absorb all floating liquid before it is mixed with the sealant. The
accelerator can then be poured into the container of sealant for mixing, otherwise, a waxfree container must be used.
Thoroughly stir accelerator in its container until even consistency is obtained.
Slowly stir accelerator into the base compound and thoroughly mix for approximately 7 to
10 minutes.
Note:
(d)
Page 10
Mixing must not be performed in a paint shaker. Slow hand mixing is recommended. The compound may be mixed by a slow-speed mechanical mixer. A
high-speed mechanical mixer will generate internal heat and reduce application
life.
Be sure to scrape the sides and bottom of the container in order to include
all the compound in the mixture and to ensure uniform blending. Scrape
mixing paddle on container sides periodically to ensure all material, including that on paddle, is mixed.
Fill new cartridge with mixed sealant and apply or freeze for storage as required.
20-10
13773-001
30 Nov 2000
C. Application of Sealants (General Procedure)
(1)
Acquire necessary tools, equipment, and supplies.
Description
(2)
Supplier
Purpose
Isopropyl Alcohol
TT-I-735
Grade A or B
Any Source
Solvent Cleaning
Acetone
ASTM D-329
Any Source
Solvent Cleaning
Parting Agent,
(silicone-free automotive
wax)
Any Source
Prevent sealant from
adhering to parts
Cotton cloth
(clean, white, lint free)
-
Any Source
Surface Cleaning
Gloves (clean, powder
free and lint free)
-
Any Source
Handling cleaned
surfaces
Bristle Brush
(non-nylon)
-
Any Source
Apply brushable
sealant.
Pipe Cleaners
-
Any Source
Clean injection seals
Sandpaper, Aluminum
Oxide
200 grit
Any Source
Prep composite surfaces
Extrusion Gun
Semco #850
Semco Application Systems
PRC-Desoto Intl Inc.
Glendale, CA
Apply extrudable
sealant
Polyethylene Cartridge
-
Semco Application Systems
PRC-DeSoto Intl Inc.
Glendale, CA
Hold sealant for
extrusion gun
Polyethylene Nozzles
-
Semco Application Systems
PRC-Desoto Intl Inc.
Glendale, CA
Apply sealant
Roller
-
Any Source
Apply faying surface
sealant
Spatula
-
Any Source
Apply sealant
Gloves, Protective
-
Any Source
Protect hands from
chemicals
Goggles
-
Any Source
Protect eyes from
chemicals
Prepare surfaces to be sealed.
(a) Lightly sand any composite areas to be sealed with 200 grit sandpaper.
CAUTION:
13773-001
30 Nov 2000
P/N or Spec.
Use caution not to sand through resin coat exposing fibers. Sanding
through the resin coat and exposing fibers will be cause for repair.
20-10
Page 11
(b)
(c)
WARNING:
Remove metal and composite chips, shavings, and lint using stiff bristle brushes or vacuum.
Solvent clean all surfaces using acetone or isopropyl alcohol. (Refer to 20-30)
Keep all sealants away from open flames or other sources of ignition.
Mix and use sealants only in areas with adequate ventilation.
Wear protective gloves when handling sealants and cleaned parts. Do not use
protective hand creams as they can contaminate the sealant.
Avoid skin contact. If contact occurs, wash area thoroughly with soap and water.
Wear goggles for eye protection. If accidental eye contact with sealant, sealant
components, or cleaning solvent occurs, immediately flush eyes with large quantities of water and report to a doctor for further examination and/or treatment.
(3)
(4)
(5)
Mix sealant as required.
Apply sealant using the appropriate sealing techniques outlined in paragraph D. - “Sealing Techniques.”
Allow sealant to cure before handling.
D. Sealing Techniques
(1)
Repairing Faying Surface Seal
The faying surface, is the overlapping area of the adjoining surfaces. Fay surface sealing is
accomplished by applying sealant to one mating part before assembly. Sufficient sealant must
be applied so it will squeeze out completely around the joint when the parts are fastened
together. In order to accomplish an adequate seal in an efficient manner, the following sealing
and cleaning procedures must be performed as specified. Examples of faying surface seals are
at the firewall attachment of the heat box and window installation.
(a)
(b)
(c)
Disassemble components from structure to be sealed.
If not already accomplished remove all sealant from faying surfaces with cutting tools and
suitable hardwood or plastic scrapers as described in paragraph A. - “Preparation for
Sealing.”
Refinish damaged surface.
CAUTION:
After thoroughly cleaning surfaces to be sealed, wear clean, white, cotton
gloves to prevent contaminating the surfaces to be sealed.
Use care in selecting solvent. Do not use acetone to clean acrylic. Use only
isopropyl alcohol for solvent cleaning acrylic surfaces.
(d)
Solvent clean surfaces to be sealed. (Refer to 20-30)
CAUTION:
(e)
Page 12
Do not apply parting agent over paints, primers, or on acrylics.Parting
agents will lift paints and most primers and will craze acrylics. Epoxy primers are unaffected by parting agent.
Removable seals shall be applied with the use of a parting agent. For fuel tank access
plates, apply parting agent to both surfaces. In all other cases, apply parting agent to one
surface only. When parting agent is dry to the touch, the parts may be faying surface
sealed and assembled.
20-10
13773-001
30 Nov 2000
CAUTION:
(f)
(g)
Sealant which does not wet properly or which is difficult to extrude from the
sealing gun must be discarded. Sealant should never be applied at temperatures below 60° F (15.5° C) or to a structure that is below 60° F (15.5° C).
Sealed structures must be handled with care and should never be moved
until sealant has achieved a tack-free surface. Pressure testing, if required,
must never be performed, until all sealant has cured.
Using an extrusion gun, roller, or spatula, apply sealant to one mating surface. Spread
sealant over entire faying surface.
Place parts in assembly position and install fasteners within the sealant work life.
Note:
Sufficient sealant shall have been applied so that the space between the
faying surfaces is completely filled with sealant and a small amount of sealant is extruded continuously along the joint.
(h)
(i)
(2)
Fair out extruded sealant to leave a smooth fillet along joint.
Inspect seal for poor adhesion and evidence of air bubbles. Evidence of air bubbles is
cause to rework the seal.
(j)
Allow sealant to cure.
Repairing an Injection Seal
Injection seals are used to fill holes, joggles, channels and other voids. Injection seals may be
applied to provide continuity where fillet seals are interrupted by structure. Injection sealing
forces air out of a cavity and fills the vacated space with sealant. Injection seals are accomplished by injecting the area with an extrudable sealant through an extrusion cartridge or a tube.
An example of an injection seal is the seal applied in the fuel tank where the joggle at the end of
a rib intersects the wing skin interior and the spar or shear web.
(a)
If not already accomplished remove all sealant from damaged seal with cutting tools and
suitable hardwood or plastic scrapers as described in paragraph A (Preparation for Sealing).
Note:
(b)
The injection channel must be cleared all the way through as trapped air will
prevent complete filling of the channel. A pipe cleaner or hooked wire may
be used to clear sealant debris from inside the seal channel.
Refinish damaged surface.
CAUTION:
After thoroughly cleaning surfaces to be sealed, wear clean, white, cotton
gloves to prevent contaminating the surfaces to be sealed.
Use care in selecting solvent. Do not use acetone to clean acrylic. Use only
isopropyl alcohol for solvent cleaning acrylic surfaces.
(c)
Solvent clean joints to be sealed. Remove all solvent residue and thoroughly dry area.
(Refer to 20-30)
CAUTION:
13773-001
30 Nov 2000
Ensure that extrusion gun cartridge has sufficient sealant to make a complete seal with one injection without any break. Stopping and starting an
injection seal will cause air to be entrapped in the seal and is cause for
rework.
20-10
Page 13
Sealant which does not wet properly or which is difficult to extrude from the
sealing gun must be discarded. Sealant should never be applied at temperatures below 60° F (15.5° C) or to a structure that is below 60° F (15.5° C).
Sealed structures must be handled with care and should never be moved
until sealant has achieved a tack-free surface. Pressure testing, if required,
must never be performed, until all sealant has cured.
(d)
(3)
Apply injection seal by injecting cavity with sealant from one end until sealant emerges
from the other.
(e) Remove excess sealant with a fairing tool and smooth ends of seal.
(f)
Fair out extruded sealant to leave a smooth fillet along joint.
(g) Inspect seal for poor adhesion and evidence of air bubbles. Evidence of air bubbles is
cause to rework the seal.
(h) Allow seal to cure.
Repairing Fillet Seals
Fillet seals are used in the integral fuel tank along the intersection of the wing skin ribs, along the
intersection of the wing skin and the spar and aft shear web, around fasteners and fitting protruding into the tank. Fillet seals are also used around the firewall perimeter, and other places
where weather, fume, or dust intrusion must be prevented and to seal wetted areas. Fillet seals
produce a smooth junction. All joints, joggles, voids, and fasteners in wet areas must be fillet
sealed. Fillets laid on intersecting joints must be joined together to produce a continuous seal.
(a)
If not already accomplished, remove all sealant from damaged seal with cutting tools and
suitable scrapers as described in paragraph A. - “Preparation for Sealing.”
Note:
(b)
The injection channel must be cleared all the way through as trapped air will
prevent complete filling of the channel. A pipe cleaner or hooked wire may
be used to clear sealant debris from inside the seal channel.
Refinish damaged surface.
CAUTION:
After thoroughly cleaning surfaces to be sealed, wear clean, white, cotton
gloves to prevent contaminating the surfaces to be sealed.
Use care in selecting solvent. Do not use acetone to clean acrylic. Use only
isopropyl alcohol for solvent cleaning acrylic surfaces.
(c)
Solvent clean channel to be sealed using pipe cleaners. The channel should be cleaned at
least twice and all reside removed. Dry channel using pipe cleaners.
CAUTION:
(d)
Page 14
Sealant which does not wet properly or which is difficult to extrude from the
sealing gun must be discarded. Sealant should never be applied at temperatures below 60° F (15.5° C) or to a structure that is below 60° F (15.5° C).
Handle sealed structures carefully and do not move until sealant is tackfree. Pressure testing, if required, must never be performed, until all sealant
has cured. Sealant must never be applied after usable application time.
Use the extrusion gun to lay a bead along joint. Point the extrusion gun into the seam and
maintain it nearly perpendicular to the line of travel. A bead of sealant shall precede the
extrusion gun nozzle tip. and work out all entrapped air with a small paddle.
20-10
13773-001
30 Nov 2000
Note:
(e)
A fillet may be applied in two or more applications. A small fillet should be applied first and
allowed to partially cure, followed by a second application of sealant sufficient to form the
final fillet. The final fillet must be smooth and should have the dimensions as specified.
CAUTION:
13773-001
30 Nov 2000
Sealant must be applied so that it provides an airtight seal. Ensure that
folds, laps, and entrapped air are not created during sealing. The fillet can
be moved slightly to ensure that the highest portion of the fillet is over the
edge of the structure.
Lubrication in any form shall not be used to assist in smoothing the fillet.
20-10
Page 15
Figure 20-103
Fastener Sealing
Page 16
20-10
13773-001
30 Nov 2000
(f)
(4)
Work out all entrapped air and remove excess sealant with a fairing tool. Fair out extruded
sealant to leave a smooth fillet along joint and at ends.The tool should be pressed against
the sealant and moved parallel to the bead.
(g) Inspect seal for poor adhesion and evidence of air bubbles. Evidence of air bubbles is
cause to rework the seal.
(h) Allow seal to cure
Fastener Sealing in Wet and Non-Wet Areas
The following procedure is used primarily for sealing bolts, nuts, and domed nutplates in wet
areas with MIL-S-8802 Class B fuel tank sealant. However, this procedure is also applicable to
bolt sealing with RTV 736 sealant in non-wet areas, such as the firewall.
(a)
(b)
If not already accomplished remove all sealant from damaged seal with cutting tools and
suitable hardwood or plastic scrapers as described in paragraph A. - “Preparation for
Sealing.”
Ensure that fastener is properly installed and torqued.
CAUTION:
After thoroughly cleaning surfaces to be sealed, wear clean, white, cotton
gloves to prevent contaminating the surfaces to be sealed.
Use care in selecting solvent. Do not use acetone to clean acrylic. Use only
isopropyl alcohol for solvent cleaning acrylic surfaces.
(c)
Solvent clean area to be sealed. The fastener and surrounding area should be cleaned at
least twice and all residue removed. (Refer to 20-30)
CAUTION:
(d)
Sealant which does not wet properly or which is difficult to extrude from the
sealing gun must be discarded. Sealant should never be applied at temperatures below 60° F (15.5° C) or to a structure that is below 60° F (15.5° C).
Handle sealed structures carefully and do not move until sealant is tack
free. Pressure testing, if required, must never be performed, until all sealant
has cured. Sealant must never be applied after usable application time.
Use extrusion gun or spatula to apply sealant around the base and over the fastener. If
necessary, the sealant may be worked with a tool so that the sealant has a minimum thickness as specified.
Note:
Sealant must be applied so that it provides an airtight seal. Ensure that
folds, laps, and entrapped air are not created during the process. The fillet
can be moved slightly to insure that the highest portion of the fillet is over
the edge of the structure.
(e)
(f)
(5)
13773-001
30 Nov 2000
Work out all entrapped air and remove excess sealant with a fairing tool.
Inspect seal for poor adhesion and evidence of air bubbles. Evidence of air bubbles is
cause to rework the seal.
(g) Allow seal to cure.
Tube Fitting Seals in Fuel Tank Bulkheads
Bulkhead tube fittings installed in fuel tank bulkheads with the bulkhead nut on the wet side of
the bulkhead, shall be sealed by applying sealant to the threaded area of the fitting prior to
installing the bulkhead nut and o-ring. Bulkhead fittings which are installed with the nut on the
dry side of the tank bulkhead shall be fillet sealed only.
20-10
Page 17
Figure 20-104
Bulkhead Fitting Seal
Page 18
20-10
13773-001
30 Nov 2000
(a)
If not already accomplished remove all sealant from damaged seal with cutting tools and
suitable hardwood or plastic scrapers as described in paragraph A. - “Preparation for
Sealing.”
CAUTION:
After thoroughly cleaning surfaces to be sealed, wear clean, white, cotton
gloves to prevent contaminating the surfaces to be sealed.
Use care in selecting solvent. Do not use acetone to clean acrylic. Use only
isopropyl alcohol for solvent cleaning acrylic surfaces.
(b)
(c)
(d)
Solvent clean area and fitting to be sealed. The fastener and surrounding area should be
cleaned at least twice and all residue removed. (Refer to 20-30)
Apply a small amount of sealant on fitting threads before installing nut. Ensure that bulkhead fitting is properly installed with O-ring and nut is on wet side of bulkhead and nut is
properly torqued.
CAUTION:
Sealant which does not wet properly or which is difficult to extrude from the
sealing gun must be discarded. Sealant should never be applied at temperatures below 60° F (15.5° C) or to a structure that is below 60° F (15.5° C).
Sealed structures must be handled with care and should never be moved
until sealant has achieved a tack-free surface. Pressure testing, if required,
must never be performed, until all sealant has cured. Sealant must never be
applied after usable application time.
Note:
Application time is the period in which the sealant can be satisfactorily
applied. After this point, the material does not “wet” properly and may fail in
adhesion (sealant “rolls up” ahead of the sealing gun or “draws up” behind
the gun).
Use extrusion gun or spatula to apply sealant around the base and over the nut on the wet
side. If necessary, the sealant may be worked with a tool so that the sealant has a minimum thickness as specified.
Note:
Sealant must be applied so that it provides an airtight seal. Care must be
exercised so that folds, laps, and entrapped air are not created during the
process. All air bubbles must be worked out of the sealant. The fillet can be
moved slightly to insure that the highest portion of the fillet is over the edge
of the structure.
(e)
(f)
(6)
13773-001
30 Nov 2000
Work out all entrapped air and remove excess sealant with a fairing tool.
Inspect seal for poor adhesion and evidence of air bubbles. Evidence of air bubbles is
cause to rework the seal.
(g) Allow seal to cure.
Cable Pass-Through
The heat box control cable, alternate air control cable, mixture control cable, throttle control
cable, and governor control cables all pass-through the firewall. When any of these cables are
removed, the cable pass-through must be properly fillet sealed to assure an airtight seal.
20-10
Page 19
Figure 20-105
Cable Pass-Through Sealing
Page 20
20-10
13773-001
30 Nov 2000
(a)
Acquire necessary tools, equipment, and supplies.
Description
P/N or Spec.
Sealant Removal and Cut- ting Tools
(b)
(c)
(d)
(e)
(f)
(g)
(h)
(i)
Supplier
Locally
manufacture
Purpose
Remove sealant
Isopropyl Alcohol
TT-I-735 Isopro- Any Source
pyl Alcohol,
Grade A or
Grade B
Clean cable passthrough free of
adhesive
Fiber Frax paper 1/8”
970J, TON0146 UniFrax
Firewall insulation
High Temperature Silicone Sealant
RTV 736
Sealant
Dow Corning
Remove old sealant from cable pass-through fitting and firewall. Ensure fitting and firewall
are clear and free of old sealant.
Ensure cable pass-through is securely fastened to firewall.
Solvent clean firewall and cable pass-through using isopropyl alcohol. (Refer to 20-30)
Wrap Fiber Frax paper around control cable in area where cable rests inside cable passthrough.
Insert the control cable (wrapped with Fiber Frax) through cable pass-through and into
position. Ensure cable and pass-through have a tight fit.
Properly route and secure control cable.
Fillet seal and cover entire cable pass-through on both sides of the firewall with high temperature silicone sealant. (Refer to 20-10)
Allow sealant to cure.
E. Reseal Integral Fuel Tank After a Structural Repair
The fuel tank was manufactured with a resin coating on all skin surfaces of the tank with injection and
fillet seals using MIL-S-8802 Class B extrudable sealant along all bond lines and at all penetrations for
tubing, fuel filler, and fuel level float. After a repair has been made to the composite structure of the fuel
tank, it will be necessary to reseal the tank in the area of the repair.
Access covers are faying surface sealed with MIL-S-8802 Class B sealant with parting agent applied
to both faying surfaces as described under D.1. - “Faying Surface Seals.”
Repairing seals at joggles at rib-spar intersections and along bond lines will be accomplished using
MIL-S-8802 Class B extrudable sealant in accordance with D.2. - “Repairing an Injection Seal,” and
D.3. - “Repairing a Fillet Seal.”
Repairs to bulkhead penetrations will be accomplished using MIL-S-8802 Class B sealant in accordance with D.5. - “Repairing Tube Fitting Seals in Fuel Tank Bulkheads.”
Repairs to seals around fasteners in the fuel tank will be accomplished using MIL-S-8802 Class B
sealant in accordance with D.4. - “Fastener Sealing in Wet and Non-Wet Areas.”
Repairs to the surface of the wing structure will be made from the outside and the inside wing surfacers must be resealed using MIL-S-8802 Class A brushable sealant using the following procedure:
(1)
13773-001
30 Nov 2000
Prepare surfaces to be sealed.
(a) Preclean all surfaces using acetone or isopropyl alcohol solvent. (Refer to 20-30)
(b) Lightly sand the repaired area and adjacent area with 200 grit sandpaper.
20-10
Page 21
CAUTION:
(c)
(d)
WARNING:
Use caution not to sand through resin coat exposing fibers. Sanding
through the resin coat and exposing fibers will be cause for composite
repair.
Remove metal and composite chips, shavings, and lint using stiff bristle brushes and vacuum.
Solvent clean all surfaces using acetone or isopropyl alcohol. Thoroughly dry surfaces
and remove all residue. (Refer to 20-30)
Keep all sealants away from open flames or other sources of ignition.
Mix and use sealants only in areas with adequate ventilation.
Wear protective gloves when handling sealants and cleaned parts. Do not use
protective hand creams as they can contaminate the sealant.
Avoid skin contact. If contact occurs, wash area thoroughly with soap and water.
Wear goggles for eye protection. If accidental eye contact with sealant, sealant
components, or cleaning solvent occurs, immediately flush eyes with large quantities of water and report to a doctor for further examination and/or treatment.
(2)
(3)
(4)
Page 22
Mix sealant as required.
Apply a coat of MIL-S-8802 Class A sealant to the prepared area. Apply sealant with a brush,
stroking in two directions to thoroughly coat the area with sealant 5 to 15 mils thick (0.005 to
0.015 inch). Small areas, drips, or runs in excess of the 15 mils (0.015 inch) are acceptable in
isolated cases. No greater than 10% of the area being coated shall exceed the maximum thickness.
Allow sealant to cure.
20-10
13773-001
30 Nov 2000
ADHESIVES
1. DESCRIPTION
This section contains information on the adhesives that are used on the airplane.
2. MAINTENANCE PRACTICES
A. Adhesives
The following adhesives, when applied properly in the appropriate area, have been approved by Cirrus
Design. Contact Neoprene Adhesive is used for securing the seat foam and seat to the seat assembly.
Epoxy is used for retaining the light strips to the glareshield.
WARNING:
Always follow the directions from the manufacture of the product being used.
Approved Adhesives
Item
P/N or Spec.
Supplier
Contact Neoprene Adhesive
80
3M
2158 Adhesive
50010-001
3M
Epoxy
5 Minute
Devcon
13773-001
30 Nov 2000
20-20
Page 1
SOLVENT CLEANING
1. DESCRIPTION
This section covers solvent cleaning procedures for metallic and non-metallic materials. These procedures
may be used for general cleaning when solvents are required and must be used to clean surfaces prior to
the application of adhesive, resin, or sealants.
WARNING:
Cleaning solvents are toxic and flammable. Therefore, special precautions must be
used whenever solvents are used for any purpose.
Always follow the solvent manufacture’s directions.
A fire extinguisher must be immediately available when using solvents.
Adequate ventilation shall be provided and fresh air masks shall be used in all closed
areas with marginal or insufficient ventilation.
Skin protection in the form of protective gloves and eye protection must be worn
when pouring or applying solvents.
When solvent cleaning closed areas such as fuel tanks, eliminate spark hazards, electrically ground the aircraft, and fill the enclosed area with an inert gas such as argon
or nitrogen. Apply the inert gas continuously until the tank is clean and dry.
Always check the MSDS for the solvent being used for additional requirements and/or
precautions to be followed when using a particular solvent.
Special procedures may be required to dispose of used solvents.
13773-001
30 Nov 2000
20-30
Page 1
2. MAINTENANCE PRACTICES
A. Solvent Cleaning Metal Parts
(1)
Acquire necessary tools, equipment, and supplies.
Description
(2)
Supplier
Purpose
Isopropyl Alcohol
TT-I-735
Grade A or B
Any Source
Preliminary and Final
Cleaning
Acetone
ASTM D-329
Any Source
Preliminary and Final
Cleaning.
Mineral Spirits
TT-T-291
I, II, or III
Any Source
Preliminary and Final
Cleaning
Aliphatic Naptha
TT-N-95
Type II
Any Source
Preliminary and Final
Cleaning
Sealant Removal and Cutting Tools
-
Locally
manufacture
Remove sealant
Pipe Cleaners
-
Any Source
Remove sealant in
injectable gaps
Bristle Brush
(Non-nylon, Non-metallic)
-
Any Source
Clean up
Solvent Dispensers
(Polyethylene Squirt Bottle)
Any Source
Dispense Solvents
Cotton cloth
(clean, white, lint free)
-
Any Source
Surface Cleaning
Cotton Gloves
(Clean, White, Lint Free)
-
Any Source
Handle Cleaned Surfaces
Protective Gloves
(Neoprene Rubber)
-
Any Source
Protect hands from
chemicals
Goggles
-
Any Source
Protect eyes from chemicals
Preliminary Cleaning
(a) Remove excess material (metal chips, shavings, lint, etc.) using a vacuum sweeper, clean
bristle brush, etc.
WARNING:
(b)
Page 2
P/N or Spec.
Cleaning solvents are toxic and flammable. Skin protection and eye
protection are required. Additionally, adequate ventilation and/or fresh
air masks shall be used in all closed areas.
Clean area with a clean cloth dampened with cleaning solvent and immediately wipe area
dry with a clean dry cloth. Do not allow cleaning solvent to air dry as a residue will remain
on the surface.
20-30
13773-001
30 Nov 2000
(3)
Final Cleaning
Note:
(a)
Final cleaning must be accomplished prior to applying any adhesive, or sealant.
All surfaces shall be thoroughly cleaned and dried before application of any adhesive or sealant. When handling cleaned surfaces, wear clean white cotton gloves
to prevent surface contamination. Surfaces shall be recleaned in the event of contamination.
Fold clean lint-free cloths in such a manner as to eliminate raw edges to reduce the possibility of lint contaminating the surface to be cleaned.
WARNING:
(b)
Cleaning solvents are toxic and flammable. Skin protection and eye
protection are required. Additionally, adequate ventilation and/or fresh
air masks shall be used in all closed areas.
Dampen one cloth with cleaning solvent from polyethylene squirt bottle. The cloth should
not be saturated to a point where solvent drips.
Note:
Never pour or spray cleaning solvent on aircraft structure because it will run
back between structural layers, then run back out again after the cleaning
operations are completed, bringing contamination to surfaces previously
cleaned.
CAUTION:
Extreme care is needed to clean hard to reach areas, corners, gaps, etc. A
small paint brush, pipe cleaners, or cloth wrapped around wooden or phenolic tools may be used for slots, recesses, and other hard to reach areas.
Do not allow cleaning solvent to air dry as a residue will remain on the surface, contaminating a following process.
(c)
Thoroughly clean small areas at a time and immediately wipe area dry with a clean, dry,
lint-free cloth.
Note:
(d)
If adhesive or sealant is to be applied, always clean an area wider than the
width of final product being applied.
Continue cleaning process until no discoloration is noted on the drying cloth.
Note:
If primer is removed during cleaning and if the exposed metal surface will
be completely covered by the sealing process, the exposed metal surface
need not be further treated.
Final cleaning must be done prior to applying adhesive or sealant. All surfaces shall be thoroughly cleaned and dried before application of any adhesive or sealant. When handling cleaned surfaces, wear clean white cotton
gloves to prevent surface contamination. Surfaces shall be recleaned in the
event of contamination.
13773-001
30 Nov 2000
20-30
Page 3
B. Solvent Cleaning Composite Materials
CAUTION:
(1)
Isoproply alcohol is the only cleaning agent recommended when preparing
composite surfaces (excluding fuel compartments) for repair. When cleaning a composite surface in any of the fuel compartments, acetone is the recommended cleaning agent.
Acquire necessary tools, equipment, and supplies.
Description
Page 4
P/N or Spec.
Supplier
Purpose
Cleaner
DX 330
PPG Industries,
Inc.
Cleaning repair surfaces
before apply paint manufactured by PPG Industries.
Isopropyl Alcohol
TT-I-735
Grade A or B
Any Source
Preliminary and Final
Cleaning of composites
before bonding process
Acetone
ASTM D-329
Any Source
Preliminary and Final
Cleaning.
Mineral Spirits
TT-T-291
I, II, or III
Any Source
Preliminary and Final
Cleaning
Aliphatic Naptha
TT-N-95
Type II
Any Source
Preliminary and Final
Cleaning
Sealant Removal and Cutting Tools
-
Locally
Manufacture
Remove sealant
Pipe Cleaners
-
Any Source
Remove sealant in
injectable gaps
Bristle Brush
(Non-nylon, Non-metallic)
-
Any Source
Clean up
Solvent Dispensers
(Polyethylene Squirt Bottle)
Any Source
Dispense Solvents
Cotton cloth
(clean, white, lint free)
-
Any Source
Surface Cleaning
Cotton Gloves
(clean, white, lint free)
-
Any Source
Handle Cleaned Surfaces
Protective Gloves
(Neoprene Rubber)
-
Any Source
Protect hands from
chemicals
Goggles
-
Any Source
Protect eyes from chemicals
20-30
13773-001
30 Nov 2000
(2)
Preliminary Cleaning
WARNING:
(a)
If fuel tank interior is to be cleaned, ground aircraft to suitable earthground. Evacuate oxygen from fuel tank by filling tank with an inert
gas such as nitrogen or argon. Gas should be applied continuously
until tank is clean and dry. Laminates that come in contact with moisture must be dried before performing composite repairs.
Remove excess material (chips, shavings, lint, etc.) using a vacuum sweeper, clean bristle
brush, etc.
WARNING:
Cleaning solvents are toxic and flammable. Skin protection and eye
protection are required. Additionally, adequate ventilation and/or fresh
air masks shall be used in all closed areas.
CAUTION:
Isoproply alcohol is the only cleaning agent recommended when preparing
composite surfaces (excluding fuel compartments) for repair. When cleaning a composite surface in any of the fuel compartments, acetone is the recommended cleaning agent.
(b)
(3)
Clean area with a clean cloth dampened with Isoproply alcohol and immediately wipe area
dry with a clean dry cloth. Do not allow solvent to air dry as a residue will remain on the
surface.
Final Cleaning
Note:
(a)
(b)
Final cleaning must be accomplished prior to applying adhesive, resin, or sealant.
All surfaces shall be thoroughly cleaned and dried before application of any adhesive, resin, or sealant. When handling cleaned surfaces, wear clean white cotton
gloves to prevent surface contamination. Surfaces shall be recleaned in the event
of contamination.
Absorb all visible moisture on the laminate using a clean, lint-free, cotton cloth.
Fold clean lint-free cloths in such a manner as to eliminate raw edges to reduce the possibility of lint contaminating the surface to be cleaned.
WARNING:
(c)
(d)
Cleaning solvents are toxic and flammable. Skin protection and eye
protection are required. Additionally, adequate ventilation and/or fresh
air masks shall be used in all closed areas.
Wipe effected area with Isoproply alcohol using a clean, lint-free, cotton cloth.
Dampen one cloth with Isoproply alcohol. The cloth should not be saturated to a point
where solvent drips.
CAUTION:
Extreme care is needed to clean hard to reach areas, corners, gaps, etc. A
small paint brush, pipe cleaners, or cloth wrapped around wooden or phenolic tools may be used for slots, recesses, and other hard to reach areas.
Do not allow cleaning solvent to air dry as a residue will remain on the surface, contaminating a following process.
13773-001
30 Nov 2000
20-30
Page 5
Note:
(e)
Never pour or spray cleaning solvent on aircraft structure because it will run
back between structural layers, then run back out again after the cleaning
operations are completed, bringing contamination to surfaces previously
cleaned.
Thoroughly clean small areas at a time and immediately wipe area dry with a clean, dry,
lint-free cloth.
Note:
(f)
If adhesive, resin, or sealant is to be applied, always clean an area wider
than the width of final product being applied.
Continue cleaning process until no discoloration is noted on the drying cloth.
C. Cleaning Acrylic Surfaces
(1)
Acquire necessary tools and equipment.
Description
P/N or Spec.
Supplier
Purpose
Isopropyl Alcohol
TT-I-735
Grade A or B
Any Source
Preliminary and final
cleaning
Aliphatic Naptha
TT-N-95
Type II
Any Source
Preliminary and final
cleaning
Acrylic Polish and Sealant
SP-PL16
LP Aero Plastics Polish exterior window
surface
210 Plastic Cleaner And
Polish
SP-210A
LP Aero Plastics Polish interior window
surface
Bristle Brush
(Non-nylon, Non-metallic)
-
Any Source
Clean up
Solvent Dispensers
(Polyethylene Squirt Bottle)
Any Source
Dispense solvents
Cotton cloth
(clean, white, lint free)
-
Any Source
Surface cleaning
Cotton Gloves
(Clean, White, Lint Free)
-
Any Source
Handle cleaned surfaces
Protective Gloves
(Neoprene Rubber)
-
Any Source
Protect hands from
chemicals
Goggles
-
Any Source
Protect eyes from chemicals
CAUTION:
Do not use any solvent other than aliphatic naphtha or Isoproply alcohol to clean
acrylic parts, as crazing may occur. Isoproply alcohol can also craze acrylic if
instructions are not carefully followed.
If sealant is to be applied, use cleaning solvent only on portions of acrylic parts
necessary to facilitate a proper sealing procedure.
Page 6
20-30
13773-001
30 Nov 2000
(2)
Clean acrylic parts (interior surface of windshield which is to be sealed) with aliphatic naphtha or
Isoproply alcohol.
Note:
(a)
If sealant is to be applied, acrylic surfaces must be completely dry, without contaminants, prior to sealing.
Fold clean lint-free cloths in such a manner as to eliminate raw edges to reduce the possibility of lint contaminating the surface to be cleaned.
WARNING:
(b)
Dampen one cloth with cleaning solvent from polyethylene squirt bottle. The cloth should
not be saturated to a point where solvent drips.
Note:
(c)
(d)
13773-001
30 Nov 2000
Cleaning solvents are toxic and flammable. Skin protection and eye
protection are required. Additionally, adequate ventilation and/or fresh
air masks shall be used in all closed areas.
Never pour or spray cleaning solvent on aircraft structure because it will run back
between structural layers, then run back out again after the cleaning operations
are completed, bringing contamination to surfaces previously cleaned.
Thoroughly clean small areas at a time. Wipe area dry with a clean, dry, lint-free cloth. Do
not allow solvent to air dry as a residue will remain on the surface, contaminating a following process.
Note:
If sealant is to be applied, always clean an area wider than the width of
finally applied sealant.
CAUTION:
After thoroughly cleaning surfaces to be sealed, personnel should wear
clean white gloves to prevent contaminating the surfaces to be sealed. If
contamination occurs, surfaces shall be recleaned.
Continue cleaning until no discoloration is evident on the drying cloth.
20-30
Page 7
D. Cleaning Painted or Primed Surfaces for Decal Application
(1)
Acquire necessary tools and equipment.
Description
(2)
Supplier
Purpose
Denatured Alcohol
O-E-760
Type III
Any Source
Preliminary and Final
Cleaning
Solvent Dispensers
(Polyethylene Squirt
Bottle)
-
Any Source
Dispense Solvents
Cotton cloth
(clean, white, lint
free)
-
Any Source
Surface Cleaning
Cotton Gloves
(Clean, White, Lint
Free)
-
Any Source
Handle Cleaned Surfaces
Protective Gloves
(Neoprene Rubber)
-
Any Source
Protect hands from
chemicals
Goggles
-
Any Source
Protect eyes from
chemicals
Use denatured alcohol to thoroughly clean painted or primed surface free of oil, grease, dirt, etc.
(a) Fold clean lint-free cloths in such a manner as to eliminate raw edges to reduce the possibility of lint contaminating the surface to be cleaned.
WARNING:
(b)
(c)
Never pour or spray cleaning solvent on aircraft structure because it will run
back between structural layers, then run back out again after the cleaning
operations are completed, bringing contamination to surfaces previously
cleaned.
Thoroughly clean small areas at a time. Wipe area dry with a clean, dry, lint-free cloth. Do
not allow solvent to air dry as a residue will remain on the surface, contaminating a following process.
CAUTION:
(d)
Cleaning solvents are toxic and flammable. Skin protection and eye
protection are required. Additionally, adequate ventilation and/or fresh
air masks shall be used in all closed areas.
Dampen one cloth with cleaning solvent from polyethylene squirt bottle. The cloth should
not be saturated to a point where solvent drips.
Note:
Page 8
P/N or Spec.
After thoroughly cleaning surfaces to be sealed, personnel should wear
clean white gloves to prevent contaminating the surfaces to be sealed. If
contamination occurs, surfaces shall be recleaned.
Continue cleaning until no discoloration is evident on the drying cloth.
20-30
13773-001
30 Nov 2000
LOCTITE/TORQUE SEAL
1. DESCRIPTION
This section contains surface preparations and cleaning procedures for the usage of thread lock and
thread sealing agents.
2. MAINTENANCE PRACTICES
A. Threadlock
(1)
Shelf Life
Threadlock itself has no designated maximum shelf life when stored at room temperature in a
unopened container. Once the container is opened, temperature and environmental factors,
such as humidity and exposure to sunlight, have a major affect on shelf life. Observe shelf life
recommendations for threadlock stored in previously opened containers. Normally, threadlock
stored within the shelf life parameters will be acceptable for use provided there is no contamination or jelling of the substance.
(2)
Application of Thread Lock
(a)
Acquire necessary tools, equipment, and supplies..
Description
(b)
(c)
(d)
P/N or Spec.
Supplier
Purpose
Isopropyl Alcohol
TT-I-735
Grade A or B
Any Source
Clean Surfaces
Primer
7471 Grade T
Any Source
Prime surfaces
Loctite
-
Loctite Corp.
Newington, CT
Lock threads as
required by application
Bearing surfaces and threads to receive thread lock shall be clean, free of dust, grease,
condensation, moisture, or other contaminating substances. Solvent clean surfaces with
isopropyl alcohol. (Refer to 20-30)
Prime surfaces with 7471 Grade T primer.
Use care to keep thread lock out of bearings.Thread lock may be applied by brushing, dipping, tumbling, or by running the nozzle over the threads. Either the nut or the bolt may be
coated. However, for blind hole applications, the sides of the blind hole and the first two
threads of the male fastener shall be coated. Parts shall then be assembled using normal
torque. Excess thread lock must be wiped off with a rag moistened with isopropyl alcohol.
Note:
When specified, threaded fasteners in the fuel tank area shall be installed with
Loctite 242 and 7471 Grade T primer.
B. Torque Seal
Torque Seal should be applied to all jam nuts. Inspect torque sealed components when ever accessible and during each specified inspection period. Inspect the component for any signs of loosening. If
the torque seal is broken, the component must be immediately inspected and serviced.
13773-001
30 Nov 2000
20-40
Page 1
LOCTITE USAGE SPECIFICATIONS
Product
Number
222 222MS
242
262
271
277
Small remov- Removable
able screws grade to 3/4”
P/N or
Spec.
MIL-S-46163 MIL-S-46163 MIL-S-46163 MIL-S-46163 MIL-S-46163 MIL-S-46163 MIL-S-46163
Type ll
Type ll
Type ll
Type l
Type l
Type ll
Grade M
Grade N
Grade O
Grade K
Grade L
Grade R
Viscosity
cP
Wing attach
spanner nut
and large
bolts
680
Typical
Use
Color
Permanent
Permanent
locking to 3/4” high strength
to 1” and stud
locking
290
Wicking
grade preassembled
component
Bearing and
bushing
retention
Purple
Blue
Red
Red
Red
Green
Green
1200/6000
Thixotropic
1200/6000
Thixotropic
1800/5000
Thixotropic
500
7000
12
1250
Tempera- -65° to 300°F -65° to 300°F -65° to 300°F -65° to 300°F -65° to 300°F -65° to 300°F -65° to 300°F
ture Range
Cure
Speed,
Steel
@77°F
Handling:
Full:
Primer
20 Minutes
24 Hours
10 Minutes
24 Hours
20 Minutes
24 Hours
10 Minutes
24 Hours
30 Minutes
24 Hours
20 Minutes
24 Hours
10 Minutes
24 Hours
T (7471)
T (7471)
T (7471)
T (7471)
T (7471)
T (7471)
T (7471)
LOCTITE SHELF LIFE
Item
Shelf Life in
Months
Storage Temperature
Extended Shelf Life in
Months
Retest in
Months
Loctite 222
40 to 80°F
12
6
6
Loctite 242
40 to 80°F
12
6
6
Loctite 262
40 to 80°F
12
6
6
Loctite 271
40 to 80°F
12
6
6
Loctite 277
40 to 80°F
12
6
6
Loctite 290
40 to 80°F
12
6
6
Loctite 680
40 to 80°F
12
6
6
Page 2
20-40
13773-001
30 Nov 2000
SAFETYING
1. DESCRIPTION
This section contains information on the proper safetying techniques and procedures used when fastening
hardware.
2. MAINTENANCE PRACTICES
A. Safety Wiring
There are two basic forms of safety wiring. The single-wire method and the double-twist method.
Safety wire comes in three types which are identified by size and color. The three types are classified
by use. Inconel and Monel wire is used for general safety wiring and is identified by a natural wire
color. Monel can withstand temperatures up to 800°F; Inconel can withstand temperatures up to
1500°F. Copper that is cadium-plated and dyed yellow is used for shear and seal wiring applications.
Aluminum Alloy (Alclad 5056) is dyed blue and is used exclusively for safety-wiring magnesium parts.
Size of wire is dependent on material and purpose of installation. Use a 0.020” diameter copper wire
for shear and seal applications. Use a 0.020” diameter wire to safety wire parts with tie holes smaller
than 0.045” or on parts with a tie hole diameter between 0.045” and 0.062” when spacing between
parts is less than two inches or, when bolts and screws of 0.250” diameter or less are closely spaced.
Use a 0.032” diameter wire (minimum) for general purpose safety wiring.
Shear applications are those where it is necessary to break or shear wire to permit operation or actuation of emergency devices. Seal applications are where wire is used with a lead seal to prevent tampering or use of a device without indication.
(1)
Single Wire Method (See Figure 20-501)
The single wire method has a limited application. Single-wire method is used for shear and seal
wiring applications. The single wire method is most commonly used on emergency equipment.
The single wire method is also used when a series of three or more parts, usually small screws
or bolts, are in a closely spaced geometric pattern (square, rectangle, or circle). Closely spaced
is defined as the spacing of two inches or less between the centerline of parts. The wire in this
application is strong enough to safety the part, but can be easily broken when use of the emergency equipment is required. A third application of the single wire method is safetying hard to
reach parts which are impractical to double wire. Single-wire method is accomplished by passing
a single wire through tie holes and back with the ends then twisted together. Wire twisting pliers
are used to obtain a uniformly tight twist in the wire.
Note:
(2)
13773-001
30 Nov 2000
When using single-wire method of safety wiring, the largest wire that will fit the tie
holes should be used.
Double Wire Method (See Figure 20-502)
The double-twist method is the most common method of safety wiring. When double wire safetying in a series, the direction of twist must be reversed at each unit. When safetying widely
spaced series using this method, the maximum number of units is three. Safety wiring by the
double-twist method is really one wire twisted on itself several times and is accomplished by
inserting one end of the wire through the tie holes of the bolt head and firmly loop around the bolt
head. This does not necessarily apply to castellated nuts when the slot is close to the top of the
nut. The wire will be more secure if it is made to pass along side of the stud. While taut, twist the
strands to within 1/8” of the next part. The twisting keeps the wires taut without overstressing
and prevents the wire from becoming nicked, kinked, or mutilated. After the last tie hole, the wire
is twisted three to five times to form a pigtail. Cut off any excess wire and bend the pigtail
towards the part.
20-50
Page 1
Note:
(3)
Widely spaced multiple groups shall mean those in which fasteners are from four
to six inches apart.
General Installation Procedures
CAUTION:
Screws in closely spaced geometric pattern which secure hydraulic or air seals,
hold hydraulic pressure, or are used in critical areas should use the double-twist
method of lockwiring. Lockwiring shall not be used to secure fasteners or fittings
which are spaced more than six inches apart, unless tie points are provided on
adjacent parts to shorten the span of safety wire to less than six inches. When
safety wiring closely spaced multiple groups, the number of units that can be
safety wired by a 24-inch length of wire shall be the maximum number in a series.
Note:
Safety wire 0.20 inch (0.5mm) in diameter shall have 10 to 13 twists per one inch
(25.4 mm).
Safety wire 0.032 inch (0.8mm) in diameter shall have 6 to 12 twists per one inch
(25.4 mm).
(a)
(b)
Ensure fasteners to be safetied are correctly tightened and, where specified, torqued.
Start and finish twisting the safety wire within 0.109 inch (3 mm) of the wire locking hole in
either part (when using the double wire method).
Note:
(c)
Cut pigtails square to prevent snagging.
Note:
(4)
Pigtails should be made without sharp bends to prevent fractures and to
prevent them from touching other components. Use new wire for each
application, never re-use old wire. Parts should be safety wired so that the
wire is placed in tension (pulled on) if a part attempts to loosen.
Required Installations of Safety Wire
(a) Bolts and other fasteners securing critical parts that affect airplane safety and operation.
Note:
(b)
(c)
(d)
In blind-tapped hole applications of bolts or castellated nuts on studs, lockwiring is installed in the same manner as described for bolt heads. Hollow
head bolts are safetied in the same manner as regular bolts.
Drain plugs and cocks may be safetied to a bolt, nut, or other part having a free tie hole.
External snap rings may be locked if necessary using general locking principles as illustrated.
Note:
Page 2
Safety wire between the parts must be tight. The safety wire at the head of
the part must not be capable of being pulled over its head by using finger
tension. The end of the safety-tie (pigtail) must contain a minimum of five
twists, but not to exceed 0.703 inch (18 mm) in length. Twist slightly more
wire than needed for the pigtail.
Internal snap rings should not be safety wired.
When locking is required on electrical connectors which use threaded coupling rings, or on
plugs which employ screws or rings to fasten individual parts of which plug together, they
shall be safety wired with 0.020” diameter wire in accordance with locking principles as
described and illustrated.
20-50
13773-001
30 Nov 2000
Note:
(e)
It is preferable to safety wire all electrical connectors individually. Do not
safety wire one connector to another unless it is necessary to do so.
Drilled head bolts and screws need not be safety wired if installed into self-locking nuts or
installed with lockwashers. Castellated nuts with cotter pins or safety wire are preferred on
bolts or studs with drilled shanks.
WARNING:
Safety wire shall not be used to secure nor shall safety wire be dependent upon fracture as basis for operation of emergency devices such
as handles, switches, and guard-covering handles that operate emergency mechanisms such as fire extinguishers and the like. However,
where existing structural equipment or safety of flight emergency
devices requires shear wire to secure equipment while not in use, but
which are dependent upon shearing or breaking of safety wire for successful emergency operation of equipment. Particular care must be
exercised to assure that wiring under these circumstances will not
prevent emergency operations of these devices.
Care must be used to assure that safety wire doesn’t interfere with any
controls, structures, wires or any other objects.
13773-001
30 Nov 2000
20-50
Page 3
Figure 20-501
Single Twist Safety Wiring
Page 4
20-50
13773-001
30 Nov 2000
Figure 20-502
Double Twist Safety Wiring
13773-001
30 Nov 2000
20-50
Page 5
FASTENER IDENTIFICATION AND TORQUE DATA
1. DESCRIPTION
This section contains information on the correct usage and identification of bolts, flat washers, lock washers, nuts, lock nuts, fittings and torque data. The nuts, bolts, and washers used on the airplane are in
accordance with Air Force Navy Specifications, Military Specifications, and National Aircraft Standards.
CAUTION:
Overtorquing of fasteners can result in failed fasteners and/or components. Under torquing a
fastener can result in premature wear of the fastener and/or the fastening material which can
result in failure of the component and/or fastener. Due to the diminished friction torque, self
locking nuts should be replaced with new ones after removal. If you choose to reuse a selflocking nut, ensure nut has the minimum prevailing drag torque. Nuts or bolts with self-locking devices must be discarded if the fastener can be fully hand tightened.
Note:
Observe torque values and the installation of the recommended safetying device for every
fastener. The end of a flat end bolt or screw shall extend through the nut or nutplate at least
1/32”, or the end of a round or chamfered end bolt or screw shall extend through the nut or
nutplate the full round or chamfer. Do not use MS17826 nuts for tension applications. The
aforementioned nuts can be used on standard and high strength bolts.
2. MAINTENANCE PRACTICES
A. Bolts
Bolts can be identified by the marking(s) located on the head of each bolt. When securing a fastener,
use the torque specifications from the following tables.
When torquing fasteners which do not have a specific torque pattern called out, refer to the general
torque patterns shown. (See Figure 20-601)
CAUTION:
13773-001
30 Nov 2000
Composite and non-composites require different torque values. Make sure to select the
correct torque table.
20-60
Page 1
Figure 20-601
Bolt Identification
Page 2
20-60
13773-001
30 Nov 2000
Figure 20-602
General Torque Pattern
13773-001
30 Nov 2000
20-60
Page 3
Specific Torque Requirements
Chapter/
Section
Reference
Item
Inch Pounds
Minimum Dry
Torque
Maximum Dry
Torque
Nm
Minimum Dry
Torque
Maximum Dry
Torque
Propeller mounting nuts
61-10
840.0
960.0
92.4
105.6
Propeller mounting bolts
61-10
264.0
264.0
29.0
29.0
Propeller governor
nuts
61-20
155
175
17.0
19.2
Spark plugs
72-00
300.0
360.0
33.9
40.7
Engine mount to
firewall bolts (1/4”)
71-20
75.0
100.0
8.5
11.3
Engine mount to
firewall bolts (1/2”)
71-20
456.0
480.0
50.1
52.8
Nose wheel axle
nut
32-20
Preload 150
Final 20
Preload 150
Final 40
Preload 17.0
Final 2.3
Preload 17.0
Final 4.5
Main landing gear
upper attach fitting
to rib fitting nuts
32-10
25
50
2.82
5.65
Main landing gear
fitting to canted rib
clamp bolts
32-10
160
190
18.1
21.5
Main wing attachment bolts
57-10
400
500
45.2
56.5
Main wing spanner nuts
57-10
1200
1400
135.6
158.2
Brass exhaust nuts
78-10
100
110
11.0
12.1
Nose landing gear
aft mounting bolts
32-20
480
690
52.8
75.9
Engine mount bolts
(1/2 inch)
71-20
468
480
51.5
52.8
Note:
Nose Landing Gear Spindle Nut - After initial preload, retorque nose landing gear spindle nut
until 15-20 lbs of force is required at the axle to swivel the nose wheel. Grease spindle
threads.
Main Landing Wheel Nut - After initial preload, retorque main landing wheel nut until side
play is eliminated.
Page 4
20-60
13773-001
30 Nov 2000
The required torque values are shown for fasteners used on this airplane. Make sure that the needed torque
value is selected from the correct table.
NON-COMPOSITE STRUCTURE
Torque Specifications for High Strength Steel Tension Nuts and Bolts with FINE Threads
Inch Pounds
Item
STEEL TENSION NUTS
AN310
AN315
AN363
AN365
MS17825
MS20365
MS21045
NAS1021
NAS679
NAS1291
Thread
Size
Nm
Minimum Dry
Torque
Maximum Dry
Torque
Minimum Dry
Torque
Maximum
Dry Torque
10-32
25
30
2.8
3.3
1/4”-28
80
100
8.8
11.0
5/16”-24
120
145
13.2
16.0
3/8”-24
200
250
22.0
27.5
7/16”-20
520
630
57.2
69.3
1/2”-20
770
950
84.7
104.5
9/16”-18
1,100
1,300
121.0
143.0
5/8”-18
1,250
1,550
137.5
170.5
3/4”-16
2,650
3,200
291.5
352.0
7/8”-14
3,550
4,350
390.5
478.5
1”-14
4,500
5,500
495.0
605.0
1-1/8”-12
6,000
7,300
660.0
803.0
1-1/4”-12
11,000
13,400
1210.0
1474.0
STEEL TENSION BOLTS
MS20004 thru MS20024
NAS144 thru NAS158
NAS333 thru NAS340
NAS583 thru NAS590
NAS624 thru NAS644
NAS1303 thru NAS1320
NAS6603 thru 6620
NAS172
NAS174
NAS517
13773-001
30 Nov 2000
20-60
Page 5
NON-COMPOSITE STRUCTURE
Torque Specifications for High Strength Steel Shear Nuts and Bolts with FINE Threads
Inch Pounds
Item
STEEL SHEAR NUTS
AN320
AN364
NAS1022
MS17826
MS20364
Thread
Size
Minimum
Dry Torque
Maximum
Dry Torque
Nm
Minimum
Dry Torque
Maximum Dry
Torque
10-32
15
20
1.7
2.2
1/4”-28
50
60
5.5
6.6
5/16”-24
70
90
7.7
9.9
3/8”-24
120
150
13.2
16.5
7/16”-20
300
400
33.0
44.0
1/2”-20
450
550
49.5
60.5
9/16”-18
650
800
71.5
88.0
5/8”-18
750
950
82.5
104.5
3/4”-16
1,600
1,900
176.0
209.0
7/8”-14
2,100
2,600
231.0
286.0
1”-14
2,700
3,300
297.0
363.0
1-1/8”-12
3,600
4,400
396.0
484.0
1-1/4”-12
6,600
8,000
726.0
880.0
STEEL SHEAR BOLTS
NAS464
NAS6203 thru NAS6220
NAS1103 thru NAS1120
Page 6
20-60
13773-001
30 Nov 2000
NON-COMPOSITE STRUCTURE
Torque Specifications for Standard Steel Shear Nuts with FINE Threads
Inch Pounds
Item
STEEL SHEER NUTS
AN320
AN364
NAS1022
MS17826
MS20364
MS21042
MS21083
MS21245
13773-001
30 Nov 2000
Thread
Size
Nm
Minimum Dry
Torque
Maximum Dry
Torque
Minimum Dry
Torque
Maximum Dry
Torque
8-36
7
9
.8
1.0
10-32
12
15
1.3
1.7
1/4”-28
30
40
3.3
4.4
5/16”-24
60
85
6.6
9.4
3/8”-24
95
110
10.5
12.1
7/16”-20
270
300
29.7
33.0
1/2”-20
290
410
31.9
45.1
9/16”-18
480
600
52.8
66.0
5/8”-18
660
780
72.6
85.8
3/4”-16
1,300
1,500
143.0
165.0
7/8”-14
1,500
1,800
165.0
198.0
1”-14
2,200
3,300
242.0
363.0
1-1/8”-12
3,000
4,200
330.0
462.0
1-1/4”-12
5,400
6,600
594.0
726.0
20-60
Page 7
NON-COMPOSITE STRUCTURE
Torque Specifications for Standard Steel Tension Nuts and Bolts with FINE Threads
Inch Pounds
Item
STEEL TENSION NUTS
AN310
AN315
AN363
AN365
NAS1021
MS17825
MS21044
MS21045
MS21046
MS20365
MS20500
NAS679
STEEL TENSION BOLTS
AN3 thru AN20
AN42 thru AN49
AN73 thru AN81
AN173 thru AN186
MS20033 thru MS20046
MS20073
MS20074
AN509NK9
MS24694
AN525NK525
MS27039
Page 8
20-60
Thread
Size
Minimum
Dry Torque
Maximum
Dry Torque
Nm
Minimum Dry
Torque
Maximum
Dry Torque
8-36
12
15
1.3
1.7
10-32
20
25
2.2
2.8
1/4”-28
50
70
5.5
7.7
5/16”-24
100
140
11.0
15.4
3/8”-24
160
190
17.6
20.9
7/16”-20
450
500
49.5
55.0
1/2”-20
480
690
52.8
75.9
9/16”-18
800
1,000
88.0
110.0
5/8”-18
1,100
1,300
121.0
143.0
3/4”-16
2,300
2,500
253.0
275.0
7/8”-14
2,500
3000
275.0
330.0
1”-14
3,700
4,500
407.0
495.0
1-1/8”-12
5,000
7,000
550.0
770.0
1-1/4”-12
9,000
11,000
990.0
1210.0
13773-001
30 Nov 2000
NON-COMPOSITE STRUCTURE
Torque Specifications for Standard Steel Tension Nuts and Bolts with COARSE Threads
Inch Pounds
Item
STEEL TENSION NUTS
AN310
AN315
AN363
AN365
NAS1021
MS17825
MS21044
MS21045
MS21046
MS20365
MS20500
NAS679
STEEL TENSION BOLTS
AN3 thru AN20
AN42 thru AN49
AN73 thru AN81
AN173 thru AN186
MS20033 thru MS20046
MS20073
MS20074
AN509NK9
MS24694
AN525NK525
MS27039
13773-001
30 Nov 2000
Thread
Size
Minimum
Dry Torque
Nm
Maximum Dry
Torque
Minimum Dry
Torque
Maximum Dry
Torque
8-32
12
15
1.3
1.7
10-24
20
25
2.2
2.8
1/4”-20
40
50
4.4
5.5
5/16”-18
80
90
8.8
9.9
3/8”-16
160
185
17.6
20.4
7/16”-14
235
255
25.9
28.0
1/2”-13
400
480
44.0
52.8
9/16”-12
500
700
55.0
77.0
5/8”-11
700
900
77.0
99.0
3/4”-10
1,150
1,600
126.5
176.0
7/8”-9
2,200
3,000
242.0
330.0
1”-8
3,700
5,000
407.0
550.0
1-1/8”-8
5,500
6,500
605.0
715.0
1-1/4”-8
6,500
8,000
715.0
880.0
20-60
Page 9
NON-COMPOSITE STRUCTURE
Torque Specifications for Standard Steel Shear Nuts with COARSE Threads
Inch Pounds
Item
STEEL SHEER NUTS
AN320
AN364
NAS1022
MS17826
MS20364
MS21042
MS21083
MS21245
Page 10
20-60
Thread
Size
Minimum
Dry Torque
Nm
Maximum Dry
Torque
Minimum Dry
Torque
Maximum Dry
Torque
8-32
7
9
.8
1.0
10-24
12
15
1.3
1.7
1/4”-20
25
30
2.8
3.3
5/16”-18
48
55
5.3
6.1
3/8”-16
95
110
10.5
12.1
7/16”-14
140
155
15.4
17.1
1/2”-13
240
290
26.4
31.9
9/16”-12
300
420
33.0
46.2
5/8”-11
420
540
46.2
59.4
3/4”-10
700
950
77.0
104.5
7/8”-9
1,300
1,800
143.0
198.0
1”-8
2,200
3,000
242.0
330.0
1-1/8”-8
3,300
4,000
363.0
440.0
1-1/4”-8
4,000
5,000
440.0
550.0
13773-001
30 Nov 2000
COMPOSITE STRUCTURE
Torque Specifications For FINE Thread Hex-head Tension And Shear Bolts, Or Any Bolted
Structure With Combinations Of Composite And Metallic Parts
Inch Pounds
Thread Size
Minimum Dry
Torque
Maximum Dry
Torque
Nm
Minimum Dry
Torque
Maximum Dry
Torque
10-32
15
20
1.7
2.2
1/4-28
25
30
2.8
3.3
5/16-24
50
60
5.5
6.6
3/8-24
80
95
8.8
10.5
7/16-20
150
170
16.5
18.7
1/2-20
220
245
24.2
27.0
B. Calculating Torque
To assure an accurate torque measurement, a smooth and even motion must be applied. Whenever a
bolt is torqued on the head side instead of torquing the nut, additional resistance (friction drag torque)
may occur due to the friction of the shank during rotation. This could result in an under-torqued fastener. The value (friction drag torque) observed from the torque wrench indicator during the initial tightening phase of the bolt (before seating of the bolt has been accomplished), must be added to the
torque value given in the specified torque table. When checking friction drag torque, use a torque
wrench which allows the friction drag torque to fall in the middle of the overall range of the torque
wrench. When using lock-nuts, the friction drag torque (from locking device) must be added to the
specified torque value.
When using a torque wrench with an adapter that changes the distance from the torque wrench drive
centerline to the adapter centerline, compensation must be made for the extra leveraged gained. New
torque specifications must be calculated before the wrench is used. To calculate the new torque specifications, use the following formula.
(1)
13773-001
30 Nov 2000
Requirements for Calculating Torque
(a) When selecting a torque wrench, select one that has the required torque specification in
the middle of the overall range of the torque wrench. When lower torque specifications are
called out, always use an inch-pound torque wrench or a smaller foot-pound torque
wrench. Use only calibrated torque wrenches that have been certified.
(b) Calibrate the torque wrench and recheck calibration frequently to assure accuracy.
(c)
Thoroughly clean and dry all threads and fasteners prior to torquing.
(d) Torque only to the specified range; stopping instantly at the correct torque.
(e) When using a torque wrench adapter be certain to allow for the additional extension length
when torquing.
(f)
Sheet metal screws and screws tightened to nutplates should be tightened firmly.
(g) Always start the nut or bolt by hand prior to the torquing process.
20-60
Page 11
(h)
(i)
(j)
(k)
Page 12
Screws using dimpled washers should be drawn tight enough to eliminate the crown of the
washer.
Specified torques must be considered dry torques.
Castellated nuts requiring cotter pins should be tightened to low torque value. Torque can
be increased to install cotter pin, but should never exceed maximum torque value.
When nut cannot be tightened within given torque values to install cotter pins, remove nut,
install a washer, then reinstall nut.
20-60
13773-001
30 Nov 2000
Figure 20-603
Torque Wrench Adapter
13773-001
30 Nov 2000
20-60
Page 13
FASTENER AND HARDWARE GENERAL REQUIREMENTS
1. DESCRIPTION
This section contains general requirements for common hardware installation. Covered are selection and
installation of cotter pins, installation of turnbuckle locking clips, rod end inspection requirements, fastener
flushness requirements, self-locking nut installation requirements, and installation and usage requirements
for washers and lockwashers.
2. MAINTENANCE PRACTICES
A. Cotter Pins (See Figure 20-701)
The preferred method to secure a pin or castellated nut is by the use of a cotter pin. Safety wiring is
also an acceptable method to secure pins or castellated nuts.
CAUTION:
(1)
13773-001
30 Nov 2000
Cadium-plated cotter pins should not be used in applications bringing them in contact
with fuel, hydraulic fluid, or synthetic lubricants.
Proper Usage of Cotter Pins.
(a) Select cotter pin material in accordance with temperature, atmosphere, and service limitations.
(b) Cotter pins shall be new upon each application.
(c)
When nuts are to be secured to a fastener with cotter pins, tighten nut to low side (minimum) of applicable specified or selected torque range unless otherwise specified, and if
necessary, continue tightening until slot aligns with hole. In no case shall the high side
(maximum) torque range be exceeded.
(d) If more than 50% of cotter pin diameter is above nut castellation, a washer should be used
under nut or a shorter fastener should be used. A maximum of two washers may be permitted under a nut.
(e) The largest diameter cotter pin which the hole and slot will accommodate should be used.
In no application shall cotter pin size be less than size called out on the following table.
(f)
Install cotter pin with head firmly in slot of nut with axis of eye at right angles to bolt shank.
Bend prongs so that head and upper prong are firmly seated against bolt.
(g) In pin applications, install cotter pin with axis of eye parallel to shank of clevis pin or rod
end. Bend prongs around shank of pin or rod end.
20-70
Page 1
Figure 20-701
Cotter Pin Safetying
Page 2
20-70
13773-001
30 Nov 2000
Cotter Pin Specifications
Material
Temperature
Carbon Steel (MS24665)
Usage
Up to 450°F
Pins that contact cadmium-plated
surfaces.
General Applications
Normal Atmospheres
Corrosion-Resistant (MS24665C) Up to 800°F
Pins that contact corrosion-resistant steel.
Corrosive atmospheres
Minimum Allowable Cotter Pin Size
13773-001
30 Nov 2000
Thread Size
Diameter of Cotter Pin
6
0.028
8
0.044
10
0.044
1/4
0.044
5/16
0.044
3/8
0.072
7/16
0.072
1/2
0.072
9/16
0.086
5/8
0.086
3/4
0.086
7/8
0.086
1
0.086
1-1/8
0.116
1-1/4
0.116
1-3/8
0.116
1-1/2
0.116
20-70
Page 3
B. Locking Clip
(1)
Proper use of Locking Clips
(a) Prior to safetying, both threaded terminals shall be screwed an equal distance into the
turnbuckle body and shall be screwed in at least so that not more than three threads of
any terminal are exposed outside of body.
(b) After the turnbuckle has been adjusted to its locking position, (with slot indicator groove on
terminals and slot indicator notch on body aligned) insert the end of locking clip into terminal and body until the U-curved end of locking clip is over the hole and in the center of the
body.
(c)
Press locking clip into hole until it’s fully seated (curved end of locking clip will expand and
latch in body slot).
(d) To check proper seating of locking clip, attempt to remove pressed “U” end from body with
fingers only.
Note:
Both locking clips may be inserted in same hole of turnbuckle body or in
opposite holes of turnbuckle body. Locking clips are for one time use only
and shall not be re-used.
C. Rod Ends
Rod end assemblies are subject to a variety of environmental conditions and forms of deterioration
that ultimately may be easy to recognize such as a failed rod end. The not so readily visible types of
deterioration include wear, corrosion and/or distortion. The critical area on a female rod end is the
internal thread of the rod end.
(1)
Inspecting
It will be necessary to remove the rod end from the corresponding control cable to properly
inspect it for internal wear and corrosion as this condition is usually not evident on the outer surface of the rod end.
Note:
(a)
(b)
(c)
(d)
Before removing rod ends with inspection holes, ensure the rod ends are properly
seated onto the control cable. The control cable must be installed beyond the
inspection hole. When removing rod ends without inspection holes, leave the jam
nut in its original position. Measure the distance from the face of the jam nut (side
which was tightened against the rod end) to the end of the control cable. This distance is referred to as the thread engagement depth. Rod ends with a hole diameter of 0.190 inch or 0.250 inch must be threaded onto the control cable to a
minimum thread engagement depth of 0.312 inch.
Examine all rod ends for proper depth installation and then remove the rod ends.
Carefully examine the exterior of all rod ends for wear, corrosion, damage, and/or distortion. Replace all rod ends having signs of wear, corrosion, damage, and/or distortion.
Carefully examine all rod ends for internal wear, corrosion, damage, and/or distortion.
Replace all rod ends having signs of internal wear, corrosion, damage, and/or distortion.
Carefully examine the threaded portion of rod end for damaged threads. Replace all rod
ends having signs of damage to the threads.
Note:
Page 4
20-70
If damaged threads or premature/excessive wear is found or suspected,
replace the rod end.
13773-001
30 Nov 2000
Figure 20-702
Locking Clip Safetying
13773-001
30 Nov 2000
20-70
Page 5
Figure 20-703
Rod End
Page 6
20-70
13773-001
30 Nov 2000
D. Fastener Flushness
(1)
(2)
(3)
(4)
Flush Head Screws
(a) The gap under the head of screws and bolts, and under nuts, shall be.002” maximum for
no more than 40% of the circumference. The heads of flush rivets, screws and Hi-Loks on
the exterior of the airplane shall be flush with the local skin contour to within the tolerances
specified. For fasteners installed in the exterior skin, head protrusion for flush head screws
shall meet the following requirements. Heads shall not be shaved. Check gaps at the
outer periphery of the intended bearing surfaces as indicated by the darkened areas.
Gaps of any thickness shall not be continuous for more than 40% of the peripheral distance of the head or nut.
Driven Rivets
(a) The aforementioned rivets should be flush with the exterior finish. Driven rivets must never
protrude the surface more than 0.005”.
Blind Rivets, Screws and Hi-Loks
(a) The aforementioned fasteners may be countersunk in the exterior finish no more than
0.005”. These fasteners must never protrude above the finish by more than 0.005”.
Camlocks
(a) The aforementioned fasteners may be countersunk in the exterior finish no more than
0.020”. These fasteners must never protrude above the finish by more than 0.010”.
E. Self Locking Nuts
When torquing a self-locking nut, the nut should be run down on the threads of the bolt until the nut
almost contacts the mating surface. The amount of torque required to run the nut down (friction drag
torque) should be measured and added to the amount of torque specified for the fastener. To assure
an accurate torque measurement; a smooth and even motion must be applied.
Note:
When checking friction drag torque, use a torque wrench which allows the friction drag
torque to fall in the middle of the overall range of the torque wrench.
Impact-type wrenches should never be used on any fastener whose torque is crucial. If a nut is slightly
over torqued, it must be loosened and then re-torqued to the correct value. Never back off a nut or a
bolt and leave it un-torqued. When installing a castle nut, start alignment with the cotter pin hole at the
minimum recommended torque, plus friction drag. If the hole and nut castellation do not align, change
washers and try again. Exceeding the maximum recommend torque is not permissible. Never use a
tap in a self locking nut or nutplate. Discard these parts, if this has occurred. Never install a self locking
nut or nutplate backwards on a bolt. Discard these parts if this has occurred.
CAUTION:
13773-001
30 Nov 2000
Whenever a nut is over torqued the nut and bolt must be inspected for damage. If damage is suspected, replace the nut and bolt. Over-torquing of fasteners can result in failed
fasteners and/or components. Under torquing a fastener can result in premature wear of
the fastener and/or the fastening material which can result in failure of the component
and/or fastener. Due to the diminished friction torque, self locking nuts should be
replaced with new ones after removal. If you choose to reuse a self-locking nut, ensure
nut has the minimum prevailing drag torque. Nuts or bolts with self-locking devices must
be discarded if the fastener can be fully hand tightened.
20-70
Page 7
Note:
(1)
Observe torque values and the installation of the recommended safetying device for
every fastener. The end of a flat end bolt or screw shall extend through the nut or nutplate at least 1/32”, or the end of a round or chamfered end bolt or screw shall extend
through the nut or nutplate the full round or chamfer. Do not use MS17826 nuts for tension applications. The aforementioned nuts can be used on standard and high strength
bolts.
Restrictions of self-locking nuts
(a) Do not use reworked or reprocessed self-locking nuts for any application.
(b) Do not use at joints in a control system for singular attachment points.
(c)
Do not use on externally threaded parts that serve as an axle of rotation for another part
where tensional (torque) loads can cause nut to loosen and/or become separated. Examples are pulleys, levers linkages, and cam followers.
Note:
(d)
(e)
(f)
(g)
(h)
Self-locking nuts can be used when threaded parts are held by a positive
locking device that requires shearing or rupture before torsional loads can
act on threaded parts.
Do not use where a loose nut, bolt, or screw, could fall or be drawn into an area that would
impede or damage or otherwise distort operation.
Do not use for access panels, doors or to assemble components that are routinely disassembled or removed for access and servicing.
Do not use a self-locking nut where the loss of a bolt will affect the safety of flight.
Bolts, studs, or screws, excluding Hi-Locks, must extend 1/32-inch through self-locking
nuts, for a length equivalent of approximately two threaded pitches. This length includes
chamfer.
Self-locking nuts which are attached to the structure shall be attached in a positive manner to eliminate possibility of their rotation or misalignment when tightening is to be
accomplished by rotating bolts to structure, and permit replacement of nuts.
Minimum Prevailing Drag Torque for Reused Self-locking Nuts
Fine Thread
Page 8
Course Thread
7/16 - 20
8 inch-pounds
7/16 - 14
8 inch-pounds
1/2 - 20
10 inch-pounds
1/2 - 13
10 inch-pounds
9/16 - 18
13 inch-pounds
9/16 - 12
14 inch-pounds
5/8 - 18
18 inch-pounds
5/8 - 11
20 inch-pounds
3/4 - 16
27 inch-pounds
3/4 - 10
27 inch-pounds
7/8 - 14
40 inch-pounds
7/8 - 9
40 inch-pounds
1 - 14
55 inch-pounds
1-8
51 inch-pounds
1 - 1/8 -12
73 inch-pounds
1 - 1/8 -8
68 inch-pounds
1 - 1/4 -12
94 inch-pounds
1 - 1/4 -8
88 inch-pounds
20-70
13773-001
30 Nov 2000
Figure 20-704
Fastener Head Flushness
13773-001
30 Nov 2000
20-70
Page 9
F.
Washers
Do not use washers under the head of flush screws unless specifically called out. When installing a
countersunk MS20002 washer under the head of bolts, the washer shall be installed so that the countersunk side faces the bolt head. A maximum of two AN960 (thick or thin) washers may be used under
a nut on all bolts, except when a AN 970 washer is specified; then a maximum of only one additional
AN960 washer may be used between the nut and AN970 washer. A maximum of one AN960 (thick or
thin) washer may be used under the head of a bolt, except when a countersunk MS20002 washer or a
AN970 washer is specified, in which case no additional washers are allowed.
G. Lockwashers
(1)
Page 10
Lockwasher Usage
(a) When loosening of threaded parts would not endanger safety of airplane or people.
(b) When the self-locking feature cannot be provided in externally or internally threaded parts.
(c)
When safety wire cannot be used to prevent loosening of threaded parts.
(d) When a cotter pin cannot be used to prevent rotation of internal threads with respect to
external threads.
(e) When fastening is not used for fabrication of primary structure.
(f)
When corrosion encouraged by gouging aluminum or magnesium alloys by edges of teeth
on tooth-locked washers would not cause malfunctioning of parts being fastened together.
20-70
13773-001
30 Nov 2000
Figure 20-705
Washer Placement
13773-001
30 Nov 2000
20-70
Page 11
FLARED TUBING
1. DESCRIPTION
This section contains the proper torque specifications for hydraulic fittings.
2. MAINTENANCE PRACTICES
A. Hydraulic Fittings
Hydraulic fittings must be torqued to the following specifications to prevent loosening while in flight, or
damage due to over tightening.
CAUTION:
13773-001
30 Nov 2000
The tube nut must never be used to pull the tube assembly to seat against the fitting.
20-80
Page 1
Hydraulic Fitting Torque
Torque for AN-818 Nuts with Steel Tubing
Inch Pounds
Dash #
Nm
Tube OD
Minimum
Maximum
Minimum
Maximum
-3
3/16
95
105
10.5
11.6
-4
1/4
135
150
14.9
16.5
-6
3/8
270
300
29.7
33.0
-8
1/2
450
500
49.5
55.0
Torque for AN-818 Nuts with Aluminum Alloy Tubing
Inch Pounds
Dash #
Nm
Tube OD
Minimum
Maximum
Minimum
Maximum
-3
3/16
25
35
2.8
3.9
-4
1/4
50
65
5.5
7.2
-6
3/8
110
130
12.1
14.3
-8
1/2
230
260
25.3
28.6
Torque for Bulkhead Fittings
Gasketed Fittings
Dash
#
Tube
OD
Jamnuts and Fittings without Gaskets
Aluminum or Steel
Minimum
Maximum
Aluminum
Minimum
Steel
Maximum
Minimum
Maximum
-3
3/16
50
75
65
80
70
90
-4
1/4
55
80
90
105
110
130
-6
3/8
100
150
125
145
225
275
-8
1/2
180
230
240
280
400
450
-10
5/8
250
350
330
370
550
650
-12
3/4
420
600
540
660
800
960
Page 2
20-80
13773-001
30 Nov 2000
CABLE INSPECTION
1. DESCRIPTION
This section covers procedures necessary for the proper inspection of control cables.
2. MAINTENANCE PRACTICES
A. Control Cables (See Figure 20-901)
Control cable assemblies are subject to a variety of environmental conditions and forms of deterioration that ultimately may be easy to recognize such as wire/strand breakage. The not so readily visible
types of deterioration include corrosion and/or distortion. The following information will aid in detecting
these cable conditions. Carefully examine any cable for corrosion that has a broken wire in a section
not in contact with wear-producing airframe components such as pulleys, fairleads, rub blocks, etc. It
may be necessary to remove and bend cable to properly inspect it for internal strand corrosion as this
condition is usually not evident on outer surface of cable. Replace any cable that has internal corrosion. If a cable has been wiped clean of its corrosion-preventive lubricant and metal-brightened, the
cable shall be examined closely for corrosion.
(1)
13773-001
30 Nov 2000
Inspecting
(a) Examine cables for broken wires by passing a cloth along the entire length of the cable.
Broken wires will be detected if the cloth snags on cable. Critical areas for wire breakage
are those sections of cable which pass through fairleads, across rub blocks, and around
pulleys. If no snags are found, then no further inspection is required. If snags are found or
broken wires are suspected, then a more detailed inspection is necessary which requires
that the cable be bent in a loop to confirm broken wires. Loosen or remove cable to allow
it to be bent in a loop as shown. While rotating cable, inspect bent area for broken wires.
(b) Individual broken wires are acceptable in primary and secondary control cables at random
locations. No more than six broken wires in any given ten-inch cable length is allowable.
20-90
Page 1
Figure 20-901
Control Cable Inspection
Page 2
20-90
13773-001
30 Nov 2000
CHAPTER
ENVIRONMENTAL
SYSTEMS
CHAPTER 21 - ENVIRONMENTAL SYSTEMS
LIST OF EFFECTIVE PAGES
Chapter/Section
Page
Date
21-LOEP
1
30 NOV 2000
21-TOC
1
30 NOV 2000
21-TOC
2
30 NOV 2000
21-00
1
30 NOV 2000
21-00
2
30 NOV 2000
21-00
3
30 NOV 2000
21-20
1
30 NOV 2000
21-20
2
30 NOV 2000
21-20
3
30 NOV 2000
21-20
4
30 NOV 2000
21-20
5
30 NOV 2000
21-40
1
30 NOV 2000
21-40
2
30 NOV 2000
21-40
3
30 NOV 2000
21-60
1
30 NOV 2000
21-60
2
30 NOV 2000
21-60
3
30 NOV 2000
21-60
4
30 NOV 2000
21-60
5
30 NOV 2000
13773-001
30 Nov 2000
21-LOEP
Page 1
CHAPTER 21 - ENVIRONMENTAL SYSTEMS
TABLE OF CONTENTS
Subject
ENVIRONMENTAL SYSTEMS
Chapter/Section
Page
21-00
General
1
Troubleshooting
1
AIR DISTRIBUTION SYSTEM
21-20
Description
1
Maintenance Practices
1
Eyeball Outlets
Removal - Bolster Panel Eyeball Air Vent
Installation - Bolster Panel Eyeball Air Vent
Removal - Armrest Eyeball Air Vent
Installation - Armrest Eyeball Air Vent
Air Ducts
Removal - Plenum Box Air Ducts
Installation - Plenum Box Air Ducts
Removal - Side Panel Air Ducts
Installation - Side Panel Air Ducts
Removal - Kick Plate Air Duct
Installation - Kick Plate Air Duct
Removal - Passenger Heat Duct
Installation - Passenger Heat Duct
HEAT AND DEFROST SYSTEM
1
1
1
1
1
3
3
3
3
3
3
3
3
4
21-40
Description
1
Maintenance Practices
1
Heat Box
Removal - Heat Box
Installation - Heat Box
Cabin Air Plenum
Removal - Cabin Air Plenum
Installation - Cabin Air Plenum
Exhaust Muffler/Heat Exchanger
TEMPERATURE CONTROL
1
1
1
2
2
2
2
21-60
Description
1
Maintenance Practices
1
Temperature Control Knobs
Removal - Temperature Control Knob
Installation - Temperature Control Knob
13773-001
30 Nov 2000
1
1
1
21-TOC
Page 1
CHAPTER 21 - ENVIRONMENTAL SYSTEMS
TABLE OF CONTENTS
Subject
Chapter/Section
Adjustment - Heat Position Control
Adjustment/Test - Defrost and Cold Air Position Linkage
Heat Box Control Cable
Removal - Heat Box Control Cable
Installation - Heat Box Control Cable
Adjustment - Heat Box Control Cable
Page 2
21-TOC
Page
1
1
4
4
4
5
13773-001
30 Nov 2000
ENVIRONMENTAL SYSTEMS
1. GENERAL
The airplane fresh air and conditioned air systems are covered in this chapter. Temperature, volume, and
flow selection are regulated by manipulation of the cabin temperature and cabin air selector knobs on the
lower right side of the instrument panel.
Cabin heating and ventilation is accomplished by supplying conditioned air for heating and windshield
defrost and fresh air for ventilation. The system consists of a heater muff (heat exchanger) around the
engine exhaust muffler, fresh air inlets in each wing, an air mixing plenum, air ducting for distribution, a
windshield diffuser, heating outlets, fresh air outlets, and cable control for selecting temperature and flow.
Ventilation air is provided by ducting fresh air from air inlets, located in each wing leading edge, to eyeball
outlets for each occupant. Each occupant can direct the fresh air flow by positioning the eyeball outlets to
a new location. Each occupant can control flow rate of the eyeball outlet by rotating the outlet.
Heating and windshield defrost is accomplished by mixing ventilation air from the fresh air inlets with
heated air from the heat exchanger and then distributing the “conditioned” air to the occupants and/or the
windshield diffuser. Air for heating is supplied through an inlet in the engine baffling to a muff-type heat
exchanger surrounding the engine exhaust muffler. This heated air is allowed to mix with fresh air from the
leading edge air inlets in the air mixing plenum behind the instrument panel. The proportion of heated air to
fresh air is pilot controllable. The mixed (conditioned) air is then directed to the passenger outlets and/or to
the windshield diffuser. Conditioned air outlets for the forward occupants are directionally controllable and
are located beneath the instrument panel at knee level at each position at knee level. Outlets for the rear
occupants are at floor level. (See Figure 21-001)
2. TROUBLESHOOTING
Trouble
Probable Cause
Remedy
Controls/Inoperable
Control linkage jam nuts loose/dis- Adjust and secure control linkage
connected
(Refer to 21-60)
Defroster System Inoperable
Control jam nuts loose/disconnected
Defroster vent holes blocked
Heater muffler hose disconnected
or collapsed
Adjust and secure control linkage
(Refer to 21-60)
Remove restriction
Connect hose
Fresh Air System Inoperable
Eyeball vents closed
Inlet vents covered, plugged, or
restricted
Fresh air inlet hose disconnected
or collapsed
Open vents
Remove obstruction
Connect inlet hose, repair hose
Cabin Occupants Become Disori- Exhaust gasses leaking into the
ented, Tired, or Nauseated. Com- heater muffler
plaints of headaches
Pressure test heater muffler and
replace if leaking
Poor Temperature Control
Connect or replace duct work
(Refer to 21-60)
13773-001
30 Nov 2000
Duct work is disconnected or has
a hole in it or is collapsed
21-00
Page 1
Figure 21-001
Heating and Ventilation System (Sheet 1 of 2)
Page 2
21-00
13773-001
30 Nov 2000
Figure 21-001
Heating and Ventilation System (Sheet 2 of 2)
13773-001
30 Nov 2000
21-00
Page 3
AIR DISTRIBUTION SYSTEM
1. DESCRIPTION
This section covers the servicing procedures for the integral fresh air inlets, fresh air ducts, and eyeball
vents. Fresh air vents are located along the sidewall near each rear passenger seat and directly forward of
the pilot and co-pilot seats. One integral fresh air inlet is located on the forward side of each wing. Fresh
ram air flows through the fresh air inlets and into the cabin. A screen in the wing inlet duct prevents large
objects from entering the fresh air system. The inlet screens should be inspected periodically for obstructions.
2. MAINTENANCE PRACTICES
A. Eyeball Outlets
(1)
(2)
(3)
Removal - Bolster Panel Eyeball Air Vent
(a) Remove bolster panel to gain access to back side of eyeball air vent. (Refer to 25-10)
(b) Remove vent assembly from the eyeball air vent.
(c)
Remove eyeball vent.
Installation - Bolster Panel Eyeball Air Vent
(a) Insert outlet into bolster panel.
(b) Secure vent assembly to the eyeball air vent.
(c)
Place bolster panel into position and secure. (Refer to 25-10)
Removal - Armrest Eyeball Air Vent
(a) Remove armrest interior trim panel and disconnect passenger fresh air duct from vent.
(Refer to 25-10)
CAUTION:
(4)
13773-001
30 Nov 2000
Use care when drilling out old rivets to prevent protruding through leather
interior panel.
(b) Drill out rivets securing armrest assembly to interior trim panel.
(c)
Remove retaining nut hose assembly and o-ring from vent.
(d) Remove vent.
Installation - Armrest Eyeball Air Vent
(a) Insert vent into interior trim panel.
(b) Place o-ring over back side of vent.
(c)
Secure vent with retaining nut hose assembly.
(d) Secure armrest assembly to interior trim panel with rivets.
(e) Place armrest interior trim panel into position, secure fresh air duct to vent, and secure
panel. (Refer to 25-10)
21-20
Page 1
Figure 21-201
Air Distribution Vents
Page 2
21-20
13773-001
30 Nov 2000
B. Air Ducts
(1)
(2)
Removal - Plenum Box Air Ducts
(a) Remove MFD. (Refer to 34-40)
(b) Remove the appropriate kick panel. (Refer to 25-10)
(c)
Remove the cable ties securing the appropriate air duct.
(d) Remove the air duct.
Installation - Plenum Box Air Ducts
CAUTION:
(a)
Ensure air duct routing doesn’t interfere with other components.
Acquire necessary tools, equipment, and supplies.
Description
Cable Ties
P/N or Spec.
8 inch
Supplier
Any Source
Purpose
Retain air duct
(b)
(c)
(d)
(3)
(4)
(5)
(6)
(7)
13773-001
30 Nov 2000
Install air duct into position.
Secure the air duct with cable ties.
Visually inspect air ducts to assure no interference with flight controls, brackets or any
other linkage.
(e) Secure the kick plate. (Refer to 25-10)
(f)
Install the MFD. (Refer to 34-40)
Removal - Side Panel Air Ducts
(a) Remove side duct cover. (Refer to 25-10)
(b) Remove sidewall air duct.
(c)
Remove cable ties and disconnect air duct from each end. Remove air duct.
Installation - Side Panel Air Ducts
(a) Install air duct and secure at both ends.
(b) Place sidewall air duct into position and secure.
(c)
Install side duct cover. (Refer to 25-10)
Removal - Kick Plate Air Duct
(a) Remove kick plate to gain access to back side of air duct. (Refer to 25-10)
(b) Remove clamp and duct from air duct.
(c)
Remove air duct from kick plate by unscrewing the inner air duct from the outer air housing.
Installation - Kick Plate Air Duct
(a) Mount air duct assembly to kick plate by screwing the inner duct into the outer duct housing.
(b) Secure air duct hose to air duct with clamp.
(c)
Secure kick plate. (Refer to 25-10)
Removal - Passenger Heat Duct
(a) Remove side duct cover. (Refer to 25-10)
(b) Remove armrest interior trim panel. (Refer to 25-10)
(c)
Remove MFD. (Refer to 34-40)
(d) Remove cable ties and disconnect air duct from each end.
(e) Remove air duct.
21-20
Page 3
(8)
Installation - Passenger Heat Duct
CAUTION:
(a)
Ensure air duct routing doesn’t interfere with other components.
Acquire necessary tools, equipment, and supplies.
Description
Cable Ties
(b)
(c)
(d)
(e)
(f)
Page 4
P/N or Spec.
8 inch
Supplier
Any Source
Purpose
Retain air duct
Install air duct into position.
Secure duct with cable ties at both ends.
Install MFD. (Refer to 34-40)
Secure armrest interior trim panel. (Refer to 25-10)
Secure side duct cover. (Refer to 25-10)
21-20
13773-001
30 Nov 2000
Figure 21-202
HVAC System
13773-001
30 Nov 2000
21-20
Page 5
HEAT AND DEFROST SYSTEM
1. DESCRIPTION
Heated air is available at floor level for all occupants. Positive pressure inside the engine cowling causes
airflow from the inlet at the rear engine baffle to the engine exhaust muffler. The airflow is then ducted to
the heat box on the firewall. When the heat box damper is closed, the heated air remains in the engine
compartment. When the heat box damper is open, heated air flows from the heat box into the cabin air plenum mixing chamber. The heated air is conditioned in the cabin air plenum by mixing it with fresh air (if
desired) from the fresh air inlet on the right wing. From the cabin air plenum, the conditioned air is ducted
to either the defroster or passengers. Defroster outlet holes are located in the glareshield just aft of the
windshield. Forward passenger conditioned air enters the cabin through outlets in the kick panel at each
position. Conditioned air for rear passengers is ducted to outlets on the sidewalls near floor level.
The amount of heated air allowed into the air mixing plenum is controlled by rotating the Cabin Heat Control, located inboard of the Cabin Air Selector. The control is mechanically linked to a damper in a heater
box between the heater muff and the cabin air plenum mixing chamber. Rotating the control full counterclockwise (HEAT OFF) bypasses heated air from the heater muff into the engine compartment. Rotating
the control clockwise opens the door in the heater box allowing heated air to enter the mixing plenum. The
proportion of heated air to ventilation air mixed in the cabin air plenum mixing chamber is regulated by
manipulating the Cabin Heat Control and Cabin Cold Control to obtain the desired temperature and flow.
The pilot and co-pilot control the conditioning (mixing) of the heated and fresh air.
2. MAINTENANCE PRACTICES
A. Heat Box
The heat box is mounted in the engine compartment on the forward right-hand side of the firewall.
(1)
(2)
Removal - Heat Box
(a) Remove engine cowling to gain access to the heat box. (Refer to 71-10)
(b) Remove hose clamp securing duct to heat box. Remove duct.
(c)
Disconnect heater cable from heat box.
(d) Remove screws and washers securing heat box to the firewall. Remove heat box.
Installation - Heat Box
(a)
Acquire necessary tools, equipment, and supplies.
Description
Cable Ties
P/N or Spec.
8 inch
Dow Corning Silicone Seal- RTV 736
ant
(b)
(c)
(d)
(e)
(f)
(g)
(h)
13773-001
30 Nov 2000
Supplier
Purpose
Any source
Retain air duct
Any Source
Provide air-tight
seal between cabin
and engine compartment
Solvent clean heat box and firewall mating surfaces. (Refer to 20-30)
Apply silicone sealant (fay seal) to the back side of heat box. (Refer to 20-10)
Secure heat box to the firewall.
Rotate control knob to the full heat position.
Position heat box flap in the down position.
Connect heater core wire to heat box cable stop.
Secure duct to heat box with hose clamp.
21-40
Page 1
(i)
Install engine cowling. (Refer to 71-10)
B. Cabin Air Plenum
The cabin air plenum is located inside the fuselage. The plenum is mounted to the firewall on the righthand side.
(1)
(2)
Removal - Cabin Air Plenum
(a) Remove the co-pilot kick plate. (Refer to 25-10)
(b) Remove the MFD for improved access to the plenum. (Refer to 34-40)
(c)
Cut and remove the cable ties securing the ducts to the plenum.
(d) Disconnect the ducts from the plenum.
(e) Disconnect the temperature control linkage.
(f)
Loosen the two right screws securing the plenum and console rib to the firewall.
(g) Remove the two left screws securing the plenum to the firewall, remove the plenum.
Installation - Cabin Air Plenum
(a)
Acquire necessary tools, equipment, and supplies.
Description
Cable ties
(b)
(c)
(d)
(e)
(f)
P/N or Spec.
8 inch
Supplier
Any source
Purpose
Retain air duct
Secure plenum to firewall, with attaching hardware.
Connect ducts to plenum and secure with cable ties.
Adjust and secure the temperature control linkage. (Refer to 21-60)
Install MFD. (Refer to 34-40)
Install the kick plate. (Refer to 25-10)
C. Exhaust Muffler/Heat Exchanger (Refer to 78-20)
Page 2
21-40
13773-001
30 Nov 2000
Figure 21-401
Conditioned Air Flow
13773-001
30 Nov 2000
21-40
Page 3
TEMPERATURE CONTROL
1. DESCRIPTION
The amount of cooling air allowed into the air mixing plenum is controlled by rotating the Cabin Cold Control Knob, located outboard of the Cabin Air Selector (Defrost-Floor). The control is mechanically linked to
a butterfly valve at the fresh air entrance to the mixing plenum. Rotating the control full counterclockwise
shuts down cooling airflow to the mixing plenum from the fresh air inlet in the right wing root. Rotating the
control clockwise opens the butterfly allowing fresh cooling air to enter the mixing plenum. Rotating the
control to the full clockwise (COLD) position provides maximum cooling airflow to the mixing plenum.
Conditioned air from the mixing plenum can be proportioned and directed to the windshield or passengers
by manipulating the Cabin Air Selector. The control is linked to a door at the outlet end of the mixing plenum. Rotating the control full counterclockwise to the miniature windshield icon shuts off airflow to the passenger air distribution system and allows maximum airflow to the windshield diffuser. Rotating the knob full
clockwise to the seated person icon shuts off airflow to the windshield diffuser and allows maximum airflow
to the passenger air distribution system. The control can be positioned to allow any proportion of windshield and passenger air.
Conditioned air for the forward seats is routed to outlets under the instrument panel at knee level. Conditioned air for the aft seats is ducted to outlets beneath the forward seats near the door posts and exits at
floor level.
2. MAINTENANCE PRACTICES
A. Temperature Control Knobs
(1)
(2)
(3)
(4)
13773-001
30 Nov 2000
Removal - Temperature Control Knob
(a) Rotate the control knob to gain access to setscrews.
(b) Loosen the two setscrews. Remove the control knob.
Installation - Temperature Control Knob
(a) Rotate the linkage shaft counterclockwise.
(b) Slide the control knob onto the linkage shaft in the full counterclockwise position.
(c)
Secure the two setscrews.
(d) Verify operation of the Temperature Control Knob.
Adjustment - Heat Position Control
(a) Loosen the stop on the end of the cable.
(b) Move the butterfly in the heat box to the full hot position (downward).
(c)
Rotate the heat position control knob to the full heat position (clockwise).
(d) Secure stop on end of cable.
(e) Verify operation of the Heat Position Control knob.
Adjustment/Test - Defrost and Cold Air Position Linkage
(a) Rotate the control knob to gain access to the two setscrews.
(b) Loosen the two setscrews. Remove the control knob.
(c)
Rotate the linkage shaft counterclockwise.
(d) Slide the control knob onto the linkage shaft.
(e) Rotate the control knob to the full counterclockwise position.
(f)
Secure the two setscrews.
(g) Verify operation of the Defrost and Cold Air Position control knob.
21-60
Page 1
Figure 21-601
Temperature Controls (Sheet 1 of 2)
Page 2
21-60
13773-001
30 Nov 2000
Figure 21-601
Temperature Controls (Sheet 2 of 2)
13773-001
30 Nov 2000
21-60
Page 3
B. Heat Box Control Cable
(1)
(2)
Removal - Heat Box Control Cable
(a) Remove engine cowling to gain access to heat box cable. (Refer to 71-10)
(b) Solvent clean adhesive (with alcohol) from cable pass-through on the forward side of the
firewall. (Refer to 20-30)
(c)
Loosen lower cable stop bolt from heat box actuation arm.
(d) Loosen cable stop bolt from the inner core wire. Slide cable stop off heater cable core
wire.
(e) Loosen clamp fastened to angle bracket and engine mount. Slide cable out of clamp.
(f)
Remove MFD. (Refer to 34-40)
(g) Remove co-pilot kick plate. (Refer to 25-10)
(h) Remove adhesive from cable pass-through on aft side of firewall.
(i)
Remove the bolt, washers, and nut securing core wire to the linkage shaft.
(j)
Remove bolt, washers, and nut securing the cable and clamp to the cable bracket.
Remove clamp.
(k)
Pull heat box cable, cable stop, and Fiber Frax paper out of the cable pass-through.
Installation - Heat Box Control Cable
(a)
Acquire necessary tools, equipment, and supplies.
Description
(b)
(c)
(h)
(i)
(j)
(k)
Page 4
Supplier
Purpose
Fiber Frax paper 1/8”
970J, TON0146 UniFrax
Firewall insulation
Dow Corning Silicone
Sealant
RTV 736
Provide air-tight
seal between cabin
and engine compartment
Isopropyl Alcohol
TT-I-735 Isopro- Any Source
pyl Alcohol,
Grade A or
Grade B
Any Source
Clean cable passthrough free of
adhesive
Insert the heat box cable (wrapped with Fiber Frax) through cable pass-through and into
position. (Refer to 20-10)
Slide cable through the clamp mounted to the angle bracket and engine mount.
Note:
(d)
(e)
(f)
(g)
P/N or Spec.
Make sure clamp is positioned properly and that the controls do not interfere with any other components.
Secure cable and clamp to the angle bracket.
Slide lower cable stop over the inner core wire.
Secure the lower cable stop bolt and inner core wire to the heat box actuation arm.
Apply silicone adhesive over entire cable pass-through on both sides of firewall. (Refer to
20-10)
Secure cable to linkage shaft with bolt, washers, and nut.
Wrap clamp around upper end of the heat box control cable.
Tighten bolt, washers, and nut to secure cable and clamp to the cable bracket.
Adjust and secure the inner core wire cable stop. (Refer to 21-60)
21-60
13773-001
30 Nov 2000
(3)
13773-001
30 Nov 2000
(l)
Install MFD. (Refer to 34-40)
(m) Install co-pilot kick plate. (Refer to 25-10)
(n) Install engine cowling. (Refer to 71-10)
(o) Verify proper operation of temperature controls and MFD.
Adjustment - Heat Box Control Cable
(a) Remove MFD. (Refer to 34-40)
(b) Remove engine cowling.
(c)
Loosen the cable stop bolt from the inner core wire (located above the heat box actuation
arm).
(d) Loosen the heat box actuation arm cable stop bolt.
(e) Rotate control knob to full heat position.
(f)
Position heat box flap in the full heat position by pushing down on the control arm.
(g) Secure the heater cable core wire to the heat box actuation arm by tightening the bolt into
the actuation arm cable stop.
(h) Rotate control knob to the full off position.
(i)
Slide the lower cable stop up to the outer cable housing and secure cable stop bolt.
(j)
Install MFD and engine cowling. (Refer to 34-40)
(k)
Verify proper operation of temperature controls and MFD.
21-60
Page 5
CHAPTER
AUTO FLIGHT
CHAPTER 22 - AUTOFLIGHT
LIST OF EFFECTIVE PAGES
Chapter/Section
Page
Date
22-LOEP
1
31 JULY 2001
22-TOC
1
31 JULY 2001
22-00
1
30 NOV 2000
22-00
2
31 JULY 2001
22-10
1
31 JULY 2001
22-10
2
31 JULY 2001
22-10
3
31 JULY 2001
22-10
4
31 JULY 2001
22-10
5
31 JULY 2001
22-10
6
31 JULY 2001
22-10
7
31 JULY 2001
13773-001
31 July 2001
22-LOEP
Page 1
CHAPTER 22 - AUTOFLIGHT
TABLE OF CONTENTS
Subject
AUTOFLIGHT
Chapter/Section
Page
22-00
General
SYSTEM 55 AUTOPILOT
1
22-10
Description
1
Maintenance Practices
1
Flight Guidance Programmer/Computer
Removal - Flight Guidance Programmer/Computer
Installation - Flight Guidance Programmer/Computer
Altitude Selector/Alerter
Removal - Altitude Selector/Alerter
Installation - Altitude Selector/Alerter
Altitude Transducer
Removal - Altitude Transducer
Installation - Altitude Transducer
Autopilot Disconnect Switch
Pitch Servo
Removal - Pitch Servo
Disassemble - Pitch Servo
Reassembly - Pitch Servo
Installation - Pitch Servo
Adjustment/Test - Pitch-Servo Torque
Adjustment/Test - Bridle-Cable Tension
13773-001
31 July 2001
1
1
1
1
1
1
2
2
2
2
4
4
4
4
4
5
5
22-TOC
Page 1
AUTOFLIGHT
1. GENERAL
This chapter describes the airplane’s automated guidance system. The System 55 Autopilot offers a
means of automatically or manually controlling the flight of the airplane by providing directional, heading,
altitude, and attitude control. (See Figure 22-001)
For additional information regarding S-TEC autopilot systems refer to the List of Publications listed in the
front of this manual.
13773-001
30 Nov 2000
22-00
Page 1
Figure 22-001
System 55 Schematic
Page 2
22-00
13773-001
31 July 2001
SYSTEM 55 AUTOPILOT
1. DESCRIPTION
The S-TEC System 55 is a dual axis autopilot system that provides roll stability, heading hold, NAV/GPS
tracking, altitude hold, vertical speed selection, automatic glideslope capture, and automatic 45 ° intercept
to desired flight path capabilities controlled via the roll-trim cartridge and pitch servo.
The system components consist of a Flight Guidance Programmer/Computer, Altitude Selector/Alerter,
Altitude Transducer, and Pitch Servo. The operating controls for the autopilot are located on the Flight
Guidance Programmer/Computer.
Through panel mounted switches and the vertical speed knob, the Flight Guidance Programmer/Computer
serves the function of converting operator commands to logic signals for the roll and pitch computer functions. The integrated roll computer receives signal inputs from the Turn Coordinator and HSI to compute
roll commands for stabilization, turns, radio intercepts, heading and tracking. The integrated pitch computer receives signal inputs from the Altitude Transducer, accelerometer, glideslope deviations, and Altitude Selector/Alerter.
2. MAINTENANCE PRACTICES
A. Flight Guidance Programmer/Computer (See Figure 22-101)
(1)
(2)
Removal - Flight Guidance Programmer/Computer
(a) Ensure BAT 1, BAT 2, and AVIONICS master switches are in off position.
(b) Pull AUTOPILOT circuit breaker.
(c)
Insert allen wrench into front panel bolt hole and engage allen bolt.
(d) Turn locking screw counterclockwise to loosen locking cam. Cam will move the transceiver unit out 1/4” and disengage from the electrical connectors.
(e) Pull Flight Guidance Programmer/Computer from mounting tray
Installation - Flight Guidance Programmer/Computer
(a) With light to medium pressure, push Guidance Programmer/Computer into mounting tray
to engage electrical connectors.
(b) Insert allen wrench into front panel bolt hole and engage allen bolt.
(c)
Turn bolt clockwise to tighten locking cam.
(d) Reset AUTOPILOT circuit breaker.
B. Altitude Selector/Alerter (See Figure 22-101)
(1)
(2)
13773-001
31 July 2001
Removal - Altitude Selector/Alerter
(a) Ensure BAT 1, BAT 2, and AVIONICS master switches are in off position.
(b) Pull AUTOPILOT circuit breaker.
(c)
Remove MFD. (Refer to 34-40)
(d) Disconnect cable from Altitude Selector/Alerter.
(e) Remove screws securing Altitude Selector/Alerter to instrument panel.
(f)
Remove Altitude Selector/Alerter from airplane.
Installation - Altitude Selector/Alerter
(a) Align Altitude Selector/Alerter over instrument panel mounting holes and secure with
screws.
(b) Connect cable to Altitude Selector/Alerter.
(c)
Install MFD. (Refer to 34-40)
(d) Reset AUTOPILOT circuit breaker.
22-10
Page 1
C. Altitude Transducer (See Figure 22-101)
(1)
(2)
Removal - Altitude Transducer
(a) Ensure BAT 1, BAT 2, and AVIONICS master switches are in off position.
(b) Pull AUTOPILOT circuit breaker.
(c)
Remove MFD. (Refer to 34-40)
(d) Disconnect cable from altitude transducer.
(e) Disconnect static line from altitude transducer.
(f)
Remove screws and washers securing altitude transducer to console rib.
(g) Remove altitude transducer from airplane.
Installation - Altitude Transducer
(a) Align altitude transducer over console rib mounting holes and secure with washers and
screws.
(b) Connect static line to attitude transducer.
(c)
Connect cable to altitude transducer.
(d) Perform Pitot System Leakage Test. (Refer to 34-10)
(e) Perform Static System Leakage Test. (Refer to 34-10)
(f)
Install MFD. (Refer to 34-40)
(g) Reset AUTOPILOT circuit breaker.
D. Autopilot Disconnect Switch
The autopilot disconnect switch is integral to the 4-way trim switch on the control yoke. For maintenance practices pertinent to the control yoke, see Flight Controls. (Refer to 27-10)
Page 2
22-10
13773-001
31 July 2001
Figure 22-101
System 55 Installation
13773-001
31 July 2001
22-10
Page 3
E. Pitch Servo (See Figure 22-102)
(1)
Removal - Pitch Servo
(a) Ensure BAT 1, BAT 2, and AVIONICS master switches are in off position.
(b) Pull AUTOPILOT circuit breaker.
(c)
Remove baggage floor carpet and access panel CF5. (Refer to 6-00)
(d) Disconnect pitch servo plug from socket.
Note:
Note location of bridle clamps on outboard elevator cable to facilitate reinstallation.
(e)
(2)
(3)
(4)
Page 4
Loosen nuts securing bridle clamps to elevator outboard cable and remove bridle from
cable.
(f)
Remove bolts and washers securing pitch servo to mounting bracket and remove pitch
servo from airplane.
Disassemble - Pitch Servo
(a) Remove screws and washers securing capstan cover to capstan.
(b) Remove cable guards from servo flange.
(c)
Remove cotter pin, washer, and nut securing tension washers to capstan.
(d) Free bridal cable stop-ball in capstan recess by loosening set screw located inside of middle spanner-adapter tooling hole.
(e) Pull stop-ball from capstan recess and unwrap bridle cable from capstan.
(f)
Remove screw and washer securing cover to servo motor.
Reassembly - Pitch Servo
(a) Place tension washers on capstan and secure with washer and nut.
(b) Perform Pitch-Servo Torque Adjustment/Test.
(c)
Insert and depress bridal cable stop-ball into capstan recess and tighten set screw.
(d) On the servo capstan, position the middle spanner adapter tooling hole to the 12 o’clock
position (stop-ball at top of capstan), and wrap aft bridle cable 540° counterclockwise.
(e) On the servo capstan, position the middle spanner adapter tooling hole to the 12 o’clock
position (stop-ball at top of capstan), and wrap forward bridle cable 180° clockwise.
(f)
Install cable guards to servo flange.
(g) Install screws and washers securing capstan cover to servo motor.
(h) Install screw and washer securing cover to servo motor.
Installation - Pitch Servo
(a) Position pitch servo to mounting bracket and secure with washers and bolts.
(b) Perform Bridle-Cable Tension Adjustment/Test.
(c)
Connect pitch servo plug to socket.
(d) Install access panel CF5 and baggage floor carpet. (Refer to 6-00)
(e) Reset AUTOPILOT circuit breaker.
22-10
13773-001
31 July 2001
(5)
Adjustment/Test - Pitch-Servo Torque
(a)
Acquire necessary tools, equipment, and supplies.
Description
(b)
(c)
(d)
P/N or Spec.
Spanner Adapter (1 of 2)
6622-1
Spanner Adapter (2 of 2)
6624-1
Supplier
One S-TEC Way
Municipal Airport
Mineral Wells, TX
76067-9236
““
Purpose
Torque Adjustment
““
Insert pins of spanner adapter into capstan tooling holes.
Position dial torque wrench to spanner adapter.
Push servo flapper down and adjust clutch torque to 35.0 ± 3.0 in-lbs (3.9 ± 0.3 Nm).
Note:
If it is necessary to rotate nut for cotter pin installation, it is allowable to
remove thinnest (0.032”) tension washer from stackup to maintain specified
torque.
(e)
(6)
Install new cotter pin. If capstan nut must be rotated to install cotter pin, verify clutch
torque is within recommended torque settings.
Adjustment/Test - Bridle-Cable Tension
(a)
Acquire necessary tools, equipment, and supplies.
Description
Tensiometer
(b)
(c)
(d)
(e)
(f)
(g)
13773-001
31 July 2001
BT-33-75D
Supplier
Kent Moore
Purpose
Cable Tension
Determination
Remove access panel RE1.(Refer to 6-00)
Insert lock-out pin at elevator actuation pulley in empennage.
Using tensiometer, ensure elevator control cable tension is set to 30.0 - 40.0 lb (13.6 18.1 Kg). If elevator control cable tension falls outside specified torque, perform Elevator
System Rigging Adjustment/Test. (Refer to 27-30]
On the servo capstan, position the middle spanner adapter tooling hole to the 12 o’clock
position (stop-ball at top of capstan).
Position and loosely install aft bridal cable and bridal clamp to outboard elevator cable
with washers and bolts.
Position and loosely install forward bridal clamp to outboard elevator cable with washers
and bolts.
Note:
(h)
P/N or Spec.
Use a ratcheting open-end wrench and socket for tightening bridal clamp
assembly to elevator cable.
Position bridal cable in clamp and while pushing clamp assembly forward, tighten clamp to
elevator cable.
22-10
Page 5
Note:
(i)
(j)
(k)
(l)
Page 6
While tightening bridal clamp to elevator cable, capstan will rotate. Offset
this rotation while adjusting opposite bridal cable tension so that when
specified tension is reached, the middle spanner adapter tooling hole is at
the 12 o’clock position (stop-ball at top of capstan).
At aft bridal clamp assembly, push clamp assembly aft while tightening clamp to elevator
cable.
Using the techniques described above, adjust bridal cable tension to 17.0 +/- 4.0 lb (7.7 +/
- 1.8 Kg).
Remove lock-out pin.
Install access panel RE1. (Refer to 6-00)
22-10
13773-001
31 July 2001
Figure 22-102
Pitch Trim Servo Installation
13773-001
31 July 2001
22-10
Page 7
CHAPTER
COMMUNICATIONS
CHAPTER 23 - COMMUNICATIONS
LIST OF EFFECTIVE PAGES
Chapter/Section
Page
Date
23-LOEP
1
30 NOV 2000
23-TOC
1
30 NOV 2000
23-00
1
30 NOV 2000
23-00
2
30 NOV 2000
23-10
1
30 NOV 2000
23-50
1
30 NOV 2000
23-50
2
30 NOV 2000
23-50
3
30 NOV 2000
13773-001
30 Nov 2000
23-LOEP
Page 1
CHAPTER 23 - COMMUNICATIONS
TABLE OF CONTENTS
Subject
COMMUNICATIONS
Chapter/Section
Page
23-00
General
SPEECH COMMUNICATIONS
1
23-10
Description
1
Maintenance Practices
1
Garmin GNS 430 GPS/COM/NAV
AUDIO INTEGRATING
1
23-50
Description
1
Maintenance Practices
1
Garmin GMA 340 Audio Control Unit
Removal - Garmin GMA 340 Audio Control Unit
Installation - Garmin GMA 340 Audio Control Unit
Inspection/Check - Garmin GMA 340 Audio Control Unit
Audio Jacks
Removal - Cockpit Audio Jacks
Installation - Cockpit Audio Jacks
Removal - Passenger Seat Audio Jacks
Installation - Passenger Seat Audio Jacks
Cabin Speaker
Removal - Cabin Speaker
Installation - Cabin Speaker
Push-to-Talk Switch
13773-001
30 Nov 2000
1
1
1
1
2
2
2
2
2
2
2
2
2
23-TOC
Page 1
COMMUNICATIONS
1. GENERAL
This chapter describes the systems, units, components which provide a means of communicating from one
part of the airplane to another and between the airplane and other airplanes or ground stations. Included
are voice and continuous wave communicating components and intercom. (See Figure 23-001)
13773-001
30 Nov 2000
23-00
Page 1
Figure 23-001
Communications System
Page 2
23-00
13773-001
30 Nov 2000
SPEECH COMMUNICATIONS
1. DESCRIPTION
This section covers the systems which utilize the voice to transmit and/or receive messages from air-to-air
or air-to-ground. For additional maintenance practice information refer to the appropriate Garmin Installation Manual indexed in the front of this manual.
The speech communications system consists of two digitally-tuned integrated VHF communications
(COM) transceiver. The transceiver receives all narrow- and wide-band VHF communication transmissions
transmitted within a frequency range of 118.000 MHz to 136.975 MHz in 25.0 kHz steps (720 channels).
For European operations, the COM can be operator configured for 8.33 kHz channel spacing (2280 channels). The tuning controls are collocated with the NAV at the left side of the transceiver front panel. Frequency tuning is accomplished by rotating the large and small concentric knobs to select a standby
frequency and then transferring the frequency to the active window. The COM frequency display window is
at the upper left corner of the transceiver display. Auto-tuning can be accomplished by entering a frequency from a menu. The COM 1 antenna is located above the cabin on the airplane centerline. The COM
2 antenna is located below the cabin on the airplane centerline. 28 VDC for transceiver operating is controlled through the Avionics Master Switch and supplied through the 7.5-amp COM1 and COM2 circuit
breaker on the Avionics Essential Bus.
2. MAINTENANCE PRACTICES
A. Garmin GNS 430 GPS/COM/NAV
The GNS 430 is an IFR certified VHF communications transceiver and Navigation Management System (NMS). The NMS includes GPS sensor, VOR/Localizer and Glideslope receivers. The GNS 430
includes two removable data cards, one with a Jeppesen data base, and second being a custom data
card. GPS signals are received by an internally mounted antennas. NAV/LOC/GS signals are received
by the VOR antenna. For installation and removal procedures refer to Position Determining. (Refer to
34-40)
13773-001
30 Nov 2000
23-10
Page 1
AUDIO INTEGRATING
1. DESCRIPTION
This section covers the portion of the system which controls the output of the communications and navigation receivers into the flight crew headphones and speakers, and the output of the flight crew microphones
into the communications transmitters. Included are the audio control panel, audio jacks, cockpit loud
speaker, and push-to-talk (PTT) switch.
The Audio Control Unit provides audio amplification, audio selection, marker beacon control, and a voice
activated intercom system for the cabin speaker, headsets, and microphones. The system allows audio
switching for up to three transceivers (COM 1, COM 2, and COM3) and five receivers (NAV 1, NAV2, ADF,
DME, and MKR). Push-buttons select the receiver audio source provided to the headphones. A fail-safe
mode connects the pilot headphone and microphone to COM 1 if power is removed or if the Mic Selector
switch is turned to the OFF position. The audio control unit is located on the center console, center-high.
Audio jacks are mounted on the center console. The pilot and co-pilot audio jacks are mounted inside the
center console arm rest, the passenger audio jacks are mounted on the top, rear of the center console.
Push-To-Talk (PTT) switches, mounted on the control yolks, allow the pilot and co-pilot to transmit over the
selected transceiver.
2. MAINTENANCE PRACTICES
A. Garmin GMA 340 Audio Control Unit (See Figure 23-501)
(1)
Removal - Garmin GMA 340 Audio Control Unit
CAUTION:
Ensure electrical power to airplane is off prior to performing maintenance.
(a)
(b)
(2)
(3)
Insert allen wrench into front panel bolt hole and engage allen bolt.
Turn locking screw counterclockwise to loosen locking cam. Cam will move the transceiver unit out 1/4” and disengage from the electrical connectors.
(c)
Pull audio control unit from mounting tray
Installation - Garmin GMA 340 Audio Control Unit
(a) With light to medium pressure, push audio control unit into mounting tray to engage electrical connectors.
(b) Insert allen wrench into front panel bolt hole and engage allen bolt.
(c)
Turn bolt clockwise to tighten locking cam.
Inspection/Check - Garmin GMA 340 Audio Control Unit
CAUTION:
13773-001
30 Nov 2000
Verify proper operation of marker beacon under VFR conditions.
(a)
After installing audio control unit conduct a performance flight test to ensure satisfactory
performance of audio and maker beacon receiver functions. Verify proper operation of the
maker lamps and marker audio including marker audio mute function. Check proper operation of the sensitivity selection (using the SENS button) by flying towards the outer
marker position initially using HI sensitivity. When OM audio is just barely audible, switching to LO sensitivity should reduce or eliminate the audio.
(b)
The following adjustments can be made via access holes in top cover of the audio panel:
1
Marker beacon audio level
Airplane radio speaker output level
2
3
Pilot PA microphone speaker output level
23-50
Page 1
4
5
Copilot PA microphone speaker output level
MUSIC1 mute trip level
B. Audio Jacks (See Figure 23-501)
(1)
(2)
(3)
(4)
Removal - Cockpit Audio Jacks
(a) Open center console armrest and remove glove box. (Refer to 25-10)
(b) Remove nut, shoulder washer, and nylon washer securing jack to console.
(c)
Disconnect audio harness leads from jack and remove from airplane.
Installation - Cockpit Audio Jacks
(a) Connect audio harness lead to jack and position in console.
(b) Install nut, shoulder washer, and nylon washer.
(c)
Insert glove box. (Refer to 25-10)
Removal - Passenger Seat Audio Jacks
(a) Remove aft console rear cover. (Refer to 25-10)
(b) Remove nut, shoulder washer, and nylon washer securing jack to console.
(c)
Disconnect audio harness leads from jack and remove from airplane.
Installation - Passenger Seat Audio Jacks
(a) Connect audio harness lead to jack and position in console.
(b) Install nut, shoulder washer, and nylon washer.
(c)
Install aft console rear cover. (Refer to 25-10)
C. Cabin Speaker (See Figure 23-501)
(1)
(2)
Removal - Cabin Speaker
(a) Remove cabin speaker grill from overhead console.
(b) Remove screws securing cabin speaker to headliner.
(c)
Disconnect cabin speaker electrical connector.
(d) Remove cabin speaker from airplane.
Installation - Cabin Speaker
(a) Connect cabin speaker electrical connector.
(b) Position speaker and install screws securing cabin speaker to headliner.
(c)
Verify cabin speaker operation.
(d) Install cabin speaker grill.
D. Push-to-Talk (PPT) Switch
The Push-to-Talk Switch is integral to the Yoke Grip Assembly. For maintenance practices pertinent to
the PPT Switch, see Flight Controls. (Refer to 27-10)
Page 2
23-50
13773-001
30 Nov 2000
Figure 23-501
Audio Integration
13773-001
30 Nov 2000
23-50
Page 3
CHAPTER
ELECTRICAL
POWER
CHAPTER 24 - ELECTRICAL POWER
LIST OF EFFECTIVE PAGES
Chapter/Section
Page
Date
24-LOEP
1
31 JULY 2001
24-TOC
1
30 NOV 2000
24-TOC
2
30 NOV 2000
24-00
1
30 NOV 2000
24-00
2
30 NOV 2000
24-00
3
30 NOV 2000
24-30
1
30 NOV 2000
24-30
2
30 NOV 2000
24-30
3
30 NOV 2000
24-30
4
30 NOV 2000
24-30
5
30 NOV 2000
24-30
6
30 NOV 2000
24-30
7
30 NOV 2000
24-30
8
30 NOV 2000
24-30
9
30 NOV 2000
24-30
10
30 NOV 2000
24-30
11
30 NOV 2000
24-30
12
30 NOV 2000
24-30
13
30 NOV 2000
24-30
14
30 NOV 2000
24-30
15
30 NOV 2000
24-30
16
30 NOV 2000
24-30
17
30 NOV 2000
24-30
18
30 NOV 2000
24-30
19
30 NOV 2000
24-30
20
30 NOV 2000
24-40
1
30 NOV 2000
24-40
2
30 NOV 2000
24-50
1
31 JULY 2001
24-50
2
30 NOV 2000
24-50
3
30 NOV 2000
24-50
4
30 NOV 2000
24-50
5
30 NOV 2000
13773-001
31 July 2001
24-LOEP
Page 1
CHAPTER 24 - ELECTRICAL POWER
TABLE OF CONTENTS
Subject
ELECTRICAL POWER
Chapter/Section
Page
24-00
General
1
Troubleshooting
1
DC GENERATION
24-30
Description
1
Alternator 1
Alternator 2
Master Control Unit (MCU)
Low Volts Warning Light
ALT 1 and ALT 2 Fail Lights
Volt and Ampere Meter
Ammeter Select Switch
Battery 1
Battery 2
Maintenance Practices
2
2
2
3
3
4
4
4
4
5
Alternator 1 (Forward Alternator)
Removal
Installation
Alternator 2 (Aft Alternator)
Removal
Installation
Master Control Unit (MCU)
Removal - MCU
Installation - MCU
Low-Volts Warning Light (Annunciator Panel)
Removal Installation ALT 1 and ALT 2 Fail Lights (Annunciator Panel)
Removal - ALT 1 and ALT 2 Fail Lights
Installation - ALT 1 and ALT 2 Fail Lights
Volt / Amp Meter
Removal - Volt / Amp Meter
Installation - Volt / Amp Meter
Ammeter Select Switch
Removal - Ammeter Select Switch
Installation - Ammeter Select Switch
Battery 1
Servicing - Electrolyte Replenishment
13773-001
30 Nov 2000
5
5
5
7
7
7
9
9
9
11
11
11
11
11
11
11
11
11
12
12
12
12
12
24-TOC
Page 1
CHAPTER 24 - ELECTRICAL POWER
TABLE OF CONTENTS
Subject
Chapter/Section
Removal - Battery 1
Installation - Battery 1
Adjustment/Test - Battery 1 Specific Gravity
Inspection/Check - Battery 1 Capacity
Battery Charging (Battery 1)
Battery 2
Removal - Battery 2
Installation - Battery 2
Top-charging (Battery 2)
EXTERNAL POWER
Page
14
15
15
16
16
18
18
18
18
24-40
Description
1
Maintenance Practices
1
External Power Receptacle
Removal - Refer to MCU removal.
Installation - Refer to MCU removal.
ELECTRICAL LOAD DISTRIBUTION
1
1
1
24-50
Description
1
Circuit Protection Devices
Switches
BAT & ALT Master Switches
Avionics Power Switch
Transmission Wire
Maintenance Practices
1
1
2
2
2
3
Circuit Breakers
Removal - Circuit Breakers
Installation - Circuit Breakers
Switches
Removal - Bolster Panel Switches
Installation - Bolster Panel Switches
Page 2
24-TOC
3
3
3
3
3
3
13773-001
30 Nov 2000
ELECTRICAL POWER
1. GENERAL
The information in this chapter covers DC Generation, External Power, and Electrical Load Distribution.
This airplane is equipped with a 28-volt direct-current (VDC) electrical system. Two alternators and two
batteries are used to ensure sufficient electrical power. Electrical power is supplied to the essential bus
from both batteries and both alternators. The electrical system provides automatic switching from either
battery or alternator to the essential bus in the event of an electrical system failure by the opposing alternator or battery. The electrical system provides uninterrupted power for avionics, flight instruments, lighting
and other electrically operated and controlled systems during normal operation.
The generation system consists of a 24-volt, 10-amp-hour battery, two 12-volt 7-amp-hour batteries (connected in series for 24-volts), 60-amp (rated at 58-amps) engine-driven alternator, 20-amp engine-driven
alternator, voltage regulator, and an over-voltage protection system. The bolster panel contains the pilot
switches for operating both batteries (BAT 1 and BAT 2) and both alternators (ALT 1 and ALT 2). The
switches are mounted adjoining so that a pilot can control all four switches with a single hand.
Power generated from the alternators is fed into the Master Control Unit (MCU). The MCU regulates and
distributes the power to the batteries and the system loads. Each alternator provides constant charging
current for its corresponding battery and primary power to the aircraft electrical system during normal system operation.
2. TROUBLESHOOTING
Troubleshooting Power Generation System
Trouble
Probable Cause
Loose alternator wire connection
No Alternator Output
(Voltmeter Indicates 24 VDC or
less and the ammeter indicates a Alternator switch off
discharge when the corresponding
Bat switch is in “on” position)
Defective alternator
Alternator output is low
No battery output
Tighten connector
Turn on corresponding alternator
switch
Replace alternator
Circuit breaker activated (open)
Faulty voltage regulator
Reset circuit breaker and troubleshoot circuit
Low engine RPM
Increase engine RPM
Loose alternator wire connection
Tighten corresponding connector
Faulty rectifier
Replace corresponding alternator
Faulty MCU
Replace MCU
Low engine RPM
Increase engine RPM
Poor battery connections
Clean and tighten connections
Failed battery
Replace corresponding battery
Battery water usage high (Battery Alternator output high, faulty volt1)
age regulator
13773-001
30 Nov 2000
Remedy
Replace MCU
24-00
Page 1
Troubleshooting Power Generation System
Trouble
Battery will not hold charge
Short battery life (Battery 1)
External Power Receptacle Inoperable
Low Volts Light Illuminates
Probable Cause
Remedy
Flights too short to recharge suffi- Remove corresponding battery
ciently
and recharge when necessary
Loose connections, corrosion
Tighten, clean, and neutralize connections
Faulty battery
Replace corresponding battery
Standing too long (hot climate)
Remove corresponding battery
and recharge when necessary
Electrolyte level below top of
plates
Keep electrolyte level above
plates
Battery hold down loose
Keep hold down secure at all
times
Overcharging of battery (faulty
voltage regulator)
Replace MCU
BAT 1 switch in “OFF” position
Place BAT 1 switch in “ON” position
Faulty ground wire/connection
Inspect and repair ground wire/
connection at receptacle or firewall ground bus bar
Faulty ground power relay
Replace MCU
High demand on electrical system Increase engine RPM or load shed
with a low engine RPM setting
Faulty logic module or current sen- Replace MCU
sor
Alternator is noisy
Page 2
24-00
Worn alternator bearings
Replace corresponding alternator
Faulty alternator diode(s)
Replace corresponding alternator
13773-001
30 Nov 2000
Figure 24-001
Electrical Power and Distribution
13773-001
30 Nov 2000
24-00
Page 3
DC GENERATION
1. DESCRIPTION
This section covers the systems to generate, regulate, control, and indicate DC electrical power. The DC
generation portion of the system includes the batteries, alternators (with internal rectifiers), and regulator.
Two batteries (battery 1 and battery 2) and two alternators (alternator 1 and alternator 2) are used in the
power generation system on this airplane. Both batteries are used for power storage. The two alternators
are very similar in design to each other.
The alternators and the batteries are designed to function in parallel or independently. Both alternators are
self-exciting which means the alternators become energized as soon as either battery switch is moved to
the “on” position. If an alternator becomes disconnected, the remaining alternator will still function properly,
as long as the opposing alternator received initial excitation. If the alternators were initially excited from the
batteries, they will continue to generate electrical power if either battery should fail. Because the alternators are self-exciting (not self-starting), the battery switches should never be turned off during flight.
CAUTION:
Never turn the battery switches off during normal flight.
During normal operation, the alternators feed their respective distribution bus independently (ALT 1 feeds
the main distribution bus and ALT 2 feeds the essential distribution bus). The distribution buses are interconnected by two 50-amp fuses and diodes. The diodes prevent ALT 2 from feeding the main distribution
bus. Additionally, since ALT 2 / essential bus voltage is slightly higher than ALT 1 / main distribution bus
voltage, ALT 1 will not feed the essential distribution bus unless ALT 2 fails.
The alternators are three-phase AC generator type; each alternator has an internal rectifier, which limits
current output to 28 VDC. Each alternator uses two diodes for each phase to rectify the output. In addition,
these diodes will block reverse current. If a single output diode were to fail, the winding junction will be held
to the output potential, reducing the quantity of current the alternator can produce.
The alternators are regulated by the MCU and power the MCU via 6 AWG tin plated copper wires. Alternator 1 is protected by an 80-amp fuse within the MCU while alternator 2 is protected by a 40-amp fuse within
the MCU. ALT 1 is connected to the main distribution bus and ALT 2 is connected to the essential distribution bus. Each alternator system has its own 5-amp alternator circuit breaker located in the circuit breaker
panel. Each alternator is individually protected against overvoltage generation by the voltage regulator,
located within the MCU. ALT 1 is regulated to 28 volts and ALT 2 is regulated to 28.75 volts.
Voltage output of each alternator is a function of engine RPM, alternator design, and load on the alternator.
During low RPM operation, the alternator will require higher engine RPM to provide the same voltage to
increased electrical loads. With nominal loads on the electrical system, alternator 2 will drop off at approximately 1700 - 2200 RPM and alternator 1 will drop off at approximately 600 - 900 RPM. Alternator 2 drops
off before alternator 1 because alternator 2 spins half as fast as alternator 1.
The drop off RPM for each alternator will change whenever the electrical system loads are altered from
nominal. Any time an alternator drops off line, it will be indicated by illumination of the corresponding ALT 1
or ALT 2 annunciators. If an alternator drops off line due to low engine RPM, the alternator(s) can be
restarted by simply increasing engine RPM. When alternator 2 drops off line, the ALT 2 annunciator will
illuminate and alternator 1 will provide electrical power to the entire electrical system, including charging
both batteries. When alternator 1 drops off line, the ALT 1 annunciator will illuminate and alternator 2 will
provide electrical power to only the essential bus and BAT 1 will provide power to the main bus. Alternator
2 will then allow continued operation of only the flight critical instruments and charging of battery 2.
13773-001
30 Nov 2000
24-30
Page 1
A. Alternator 1
The front alternator (alternator 1) is mounted directly to the front of the engine on the co-pilots’ side.
Alternator 1 is a 60-amp (rated at 58-amps) engine-driven alternator.
Alternator 1 is controlled by the ALT 1 master switch located in the bolster panel. Battery 1 and alternator 1 are independently controlled and can be alternately connected to main bus 2. Failure or malfunction of alternator 1 will not impair the capability of the main battery to provide power to main bus 2.
Failure or malfunction of either or both alternators will not impair the capability of either battery to
power the essential load circuits, because each of these power sources feed into the essential bus. If
either alternator is lost, the other alternator and both batteries are still capable of feeding the essential
bus. In addition, each alternator or battery can be manually disconnected by switching the appropriate
master bolster switch located on the pilot's bolster switch panel.
B. Alternator 2
The rear alternator (alternator 2) is mounted directly to the aft engine accessory pad which is located
at the rear of the engine. Alternator 2 supplies electrical power to the essential bus through a 5-amp
circuit breaker located in the circuit breaker panel.
Alternator 2 is controlled by the ALT 2 switch located in the bolster panel. If alternator 2 fails while in
operation, the essential bus will then get electrical power from alternator 1, battery 1, and/or battery 2.
Alternator 2 is a 20-amp engine-driven alternator.
C. Master Control Unit (MCU)
The MCU is an integrated component which ensures proper electrical output over the entire temperature and RPM range of the alternator system by regulating and distributing alternator output. The MCU
is mounted to the forward side of the firewall, on the pilot’s side. The MCU controls alternator 1, alternator 2, starter, landing light, external power, and the power generation system annunciation. The
MCU provides protection for external power reverse polarity and alternator 1 and alternator 2 overvoltage situations. The MCU also provides low voltage annunciation and an overload annunciation for ALT
1 and ALT 2 fail annunciators in the instrument panel.
The bus structure of the MCU and the circuit breaker panel allows all power devices to feed into the
Essential Bus during emergencies. This action is automatic and does not require pilot intervention. The
Main and Essential Busses are separated via diodes which allow the main bus to feed into the Essential Bus during failures of Alternator 2 or Battery 2. The MCU regulates Alternator 1 to 28 VDC, while
Alternator 2 is regulated to 28.75 VDC which ensures the diode separates the busses during normal
operation.
The MCU used on this airplane contains a landing light relay, battery relay, ground power relay, starter
relay, ammeter transducer, 15-amp landing light circuit breaker, two buses (one essential and one nonessential), two voltage regulators, three current sensors, and five 25-amp distribution feeder circuit
breakers.
The pilot has access to the alternator circuit breakers, which are located in the circuit breaker panel,
during flight. If the system is generating more than 31.75 ± 0.25 V, the corresponding alternator circuit
breaker will open, preventing further power generation by that alternator.
The MCU contains a current sensor in the battery bus, this current sensor sends a signal to the ammeter (battery charge or discharge). The ammeter will only indicate a discharge when the ammeter select
switch is in the BATT position and the electrical draw on the system exceeds the quantity of power
generated by the system. Diodes in the alternators block reverse current making negative current indication unnecessary. The current value displayed by the ammeter corresponds directly to the quantity
of power generated by the alternator system. When the ammeter select switch is in the ALT 1 or ALT 2
position, the ammeter drives will only allow the ammeter to display a positive current value because of
the diodes within the alternator block.
Page 2
24-30
13773-001
30 Nov 2000
The master switch arrangement, located in the pilot's bolster contains battery 1, battery 2, alternator 1,
and alternator 2 control switches. Each switch disconnects the associated device from the corresponding bus. The switches are located in a side-by-side arrangement and are labeled as to their function.
The BAT 2 switch, when closed, connects battery 2 to the essential bus. This switch activates a relay
located next to BAT 2, providing the ability to connect and disconnect battery 2 from the aircraft.
Buses in the MCU are designed to ensure essential flight and avionics systems remain powered during a malfunction of any one of the buses. Five bus wires run from the MCU, through the firewall, and
to the circuit breaker panel. Five bus wires in the MCU are overload protected by fuses and circuit
breakers. Five buses are used to power the majority of the aircraft loads. These five buses supply
power to the circuit breaker panel. The second bus is for the landing light. The fifth is the clock bus
which is fused at 5 amperes and is the only bus powered directly from battery 1 and is not controlled by
the master switch arrangement. The clock bus fuse is externally removable for long term storage situations to prevent battery drain.
Alternator power flows from the alternators into the MCU. Inside the MCU is where the voltage regulator regulates the alternators output. Each voltage regulator provides transient suppression and constant voltage regulation of the unfiltered alternator power. To protect sensitive instruments, the overvoltage protection system monitors the primary power bus and automatically limits the peak voltage to
approximately 31.75 volts. During sustained over-voltage periods, the over-voltage system provides a
warning to the pilot. Each voltage regulator will cause the corresponding alternator circuit breaker to
open in cases of field output overloads, and overvoltage. In the event an over-voltage condition
occurs, the corresponding voltage regulator automatically removes alternator field current to shut
down the corresponding alternator. Each voltage regulator has been integrated into the MCU case, for
durability and reliability.
D. Low Volts Warning Light
The airplane is equipped with a red LOW VOLTS warning light in the annunciator panel, located on the
left side of the instrument panel. The voltage regulator within the MCU operates the red LOW VOLTS
warning light. If Essential Bus voltage drops to approximately 24.5 volts, the LOW VOLTS warning light
will illuminate red. The LOW VOLTS annunciator will illuminate regardless of how many or what types
of power sources are connected.
Resetting the ALT 1 and ALT 2 switches (from off and back on again) may reset the voltage regulator.
If the warning light does not illuminate again, normal alternator charging has resumed. If the light illuminates again, a malfunction has occurred.
Illumination of the LOW VOLTS warning light along with ammeter discharge indications may occur during low RPM conditions with an electrical load on the system, such as during a low RPM taxi. Under
these conditions, the light will go out at higher RPM. The battery switches will not need to be recycled
since an over-voltage condition has not occurred to de-activate the alternator system.
E. ALT 1 and ALT 2 Fail Lights
Two amber colored alternator fail lights are located in the annunciator panel. The lights provide warning of a overloaded or inoperative alternator. In conjunction with the red LOW VOLTS warning light, the
MCU controls the illumination of the appropriate alternator fail light (ALT 1 or ALT 2), notifying the pilot
of the system at fault.
If either alternator generates less than 2 amps (approximately), the corresponding annunciator light
will illuminate steady. If either alternator becomes overloaded, the corresponding annunciator light will
flash approximately 40 times per minute.
13773-001
30 Nov 2000
24-30
Page 3
F.
Volt and Ampere Meter
A combination Volt and Ampere meter is mounted on the right instrument panel immediately outboard
of the oil temperature and pressure gage. The AMP pointer sweeps a scale from -60 to +60 amps with
zero at the 9 o'clock position. The ammeter will indicate the current generation provided by Alternator
1, Alternator 2, and the charge or discharge status of battery 1.
The VOLT pointer sweeps a scale from 16 to 32 volts. The voltage indication for the Volt / Ampere
Meter is measured off the annunciator circuit breaker which is on the Essential Bus. The voltage
required to operate the internal meter lighting is supplied through the 2-amp instrument lights circuit
breaker which is on Main Bus 1. Main Bus voltage (measured at the engine instrument circuit breaker)
is displayed on the clock voltmeter for reference.
G. Ammeter Select Switch
An ammeter select switch is located on the right instrument panel and is labeled distinctly. The ammeter select switch controls which output reading the ammeter will display the voltage from ALT 1, ALT 2
or the BAT 1 or BAT 2. The ammeter will also display the state of charge or discharge either battery is
in. The amps indication is derived from a current transducer located in the electrical system MCU.
When the engine is operating and the BAT 1 switch is turned on, the ammeter indicates the charging
rate applied to battery 1. Due to the inability of the alternators to dissipate current, the alternator
ammeter indications are positive only.
H. Battery 1
Battery 1 is a 24-volt, 12-cell,10-ampere hour, lead-acid aviation-grade type battery with non-spill vent
caps. The battery is mounted in the engine compartment and has a top vent with an acid-resistant
tube. The tube discharges out the bottom of the engine cowling, preventing the build up of dangerous
or explosive gasses within the engine cowl.
The battery is used for engine starting and can also be used as an emergency power source in the
event Battery 2 fails or in the event of either alternator failure. Battery 1 provides all the electrical
power for starting the aircraft. Battery 1 also supplies the electrical power to the landing light in the
event Alternator 1 fails. Battery 1 is independently controlled by the BAT 1 switch, located in the pilot’s
bolster panel. The BAT 1 switch energizes a relay in the MCU which will connect BAT 1 to the Main
Distribution Bus.
I.
Battery 2
Battery 2 consists of two 12-volt, 6-cell, 7-amp-hour batteries connected in series to provide 28-VDC to
the Essential Bus. Battery 2 is independently controlled by using the BAT 2 switch, located in the pilot’s
bolster panel. The BAT 2 switch energizes a relay located just aft of bulkhead 222 in the MCU which
will connect BAT 2 to the Essential Bus. The electrical power from BAT 2 reaches the Essential Bus
through the circuit breaker panel. Battery 2 is mounted directly behind bulkhead 222 in an acid resistant battery container.
Battery 2 is primarily used to power the Essential Bus. The Essential Bus delivers electrical power to
the annunciator lights, turn coordinator, attitude indicator, horizontal situation indicator (HSI), stall
warning system, and alternator 2.
Failure of the BAT 1 will not affect the ability of BAT 2 to provide necessary power to the Essential Bus.
Because of diode protection, a failure or malfunction of the BAT 1 will not affect BAT 2 or either alternator output.
Note:
Page 4
Prior to engine start-up, the pilot must activate only the BAT 2 switch to verify that BAT 2
properly energizes the electrical loads powered by the Essential Bus and that BAT 2 has
proper voltage. The voltage reading must be taken from the combination Volt and
Ampere meter mounted on the right instrument panel.
24-30
13773-001
30 Nov 2000
2. MAINTENANCE PRACTICES
A. Alternator 1 (Forward Alternator)
(1)
(2)
13773-001
30 Nov 2000
Removal
(a) Verify ignition switch is in the off position and remove the key. (Refer to POH)
(b) Ensure BAT 1, BAT 2 and AVIONICS master switches are in the off position.
(c)
Remove engine cowling. (Refer to 71-10)
(d) Disconnect battery and insulate battery terminals to prevent accidental connection. (Refer
to 24-30)
(e) Identify each wire from the alternator terminals and disconnect.
(f)
Remove alternator mounting nuts, washers, lockwashers, and remove the alternator.
Installation
(a) Place alternator and a new gasket into position and secure it using the existing washers,
lockwashers, and nuts.
(b) Connect the alternator wires to the appropriate terminal.
(c)
Connect battery.(Refer to 24-30)
(d) Install engine cowling. (Refer to 71-10)
24-30
Page 5
Figure 24-301
Alternator One (Forward Alternator)
Page 6
24-30
13773-001
30 Nov 2000
B. Alternator 2 (Aft Alternator)
(1)
(2)
13773-001
30 Nov 2000
Removal
(a) Verify ignition switch is in the off position and remove the key. (Refer to POH)
(b) Ensure BAT 1, BAT 2 and AVIONICS master switches are in the off position.
(c)
Remove engine cowling. (Refer to 71-10)
(d) Disconnect battery and insulate battery terminals to prevent accidental connection. (Refer
to 24-30)
(e) Identify each wire from the alternator terminals and disconnect.
(f)
Remove the alternator mounting nuts and washers. Remove alternator 2 from the engine.
Installation
(a) Place alternator and a new gasket into position and loosely secure using the existing
washers, lockwashers, and nuts.
(b) Secure alternator mounting hardware.
(c)
Connect the alternator wires to the appropriate terminal.
(d) Connect battery.(Refer to 24-30)
(e) Install engine cowling. (Refer to 71-10)
24-30
Page 7
Figure 24-302
Alternator 2 (Aft alternator)
Page 8
24-30
13773-001
30 Nov 2000
C. Master Control Unit (MCU)
(1)
(2)
13773-001
30 Nov 2000
Removal - MCU
(a) Verify the ignition switch is in the off position and remove the key. (Refer to POH)
(b) Ensure BAT 1, BAT 2, and AVIONICS master switches are in the off position.
(c)
Remove the engine cowling. (Refer to 71-10)
(d) Disconnect battery and insulate battery terminals to prevent accidental connection. (Refer
to 24-30)
(e) Identify and disconnect all wires from the MCU.
(f)
Remove the mounting hardware securing the MCU to the firewall.
Installation - MCU
(a) Secure the MCU to the firewall using the existing mounting hardware.
(b) Identify and connect all wires to the MCU.
(c)
Connect the battery. (Refer to 24-30)
(d) Install the engine cowling. (Refer to 71-10)
24-30
Page 9
Figure 24-303
Master Control Unit (MCU)
Page 10
24-30
13773-001
30 Nov 2000
D. Low-Volts Warning Light (Annunciator Panel)
(1)
(2)
Removal - (Refer to 31-50)
Installation - (Refer to 31-50)
E. ALT 1 and ALT 2 Fail Lights (Annunciator Panel)
(1)
(2)
F.
Removal - ALT 1 and ALT 2 Fail Lights
(a) Verify the ignition switch is in the off position and remove the key. (Refer to POH)
(b) Ensure BAT 1, BAT 2, and AVIONICS master switches are in the off position.
(c)
Pull BAT 2 circuit breaker to the off position.
(d) Remove the engine cowling. (Refer to 71-10)
(e) Disconnect primary battery and insulate battery terminals to prevent accidental connection. (Refer to 24-30)
(f)
Remove the MFD.
(g) Identify the location of the ALT 1 and ALT 2 Fail Lights.
(h) Identify all wires to the ALT 1 and ALT 2 Fail Lights wire harness.
(i)
Remove the nut rings securing the ALT 1 and ALT 2 Fail Lights to the instrument panel.
(j)
Identify and disconnect all wires from the solder joints of the ALT 1 and ALT 2 Fail Lights
wire harness. Remove the lights.
Installation - ALT 1 and ALT 2 Fail Lights
(a) Identify the corresponding wires and place heat shrink tubing into position.
(b) Identify, connect and solder all wires to the ALT 1 and ALT 2 Fail Lights wire harness.
(c)
Secure the ALT 1 and ALT 2 Fail Lights to the appropriate hole in the instrument panel
using the existing nut rings.
(d) Install MFD.
(e) Connect the primary battery.
(f)
Install and secure the engine cowling.
Volt / Amp Meter
(1)
(2)
13773-001
30 Nov 2000
Removal - Volt / Amp Meter
(a) Verify the ignition switch is in the off position and remove the key. (Refer to POH)
(b) Ensure BAT 1, BAT 2, and AVIONICS master switches are in the off position.
(c)
Pull BAT 2 circuit breaker to the off position.
(d) Remove the engine cowling. (Refer to 71-10)
(e) Disconnect primary battery and insulate battery terminals to prevent accidental connection. (Refer to 24-30)
(f)
Remove the MFD.
(g) Remove the screws and washers securing the Volt / Amp Meter to the instrument panel.
(h) Identify and disconnect all wires from the Volt / Amp Meter.
(i)
Remove the Volt / Amp Meter.
Installation - Volt / Amp Meter
(a) Identify and connect all wires to the Volt / Amp Meter.
(b) Secure the Volt / Amp Meter to instrument panel using the existing screws and washers.
(c)
Install MFD.
(d) Connect the primary battery.
(e) Install and secure the engine cowling.
24-30
Page 11
G. Ammeter Select Switch
(1)
(2)
Removal - Ammeter Select Switch
(a) Verify the ignition switch is in the off position and remove the key. (Refer to POH)
(b) Ensure BAT 1, BAT 2, and AVIONICS master switches are in the off position.
(c)
Pull BAT 2 circuit breaker to the off position.
(d) Remove the engine cowling. (Refer to 71-10)
(e) Disconnect primary battery and insulate battery terminals to prevent accidental connection. (Refer to 24-30)
(f)
Remove the MFD.
(g) Remove the screws and washers securing the Low-Volts annunciator to the instrument
panel.
(h) Identify and disconnect all wires from the Low-Volts annunciator and the select switch.
(i)
Remove the nut and washer securing the Ammeter Select Switch to the instrument panel.
Remove the Low-Volts annunciator and the Ammeter Select Switch from the instrument
panel.
(j)
To disconnect the switch, use a solder gun and remove the solder from each terminal.
Installation - Ammeter Select Switch
(a) Identify the corresponding wires and place heat shrink tubing into position. Solder all wires
to the corresponding terminal on the select switch.
(b) Secure the Low-Volts annunciator to the instrument panel using the existing screws and
washers.
(c)
Place the Ammeter Select Switch into position and secure it with the existing washer and
nut.
(d) Install MFD.
(e) Connect the primary battery.
(f)
Install and secure the engine cowling.
H. Battery 1
(1)
Servicing - Electrolyte Replenishment
Prior to servicing, visually inspect the battery, container, cover, and connections for distortion or
damage. Electrolyte is stored in the primary battery case. Electrolyte is a diluted solution of sulfuric acid and distilled water with a specific gravity of 1.285. Pure distilled water has a specific
gravity of 1.000 and concentrated sulfuric acid has a specific gravity of 1.835.
To minimize battery discharge during storage or low usage of the airplane, the battery should be
disconnected. If all switches are turned to the off position, the only electrical drain connected
directly to the primary battery will be the clock. Removing the external 5-amp fuse from the MCU
will prevent the clock from draining the battery.
WARNING:
Page 12
24-30
Always wear a face shield and remove all jewelry before servicing the battery. Metal objects may fuse to electrical connections and cause severe
burns. Acid should never be added unless the electrolyte has been lost by
spillage, because the acid does not evaporate. When it is necessary to add
acid, the battery should be fully charged, on charge and gassing freely. Specific gravity then may be adjusted by adding acid or distilled water, or drawing off electrolyte.
13773-001
30 Nov 2000
Note:
(a)
The battery should be removed from the airplane prior to inspection. The battery
box should be washed out thoroughly and dried each time the battery is removed.
The battery vent hose should be inspected periodically for any damage, kinks or
obstructions. If adding distilled water in freezing weather, charge battery long
enough to mix electrolyte and water. Never use a wire brush to clean the battery;
instead use a brush with non-conductive bristles.
Acquire necessary tools and equipment.
Description
(b)
Purpose
-
Any Source
Measure specific gravity
Acid Resistant Brush
(Nonmetallic)
-
Any Source
Remove corrosion
Petroleum Jelly
(W-P-236)
Any Source
Retard corrosion
Cotton cloth (clean and
lint free)
-
Any Source
Wipe components clean
Distilled Water
-
Any Source
Replenish battery fluid level
Small Plastic Syringe
-
Any Source
Add fluid to battery cells
Bicarbonate Of Soda
(Baking Soda)
-
Any Source
Neutralize Electrolyte
Rubber Apron And Gloves -
Any Source
Prevent Electrolyte Exposure
Face Shield And Goggles -
Any Source
Prevent Electrolyte Exposure
Remove the battery. (Refer to 24-30)
To prevent contamination from one cell to the other, immediately reinstall
cell caps into their original location after testing the specific gravity.
Remove the battery cell covers and check the specific gravity of each cell. The electrolyte
should have a specific gravity of 1.225 or above to avoid freezing. If the level is too low for
accurate hydrometer readings, add just enough distilled water to cover the plates and
charge the battery to mix the electrolyte. Continue charging until the voltage and specific
gravity readings are constant over three readings taken at 1/2 hour intervals.
Note:
13773-001
30 Nov 2000
Supplier
Hydrometer
CAUTION:
(c)
P/N or Spec.
Adjust the level of electrolyte at the end of the charge, because the level will
rise from acid coming back into the electrolyte mix, normal gassing, and
expansion from the temperature rise. When adding distilled water to the
battery, the electrolyte should just touch or be slightly short of the eyelet
(level indicator) when the battery is warm and in a good state of charge. As
an example, this condition would exist just after a bench charge or when the
aircraft has just returned from a flight of ninety minutes or more.
24-30
Page 13
(d)
Inspect the battery box for corrosion and spilled electrolyte. If the battery box, battery
cables, or battery terminals need to be cleaned, use a solution of bicarbonate of soda and
clean fresh water. Do not allow bicarbonate of soda to enter the battery cells.
CAUTION:
(2)
When cleaning a battery, never allow bicarbonate of soda to enter the battery cells or permanent battery damage will result.
(e) Rinse the battery with clean fresh water and wipe clean with a dry cloth.
(f)
Check battery vent for any obstructions.
(g) Install the battery. (Refer to 24-30)
Removal - Battery 1
WARNING:
All electrical circuits must be off, prior to disconnecting battery cables.
Always remove the negative battery cable first, then remove the positive
cable and insulate both cable ends to prevent accidental reconnection. After
insulating cable ends and battery terminals, disconnect the battery vent
tube. Always wear a face shield and remove all jewelry before servicing the
battery. Metal objects may fuse to electrical connections and cause severe
burns.
Because acid does not evaporate, acid should never be added unless the
electrolyte has been lost by spillage. When it is necessary to add acid, the
battery should be fully charged, on charge, and gassing freely. Specific
gravity then may be adjusted by adding acid or distilled water, or drawing
off electrolyte.
Note:
(a)
(b)
(c)
(d)
The battery should be removed from the airplane prior to inspection. The battery
box should be washed out thoroughly and dried each time the battery is removed.
The battery vent hose should be inspected periodically for obstructions. If adding
distilled water in freezing weather, charge battery long enough to mix electrolyte
and water. Use a bristle brush to clean the battery.
Verify Start/Ignition Key Switch is in “OFF” position and remove key. (Refer to POH)
Ensure BAT 1, BAT 2, and AVIONICS master switches are in the off position.
Pull BAT 2 circuit breaker to the off position.
Remove the upper engine cowling. (Refer to 71-10).
CAUTION:
(e)
(f)
(g)
(h)
(i)
Page 14
After battery disconnection, insulate battery terminals to prevent accidental
connection.
Remove the negative battery cable first and then the positive battery cable.
Insulate battery terminals. (Refer to 24-30)
Remove the battery vent hose.
Remove cotter pins from the hold-down bolts.
Remove the battery hold-down bracket, and remove the battery from the airplane.
24-30
13773-001
30 Nov 2000
(3)
Installation - Battery 1
(a)
Acquire necessary tools, equipment, and supplies.
Description
(b)
(c)
(d)
(e)
P/N or Spec.
Supplier
Purpose
Contact Cleaner
-
Any Source
Clean terminals
Non-conductive Bristle
Brush
-
Any Source
Clean terminals
Petroleum Jelly
W-P-236
Any Source
Prevent corrosion
Examine battery contacts. Any dirt or corrosion should be gently removed using electrical
contact cleaner and a stiff brush.
Install battery into battery hold-down bracket and secure the bracket.
Using new cotter pins, secure the battery hold-down bracket wing nuts.
Inspect battery vent hose for damage, kinks or obstructions. Connect battery vent hose.
CAUTION:
Connecting cables in reverse (positive to negative and negative to positive)
can cause serious damage to the electrical system. Connect the negative
cable last.
(f)
(4)
Connect the battery cables to the proper terminals: positive cable to the positive terminal
(+) and negative cable to the negative terminal (-). Connect the negative cable last.
(g) After tightening battery terminals, coat them with petroleum jelly (W-P-236) to retard corrosion.
(h) Install the engine cowling. (Refer to 71-10)
(i)
Verify complete electrical system is fully operable.
Adjustment/Test - Battery 1 Specific Gravity
The most common instrument used for testing vented lead-acid batteries is the hydrometer. The
specific gravity of the electrolyte in a battery cell is a good index to the state of charge in the cell,
due to the fact that as the battery is discharged, the acid in the electrolyte is used up. That is, the
acid has broken down, part of it combining with the lead of the plates to form lead sulfate, and
part combining with oxygen to form water. It must be pointed out that the specific gravity reading
is not always an indication of the state of charge in a cell. If the electrolyte is removed from a discharged cell and replaced with an electrolyte of high specific gravity, the cell will still be in a discharged condition even though the hydrometer test shows a full charge reading.
(a)
Acquire necessary tools, equipment, and supplies.
Description
Hydrometer/Thermometer
(b)
(c)
(d)
13773-001
30 Nov 2000
P/N or Spec.
FR-1
Supplier
Purpose
Teledyne Continental
Test battery condition
Remove battery. (Refer to 24-30)
Clean exterior case of battery with clean fresh water.
Remove each cell cap and draw electrolyte into the hydrometer. This will test the specific
gravity of electrolyte. After the specific gravity reading is taken, the electrolyte must be
24-30
Page 15
returned to the same cell from which it was taken. The electrolyte should have a specific
gravity of 1.225 or above to avoid freezing.
(e)
CAUTION:
To prevent contamination from one cell to the other, immediately reinstall
cell caps into their original location after testing the specific gravity.
Note:
If the level is too low for accurate hydrometer readings, add just enough distilled water to cover the plates and charge the battery to mix the electrolyte.
Record specific gravity of electrolyte drawn, then return electrolyte to the cell from which it
was taken.
Note:
(5)
A specific gravity reading from 1.285 to 1.295 usually indicates a fully
charged cell. If the reading is from 1.220 to 1.260, the charge is considered
low. It is necessary to take temperature into consideration because specific
gravity readings shown on the hydrometer will vary from true specific gravity
as the temperature goes above or below 80° F (26.70° C). The standard
temperature used in rating lead acid battery performance is 77° F (25°C).
Inspection/Check - Battery 1 Capacity
Note:
(a)
A fully charged battery is considered serviceable if it meets 80% of the 30 minute
emergency capacity rating.
Acquire necessary tools, equipment, and supplies.
Description
Battery/alternator Load
Tester
(b)
EECS300A
Supplier
Snap-on
Purpose
Test battery condition
Perform load test as instructed by the manufacture of the load tester.
Note:
(6)
P/N or Spec.
Replace the battery if it fails to meet manufactures requirement.
Battery Charging (Battery 1)
When the airplane isn’t being used, the battery may become discharged to a point in which the
battery will need to be recharged. When charging the battery, use a constant-voltage charger.
WARNING:
Charging batteries in an airplane or within 10 feet of a fuel servicing area is
prohibited by the National Electric Code. To prevent contamination from one
cell to the other, always reinstall cell caps into their original location.
When working with acid such as filling batteries, wear splash proof goggles
and protective clothing. Use extreme care to avoid spilling or splashing
electrolyte (which is diluted sulfuric acid) as it can destroy clothing and
burn the skin. When handling a plastic cased battery, excessive pressure
placed on the end walls could cause electrolyte to spew through the vents.
Therefore, always use the battery lifting strap or lift it with hands placed at
opposite corners. If electrolyte is spilled or splashed on clothing or the
body, it should be neutralized immediately with a solution of baking soda
and water and then rinsed with clean water.
Page 16
24-30
13773-001
30 Nov 2000
If it is necessary to prepare electrolyte to 1.285 specific gravity from concentrated sulfuric acid, always pour the acid into the water, not the water
into the acid. Use non-metallic receptacles and/or funnels except for lead or
lead-lined containers. While charging Battery 1, the battery cell caps must
be installed.
Electrolyte splashed into the eyes is extremely dangerous. If this should
happen, force the eye open and flood it with cool, clean water for approximately five minutes. A physician should be called immediately when an
accident occurs, and “on-the-spot” medical attention given if possible. If a
physician cannot come to the scene of the accident immediately, follow the
physician’s instructions concerning actions to take. Do not add eye drops
or other medication unless advised to do so by the physician. If acid (electrolyte) is taken internally drink large quantities of water or milk. Follow with
milk of magnesia, beaten egg, or vegetable oil. Call a physician immediately.
CAUTION:
(a)
If electrolyte is spilled or splashed on any surface of the aircraft, it should be neutralized with baking soda solution and rinsed with clean water. Do not store acid in
excessively warm locations or in direct sunlight.
Acquire necessary tools, equipment, and supplies.
Description
P/N or Spec.
Battery Charger (constant- 24 Volt
voltage)
(b)
(c)
(d)
13773-001
30 Nov 2000
To prevent contamination from one cell to the other, immediately reinstall
cell caps into their original location after testing the specific gravity. While
charging Battery 1, the battery cell caps must be installed.
The electrolyte should have a specific gravity of 1.225 or above to avoid
freezing. If level is too low for accurate hydrometer readings, add just
enough distilled water to cover plates and charge battery to mix electrolyte.
With the battery cell caps installed and the charger turned off, connect the battery charger
leads to the proper terminals: positive cable to the positive terminal (+) and negative cable
to the negative terminal (-). Connect the negative cable last.
Note:
(g)
Charge Battery 1
Remove the battery cell covers and check the specific gravity of each cell. (Refer to 24-30)
Note:
(f)
Any Source
Purpose
Verify the ignition switch is in the off position and remove the key. (Refer to POH)
Ensure BAT 1, BAT 2, and AVIONICS master switches are in the off position.
Remove battery. (Refer to 24-30)
CAUTION:
(e)
Supplier
The battery should be initially charged at 3 amps until the cells are gassing,
then reduce the rate to 1.5 amps. It will take approximately 18 to 24 hours to
fully charge the battery. During the period of charging, electrolyte temperature should be maintained between 60 - 110°F.
Turn on battery charger (at 3-amp setting) and allow the battery to charge until the cells
are gassing. Once the cells start gassing, reduce the rate of charge to 1.5 amps.
24-30
Page 17
(h)
Continue charging until the voltage and specific gravity readings are constant over three
readings taken at 1/2-hour intervals.
CAUTION:
(i)
(j)
(k)
(l)
I.
To prevent contamination from one cell to the other, immediately reinstall
cell caps into their original location after testing the specific gravity.
Turn off and unplug the battery charger.
Disconnect negative battery charger lead first and then disconnect positive battery
charger lead.
Rinse the battery off with clean fresh water.
Install battery into airplane. (Refer to 24-30)
Battery 2
Battery 2 is a maintenance free rechargeable sealed lead acid battery. Battery 2 is comprised of two
12-volt, 6-cell, 7-amp-hour batteries (connected in series for 24-volts). Battery 2 is located just aft of
bulkhead / Fuselage Station 222 (FS 222.0) and is mounted in an acid resistant container.
There is no need to check the specific gravity of the electrolyte or add water to these batteries during
their service life. In fact, there is no provision for this type of maintenance.
The battery will discharge at approximately 3% per month when storage temperature is maintained at
68° F (20° C). Self-discharge rate will vary with storage temperature and the remaining capacity. If the
battery is going to be stored for extended periods of time, the battery should be top-charged periodically.
(1)
Removal - Battery 2
CAUTION:
(a)
(b)
(c)
(d)
(e)
(f)
Ensure electrical power to airplane is off prior to performing maintenance.
Remove the carpet from bulkhead 222.
Remove access panel from bulkhead 222.
Disconnect electrical connector and vent hose from battery tray.
Remove the four screws securing battery 2 to the standoffs.
Remove battery tray from the airplane.
Remove the remaining screws and each battery from the battery tray.
CAUTION:
(2)
(3)
Page 18
Do not use abrasive cleaners or materials to clean battery contacts.
(g) Examine battery contacts for dirt or corrosion, clean or replace contacts as necessary.
Installation - Battery 2
(a) Install the battery into the battery mounting tray.
(b) Secure battery to mounting tray using the existing mounting hardware.
(c)
Verify correct battery voltage and terminal location to ensure batteries have correct voltage and that they have been installed correctly.
Top-charging (Battery 2)
When the airplane isn’t being used, battery 2 may become discharged to a point in which the
battery will need to be top-charged. When top-charging battery, use a constant-voltage charger.
Cirrus Design recommends constant-voltage charging because this is the most suitable and
most commonly used method to charge maintenance free sealed lead acid batteries. Battery 2
should be charged at a rate of 2.35 to 2.47 volts per cell (each battery has 6-cells). In higher
temperature areas, the battery should be charged at the lower voltage (2.35 volts per cell).
24-30
13773-001
30 Nov 2000
WARNING:
Charging batteries in an airplane or within 10 feet of a fuel servicing area is
prohibited by the National Electric Code.
If battery 2 becomes damaged and electrolyte is spilled or splashed on
clothing or the body, it should be neutralized immediately with a solution of
baking soda and water and then rinsed with clean water.
Electrolyte splashed into the eyes is extremely dangerous. If this should
happen, force the eye open and flood it with cool, clean water for approximately five minutes. A physician should be called immediately when an
accident occurs, and “on-the-spot” medical attention given if possible. If a
physician cannot come to the scene of the accident immediately, follow the
physician’s instructions concerning actions to take. Do not add eye drops
or other medication unless advised to do so by the physician. If acid (electrolyte) is taken internally drink large quantities of water or milk. Follow with
milk of magnesia, beaten egg, or vegetable oil. Call a physician immediately.
CAUTION:
If battery 2 becomes damaged and electrolyte is spilled or splashed on any surface of the aircraft, it should be neutralized with baking soda solution and rinsed
with clean water.
Note:
Electrical power will be supplied to BAT 2 if electrical power is applied to the external power receptacle while BAT 1 and BAT 2 switches are in the on position.
(a)
Acquire necessary tools, equipment, and supplies.
Description
P/N or Spec.
Battery Charger (constant- 24 Volt
voltage)
(b)
(c)
(d)
(e)
13773-001
30 Nov 2000
Purpose
Any Source
Charge Battery 2
Verify the ignition switch is in the off position and remove the key. (Refer to POH)
Ensure BAT 1, BAT 2, and master switches are in the off position.
Remove battery 2. (Refer to 24-30)
With the battery charger turned off, connect the battery charger leads to the proper terminals: positive cable to the positive terminal (+) and negative cable to the negative terminal
(-). Connect the negative cable last.
CAUTION:
(f)
(g)
(h)
Supplier
Operate battery charger per manufacture’s instructions.
Turn off and unplug the battery charger after the battery has been fully charged.
Disconnect negative battery charger lead first and then positive battery charger lead.
Install battery into airplane. (Refer to 24-30)
24-30
Page 19
Figure 24-304
Battery 2
Page 20
24-30
13773-001
30 Nov 2000
EXTERNAL POWER
1. DESCRIPTION
The external power connector is mounted on the Master Control Unit (MCU). The MCU is mounted on
the left side of the fuselage, just forward of the firewall. The receptacle is comprised of a three-contact
connector. The long contacts are used for transferring power. The shorter, third connector, engages
the external power relay located in the MCU, which connects the external power to the Main Distribution Bus. By making this contact shorter, power will not be transferred until a reliable connection is
made between the jack and plug, thereby reducing the chance of arcing or sparking. In addition, the
signal power to the relay contains an isolation diode to prevent reverse polarity. If reverse polarity is
applied to the external power connector, the relay will not engage, preventing connection of the external source to the primary bus.
The external power receptacle is installed to permit the use of an external power source for cold
weather starting and maintenance procedures requiring reliable power for an extended period. The
external power source must be regulated to 28 VDC. The external power control contactor is wired
through the BAT 1 switch so that the BAT 1 switch must be on to apply external power.
2. MAINTENANCE PRACTICES
A. External Power Receptacle
Because the external power receptacle is part of the MCU, the MCU must be replaced if the receptacle
were to fail.
(1)
(2)
13773-001
30 Nov 2000
Removal - Refer to MCU removal. (Refer to 24-30)
Installation - Refer to MCU removal. (Refer to 24-30)
24-40
Page 1
Figure 24-401
External Power Receptacle
Page 2
24-40
13773-001
30 Nov 2000
ELECTRICAL LOAD DISTRIBUTION
1. DESCRIPTION
The power distribution system for this airplane consists of the main distribution bus and the essential distribution bus in the MCU along with the associated buses in the circuit breaker panel and their associated circuit breakers and switches. Each bus and circuit are labeled on the circuit breaker panel. The clock bus is
fused within the MCU and is the only bus not connected to the master switch arrangement. The clock is
continuously powered through a 5-amp fuse connected to the primary bus in the MCU.
This airplane has four ways of obtaining electrical power for the essential bus. The essential bus can
obtain electrical power from BAT 1, BAT 2, ALT 1, or ALT 2. In an emergency, as long as one of the four
power sources remain functional, the essential bus will continue to supply electrical power to all of the flight
critical instruments. The essential power bus normally receives electrical power from the ALT 2 and BAT 2
electrical systems.
The main power bus receives power from the BAT 1 system (ALT 1 and/or BAT 1). The main power bus
provides power to the essential and nonessential power buses through a network of bus fuses or bus circuit breakers.
For normal operation, the Essential Buses in the circuit breaker panel are powered from the essential distribution bus in the MCU through 25-amp circuit breakers. BAT 2 is connected directly to the Essential Bus
in the circuit breaker panel and will power the bus should the voltage coming from the MCU distribution
buses drop below the battery voltage. Additionally, in the event of an ALT 2 failure, the circuit breaker panel
Essential Bus will be powered from ALT 1 through the main distribution and essential distribution buses in
the MCU. Main Bus 1, Main Bus 2, and the equipment Non-Essential Bus in the circuit breaker panel are
powered from ALT 1 through the main distribution bus in the MCU. The Avionics Non-Essential Bus in the
circuit breaker panel is powered from circuit breaker panel Main Bus 1.
Note:
Individual circuit load charts and bus schematics showing system current flow during normal
and failure modes are provided in 91-00.(Refer to 91-00]
A. Circuit Protection Devices
The electrical system in this airplane is protected by using circuit breakers and fuses. A circuit breaker
panel is located near the pilot's right leg, and is labeled as to each circuit's identity. The circuit breaker
panel contains all circuit protection devices resettable in flight. The circuit breakers have their rated
values identified on the top of the shaft. The circuit breakers only have two positions, open and closed.
In the open position the circuit is disconnected and in the closed position the circuit breaker will automatically open the circuit if an overload or circuit fault occurs. Each circuit breaker requires a manual
reset by the operator.
Avionics loads on the NON-ESSENTIAL Avionics Bus and ESSENTIAL Avionics Bus are protected by
15-amp AVIONICS circuit breakers connected to the respective bus through relays energized by the
AVIONICS switch.
In addition to the individual circuit breakers, 25-amp circuit breakers located in the Master Control Unit
(MCU) protect the Main Distribution Bus and the Essential Distribution Bus. Additionally a 15-amp circuit breaker is located in the MCU to protect the landing light circuit.
B. Switches
BAT 1, BAT 2, ALT 1, and ALT 2 master switches are side by side and directly in front of the pilot on the
bolster panel. The BAT 1 switch disconnects battery 1 from the main bus in the MCU. The alternator 1
switch disconnects the forward alternator (ALT 1) from the main bus. If BAT 1 and ALT 1 switches are
in the off position the flight critical instruments will remain powered from ALT 2 or BAT 2. If BAT 1 and
either ALT 1 or ALT 2 switches are turned on, the hour meter becomes activated.
13773-001
31 July 2001
24-50
Page 1
(1)
BAT & ALT Master Switches
Note:
Prior to engine start-up, the pilot must activate only the BAT 2 switch to verify that
BAT 2 properly energizes the electrical loads powered by the ESSENTIAL Bus
and that BAT 2 has proper voltage. The voltage reading must be taken from the
combination Volt and Ampere meter mounted on the right instrument panel.
Use BAT 1 for suppling electrical power to the avionics system when performing
general servicing tests.
The rocker type electrical system MASTER switches are ON in the up position and off in the
down position. The left battery switches, labeled BAT 1 and BAT 2, control all electrical power to
the airplane. The right switches, labeled ALT 1 and ALT 2, control the corresponding alternator.
Normally, all master switches will be on. However, the BAT 1 switch can be turned on separately
to check equipment while on the ground. To check or use avionics equipment or radios while on
the ground, the avionics power switch must also be turned on. Positioning the ALT 1 and ALT 2
switch to the off position isolates the alternators from the electrical system and the entire electrical load is placed on the batteries.
Note:
(2)
Continued operation with the alternator switch off will reduce battery power low
enough to open the battery relay, remove power from the alternator field, and prevent alternator restart.
Avionics Power Switch
A rocker switch, labeled AVIONICS, controls electrical power from the airplane primary bus to
the avionics bus. The switch is located next to the ALT 1, ALT 2, BAT 1, and BAT 2 Master
switches and is ON in the up position and off in the down position. Typically, the Avionics Power
Switch is used to energize or de-energize all avionics on the Avionics Non-essential and Avionics Essential buses simultaneously. With the switch in the off position, no electrical power will be
applied to the avionics equipment, regardless of the position of the master switch or the individual equipment switches. The AVIONICS switch should be placed in the off position prior to turning the master switch ON or off, starting the engine, or applying an external power source.
The airplane has two different types of circuit protection devices. Each circuit has an electrical
protective device, with the exception of the starter motor. A 5-amp clock fuse is located in the
MCU and the push-pull type circuit breakers are all located in the cabin area. The fuses are not
replaceable during flight.
C. Transmission Wire
Power is routed throughout most of the aircraft with MIL-W-22759/16 teflon coated wires. These wires
have a 150° C rating. Joints made in wires are covered with polyolefin heat shrink material, or are
joined using a solder sleeve. In the engine compartment, all power wire terminal ring ends are covered
with a silicon boot. Rubber, nylon, or teflon grommets protect the wires from chafing where the wires
pass through materials that could cause wear.
Page 2
24-50
13773-001
30 Nov 2000
2. MAINTENANCE PRACTICES
A. Circuit Breakers
(1)
Removal - Circuit Breakers
(a) Verify the ignition switch is in the OFF position and remove the key.
(b) Disconnect both batteries (BAT 1 and BAT 2). (Refer to 24-30)
(c)
Remove the two aft screws securing circuit breaker panel to the center console. Swing the
panel open.
(d) Identify and disconnect all wires to the selected breaker and/or bus.
(e) Remove the retaining ring from the circuit breaker and remove the breaker.
Note:
(2)
It may be necessary to loosen more than one circuit breaker and/or bus bar
to remove the selected breaker and/or bus bar.
Installation - Circuit Breakers
(a) Install the circuit breaker(s) into position on the panel and secure.
(b) Identify and connect all wires to the selected breaker(s).
(c)
Tighten the two aft screws securing circuit breaker panel to the center console.
(d) Connect the battery. (Refer to 24-30)
B. Switches
(1)
(2)
13773-001
30 Nov 2000
Removal - Bolster Panel Switches
(a) Verify the ignition switch is in the OFF position and remove the key.
(b) Disconnect the battery. (Refer to 24-30)
(c)
Remove the Kick Plate to gain access to the underside of the switches.
(d) Remove the screws and washers securing Bolster Panel to the Flight Instrument Panel.
(e) Identify and disconnect all wires to the selected switch.
(f)
Compress the retainers on the selected switch and push up to remove.
Installation - Bolster Panel Switches
(a) Compress the retainers on the selected switch and push down into position.
(b) Identify and connect all wires to the selected switch.
(c)
Secure Bolster Panel to the Flight Instrument Panel with screws and washers.
(d) Secure the Kick Plate.
(e) Connect the battery. (Refer to 24-30)
24-50
Page 3
Figure 24-501
Circuit Breaker Panel (Sheet 1 of 2)
Page 4
24-50
13773-001
30 Nov 2000
Figure 24-502
Circuit Breaker Panel (Sheet 2 of 2)
13773-001
30 Nov 2000
24-50
Page 5
CHAPTER
EQUIPMENT AND
FURNISHINGS
CHAPTER 25 - EQUIPMENT AND FURNISHINGS
LIST OF EFFECTIVE PAGES
Chapter/Section
Page
Date
25-LOEP
1
31 JUL 2001
25-TOC
1
31 JUL 2001
25-TOC
3
31 JUL 2001
25-00
1
30 NOV 2000
25-10
1
31 JUL 2001
25-10
2
30 NOV 2000
25-10
3
31 JUL 2001
25-10
4
30 NOV 2000
25-10
5
31 JUL 2001
25-10
6
31 JUL 2001
25-10
7
31 JUL 2001
25-10
8
31 JUL 2001
25-10
9
31 JUL 2001
25-50
1
31 JUL 2001
25-50
2
31 JUL 2001
25-60
1
30 NOV 2000
25-60
2
30 NOV 2000
25-60
3
30 NOV 2000
25-60
4
30 NOV 2000
25-60
5
30 NOV 2000
25-60
6
30 NOV 2000
13773-001
31 Jul 2001
25-LOEP
Page 1
CHAPTER 25 - EQUIPMENT AND FURNISHINGS
TABLE OF CONTENTS
Subject
EQUIPMENT AND FURNISHINGS
Chapter/Section
Page
25-00
General
CABIN
1
25-10
Description
1
Maintenance Practices
1
Crew Seats
Removal - Crew Seats
Installation - Crew Seats
Inspection/Check - Crew Seats
Cleaning - Crew Seats
Passenger Seats
Removal - Passenger Seats
Installation - Passenger Seats
Cleaning - Passenger Seats
Rear Seat Harness
Removal - Rear Seat Harness
Installation - Rear Seat Harness
Trim
Removal - Glareshield Assembly
Installation - Glareshield Assembly
Removal - Cabin Headliner
Installation - Cabin Headliner
Removal - A-Pillar and B-pillar Trim
Installation - A-Pillar and B-pillar Trim
Removal - Lower Windshield Trim
Installation - Lower Windshield Trim
Removal - Center Bolster Trim
Installation - Center Bolster Trim
Removal - Right Bolster Trim
Installation - Right Bolster Trim
Removal - Left Bolster Trim
Installation - Left Bolster Trim
Removal - Interior Door Trim
Installation - Interior Door Trim
Removal - Left Mid Console Circuit Breaker Trim
Installation - Left Mid Console Circuit Breaker Trim
Removal - Right Mid Console Trim
Installation - Right Mid Console Trim
Removal - Right Aft Console Lower Panel
13773-001
31 Jul 2001
1
1
1
1
1
1
1
1
1
3
3
3
5
5
5
5
5
5
5
5
6
6
6
6
6
6
6
7
7
7
7
7
7
7
25-TOC
Page 1
CHAPTER 25 - EQUIPMENT AND FURNISHINGS
TABLE OF CONTENTS
Subject
Chapter/Section
Installation - Right Aft Console Lower Panel
Removal - Left Aft Console Lower Panel
Installation - Left Aft Console Lower Panel
Removal - Center Armrest Console
Installation - Center Armrest Console
Removal - Aft Console Rear Cover
Installation - Aft Console Rear Cover
Removal - Side Duct Cover Panel
Installation - Side Duct Cover Panel
Removal - Right Aft Console Trim
Installation - Right Aft Console Trim
Removal - Left Aft Console Trim
Installation -Left Aft Console Trim
Kick Plate
Removal - Kick Plate
Installation - Kick Plate
Sunvisors and Mounting Brackets
Removal - Sunvisors and Mounting Brackets
Installation - Sunvisors and Mounting Bracket
Floor Covering
Removal - Floor Covering
Installation - Floor Covering
BAGGAGE AREA
Page
7
7
7
7
7
7
7
8
8
8
8
8
8
8
8
8
8
8
8
9
9
9
25-50
Description
1
Maintenance Practices
1
Anchor Plates
Removal - Anchor Plates
Installation - Anchor Plates
Aft Headliner
Removal - Aft Headliner
Installation - Aft Headliner
Aft Interior Trim Panels
Removal - Aft Bulkhead Trim Panel
Installation - Aft Bulkhead Trim Panel
Removal - Baggage Door Interior Trim Panel
Installation - Baggage Door Interior Trim Panel
Floor Covering
Removal - Floor Covering
Installation - Floor Covering
Page 2
25-TOC
1
1
1
1
1
1
1
1
1
1
1
1
1
2
13773-001
31 Jul 2001
CHAPTER 25 - EQUIPMENT AND FURNISHINGS
TABLE OF CONTENTS
Subject
EMERGENCY
Chapter/Section
Page
25-60
DEScription
1
Emergency Locator Transmitter (ELT)
Maintenance Practices
1
2
Emergency Locator Transmitter (ELT)
Removal - ELT
Installation - ELT
Inspection Check - ELT
ELT Function Test
ELT and Remote Control Panel Indicator (RCPI) Batteries
Removal - ELT Battery
ELT Remote Control Panel Indicator (RCPI)
Removal - Remote Control Panel Indicator
Installation - Remote Control Panel Indicator
Removal - Remote Control Panel Indicator Battery
ELT Antenna
Removal - ELT Antenna
Installation - ELT Antenna
13773-001
31 Jul 2001
2
2
2
3
4
4
4
4
4
4
4
5
5
5
25-TOC
Page 3
EQUIPMENT AND FURNISHINGS
1. GENERAL
Interior equipment and furnishings on the airplane include forward and rear seats, four-point seat belts with
inertia-reel retractors, carpeting, headliner panels, interior panels and trim, console panels and trim, center
console, sunvisors, and baggage restraints.
The front seats adjust on inclined tracks and can be individually reclined to three different positions. The
front and rear seats feature independent fold-down features for each side. The baggage area behind the
rear seat is accessible through the baggage door on the left side of the airplane.
13773-001
30 Nov 2000
25-00
Page 1
CABIN
1. DESCRIPTION
This section covers cabin compartment seats, seat harness, trim, cabin headliner, and floor covering.
This airplane has two individual front seats and a split rear bench seat for two passengers. Each front
(crew) seat has a four-point restraint, with inertia-reel retractors on the shoulder belts. The fore and aft
travel path is adjusted through the seat position control located below the center of the seat cushion. The
seat track is angled upward for forward travel so that shorter people will be positioned slightly higher as
they adjust the seat forward. Recline position is controlled through levers located on either side of the seat
back. Rotating the lever to the recline position when there is no pressure on the seat back will return the
seat back to the full up position.
The rear seat features backrests that fold forward independently for each side. Each rear passenger seat
has a fixed seat bottom and a folding seat back.
2. MAINTENANCE PRACTICES
A. Crew Seats
(1)
(2)
(3)
(4)
Removal - Crew Seats
(a) Remove seat stop screws and washers from seat rails.
(b) Lift up on seat tracking handle and slide seat forward off seat tracks.
Installation - Crew Seats
(a) Position seat channel onto forward edge of seat tracks.
(b) Lift up seat tracking handle and slide seat rearward onto tracks. Slide seat back to neutral
position.
(c)
Torque each seat stop screw assembly to 25 inch pounds.
Inspection/Check - Crew Seats
(a) Verify security of seat stop screw.
(b) Verify seat forward/aft position adjustment catches in all locking positions.
(c)
Verify seat recline lock functions in all recline positions.
Cleaning - Crew Seats (Refer to 12-20)
B. Passenger Seats (See Figure 25-101)
Seat backs can be folded forward (by removing detent pins) to provide a semi-flat surface for bulky
cargo extending forward from the baggage compartment. The detent pins are located in the backrest.
CAUTION:
(1)
(2)
(3)
13773-001
31 Jul 2001
Detent pins must be installed when occupants are seated in the passenger seats.
Removal - Passenger Seats
(a) Remove seat cushion.
(b) Remove cotter pins used to secure the seat assembly to floor.
(c)
Remove the detent pins from the seat back.
(d) Lift forward edge of seat assembly up, pull seat assembly forward, and remove seats.
Installation - Passenger Seats
(a) Install seats on aft floor and insert the rear studs into the attach fittings.
(b) Secure forward seat brackets with cotter pins.
(c)
Place the detent pins into position.
(d) Secure seat cushion.
Cleaning - Passenger Seats (Refer to 12-20)
25-10
Page 1
Figure 25-101
Passenger Seat
Page 2
25-10
13773-001
30 Nov 2000
C. Rear Seat Harness
(1)
(2)
Removal - Rear Seat Harness (See Figure 25-102)
(a) Remove the bolt, washer, bushing, washer, and nylon self-locking nut from lower outboard
harness mount.
(b) Remove the bolt, washer, bushing, washer, and self-locking nut from lower (central) harness mount.
(c)
Remove the aft bulkhead trim panel and the rear headliner. (Refer to 25-50)
(d) Remove the bolts, washers, and self-locking nuts from upper seat harness mount.
Installation - Rear Seat Harness
(a) Install the two lower (central) lap harnesses into the lower (central) harness mount.
(b) Insert the bushing, bolt, and washer through the harness mount and both harnesses.
(c)
Install flat washer and self-locking nut. Tighten self-locking nut.
WARNING:
(d)
(e)
(f)
13773-001
31 Jul 2001
Inertia reel must be installed with harness coming off the top side of
inertia reel. The inertia reel plate must be installed on the underside of
mount.
Install inertia reel plate on the underside of mount and secure with three bolts, washers,
and self-locking nuts.
Secure aft bulkhead trim panel. (Refer to 25-50)
Install the lower outboard harness mount, and secure with bolt, washer, bushing, washer,
and nylon self-locking nut. Torque to 150 inch pounds.
25-10
Page 3
Figure 25-102
Rear Seat Belt Harness
Page 4
25-10
13773-001
30 Nov 2000
D. Trim
(1)
(2)
(3)
(4)
(5)
(6)
(7)
13773-001
31 Jul 2001
Removal - Glareshield Assembly
(a) Remove glareshield mounting screws located just inside the aft edge on the left-hand side
of the glareshield.
(b) Remove glareshield mounting screws located just outside the aft edge on the right-hand
side of the glareshield.
(c)
Disconnect GPS antenna lead located underneath the glareshield.
(d) Disconnect glareshield light wire harness and remove glareshield.
Installation - Glareshield Assembly
(a) Place glareshield into position and connect glareshield light wire harness.
(b) Connect GPS antenna lead.
(c)
Install glareshield mounting screws.
Removal - Cabin Headliner
(a) Remove CAPS cover and insert safety pin.
(b) Remove door-seal.
(c)
Remove both A-pillar and B-pillar trim panels.
(d) Using a non-magnetic screwdriver, remove the screws securing the compass. Remove
compass assembly. (Refer to 34-20)
(e) Remove upper windshield interior trim. Disconnect wires to switches and lights.
(f)
Remove aft bulkhead trim panel.
(g) Remove aft headliner.
(h) Remove rear passenger light access panel and disconnect wires to the switch and light.
(i)
Remove the four screws securing the headliner and remove the headliner.
Installation - Cabin Headliner
(a) Using the existing screws, secure the headliner.
(b) Connect wires to the rear passenger light access panel switch and light. Secure rear passenger light access panel.
(c)
Install and secure the aft headliner.
(d) Install and secure the aft bulkhead trim panel.
(e) Connect wires to switches, compass, and lights in upper windshield trim. Secure trim.
(f)
Install and secure the compass. (Refer to 34-20)
(g) Install and secure A-pillar and B-pillar trim panels.
(h) Place door-seal into position and secure.
(i)
Remove safety pin from CAPS handle and place CAPS cover into position.
Removal - A-Pillar and B-pillar Trim
(a) Remove sunvisor.
(b) Remove screws securing trim to fuselage. Remove trim.
Installation - A-Pillar and B-pillar Trim
(a) Place trim into position and secure pillar trim with screws.
(b) Install and secure sunvisor.
Removal - Lower Windshield Trim
(a) Remove glareshield. (Refer to 25-10)
(b) Remove both forward door-seals. (Refer to 52-10)
(c)
Remove the upper and lower A-pillar trim from both sides. (Refer to 25-10)
(d) Place a cover over the inside of the windshield and remove the lower windshield trim.
25-10
Page 5
(8)
(9)
(10)
(11)
(12)
(13)
(14)
Page 6
Installation - Lower Windshield Trim
(a) Install glareshield. (Refer to 34-20)
(b) Secure the upper and lower A-pillar trim on both sides. (Refer to 25-10)
(c)
Install both forward door-seals. (Refer to 52-10)
(d) Remove the protective cover from the windshield.
Removal - Center Bolster Trim
(a) Loosen the four screws on the bolster switch panel.
(b) Lift edge of bolster trim and slowly remove the panel.
Installation - Center Bolster Trim
(a) Place trim into position
(b) Using four screws, secure center bolster trim.
Removal - Right Bolster Trim
(a) Remove door-seal. (Refer to 52-10)
(b) Remove right A-pillar trim (lower).
(c)
Loosen lower right-side instrument panel screws.
(d) Lift edge of lower windshield trim to slowly release the hook and loop fasteners.
(e) Remove right-hand bolster by cutting the cable tie on the vent tubing and by separating
the RTV seal.
Installation - Right Bolster Trim
(a) Place trim into position and seal vent tubing with RTV and a cable tie. Secure trim.
(b) Secure lower windshield trim. Firmly push on trim in areas of hook and loop fasteners.
(c)
Secure lower right-side instrument panel screws.
(d) Secure right A-pillar trim.
(e) Install door seal. (Refer to 52-10)
Removal - Left Bolster Trim
(a) Disconnect battery.
(b) Verify the Start/Ignition Key Switch is in the “OFF” position and remove the key. (Refer to
POH)
(c)
Remove door-seal. (Refer to 52-10)
(d) Remove left A-pillar trim (lower). (Refer to 25-10)
(e) Loosen lower-left instrument panel screws.
(f)
Remove center bolster trim. (Refer to 25-10)
(g) Remove nut securing the Start/Ignition Key Switch.
(h) Remove allen head screws securing the three interior light knobs.
(i)
Remove the four screws securing the bolster switch panel. Remove panel.
Installation - Left Bolster Trim
(a) Secure bolster switch panel with screws.
(b) Secure the three interior light knobs with allen head screws.
(c)
Tighten the Start/Ignition Key Switch nut finger tight (snug).
(d) Secure center bolster trim. (Refer to 25-10)
(e) Secure lower-left instrument panel screws.
(f)
Secure left A-pillar trim (lower). (Refer to 25-10)
(g) Install door seal. (Refer to 52-10)
(h) Connect battery.
25-10
13773-001
31 Jul 2001
(15) Removal - Interior Door Trim
(a) Remove the bolt and washer securing the door handle to the door. Remove door handle.
(b) Remove the screws securing the trim to the door.
(c)
Gently lift the corner of the door trim and slowly release the hook and loop fasteners, and
remove door trim.
(16) Installation - Interior Door Trim
(a) Place trim into position and firmly push down on trim in areas of hook and loop fasteners.
(b) Secure trim with screws.
(c)
Place door handle into position and secure with bolt and washer.
(17) Removal - Left Mid Console Circuit Breaker Trim
(a) Lift forward edge of the Alternate Static Source cover plate and slowly release the hook
and loop fasteners. Remove cover plate.
(b) Remove screws securing the Left Mid Console Circuit Breaker Trim and remove the trim.
(18) Installation - Left Mid Console Circuit Breaker Trim
(a) Place Left Mid Console Circuit Breaker Trim into position and secure with screws.
(b) Place Alternate Static Source cover plate into position and firmly push on trim in areas of
hook and loop fasteners.
(19) Removal - Right Mid Console Trim
(a) Remove the screws securing the trim and slowly remove the trim.
(20) Installation - Right Mid Console Trim
(a) Place trim into position and secure using screws.
(21) Removal - Right Aft Console Lower Panel
(a) Remove co-pilot seat. (Refer to 25-10)
(b) Remove screws securing the Right Aft Console Lower Panel. Remove panel.
(22) Installation - Right Aft Console Lower Panel
(a) Place panel into position and secure with screws.
(b) Install co-pilot seat. (Refer to 25-10)
(23) Removal - Left Aft Console Lower Panel
(a) Lift forward edge of trim and slowly release the hook and loop fasteners. Remove trim.
(24) Installation - Left Aft Console Lower Panel
(a) Place trim into position and secure. Firmly push on trim in areas of hook and loop fasteners.
(25) Removal - Center Armrest Console
(a) Open Center Armrest Console and remove the screw, washer, lanyard, and spacer from
the armrest.
(b) Remove armrest mounting screws and remove armrest.
(26) Installation - Center Armrest Console
(a) Place Center Armrest Console into position and secure with screws.
(b) Secure armrest lanyard with screw, washer, and spacer.
(27) Removal - Aft Console Rear Cover
(a) Remove the screws securing the Aft Console Rear Cover to the center console.
(28) Installation - Aft Console Rear Cover
(a) Place cover into position and secure with screws.
13773-001
31 Jul 2001
25-10
Page 7
(29) Removal - Side Duct Cover Panel (Refer to 25-10)
(a) Remove door seal. (Refer to 52-10)
(b) Lift forward edge of side duct cover and slowly release the hook and loop fasteners.
Remove side duct cover.
(30) Installation - Side Duct Cover Panel
(a) Place side duct cover into position and secure. Firmly push on trim in areas of hook and
loop fasteners.
(b) Install door seal. (Refer to 52-10)
(31) Removal - Right Aft Console Trim
(a) Unscrew friction control knob and remove.
(b) Remove co-pilot seat. (Refer to 25-10)
(c)
Remove Right Mid Console Trim screws and remove trim. (Refer to 25-10)
(d) Remove Right Aft Console Trim screws and remove trim.
(32) Installation - Right Aft Console Trim
(a) Secure Right Aft Console Trim with screws.
(b) Secure Right Mid Console Trim. (Refer to 25-10)
(c)
Secure co-pilot seat. (Refer to 25-10)
(d) Secure friction control knob.
(33) Removal - Left Aft Console Trim
(a) Remove pilot seat. (Refer to 25-10)
(b) Lift forward edge of the Alternate Static Source cover plate and slowly release the hook
and loop fasteners. Remove cover plate.
(c)
Remove Left Mid Console Circuit Breaker Trim and remove trim. (Refer to 25-10)
(d) Remove Left Aft Console Trim screws and remove trim.
(34) Installation -Left Aft Console Trim
(a) Secure Left Aft Console Trim with screws.
(b) Secure Left Mid Console Circuit Breaker Trim. (Refer to 25-10)
(c)
Place Alternate Static Source cover plate into position and firmly push on trim in areas of
hook and loop fasteners.
(d) Secure pilot seat. (Refer to 25-10)
E. Kick Plate
(1)
(2)
F.
Sunvisors and Mounting Brackets
(1)
(2)
Page 8
Removal - Kick Plate
(a) Remove screws securing kick plate to the lower console rib.
(b) Remove clamp from conditioned air duct and remove duct.
(c)
Remove kick plate.
Installation - Kick Plate
(a) Secure conditioned air duct to vent.
(b) Place kick plate into position and secure with screws.
Removal - Sunvisors and Mounting Brackets
(a) Remove the screws securing the sunvisor to the mounting bracket.
(b) Remove screws securing mounting bracket to fuselage.
Installation - Sunvisors and Mounting Bracket
(a) Secure mounting bracket to fuselage.
(b) Place sunvisor into position and secure with screws.
25-10
13773-001
31 Jul 2001
G. Floor Covering
(1)
(2)
13773-001
31 Jul 2001
Removal - Floor Covering
(a) Lift corner of carpet and pull carpet from floor to release the hook and loop fasteners.
Installation - Floor Covering
(a) Clean floor surface and the hook and loop fasteners using a whisk broom and a vacuum
cleaner.
(b) Place carpet into position and firmly push down on the hook and loop fasteners.
25-10
Page 9
BAGGAGE AREA
1. DESCRIPTION
This section covers the cargo floor carpet, anchor plates, and trim panels that are located directly behind
the passenger seats.
2. MAINTENANCE PRACTICES
A. Anchor Plates
(1)
(2)
Removal - Anchor Plates
(a) Remove carpet from cargo compartment. (Refer to 25-10)
(b) Remove access panel CF5. (Refer to 6-00)
(c)
Remove the bolts, nuts, and washers securing the anchor plate to the floor.
Installation - Anchor Plates
(a) Place anchor into position and secure with bolts, washers, and nuts.
(b) Secure access panel CF5. (Refer to 6-00)
(c)
Clean floor surface and the hook and loop fasteners using a whisk broom and a vacuum
cleaner.
(d) Place carpet back into position and secure by pressing down firmly on the areas of the
hook and loop fasteners.
B. Aft Headliner
(1)
(2)
Removal - Aft Headliner
(a) Remove screws securing headliner to fuselage.
(b) Lift the upper corner of the rear headliner panel and slowly pull the hook and loop apart
from the cabin headliner. Remove rear headliner interior trim panel.
(c)
Remove aft headliner.
Installation - Aft Headliner
(a) Install aft headliner and secure with screws.
(b) Place adjoining trim panels into position and press down firmly on the areas of the hook
and loop fasteners.
C. Aft Interior Trim Panels
(1)
(2)
(3)
(4)
Removal - Aft Bulkhead Trim Panel (Refer to 6-00)
(a) Remove interior trim panel from the aft bulkhead by gently pulling it forward to release the
hook and loop fasteners.
Installation - Aft Bulkhead Trim Panel (Refer to 6-00)
(a) Secure trim panel to aft bulkhead and press down firmly on areas of hook and loop fasteners.
Removal - Baggage Door Interior Trim Panel
(a) Remove screws securing interior trim panel to baggage door.
(b) Lift corner of baggage interior trim and slowly pull the hook and loop apart.
(c)
Remove baggage door interior trim panel.
Installation - Baggage Door Interior Trim Panel
(a) Place panel back into position and secure by pressing down firmly on the areas of the
hook and loop fasteners.
(b) Secure interior trim panel with screws.
D. Floor Covering
(1)
13773-001
31 Jul 2001
Removal - Floor Covering
25-50
Page 1
(2)
Page 2
(a) If required, remove screws securing floor trim.
(b) Lift corner of carpet and pull up carpet from floor to release the hook and loop fasteners.
Installation - Floor Covering
(a) Clean floor surface and the hook and loop fasteners using a whisk broom and a vacuum
cleaner.
(b) Place carpet into position and firmly push down on the hook and loop fasteners.
(c)
If required, secure floor trim with screws.
25-50
13773-001
31 Jul 2001
EMERGENCY
1. DESCRIPTION
A. Emergency Locator Transmitter (ELT)
For specific information on the ACK model E-01 ELT, refer to the ACK Technologies Installation and
Operation Manual (Manual Number 9/94). (See Figure 25-601)
WARNING:
The ACK model E-01 ELT is designed to use only Duracell MN1300 alkaline batteries which are dated by the manufacturer. This ELT does not meet the requirements of TSO-91a or FAR 91.207 if used with any other type of battery. ELT
batteries must be inspected in accordance with the requirements of the replacement schedule in Chapter 5. The ELT batteries must be replaced prior to the date
stamped on the batteries or whenever the batteries have been in use for one
cumulative hour. Replace all ELT batteries at the same time and with the same
expiration date stamp.
This airplane is equipped with a self-contained ELT. The ELT transmitter is installed immediately
behind the aft cabin bulkhead. The ELT is mounted slightly to the right of the airplane centerline. The
transmitter and antenna are accessible through an access panel at the base of the baggage compartment bulkhead. The transmitter uses integral and remote antennas.
The transmitter unit is mounted longitudinally in the airplane in order to detect deceleration greater
than 3.5 feet per second. If rapid deceleration is detected, the transmitter will repeatedly transmit VHF
band audio sweeps at 121.5 Mhz and 243.0 Mhz approximately 0.5 seconds apart. The transmitter is
automatically activated upon sensing a change of velocity along its longitudinal axis, exceeding 3 to 5
feet per second. The transmitter can be removed from the airplane and used as a personal locating
device if it is necessary to leave the airplane after an accident.
The ELT Remote Switch and Control Panel Indicator (RCPI) are located below the circuit breakers on
the circuit breaker panel. The RCPI provides test and monitoring functions for the transmitter. The
panel contains a button labeled ON, a button labeled RESET, and a red LED (light). The red light
flashes when the ELT is transmitting. A Duracell PX28L or Kodak K28L 6-volt lithium battery mounted
in the panel powers the LED. RCPI batteries must be inspected in accordance with the requirements of
the replacement schedule in Chapter 5. The RCPI batteries must be replaced prior to the date
stamped on the batteries or whenever the batteries have been in use for any unknown period of time.
The ON button is used to test the unit in accordance with the ACK Maintenance Manual and AIM procedures. The RESET button can be used to cancel an inadvertent transmission.
The main transmitter control switch is labeled ON-OFF-ARMED. The transmitter is in the armed position for normal operations. Eight dated “D” cell alkaline batteries contained within the transmitter unit
provide power to the transmitter. ELT battery replacement is required upon reaching the date marked
upon each battery. ELT batteries must be inspected in accordance with the requirements of the
replacement schedule in Chapter 5. All batteries must be replaced at the same time and all batteries
must have the same expiration date. FAR 91.207 (d)(1) requires that batteries be replaced when the
transmitter has been in use for more than one cumulative hour. The expiration date of the batteries
must be indicated on the outside of the ELT battery case and recorded in the aircraft logs.
13773-001
30 Nov 2000
25-60
Page 1
2. MAINTENANCE PRACTICES
A. Emergency Locator Transmitter (ELT)
(1)
Removal - ELT
CAUTION:
(2)
(a) Remove carpet from baggage compartment floor. (Refer to 25-50)
(b) Remove access panel CB06. (Refer to 6-00)
(c)
Move the main transmitter control switch (labeled ON-OFF-ARMED) to the “OFF” position.
(d) Disconnect transmitter RJ-11 plug from RJ-11 jack.
(e) Disconnect fixed antenna lead from front panel on ELT. Remove portable antenna.
(f)
Unstrap transmitter and remove.
Installation - ELT
WARNING:
(a)
(b)
(c)
(d)
(e)
(f)
(g)
(h)
(i)
(j)
The ELT must be mounted with the arrow (which is printed on the battery
case) pointing in the direction of flight.
Install transmitter onto mounting plate with arrow on battery case pointing in direction of
flight.
Note:
Page 2
The quick release retaining straps which secure the ELT to the tray are slightly different size. The strap which fits around the front of the ELT transmitter is marked
FRONT. The strap which fits around the battery end of the ELT case, is marked
BATTERY.
The quick release retaining straps which secure the ELT to the tray are
slightly different size. The strap which fits around the front of the ELT (transmitter assembly) is marked FRONT. The strap which fits around the battery
case end of the ELT is marked BATTERY.
Secure transmitter with straps.
Connect fixed antenna lead to front of ELT. Secure portable antenna.
Connect RJ-11 plug from transmitter to RJ-11 jack.
Note:
After completing the mechanical installation of the ELT, the following tests
must be performed.
Note:
Regulations require that transmitter tests only be done during the first five
minutes of each hour and must not last for more than three audio sweeps
(1.5 seconds). If you are at a location where there is an FAA control tower
or other monitoring facility, notify the facility before beginning the tests.
Turn the squelch all the way down or to the OFF position.
Monitor 121.5 Mhz using the aircraft COM receiver or a portable hand held receiver.
Place the main switch on the front of the ELT unit in the ON position and verify that the
audio sweep tone can be heard on the COM radio.
Place the main switch on the front of the ELT unit in the ARMED position. While seated at
the pilots normal operating position, press the ON button on the RCPI unit. Verify that the
red LED flashes and is readily visible from the pilots operating position.
Verify that the audio sweep tone can be heard on the COM receiver. Push the RESET button on the RCPI unit. The LED should stop flashing and the audio sweep tone should stop.
Install access panel CB06. (Refer to 6-00)
25-60
13773-001
30 Nov 2000
(3)
(k)
Install baggage compartment carpet. (Refer to 25-50)
Inspection Check - ELT
For inspection of the ACK model E-01 ELT, refer to the ACK Technologies Installation and Operation Manual (manual number 9/94).
(a)
(b)
(c)
(d)
(e)
(f)
(g)
(h)
(i)
(j)
Remove ELT from the mount and inspect the mounting tray to ensure all fasteners and
mechanical assemblies are secure.
Inspect the coaxial cable connecting the ELT to the antenna for cuts or abrasions on its
outer jacket. Disconnect the BNC connectors on each end. Examine both the BNC connectors and the mating plug on the antenna and ELT unit for any signs of corrosion.
Inspect the modular cable connecting the ELT to the RCPI unit to for signs of wear or
abrasion on the outer jacket. Remove the modular plug connecting the ELT to the connecting cable and inspect the jack and plug assembly for corrosion.
Visually inspect and confirm proper seating of all connector pins. Special attention should
be given to coaxial center conductor pins which are prone to retracting into the connector
housing.
Gain access to the ELT and RCPI batteries and inspect. No corrosion should be detectable. Verify that the batteries are approved (Duracell MN1300 for the ELT and Duracell
PX28L or Kodak K28L for the RCPI) and check the expiration date. Replace if necessary.
(See Figure 25-601) (Refer to 5-30)
Activate the ELT using applied force. The direction for mounting and force activation is
indicated on the ELT.
Verify that the ELT has been activated by the use of a wattmeter, or the airplane's VHF
radio communications receiver (when tuned to 121.5 Mhz).
Note:
The aforementioned procedure is not a measured check, it only indicates
that the G-switch is working.
WARNING:
The ELT must be mounted with the arrow (which is printed on the battery case) pointing in the direction of flight.
Note:
The quick release retaining straps which secure the ELT to the tray are
slightly different size. The strap which fits around the front of the ELT (transmitter assembly) is marked FRONT. The strap which fits around the battery
case end of the ELT is marked BATTERY.
Reinstall ELT into its mount and verify the proper direction for crash activation.
Reconnect all cables to allow slack at each end and be properly secured to the airplane
structure for support and protection.
Activate the ELT using the ON or TEST switch. A low-quality AM broadcast radio receiver
should be used to determine if energy is being transmitted from the antenna. When the
antenna of this radio (tuning dial on any setting) is held about six inches from the activated
ELT antenna, the ELT aural tone will be heard.
Note:
13773-001
30 Nov 2000
The aforementioned procedure is not a measured check, but it does provide
confidence that the antenna is radiating with sufficient power to aid search
and rescue. The aircraft’s receiver, tuned to 121.5 Mhz, may also be used.
This receiver however is more sensitive and could pick up a weak signal
even if the radiating ELT’s antenna is disconnected. Thus, it does not check
the integrity of the ELT system or provide the same level of confidence as
does an AM radio.
25-60
Page 3
Note:
(4)
Because the ELT radiates on the emergency frequency, the federal communications commission allows these tests to be conducted only within the first
five minutes after any hour and limits the tests to three sweeps of the transmitter audio modulation.
(k)
Verify that all switches are properly labeled and positioned.
(l)
Perform ELT function test. (Refer to 25-60)
ELT Function Test
The following function test must be done to verify that the transmitter, latch circuit, batteries and
associated equipment are operating properly.
Note:
(a)
(b)
(c)
Regulations require that transmitter tests only be done during the first 5 minutes of
each hour and must not last for more than 3 audio sweeps (1.5 seconds). If you
are at a location where there is an FAA control tower or other monitoring facility
notify the facility before beginning the tests. Never activate the ELT while airborne
for any reason.
Turn the squelch all the way down (OFF) to hear the sweep tone.
Monitor 121.5 Mhz using the aircraft COM receiver or portable hand-held receiver.
Press “ON” button on the RCPI unit. Verify that the red led flashes. Verify that the audio
sweep tone can be heard on the COM receiver. Push the “RESET” button on the RCPI
unit. The LED should stop flashing and the audio sweep tone should stop.
Note:
The red LED on the RCPI will flash on and off indicating the ELT is transmitting should the ELT be accidently activated by turbulence, hard landing, etc.
Should this occur under any conditions other than an accident requiring
immediate assistance, the ELT should be reset by pressing the “RESET”
button on the RCPI unit. If the aircraft is on the ground and the “RESET”
button does not cause the LED to stop flashing the main switch on the ELT
unit should be set to the off position. The aircraft may be operated with the
ELT removed for inspection or repair subject to the conditions of FAR
91.207.
B. ELT and Remote Control Panel Indicator (RCPI) Batteries
(1)
Removal - ELT Battery
(a) For instructions on how to remove the ELT battery, refer to ACK Technologies Installation
and Operation Manual (Manual Number 9/94).
C. ELT Remote Control Panel Indicator (RCPI)
(1)
(2)
(3)
Page 4
Removal - Remote Control Panel Indicator
(a) Remove the two aft screws from circuit breaker panel and open.
(b) Disconnect remote control panel indicator RJ-11 connector.
(c)
Remove bolts, washers, and nuts securing the RCPI to the circuit breaker panel.
(d) Remove the RCPI.
Installation - Remote Control Panel Indicator
(a) Secure RCPI to circuit breaker panel with bolts, washers, and nuts.
(b) Connect RJ-11 connector to the Remote Control Panel Indicator.
(c)
Secure aft circuit breaker panel with screws.
Removal - Remote Control Panel Indicator Battery
25-60
13773-001
30 Nov 2000
(a)
(b)
(c)
Remove the three retaining screws which secure the upper and lower half of the RCPI
unit.
Loosen the two switch retaining nuts located on the front of the unit.
Carefully remove the top half of the RCPI unit exposing the battery compartment.
Note:
(d)
(e)
(f)
(g)
If replacing an old battery carefully inspect the battery contacts for dirt or
corrosion. If the contacts need cleaning use only nonabrasive electrical contact cleaner and a stiff brush. Abrasive cleaners will remove the nickel and
gold plating from the contacts. Badly corroded contacts should be replaced.
Insert the 6-volt battery (Duracell PX28L or Kodak K28L) with the polarity as shown on the
bottom of the battery compartment.
Replace the top half of the RCPI and replace the three retaining screws and tighten the
two switch retaining nuts.
Record the next RCPI battery replacement date on one of the adhesive labels supplied
with the ELT. Affix the label on the ELT in a readily visible location when installed. Record
the battery replacement date in logbook.
Perform Transmitter Inspection Check. (Refer to 25-60)
D. ELT Antenna
(1)
(2)
13773-001
30 Nov 2000
Removal - ELT Antenna
(a) Remove carpet from baggage compartment floor. (Refer to 25-50)
(b) Remove access panel CB06. (Refer to 6-00)
(c)
Disconnect antenna lead from underside of ELT mounting bracket.
(d) Remove nut, small washer, and large washer from ELT antenna.
(e) Remove antenna from mounting bracket and the upper cable tie.
Installation - ELT Antenna
(a) Slide top of antenna into the upper cable tie and install base of antenna into mounting
bracket.
(b) Secure antenna with a large washer, small washer, and nut.
(c)
Connect antenna lead at underside of ELT mounting bracket.
(d) Secure lower access panel with screws. (Refer to 6-00)
(e) Clean floor surface and the hook and loop fasteners using a whisk broom and a vacuum
cleaner.
(f)
Install access panel CB06. (Refer to 6-00)
(g) Install baggage compartment carpet. (Refer to 25-50)
25-60
Page 5
Figure 25-601
Emergency Locator Transmitter
Page 6
25-60
13773-001
30 Nov 2000
CHAPTER
FIRE
PROTECTION
CHAPTER 26 - FIRE PROTECTION
LIST OF EFFECTIVE PAGES
Chapter/Section
Page
Date
26-LOEP
1
30 NOV 2000
26-TOC
1
30 NOV 2000
26-00
1
30 NOV 2000
26-20
1
30 NOV 2000
26-20
2
30 NOV 2000
13773-001
30 Nov 2000
26-LOEP
Page 1
CHAPTER 26 - FIRE PROTECTION
TABLE OF CONTENTS
Subject
FIRE PROTECTION
Chapter/Section
Page
26-00
General
EXTINGUISHING
1
26-20
Description
1
Maintenance Practices
1
Fire Extinguisher
Removal - Fire Extinguisher
Installation - Fire Extinguisher
Operation - Fire Extinguisher
Inspection/Check - Fire Extinguisher
13773-001
30 Nov 2000
1
1
1
1
1
26-TOC
Page 1
FIRE PROTECTION
1. GENERAL
This chapter describes that portion of the airplane system which is used to extinguish fire. Fire protection is
provided by a portable Halon 1211/1301 fire extinguisher, mounted on the forward inboard side of the
pilot’s seat base.
13773-001
30 Nov 2000
26-00
Page 1
EXTINGUISHING
1. DESCRIPTION
The airplane is equipped with a liquefied-gas type fire extinguisher mounted within a quick-release bracket
assembly attached at the forward inboard side of the pilot’s seat base. The extinguishing agent is Halon
1211/1301 blend and is approved for use on class B (liquid, grease) and class C (electrical equipment)
fires. The fire extinguisher must be replaced after each use.
2. MAINTENANCE PRACTICES
A. Fire Extinguisher (See Figure 26-201)
(1)
(2)
(3)
(4)
Removal - Fire Extinguisher
(a) Release quick-release clamp.
(b) Remove fire extinguisher from bracket assembly.
Installation - Fire Extinguisher
(a) Position fire extinguisher in bracket assembly.
(b) Secure with quick-release clamp.
Operation - Fire Extinguisher
(a) Point fire extinguisher nozzle directly at target.
(b) Pull ring to remove safety pin.
(c)
Depress discharge lever.
(d) Direct discharge at base of flame with side to side motion (range for a fully charged extinguisher is 6 to 8 feet (1.8 to 2.4 meters) with a duration of 10 to 12 seconds.
Inspection/Check - Fire Extinguisher
(a)
Acquire necessary tools, equipment, and supplies.
Description
Scale
(b)
(c)
(d)
13773-001
30 Nov 2000
P/N or Spec.
-
Supplier
Any Source
Purpose
Weighing
Thoroughly examine fire extinguisher for signs of leakage, corrosion, or other damage.
At annual inspection, weigh fire extinguisher to ensure gross weight is above 24.2 oz. (686
g). If extinguisher weighs less than that specified, replace immediately.
Once a month (or at more frequent intervals when circumstances require) weigh or “heft”
the fire extinguisher to ensure the gross weight is above 24.2 oz. (686 g). Ensure the nozzle is not obstructed, and the safety seal is intact.
26-20
Page 1
Figure 26-201
Fire Extinguisher Installation
Page 2
26-20
13773-001
30 Nov 2000
CHAPTER
FLIGHT
CONTROLS
CHAPTER 27 - FLIGHT CONTROLS
LIST OF EFFECTIVE PAGES
Chapter/Section
Page
Date
27-LOEP
1
31 JULY 2001
27-LOEP
2
31 JULY 2001
27-TOC
1
31 JULY 2001
27-TOC
2
31 JULY 2001
27-TOC
3
31 JULY 2001
27-TOC
4
31 JULY 2001
27-00
1
30 NOV 2000
27-00
2
30 NOV 2000
27-10
1
30 NOV 2000
27-10
2
30 NOV 2000
27-10
3
30 NOV 2000
27-10
4
30 NOV 2000
27-10
5
30 NOV 2000
27-10
6
30 NOV 2000
27-10
7
30 NOV 2000
27-10
8
30 NOV 2000
27-10
9
30 NOV 2000
27-10
10
30 NOV 2000
27-10
11
30 NOV 2000
27-10
12
30 NOV 2000
27-10
13
30 NOV 2000
27-10
14
30 NOV 2000
27-10
15
30 NOV 2000
27-10
16
30 NOV 2000
27-10
17
30 NOV 2000
27-10
18
30 NOV 2000
27-10
19
30 NOV 2000
27-10
20
30 NOV 2000
27-10
21
30 NOV 2000
27-20
1
31 JULY 2001
27-20
2
30 NOV 2000
27-20
3
30 NOV 2000
27-20
4
30 NOV 2000
27-20
5
30 NOV 2000
27-20
6
30 NOV 2000
27-20
7
30 NOV 2000
27-20
8
30 NOV 2000
27-20
9
30 NOV 2000
13773-001
31 July 2001
27-LOEP
Page 1
CHAPTER 27 - FLIGHT CONTROLS
LIST OF EFFECTIVE PAGES
Chapter/Section
Page
Date
27-20
10
30 NOV 2000
27-20
11
30 NOV 2000
27-20
12
30 NOV 2000
27-20
13
30 NOV 2000
27-20
14
31 JULY 2001
27-20
15
31 JULY 2001
27-20
16
31 JULY 2001
27-20
17
31 JULY 2001
27-30
1
30 NOV 2000
27-30
2
30 NOV 2000
27-30
3
30 NOV 2000
27-30
4
30 NOV 2000
27-30
5
30 NOV 2000
27-30
6
30 NOV 2000
27-30
7
30 NOV 2000
27-30
8
30 NOV 2000
27-30
9
30 NOV 2000
27-30
10
30 NOV 2000
27-30
11
30 NOV 2000
27-30
12
30 NOV 2000
27-30
13
30 NOV 2000
27-31
1
30 NOV 2000
27-31
2
30 NOV 2000
27-31
3
30 NOV 2000
27-50
1
30 NOV 2000
27-50
2
30 NOV 2000
27-50
3
30 NOV 2000
27-50
4
30 NOV 2000
27-50
5
30 NOV 2000
27-50
6
30 NOV 2000
27-50
7
30 NOV 2000
27-50
8
30 NOV 2000
27-50
9
30 NOV 2000
27-50
10
30 NOV 2000
Page 2
27-LOEP
13773-001
31 July 2001
CHAPTER 27 - FLIGHT CONTROLS
TABLE OF CONTENTS
Subject
FLIGHT CONTROLS
Chapter/Section
Page
27-00
General
1
Troubleshooting
2
AILERON AND ROLL TRIM SYSTEM
27-10
Description
1
Maintenance Practices
1
Aileron System Cables
Removal - Aileron System Cables
Installation - Aileron System Cables
Adjustment/Test - Aileron System Rigging
Inspection/Check - Aileron System Rigging
Control Grip Assembly
Removal - Control Grip Assembly
Installation - Control Grip Assembly
4-Way Trim/Autopilot Disconnect Switch
Removal - 4-Way Trim/Autopilot Disconnect Switch
Installation - 4-Way Trim/Autopilot Disconnect Switch
Push-to-Talk (PPT) Switch
Removal - Push-to-Talk (PPT) Switch
Installation - Push-to-Talk (PPT) Switch
Control Yoke Assembly
Removal - Control Yoke Assembly
Installation - Control Yoke Assembly
Inspection/Check - Control Yoke Assembly
Aileron Push/Pull Rods
Removal - Aileron Push/Pull Rods
Installation - Aileron Push/Pull Rods
V-Grooved-Guide Wheel
Removal - V-Grooved-Guide Wheel
Installation - V-Grooved-Guide Wheel
Adjustment/Test - V-Grooved-Guide Wheel
Aileron System Pulleys
Removal - Aileron Actuation Pulley-Console
Installation - Aileron Actuation Pulley-Console
Removal - Pulley Gang-Forward
Installation - Pulley Gang-Forward
Removal - Kick-Out Pulley
Installation - Kick-Out Pulley
13773-001
31 July 2001
1
1
2
4
5
8
8
8
8
8
8
10
10
10
10
10
10
13
13
13
13
13
13
13
13
14
14
14
14
14
14
15
27-TOC
Page 1
CHAPTER 27 - FLIGHT CONTROLS
TABLE OF CONTENTS
Subject
Chapter/Section
Removal - Cross-Over Pulley
Installation - Cross-Over Pulley
Roll Trim System
Removal - Aileron Actuation Pulley-Wing
Installation - Aileron Actuation Pulley-Wing
Removal - Roll Trim Cartridge
Installation - Roll Trim Cartridge
Adjustment/Test - Roll Trim Cartridge
Inspection/Check - Roll Trim Cartridge
Removal - Roll Trim Motor Assembly
Installation - Roll Trim Motor Assembly
RUDDER AND YAW TRIM SYSTEM
Page
15
15
18
18
18
18
18
20
20
21
21
27-20
Description
1
Maintenance Practices
1
Rudder System Cables
Removal - Rudder System Cables
Installation - Rudder System Cables
Adjustment/Test - Rudder System Rigging
Inspection/Check - Rudder System Rigging
Rudder Pedal Assembly
Removal - Rudder Pedal Assembly
Installation - Rudder Pedal Assembly
Inspection/Check - Rudder Pedal Assembly
Rudder System Pulleys and Bellcranks
Pulley Gang-Forward
Removal - Rudder-Elevator Pulley Gang
Installation - Rudder-Elevator Pulley Gang
Removal - Empennage Pulley Gang
Installation - Empennage Pulley Gang
Inspection/Check - Empennage Pulley Gang
Yaw Trim Cartridge
Removal - Yaw Trim Cartridge
Installation - Yaw Trim Cartridge
Inspection/Check - Yaw Trim Cartridge
Yaw Trim Servo
Removal - Yaw Trim Servo
Installation - Yaw Trim Servo
Adjustment/Test - Yaw Trim Servo
Yaw Trim Gage
Page 2
27-TOC
1
1
2
4
5
7
7
7
7
9
9
9
9
9
9
10
14
14
14
14
14
14
14
14
15
13773-001
31 July 2001
CHAPTER 27 - FLIGHT CONTROLS
TABLE OF CONTENTS
Subject
Chapter/Section
Page
Removal - Yaw Trim Gage
Installation - Yaw Trim Gage
Rudder-Aileron Interconnect
Removal - Rudder-Aileron Interconnect
Installation - Rudder-Aileron Interconnect
Adjustment/Test - Rudder-Aileron Interconnect
Inspection/Check - Rudder-Aileron Interconnect
ELEVATOR AND PITCH TRIM SYSTEM
15
15
15
15
15
15
16
27-30
Description
1
Maintenance Practices
1
Elevator System Rigging
Removal - Elevator System Cable
Installation - Elevator System Cable
Adjustment/Test - Elevator System Rigging
Inspection/Check - Elevator System Rigging
Forward Elevator Push/Pull Rod
Removal - Forward Elevator Push/Pull Rod
Installation - Forward Elevator Push/Pull Rod
Elevator Torque Tube
Removal - Elevator Torque Tube
Installation - Elevator Torque Tube
Elevator System Pulleys
Removal - Elevator Pulley Sector
Installation - Elevator Pulley Sector
Forward Pulley Gang
Rudder-Elevator Pulley Gang
Empennage Pulley Gang
Pitch Trim System
Removal - Pitch Trim Cartridge
Installation - Pitch Trim Cartridge
Adjustment/Test - Pitch Trim Cartridge
Inspection/Check - Pitch Trim Cartridge
Removal - Pitch Trim Motor
Installation - Pitch Trim Motor
Pitch Trim Tab
STALL WARNING SYSTEM
1
1
2
4
6
8
8
8
8
8
8
10
10
10
10
10
10
10
10
10
12
12
13
13
13
27-31
Description
1
Maintenance Practices
1
13773-001
31 July 2001
27-TOC
Page 3
CHAPTER 27 - FLIGHT CONTROLS
TABLE OF CONTENTS
Subject
Chapter/Section
Stall Warning Pressure Switch
Removal - Stall Warning Pressure Switch
Installation - Stall Warning Pressure Switch
Inspection/Check - Stall Warning Operational Check - Ground
Inspection/Check - Stall Warning Operational Check - Flight
Stall Warning Horn
Removal - Stall Warning Horn
Installation - Stall Warning Horn
FLAPS
Page
1
1
1
1
2
2
2
2
27-50
General
1
Maintenance Practices
1
Flap Actuator Assembly
Removal - Flap Actuator Assembly
Installation - Flap Actuator Assembly
Torque Tube Assembly
Removal -Torque Tube Assembly
Installation -Torque Tube Assembly
Flap Switch Assembly
Removal - Flap Switch Assembly
Installation - Flap Switch Assembly
Flap Circuit Card Assembly (CCA)
Removal - Flap Circuit Card Assembly
Installation - Flap Circuit Card Assembly
Flap Relays
Removal - Flap Relay
Install - Flap Relay
Flap Adjustments and Inspections
Adjustment/Test - Flap Travel
Inspection/Check - Flap Rigging
Page 4
27-TOC
1
1
1
1
1
2
2
2
2
3
3
3
3
3
3
7
7
8
13773-001
31 July 2001
FLIGHT CONTROLS
1. GENERAL
This chapter describes those units and components which furnish a means of manually controlling the
flight attitude characteristics of the airplane. The flight controls for the airplane consist of ailerons, roll trim
cartridges, rudder, elevator, pitch trim cartridges, and flap system.
13773-001
30 Nov 2000
27-00
Page 1
2. TROUBLESHOOTING
Trouble
Probable Cause
Remedy
Reserved
Page 2
27-00
13773-001
30 Nov 2000
AILERON AND ROLL TRIM SYSTEM
1. DESCRIPTION
This section describes that portion of the flight control system which controls the position and movement of
the ailerons. Included are; aileron system rigging, control grip assembly, control yoke assembly, V-groovedguide wheel, pulleys and cables, roll trim cartridge, and 4-way trim/autopilot disconnect switch.
Aileron control motion is transferred by conventional yoke motion through a linkage to a pulley mounted on
the console structure. From the pulley, the single cable system is routed through a pulley gang at the bottom of the center console, under the cabin floor to the rudder-aileron interconnect, along the fuselage longerons to kick-out pulleys which direct the cables to the wing area between the aft spar and flap cove. The
cables pass through fairleads at each flap hinge location where they attach to the aileron actuation pulley.
As the aileron actuating pulley rotates, the control surface is deflected via a right-angle drive arm. A crossover cable returns to the other wing, interconnecting the left and right ailerons. Cable retainers on each set
of pulleys prevent fouling. Adjustable control stops on each aileron actuation pulley limit control surface
travel.
The roll trim system acts as autopilot servo through the use of a captured compression spring cartridge
integrated into the control system and activated by an electric motor. The spring cartridge, bolted directly to
the LH aileron actuation pulley, and the electric trim motor, provide a centering force regardless of the
direction of control surface deflection. When activated, the trim motor moves the spring cartridge causing
the aileron actuation pulley to move the aileron to a new trimmed position. A 4-way switch, mounted on
both yoke grips, controls the roll trim system.
2. MAINTENANCE PRACTICES
WARNING:
A system rigging Inspection/Check must be performed after loosening any flight control cable to assure proper control surface operation. Refer to the appropriate control
system’s rigging procedures for the Inspection/Check maintenance practices.
A. Aileron System Cables (See Figure 27-101)
(1)
Removal - Aileron System Cables
(a)
Acquire necessary tools, equipment, and supplies.
Description
String
(b)
(c)
(d)
(e)
(f)
(g)
(h)
(i)
(j)
13773-001
30 Nov 2000
P/N or Spec.
-
Supplier
Any Source
Purpose
Cable Routing
Remove kick plate. (Refer to 25-10)
Remove MFD. (Refer to 34-40)
Remove passenger seats. (Refer to 25-10)
Remove carpet and access panels CF1L, CF1R, CF3C, CF4C, CF4R, and CF4L. (Refer
to 6-00)
Remove LH and RH ailerons. (Refer to 57-50).
At access holes CF3C and CF4C, remove turnbuckles from LH, RH, and forward aileron
cables.
Disconnect rudder/aileron interconnect bungee from RH aileron cable. (Refer to 27-20)
Remove cotter pins and washers securing clevis pins from kick-out and cross-over pulley
brackets and remove pins.
Remove safety wire securing aileron cable to LH aileron actuation pulley and remove bolt
and washer securing cable guard to pulley bracket. Repeat procedure on RH side.
27-10
Page 1
(k)
(l)
(m)
Remove cotter pins and washers securing pulley guard pins to forward pulley gang bracket
and remove pins.
Remove safety wire securing aileron cable to console actuation pulley.
Loosen nuts securing pulley keepers to console.
Note:
Attach string to end of cable prior to removing from airplane to facilitate
cable routing during installation.
(n)
(2)
Attach string to end of forward aileron cable below access hole CF3C and pull cable
through. Remove cable from airplane.
(o) Attach string to end of LH aileron cable below access hole CF4C and pull cable through.
Remove cable from airplane. Repeat procedure for RH aileron cable.
Installation - Aileron System Cables
(a) At access hole CF3C, route forward aileron cable to forward pulley gang, up to console
actuation pulley and back to access hole CF3C.
(b) At access hole CF4C, route LH aileron cable to kick-out pulley, cross-over pulley, aileron
actuation pulley, and back to center of fuselage floor. Repeat procedure for RH aileron
cable.
(c)
Secure forward aileron cable to console actuation pulley with safety wire.
(d) Tighten nuts securing pulley keepers to center console.
(e) At forward pulley gang bracket, verify cable routing, insert pulley guard pins, and install
washers and cotter pins.
(f)
For LH aileron cable, verify cable routing through flap-hinge fairleads, kick-out, and crossover pulleys, insert clevis pins, and install washers and cotter pins. Repeat procedure for
RH aileron cable.
(g) At LH aileron actuation pulley, verify cable routing, position cable guard to pulley bracket,
and install washer and bolt. Safety wire aileron cable to pulley. Repeat procedure at RH
aileron actuation pulley.
WARNING:
(h)
(i)
(j)
(k)
Page 2
Position turnbuckle so that at aileron neutral position, turnbuckle is
centered between LH and RH longerons and at full left and full right
aileron deflection swaged cable end does not contact either longeron.
Install turnbuckles on LH and RH aileron cables.
Install rudder/aileron interconnect to RH aileron cable. (Refer to 27-20)
Perform Aileron System Rigging Adjustment/Test. (Refer to 27-10)
Install ailerons. (Refer to 57-50)
27-10
13773-001
30 Nov 2000
Figure 27-101
Aileron System Cables
13773-001
30 Nov 2000
27-10
Page 3
(3)
Adjustment/Test - Aileron System Rigging
Note:
(a)
All control surface cable tensions should be rigged at an ambient temperature of
70°. Allow temperature to stabilize for a period of four hours before setting cable
tensions.
Acquire necessary tools, equipment, and supplies.
Description
(b)
(c)
(d)
(e)
(f)
(g)
(h)
P/N or Spec.
Supplier
Purpose
WS 144 Rigging Template
-
Cirrus Design Corp.
Aileron Rigging
Inclinometer
PRO360
Maclanburg Duncan
Deflection Angle
Determination
Tensiometer
BT-33-75D
Kent Moore
Cable Tension
Determination
Remove kick plate. (Refer to 25-10)
Remove MFD. (Refer to 34-40)
Remove passenger seats. (Refer to 25-10)
Remove carpet and access panels CF3C and CF4C. (Refer to 6-00)
Insert lock-out pins at aileron actuation pulleys in LH and RH wing.
Insert lock-out pin at aileron actuation pulley in center console.
Set LH yoke grip to 45° by adjusting LH aileron push/pull rod at aileron actuation bracket
so trim indicator is aligned with 0° on roll trim decal. Repeat procedure on RH side.
Note:
Check cable tensions at the following locations:
Wing RH; below access hole CF4R, inboard of cross-over pulley.
Wing LH; below access hole CF4L, inboard of cross-over pulley.
Forward cable RH and LH; below access hole CF4C, outboard of both kickout pulleys.
(i)
(j)
(k)
(l)
Adjust the aileron control cable to 30.0 - 40.0 lb (13.6 - 18.1 Kg).
Ensure aileron cables at kick-out and cross-over pulleys do not rub against pulley flange.
Remove lock-out pins from LH and RH aileron actuation pulleys.
Set ailerons to neutral position using the WS 144 template or approved equivalent.
Note:
To keep the opposite aileron in approximate neutral position, as the crossover turnbuckle is tightened, the direct-cable turnbuckle must be loosened
(or vice-versa).
1
(m)
(n)
(o)
Page 4
Align aileron trailing edges to wing chord line. To lower trailing edge, tighten the
cross-over cable turnbuckle and loosen the direct-cable turnbuckle for the appropriate aileron side.
Fasten inclinometer to LH aileron and set at 0°
Remove lock-out pin in center console aileron actuation pulley.
Verify aileron neutral position remains at 0° +/- 1° with control yoke in neutral position and
cable tension at 30.0 - 40.0 lb (13.6 - 18.1 Kg).
27-10
13773-001
30 Nov 2000
WARNING:
(p)
Turning control yoke counterclockwise should put left aileron trailing
edge in raised position. If this is not true, system is improperly rigged.
The system MUST BE RIGGED CORRECTLY. Check for crossed or
wrapped cables.
Rotate control yoke counterclockwise placing LH aileron in raised position.
Note:
Aileron removal may be necessary to facilitate aileron travel limits/stop
adjustments.
(q)
(4)
Adjust stop screws at LH aileron actuation pulley to allow 12.5° +/- 1° up and down aileron
travel. In addition, adjust stops screws at LH aileron actuation pulley so that for full left roll
input;
1
the LH lower aileron stop contacts first with 12.5° +/- 1° aileron up travel,
2
the RH upper aileron stop shows a 0.035 inch (0.89 mm) gap between stop and pulley bearing,
3
secondary stop mounted on co-pilot control yoke assembly shows a 0.070 inch (1.8
mm) gap between stop and center console.
(r)
Fasten inclinometer to RH aileron and set at 0°
(s)
Adjust stop screws at RH aileron actuation pulley to allow 12.5° +/- 1° up and down aileron
travel. In addition, adjust stops screws at RH aileron actuation pulley so that for full right
roll input;
1
the RH lower aileron stop contacts first with 12.5° +/- 1° aileron up travel,
the LH upper aileron stop shows a 0.035 inch (0.89 mm) gap between stop and pul2
ley bearing,
3
secondary stop mounted on pilot control yoke assembly shows a 0.070 inch (1.8
mm) gap between stop and center console.
4
Verify trim cartridge minimum rod end thread engagement of 0.312 inch (0.79 cm).
Tighten jam nuts.
(t)
Perform Roll Trim Inspection/Check. (Refer to 27-10)
(u) Install access panels and carpet. (Refer to 6-00)
(v)
Install passenger seats. (Refer to 25-10)
(w) Install MFD. (Refer to 34-40)
(x)
Install kick plate. (Refer to 25-10)
Inspection/Check - Aileron System Rigging (See Figure 27-102)
Note:
(a)
If the following aileron leading edge, overlap, and neutral position gap inspections
do not fall within the specified clearances, contact Cirrus Design Customer Service Department for disposition.
Acquire necessary tools, equipment, and supplies.
Description
13773-001
30 Nov 2000
P/N or Spec.
Supplier
Purpose
6" Scale
-
Any Source
Aileron Rigging
Inclinometer
PRO360
Maclanburg Duncan
Deflection Angle
Tensiometer
BT-33-75D
Kent Moore
Cable Tension
27-10
Page 5
(b)
(c)
(d)
(e)
(f)
(g)
(h)
(i)
(j)
(k)
(l)
(m)
(n)
(o)
(p)
(q)
(r)
(s)
Page 6
Defuel airplane. (Refer to 12-20)
Verify gap between aileron leading edge and trailing edge of wing has a minimum of 0.110
inch (2.8 mm) and a maximum of 0.200 inch (5.0 mm) clearance when aileron is fully
deflected, trailing edge down. In the area near the aileron actuation arm where there is no
leading edge cover, the minimum shall be 0.125 inch (3.2 mm).
Verify overlap between aileron and wing has a minimum of 0.010 inch (0.25 mm) and a
maximum of 0.125 inch (3.2 mm) clearance. Aileron may be deflected downward 0° - 5° to
achieve upper overlap, and may be deflected upward 0° - 5° to achieve lower overlap.
With ailerons streamlined, verify neutral position gap has a minimum of 0.060" (1.5 mm)
and a maximum of 0.150" (3.8 mm) at the two points closest to the aileron cove. Maximum
gap in other areas must be less than 0.210" (5.3 mm).
Remove passenger seats. (Refer to 25-10)
Remove carpet and access panels CF3C and CF4C. (Refer to 6-00)
Verify aileron control cable tension set to 30.0 - 40.0 lb (13.6 - 18.1 Kg). (Refer to 27-10)
Verify aileron cable at kick-out pulleys do not rub against pulley flange. (Refer to 27-10)
Verify aileron neutral position remains at 0° +/- 1° with control yoke in neutral position.
Verify 12.5° +/- 1° aileron up and down travel. (Refer to 27-10)
Verify upper aileron stops show a 0.035 inch (0.89 mm) gap between stops and pulley
bearings at aileron actuation pulleys under full left or right roll input. (Refer to 27-10)
Verify 6° +/- 1° aileron trim deflection. (Refer to 27-10)
Perform Rudder-Aileron Interconnect Inspection/Check. (Refer to 27-20)
Verify minimum rod end thread engagement of 0.312 inch (0.79 cm).
Verify proper installation of safety wires and cotter pins on all fasteners and engagement
of all jam nuts through complete aileron control system.
Install access panels and carpet. (Refer to 6-00)
Install passenger seats. (Refer to 25-10)
Fuel airplane. (Refer to 12-10)
27-10
13773-001
30 Nov 2000
Minimum
Maximum
Min. at Actuation Arm
Max. Adjacent to
Aileron Cove
Leading Edge Gap
0.110"
2.8 mm
0.200"
5.1 mm
0.125"
3.2 mm
-
Overlap
0.010"
0.25 mm
0.125"
3.2 mm
-
-
Neutral Position Gap
0.060"
1.5"
0.210"
5.3 mm
-
0.150"
3.8 mm
Figure 27-102
Aileron Gap Overlap Inspections
13773-001
30 Nov 2000
27-10
Page 7
B. Control Grip Assembly (See Figure 27-103)
(1)
Removal - Control Grip Assembly
(a)
Acquire necessary tools, equipment, and supplies.
Description
Pin Extractor
(2)
P/N or Spec.
305183
Supplier
AMP
Purpose
Removal of connector pins.
(b) Remove kick plate. (Refer to 25-10)
(c)
Remove seat. (Refer to 25-10)
(d) Ensure BAT 1, BAT 2, and AVIONICS master switches are in off position.
(e) Pull AUTOPILOT, PITCH TRIM, and ROLL TRIM circuit breakers.
(f)
Disconnect electrical connector at forward end of yoke tube.
(g) Use pin extractor to remove individual pins on electrical connector.
(h) Remove set screws securing control yoke grip to yoke tube.
(i)
Remove yoke tube cover.
(j)
Carefully pull wires through yoke tube and remove grip assembly from airplane.
Installation - Control Grip Assembly
(a) Route control yoke wires through yoke tube.
Note:
(b)
(c)
(d)
(e)
(f)
(g)
(h)
Ensure retaining barbs are sufficiently bent away from electrical pins to prevent pins from dislodging from connector body.
Install pins into electrical connector and connect electrical connector.
Install yoke tube cover.
Install screws securing control grip to yoke tube.
Perform Push-to-Talk (PTT) Switch Adjustment/Test (Refer to 27-10)
Reset AUTOPILOT, PITCH TRIM, and ROLL TRIM circuit breakers.
Install kick plate. (Refer to 25-10)
Install seat. (Refer to 25-10)
C. 4-Way Trim/Autopilot Disconnect Switch (See Figure 27-103)
(1)
(2)
Page 8
Removal - 4-Way Trim/Autopilot Disconnect Switch
(a) Ensure BAT 1, BAT 2, and AVIONICS master switches are in off position.
(b) Pull AUTOPILOT, PITCH TRIM, and ROLL TRIM circuit breakers.
(c)
Remove screws securing switch plate assembly to top of control yoke to gain access to
switch terminals.
(d) De-solder disconnect switch electrical leads.
(e) Remove nut and bezel securing trim switch to switch plate.
(f)
Remove switch from airplane.
Installation - 4-Way Trim/Autopilot Disconnect Switch
(a) Position trim switch in yoke and solder electrical leads to switch terminals.
(b) Install nut and bezel securing switch to switch plate.
(c)
Position switch plate assembly on control yoke and install screws securing plate to yoke.
(d) Reset AUTOPILOT, PITCH TRIM, and ROLL TRIM circuit breakers.
27-10
13773-001
30 Nov 2000
Figure 27-103
Control Grip Assembly Installation
13773-001
30 Nov 2000
27-10
Page 9
D. Push-to-Talk (PPT) Switch (See Figure 27-103)
(1)
Removal - Push-to-Talk (PPT) Switch
(a) Remove screws securing switch plate assembly to top of control grip to gain access to
switch terminals.
CAUTION:
(2)
Identify and mark electrical leads prior to cutting to facilitate reinstallation.
(b) Cut electrical leads from push-to-talk switch as close to switch base as possible.
(c)
Remove bezel and unscrew push-to-talk switch from grip.
Installation - Push-to-Talk (PPT) Switch
(a) Solder new electrical leads to push-to-talk switch.
(b) Route electrical leads through mounting hole, screw switch into grip, and tighten bezel to
switch.
(c)
Splice harness leads to push-to-talk switch leads.
(d) Position switch plate assembly on control grip and install screws securing plate to grip.
E. Control Yoke Assembly (See Figure 27-104)
(1)
Removal - Control Yoke Assembly
(a) Remove control grip assembly. (Refer to 27-10)
(b) Remove seat. (Refer to 25-10)
(c)
Remove kick plate. (Refer to 25-10)
(d) Remove yoke tube trim. (Refer to 25-10)
(e) Remove bolster panel trim. (Refer to 25-10)
(f)
Remove cotter pin, castellated nut, washers, and bolt securing aileron push/pull rod to
control yoke aileron actuation bracket.
(g) Remove cotter pin, castellated nut, washers, and bolt securing elevator push/pull rod to
control yoke elevator stop.
Note:
For the following step, note washer stackup to aid in reinstallation.
(h)
(2)
Page 10
Remove cotter pins, castellated nuts, washers, and bolts securing control yoke assembly
rod ends to console assembly.
(i)
Remove control yoke assembly from airplane.
Installation - Control Yoke Assembly
(a) Position control yoke assembly on center console and install bolts, washers, castellated
nuts, and cotter pins securing the control yoke assembly rod ends to the console assembly.
(b) Install bolt, washers, castellated nut, and cotter pin securing elevator push/pull rod to control-yoke elevator stop.
(c)
Position aileron push/pull rod to control yoke actuation bracket and install bolt, washers,
castellated nut, and cotter pin.
(d) Install yoke tube trim. (Refer to 25-10)
(e) Install bolster panel trim. (Refer to 25-10)
(f)
Install kick plate. (Refer to 25-10)
(g) Install seat. (Refer to 25-10)
(h) Install control grip assembly. (Refer to 27-10)
27-10
13773-001
30 Nov 2000
Figure 27-104
Control Yoke Assembly (Sheet 1 of 2)
13773-001
30 Nov 2000
27-10
Page 11
Figure 27-104
Control Yoke Assembly (Sheet 2 of 2)
Page 12
27-10
13773-001
30 Nov 2000
(3)
F.
Inspection/Check - Control Yoke Assembly
(a) Remove seat. (Refer to 25-10)
(b) Remove kick plate. (Refer to 25-10)
(c)
Verify zero vertical play exists between yoke tube and V-grooved-guide wheels.
(d) Verify V-grooved-guide wheel bolts torqued to 50-55 inch lb (5.5-6.1 Nm).
(e) Verify positive clearance and proper operation of control yoke assembly through full range
of motion.
(f)
Verify yoke movement free of resistance.
(g) Verify yoke tubes/bearing free of grit build-up.
(h) Verify engagement of jam nuts on control yoke assembly rod ends.
(i)
Verify proper installation of safety wires and cotter pins on all fasteners.
(j)
Install kick plate. (Refer to 25-10)
(k)
Install seat. (Refer to 25-10)
Aileron Push/Pull Rods (See Figure 27-104)
(1)
(2)
Removal - Aileron Push/Pull Rods
(a) Remove kick plate. (Refer to 25-10)
(b) Remove MFD. (Refer to 34-40)
(c)
Remove cotter pin, castellated nut, washers, and bolt securing aileron push/pull rod to
aileron actuation pulley.
(d) Remove cotter pin, castellated nut, washers, and bolt securing aileron push/pull rod to
control yoke aileron actuation bracket and remove push/pull rod from airplane.
Installation - Aileron Push/Pull Rods
(a) Position aileron push/pull rod to control yoke aileron actuation bracket and install bolt,
washers, castellated nut, and cotter pin.
(b) Install bolt, washers, castellated nut, and cotter pin securing aileron push/pull rods to aileron actuation pulley.
(c)
Install MFD. (Refer to 34-40)
(d) Install kick plate. (Refer to 25-10)
G. V-Grooved-Guide Wheel (See Figure 27-104)
(1)
(2)
(3)
13773-001
30 Nov 2000
Removal - V-Grooved-Guide Wheel
(a) Remove control yoke assembly. (Refer to 27-10)
(b) Remove bolt, nut, washers, bearing tie plate, and spacer securing V-grooved-guide wheel
to yoke assembly.
Installation - V-Grooved-Guide Wheel
(a) Position spacers, washers, V-grooved-guide wheels, and yoke tube on bearing mount and
loosely secure with bolts and nuts.
(b) Perform V-grooved-guide wheel Adjustment/Test. (Refer to 27-10)
(c)
Install control yoke assembly. (Refer to 27-10)
Adjustment/Test - V-Grooved-Guide Wheel
(a) On bottom, aft side of bearing mount, loosen jam nut and adjust hex screw so zero vertical
play exists between yoke tube and V-grooved-guide wheel.
(b) Repeat step (a) on forward hex screw.
(c)
When no vertical play exist between yoke tube and V-grooved-guide wheels, torque bearing nuts to 50-55 inch lb (5.5-6.1 Nm). After torquing bearing nuts to proper spec, check for
vertical play between yoke tube and V-grooved-guide wheels. If play exists, loosen bearing
nuts and repeat Adjustment/Test.
27-10
Page 13
H. Aileron System Pulleys (See Figure 27-105)
(1)
(2)
(3)
Removal - Aileron Actuation Pulley-Console
(a) Remove carpeting and access panel CF3C from passenger compartment floor. (Refer to
6-00)
(b) Identify and loosen aileron cable tension via turnbuckle.
(c)
Remove MFD. (Refer to 34-40)
(d) Remove cotter pin, castellated nut, washers, and bolt securing aileron push/pull rods to
aileron actuation pulley.
(e) Cut safety wire securing cable to aileron actuation pulley.
(f)
Remove cotter pin, castellated nut, washers, spacer, and bolt securing aileron actuation
pulley to console assembly and remove from airplane.
Installation - Aileron Actuation Pulley-Console
(a) Position aileron actuation pulley over console assembly ensuring lockout holes line up,
and install bolt, spacer, washers, castellated nut.
(b) Install bolt, washers, castellated nut, and cotter pin securing aileron push/pull rods to aileron actuation pulley.
(c)
Perform Aileron System Rigging Adjustment/Test. (Refer to 27-10)
(d) Install access panel CF3C and carpeting. (Refer to 6-00)
(e) Install MFD. (Refer to 34-40)
Removal - Pulley Gang-Forward
The forward pulley gang is used to route the aileron, rudder, and elevator system control cables.
(a)
(4)
(5)
Page 14
Remove carpeting and access panel CF3C from passenger compartment floor. (Refer to
6-00)
(b) Identify and loosen aileron cable tension via turnbuckle.
(c)
Remove carpeting and access panel CF5 from baggage compartment floor. (Refer to 600)
(d) Identify and loosen rudder and elevator cable tension via turnbuckle.
(e) Remove pilot and co-pilot seats.(Refer to 25-10)
(f)
Remove carpeting and access panel CF2L and CF2R from cockpit floor. (Refer to 6-00)
(g) Remove cotter pin, nut, washers, spacers, and bolt securing pulleys to console assembly
and remove components from airplane.
Installation - Pulley Gang-Forward
(a) Position and install bolt, spacers, washers, nut, and cotter pin securing pulleys to console
assembly.
(b) Rig aileron system and perform Aileron System Rigging Adjustment/Test. (Refer to 27-10)
(c)
Rig rudder system and perform Rudder System Rigging Adjustment and Cable Tension
Adjustment/Test. (Refer to 27-20)
(d) Rig elevator system and perform Elevator System Rigging Adjustment/Test. (Refer to 2730)
(e) Install access panels CF3C, CF5, CF2L, and CF2R. (Refer to 6-00)
(f)
Install carpeting. (Refer to 25-10)
Removal - Kick-Out Pulley
(a) Remove passenger compartment seats. (Refer to 25-10)
(b) Remove carpeting and access panel CF4C from passenger compartment floor. (Refer to
6-00)
(c)
Identify and loosen aileron cable tension via turnbuckle.
27-10
13773-001
30 Nov 2000
(d)
(e)
(6)
(7)
(8)
13773-001
30 Nov 2000
Remove cotter pins and washers securing cable retainer clevis pins to pulley brackets
Remove cotter pin, nut, washers, and bolt securing kick-out pulley to pulley brackets and
remove from airplane.
Installation - Kick-Out Pulley
(a) Install pulley, bolt, washers, nut, and cotter pin securing kick-out pulley to brackets.
(b) Position cable on pulley and install cable retainer clevis pins, washers, and cotter pins.
(c)
Perform Aileron System Rigging Adjustment/Test (Refer to 27-10)
(d) Install access panel CF4C. (Refer to 6-00)
(e) Install carpeting. (Refer to 25-10)
Removal - Cross-Over Pulley
(a) Remove passenger compartment seats. (Refer to 25-10)
(b) Remove carpeting and access panels CF4L and CF4R from aft floor. (Refer to 6-00)
(c)
Identify and loosen aileron cable tension via turnbuckle.
(d) Remove cotter pin, washer, and cable retainer clevis pin from pulley assembly and remove
cable from pulley.
(e) Remove cotter pin, washers, and bolt securing cross-over pulley to pulley bracket and
remove from airplane.
Installation - Cross-Over Pulley
(a) Install pulley, washers, bolt, and cotter pin securing cross-over pulley to bracket assembly.
(b) Position cable on pulley and install cable retainer clevis pin, washer, and cotter pin.
(c)
Perform Aileron System Rigging Adjustment/Test (Refer to 27-10)
(d) Install access panels CF4L and CF4R. (Refer to 6-00)
(e) Install carpeting. (Refer to 25-10)
(f)
Install passenger compartment seats. (Refer to 25-10)
27-10
Page 15
Figure 27-105
Aileron System Pulleys (Sheet 1 of 2)
Page 16
27-10
13773-001
30 Nov 2000
Figure 27-105
Aileron System Pulleys (Sheet 2 of 2)
13773-001
30 Nov 2000
27-10
Page 17
I.
Roll Trim System(See Figure 27-106)
(1)
(2)
Removal - Aileron Actuation Pulley-Wing
(a) Remove passenger compartment seats. (Refer to 25-10)
(b) Remove carpeting and access panels CF3C and CF4C (Refer to 6-00) from passenger
compartment.
(c)
Identify and loosen aileron cable tension via turnbuckles.
(d) Remove ailerons. (Refer to 57-50)
(e) Remove aileron cove access panel. (Refer to 6-00)
(f)
Cut safety wire securing cable to aileron actuation pulley.
(g) Remove castellated nut, washers, bolt, and cotter pin securing trim cartridge push/pull rod
to aileron actuation pulley. (LH side only.)
(h) Cut safety wire securing bolt to pulley bracket and remove washers, pulley assembly, and
bolt securing aileron actuation pulley to pulley bracket. Remove aileron actuation pulley
from airplane.
Installation - Aileron Actuation Pulley-Wing
(a)
Acquire necessary tools, equipment, and supplies.
Description
Safety Wire
P/N or Spec.
-
Supplier
Any Source
Purpose
Safetying
(b)
(3)
(4)
Page 18
Position aileron actuation pulley on pulley bracket and secure with washer and bolt. Torque
bolt 10 to 15 inch-pounds (1.1 to 1.6 Nm) and safety wire.
(c)
Install castellated nut, washers, bolt, and cotter pin securing trim cartridge push/pull rod to
aileron actuation pulley. (LH side only.)
(d) Install ailerons. (Refer to 57-50)
(e) Rig and perform Aileron System Rigging Adjustment/Test (Refer to 27-10)
(f)
Install access panel CF3C. (Refer to 6-00)
(g) Install carpeting. (Refer to 25-10)
(h) Install passenger compartment seats. (Refer to 25-10)
Removal - Roll Trim Cartridge
(a) Slightly loosen trim motor assembly to facilitate trim cartridge removal. (Refer to 27-10)
(b) Remove LH aileron. (Refer to 57-50)
(c)
Remove aileron cove access panel. (Refer to 6-00)
(d) Remove castellated nut, washers, spacer, bolt, and cotter pin securing trim cartridge to
trim motor offset arm.
(e) Remove castellated nut, washers, bolt, and cotter pin securing trim cartridge push/pull rod
to aileron actuation pulley and remove from airplane.
Installation - Roll Trim Cartridge
(a) Align trim cartridge push/pull rod with mounting hole on aileron actuation pulley and install
washers, bolt, nut, and castellated nut.
(b) Align trim cartridge with trim motor offset arm and install washers, bolt, castellated nut and
cotter pin.
(c)
Tighten trim motor assembly. (Refer to 27-10)
(d) Perform Roll Trim Cartridge Adjustment/Test. (Refer to 27-10)
(e) Install aileron cove access panel. (Refer to 6-00)
(f)
Install LH aileron. (Refer to 57-50)
27-10
13773-001
30 Nov 2000
Figure 27-106
Roll Trim System Installation
13773-001
30 Nov 2000
27-10
Page 19
(5)
Adjustment/Test - Roll Trim Cartridge
(a)
Acquire necessary tools, equipment, and supplies.
Description
Inclinometer
(b)
(c)
(d)
P/N or Spec.
PRO360
Supplier
Maclanburg Duncan
Purpose
Deflection Angle
Determination
Remove MFD. (Refer to 34-40)
Insert lock-out pin at aileron actuation pulley in center console.
Remove LH aileron. (Refer to 57-50)
CAUTION:
To prevent damage to trim motor, set adjustment screws on limit switch
stops all the way in to limit the travel of the motor to minimal rotation.
(e)
(f)
(g)
(6)
Fasten inclinometer to RH aileron and set at 0°
Remove lock-out pin.
Adjust trim cartridge length to allow 6° +/- 1° aileron trim deflection:
1
If required, adjust initial length of trim cartridge to 9.4 inches (24.1 cm).
2
To increase RH aileron trailing edge up movement (LH aileron trailing edge down),
lengthen trim cartridge by loosening jam nut and turning rod counterclockwise.
3
Shorten cartridge for opposite results.
4
If additional travel is required, adjust trim motor adjustment screws.
(h) Verify trim cartridge minimum rod end thread engagement of 0.312 inch (0.792 cm).
Tighten jam nuts.
(i)
Perform Roll Trim Cartridge Inspection/Check. (Refer to 27-10)
(j)
Install LH aileron. (Refer to 57-50)
(k)
Install MFD. (Refer to 34-40)
Inspection/Check - Roll Trim Cartridge
(a)
Acquire necessary tools, equipment, and supplies.
Description
Inclinometer
(b)
(c)
(d)
(e)
(f)
(g)
(h)
Page 20
P/N or Spec.
PRO360
Supplier
Maclanburg Duncan
Purpose
Deflection Angle
Determination
Verify correct aileron system rigging. (Refer to 27-10)
Fasten inclinometer to left aileron and set at 0°
Verify roll trim cartridge is adjusted to hold ailerons in neutral position +/- 1°.
Run trim motor to full right and full left bank trim positions and verify 6° +/- 1° aileron trim
deflection. If roll trim is out of adjustment, perform Roll Trim Cartridge Adjustment/Test.
(Refer to 27-10)
Verify that at full aileron trim travel (+/- 6°), the aileron-rudder interconnect bungee does
not get tensioned.
Remove inclinometer.
Verify positive clearance between trim cartridge and actuation pulley under full range of
trim motor positions.
27-10
13773-001
30 Nov 2000
(7)
(8)
13773-001
30 Nov 2000
(i)
Verify minimum rod end thread engagement of 0.312 inch (0.79 cm).
(j)
Verify proper installation of safety wires and cotter pins on all fasteners.
Removal - Roll Trim Motor Assembly
(a) Ensure BAT 1, BAT 2, and AVIONICS master switches are in off position.
(b) Pull ROLL TRIM circuit breaker.
(c)
Remove LH aileron. (Refer to 57-50)
(d) Remove aileron cove access panel. (Refer to 6-00)
(e) Slightly loosen trim motor assembly to facilitate trim cartridge removal. (Refer to 27-10)
(f)
Remove castellated nut, washers, spacer, bolt, and cotter pin securing trim cartridge
assembly to trim motor offset arm.
(g) Remove bolts and washers securing ground lead and trim motor assembly to spar.
(h) Disconnect electrical connector and remove trim motor assembly from wing
Installation - Roll Trim Motor Assembly
(a) Connect electrical connector and insert trim motor assembly into spar.
(b) Align mounting bracket with bolt holes and install washers and bolts securing ground lead
and trim motor assembly to spar. Leave assembly slightly loosen to facilitate trim cartridge
installation.
(c)
Install bolt, washers, spacer, castellated nut, and cotter pin securing trim cartridge assembly to trim motor actuation arm.
(d) Tighten bolts securing trim motor assembly to spar.
(e) Perform Roll Trim Cartridge Adjustment/Test. (Refer to 27-10)
(f)
Reset ROLL TRIM circuit breaker.
27-10
Page 21
RUDDER AND YAW TRIM SYSTEM
1. DESCRIPTION
This section describes that portion of the flight control system which controls the position and movement of
the rudder. Included are; rudder system rigging, rudder pedal assembly, pulleys, cables and bellcranks,
rudder-aileron interconnect, and yaw trim system.
Rudder control is transferred by conventional rudder pedals through to the forward pulley gang at the bottom of the center console. From the pulley gang, the single cable system is routed under the cabin floor to
the rudder-aileron interconnect, through to rudder-elevator pulley gang under the baggage floor, and finally
to the rudder actuation pulley. The rudder and elevator control system utilize separate pulleys which mount
to a shared pulley-gang bracket mounted inside the empennage. The rudder actuation pulley drives a
push/pull rod attached to the rudder bellcrank which is bolted directly to the rudder. Each set of pulleys has
a cable retainer to prevent fouling. Adjustable control stops at the rudder actuation pulley limit control surface travel. Two springs attached to the rudder assembly and firewall provide rudder system interconnection and determine system cable tension.
The yaw trim system employes an electric trim tab. Neutral rudder position is held by a ground-adjustable
spring cartridge which bolts to the left rudder pedal torque tube and center console assembly. The cartridge is a captured compression spring that provides a centering force regardless of the direction of control surface deflection.
2. MAINTENANCE PRACTICES
WARNING:
A system rigging Inspection/Check must be performed after loosening any flight control cable to assure proper control surface operation. Refer to the appropriate control
system’s rigging procedures for the Inspection/Check maintenance practices.
A. Rudder System Cables (See Figure 27-201)
(1)
Removal - Rudder System Cables
(a)
Acquire necessary tools, equipment, and supplies.
Description
String
(b)
(c)
(d)
(e)
(f)
(g)
(h)
13773-001
31 July 2001
-
Supplier
Any Source
Purpose
Cable Routing
Remove right mid console trim panel. (Refer to 25-10)
Remove passenger seats. (Refer to 25-10)
Remove carpet and access panels CF3C, CF4C, and CF5. (Refer to 6-00)
Disconnect rudder/aileron interconnect bungee from RH rudder cable. (Refer to 27-20)
Remove empennage pulley gang. (Refer to 27-20)
Remove cotter pin and washer securing pulley guard pin to rudder-elevator pulley gang
bracket and remove pin.
Remove cotter pins and washers securing pulley guard pins to forward pulley gang bracket
and remove pins.
Note:
(i)
P/N or Spec.
To facilitate cable routing during installation, attach string to end of cables
prior to removing from airplane.
Remove cotter pins, washers, nuts, and bolts securing rudder cables to rudder pedal
torque tubes. Attach string to ends of forward rudder cables.
27-20
Page 1
(2)
Page 2
(j)
At access hole CF5 pull forward rudder cables through and remove cables from airplane.
Installation - Rudder System Cables
(a) Install empennage pulley gang. (Refer to 27-20)
(b) At access hole CF5, install turnbuckles on forward and aft rudder cables.
(c)
At rudder pedal torque tubes, route forward rudder cable through mid and forward pulleys
gangs.
(d) Install bolts, washers, nuts and cotter pins securing rudder cables to rudder pedal torque
tubes.
(e) At forward pulley gang, verify cable routing, insert pulley guard pins, and install washers
and cotter pins.
(f)
At rudder-elevator pulley gang, verify cable routing, insert pulley guard pin, and install
washer and cotter pin.
(g) At empennage pulley gang, verify cable routing.
(h) Install rudder/aileron interconnect to RH rudder cable. (Refer to 27-20)
(i)
Perform Rudder System Rigging Adjustment/Test. (Refer to 27-20)
(j)
Perform Rudder-Aileron Interconnect Adjustment/Test. (Refer to 27-20)
(k)
Perform Empennage Pulley Gang Inspection/Check. (Refer to 27-20)
(l)
Install carpet and access panels CF3C, CF4C, and CF5. (Refer to 6-00)
(m) Install RH mid console trim panel. (Refer to 25-10)
(n) Install passenger seats. (Refer to 25-10)
27-20
13773-001
30 Nov 2000
Figure 27-201
Rudder System Cables
13773-001
30 Nov 2000
27-20
Page 3
(3)
Adjustment/Test - Rudder System Rigging
Note:
(a)
All control surface cable tensions should be rigged at an ambient temperature of
70°. Allow temperature to stabilize for a period of four hours before setting cable
tensions.
Acquire necessary tools, equipment, and supplies.
Description
Wood Block
(b)
(c)
(d)
(e)
(f)
(g)
(h)
(k)
(l)
(m)
Page 4
-
Supplier
Any Source
Purpose
Spacer
Remove baggage compartment carpet and access panel CF5. (Refer to 6-00)
Loosen rudder system turnbuckles so all cable tension is removed.
Insert lock-out pin at rudder actuation pulley in empennage.
Set Rudder Pedal Neutral Position:
1
Determine spacer block length by measuring distance from gap between rudder
pedal torque tubes to firewall.
Cut block to determined spacer block length.
2
3
At LH outboard rudder pedal, wedge block between rudder pedal tube and firewall.
4
Tighten LH cable turnbuckle until spacer block falls, indicating LH rudder pedals are
in neutral position.
5
Repeat procedure on RH side.
Remove access panels LE2 and LE1. (Refer to 6-00)
If necessary, adjust rudder-to-vertical stabilizer alignment such that the rudder horn aligns
with the vertical stabilizer with no more than 0.1 inches (.25 cm) misalignment:
1
To move rudder trailing edge right, lengthen push/pull rod by loosening jam nut and
turning rod counterclockwise.
2
Shorten push/pull rod for opposite results.
Remove lock-out pin.
WARNING:
(i)
(j)
P/N or Spec.
Applying right rudder should deflect rudder trailing edge to the right. If
this is not true, system is improperly rigged. The system MUST BE
RIGGED CORRECTLY. Check for crossed or wrapped cables.
Verify application of right rudder deflects rudder trailing edge to the right.
Determine rudder travel:
1
With full left rudder applied, verify rudder deflection angle is equal to 20° +/- 1° by
ensuring distance between chord line of vertical stabilizer and chord line of the
deflected rudder horn is equal to 5.71 inches +/- 0.30 (14.5 cm +/- 7.6 mm). Adjust
stop screws at empennage rudder actuation pulley if necessary.
2
Repeat procedure for right rudder travel.
Ensure that rudder actuation pulley stops limit rudder travel and not yaw trim car3
tridge.
Verify trim cartridge minimum rod end thread engagement of 0.312 inch (0.79 cm).
Tighten jam nuts.
Perform Yaw Trim Cartridge Inspection/Check.(Refer to 27-20)
Install access panels LE2 and LE1. (Refer to 6-00)
27-20
13773-001
30 Nov 2000
(4)
Inspection/Check - Rudder System Rigging (See Figure 27-202)
Note:
If the following rudder leading edge gap and overlap inspections do not fall within
the specified clearances, contact Cirrus Design Customer Service Department for
disposition.
The following rudder gap and overlap inspections apply only to the area between
the waterline of the horizontal stabilizer to the tip of the vertical stabilizer
(a)
Acquire necessary tools, equipment, and supplies.
Description
6" Scale
(b)
(c)
(d)
(e)
(f)
(g)
(h)
13773-001
30 Nov 2000
P/N or Spec.
-
Supplier
Any Source
Purpose
Aileron Rigging
Verify gap between rudder leading edge and trailing edge of vertical stabilizer has a minimum of 0.060 inch (1.5 mm) and a maximum of 0.150 inch (3.8 mm) clearance when rudder is fully deflected right or left.
Verify overlap between rudder and vertical stabilizer has a minimum of 0.00 inch (0.0 mm)
and a maximum of 0.125 inch (3.2 mm) clearance. Rudder may be deflected left 0° - 5° to
achieve right overlap, and may be deflected right 0° - 5° to achieve left overlap.
Verify rudder neutral position remains at 0° +/- 1° with rudder pedals in neutral position.
Verify 20° rudder deflection angle. (Refer to 27-20)
Perform Rudder-Aileron Interconnect Inspection/Check. (Refer to 27-20)
Verify minimum rod end thread engagement of 0.312 inch (0.79 cm).
Verify proper installation of safety wires and cotter pins on all fasteners and engagement
of all jam nuts through complete rudder control system.
27-20
Page 5
Minimum
Maximum
Leading Edge Gap
0.060"
1.5"
0.150"
3.8 mm
Overlap
0.000"
0.0 mm
0.125"
3.2 mm
Figure 27-202
Rudder Gap Inspections
Page 6
27-20
13773-001
30 Nov 2000
B. Rudder Pedal Assembly (See Figure 27-203)
(1)
(2)
(3)
13773-001
30 Nov 2000
Removal - Rudder Pedal Assembly
(a) Remove pilot and co-pilot seats. (Refer to 25-10)
(b) Remove left mid console circuit breaker trim panel. (Refer to 25-10)
(c)
Remove carpeting and access panel CF5 from baggage compartment floor. (Refer to 600)
(d) Identify and loosen rudder cable tension via turnbuckle.
(e) Remove yaw trim cartridge. (Refer to 25-10)
(f)
Remove cotter pin, nut, washers, and bolt securing cable fork ends to torque tube actuation arm.
(g) Disconnect springs from firewall and torque tube actuation arms.
(h) Remove cotter pins, washers, and clevis pins from upper connection at rudder pedals of
each master cylinder.
(i)
Remove cotter pin and washers from rudder pedal pivot tube.
(j)
Slide rudder pedal pivot tube from bearing.
(k)
Detach rudder pedal from torque tube weldment.
(l)
Disconnect brake lines at torque tube fittings. Cap brake lines and fittings.
(m) Remove carpeting and forward access panels CF1R and CF1L to gain access to torque
tube mounting nuts. (Refer to 6-00)
(n) Remove cotter pin, nut, washers, and bolt securing rudder pedal assembly and bracket to
floor.
(o) Remove torque tube assembly from airplane.
Installation - Rudder Pedal Assembly
(a) Align torque tube assembly and bracket over mounting holes on airplane floor and install
bolts, washers, nuts, and cotter pins securing torque tube assembly to airplane floor.
(b) Install forward access panels CF1R and CF1L. (Refer to 6-00)
(c)
Install carpeting. (Refer to 25-10)
(d) Connect brake lines at torque tube fittings.
(e) Align rudder pedal on torque tube weldment, insert rudder pedal pivot tube, and install
washer and cotter pin.
(f)
Install clevis pin, washers, and cotter pin securing rudder pedal to upper connection on
master cylinder.
(g) Connect springs to firewall and torque tube actuation arms
(h) Install bolt, washers, nut and cotter pin securing cable fork ends to torque tube actuation
arms.
(i)
Install yaw trim cartridge. (Refer to 25-10)
(j)
Perform Rudder Pedal Assembly Inspection/Check. (Refer to 27-20)
(k)
Install left mid console circuit breaker trim panel. (Refer to 25-10)
(l)
Install pilot and co-pilot seats. (Refer to 25-10)
(m) Bleed brake system. (Refer to 32-42)
Inspection/Check - Rudder Pedal Assembly
(a) Verify torque tube bushing attach bolt torque is 50-70 inch lb (5.5-7.7 Nm)
(b) Verify positive rudder pedal clearance through full range of pedal motion from brake lines
and any other console structure or systems.
27-20
Page 7
Figure 27-203
Rudder Pedal Installation
Page 8
27-20
13773-001
30 Nov 2000
C. Rudder System Pulleys and Bellcranks (See Figure 27-204), (See Figure 27-205)
(1)
Pulley Gang-Forward
The forward pulley gang is used to route the aileron, rudder, and elevator system control cables.
Maintenance practices pertinent to the forward pulley gang are covered under the Aileron and
Roll Trim System. (Refer to 27-10)
(2)
Removal - Rudder-Elevator Pulley Gang
(a) Remove carpeting and access panel CF5 from baggage compartment floor. (Refer to 600)
(b) Identify and loosen rudder and elevator cable tension via turnbuckle.
(c)
Remove cotter pin, nut, washers, spacers, and bolt securing pulleys to rudder-elevator pulley gang bracket and remove components from airplane.
Installation - Rudder-Elevator Pulley Gang
(a) Position and install bolt, spacers, washers, nut, and cotter pin securing pulleys to rudderelevator pulley gang bracket.
(b) Rig rudder system and perform Rudder System Rigging Adjustment/Test. (Refer to 27-20)
(c)
Rig elevator system and perform Elevator System Rigging Adjustment/Test. (Refer to 2730)
(d) Install fuselage floor access panel CF5 and carpeting. (Refer to 6-00)
Removal - Empennage Pulley Gang
(a) Remove carpeting and access panel CF5 from baggage compartment floor. (Refer to 600)
(b) At access panel CF5, remove turnbuckles from rudder and elevator cables.
(c)
Remove fuselage access panels RE1, RE2, LE1, and LE2. (Refer to 6-00)
(d) Loosen jam nuts securing rudder and elevator push/pull rods to rudder and elevator actuation pulleys.
(e) Remove cotter pin, castellated nut, washer, spacer, and bolt securing rudder push/pull rod
to rudder bell crank.
(f)
Remove cotter pin, castellated nut, washers, and bolt securing elevator push/pull rod to
elevator bell crank.
(g) Unscrew rudder push/pull rod from rod end attached to rudder actuation pulley and
remove from airplane.
(h) Unscrew elevator push/pull rod from rod end attached to elevator actuation pulley and
remove from airplane.
(i)
Remove nut, washer, and screw securing support brace to empennage, loosen jam nut
securing support brace to pulley gang, and remove support brace from airplane.
(j)
Gain access to pulley gang mounting bracket through access hole in vertical stabilizer
bulkhead and remove bolts securing pulley gang to bulkhead. Remove gang assembly
from airplane.
(k)
Remove cotter pins securing pulley guard pins to empennage pulley gang bracket and
remove pins.
(l)
Cut safety wire securing cables to actuation pulleys.
(m) At access hole CF5, pull rudder and elevator cables through. Remove cables from airplane.
Installation - Empennage Pulley Gang
(a) Prior to empennage pulley gang installation, secure rudder and elevator cables to actuation pulleys with safety wire and insert pulley guard pins, install washers and cotter pins
(b) Route rudder and elevator cables through access hole RE1 forward to access hole CF5.
(3)
(4)
(5)
13773-001
30 Nov 2000
27-20
Page 9
(c)
(6)
Page 10
Insert pulley gang into empennage and position gang assembly over vertical stabilizer
bulkhead holes. Install bolts securing pulley gang to bulkhead.
(d) Screw rudder push/pull rod onto rod end attached to rudder actuation pulley and tighten
jam nut.
(e) Screw elevator push/pull rod onto rod end attached to elevator actuation pulley and tighten
jam nut.
(f)
Install bolt, spacer, washer, castellated nut, and cotter pin securing rudder push/pull rod to
rudder bell crank.
(g) Install bolt, washers, castellated nut, and cotter pin securing elevator push/pull rod to elevator bell crank.
(h) Install support brace to pulley gang and install screw, washer, and nut securing support
brace to empennage.
(i)
Install Rudder and Elevator Cables. (Refer to 27-20), (Refer to 27-30)
Inspection/Check - Empennage Pulley Gang
(a) Remove fuselage access panels RE1, RE2 LE1, and LE2. (Refer to 6-00)
(b) Verify positive clearance of pulleys through full range of rudder and elevator movement.
(c)
Verify positive clearance between pitch trim cartridge and vertical stabilizer bulkhead
through full range of elevator and trim motor operation.
(d) Verify minimum rod end thread engagement of 0.312 inch (0.79 cm).
(e) Verify proper safety wire and cotter pin installation on all fasteners.
(f)
Install fuselage access panels RE1, RE2 LE1, and LE2. (Refer to 6-00)
27-20
13773-001
30 Nov 2000
Figure 27-204
Rudder-Elevator Pulley Gang
13773-001
30 Nov 2000
27-20
Page 11
Figure 27-205
Empennage Pulley Gang (Sheet 1 of 2)
Page 12
27-20
13773-001
30 Nov 2000
Figure 27-205
Empennage Pulley Gang (Sheet 1 of 2)
13773-001
30 Nov 2000
27-20
Page 13
D. Yaw Trim Cartridge (See Figure 27-203)
(1)
(2)
(3)
Removal - Yaw Trim Cartridge
(a) Remove left mid console circuit breaker trim. (Refer to 25-10)
(b) Remove cotter pin, castellated nut, washers, bushing, spacers, and bolt securing trim cartridge to console bracket.
(c)
Remove cotter pin, castellated nut, washers, and bolt securing trim cartridge push/pull rod
to left torque tube actuation arm and remove from airplane.
Installation - Yaw Trim Cartridge
(a) Position trim cartridge push/pull rod on left torque tube actuation arm and install cotter pin,
castellated nut, washers, and bolt.
(b) Install cotter pin, castellated nut, washers, bushing, spacers, and bolt securing trim cartridge to console bracket.
(c)
Perform Rudder System Rigging Adjustment/Test. (Refer to 27-20)
(d) Install Left Mid Console Circuit Breaker Trim. (Refer to 25-10)
Inspection/Check - Yaw Trim Cartridge
(a) Verify correct rudder system rigging. (Refer to 27-20)
(b) Verify yaw trim cartridge is adjusted to hold rudder in neutral position +/- 1°.
(c)
Verify positive clearance between trim cartridge and actuation pulley under full range of
trim motor positions.
(d) Verify minimum rod end thread engagement of 0.312 inch (0.79 cm).
(e) Verify proper installation of safety wires and cotter pins on all fasteners.
E. Yaw Trim Servo
(1)
(2)
(3)
Page 14
Removal - Yaw Trim Servo
(a) Disconnect Pitch/Yaw Trim circuit breaker.
(b) Remove composite rudder tip from bottom of rudder.
(c)
Disconnect yaw trim wire harness.
(d) Disconnect ground wires.
(e) Disassemble connector.
(f)
Disconnect cable ties securing wire harness to rudder.
(g) Disconnect trim actuation arm from rudder trim tab assembly.
(h) Remove rivets securing yaw trim servo to rudder and remove servo assembly from airplane.
Installation - Yaw Trim Servo
(a) Position yaw trim servo to rudder and secure with rivets.
(b) Connect trim actuation arm to rudder trim tab assembly so that actuation arm extends
approximately 0.38 inch past nut.
(c)
Connect cable ties securing wire harness to rudder.
(d) Assemble wire harness connector.
(e) Connect ground wires.
(f)
Connect yaw trim servo wire harness connector.
(g) Install composite rudder tip to bottom of rudder.
(h) Reset Pitch/Yaw Trim circuit breaker.
Adjustment/Test - Yaw Trim Servo
(a) TBD.
27-20
13773-001
31 July 2001
F.
Yaw Trim Gage
(1)
(2)
Removal - Yaw Trim Gage
(a) Disconnect Pitch/Yaw Trim circuit breaker.
(b) Remove screws securing gage to center console.
(c)
Disconnect yaw trim gage connector and remove from airplane.
Installation - Yaw Trim Gage
(a) Connect yaw trim gage connector.
(b) Position yaw trim gage connector to center console and secure with screws.
(c)
Reset Pitch/Yaw Trim circuit breaker
G. Rudder-Aileron Interconnect (See Figure 27-206)
(1)
(2)
(3)
Removal - Rudder-Aileron Interconnect
(a) Remove rear passenger compartment carpeting. (Refer to 25-10)
(b) Remove cabin floor access panel 3C. (Refer to 6-00)
(c)
Remove nuts, washers, clamps, and bolts securing bungee cord to right aileron cable.
(d) Remove nut, washers, clamps, and bolt securing right rudder cable to interconnect arm.
(e) Remove washers, bolts, and spacer securing interconnect bracket to left longeron and
remove interconnect from airplane.
Installation - Rudder-Aileron Interconnect
(a) Install spacer, bolts, and nuts securing interconnect bracket to left longeron.
(b) Install bolt, clamps, washers, and nut securing right rudder cable to interconnect arm.
(c)
Install bolt, clamps, washers, and nuts securing bungee cord to right aileron cable.
(d) Perform Rudder-Aileron Interconnect Adjustment/Check (Refer to 27-20)
(e) Install fuselage floor access panel 3C. (Refer to 6-00)
(f)
Install rear passenger compartment carpeting.(Refer to 25-10)
Adjustment/Test - Rudder-Aileron Interconnect
Note:
Improper Rudder-Aileron Interconnect adjustment may effect autopilot roll trim
and roll performance.
The interconnect must be adjusted so that full rudder application will meet the requirements of
FAR 23.177 or optionally:
full left rudder deflection causes 5° minimum, 8° maximum right aileron trailing edge down;
full right rudder deflection causes 5° minimum, 8° maximum left aileron trailing edge down.
To adjust the interconnect, perform the following procedure:
(a)
Acquire necessary tools, equipment, and supplies.
Description
WS 144 Rigging Template
(b)
(c)
(d)
(e)
13773-001
31 July 2001
P/N or Spec.
-
Supplier
Purpose
Cirrus Design Corp.
Aileron Rigging
Remove rear passenger compartment carpeting. (Refer to 25-10)
Remove cabin floor access panel 3C. (Refer to 6-00)
Initially position bungee clamps approximately 4.5" forward and aft of interconnect arm
centerline.
Set roll trim to full right.
27-20
Page 15
(f)
(4)
Page 16
Remove excess slack from interconnect arm to forward clamp by pulling excess bungee
through clamp.
(g) Set roll trim to full left.
(h) Remove excess slack from interconnect arm to aft clamp by pulling excess bungee
through clamp.
(i)
Position aileron rigging template on wing.
(j)
Verify that steady rudder application will move the ailerons the required travel while also
ensuring that at full aileron trim travel, the bungee does not get tensioned.
(k)
Install fuselage floor access panel 3C. (Refer to 6-00)
(l)
Install rear passenger compartment carpeting.(Refer to 6-00)
Inspection/Check - Rudder-Aileron Interconnect
(a) Verify interconnect adjustment will meet the requirements of FAR 23.177 or optionally:
1
full left rudder deflection causes 5° minimum, 8° maximum right aileron trailing edge
down.
2
full right rudder deflection causes 5° minimum, 8° maximum left aileron trailing edge
down.
(b) Verify bungee cord ends are folded back upon themselves and securely terminated with
vinyl electrical tape or electrical heat shrink wrap.
(c)
Verify positive bungee cord clearance under slack and full cross control movement.
(d) Verify minimum 0.06 inch clearance between interconnect arm and aileron cable turnbuckles. Shim arm with washers if necessary to obtain correct clearance.
27-20
13773-001
31 July 2001
Figure 27-206
Rudder-Aileron Interconnect Installation
13773-001
31 July 2001
27-20
Page 17
ELEVATOR AND PITCH TRIM SYSTEM
1. DESCRIPTION
This section describes that portion of the flight control system which controls the position and movement of
the elevator. Included are; elevator system torque tube, rigging, push/pull rods, pulleys, and pitch trim cartridge.
Elevator control motion is transferred by conventional yoke motion through a linkage to a pulley sector
mounted on the elevator torque tube. From the pulley sector, the single cable system runs to a pulley gang
at the bottom of the center console, routed to a second pulley gang under the baggage floor, and finally to
the elevator actuation pulley. The elevator actuation pulley drives a push/pull rod attached to the elevator
bellcrank which is bolted directly to the elevators. Each set of pulleys has a cable retainer to prevent fouling. Adjustable control stops at the elevator actuation pulley limit control surface travel.
The pitch trim system employs a ground adjustable trim tab, and a spring cartridge activated by an electric
motor to act as the autopilot servo. The spring cartridge, directly connected to the elevator bellcrank and
the electric trim motor, provides a centering force regardless of the direction of control surface deflection.
When activated, the trim motor moves the spring cartridge causing the elevator bellcrank to move the elevator to a new trimmed position. A 4-way switch, mounted on both yoke grips, controls the pitch trim system.
WARNING:
A system rigging Inspection/Check must be performed after loosening any flight control cable to assure proper control surface operation. Refer to the appropriate control
system’s rigging procedures for the Inspection/Check maintenance practices.
2. MAINTENANCE PRACTICES
A. Elevator System Rigging (See Figure 27-301)
(1)
Removal - Elevator System Cable
(a)
Acquire necessary tools, equipment, and supplies.
Description
String
(b)
(c)
(d)
(e)
(f)
(g)
(h)
13773-001
30 Nov 2000
-
Supplier
Any Source
Purpose
Cable Routing
Remove RH mid console trim panel. (Refer to 25-10)
Remove LH mid console circuit breaker trim panel. (Refer to 25-10)
Remove passenger seats. (Refer to 25-10)
Remove carpet and access panels CF5. (Refer to 6-00)
Remove empennage pulley gang. (Refer to 27-20)
Remove cotter pin and washer securing pulley guard pin to rudder-elevator pulley gang
bracket and remove pin.
Remove cotter pins and washers securing pulley guard pins to forward pulley gang bracket
and remove pins.
Note:
(i)
(j)
P/N or Spec.
To facilitate cable routing during installation, attach string to end of cables
prior to removing from airplane.
Remove nuts, washers, and screws securing elevator cables to elevator pulley sector.
At elevator pulley sector pull forward cables through. Cut string from cable and remove
cable from airplane.
27-30
Page 1
(2)
Page 2
Installation - Elevator System Cable
(a) Install empennage pulley gang. (Refer to 27-20)
(b) At access hole CF5, install turnbuckles on forward and aft elevator cables.
(c)
At access hole CF5, route forward elevator cable through forward and mid pulleys gangs.
(d) Install screws, washers, and nuts securing elevator cables to elevator pulley sector.
(e) At forward pulley gang, verify cable routing, insert pulley guard pins, and install washers
and cotter pins.
(f)
At rudder-elevator pulley gang, verify cable routing, insert pulley guard pin, and install
washer and cotter pin.
(g) At empennage pulley gang, verify cable routing.
(h) Perform Elevator System Rigging Adjustment/Test. (Refer to 27-30)
(i)
Perform Empennage Pulley Gang Inspection/Check. (Refer to 27-20)
(j)
Install carpet and access panels CF5. (Refer to 6-00)
(k)
Install RH mid console trim panel. (Refer to 25-10)
(l)
Install LH mid console circuit breaker trim panel. (Refer to 25-10)
(m) Install passenger seats. (Refer to 25-10)
27-30
13773-001
30 Nov 2000
Figure 27-301
Elevator System Cables
13773-001
30 Nov 2000
27-30
Page 3
(3)
Adjustment/Test - Elevator System Rigging
Note:
(a)
All control surface cable tensions should be rigged at an ambient temperature of
70°. Allow temperature to stabilize for a period of four hours before setting cable
tensions.
Acquire necessary tools, equipment, and supplies.
Description
(b)
(c)
(d)
(e)
(f)
(g)
(h)
(i)
(j)
(k)
Page 4
Supplier
Purpose
BL 60 Template
Reserved
Cirrus Design Corp.
Elevator Rigging
BL 12 Template
Reserved
Cirrus Design Corp.
Elevator Rigging
Tensiometer
BT-33-75D
Kent Moore
Cable Tension
Determination
Inclinometer
PRO360
Maclanburg Duncan
Deflection Angle
Determination
Clamp
-
Any Source
Neutral Pitch
Determination
Remove baggage compartment carpet and access panel CF5. (Refer to 6-00)
Remove access panels RE1 and RE2. (Refer to 6-00)
Remove kick plate. (Refer to 25-10)
Set control yoke to neutral pitch position:
1
Clamp control yoke so the distance from push/pull rod end to the inside face of the
yoke carriage is 3.81 inches.
2
Adjust elevator push/pull rods so that at full forward or full aft yoke movement the
elevator cables on the pulley sector do pull away or bend around sector. Elevator
cables should stay in sector track through full forward or aft yoke travel.
Insert lock-out pin at elevator actuation pulley in empennage.
Set elevators to neutral position using BL 12 and BL 60 templates.
1
Align elevator trailing edges to horizontal stabilizer chord line. To move elevator trailing edge up, lengthen push/pull rod by loosening jam nut and turning rod counterclockwise. Shorten push/pull rod for opposite results.
Adjust the elevator control cable to a tension of 30.0 - 40.0 lb (13.6 - 18.1 Kg).
Remove lock-out pin.
Fasten inclinometer to elevator and set at 0°.
Verify elevator neutral position remains at 0° +/- 1° with control yoke in neutral position
WARNING:
(l)
(m)
(n)
P/N or Spec.
Pulling back on pilot control yoke should deflect elevator trailing edge
up. If this is not true, system is improperly rigged. The system MUST
BE RIGGED CORRECTLY. Check for crossed or wrapped cables.
Verify pulling back on pilot control yoke deflects elevator trailing edge up.
Streamline elevator.
Adjust stop screws at empennage elevator actuation pulley to allow 15° +/- 1° down and
25° +/- 1° up elevator travel. In addition, adjust stops screws at empennage elevator actuation pulley so that for full forward or full aft yoke movement;
27-30
13773-001
30 Nov 2000
1
2
(o)
(p)
(q)
(r)
(s)
(t)
(u)
13773-001
30 Nov 2000
the empennage elevator actuation pulley stops contact before secondary stops,
secondary stops mounted on either control yoke assemblies show a 0.035 inch +/0.020 (0.89 mm +/- 0.51 mm) gap between stop and yoke bearing mount.
Verify trim cartridge minimum rod end thread engagement of 0.312 inch (0.79 cm).
Tighten jam nuts.
Perform Pitch Trim Inspection/Check. (Refer to 27-30)
Remove inclinometer.
Remove clamp holding control yoke to neutral pitch position.
Install kick plate. (Refer to 25-10)
Install access panels RE1 and RE2.(Refer to 6-00)
Install baggage compartment carpet and access panel CF5. (Refer to 6-00)
27-30
Page 5
(4)
Inspection/Check - Elevator System Rigging (See Figure 27-302)
Note:
(a)
If the following elevator leading edge gap and overlap inspections do not fall within
the specified clearances, contact Cirrus Design Customer Service Department for
disposition.
Acquire necessary tools, equipment, and supplies.
Description
(b)
(c)
(d)
(e)
(f)
(g)
(h)
(i)
(j)
(k)
Page 6
P/N or Spec.
Supplier
Purpose
6" Scale
-
Any Source
Aileron Rigging
Inclinometer
PRO360
Maclanburg Duncan
Deflection Angle
Determination
Tensiometer
BT-33-75D
Kent Moore
Cable Tension
Determination
Remove baggage compartment carpet and access panel CF5. (Refer to 6-00)
Verify gap between elevator leading edge and trailing edge of horizontal stabilizer has a
minimum of 0.060 inch (1.5 mm) and a maximum of 0.150 inch (3.8 mm) clearance when
elevator is fully deflected up and down.
Verify overlap between elevator and horizontal stabilizer has a minimum of 0.010 inch
(0.25 mm) and a maximum of 0.125 inch (3.2 mm) clearance. Elevator may be deflected
downward 0° - 5° to achieve upper overlap, and may be deflected upward 0° - 5° to
achieve lower overlap.
Verify elevator control cable tension set to 30.0 - 40.0 lb (13.6 - 18.1 Kg). (Refer to 27-30)
Verify elevator neutral position remains at 0° +/- 1° with control yoke in neutral position
Verify 15° +/- 1° down and 25° +/- 1° up elevator travel. (Refer to 27-30)
Verify minimum rod end thread engagement of 0.312 inch (0.79 cm).
Verify proper installation of safety wires and cotter pins on all fasteners and engagement
of all jam nuts through complete elevator control system.
Install access panels RE1 and RE2.(Refer to 6-00)
Install baggage compartment carpet and access panel CF5. (Refer to 6-00)
27-30
13773-001
30 Nov 2000
Minimum
Maximum
Leading Edge Gap
0.060"
1.5"
0.150"
3.8 mm
Overlap
0.010"
0.25 mm
0.125"
3.2 mm
Figure 27-302
Elevator Gap Inspections
13773-001
30 Nov 2000
27-30
Page 7
B. Forward Elevator Push/Pull Rod (See Figure 27-303)
(1)
(2)
Removal - Forward Elevator Push/Pull Rod
(a) Remove seat. (Refer to 25-10)
(b) Remove kick plate. (Refer to 25-10)
(c)
Remove mid-console trim panel. (Refer to 25-10)
(d) Remove cotter pin, castellated nut, washers, and bolt securing elevator push/pull rod end
to control-yoke elevator stop.
(e) Remove cotter pin, castellated nut, washers, and bolt securing elevator push/pull rod end
to torque tube end-fitting weldment and remove elevator push/pull rod from airplane.
Installation - Forward Elevator Push/Pull Rod
(a) Position elevator push/pull rod to control-yoke stop and install bolt, washers, castellated
nut, and cotter pin.
(b) Position elevator push/pull rod to torque tube end-fitting weldment and install bolt, washers, castellated nut, and cotter pin.
(c)
Install mid-console trim panel. (Refer to 25-10)
(d) Install kick plate. (Refer to 25-10)
(e) Install seat. (Refer to 25-10)
C. Elevator Torque Tube (See Figure 27-303)
(1)
(2)
Page 8
Removal - Elevator Torque Tube
(a) Remove MFD. (Refer to 34-40)
(b) Remove pilot and co-pilot seats. (Refer to 25-10)
(c)
Remove kick plate. (Refer to 25-10)
(d) Remove mid-console trim panels from LH and RH sides. (Refer to 25-10)
(e) Gain access to torque tube coupler through MFD opening and remove nut, washers, and
bolt securing torque tube coupler to elevator torque tube.
(f)
Remove nut, washers, and bolt securing elevator torque tube to end-fitting weldment. Disconnect end-fitting weldment from elevator torque tube.
(g) Slide torque tube outboard to disconnect from coupler then slide tube inboard to remove
from console bearing plate.
Installation - Elevator Torque Tube
(a) From the inboard side of console, insert elevator torque tube into console bearing plate,
then position and slide the torque tube into the elevator coupler and install bolt, washer,
and nut.
(b) Install bolt, washers, and nut securing the end-fitting weldment to elevator torque tube.
(c)
Install forward center console trim panels. (Refer to 25-10)
(d) Install kick plate. (Refer to 25-10)
(e) Install pilot and co-pilot seats. (Refer to 25-10)
(f)
Install MFD. (Refer to 34-40)
27-30
13773-001
30 Nov 2000
Figure 27-303
Elevator System
13773-001
30 Nov 2000
27-30
Page 9
D. Elevator System Pulleys (See Figure 27-105), (See Figure 27-204),(See Figure 27-205), (See Figure 27-303)
WARNING:
(1)
(2)
(3)
A system rigging Inspection/Check must be performed after loosening any flight
control cable to assure proper control surface operation. Refer to the appropriate
control system’s rigging procedures for the Inspection/Check maintenance practices.
Removal - Elevator Pulley Sector
(a) Remove co-pilot seat. (Refer to 25-10)
(b) Remove right mid console trim. (Refer to 25-10)
(c)
Remove carpeting and access panel CF5 from baggage compartment floor. (Refer to 600) Identify and loosen elevator cable tension via turnbuckle.
(d) Remove nuts, washers, and screws securing cable to elevator pulley sector.
(e) Remove nuts, washers, and bolts securing elevator pulley-sector to torque-tube coupler
flange and remove from airplane.
Installation - Elevator Pulley Sector
(a) Position pulley sector on torque-tube coupler flange and install bolts, washers, and nuts.
(b) Position cable on elevator pulley sector and install screws, washers, and nuts.
(c)
Rig and perform Elevator System Rigging Adjustment/Test. (Refer to 27-30).
(d) Install access panel and carpeting. (Refer to 6-00)
(e) Install co-pilot seat. (Refer to 25-10)
Forward Pulley Gang
The forward pulley gang is used to route the aileron, rudder, and elevator system control cables.
Maintenance practices pertinent to the forward pulley gang are covered under the Aileron and
Roll Trim System. (Refer to 27-10)
(4)
Rudder-Elevator Pulley Gang
The rudder-elevator pulley gang is used to route the rudder, and elevator system control cables.
Maintenance practices pertinent to the rudder-elevator pulley gang are covered under the Rudder and Yaw Trim System. (Refer to 27-20)
(5)
Empennage Pulley Gang
The rudder and elevator control system utilize separate pulleys which mount to a shared pulleygang bracket mounted inside the empennage. Maintenance practices pertinent to the empennage pulley gang are covered under the Rudder and Yaw Trim System (Refer to 27-20)
E. Pitch Trim System (See Figure 27-304)
(1)
(2)
Page 10
Removal - Pitch Trim Cartridge
(a) Remove RE1, RE2 and LE1 access panels. (Refer to 6-00)
(b) Remove nut, washers, and bolt securing trim cartridge push/pull rod to trim motor actuation arm.
(c)
Remove castellated nut, washers, bolt, and cotter pin securing trim cartridge to elevator
bellcrank and remove from airplane.
Installation - Pitch Trim Cartridge
(a) Align trim cartridge push/pull rod with mounting hole on elevator bellcrank and install
washers, bolt, nut, and castellated nut.
(b) Align trim cartridge housing with trim motor actuation arm and install washers, bolt, castellated nut and cotter pin.
(c)
Install RE1, RE2, and LE1 access panels. (Refer to 6-00)
27-30
13773-001
30 Nov 2000
Figure 27-304
Pitch Trim System
13773-001
30 Nov 2000
27-30
Page 11
(3)
Adjustment/Test - Pitch Trim Cartridge
(a)
Acquire necessary tools, equipment, and supplies.
Description
Inclinometer
P/N or Spec.
PRO360
Supplier
Maclanburg Duncan
Purpose
Deflection Angle
Determination
(b)
(c)
(4)
Remove access panels RE1 and RE2. (Refer to 6-00)
Set elevators to neutral position using BL 12 and BL 60 templates.
1
Align elevator trailing edges to horizontal stabilizer chord line. To move elevator trailing edge up, lengthen push/pull rod by loosening jam nut and turning rod counterclockwise. Shorten push/pull rod for opposite results.
(d) Fasten inclinometer to elevator and set at 0°.
(e) Run trim motor to full nose-down trim position until travel is stopped by lower limit switch.
(f)
Adjust elevator push/pull rod so elevator deflection angle is -10.5° +/-1.0°:
1
To increase elevator trailing edge (TE) down movement, shorten push/pull rod by
loosening jam nut and turning rod clockwise
2
Lengthen cartridge for opposite results.
(g) Run trim motor to full nose-up trim position until travel is stopped by upper limit switch.
(h) Adjust elevator push/pull rod so minimum elevator deflection angle is +17°:
1
To increase elevator trailing edge (TE) up movement, lengthen push/pull rod by
loosening jam nut and turning rod counterclockwise.
2
Shorten cartridge for opposite results.
(i)
Perform Pitch Trim Cartridge Inspection/Check. (Refer to 27-30)
(j)
Verify trim cartridge minimum rod end thread engagement of 0.312 inch (0.79 cm).
Tighten jam nuts.
(k)
Instal access panels RE1 and RE2. (Refer to 6-00)
Inspection/Check - Pitch Trim Cartridge
(a)
Acquire necessary tools, equipment, and supplies.
Description
Inclinometer
(b)
(c)
(d)
(e)
(f)
(g)
(h)
(i)
Page 12
P/N or Spec.
PRO360
Supplier
Maclanburg Duncan
Purpose
Deflection Angle
Determination
Verify correct elevator system rigging. (Refer to 27-30)
Fasten inclinometer to elevator and set at 0°.
Run trim motor to full nose-down trim position until travel is stopped by lower limit switch.
Verify elevator deflection angle is -10.5° +/-1.0°°. If pitch trim is out of adjustment, perform
Pitch Trim Cartridge Adjustment/Test. (Refer to 27-30)
Run trim motor to full nose-up trim position until travel is stopped by upper limit switch.
Verify minimum elevator deflection angle is +17°. If pitch trim is out of adjustment, perform
Pitch Trim Cartridge Adjustment/Test. (Refer to 27-30)
Remove inclinometer.
Verify positive clearance between trim cartridge and actuation pulley under full range of
trim motor positions.
27-30
13773-001
30 Nov 2000
(5)
(6)
F.
(j)
Verify minimum rod end thread engagement of 0.312 inch (0.79 cm).
(k)
Verify proper installation of safety wires and cotter pins on all fasteners.
Removal - Pitch Trim Motor
(a) Ensure BAT 1, BAT 2, and AVIONICS master switches are in OFF position.
(b) Pull PITCH TRIM circuit breaker.
(c)
Remove access panel RE2. (Refer to 6-00)
(d) Remove composite rudder bottom. (Refer to 55-40)
(e) Remove nut, washer, and screw securing pulley gang support brace to empennage.
(f)
Disconnect trim motor electrical connection.
(g) Remove nut, washers, and bolt securing trim cartridge push/pull rod to trim motor actuation arm.
(h) Remove nuts, washers, and bolts, securing pitch trim motor assembly to vertical stabilizer
spar and remove from airplane.
Installation - Pitch Trim Motor
(a) Position pitch trim motor assembly over vertical stabilizer spar holes and install bolts,
washers, and nuts.
(b) Install bolt, washers, and nut securing trim cartridge push/pull rod to trim motor actuation
arm.
(c)
Connect trim motor electrical connection.
(d) Install screw, washer, and nut securing pulley gang support brace to empennage.
(e) Install composite rudder bottom. (Refer to 55-40)
(f)
Install access panel RE2. (Refer to 6-00)
(g) Reset PITCH TRIM circuit breaker.
Pitch Trim Tab
Pitch trim adjustment is ground adjustable only and is achieved by changing the deflection angle of the
trim tab. Adjustments may be made to a maximum trim tab angle of 25° from straight, trim tab trailing
edge up.
13773-001
30 Nov 2000
27-30
Page 13
STALL WARNING SYSTEM
1. DESCRIPTION
The airplane utilizes an electro-pneumatic stall warning system to indicate an approach to aerodynamic
stall. As the angle of attack increases and the airplane approaches an aerodynamic stall, the stagnation
point moves lower on the leading edge causing low pressure on the upper leading edge to increase. As low
pressure passes over the stall warning port located on the leading edge of the wing, negative pressure is
sensed by a pressured switch which activates the stall warning horn. The pressure switch, located on the
left side panel of the mid-console, forward of the circuit breaker panel, is a normally open, diaphragm-operated switch. The stall warning horn, located on the top flange of the left-center console rib, is a piezoceramic audio indicator which, when achieved, supplies a continuous 94 dB, 2800 Hz tone.
Primary VDC power is supplied through the 2-amp ANNUNCATOR POWER circuit breaker on the Essential Bus. In the case of emergency procedures that require the MASTER switch to be turned OFF, power is
supplied to the stall warning system directly from the airplane battery on the clock circuit. In addition, this
provides a ground check of the stall warning system with the power off. In the event of a total electrical failure, power for the stall warning system is supplied by the turn coordinator battery back-up by turning the
EMERG. switch ON.
2. MAINTENANCE PRACTICES
A. Stall Warning Pressure Switch (See Figure 27-311)
(1)
(2)
(3)
Removal - Stall Warning Pressure Switch
(a) Ensure AVIONICS and MASTER switches are in OFF position.
(b) Pull ANNUCIATOR POWER circuit breaker.
(c)
Remove LH mid-console circuit breaker trim panel.
(d) Open circuit breaker panel.
(e) Remove nuts, washers, and screws securing pressure switch to console.
(f)
Disconnect electrical leads from pressure switch.
(g) Disconnect stall warning line form pressure switch and remove switch from airplane.
Installation - Stall Warning Pressure Switch
(a) Position pressure switch on console and install screws, washers, and nuts.
(b) Connect stall warning line to pressure switch.
(c)
Connect electrical leads to pressure switch.
(d) Close circuit breaker panel.
(e) Reset ANNUCIATOR POWER circuit breaker.
(f)
Install LH mid-console circuit breaker trim panel.
(g) Perform Stall Warning Operational Check - Ground. (Refer to 27-31)
(h) Perform Stall Warning Operational Check - Flight. (Refer to 27-31)
Inspection/Check - Stall Warning Operational Check - Ground
(a)
Acquire necessary tools, equipment, and supplies.
Description
Suction Cup
(b)
13773-001
30 Nov 2000
P/N or Spec.
-
Supplier
Any Source
Purpose
Application of negative pressure.
Ensure leading edge surrounding stall warning port, located on RH wing leading edge, is
clean.
27-31
Page 1
(c)
(d)
(4)
Lightly moisten suction cup and firmly press cup over stall warning port.
Activate stall warning pressure switch by sharply pulling the suction cup directly away from
the warning port. Note momentary audible warning signal.
Inspection/Check - Stall Warning Operational Check - Flight
WARNING:
(a)
(b)
(c)
(d)
(e)
(f)
(g)
The following Adjustment/Test must be performed by a Cirrus Design authorized pilot.
Remove access cap covering stall warning pressure switch located on lower portion of the
left mid-console circuit breaker trim panel.
Perform Stall Warning Operational Check - Ground. (Refer to 27-31)
Place airplane in stall attitude.
Record airplane speed that stall warning signal sounds.
Record airplane speed that stall occurred.
Stall warning signal should sound 5 to 10 KIAS prior to stall.
If necessary, adjust stall warning pressure switch until stall warning signal sounds 5 to 10
KIAS prior to stall.
1
Rotating the adjustment screw 1 full turn clockwise will raise the speed at which the
stall warning horn sounds by approximately 2 knots.
2
Rotating the adjustment screw 1 full turn counterclockwise will lower the speed at
which the stall warning horn sounds by approximately 2 knots.
B. Stall Warning Horn (See Figure 27-311)
(1)
(2)
Page 2
Removal - Stall Warning Horn
(a) Remove MFD (Refer to 34-40).
(b) Disconnect stall warning horn electrical connector.
(c)
Remove nuts, washers, and screws securing horn to console rib and remove from airplane.
Installation - Stall Warning Horn
(a) Position stall warning horn on console rib and install screws, washers, and nuts.
(b) Connect electrical connector.
(c)
Install MFD. (Refer to 34-40)
(d) Perform Stall Warning Operational Check - Ground. (Refer to 27-31)
(e) Perform Stall Warning Operational Check - Flight. (Refer to 27-31)
27-31
13773-001
30 Nov 2000
Figure 27-311
Stall Warning System Installation
13773-001
30 Nov 2000
27-31
Page 3
FLAPS
1. GENERAL
This section describes that portion of the flight control system which controls the position and movement of
the flaps. Included are the torque tube assembly, flap actuator assembly, flap indicator and switch.
Flap control is achieved via a flap activation switch mounted on the center console. Indicator lights identify
flap position. A linear actuator, located under the baggage floor, drives a torque tube interconnect between
the left and right flaps. A load limiting clutch on the actuator prevents flap deployment at high speeds. Proximity sensors on the flap linear actuator identify flap position and surface travel. In the event of a sensor
failure, torque tube/actuator geometry prevents the flaps from causing an uncontrollable flight condition.
2. MAINTENANCE PRACTICES
A. Flap Actuator Assembly (See Figure 27-501)
(1)
(2)
Removal - Flap Actuator Assembly
(a) Pull FLAPS circuit breaker.
(b) Remove passenger compartment seats. (Refer to 25-10)
(c)
Remove carpet and access panels CF4C and CF5. (Refer to 6-00)
(d) Remove cotter pin, castellated nut, washers, and bolt securing flap actuator to torque tube
coupler.
(e) Disconnect flap actuator electrical connector.
(f)
Remove bolts, washers, and radius blocks securing flap actuator assembly to actuator
bracket and remove from airplane.
Installation - Flap Actuator Assembly
(a) Position flap actuator assembly to actuator bracket and install bolts and washers.
(b) Manually extend actuator to approximately 50% full deployment.
(c)
Connect flap actuator electrical connector.
(d) Reset FLAPS circuit breaker.
(e) Turn flap switch to UP.
(f)
Turn MASTER SWITCH to ON.
(g) After flap actuator stops, turn flap switch to 50%.
(h) Loosen adjustment screws and reposition full up proximity sensor to within 1.0 inch (2.5
cm) of middle proximity sensor.
(i)
Loosen adjustment screws and reposition full down proximity sensor to within 1.0 inch (2.5
cm) of middle proximity sensor.
(j)
Install bolt, washers, castellated nut, and cotter pin securing flap actuator push/pull rod to
torque tube coupler.
(k)
Perform Flap Travel Adjustment/Test. (Refer to 27-50)
(l)
Install access panels and carpet. (Refer to 6-00)
(m) Install passenger compartment seats. (Refer to 25-10)
B. Torque Tube Assembly (See Figure 27-501)
(1)
13773-001
30 Nov 2000
Removal -Torque Tube Assembly
(a) Remove nuts, washers, spacers, and bolts securing torque tube thrust collar and end fitting to flap torque tube.
(b) Remove passenger compartment seats. (Refer to 25-10)
(c)
Remove carpet and access panel CF4C. (Refer to 6-00)
(d) Remove cotter pin, castellated nut, washers, and bolt securing flap actuator push/pull rod
to torque tube coupler.
27-50
Page 1
(e)
(2)
Remove nuts, washers, spacers, and bolts, securing torque tube coupler and torque
tubes.
(f)
Withdraw torque tube from outboard tube bushing.
(g) Withdraw torque tube coupler from inboard tube bushing.
Installation -Torque Tube Assembly
(a) Insert torque tube coupler into inboard tube bushing.
(b) Insert LH torque tube through outboard bushing into torque tube coupler.
(c)
Insert RH torque tube through outboard bushing into torque tube coupler.
(d) Install bolts, washers, spacers, and nuts securing torque tube coupler and torque tubes.
(e) Install bolts, washers, spacers, and nuts securing torque tube thrust collar and end fitting
to flap torque tube.
(f)
Install bolt, washers, castellated nut, and cotter pin securing flap actuator push/pull rod to
torque tube coupler.
(g) Perform Flap Travel Adjustment/Test. (Refer to 27-50)
(h) Install access panel and carpet. (Refer to 6-00)
(i)
Install passenger compartment seats. (Refer to 25-10)
C. Flap Switch Assembly (See Figure 27-501)
(1)
(2)
Removal - Flap Switch Assembly
(a) Pull FLAPS circuit breaker.
(b) Remove right mid console trim. (Refer to 25-10)
(c)
Remove bolt, washer, and clamp securing switch wiring to center console assembly and
disconnect switch connector.
(d) Loosen switch handle set screws and remove handle from switch shaft.
(e) Remove nut, star washer, and adjustable stop washer securing switch handle to console
panel.
(f)
Remove LED sleeves and securing LEDs to console panel.
(g) Withdraw switch assembly from console panel and remove assembly from airplane.
Installation - Flap Switch Assembly
Note:
(a)
(b)
(c)
(d)
(e)
(f)
(g)
Page 2
Prior to securing switch to console panel, ensure that alignment tab on switch
aligns with hole in panel and the adjustable stop washer is installed to limit switch
travel to 3 positions, starting from the counterclockwise position.
Position flap switch in panel hole and install adjustable stop washer, star washer, and jam
nut.
Position switch handle on switch and install set screws.
Position flap LEDs in panel holes and install LED sleeves.
Connect electrical connector.
Install clamp, washer, and bolt securing wires to console assembly.
Install right mid console trim. (Refer to 25-10)
Reset FLAPS circuit breaker.
27-50
13773-001
30 Nov 2000
D. Flap Circuit Card Assembly (CCA) (See Figure 27-501)
(1)
(2)
Removal - Flap Circuit Card Assembly
(a) Pull FLAPS circuit breaker.
(b) Remove passenger compartment seats. (Refer to 25-10)
(c)
Remove carpet and access panels CF4C. (Refer to 6-00)
(d) Disconnect flap CCA connector.
(e) Remove nuts, washers, spacers, and screws securing flap CCA to longeron.
Installation - Flap Circuit Card Assembly
(a) Position flap CCA to longeron and install screws, washers, spacers, and nuts.
(b) Connect flap CCA connector.
(c)
Install access panels and carpet. (Refer to 6-00)
(d) Install passenger compartment seats. (Refer to 25-10)
(e) Reset FLAPS circuit breaker.
E. Flap Relays (See Figure 27-501)
CAUTION:
(1)
(2)
13773-001
30 Nov 2000
Failure of either flap relay is cause for replacement of both relays. Replace both relays
upon failure of one.
Removal - Flap Relay
(a) Pull FLAPS circuit breaker.
(b) Remove passenger compartment seats. (Refer to 25-10)
(c)
Remove carpet and access panels CF4C. (Refer to 6-00)
(d) Firmly pull relay out of socket.
Install - Flap Relay
(a) Position relay on socket and firmly push relay into place.
(b) Install access panels and carpet. (Refer to 6-00)
(c)
Install passenger compartment seats. (Refer to 25-10)
(d) Reset FLAPS circuit breaker.
27-50
Page 3
Figure 27-501
Flap System Installation (Sheet 1 of 3)
Page 4
27-50
13773-001
30 Nov 2000
Figure 27-501
Flap System Installation (Sheet 2 of 3)
13773-001
30 Nov 2000
27-50
Page 5
Figure 27-501
Flap System Installation (Sheet 3 of 3)
Page 6
27-50
13773-001
30 Nov 2000
F.
Flap Adjustments and Inspections
(1)
Adjustment/Test - Flap Travel
(a)
Acquire necessary tools, equipment, and supplies.
Description
(e)
(f)
(g)
(h)
(i)
Supplier
Purpose
WS 40 Wing Template
13057-101/-102 Cirrus Design Corp.
Flap Rigging
WS 132 Wing Template
13057-107/-180 Cirrus Design Corp.
Flap Rigging
Inclinometer
PRO360
Deflection Angle
Determination
Note:
(b)
(c)
(d)
P/N or Spec.
Maclanburg Duncan
Flap may exhibit a slight twist from root to tip. Average the inboard and outboard angle to set the neutral point.
Remove passenger compartment seats. (Refer to 25-10)
Remove carpet and access panels CF4C and CF5. (Refer to 6-00)
Adjust flap actuator end fitting engagement length:
1
Airplane S/N 1005 - 1034; ensure minimum engagement length of flap actuator end
fitting to flap actuator rod is 0.250 inch (0.635 cm).
2
Airplane S/N 1035 and subsequent; adjust the flap actuator end fitting so that the
flap actuator and the rod end connected to the torque tube coupler are installed to a
depth between the end fitting inspection holes.
Turn MASTER SWITCH to ON.
Turn flap switch to UP.
Mark WS 132 reference line for left and right wing templates as follows:
1
From wing cuff, measure 1.75 inches inboard and mark.
From flap outboard edge, measure 10.7 inches inboard and mark.
2
3
Draw WS 132 reference mark line from leading edge to trailing edge.
Mark WS 40 reference line for left and right wing templates as follows:
1
From flap inboard edge, measure 1.75 inches outboard and mark.
2
From wing cuff, measure 90 inches inboard and mark.
3
Draw WS 40 reference mark line from leading edge to trailing edge.
Position WS 40 and WS 132 template on left and right wing to verify flaps are in full up
position. If flaps are not set at full up position adjust the flap actuator proximity sensor as
follows:
1
Turn switch to 50%.
Note:
For best results in determining proximity sensor location, do not move
sensor more than 0.10 inch (2.5 mm) per positioning attempt.
2
(j)
(k)
13773-001
30 Nov 2000
Reposition full up proximity sensor by loosening screw and repositioning on flap
actuation extension tube.
3
Turn flap switch to UP.
Repeat step (f) until flaps are in full up position.
4
Fasten inclinometer to inboard side of left flap and set at 0°.
Turn flap switch to 100%.
27-50
Page 7
(l)
Ensure flap exhibits a 32° angle change. If flaps are not set at 100% deployed position
adjust the flap actuator proximity sensor as follows:
1
Turn switch to 50%.
Note:
For best results in determining proximity sensor location, do not move
sensor more than 0.10 inch (2.5 mm) per positioning attempt.
2
(m)
(n)
Reposition full down proximity sensor by loosening screw and repositioning on flap
actuation extension tube.
3
Turn flap switch to 100%.
Repeat step (i) until flaps are in 100% deployed position.
4
Turn flap switch to UP. After flaps stop, turn flap switch to 50%.
Ensure flap exhibits a 16° angle change. If flaps are not set at 50% deployed position
adjust the flap actuator proximity sensor as follows:
1
Turn flap switch to 100%
Note:
For best results in determining proximity sensor location, do not move
sensor more than 0.10 inch (2.5 mm) per positioning attempt.
2
(2)
Reposition half down proximity sensor by loosening screw and repositioning on flap
actuation extension tube.
3
Turn flap switch to 50%.
4
Repeat step (k) until flaps are in 50% deployed position.
(o) Remove inclinometer from flap.
(p) Install carpet and access panels CF4C and CF5. (Refer to 6-00)
(q) Install passenger compartment seats. (Refer to 25-10)
Inspection/Check - Flap Rigging (See Figure 27-502)
Note:
(a)
If the following flap leading edge gap and overlap inspections do not fall within the
specified clearances, contact Cirrus Design Customer Service Department for disposition.
Acquire necessary tools, equipment, and supplies.
Description
90° Square
(b)
(c)
(d)
(e)
(f)
Page 8
P/N or Spec.
-
Supplier
Any Source
Purpose
Flap Rigging
Using 90° square with flaps fully extended, verify maximum gap between crown of flap and
trailing edge of wing is 0.965 inch +/- 0.300 (2.50 cm +/- 7.6 mm) at root of the flap, and
0.843 inch +/- 0.300 (2.10 cm +/- 7.6 mm) at tip of flap.
Using 90° square with flaps fully extended, verify maximum overlap between leading edge
of flap and trailing edge of wing is 1.475 inch +/- 0.300 (3.80 cm +/- 7.6 mm) at root of flap,
and 0.813 inch +/- 0.300 (2.10 cm +/- 7.6 mm) at tip of flap.
Verify flap UP, 50%, and 100% deployment positions. (Refer to 27-50)
Verify minimum rod end thread engagement of 0.312 inch (0.79 cm).
Verify flap actuator end fitting engagement length:
1
Airplane S/N 1005 - 1034; ensure minimum engagement length of flap actuator end
fitting to flap actuator rod is 0.250 inch (0.635 cm).
27-50
13773-001
30 Nov 2000
2
(g)
13773-001
30 Nov 2000
Airplane S/N 1035 and subsequent; verify the flap actuator and the rod end at the
flap actuator end fitting are installed to a depth between the end fitting inspection
holes.
Verify proper installation of safety wires and cotter pins on all fasteners and engagement
of all jam nuts through complete flap control system.
27-50
Page 9
Max. at Root of Flap
Min. at Root of Flap
Max. at Tip of Flap
Min. at Tip of Flap
Leading Edge Gap
1.265"
3.21 cm
0.665"
1.7 cm
1.143"
2.90 cm
0.543"
1.4 cm
Overlap Gap
1.775"
4.5 cm
1.175"
3.0 cm
1.113"
2.82 cm
0.513"
1.3 cm
Figure 27-502
Flap Gap and Overlap Inspection
Page 10
27-50
13773-001
30 Nov 2000
CHAPTER
FUEL
CHAPTER 28 - FUEL
LIST OF EFFECTIVE PAGES
Chapter/Section
Page
Date
28-LOEP
1
31 JULY 2001
28-TOC
1
31 JULY 2001
28-TOC
2
31 JULY 2001
28-00
1
30 NOV 2000
28-00
2
30 NOV 2000
28-00
3
30 NOV 2000
28-00
4
30 NOV 2000
28-10
1
30 NOV 2000
28-10
2
30 NOV 2000
28-10
3
30 NOV 2000
28-10
4
30 NOV 2000
28-10
5
30 NOV 2000
28-10
6
30 NOV 2000
28-10
7
30 NOV 2000
28-10
8
30 NOV 2000
28-10
9
30 NOV 2000
28-10
10
30 NOV 2000
28-10
11
30 NOV 2000
28-20
1
30 NOV 2000
28-20
2
30 NOV 2000
28-20
3
30 NOV 2000
28-20
4
30 NOV 2000
28-20
5
30 NOV 2000
28-20
6
30 NOV 2000
28-20
7
30 NOV 2000
28-20
8
30 NOV 2000
28-20
9
30 NOV 2000
28-20
10
30 NOV 2000
28-40
1
30 NOV 2000
28-40
2
30 NOV 2000
28-40
3
30 NOV 2000
28-40
4
30 NOV 2000
28-40
5
31 JULY 2001
28-40
6
30 NOV 2000
13773-001
31 July 2001
28-LOEP
Page 1
CHAPTER 28 - FUEL
TABLE OF CONTENTS
Subject
FUEL
Chapter/Section
Page
28-00
General
1
Troubleshooting
1
STORAGE
28-10
Description
1
Maintenance Practices
2
Wing Fuel Tank
Adjustment/Test - Wing Fuel Tank Pressure Test
Inspection/Check - Wing Fuel Tank
Cleaning - Wing Fuel Tank
Repairing - Wing Fuel Tank
Collector Tanks
Adjustment/Test - Collector Tank
Inspection/Check - Collector Tank
Fuel Strainers
Removal - Fuel Strainers
Installation - Fuel Strainers
Inspection/Check - Fuel Strainers
Fuel System Ventilation
Removal - Fuel System Ventilation
Installation - Fuel System Ventilation
Inspection/Check - Fuel System Ventilation
Inspection/Check - Fuel Storage System
Stain
Seep
Heavy seep
Running Leak
Fuel Drain Valves
Removal - Fuel Drain Valves
Installation - Fuel Drain Valves
Inspection/Check - Fuel Drain Valves
DISTRIBUTION
2
2
5
5
5
7
7
7
9
9
9
9
9
9
9
9
9
9
9
9
9
10
10
10
10
28-20
Description
1
Maintenance Practices
2
Gascolator
Removal - Gascolator
Installation - Gascolator
13773-001
31 July 2001
2
2
2
28-TOC
Page 1
CHAPTER 28 - FUEL
TABLE OF CONTENTS
Subject
Chapter/Section
Removal - Gascolator Fuel Filter Screen
Installation - Gascolator Fuel Filter Screen
Cleaning - Gascolator Fuel Filter Screen
Electric Fuel (Boost) Pump
Removal - Electric Fuel (Boost) Pump
Installation - Electric Fuel (Boost) Pump
Selector Valve
Removal - Selector Valve
Installation - Selector Valve
Cabin Fuel System Fuel Enclosure (Firewall)
Removal - Cabin Fuel System Fuel Enclosure
Installation - Cabin Fuel System Fuel Enclosure
INDICATING
Page
2
2
2
4
4
4
6
6
6
9
9
9
28-40
Description
1
Maintenance Practices
1
Fuel Quantity Indicator
Removal - Fuel Quantity Indicator
Installation - Fuel Quantity Indicator
Adjustment - Fuel Quantity Indicator
Test - Fuel Quantity Indicator and Fuel Sender Test
Fuel Quantity Sensors
Removal - Wing Tank Fuel Quantity Sensors
Installation - Wing Tank Fuel Quantity Sensors
Removal - Wing Collector Tank Fuel Quantity Sensors
Installation - Wing Collector Tank Fuel Quantity Sensors
Test - Fuel Sensor Test
Fuel Pressure Switch
Removal - Fuel Pressure Switch
Installation - Fuel Pressure Switch
Fuel Flow Gage
Fuel Flow Sensor
Page 2
28-TOC
1
1
1
1
2
4
4
4
4
4
4
5
5
5
5
5
13773-001
31 July 2001
FUEL
1. GENERAL
This chapter contains information on storage, distribution, and indicating components of the fuel system. The engine is supplied with fuel drawn out of the left or right integral fuel tank (depending on the
fuel selector valve position). Fuel flows through a flapper assembly (swing check valve), integral collector tank, selector valve, electric auxiliary fuel pump, gascolator, engine-driven fuel pump, fuel-flow
transducer, throttle body, fuel injection manifold (spider), and is then distributed to the fuel nozzles. All
fittings installed in the cabin area of the fuselage are enclosed in a vented and drained enclosure.
Refer to Chapter 73 for information on servicing of the engine-driven fuel pump, fuel flow transducer
and fuel nozzles. (See Figure 28-001), (See Figure 28-002)
2. TROUBLESHOOTING
Trouble
Filler cap leaks
Probable Cause
Remedy
Filler cap improperly installed
Install filler cap properly
Seal improperly installed
Replace fuel cap seal
Deteriorated seal
Replace fuel cap seal
Improperly tightened cap fuel nuts Tighten or loosen fuel cap nuts as
required
Fuel connector(s) leak
Loose connector(s)
Inspect and tighten connector(s)
Defective seals
Replace seals
Defective thread
Replace threaded component
Insufficient fuel flow
Restricted fuel filter/screen
Defective mechanical fuel pump
Defective fuel pressure sensor or
insufficient voltage supplied
Cracked fuel line
Clean filter or screen
Replace pump
Replace pressure sensor
Find voltage problem
Replace line
Fuel quantity indicator reading
incorrect
Defective fuel sensor
Defective fuel quantity indicator
Incorrectly adjusted fuel sensor
Faulty fuel system wiring
Replace sensor
Replace indicator
Adjust sensor
Repair/Replace wire(s)
No fuel flow to engine driven fuel
pump
Fuel selector valve not in the on
position
Fuel tanks empty
Fuel line disconnected or broken
Fuel tank screen plugged
Defective fuel selector valve
Plugged gascolator
Fuel line plugged
Frozen fuel line
Turn selector valve on
13773-001
30 Nov 2000
Fill tanks
Repair or replace line
Clean or replace screen
Replace selector valve
Clean or replace gascolator
Remove obstruction
Thaw and drain complete fuel system
28-00
Page 1
Trouble
Fuel starvation after start up
Probable Cause
Partial fuel flow from preceding
causes
Malfunction of engine-driven fuel
pump or fuel system
Fuel vents plugged
Water in fuel
Remedy
See remedies from above
Replace pump
Remove obstruction
Remove water
No fuel output indicated from fuel Mixture control set in lean position
flow gage when auxiliary pump is and throttle lever is pulled back
Fuel line disconnected before fuel
operated
flow sensor
Defective fuel pump switch
NOTE: If the auxiliary pump is
turned on when the engine is off, Open or defective circuit breaker
Loose connections or open circuit
the fuel flow gage will show a
Defective electric fuel pump
momentary fuel flow.
Defective engine-driven fuel pump
bypass or defective fuel system
Adjust mixture control richer and
move throttle lever forward.
Disconnect fuel line after fuel flow
sensor
Replace switch
Reset or replace circuit breaker
Tighten connections/Repair wire
Replace pump
Replace pump/troubleshoot fuel
system
Erratic fuel quantity indicator read- Defective fuel quantity indicator
ings
Loose ground
Defective fuel sensor
Replace indicator
Repair ground
Replace fuel sensor
Fuel quantity indicator indicates
inaccurate fuel level
Fuel system indicator calibration Calibrate indicator
Defective fuel quantity indicator or Replace indicator or sensor
sensor
Sticky fuel quantity indicator
pointer
Defective fuel quantity indicator
Replace indicator
No fuel quantity indication
Fuel tanks empty
Left or right fuel tank circuit
breaker open or defective
Loose connections or open circuit
Defective fuel quantity indicator or
sensor
Fill with approved fuel
Reset or replace circuit breaker
Fuel flow indicator/transducer
Replace fuel flow indicator/transducer
Turn on Auxiliary Fuel Pump
Fluctuating fuel flow indications
Vapor in fuel lines
Fuel leaks from electric fuel pump Faulty internal fuel pump seal
drain manifold fitting
Page 2
28-00
Tighten connections/Repair wire
Replace indicator or sensor
Replace electric fuel pump
13773-001
30 Nov 2000
Figure 28-001
Fuel System Schematic
13773-001
30 Nov 2000
28-00
Page 3
Figure 28-002
Fuel System
Page 4
28-00
13773-001
30 Nov 2000
STORAGE
1. DESCRIPTION
The fuel storage system consists primarily of a vented integral 42-gallon (159-liters) capacity fuel tank in
each wing, a integral fuel collector tank/sump in each wing, a three-position selector valve, an electric
boost pump, gascolator, an engine-driven fuel pump, and five fuel drains.
Each wing contains an integral fuel tank bounded by the upper and lower wing skins, main spar web, aft
wing shear web, and the inboard and outboard fuel tank ribs. The wing skins and fuel ribs, are of fiberglass
composite with foam core sandwich construction. A fuel baffle rib is also integral to each tank to reduce
fuel slosh. Fuel return lines are fed to the top of each fuel tank. Access panels are located in each fuel tank
bay for servicing. Fuel tank fittings and screens are accessible through wing access panels. Fuel flows by
gravity from each fuel tank to the corresponding integral collector tank. Fuel then feeds into a fuel tube
located in the fuselage.
Sumps are built into the fuel tanks and collector tanks. Integral collector tanks are located at the inboard
wing root area of each wing. The collector tank offers a sediment and water collection area, and capacity
for ensuring fuel flow to the engine during uncoordinated maneuvering. A drain is located in each tank for
preflight inspection. The collector tank drains are located at the fuel system low points. The center of the
fuel drains can be pushed inward with the fuel sampler to inspect for water or contaminates. A flapper
assembly (swing check valve) is installed in the line from the wing tanks to the collector tank to keep fuel in
the collector tanks during uncoordinated maneuvers. Each collector tank holds approximately 3.5 gallons
(13.2 liters). The integral collector tank access cover is supported by a continuous flange around the lower
skin opening.
A 1/16-inch mesh strainer is installed on each of the two ports in each integral fuel tank. The strainers are
accessible by removing the inboard fuel tank access cover. The stainless steel strainers are brazed to
stainless steel nuts and are 1.0 inch (25.4 mm) in diameter by 2.5 inches (63.5 mm) long. The fuel strainers in the fuel tanks should always be cleaned after the airplane has been in storage. If any damage or
restrictions are noted during inspection, then replace the strainers.
Each filler cap has a viton o-ring which seals the fitting in the upper wing skin. The filler cap is grounded to
the airframe through a resistive (approximately 100 ohm) connection through the aircraft lightning protection. Fuel tabs are integrated into the fuel filler necks and indicate approximately 23.0 usable gallons (87.0
liters) in each tank.
Each integral fuel tank is vented from the top of each fuel tank to a flush NACA style scoop vent located
approximately 51 inches from the wing tip on the lower wing skin. Vent lines from the main fuel tanks are
constructed of fuel resistant plastic. The fuel tank vent lines do not have any points in which moisture can
accumulate during normal ground or level flight operation. The top of each collector tank is vented to the
inboard fuel rib of the corresponding fuel tank.
Fuel drains are provided at various locations throughout the fuel system for drainage of water and sediment from the fuel system. To activate the drain valves, a fuel sampler cup/screwdriver is furnished with
the flyaway kit. Drain valves are located at the inboard access panel of each integral fuel tank, both collector tanks, and the gascolator.
Note:
13773-001
30 Nov 2000
When servicing fuel system pipe thread fittings, apply a small amount of grease (MIL-G60320 Type 1) to the external threads.
28-10
Page 1
2. MAINTENANCE PRACTICES
A. Wing Fuel Tank
(1)
Adjustment/Test - Wing Fuel Tank Pressure Test
(a)
Acquire necessary tools, equipment, and supplies.
Description
(b)
(c)
(d)
(e)
(f)
(g)
(h)
(i)
(j)
(k)
(l)
(m)
Page 2
P/N or Spec.
Supplier
Purpose
Rubber vent hose
-
Any Source
Test fuel system
Tee fitting
-
Any Source
Test fuel system
Air pressure gage
0-5 psi
Any Source
Verify pressure
Water manometer
-
Any Source
Verify pressure
Soapy water solution
-
Any Source
Inspect for leaks
Fill each tank with approved fuel. (Refer to 12-10)
Place the fuel selector valve in the off position.
Remove the fuel system vent scoops (NACA vent) from the underside of each wing, next
to the wing tip (LW14 or RW14).
Disconnect vent hoses from the vent scoops.
Plug outboard end of either vent hose.
Connect a rubber hose and tee into the unplugged vent hose.
Attach a water manometer and a low pressure air gage into the tee. The water manometer
will be the primary checking device for pressure measurements. The pressure gage is the
backup gage and will serve as a check on the manometer.
Record the ambient and calculated maximum water pressure and level readings.
WARNING:
Never attempt to remove the fuel filler cap with pressure in the fuel
system. Never apply regulated or unregulated air from an air compressor to the fuel vent hose.
CAUTION:
The water manometer will be the primary checking device for pressure
measurements. The pressure gage is the backup gage and will serve as a
check on the manometer. Do not pressurize the fuel tanks to more than
55.4 inches of water (2.0 psi). Major structural damage to the fuel tank/wing
may occur if more than 55.4 inches of water (2.0 psi) is applied. Stop pressurizing the fuel system when either gage indicates the maximum allowable
pressure or level. If pressure or level exceeds 55.4 inches of water (2.0 psi),
the fuel system may sustain damage that cannot be repaired. Always blow
into hose, never inhale fuel or vapor. It may take several breaths to reach
55.4 inches of water (2.0 psi). Only air gages that are known to be accurate
shall be used.
Blow into the open end of hose until the manometer indicates 55.4 inches of water (2.0
psi).
Pinch or clamp hose to maintain maximum pressure in the fuel tanks.
Leave the fuel system pressurized for 10-20 minutes.
Inspect fuel and collector tanks, fittings, and caps for signs of leakage.
28-10
13773-001
30 Nov 2000
(n)
(o)
If leakage is suspected (manometer level or pressure readings drop), apply soapy water to
the area in question and inspect for bubbles.
WARNING:
If the fuel system leaks, release all pressure from the system before
removing the fuel filler caps. Never attempt to remove the fuel filler
cap with pressure in the fuel system. Never remove the fuel filler cap
when a soapy water solution is present or contamination of the fuel
system could occur.
Note:
Inspect fuel tank seams, fuel lines, hoses, caps, connections, collector tank
seams and fittings, and all other fuel related areas for leakage with soapy
water.
If the fuel cap leaks, replace the outer o-ring. If leak is observed in recessed area around
the stem, cap must be replaced.
Note:
(p)
(q)
(r)
(s)
(t)
(u)
13773-001
30 Nov 2000
Minor fuel cap leaks may be stopped by turning the nut on the fuel cap
clockwise to apply more tension on the stem o-ring.
If either tank leaks, release all pressure from the fuel system. Repair fuel tank as required.
(Refer to 51-10)
Install and secure the fuel filler caps.
Remove the plug and tee from each vent hose.
Connect both vent hoses to the fuel vent scoops and secure with clamps.
Install the vent hose scoop to the underside of each wing.
Turn the selector valve on.
28-10
Page 3
Figure 28-101
Fuel Cap Assembly
Page 4
28-10
13773-001
30 Nov 2000
(2)
Inspection/Check - Wing Fuel Tank
Note:
No detectable fuel leaks are allowed after the repair procedure has been performed. (Refer to 28-10)
(a)
(3)
Drain a pint of fuel from the fuel tank through the drain valve into a clean, clear container.
Check this fuel sample for any evidence of contaminates. Repeat this same procedure,
draining at least a quart of fuel from the collector tank through drain valve.
(b) If no contaminates are found then no further action is required. Make an entry in the airplane logbook stating the inspection was performed.
(c)
If contaminates are noted, the fuel tank must be drained and cleaned. (Refer to 12-10)
Cleaning - Wing Fuel Tank
WARNING:
(a)
Special precautions must be observed when using solvents for cleaning.
Solvents used in cleaning are toxic and flammable. Fresh air masks and/or
adequate ventilation, eye protection, and skin protection must be used in all
closed areas.
Acquire necessary tools, equipment, and supplies.
Description
P/N or Spec.
Supplier
Purpose
Methyl Ethyl Ketone (MEK) ASTM D-740
Type 1or 2
Any Source
Cleaning
Acetone
Any Source
Cleaning
ASTM D-329
(b)
(c)
(4)
Vacuum thoroughly to remove all chips, filings, dirt, etc., from the tank area.
All surfaces to be sealed should be thoroughly cleaned by wiping with a clean cloth dampened with Methyl Ethyl Ketone (MEK), acetone or similar solvent, and dried with a clean
cloth before allowing solvent to evaporate. Always pour the solvent on the cloth to prevent
contaminating solvent. Do not allow cloth to drip. Wipe surfaces with clean, dry cloths until
white haze disappears. Never use contaminated solvent.
Repairing - Wing Fuel Tank
The following procedures are to be used for sealing integral fuel tanks made of composite materials. If a repair must be made to a bondline, joint or seam, the repair should be made using a
sealant that meets or exceeds MIL-S-8802. (Refer to 20-10) If the leak is coming from a small
pinhole located away from any bondlines, joints or seams, the repair must be made using a Type
2, Class 1 non-structural resin system. Repair procedures for composites are covered in Chapter 51-00. (Refer to 51-00)
WARNING:
Purge the fuel tank with argon or carbon dioxide gas, prior to sealing leaks.
This will help minimize the possibility of an explosion. Use a portable vapor
detector to determine when it is safe to seal the fuel tank(s). Use only nonsparking tools during the sealing process.
Prevent fuel drains, vent openings, and outlet screens from becoming
restricted when sealing fuel tanks.
13773-001
30 Nov 2000
28-10
Page 5
(a)
Acquire necessary tools, equipment, and supplies.
Item
(b)
(c)
(d)
(e)
(f)
(g)
(h)
Page 6
Any Source
Purpose
ASTM D740
Type 1or 2
Non-structural Resin
Repair System
Shell Oil
Shell EPON
862/heloxy 68
& Teta 3234
resin system
Type 2 Class 1
Seal pinholes that are
away from bondlines,
joints or seams
Gloves
-
Any Source
Protect hands
Cotton cloth (clean and
lint free)
-
Any Source
General cleaning
Application Brush (nylon) -
Any Source
Tank repair
Compressed Air (clean,
oil and moisture free)
-
Any Source
General cleaning
Argon or CO2 gas
-
Any Source
Eliminate fuel vapors
Vapor Detector
18995T57
McMaster-Carr
Detect fuel vapor
Sealant Gun
-
Any Source
Apply sealant
Sandpaper - Aluminum
Oxide
200 grit
Any Source
Prepare surface
General cleaning
Ground the airplane exhaust outlet pipe to the earth and a suitable fuel drainage container.
Disconnect the battery. (Refer to 24-30)
Drain fuel tank. (Refer to 12-10)
Remove appropriate wing access panel (LW10, RW10, LW11, or RW11). (Refer to 6-00)
Place the inert gas supply hose into the fuel tank. Allow gas to flow into the tank until no
fuel vapor remains.
In accordance with the manufactures instructions, verify no fuel vapors exist with the
usage of the fuel vapor detector.
Solvent clean the area to be repaired with acetone. (Refer to 20-30)
Always prepare and seal an area larger than the initial repair area.
Lightly sand the composite areas to be sealed with 200-grit sandpaper. Sand an area
larger than the initial repair area.
CAUTION:
(j)
(k)
Supplier
Methyl Ethyl Ketone
(MEK)
Note:
(i)
P/N or Spec.
Use caution not to sand through resin coat exposing fibres. Sanding
through the resin coat and exposing fibers will be cause for composite
repair.
Remove all large contaminates using a stiff bristle brush.
Solvent clean all surfaces to be sealed with acetone or isopropyl alcohol. (Refer to 20-30)
28-10
13773-001
30 Nov 2000
Note:
If the fuel leak is located at a bondline, joint or seam, mix sealant (MIL-8802
Type 2 Class A and/or Class B) per manufacture’s instructions. (Refer to 2010)
If the leak is coming from a small pinhole located away from any bondlines,
joints or seams, mix non-structural resin (Type 2, Class 1) per the manufacture’s instructions.
(l)
(m)
(n)
(o)
(p)
(q)
(r)
Fillet, fay or injection seal as required. Brush sealant or resin over repair area making sure
brushed area is larger than the repaired area. (Refer to 20-10)
Allow sealant or resin to fully cure.
Seal and install fuel tank access panel(s). (Refer to 6-00)
Fill the fuel tank. (Refer to 12-10)
Visually inspect tank seams for any signs of leakage or stains. If any leaks are present,
repair tank as needed. (Refer to 28-10)
Connect battery. (Refer to 24-30)
Remove airplane exhaust outlet pipe ground.
B. Collector Tanks
The collector tanks are made out of composite material and are integrated into each side of the wing
and cannot be removed.
(1)
(2)
13773-001
30 Nov 2000
Adjustment/Test - Collector Tank
(a) Perform Fuel Tank Pressure Test. (Refer to 28-10)
Inspection/Check - Collector Tank
(a) Drain the corresponding fuel and collector tank bays for the side being serviced. (Refer to
12-10)
(b) Remove the appropriate access panel (LW3 or RW3) from the wing to gain access to the
collector tank bays. (Refer to 6-00)
(c)
Visually inspect each collector tank bay for any signs of damage, leaks or stains. If any
damage, stains or leaks are present, repair tank.
(d) Seal and secure access panel with screws.
(e) Fill the corresponding fuel tank.
(f)
Inspect the fuel and collector tank bays, hoses, and lines for any signs of leakage. Service
as required.
28-10
Page 7
Figure 28-102
Wing Fuel System Components
Page 8
28-10
13773-001
30 Nov 2000
C. Fuel Strainers
(1)
(2)
(3)
Removal - Fuel Strainers
(a) Drain the corresponding fuel tank for the side being serviced. (Refer to 12-10)
(b) Remove the appropriate fuel tank access panel (LW10 or RW10) from the wing to gain
access to the fuel pickup strainers. (Refer to 6-00)
(c)
Remove the strainers.
(d) Remove all sealant from the access panel cover and wing.
Installation - Fuel Strainers
(a) Install and secure the strainers.
(b) Fay surface seal and install the fuel tank access panel to the wing. (Refer to 20-10)
(c)
Fill the corresponding fuel tank.
(d) Inspect the fuel tank for any signs of leakage. Service as required.
Inspection/Check - Fuel Strainers
(a) Visually inspect strainers for signs of damage or restrictions. If damage, or restrictions
exist, replace fuel strainer.
D. Fuel System Ventilation
(1)
(2)
(3)
Removal - Fuel System Ventilation
(a) Remove the appropriate access panel (LW14 or RH14). (Refer to 6-00)
(b) Remove the fuel system vent scoop from the underside of the wing, next to the wing tip.
(Refer to 6-00)
(c)
Disconnect vent hose from fuel tank vent and vent scoop hose fittings.
(d) Repeat previous steps for the remaining side (if necessary).
Installation - Fuel System Ventilation
(a) Secure vent hose to fuel tank vent and vent scoop hose fittings.
(b) Secure vent scoop to underside of wing. (Refer to 6-00)
(c)
Secure Outboard Fuel Rib access panel. (Refer to 6-00)
Inspection/Check - Fuel System Ventilation
(a) Inspect vent hose for obstructions, kinks, chaffing, or cuts. Replace hose if damaged.
E. Inspection/Check - Fuel Storage System
A wet or stained spot on the wing can be an indication of a fuel leak. Not all fuel leaks require immediate repair. Fuel leaks which do not constitute a flight hazard can be repaired at the next scheduled servicing. Fuel leaks that do not constitute a flight hazard are stains, seeps, and heavy seeps which are
not in an enclosed area. Fuel tanks are sealed with MIL-S-8802 Type ll sealant.
Repairs that break the fuel tank access panel seal will necessitate resealing of that fuel tank. All
repairs made within the fuel tank must be fay surface sealed and fillet sealed. All boundaries and any
other place that could leak must be sealed. Stains and seeps which are not immediately repaired must
be inspected prior to and immediately after each flight until they have been repaired.
(1)
(2)
(3)
(4)
13773-001
30 Nov 2000
Stain
(a) Stains are 3/4 of an inch in size or less.
Seep
(a) Seeps range in size from 3/4 of an inch up to 1 1/2 inches.
Heavy seep
(a) Heavy seeps range in size from 1 1/2 inches up to 4 inches.
Running Leak
28-10
Page 9
(a)
F.
A running leak will vary in size depending on location and intensity of the leak. Fuel usually will flow and immediately drip after being wiped dry.
Fuel Drain Valves (See Figure 28-103)
(1)
(2)
Removal - Fuel Drain Valves
(a) Drain the corresponding fuel tank. (Refer to 12-10)
(b) Cut safety wire and remove drain valve (fuel tank drain valves only).
Installation - Fuel Drain Valves
WARNING:
The collector tank drain valves are certified to tolerate swept stroke
lightning. To meet and maintain protection levels, the drain valves
must be installed onto a clean, bare metal surface. If the base of the
drain valve doesn’t make full contact with the access panel it may be
possible for lightning currents to arc to the base of the drain valve and
create potential ignition sources in the tank.
The collector tank access panels must never have paint or any other
type of exterior finish in between the drain valves and the access panels.
(a)
(3)
Page 10
Inspect drain valve contact area for any paint or other contaminates. Remove contaminates as necessary to obtain a clean and bare metal contact area.
(b) Install and torque the drain valve with a new o-ring. Torque collector tank drain valves to
100-190 inch-pounds (11-20.9 Nm).
(c)
Inspect the drain valve to ensure the entire base of the drain valve makes contact with the
access panel.
(d) Safety wire drain valve (fuel tank drain valves only). (Refer to 20-50)
(e) Fill fuel tank and inspect for leaks. If a fuel leak is observed, repair as required. (Refer to
51-10)
(f)
Place the fuel sampler cup into the drain valve and inspect the drain valve for proper operation. Inspect the fuel for any contaminates.
Inspection/Check - Fuel Drain Valves
(a) Visually inspect drain valves for leaks or seepage. If leaks or seepage is noted, replace
drain valve.
28-10
13773-001
30 Nov 2000
Figure 28-103
Fuel Tank Drain Valve
13773-001
30 Nov 2000
28-10
Page 11
DISTRIBUTION
1. DESCRIPTION
This section contains information on the distribution system. The fuel distribution system consists of electric and mechanical (engine-driven) fuel pumps, fuel gascolator, fuel hose, fuel lines, fuel selector valve,
and the fuel pump switch.
A gascolator is installed on the forward side of the firewall after the electric fuel pump and before the
engine driven fuel pump. A drain valve, connected to the bowl of the gascolator, is used to drain off contaminates during the preflight inspection. The gascolator provides 100 to 140 micron filtration and has a
4.9 fluid ounce (144.89 milliliters) capacity. The filter element can be cleaned or replaced when the bowl is
removed.
Note:
The majority of all fuel system problems are directly related to contaminated fuel. Therefore
inspecting and cleaning the fuel drains and filter in the gascolator should be considered to
be of utmost importance. Under normal operating conditions the fuel drains and filter in the
gascolator should be inspected and cleaned as called out in Chapter 5. If the airplane is
used in dusty or dirty environments, the fuel drains and filter in the gascolator should be
cleaned more often.
The engine-driven fuel pump is mounted to the aft side of the engine. An electric fuel (boost) pump is
installed on the forward side of the firewall. Mounted on the center console (adjacent to the fuel selector
valve) is a Fuel Pump BOOST-PRIME rocker switch. The prime position on the switch is momentary. The
boost position is continuous. For engine starting, pressing PRIME causes the boost pump to operate at
high speed until the fuel pressure reaches 2-4 psi. When the fuel pressure reaches the 2-4 psi range a
pressure switch in the fuel injection line switches the boost pump to the low-speed mode to provide a 4-6
psi fuel pressure boost. Two-speed prime allows the fuel pressure to rapidly achieve proper starting pressure. Once the fuel system is primed, the electric pump is switched to the low setting by the pressure
switch. Selecting BOOST energizes the boost pump in low-speed mode to deliver a continuous 4-6 psi
boost to the fuel flow for vapor suppression in a hot fuel condition. The boost pump operates on 28 VDC
supplied through the 7.5-amp FUEL PUMP circuit breaker on Main Bus 1. The boost position operates the
electric pump on the low-speed setting only, regardless of the fuel system pressure.
A fuel tank selector valve is installed in the center console between the crew seats, and is isolated from the
cabin in case of leakage. The valve has a left, right, and off position. Each position has a positive detent. A
knob is located at the top of the handle, and must be pulled to switch the valve to the off position; the valve
can be rotated back to on without any further action. The selector valve can be switched between left and
right fuel tanks by simply rotating the valve. The valve handle points in the direction of the tank being
selected. The selector valve only allows feed from one tank at a time.
Drain hoses are provided for the auxiliary fuel pump, gascolator, engine driven fuel pump, fuel injection
manifold (spider), and the engine manifolds (cylinder heads). Drain hoses are routed to a drain manifold
located on the bottom center of the firewall. A check valve is installed on the cylinder drain manifold to prevent loss of manifold pressure. The valve closes when manifold pressure is below ambient pressure. An aft
side firewall fuel enclosure, and a selector valve enclosure prevent fuel from leaking into the cabin. If fuel is
leaking from either enclosure, the component causing the fuel leak must be repaired immediately to prevent fuel from entering the cabin.
Note:
13773-001
30 Nov 2000
When servicing fuel system pipe thread fittings, apply a small amount of grease (MIL-G60320 Type 1) to the external threads.
28-20
Page 1
2. MAINTENANCE PRACTICES
A. Gascolator (See Figure 28-201)
(1)
(2)
(3)
Removal - Gascolator
(a) Disconnect battery and insulate both cable ends to prevent accidental reconnection.
(Refer to 24-30)
(b) Place the fuel selector valve in the off position.
(c)
Using fuel sampler, drain fuel from gascolator and valve line.
(d) Disconnect fuel inlet and outlet lines.
(e) Disconnect gascolator drain line.
(f)
Remove bolts securing gascolator to mounting bracket. Remove gascolator.
Installation - Gascolator
(a) Loosely secure gascolator to mounting bracket.
(b) Connect and tighten fuel inlet and outlet lines.
(c)
Tighten gascolator to mounting bolts.
(d) Place the fuel selector valve in the on position.
(e) Inspect fuel system for signs of leakage.
(f)
Connect battery. (Refer to 24-30)
Removal - Gascolator Fuel Filter Screen
(a) Disconnect battery and insulate both cable ends to prevent accidental reconnection.
(Refer to 24-30)
(b) Remove gascolator. (Refer to 28-20)
(c)
Remove drain valve fitting and remove the bowl.
Note:
(4)
(5)
Page 2
The bowl may resist disassembly due to the o-ring seal. If necessary lightly
tap on side of gascolator or rotate bowl while pulling apart to aid in disassembly.
(d) Remove snap ring and remove the filter screen.
Installation - Gascolator Fuel Filter Screen
(a) Install the filter screen onto the gascolator and secure with snap ring.
(b) Install new o-ring onto gascolator.
(c)
Slide bowl onto gascolator and secure drain valve fitting using a new stat-o-seal washer.
(d) Install gascolator. (Refer to 28-20)
(e) Connect battery. (Refer to 24-30)
Cleaning - Gascolator Fuel Filter Screen
(a) Remove fuel filter screen. (Refer to 28-20)
(b) Blow compressed air into the filter screen from the inside towards the outside.
28-20
13773-001
30 Nov 2000
Figure 28-201
Gascolator Assembly
13773-001
30 Nov 2000
28-20
Page 3
B. Electric Fuel (Boost) Pump (See Figure 28-202)
(1)
(2)
Removal - Electric Fuel (Boost) Pump
(a) Disconnect battery and insulate both cable ends to prevent accidental reconnection.
(Refer to 24-30)
(b) Place the fuel selector valve in the off position.
(c)
Disconnect inlet tube from gascolator.
(d) Disconnect tube from gascolator to electric auxiliary fuel pump. Drain fuel from tube.
(e) Disconnect fuel drain hose.
(f)
Disconnect the pump wires.
(g) Loosen nuts on clamp securing pump to firewall, and remove pump.
Installation - Electric Fuel (Boost) Pump
CAUTION:
(a)
(b)
(c)
(d)
(e)
(f)
(g)
(h)
Page 4
If fittings were removed from pump, install fittings using new o-rings.
Insert pump into retaining clamps and loosely secure pump.
Connect fuel inlet and outlet tubes.
Connect fuel drain hoses.
Connect pump wires.
Tighten nuts on clamp securing pump to firewall.
Connect battery. (Refer to 24-30)
Place the fuel selector valve in the on position.
Test run pump and inspect for leakage. Repair any leaks found immediately.
28-20
13773-001
30 Nov 2000
Figure 28-202
Electric Fuel Pump Installation
13773-001
30 Nov 2000
28-20
Page 5
C. Selector Valve (See Figure 28-203)
(1)
Removal - Selector Valve
WARNING:
Disconnect the battery prior to servicing the selector valve.
(a)
(2)
Disconnect battery and insulate both cable ends to prevent accidental reconnection.
(Refer to 24-30)
(b) Remove crew seats and inboard seat track mounting hardware. (Refer to 25-10), (Refer to
53-40)
(c)
Remove mid console trim from each side. (Refer to 25-10)
(d) Remove console support side brackets.
(e) Remove screws and washers securing both fuel selector valve side panels and gaskets.
(f)
Remove the screws and washers securing the front fuel selector valve panel.
(g) Remove the three hex head bolts, washers, and locknuts securing the fuel selector linkage to the valve body.
(h) Remove the screws and washers from the upper selector valve panel.
(i)
Disconnect the fuel supply and return lines.
(j)
Remove the fuel selector valve mounting screws, washers, and locknuts.
(k)
Remove the fuel selector valve assembly.
Installation - Selector Valve
(a)
Acquire necessary tools, equipment, and supplies.
Description
P/N or Spec.
Brushable Seal- MIL-S-8802 Type 2 Class A*
ant
GC408A
P/S 890A
EC1675A
CS3204 C1.A
PR1440A
Extrusion Gun
Sealant
Grease
(b)
(c)
(d)
(e)
Page 6
Supplier
Purpose
Fuel tank
repair surGoal
PRC Aerospace Sealants face seal.
3M
Chem Seal - Flame Master
PRC Aerospace Sealants
MIL-S-8802 Type 2 Class B*
CS3204 C1.B
GC408B
P/S 890B
PR1440B
EC1675B
Chem Seal - Flame Master
Goal
PRC Aerospace Sealants
PRC Aerospace Sealants
3M
AC-240B
Dynamold Aerospace
Seal fuel system enclosure
in cabin.
MIL-G-24139A
Aeroshell # 6
Shell Oil Company
Lubricate
seals and
threads
Fillet, faying
surface, and
injection seal
in fuel tanks.
Install and
seal windows.
Verify battery is disconnected.
Place the fuel selector valve assembly into position.
Secure the fuel selector valve assembly with screws, washers, and locknuts.
Apply a small amount of grease on the banjo fitting bolt threads and the new seals.
28-20
13773-001
30 Nov 2000
(f)
(g)
(h)
(i)
(j)
(k)
(l)
Place one new seal on each side of banjo fitting and slide banjo fitting bolt through banjo
fitting. Finger-tighten banjo fitting bolt.
Support banjo fittings and secure all fuel supply and return lines (with grommets) to the
corresponding fitting.
CAUTION:
Always support banjo fittings during the torquing procedure to prevent damaging the fuel supply lines, return lines, and selector valve assembly.
Always use new seals to help prevent fuel leaks.
Note:
The fuel line grommets must lay flat against the interior and exterior surfaces of the panel. Fuel line grommets must seal all fuel and vapors inside
fuel selector valve housing.
Support banjo fittings and tighten the small banjo fitting bolts to 10 foot-pounds (13 Nm).
Support banjo fittings and tighten the large banjo fitting bolts to 20 foot-pounds (26 Nm).
Safety wire all banjo fitting bolts. (Refer to 20-10)
Fay surface seal upper selector valve panel and secure with screws and washers. (Refer
to 20-10)
Connect the fuel selector linkage together and secure with three hex head bolts, washers,
and locknuts. Washers must be installed against locknuts.
CAUTION:
(m)
(n)
(o)
(p)
(q)
(r)
(s)
(t)
13773-001
30 Nov 2000
Gaskets must be installed properly (flat) to prevent leakage of any fuel or
vapors. Gaskets must have overlap on all sides.
Fay surface seal front fuel selector valve panel and secure with screws and washers.
(Refer to 20-10)
Pressure check complete fuel system. (Refer to 20-10)
Secure both fuel selector valve side panels and gaskets with screws, washers and locknuts.
Inspect selector valve and enclosure for any signs of potential fuel leakage. Repair any
leaks found immediately.
Secure console support side brackets.
Secure both pieces of mid console trim. (Refer to 25-10)
Install and secure crew seats and mounting hardware. (Refer to 25-10)
Connect battery. (Refer to 24-30)
28-20
Page 7
Figure 28-203
Fuel Selector Valve Installation
Page 8
28-20
13773-001
30 Nov 2000
D. Cabin Fuel System Fuel Enclosure (Firewall)
(1)
Removal - Cabin Fuel System Fuel Enclosure
WARNING:
Disconnect the battery prior to servicing the selector valve.
Note:
Steps B through G do not need to be performed if you are just going to inspect the
fuel lines under the firewall fuel enclosure.
(a)
(2)
Disconnect battery and insulate both cable ends to prevent accidental reconnection.
(Refer to 24-30)
(b) Remove carpet, crew seats, and mounting hardware. (Refer to 25-10)
(c)
Remove mid console trim from each side. (Refer to 25-10)
(d) Remove console support side brackets.
(e) Remove screws and washers securing both fuel selector valve side panels and gaskets.
(f)
Remove the screws and washers securing the front fuel selector valve panel.
(g) Using shop towels to soak up any fuel, disconnect fuel supply and return lines from the
forward side of the selector valve.
(h) Slide spring clamp downward on drain tube.
(i)
Disconnect drain tube from fitting on enclosure.
(j)
Remove screws and washers securing bracket, enclosure, and gasket to the firewall.
(k)
Disconnect fuel supply and return lines from fittings inside fuel enclosure.
(l)
Slide fuel enclosure off fuel supply and return lines.
Installation - Cabin Fuel System Fuel Enclosure
(a)
Acquire necessary tools, equipment, and supplies.
Description
(b)
(c)
(d)
(f)
(g)
13773-001
30 Nov 2000
Supplier
Purpose
Firewall Sealant
MIL-S-38249
Type 1
P/S 700 Firewall Sealant
P/R 812 Firewall Sealant
PRC Aerospace Sealants Glendale, CA
Seal selector valve
enclosure
Grease
#6
Aeroshell
Lubricate seals and
threads
Verify battery is disconnected.
Slide fuel enclosure over fuel supply and return lines.
Connect fuel enclosure supply and return fuel lines.
CAUTION:
(e)
P/N or Spec.
Gasket must be installed properly (flat) to prevent leakage of any fuel or
vapors. Gasket must have an equal amount of overlap on all sides.
Place bracket, enclosure (fitting pointing down), and gasket (evenly centered) into position, secure with screws and washers.
Slide drain tube over fitting on enclosure.
Slide spring clamp upward on drain tube until the clamp is centered over fitting.
28-20
Page 9
(h)
CAUTION:
Always support fittings during the torquing procedure to prevent damaging
the fuel supply line, return line, or selector valve assembly.
Note:
The fuel line grommets must lay flat against the interior and exterior surfaces of the panel. Fuel line grommets must seal all fuel and vapors inside
fuel selector valve housing.
Support fittings and secure the forward fuel supply and return line (with grommets) to the
corresponding fitting.
CAUTION:
(i)
Fay surface seal front fuel selector valve panel and secure with screws and washers.
(Refer to 20-10)
CAUTION:
(j)
(k)
(l)
(m)
(n)
(o)
(p)
Page 10
Gaskets must be installed properly (flat) to prevent leakage of any fuel or
vapors. Gaskets must have an equal amount of overlap on all sides.
Gaskets must be installed properly (flat) to prevent leakage of any fuel or
vapors. Gaskets must have an equal amount of overlap on all sides.
Secure both fuel selector valve side panels and gaskets with screws, washers and locknuts.
Inspect both enclosures for any signs of potential fuel leakage. Repair any leaks found
immediately.
Secure console support side brackets.
Pressure check complete fuel system. (Refer to 20-10)
Secure both pieces of mid console trim. (Refer to 25-10)
Install and secure carpet, crew seats, and mounting hardware. (Refer to 25-10)
Connect battery. (Refer to 24-30)
28-20
13773-001
30 Nov 2000
INDICATING
1. DESCRIPTION
Fuel flow is monitored with a turbine flow transducer located between the throttle body and injection manifold. A fuel flow gage is installed in the instrument panel adjacent to the other engine instruments.
The fuel quantity in each integral fuel tank and each integral collector tank is displayed by a single fuel
quantity indicator (fuel gage). One float type fuel quantity sensor is installed in each integral fuel tank and
each integral collector tank. The fuel level senders are not adjustable. To adjust the fuel quantity indicator
reading, the fuel gage itself must be adjusted.
A fuel level gage is installed in the center console directly forward of the fuel selector valve. The fuel gage
indicates the amount of usable fuel remaining in each fuel tank. The fuel quantity indicator is a 2¼” dual
indicator, with separate needles and markings for the left and right fuel tanks, and a range of 0 gallons to
full (F). The indicator has a yellow arc from 0 to 14 gallons, a red line at 0 gallons, and a red arc from 0 gallons down to the minimum meter movement. The indicator has 4 separate needle adjustment screws for
full and empty indications on the left and right tanks. The annunciator indicates low fuel when both tanks
are below approximately14 gallons. These outputs are monitored by the caution/warning annunciator
panel to indicate a low fuel condition. The indicator is internally lighted with externally replaceable lamps,
and has non-reflective glass.
Note:
When servicing fuel system pipe thread fittings, apply a small amount of grease (MIL-G60320 Type 1) to the external threads.
2. MAINTENANCE PRACTICES
A. Fuel Quantity Indicator (See Figure 28-401)
(1)
(2)
(3)
13773-001
30 Nov 2000
Removal - Fuel Quantity Indicator
(a) Ensure BAT 1, BAT 2, and AVIONICS master switches are in off position.
(b) Pull ENGINE INSTRUMENTS circuit breaker.
(c)
Remove right mid-console trim panel. (Refer to 25-10)
(d) Locate and unplug wire harness from the fuel level indicator.
(e) Remove the four screws and washers from the upper side of fuel level indicator and
remove indicator.
Installation - Fuel Quantity Indicator
(a) Install indicator into position and secure with screws and washers.
(b) Connect fuel indicator wire harness.
(c)
Adjust the fuel indicator. (Refer to 28-40)
(d) Install right mid-console trim panel. (Refer to 25-10)
(e) Reset ENGINE INSTRUMENTS circuit breaker.
Adjustment - Fuel Quantity Indicator
(a) Remove right mid-console trim and locate fuel quantity indicator. (Refer to 25-10)
(b) Drain both integral fuel tanks and both integral collector tanks. (Refer to 12-10)
(c)
Add 1-1/2 gallons of fuel to each tank and allow fuel to settle.
(d) Turn BAT switch to the ON position.
(e) Remove fuel indicator adjustment screw covers.
(f)
Adjust both the left and right empty adjustment screws until the needles indicate zero gallons.
(g) Turn BAT switch to the OFF position.
(h) Fill both fuel tanks to within one inch of the filler cap.
28-40
Page 1
(4)
(i)
Turn BAT switch to the ON position.
(j)
Adjust both the left and right full adjustment screws until the needles indicate full.
(k)
Turn BAT switch to the OFF position.
(l)
Install the fuel indicator adjustment screw covers.
(m) Install right mid-console trim. (Refer to 25-10)
Test - Fuel Quantity Indicator and Fuel Sender Test
(a) Verify the ignition switch is in the OFF position and remove the key.
(b) Place the BAT Master Switch in the OFF position.
(c)
Fill each fuel tank with 41 gallons of fuel. (Refer to 12-10)
(d) Remove right mid-console trim panel. (Refer to 25-10)
(e) Locate and unplug wire harness from the fuel level indicator.
(f)
Place multimeter in the 100-ohm scale and zero out the ohmmeter.
CAUTION:
(g)
Connect black (-) ohmmeter lead to pin # 9 (blue, ground) fuel sender wire. Connect the
red (+) positive ohmmeter lead to pin # 2 (white, power) fuel sender wire. The meter
should read 69 to 77 ohms resistance when the left tank is full.
Note:
(h)
Page 2
If the right tank were empty, the meter should indicate 1 to 5 ohms of resistance. If these specifications are not met, inspect the fuel sender itself or
the wires and connectors to the sender.
Connect the fuel level indicator wire harness to the fuel sender wire harness.
Set multimeter to the DC 30-volt scale.
Turn the key switch (main power supply) to the ON position.
Connect the red (+) voltmeter lead to fuel indicator pin # 1 (power), connect the black (-)
voltmeter lead to fuel indicator pin # 9 (ground). Battery voltage should be present.
Note:
(m)
If the left tank were empty (dry), the meter should indicate 1 to 5 ohms
resistance. If these specifications are not met, inspect the fuel sender itself
or the wires and connectors to the sender. If the left tank had unusable fuel
(1-1/2 gallons) remaining inside of the tank, the meter should indicate 4.4 to
12.4 ohms resistance.
Connect black (-) ohmmeter lead to pin # 9 (blue, ground) fuel sender wire. Connect the
red (+) positive ohmmeter lead to pin # 4 (orange, power) fuel sender wire. The meter
should read 69 to 77 ohms resistance when the right tank is full.
Note:
(i)
(j)
(k)
(l)
If battery power is on for the following test, the ohmmeter could become
permanently damaged.
If battery voltage is not present, inspect circuit breakers, wiring harness,
voltmeter, and battery. If the fuel sender resistance checks good and there
is battery voltage to the indicator, the indicator or wires and connector to the
indicator are faulty.
Install right mid-console trim panel. (Refer to 25-10)
28-40
13773-001
30 Nov 2000
Figure 28-401
Fuel Quantity Indicator
13773-001
30 Nov 2000
28-40
Page 3
B. Fuel Quantity Sensors
(1)
(2)
(3)
(4)
(5)
Page 4
Removal - Wing Tank Fuel Quantity Sensors
(a) Ensure BAT 1, BAT 2, and AVIONICS master switches are in the off position.
(b) Pull ENGINE INSTRUMENTS circuit breaker.
(c)
Disconnect battery and insulate both cable ends to prevent accidental connection. (Refer
to 24-30)
(d) De-fuel airplane. (Refer to 12-10)
(e) Remove appropriate access panels (LW10 or RW10). (Refer to 6-00)
(f)
Identify and disconnect wires to sensor.
(g) Remove screws securing sensor and remove sensor.
Installation - Wing Tank Fuel Quantity Sensors
(a) Secure sensor and gasket to fuel tank.
(b) Connect wires to sensor.
(c)
Remove sealant from access panel and its mating surface.
(d) Solvent clean the access panel and the mating surfaces. (Refer to 20-30)
(e) Faying surface seal access panel and its’ mating surfaces. (Refer to 20-10)
(f)
Secure access panels. (Refer to 6-00)
(g) Fill fuel tanks full with approved fuel. (Refer to 12-10)
(h) Inspect fuel sender area for any signs of leakage. Repair as required.
(i)
Connect battery. (Refer to 24-30)
(j)
Reset ENGINE INSTRUMENTS circuit breaker.
(k)
Adjust fuel quantity indicator. (Refer to 28-40)
Removal - Wing Collector Tank Fuel Quantity Sensors
(a) Ensure BAT 1, BAT 2, and AVIONICS master switches are in off position.
(b) Pull ENGINE INSTRUMENTS circuit breaker.
(c)
Disconnect battery and insulate both cable ends to prevent accidental connection. (Refer
to 24-30)
(d) De-fuel airplane. (Refer to 12-10)
(e) Remove appropriate access panels (LW3 and LW4 or RW3 and RW4). (Refer to 6-00)
(f)
Identify and disconnect wires to sensor.
(g) Remove screws securing sensor and remove sensor.
Installation - Wing Collector Tank Fuel Quantity Sensors
(a) Secure sensor and gasket to collector tank.
(b) Connect wires to sensor.
(c)
Remove sealant from access panel and its’ mating surface.
(d) Solvent clean the access panel and its’ mating surfaces. (Refer to 20-30)
(e) Faying surface seal access panel its’ mating surfaces. (Refer to 20-10)
(f)
Secure access panels. (Refer to 6-00)
(g) Fill fuel tanks full with approved fuel. (Refer to 12-10)
(h) Inspect fuel sender area for any signs of leakage. Repair as required.
(i)
Connect battery. (Refer to 24-30)
(j)
Reset ENGINE INSTRUMENTS circuit breaker.
(k)
Adjust fuel quantity indicator. (Refer to 28-40)
Test - Fuel Sensor Test
(a) Ensure BAT 1, BAT 2, and AVIONICS master switches are in off position.
28-40
13773-001
30 Nov 2000
(b)
(c)
(d)
(e)
(f)
(g)
Pull ENGINE INSTRUMENTS circuit breaker.
Disconnect battery and insulate both cable ends to prevent accidental connection. (Refer
to 24-30)
De-fuel airplane. (Refer to 12-10)
Remove appropriate access panel(s) (LW3 and LW4, RW3 and RW4, or LW10 and RW10.
(Refer to 6-00)
Identify and disconnect the center wire to the corresponding sensor.
Place multimeter in the 50-ohm scale and zero out the ohmmeter.
CAUTION:
(h)
(i)
If ohmmeter leads come in contact with battery power, the ohmmeter could
become permanently damaged.
Connect black (-) ohmmeter lead to mounting ring. Connect the red (+) positive ohmmeter
lead to the center stud on the sensor. The meter should read approximately 0 ohms resistance when the corresponding sensor is in the empty (down) position and approximately
45 ohms when the corresponding sensor is moved in the full (up) position.
If the sensor fails to indicate the correct resistance values, replace that sensor.
C. Fuel Pressure Switch
(1)
(2)
Removal - Fuel Pressure Switch
(a) Remove top engine cowling. (Refer to 77-10)
(b) At fuel injector manifold, locate fuel pressure switch and associated wire leads.
(c)
Disconnect adel clamps securing bundled wire harnesses to engine.
(d) Remove cable ties and plastic sheath bundling wire harnesses.
(e) Disconnect fuel pressure switch jack J104 located on aft RH side of engine baffling.
(f)
Remove adel clamp securing fuel pressure switch to engine standoff.
(g) Unscrew fuel pressure switch from injector manifold fitting, gently de-bundle fuel pressure
switch wire leads from bundled harnesses, and remove fuel pressure switch from airplane.
Installation - Fuel Pressure Switch
(a)
Acquire necessary tools, equipment, and supplies.
Description
Fuel Fitting Grease
(b)
(c)
(d)
(e)
(f)
(g)
(h)
P/N or Spec.
MIL-G-60320
Supplier
Any Source
Purpose
Lubrication
Apply thin coat of grease to injector manifold fitting.
Install fuel pressure switch to fitting.
Install adel clamp securing fuel pressure switch to engine standoff.
Route switch leads in with bundled harnesses, ensure plastic sheath covers all wires, and
close with cable ties.
Connect fuel pressure switch jack J104 to associated plug.
Install adel clamps securing harness bundle to engine.
Install top engine cowling. (Refer to 71-10)
D. Fuel Flow Gage (Refer to 73-30)
E. Fuel Flow Sensor (Refer to 73-30)
13773-001
31 July 2001
28-40
Page 5
Figure 28-402
Fuel Quantity Sensor
Page 6
28-40
13773-001
30 Nov 2000
CHAPTER
INDICATING AND
RECORDING
CHAPTER 31 - INDICATING AND RECORDING
LIST OF EFFECTIVE PAGES
Chapter/Section
Page
Date
31-LOEP
1
30 NOV 2000
31-TOC
1
30 NOV 2000
31-00
1
30 NOV 2000
31-30
1
30 NOV 2000
31-30
2
30 NOV 2000
31-50
1
30 NOV 2000
31-50
2
30 NOV 2000
31-50
3
30 NOV 2000
13773-001
30 Nov 2000
31-LOEP
Page 1
CHAPTER 31 - INDICATING AND RECORDING
TABLE OF CONTENTS
Subject
INDICATING/RECORDING SYSTEMS
Chapter/Section
Page
31-00
General
RECORDERS
1
31-30
Description
1
Hour Meter
Removal - Hour Meter
Installation - Hour Meter
INDICATING/RECORDING SYSTEMS
1
1
1
31-50
Description
1
Annunciator Panel
Removal - Annunciator Panel
Installation - Annunciator Panel
13773-001
30 Nov 2000
1
1
1
31-TOC
Page 1
INDICATING/RECORDING SYSTEMS
1. GENERAL
This chapter describes those units which give visual or aural warning of conditions in unrelated systems.
This includes the Hour Meter and Central Caution/Warning Annuciator Panel.
13773-001
30 Nov 2000
31-00
Page 1
RECORDERS
1. DESCRIPTION
This section describes those components used for recording data not related to specific systems. This
includes the hour meter.
Located inside the glove box, the hour meter is powered by 28 VDC supplied through the 5-amp ENGINE
INSTRUMENTS circuit breaker on the Main Bus. Recording begins when the BAT 1 switch is ON and
either ALT 1 or ALT 2 switch is ON.
A. Hour Meter (See Figure 31-301)
(1)
(2)
Removal - Hour Meter
(a) Pull ENGINE INSTRUMENTS circuit breaker.
(b) Remove pilot seat. (Refer to 25-10)
(c)
Remove left aft console trim. (Refer to 25-10)
(d) Disconnect electrical terminals at hour meter.
(e) Open glove box and gently pry hour meter loose from double sided tape with putty knife or
similar tool and remove meter from bracket.
Installation - Hour Meter
(a)
Acquire necessary tools, equipment, and supplies.
Description
P/N or Spec.
Tape, Two Sided Foam,1/2” 4932 Acrylic
Adhesive
(b)
(c)
(d)
(e)
(f)
(g)
(h)
13773-001
30 Nov 2000
Supplier
3M
Purpose
Adhesive
Solvent clean mating surfaces of center console bracket and hour meter with Isoproply
alcohol. (Refer to 20-30)
Apply two sided tape to hour meter.
Position and adhere hour meter to center console bracket.
Connect electrical terminals at hour meter.
Install left aft console trim. (Refer to 25-10)
Install pilot seat. (Refer to 25-10)
Reset ENGINE INSTRUMENTS circuit breaker.
31-30
Page 1
Figure 31-301
Hour Meter Installation
Page 2
31-30
13773-001
30 Nov 2000
INDICATING/RECORDING SYSTEMS
1. DESCRIPTION
This section describes the Central Caution/Warning System which consists of an annunciator assembly
and related sensors and switches. The annunciator assembly is mounted center, high on the flight instrument panel and contains six annunciators. Each annunciator has two individual LEDs as light sources. The
annunciator panel has bright, dim, and test modes, which are activated by a toggle switch mounted to the
left of the annunciator panel. In test mode all annunciators illuminate in the bright mode, allowing the pilot
to verify that all LEDs are functional. The entire annunciator assembly is mounted on a printed circuit
board, which decodes information from the individual sensors and illuminates the necessary annunciator.
28 VDC for annunciator operation is supplied through the 2-amp ANNUNCIATOR POWER circuit breaker
on the Essential Bus.
The OIL annunciator will illuminate if the oil temperature is greater than 240° F or if the oil pressure is less
than 10 PSI. The oil pressure/oil temperature gage provides a logic low signal if either the oil pressure or
oil temperature meets the above temperature or pressure criteria. The OIL annunciator illuminates red.
The FUEL annunciator will illuminate if the fuel quantity is less than approximately 14 gallons in both tanks.
The fuel quantity gage provides a logic low signal when each tank is below approximately 14 gallons. The
annunciator decodes these two signals and illuminates when both signals are low. The FUEL annunciator
illuminates amber.
The LOW VOLTS annunciator will illuminate if the system voltage falls below 24.5 ± 0.35 volts. The MCU
provides a logic low signal when the voltage is low. The LOW VOLTS annunciator illuminates red.
The ALT 1 annunciator provides two indications. During an overload condition, when alternator 1 is generating more than maximum rated alternator amperage, the light will flash approximately 40 times per
minute. When the alternator is generating less than 2.0 ± 2.0 amps, the ALT 1 annunciator will illuminate
steady, notifying the pilot that the alternator is not generating power. The ALT 1 annunciator illuminates
amber.
The ALT 2 annunciator also provides two indications. During an overload condition, where alternator 2 is
generating more than maximum rated alternator amperage, the light will flash approximately 40 times per
minute. When the alternator is generating less than 2.0 ± 2.0 amps, the ALT 2 annunciator will illuminate
steady, notifying the pilot that the alternator is not generating power. The ALT 2 annunciator illuminates
amber.
The PITOT HEAT annunciator will illuminate if the pitot heat is inoperative. If the Pitot Heat switch is “ON”
and there is no current in the line, indicating a circuit malfunction, the PITOT HEAT annunciator will illuminate. A current sensor provides a logic low signal to the annunciator when current is absent in the pitot
heat circuit and the pitot heat switch is “ON”. The PITOT HEAT annunciator illuminates amber.
A. Annunciator Panel (See Figure 31-501)
(1)
(2)
13773-001
30 Nov 2000
Removal - Annunciator Panel
(a) Ensure BAT 1, BAT 2, and AVIONICS master switches are in OFF position.
(b) Pull ANNUNCIATOR PANEL circuit breaker.
(c)
Remove glareshield. (Refer to 25-10)
(d) Remove dress nut and washers securing annunciator toggle switch to instrument panel.
(e) Disconnect electrical connector from annunciator.
(f)
While supporting annunciator and toggle switch, remove screws, washers, and nuts
securing assembly to instrument panel and remove from airplane.
Installation - Annunciator Panel
(a) Position annunciator on instrument panel with rear connector on top, right side, and install
screws, washers, and nuts.
31-50
Page 1
(b)
(c)
(d)
(e)
Page 2
Install washer on toggle switch and position on instrument panel so keyway on switch
faces down. Install washer and dress nut.
Connect electrical connector to annunciator.
Install glareshield. (Refer to 25-10)
Reset ANNUNCIATOR PANEL circuit breaker.
31-50
13773-001
30 Nov 2000
Figure 31-501
Annunciator Panel Installation
13773-001
30 Nov 2000
31-50
Page 3
CHAPTER
LANDING GEAR
CHAPTER 32 - LANDING GEAR
LIST OF EFFECTIVE PAGES
Chapter/Section
Page
Date
32-LOEP
1
31 JULY 2001
32-LOEP
2
31 JULY 2001
32-TOC
1
31 JULY 2001
32-TOC
2
31 JULY 2001
32-00
1
30 NOV 2000
32-00
2
30 NOV 2000
32-10
1
31 JULY 2001
32-10
2
31 JULY 2001
32-10
3
30 NOV 2000
32-10
4
30 NOV 2000
32-10
5
30 NOV 2000
32-10
6
30 NOV 2000
32-10
7
30 NOV 2000
32-10
8
31 JULY 2001
32-20
1
31 JULY 2001
32-20
2
31 JULY 2001
32-20
3
31 JULY 2001
32-20
4
30 NOV 2000
32-20
5
30 NOV 2000
32-20
6
30 NOV 2000
32-40
1
30 NOV 2000
32-40
2
30 NOV 2000
32-41
1
30 NOV 2000
32-41
2
30 NOV 2000
32-41
3
30 NOV 2000
32-41
4
30 NOV 2000
32-41
5
30 NOV 2000
32-41
6
30 NOV 2000
32-41
7
30 NOV 2000
32-41
8
30 NOV 2000
32-41
9
30 NOV 2000
32-42
1
30 NOV 2000
32-42
2
31 JULY 2001
32-42
3
31 JULY 2001
32-42
4
30 NOV 2000
32-42
5
30 NOV 2000
32-42
6
30 NOV 2000
32-42
7
30 NOV 2000
13773-001
31 July 2001
32-LOEP
Page 1
CHAPTER 32 - LANDING GEAR
LIST OF EFFECTIVE PAGES
Chapter/Section
Page
Date
32-42
8
30 NOV 2000
32-42
9
30 NOV 2000
32-42
10
30 NOV 2000
Page 2
32-LOEP
13773-001
31 July 2001
CHAPTER 32 - LANDING GEAR
TABLE OF CONTENTS
Subject
LANDING GEAR
Chapter/Section
Page
32-00
General
MAIN LANDING GEAR
1
32-10
Description
1
Troubleshooting
1
Maintenance Practices
1
Main Gear Fairing
Removal - Main Gear Fairing
Installation - Main Gear Fairing
Main Gear Assembly
Removal - Main Gear Assembly
Installation - Main Gear Assembly
Inspection/Check - Main Landing Gear and Fairings
Adjustment/Test - Wheel Toe-In Check
NOSE GEAR
1
1
2
4
4
4
4
6
32-20
Description
1
Troubleshooting
1
Maintenance Practices
1
Nose Gear Fairing
Removal - Nose Gear Fairing
Installation - Nose Gear Fairing
Nose Gear Assembly
Removal - Nose Gear Assembly
Installation - Nose Gear Assembly
Nose Gear Fork Assembly
Removal - Nose Gear Fork Assembly
Installation - Nose Gear Fork Assembly
Inspection/Check - Nose Gear and Fairing
WHEELS AND BRAKES
1
1
2
4
4
4
4
4
4
5
32-40
General
1
Troubleshooting
2
WHEELS
32-41
Description
1
Maintenance Practices
1
13773-001
31 July 2001
32-TOC
Page 1
CHAPTER 32 - LANDING GEAR
TABLE OF CONTENTS
Subject
Chapter/Section
Servicing Tires and Tubes
Main Wheel, Tire, and Tube
Removal - Main Wheel, Tire, and Tube
Disassembly - Main Wheel, Tire, and Tube
Reassembly - Main Wheel, Tire, and Tube
Installation - Main Wheel, Tire, and Tube
Inspection/Check - Main Wheel Inspection
Nose Wheel, Tire, and Tube
Removal - Nose Wheel, Tire, and Tube
Disassembly - Nose Wheel, Tire, and Tube
Reassembly - Nose Wheel, Tire, and Tube
Installation - Nose Wheel, Tire, and Tube
Inspection/Check - Nose Wheel Inspection
BRAKES
Page
1
1
1
1
2
2
2
6
6
6
6
7
7
32-42
Description
1
Maintenance Practices
1
Brake System Replenishing
Brake Assembly
Removal - Brake Assembly
Disassembly - Brake Assembly
Reassembly - Brake Assembly
Installation - Brake Assembly
Inspection/Check - Brake Inspection
Inspection/Check - Brake Disk
Brake Linings
Removal - Brake Linings
Installation - Brake Linings
Adjustment/Test - Conditioning Procedure for Organic Brake Linings.
Brake Master Cylinder
Removal - Brake Master Cylinder
Disassembly - Brake Master Cylinder
Reassembly - Brake Master Cylinder
Installation - Brake Master Cylinder
Inspection/Check - Master Cylinder Components
Parking Brake Valve
Removal - Parking Brake Valve
Installation - Parking Brake Valve
Adjustment/Test - Bleeding the Brake System
Page 2
32-TOC
1
1
1
1
1
2
3
3
3
3
4
4
6
6
6
6
6
8
8
8
8
10
13773-001
31 July 2001
LANDING GEAR
1. GENERAL
This chapter describes those units and components which furnish a means of supporting and steering the
airplane. The landing gear design is of the fixed tricycle type, employing composite leaf-spring main gear
strut assemblies and a tubular nose-gear leg with a castering nose wheel. Aluminum nose and main landing gear wheels are installed and are designed to be used with tubes and tires. The main wheels have
hydraulically operated, dual-disc type brakes actuated by pressing the toe brakes at each crew position.
Steering is accomplished through differential braking. (See Figure 32-001)
Main gear shock absorbing is provided by composite leaf-springs attached to the wing. (Refer to 32-10)
Nose gear shock absorption is provided by polymer shock absorbing pucks. (Refer to 32-20)
13773-001
30 Nov 2000
32-00
Page 1
Figure 32-001
Landing Gear
Page 2
32-00
13773-001
30 Nov 2000
MAIN LANDING GEAR
1. DESCRIPTION
A rugged, maintenance free fiberglass strut assembly is utilized for the main landing gear. The strut
attaches to the airplane via a canted wing rib and an upper attach fitting that bolts to the WS 37 rib. The
wheel, brake, axle, tire and tube, wheel bearing, and attaching hardware is mounted on each main gear.
(See Figure 32-101)
2. TROUBLESHOOTING
TROUBLE
Airplane leans to one side.
Tires wear excessively.
Obvious vibration on smooth surface.
PROBABLE CAUSE
REMEDY
Incorrect tire pressure.
Inflate to proper pressure. (Refer
to 12-10)
Attaching parts loose, defective.
Tighten loose parts, replace.
Bent axles.
Replace with new parts.
Incorrect tire pressure.
Inflate to proper pressure. (Refer
to 12-10)
Bent axles.
Replace with new parts.
Dragging brakes.
Inspect and adjust brakes. (Refer
to 32-42)
Wheels out of balance.
Balance wheel and tire.
Improper toe-in.
Adjust toe-in.(Refer to 32-10)
Wheels out of balance
Balance wheel and tire.
Worn tire.
Replace.
3. MAINTENANCE PRACTICES
A. Main Gear Fairing (See Figure 32-101)
(1)
13773-001
31 July 2001
Removal - Main Gear Fairing
(a) Remove screws along seam securing inboard access panel to wheel fairing.
(b) Remove screw securing access panel to wheel assembly lower attach bracket.
(c)
Remove bolt and washer securing wheel fairing to axle.
(d) Remove screws securing wheel fairing to upper adjustment bracket and remove fairing
from airplane.
(e) Remove screws securing strut fairing to strut and remove strut fairing from airplane.
(f)
Remove screws attaching upper strut fairing to wing and remove upper strut fairing from
airplane.
32-10
Page 1
(2)
Installation - Main Gear Fairing
Note:
(a)
(b)
To ensure clearance between wheel assembly and fairing assembly, finger tighten
all attaching parts and adjust fairing assembly before final tightening.
Pry trailing edge seam of upper strut fairing open, position around strut, and install screws
attaching upper strut fairing to wing.
Pry trailing edge seam of strut fairing open, slide fairing into position under upper strut fairing, and install screws securing fairing to strut.
Note:
(c)
(d)
(e)
(f)
(g)
(h)
Page 2
To facilitate proper installation, adjust wheel assembly attach brackets if
necessary.
Position wheel fairing around wheel assembly and strut fairing, and install screws securing
fairing to wheel assembly upper attach bracket.
Install washer and bolt securing fairing to axle.
Position access panel to fairing and install screws.
Loctite and install screw securing access panel to lower attach bracket. (Refer to 20-40)
Adjust wheel fairing as required for clearance between tire and wheel pant.
Final tighten all attaching parts.
32-10
13773-001
31 July 2001
SR2_MM32_1382
Reserved
Figure 32-101
Main Gear Fairing Installation
13773-001
30 Nov 2000
32-10
Page 3
B. Main Gear Assembly (See Figure 32-102)
(1)
Removal - Main Gear Assembly
(a)
Acquire necessary tools, equipment, and supplies.
Description
Plastic Wedge
P/N or Spec.
-
Supplier
Any Source
Purpose
Removal of strut.
(b)
(c)
(d)
(e)
(f)
(g)
(2)
(3)
Page 4
Remove main gear fairings. (Refer to 32-10)
Raise airplane on jacks. (Refer to 7-00)
Drain hydraulic fluid from brake system.
Disconnect and cap flexible brake line at upper end of strut at rib fitting.
Remove nuts, washers, and bolts at clamp securing strut assembly to canted rib.
Squarely strike the upper side of the strut near the clamp fitting with a rubber mallet to
move the strut down and away from the clamp fitting.
(h) Insert and drive plastic wedge into space between strut and clamp fitting to dislodge strut
from clamp.
(i)
With gear assembly supported, remove bolt connecting upper attach fitting to rib attach fitting and lower assembly to the ground, clear of airplane.
Installation - Main Gear Assembly
(a) Support main gear assembly under airplane and lift assembly up to align main gear upper
attach fitting with rib attach fitting. Install bolt securing main gear assembly to rib attach fitting and torque to 25-50 inch-pounds (2.75-5.5 Nm).
(b) Install bolts, washers and nuts securing strut to canted rib.
(c)
Install clamp securing brake line to strut assembly.
(d) Connect flexible brake line at rib fitting.
(e) Lower airplane and remove from jacks. (Refer to 7-00)
(f)
Fill brake system.
(g) Bleed brake system. (Refer to 32-42)
(h) Install main landing gear fairings. (Refer to 32-10)
Inspection/Check - Main Landing Gear and Fairings
(a) Inspect main landing gear and fairings for cracks, wear, and loose fasteners.
(b) Remove main landing gear fairings. (Refer to 32-10)
(c)
Raise airplane on jacks. (Refer to 7-00)
(d) Inspect main gear strut assembly and attach points for security, cracks, and corrosion.
(e) Check brake lines for leakage and security to main gear strut.
(f)
Lower airplane and remove from jacks. (Refer to 7-00)
(g) Install main landing gear fairings. (Refer to 32-10)
32-10
13773-001
30 Nov 2000
Figure 32-102
Main Landing Gear Installation
13773-001
30 Nov 2000
32-10
Page 5
(4)
Adjustment/Test - Wheel Toe-In Check (See Figure 32-103)
Correct wheel alignment plays a critical role in maintaining tire wear and should be checked
whenever abnormal or excessive wear is noted. To correct wheel alignment the airplane is
placed on greased-slide plates which allow the main wheels to easily assume their true alignment position. Shims are inserted or removed to adjust camber and toe-in. Measurements are
taken on wheel flange.
(a)
Acquire necessary tools, equipment, and supplies.
Description
(b)
(c)
(d)
(e)
(f)
(g)
(h)
(i)
(j)
(k)
(l)
(m)
(n)
(o)
(p)
(q)
Page 6
P/N or Spec.
Supplier
Purpose
Plumb bob
-
Any Source
Establishing airplane centerline.
Straightedge
-
Any Source
Aid in measuring
toe-in.
Framing squares
-
Any Source
Aid in measuring
toe-in.
Wood blocks
-
Any Source
Aid in measuring
toe-in.
Remove main landing gear fairings. (Refer to 32-10)
Remove nose landing gear fairing. (Refer to 32-20)
Place airplane on level surface.
Ensure airplane is at maximum gross weight. (POH 1-7)
Ensure tires are properly inflated. (Refer to 12-10)
Place metal slide plates approximately 16 inches square in front of each main gear wheel.
Grease surface of bottom plate and place top plate of same dimension over bottom plate.
Roll main gear wheels onto greased metal slide plates.
Establish airplane centerline by dropping plumb bob line from forward center position
(located immediately aft of nose landing gear bridge) and from aft center position (located
at tail tie down). Draw chalk line between two plumb bob points.
Establish perpendicular line to airplane centerline just forward of main wheels using intersecting arc method
Using squares, wood blocks, and straightedge, position straightedge parallel to second
chalk line just below axle nut.
Roll airplane forward until tires just touch straightedge.
Place two marks on wheel flanges just below axle nut 6.5 inches apart, level.
Place framing square against straightedge and level with wheel flange marks. Measure
distance between blade of framing square and front and rear flange marks and determine
distances X and Y. Toe-in = X-Y.
If toe-in angle is not within specified tolerance, determine which shim combination will
establish specified tolerance and adjust.
Install main landing gear fairings. (Refer to 32-10)
Install nose landing gear fairing. (Refer to 32-20)
32-10
13773-001
30 Nov 2000
Figure 32-103
Wheel Alignment (Sheet 1 of 2)
13773-001
30 Nov 2000
32-10
Page 7
Figure 32-103
Wheel Alignment (Sheet 2 of 2)
Page 8
32-10
13773-001
31 July 2001
NOSE GEAR
1. DESCRIPTION
The nose gear consists of a tubular steel strut attached to the engine mount. The free castering nosewheel’s maximum turning arc is 216 degrees (108 degrees either side of center). Shock absorption is provided by a series of stacked, polymer pucks which react against the engine mount. Steering is
accomplished by differential application of the main gear brakes. The wheel, axle, tire and tube, wheel
bearing, and seal are mounted on the nose gear. (See Figure 32-202)
2. TROUBLESHOOTING
TROUBLE
Excessive tire wear.
Nose wheel shimmy.
Airplane leans forward.
PROBABLE CAUSE
REMEDY
Main gear out of alignment.
Align main gear. (Refer to 32-10)
Nose wheel out of balance
Balance nose wheel and tire.
Incorrect tire pressure.
Inflate to proper pressure. (Refer
to 12-10)
Nose wheel out of balance
Balance nose wheel and tire.
Loose, incorrectly tightened spindle nut.
Torque spindle nut. (Refer to 3220)
Incorrect tire pressure.
Inflate to proper pressure. (Refer
to 12-10)
Defective tire.
Replace tire.
Incorrect tire pressure.
Inflate to proper pressure. (Refer
to 12-10)
Attaching parts loose, defective.
Tighten loose parts, replace.
Bent axles.
Replace with new parts.
Polymer pucks damaged.
Inspect and replace with new
parts.
3. MAINTENANCE PRACTICES
A. Nose Gear Fairing (See Figure 32-201)
(1)
13773-001
31 July 2001
Removal - Nose Gear Fairing
(a) Turn nose wheel to full 108 degree deflection.
(b) Cut and remove safety wire securing hinge pin to strut fairing and pull hinge pin from strut
fairing.
(c)
Remove screws securing strut fairing to nose strut and remove strut fairing from airplane.
(d) Remove screws securing upper shell panel to forward shell and remove upper shell panel
from airplane.
(e) Remove screws securing rear shell to forward shell and remove rear shell.
(f)
Remove towing lug from nose wheel assembly.
(g) Remove screws securing forward shell to nose wheel assembly and remove forward shell
from airplane.
32-20
Page 1
(2)
(h) Reinstall towing lug.
Installation - Nose Gear Fairing
(a)
Acquire necessary tools, equipment, and supplies.
Description
Safety Wire
(b)
(c)
(d)
(e)
(f)
(g)
(h)
(i)
(j)
(k)
(l)
(m)
Page 2
P/N or Spec.
-
Supplier
Any Source
Purpose
Secure hinge pin
Remove towing lug from nose wheel assembly.
Turn nose wheel to full 108 degree deflection.
Pry trailing edge seam of strut fairing open and position strut fairing around strut.
From bottom of strut fairing, insert and slide hinge pin into hinge bodies until hinge pin is
fully inserted and seated.
Secure hinge pin to strut fairing with safety wire.
Install screws attaching strut fairing to nose strut and apply Loctite. (Refer to 20-40)
Place forward shell in proper alignment with wheel assembly and install screws.
Insert upper shell plate in forward shell slot.
While supporting upper shell plate, place rear shell in proper alignment with forward shell
apply light force to mate the pant shells together.
Install screws along nose pant seam and upper shell plate.
Reinstall towing lugs.
Rotate nose wheel assembly to ensure there is no interference through caster travel.
32-20
13773-001
31 July 2001
Figure 32-201
Nose Gear Fairing Installation
13773-001
31 July 2001
32-20
Page 3
B. Nose Gear Assembly (See Figure 32-202)
(1)
(2)
Removal - Nose Gear Assembly
(a) Remove nose gear fairing. (Refer to 32-20)
(b) Remove engine cowling. (Refer to 71-10)
(c)
Raise airplane on jacks (Refer to 7-10)
(d) With nose gear assembly supported, remove cotter pin, nut, washers, spacers, and bolt at
top of puck stack securing strut assembly to engine mount.
(e) Remove cotter pins, washers, spacers, nuts, and bolts securing aft strut assembly to
engine mount.
(f)
Lower assembly to ground, clear of airplane.
Installation - Nose Gear Assembly
(a)
Acquire necessary tools, equipment, and supplies.
Description
Grease
(b)
(c)
(d)
(e)
(f)
(g)
(h)
P/N or Spec.
ASG22
Supplier
Aeroshell
Purpose
Lubrication
Coat bolt shafts with thin coat of grease.
Support nose gear assembly under airplane and lift assembly up to align nose gear bolt
holes with aft engine mount attach fittings.
Install bolts, washers, spacers, and nuts securing aft strut assembly to engine mount.
Torque nuts to 480 - 690 inch pounds (53 - 76 Nm) and install cotter pins.
Lower airplane off jacks. (Refer to 7-10)
At top of puck stack, install bolt, washers, spacers, and nut securing strut assembly to
engine mount and install cotter pins.
Install nose gear fairing. (Refer to 32-20)
Install engine cowling. (Refer to 71-10)
C. Nose Gear Fork Assembly (See Figure 32-202)
(1)
(2)
Removal - Nose Gear Fork Assembly
(a) Raise airplane on jacks (Refer to 7-10)
(b) While supporting fork assembly, remove cotter pin, nut, and Belleville washers from spindle bolt.
(c)
Remove fork assembly from nose gear strut.
Installation - Nose Gear Fork Assembly
(a)
Acquire necessary tools, equipment, and supplies.
Description
Supplier
Purpose
Grease
ASG22
Aeroshell
Calibrated Spring Scale
5A354
Load determination
Chatillon
83-30 Kew Gardens Rd
Kew Gardens, N.Y.
11415
CAUTION:
Page 4
P/N or Spec.
32-20
Lubrication
Do not allow grease to come in contact with spindle bearing surface or fork
bushings.
13773-001
30 Nov 2000
(b)
Apply thin coat of grease to spindle threads.
CAUTION:
Improper orientation of Belleville washers may result in undesirable handling characteristics of the airplane and/or damage to the airplane.
(c)
(d)
(e)
(3)
Insert washers and Belleville washers in proper orientation. (See Figure 32-202)
Install spindle nut.
Attach spring scale to axle fork and torque spindle nut so that side load required to rotate
wheel assembly, after initial break-free pull, is 10 to 20 lbs (4.5 kg to 9.1 kg). Install cotter
pin. Nut may be tighten to facilitate cotter pin installation.
(f)
Lower airplane off jacks. (Refer to 7-10)
Inspection/Check - Nose Gear and Fairing
Acquire necessary tools, equipment, and supplies.
Description
(a)
(b)
(c)
(d)
(e)
(f)
(g)
(h)
(i)
(j)
13773-001
30 Nov 2000
P/N or Spec.
Supplier
Purpose
Grease
ASG22
Aeroshell
Lubrication.
Calibrated Spring Scale
5A354
Load determination
Chatillon
83-30 Kew Gardens Rd
Kew Gardens, N.Y.
11415
Inspect nose gear fairing for cracks, wear, and loose fasteners.
Remove nose gear fairing. (Refer to 32-20)
Raise airplane on jacks. (Refer to 7-10)
Inspect nose gear strut assembly and attach points for security, cracks, and corrosion.
Inspect pucks for delamination, cracking, or other distress.
Attach spring scale to axle fork and torque spindle nut so that side load required to rotate
wheel assembly, after initial break-free pull, is 10 to 20 lbs (4.5 kg to 9.1 kg).
Coat exposed fork assembly bolt and nut with grease.
Verify security of spindle nut cotter pin.
Install nose gear fairing. (Refer to 32-20)
Remove airplane from jacks. (Refer to 7-10)
32-20
Page 5
Figure 32-202
Nose Gear Assembly and Installation
Page 6
32-20
13773-001
30 Nov 2000
WHEELS AND BRAKES
1. GENERAL
This chapter describes that portion of the landing gear system which provides for rolling and stopping of
the airplane while on the ground.
Chapter 32-41 contains maintenance practices pertinent to the wheels, tires, and tubes. (Refer to 32-41)
Chapter 32-42 contains maintenance practices pertinent to the brake system. (Refer to 32-42)
13773-001
30 Nov 2000
32-40
Page 1
2. TROUBLESHOOTING
Trouble
Airplane Leans To One Side.
Probable Cause
Remedy
Bent axle.
Replace with new parts.
Incorrect tire pressure.
Inflate to proper pressure. (Refer
to 12-10)
Attaching parts loose or defective. Replace with new parts.
Brake Drag.
Piston cocked in cylinder, resulting Remove and repair cylinder or pisin overheating brake and/or
ton, or replace brake (Refer to 32excessive lining wear.
42)
Foreign matter wedged in brakes. Locate and remove.
Back pressure due to malfunction Bleed hydraulic system and/or
of master cylinder or parking
repair/replace master cylinder or
valve.
parking valve. (Refer to 32-42)
Water or ice in hydraulic system.
Flush and bleed hydraulic system
(thaw ice first).
Excessive bolt torque has caused Replace cylinder and follow manuback plate to crush cylinder, evi- facturer's recommended torque
value.
denced by depressions around
bolt holes.
Piston does not retract.
Bleed system and/or remove piston. Inspect for damage (Refer to
32-42)
Warped pressure plate.
Replace pressure plate or flatten
to within 0.100 inch (0.254 mm).
(Refer to 32-42)
Corroded anchor bolts and/or
torque plate bushings.
Clean and lubricate or replace.
Cocked anchor bolts and/or torque Replace. (Refer to 32-42)
plate bushings.
Bent or cracked torque plate.
Replace. (Refer to 32-42)
Warped brake disc; inspect by lay- Replace and use caution during
ing a straightedge across disc
operation to prevent excessive
face.
energy input into brake.
Page 2
32-40
Out of position/stuck lining.
Repair or Replace.
Restriction in hydraulic line.
Isolate and remove restriction.
Lining not firmly seated flush
against pressure/back plate.
Deburr rivet hole on surface adjacent to lining.
13773-001
30 Nov 2000
Trouble
Brakes Inoperative.
Parking brake inoperative.
Probable Cause
Remedy
Brake fluid level low.
Replenish brake fluid. (Refer to
12-10)
Air in brake system.
Bleed brake system. (Refer to 3242)
Defective master cylinder.
Replace master cylinder (Refer to
32-42)
Defective caliper.
Replace caliper (Refer to 32-42)
Worn brake linings.
Replace linings (Refer to 32-42)
Leaky brake line connections
Tighten or replace connectors.
Parking brake valve defective.
Replace valve (Refer to 32-42)
Air in hydraulic system.
Unable to Obtain Sufficient
Hydraulic Brake Pressure, Excessive Toe Pedal Travel, or Spongy
Vent in master cylinder reservoir
Pedal.
clogged.
Check for source, then bleed
hydraulic system.
Clean vent or overboard drain.
Leak in system; brake, master cyl- Locate leak and repair.
inder, fittings, or lines.
Defective master cylinder.
Replace or repair.
Back plate bolts loose or not prop- Torque bolts to proper value.
erly torqued, causing excessive
brake deflection.
Rapid Disc and Lining Wear.
Excess bolt torque has caused
back plate to crush cylinder, evidenced by depressions around
bolt holes.
Replace cylinder.
Defective brake line (ballooning).
Replace.
Improper adjustment of master
cylinder rod length restricting the
development of maximum stroke.
Adjust cylinder rod length.
Improper conditioning of brake lin- Replace linings.
ings.
Excessive rusting, scoring, or pit- Clean or replace disc. Use factory
ting of brake disc.
chrome-plated disc where applicable.
13773-001
Excessive back plate deflection
caused by bent bolts or over
torquing bolts.
Check and replace bolts.
Incorrect lining and/or disc.
Replace with correct parts.
32-40
Page 3
Trouble
Brakes Won't Hold.
Probable Cause
Contaminated lining.
Remedy
Replace lining.
Improper conditioning of brake lin- Replace linings.
ings.
Lining worn below minimum wear Replace linings.
limits.
Discs worn below minimum wear
limits.
Replace discs.
Organic brake lining carbonized
(overheated).
Replace lining.
Pressure plate contacting torque
plate assembly.
Check for correct torque plate/
wheel installation.
New Lining installed with old disc, Replace excessively worn disc.
Lining not seated in wear track
creating partial contact with disc.
Cracked Or Distorted Wheel or
Wheel Half.
Hitting rocks or other hard objects Inspect wheel using Zyglo to
during landing or takeoff.
determine condition. Replace
wheel or wheel half.
CAUTION: Do Not Attempt To
Weld Or Repair Cracks In Wheel
Halves.
Use of sharp objects to break tire Replace wheel or wheel half.
bead.
Landing with flat tire or abnormally Replace wheel or wheel half.
hard landing.
Landing in crabbing position in
Replace wheel or wheel half.
crosswind causing excessive side
force.
Damaged Bearing Cone.
Normal fatigue failure when used
beyond expected wheel life.
Replace wheel or wheel half.
Misalignment of bearings.
Replace bearing cone being sure
it is properly seated in bearing
bore.
Axle nut improperly torqued.
Replace and torque axle nut.
Foreign matter in bearing grease. Check grease seals for damage.
Replace seals and be sure bearing grease is free from foreign
matter.
Lack of bearing grease.
Page 4
32-40
Replace bearings and repack with
grease.
13773-001
WHEELS
1. DESCRIPTION
The main wheels are of aluminum construction and designed to be used with tires and tubes. Each main
wheel consists of two wheel halves, two bearing cups, two bearing cones, grease seals, a brake disc
assembly, and a snap ring. The wheel halves are joined with bolts, washers, and nuts. A hole in one wheel
half provides for valve stem installation. The 15 x 6.00 x 6 wheels use 6-ply-rated tube tires and rotate on
two bearings protected against contamination by grease seals. The wheel is secured to the axle with a nut,
and cotter pin.
The nose wheel is of aluminum construction and designed to be used with tires and tubes. The nose wheel
consists of two wheel halves, two bearing cups, two bearing cones, grease seals, and snap rings. The
wheel is joined by bolts, washers, and nuts. A hole in one wheel halve provides for valve stem installation.
The 5.00 x 5 wheels use a 6-ply-rated tube tire and rotate on two bearings protected against contamination
by grease seals. The wheel is free castering on an independent axle and is used to steer the airplane on
the ground by means differential brake application.
2. MAINTENANCE PRACTICES
A. Servicing Tires and Tubes (Refer to 12-20)
B. Main Wheel, Tire, and Tube (See Figure 32-411), (See Figure 32-412)
(1)
Removal - Main Wheel, Tire, and Tube
(a) Remove main gear fairings. (Refer to 32-10)
(b) Raise airplane on jacks. (Refer to 7-00)
(c)
Remove brake assembly. (Refer to 32-10)
(d) Deflate tire and tube completely.
WARNING:
(2)
(e) Remove valve core.
(f)
Remove cotter pin from axle and remove axle nut
(g) Remove wheel/tire assembly from axle.
Disassembly - Main Wheel, Tire, and Tube
WARNING:
(a)
(b)
(c)
(d)
(e)
(f)
13773-001
30 Nov 2000
Do not attempt to remove valve core until tire has been completely deflated.
The valve core will be ejected at high velocities if unscrewed before air pressure has been released.
Injury can result when attempting to separate wheel halves with tube
inflated. Care must also be taken to avoid damaging wheel halves when
breaking tire beads loose.
Separate tire beads from wheel halves by applying even pressure around the entire sidewall of the tire.
Remove nuts, washers, and bolts holding wheel halves together.
Mark wheel halves to note relationship to each other for reassembly.
Separate inner wheel half and outer wheel half
Remove tire, tube, and brake disk.
Remove snap rings, grease seals, and bearing cones from wheel halves.
32-41
Page 1
Note:
(3)
The bearing cup is press fit into the wheel half and should not be removed
unless replacement is necessary. To remove bearing cup, insert wheel into
boiling water or place in an oven not exceeding 212° Fahrenheit for 15 minutes. Remove wheel half from heat source and immediately remove bearing
cup with a fiber drift pin or suitable arbor press. Press in new bearing cup
while wheel half is still hot.
Reassembly - Main Wheel, Tire, and Tube
(a)
Acquire necessary tools, equipment, and supplies.
Description
(b)
(c)
(d)
(e)
(f)
(g)
(5)
Page 2
Supplier
Purpose
Bearing Grease
ASG22
Shell Oil Co.
Lubrication.
Talcum Powder
-
Any Source
Lubrication.
Apply light coat of talcum powder to surface of tube and inside of tire.
Position tire and tube in outboard wheel half ensuring valve stem is protruding through
hole in wheel half.
Place outboard wheel half in proper alignment position with inboard wheel half and apply
light force to mate the wheel halves together. Do not pinch tube between wheel halves.
Insert brake disc into inboard wheel half and align bolt holes with outboard wheel half.
Install nuts, washers, and bolts.
Torque nuts to 150 inch-pounds (16.9 N.m.).
CAUTION:
(4)
P/N or Spec.
Uneven torque of nuts can cause bolt failure with resultant wheel failure.
(h) Inflate tire and adjust pressure. (Refer to 12-10)
(i)
Clean and repack bearing cones.
(j)
Install bearing cones and grease seals into wheel halves and secure with snap rings.
Installation - Main Wheel, Tire, and Tube
(a) Carefully slide wheel/tire assembly onto axle making sure inboard bearing is seated.
(b) While rotating wheel/tire assembly, install axle nut and torque to 150 to 200 inch-pounds
(16.9-22.6 N.m.) to seat bearing.
(c)
Back off axle nut to zero torque.
(d) While rotating wheel, retorque to 30-40 inch-pounds (3.4-4.5 N.m.).
(e) Rotate axle nut to nearest slot and cotter pin hole, and install cotter pin.
(f)
Install brake assembly. (Refer to 32-10)
(g) Inflate tires.(Refer to 12-10)
(h) Remove airplane from jacks. (Refer to 7-00)
(i)
Install main gear fairings. (Refer to 32-10)
Inspection/Check - Main Wheel Inspection
(a) Disassemble wheel. (Refer to 32-42)
(b) Inspect wheel halves for cracks, corrosion, or other damage. Areas with suspected cracks
should be dye-penetrant inspected. Cracked or badly corroded parts must be replaced.
Small nicks, pits, and scratches may be polished out with fine 400 grit wet or dry sandpaper.
32-41
13773-001
30 Nov 2000
(c)
(d)
(e)
(f)
(g)
13773-001
30 Nov 2000
Inspect bearing cups for looseness, scratches, pitting, corrosion, or evidence of overheating. Replace cup if any defect exists.
Inspect snap rings and grease seals for distortion or wear. Replace grease seal felts if
contaminated or hard.
Carefully inspect through bolts. Check for cracks by magnetic particle inspection, especially in radius under head and in threads adjacent to bolt shank. Replace any doubtful
bolt.
Inspect self locking nuts for damage. Replace nut if doubtful.
Reassemble wheel. (Refer to 32-42)
32-41
Page 3
Figure 32-411
Main Wheel Installation
Page 4
32-41
13773-001
30 Nov 2000
Figure 32-412
Main Wheel Assembly
13773-001
30 Nov 2000
32-41
Page 5
C. Nose Wheel, Tire, and Tube (See Figure 32-413), (See Figure 32-414)
(1)
Removal - Nose Wheel, Tire, and Tube
(a) Remove nose gear fairings. (Refer to 32-20)
(b) Raise airplane on jacks. (Refer to 7-00)
(c)
Deflate tire completely.
WARNING:
(d)
(e)
(f)
Remove valve core.
While supporting wheel/tire assembly, remove axle plugs, cotter pin, axle nut, washers,
and withdraw bolt from axle.
Pull tire, axle, and wheel from fork.
Note:
(2)
Label bearings with position from which it was removed for proper reinstallation.
(g) Remove and store spacers and axle before disassembling wheel.
Disassembly - Nose Wheel, Tire, and Tube
WARNING:
(a)
(b)
(c)
(d)
(e)
(f)
Injury can result when attempting to separate wheel halves with tube
inflated. Care must be taken to avoid damaging wheel halves when breaking
tire beads loose.
Separate tire beads from wheel halves by applying even pressure around the entire sidewall of the tire.
Remove nuts, washers, and bolts holding wheel halves together.
Mark wheel halves to note relationship to each other for reassembly.
Separate inner wheel half and outer wheel half
Remove tire and tube.
Remove snap rings, grease seals, and bearing cones from wheel halves.
Note:
(3)
Do not attempt to remove valve core until tire has been completely deflated.
Valve core will be ejected at high velocities if unscrewed before air pressure
has been released.
The bearing cup is press fit into the wheel half and should not be removed
unless replacement is necessary. To remove bearing cup, insert wheel into
boiling water or place in an oven not exceeding 212° Fahrenheit for 15 minutes. Remove wheel half from heat source and immediately remove bearing
cup with a fiber drift pin or suitable arbor press. Press in new bearing cup
while tire half is still hot.
Reassembly - Nose Wheel, Tire, and Tube
(a)
Acquire necessary tools, equipment, and supplies.
Description
(b)
Page 6
P/N or Spec.
Supplier
Purpose
Bearing Grease
ASG22
Shell Oil Co.
Lubrication.
Talcum Powder
-
Any Source
Lubrication.
Apply light coat of talcum powder to surface of tube and inside of tire.
32-41
13773-001
30 Nov 2000
(c)
(d)
(e)
(f)
Position tire and tube on wheel half ensuring valve stem protrudes from hole in wheel half.
Place wheel half in proper alignment position with opposite wheel half and apply light force
to mate the wheel halves together. Do not pinch tube between wheel halves.
Install nuts, washers, and bolts.
Torque nuts to 90 inch-pounds (10.2 N.m.).
CAUTION:
(4)
(5)
13773-001
30 Nov 2000
Uneven torque of nuts can cause bolt failure with resultant wheel failure.
(g) Inflate tire and adjust pressure. (Refer to 12-10)
(h) Clean and repack bearing cones.
(i)
Install bearing cones and grease seals into wheel halves and secure with snap rings.
Installation - Nose Wheel, Tire, and Tube
(a) Insert axle and spacers into wheel and tire.
(b) Position wheel into fork so that valve stem is on left side of airplane and install washers,
axle bolt, and nut.
(c)
Torque axle nut to 150 inch-pounds (16.9 N.m.) to seat bearing.
(d) Back off axle nut to zero torque.
(e) While rotating wheel, retorque axle nut to 20-40 inch-pounds (2.2-4.5 N.m.) and install cotter pin. Wheel should spin 1-2 revolutions when spun by hand.
(f)
Inflate tire. (Refer to 12-10)
(g) Remove airplane from jacks (Refer to 7-00)
(h) Install nose gear fairing. (Refer to 32-20)
Inspection/Check - Nose Wheel Inspection
(a) Disassemble wheel. (Refer to 32-42)
(b) Inspect wheel halves for cracks, corrosion, or other damage. Areas with suspected cracks
should be dye-penetrant inspected. Cracked or badly corroded parts must be replaced.
Small nicks, pits, and scratches may be polished out with fine 400 grit wet or dry sandpaper.
(c)
Inspect bearing cups for looseness, scratches, pitting, corrosion, or evidence of overheating. Replace cup if any defect exists.
(d) Inspect snap rings and grease seals for distortion or wear. Replace grease seal felts if
contaminated or hard.
(e) Carefully inspect through bolts. Check for cracks by magnetic particle inspection, especially in radius under head and in threads adjacent to bolt shank. Replace any doubtful
bolt.
(f)
Inspect self locking nuts for damage. Replace nut if doubtful.
(g) Reassemble wheel. (Refer to 32-42)
32-41
Page 7
Figure 32-413
Nose Wheel Installation
Page 8
32-41
13773-001
30 Nov 2000
Figure 32-414
Nose Wheel Assembly
13773-001
30 Nov 2000
32-41
Page 9
BRAKES
1. DESCRIPTION
The hydraulically operated brakes are individually activated by floor mounted toe pedals located at both
pilot stations. The brake system is designed to use MIL-H-5606 hydraulic fluid. The brake system consists
of a dual disc brake assembly on each main landing gear wheel, master cylinder for each rudder pedal,
hydraulic fluid reservoir, parking brake valve, and associated hydraulic plumbing. The brake system reservoir is located in the engine compartment on the upper right side of the firewall. The master cylinders are
located forward of the pilot’s rudder pedals.
A parking brake system consisting of a parking brake valve, hydraulic plumbing, and a parking brake control wire and knob. The parking brake valve is mounted forward of instrument panel on the upper left side,
adjacent to firewall.
2. MAINTENANCE PRACTICES
A. Brake System Replenishing (Refer to 12-10)
B. Brake Assembly (See Figure 32-421)
(1)
Removal - Brake Assembly
WARNING:
(2)
Insure parking brake is in off position and wheels are blocked.
(a) Remove main gear fairings. (Refer to 32-10)
(b) Remove and cap hydraulic line attached to brake. Cap brake inlet fitting.
(c)
Remove back plate tie bolts and washers, and remove back plate.
(d) Carefully slide brake cylinder out of torque plate.
(e) If torque plate removal is required, remove wheel/tire. (Refer to 32-40)
(f)
Remove torque plate attachment bolts, nuts, and washers.
(g) Remove torque plate.
Disassembly - Brake Assembly
(a) Separate assembled cylinder and torque plate.
(b) Remove back plate tie bolts and washers. Separate cylinder and back plate.
(c)
Remove pressure plate by sliding over anchor pins.
(d) Remove pistons by injecting air into ports (15-20 psi) [103 to 138 kPa] maximum pressure.
CAUTION:
(3)
Care should be used in handling O-rings to prevent damage.
(e) Remove O-rings from pistons.
(f)
Remove bleeder fitting, screw, and cap.
(g) Remove brake lining, if necessary. (Refer to 32-42)
Reassembly - Brake Assembly
Note:
(a)
Thoroughly clean parts before assembling.
Acquire necessary tools, equipment, and supplies.
Description
Arbor Press
13773-001
30 Nov 2000
P/N or Spec.
-
Supplier
Any Source
Purpose
Install anchor bolts.
32-42
Page 1
Description
(b)
(c)
(d)
(e)
(f)
(j)
(k)
Parker Aerospace
Sealing device.
O-Ring Lubricant
Dow Corning
55 O-Ring
Lubricant
Dow Corning
Lubrication.
Silicon Spray
-
Any Source
Lubrication.
If anchor bolts were removed, install anchor bolts using arbor press and a holding fixture.
Install washers and nuts. Torque nuts to 90 inch-pounds (7.9 N.m.).
Install O-rings on pistons and lubricate.
Place pistons in cylinder bores and insure pistons and O-rings are in proper alignment
Press pistons into cylinder bores hand. If required, tap the pistons squarely with a wooden
or plastic mallet while rotating pistons.
Install brake linings. (Refer to 32-42)
Care should be exercised to prevent over tightening the inlet fitting which
could result in cracking of cylinder casting. Finger tighten the inlet fitting,
rotate one to two turns to obtain proper installation orientation, and torque to
specified value.
Install inlet fitting and torque to 40-50 inch-pounds (4.5-5.6 N.m.).
Install bleeder fitting, seat, cap and torque to 40-50 inch-pounds (4.5-5.6 N.m.).
Cap fittings if brake is not being immediately installed on the airplane.
Install pressure plate lining facing away from pistons by sliding over anchor bolts. Ensure
pressure plate slides freely over anchor bolts.
Install back plate with attachment bolts and washers.
Install cylinder assembly in torque plate by sliding anchor bolts into torque plate bushings.
Note:
(4)
Dry film lubricants such as silicone spray should be applied to anchor bolts
and torque plate bushing to assist sliding motion. Exercise care to insure
that linings do not become contaminated with fluid or lubricant. For best service life, cylinders must slide freely in torque plate.
Installation - Brake Assembly
(a)
Acquire necessary tools, equipment, and supplies.
Description
Silicon Spray
(b)
(c)
(d)
(e)
Page 2
Purpose
101-02700
Note:
(i)
Supplier
O-Rings
CAUTION:
(g)
(h)
P/N or Spec.
P/N or Spec.
-
Supplier
Any Source
Purpose
Lubrication.
Orient and install torque plate on axle flange with bolts, nuts, and washers. Torque to 160190 inch-pounds (17.6-20.9 N.m.).
Install wheel assembly. (Refer to 32-41)
Remove back plate attachment bolts, washers, and back plate.
Install cylinder assembly in torque plate by sliding anchor bolts into torque plate bushings.
32-42
13773-001
31 July 2001
Note:
(f)
(g)
(h)
(i)
(j)
Dry film lubricants such as silicone spray should be applied to anchor bolts
and torque plate bushing to assist sliding motion. Exercise care to insure
that linings do not become contaminated with fluid or lubricant. For best service life, cylinders must slide freely in torque plate.
Install back plate and back plate attachment bolts and washer. Torque to 75-80 inchpounds (8.5-9.1 N.m.).
Uncap and attach hydraulic line to cylinder inlet fitting.
Bleed the system. (Refer to 32-42)
Install main gear fairings. (Refer to 32-10)
Perform Adjustment/Test - Conditioning Procedure for Organic Brake Linings. (Refer to 3242)
C. Inspection/Check - Brake Inspection
(a)
(b)
(c)
(d)
(e)
Disassemble brake assembly. (Refer to 32-42)
Check brake lining for deterioration and maximum permissible wear. Replace lining when
worn to 0.100 inch (2.54 mm).
Inspect brake cylinder bores for evidence of scoring and deterioration. Replace scored
cylinders.
Replace all packings and O-rings upon reassembly.
Reassemble brake assembly. (Refer to 32-42)
D. Inspection/Check - Brake Disk
(a)
(b)
(c)
(d)
(e)
(f)
Disassemble wheel. (Refer to 32-41)
Inspect brake disc for cracks, excessive wear, scoring, mounting hole elongation, corrosion, and warping.
Remove corrosion and blend out small nicks using fine 400 grit wet or dry sandpaper.
Replace brake disc if worn below 0.327 inch (8.306mm).
Coning of disc in excess of 0.015 inch (0.381 mm) is cause for replacement.
Reassemble wheel. (Refer to 32-41)
E. Brake Linings (See Figure 32-421)
(1)
Removal - Brake Linings
(a)
Acquire necessary tools, equipment, and supplies.
Description
Arbor Press
(b)
(c)
(d)
(e)
(f)
(g)
(h)
(i)
(j)
13773-001
31 July 2001
P/N or Spec.
-
Supplier
Any Source
Purpose
Rivet removal.
Remove back plate attaching bolts and washers
Remove back plate.
Slide brake caliper out of torque plate bushing.
Slide pressure plate assembly off anchor bolts.
Using arbor press, remove rivets attaching lining to pressure plate.
Using arbor press, remove rivets attaching lining to back plate.
Separate lining from pressure plate/back plate.
Clean pressure plate and back plate surfaces of dirt and grease.
Inspect pressure plate and back plate for excessive corrosion, visible damage, or excessive warping.
32-42
Page 3
Note:
Pressure plates should not be used if warped in excess of 0.010 inch (0.254
mm) flatness. Excessive warping can result in brake drag especially when
new disc and linings are installed.
(k)
(2)
Align new lining segments on pressure plate/back plate and install rivets. Insure lining is
tight and movement free with no distortion of parts.
Installation - Brake Linings
(a)
Acquire necessary tools, equipment, and supplies.
Description
Silicon Spray
(b)
(c)
F.
-
Supplier
Any Source
Purpose
Lubrication.
Clean dirt, grease, etc. from cylinder, pressure plate, and portions of piston extending
beyond cylinder face. Push piston back into cylinder.
Slide pressure plate with new lining over anchor bolts and install brake caliper into torque
plate.
Note:
(d)
(e)
P/N or Spec.
Dry film lubricants such as silicone spray should be applied to anchor bolts
and torque plate bushing to assist sliding motion. Exercise care to insure
that linings do not become contaminated with fluid or lubricant. For best service life, cylinders must slide freely in torque plate.
Install back plate attachment bolts and washers in brake caliper.
Slide back plates between brake disc and wheel/tire and install back plate attachment
bolts and washer into back plates.
Adjustment/Test - Conditioning Procedure for Organic Brake Linings.
This conditioning procedure will generate sufficient heat to create a thin layer of glazed material
at the lining friction surface. Normal brake usage should generate enough heat to maintain the
glaze throughout the life of the lining. Light brake usage can cause the glaze to wear off, resulting in reduced brake performance. In such cases, the lining may be conditioned again following
the instructions below.
(a)
(b)
(c)
(d)
Page 4
Taxi airplane for 1500 feet with engine at 1700 RPM applying brake pedal force as needed
to develop a 5-10 MPH taxi speed.
Allow brakes to cool for 10-15 minutes.
Apply brakes and check to see if a high throttle static run up may be held with normal
pedal force. If so, conditioning is completed.
If static run up cannot be held, repeat steps (a) through (c) as needed to successfully complete test.
32-42
13773-001
30 Nov 2000
Figure 32-421
Brake Assembly
13773-001
30 Nov 2000
32-42
Page 5
G. Brake Master Cylinder (See Figure 32-422), (See Figure 32-423)
(1)
(2)
(3)
Removal - Brake Master Cylinder
(a) Drain hydraulic fluid from brake system.
(b) Remove cotter pins and washers from rudder pedal pivot tubes.
(c)
Slide rudder pedal pivot tube from bearing.
(d) Detach rudder pedals from torque tube weldment.
(e) Disconnect hoses from master cylinders. Cap or plug ports and hoses.
(f)
Remove cotter pins, washers, and clevis pins from upper connection at rudder pedals of
each master cylinder.
(g) Pull rudder pedal aft and remove cotter pins, washers, and clevis pins at floorboard
mounting points and remove master cylinder.
Disassembly - Brake Master Cylinder
(a) Drain residual hydraulic fluid open ports of body.
(b) Remove snap ring at end gland from cylinder body and withdraw piston rod assembly.
(c)
Remove snap ring from piston end of rod assembly, and slide bushing, piston spring, piston, end gland, return spring, washer, and star washer from piston rod.
(d) Remove O-rings, from piston, end gland, and piston rod.
(e) Remove nut and clevis from piston rod (if required).
(f)
Inspect master cylinder components.
Reassembly - Brake Master Cylinder
(a)
Acquire necessary tools, equipment, and supplies.
Description
Hydraulic Fluid
P/N or Spec.
MIL-H-5606
Supplier
Any Source
Purpose
Lubrication
(b)
(c)
(d)
(e)
(f)
(4)
Page 6
Lubricate and install O-rings, on piston, end gland, and piston rod.
Install clevis and nut on piston rod.
Slide star washer and washer over piston rod against nut.
Place return spring on piston rod and slide end gland onto piston rod.
Slide piston, piston spring, and bushing onto small shaft of piston rod and secure snap
ring.
(g) Adjust clevis to obtain on overall length of 8.420 (+0.25/ - 0.15) inches between clevis eye
and floor attach point at full extension. Torque nut to 35 inch pounds. (3.85 N.m.)
Installation - Brake Master Cylinder
(a) Place master cylinders on floorboard mounting points, install clevis pins, and secure with
washers, and cotter pins.
(b) Connect brake hoses to master cylinders. Upper port is inlet, lower port is outlet.
(c)
Connect piston rod clevis to upper connection at rudder pedals and install washers, clevis
pins, and cotter pins.
(d) Place rudder pedals in proper alignment with torque tube weldment and install rudder
pedal pivot tubes, washers, and cotter pins.
32-42
13773-001
30 Nov 2000
Figure 32-422
Master Cylinder Assembly
13773-001
30 Nov 2000
32-42
Page 7
H. Inspection/Check - Master Cylinder Components (See Figure 32-422)
(a)
(b)
(c)
I.
Inspect retaining rings for cracks or burns.
Inspect bushing, piston, end gland, and piston rod for nicks, scratches, or damaged
threads.
Inspect cylinder body for damage to threaded ports and cracks in the floor attach point.
Parking Brake Valve (See Figure 32-423)
(1)
(2)
Removal - Parking Brake Valve
(a) With parking brake knob in “off” position, drain hydraulic fluid from brake system
(b) Remove left crew seat. (Refer to 25-10)
(c)
Remove kick plate from underside of left hand instrument panel and locate parking brake
valve mounted forward of instrument panel on the lower left side of console assembly,
adjacent to firewall.
(d) Disconnect brake hoses, and lines, from parking brake valve. Cap or plug ports and
hoses.
(e) Loosen clamp bolt on control lever and remove control wire.
(f)
Remove bolts attaching parking brake valve to center console.
(g) Remove parking brake valve from airplane.
Installation - Parking Brake Valve
(a) Position parking brake valve on outboard center console, aligning holes in parking brake
valve with holes in console; install bolts, washers, and nuts.
CAUTION:
(b)
(c)
(d)
(e)
(f)
(g)
(h)
(i)
Page 8
Do not cross left and right hoses. Hoses for left master cylinder and brake
connect to forward most outlet ports.
Remove caps from hoses, and lines, and connect to appropriate port of parking brake
valve.
Install clamp bolt, washer, and nut on control lever so bolt will swivel in control lever.
If knob and control cable were removed, install wire, washer, and locknut on forward-side
of mounting bracket. Install sleeve, washer and control knob on aft side.
Insert control wire through clamp bolt on control lever and torque clamp bolt nut to 20 inchpounds (2.2 N.m.).
Bend control wire protruding past nut 90 degrees to prevent disconnect in the event nut
should become loose.
Bleed brake system.(Refer to 32-42)
Install kick plate to underside of left hand instrument panel.
Install left crew seat. (Refer to 25-10)
32-42
13773-001
30 Nov 2000
Figure 32-423
Brake System
13773-001
30 Nov 2000
32-42
Page 9
J. Adjustment/Test - Bleeding the Brake System
If a brake line has been disconnected or the brake pedal has a “spongy” feel, there is a strong
likelihood that air has entered the brake system. To ensure proper braking, all trapped air must
be removed from the brake system.
(a)
Acquire necessary tools and equipment
Description
(b)
(c)
(d)
(e)
(f)
(g)
(h)
Page 10
P/N or Spec.
Supplier
Purpose
Pressure Pot
-
Any Source
Bleed brake system.
Hydraulic Fluid
MIL-H-5606
Any Source
Replenish brake
system.
Remove main gear fairings. (Refer to 32-10)
Disengage parking brake.
Connect hydraulic pressure source, to right brake wheel cylinder bleeder valve.
Open bleeder valve and begin pumping hydraulic fluid into system. Observe fluid level in
brake system reservoir to prevent overfill.
After bubbles cease to appear in reservoir, check fluid level, close bleeder valve, and
remove pressure source.
Repeat steps through for left brake system.
Install main gear fairings. (Refer to 32-10)
32-42
13773-001
30 Nov 2000
CHAPTER
LIGHTS
CHAPTER 33 - LIGHTS
LIST OF EFFECTIVE PAGES
Chapter/Section
Page
Date
33-LOEP
1
30 NOV 2000
33-TOC
1
30 NOV 2000
33-TOC
2
30 NOV 2000
33-00
1
30 NOV 2000
33-10
1
30 NOV 2000
33-10
2
30 NOV 2000
33-10
3
30 NOV 2000
33-10
4
30 NOV 2000
33-10
5
30 NOV 2000
33-10
6
30 NOV 2000
33-10
7
30 NOV 2000
33-20
1
30 NOV 2000
33-20
2
30 NOV 2000
33-40
1
30 NOV 2000
33-40
2
30 NOV 2000
33-40
3
30 NOV 2000
33-40
4
30 NOV 2000
33-40
5
30 NOV 2000
33-40
6
30 NOV 2000
33-40
7
30 NOV 2000
13773-001
30 Nov 2000
33-LOEP
Page 1
CHAPTER 33 - LIGHTS
TABLE OF CONTENTS
Subject
LIGHTS
Chapter/Section
Page
33-00
General
FLIGHT COMPARTMENT
1
33-10
Description
1
Troubleshooting
3
Maintenance Practices
4
Cabin Lights
Removal - Glareshield Light Strip
Installation - Glareshield Light Strip
Removal - Cabin Eyeball Light and Switch
Installation - Cabin Eyeball Light and Switch
Removal - Cabin Dome Light
Installation - Cabin Dome Light
Removal - CAPS Handle Lighting
Installation - CAPS Handle Lighting
Removal - Circuit Breaker Panel Lighting
Installation - Circuit Breaker Panel Lighting
Removal - Alternate Induction Air and Parking Brake Handle Light
Installation - Alternate Induction Air and Parking Brake Handle Light
Removal - Dimmer Switch
Installation - Dimmer Switch
Lamp Replacement
Removal - Cabin Eyeball Light
Installation - Cabin Eyeball Light
Removal - Cabin Dome Light
Installation - Cabin Dome Light
PASSENGER COMPARTMENT
4
4
4
4
4
4
4
5
5
5
5
5
5
6
6
6
6
6
6
6
33-20
Description and Operation
1
Troubleshooting
1
Passenger Eyeball Lights
Removal - Passenger Eyeball Light and Switch
Installation - Passenger Eyeball Light and Switch
Lamp Replacement
Removal - Passenger Eyeball Light
Installation - Passenger Eyeball Light
13773-001
30 Nov 2000
1
1
1
2
2
2
33-TOC
Page 1
CHAPTER 33 - LIGHTS
TABLE OF CONTENTS
Subject
Chapter/Section
EXTERIOR LIGHTING
Description
Landing Light
Removal - Landing Light
Installation - Landing Light
Adjustment - Landing Light
Anti-collision Strobe Light Assembly
Removal - Anti-collision Strobe Light assembly
Installation - Anti-collision Strobe Light assembly
Light Bulb Replacement
Removal - Navigation Light bulb
Installation - Navigation Light bulb
Removal - Position Light bulb
Installation - Position Light bulb
Removal - Strobe Light
Installation - Strobe Light
Removal - Strobe Light Module
Installation - Strobe Light Module
Page 2
33-TOC
Page
33-40
1
1
1
1
2
4
4
4
6
6
6
6
6
6
6
7
7
13773-001
30 Nov 2000
33-00LIGHTS
LIGHTS
1. GENERAL
This chapter contains information for troubleshooting, removal, installation and adjustments of the interior
and exterior lighting systems used on the airplane.
Exterior lighting consists of standard wing tip navigation lights with integral anti-collision strobe lights and
position lights. A single landing light is mounted in the lower engine cowling.
Interior lighting consists of separately controlled incandescent overhead lights for general cabin lighting,
individual map lights for the pilots, and dimmable panel flood lights. The flight instruments and avionics
equipment are integrally lighted and are controlled by a single dimming circuit.
WARNING:
Always disconnect the power supply prior to servicing any portion of the electrical
system. Ensure the main power switch is in the off position; then remove the negative
battery cable followed by the positive battery cable.
CAUTION:
Always wear clean cotton gloves when working with light bulbs. Never allow the glass portion of the light bulb to come into contact with exposed skin. Oils from the exposed skin will
cause premature bulb failure.
13773-001
30 Nov 2000
33-00
Page 1
33-10FLIGHT COMPARTMENT
FLIGHT COMPARTMENT
1. DESCRIPTION
The interior lights include the following: instrument, pilot control, environmental control, glareshield, circuit
breaker, alternate air induction handle, CAPS handle, and individual reading lights above each seat. The
instrument panel flood lighting is controlled by the dimmer control on the bolster panel. The flight instruments and avionics equipment are integrally lighted and are controlled by a single dimming circuit. The
overhead lights for general cabin lighting are separately controlled. The front overhead lights are dimmable
by the panel light dimmer switch.
The instrument panel flood lighting consists of two strings of red LEDs inside flexible plastic extruded
tubes. The strip is mounted inside the aft edge of the glareshield, and towards the instrument panel.
The cabin dome light is a single ceiling mounted dome light controlled by the overhead light dimmer switch
(labeled “overhead”) located on the Bolster Switch Panel.
The reading lights consist of four lights with switches mounted in the headliner above each seat. Each light
is round, and flush mounted with a swivel lens. Each light is individually switched with a push on/push off
toggle switch. The reading lights are powered from the Main Bus 2 through the 3-amp Cabin Lights circuit
breaker, and receive power to the switches when the switch for Battery 1. The pilot, co-pilot, yoke, mixture
control and environmental control lights are controlled by the PANEL switch on the bolster panel. The rear
passenger lights are not controlled by a dimmer switch.
CAPS handle light is provided by two super-bright red LEDs. The LEDs are powered from the Main Bus 2
through the 3-amp Cabin Lights circuit breaker, and are switched on by BAT 1.
Parking Brake and Alternate Air lighting is provided by one super-bright red LED. The LED is controlled
and dimmed through the instrument light dimmer switch (labeled “INST”) located on the Bolster Switch
Panel.
Circuit breaker light is provided by six super bright red LEDs. The LEDs are controlled by the Instrument
Light Dimmer switch located on the Bolster Switch Panel. Overhead console lighting provides light for the
fuel switch, throttle, yokes, mixture control and environmental controls.
CAUTION:
13773-001
30 Nov 2000
Always wear clean cotton gloves when working with light bulbs. Never allow the glass portion of the light bulb to come into contact with exposed skin. Oils from the exposed skin will
cause premature bulb failure.
33-10
Page 1
Figure 33-101
Cabin Light Location
Page 2
33-10
13773-001
30 Nov 2000
2. TROUBLESHOOTING
Trouble
Reading Lights inoperative
Probable Cause
Remedy
Defective bulb
Replace bulb.
Loose connection
Tighten electrical connection.
Circuit breaker or switch tripped
Inspect for short circuit.
Reset circuit breaker.
Circuit breaker switch defective
Check for continuity through
switch. Replace if defective.
Defective power supply
Replace power supply.
BAT Master Switch in “off” position Place switch in “on” position.
Cabin Dome Lights inoperative
13773-001
30 Nov 2000
Battery defective
Replace battery/use external
power.
Panel Light dimmer is off (Pilot
and co-pilot lights only)
Turn Panel Light dimmer on.
Defective bulb
Replace bulb.
Overhead dimmer is off
Turn Overhead dimmer on.
Loose connection
Tighten electrical connection.
Circuit breaker switch defective
Check for continuity through
switch. Replace if defective.
Defective power supply
Replace power supply.
33-10
Page 3
3. MAINTENANCE PRACTICES
A. Cabin Lights
(1)
(2)
(3)
(4)
(5)
(6)
Page 4
Removal - Glareshield Light Strip
(a) Open (pull) the CABIN LIGHTS circuit breaker.
(b) Remove glareshield. (Refer to 25-10)
(c)
Locate and mark the outer edges of the light strip.
(d) Remove the retaining clips.
(e) Gently pull the light strip from the glareshield.
Installation - Glareshield Light Strip
(a) Place the lighting strip into position and secure with clips.
(b) Install glareshield. (Refer to 25-10)
(c)
Reset the CABIN LIGHTS circuit breaker.
(d) Verify proper operation of lights.
Removal - Cabin Eyeball Light and Switch
(a) Open (pull) the CABIN LIGHTS circuit breaker.
(b) Remove cabin headliner. (Refer to 25-10)
(c)
Identify and disconnect cabin eyeball light and switch wire harnesses.
(d) Depress mounting tabs and push the switch and light out of the headliner.
Installation - Cabin Eyeball Light and Switch
(a) Push the cabin eyeball light and switch into the headliner.
(b) Identify and connect wire harnesses.
(c)
Install cabin headliner. (Refer to 33-10)
(d) Reset the CABIN LIGHTS circuit breaker.
(e) Verify proper operation of light and switch.
Removal - Cabin Dome Light
(a) Open (pull) the CABIN LIGHTS circuit breaker.
(b) Gently pry the lens off of the light base.
(c)
Remove cabin headliner. (Refer to 25-10)
(d) Identify and disconnect the cabin dome light wire harness.
(e) Remove the cabin dome light retaining screws.
Installation - Cabin Dome Light
(a) Secure the cabin dome light to headliner with screws and nuts.
(b) Connect dome light wire harness.
(c)
Install cabin headliner. (Refer to 33-10)
(d) Secure lens to dome light.
(e) Reset the CABIN LIGHTS circuit breaker.
(f)
Verify proper operation of light and switch.
33-10
13773-001
30 Nov 2000
(7)
Removal - CAPS Handle Lighting
WARNING:
CAPS must be serviced and maintained by Cirrus Design trained and authorized parachute system technicians only. Airframe and powerplant license
is not sufficient credentials for performing maintenance on CAPS. Ground
activation of the CAPS will render the system and the airplane unusable
until the CAPS and fuselage have been rebuilt by a certified technician.
(a) Open (pull) the CABIN LIGHTS circuit breaker.
(b) Remove CAPS Activation T-Handle Cover.
(c)
Secure CAPS handle with safety pin to prevent accidental discharge of the CAPS rocket.
(d) Remove cabin headliner. (Refer to 25-10)
(e) Disconnect wire harness.
(f)
Peel the epoxy away from the CAPS handle lights.
(g) Push the lights inward and disconnect the wire harness. Remove the lights.
(8) Installation - CAPS Handle Lighting
(a) Install and secure LEDs to headliner using 5 minute epoxy.
(b) Connect wire harness.
(c)
Install cabin headliner. (Refer to 33-10)
(d) Remove lock from CAPS handle and secure cover.
(e) Reset cabin light circuit breaker.
(f)
Verify proper operation of lights.
(9) Removal - Circuit Breaker Panel Lighting
(a) Remove left mid-console circuit breaker trim. (Refer to 25-10))
(b) Push each of the six LEDs out of the circuit breaker panel lighting brackets.
(c)
Disconnect the circuit breaker panel lighting wire harness.
(d) Remove the lights and harness.
(10) Installation - Circuit Breaker Panel Lighting
(a) Push each of the six LEDs into the circuit breaker panel lighting brackets.
(b) Secure the lights to the bracket by lightly crimping the edge of the bracket.
(c)
Route and connect circuit breaker panel lighting wire harness.
(d) Install left mid-console circuit breaker trim. (Refer to 25-10)
(e) Reset the CABIN LIGHTS circuit breaker.
(f)
Verify proper operation of lights.
(11) Removal - Alternate Induction Air and Parking Brake Handle Light
(a) Remove left bolster panel to gain access to the LED. (Refer to 25-10)
(b) Disconnect the LED wire harness.
(c)
Push LED out of the panel and remove the LED.
(12) Installation - Alternate Induction Air and Parking Brake Handle Light
(a) Connect wire harness.
(b) Push the LED into position and secure with 5 minute epoxy.
(c)
Install left bolster panel. (Refer to 25-10)
(d) Verify proper operation of light.
13773-001
30 Nov 2000
33-10
Page 5
(13) Removal - Dimmer Switch
(a) Remove the pilot’s kick panel. (Refer to 25-10)
(b) Remove left bolster panel to gain access to dimmer switch. (Refer to 25-10)
(c)
Identify each wire to the switch and desolder wires.
(d) Remove nut and star washer securing switch to bolster panel.
(e) Remove switch from bolster panel.
(14) Installation - Dimmer Switch
(a) Place switch into bolster panel and secure with a star washer and nut.
(b) Connect and solder each wire to the corresponding terminal of the switch.
(c)
Install left bolster panel. (Refer to 25-10)
(d) Install kick panel. (Refer to 25-10)
(e) Verify proper operation of switch.
B. Lamp Replacement
(1)
(2)
(3)
(4)
Page 6
Removal - Cabin Eyeball Light
(a) Pull CABIN LIGHTS circuit breaker.
(b) Remove cabin headliner.(Refer to 25-10))
(c)
To remove the eyeball light bulb, rotate the socket and pull the bulb out.
Installation - Cabin Eyeball Light
(a) Push and rotate eyeball lightbulb assembly into position.
(b) Install cabin headliner. (Refer to 33-10)
(c)
Reset the CABIN LIGHTS circuit breaker.
(d) Verify proper operation of light.
Removal - Cabin Dome Light
(a) Pull CABIN LIGHTS circuit breaker.
(b) Gently pry the lens off of the light base.
(c)
Remove light bulb.
Installation - Cabin Dome Light
(a) Push eyeball lightbulb into position.
(b) Secure lens to dome light.
(c)
Reset the CABIN LIGHTS circuit breaker.
(d) Verify proper operation of light.
33-10
13773-001
30 Nov 2000
Figure 33-102
Interior Lamp Replacement
13773-001
30 Nov 2000
33-10
Page 7
33-20PASSENGER COMPARTMENT
PASSENGER COMPARTMENT
1. DESCRIPTION AND OPERATION
This section covers the passenger compartment lighting. Each passenger light is controlled by an overhead switch. The eyeball lights consist of two lights and switches mounted in the headliner above the
seats. Each light is round, and flush mounted with a swivel lens. Each light is individually switched with a
push on/off toggle switch. The eyeball lights are powered from the Main Bus 2 through the 3-amp Cabin
Lights circuit breaker, and receive power to the switches when the BAT 1 Switch is on.
CAUTION:
Always wear clean cotton gloves when working with light bulbs. Never allow the glass portion of the light bulb to come into contact with exposed skin. Oils from the exposed skin will
cause premature bulb failure.
2. TROUBLESHOOTING
Trouble
Reading Light inoperative
Probable Cause
Remedy
Defective bulb
Replace bulb
Loose connection
Tighten electrical connection
Fixture not grounded/defective fix- Check for continuity through fixture
ture. Repair ground circuit.
Replace defective fixture.
Circuit breaker or switch tripped
Inspect for short circuit
Reset circuit breaker
Circuit breaker switch defective
Check for continuity through
switch. Replace if defective.
Defective power supply
Replace power supply
Battery defective
Replace battery/use external
power
A. Passenger Eyeball Lights
(1)
(2)
13773-001
30 Nov 2000
Removal - Passenger Eyeball Light and Switch
(a) Open (pull) the CABIN LIGHTS circuit breaker.
(b) Remove headliner. (Refer to 25-10)
(c)
Identify and disconnect passenger eyeball light and switch wire harnesses.
(d) Depress mounting tabs and push the switch and light out of the headliner.
Installation - Passenger Eyeball Light and Switch
(a) Push the passenger eyeball light and switch into the headliner.
(b) Identify and connect wire harnesses.
(c)
Install cabin headliner. (Refer to 33-10)
(d) Reset the CABIN LIGHTS circuit breaker.
(e) Verify proper operation of light and switch.
33-20
Page 1
B. Lamp Replacement
(1)
(2)
Page 2
Removal - Passenger Eyeball Light
(a) Pull CABIN LIGHTS circuit breaker.
(b) Remove cabin headliner.(Refer to 25-10))
(c)
To remove the eyeball light bulb, rotate the socket and pull the bulb out.
Installation - Passenger Eyeball Light
(a) Push and rotate eyeball light bulb assembly into position.
(b) Install cabin headliner. (Refer to 33-10)
(c)
Reset the CABIN LIGHTS circuit breaker.
(d) Verify proper operation of light.
33-20
13773-001
30 Nov 2000
33-40EXTERIOR LIGHTING
EXTERIOR LIGHTING
1. DESCRIPTION
This section contains information on servicing the landing, position, and integral anti-collision strobe lights.
The anti-collision light assembly and strobe light power supply are mounted to the outboard surface of
each wing tip. The light assembly includes a strobe light with forward (red-left, green-right) and white position lights.
A single 34-watt High Intensity Discharge (HID) landing light is installed in the lower left engine cowling.
The light is spring-mounted to the engine cowl and is ground adjustable by mounting screws. The landing
light is powered from a ballast mounted on the firewall. The ballast provides increased voltage to illuminate
the HID lamp. Electrical power is supplied directly from the main distribution bus and a 15-amp fuse in the
MCU.
WARNING:
Always disconnect the power supply prior to servicing any portion of the electrical
system. Ensure the main power switch is in the off position; then remove the negative
battery cable first and then the positive battery cable.
CAUTION:
Always wear clean cotton gloves when working with light bulbs. Never allow the glass portion of the light bulb to come into contact with exposed skin. Oils from the exposed skin will
cause premature bulb failure.
A. Landing Light
(1)
Removal - Landing Light
CAUTION:
(a)
(b)
(c)
(d)
(e)
(f)
(g)
Place the Landing Light switch in the off position.
Ensure BAT 1, BAT 2, and AVIONICS master switches are in off position.
Disconnect the battery. (Refer to 24-30)
Identify and note routing of landing light wires.
Remove the machine screws from the ring clamp assembly.
Disconnect the wires from the landing light.
Remove the machine screws, washers, and springs.
Note:
(2)
13773-001
30 Nov 2000
The External Power Receptacle must never become energized during the
following procedure.
Count the number of turns required to remove the adjustment/mounting
machine screws during removal.
(h) Remove the lamp and mounting rings from the housing.
Installation - Landing Light
(a) Install the lamp and mounting rings into the housing.
(b) Install the machine screws, washers, and springs into the mounting ring.
(c)
Tighten the machine screw to the number of turns noted during removal of the machine
screw.
(d) Connect wires to the landing light.
(e) Connect battery. (Refer to 24-30)
33-40
Page 1
(3)
Adjustment - Landing Light
Note:
(a)
The airplane must be on a level and flat surface prior to adjusting the beam of light
from the landing light. There must be a vertical wall or door in front of the landing
light lens.
Check and adjust tire pressure and fuel level if necessary. (Refer to 12-10)
Note:
(b)
(c)
(d)
(e)
(f)
Page 2
To aid in obtaining an accurate adjustment, each fuel tank must have the
same amount of fuel in it. Measurement will be taken from the center of
landing light lens to the center of the illuminated pattern on the wall.
Position airplane 112 inches away from a vertical wall or door.
Place wheel chocks in place.
Place a small piece of tape on the vertical wall or door 40 inches high and directly in line
with the landing light lamp.
Turn on landing light. Verify tape is centrally located in beam. The landing light beam
should be centrally illuminating the tape placed on the wall or door.
If the beam is too high, tighten the bottom adjuster screws. If necessary loosen the top
adjuster screws.
33-40
13773-001
30 Nov 2000
Figure 33-401
Landing Light Assembly
13773-001
30 Nov 2000
33-40
Page 3
B. Anti-collision Strobe Light Assembly
(1)
(2)
Removal - Anti-collision Strobe Light assembly
(a) Place the Strobe light and NAV light switches in the “off” position.
(b) Pull the Strobe Lights and NAV Lights circuit breaker to open the circuit.
(c)
Remove the screws securing the lens retainer to the base plate.
(d) Disconnect the Anti-collision Strobe Light assembly wire harnesses.
(e) Remove the Anti-collision Strobe Light assembly.
Installation - Anti-collision Strobe Light assembly
WARNING:
(a)
(b)
(c)
(d)
(e)
Connect the corresponding Anti-collision Strobe Light wiring harnesses.
Place the corresponding Anti-collision Strobe Light assembly against the wing tip.
Secure the lens retainer to the base plate with screws.
Reset the Strobe Lights and NAV Lights circuit breakers.
Ensure proper Anti-collision Strobe Light operation.
CAUTION:
Page 4
The anti-collision strobe light assembly with the green lens is for the
right wing tip.
33-40
Always wear clean cotton gloves when working with light bulbs. Never allow
the glass portion of the light bulb to come into contact with exposed skin.
Oils from the exposed skin will cause premature bulb failure.
13773-001
30 Nov 2000
Figure 33-402
Anti-Collision Strobe Light Assembly
13773-001
30 Nov 2000
33-40
Page 5
C. Light Bulb Replacement
(1)
(2)
Removal - Navigation Light bulb
(a) Place the Strobe light and NAV light switches in the “off” position.
(b) Pull the Strobe Lights and NAV Lights circuit breakers to open the circuit.
(c)
Remove the screws securing the lens retainer to the base plate.
(d) To remove the Navigation Light bulb, push in and rotate the bulb counterclockwise.
Installation - Navigation Light bulb
CAUTION:
(3)
(4)
(a) Place the bulb into the socket with the flat portion of the bulb facing the mounting bracket.
(b) Push the bulb into the socket and rotate clockwise.
(c)
Secure the lens retainer to the base plate with screws.
(d) Reset the Strobe Lights and NAV Lights circuit breakers.
(e) Ensure proper Anti-collision Strobe Light operation.
Removal - Position Light bulb
(a) Place the Strobe light and NAV light switches in the “off” position.
(b) Pull the Strobe Lights and NAV Lights circuit breakers to open the circuit.
(c)
Remove the screws securing the lens retainer to the base plate.
(d) Pull the bulb straight out from the socket to remove it.
Installation - Position Light bulb
CAUTION:
(5)
(6)
Always wear clean cotton gloves when replacing any of the bulbs from the
Anti-collision Strobe Light assembly. Never allow the glass portion of the
light bulb to come into contact with exposed skin. Oils from the exposed
skin will cause premature bulb failure.
(a) To install the bulb, push it straight into the socket.
(b) Secure the lens retainer to the base plate with screws.
(c)
Reset the Strobe Lights and NAV Lights circuit breakers.
(d) Ensure proper Anti-collision Strobe Light operation.
Removal - Strobe Light
(a) Place the Strobe light and NAV light switches in the “off” position.
(b) Pull the Strobe Lights and NAV Lights circuit breakers to open the circuit.
(c)
Remove the screws securing the lens retainer to the base plate.
(d) Push the strobe light out of the lens retainer and disconnect wire harness.
(e) Gently pull the strobe light and wire harness out of the base plate.
Installation - Strobe Light
CAUTION:
(a)
Page 6
Always wear clean cotton gloves when replacing any of the bulbs from the
Anti-collision Strobe Light assembly. Never allow the glass portion of the
light bulb to come into contact with exposed skin. Oils from the exposed
skin will cause premature bulb failure.
Always wear clean cotton gloves when replacing any of the bulbs from the
Anti-collision Strobe Light assembly. Never allow the glass portion of the
light bulb to come into contact with exposed skin. Oils from the exposed
skin will cause premature bulb failure.
Route the wires through the base plate.
33-40
13773-001
30 Nov 2000
(7)
(8)
13773-001
30 Nov 2000
(b) Connect the strobe light wire harness.
(c)
Secure the lens retainer to the base plate with screws.
(d) Reset the Strobe Lights and NAV Lights circuit breakers.
(e) Ensure proper Anti-collision Strobe Light operation.
Removal - Strobe Light Module
(a) Place the Strobe light and NAV light switches in the “off” position.
(b) Pull the Strobe Lights and NAV Lights circuit breakers to open the circuit.
(c)
Remove wing tip. (Refer to 57-20)
(d) Locate and identify the module wire harness.
(e) Identify and locate the four bolts, washers, and spacers used to secure the module.
(f)
Remove the screws securing the module and rubber sheet to the wing tip.
Installation - Strobe Light Module
(a) Place the module, bolts, washers, and spacers in position as noted from disassembly.
(b) Secure bolts holding module to wing tip.
(c)
Connect the module wire harness.
(d) Install wing tip. (Refer to 57-20)
(e) Reset the Strobe Lights and NAV Lights circuit breakers.
(f)
Ensure proper Anti-collision Strobe Light operation.
33-40
Page 7
CHAPTER
NAVIGATION AND
PITOT STATIC
CHAPTER 34 - NAVIGATION
LIST OF EFFECTIVE PAGES
Chapter/Section
Page
Date
34-LOEP
1
31 JULY 2001
34-LOEP
2
31 JULY 2001
34-TOC
1
31 JULY 2001
34-TOC
2
31 JULY 2001
34-TOC
3
31 JULY 2001
34-00
1
30 NOV 2000
34-00
2
31 JULY 2001
34-10
1
31 JULY 2001
34-10
2
30 NOV 2000
34-10
3
30 NOV 2000
34-10
4
30 NOV 2000
34-10
5
30 NOV 2000
34-10
6
30 NOV 2000
34-10
7
30 NOV 2000
34-10
8
30 NOV 2000
34-10
9
30 NOV 2000
34-10
10
30 NOV 2000
34-10
11
30 NOV 2000
34-10
12
30 NOV 2000
34-10
13
30 NOV 2000
34-20
1
30 NOV 2000
34-20
2
30 NOV 2000
34-20
3
30 NOV 2000
34-20
4
30 NOV 2000
34-20
5
30 NOV 2000
34-20
6
30 NOV 2000
34-20
7
30 NOV 2000
34-20
8
30 NOV 2000
34-20
9
30 NOV 2000
34-30
1
30 NOV 2000
34-30
2
30 NOV 2000
34-40
1
30 NOV 2000
34-40
2
31 JULY 2001
34-40
3
30 NOV 2000
34-40
4
30 NOV 2000
34-40
5
30 NOV 2000
34-40
6
30 NOV 2000
34-40
7
31 JULY 2001
13773-001
31 July 2001
34-LOEP
Page 1
CHAPTER 34 - NAVIGATION
LIST OF EFFECTIVE PAGES
Chapter/Section
Page
Date
34-40
8
31 JULY 2001
34-40
9
31 JULY 2001
34-40
10
31 JULY 2001
34-50
1
31 JULY 2001
34-50
2
30 NOV 2000
34-50
3
30 NOV 2000
34-50
4
30 NOV 2000
Page 2
34-LOEP
13773-001
31 July 2001
CHAPTER 34 - NAVIGATION
TABLE OF CONTENTS
Subject
Chapter/Section
NAVIGATION AND PITOT-STATIC SYSTEMS
Page
34-00
General
1
FLIGHT ENVIRONMENTAL DATA/PITOT-STATIC SYSTEMS 34-10
Description
1
Troubleshooting
2
Maintenance Practices
3
Pitot Tube Assembly
Removal - Pitot Tube Assembly
Installation - Pitot Assembly
Inspection/Check - Purging the Pitot System
Inspection/Check - Pitot System Leak Test
Alternate Static Source Valve
Removal - Alternate Static Source Valve
Installation - Alternate Static Source Valve
Inspection/Check - Purging the Static System
Altitude Digitizer
Removal - Altitude Digitizer
Installation - Altitude Digitizer
Inspection/Check - Static System Leak Test
Vertical Speed Indicator
Removal - Vertical Speed Indicator
Installation - Vertical Speed Indicator
Adjustment/Test - Vertical Speed Indicator
Altimeter
Removal - Altimeter
Installation - Altimeter
Airspeed Indicator
Removal - Airspeed Indicator
Installation - Airspeed Indicator
Outside Air Temperature Gage/Clock
Removal - Outside Air Temperature Gage/Clock
Installation - Outside Air Temperature Gage/Clock
Removal - Outside Air Temperature Gage/Clock Battery
Installation - Outside Air Temperature Gage/Clock Battery
ATTITUDE AND DIRECTION
3
3
3
3
4
4
4
4
4
5
5
5
5
10
10
10
10
10
10
10
12
12
12
12
12
12
12
12
34-20
Description
1
TroubleshootinG
2
13773-001
31 July 2001
34-TOC
Page 1
CHAPTER 34 - NAVIGATION
TABLE OF CONTENTS
Subject
Chapter/Section
Maintenance Practices
3
Magnetic Compass
Removal - Magnetic Compass Assembly
Installation - Magnetic Compass
Adjustment/Test - Magnetic Compass Calibration
Turn Coordinator
Removal - Turn Coordinator
Installation - Turn Coordinator
Attitude Indicator
Removal - Attitude Indicator
Installation - Attitude Indicator
HSI - NSD 1000 System
Removal - NSD 1000 Display
Installation - NSD 1000 Display
Removal - Slave Amplifier
Installation - Slave Amplifier
Removal - Flux Detector
Installation - Flux Detector
Adjustment/Test - Flux Detector Calibration
LANDING AIDS
Page
3
3
3
3
4
4
4
4
4
4
7
7
7
7
7
7
7
7
34-30
Description
1
Maintenance Practices
1
Garmin GNS 430 GPS/COM/NAV
Marker Beacon
Marker Beacon Antenna
Removal - Marker Beacon Antenna
Installation - Marker Beacon Antenna
INDEPENDENT POSITION DETERMINING
1
1
1
1
1
34-40
Description
1
Maintenance Practices
1
Garmin GNS 430 GPS/COM/NAV
Removal - Garmin GNS 430 GPS/COM/NAV
Installation - Garmin GNS 430 GPS/COM
Inspection/Check VHF COM Check - GNS 430
Multifunction Display (MFD)
Removal - Multifunction Display (MFD)
Installation - Multifunction Display (MFD)
Page 2
34-TOC
1
1
2
2
2
2
2
13773-001
31 July 2001
CHAPTER 34 - NAVIGATION
TABLE OF CONTENTS
Subject
Chapter/Section
Page
GPS 1 Antenna
Removal - GPS 1 Antenna
Installation - GPS 1 Antenna
COM 1 Antenna
Removal - COM 1 Antenna
Installation - COM 1 Antenna
GPS 2 Antenna
Removal - GPS 2 Antenna
Installation - GPS 2 Antenna
COM 2 Antenna
Removal - COM 2 Antenna
Installation - COM 2 Antenna
Stormscope
Removal - Stormscope Processor and Tray
Installation - Stormscope Processor and Tray
Removal - Stormscope Antenna
Installation - Stormscope Antenna
Stormscope System Tests
Test - Stormscope System
Engine Run-Up Test - Stormscope System
DEPENDENT POSITION DETERMINING
4
4
4
4
4
4
4
4
4
5
5
5
7
7
7
7
7
8
8
9
34-50
Description
1
Maintenance Practices
1
Garmin GNS 430 GPS/COM/NAV
Garmin GTX 327 Transponder
Removal - Garmin GTX 327 Transponder
Installation - Garmin GTX 327 Transponder
Transponder Antenna
Removal - Transponder Antenna
Installation - Transponder Antenna
VOR/LOC Antenna
Removal - VOR/LOC Antenna
Installation - VOR/LOC Antenna
13773-001
31 July 2001
1
1
1
1
1
1
1
3
3
3
34-TOC
Page 3
NAVIGATION AND PITOT-STATIC SYSTEMS
1. GENERAL
This chapter describes the navigation systems, units, and components which provide airplane navigational
information. Included are pitot-static, gyros, compass, landing aids, global positioning system (GPS), and
indicators. The subjects to be covered in this chapter are as follows:
The Flight Environmental Data/Pitot Static Section describes systems which sense environmental conditions and use the data to influence navigation of the airplane. This includes components that depend on
the pitot-static system such as vertical speed indicator, airspeed indicator, and altimeter. (Refer to 34-10)
The Attitude and Direction Section describes systems which use magnetic, gyroscopic and inertia forces.
This includes gyros, magnetic compass, and turn coordinator. (Refer to 34-20)
The Landing and Taxiing Aids Section describes systems which provide guidance during approach, landing, and taxiing. This includes components such as the glideslope and marker beacon systems. (Refer to
34-30)
The Independent Position Determining Section describes systems which provide information to determine
position from sources which are mainly independent of ground installations. This includes the global positoning system (GPS), multifunction display (MFD) and the optional Stormscope system. (Refer to 34-40)
The Dependent Position Determining Section describes systems which provide information to determine
position from sources which are mainly dependent on ground installations. This includes systems such as
radio navigational aids and transponder. (Refer to 34-50)
Navigational system instrument layout: (See Figure 34-001)
Note:
13773-001
30 Nov 2000
This chapter does not address specific instrument repair. Federal Aviation Regulations
require malfunctioning instruments be sent to an approved instrument overhaul and repair
station or returned to the manufacturer for servicing.
34-00
Page 1
Figure 34-001
Navigation System Layout
Page 2
34-00
13773-001
31 July 2001
FLIGHT ENVIRONMENTAL DATA/PITOT-STATIC SYSTEMS
1. DESCRIPTION
This section covers that portion of the system which senses environmental conditions and uses the data to
influence navigation of the airplane. This includes pitot-static, outside air temperature gage/clock, vertical
speed indicator, airspeed indicator, and altimeter.
The pitot system utilizes an “L” shaped mast with integral pitot tube and heater located on the left wing just
inboard of the wing tip to sense impact or ram air pressure. The pitot mast utilizes an electrical heating element to prevent ice from blocking ram air. Pitot heat is controlled by a switch located in the center of the
bolster switch panel. A amber PITOT HEAT light will illuminate if the pitot heat switch is ON and the pitot
heater is not using power.
The normal static system utilizes two ports, a static source water trap, an alternate static source selector
valve, and the necessary plumbing to provide static air pressure sensing for the airspeed indicator, vertical
speed indicator, altimeter, altitude digitizer, and, if applicable, altitude transducer. The normal static ports
are located on the left and right sides of the fuselage behind the aft cabin bulkhead. The static line runs
from these ports to a tee connector mounted on the aft cabin bulkhead to a water trap located directly forward of the pitot system water trap.
The alternate static source valve is located on the lower left side of the console. The valve provides an
alternate source of static air pressure from inside the cabin in the event the normal static sources are
plugged.
Note:
The alternate static source is to be used when the normal system is inoperative or malfunctioning. When alternate static air is used, instrument readings will vary from normal reading
due to static air being obtained from the cabin. Refer to the Pilot’s Operating Handbook for
flight operation using alternate static air.
The Outside Air Temperature/Clock, located in the upper right portion of the pilot’s instrument panel. The
OAT gage is integral to the clock. The clock provides Universal Time (UT), Local Time (LT), Flight Time
(FT) with alarm, Elapsed Time (ET), Outside Air Temperature (OAT) in °C or °F, and Voltmeter functions. All
features and functions are selectable from control buttons on the clock face. The clock receives the OAT
signal from a temperature sensor installed immediately forward of the pilots door. The clock operates on
28VDC supplied through a 5-amp fuse connected to the airplane primary bus in the Master Control Unit
(MCU). A replaceable AA battery is installed to provide up to three years battery back up. (Refer to POH)
The Vertical Speed Indicator, located in the lower right portion of the pilot’s instrument panel, measures the
rate of change in static pressure when the airplane is climbing or descending. By means of a pointer, it
indicates the rate of descent or ascent of the airplane in feet per minute. A zero adjust screw is located on
the front of the VSI in the lower left corner to allow for pointer adjustment.
The Airspeed Indicator, located in the upper left portion of the pilot’s instrument panel, is a differential air
pressure gage which measure the difference between ram air pressure and static air pressure to indicate
the speed of the airplane. An adjustment knob allows the pilot to correlate outside air temperature with
pressure altitude, thereby allowing the airspeed indicator to show both true and indicated airspeeds. A
moveable pointer and a fixed dial with the 0 index at the 12 o’clock position indicates airspeed. Range of
the instrument is 0 to 220 knots.
The Altimeter, located in the upper mid portion of the pilot’s instrument panel, converts static pressure into
a visual indication of airplane altitude above sea level. Pointers on the instrument dial indicate altitude in
increments of 100, 1000, and 10,000 feet, with a range of -1000 to 20,000 feet.
13773-001
31 July 2001
34-10
Page 1
2. TROUBLESHOOTING
Trouble - Pitot Static
Probable Cause
Low or sluggish airspeed indica- Pitot tube deformed.
tion. Normal altimeter and vertical Leak or obstruction in pitot line.
speed indication.
Remedy
Repair or replace damaged component.
Incorrect or sluggish response on Leaks or obstruction in static line. Repair or replace line. Remove
all three pitot-static instruments.
obstruction.
Pitot tube does not heat or melt
ice.
Pitot Heat switch turned OFF.
Turn switch ON.
Pitot tube does not heat or melt
ice. Pitot Light ON.
Circuit breaker out.
Reset circuit breaker.
Break in wiring.
Test and repair wiring.
Insufficient current.
Check current drain of element.
Heating element burned out.
Replace element.
Trouble - Vertical Speed Ind.
Probable Cause
Remedy
Pointer does not set on zero.
Leaking or ruptured diaphragm.
Substitute known-good indicator
and check reading. Replace or
repair instrument.
Pointer fails to respond.
Obstruction in static line.
Check line for obstruction. Blow
out lines. (Refer to 34-10)
Pointer oscillates or fails to
respond.
Leaks in static line.
Check line for obstruction. Blow
out lines. (Refer to 34-10)
Defective instrument.
Replace or repair instrument.
Excessive vibration caused by
loose mounting screws.
Tighten mounting screws.
Excessive tube vibration.
Tighten clamps and connections.
Trouble - Airspeed Indicator
Pointer fails to respond or indicates improperly.
Incorrect indication or pointer
oscillates.
Probable Cause
Remedy
Leak in instrument case.
Replace or repair instrument.
Obstruction in pitot line.
Check line for obstruction. Blow
out lines. (Refer to 34-10)
Leak in pitot or static lines.
Repair or replace damaged lines.
Tighten connections.
Leaking or ruptured diaphragm.
Substitute know-good indicator
and check reading. Replace or
repair instrument.
Alternate static source valve open. Close for normal operation.
Page 2
34-10
13773-001
30 Nov 2000
Trouble - Pitot Static
Pointer vibrates.
Trouble - Altimeter
Probable Cause
Remedy
Excessive vibration caused by
loose mounting screws.
Tighten mounting screws.
Excessive tube vibration.
Tighten clamps and connections.
Probable Cause
Remedy
Excess scale error.
Improper calibration adjustment.
Replace instrument.
Excessive pointer oscillation.
Defective instrument.
Replace or repair instrument.
High reading.
Static system leak.
Inspect static system. (Refer to
34-10)
Difficult to turn setting knob.
Wrong or lack of lubrication.
Replace or repair instrument.
Cracked or loose cover glass.
Excessive vibration caused by
loose mounting screws.
Tighten mounting screws.
3. MAINTENANCE PRACTICES
A. Pitot Tube Assembly (See Figure 34-101)
(1)
(2)
(3)
Removal - Pitot Tube Assembly
(a) Ensure BAT 1, BAT 2, and AVIONICS master switches are in off position.
(b) Pull PITOT HEAT circuit breaker.
(c)
Remove left wing tip. (Refer to 57-20)
(d) Identify and disconnect pitot line at low point on connector projecting from top of pitot
bracket. Cap off connector.
(e) Remove attaching screws securing pitot tube assembly to bracket, disconnect pitot heat
electrical connector, and remove pitot tube.
(f)
Remove attaching screws securing pitot tube bracket to rib and remove bracket.
Installation - Pitot Assembly
(a) Align mounting holes on pitot tube bracket with screw holes in rib and install screws.
(b) Slide pitot tube assembly into bracket, connect pitot heat electrical connector, and connect
pitot line.
(c)
Install attaching screws securing pitot tube to bracket.
(d) Perform pitot system leakage test. (Refer to 34-10)
(e) Install left wing tip. (Refer to 57-20)
(f)
Reset PITOT HEAT circuit breaker.
Inspection/Check - Purging the Pitot System
Pitot system lines must be kept clear and connections tight. A water trap and plug, located at the
low point of the pitot system directly behind the center console and underneath the cabin floor, is
used to trap and then drain water from the system. However, moisture may collect at other
points of the system. To purge the static system, proceed as follows:
(a)
(b)
Remove glareshield. (Refer to 25-10)
Disconnect pitot line at airspeed indicator and cap off airspeed indicator.
CAUTION:
13773-001
30 Nov 2000
Never blow air through the line toward the instruments. To do so will seriously damage the instruments.
34-10
Page 3
(c)
(4)
Blow clean, low-pressure air from the disconnected line at the airspeed indicator to the
pitot tube.
(d) Connect line at airspeed indicator.
(e) Perform pitot system leakage test. (Refer to 34-10)
(f)
Install glareshield. (Refer to 25-10)
Inspection/Check - Pitot System Leak Test
The following procedure outlines inspection and testing of the pitot system. Perform this test any
time an instrument, fitting, line, or pitot head is disconnected.
(a)
Acquire necessary tools, equipment, and supplies.
Description
(b)
(c)
(d)
(e)
(f)
(g)
(h)
P/N or Spec.
Supplier
Purpose
Sphygmomanometer Pres- 21-140
sure Bulb with Check Valve
Omron Health Care
Inc.
Simulate ram air
pressure.
Surgical Hose
Omron Health Care
Inc.
Bulb attachment to
hose.
21-321
Fasten surgical hose and sphygmomanometer bulb over pitot tube.
Pump bulb until airspeed indicator registers 115 KIAS.
Close check valve
Wait 15 seconds for airspeed indicator to stabilize.
Observe airspeed indicator for one minute. If leak is present, indicated airspeed will
decrease.
Slowly release check valve so pressure is reduced gradually to prevent instrument damage.
If test reveals a leak in system, check all connections for tightness and repair faulty components.
B. Alternate Static Source Valve (See Figure 34-101)
(1)
(2)
(3)
Page 4
Removal - Alternate Static Source Valve
(a) Open circuit breaker panel to gain access to alternate static source valve.
(b) Identify, disconnect, and cap off line from alternate static source valve.
(c)
Remove set screw attaching knob to alternate static source valve.
(d) Pull knob off alternate static source valve.
(e) Remove screw securing alternate static source valve to console and remove valve.
Installation - Alternate Static Source Valve
(a) Position alternate static source valve to console and install mounting screw.
(b) Connect static line to alternate static source valve.
(c)
Push knob onto alternate static source valve and install set screw.
(d) Perform static system leakage test. (Refer to 34-10)
(e) Close and secure circuit breaker panel.
Inspection/Check - Purging the Static System
Static air pressure lines must be kept clear and connections tight. A water trap and plug, located
at the low point of the static system directly behind the center console and underneath the cabin
floor, is used to trap and then drain water from the system. However, moisture may collect at
other points of the system. To purge the static system, proceed as follows:
34-10
13773-001
30 Nov 2000
(a)
(b)
Open circuit breaker panel to gain access to altitude digitizer.
Identify and disconnect lower static line at altitude digitizer branch tree and cap off branch
tee.
CAUTION:
(c)
(d)
(e)
(f)
Never blow air through the line toward the instruments. To do so will seriously damage the instruments.
Blow clean, low-pressure air from the disconnected line at the altitude digitizer branch tree
to the static ports.
Connect static line at altitude digitizer branch tree.
Perform static system leakage test. (Refer to 34-10)
Close and secure circuit breaker panel.
C. Altitude Digitizer (See Figure 34-101)
(1)
(2)
Removal - Altitude Digitizer
(a) Ensure BAT 1, BAT 2, and AVIONICS master switches are in off position.
(b) Pull ENCODER/TRANSPONDER circuit breaker.
(c)
Remove trim panel from right side of center console. (Refer to 25-10)
(d) Disconnect cable from altitude digitizer.
(e) Disconnect static line to altitude digitizer.
(f)
Cut safety wire securing knurled nut.
(g) Loosen knurled nut and remove altitude digitizer from mounting tray.
Installation - Altitude Digitizer
(a)
Acquire necessary tools, equipment, and supplies.
Description
Safety Wire
(3)
-
Supplier
Purpose
Any Source
Safetying
(b) Position altitude digitizer in mounting tray and tighten knurled nut.
(c)
Safety wire knurled nut to mounting tray.
(d) Connect cable to altitude digitizer.
(e) Connect static line to altitude digitizer.
(f)
Perform Static System Leak Inspection/Test. (Refer to 34-10)
(g) Install right-side center console trim panel. (Refer to 25-10)
(h) Reset ENCODER/TRANSPONDER circuit breaker.
Inspection/Check - Static System Leak Test
(a)
Acquire necessary tools, equipment, and supplies.
Description
13773-001
30 Nov 2000
P/N or Spec.
P/N or Spec.
Supplier
Purpose
Sphygmomanometer Pres- 21-140
sure Bulb with Check Valve
Omron Health Care
Inc.
Simulate static air
pressure.
Surgical Hose
Omron Health Care
Inc.
Bulb attachment.
21-321
34-10
Page 5
Description
Hose Fitting
(b)
(c)
(d)
(e)
(g)
(h)
(i)
(l)
(o)
(p)
(q)
(r)
Page 6
Hose attachment to
valve.
Do not apply positive pressure with airspeed indicator or vertical speed indicator connected into static system.
If leakage rate exceeds the maximum allowable, check all fittings and hoses
for condition and tightness and repeat leakage test. If leakage rate still
exceeds the maximum allowable, perform the following procedure:
Remove glareshield. (Refer to 25-10)
Disconnect static pressure lines from airspeed indicator, vertical speed indicator, altitude
digitizer, and if applicable, altitude transducer. Use suitable fittings to connect lines
together so altimeter is the only instrument still connected into static pressure system.
Repeat leakage test to ascertain whether the static pressure system or the bypassed
instruments are causing the leakage. If instruments are faulty, repair at an appropriately
rated repair station. If static pressure system is faulty, perform the following procedure to
locate leakage:
CAUTION:
(m)
(n)
U.S. Plastics
Purpose
Slowly open air bulb check valve until airplane altimeter indicates a 1000-foot increase in
altitude then close check valve to trap suction in system.
While increasing suction and altimeter indicating 1000 feet, ensure that the airspeed indicator shows an increase and the vertical speed indicator shows a climb indication.
Leakage shall not exceed 100 feet of altitude loss as indicated on the altimeter.
Momentarily remove tape from one static air button. There should be a decrease in altimeter indication. If no change occurs, the system is blocked and must be repaired prior to
further testing.
Note:
(j)
(k)
-
Supplier
Tape over static air buttons.
Connect hose fitting to alternate static source valve.
Squeeze sphygmomanometer bulb and close check valve to establish a vacuum inside
bulb.
Open alternate static source valve and attach hose to valve.
CAUTION:
(f)
P/N or Spec.
Do not apply positive pressure with airspeed indicator or vertical speed indicator connected into static system.
Remove sphygmomanometer assembly and release check valve.
Attach hose to alternate static source valve and slowly apply positive pressure until altimeter indicates a 500-foot decrease in altitude. Maintain this altimeter indication while
checking for leaks.
Coat line with a solution of mild soap and water, watching for bubbles to locate leaks.
Tighten leaking connections. Repair or replace defective components.
Reconnect airspeed, vertical speed indicator, altitude digitizer, and if applicable, altitude
transducer. Repeat static system leakage test, and perform pitot system adjustment/test.
Install glareshield. (Refer to 25-10)
34-10
13773-001
30 Nov 2000
Figure 34-101
Pitot-Static System (Sheet 1 of 3)
13773-001
30 Nov 2000
34-10
Page 7
Figure 34-101
Pitot-Static System (Sheet 2 of 3)
Page 8
34-10
13773-001
30 Nov 2000
Figure 34-101
Pitot-Static System (Sheet 3 of 3)
13773-001
30 Nov 2000
34-10
Page 9
D. Vertical Speed Indicator (See Figure 34-102)
(1)
(2)
(3)
Removal - Vertical Speed Indicator
(a) Ensure BAT 1, BAT 2, and AVIONICS master switches are in off position.
(b) Pull INSTRUMENT LIGHTS circuit breaker.
(c)
Remove MFD. (Refer to 34-40)
(d) Remove and cap off static line.
(e) Disconnect electrical connector.
(f)
While supporting vertical speed indicator, remove screws securing unit to instrument
panel.
(g) Cap off fitting on back of vertical speed indicator and remove from airplane.
Installation - Vertical Speed Indicator
(a) Position vertical speed indicator in instrument panel and attach with screws.
(b) Connect electrical connector.
(c)
Attach static line.
(d) Perform Static System Leak Inspection/Test. (Refer to 34-10)
(e) Reset INSTRUMENT LIGHTS circuit breaker.
(f)
Install MFD. (Refer to 34-40)
Adjustment/Test - Vertical Speed Indicator
(a) A zero adjust screw is located on the front of the vertical speed indicator in the lower left
hand corner of the VSI to allow for pointer adjustment. Turning the screw clockwise
deflects the pointer downward. Turning the screw counterclockwise deflects the pointer
upward.
E. Altimeter (See Figure 34-102)
(1)
(2)
Page 10
Removal - Altimeter
(a) Ensure BAT 1, BAT 2, and AVIONICS master switches are in off position.
(b) Pull INSTRUMENT LIGHTS circuit breaker.
(c)
Remove MFD. (Refer to 34-40)
(d) Remove and cap off static line.
(e) Disconnect electrical connector.
(f)
While supporting altimeter, remove screws securing unit to instrument panel.
(g) Cap off fitting on back of altimeter to prevent possible contamination and remove from airplane.
Installation - Altimeter
(a) Position altimeter in instrument panel and attach with screws.
(b) Connect electrical connector.
(c)
Attach static line.
(d) Perform Static System Leak Inspection/Test. (Refer to 34-10)
(e) Reset INSTRUMENT LIGHTS circuit breaker.
(f)
Install MFD. (Refer to 34-40)
(g)
34-10
13773-001
30 Nov 2000
Figure 34-102
VSI and Altimeter Installation
13773-001
30 Nov 2000
34-10
Page 11
F.
Airspeed Indicator (See Figure 34-103)
(1)
(2)
Removal - Airspeed Indicator
(a) Ensure BAT 1, BAT 2, and AVIONICS master switches are in off position.
(b) Pull INSTRUMENT LIGHTS circuit breaker.
(c)
Remove glareshield. (Refer to 25-10)
(d) Remove and cap off static and pitot line.
(e) Disconnect electrical connector.
(f)
While supporting airspeed indicator, remove screws securing unit to instrument panel.
(g) Cap off fitting on back of airspeed indicator to prevent possible contamination and remove
from airplane.
Installation - Airspeed Indicator
(a) Position airspeed indicator in instrument panel and attach with screws.
(b) Connect electrical connector.
(c)
Attach static and pitot line.
(d) Perform Static System Leak Inspection/Test. (Refer to 34-10)
(e) Perform Pitot System Leak Inspection/Test. (Refer to 34-10)
(f)
Install glareshield. (Refer to 25-10)
(g) Reset INSTRUMENT LIGHTS circuit breaker.
G. Outside Air Temperature Gage/Clock (See Figure 34-103)
(1)
(2)
(3)
Removal - Outside Air Temperature Gage/Clock
(a) Remove glareshield. (Refer to 25-10)
(b) Disconnect electrical connector.
(c)
While supporting outside air temperature gage/clock, remove screws securing unit to
instrument panel and remove from airplane.
Installation - Outside Air Temperature Gage/Clock
(a) Position outside air temperature gage/clock in instrument panel and attach with screws.
(b) Connect electrical connector.
(c)
Install glareshield. (Refer to 25-10)
Removal - Outside Air Temperature Gage/Clock Battery
The Outside Air Temperature Gage/Clock battery must be inspected every 24 months. Upon
replacement, the battery must have a date stamp to indicate battery expiration date.
CAUTION:
(a)
(b)
Ensure electrical power to airplane is off prior to performing maintenance.
Remove glareshield. (Refer to 25-10)
Remove battery from OAT/Clock gage.
CAUTION:
(4)
Page 12
Do not use abrasive cleaners or materials to clean battery contacts.
(c)
Examine battery contacts for dirt or corrosion, clean contacts as necessary.
Installation - Outside Air Temperature Gage/Clock Battery
(a) Record the battery replacement date of new cell in airplane log book
(b) Install new battery as indicated by battery polarity signs marked on cell holder.
(c)
Install glareshield. (Refer to 25-10)
34-10
13773-001
30 Nov 2000
Figure 34-103
Airspeed Speed and OAT/Clock Gage Installation
13773-001
30 Nov 2000
34-10
Page 13
ATTITUDE AND DIRECTION
1. DESCRIPTION
This section contains information pertaining to those portions of the system which use magnetic, gyroscopic, and inertia forces. Included is the magnetic compass, turn coordinator, attitude indicator, and horizontal situation indicator. (See Figure 34-001)
The magnetic compass, mounted to the fuselage above the windshield, contains a circular compass card,
visible through the compass case window, suspended in alcohol solution. The compass is equipped with
compensating magnets and has two adjusting set screws, one for North-South adjustment and one for
East-West adjustment. These set screws are located behind the access plate on face of the compass.
Light is integral and controlled by the instrument light rheostat on the bolster switch panel.
The turn coordinator, mounted to the left of the HSI, is an electrically driven rate gyro and slip/skid coordinator which provides roll axis information to the pilot.
The attitude indicator, mounted directly in front of the pilot on the LH side of the instrument panel, has an
electrically driven gyro which displays a pictorial horizon and provides the pilot with a visual indication of
the airplane’s pitch and roll attitude by sensing pitching and rolling movements about the airplane’s lateral
and longitudinal axis.
The horizontal situation indicator (HSI), located directly below the attitude indicator, has an electrically
driven gyro slaved to a flux detector mounted in the right wing and an amplifier mounted under the copilot
floor for continuous compass card correction. The HSI mode switch is mounted directly beneath the HSI to
allow the pilot to select either Slave or Free Gyro mode. The HSI displays a stable indication of the airplane heading to the pilot.
13773-001
30 Nov 2000
34-20
Page 1
2. TROUBLESHOOTING
Trouble - Magnetic Compass
Excessive card error.
Probable Cause
Remedy
Compass not properly compensated.
Compensate instrument.
External magnetic interference.
Locate magnetic interference and
eliminate if possible.
Excessive card oscillation.
Insufficient fluid.
Replace instrument.
Card sluggish.
Weak card magnet.
Replace instrument.
Excessive pivot friction or broken
jewel.
Replace instrument.
Loose bezel screws.
Replace instrument.
Broken cover glass
Replace instrument.
Defective sealing gaskets.
Replace instrument.
Liquid leakage.
Defective light.
Burned out lamp or broken circuit. Check lamp or continuity of wiring.
Card sticks.
Altitude compensating diaphragm Replace instrument.
collapsed.
Card does not move when compensating screws are turned.
Gears that turn compensating
magnets stripped.
Replace instrument.
Compass swings erratically when Normal.
radio transmitter is keyed.
Excessive drift in either direction.
Trouble - Turn Coordinator
Turn coordinator incorrect sensitivity.
Excessive vibration.
Probable Cause
Out of calibration.
Tighten mounting screws.
Remedy
Replace instrument.
Turn coordinator/roll computer ball Instrument not level in panel.
not centered when airplane is correctly trimmed.
Level instrument.
Noisy gyro.
Check voltage in indicator and correct.
High voltage.
Loose or defective rotor bearings. Replace instrument.
In cold temperatures, turn coordi- Oil in indicator too thick.
nator/roll computer wing pointer
Insufficient bearing end play.
fails to respond or is sluggish.
Low voltage.
Page 2
34-20
Replace instrument
Replace instrument.
Check voltage in indicator and correct.
13773-001
30 Nov 2000
Trouble - Attitude Indicator
Horizon bar does not settle.
Horizon bar oscillates or vibrates
excessively.
Probable Cause
Remedy
Defective instrument.
Replace instrument.
Excessive vibration.
Tighten mounting screws.
Excessive vibration.
Tighten mounting screws.
3. MAINTENANCE PRACTICES
A. Magnetic Compass (See Figure 34-201)
(1)
Removal - Magnetic Compass Assembly
WARNING:
When performing maintenance practices on the magnetic compass, use a
non-magnetic or plastic screwdriver.
(a)
(b)
(c)
(d)
(e)
(f)
(2)
(3)
Ensure BAT 1, BAT 2, and AVIONICS master switches are in off position.
Pull INSTRUMENT LIGHTS circuit breaker.
While supporting compass assembly, remove screws securing compass to bracket.
While supporting compass, loosen forward headliner. (Refer to 25-10)
Disconnect electrical connector.
While supporting compass assembly, remove screws securing compass bracket to cabin
ceiling.
(g) Remove compass assembly from airplane.
Installation - Magnetic Compass
(a) Position compass assembly bracket over mounting holes in fuselage.
(b) Install screws securing compass bracket to cabin ceiling.
(c)
Connect electrical connector.
(d) Install forward headliner. (Refer to 25-10)
(e) Reset INSTRUMENT LIGHTS circuit breaker.
Adjustment/Test - Magnetic Compass Calibration
Prior to calibrating compass, place the airplane in as realistic flight environment as possible.
Check to see that the doors are closed, flaps in retracted position, engine running, and airplane
in level flight attitude. Battery Master Switch, Pitot Heat, Alternator Master Switch, and all radio
switches are in the ON position. All other cockpit controlled electrical switches should be in the
OFF position.
WARNING:
(a)
(b)
(c)
(d)
(e)
13773-001
30 Nov 2000
When performing maintenance practices on the magnetic compass, use a
non-magnetic or plastic screwdriver.
Remove screws securing access plate to compass housing to reveal adjustment screws.
Set adjustment screws of compensator on zero. Zero position is indicated when dot of
screw is aligned with dot on compass frame.
Taxi airplane to compass rose.
Align centerline of airplane on magnetic North heading. Adjust N-S set screw until compass reads North.
Align centerline of airplane on magnetic East heading. Adjust E-W set screw until compass reads East.
34-20
Page 3
(f)
(g)
(h)
Align centerline of airplane on magnetic South heading and note resulting South error.
Adjust N-S set screw until one-half of error is removed.
Align centerline of airplane on magnetic West heading and note resulting West error.
Adjust E-W set screw until one-half of error is removed.
Align centerline of airplane in successive magnetic 30-degree headings and record compass readings on appropriate deviation card. Deviations must not exceed 10 degrees on
any heading.
B. Turn Coordinator (See Figure 34-202)
(1)
(2)
Removal - Turn Coordinator
(a) Ensure BAT 1, BAT 2, and AVIONICS master switches are in off position.
(b) Pull TURN COORDINATOR circuit breaker.
(c)
Remove pilot-side kick plate.(Refer to 25-10)
(d) Disconnect instrument light connector and cable assembly from back of turn coordinator.
(e) While supporting turn coordinator, remove screws and washers securing unit to instrument
panel.
(f)
Remove turn coordinator from airplane.
Installation - Turn Coordinator
(a) Position turn coordinator in instrument panel and install washers and screws.
(b) Connect connector and cable assembly.
(c)
Install pilot-side kick plate. (Refer to 25-10)
(d) Reset TURN COORDINATOR circuit breaker.
C. Attitude Indicator (See Figure 34-202)
(1)
(2)
Page 4
Removal - Attitude Indicator
(a) Ensure BAT 1, BAT 2, and AVIONICS master switches are in off position.
(b) Pull INSTRUMENT LIGHTS circuit breaker.
(c)
Remove glareshield. (Refer to 25-10)
(d) Disconnect electrical connector.
(e) While supporting attitude indicator, remove screws securing unit to instrument panel.
(f)
Remove attitude indicator from airplane.
Installation - Attitude Indicator
(a) Position attitude gage in instrument panel and attach with screws.
(b) Connect electrical connector.
(c)
Attach vacuum and vent hoses.
(d) Install glareshield. (Refer to 25-10)
(e) Reset INSTRUMENT LIGHTS circuit breaker.
34-20
13773-001
30 Nov 2000
Figure 34-201
Magnetic Compass Installation
13773-001
30 Nov 2000
34-20
Page 5
Figure 34-202
Turn Coordinator and Attitude Indicator Installation
Page 6
34-20
13773-001
30 Nov 2000
D. HSI - NSD 1000 System (See Figure 34-203)
(1)
(2)
(3)
(4)
(5)
(6)
Removal - NSD 1000 Display
(a) Ensure BAT 1, BAT 2, and AVIONICS master switches are in off position.
(b) Pull HSI circuit breaker.
(c)
Remove pilot-side kick plate. (Refer to 25-10)
(d) Disconnect cable.
(e) While supporting HSI, remove screws securing unit to instrument panel.
Installation - NSD 1000 Display
(a) Position HSI in instrument panel and attach with screws.
(b) Connect data cable.
(c)
Install pilot-side kick plate. (Refer to 25-10)
(d) Reset HSI circuit breaker.
Removal - Slave Amplifier
(a) Ensure BAT 1, BAT 2, and AVIONICS master switches are in off position.
(b) Pull HSI circuit breaker.
(c)
Remove passenger side carpeting.
(d) Remove access panel CF2R from cabin floor.
(e) Disconnect slave amplifier connector assembly.
(f)
Remove screws securing slave amplifier to access panel and remove from airplane.
Installation - Slave Amplifier
(a) Position slaving amplifier to access panel CF2R and secure with screws.
(b) Connect connector assembly.
(c)
Install access panel CF2R.
(d) Reset HSI circuit breaker.
Removal - Flux Detector
(a) Ensure BAT 1, BAT 2, and AVIONICS master switches are in off position.
(b) Pull HSI circuit breaker.
(c)
Remove wing access panel RW6.
(d) Remove screws and washers securing slave amplifier to standoffs.
(e) Cut cable tie securing flux amplifier connector assembly to tie down and remove flux
detector from airplane.
Installation - Flux Detector
CAUTION:
(7)
(a) Position flux detector to standoffs and attach with washers and screws.
(b) Connect connector assembly.
(c)
Secure connector assembly to tie down with cable tie.
(d) Perform Flux Detector Calibration.
Adjustment/Test - Flux Detector Calibration
Note:
(a)
(b)
13773-001
30 Nov 2000
Ensure flux detector is installed with arrow and word FORE embossed on top of
flux detector pointing forward. Failure to do will cause HSI system malfunction.
Engine starting, taxiing, and shut-down may only be performed by authorized personnel.
Run up airplane and turn on all avionics, navigation and strobe lights.
Taxi to compass calibration site.
34-20
Page 7
(c)
(d)
(e)
(f)
(g)
(h)
(i)
(j)
(k)
(l)
(m)
(n)
(o)
Page 8
Align airplane with North. Rotate HSI compass card to center slaving meter at 45°. Record
heading deviation.
Align airplane with East. Rotate HSI compass card to center slaving meter at 45°. Read
heading deviation.
Align airplane with South. Rotate HSI compass card to center slaving meter at 45°. Read
heading deviation.
Align airplane with West. Rotate HSI compass card to center slaving meter at 45°. Read
heading deviation.
Find average deviation and direction of average deviation.
Rotate flux detector in opposite direction of the deviation by degrees of average deviation.
Repeat heading checks.
Readjust if necessary.
Compare North & South heading deviations. Deviations that occur on the same side of the
North-South reference line are reduced by adjusting the N-S adjusting screw on the compensator.
Compare East & West heading deviations. Deviations that occur on the same side of the
East-West reference line are reduced by adjusting the E-W adjusting screw on the compensator.
Repeat heading checks.
Readjust if necessary.
HSI reading should be within ±2° of magnetic heading.
34-20
13773-001
30 Nov 2000
Figure 34-203
HSI System Installation
13773-001
30 Nov 2000
34-20
Page 9
LANDING AIDS
1. DESCRIPTION
This section covers that portion of the system which provides guidance during approach, landing, and taxiing. This includes glideslope and marker beacon systems. (See Figure 34-001)
2. MAINTENANCE PRACTICES
A. Garmin GNS 430 GPS/COM/NAV
The GNS 430 is an IFR certified VHF communications transceiver and Navigation Management System (NMS). The NMS includes GPS sensor, VOR/Localizer and Glideslope receivers. The GNS 430
includes two removable data cards, one with a Jeppesen data base, and second being a custom data
card. GPS signals are received by Garmin’s low-profile GA 56 antenna. For installation and removal
procedures refer to Position Determining. (Refer to 34-40)
B. Marker Beacon
The marker beacon, integrated into the audio panel located in the avionics console, provides annunciation and audio indications necessary for ILS approach. Refer to 23-50 for audio control panel maintenance practices. The marker beacon antenna is mounted inside the fuselage, under the baggage
compartment floor, right of access panel. Refer to GMA 340 Audio Control Panel Installation and Operation Manual listed in the front of this manual for additional maintenance information on the marker
beacon system. (Refer to 23-50)
C. Marker Beacon Antenna (See Figure 34-301)
(1)
(2)
13773-001
30 Nov 2000
Removal - Marker Beacon Antenna
(a) Remove baggage compartment floor covering. (Refer to 25-10)
(b) Remove access panel CF5 from baggage compartment floor. (Refer to 6-00)
(c)
Disconnect coaxial cable connector from marker beacon antenna.
(d) While supporting antenna assembly, remove screws countersunk into baggage compartment floor securing mounting bracket to underside of floor.
(e) Remove antenna assembly from airplane.
Installation - Marker Beacon Antenna
(a) Align antenna bracket mounting holes with baggage floor hardpoint holes and install countersunk screws.
(b) Connect coaxial cable to antenna connector.
(c)
Install access panel CF5. (Refer to 6-00)
(d) Install baggage compartment floor covering. (Refer to 25-10)
34-30
Page 1
Figure 34-301
Marker Beacon Antenna Installation
Page 2
34-30
13773-001
30 Nov 2000
INDEPENDENT POSITION DETERMINING
1. DESCRIPTION
This section covers that portion of the system which provides information to determine position from
sources which are mainly independent of ground installations. This includes the GPS, multifunction display
(MFD), and Stormscope systems.
Two VHF communications (COM) transceivers are installed to provide VHF communication. The transceivers and integrated controls are mounted in the Garmin GNS 430 units. The transceivers receive all narrowand wide-band VHF communication transmissions transmitted within range of the selected frequency. The
antennas pick up the signals and route the communication signals to the transceivers, which digitize the
audible communication signal. The digitized audio is then routed to the audio control unit for distribution to
the speakers or headphones.
COM 1 - The upper Garmin GNS 430 is designated COM 1. The Garmin GNS 430 control panel provides
COM 1 transceiver active and standby frequency indication, frequency memory storage, and knob-operated frequency selection. The COM 1 antenna is located above the cabin on the airplane centerline. 28
vdc for COM 1 transceiver operation is controlled through the Avionics Master Switch on the bolster switch
panel and supplied through the 7.5-amp COM 1 circuit breaker on the Essential Avionics Bus.
COM 2 - The lower Garmin GNS 430 is designated COM 2. The Garmin GNS 430 control panel provides
COM 2 transceiver active and standby frequency indication, frequency memory storage, and knob-operated frequency selection. The COM 2 antenna is located on the underside of the cabin on the airplane centerline. 28 vdc for COM 2 transceiver operation is controlled through the Avionics Master Switch on the
bolster switch panel and supplied through the 7.5-amp COM 2 circuit breaker on the Non-Essential Avionics Bus.
GPS signals are received by an antenna mounted inside the fuselage under the forward headliner or by an
antenna mounted inside the fuselage under the instrument console. Refer to GNS 430 Installation Manual
indexed in the List of Publications in the front of this manual for additional maintenance information on the
GNS 430
The ARNAV ICDS-2000 multifunction display (MFD), located on the instrument panel, provides 10.4” diagonal, color depiction of navigational data from its own database and position and flight-plan data from the
GPS receiver. Refer to ARNAV System’s ICDS 2000 Operations Handbook indexed in the List of Publications in the front of this manual for additional maintenance information on the multifunction display.
The Stormscope processor and antenna detect electrical discharges associated with thunderstorms. This
information is then sent to the MFD that plots the locations of the associated thunderstorms.
2. MAINTENANCE PRACTICES
A. Garmin GNS 430 GPS/COM/NAV (See Figure 34-401)
(1)
13773-001
30 Nov 2000
Removal - Garmin GNS 430 GPS/COM/NAV
(a) Ensure BAT 1, BAT 2, and AVIONICS master switches are in off position.
(b) Pull ESSENTIAL and NON-ESSENTIAL AVIONICS circuit breakers.
(c)
Insert hex wrench into front panel bolt hole and engage hex bolt.
(d) Turn locking screw counterclockwise to loosen locking cam. Cam will move the transceiver unit out 1/4” and disengage from the electrical connectors.
(e) Pull transceiver from mounting tray
34-40
Page 1
(2)
Installation - Garmin GNS 430 GPS/COM
CAUTION:
When mounting the transceiver, do not press on display window as damage may
result.
(a)
(3)
With light to medium pressure, push transceiver into mounting tray to engage electrical
connectors.
(b) Insert hex wrench into front panel bolt hole and engage hex bolt.
(c)
Turn bolt clockwise to tighten locking cam.
(d) Reset ESSENTIAL and NON-ESSENTIAL AVIONICS circuit breakers.
Inspection/Check VHF COM Check - GNS 430
A flight test is recommended after the installation to ensure satisfactory performance. To check
the communications transceiver, maintain an appropriate altitude and contact a ground station
facility at a range of at least 50 nautical miles. Contact a close ground station. Press the squelch
disable button to defeat the automatic squelch feature and listen for any unusual electrical noise
which would increase the squelch threshold. If possible, verify the communications capability on
both the high and low ends to the VHF COM band.
B. Multifunction Display (MFD) (See Figure 34-401)
(1)
Removal - Multifunction Display (MFD)
(a) Ensure BAT 1, BAT 2, and AVIONICS master switches are in off position.
(b) Pull MFD circuit breaker.
(c)
Rotate captive screws counterclockwise to loosen MFD from instrument panel.
CAUTION:
(2)
Page 2
When removing MFD, do not strain wire harness by pulling cable too far
from instrument panel.
(d) Pull MFD from instrument panel just sufficiently to expose cable connector.
(e) Rotate cable plug counterclockwise and remove from receptacle.
(f)
Remove MFD from airplane.
Installation - Multifunction Display (MFD)
(a) Position MFD close enough to instrument panel cutout to connect cable plug to receptacle
without straining wire harness.
(b) Insert MFD into instrument panel cutout and slide forward until captive screws align with
instrument panel mounting holes.
(c)
Rotate captive screws clockwise until detent position is felt indicating screw is aligned with
receptacle. Continue clockwise rotation approximately 1/4 turn until screw is secure.
(d) Reset MFD circuit breaker.
34-40
13773-001
31 July 2001
Figure 34-401
GNS 430 and Multifunction Display
13773-001
30 Nov 2000
34-40
Page 3
C. GPS 1 Antenna (See Figure 34-402)
(1)
(2)
Removal - GPS 1 Antenna
(a) Remove forward headliner. (Refer to 25-10)
(b) Disconnect antenna cable from antenna.
(c)
Pry antenna from hook and loop fastener securing antenna to fuselage.
(d) Remove antenna from airplane.
Installation - GPS 1 Antenna
(a) To secure antenna to fuselage, firmly press fastener strip on antenna against fastener strip
fastened to the fuselage.
(b) Connect antenna cable.
(c)
Install forward headliner. (Refer to 25-10)
D. COM 1 Antenna (See Figure 34-402)
(1)
(2)
Removal - COM 1 Antenna
(a) Remove center headliner. (Refer to 25-10)
(b) Disconnect antenna cable from antenna.
(c)
Remove nuts and washers securing antenna to fuselage.
(d) Remove antenna and gasket from top of fuselage
(e) Peel off remaining sealant from fuselage.
Installation - COM 1 Antenna
(a)
Acquire necessary tools, equipment, and supplies.
Description
Adhesive/Sealant
(b)
(c)
(d)
(e)
(f)
P/N or Spec.
C850A 1518275
Supplier
Sherwin Williams
Purpose
Weather Sealant
Position gasket and antenna on fuselage roof and insert screws through mounting holes.
Install washers and nuts securing antenna to fuselage.
Fillet seal antenna perimeter. (Refer to 20-10)
Connect antenna cable.
Install center headliner. (Refer to 25-10)
E. GPS 2 Antenna (See Figure 34-402)
(1)
(2)
Page 4
Removal - GPS 2 Antenna
(a) Remove glareshield. (Refer to 25-10)
(b) Disconnect antenna cable from antenna.
(c)
Pry antenna from hook and loop fastener securing antenna to glareshield.
(d) Remove antenna from airplane.
Installation - GPS 2 Antenna
(a) To secure antenna to glareshield, firmly press hook and loop strip on antenna against
hook and loop strip fastened to the fuselage.
(b) Connect antenna cable.
(c)
Install glareshield. (Refer to 25-10)
34-40
13773-001
30 Nov 2000
F.
COM 2 Antenna (See Figure 34-402)
(1)
(2)
Removal - COM 2 Antenna
(a) Remove baggage compartment floor access panel. (Refer to 6-00)
(b) Disconnect antenna cable from antenna.
(c)
Remove nuts and washers securing antenna to fuselage.
(d) Remove antenna and gasket from belly of fuselage
(e) Peel off remaining sealant from fuselage.
Installation - COM 2 Antenna
(a)
Acquire necessary tools, equipment, and supplies.
Description
Adhesive/Sealant
(b)
(c)
(d)
(e)
(f)
13773-001
30 Nov 2000
P/N or Spec.
C850A 1518275
Supplier
Sherwin Williams
Purpose
Weather Sealant
Position gasket and antenna on fuselage belly and insert screws through mounting holes.
Install washers and nuts securing antenna to fuselage.
Fillet seal antenna perimeter. (Refer to 20-10)
Connect antenna cable.
Install baggage compartment floor access panel. (Refer to 6-00)
34-40
Page 5
Figure 34-402
GPS and COM Antenna Installation
Page 6
34-40
13773-001
30 Nov 2000
G. Stormscope (See Figure 34-403)
(1)
(2)
(3)
(4)
Removal - Stormscope Processor and Tray
(a) Ensure BAT 1, BAT 2, and AVIONICS master switches are in off position.
(b) Pull ESSENTIAL and NON-ESSENTIAL AVIONICS circuit breakers.
(c)
Remove processor:
1
Remove baggage compartment access panel CF5. (Refer to 6-00)
2
Remove safety wire securing knurled nut to mounting tray, loosen and swing
knurled nut away from clasp.
3
Firmly pull stormscope processor straight out of mounting tray and remove from airplane.
(d) Remove processor tray:
1
Disconnect electrical leads from tray.
2
Remove screws and countersunk washers securing tray to baggage floor and
remove from airplane.
Installation - Stormscope Processor and Tray
(a) Install processor tray:
1
Position mounting tray washers over floor mounting holes and secure washers to
underside of the floor with masking tape.
2
Position mounting tray assembly against the taped washers, secure with Loctite,
countersunk washers, and screws. Remove tape.
(b) Install processor:
1
With medium pressure, push processor into mounting tray to engage connectors
and secure with knurled nut.
2
Safety wire knurled nut to processor handle.
Install access panel CF5 and baggage floor carpet. (Refer to 6-00)
3
4
Reset ESSENTIAL and NON-ESSENTIAL AVIONICS circuit breakers.
Removal - Stormscope Antenna
(a) Remove cabin headliner. (Refer to 25-10)
(b) Disconnect antenna cable from antenna.
(c)
Remove nuts and washers securing antenna to fuselage.
(d) Remove antenna and gasket from top of fuselage
(e) Peel off remaining sealant from fuselage.
Installation - Stormscope Antenna
(a)
Acquire necessary tools, equipment, and supplies.
Description
Adhesive/Sealant
(b)
(c)
(d)
(e)
13773-001
31 July 2001
P/N or Spec.
C850A 1518275
Supplier
Sherwin Williams
Purpose
Weather Sealant
Position antenna gasket and antenna over installation holes and insert washers and
screws.
Loosely install the antenna with washers and nuts.
Route antenna cable up through installation hole and connect cable to antenna connector.
Place the antenna ground wire terminal ring on the forward mounting screw and secure
both antenna-mounting screws.
34-40
Page 7
(f)
(g)
Install center headliner. (Refer to 25-10)
Fillet seal antenna perimeter. (Refer to 20-10)
H. Stormscope System Tests
(1)
Test - Stormscope System
(a) Set BATTERY and AVIONICS master switches to ON position.
(b) On MFD, press top button to enter Software Main menu.
(c)
Press the CHECKLIST button.
(d) Press the END PROGRAM button.
(e) At left/right button pair, press left button to highlight END.
(f)
Press the SEL button to End Program.
(g) Press the SETUP/USER GRAPHICS button.
(h) Press the SEL button to select no Demo.
(i)
At left/right button pair, press left button to highlight YES.
(j)
Press the SEL button to select Yes.
(k)
Press the SYSTEM CONFIGURATION button.
(l)
Press the ACK button to move cursor down to STORMSCOPE selection (11 times).
(m) Press the NEXT button to highlight 1 for Stormscope ON.
(n) Press the SEL button to Exit menu.
(o) At left/right button pair, press left button to highlight YES.
(p) Press the SEL button to select Yes.
(q) Press the END button.
(r)
Press the DIAGNOSTICS button.
(s)
Press the STORMSCOPE button.
(t)
Press the HEADING STABILIZATION button.
(u) At left/right button pair, press left button to highlight ENABLE.
(v)
Press the SEL button to select Yes.
(w) Press the RESET ANTENNA CONFIGURATION button.
(x)
At left/right button pair, press left button to highlight TOP.
(y)
Press the SEL button to select Yes.
(z)
Press the CONFIGURATION/HEADING PAGE button.
CAUTION:
(1)
Page 8
If configuration values do match those below, call Cirrus Design Customer
Service Department.
Verify values and jumper setting match the following:
Hdg: XYZ: J3 - 1
Jumper
J2 - 2
Open
Hdg Valid Flag
No Fla
Flag Sense
+ vld
J3 - 4
Jumper
Hdg Value
###
Inhibit Line
Off
34-40
(Value should match HSI reading)
13773-001
31 July 2001
(2)
Antenna Mount
Top
J3 - 3
Jumper
(aa) Press the top button.
(ab) The SELF-TEST procedure will fail if the Stormscope Setup procedure (steps a through
aa) isn’t performed prior to performing the SELF-TEST procedure.
(ac) Press the SELF-TEST button and wait approximately 10 seconds.
(ad) Verify Test Complete and PASSED.
(ae) Press the top button.
(af) Press the NOISE MONITOR button.
(ag) A small number of triggers and/or random noise points inside display ring is acceptable.
Call Cirrus Design Customer Service Department if electrical noise indications are persistent.
(ah) While monitoring MFD for electrical noise, toggle NAV, STROBE, LANDING LIGHT, and
PITOT HEAT switches ON and OFF. Deploy FLAPS to full deflection and retract. Operate
ROLL and PITCH TRIM.
(ai) Press the EXIT button.
(aj) Press the STIKE TEST button.
(ak) During Strike Test, a strike should display and clear inside of box every 2 - 3 seconds. Call
Cirrus Design Customer Service Department if the Strike Test fails.
(al) Verify test strikes are inside of box. A strike should be displayed and cleared inside of box
every 2 - 3 seconds.
(am) Press the EXIT button.
(an) Press the END button.
(ao) Press the MAPPING button and ensure that the software exits to the Main Map menu.
Engine Run-Up Test - Stormscope System
Note:
(a)
(b)
(c)
(d)
(e)
(f)
The Engine Run-up Test must be performed when thunderstorms are not present
within 200 nautical miles.
With the airplane secured outdoors, start engine.
Turn on alternators and avionics.
On the MFD, press the LT OFF button to access Strike mode.
Press the 120 button to access 360° view.
Press the 25 Nautical Mile button 3 times to access the 200 Nautical Mile view.
Run engine up to 1,500 RPMs, with 1 or both alternators operating, ensure MFD display is
free from erroneous strikes.
Note:
(g)
13773-001
31 July 2001
Call Cirrus Design Customer Service Department if the Engine Run-up Test
fails.
Stop engine and turn all switches off.
34-40
Page 9
Figure 34-403
Stormscope Installation
Page 10
34-40
13773-001
31 July 2001
DEPENDENT POSITION DETERMINING
1. DESCRIPTION
This section covers that portion of the system which provides information to determine position from
sources which are mainly dependent on ground installations. This includes the Garmin GNS 430 GPS/
COM/NAV, Garmin GTX 327 Transponder system, and VOR/LOC Antenna.
The Garmin GTX 327 Transponder, located mid-avionics panel, receives interrogations from a groundbased secondary radar transmitter and transmits the airplane’s identification to the Air Traffic Control Center via Mode A transmissions and altitude information via Mode C. Refer to GTX 327 Installation Manual
indexed in the front of this manual for additional maintenance information on the GTX 327
2. MAINTENANCE PRACTICES
A. Garmin GNS 430 GPS/COM/NAV
The GNS 430 is an IFR certified VHF communications transceiver and Navigation Management System (NMS). The NMS includes GPS sensor, VOR/Localizer and Glideslope receivers. The GNS 430
includes two removable data cards, one with a Jeppesen data base, and second being a custom data
card. GPS signals are received by an internally mounted antennas. NAV/LOC/GS signals are received
by the VOR/LOC antenna. For installation and removal procedures refer to Independent Position
Determining. (Refer to 34-40)
B. Garmin GTX 327 Transponder (See Figure 34-501)
(1)
(2)
Removal - Garmin GTX 327 Transponder
(a) Ensure BAT 1, BAT 2, and AVIONICS master switches are in off position.
(b) Pull ENCODER/TRANSPONDER circuit breaker.
(c)
Insert hex wrench into front panel bolt hole and engage hex bolt.
(d) Turn locking screw counterclockwise to loosen locking cam. Locking cam will move the
transponder unit out 1/4” and disengage from the electrical connectors.
(e) Pull transponder from mounting tray and remove from airplane.
Installation - Garmin GTX 327 Transponder
(a) With light to medium pressure, push transponder into mounting tray to engage electrical
connectors.
(b) Insert hex wrench into front panel bolt hole and engage hex bolt.
(c)
Turn bolt clockwise to tighten locking cam.
(d) Reset ENCODER/TRANSPONDER circuit breaker.
C. Transponder Antenna (See Figure 34-501)
(1)
(2)
13773-001
31 July 2001
Removal - Transponder Antenna
(a) Remove access panel CF8. (Refer to 6-00)
(b) Disconnect antenna cable from antenna.
(c)
Ensure transponder antenna is supported and remove nut and washer securing antenna
to fuselage belly.
(d) Remove antenna from airplane.
Installation - Transponder Antenna
(a) Ensure transponder antenna is inserted and supported in antenna mounting hole in fuselage belly.
(b) Install washer and nut securing antenna to fuselage belly.
(c)
Connect antenna cable to antenna.
(d) Install access cover CF8. (Refer to 6-00)
34-50
Page 1
Figure 34-501
Transponder and Antenna Installations
Page 2
34-50
13773-001
30 Nov 2000
D. VOR/LOC Antenna (See Figure 34-502)
(1)
(2)
Removal - VOR/LOC Antenna
(a) Remove screws securing antenna mounting-plate to vertical stabilizer.
(b) Lift antenna mounting-plate assembly from vertical stabilizer recess.
(c)
Disconnect antenna cable from antenna.
(d) Remove screws securing antenna to mounting plate and remove antenna from airplane.
Installation - VOR/LOC Antenna
(a)
Acquire necessary tools, equipment, and supplies.
Description
Adhesive/Sealant
(b)
(c)
(d)
(e)
(f)
(g)
13773-001
30 Nov 2000
P/N or Spec.
C850A 1518275
Supplier
Sherwin Williams
Purpose
Weather Sealant
Remove old sealant and solvent clean antenna mounting surfaces. (Refer to 20-30)
Install screws securing antenna to antenna mounting-plate.
Connect antenna cable to antenna.
Install antenna mounting-plate assembly into vertical stabilizer recess.
Install screws securing antenna mounting-plate to vertical stabilizer.
Apply sealant around perimeter of antenna mounting-plate.
34-50
Page 3
Figure 34-502
VOR/LOC Antenna Installation
Page 4
34-50
13773-001
30 Nov 2000
CHAPTER
OXYGEN
CHAPTER 35 - OXYGEN
LIST OF EFFECTIVE PAGES
Chapter/Section
Page
Date
35-LOEP
1
30 NOV 2000
35-TOC
1
30 NOV 2000
35-00
1
30 NOV 2000
13773-001
30 Nov 2000
35-LOEP
Page 1
CHAPTER 35 - OXYGEN
TABLE OF CONTENTS
Subject
OXYGEN
Chapter/Section
Page
35-00
General
13773-001
30 Nov 2000
1
35-TOC
Page 1
OXYGEN
1. GENERAL
This chapter describes those units and components which store, regulate and deliver oxygen to the passengers and crew.
Certain portable oxygen systems are approved for use in the airplane. Refer to the Pilot’s Operating Handbook and the applicable operating manuals listed in the front of this book for additional operating and maintenance information.
13773-001
30 Nov 2000
35-00
Page 1
CHAPTER
ELECTNC PNLS &
MULTIPURPOSE
PARTS
CHAPTER 39 - ELECTRONIC PANELS AND MULTIPURPOSE PARTS
LIST OF EFFECTIVE PAGES
Chapter/Section
Page
Date
39-LOEP
1
30 NOV 2000
39-TOC
1
30 NOV 2000
39-00
1
30 NOV 2000
39-10
1
30 NOV 2000
39-10
2
30 NOV 2000
39-10
3
30 NOV 2000
39-10
4
30 NOV 2000
39-10
5
30 NOV 2000
13773-001
30 Nov 2000
39-LOEP
Page 1
CHAPTER 39 - ELECTRONIC PANELS AND MULTIPURPOSE PARTS
TABLE OF CONTENTS
Subject
ELECTRONIC PANELS AND MULTIPURPOSE PARTS
Chapter/Section
Page
39-00
General
INSTRUMENT AND CONTROL PANEL
1
39-10
Description
1
Maintenance Practices
1
Instrument Panel
Removal - Instrument Panel
Installation - Instrument Panel
Circuit Breaker Panel
Removal - Circuit Breaker Panel
Installation - Circuit Breaker Panel
13773-001
30 Nov 2000
1
1
1
3
3
3
39-TOC
Page 1
ELECTRONIC PANELS AND MULTIPURPOSE PARTS
1. GENERAL
The instrument panel is designed for glare-free use in all flight conditions. The instrument panel is
arranged primarily for use by the pilot in the left seat; however, it can be viewed from either seat. Flight
instruments and annunciators are located on the left side of the panel and engine instruments are located
on the right side of the instrument panel. A large multifunction display (MFD) is located between the flight
instruments and engine instruments.
13773-001
30 Nov 2000
39-00
Page 1
INSTRUMENT AND CONTROL PANEL
1. DESCRIPTION
The airplane uses standard flight instruments arranged in the “basic-six” pattern. The airspeed indicator,
attitude gyro, altimeter, turn coordinator, horizontal situation indicator (HSI), and vertical speed indicator
are mounted in the instrument panel. A switch panel located in the bolster panel below the flight instruments contains the avionics power switch, pitot heat switch, lighting dimmer switches, BAT 1, BAT 2, and
alternator switches.
A center console contains the avionics, flap control and position lights, power lever and mixture controls,
fuel system indicator and controls, and audio controls. System circuit breakers, the alternate static source
valve, alternate induction air control, and ELT panel switch are located on the left side of the console for
easy access by the pilot. The parking brake actuation knob is mounted below the flight instruments on the
left side of the center console. A friction knob for adjusting throttle and mixture control feel and position stability is located on the right side of the console. An accessory outlet, map compartment and audio controls
are located in the console between the front seats. An hour meter, emergency egress hammer, and headset jacks are installed below the console armrest.
2. MAINTENANCE PRACTICES
A. Instrument Panel
(1)
Removal - Instrument Panel
CAUTION:
To prevent an accidental short the External Power Receptacle must never
become energized during the following procedure.
(a)
(b)
(c)
(d)
(e)
(2)
13773-001
30 Nov 2000
Disconnect battery. (Refer to 24-30)
Remove MFD. (Refer to 34-40)
Remove glareshield. (Refer to 25-10)
Identify all electrical connectors, hoses, and associated wiring.
Disconnect all electrical connectors, hoses, and associated wiring to allow removal of the
instrument panel assembly.
(f)
Remove the screws, washers, and spacers securing the instrument panel to the console.
Remove the instrument panel assembly.
Installation - Instrument Panel
(a) Place the instrument panel assembly into position and secure to the console with screws,
spacers, and washers.
(b) Connect all electrical connectors, hoses, and associated wiring from the components that
were disconnected during the disassembly procedure.
(c)
Perform pitot system leakage test. (Refer to 34-10)
(d) Perform static system leakage test. (Refer to 34-10)
(e) Install glareshield. (Refer to 25-10)
(f)
Install MFD. (Refer to 34-40)
(g) Connect battery. (Refer to 24-30)
(h) Perform function test for all instruments and systems to assure proper operation.
39-10
Page 1
Figure 39-101
Instrument Panel Assembly
Page 2
39-10
13773-001
30 Nov 2000
B. Circuit Breaker Panel
(1)
Removal - Circuit Breaker Panel
CAUTION:
The External Power Receptacle must be disconnected during the following procedure.
(a)
(b)
(2)
13773-001
30 Nov 2000
Disconnect battery. (Refer to 24-30)
Remove the screws securing the circuit breaker panel to the hinge and console. (Refer to
24-50)
(c)
Identify and disconnect all wire terminal connectors. Remove the circuit breaker panel.
Installation - Circuit Breaker Panel
(a) Place the circuit breaker panel into position and connect all wire connectors.
(b) Secure the circuit breaker panel to the console with screws.
(c)
Connect battery. (Refer to 24-30)
39-10
Page 3
Figure 39-102
Electronic Panel Locator
Page 4
39-10
13773-001
30 Nov 2000
Figure 39-103
Bolster Panel Assembly
13773-001
30 Nov 2000
39-10
Page 5
CHAPTER
STANDARD
PRACTICES:
CHAPTER 51 - STANDARD PRACTICES: STRUCTURES
LIST OF EFFECTIVE PAGES
Chapter/Section
Page
Date
51-LOEP
1
31 JULY 2001
51-LOEP
2
31 JULY 2001
51-TOC
1
30 NOV 2000
51-TOC
2
30 NOV 2000
51-00
1
30 NOV 2000
51-00
2
30 NOV 2000
51-00
3
30 NOV 2000
51-00
4
30 NOV 2000
51-00
5
30 NOV 2000
51-00
6
30 NOV 2000
51-00
7
30 NOV 2000
51-00
8
30 NOV 2000
51-00
9
30 NOV 2000
51-00
10
31 JULY 2001
51-00
11
31 JULY 2001
51-10
1
30 NOV 2000
51-10
2
30 NOV 2000
51-10
3
30 NOV 2000
51-20
1
30 NOV 2000
51-20
2
30 NOV 2000
51-20
3
30 NOV 2000
51-20
4
30 NOV 2000
51-20
5
30 NOV 2000
51-20
6
30 NOV 2000
51-20
7
30 NOV 2000
51-20
8
30 NOV 2000
51-20
9
30 NOV 2000
51-20
10
30 NOV 2000
51-20
11
30 NOV 2000
51-20
12
30 NOV 2000
51-20
13
30 NOV 2000
51-20
14
30 NOV 2000
51-20
15
30 NOV 2000
51-20
16
30 NOV 2000
51-20
17
30 NOV 2000
51-20
18
30 NOV 2000
51-20
19
30 NOV 2000
51-20
20
30 NOV 2000
13773-001
31 July 2001
51-LOEP
Page 1
CHAPTER 51 - STANDARD PRACTICES: STRUCTURES
LIST OF EFFECTIVE PAGES
Chapter/Section
Page
Date
51-20
21
30 NOV 2000
51-20
22
30 NOV 2000
51-20
23
30 NOV 2000
51-20
24
30 NOV 2000
51-20
25
30 NOV 2000
51-20
26
30 NOV 2000
51-20
27
30 NOV 2000
51-20
28
30 NOV 2000
51-20
29
30 NOV 2000
51-20
30
30 NOV 2000
51-20
31
30 NOV 2000
51-20
32
30 NOV 2000
51-20
33
30 NOV 2000
51-20
34
30 NOV 2000
51-20
35
30 NOV 2000
51-20
36
30 NOV 2000
51-20
37
30 NOV 2000
51-20
38
30 NOV 2000
51-30
1
30 NOV 2000
51-30
2
30 NOV 2000
51-30
3
30 NOV 2000
51-30
4
30 NOV 2000
51-30
5
30 NOV 2000
51-30
6
30 NOV 2000
51-30
7
30 NOV 2000
51-30
8
30 NOV 2000
51-30
9
30 NOV 2000
51-30
10
30 NOV 2000
51-30
11
31 JULY 2001
51-30
12
30 NOV 2000
Page 2
51-LOEP
13773-001
31 July 2001
CHAPTER 51 - STANDARD PRACTICES: STRUCTURES
TABLE OF CONTENTS
Subject
STANDARD PRACTICES: STRUCTURES
Chapter/Section
Page
51-00
General
1
Repairs Areas
Lightning Protection (EMM)
Composite Repair Requirements and Materials
Exterior Finish Requirements and Materials
Terminology
ASSESSING COMPOSITE DAMAGE
1
1
1
1
2
51-10
Description
1
Maintenance Practices
1
Determining Extent of Damage
Visual
Coin Tap
Exploration
Types Of Damage
COMPOSITE REPAIR
1
1
1
1
2
51-20
Description
1
Maintenance practices - General
1
Resin Mixing
Mixing Filler Paste
Cure Cycle
Initial-Cure
Post-Cure
Heated Air Cure
Other Cure Methods
Laminating
Laminating in Place
Transfer Method
Backing Plate
Backing Plate Construction
Backing Plate Installation
Cutting Reinforcements
Templates
Cutting Repair Plies
Ply Orientation
Determining Ply Count
1
2
2
3
3
3
3
4
4
6
7
7
9
11
11
11
12
14
13773-001
30 Nov 2000
51-TOC
Page 1
CHAPTER 51 - STANDARD PRACTICES: STRUCTURES
TABLE OF CONTENTS
Subject
Chapter/Section
Maintenance Practices - Composite Repair Procedures
26
Preparation for Repair
Repair Techniques
Outer Laminate Repair
Minor Core Damage
Core Replacement
Inner Laminate Repair
Pure Laminate Repair
EXTERIOR FINISH
Page
27
31
31
34
36
38
38
51-30
Description
1
Maintenance Practices
1
Identification/Markings
Surfacer (High Build Primer)
Application of Surfacer
Fillers
Application of Body Filler
Application of Spot Putty
Filler Thickness Inspection
Sealer
Application of Sealer
Paint
Pre-painting Instructions
Application of Paint
Post Painting Instructions
Page 2
51-TOC
1
1
2
4
4
6
7
7
7
8
9
11
12
13773-001
30 Nov 2000
STANDARD PRACTICES: STRUCTURES
1. GENERAL
This chapter contains information and procedures applicable to all composite repairs as well as information
and procedures for aircraft painting and priming. The basic elements of successful repair are; preparation
of the laminate and repair material, proper mixing of resin, technique, and a complete cure cycle. If any
element is not properly executed the repair will be substandard. The procedures are not difficult, but the
location of the repair might be difficult to access.
A. Repairs Areas
The majority of the airplane structure is made of composite materials, except for the console, engine
mount, and flight control surfaces. Skins, bulkheads, floors, longerons, and ribs are made from fiberglass/epoxy composite and closed-cell foam core. Some areas of the structure are considered not field
repairable. The non-repairable areas are indicated by shaded areas on the figures in this chapter.
Although most areas of the airplane structure are field repairable, some areas are difficult to repair or
require special procedures to be followed to assure the structural integrity of a repair. If the area of
damage is inside the fuselage or in a figures shaded area, Cirrus Design must be contacted prior to
beginning a repair. (See Figure 51-001)
B. Lightning Protection (EMM)
Expanded metal mesh (EMM) is used in many areas on the airplane for lightning protection. When
repairing an area that contains EMM, the EMM must overlap the existing EMM by 0.200-inch (5 mm).
Shaded areas which contain EMM are not field repairable. EMM shall be laid over the final repair ply.
(See Figure 51-002)
CAUTION:
Replacement EMM must overlap the existing EMM by 0.200-inch (5 mm). Contact Cirrus Design before repairing any composite surface within the figures shaded area.
C. Composite Repair Requirements and Materials
(1)
(2)
(3)
(4)
(5)
Only approved composite materials may be used to complete repairs to the airplane structure.
Some figures in this chapter contain shaded areas. The shaded areas indicate portions of the
airplane which must not be repaired without first contacting Cirrus Design. Flight control surfaces
are not repairable.
All external areas which are not shaded (excluding flight control surfaces) can be repaired without contacting Cirrus Design.
Repairs must be completed by competent technicians that are trained in composite repair. Technicians should use materials and procedures outlined in this Chapter. (Refer to 51-20)
Repairs should be made in a clean, temperature controlled environment. Optimal repair temperature ranges from 60°- 80°F (16°- 27°C) with 50% relative humidity or less.
D. Exterior Finish Requirements and Materials
(1)
(2)
(3)
13773-001
30 Nov 2000
To ensure that the temperature of the composite structure is kept below 150° F (66°C), the maximum allowable paint on the wing will have an absorptivity not greater than 0.4, with an emissivity no less than 0.9. The maximum allowable paint on the fuselage will have an absorptivity not
greater than 0.6 with no less than 0.7 emissivity.
Use of approved paints and primers for the base color will satisfy the above absorptivity and
emissivity requirements.
Special precautions and guidelines regarding the use of contrasting colors for identification and
styling apply. Adherence to the painting procedures given in this chapter are required. (Refer to
51-30)
51-00
Page 1
E. Terminology
The following terms are used throughout this Chapter. Technicians involved in composite repair should
be familiar with the following definitions, the materials used, and the procedures required.
Page 2
Backing Plate
A plate used behind a hole in the structure when making a composite repair. The backing
plate is considered a tool and is not considered to add any strength to the repair.
Core
The central member, usually foam or honeycomb, of a sandwich construction to which the
laminate faces of the sandwich are attached or bonded.
Delamination
Separation of the core and laminate face sheets or separation between plies of a laminate.
Disbond
An area within a bonded interface between two parts in which an adhesion failure or separation has occurred.
Fiber Direction
The orientation or alignment of the longitudinal axis of the fiber with respect to a stated reference axis.
Filler
A relatively inert substance added to a material to alter its physical, mechanical, thermal,
electrical, and other properties. Fillers are also used to lower cost and density.
Glass Cloth
A type of fabric made from fine spun glass filaments which are woven into a strong, tough
fabric. These fabrics are used to construct, reinforce, and repair composite structures.
Glass Fiber
Filaments of fine spun glass.
Initial-cure
Minimum cure cycle required to achieve handling strength. Required before the laminate or
repair is handled, processed, or stressed in any way.
Lamince
Single layer of unidirectional or woven fibers embedded in a resin matrix.
Laminate
To unit laminae, usually with heat and pressure. A product made by such bonding.
Peel Ply
A special ply used as the outer layer which is peeled off after cure to provide a smooth contaminate free repair surface.
Plies
Layers of material (glass cloth or glass fiber) which are laminated together.
Post-cure
Additional elevated-temperature cure, usually without pressure, to improve final properties
and/or complete the cure. In certain resins, complete cure and ultimate mechanical properties are attained only by exposure of the cured resin to higher temperature than those of initial curing.
Release Film
An impermeable layer of film that does not bond to the resin being cured. Both sides of the
release film are adhesive free.
Release Tape
A plastic film with adhesive backing on one side. Release tape is used during backing plate
manufacture to allow the backing plate to release from the lay-up surface without damage.
Sandwich Construction
A bonded structure in which a core of material such as rigid foam is bonded between two
laminate face sheets of metal or fiberglass cloth. Sandwich constructed materials are used
where high strength and light weight are required.
Scarf Joint
A joint made by cutting away angular segments of a part and then either bonding a second
part with similar angular cuts or wet laying material with staggered widths.
Template
A pattern made of any suitable material to permit the layout of parts with a minimum expenditure of time and effort.
51-00
13773-001
30 Nov 2000
Figure 51-001
Repair Areas (Sheet 1 of 3)
13773-001
30 Nov 2000
51-00
Page 3
Figure 51-001
Repair Areas (Sheet 2 of 3)
Page 4
51-00
13773-001
30 Nov 2000
Figure 51-001
Repair Areas (Sheet 3 of 3)
13773-001
30 Nov 2000
51-00
Page 5
Figure 51-002
Lightning Protection (Sheet 1 of 4)
Page 6
51-00
13773-001
30 Nov 2000
Figure 51-002
Lightning Protection (Sheet 2 of 4)
13773-001
30 Nov 2000
51-00
Page 7
Figure 51-002
Lightning Protection (Sheet 3 of 4)
Page 8
51-00
13773-001
30 Nov 2000
Figure 51-002
Lightning Protection (Sheet 4 of 4)
13773-001
30 Nov 2000
51-00
Page 9
APPROVED COMPOSITE REPAIR MATERIALS
Description
P/N or Spec.
Supplier
Shelf Life
Release Film
WL5200
(Red or Blue)
AIRTECH Int’l Inc.
18 months from date of manufacture
Peel Ply
Stitch Ply G
AIRTECH Int’l Inc.
18 months from date of manufacture
Glass Fabric Repair
7781-F16
Hexcel
12 months from date of receipt when
stored at or below 95°F (35°C) in a
sealed moister proof container
Devcon Epoxy
5 Minute
Devcon
Refer to manufactures data sheet
Resin Repair System, Type 2 Shell Epon 862/heloxy 68 Shell Oil
(Non-structural)
& Teta 3234 resin system
Type 2 Class 1
24 months from date of receipt or the
manufacture’s expiration date,
whichever occurs first
Resin Repair System, Type 1 MGS L418/418
(Structural)
MGS
12 months from date of receipt or the
manufacture’s expiration date,
whichever occurs first
Rigid Closed Cell Foam
HT70
Divincell
Indefinite
Aerosil
200
Degussa
Indefinite when stored in sealed
moister proof containers
Sil-Cell
Sil-32
Silbrico
Indefinite when stored in sealed
moister proof containers
* Refer to manufactures data sheet for shelf life.
Figure 51-003
Approved Repair Materials (Sheet 1 of 2)
Page 10
51-00
13773-001
31 July 2001
APPROVED PAINT MATERIALS
Description
P/N or Spec.
Supplier
Purpose
Primer Surfacer Sys- K 36 Base
tem *
K 210 Hardener
DT 860, 870, 885 Reducer
DX 84 Enhancer
PPG Industries, Inc.
Aid paint adhesion and to fill
minor surface imperfections
Epoxy Primer Sealer DP 40 Base
System *
DP 410/402 Catalyst
DT 860, 870, 885 Reducer
PPG Industries, Inc.
Seal surfacer
Polyurethane Paint
System*
(HS ACRY-GLO
CM0830104/A00435 Paint)
(HS ACRY-GLO
CM0830081 Hardener)
(ACRY-GLO HS
CM011944 DT Reducer)
(HS ACRY-GLO
CM0830H18 Activator)
Sherwin Williams
Seal repair and provide
smooth exterior finish (used
on ASN up to 1059)
DSS Series Delta Polyurethane
(Delta DSS 92813 Cirrus White
Paint)
(DRS1460, DRS1470, DRS1485,
DRS1495, DRS1498 Solvent)
(DDH525 or DDH526 Catalyst)
(DX39 Accelerator)
(DX49 Super Accelerator)
(DX53 Retarder)
(DX595 Flattening paste)
PPG Industries, Inc.
Seal repair and provide
smooth exterior finish (used
on ASN 1060 and later)
DCC Series Acrylic Urethane
(4541 White, 9437 White, 92813
Flat Black Paint)
(DT850, DT860, DT870, DT885,
DT895 or DT898 Solvent)
(DCX61, DCX9 Catalyst)
(DX84 or DX76 Accelerator)
(DX73 Fisheye eliminator)
(DTR8110 Retarder)
(DX685 Flattening paste)
PPG Industries, Inc.
Seal repair and provide
smooth exterior finish (primarily used for spot repairs and
for when short cure times are
desirable)
Figure 51-003
Approved Repair Materials (Sheet 2 of 2)
13773-001
31 July 2001
51-00
Page 11
ASSESSING COMPOSITE DAMAGE
1. DESCRIPTION
Most damage to a composite structure will be visually detectable. An impact is the most common cause of
damage and will usually leave visual evidence. Other types of damage are more difficult to detect but can
be detected by simple methods. If the exterior surface is damaged, always assume that the underlying
structure may also be damaged.
2. MAINTENANCE PRACTICES
A. Determining Extent of Damage
There are three basic methods to determine the extent of composite damage: visual, coin tap, and
exploration.
(1)
Visual
The visual method can be used when the suspect area is clearly visible. Damage to the outer
surface of the aircraft will usually crack the paint. Paint is generally more brittle than the composite and will crack before the laminate is damaged. However, this does not help the technician to
determine the extent of the damage, only that damage has occurred. When a crack in the paint
is found, further investigation is required. Paint cracks on fairings can often occur due to the flexing at these intersections.
Dimples, dents or creases are also a sign of damage. Dimple and dent damage is similar in
appearance to hail damage on a metal surface. Again, this does not reveal how extensive the
damage is, only that it occurred. If tears or broken fibers are visible, there is no question the part
is damaged and must be repaired.
Separation between plies of a laminate (delamination) or between the laminate and the core or
between two bonded laminates (disbond), is more difficult to detect. This type of damage may
evidence itself in the form of a raised area or puckering outward of the skin. It is sometimes possible to feel this type of damage by pressing on the area. A disbond or delamination may feel
soft and movement between the separated layers may be detected.
If possible, the backside of the suspected area should be examined. Use of a borescope, if available, is highly recommended to assess internal damage. The interior surfaces are usually not
painted and damage to glass-fabric structures will show up as a white area. The white color indicates separation of fabric from resin, which changes the way light refracts in the laminate.
(2)
Coin Tap
Coin tap is just what the name implies, tapping with a coin, or similar object. By tapping at a consistent rate and energy, it is possible to audibly detect discontinuities in the underlying surface.
The coin tap method is useful for detecting delamination and disbonds. Areas of disbond or
delamination will sound flat or hollow, undamaged areas should sound sharp and clear. The coin
tap method helps to assess damage in hard to see areas and when disbond or delamination is
suspected; the coin tap method should be used in conjunction with the exploration method. All
suspect areas, including obvious damage, should be checked with the Coin Tap method. This
method will help determine the extent of damage and whether or not the aircraft can be field
repaired.
The coin tap method is effective if used properly. It is important that the area being investigated
is similar to a standard, or undamaged area, to which it is compared. For instance, if the suspected area lies directly over a rib, or is sandwich construction, the reference area should also
be this type of construction.
(3)
13773-001
30 Nov 2000
Exploration
51-10
Page 1
Exploration is an extension of visual inspection, but requires removal of the surface coat.
Removing the surface coat is a difficult task, and care must be taken to ensure that more damage is not created in the process. The exploration method must be used when the suspect area
is hard or impossible to access or to evaluate the damage. A borescope or ultrasound can also
be used for inspecting damage.
B. Types Of Damage
Structural damage to composite laminates can be divided into four categories or types. The following
are definitions of each category: (See Figure 51-101)
Laminate Only
Damage to pure laminate or damage to one side of a sandwich construction that
has no core damage.
Minor Core
Damage to one side of a sandwich construction and minor gouging of core material. No penetration through core or other side of sandwich.
Major Core
Same damage as Minor Core damage except a large portion of core will have to
be replaced. No penetration of other side of sandwich or laminate damage.
Sandwich Pene- Both sides of sandwich penetrated, laminate of both sides requires repair and core
tration
section must be replaced.
Page 2
51-10
13773-001
30 Nov 2000
Figure 51-101
Types of Laminate Damage
13773-001
30 Nov 2000
51-10
Page 3
COMPOSITE REPAIR
1. DESCRIPTION
The quality of all repairs is directly related to application of proper repair procedures. This includes: cleaning and preparing the damaged area, cutting reinforcements, mixing and applying resin and curing the
repair.
The following are general practices used during most composite repairs. A repair technician must be familiar with these practices prior to attempting composite repairs on this airplane.
2. MAINTENANCE PRACTICES - GENERAL
A. Resin Mixing
WARNING:
Use only approved resin systems for repair. Never substitute another resin
system. Resin must be mixed in accordance with the procedures described
herein. Always follow the manufactures recommendations.
CAUTION:
MGS L418/418 resin system will not cure at room temperature to a condition suitable for handling or processing in any manner. At room temperatures this resin
system will only reach an early stage of cure and will be very brittle and easy to
irreparably damage. Never bend, twist, pull, or push repair area prior to initial
cure.
High ambient temperatures will decrease worklife and viscosity. High ambient
temperatures are acceptable, but will shorten application time. An increase of
18°F or 10.0°C will decrease the application time by 50%. High humidity (above
65% relative humidity), accelerates reaction and shortens application time.
(1)
Acquire necessary tools, equipment, and supplies.
Description
(2)
(3)
(4)
(5)
(6)
(7)
13773-001
30 Nov 2000
P/N or Spec.
Supplier
Purpose
Resin (structural repair)
MGS L418/418 MGS
Laminate repair
plies
Mixing container (cup)
-
Any Source
Mix resin system
Stir sticks
-
Any Source
Mix resin system
Scale
18605T84
McMaster-Carr
Weigh chemicals
Zero scale, to assure accurate measurements.
Place mixing cup on scale and record mixing cup weight (MCW).
Pour required amount of base resin into mixing cup.
Place mixing cup with base resin on scale and record the total weight.
Subtract mixing cup weight from total weight (mixing cup and resin), to determine the base resin
weight (BRW).
Record the base resin weight.
51-20
Page 1
(8)
To determine the amount curing agent (CA) required for a given base resin weight (BRW) use
the following formula: CA = BRW x 0.4
For example: If a repair required 250 gm of base resin, the amount of curing agent is calculated
as follows:
CA = BRW x 0.4
CA = 250 gm x 0.4
CA = 100 gm.
Note:
Mix ratio for MGS L418 resin is 100 parts resin, to 40 parts curing agent (100:40).
(9) Place a second mixing cup on the scale. Record second mixing cup weight.
(10) Add the second mixing cup weight and the curing agent weights together, to determine the gross
curing agent weight (GCAW).
(11) With the second mixing cup on the scale, pour curing agent into second mixing cup until GCAW
is obtained.
CAUTION:
Material will adhere to the cup sidewalls, scrape the inside of the cup several
times to assure all material will be used. If all material is not used or properly
mixed, the resin will not obtain full strength.
(12) Mix curing agent and base resin. Stir mixture continuously and mix thoroughly. Mix resin to uniform appearance with no swirls or color differences. After resin appears uniform, mix for an additional two minutes. Continue to mix until no clouding is visible in the mixing cup.
B. Mixing Filler Paste
Filler Paste will be used for filling dents and gouges in core and for bonding replacement core sections.
The mix ratio of filler to resin is not as critical as mixing the resin. The filler ratio may be varied slightly
to alter the viscosity of the filler paste. Resin to filler mix ratio is approximately 1:1½ parts by volume.
Add filler to mixed resin and mix slowly until all filler is incorporated. Scrape the sides and bottom of
the container while mixing to ensure material is uniform.
Note:
(1)
(2)
(3)
(4)
Filler paste must receive an initial cure per Chapter 51-20 (Cure Cycle) prior to the next
operation (i.e. laminating, sanding, etc.) (Refer to 51-20)
Mix resin. (Refer to 51-20)
By volume, mix the fillers 1:1 Aerosil to Sil-Cell.
By volume, add filler mixture to mixed resin. Mix ratio is approximately 1:1½ resin to filler.
Mix until material is uniform in texture.
C. Cure Cycle
In order to achieve full strength of a repair, the repair must cure properly. To achieve full cure of the
MGS L418/418 resin system, heat the entire repair area using an artificial heat source. Because much
of the structure consists of sandwich construction which makes it difficult to properly heat the inner
laminate, it is often necessary to perform two post-cure cycles. When it is necessary to repair sandwich composite, repair the inner laminate and post-cure first; then follow by repairing the core and
outer laminate.
CAUTION:
Page 2
MGS L418/418 resin system will not cure at room temperature to a condition suitable for
handling or processing in any manner. At room temperatures this resin system will only
reach an early stage of cure and will be very brittle and easy to irreparably damage. Do
not bend, twist, pull, or push the repair area prior to initial-cure.
51-20
13773-001
30 Nov 2000
(1)
(2)
(3)
(4)
13773-001
30 Nov 2000
Initial-Cure
An initial-cure must be performed before handling the repaired area. Cure time at temperature
for the initial cure is:
(a) 5 hours at 125°-150°F (52°-66°C)
(b) 3 hours at 150°-195°F (66°-91°C)
Post-Cure
Post-Cure must be completed before the assembly is ready for service. Multi-step post-cure may
be used providing the total time at temperature meets the minimum requirement. Initial-cure
requirements must be met if assembly will be handled between post-cure steps. Cure time at
temperature for the post cure is:
(a) 10 hours at 175°-195°F (79°-91°C)
Heated Air Cure
(a) To perform initial-cure or post-cure with heated air, an enclosure around the repair is
required. The enclosure can be made from any material that will withstand around 250°F
(121.1°C). Plastic sheet taped to the structure is often used. If plastic sheet is used, manufacture a simple structure to ensure that the plastic stays clear from the repair area.
(b) To supply heated air, use a common hair dryer. More sophisticated equipment may be
used if available. Avoid hot air guns, as temperatures achieved are too high for this application. Place the hot air source so that it doesn't contact the structure and is not blowing
directly at the repair area.
(c)
Temperature of the repair is critical, for the resin must be in the specified range for both
temperature and duration. A thermocouple, or similar surface temperature measuring
device, shall be placed in contact with the panel immediately adjacent to the repair. At
least one temperature measuring device should be used for every 1-2 square feet of
repair area. It is recommended that at least two temperature measuring devices be used.
(d) Repair temperature is controlled by air temperature. Air temperature should be approximately 15°-25°F (8.3°-13.9°C) higher than the desired repair temperature. The exact air
temperature required is dependent on many factors such as shop temperature, insulation
of the enclosure, thickness of the repair, etc. Part temperature can be controlled by cutting
vent holes in or insulating the enclosure and/or by insulating the backside of the repair
area. Be sure to remove all insulation after completing cure.
(e) Bringing the part temperature up slowly is preferred, this allows the resin to solidify at a
lower temperature. During the first part of the cure cycle the repair plies should be
observed frequently. Any air trapped within the repair will expand when heat is applied. It
will be necessary to deflate any bubbles that form. Lance bubbles with a scribe or pin, and
push the ply down with a brush. This must be done before the resin solidifies.
Other Cure Methods
Heat blankets are also commonly used for repairs. Use equipment per manufacturer’s
instructions.
51-20
Page 3
D. Laminating
Laminating is accomplished after repair plies have been cut and the repair area is prepared (backing
plates attached, core section replaced, repair surface abraded, repair surface solvent cleaned, etc.).
Two methods are used for lamination of repair plies; Laminating in Place and the Transfer Method.
WARNING:
When using peel ply, position the peel ply on the outer ply (largest) only. Never
bond repair plies to peel ply. If plies are bonded on top of peel ply, the repair will
not develop full strength.
Place each repair ply in the same direction as the original plies were positioned.
Every other repair ply must have the directional fiber orientation staggered to prevent the repair from warping.
(1)
Laminating in Place
The Laminating in Place method is used when the area of damage does not present difficulty for
applying repair plies.
Note:
(a)
Laminates that have come in contact with moisture must be dried before performing any repair. If moisture contamination is confined to a small area, the area may
be dried with a heat gun. Dry the contaminated area for at least two minutes while
keeping the nozzle a minimum of 10 inches from the part.
Absorb all visible moisture on the laminate using a clean, lint-free, cotton cloth.
Note:
(b)
(c)
Wipe the affected area with isopropyl alcohol using a clean, lint-free, cotton cloth.
Abrade surface (by hand) in a random pattern using 60-grit to 80-grit aluminum oxide
paper. If abrading with powered equipment, use 120-grit to 180-grit aluminum oxide paper.
Note:
(d)
(e)
Page 4
If surface contamination is present, solvent wipe bond area and adjacent
surfaces. Before bonding, all surfaces must be prepared by mechanical
abrasion and then solvent cleaned, even if peel ply was used. Allow solvent
to evaporate.
Remove dust and observe laminate surface frequently during the abrading
procedure. If fiber damage is apparent, stop abrading and repair the damaged area. When preparing peel ply surfaces, abrade surface until the
impression left from the peel ply is no longer visible. When preparing surfaces where no peel ply was present (i.e., barrier film), abrade surface until
no gloss is visible. To assure proper abrasion, replace sandpaper many
times during the abrading procedure.
Remove dust particles using a vacuum cleaner. To assist in the removal of dust particles,
use either a clean vacuum cleaner brush attachment or a new paint brush.
Solvent clean repair surface. (Refer to 20-30)
51-20
13773-001
30 Nov 2000
Note:
Do not allow cleaning cloth to contact unprepared areas adjacent to the
bond area. Contaminates could adhere to the cleaning cloth and become
transferred onto the previously prepared area. Never apply solvent directly
onto the part. Wipe surface until no sign of dust, particles or other contamination is visible on the cloth. After wiping, if cloth shows any signs of contamination, replace cloth.
After solvent cleaning, the repair area must be allowed to air dry for a minimum of 15 minutes. Do not cover the area for at least 15 minutes after final
solvent wipe.
(f)
Absorb any visible solvent with a clean dry cloth. Allow part to air dry for a minimum of 15
minutes.
Note:
(g)
Apply a thin coat of mixed resin to the repair area using a clean brush.
CAUTION:
(h)
(i)
(j)
(k)
13773-001
30 Nov 2000
When using peel ply, position the peel ply on the outer ply (largest)
only. Never bond repair plies to peel ply. If plies are bonded on top of
peel ply, the repair will not develop full strength.
If repairing an outer surface, apply a layer of peel ply over entire area of the last (outer)
repair ply.
Note:
(m)
(n)
Center each ply over the damage. Each ply must have half of the total overlap on all sides of the damaged area or over the previous repair ply. The first
ply (smallest) must be 0.5 inch to 1.0 inch larger than the damaged area.
Each following ply must be 0.5 inch to 1.0 inch larger than the previous
repair ply. Place each repair ply in the same direction as the original plies
were positioned. Every other repair ply must have the directional fiber orientation staggered to prevent the repair from warping.
Center the first ply (smallest) over the damaged area. Use the template and 0° reference
line to help align the ply.
Lightly flatten the ply with the brush. Allow time for resin to wick through the ply from
below.
Work air bubbles to the edge of the ply using the brush. Stipple (tap the ply) with the brush
instead of brushing, brushing will pull and distort the ply. If necessary, add resin to saturate
dry areas. When ply is saturated and air bubbles have been removed, coat the ply with a
thin layer of resin.
Lay-up all remaining repair plies (smallest to largest) using the previous steps as guidelines.
WARNING:
(l)
If required, protect the prepared area with a clean plastic sheet until resin is
to be applied. Apply resin within 24 hours of preparing surface. If resin is not
applied within 24 hours, repeat the aforementioned cleaning procedure.
Remove plastic sheet before continuing repair.
Peel ply will not stretch when brushed and becomes transparent when wet
with resin. Peel ply can be worked more aggressively than repair plies.
Lightly flatten the peel ply with the brush.
Fully cure repair. (Refer to 51-20)
51-20
Page 5
(2)
Transfer Method
This method is used when the repair is in a difficult position. The Transfer Method is similar to
Laminating in Place, except the repair plies are wet with resin and then stacked-up on a clean
sheet of plastic or release film. Repair plies are then centered over the damaged area.
WARNING:
Place each repair ply in the same direction as the original plies were positioned. Every other repair ply must have the directional fiber orientation
staggered to prevent the repair from warping.
Note:
Laminates that have come in contact with moisture must be dried before performing any repair. If moisture contamination is confined to a small area, the area may
be dried with a heat gun. Dry the contaminated area for at least two minutes while
keeping the nozzle a minimum of 10 inches from the part.
If large areas, or the entire part, is moisture contaminated, place part in an air circulating oven for a minimum of 15 minutes at 150° F to 200° F air temperature.
Remove part from oven and allow part to cool down in a dry area.
(a)
(b)
Prepare surface as previously described in 51-20 “Laminating in Place”. (Refer to 51-20)
Cut two sheets of plastic approximately 6 inches larger than the total repair area. Place
one sheet on a flat clean work surface.
WARNING:
(c)
If repairing an outer surface, apply a layer of peel ply with the same shape and size of the
largest repair ply onto the plastic sheet.
Note:
(d)
(e)
(g)
Page 6
Place each repair ply in the same direction as the original plies were positioned. Every other repair ply must have the directional fiber orientation
staggered to prevent the repair from warping. Use the template and 0° reference line to help align the ply (use the bottom edge of the plastic sheet as
the 0° reference line).
Center the largest repair ply (last repair ply installed on damaged laminate) onto the resinwet peel ply or plastic sheet.
Lightly flatten ply with brush.
Note:
(h)
Peel ply will not stretch when brushed and becomes transparent when wet
with resin. Peel ply can be worked more aggressively than repair plies.
Mix resin. (Refer to 51-20)
With a clean brush apply a thin coat of mixed resin directly onto the peel ply or plastic
sheet (if peel ply is not being used).
CAUTION:
(f)
When using peel ply, position the peel ply on the outer ply (largest)
only. Never bond repair plies to peel ply. If plies are bonded on top of
peel ply, the repair will not develop full strength.
Allow time for resin to wick through the ply from below. With the brush, work
air bubbles to the edge of the ply. Stipple (tap the ply) with the end of the
brush. Brushing will pull and distort the ply.
If necessary, add resin to saturate dry areas. When ply is saturated and air bubbles have
been removed, coat the ply with a thin layer of resin.
51-20
13773-001
30 Nov 2000
(i)
(j)
(k)
Lay-up all remaining repair plies (largest to smallest) using the previous steps as guidelines. The remaining repair plies must be staggered from largest to smallest. Each repair
ply must have an even amount of overlap around all edges of the previously installed
repair ply.
Place the second sheet of plastic directly over the stacked and evenly centered repair
plies.
Work out trapped air bubbles and excess resin out from between the plastic sheets with a
squeegee.
Note:
(l)
(m)
(n)
The plastic sheets stabilize the materials, preventing distortion.
Wipe up excess resin.
Carefully peel the second sheet away from the last repair ply laid-up on the stack (smallest
repair ply, but first repair ply placed onto the damaged laminate).
Apply a thin coat of mixed resin onto the previously prepared damaged laminate.
CAUTION:
(o)
(p)
(q)
(r)
(s)
(t)
Center each ply over the damage. Each ply must have half of the total overlap on all sides of the damaged area or over the previous repair ply. The first
repair ply must be 0.5 inch to 1.0 inch larger than the damaged area. Each
additional repair ply must be 0.5 inch to 1.0 inch larger than the previous
repair ply. Place each repair ply in the same direction as the original plies
were positioned. Every other repair ply must have the directional fiber orientation staggered to prevent the repair from warping.
Turn all of the stacked-up plies over together and immediately place all plies over center of
damage.
Carefully peel plastic sheet away from the outer repair ply (largest).
Ensure that each repair ply has an even amount of overlap around all edges of the damaged area and the previously installed repair ply.
Work trapped air bubbles and excess resin out to the edge of the repair and wipe up
excess resin. Ensure that each repair ply has an even amount of overlap around all edges
of the damaged area and the previously installed repair ply.
Lay-up peel ply if required.
Fully cure repair. (Refer to 51-20)
E. Backing Plate
Backing plates are used to repair laminated composites that have puncture damage. The backing
plate can be bonded to the inner or outer surface of the repair area. The backing plate bridges the hole
left by the removal of damaged laminate. Backing plates are constructed from the same material used
for repairing the laminate.
(1)
Backing Plate Construction
Manufacture a backing plate to bridge the puncture using Hexcel glass-fiber cloth and Shell
Epon 862/heloxy 68 & Teta 3234 resin system (Type 2 Class 1).
CAUTION:
13773-001
30 Nov 2000
Do not use the MGS L418/418 resin system for manufacturing backing plates.
The aforementioned resin system will not cure at room temperature to a condition
suitable for handling or processing in any manner. At room temperatures this resin
system will only reach an early stage of cure and will be very brittle and easy to
irreparably damage. Do not bend, twist, pull, or push the laminate prior to initialcure.
51-20
Page 7
Note:
(a)
Always manufacture backing plate on a surface with shape similar to the damaged area. Backing plate shall be approximately one inch larger (0.5" overlap on
each side) than diameter of puncture if the backing plate is being bonded to backside of puncture.
Acquire necessary tools, equipment, and supplies.
Description
(b)
(f)
Page 8
Purpose
Used only for manufacturing backing
plates and for
repairing Nonstructural areas
Glass Fiber Cloth
7781-F16
Hexcel
Manufacture backing plates and laminate repair
Devcon Epoxy
5 Minute
Devcon
Bond backing plate
to damaged inner
laminate
Clecos or Small Screws
N/A
Any Source
Secure backing
plate into position
Cover the selected area with release film and work out all wrinkles.
The release film will protect the underlying surface and will separate easily
after the part is fully cured.
Cut glass-fiber cloth for backing plate. Number of plies required is dependent on the size
of the hole. Fiber orientation is not important. However, finished backing plate may warp if
laminate is unbalanced.
Note:
(d)
(e)
Supplier
Non-structural Resin Repair Shell Epon
Shell Oil
System (Type 2, Class 1)
862/heloxy 68
& Teta 3234
Note:
(c)
P/N or Spec.
Minor warping is caused from improper fiber orientation. Minor warping is
not a concern when manufacturing backing plates. Because backing plates
are generally thin and flexible, they can be forced to the correct contour
when necessary.
Cut two pieces of peel ply one-inch larger than the desired backing plate dimension.
Mix resin (Shell Epon 862/heloxy 68 & Teta 3234, Type 2 Class 1) per manufactures
instructions.
Laminate plies on selected area and perform initial cure per standard procedure to create
backing plate. (Refer to 51-20)
51-20
13773-001
30 Nov 2000
CAUTION:
Ensure that size and shape of backing plate will not interfere with internal
structure or other systems.
Backing plate shall be approximately one-inch larger (0.5" overlap on each
side) than diameter of puncture if the backing plate is being bonded to backside of puncture. If impossible to bond backing plate to backside of puncture, the backing plate must be sanded to form a scarf joint with a maximum
overlap of 0.25-inch before installing the backing plate on the topside of the
puncture.
Note:
If impossible to bond backing plate to backside of puncture, the following
must be performed prior to installing backing plate to topside of puncture.
1
(2)
Sand the trimmed backing plate and the punctured laminate to form a scarf joint.
Backing plate should be flush or slightly recessed to the surrounding laminate when
placed on topside of puncture.
2
Trim the backing plate to a maximum overlap of 0.25-inch. Taper the edge to match
the taper on the laminate.
(g) Remove peel ply after backing plate has cured and been trimmed to final size.
Backing Plate Installation
CAUTION:
(a)
Place the backing plate into position. Ensure backing plate will not interfere with any internal structure or other system.
Note:
(b)
(c)
(d)
Backside of laminate and edge of backing plate must be prepared for bonding
before installing the backing plate.
Remove the peel ply from backing plate (if present).
Sand, remove loose debris with vacuum or clean compressed air, and solvent clean with
isopropyl alcohol. Allow adequate time for solvent to dry. (Refer to 20-30)
Bond backing plate to laminate with Devcon 5 Minute Epoxy.
Note:
(e)
(f)
13773-001
30 Nov 2000
Ensure that size and shape of backing plate will not interfere with internal structure or other systems.
If difficult to manipulate backing plate into place, hold plate in place with
temporary fasteners (tape or hot glue) to attach a temporary handle.
Remove fasteners and sand off any protruding ridges of adhesives.
Grind the taper to a smooth transition between the backing plate and laminate, avoid
grinding the backing plate.
51-20
Page 9
Figure 51-201
Inner Laminate Damage Using Backing Plate
Page 10
51-20
13773-001
30 Nov 2000
F.
Cutting Reinforcements
(1)
Templates
After the extent of damage is determined and the area is prepared, repair ply templates should
be made. A template is used to assist in cutting the correct shape and size of glass-fabric. A
template should be made for each layer (ply) of composite repair. Clear plastic sheet is commonly used for this purpose, however release film may be used instead of clear plastic.
(a)
(b)
Remove surface coats from the surrounding area of laminate damage. Remove all paint,
primer, and body filler from the perimeter of the damage by hand or by using a multi-action
sander. Expose at least a 1.5-inch to 2.0-inch border of undamaged laminate around the
repair area.
Construct template as follows; tape plastic sheet over damaged area. Draw line on plastic
sheet off-setting the inside edge (first repair ply, smallest) of damage by 1.0-inch minimum. This is the dimension of the first repair ply.
Note:
The first template manufactured must be a minimum of 1.0-inch larger than
the damage. Each remaining template must be 0.5-inch to 1.0-inch larger
than the previous template.
(c)
(2)
Tape a new plastic sheet over the previous plastic sheet and draw a line (larger in radius)
off-setting the previous line drawn by 0.5-inch to 1.0-inch on the new plastic sheet (first
repair ply, smallest). This is the dimension of the next repair ply. Repeat this step on a new
plastic sheet for each subsequent repair ply.
(d) Determine fiber orientation for each ply. Label template with fiber orientation (0° or 45°).
(Refer to 51-20), (See Figure 51-202) Repeat this step for each repair ply.
(e) Properly orientate and cut glass-fabric to the same dimension and direction as traced onto
each plastic sheet.
Cutting Repair Plies
Glass-fiber cloth can be cut with clean sharp scissors or razor knife. Dull tools will catch and pull
fibers, distorting the fabric. The cloth is very drapable, it is easy to pull out of shape during cutting and handling. Exercise caution when cutting and handling the glass-fiber cloth to maintain
fiber orientation. Clean all tools with solvent and dry thoroughly before using.
CAUTION:
Never handle glass-fabric materials with bare hands, use clean cotton or rubber
gloves. If fabric becomes contaminated from oily hands or any other source, the
fabric must be discarded. Because contaminated fabric will not bond properly.
Always store glass-fabric materials in clean and sealed containers. Keep glassfabric out of direct sunlight.
It is difficult to determine the fiber orientation of a piece of cloth once the factory
edge has been removed. If the factory edge is unknown the fabric must be discarded. Using fabric without knowing the ply orientation can cause a weak repair.
Position template in the required orientation. Hold template against the fabric
when cutting. This will reduce the chance of distorting the material. The template
should be kept with the repair ply.
(a)
(b)
13773-001
30 Nov 2000
Position the glass-fiber cloth on a contaminate free cutting surface.
Orientate each template onto the cloth. Cut cloth around template with a sharp, contaminate free tool. Keep each template and repair ply properly orientated.
51-20
Page 11
G. Ply Orientation
Each ply has a fiber orientation. Fiber orientation, is the direction that the 0° axis fibers point. The
glass-fabric used for repair in this airplane is Hexcel 7781-F16 fabric (the number 7781-F16 denotes
the weave style and the fiber type). For repair purposes, 7781 is considered a balanced cloth, meaning
that approximately 50% of the fibers run parallel to warp, and approximately 50% run perpendicular to
warp. Fibers that run parallel to the edge are the 0° axis fibers. (See Figure 51-202)
Generally, the 0° axis is parallel to the ground and centerline of the fuselage when the aircraft is level.
For example: the main spar in most wings run perpendicular to the 0° axis. Draw the 0° reference line
alongside the damage, position the line so it intersects the center of the damage. This line will be used
for positioning the repair plies.
When cutting a ply, if fiber orientation of a ply is 0°, position the template on the fabric with the 0° reference line parallel with the edge of the cloth. If orientation is 45°, turn the template so the 0° reference
line is at a 45° angle to the cloth edge.
Page 12
51-20
13773-001
30 Nov 2000
Figure 51-202
Fiber Orientation
13773-001
30 Nov 2000
51-20
Page 13
H. Determining Ply Count
Ply count refers to the thickness of unfinished laminate (no surfacer, sealer or paint). To determine ply
count, measure the thickness of the damaged laminate (unpainted) in a relatively undamaged area.
Always verify and compare the measurement taken from the damaged laminate to the following ply
lay-up figures. A three-ply laminate without paint should measure approximately.030 inch.
WARNING:
(a)
Always use twice as many repair plies as the original lay-up in order to assure
that the original strength is achieved.
Remove paint and primer by mechanical abrasion.
Note:
Multi-action orbital type sanders or simple hand-sanding are the preferred
methods of paint removal. Fine-grit paper (120-grit or finer) should be
selected to minimize the potential for accidental damage.
CAUTION:
Never use a grinder for removal of outer surface coats. A grinder will gouge
the surface creating more damage. Chemical strippers should not be used
as they may become trapped, damage the laminate or leave a residue. The
following figures show approximate areas which identify specific items of
repair.
Highly contoured or fine detail areas should always be sanded by hand.
Grinders, air files and other single-action tools tend to intensify pressure at
the edges and will rapidly remove paint and damage the underlying laminate. Mechanical abrasion can also damage a laminate, and may be particularly damaging to certain joint designs (commonly leading edge and
fuselage joints).
(b)
(c)
Using a micrometer, measure the thickness of undamaged and unpainted laminate next to
the area of damaged laminate.
Note the micrometer reading. If the micrometer reads 0.010-inch, the laminate is only one
ply thick.
Note:
Page 14
51-20
A three-ply laminate without paint should measure approximately.030 inch.
13773-001
30 Nov 2000
Figure 51-203
Ply Lay-up (Sheet 1 of 11)
13773-001
30 Nov 2000
51-20
Page 15
Figure 51-203
Ply Lay-up (Sheet 2 of 11)
Page 16
51-20
13773-001
30 Nov 2000
Figure 51-203
Ply Lay-up (Sheet 3 of 11)
13773-001
30 Nov 2000
51-20
Page 17
Figure 51-203
Ply Lay-up (Sheet 4 of 11)
Page 18
51-20
13773-001
30 Nov 2000
Figure 51-203
Ply Lay-up (Sheet 5 of 11)
13773-001
30 Nov 2000
51-20
Page 19
Figure 51-203
Ply Lay-up (Sheet 6 of 11)
Page 20
51-20
13773-001
30 Nov 2000
Figure 51-203
Ply Lay-up (Sheet 7 of 11)
13773-001
30 Nov 2000
51-20
Page 21
Figure 51-203
Ply Lay-up (Sheet 8 of 11)
Page 22
51-20
13773-001
30 Nov 2000
Figure 51-203
Ply Lay-up (Sheet 9 of 11)
13773-001
30 Nov 2000
51-20
Page 23
Figure 51-203
Ply Lay-up (Sheet 10 of 11)
Page 24
51-20
13773-001
30 Nov 2000
Figure 51-203
Ply Lay-up (Sheet 11 of 11)
13773-001
30 Nov 2000
51-20
Page 25
3. MAINTENANCE PRACTICES - COMPOSITE REPAIR PROCEDURES
Always perform repairs in a clean, heated, and well ventilated area with good lighting. Before attempting a
repair make sure all required tools, equipment, and material are ready.
WARNING:
Always use twice as many repair plies as the original lay-up in order to assure that
the original strength is achieved.
CAUTION:
Many tools are needed to perform composite repairs properly. If you don’t have the knowledge on using all repair tools properly, never attempt a composite repair. If proper procedures are not followed, a minor repair can end up becoming an extensive repair.
Never allow hands or other contaminates such as oil to come into contact with the repair surface after solvent cleaning. Never touch glass-fabric or release film with bare hands. The oils
excreted from your body will contaminate the repair, causing it to be substandard. Products
containing uncured silicones (some wax, oils, sealants, etc.) should never be used on a
composite structure. Silicone will contaminate surfaces and is extremely difficult to remove.
Page 26
51-20
13773-001
30 Nov 2000
A. Preparation for Repair
(1)
Acquire necessary tools, equipment, and supplies.
Description
13773-001
30 Nov 2000
P/N or Spec.
Supplier
Purpose
Borescope
6592T12
McMaster-Carr
Inspect damage
Compressed air (Contaminate
free)
N/A
Any Source
General repair
Liquid dish soap
N/A
Any Source
General cleaning
Isopropyl Alcohol
TT-I-735 Grade A Any Source
or B
General cleaning
Orbital Sander
39825A12
McMaster-Carr
Prepare repair surface
Masking Tape
2-inch
Any Source
Limit repair area
Permanent Marker
Sanford Ink Co.
Any Source
Identify repair area
Micrometer
0-1inch
Any Source
Measure laminate
thickness
Release Film
WL5200 (Red or
Blue)
AIRTECH Int’l Inc.
Protect lay-up surface
Peel Ply
Stitch Ply G
AIRTECH Int’l Inc.
Makes a smooth and
contaminate free repair
surface
Glass Repair Fabric
7781-F16
Hexcel
Repair composite
structures
Devcon Epoxy
5 Minute
Devcon
Temporarily hold backing plate
Clecos or Small Screws
N/A
Any Source
Secure backing plate
Plastic Sheet
N/A
Any Source
Make template of
repair ply
Structural Resin Repair System
MGS L418/418
MGS
Bond plies over puncture
Sandpaper
120-grit or finer
Any Source
Paint and primer
removal
Sandpaper
60 to 80-grit garnet or aluminum
oxide
Any Source
Abrade bonding surfaces
Rigid Closed Cell Foam
HT70
Divincell
Stiffen laminate
Aerosil
200
Degussa
Resin filler
Sil-Cell
Sil-32
Silbrico
Resin filler
51-20
Page 27
(2)
(3)
Determine type of damage:
(a) Laminate Only, Minor Core, Major Core, or Sandwich Penetration. (Refer to 51-10)
Expose Damage and Prepare Repair Area
(a) Cover the damaged area with plastic sheet and seal the edges with tape to prevent moisture from penetrating the composite laminate and core.
(b) Clean the area surrounding the damage with hot soapy water. Rinse repair area with clean
water and dry. When dry, remove plastic sheet from damaged area.
Note:
(c)
(d)
Solvent clean the damaged area with isopropyl alcohol and dry with a clean cloth. (Refer
to 20-30)
Mask off the surrounding surfaces to protect them from spilled resin and scratches.
CAUTION:
(e)
(f)
(g)
(i)
Page 28
Never use grease pencils or china markers to mark visible damage. The
surface being repaired will be contaminated from the residue left behind.
Inspect damage, mark out all visible damage. Layout an oval or circular (approximate)
perimeter that includes all observed damage. If possible, examine from the back side.
Mark the 0° axis for reference. This line will be used for positioning the repair plies. (See
Figure 51-204)
Carefully trim away damaged laminate using a small angle grinder, with 80-grit or similar
disk, to taper the edge of the damaged laminate at approximately a 1:50 taper (taper
length is 50 times the thickness of the laminate).
Note:
(h)
Moisten cloth with cleaning solvent. Never pour solvent directly onto laminate, allowing laminate to soak up cleaning solvent.
If ply lay-up information (ply lay-up and ply orientation) is not available,
retain a section of the damaged laminate, this may be used to determine
number of plies and fiber orientation. Mark a reference line on the retained
section to maintain orientation.
Check for separation of laminate from the core. If required, continue to sand back until all
separated laminate is removed. Continue tapering back the laminate until all damage is
removed. Remove paint and primer as required.
Note:
When repairing an inner laminate or a pure laminate section, do not taper
the laminate edge until the backing plate has been attached. If core or inner
laminate requires repair, refer to the section entitled “Repair Techniques”.
(Refer to 51-20)
CAUTION:
Do not use a grinder when repairing an inner laminate or a pure laminate
section, as it will gouge the laminate creating more damage.
Once the extent of damage is determined, remove surface coats (paint, primer, and body
filler) from the surrounding area of damage. This can be done either by hand, or by using
a multi-action sander. Multi-Action orbital type sanders or simple hand-sanding are the
preferred methods of paint removal.
51-20
13773-001
30 Nov 2000
(j)
CAUTION:
Chemical strippers should not be used as they may damage the laminate,
leave a residue or become trapped. Mechanical abrasion can also damage
a laminate, and may be particularly damaging to certain joint designs (wing
leading edge and fuselage joints). Grinders, air files and other single-action
tools tend to intensify pressure at the edges and will rapidly remove paint
and damage the underlying laminate.
Note:
Highly contoured or fine detail areas should always be done by hand. Fine
grit paper (120-grit or finer) should be selected to minimize the potential for
accidental damage.
From the inner border of the damaged area going outward, remove 1.0-inch of surface finish for each ply of laminate in the damaged area. For example: For 2-ply, prepare 2-inches
of sanded border; and for 3-ply prepare 3.0-inches of sanded border, etc.
Note:
(k)
13773-001
30 Nov 2000
Once the paint, primer and any filler are removed, the damage should be
more apparent. On a glass-fiber reinforced laminate, damage will appear
white. If the backside of the laminate is accessible, and it does not have a
solid core, a bright light placed behind will show the damage as a dark or
gray area.
Clean the area with a vacuum and clean compressed air to remove all loose particles and
dust.
51-20
Page 29
Figure 51-204
Repair Patch Orientation
Page 30
51-20
13773-001
30 Nov 2000
B. Repair Techniques
One or more of the following techniques will be used to repair the damage. Expose and prepare the
area as previously described under the section titled “Preparation for Repair”.
WARNING:
(1)
Always use twice as many repair plies as the original lay-up in order to assure
that the original strength is achieved.
Outer Laminate Repair
(a) If required, repair the inner laminate and core. (See Figure 51-205)
(b) Determine ply count and orientation. (Refer to 51-20)
Note:
(c)
(d)
Make a repair template for each ply being repaired. Make one additional template, offset
the outer edge of the taper by 0.75 to 1.0 inch. The additional ply is sacrificial, it covers the
entire repair and protects the repair plies during finishing operations. This ply will be called
the cover ply.
If the core was repaired, lightly sand the cured filler paste to remove ridges, feather the
edges and prepare for bonding. If core section was replaced it may be necessary to sand
it down to the level of surrounding core. Small core gaps can be filled at this time with filler
paste; fill after the core area has been prepared for bonding.
CAUTION:
(e)
(f)
(g)
(j)
(k)
Moisten cloth with cleaning solvent. Never pour solvent directly onto laminate, allowing laminate to soak up cleaning solvent.
Solvent clean bonding surfaces of outer laminate with isopropyl alcohol. (Refer to 20-30)
Use MGS L418/418 resin and lay up repair plies. Transfer plies over center of puncture on
outer laminate.
If required, install lightning protection (expanded metal mesh or EMM) with a 0.20-inch
overlap onto the adjacent EMM strips over the last repair ply installed. The original EMM
must be lightly sanded until it becomes shiny. Clean and shiny EMM will assure good electrical continuity. (Refer to 51-00).
Using 80-grit sand paper or finer, lightly sand the area until the EMM is exposed. Exposed
EMM will have a shiny appearance when sanded. During sanding, periodically clean the
area to ensure that the EMM is not being damaged.
CAUTION:
13773-001
30 Nov 2000
Be careful not to cause separation between core and outer laminate when
sanding the outer laminate to a 50:1.
Sand the edge of the outer laminate to a 50:1 taper using 80-grit sandpaper.
Remove all dust and debris with clean oil free compressed air and a vacuum.
Check for any separation of the laminate to the core. Continue to sand back until all separated laminate is removed.
Note:
(h)
(i)
The first ply is the smallest. The cover ply is always the last and largest ply.
Cut each ply in the required orientation. Keep template and ply together. If
available, cut a section of peel ply large enough to cover the last ply.
Do not continue to sand EMM after it becomes shiny. The EMM is very thin
and can easily be sanded through.
51-20
Page 31
Note:
(l)
(m)
(n)
Page 32
When sanding EMM under antennas, the EMM should be exposed in at
least 70% of the defined area. The defined area is typically the antenna
footprint. The footprint area can be exceeded, but should not be more than
0.5-inch outside the footprint. When sanding EMM under bolts or washers,
the EMM should be exposed in at least 90% of the defined area. Areas
under bolts and washers can be exposed outside the bolt/washer area but
should not exceed twice the diameter area.
Use MGS L418/418 resin and lay up repair plies.
Cure repair plies. (Refer to 51-20)
Continue repair by preparing the surface for primer and paint. (Refer to 51-20)
51-20
13773-001
30 Nov 2000
Figure 51-205
Outer Laminate Damage Only
13773-001
30 Nov 2000
51-20
Page 33
(2)
Minor Core Damage
If the core has sustained only minor damage, it does not require replacement and may be filled
with filler paste. If the core is gouged or dented, fill the indentation with filler paste. Mix filler
paste. (See Figure 51-206), (Refer to 51-20)
Note:
(a)
(b)
Use more filler for vertical or overhead repairs, use less for filling small gaps.
Using a clean spatula or wooden applicator, fill indentation with paste. Paste should be
approximately flush with surrounding core.
Perform Initial-Cure of filler paste, then continue with laminate repair procedures.
Note:
Page 34
51-20
The repair may continue without curing the paste, but care must be taken to
prevent displacing the paste during lamination.
13773-001
30 Nov 2000
Figure 51-206
Minor Core Damage and Outer Laminate Damage
13773-001
30 Nov 2000
51-20
Page 35
(3)
Core Replacement
If the damage penetrated the inner laminate or there is major damage to the core, a core section
will have to be replaced and the integrity of the inner laminate restored. (See Figure 51-207)
(a)
(b)
(c)
(d)
Using a utility knife, carefully cut through the core to the inner laminate.
Cut perpendicular to the outer surface at the inside edge of the damage, do not score the
inner laminate. Remove enough core to expose a border of undamaged inner laminate
approximately 0.5 inch wide for each ply of the repair. A 3-ply damaged laminate would be
trimmed back 1.5 inches.
Sand off residual core from the surface of the inner laminate. Be careful not to cause separation between core and inner laminate during this operation.
Inspect for separation of the inner laminate from the core. Continue to sand back until all
separated laminate is removed.
Note:
(e)
Cut a piece of inner core to fit snugly into damaged area.
Note:
(f)
(g)
Page 36
Moisten cloth with cleaning solvent. Never pour solvent directly onto laminate, allowing laminate to soak up cleaning solvent.
Solvent clean bonding surfaces of outer laminate with isopropyl alcohol. (Refer to 20-30)
Mix filler paste. (Refer to 51-20)
Apply paste to edges and back side of core and a thin layer to the inner laminate surface.
Insert core into damaged area and lightly clamp core into place.
Note:
(l)
(m)
Replacement core can be slightly thicker than required. Replacement core
will be sanded down after bonding in place.
Before bonding in core, sand the inner laminate thoroughly with 80-grit to 120-grit paper.
Remove all dust and debris with clean oil free compressed air and a vacuum.
Note:
(h)
(i)
(j)
(k)
If the inner laminate is damaged, a backing plate will need to be made and
bonded into place and the inner laminate repaired prior to replacing core.
On contoured surfaces it will be necessary to apply enough pressure to
maintain contact between core and inner laminate. Small weights may be
used to apply enough pressure to maintain contact between core and inner
laminate.
Allow resin to fully cure. (Refer to 51-20)
Continue repair by following the Outer Laminate Repair procedures. (Refer to 51-20)
51-20
13773-001
30 Nov 2000
Figure 51-207
Core Replacement and Outer Laminate Repair
13773-001
30 Nov 2000
51-20
Page 37
(4)
Inner Laminate Repair
WARNING:
(a)
If there is a hole in the inner laminate, trim the damaged laminate back until all damaged
laminate is removed.(See Figure 51-201)
Note:
(b)
(c)
(d)
(e)
(f)
(g)
Always use twice as many repair plies as the original lay-up in order to
assure that the original strength is achieved.
If there is a hole in the inner laminate, make and attach a backing plate. If the
inner laminate is cracked or delaminated, but there are no large holes, the repair
plies will be applied over the damage.
If required, manufacture and bond a backing plate into position. (Refer to 51-20)
Make templates for each ply of the repair.
Cut repair plies using templates.
Sand the edge of the inner laminate to a 50:1 taper using 80-grit sandpaper.
Remove all dust and debris with clean oil free compressed air and a vacuum.
Check for any separation of the laminate to the core. Continue to sand back until all separated laminate is removed.
Note:
Never pour cleaning solvent directly onto laminate. Pouring solvent directly
onto a laminate surface will allow the laminate to soak up the solvent.
Moisten cloth with cleaning solvent to prevent the laminate from soaking up
the cleaning solvent.
(h)
(i)
(5)
Solvent clean bonding surfaces of inner laminate with isopropyl alcohol. (Refer to 20-30)
Use MGS L418/418 resin and lay up repair plies. Lay-up plies over center of puncture on
inner laminate.
(j)
Perform full post-cure of repair plies. (Refer to 51-20)
(k)
Continue repair with replacement of core. (Refer to 51-20)
Pure Laminate Repair
WARNING:
Always use twice as many repair plies as the original lay-up in order to
assure that the original strength is achieved.
Pure laminate means there is no core present. Pure laminate, or inner laminate repair is similar
to repairing the outer laminate of a sandwich structure, the difference is, there is no underlying
surface to apply the repair to. A backing plate must first be constructed and attached to close
gaps or holes in the laminate. The backing plate is generally a thin, 2-ply laminate laid-up on a
surface with a contour similar to the repair area. A thin backing plate is flexible enough to conform to minor differences in shape. As soon as the extent of the damage is known, the backing
plate should be constructed.
Page 38
51-20
13773-001
30 Nov 2000
EXTERIOR FINISH
1. DESCRIPTION
This section covers the proper procedures for painting the airplane, as well as procedures for preparing the
exterior surface of the airplane for paint. The following procedures are used for application of surfacer,
filler, sealer, and top coat. The following information must be used when painting the airplane.
2. MAINTENANCE PRACTICES
A. Identification/Markings
WARNING:
Application of Identification/Markings must not cover pitot/static ports, drain
holes or vent holes.
Nationality and registration marks shall be in accordance with Federal Aviation Regulations Part 45
Subpart C - Nationality and Registration Marks.
No striping or contrasting paint scheme is allowed on composite wing surfaces, horizontal stabilizer
surfaces, concave portions of the wing root fairings and the horizontal root fillets, or on the fuselage
above the bottom edge of windows.
Striping or contrasting colors are allowed on all fairings without limitation, except for the concave portions of wing root fairings. Wheel pants, landing gear fairings, and rudder tips may have contrasting
colors covering 100% of their exterior surface. Wing tips and elevator tips may have contrasting colors
covering up to 51% of their exterior surfaces. The vertical stabilizer may have contrasting colors. The
metal control surfaces are not subject to paint scheme or color limitations.
Note:
Fairings include the engine cowl, dorsal fairing and part of the wing root fairings.
On the fuselage, aft of the baggage compartment bulkhead, in addition to registration markings, total
stripe width shall not exceed 51% of fuselage height per side. If stripe width is measured along the
contour, then fuselage height should also be measured along the contour (from top center to bottom
center). If stripe width is measured by horizontal projection, then fuselage height should also be measured by horizontal projection (vertical dimension only, overall local height). On the fuselage, forward
of the baggage compartment bulkhead, stripe width shall not exceed 12 inches per side. Stripe width
shall not exceed 6 inches at fuselage stations where doors are located.
B. Surfacer (High Build Primer)
Surfacer is used to fill minor imperfections, pinholes, and waviness of exterior surfaces. Surfacer is
also used to help paint adhere to the airplane. Surfacer can be applied to primed or un-primed composite surfaces which are properly prepared. (Refer to surfacer manufacture for specific instructions)
WARNING:
13773-001
30 Nov 2000
Aircraft control surface balance is critical to safe flight. If any paint, body filler,
striping, or other material is added to a control surface, the control must be rebalanced. Mask flight control hinge bushings and bearings prior to applying surfacer or paint.
51-30
Page 1
Note:
It is unnecessary to use a straight primer when surfacer (high build primer) is being
used. Always apply the surfacer per manufacturer’s instructions. Usually surfacer will be
applied in three individual coats. It is preferable to use a finishing system (primer, surfacer, sealer, and paint) from one manufacturer for the entire refinishing procedure. If
body filler is applied prior to surfacer, allow filler to fully cure and then apply surfacer.
Surfacer should not exceed 4 mil. over large areas. No more than 5% of the total surface area shall have surfacer thicker than 4 mil. On overlapping areas of repair, surfacer
thickness may be up to 8 mils. Surfacer thickness can be checked by multiplying the
average dried thickness (refer to manufacturer's information for average dried thickness) by the number of coats applied.
(1)
Application of Surfacer
(a)
Acquire necessary tools, equipment, and supplies.
Description
P/N or Spec.
-
Any Source
Limit repair area
Sandpaper
120-grit to 400- Any Source
grit
Abrade bonding
surfaces
Compressed air (contaminate free)
-
Any Source
General repair
PPG Industries, Inc.
Aid paint adhesion
and to fill minor surface imperfections
PPG Industries, Inc.
Surface preparation
Any Source
General cleaning
Surfacer/primer system
Base primer
Hardener
Reducer
Enhancer
K 36
K 201
DT
DX-84
Cleaner
DX 330
Note:
Page 2
When applying surfacer over a repair, inspect the repair to assure that it is
fully cured and has been properly contoured.
Mask off all surfaces that do not require surfacer or where surfacer is not permitted.
CAUTION:
(c)
(d)
(e)
Purpose
Masking tape, 2-inch
Cotton cloth (clean and lint free)
(b)
Supplier
Exercise caution when sanding composite surfaces to prevent sanding into
the laminate. Cover any system that may be contaminated by dust or where
surfacer may cause the system not to operate properly (for example, the
flight control system and the pitot/static system).
Lightly sand the application area for surfacer with 120-grit sandpaper.
Blow surface clean with compressed air.
Solvent clean the application area with DX 330. (Refer to 20-30)
51-30
13773-001
30 Nov 2000
Note:
(f)
(g)
(h)
Wipe surface in one direction only to prevent smearing contaminates. For
maximum results, wipe dry with clean white cloths in one direction only,
while the surface is still wet.
Mix surfacer per manufacturer's instructions, mix thoroughly.
Apply surfacer as recommended by the manufacturer. Allow surfacer to fully cure.
To determine low areas after application of the first surfacer coat, block sand with 120-grit
sandpaper. Once the low areas are located, apply body filler to those areas. (Refer to 5130)
Note:
The low area is defined as the surface in which the sandpaper doesn’t contact the surfacer when block sanded. The aforementioned procedures may
need to be performed more than once in order to remove all remaining
imperfections, pinholes, or waviness.
Minor texture defects can be sanded out using 120-grit sandpaper. If
required, up to three additional coats of surfacer may be applied. Small
imperfections such as minor scratches and pinholes can be filled with spot
putty and sanded out with 320-grit sandpaper.
(i)
(j)
After body filler is fully cured and contoured to the proper shape, blow surface clean with
compressed air.
Solvent clean the application area with DX 330. (Refer to 20-30)
Note:
(k)
After solvent cleaning, inspect application for any cosmetic blemishes and minor surface
defects. If needed, apply spot putty to those areas. (Refer to 51-30)
Note:
(l)
(m)
13773-001
30 Nov 2000
If the surfacer was sanded or spot putty was applied, apply another surfacer
coat to that area.
Dry sand the final surface coat with 320-grit followed by 400-grit wet/dry.
After final sanding, examine the surface for any imperfections. If needed, resurface the
entire part.
Note:
(n)
Wipe surface in one direction only to prevent smearing contaminates. For
maximum results, wipe dry with clean white cloths in one direction only,
while the surface is still wet.
Surface should be free of sags, runs, fisheyes, orange-peel, over-spray and
other defects. After application of the final surfacer coat, the surface should
be as smooth and defect free as practical. The surface is now ready to be
sealed. (Refer to 51-30)
Apply sealer. (Refer to 51-30)
51-30
Page 3
C. Fillers
Body filler and spot putty are two types of fillers used for repairing cosmetic blemishes and minor surface defects. Body filler is primarily used for repairing small dents and to fill large surface imperfections
and gaps at seams or bond joints. Spot putty is used to fill minute cosmetic defects such as pits and
minor scratches.
WARNING:
Aircraft control surface balance is critical to safe flight. If any paint, body filler,
striping, or other material is added to a control surface, the control must be rebalanced. Mask flight control hinge bushings and bearings prior to applying surfacer or paint.
Note:
Over large areas, body filler thickness shall not exceed 0.13 inch (3.3 mm). No more
than 15% of the surface may be covered with body filler and no more than 5% of the surface area shall have filler thicker than 0.10 inch (2.5 mm). Body filler thickness in small
local areas (less the 10 square inches) or at seams and joints may exceed maximum
filler thickness. Filler thickness can be verified by inserting the pointed end of a toothpick
into uncured filler. (Refer to 51-30, Filler Thickness)
Body filler can be applied to primed or un-primed composite surfaces that are contaminate free. Areas that will receive body filler should be scuffed with 80-grit to 120-grit
sand paper or similar abrasive to improve adhesion.
It is preferable to use a finishing system (primer, surfacer, sealer, and paint) from one
manufacturer for the entire refinishing procedure.
(1)
Application of Body Filler
(a)
Acquire necessary tools, equipment, and supplies.
Description
P/N or Spec.
36-grit to 320- Any Source
grit
Abrade bonding
surfaces
Compressed air (contaminate free)
-
Any Source
General repair
Spot-Lite, Light Weight
BodyFiller
100445
Fibre Glass - Evercoat Repair blemishes
Co.
Cleaner
DX 330
PPG Industries, Inc.
Surface preparation
Any Source
General cleaning
Mask off all surfaces that do not require filling or where filler is not permitted.
CAUTION:
Page 4
Purpose
Sandpaper
Cotton cloth (clean and lint free)
(b)
Supplier
51-30
Exercise caution when sanding composite surfaces to prevent sanding
through the existing surfacer coats or into the laminate. Never apply body
filler over a known or suspected area of damage. Cover any system that
may be contaminated by dust or where extraneous filler may cause the system not to operate properly (for example, the flight control system and the
pitot/static system).
13773-001
30 Nov 2000
(c)
(d)
(e)
Sand area with 80-grit to 120-grit sandpaper.
Blow surface clean with compressed air.
Solvent clean the application area with DX 330. (Refer to 20-30)
Note:
(f)
(g)
(h)
(i)
Mix body filler thoroughly per manufacturer's instructions.
Apply body filler with a clean applicator according to the manufacturer's instructions.
When the body filler is cured, rough out shape with 36-grit sandpaper. When the shape is
approximately correct, switch to 80-grit sandpaper for final shaping.
Sand the area with 120-grit sandpaper and then switch to 320-grit sandpaper to remove
all sanding scratches.
CAUTION:
(j)
(k)
(l)
(n)
(o)
(p)
13773-001
30 Nov 2000
Wipe surface in one direction only to prevent smearing contaminates. For
maximum results, wipe dry with clean white cloths in one direction only,
while the surface is still wet.
If needed, apply spot putty to fill all minute scratches or cosmetic defects. Apply spot putty
with a clean applicator according to manufacture’s instructions. (Refer to 51-30)
When the spot putty has cured, lightly sand the surface with 120-grit sandpaper to assure
a smooth and defect free surface.
Blow surface clean with compressed air.
Solvent clean the application area with DX 330. (Refer to 20-30)
Note:
(q)
Remove excess body filler from access holes, flanges, systems, etc. Make
certain all drain holes and systems are clear of filler.
Remove all excess body filler.
Blow surface clean with compressed air.
Solvent clean the application area with DX 330. (Refer to 20-30)
Note:
(m)
Wipe surface in one direction only to prevent smearing contaminates. For
maximum results, wipe dry with clean white cloths in one direction only,
while the surface is still wet. If body filler is applied prior to surfacer, allow
filler to fully cure and apply surfacer coat. (Refer to 51-30)
Wipe surface in one direction only to prevent smearing contaminates. For
maximum results, wipe dry with clean white cloths in one direction only,
while the surface is still wet.
Apply surfacer. (Refer to 51-30)
51-30
Page 5
(2)
Application of Spot Putty
After the repair area has been filled with body filler (if required) and/or coated with surfacer,
apply a thin layer of spot putty to fill all minute cosmetic defects and/or minor scratches.
(a)
Acquire necessary tools, equipment, and supplies.
Description
P/N or Spec.
DX 330
PPG Industries, Inc.
Surface preparation
Sandpaper
400-grit
Any Source
Abrade bonding
surfaces
Compressed air (contaminate free)
-
Any Source
General repair
Spot Putty (Glaze Coat)
-
Fibre Glass - Evercoat Fill minor scratches
Co.
and imperfections
Page 6
Wipe surface in one direction only to prevent smearing contaminates. For
maximum results, wipe dry with clean white cloths in one direction only,
while the surface is still wet.
Remove excess body filler from access holes, flanges, systems, etc. Make
certain all drain holes and systems are clear of filler.
Blow surface clean with compressed air.
Solvent clean the application area with DX 330. (Refer to 20-30)
Note:
(h)
General cleaning
Apply spot putty with a clean applicator as per manufacture’s instructions.
When the spot putty has cured, lightly sand the surface with 400-grit sandpaper to assure
a smooth and defect free surface.
CAUTION:
(f)
(g)
Any Source
Blow surface clean with compressed air.
Solvent clean the application area with DX 330. (Refer to 20-30)
Note:
(d)
(e)
Purpose
Cleaner
Cotton cloth (clean and lint free)
(b)
(c)
Supplier
Wipe surface in one direction only to prevent smearing contaminates. For
maximum results, wipe dry with clean white cloths in one direction only,
while the surface is still wet.
Apply the final coat of surfacer. (Refer to 51-30)
51-30
13773-001
30 Nov 2000
(3)
Filler Thickness Inspection
Filler thickness is verified by inserting the pointed end of the toothpick into uncured filler. The wet
portion of the toothpick is then measured with a vernier caliper. The wet portion of the toothpick
is referred to as the filler thickness.
Note:
(a)
If multiple layers of filler are used, each layer must be measured. Add the
thickness of each layer together for total filler thickness. Over large areas,
body filler thickness shall not exceed 0.13 inch (3.3 mm) No more than 15%
of the surface may be covered with body filler and no more than 5% of the
surface area shall have filler thicker than 0.10 inch (2.5 mm). Body filler
thickness in small local areas (less the 10 square inches) or at seams and
joints may exceed maximum filler thickness.
Acquire necessary tools, equipment, and supplies.
Description
(b)
(c)
Supplier
Purpose
Vernier caliper, 6-inch
-
Any Source
Check filler thickness
Toothpick
-
Any Source
Check filler thickness
Push toothpick into uncured body filler until toothpick comes to rest against laminate.
Measure wet portion of toothpick (body filler depth) using a vernier caliper.
Note:
(d)
P/N or Spec.
If body filler thickness exceeds the aforementioned specification, remove
body filler and repair the area with the proper composite repair procedures.
(Refer to 51-20)
Fill inspection hole with body filler. Allow body filler to fully cure.
D. Sealer
Sealer prevents moisture from effecting the fillers and staining of the topcoat from chemicals released
by the fillers. Sealers should be applied over the final surfacer coat.
(1)
13773-001
30 Nov 2000
Application of Sealer
WARNING:
Aircraft control surface balance is critical to safe flight. If any paint, body
filler, striping, or other material is added to a control surface, the control
must be re-balanced. Mask flight control hinge bushings and bearings prior
to applying surfacer or paint.
CAUTION:
Cover any system that may be contaminated by sealer or where extraneous
sealer may cause the system not to operate properly (for example, the flight control system and the pitot/static system).
Note:
When sealer is dry, top coat (paint) as soon as practical. It is not necessary to
abrade sealer prior to application of top coat as long as it is applied within the time
limit specified by the manufacturer.
51-30
Page 7
(a)
Acquire necessary tools, equipment, and supplies.
Description
(b)
(d)
(e)
(h)
Purpose
DX 330
PPG Industries, Inc.
Surface preparation
Sandpaper
400-grit
Any Source
Abrade bonding
surfaces
Compressed air (contaminate free)
-
Any Source
General repair
Cotton cloth (clean and lint free)
Any Source
General cleaning
Epoxy Primer/Sealer
DP 40
Epoxy Primer Catalyst
DP 401
Fast Epoxy Primer Catalyst DP 402
PPG Industries, Inc.
Seal surfacer
Mask off all surfaces that do not require sealer or where sealer is not permitted.
Never sand through existing primer coats. Sand and feather out any small
surface defects in the surfacer coat with 400-grit sandpaper.
If required, lightly sand the surfacer with 400-grit sandpaper. (Refer to the surfacer and
sealer drying time limits specified by the manufacturer)
If required, blow surface clean with compressed air.
Solvent clean the application area with DX 330. (Refer to 20-30)
Note:
(f)
(g)
Supplier
Cleaner
Note:
(c)
P/N or Spec.
Wipe surface in one direction only to prevent smearing contaminates. For
maximum results, wipe dry with clean white cloths in one direction only,
while the surface is still wet.
Thoroughly mix sealer in accordance with manufacturer's instructions.
Apply one coat of sealer to the entire surface per the manufacturer's instructions. Refer to
the manufacturer's information for cure time.
Apply top coat (paint). (Refer to 51-30)
E. Paint
To ensure that the temperature of the composite structure is kept below 150°F (65.5°C), use only the
approved materials specified in this section and in the approved materials figure at the beginning of
this chapter. (Refer to 51-00)
WARNING:
Page 8
Aircraft control surface balance is critical to safe flight. If any paint, body filler,
striping, or other material is added to a control surface, the control must be rebalanced. Mask flight control hinge bushings and bearings prior to applying surfacer or paint.
51-30
13773-001
30 Nov 2000
CAUTION:
Cover any system that may be contaminated by paint or where extraneous paint may
cause the system not to operate properly (for example, the flight control system and the
pitot/static system). Mask bearings on lower vertical stabilizer hinge (rudder), aileron
hinges, rod end bearings on flap actuation link, and rod end on aileron actuation arm.
Mask off push-pull tube for rudder actuation.
Do not paint plastic cap access panels on empennage. Do not plug the dorsal fairing
drain hole, outside air temperature (OAT) probe, static ports or pitot tube with paint or
filler. Holes must be open after aircraft is finished. Do not paint over placard or data
plate. Do not paint the outside air temperature (OAT) probe, static ports, antennas, interior surfaces of access panels, sealant region between window and door skin, pitot tube
or the flexible plastic fairing on nose landing gear slot.
Note:
It is not necessary to abrade sealer prior to application of top coat as long as it is applied
within the time limit specified by the manufacturer.
Avoid applying materials from one manufacturer over that of another. It is preferable to
use a finishing system (primer, surfacer, sealer, and paint) from one manufacturer for the
entire refinishing procedure.
(1)
Pre-painting Instructions
The following items are examples of components that should be painted off of the airplane: wing
tip fairings, landing gear fairings, upper engine cowling, lower engine cowling, oil access door,
and lower engine cowling access panel.
WARNING:
Never apply chemical paint stripper on composite surfaces.
Note:
All access panels (excluding the fuel system access panels) should be painted off
of the airplane. Paint flap, aileron, rudder, and elevator hinges on the aircraft.
Rudder and elevator cove areas should be painted with hinges in place. Flap and
aileron coves can also be painted. Mask flight control hinge bushings and bearings prior to applying surfacer or paint.
(a)
(b)
(c)
(d)
Solvent clean the application area with DX 330. (Refer to 20-30)
Repair all composite surfaces as required. (Refer to 51-20)
Prepare the surface for paint by applying surfacer, filler, and sealer as required. (Refer to
51-30)
Acquire necessary tools, equipment, and supplies.
Description
Masking tape
P/N or Spec.
2-inch
Cotton cloth (clean and lint free)
WARNING:
13773-001
30 Nov 2000
Supplier
Purpose
Any Source
Limit repair area
Any Source
General cleaning
Do not remove fuel system access panels. These should be painted on
the aircraft. The fuel access panels are located on the lower wing surface. Both of the two inboard fuel access panels both have drain fittings mounted on them. Never allow paint to get in between the
collector tank drain valves and the collector tank access panels.
51-30
Page 9
(e)
(f)
(g)
(h)
(i)
(j)
Remove all exterior access panels except for the fuel system access panels.
Remove wing tip fairings and landing gear fairings. (Refer to 57-20), (Refer to 32-10)
Remove anti-collision strobe light assemblies from wing tip fairings. (Refer to 33-40)
Remove upper and lower engine cowlings. (Refer to 71-10)
Remove lower engine cowling access panel.
Remove oil access door.
Note:
(k)
(l)
(m)
(n)
Remove VOR antenna wicks and rubber grommets.
Remove baggage door. Remove interior trim from baggage door. (Refer to 52-30)
Remove cabin doors. Remove interior trim from cabin doors. (Refer to 52-10)
Mask off the exterior surface of the windows, extending mask area to the door skin edge.
Note:
(o)
(p)
(r)
(s)
(t)
(u)
(v)
(w)
Do not paint plastic door jamb pin receivers.
Mask off cabin door handle and exterior exposed parts that rotate with the handle. Mask
off or remove door locks.
Note:
Page 10
Mask off only the part of the camlock that moves.
Mask off latch and hinge area on the lower engine cowling access panel and the oil
access door.
Mask off airplane data plate on empennage.
Mask bearings on lower vertical stabilizer hinge (rudder), aileron hinges, rod end bearings
on flap actuation link, and rod end on aileron actuation arm.
Mask off push-pull tube for rudder actuation.
Mask off landing gear, engine, propeller/spinner, access panel flanges, and the threads of
the VOR antenna.
Mask off openings of doors at the inner mating surface.
Mask off door pins (stainless) and plastic door jamb pin receivers.
Note:
(x)
Do not paint sealant region between window and door skin.
Mask off the outside air temperature (OAT) probe, tiedowns, fuel vents, fuel caps, static
ports, antennas, interior surfaces of access panels, sealant region between window and
door skin, flexible plastic fairing on nose landing gear slot, and pitot tube.
Mask off oil access door latches and camlocks.
Note:
(q)
Only paint the exterior surface of the oil access door.
51-30
Mask off all surfaces that do not require top coat or where top coat is not
permitted.
13773-001
30 Nov 2000
(2)
Application of Paint
Note:
Paint can be applied over the sealer if applied within the time frame set by the
manufacturer.
If set time of the sealer is unknown, beyond the manufacturer allowed limit, or if
the surface required rework, the surface must be sanded with 400-grit wet/dry
sandpaper and solvent cleaned with DX 330 prior to top coating.
As an alternative to wet-sanding, the entire surface may be abraded with a fine
grade of Scotchbrite. Scotchbrite will not flatten the surface, only remove gloss.
Wet sand if the surface requires flattening.
Over large areas, the top coat should not exceed 4-mil. No more than 5% of the
total surface area shall have top coat thicker than 4-mil. Top Coat thickness is verified by multiplying the average dried thickness by the number of coats applied.
See manufacturer's information for average dried thickness.
(a)
Acquire necessary tools, equipment, and supplies.
Description
(b)
(c)
(d)
(f)
13773-001
31 July 2001
Supplier
Purpose
Tack cloth
-
Any Source
Remove contaminates
Cleaner
DX 330
PPG Industries, Inc.
Surface preparation
Masking tape
2-inch
Any Source
Limit repair area
Sandpaper
80-grit to 400- Any Source
grit
Abrade bonding
surfaces
Compressed air (contaminate free)
-
General repair
Polyurethane paint
Refer to 51-00 PPG Industries, Inc. or Seal repair and
Sherwin Williams
provide smooth
exterior finish
Any Source
If required, wet-sand entire surface to be top coated with 400-grit wet/dry sandpaper. Dry
thoroughly after wet sanding.
Mask off all surfaces that do not require top coat or where top coat is not permitted. (Refer
to 51-30)
Solvent clean the application area with DX 330. (Refer to 20-30)
Note:
(e)
P/N or Spec.
Wipe surface in one direction only to prevent smearing contaminates. For
maximum results, wipe dry with clean white cloths in one direction only,
while the surface is still wet.
Visually inspect prepared surface for imperfections prior to application of top coat. Rework
and solvent clean any damaged or defective areas prior to further operations. (Refer to 2030)
Wipe the entire area to be painted with a tack cloth.
51-30
Page 11
(3)
(g) Mix and apply top coat per manufacturer's instructions. Allow to fully cure.
Post Painting Instructions
The following components should be installed back onto the airplane: oil access door, lower
engine cowling access panel, upper engine cowling, lower engine cowling, wing tip fairings,
antenna components, and landing gear fairings.
(a)
Remove masking tape within the paint manufacture’s specified removal time.
CAUTION:
(b)
(c)
(d)
(e)
(f)
(g)
(h)
(i)
(j)
Install all exterior access panels. (Refer to 6-00)
Install anti-collision strobe light assemblies to the wing tip fairings. (Refer to 33-40)
Install wing tip fairings and landing gear fairings. (Refer to 57-20), (Refer to 32-10)
Install lower engine cowling access panel.
Install oil access door.
Install upper and lower engine cowlings. (Refer to 71-10)
Install VOR antenna wicks and rubber grommets.
Install interior trim onto baggage door. Install baggage door. (Refer to 52-30)
Install interior trim onto cabin doors. Install cabin doors. (Refer to 52-10)
Note:
(k)
(l)
(m)
(n)
Page 12
All masking tape must be removed from doors, door locks, cabin door handle, door pins (stainless), plastic door jamb pin receivers, landing gear,
engine, propeller/spinner, access panel flanges, threads of VOR antenna,
rudder actuation push-pull tube, bearings on lower vertical stabilizer hinge
(rudder), aileron hinges, rod end bearings on flap actuation link, rod end on
aileron actuation arm, data plate, camlocks, hinges, lower engine cowling
access panel, oil access door, outside air temperature (OAT) probe, fuel
vents, fuel caps, static ports, interior surfaces of access panels, sealant
region between window and door skin, flexible plastic fairing on nose landing gear slot, pitot tube, exterior surface of the windows, and all antennas.
Make sure all masking tape and alike has been removed from the airplane
and its components.
Apply all placards. (Refer to 11-00)
Balance flight controls. (Refer to 55-00)
Verify all flight controls for proper operation.
Verify all electronics for proper operation.
51-30
13773-001
30 Nov 2000
CHAPTER
DOORS
CHAPTER 52 - DOORS
LIST OF EFFECTIVE PAGES
Chapter/Section
Page
Date
52-LOEP
1
30 NOV 2000
52-TOC
1
30 NOV 2000
52-00
1
30 NOV 2000
52-10
1
30 NOV 2000
52-10
2
30 NOV 2000
52-10
3
30 NOV 2000
52-10
4
30 NOV 2000
52-10
5
30 NOV 2000
52-10
6
30 NOV 2000
52-10
7
30 NOV 2000
52-10
8
30 NOV 2000
52-10
9
30 NOV 2000
52-30
1
30 NOV 2000
52-30
2
30 NOV 2000
13773-001
30 Nov 2000
52-LOEP
Page 1
CHAPTER 52 - DOORS
TABLE OF CONTENTS
Subject
DOORS
Chapter/Section
Page
52-00
General
PASSENGER AND CREW DOORS
1
52-10
Description and Operation
1
Maintenance Practices
2
Cabin Doors
Removal - Cabin Door
Installation - Cabin Doors
Removal - Cabin Door Latching Mechanism
Installation - Cabin Door Latching Mechanism
Adjustment - Cabin Door Latching Mechanism
Removal - Pin Receiver
Installation - Pin Receiver
Removal - Door Seals
Installation - Door Seals
Cleaning - Cabin Door Seals
BAGGAGE DOOR
2
2
2
4
4
7
9
9
9
9
9
52-30
Description and Operation
1
Maintenance Practices
1
Baggage Door
Removal - Baggage Door
Installation - Baggage Door
Removal - Baggage Door Lock and Latch Assemblies
Installation - Baggage Door Latching Mechanism
Baggage Door Seal
13773-001
30 Nov 2000
1
1
1
1
1
1
52-TOC
Page 1
DOORS
1. GENERAL
Two forward hinged doors on both sides of the fuselage allow cabin ingress and egress. Latching pins at
the rear of each door are engaged by a door handle. A gas strut provides assistance opening, and holding,
the door open. Front seat armrests are integral with the doors' interior. A baggage door is located on the
left side of the airplane behind the rear seat. Occupants exit rearward off of the wing via a step.
13773-001
30 Nov 2000
52-00
Page 1
52-10PASSENGER AND CREW DOORS
PASSENGER AND CREW DOORS
1. DESCRIPTION AND OPERATION
The two crew/passenger doors incorporate a flush-mount outside door handle, key-operated door lock,
and a conventional inside door handle. The door latch handle is centered under the window. Latching pins
at the rear of each door are engaged by that door’s handle. To open either door from outside the airplane;
push in on the forward end handle to release the handle from the flush mount position, rotate handle down
and forward to the OPEN position, and the gas strut will then automatically assist in raising the door to the
full up position. To close the door from inside of the airplane, pull the door shut and rotate handle to the
CLOSED position. When handle is rotated to the CLOSED position, a detent holds the handle in the correct position. To close the doors from outside of the airplane, close the door with the interior handle in the
unlatched position and then latch the door by rotating the outside door handle up and forward to the
CLOSED position.
Rotating the door handle either inserts or retracts two round pins into or out of receivers on the aft door
jamb. The round pins operate by push-pull cable and linkage. The handle mechanism is designed to allow
the inside handle to operate while the outside handle stays nestled into a depression, yet the outside handle will twist the inside door handle to the open or closed position. A detent pin, which is a roller follower on
the handle actuator disk, holds the handle assembly in the fully latched, and the open, positions. The
inside door handle in the closed position is nestled into the armrest, and in the unlatched position, juts up
into the crew's forearm. The mechanism has a spring detent which requires a deliberate effort to overcome. This is the only locking mechanism on the inside.
The external security lock doesn’t hinder egress from within. Their function is only to disable the external
handle by holding it in it's recess. At least one of the two doors is unlocked anytime the airplane is occupied, for it must be unlocked to enter, and it cannot be locked from inside.
To lock crew/passenger entry doors when leaving the airplane, insert the key into the lock and rotate
accordingly. To enter the airplane through either crew entry door, unlock the door handle using a key, and
rotate exterior door handle to the open position. The gas strut will automatically raise the door to the full up
position. Front seat armrests are integral with the doors’ interior.
13773-001
30 Nov 2000
52-10
Page 1
2. MAINTENANCE PRACTICES
A. Cabin Doors
(1)
Removal - Cabin Door
(a) Remove locking cap from inboard end of gas strut. Remove gas strut from fuselage
mounting bracket.
(b) Remove glareshield trim and lower windshield trim to allow access to the lower door hinge
retaining screw. (Refer to 25-10)
CAUTION:
The lower door hinge retaining screw only needs to be loosened to accomplish door removal. Removal of the lower door hinge screw is not recommended for door removal. The door must be almost fully closed to allow
easy removal.
(c)
(d)
(2)
Page 2
Cut the safety wire used to secure the lower door hinge screw to the safety wire tab.
Loosen the lower door hinge screw just enough (approximately five turns counterclockwise) to allow lower door hinge to become dislodged from its mount.
(e) Slide door up and off of the upper door hinge pivot pin.
Installation - Cabin Doors
(a) Slide upper door hinge over the upper door hinge pivot pin.
(b) Place the lower door hinge into position and secure the hinge and door by tightening the
lower door hinge retaining screw, washer, and spacer.
(c)
Install the glareshield trim and the lower windshield trim.
(d) Snap the gas strut to the fuselage bracket and install the locking cap.
52-10
13773-001
30 Nov 2000
Figure 52-101
Crew Door Mounts
13773-001
30 Nov 2000
52-10
Page 3
(3)
Removal - Cabin Door Latching Mechanism
Note:
The external handle can be removed by just removing the roll pin from the
interior handle shaft. Always use the correct size pin punch when removing
roll pins.
(a)
(b)
(c)
(4)
Remove the screw and washer securing the interior handle to the interior handle shaft.
Remove door panel screws.
Remove inner door panel by gently pulling it away from the door, allowing hook and loop
fasteners to separate.
(d) Remove nuts and washers from spring return bracket, remove spring return bracket.
(e) Remove roll pin from interior handle shaft.
(f)
Remove screws and washers securing span bracket to the door, remove span bracket.
(g) Disconnect the yoke rod ends from the actuation disk by removing each cotter key and
washers from each clevis pin.
(h) Remove roll pin securing main shaft to the actuation disk.
(i)
Remove the external handle from the cabin door main shaft.
(j)
Remove interior actuator disk.
Installation - Cabin Door Latching Mechanism
Note:
(a)
(b)
(c)
(d)
(e)
(f)
(g)
(h)
(i)
Page 4
Lubricate all moving cabin door latch mechanisms with a dry film lubricant
such as silicone spray.
Install the interior actuator disk.
Install the external handle to the cabin door main shaft.
Secure main shaft to actuation disk with roll pin.
Secure the yoke rod ends to the actuation disk by installing a cotter key and washers to
each clevis pin.
Secure span bracket to door with screws and washers.
Install interior handle shaft roll pin.
Secure spring return bracket with washers and nuts.
Secure the inner door panel with screws.
Secure the interior handle to the interior handle shaft with a screw and washer.
52-10
13773-001
30 Nov 2000
Figure 52-102
Cabin Door Latch Hardware (Sheet 1 of 2)
13773-001
30 Nov 2000
52-10
Page 5
Figure 52-102
Cabin Door Latch Hardware (Sheet 2 of 2)
Page 6
52-10
13773-001
30 Nov 2000
(5)
Adjustment - Cabin Door Latching Mechanism
(a) Open the cabin door and hold the cabin door handle in the full open position (keeping
pressure on the compression springs).
(b) Inspect and measure the clearance between both door pins and receivers using a feeler
gage.
Note:
(c)
(d)
(e)
(f)
13773-001
30 Nov 2000
The door pin and receiver clearance should be between 0.0 to 0.05-inch. If
the pins need adjusting, proceed with the following steps.
Remove door trim panel. (Refer to 25-10)
Remove the appropriate rod end and turn the rod end in the corresponding direction.
Repeat the above procedures as required until the specified clearance is obtained.
Secure door trim. (Refer to 25-10)
52-10
Page 7
Figure 52-103
Cabin Door Adjustment Points
Page 8
52-10
13773-001
30 Nov 2000
(6)
Removal - Pin Receiver
The pin receiver has four wear surfaces available. The pin receiver can be rotated to the new
wear surface and then resealed with a white latex caulk.
Note:
(7)
An alternate pin receiver is available. The alternate pin receiver has the receiver
hole offset to one side. This offset pin receiver can be used if it’s impossible to
latch the door with the standard pin receiver.
(a) Remove the cabin headliner. (Refer to 25-10)
(b) Remove the screw, washer, spring, and washer from the pin receiver.
(c)
Push pin receiver out.
Installation - Pin Receiver
(a)
Acquire necessary tools, equipment, and supplies.
Description
Latex Caulk
(b)
(c)
(9)
Dow Corning
Purpose
Seal pin receiver
Never overtighten the pin receiver. Overtightening of the pin receiver may
cause the pin receiver to break.
Place the pin receiver into position and secure with washer, spring, washer, and screw.
Note:
(8)
White
Supplier
Solvent clean pin receiver mating surfaces with isopropyl alcohol. (Refer to 20-30)
Apply a thin coat of white latex caulk on the pin receiver mating surfaces.
CAUTION:
(d)
P/N or Spec.
If the pin receiver is of the eccentric type, the pin receiver can be rotated to
allow the door skin to fit flush with the fuselage skin.
(e) Install cabin headliner. (Refer to 25-10)
Removal - Door Seals
(a) Remove the seal from the fuselage by pulling them up and away from the fuselage.
Installation - Door Seals
(a) Solvent clean the seal mating area with isopropyl alcohol. (Refer to 20-30)
(b) Starting at the center of the lower door frame, place one end of the seal into position.
(c)
Press seal firmly over the door frame making sure that the ends of the seal butt together.
Note:
If the door seal doesn’t seal tight against the door, shim the door seal by
applying teflon tape under the door seal in the appropriate area.
(d) After installation, clean door seals with a cloth slightly dampened with isopropyl alcohol.
(10) Cleaning - Cabin Door Seals
It is important that all doors seals are properly secured and cleaned periodically to ensure a
good air-tight and water-tight seal. Clean door seals with isopropyl alcohol.
13773-001
30 Nov 2000
52-10
Page 9
BAGGAGE DOOR
1. DESCRIPTION AND OPERATION
The baggage door is located on the left side of the fuselage, just aft of the wing. This door allows easy
access to the baggage compartment. The baggage door contains a molded storage pocket for storing
small lightweight items. The baggage door is hinged on the forward edge and latched on the rear edge.
The door is locked from the outside with a key lock. The baggage compartment key will also open the
cabin doors.
2. MAINTENANCE PRACTICES
A. Baggage Door
(1)
(2)
(3)
(4)
Removal - Baggage Door
(a) Remove the inner panel from the baggage door by, removing fasteners and then pull outward on the panel.
(b) Remove screws and washers securing the door to the hinges and remove the door
assembly and shims (if applicable).
Installation - Baggage Door
(a) Place the baggage door and shims (if applicable) into position and loosely secure the door
to the hinges with screws.
(b) Center the door inside the baggage door opening and secure screws and washers.
Removal - Baggage Door Lock and Latch Assemblies
(a) Remove the screws securing the latch cover.
(b) Remove the nut securing the lock to the baggage door.
(c)
Remove the lock from the baggage door.
Installation - Baggage Door Latching Mechanism
(a) Secure the lock to the baggage door with the nut.
(b) Secure the latch cover to the baggage door and fuselage.
B. Baggage Door Seal (Refer to 52-10)
13773-001
30 Nov 2000
52-30
Page 1
Figure 52-301
Baggage Door Hardware
Page 2
52-30
13773-001
30 Nov 2000
CHAPTER
FUSELAGE
CHAPTER 53 - FUSELAGE
LIST OF EFFECTIVE PAGES
Chapter/Section
Page
Date
53-LOEP
1
31 JULY 2001
53-TOC
1
31 JULY 2001
53-TOC
2
31 JULY 2001
53-00
1
30 NOV 2000
53-00
2
30 NOV 2000
53-10
1
30 NOV 2000
53-20
1
30 NOV 2000
53-20
2
30 NOV 2000
53-20
3
30 NOV 2000
53-20
4
30 NOV 2000
53-30
1
30 NOV 2000
53-30
2
30 NOV 2000
53-40
1
31 JULY 2001
53-40
2
30 NOV 2000
13773-001
31 July 2001
53-LOEP
Page 1
CHAPTER 53 - FUSELAGE
TABLE OF CONTENTS
Subject
FUSELAGE
Chapter/Section
Page
53-00
General
MAIN FRAME
1
53-10
Description
1
Firewall
FS 222 Bulkhead
FS 289 Bulkhead
FS 306 Bulkhead
Spar Tunnel
Roll Cage
AUXILIARY STRUCTURE
1
1
1
1
1
1
53-20
Description
1
Entry Step and Support Handle
Fuselage Floor Structure
Maintenance Practices
1
1
1
Fuselage Floor Access Panels
Removal - Fuselage Floor Access Panels
Installation - Fuselage Floor Access Panels
Entry Step
Removal - Entry Step
Installation - Entry Step
Support Handle
Removal - Support Handle
Installation - Support Handle
PLATES AND SKIN
1
1
1
1
1
1
2
2
2
53-30
Description
1
Fuselage Skin
Maintenance Practices
1
1
Empennage Access Panels
Removal - Empennage Access Panels
Installation -Empennage Access Panels
13773-001
31 July 2001
1
1
1
53-TOC
Page 1
CHAPTER 53 - FUSELAGE
TABLE OF CONTENTS
Subject
Chapter/Section
ATTACH FITTINGS
Page
53-40
Description
1
Maintenance Practices
1
Seat Track
Removal - Seat Track
Installation - Seat Track
Footman Loops
Removal - Footman Loops
Installation - Footman Loops
Page 2
53-TOC
1
1
1
1
1
1
13773-001
31 July 2001
FUSELAGE
1. GENERAL
The SR22 fuselage is a semi monocoque structure made primarily of composite materials. The fuselage
structure is comprised of two halves fabricated from fiberglass laminate bonded along a centerline lapjoint. The vertical stabilizer, door frames, window frames, and recess channel for the forward parachute risers, are all integral to the fuselage structure.
The cabin area is limited by the forward firewall at FS 100, and the cargo compartment bulkhead at FS
222. A composite roll cage bonded to the fuselage structure provides protection for the cabin occupants.
The forward and aft fuselage floors are constructed of composite sandwich panels with access to underfloor components. The fuselage skin is composed primarily of fiberglass and foam core with some areas
fabricated of solid laminate (no foam) construction. Cockpit seats are secured to the forward floor through
the use of aluminum T-tracks mounted to the wing spar box. (See Figure 53-001)
13773-001
30 Nov 2000
53-00
Page 1
Figure 53-001
Fuselage Components
Page 2
53-00
13773-001
30 Nov 2000
MAIN FRAME
1. DESCRIPTION
This section describes those structural components which make up the main frame including vertical stabilizer, firewall, bulkheads, spar tunnel, and roll cage.
A. Firewall
The firewall is designed to separate the engine compartment from the rest of the fuselage and support
various airplane components on both the forward and aft sides. The firewall, constructed of a fiberglass composite sandwich, includes metal fittings for supporting the engine mount, and incorporates
several hardpoints for support of various engine components. In addition the firewall assembly also
supports the compression tube that is used to absorb CAPS deployment loads. Fire protection is provided by a layer of aluminum foil, FiberFrax paper, and a stainless steel sheet mounted on the bulkhead’s forward side.
B. FS 222 Bulkhead
The FS 222 bulkhead is constructed of fiberglass composite sandwich and solid laminate. The upper
portion of the bulkhead is reinforced with additional fiberglass to support reaction loads during CAPS
deployment and to support passenger seat shoulder harness attachments. The bulkhead also contains
hardpoints which support cargo attachment loads.
C. FS 289 Bulkhead
The bulkhead at FS 289 is fabricated from fiberglass laminate. This bulkhead provides buckling support to the empennage.
D. FS 306 Bulkhead
The FS 306 bulkhead, located below the horizontal stabilizer, is fabricated from fiberglass laminate to
carry loads generated by the attached rudder/elevator actuation system.
E. Spar Tunnel
The spar tunnel is comprised of solid laminate and supports wing reaction loads. In addition, seat track
attachment channels are mounted to the front and rear face of the spar box.
F.
Roll Cage
The roll cage is composed primarily of bi-directional fiberglass but also contains unidirectional fiberglass to add bending strength. The main structural components of the roll cage are side longerons,
which support in-flight bending loads, and hoop sections surrounding the right and left doors. The
remaining components provide local stiffening to cutout regions of the fuselage.
13773-001
30 Nov 2000
53-10
Page 1
AUXILIARY STRUCTURE
1. DESCRIPTION
This section describes those structural components which make up the auxiliary structure including
fuselage floor structure, floor access panels, entry step, and support handle.
A. Entry Step and Support Handle
The entry step is constructed 0.049" gage streamline steel tubing. The entry step has 0.09" gage
flanges that are welded to the tubing and secured to the fuselage belly and the aft floor. The support
handle is constructed of 0.38" solid aluminum and secured to the top of the fuselage by screws.
B. Fuselage Floor Structure
The floor structure of the airplane consists of a forward floor and an aft floor. Both are foam core composite laminate panels designed to support flight and user loads. The front floor supports forward and
aft console structures, rudder pedals, and a pulley gang assembly. The aft floor supports aft wing
attachment loads, aft passenger seat loads, and cargo loads. The front floor is bonded to the sides of
the fuselage and is supported by two longerons, firewall, and spar box. The aft floor is bonded to the
sides of the fuselage and is supported by two longerons, the spar box, bulkhead 186, and bulkhead
222.
2. MAINTENANCE PRACTICES
A. Fuselage Floor Access Panels (See Figure 53-201)
(1)
(2)
Removal - Fuselage Floor Access Panels
(a) Remove carpeting covering access panel. (Refer to 25-10)
(b) Remove seat covering access panel, if necessary. (Refer to 25-10)
(c)
Remove screws securing access panel to fuselage floor.
(d) Remove access panel.
Installation - Fuselage Floor Access Panels
(a) Position access panel to floor access hole.
(b) Install screws securing access panel to fuselage floor.
(c)
Install seat, if necessary. (Refer to 25-10)
(d) Install carpeting. (Refer to 25-10)
B. Entry Step (See Figure 53-202)
(1)
(2)
13773-001
30 Nov 2000
Removal - Entry Step
(a) Remove carpet and access panel CF5 from baggage compartment floor. (Refer to 6-00)
(b) Remove nuts, washers, and bolts securing entry step to baggage compartment floor.
(c)
While supporting entry step, remove nuts, washers, and bolts securing step to fuselage
belly and remove from airplane.
Installation - Entry Step
(a) Position entry step to baggage compartment floor and fuselage belly.
(b) Install bolts, washers, and nuts securing entry step to baggage compartment floor and
fuselage belly.
(c)
Install access panel CF5 and carpet to baggage compartment floor. (Refer to 6-00)
53-20
Page 1
C. Support Handle (See Figure 53-202)
(1)
(2)
Removal - Support Handle
(a) Remove cabin headliner. (Refer to 25-10)
(b) Remove screws and washers securing support handle to fuselage and remove from airplane.
Installation - Support Handle
(a)
Acquire necessary tools, equipment, and supplies.
Description
Loctite
(b)
(c)
Page 2
P/N or Spec.
242 Blue
Supplier
Loctite Corp
Newington, CT
Purpose
Sealant
Position support handle to fuselage, apply loctite to handle stud, and install washers and
screws.
Install cabin headliner. (Refer to 25-10)
53-20
13773-001
30 Nov 2000
Figure 53-201
Floor Access Panel Installation
13773-001
30 Nov 2000
53-20
Page 3
Figure 53-202
Entry Step and Handle Installation
Page 4
53-20
13773-001
30 Nov 2000
PLATES AND SKIN
1. DESCRIPTION
This section describes the exterior covering of the fuselage which makes up the skin. Also included are the
fuselage access panels.
A. Fuselage Skin
The fuselage skin is composed primarily of bi-directional E-glass fiberglass with a PVC foam core.
Some areas are of solid laminate construction. Areas around the passenger door are reinforced with
unidirectional fiberglass.The belly closure panel is bonded to the fuselage following the attachment of
the wing and provides a continuous load path along the bottom of the fuselage.
2. MAINTENANCE PRACTICES
A. Empennage Access Panels
(1)
(2)
13773-001
30 Nov 2000
Removal - Empennage Access Panels
(a) Remove screws securing access panel to empennage.
(b) Remove access panel.
Installation -Empennage Access Panels
(a) Position access panel to empennage.
(b) Install screws securing access panel to empennage.
53-30
Page 1
Figure 53-301
Empennage Access Panels
Page 2
53-30
13773-001
30 Nov 2000
ATTACH FITTINGS
1. DESCRIPTION
Attach fittings are provided for attachment of the wing assembly (Refer to 57-00), landing gear (Refer to 3200), doors (Refer to 52-00), engine (Refer to 72-00), and seats. Footman loops are installed on baggage
compartment floor and F.S. 222 cabin bulkhead.
Cockpit seats are secured to the airplane through the use of aluminum tracks mounted to the wing spar
tunnel. The track assemblies are installed at a 10° angle which allows the seat to rise as it is moved forward. Steel clamps and locking pins secure the seat to the track.
Rear seats are secured to the aft fuselage floor through the use of integral seat frame studs which insert
into floor fittings and fastened with cotter pins. For additional maintenance practices pertinent to airplane
seats refer to Chapter 25, Equipment and Furnishings. (Refer to 25-10)
2. MAINTENANCE PRACTICES
A. Seat Track (See Figure 53-401)
(1)
(2)
Removal - Seat Track
(a) Remove seat from seat track. (Refer to 25-10)
(b) Remove side-duct-cover trim panel. (Refer to 25-10)
(c)
Remove aft-console trim panel. (Refer to 25-10)
(d) Remove nuts, washers, and bolts, securing track assembly to spar tunnel.
(e) Remove seat track assembly from airplane.
(f)
Remove nuts, washers, and screws securing T-track to track doubler, if necessary.
Installation - Seat Track
(a) If removed, install screws, washers, and nuts securing seat track to track doubler.
(b) Position track assembly to spar tunnel, ensuring rail section of assembly is oriented on
inboard side of assembly relative to seat, and install bolts, washers, and nuts.
(c)
Install aft-console trim panel. (Refer to 25-10)
(d) Install side-duct-cover trim panel. (Refer to 25-10)
(e) Install seat. (Refer to 25-10)
B. Footman Loops
Note:
(1)
(2)
13773-001
31 July 2001
Footman loops located on baggage compartment floor and F.S. 222 cabin bulkhead.
Removal - Footman Loops
(a) Remove baggage compartment carpet.
(b) Remove access panel CF5 and CB6.
(c)
Remove screw, washer, and nut securing footman loop to fuselage floor/bulkhead.
Installation - Footman Loops
(a) Position footman loop over fuselage floor/bulkhead installation holes and secure with
screw, washer, and nut.
(b) Install access panel CF5 and CB6.
(c)
Install baggage compartment carpet.
53-40
Page 1
Figure 53-401
Seat Track Installation
Page 2
53-40
13773-001
30 Nov 2000
CHAPTER
STABILIZERS
CHAPTER 55 - STABILIZERS
LIST OF EFFECTIVE PAGES
Chapter/Section
Page
Date
55-LOEP
1
30 NOV 2000
55-TOC
1
30 NOV 2000
55-00
1
30 NOV 2000
55-10
1
30 NOV 2000
55-20
1
30 NOV 2000
55-20
2
30 NOV 2000
55-20
3
30 NOV 2000
55-20
4
30 NOV 2000
55-30
1
30 NOV 2000
55-40
1
30 NOV 2000
55-40
2
30 NOV 2000
55-40
3
30 NOV 2000
55-40
4
30 NOV 2000
55-40
5
30 NOV 2000
55-40
6
30 NOV 2000
55-40
7
30 NOV 2000
55-40
8
30 NOV 2000
13773-001
30 Nov 2000
55-LOEP
Page 1
CHAPTER 55 - STABILIZERS
TABLE OF CONTENTS
Subject
STABILIZERS
Chapter/Section
Page
55-00
General
HORIZONTAL STABILIZER
1
55-10
Description
1
Maintenance Practices
1
Horizontal Stabilizer
1
ELEVATOR
55-20
General
1
Maintenance Practices
1
Elevator
Removal - Elevator
Installation - Elevator
Inspection/Check - Elevator
Elevator Balancing
VERTICAL STABILIZER
1
1
1
1
2
55-30
Description
1
Maintenance Practices
1
RUDDER
55-40
General
1
Maintenance Practices
1
Rudder
Removal - Rudder
Installation - Rudder
Removal - Rudder Bottom
Installation - Rudder Bottom
Balancing - Rudder
Inspection/Check - Rudder
13773-001
30 Nov 2000
1
1
1
1
1
4
5
55-TOC
Page 1
STABILIZERS
1. GENERAL
The horizontal stabilizer and vertical stabilizers are fully cantilever, semimonocoque design consisting of
spars, ribs, and skin. The skin is bonded to the supporting structure.
The horizontal stabilizer is a single composite structure from tip to tip. The two-piece elevator, attached to
the horizontal stabilizer, is aluminum.
The vertical stabilizer is composite structure integral to the main fuselage shell for smooth transfer of flight
loads. The rudder is aluminum and is attached to the vertical stabilizer rear shear web at three hinge
points.
The empennage consists of a horizontal stabilizer, a two-piece elevator, a vertical fin and a rudder. All of
the empennage components are conventional spar (shear web), rib, and skin construction.
13773-001
30 Nov 2000
55-00
Page 1
HORIZONTAL STABILIZER
1. DESCRIPTION
The horizontal stabilizer is a lifting surface (fixed airfoil) attached to the rear of the fuselage and provides
stability in pitch.
2. MAINTENANCE PRACTICES
A. Horizontal Stabilizer
Because the horizontal stabilizer is made from composite materials and is bonded to the fuselage, no
servicing is required. An aerodynamically balanced elevator is hinged to the trailing edge of the horizontal stabilizer.
13773-001
30 Nov 2000
55-10
Page 1
ELEVATOR
1. GENERAL
This section covers procedures for servicing the elevator assembly. The elevator is a movable control surface which is mounted in a horizontal position on the tail of the airplane. It is mounted to the horizontal stabilizer and is used to rotate the airplane about its lateral axis. The elevator itself is made from aluminum
and the elevator tips are made from composite materials.
The elevator assembly is a conventional sheet metal control surface made of riveted aluminum skins, ribs
and spar. A lead balance weight is fastened to the inboard and outboard horn ribs at BL72. The elevator is
attached to the horizontal stabilizer at five hinge locations, BL0, BL ±36, and BL ±72. The elevator is
attached to a torque tube at BL ±3.33 and BL ±20. This torque tube is attached to a bell crank. The bell
crank is actuated by a pushrod that is attached to a pulley in the empennage area of the fuselage. The pilot
controls the actuation of this system.
2. MAINTENANCE PRACTICES
A. Elevator
(1)
Removal - Elevator
(a) Remove access panels LE1 and RE1 to gain access to the bellcrank/elevator mounting
bolts. (Refer to 6-00)
(b) Remove the bellcrank/elevator mounting bolts, washers, self-locking nuts and shim.
(c)
Remove the cotter pin and washer from each elevator hinge pin.
(d) Slide the elevator assembly off of the horizontal stabilizer hinge pins by sliding the elevator
away from the fuselage.
Note:
(2)
A flat washer should be remaining on the inside of each hinge pin after the
elevator is removed.
Installation - Elevator
CAUTION:
Make sure a flat washer remains on the inner side of each hinge pin before
installing the elevator. Installing the elevator onto the hinge pins without a
flat washer in place can cause the elevator to bind.
(a)
(b)
(c)
(3)
13773-001
30 Nov 2000
Ensure there is a flat washer installed on each hinge pin.
Slide the elevator assembly against each flat washer on each of the hinge pins.
Install a washer over each hinge pin. Secure the elevator assembly to each hinge pin with
new cotter pins.
(d) Insert bolt (with washer) into the right elevator, elevator bellcrank shim, bellcrank, and left
elevator assembly. Install flat washer and self-locking nut.
(e) Install remaining bolt, lock-nut, and washers, tighten nuts to 160-190 inch pounds (17.620.9 N.m).
(f)
Install the access panels LE1 and RE1. (Refer to 6-00)
(g) Operate the elevator and inspect for any abnormal resistance.
Inspection/Check - Elevator
(a) Verify proper hinge bolt torque.
(b) Remove access panels LE1 and RE1. (Refer to 6-00)
(c)
Verify proper hinge bolt installation and torque on inboard hinge.
(d) Ensure elevator skin is smooth and free of any defects or irregularities.
(e) Inspect rivets and elevator skin for tightness.
55-20
Page 1
(4)
(f)
Verify proper installation of safety wire and for use of new cotter pins on all fasteners.
(g) Install access panels LE1 and RE1. (Refer to 6-00)
(h) Operate elevator controls and inspect for any abnormal resistance.
Elevator Balancing
CAUTION:
Before balancing, ensure no breeze or drafts are in balancing room.
Note:
To balance the elevator, the assembly must be complete including composite elevator tip and all attaching hardware.
(a)
Remove elevator. (Refer to 55-20)
Note:
(b)
(c)
Remove the bolts, washers, and nuts securing the mass balance weight to the elevator.
Mark the chord line on the inboard rib shearweb.
Note:
(d)
(e)
(f)
(g)
(h)
(i)
The mass balance weight must be removed before balancing the elevator.
The chord line is defined as the line extending from the trailing edge
through the hinge line. It is perpendicular to the elevator spar.
Place the complete assembly on knife-edge supports and determine if a static overbalance (leading edge heavy) or static underbalance (trailing edge heavy) condition exists.
To determine the amount of static underbalance (trailing edge heavy), attach a paper cup
to one end of a short, small diameter string. Secure the string with masking tape to the
leading edge of the elevator tip. The paper cup should hang vertical without contact. Add
the mounting hardware in the paper cup.
Add weight in the cup until the elevator balances with the chord line level. Check this by
holding a spirit level aligned with the chord line.
Remove the string, cup and its contents. Weigh them to the smallest calibration possible
(grams).
Weigh the elevator mounting hardware and mass balance weight.
Add or remove weight as necessary to achieve the total predetermined weight needed to
balance the elevator.
Note:
Underbalanced (trailing edge heavy) conditions are corrected by adding
additional weight to the control surface. Typically, by placing additional
washers, lead or steel, under each nut or bolt head retaining the balance
mass, as required. A maximum of 4 per bolt and nut retaining the balance
masses and a maximum of 3 under any bolt head or nut.
Overbalance (leading edge heavy) conditions are corrected by removing
small amounts of material from the lead balance mass, typically by drilling
or other means. Correction may also be accomplished by reducing the number of washers, used in retention of the mass balance.
(j)
(k)
(l)
Page 2
Secure the total weight needed (to balance the elevator) to the elevator with bolts, flat
washers, and self-locking nuts. Tighten bolts to 50-70 inch pounds (5.6-7.9 N.m.).
Install elevator. (Refer to 55-20)
Operate the elevator and inspect for any abnormal resistance.
55-20
13773-001
30 Nov 2000
Figure 55-201
Elevator Assembly (Sheet 1 of 2)
13773-001
30 Nov 2000
55-20
Page 3
Figure 55-201
Elevator Assembly (Sheet 2 of 2)
Page 4
55-20
13773-001
30 Nov 2000
VERTICAL STABILIZER
1. DESCRIPTION
The vertical stabilizer is the fixed vertical surface on the airplane empennage in which the rudder is hinged
to. The vertical stabilizer consists of two C-channel spars fabricated from S2 uni-directional and 7781 bidirectional fiberglass. Two ribs are bonded to the spars at WL 131.25 and WL 159.50 and the right and left
fuselage skins cover the ribs and spars to form a two cell box beam structure that resists bending and torsion created by air loads (wind gust and aircraft maneuvers). The right and left fuselage skins cover the
ribs and spars forming the torsion box. Three hinges attached to the aft spar support the rudder and rudder
horn.
2. MAINTENANCE PRACTICES
Because the vertical stabilizer is made from composite laminate materials and is molded to the empennage, no servicing is required.
13773-001
30 Nov 2000
55-30
Page 1
RUDDER
1. GENERAL
The rudder provides airplane directional (yaw) control. It is of conventional design with skin, spar and ribs
manufactured of aluminum. It is attached to the aft vertical stabilizer shear web at three hinge points and to
the fuselage tailcone at the rudder control bell crank.
Rudder motion is transferred from conventional rudder pedals to the rudder by a single cable system under
the cabin floor to the elevator sector pulley in the aft fuselage. A push-pull tube from the sector to the rudder bell crank translates cable motion to the rudder. Springs connected to the rudder pedal assembly close
the loop and provide centering force.
2. MAINTENANCE PRACTICES
A. Rudder
(1)
(2)
(3)
(4)
13773-001
30 Nov 2000
Removal - Rudder (See Figure 55-401)
(a) Remove the cotter pins from the rudder hinge bolts.
(b) Remove the cotter pin from the rudder actuation tube bolt.
(c)
Remove the rudder actuation bolt, washers, spacer, and nut.
(d) Remove the locknuts, washers, bolts, and rudder assembly from the vertical stabilizer.
Installation - Rudder (See Figure 55-401)
(a) Place the rudder into position and install a bolt and washer (from the upper side) into each
hinge bracket.
(b) Install a washer and a new castellated self-locking nut onto each hinge bolt.
(c)
Torque the center and upper bolts to 15-20 inch-pounds.
(d) Tighten the lower bolt to 25-30 inch-pounds.
(e) Install the rudder actuation bolt, washers, spacer, and castellated nut.
(f)
Tighten the rudder actuation bolt to 25-30 inch-pounds.
(g) Secure all bolts with cotter pins.
(h) Operate the rudder and inspect for any abnormal resistance.
Removal - Rudder Bottom (See Figure 55-401)
(a) Remove the screws securing the rudder bottom to the rudder.
Installation - Rudder Bottom (See Figure 55-401)
(a) Place the rudder bottom into position and secure with screws.
55-40
Page 1
Figure 55-401
Rudder Assembly (Sheet 1 of 2)
Page 2
55-40
13773-001
30 Nov 2000
Figure 55-401
Rudder Assembly (Sheet 2 of 2)
13773-001
30 Nov 2000
55-40
Page 3
(5)
Balancing - Rudder (See Figure 55-402)
CAUTION:
(a)
When balancing the rudder, the rudder assembly must be complete including
mounting brackets, paint, stripes, rudder bottom, and rudder tip. The bench used
to support the knife edge supports must be level. Before balancing, ensure there
are no drafts in the balancing room, which can deflect the surface from its balanced condition. Maximum mass balance weight is 2.5 pounds.
Acquire necessary tools and equipment.
Description
(b)
(c)
(e)
(f)
(g)
(k)
(l)
(m)
(n)
Page 4
Purpose
Any Source
Support Rudder Assembly
Balance Fixture
-
Any Source
Balance Rudder Assembly
Straight Edge
-
Any Source
Mark Chord Line and Hinge
Centerline
Grease Pencil
-
Any Source
Make Reference Marks
Remove rudder. (Refer to 55-40)
Using the reference holes in the rib, mark the chord line on the inboard rib shearweb.
The chord line is defined as the line extending from the trailing edge
through the hinge line. This line runs perpendicular to the rudder spar.
Place a straight edge directly on the center of each rivet head used to secure the rudder
skin to the rudder spar (not the hinge mount rivet heads).
With straight edge in place, mark a reference line to indicate the rivet head centerline.
Mark a reference line 4 inches aft (towards trailing edge of rudder) of the rivet head centerline mark previously made. This line must run parallel to the centerline of all three
hinges.
Using the rivet head centerline as a reference, mark a reference line ¾” forward (towards
the hinges). This reference line is referred to as the hinge centerline.
Note:
(h)
(i)
(j)
Supplier
Close Tolerance Balance Pins
Note:
(d)
P/N or Spec.
The area between the hinge centerline mark and the line 4 inches aft of the
rivet head centerline is referred to as the balance zone.
Place close tolerance balance pins into the upper and lower hinge mounts.
Level the work bench (in all directions) using a spirit level.
Using the rudder assembly as a temporary locator, place the balancing fixtures into position on a level work bench.
Ensure each knife edge support is parallel to the bench top by placing a spirit level on
each of the knife edge supports.
If required, shim the base of the knife edge support fixtures to ensure that the knife edges
are parallel to the bench top.
Ensure balance arm is parallel to bench top by placing a spirit level on the balance arm.
If required, shim base of balance arm to ensure balance arm is parallel to the bench top.
55-40
13773-001
30 Nov 2000
(o)
Carefully place rudder assembly onto knife edge supports and determine if a static overbalance (leading edge heavy) or static underbalance (trailing edge heavy) condition
exists.
Note:
If chord line mark is parallel to balance arm without any additional weight
the rudder assembly is balanced.
If the balance arm and the chord line mark can be made parallel by placing
a 10 ounce weight on or within the balance zone reference lines (established in steps (f) and (g) above), the rudder assembly is said to be balanced. No further action is necessary.
(p)
To balance a rudder that is under balanced (trailing edge heavy), proceed to the following
steps.
CAUTION:
When balancing the rudder, the rudder assembly must be complete, including mounting brackets, paint, stripes, rudder bottom, and rudder tip. The
bench used to support the knife edge supports must be level. Before balancing, ensure there are no drafts in the balancing room, which can deflect
the surface from its balanced condition. Maximum mass balance weight is
2.5 pounds.
1
(q)
Place weight directly above the lead washer mount in the rudder horn until the chord
line and balance arm marks are parallel.
2
Remove safety wire and lead washer mounting bolts along with all balance material.
3
Place all required balance material into position and secure the lead washer mounting bolts.
4
Safety wire lead washer mounting bolts. (Refer to 20-50)
To balance a rudder that is over balanced (leading edge heavy), proceed with the following steps.
CAUTION:
When balancing the rudder, the rudder assembly must be complete including mounting brackets, paint, stripes, rudder bottom, and rudder tip. The
bench used to support the knife edge supports must be level. Before balancing, ensure there are no drafts in the balancing room, which can deflect
the surface from its balanced condition. Maximum mass balance weight is
2.5 pounds.
1
(6)
13773-001
30 Nov 2000
Remove balance material from lead washer mounting bolts (as required) to achieve
alignment of the chord line to the balance arm.
2
Place all required balance material into position and secure lead washer mounting
bolts.
3
Safety wire lead washer mounting bolts. (Refer to 20-50)
(r)
Install rudder. (Refer to 55-40)
(s)
Operate the rudder and inspect for proper operation.
Inspection/Check - Rudder
(a) Verify hinge bolts for proper torque and installation. (Refer to 55-40)
(b) Verify proper installation of safety wire and cotter pins on all fasteners.
(c)
Ensure rudder skin is smooth and free of any defects or irregularities.
(d) Inspect rivets and rudder skin for tightness.
(e) Operate rudder controls and inspect for any abnormal resistance.
55-40
Page 5
Figure 55-402
Rudder Balancing (Sheet 1 of 3)
Page 6
55-40
13773-001
30 Nov 2000
Figure 55-402
Rudder Balancing (Sheet 2 of 3)
13773-001
30 Nov 2000
55-40
Page 7
Figure 55-402
Rudder Balancing (Sheet 3 of 3)
Page 8
55-40
13773-001
30 Nov 2000
CHAPTER
WINDOWS
CHAPTER 56 - WINDOWS
LIST OF EFFECTIVE PAGES
Chapter/Section
Page
Date
56-LOEP
1
30 NOV 2000
56-TOC
1
30 NOV 2000
56-00
1
30 NOV 2000
56-10
1
30 NOV 2000
56-10
2
30 NOV 2000
56-10
3
30 NOV 2000
56-10
4
30 NOV 2000
56-10
5
30 NOV 2000
56-10
6
30 NOV 2000
56-10
7
30 NOV 2000
56-10
8
30 NOV 2000
56-10
9
30 NOV 2000
56-10
10
30 NOV 2000
56-10
11
30 NOV 2000
56-10
12
30 NOV 2000
56-20
1
30 NOV 2000
56-20
2
30 NOV 2000
56-20
3
30 NOV 2000
56-20
4
30 NOV 2000
56-20
5
30 NOV 2000
56-20
6
30 NOV 2000
56-20
7
30 NOV 2000
56-20
8
30 NOV 2000
56-20
9
30 NOV 2000
56-20
10
30 NOV 2000
56-30
1
30 NOV 2000
56-30
2
30 NOV 2000
56-30
3
30 NOV 2000
56-30
4
30 NOV 2000
56-30
5
30 NOV 2000
56-30
6
30 NOV 2000
56-30
7
30 NOV 2000
56-30
8
30 NOV 2000
56-30
9
30 NOV 2000
56-30
10
30 NOV 2000
56-30
11
30 NOV 2000
13773-001
30 Nov 2000
56-LOEP
Page 1
CHAPTER 56 - WINDOWS
TABLE OF CONTENTS
Subject
WINDOWS
Chapter/Section
Page
56-00
General
FLIGHT COMPARTMENT
1
56-10
Description and Operation
1
Maintenance Practices
1
Windshield
Removal - Windshield
Installation - Windshield
Windshield - Cleaning
CABIN
1
1
5
12
56-20
Description and Operation
1
Maintenance Practices
1
Passenger and Aft Windows
Removal - Passenger and aft Windows
Installation - Passenger and aft Windows
Window - Cleaning
DOOR
1
1
4
11
56-30
Description and Operation
1
Maintenance Practices
1
Door Window
Removal - Door Window
Installation - Door Window
Window - Cleaning
13773-001
30 Nov 2000
1
1
4
11
56-TOC
Page 1
WINDOWS
1. GENERAL
The airplane is equipped with an acrylic windshield and side windows. The windows are made of stretched
acrylic. The windows are adhesive bonded to the fuselage or door structure. The windows are all fixed and
cannot be opened.
13773-001
30 Nov 2000
56-00
Page 1
FLIGHT COMPARTMENT
1. DESCRIPTION AND OPERATION
The flight compartment windows on the Cirrus Design SR22 covers the windshield only. All windshield
replacements are accomplished by removing the interior panels around the windshield, removing the four
retaining clips, removing sealant around the windshield, and then removing the windshield itself. In general
the reverse process is used to install a replacement windshield. This method is literally seamless, and the
fuselage will show no marks or evidence of maintenance.
2. MAINTENANCE PRACTICES
A. Windshield
(1)
Removal - Windshield (See Figure 56-101) and (See Figure 56-102)
(a)
Acquire necessary tools, equipment, and supplies.
Description
(b)
(c)
(d)
(e)
(f)
(g)
(h)
Supplier
Purpose
Die Grinder with 1-inch cut- off disk
Any Source
Cut windshield
Masking Tape
2-inch
Any Source
Prevent damage to
the windshield
Drop Cloth
-
Any Source
Prevent contamination
Isopropyl Alcohol
TT-I-735
Grade A or B
Any Source
General cleaning
Aluminum Oxide Sandpaper
80-grit
Any Source
Sealant removal
Phenolic or Hardwood Util- 1-inch
ity Knife
Any Source
Sealant removal
Remove crew seats. (Refer to 25-10)
Remove MFD.
Remove the interior trim panels from around the windshield. (Refer to 25-10)
Disconnect and remove the interior light harness.
Cover the interior and instrument panel with a drop cloth to prevent foreign material from
contaminating the interior and instruments. Tape drop cloth to fuselage, under windshield
bonding flange.
Remove the four windshield retaining clips. (See Figure 56-101)
Using several pieces of duct tape, make handles on the exterior of the windshield.
CAUTION:
13773-001
30 Nov 2000
P/N or Spec.
Exercise care to prevent the removal of laminate from the fuselage when
cutting and removing the sealant from between the fuselage and windshield. If laminate is damaged, it must be repaired prior to installing the new
windshield.
56-10
Page 1
Note:
(i)
(j)
Cut sealant loose from between fuselage and windshield using a small pocket knife. While
pushing in on the windshield, follow the edge of the fuselage with the tip of the blade, then
back cut in towards the fuselage to clean out the sealant. (See Figure 56-102)
Using a phenolic or hardwood utility knife, isopropyl alcohol and aluminum oxide sandpaper (80-grit), remove all remaining sealant from the fuselage bonding flange.
CAUTION:
Page 2
If windshield is being replaced, it will be easier to use a die grinder and a
cut-off disk to cut out the inner portion of the windshield to gain access to
the bonding flange. The windshield should be cut as close as possible to
the fuselage. Use care to prevent damage to the fuselage and instruments.
56-10
Exercise care to prevent removal of laminate from fuselage when cutting
and removing sealant from between fuselage and windshield. If laminate is
damaged, it must be repaired prior to installing the windshield.
13773-001
30 Nov 2000
Figure 56-101
Windshield Clips
13773-001
30 Nov 2000
56-10
Page 3
Figure 56-102
Windshield Removal
Page 4
56-10
13773-001
30 Nov 2000
(2)
Installation - Windshield (See Figure 56-103) and (See Figure 56-104)
Windshield sealant is intended to provide a seal between the windshield and fuselage and to
prevent the leakage of air through the airframe structure. Window sealant is used in the installation of all windows in the aircraft.
Isopropyl alcohol, kerosene, white alptha naptha, mineral spirits, and cotton are acceptable for
cleaning acrylic windows. Residue left behind by the “Spraylat” protective coating may be
removed by soaking the area with isopropyl alcohol and rubbing with an alcohol soaked soft
flannel cloth. Residue left behind by the adhesive backed paper covering can also be removed
by the above method. If, however, the paper covering has been stored on the windshield for an
extended period of time, soak paper with kerosene and keep it wet for several hours. Remove
any remaining adhesive by using a mixture of equal parts of kerosene and isopropyl alcohol.
Soak a soft flannel cloth with this mixture and rub the windshield with the cloth. The windshield
should be cleaned after this procedure with a dish washing liquid and plenty of water.
WARNING:
Never use organic solvents such as Methyl Ethyl Ketone (MEK), acetone, or
lacquer thinner. Do not use jewelry cleaner or paper towels to remove any
contaminates. Never use ice scrapers on acrylic windows. Do not store any
window outdoors while the protective covering is still on the window. The
covering will become very difficult, if not impossible, to remove without
damaging the windshield.
CAUTION:
It is very important to keep the windshield well supported at all times. Warm temperatures are not required during these operations; however, acrylic will take
much more abuse at 80 degrees than at 30 degrees.
Note:
Before final installation, always inspect the windshield for imperfections. Use care
to prevent staining or scratching the windshield.
(a)
Acquire necessary tools, equipment, and supplies.
Description
13773-001
30 Nov 2000
P/N or Spec.
Supplier
Purpose
Padded Cargo Rods
(adjustable rods)
-
Any Source
Temporarily secure
windshield
Masking Tape
2-inch
Any Source
Prevent damage to
the windshield
Temperature-Resistant
Sealing Compound
MIL-S-8802
Type II, Class B
Refer to 20-10
Seal windows
Isopropyl Alcohol
TT-I-735 Grade A Any Source
or B
General cleaning
Cotton Gloves (Clean, lint
free)
-
Any Source
Protect hands
Cotton Cloth (clean and lint free)
Any Source
Clean sealing surface
Application Spatula (nonnylon)
Any Source
Smooth adhesive
1-inch
56-10
Page 5
Description
(d)
(e)
(f)
(h)
LP Aero Plastics
Rd#1 Box 201-B
Jeannette, PA
15644
Aid in adhesion
Protective Coating
AC-940 Blue
AC Products, Inc.
172 Ela Jolla St.,
Placentia CA
92670
Prevent damage to
the windshield
Fine Line Tape (pin stripping)
1/4-inch
3-M
Allow smooth transition between fuselage and windshield
Aluminum Oxide Paper
80-grit or finer
Any Source
Abrade acrylic surface prior to adhesion
(j)
Page 6
Exercise care to protect the inner and outer windshield surfaces from damage during the installation process. The stepped area on the edge of the
windshield (which is bonded to the fuselage) is called the bonding flange.
Verify that sealant is within storage-life requirements.
Inspect fuselage bonding flange for any remaining sealant or contaminates, remove and
clean as necessary.
Remove the protective covering from the windshield and inspect the windshield for damage or defects, never install a defective windshield.
Install a continuous piece of fine line tape on the edge of the fuselage windshield opening
(next to the bonding flange). (See Figure 56-103)
Working in one direction on the fuselage window opening, place 2-inch masking tape on
top of the outer edge (the edge furthest away from the bonding flange) of the fine line tape.
The masking tape will provide a smooth and continuous parting line at the
bonding flange.
Make a directional mark on the masking tape to indicate the proper direction for removal.
(See Figure 56-104)
Apply three coats (in opposing directions) of protective coating (AC-940 Blue) on the outer
windshield surface.
CAUTION:
(i)
Purpose
MC-145
Note:
(g)
Supplier
Primer
Note:
(b)
(c)
P/N or Spec.
Do not apply protective coating on the windshield bonding flange.
Using several pieces of duct tape, make handles on the exterior of the windshield after the
protective coating has fully cured.
Place windshield into position and secure the windshield into the fuselage using padded
cargo rods. (See Figure 56-104)
56-10
13773-001
30 Nov 2000
Note:
(k)
(l)
Five or more padded cargo rods may be necessary to hold the windshield
into the proper position. Padded cargo rods may be placed on each corner
of the windshield and in the center of the windshield. Additional padded
cargo rods may be required to prevent the windshield from sliding down.
Inspect the windshield for proper fit. The windshield must have equal amounts of space
around the perimeter of the windshield. The exterior surface of the windshield should be
flush with exterior surface of fuselage skin.
Mark and trim the windshield as required to ensure a perfect fit.
CAUTION:
The windshield bonding flange must never be trimmed to a thickness less
than 0.080 of an inch. The windshield bonding flange must never be less
than ½-inch wide.
Note:
The windshield bonding flange should have equal amounts of space around
it. If the windshield doesn’t fit into the fuselage with equal amounts of space
around it, the windshield and/or bonding flange will need to be trimmed
accordingly.
The windshield should be flush with the exterior surface of the fuselage
skin. If the windshield cannot be made flush by adding moderate pressure
on the padded cargo rods, the thickness of the windshield bonding flange
must be trimmed accordingly. Aluminum oxide sandpaper (80-grit) on a
sanding board may be used to trim the windshield.
(m)
Place the prefit windshield into position and clamp the windshield into position using padded cargo rods.
Note:
13773-001
30 Nov 2000
Five or more padded cargo rods may be necessary to hold the windshield
into the proper position. Padded cargo rods may be placed on each corner
of the windshield and in the center of the windshield. Additional padded
cargo rods may be required to prevent the windshield from sliding down.
56-10
Page 7
Figure 56-103
Windshield Alignment
Page 8
56-10
13773-001
30 Nov 2000
(n)
(o)
(p)
(q)
Remove a small amount (approximately 2-inches wide) of protective coating from around
edge of windshield.
Install a continuous piece of fine line tape (pinstripe tape) around the edge of the windshield (next to the bonding flange). The fine line tape should be adhered to the windshield
with equal amounts of space between the fine line tape on the fuselage and the fine line
tape on the windshield.
Working in one direction on the windshield, place 2-inch masking tape on top of the inner
edge (the edge furthest away from the bonding flange) of the fine line tape.
Using a straight edge, make several alignment marks around the edges of the masking
tape on the fuselage to the masking tape on the windshield.
Note:
(r)
(s)
(t)
These alignment marks will be used to ensure that the windshield will be
installed into the exact location in which it was during prefit.
Carefully remove windshield from fuselage.
Using aluminum oxide 80-grit paper, abrade the bonding flange of the windshield in a random pattern. Remove all surface gloss.
Remove contaminates from the windshield bonding flange and the immediate work area
using a vacuum and a clean brush attachment.
CAUTION:
Wax or grease pencil markings on any part are not allowed. Any such markings inadvertently occurring must be removed prior to application of primer.
All surfaces shall be thoroughly cleaned and dried before application of
primer.
Immediately prior to applying any primer on the windshield bonding flange,
solvent clean the flange with isopropyl alcohol. When handling cleaned surfaces, wear clean cotton gloves to prevent surface contamination. Surfaces
must be re-cleaned in the event of contamination.
Note:
(u)
Ensure that all surfaces adjacent to the windshield bonding flange are masked to prevent
them from coming into contact with any primer or sealant.
CAUTION:
(v)
(w)
(x)
(y)
13773-001
30 Nov 2000
Do not apply primer to the composite bonding surface.
Using isopropyl alcohol, solvent clean the bonding flange in the fuselage.
Verify all required materials are present and all parts have been prepared and pre-fit.
Wearing clean gloves, lightly dampen a cloth with primer. Fold the cloth in such a manner
to eliminate raw edges to reduce the possibility of lint.
Apply primer to the acrylic bonding flange. Wipe the cloth over the prepared area. Apply
as little primer as possible while still wetting the entire surface.
CAUTION:
(z)
Fold cloth in such a manner to eliminate raw edges to reduce the possibility
of lint. Always clean an area larger than the application area.
Keep primed area clean and free from contaminates while primer is drying.
Seal windshield as soon as practical after primer drying period to minimize
contamination.
Allow the primer to dry for thirty to sixty minutes.
56-10
Page 9
(aa) Mix sealant per manufacturer's instructions. Mix the required quantity in the ratio specified
in the adhesive manufacturer's instructions. (Refer to 25-10)
CAUTION:
Do not apply sealant to windshield bonding flange. The sealant must be
applied to the fuselage bonding flange.
(ab) Apply a thin layer of sealant to the outer edge of the fuselage bonding flange. Spread the
sealant out using an application spatula.
(ac) Directly on top of the sealant previously spread, apply a 1/4-inch to 3/8-inch bead of sealant down the center of the bond area.
Note:
If more than one bead is required, apply it immediately adjacent to the prior
bead to form one large bead.
(ad) Using padded cargo rods, secure the windshield into position making sure the reference
marks made earlier are perfectly aligned and that the contour of the windshield matches
the contour of the fuselage.
CAUTION:
When spreading the sealant, ensure all air pockets are removed.
Note:
Five or more padded cargo rods may be necessary to hold the windshield
into the proper position. Padded cargo rods may be placed on each corner
of the windshield and in the center of the windshield. Additional padded
cargo rods may be required to prevent the windshield from sliding down.
(ae) Using a 1-inch application spatula, push sealant into the gap between the windshield and
the fuselage.
(af) Remove masking tape and fine line tape from the perimeter of the windshield and the
fuselage.
Note:
To prevent sealant from becoming damaged, pull tape towards sealant
while the sealant is still damp.
(ag) Allow the sealant to air dry. Following the manufacture’s instructions, the sealant can be
heat cured using a heat gun.
CAUTION:
(ah)
(ai)
(aj)
(ak)
(al)
(am)
(an)
(ao)
Page 10
Overheating windshield can cause windshield damage.
Install and secure the four windshield retaining clips.
Remove cargo rods.
Route and secure the interior light wiring harness.
Using a vacuum cleaner, remove all debris from the cabin and fuselage.
Remove the drop cloth.
Install and secure interior trim panels. (Refer to 25-10)
Install crew seats. (Refer to 25-10)
Install MFD.
56-10
13773-001
30 Nov 2000
Figure 56-104
Windshield Installation
13773-001
30 Nov 2000
56-10
Page 11
(3)
Windshield - Cleaning (Refer to 12-20)
Acrylic windows should be cleaned using the following chemicals, and by following the manufactures instructions for each individual product.
(a)
Acquire necessary tools, equipment, and supplies.
Description
Page 12
P/N or Spec.
Supplier
Purpose
Acrylic Polish and Sealant
SP-PL16
LP Aero Plastics, Inc.
Polish acrylic
Plastic Cleaner and Polish
SP-210A
LP Aero Plastics, Inc.
Clean acrylic
Plastic Scratch Remover
SP-210P
LP Aero Plastics, Inc.
Remove fine
scratches in acrylic
56-10
13773-001
30 Nov 2000
CABIN
1. DESCRIPTION AND OPERATION
All replacements are accomplished by removing the interior panels around the window, removing the sealant around the window, and then removing the window itself. In general the reverse process is used to
install a replacement window. This method is literally seamless, and the fuselage will show no marks or
evidence of maintenance. The passenger and aft windows are made from acrylic plastic.
2. MAINTENANCE PRACTICES
A. Passenger and Aft Windows
(1)
Removal - Passenger and aft Windows (See Figure 56-201)
(a)
Acquire necessary tools, equipment, and supplies.
Description
(b)
(c)
(d)
(e)
(f)
13773-001
30 Nov 2000
P/N or Spec.
Supplier
Purpose
Die Grinder with 1-inch cut- off disk
Any Source
Cut window
Masking Tape
2-inch
Any Source
Prevent damage to
the window
Drop Cloth
-
Any Source
Prevent contamination
Isopropyl Alcohol
TT-I-735
Grade A or B
Any Source
General cleaning
Aluminum Oxide Sandpaper
80-grit
Any Source
Sealant removal
Phenolic or Hardwood Util- 1-inch
ity Knife
Any Source
Sealant removal
Remove the interior trim panels from around the window. (Refer to 25-10)
Cover the interior and instrument panel with a drop cloth to prevent foreign material from
contaminating the interior and instruments.
Using several pieces of duct tape, make handles on the exterior of the window.
CAUTION:
Exercise care to prevent the removal of laminate from the fuselage when
cutting and removing the sealant from between the fuselage and window. If
laminate is damaged, it must be repaired prior to installing the window.
Note:
If window is being replaced, it will be easier to use a die grinder and a cutoff disk to cut out the inner portion of the window to gain access to the bonding flange. The window should be cut as close as possible to the fuselage.
Cut sealant loose from between fuselage and window using a small pocket knife. While
pushing in on the window, follow the edge of the fuselage with the tip of the blade, then
back cut in towards the fuselage to clean out the sealant. (See Figure 56-201)
Using a phenolic or hardwood utility knife, isopropyl alcohol and aluminum oxide sandpaper (80-grit), remove all remaining sealant from the fuselage bonding flange.
56-20
Page 1
CAUTION:
Page 2
56-20
Exercise care to prevent removal of laminate from fuselage when cutting
and removing sealant from between fuselage and window. If laminate is
damaged, it must be repaired prior to installing the window.
13773-001
30 Nov 2000
Figure 56-201
Window Removal
13773-001
30 Nov 2000
56-20
Page 3
(2)
Installation - Passenger and aft Windows (See Figure 56-202) and (See Figure 56-203)
Window sealant is intended to provide an acceptable seal between the window and fuselage
and to prevent the leakage of air through the airframe structure. Window sealant is used in the
installation of all windows in the aircraft.
Isopropyl alcohol, kerosene, white alptha naptha, mineral spirits, and cotton are acceptable for
cleaning acrylic windows. Residue left behind by the “Spraylat” protective coating may be
removed by soaking the area with isopropyl alcohol and rubbing with an alcohol soaked soft
flannel cloth. Residue left behind by the adhesive backed paper covering can also be removed
by the above method. If, however, the paper covering has been stored on the window for an
extended period of time, soak paper with kerosene and keep it wet for several hours. Remove
any remaining adhesive by using a mixture of equal parts of kerosene and isopropyl alcohol.
Soak a soft flannel cloth with this mixture and rub the window with the cloth. The window should
be cleaned after this procedure with a dish washing liquid and plenty of water.
WARNING:
Never use organic solvents such as Methyl Ethylketone (MEK), acetone, or
lacquer thinner. Do not use jewelry cleaner or paper towels to remove any
contaminates. Never use ice scrapers on acrylic windows. Do not store any
window outdoors while the protective covering is still on the window. The
covering will become very difficult, if not impossible, to remove without
damaging the window.
CAUTION:
It is very important to keep the window well supported at all times. Warm temperatures are not required during these operations; however, acrylic will take much
more abuse at 80 degrees than at 30 degrees.
Note:
Always inspect the window before final installation. Use care to prevent staining or
scratching the window.
(a)
Acquire necessary tools, equipment, and supplies.
Description
Page 4
P/N or Spec.
Supplier
Purpose
Padded Cargo Rods
(adjustable rods)
-
Any Source
Temporarily secure
window
Masking Tape
2-inch
Any Source
Prevent damage to
the window
Temperature-Resistant
Sealing Compound
MIL-S-8802
Type II, Class B
Refer to 20-10
Seal windows
Isopropyl Alcohol
TT-I-735 Grade A Any Source
or B
General cleaning
Cotton Gloves (Clean, lint
free)
-
Any Source
Protect hands
Cotton Cloth (clean and lint free)
Any Source
Clean sealing surface
Application Spatula (nonnylon)
Any Source
Smooth adhesive
56-20
1-inch
13773-001
30 Nov 2000
Description
(d)
(e)
(f)
(h)
LP Aero Plastics
Rd#1 Box 201-B
Jeannette, PA
15644
Aid in adhesion
Protective Coating
AC-940 Blue
AC Products, Inc.
172 Ela Jolla St.,
Placentia CA
92670
Prevent damage to
the window
Fine Line Tape (pin stripping)
1/4-inch
3-M
Allow smooth transition between fuselage and window
Aluminum Oxide Paper
80-grit or finer
Any Source
Abrade acrylic surface prior to adhesion
(j)
13773-001
30 Nov 2000
Exercise care to protect the inner and outer window surfaces from damage
during the installation process. The stepped area on the edge of the window
(which is bonded to the fuselage) is called the bonding flange.
Verify that sealant is within storage-life requirements.
Inspect fuselage bonding flange for any remaining sealant or contaminates, remove and
clean as necessary.
Remove the protective covering from the window and inspect the window for damage or
defects, never install a defective window.
Install a continuous piece of fine line tape on the edge of the fuselage window opening
(next to the bonding flange). (See Figure 56-202)
Working in one direction on the fuselage window opening, place 2-inch masking tape on
top of the outer edge (the edge furthest away from the bonding flange) of the fine line tape.
The masking tape will provide a smooth and continuous parting line at the
bonding flange.
Make a directional mark on the masking tape to indicate the proper direction for removal.
(See Figure 56-203)
Apply three coats (in opposing directions) of protective coating (AC-940 Blue) on the outer
window surface.
CAUTION:
(i)
Purpose
MC-145
Note:
(g)
Supplier
Primer
Note:
(b)
(c)
P/N or Spec.
Do not apply protective coating on the window bonding flange.
Using several pieces of duct tape, make handles on the exterior of the window after the
protective coating has fully cured.
Place window into position and secure the window into the fuselage using padded cargo
rods. (See Figure 56-203)
56-20
Page 5
Note:
(k)
(l)
Five or more padded cargo rods may be necessary to hold the window into
the proper position. Padded cargo rods may be placed on each corner of
the window and in the center of the window. Additional padded cargo rods
may be required to prevent the window from sliding down.
Inspect the window for proper fit. The window must have equal amounts of space around
the perimeter of the window. The exterior surface of the window should be flush with exterior surface of fuselage.
Mark and trim the window as required to ensure a perfect fit.
CAUTION:
The window bonding flange must never be trimmed to a thickness less than
0.080 of an inch. The window bonding flange must never be less than ½inch wide.
Note:
The window bonding flange should have equal amounts of space around it.
If the window doesn’t fit into the fuselage with equal amounts of space
around it, the window and/or bonding flange will need to be trimmed accordingly.
The window should be flush with the exterior surface of the fuselage. If the
window cannot be made flush by adding moderate pressure on the padded
cargo rods, the thickness of the window bonding flange must be trimmed
accordingly. Aluminum oxide sandpaper (80-grit) on a sanding board may
be used to trim the window.
(m)
Place the prefit window into position and clamp the window into position using padded
cargo rods.
Note:
Page 6
56-20
Five or more padded cargo rods may be necessary to hold the window into
the proper position. Padded cargo rods may be placed on each corner of
the window and in the center of the window. Additional padded cargo rods
may be required to prevent the window from sliding down.
13773-001
30 Nov 2000
Figure 56-202
Window Alignment
13773-001
30 Nov 2000
56-20
Page 7
(n)
(o)
(p)
(q)
Remove a small amount (approximately 2-inches wide) of protective coating from around
edge of window.
Install a continuous piece of fine line tape (pinstripe tape) around the edge of the window
(next to the bonding flange). The fine line tape should be adhered to the window with
equal amounts of space between the fine line tape on the fuselage and the fine line tape
on the window.
Working in one direction on the window, place 2-inch masking tape on top of the inner
edge (the edge furthest away from the bonding flange) of the fine line tape.
Using a straight edge, make several alignment marks around the edges of the masking
tape on the fuselage to the masking tape on the window.
Note:
(r)
(s)
(t)
These alignment marks will be used to ensure that the window will be
installed into the exact location in which it was during prefit.
Carefully remove window from fuselage.
Using aluminum oxide 80-grit paper, abrade the bonding flange of the window in a random
pattern. Remove all surface gloss.
Remove contaminates from the window bonding flange and the immediate work area
using a vacuum and a clean brush attachment.
CAUTION:
Wax or grease pencil markings on any part are not allowed. Any such markings inadvertently occurring must be removed prior to application of primer.
All surfaces shall be thoroughly cleaned and dried before application of
primer.
Immediately prior to applying any primer on the window bonding flange, solvent clean the flange with isopropyl alcohol. When handling cleaned surfaces, wear clean cotton gloves to prevent surface contamination. Surfaces
must be re-cleaned in the event of contamination.
Note:
(u)
Ensure that all surfaces adjacent to the window bonding flange are masked to prevent
them from coming into contact with any primer or sealant.
CAUTION:
(v)
(w)
(x)
(y)
Page 8
Do not apply primer to the composite bonding surface.
Using isopropyl alcohol, solvent clean fuselage bonding flange.
Verify all required materials are present and all parts have been prepared and pre-fit.
Wearing clean gloves, lightly dampen a cloth with primer. Fold the cloth in such a manner
to eliminate raw edges to reduce the possibility of lint.
Apply primer to the acrylic bonding flange. Wipe the cloth over the prepared area. Apply
as little primer as possible while still wetting the entire surface.
CAUTION:
(z)
Fold cloth in such a manner to eliminate raw edges to reduce the possibility
of lint. Always clean an area larger than the application area.
Keep primed area clean and free from contaminates while primer is drying.
Seal window as soon as practical after primer drying period to minimize
contamination.
Allow the primer to dry for thirty to sixty minutes.
56-20
13773-001
30 Nov 2000
(aa) Mix sealant per manufacturer's instructions. Mix the required quantity in the ratio specified
in the adhesive manufacturer's instructions. (Refer to 20-10)
CAUTION:
Do not apply sealant to window bonding flange. The sealant must be
applied to the fuselage bonding flange.
(ab) Apply a thin layer of sealant to the outer edge of the fuselage bonding flange. Spread the
sealant out using an application spatula.
(ac) Directly on top of the sealant previously spread, apply a 1/4-inch to 3/8-inch bead of sealant down the center of the bond area.
Note:
If more than one bead is required, apply it immediately adjacent to the prior
bead to form one large bead.
(ad) Using padded cargo rods, secure the window into position making sure the reference
marks made earlier are perfectly aligned and that the contour of the window matches the
contour of the fuselage.
CAUTION:
When spreading the sealant, ensure all air pockets are removed.
Note:
Five or more padded cargo rods may be necessary to hold the window into
the proper position. Padded cargo rods may be placed on each corner of
the window and in the center of the window. Additional padded cargo rods
may be required to prevent the window from sliding down.
(ae) Using a 1-inch application spatula, push sealant into the gap between the window and the
fuselage.
(af) Remove masking tape and fine line tape from the perimeter of the window and the fuselage.
Note:
To prevent sealant from becoming damaged, pull tape towards sealant
while the sealant is still damp.
(ag) Allow the sealant to air dry. Following the manufacture’s instructions, the sealant can be
heat cured using a heat gun.
13773-001
30 Nov 2000
56-20
Page 9
Figure 56-203
Window Installation
Page 10
56-20
13773-001
30 Nov 2000
(3)
13773-001
30 Nov 2000
(ah) Remove cargo rods.
(ai) Remove the drop cloth.
(aj) Using a vacuum cleaner, remove all debris.
(ak) Install and secure interior trim panels. (Refer to 20-10)
Window - Cleaning
56-20
Page 11
DOOR
1. DESCRIPTION AND OPERATION
The cabin door windows are stretched acrylic bonded to the door structure. All cabin door window replacements are accomplished by removing the interior panels around the window and removing sealant around
the window, and then removing the window itself. In general the reverse process is used to install a
replacement window. This method is literally seamless, and the door will show no marks or evidence of
maintenance.
2. MAINTENANCE PRACTICES
A. Door Window
(1)
Removal - Door Window (See Figure 56-301)
(a)
Acquire necessary tools, equipment, and supplies.
Description
(b)
(c)
(d)
(e)
(f)
13773-001
30 Nov 2000
P/N or Spec.
Supplier
Purpose
Die Grinder with 1-inch cut- off disk
Any Source
Cut window
Masking Tape
2-inch
Any Source
Prevent damage to
the window
Drop Cloth
-
Any Source
Prevent contamination
Isopropyl Alcohol
TT-I-735
Grade A or B
Any Source
General cleaning
Aluminum Oxide Sandpaper
80-grit
Any Source
Sealant removal
Phenolic or Hardwood Util- 1-inch
ity Knife
Any Source
Sealant removal
Remove the interior trim panels from around the window. (Refer to 25-10)
Cover the interior and instrument panel with a drop cloth to prevent foreign material from
contaminating the interior and instruments.
Using several pieces of duct tape, make handles on the exterior of the window.
CAUTION:
Exercise care to prevent the removal of laminate from the door when cutting
and removing the sealant from between the door and window. If laminate is
damaged, it must be repaired prior to installing the window.
Note:
If window is being replaced, it will be easier to use a die grinder and a cutoff disk to cut out the inner portion of the window to gain access to the bonding flange. The window should be cut as close as possible to the door.
Cut sealant loose from between door and window using a small pocket knife. While pushing in on the window, follow the edge of the door with the tip of the blade, then back cut in
towards the door to clean out the sealant. (See Figure 56-301)
Using a phenolic or hardwood utility knife, isopropyl alcohol and aluminum oxide sandpaper (80-grit), remove all remaining sealant from the bonding flange area on the door.
56-30
Page 1
CAUTION:
Page 2
56-30
Exercise care to prevent removal of laminate from door when cutting and
removing sealant from between door and window. If laminate is damaged, it
must be repaired prior to installing the window.
13773-001
30 Nov 2000
Figure 56-301
Window Removal
13773-001
30 Nov 2000
56-30
Page 3
(2)
Installation - Door Window (See Figure 56-302) and (See Figure 56-303)
Window sealant is intended to provide an acceptable seal between the window and door and to
prevent the leakage of air through the airframe structure. Window sealant is used in the installation of all windows in the aircraft.
Isopropyl alcohol, kerosene, white alptha naptha, mineral spirits, and cotton are acceptable for
cleaning acrylic windows. Residue left behind by the “Spraylat” protective coating may be
removed by soaking the area with isopropyl alcohol and rubbing with an alcohol soaked soft
flannel cloth. Residue left behind by the adhesive backed paper covering can also be removed
by the above method. If, however, the paper covering has been stored on the window for an
extended period of time, soak paper with kerosene and keep it wet for several hours. Remove
any remaining adhesive by using a mixture of equal parts of kerosene and isopropyl alcohol.
Soak a soft flannel cloth with this mixture and rub the window with the cloth. The window should
be cleaned after this procedure with a dish washing liquid and plenty of water.
WARNING:
Never use organic solvents such as Methyl Ethylketone (MEK), acetone, or
lacquer thinner. Do not use jewelry cleaner or paper towels to remove any
contaminates. Never use ice scrapers on acrylic windows. Do not store any
window outdoors while the protective covering is still on the window. The
covering will become very difficult, if not impossible, to remove without
damaging the window.
CAUTION:
It is very important to keep the window well supported at all times. Warm temperatures are not required during these operations; however, acrylic will take much
more abuse at 80 degrees than at 30 degrees.
Note:
Always inspect the window before final installation. Use care to prevent staining or
scratching the window.
(a)
Acquire necessary tools, equipment, and supplies.
Description
Page 4
P/N or Spec.
Supplier
Purpose
Padded Cargo Rods
-
Any Source
Temporarily secure
window
Masking Tape
2-inch
Any Source
Prevent damage to
the window
Temperature-Resistant
Sealing Compound
MIL-S-8802
Type II, Class B
Refer to 20-10
Seal windows
Isopropyl Alcohol
TT-I-735 Grade A Any Source
or B
General cleaning
Cotton Gloves (Clean, lint
free)
-
Any Source
Protect hands
Cotton Cloth (clean and lint free)
Any Source
Clean sealing surface
Application Spatula (nonnylon)
Any Source
Smooth adhesive
56-30
1-inch
13773-001
30 Nov 2000
Description
(d)
(e)
(f)
(h)
LP Aero Plastics
Rd#1 Box 201-B
Jeannette, PA
15644
Aid in adhesion
Protective Coating
AC-940 Blue
AC Products, Inc.
172 Ela Jolla St.,
Placentia CA
92670
Prevent damage to
the window
Fine Line Tape (pin stripping)
1/4-inch
3-M
Allow smooth transition between door
and window
Aluminum Oxide Paper
80-grit or finer
Any Source
Abrade acrylic surface prior to adhesion
(j)
13773-001
30 Nov 2000
Exercise care to protect the inner and outer window surfaces from damage
during the installation process. The stepped area on the edge of the window
(which is bonded to the door) is called the bonding flange.
Verify that sealant is within storage-life requirements.
Inspect bonding flange area on the door for any remaining sealant or contaminates,
remove and clean as necessary.
Remove the protective covering from the window and inspect the window for damage or
defects, never install a defective window.
Install a continuous piece of fine line tape on the edge of the door window opening (next to
the bonding flange). (See Figure 56-302)
Working in one direction on the door window opening, place 2-inch masking tape on top of
the outer edge (the edge furthest away from the bonding flange) of the fine line tape.
The masking tape will provide a smooth and continuous parting line at the
bonding flange.
Make a directional mark on the masking tape to indicate the proper direction for removal.
(See Figure 56-303)
Apply three coats (in opposing directions) of protective coating (AC-940 Blue) on the outer
window surface.
CAUTION:
(i)
Purpose
MC-145
Note:
(g)
Supplier
Primer
Note:
(b)
(c)
P/N or Spec.
Do not apply protective coating on the window bonding flange.
Using several pieces of duct tape, make handles on the exterior of the window after the
protective coating has fully cured.
Place window into position and secure the window into the door using padded cargo rods.
(See Figure 56-303)
56-30
Page 5
Note:
(k)
(l)
Five or more cargo rods may be necessary to hold the window into the
proper position. Cargo rods may be placed on each corner of the window
and in the center of the window. Additional cargo rods may be required to
prevent the window from sliding down.
Inspect the window for proper fit. The window must have equal amounts of space around
the perimeter of the window. The exterior surface of the window should be flush with exterior surface of door skin.
Mark and trim the window as required to ensure a perfect fit.
CAUTION:
The window bonding flange must never be trimmed to a thickness less than
0.080 of an inch. The window bonding flange must never be less than ½inch wide.
Note:
The window bonding flange should have equal amounts of space around it.
If the window doesn’t fit into the door with equal amounts of space around it,
the window and/or bonding flange will need to be trimmed accordingly.
The window should be flush with the exterior surface of the door skin. If the
window cannot be made flush by adding moderate pressure on the cargo
rods, the thickness of the window bonding flange must be trimmed accordingly. Aluminum oxide sandpaper (80-grit) on a sanding board may be used
to trim the window.
(m)
Place the prefit window into position and clamp the window into position using padded
cargo rods.
Note:
Page 6
56-30
Five or more cargo rods may be necessary to hold the window into the
proper position. Cargo rods may be placed on each corner of the window
and in the center of the window. Additional cargo rods may be required to
prevent the window from sliding down.
13773-001
30 Nov 2000
Figure 56-302
Window Alignment
13773-001
30 Nov 2000
56-30
Page 7
(n)
(o)
(p)
(q)
Remove a small amount (approximately 2-inches wide) of protective coating from around
edge of window.
Install a continuous piece of fine line tape (pinstripe tape) around the edge of the window
(next to the bonding flange). The fine line tape should be adhered to the window with
equal amounts of space between the fine line tape on the door and the fine line tape on
the window.
Working in one direction on the window, place 2-inch masking tape on top of the inner
edge (the edge furthest away from the bonding flange) of the fine line tape.
Using a straight edge, make several alignment marks around the edges of the masking
tape on the door to the masking tape on the window.
Note:
(r)
(s)
(t)
These alignment marks will be used to ensure that the window will be
installed into the exact location in which it was during prefit.
Carefully remove window from door.
Using aluminum oxide 80-grit paper, abrade the bonding flange of the window in a random
pattern. Remove all surface gloss.
Remove contaminates from the window bonding flange and the immediate work area
using a vacuum and a clean brush attachment.
CAUTION:
Wax or grease pencil markings on any part are not allowed. Any such markings inadvertently occurring must be removed prior to application of primer.
All surfaces shall be thoroughly cleaned and dried before application of
primer.
Immediately prior to applying any primer on the window bonding flange, solvent clean the flange with isopropyl alcohol. When handling cleaned surfaces, wear clean cotton gloves to prevent surface contamination. Surfaces
must be re-cleaned in the event of contamination.
Note:
(u)
Ensure that all surfaces adjacent to the window bonding flange are masked to prevent
them from coming into contact with any primer or sealant.
CAUTION:
(v)
(w)
(x)
(y)
Page 8
Do not apply primer to the composite bonding surface.
Using isopropyl alcohol, solvent clean the bonding flange in the door.
Verify all required materials are present and all parts have been prepared and pre-fit.
Wearing clean gloves, lightly dampen a cloth with primer. Fold the cloth in such a manner
to eliminate raw edges to reduce the possibility of lint.
Apply primer to the acrylic bonding flange. Wipe the cloth over the prepared area. Apply
as little primer as possible while still wetting the entire surface.
CAUTION:
(z)
Fold cloth in such a manner to eliminate raw edges to reduce the possibility
of lint. Always clean an area larger than the application area.
Keep primed area clean and free from contaminates while primer is drying.
Seal window as soon as practical after primer drying period to minimize
contamination.
Allow the primer to dry for thirty to sixty minutes.
56-30
13773-001
30 Nov 2000
(aa) Mix sealant per manufacturer's instructions. Mix the required quantity in the ratio specified
in the adhesive manufacturer's instructions. (Refer to 20-10)
CAUTION:
Do not apply sealant to window bonding flange. The sealant must be
applied to the door bonding flange.
(ab) Apply a thin layer of sealant to the outer edge of the door bonding flange. Spread the sealant out using an application spatula.
(ac) Directly on top of the sealant previously spread, apply a 1/4-inch to 3/8-inch bead of sealant down the center of the bond area.
Note:
If more than one bead is required, apply it immediately adjacent to the prior
bead to form one large bead.
(ad) Using padded cargo rods, secure the window into position making sure the reference
marks made earlier are perfectly aligned and that the contour of the window matches the
contour of the door.
CAUTION:
When spreading the sealant, ensure all air pockets are removed.
Note:
Five or more cargo rods may be necessary to hold the window into the
proper position. Cargo rods may be placed on each corner of the window
and in the center of the window. Additional cargo rods may be required to
prevent the window from sliding down.
(ae) Using a 1-inch application spatula, push sealant into the gap between the window and the
door.
(af) Remove masking tape and fine line tape from the perimeter of the window and the door.
Note:
To prevent sealant from becoming damaged, pull tape towards sealant
while the sealant is still damp.
(ag) Allow the sealant to air dry. Following the manufacture’s instructions, the sealant can be
heat cured using a heat gun.
13773-001
30 Nov 2000
56-30
Page 9
Figure 56-303
Window Installation
Page 10
56-30
13773-001
30 Nov 2000
(3)
13773-001
30 Nov 2000
(ah) Remove cargo rods.
(ai) Remove the drop cloth.
(aj) Using a vacuum cleaner, remove all debris.
(ak) Install and secure interior trim panels. (Refer to 20-10)
Window - Cleaning
56-30
Page 11
CHAPTER
WINGS
CHAPTER 57 - WINGS
LIST OF EFFECTIVE PAGES
Chapter/Section
Page
Date
57-LOEP
1
30 NOV 2000
57-TOC
1
30 NOV 2000
57-TOC
2
30 NOV 2000
57-00
1
30 NOV 2000
57-10
1
30 NOV 2000
57-20
1
30 NOV 2000
57-30
1
30 NOV 2000
57-30
2
30 NOV 2000
57-40
1
30 NOV 2000
57-40
2
30 NOV 2000
57-40
3
30 NOV 2000
57-50
1
30 NOV 2000
57-50
2
30 NOV 2000
57-50
3
30 NOV 2000
57-50
4
30 NOV 2000
57-50
5
30 NOV 2000
57-50
6
30 NOV 2000
13773-001
30 Nov 2000
57-LOEP
Page 1
CHAPTER 57 - WINGS
TABLE OF CONTENTS
Subject
WINGS
Chapter/Section
Page
57-00
General
WING STRUCTURE
1
57-10
Description
AUXILIARY STRUCTURE
1
57-20
Description
1
Maintenance Practices
1
Wing Tip
Removal - Wing Tip
Installation - Wing Tip
PLATES/SKIN
1
1
1
57-30
Description
1
Maintenance Practices
1
Wing Access Panels
Removal - Collector Tank and Fuel Tank Panels (Type 3 and 4)
Installation - Collector Tank and Fuel Tank Panels (Type 3 and 4)
Removal - Wing Panels
Installation - Wing Panels
Wing Skin
ATTACH FITTINGS
1
1
1
2
2
2
57-40
Description
1
Maintenance Practices
1
Wing Attachments
Wing Attachment Bolt Torque
Landing Gear Attachments
Removal - Lower Attachment Bracket
Installation - Lower Attachment Bracket
Removal - Upper Attachment Bracket
Installation - Upper Attachment Bracket
13773-001
30 Nov 2000
1
1
1
1
1
2
2
57-TOC
Page 1
CHAPTER 57 - WINGS
TABLE OF CONTENTS
Subject
Chapter/Section
FLIGHT SURFACES
Page
57-50
Description
1
Maintenance Practices
1
Aileron Assembly
Removal - Aileron Assembly
Installation - Aileron Assembly
Inspection/Check - Aileron Assembly
Adjustment - Aileron Balancing
Flap Assembly
Removal - Flap Assembly
Installation - Flap Assembly
Page 2
57-TOC
1
1
1
1
1
6
6
6
13773-001
30 Nov 2000
WINGS
1. GENERAL
The wing is manufactured from composite materials, which produce smooth and seamless flight surfaces.
The wings provide attachment structure for the main landing gear and contain one integral fuel tank and
one integral collector tank in each wing.
13773-001
30 Nov 2000
57-00
Page 1
WING STRUCTURE
1. DESCRIPTION
The wing is constructed in a conventional spar, rib, and shear section arrangement. The upper and lower
skins are bonded to the spar, ribs, and aft shear web forming a torsion box that carries all of the wing bending and torsion loads. The rear shear webs are similar in construction but do not carry through the fuselage. The wing spar is manufactured in one piece and is continuous from wing tip to wing tip. The wing
spar passes under the fuselage below the two front seats and is attached to the fuselage in two locations.
Lift and landing loads are carried by the single carry-through spar, plus a pair of rear shear webs (one on
each wing) attached to the fuselage. The spar is laminated epoxy/glass fiber in a C-section, with a center
closeout panel bonded after cure, for stability. The wing is not field removable.
13773-001
30 Nov 2000
57-10
Page 1
AUXILIARY STRUCTURE
1. DESCRIPTION
The leading edge of the wing is manufactured from composite materials. This airplane has a one-piece
wing with individual wing tips. The wing tips are manufactured from composite materials. Each strobe light
module is secured inside the corresponding wing tip.
2. MAINTENANCE PRACTICES
A. Wing Tip
(1)
(2)
Removal - Wing Tip
(a) Ensure BAT 1, BAT 2, and AVIONICS master switches are in the “OFF” position.
(b) Pull NAV LIGHTS and STROBE LIGHTS circuit breakers.
(c)
Remove the screws securing the wing tip to the wing and slide the wing tip outboard just
enough to gain access to the anti-collision/strobe light wires.
(d) Identify and disconnect the anti-collision light assembly wires. Remove wing tip.
Installation - Wing Tip
(a) Place the wing tip into position and connect the anti-collision light assembly wires.
CAUTION:
(b)
(c)
(d)
13773-001
30 Nov 2000
The wires for the anti-collision light must be positioned away from all moving parts.
Position wires from the anti-collision light away from all moving parts.
Secure the wing tip to the wing with screws.
Reset NAV LIGHTS and STROBE LIGHTS circuit breakers.
57-20
Page 1
PLATES/SKIN
1. DESCRIPTION
Access openings with covers are provided between ribs to allow access to the integral fuel tanks, fuel
lines, and the wing electrical components. The fuel tank access panels (oval shaped panels) allow access
for servicing the integral fuel tank components. The access panels located next to the fuselage on the aft
portion of the wing allows access to the integral collector tanks.
2. MAINTENANCE PRACTICES
A. Wing Access Panels
(1)
Removal - Collector Tank and Fuel Tank Panels (Type 3 and 4)
(a) Determine the access panel(s) to be removed. (Refer to 6-00)
(b) Ground the airplane exhaust outlet pipe to the earth and a suitable fuel drainage container.
(c)
Disconnect battery. (Refer to 24-30)
(d) Drain fuel tank. (Refer to 12-20)
(e) Remove screws securing fuel tank panel.
(f)
Remove all sealant from the access panel and fuel tank.
Note:
(2)
The best method of removing sealant is with a chisel-like tool made of hard
fiber. Remaining sealant can be removed with 200-grit sandpaper.
Installation - Collector Tank and Fuel Tank Panels (Type 3 and 4)
(a)
Acquire necessary tools, equipment, and supplies.
Approved Sealants
Item
P/N or Spec.
Parting Agent or
Automotive Wax (Silicone-free)
NC-700
Brushable Sealant
MIL-S-8802 Type 2
Class A*
GC408A
P/S 890A
EC1675A
CS3204 C1.A
PR1440A
13773-001
30 Nov 2000
Supplier
Frekote
Any Source
Application
Assist future panel
removal
Fuel tank repair surface seal.
Goal
PRC Aerospace
Sealants
3M
Chem Seal - Flame
Master
PRC Aerospace
Sealants
57-30
Page 1
Approved Sealants
Item
P/N or Spec.
Extrusion Gun Seal- MIL-S-8802 Type 2
ant
Class B*
CS3204 C1.B
GC408B
P/S 890B
PR1440B
EC1675B
AC-240B
Supplier
Chem Seal - Flame
Master
Goal
PRC Aerospace
Sealants
PRC Aerospace
Sealants
3M
Dynamold Aerospace
Application
Fillet, faying surface,
and injection seal in
fuel tanks. Install and
seal windows. Seal
fuel system enclosure in cabin.
* When ordering MIL-S-8802 sealants make sure that an appropriate work life is specified. Work life
is specified by adding the desired work life in the product dash number after the Class designation, e.g. A-1/2, A-2, B-1/2, B-2, etc.
(b)
Solvent clean the access panel and opening.
CAUTION:
Parting agent (Frekote or silicone-free automotive wax) must be applied to
the access panel mating surfaces. This will assure easier access panel
removal in the future.
(c)
(3)
(4)
Apply parting agent (Frekote or silicone-free automotive wax) to the access panel mating
surface.
(d) Faying surface seal fuel tank access panel. (Refer to 20-10)
(e) Position fuel tank access panel to wing.
(f)
Install screws securing access panel to wing.
(g) After sealant has cured, fill fuel tank. (Refer to 12-10)
(h) Inspect fuel system for any signs of leakage. Repair as needed.
(i)
Connect battery. (Refer to 24-30)
(j)
Remove airplane ground from exhaust outlet.
Removal - Wing Panels
(a) Determine access panel(s) to be removed. (Refer to 6-00)
(b) Remove screws securing access panel to wing.
(c)
Remove access panel.
Installation - Wing Panels
(a) Determine access panel(s) to be installed. (Refer to 6-00)
(b) Position access panel to wing.
(c)
Install screws securing access panel to wing.
B. Wing Skin
The wing is manufactured from composite laminate materials. Refer to Chapter 51 for composite repair
procedures.
Page 2
57-30
13773-001
30 Nov 2000
ATTACH FITTINGS
1. DESCRIPTION
Wing loads are transferred to the fuselage through four wing-attach points, two which are located under
each front seat and the remaining two on either sidewall just aft of the rear seats. The forward attach points
transfer load into the spar tunnel. The aft attach points transfer load into the fuselage skin and aft floor.
2. MAINTENANCE PRACTICES
A. Wing Attachments
The wing is not field removable, therefore, removal of the wing attachments is not permissible. The
attachment hardware can be inspected for proper fastener torque by accessing the hardware through
the cabin floor access panels.
(1)
Wing Attachment Bolt Torque
(a) Remove forward seats. (Refer to 25-10)
(b) Remove forward cabin floor carpet. (Refer to 25-10)
(c)
Remove cabin floor access panels CF1L and CF2L. (Refer to 6-00)
(d) Remove the access panels from the wing root fairing.
(e) Inspect the mounting hardware for proper torque. (Refer to 7-10)
B. Landing Gear Attachments
(1)
Removal - Lower Attachment Bracket
(a) Remove upper strut fairing and center strut fairing. (Refer to 32-10)
(b) Raise airplane on jacks. (Refer to 7-10)
(c)
Loosen upper strut brake line union fitting. (Refer to 32-10)
CAUTION:
(2)
When strut clamp is removed, exercise caution to prevent strut assembly
from coming into contact with wing skin.
(d) Remove the nuts and washers securing strut clamp to canted rib. Remove strut clamp.
(e) Gently allow strut assembly to swing downward.
(f)
Remove the lower gear attach bracket bolts and washers. Remove lower attach bracket.
Installation - Lower Attachment Bracket
(a)
Acquire necessary tools, equipment, and supplies.
Part Number
13773-001
30 Nov 2000
Description
Quantity
50013-101
Shell Epon 862 (resin)
As Required
50013-301
Heloxy 68 (diluent)
As Required
50013-201
Teta 3234 (hardener)
As Required
50009-301
Aero-sil 200 fumed silica
filler
As Required
50862-001
Frekote NC700 release
agent
As Required
50614-001
Release tape, Teflon, 1 inch As Required
57-40
Page 1
(b)
(c)
(d)
(e)
(f)
Remove existing liquid shim material.
Solvent clean the attach bracket with isopropyl alcohol. (Refer to 20-30)
Apply release agent (Frekote NC700 or release tape) to inner surfaces of the attach
bracket.
Mix liquid shim in accordance with manufacture’s instructions.
Inject a 3/8-inch (9.5 mm) wide bead of liquid shim across the entire width (inner surface)
of the attach bracket.
CAUTION:
Do not torque the attach bracket bolts to their final torque value of 60 inchpounds (plus drag torque) until after the liquid shim has fully cured. If bolts
are torqued before the liquid shim is allowed to fully cure, the attach bracket
may become deformed and allow the bolts to become improperly torqued
after the liquid shim has fully cured.
(g)
(3)
(4)
Page 2
Slide attach bracket up into position and loosely secure the bolts (with washers) until the
fitting is properly seated.
(h) Allow liquid shim to post-cure in accordance with manufacturer’s instructions.
(i)
Final torque bolts to 60 inch-pounds (6.6 N-m) plus drag torque.
(j)
Swing strut assembly up into position and secure strut clamp. Tighten to 190 inch-pounds
(20.9 N-m).
(k)
Secure upper strut brake line union fitting.
(l)
Fill brake system with hydraulic fluid as required. (Refer to 20-30)
(m) Bleed brake system. (Refer to 20-30)
(n) Lower airplane and remove jacks. (Refer to 7-10)
(o) Install main landing gear fairings. (Refer to 32-10)
Removal - Upper Attachment Bracket
(a) Remove main landing gear. (Refer to 32-10)
(b) Remove collector tank access panel.
(c)
Remove the bolts, washers, and locknuts from the upper landing gear fitting assembly.
Installation - Upper Attachment Bracket
(a) Secure the upper landing gear fitting assembly with bolts, washers (one on each side),
and new locknuts.
(b) Install collector tank access panel.
(c)
Install main landing gear. (Refer to 32-10)
57-40
13773-001
30 Nov 2000
Figure 57-401
Wing Attach Hardware
13773-001
30 Nov 2000
57-40
Page 3
FLIGHT SURFACES
1. DESCRIPTION
The flaps are mounted to the trailing edge of each wing between the inboard end of the ailerons and the
fuselage. The ailerons are located near the wing tips and hinge to the aileron spar to become part of the
trailing edge of the wing. The ailerons and flaps are made from aluminum.
2. MAINTENANCE PRACTICES
A. Aileron Assembly
(1)
Removal - Aileron Assembly
(a) Remove wing tip. (Refer to 57-20)
(b) Cut safety wire securing aileron hinge bolts to flat actuation fittings on each end of the aileron.
CAUTION:
When removing aileron hinge bolts, exercise caution to prevent aileron from
falling and becoming damaged. Exercise caution to prevent the aileron from
being supported by only one bolt, as this could damage the bolt, hinge, and
aileron.
(c)
(2)
Remove the outer aileron hinge bolt and thick washer from the outside edge of the hinge.
Account for a thin washer (located next to the inside edge of the outer hinge) and two thick
washers.
(d) Remove the inner aileron hinge bolt, washer, and spacer from the inner hinge. Remove
aileron.
Installation - Aileron Assembly
(a)
Acquire necessary tools, equipment, and supplies.
Description
Safety wire
P/N or Spec.
MS20995C32
Supplier
Any Source
Purpose
Retain part
(b)
(c)
(d)
(3)
(4)
13773-001
30 Nov 2000
Insert the actuation arm pin into the spherical rod end on the actuation pulley.
Place the inner aileron hinge bolt, washer, and spacer into the inner aileron hinge.
Place the outer aileron hinge bolt and thick washer into the outside edge of the outer aileron hinge. Place the thin washer (next to the inside edge of the outer aileron hinge) and
two thick washers next against the inside edge of the outer aileron hinge.
(e) Tighten both aileron hinge bolts to 20 - 25 inch pounds.
(f)
Safety wire both aileron hinge bolts to the flat actuation fittings. (Refer to 20-50)
(g) Install wing tip. (Refer to 57-20)
Inspection/Check - Aileron Assembly
(a) Lower flaps to full down position.
(b) Remove wing tips. (Refer to 57-20)
(c)
Verify proper hinge bolt installation and torque on outboard hinge. (Refer to 57-50)
(d) Verify proper hinge bolt installation and torque on inboard hinge. (Refer to 57-50)
(e) Verify proper installation of safety wires and cotter pins on all fasteners.
(f)
Install wing tips. (Refer to 57-20)
(g) Raise flaps to full up position.
Adjustment - Aileron Balancing
57-50
Page 1
To balance the aileron, the assembly must be painted and complete, including all attaching hardware.
WARNING:
(a)
Before balancing, ensure no breeze or drafts are in balancing room. Maximum allowable mass balance is 1.05 pound at each mass balance location.
Acquire necessary tools, equipment, and supplies.
Description
(b)
(c)
(f)
Any Source
Balance aileron
Scale
-
Any Source
Balance aileron
Safety wire
MS20995C32
Any Source
Retain part
Lead washer
12682-001
Cirrus Design
Balance aileron
Remove aileron. (Refer to 57-50)
Remove the bolts, nuts, and washers securing the mass balance weight to the aileron.
(h)
(i)
Page 2
The chord line is defined as the line extending from the trailing edge
through the hinge line. It is perpendicular to the spar.
Place the complete assembly on knife-edge supports and determine if a static overbalance (leading edge heavy) or static underbalance (trailing edge heavy) condition exists.
To determine the amount of static underbalance (trailing edge heavy), attach a paper cup
to one end of a short, small diameter string. Secure the string with masking tape to the
leading edge of the aileron. The paper cup should hang vertical without contact. Add the
mounting hardware in the paper cup.
Maximum allowable mass balance is 1.05 pound at each mass balance
location.
Add weight in the cup until the aileron balances with the aileron chord line level. Check
this by holding a spirit level aligned with the chord line.
Remove the string, cup and its contents. Weigh them to the smallest calibration possible
with the scale being used.
Weigh the aileron mounting hardware and mass balance weight.
CAUTION:
(j)
The mass balance weight must be removed for the following procedure.
Mark the chord line on the inboard rib shear web.
WARNING:
(g)
Purpose
-
Note:
(e)
Supplier
Knife edge supports
Note:
(d)
P/N or Spec.
Each mounting location has a maximum mass balance weight of 1.05
pounds.
Add or remove weight as necessary to achieve the total predetermined weight needed to
balance the aileron.
57-50
13773-001
30 Nov 2000
Note:
Underbalanced (trailing edge heavy) conditions are corrected by adding
additional weight to the control surface. Typically, by placing additional
washers, lead or steel, under each nut or bolt head retaining the balance
mass, as required. A maximum of four washers per bolt and nut retaining
the balance masses and a maximum of three washers under any bolt head
or nut. Always place steel washer next to nut.
Overbalance (leading edge heavy) conditions are corrected by removing
small amounts of material from the lead balance mass, typically by drilling
or other means. Correction may also be accomplished by reducing the number of washers, used in retention of the mass balance. Observe all health
precautions when handling lead.
(k)
(l)
(m)
13773-001
30 Nov 2000
Secure the total weight needed (to balance the aileron) to the aileron with bolts, flat washers, and new self-locking nuts.
Install the aileron. (Refer to 57-50)
Operate the aileron and inspect for any abnormal resistance. Correct as needed.
57-50
Page 3
Figure 57-501
Aileron Assembly (Sheet 1 of 2)
Page 4
57-50
13773-001
30 Nov 2000
Figure 57-501
Aileron Assembly (Sheet 2 of 2)
13773-001
30 Nov 2000
57-50
Page 5
B. Flap Assembly
(1)
Removal - Flap Assembly
(a) Cut safety wire securing rod end mounting bolt to the actuation fitting on the flap.
CAUTION:
When removing the rod end mounting bolt, exercise caution to prevent the
flap from swinging downward and making contact with the landing gear.
(b)
(2)
Remove the rod end mounting bolt and washer to allow the flap to swing down to the
underside of the wing.
(c)
Remove the cotter pins from each of the flap mounting bolts.
(d) Remove the center hinge bolt, thin washer, four thick washers, (two from each side of the
flap hinge) thin washer, and castellated nut.
(e) Remove the two remaining hinge mounting bolts and remove the flap.
Installation - Flap Assembly
CAUTION:
(a)
The flap hinge bolts must be installed with the castellated nuts facing
inboard.
Acquire necessary tools, equipment, and supplies.
Description
(b)
(c)
(e)
(f)
Page 6
Supplier
Purpose
Cotter pin
MS24665-134 Any Source
Retain part
Safety wire
MS20995C32
Retain part
Any Source
Place the flap into position and secure with a hinge bolt, thin washer, four thick washers,
(two from each side of the flap hinge) thin washer, and castellated nut at each of the three
hinge mounts.
Secure the three hinge bolts and castellated nuts with cotter pins.
CAUTION:
(d)
P/N or Spec.
The flap must pivot freely on each of the three hinge bolts. If the flap doesn’t
pivot freely, the problem must be corrected before securing the rod end
mounting bolt and washer.
Gently rotate the flap through its normal range of motion on the hinges and inspect for
smooth operation of the flap.
Secure the rod end to the flap with a mounting bolt and washer.
Safety wire the rod end mounting bolt to the flat actuation fitting on the flap.
57-50
13773-001
30 Nov 2000
CHAPTER
PROPELLER
CHAPTER 61 - PROPELLER
LIST OF EFFECTIVE PAGES
Chapter/Section
Page
Date
61-LOEP
1
30 NOV 2000
61-TOC
1
30 NOV 2000
61-00
1
30 NOV 2000
61-00
2
30 NOV 2000
61-00
3
30 NOV 2000
61-00
4
30 NOV 2000
61-10
1
30 NOV 2000
61-10
2
30 NOV 2000
61-10
3
30 NOV 2000
61-10
4
30 NOV 2000
61-10
5
30 NOV 2000
61-10
6
30 NOV 2000
61-10
7
30 NOV 2000
61-10
8
30 NOV 2000
61-10
9
30 NOV 2000
61-20
1
30 NOV 2000
61-20
2
30 NOV 2000
61-20
3
30 NOV 2000
13773-001
30 Nov 2000
61-LOEP
Page 1
CHAPTER 61 - PROPELLER
TABLE OF CONTENTS
Subject
PROPELLER
Chapter/Section
Page
61-00
General
1
Troubleshooting
2
PROPELLER ASSEMBLY
61-10
Description
1
Maintenance Practices
1
Propeller
Removal - Propeller
Installation - Propeller
Adjustment/Test - Propeller Balance
Inspection/Check - Propeller Assembly
Inspection/Check - Blade Track
Inspection/Check - Loose Blades
Approved Repairs - Blades
Cleaning/Painting - Propeller Blades
PROPELLER CONTROL
1
1
2
4
4
4
4
6
8
61-20
General
1
Maintenance Practices
1
Propeller Governor
Removal - Propeller Governor
Installation - Propeller Governor
Adjustment/Test - Governor Rigging and Low-Pitch Stop Adjustment
13773-001
30 Nov 2000
1
1
1
1
61-TOC
Page 1
PROPELLER
1. GENERAL
The airplane employs a 3 blade, Hartzell Compact PHC-J3YF-1RF/F7694, constant speed, non-feathering
propeller. The aluminum blades are mounted in an aluminum hub which contains the pitch changing mechanism consisting of a piston/cylinder, piston rod, and blade actuating components. For propeller speed
adjustment, a propeller control cable is terminated on a cam plate which is mounted to the throttle control
lever. This connection mechanically adjusts the propeller speed by increasing oil pressure from an engine
mounted governor to move the blades into high pitch or reduced RPM. A spring and centrifugal twisting
moment of the blades moves them to low pitch in the absence of governor oil pressure. Under this
arrangement, the propeller is set to 2700 RPM for full forward throttle takeoff and climb, 2500 RPM for
cruise, and approximately 1900 RPM at propeller check detent.
13773-001
30 Nov 2000
61-00
Page 1
2. TROUBLESHOOTING
Trouble
Surging propeller.
Probable Cause
Remedy
Governor out of adjustment.
Inspect and adjust governor.
Air in propeller governor oil body.
Cycle propeller through pitch
range several times.
Engine speed varies with attitude Governor not properly controlling
or airspeed.
propeller blade angle.
Inspect and adjust governor.
Friction in propeller.
Inspect propeller and make necessary adjustments.
Decrease in engine speed while
increasing airspeed.
Governor is excessively increasing oil volume.
Inspect and adjust governor.
Decrease in engine speed while
decreasing airspeed.
Governor is not reducing oil volume.
Inspect and adjust governor.
Increase in engine speed while
decreasing airspeed.
Governor is excessively decreasing oil volume.
Inspect and adjust governor.
Increase in engine speed while
increasing airspeed.
Governor is not increasing oil vol- Inspect and adjust governor.
ume.
Propeller piston seal leaking oil to Remove propeller from aircraft,
opposite side of piston.
disassembly, clean, and replace
propeller seals. (Refer to 61-10)
Propeller goes to uncommanded
low pitch.
Loss of propeller oil pressure
Inspect governor pressure relief
valve, governor drive, engine oil
supply, engine transfer bearing for
leakage.
Oil leakage at engine flange/hub
interface.
Damaged O-ring seal between
engine and propeller.
Replace O-ring. (Refer to 61-10)
Mounting nuts not tight.
Clean mating surface and tighten
nuts properly. (Refer to 61-10)
Defective seals or incorrect
assembly.
Repair or replace seals as
required.
Oil leakage at any location
Page 2
61-00
13773-001
30 Nov 2000
Figure 61-001
Propeller Schematic
13773-001
30 Nov 2000
61-00
Page 3
SR2_MM34_1480
RESERVED
Figure 61-002
Propeller Control
Page 4
61-00
13773-001
30 Nov 2000
PROPELLER ASSEMBLY
1. DESCRIPTION
The propeller assembly consists of a hollow aluminum hub which supports the propeller blades and also
houses the pitch changing mechanism. Movement of propeller blades is controlled by a hydraulic piston/
cylinder combination mounted on the front of the hub. The linear motion of the hydraulic piston is transmitted to each blade through a pitch change rod and fork. A pitch change knob at the base of each blade
intersects with the fork.
Blade pitch is controlled by the governor. The governor supplies oil to the propeller hub to move the blades
toward high pitch position (decreased RPM). Conversely, the propeller blades move toward low pitch position (increase RPM) as the governor drains oil away from the propeller hub. A mechanical spring is
installed within the propeller to assist movement of the blades to a lower pitch position as RPM decays
since blade centrifugal twisting moment is only present when the propeller is rotating. The mechanical
spring will insure that blade angel will reach the low pitch stop when the propeller is static. If oil pressure is
lost at any time, the propeller will move to low pitch.
The propeller assembly employes high-strength, aluminum blades. It is essential that the propeller assembly be maintained in accordance with Hartzell Propeller recommended service procedures. These procedures are detailed in the Propeller Owner’s Manual and Log Book listed in the list of publications at the
front of this manual. (List of Publications)
2. MAINTENANCE PRACTICES
A. Propeller (See Figure 61-101)
WARNING:
(1)
Ensure magneto is grounded (OFF) and ignition key is removed prior to performing maintenance.
Removal - Propeller
(a)
Acquire necessary tools, equipment, and supplies.
Description
(b)
(c)
(d)
(e)
(f)
(g)
(h)
(i)
(j)
13773-001
30 Nov 2000
P/N or Spec.
Supplier
Purpose
Hoist
-
Any Source
Hoist propeller.
Sling
-
Any Source
Secure propeller to
hoist.
Drain Pan
-
Any Source
Receive waste oil.
Ensure master and magneto switches are off, and ignition key is removed.
Move fuel selector to OFF position.
Place mixture control in idle cut-off.
Remove engine cowling. (Refer to 71-10)
Remove screws and washer securing spinner dome to spinner bulkhead and remove
spinner.
Position hoist and lifting sling forward of airplane and attach sling to propeller.
Place a drain pan beneath propeller to catch oil spillage.
Loosen and remove nuts and washers attaching propeller to engine flange.
Remove propeller from airplane.
61-10
Page 1
(k)
(2)
Remove bolts, spacers, washers, and nuts securing spinner backing plate to propeller
hub.
(l)
Remove O-ring from groove inside hub at flange mounting and discard.
Installation - Propeller
(a)
Acquire necessary tools, equipment, and supplies.
Description
(b)
(c)
(d)
(e)
(f)
(i)
Any Source
Hoist propeller.
Sling
-
Any Source
Secure propeller to
hoist.
Degreaser
-
Any Source
Degrease components.
O-Ring
C-3317-228
Hartzell Propellers Inc. Sealing compoPiqua, Ohio
nent.
Phone: (937) 778-4200
Ensure master and magneto switches are off.
Move fuel selector to OFF position.
Place mixture control in idle cut-off.
Clean the engine shaft, propeller flange, and engine flange.
Apply a light coat of engine oil to new O-ring and insert O-ring into groove inside hub at
flange mounting.
Page 2
In securing spinner backing plate to propeller hub, no less than one and no
more than three threads to be exposed beyond nut. Additional washers may
be installed to achieve this result.
Position spinner backing plate to propeller hub and torque to 22 foot-pounds (2.2 N.m.)
Care must be taken to avoid damaging hub or O-ring when installing propeller. Do not attempt to forcefully draw propeller onto engine flange with nuts.
Using hoist and sling, align dowel pins in propeller flange with corresponding holes in
engine mounting flange.
Install washers and nuts securing propeller assembly to engine flange.
CAUTION:
(j)
(k)
(l)
Purpose
-
CAUTION:
(h)
Supplier
Hoist
CAUTION:
(g)
P/N or Spec.
Tighten nuts evenly to avoid hub damage.
Secure propeller to engine flange and torque nuts to 70-80 foot-pounds (7.7-8.8 N.m.).
Position spinner dome on bulkhead and install washers and screws.
Install engine cowling. (Refer to 71-10)
61-10
13773-001
30 Nov 2000
Figure 61-101
Propeller Installation
13773-001
30 Nov 2000
61-10
Page 3
(3)
Adjustment/Test - Propeller Balance
(a)
Acquire necessary tools, equipment, and supplies.
Description
P/N or Spec.
Vibrex 2000 Balancer/Ana- 13590
lyzer Kit
Supplier
Chadwick-Helmuth
Purpose
Propeller Balance
(b)
(4)
(5)
Perform dynamic balancing in accordance with Chadwick Helmuth Vibrex 2000 Users
Guide and propeller balancing booklet; The Smooth Propeller, indexed in the List or Publications in the front of this manual. (List of Publications)
Inspection/Check - Propeller Assembly
(a) Remove screws and washer securing spinner dome to spinner bulkhead and remove
spinner.
(b) Inspect blades for nicks and gouges. Repair as required. (Refer to 61-10)
(c)
Inspect spinner and visible hub areas for damage or cracks
(d) Check for loose or missing hardware.
(e) Inspect for grease and oil leakage
(f)
Check blades for radial play or movement of blade tip. (Refer to 61-10)
Inspection/Check - Blade Track (See Figure 61-102)
Blade track is the way one rotating blade tip follows the other in almost the same plane. Excessive difference in blade track may be an indication of bent blades or improper propeller installation.
(a)
Place a flat board with a sheet of paper attached to the top within 0.25 of an inch (6 mm) of
the lowest point of the propeller arc.
WARNING:
Ensure magneto is grounded (OFF) and ignition key is removed prior
to rotating propeller blades.
(b)
(6)
Rotate propeller opposite direction of normal rotation until a blade points directly at the
paper and mark position of blade tip in relation to paper.
(c)
Repeat step (b) for remaining blades.
(d) Tracking tolerance is +/- 0.063 inch (1.60 mm) or 0.126 of an inch (3.2 mm) total.
(e) If blade track falls outside of tolerance, remove propeller and inspect for bent blades or
foreign particles lodged between hub and crank shaft mounting faces. Bent blades will
require repair and overhaul at an authorized propeller repair station.
Inspection/Check - Loose Blades (See Figure 61-102)
CAUTION:
(a)
Page 4
Blade movement beyond these limits must be referred to an authorized propeller
repair station.
Limits for blade looseness are as follows:
1
End Play: None
2
Fore and Aft Play: None
In and Out: None
3
4
Radial Play (pitch change): +/- 0.5 degrees
61-10
13773-001
30 Nov 2000
Figure 61-102
Propeller Inspection
13773-001
30 Nov 2000
61-10
Page 5
(7)
Approved Repairs - Blades (See Figure 61-103)
Nicks, gouges, and scratches on blade surfaces or on leading or trailing edges must be removed
prior to flight. Field repair of small nicks and scratches may be performed by qualified personnel
in accordance with FAA Advisory Circular 43.13-1(latest approved revision), as well as the maintenance practices specified below.
WARNING:
(a)
Re-work which involves cold working the metal, resulting in concealment of
damaged area, is NOT acceptable. Stress concentrations may exist which
can result in blade failure.
Acquire necessary tools, equipment, and supplies.
Description
(b)
(c)
(d)
P/N or Spec.
Supplier
Purpose
File
-
Any Source
Removal of damage material.
Emery Cloth
-
Any Source
Removal of damage material
Crocus Cloth
-
Any Source
Polishing of damaged area.
Dye Penetrant
-
Any Source
Inspection of damaged area.
Magnifying Glass
-
Any Source
Inspection of damaged area.
Repairs to blade are to be accomplished by removing material from the bottom of the
damaged area out to the damage perimeter in a smooth, flowing manner yielding a clean,
smooth depression which maintains the original airfoil’s general shape.
Repairs that form a continuous line across the blade section (chordwise) are unacceptable.
The area of repair is determined as follows:
Leading and trailing edge damage: Depth of nick x 10.
Face and camber: Depth of nick x 20.
Note:
(e)
(f)
(g)
Page 6
Leading edge includes the first 10 percent of chord from the leading edge.
The trailing edge consists of the last 20 percent of chord adjacent to the
trailing edge.
After filing or sanding damaged area, polish with emery cloth, then with crocus cloth to
remove any traces of filing.
Inspect repaired area with 10X magnifying glass and dye penetrant to ensure no indication
of file marks or course surface finish remain.
Before returning to service, paint repaired area. (Refer to 61-10)
61-10
13773-001
30 Nov 2000
Figure 61-103
Repair Limitations
13773-001
30 Nov 2000
61-10
Page 7
(8)
Cleaning/Painting - Propeller Blades
Propeller blades are painted with a durable specialized coating that is resistant to abrasion. If
this coating becomes eroded, it is necessary to re-paint the blades to provide proper corrosion
and erosion protection. Painting should be performed by an authorized propeller repair station in
accordance with Hartzell Propeller Owner’s Manual and Handbook. It is permissible to perform a
blade touch-up with aerosol paint in accordance with the procedure below.
(a)
Acquire necessary tools, equipment, and supplies
Description
(f)
Page 8
Purpose
-
Any Source
Cleaning blade.
120-180 Grit Sandpaper
-
Any Source
Feather existing
paint.
Masking Tape
-
Any Source
Masking damaged
area.
Oaktite 31 Corrosion Preventative
-
Oakite
Prevent blade corrosion.
Tempo Products Co.
1000 Lake Road
Medina, OH 44256
Tel: 800.321.6300
Fax: 216.349.4241
Blade touch-up
Sherwin-Williams
2390 Arbor Boulevard
Dayton, Ohio
Tel: 937.298.8691
Fax: 937.298.3820
Blade touch-up.
Approved Paints:
Grey
Black
White
Red
Yellow
A-151
A-150
A-152
A-153
A-154
Approved Paints:
Grey
Black
White
Red
Yellow
L4A89503
L4B89510
LBW89611
L4R8912
L4Y89572
Cleaning agents are flammable and toxic to the skin, eyes, and respiratory
tract. Skin and eye protection is required. Avoid prolonged contact. Use in
well ventilated area.
Using acetone, wipe surface of blade to remove contaminates.
CAUTION:
(c)
(d)
(e)
Supplier
Acetone
WARNING:
(b)
P/N or Spec.
Erosion damage is typically very similar on all blades in a propeller assembly. If one blade has more damage, i.e. in the tip area, all blades should be
sanded in the tip area to replicate the repair of the most severely damaged
blade tip. This practice is essential in maintaining balance after refinishing.
Feather existing paint coatings away from eroded or repaired area with sandpaper.
Using acetone, wipe surface of blade to remove contaminates.
Apply corrosion preventative such as Oakite 31 in accordance with directions provided by
manufacturer.
Mask off blades as needed.
61-10
13773-001
30 Nov 2000
(g)
(h)
13773-001
30 Nov 2000
WARNING:
Finish coatings are flammable and toxic to the skin, eyes, and respiratory tract. Skin and eye protection is required. Avoid prolonged contact. Use in well ventilated area.
CAUTION:
Apply finish coating only to the degree required to uniformly cover the
repair/erosion. Avoid excessive paint build-up along trailing edge to avoid
changing blade profile.
Apply the appropriate finish coat to achieve 2 to 4 mils (0.51 - 0.10 mm) thickness when
dry. Re-coat before 30 minutes or after 48 hours.
Optionally, perform dynamic balancing in accordance with procedures and limitations
specified in Hartzell Standard Practices Manual 202A. (List of Publications)
61-10
Page 9
PROPELLER CONTROL
1. GENERAL
The Woodward Governor Assembly P/N D210760 is an engine RPM sensing device and high pressure oil
pump. Pressurized engine oil is directed to the propeller hydraulic cylinder or released from the hydraulic
cylinder in response to engine RPM change. Change in oil volume in the hydraulic cylinder changes the
blade angle and returns the propeller system RPM to the value set by the cockpit throttle/propeller control.
The governor is mounted on the lower left forward portion of the engine crankcase.
2. MAINTENANCE PRACTICES
A. Propeller Governor (See Figure 61-201)
(1)
(2)
Removal - Propeller Governor
(a) Remove engine cowling. (Refer to 71-10)
(b) Disconnect governor control cable end from governor control arm.
(c)
Place a drain pan beneath governor to catch oil spillage.
(d) Remove bolts, lockwashers, and washers, securing governor to crankcase.
(e) Remove and discard gasket.
(f)
Remove governor from airplane.
Installation - Propeller Governor
(a)
Acquire necessary tools, equipment, and supplies.
Description
Engine oil.
P/N or Spec.
-
Supplier
Any Source
Purpose
Lubrication.
(b)
(c)
(d)
(3)
Lubricate governor shaft spines with engine oil.
Install new gasket over studs on governor mounting pad.
Install governor over studs on to gasket. Secure with washers, lockwashers, and nuts.
Torque nuts to 155-175 inch-pounds (17-19 N.m.).
(e) Install governor control cable to governor control arm.
(f)
Install engine cowling. (Refer to 71-10)
Adjustment/Test - Governor Rigging and Low-Pitch Stop Adjustment
(a) Remove engine cowling. (Refer to 71-10)
(b) Perform Throttle Control Adjustment/Test. (Refer to 76-10)
(c)
Perform Mixture Control Adjustment/Test. (Refer to 76-10)
(d) Adjust the governor control cable jamnuts so the power control lever in the full forward
position causes the governor control arm to make contact with the governor low pitch control-arm stop.
(e) Ensure the power control lever has positive clearance to the console slot in both the full
forward and full aft positions.
CAUTION:
(f)
13773-001
30 Nov 2000
Engine starting, and shut-down may only be performed by authorized personnel.
Start and warm up engine. (Refer to Pilot’s Operating Handbook, Section 4)
61-20
Page 1
Note:
(g)
(h)
With power lever full forward, observe engine RPM which should read 2650 RPM.
If engine tachometer does not read 2650 RPM, shut down engine, and adjust the low
pitch/high RPM screw on the governor: cut safety-wire from adjustment screw, loosen
adjustment screw locknut and turn screw in clockwise direction to decrease engine speed
or in counterclockwise direction to increase engine speed.
Note:
(i)
(j)
(k)
(l)
Page 2
Due to lower loads on the engine during flight, engine RPM should be set to
approximately 2650 during ground static adjustments to ensure engine output of 2700 RPM during flight conditions.
One revolution of the adjustment screw will increase or decrease the engine
speed approximately 20 RPM.
Verify tachometer reads 2650 RPM
After setting proper high RPM adjustment, tighten and safety-wire adjustment screw locknut.
Upon adjustment completion, tighten jam nuts. Verify minimum rod-end thread engagement of 0.312 inch (0.79 cm). Install cotter pins to rod-end nuts.
Install engine cowling. (Refer to 71-10)
61-20
13773-001
30 Nov 2000
Figure 61-201
Governor Installation
13773-001
30 Nov 2000
61-20
Page 3
CHAPTER
POWER PLANT
CHAPTER 71 - POWERPLANT
LIST OF EFFECTIVE PAGES
Chapter/Section
Page
Date
71-LOEP
1
31 JULY 2001
71-TOC
1
30 NOV 2000
71-TOC
2
30 NOV 2000
71-00
1
30 NOV 2000
71-00
2
30 NOV 2000
71-00
3
30 NOV 2000
71-00
4
30 NOV 2000
71-00
5
30 NOV 2000
71-00
6
30 NOV 2000
71-00
7
30 NOV 2000
71-00
8
30 NOV 2000
71-00
9
30 NOV 2000
71-00
10
30 NOV 2000
71-00
11
30 NOV 2000
71-00
12
30 NOV 2000
71-00
13
30 NOV 2000
71-10
1
30 NOV 2000
71-10
2
30 NOV 2000
71-10
3
30 NOV 2000
71-20
1
30 NOV 2000
71-20
2
30 NOV 2000
71-20
3
31 JULY 2001
71-40
1
30 NOV 2000
71-40
2
30 NOV 2000
71-40
3
30 NOV 2000
71-40
4
30 NOV 2000
71-50
1
30 NOV 2000
71-60
1
30 NOV 2000
71-60
2
30 NOV 2000
71-60
3
30 NOV 2000
71-70
1
30 NOV 2000
71-70
2
31 JULY 2001
13773-001
31 July 2001
71-LOEP
Page 1
CHAPTER 71 - POWERPLANT
TABLE OF CONTENTS
Subject
POWER PLANT
Chapter/Section
Page
71-00
General
1
Description
1
Troubleshooting
2
Maintenance Practices
12
Engine
Removal - Engine
Installation - Engine
Engine Baffling
Removal - Engine Baffling
Installation - Engine Baffling
COWLING
12
12
13
14
14
14
71-10
Description
1
Maintenance Practices
1
Engine Cowling
Removal - Engine Cowling
Installation - Engine Cowling
MOUNTS
1
1
1
71-20
Description
1
Maintenance Practices
1
Engine Mount Weldment
Removal - Engine Mount Weldment
Installation - Engine Mount Weldment
Engine Mount Isolators
Removal - Engine Mount Isolators
Installation - Engine Mount Isolators
ATTACH FITTINGS
1
1
1
1
1
2
71-40
Description
1
Maintenance Practices
1
Throttle Control Cable Bracket
Removal - Throttle Control Cable Bracket
Installation - Throttle Control Cable Bracket
Governor Control Cable Bracket
Removal - Governor Control Cable Bracket
Installation - Governor Control Cable Bracket
13773-001
30 Nov 2000
1
1
1
1
1
1
71-TOC
Page 1
CHAPTER 71 - POWERPLANT
TABLE OF CONTENTS
Subject
Chapter/Section
Mixture Control Cable Bracket
Removal - Mixture Control Cable Bracket
Installation - Mixture Control Cable Bracket
Fuel and Hose Line Stand-Off Clamps
Removal - Fuel and Hose Line Stand-Off Clamps
Installation - Fuel Line and Hose Stand-offs
ELECTRICAL HARNESS
Page
1
1
2
2
2
2
71-50
Description
1
Maintenance Practices
1
Electrical Harness
Removal - Electrical Harnesses
Installation - Electrical Harnesses
AIR INTAKES
1
1
1
71-60
Description
1
Maintenance Practices
1
Induction Air Filter
Removal - Induction Air Filter
Installation - Induction Air Filter
Alternate Air Control Cable.
Removal - Alternate Air Control Cable
Installation - Alternate Air Control Cable
ENGINE DRAINS
1
1
1
1
1
1
71-70
Description
1
Maintenance Practices
1
System Drain Hoses
Removal - System Drain Hose
Installation - System Drain Hose.
Page 2
71-TOC
1
1
1
13773-001
30 Nov 2000
POWER PLANT
1. GENERAL
This chapter describes maintenance practices for the airplane systems which provide the means to induce
and convert fuel-air mixture into power such as the engine, air intake, mount, cowling, and attach fittings.
2. DESCRIPTION (See Figure 71-001)
The SR22 is powered by a Teledyne Continental IO-550-N, six-cylinder, normally aspirated, fuel-injected
engine rated to 310 hp at 2700 RPM. Dual, conventional magnetos provide ignition.
The engine is bed-mounted on a tubular steel weldment which incorporates four dynafocal mount fittings.
The mount fittings use conventional elastomeric isolators. The engine mount is bolted in four locations to
the composite fuselage firewall.
Sheet metal baffles are installed on the engine to direct the air flow around the cylinders and other engine
compartment components. To help direct and contain air flow in the engine compartment, the baffles utilize
fiber reinforced silicon seals in contact with the cowling around the circumference of the engine.
13773-001
30 Nov 2000
71-00
Page 1
3. TROUBLESHOOTING
TROUBLE
Engine Will Not Start.
PROBABLE CAUSE
REMEDY
Improper use of starting procedure.
Refer to Pilot’s Operating Handbook. (List of Publications)
Fuel tank empty.
Inspect and fill tank. (Refer to 1210)
Mixture control in SHUTOFF posi- Advance mixture control to RICH
tion.
position.
Page 2
71-00
Fuel selector valve in OFF position.
Place selector valve in ON position to tank known to contain fuel.
Fuel vaporization.
Turn boost pump ON.
Engine flooded.
Turn off boost pump and ignition
switch. Advance throttle to full
OPEN, retard fuel control to full
LEAN, and crank engine to clear
cylinders of excess fuel. Repeat
starting procedure.
Water in fuel system.
Sample fuel per POH. If water
present drain and flush fuel system. (Refer to 12-20)
Fuel contamination.
Drain and flush fuel system. (Refer
to 12-20)
Defective magneto switch or
grounded magneto leads.
Check continuity. Repair or
replace switch or leads.
Spark plugs fouled.
Remove, clean, and re-gap. (Refer
to TCM Model IO-550 Overhaul
Manual)
Excessive starter slippage.
Replace starter adapter. (Refer to
TCM Model IO-550 Overhaul Manual)
Defective ignition system.
Inspect and replace necessary
components. (Refer to 74-00)
Induction system leak.
Torque or replace loose or damaged hose connection.
Excessive Starter slippage.
Replace starter adapter.
Fuel system malfunction.
Isolate cause and correct.
13773-001
30 Nov 2000
TROUBLE
Engine Will Not Run At Idling
Speed
Rough Idling
PROBABLE CAUSE
REMEDY
Fuel injection system improperly
adjusted.
See “Engine Fuel System Troubleshooting.” (Refer to 73-00)
Air leak in intake manifold.
Torque loose connection or
replace malfunctioning part
Fuel injection system improperly
adjusted.
Adjust fuel system in accordance
with IO-550 Maintenance Manual
Chapter 22 “Fuel System Adjustment.” (Refer to TCM Model IO550 Overhaul Manual)
Mixture levers set for improper
mixture.
Adjust the manual mixture control
in accordance with the Pilot’s
Operating Handbook (POH). (List
of Publications)
Fouled Spark Plugs.
Remove, clean and adjust gaps in
accordance Chapter 74, “Ignition”. (Refer to 74-00)
Hydraulic tappets fouled.
Replace fouled tappets. Inspect
and clean oil filter at more frequent
intervals.
Burned or warped exhaust valves Inspect, repair or replace cylinder.
worn seat, scored valve guides.
Replace any burned, warped or
worn exhaust valves.
Manifold valve vent obstruction.
Engine Runs Too Lean At Cruising Improper manual leaning procePower
dure.
Repair or replace manifold valve.
Refer to the Pilot’s Operating
Handbook (POH) for engine operating instructions. (List of Publications)
Fuel injection system maladjusted. Adjust fuel system in accordance
with IO-550 Maintenance Manual
Chapter 22, “Fuel System Adjustment. (Refer to TCM Model IO550 Overhaul Manual)
Engine Runs Too Rich At Cruising Restrictions in air intake passages Check passages and remove
Power
Improper manual leaning of Fuel/ restrictions See the Pilot’s OperatAir mixture.
ing Handbook (POH) for correct
leaning procedure. (List of Publications)
Engine Runs Too Lean Or Too
Rich At Throttle Setting Other
Than Cruise
13773-001
30 Nov 2000
Fuel injection system maladjusted. See “Engine Fuel System Troubleshooting”. (Refer to 73-00)
71-00
Page 3
TROUBLE
PROBABLE CAUSE
REMEDY
Continuous Fouling Of Spark
Plugs
Piston rings excessively worn or
broken Piston rings are not
seated.
Engine Runs Rough At High
Speed
Loose mounting bolts or damaged Torque mounting bolts. Replace
mount pads.
mount pads. (Refer to 71-20)
Continuous Missing At High
Speed
Sluggish Operation And Low
Power
Replace rings. Replace cylinder if
damaged Hone cylinder walls,
replace rings.
Plugged fuel nozzle jet.
Clean. Replace nozzle if obstruction cannot be cleared by solvent
action. Never use wire or any
other object to clear nozzle jet.
Propeller out of balance.
Remove and repair in accordance
with Pilot’s Operating Handbook
(POH) instructions. (List of Publications)
Ignition system malfunction.
See Ignition “Troubleshooting”.
(Refer to 74-00)
Broken valve spring.
Inspect, repair or replace cylinder.
Replace valve springs.
Plugged fuel nozzle jet.
Clean. Replace nozzle if obstruction cannot be cleared by solvent
action.
Burned or warped valve.
Inspect, repair or replace cylinder.
Replace any burned, warped or
worn exhaust valves.
Hydraulic tappet dirty or worn.
Remove and replace.
Throttle not full open.
Check and adjust linkage. See
Rigging of Mixture and Throttle
Controls in the applicable Pilot’s
Operating Handbook (POH)
instructions. (List of Publications)
Restrictions in air intake passages.
Inspect air intake and remove
restrictions.
Ignition system malfunction.
See “Ignition Troubleshooting”.
(Refer to 74-00)
Fuel injection system maladjusted. See “Engine Fuel System Troubleshooting.” (Refer to 73-00)
Page 4
71-00
13773-001
30 Nov 2000
TROUBLE
High Cylinder Head Temperature
Oil Leaks
PROBABLE CAUSE
REMEDY
Lean fuel/air mixture.
See the Pilot’s Operating Handbook (POH) for correct leaning
procedure. (List of Publications)
Debris between cylinder fins.
Clean thoroughly.
Incorrect engine timing.
Adjust engine timing in accordance with IO-550 Maintenance
Manual Chapter 12.” (Refer to
TCM Model IO-550 Overhaul Manual)
Exhaust system gas leakage.
Locate and correct in accordance
with the Pilot’s Operating Handbook (POH) instructions. (List of
Publications)
Exhaust valve leaking.
Repair cylinder. See IO-550 Maintenance Manual Chapter 19, “Cylinder Assembly Maintenance.”
(Refer to Model IO-550 Maintenance Manual)
Baffle seals leaking or mispositioned.
Repair or replace baffle seals.
At front of engine, damaged crank- Replace crankshaft oil seal.
shaft oil seal.
Around plugs, fittings and gaskets Torque or replace.
due to looseness or damage.
Low Compression
Piston rings excessively worn.
Inspect, repair or replace cylinder.
Replace piston rings.
Valve faces and seats worn.
Inspect, repair or replace cylinder.
Replace any worn parts.
Excessively worn cylinder walls.
Replace cylinder & piston rings.
Engine Will Not Stop At Idle Cutoff Fuel manifold valve not seating
properly.
Repair or replace fuel manifold
valve.
Climbing to Altitude, Fuel Flow
Fluctuates
Operate fuel boost pump in accordance with the Pilot’s Operating
Handbook (POH). (List of Publications)
13773-001
30 Nov 2000
Fuel Vaporization.
71-00
Page 5
TROUBLE
Low Fuel Pressure
High Fuel Pressure
PROBABLE CAUSE
REMEDY
Incorrect fuel pump adjustment.
Check and adjust in accordance
with IO-550 Maintenance Manual
Chapter 22, “Fuel System Adjustment.” (Refer to Model IO-550
Maintenance Manual)
Malfunctioning fuel pump relief
valve.
Replace fuel pump.
Malfunctioning relief valve operation in fuel pump.
Replace fuel pump.
Restricted recirculation passage in Replace fuel pump.
fuel pump.
Incorrect fuel pump adjustment.
Check and adjust in accordance
with IO-550 Maintenance Manual
Chapter 22, “Fuel System Adjustment.” (Refer to Model IO-550
Maintenance Manual)
Fluctuating Fuel Pressure
Vapor in fuel system, excessive
fuel temperature.
Normally, operating the auxiliary
pump will clear system. Operate
boost pump in accordance with
the Pilot’s Operating Handbook
(POH). (List of Publications)
Engine Has Poor Acceleration
Idle mixture too lean.
(Check RPM Rise, Idle Cutoff).,
Adjust idle mixture in accordance
with IO-550 Maintenance Manual
Chapter 22, “Fuel System Adjustment”. (Refer to Model IO-550
Maintenance Manual)
Incorrect fuel/air mixture, worn
control linkage, or restricted air
cleaner.
Replace worn elements of linkage.
Service air filter in accordance
with AMM. (Refer to 71-60]
Malfunctioning ignition system.
Check ignition cables and connections. Replace malfunctioning
spark plugs. (Refer to 74-00)
Page 6
71-00
13773-001
30 Nov 2000
TROUBLE
Engine Runs Rough At Speeds
Above Idle
PROBABLE CAUSE
REMEDY
Improper Fuel/Air mixture.
Check fuel manifold connections
for leaks. Torque loose connections. Check fuel control/metering
unit and linkage for setting and
adjustment in accordance with IO550 Maintenance Manual Chapter
22, “Fuel System Adjustment.”
(Refer to Model IO-550 Maintenance Manual) Check fuel filters
and screens for debris. Check for
proper fuel pump pressure.
Restricted fuel nozzle jet.
Clean. Replace nozzle if obstruction cannot be cleared by solvent
action.
Ignition system and spark plugs
malfunctioning.
Clean, regap and test spark plugs.
Inspect, test and repair ignition
system. Replace components as
required. (Refer to 74-00)
Engine Lacks Power, Reduction in Incorrectly adjusted throttle control Check movement of linkage by
Maximum Manifold Pressure
linkage or dirty air filter.
moving control from idle to full
throttle. Replace worn components.(Refer to 76-00]
Service air filter in accordance
with the airplane manufactures
instructions. (Refer to 71-60]
Low Oil Pressure Indication On
Engine Gage
Low oil supply. Oil viscosity too
low.
Replenish. Drain and refill with
correct viscosity. Adjust oil pressure in accordance with IO-550
Maintenance Manual Chapter 22,
“Oil Pressure Adjustment.” (Refer
to Model IO-550 Maintenance
Manual)
Malfunctioning oil pump.
Repair or replace oil pump.
Weak or broken oil pressure relief Replace spring.
valve spring.
High Oil Temperature Indication
13773-001
30 Nov 2000
Prolonged ground operation.
Limit ground operation to a minimum.
Malfunctioning gage or bulb unit.
Check wiring. Check bulb unit.
Check gage.
71-00
Page 7
Figure 71-001
Engine Components (Sheet 1 of 4)
Page 8
71-00
13773-001
30 Nov 2000
Figure 71-001
Engine Components (Sheet 2 of 4)
13773-001
30 Nov 2000
71-00
Page 9
Figure 71-001
Engine Components (Sheet 3 of 4)
Page 10
71-00
13773-001
30 Nov 2000
Figure 71-001
Engine Components (Sheet 4 of 4)
13773-001
30 Nov 2000
71-00
Page 11
4. MAINTENANCE PRACTICES
A. Engine
(1)
Removal - Engine
CAUTION:
Place a tail stand of suitable capacity under tail of airplane before removing
engine.
Note:
Tag each component when disconnected to facilitate reinstallation. Protect openings exposed as a result of removing or disconnecting components against entry
of foreign material by installing covers or sealing with tape.
(a)
(b)
(c)
(d)
(e)
(f)
(g)
(h)
(i)
(j)
(k)
Place all electrical switches in the cockpit in the OFF position.
Place fuel selector valve in the OFF position.
Remove engine cowling. (Refer to 71-10)
Remove battery. (Refer to 24-30)
Drain gascolator and fuel lines. (Refer to 12-20)
Drain engine oil sump. (Refer to 12-20)
Remove spinner and propeller. (Refer to 61-10)
Disconnect magneto primary lead wires at magnetos. (Refer to 74-10)
Disconnect electrical cable at starter. (Refer to 80-00)
Disconnect exhaust gas temperature probe. (Refer to 77-20)
Remove exhaust system. (Refer to 78-10)
CAUTION:
(l)
(m)
(n)
(o)
(p)
(q)
(r)
(s)
(t)
(u)
Disconnect throttle and mixture control cables at engine. Remove clamps securing cables
to engine and pull cables aft, clear of engine. (Refer to 76-10)
Disconnect governor control cable at governor. (Refer to 61-20)
Disconnect alternate air control cable at induction duct assembly. (Refer to 71-10)
Remove induction air filter. (Refer to 71-10)
Disconnect all environmental air flexible hoses and ducts and remove from airplane.
(Refer to 21-00)
Disconnect manifold air pressure sensor lead at connector. (Refer to 77-10)
Disconnect oil pressure sensor lead at connector. (Refer to 79-30)
Disconnect oil temperature sensor lead at connector. (Refer to 79-30)
Disconnect electrical wires at primary and secondary alternators. (Refer to 24-30)
Disconnect all clamps and ties attaching wires or cables to engine and pull wires and
cables aft, clear of engine.
WARNING:
(v)
(w)
(x)
Page 12
When removing throttle and governor control cables, note EXACT size,
position, and number of attaching washer or spacers for reference on reinstallation. Use care to avoid bending cable controls too sharply.
Residual oil and fuel draining from engine hoses and lines constitutes
a fire hazard. Caution must be used to prevent the inadvertent pooling
of such materials when lines or hoses are disconnected.
Disconnect fuel pump supply line at pump and cap line.
Disconnect fuel return line at pump and cap line.
Disconnect fuel system vent and drain lines at tees located beneath engine.
71-00
13773-001
30 Nov 2000
CAUTION:
(y)
(z)
Loosen bolts securing engine to engine mounts.
Attach hoist at forward and aft lifting points. Lift engine just enough to relieve weight from
engine mounts.
CAUTION:
(2)
Prior to removing engine attach bolts, ensure all hoses, wires, lines, cables,
cable ties, and clamps are disconnected or removed from positions which
would interfere with engine removal.
Note location and position of engine mount isolators prior to engine removal
for reference on reinstallation.
(aa) Remove grounding cables and nuts, washers, bolts, securing engine to engine mount.
(Refer to 71-20)
(ab) Slowly hoist engine away from airplane, guiding the detached parts out as the engine is
removed.
(ac) Preserve engine in accordance with TCM IO-550 Maintenance and Operator’s Manual.
(List of Publications)
Installation - Engine
Note:
Remove all protective caps and identification tags as each component is installed.
Prior to installing engine, install all components that were removed from engine
after engine was removed from airplane.
(a)
(b)
(c)
(d)
(e)
(f)
(g)
(h)
(i)
(j)
(k)
(l)
(m)
(n)
(o)
(p)
(q)
(r)
(s)
(t)
(u)
(v)
13773-001
30 Nov 2000
De-preserve engine in accordance with TCM IO-550 Maintenance and Operator’s Manual.
(List of Publications)
Hoist engine into alignment with engine mount attach points.
Assemble engine mount isolators. (Refer to 71-20)
Install engine mount bolts, washers, bushings, and nuts. Torque to 450 to 500 inchpounds (49.5 to 55 Nm). (Refer to 71-20)
Connect alternator leads and wiring at alternators. (Refer to 24-30)
Connect oil pressure sensor lead. (Refer to 79-30)
Connect oil temperature sensor lead. (Refer to 79-30)
Connect manifold pressure sensor lead. (Refer to 77-10)
Connect governor control cable. (Refer to 61-20)
Connect throttle and mixture control cables. Adjust power control cables. (Refer to 76-10)
Connect alternate air control cable at induction duct assembly. (Refer to 71-10)
Connect fuel pump supply line, vent line, and return line.
Connect starter electrical cable. (Refer to 80-00)
Connect fuel system vent and drain lines at tees located beneath engine.
Ensure any other lines, hoses, electrical leads, clamps, and ties disconnected during
removal of engine are installed.
Install exhaust system. (Refer to 78-10)
Connect exhaust gas temperature probe. (Refer to 77-20)
Attach and connect all environmental air flexible hoses and ducts. (Refer to 21-00)
Install propeller and spinner. (Refer to 61-10)
Connect magneto primary lead wires. (Refer to 74-10)
Connect battery cables. (Refer to 24-30)
Remove hoist and tail stand.
71-00
Page 13
(w)
(x)
Fill engine with proper grade and amount of engine oil. (Refer to 12-20)
Place fuel selector valve in the ON position, open throttle and mixture to full, turn on electric full pump, and check fuel lines for leaks.
(y)
Perform Functional Inspection of Fuel Injection System in accordance with Teledyne Continentals Motors Service Information Directive 97-3. (Refer to 5-20)
(z)
Perform operational check. (Refer to 5-30)
(aa) Install engine cowling. (Refer to 71-10)
B. Engine Baffling (See Figure 71-001)
Note:
(1)
(2)
Proper baffling installation and care is critical to engine cooling. If baffles or seals are
broken or misshaped, the amount of air flowing past a particular cylinder or component
will increase. The increased airflow in one area causes a reduction of airflow past other
components and leads to higher temperatures in some parts of the engine. Ensure baffles are installed correctly and seals fit and direct airflow in the proper direction.
Removal - Engine Baffling
(a) Remove engine cowling. (Refer to 71-10)
(b) Disconnect any lines, hoses, wires, and controls routed through baffling.
(c)
Remove vibration dampening springs.
(d) Remove bolts, washers, and screws securing baffling to engine.
(e) Remove baffling from airplane.
Installation - Engine Baffling
Note:
(a)
(b)
(c)
(d)
Page 14
Various lines, hoses, wires, and controls are routed through some baffles. Ensure
that these components are reinstalled correctly after baffle installation.
Position engine baffling and install screws, washers, and bolts.
Install vibration dampening springs.
Install any lines, hoses, wires, and controls routed through baffling.
Install engine cowling. (Refer to 71-10)
71-00
13773-001
Figure 71-002
Engine Baffling Installation
13773-001
71-00
Page 15
COWLING
1. DESCRIPTION
The engine cowling, fabricated from fiberglass and epoxy, consists of one upper and two lower halves. A
urethane close-out seal is secured to the lower cowl halves to fully surround the nose gear strut. The cowling is secured to the fuselage with quarter-turn fasteners and screws. The oil inspection door is located on
the upper cowling and external power receptacle door is located on the lower cowling. The landing light
assembly is integral to the RH lower cowl. For maintenance practices pertinent to the landing light, refer to
Chapter 33, Lights. (Refer to 33-40)
2. MAINTENANCE PRACTICES
A. Engine Cowling (See Figure 71-101)
CAUTION:
(1)
Two people are required when removing or installing engine cowling to avoid damaging
the cowling due to bending or flexing. Apply masking tape around perimeter of spinner
to avoid scratching spinner.
Removal - Engine Cowling
(a) Release quarter-turn fasteners and screws securing upper cowl to lower cowls and fuselage. Remove upper cowl from airplane.
(b) Disconnect landing light connector on RH lower cowling half.
(c)
Remove screws securing close out seal to bottom of lower cowl and remove close out seal
from airplane.
WARNING:
Ensure engine magnetos are grounded (OFF) prior to rotating propeller.
(d)
(e)
(2)
Rotate propeller so one blade is vertical.
Remove quarter-turn fasteners securing RH lower cowl to fuselage and remove from airplane.
(f)
Remove quarter-turn fasteners and screw securing LH lower cowl to fuselage and drain
manifold. Remove cowl from airplane.
Installation - Engine Cowling
WARNING:
(a)
(b)
(c)
(d)
Rotate propeller so one blade is vertical.
Position lower RH cowl around engine compartment and install quarter-turn fasteners.
Position lower LH cowl around engine compartment and install quarter-turn fasteners and
screw.
Connect landing light connector on RH lower cowling half.
Note:
(e)
(f)
13773-001
30 Nov 2000
Ensure engine magnetos are grounded (OFF) prior to rotating propeller.
To facilitate cowling installation, place thumb on cowl directly above quarterturn fastener, lightly apply thumb pressure to reduce space between fastener and receptacle, turn and seat fastener.
Place upper cowl in place and fasten to lower cowl and fuselage with quarter-turn fasteners and screws.
Position close out seal around nose gear strut and secure with screws.
71-10
Page 1
(g)
(h)
(i)
(j)
Page 2
Ensure clearance between propeller spinner and cowling measures at least 0.25" (0.64
cm).
Open engine oil access door and inspect engine baffle seal. Seal must be bent inward
ensuring a seal along the radius of the upper cowling.
Close engine oil access door.
Remove protective tape from spinner.
71-10
13773-001
30 Nov 2000
SR2_MM71_1442
RESERVED
Figure 71-101
Engine Cowling Installation
13773-001
30 Nov 2000
71-10
Page 3
MOUNTS
1. DESCRIPTION
This section describes the framework which supports and attaches the engine to the airplane. Included are
the engine mount weldment and elastomeric vibration isolators.
The engine is attached to a welded tubular steel engine mount. The engine mount weldment is fastened to
the fuselage firewall at four points by steel bolts. Conventional elastomeric isolators are employed for
vibration dampening. At the engine mount points, oversized steel disks are attached on the opposite side
of the engine so that in the event of a fire, the disks will keep the engine fastened to the engine mount
weldment.
2. MAINTENANCE PRACTICES
A.
Engine Mount Weldment (See Figure 71-201)
(1)
(2)
Removal - Engine Mount Weldment
(a) Remove engine. (Refer to 71-00)
(b) Remove cockpit floor covering. (Refer to 25-10)
(c)
Remove access panels CF1L and CF1R to gain access to engine mount weldment lower
attach points. (Refer to 6-00)
(d) Remove lower engine mount nuts, washers, and through-bolts.
(e) Remove glareshield. (Refer to 25-10)
(f)
Ensure engine mount weldment is supported and remove upper engine mount nuts, washers, and through-bolts.
(g) Remove engine mount weldment from airplane.
Installation - Engine Mount Weldment
(a) Ensure engine mount weldment is supported and aligned with mounting points on firewall.
(b) Install upper engine mount through-bolts, washers, and nuts. Torque to 38 to 40 footpounds (4.18 to 4.4 Nm) adding torque value to overcome nut friction. (Refer to 20-60)
(c)
Install lower engine mount through-bolts, washers, and nuts. Torque to 38 to 40 footpounds (4.18 to 4.4 Nm) adding torque value to overcome nut friction. (Refer to 20-60)
(d) Install access panels CF1L and CF1R. (Refer to 6-00).
(e) Install cockpit floor covering. (Refer to 25-10)
(f)
Install glareshield. (Refer to 25-10)
(g) Install engine. (Refer to 71-00)
B. Engine Mount Isolators (See Figure 71-201)
(1)
Removal - Engine Mount Isolators
CAUTION:
(a)
(b)
(c)
(d)
Remove cowling. (Refer to 71-10)
Remove exhaust system. (Refer to 78-20)
Attach hoist at forward and aft lifting points. Lift engine just enough to relieve weight from
engine mounts.
Remove nuts, washers, heat shields, and bolts from engine mount attach points.
Note:
13773-001
30 Nov 2000
Place a tail stand of suitable capacity under tail of airplane before removing
engine.
Mark and note location of each isolator for reference upon reinstallation.
71-20
Page 1
(e)
(2)
Raise or lower hoist just enough to force separation between engine mounting point and
engine mount isolators. Remove isolators from airplane.
Installation - Engine Mount Isolators
Note:
(a)
(b)
(c)
(d)
Page 2
If isolator is being reused, ensure isolators are reinstalled in same location as
originally installed.
Raise or lower hoist just enough to insert stepped isolator into engine side of mounting
point.
Install bushing, lower isolator, washers, heat shield, grounding strap (if applicable), and
bolt. Torque to 450 to 500 inch-pounds (49.5 to 55 Nm). (Refer to 20-60)
Install exhaust system. (Refer to 78-20)
Install cowling. (Refer to 71-10)
71-20
13773-001
30 Nov 2000
Figure 71-201
Engine Mount and Isolator Installation
13773-001
31 July 2001
71-20
Page 3
ATTACH FITTINGS
1. DESCRIPTION
This section describes those fittings and brackets which are used for support of components in and about
the powerplant. These items include the throttle control cable, governor control cable, mixture control
cable, and fuel and hose line stand-off clamps.
2. MAINTENANCE PRACTICES
A.
Throttle Control Cable Bracket (See Figure 71-401)
(1)
(2)
Removal - Throttle Control Cable Bracket
(a) Remove engine cowling. (Refer to 71-10)
(b) Remove cotter pin, nut, washers, and bolt from throttle control cable at lever arm.
(c)
Remove nut, washers, bolt and retaining plate at bracket and remove control cable from
bracket.
(d) Remove nuts and washers securing cable bracket to engine mounting pad and remove
bracket from airplane.
Installation - Throttle Control Cable Bracket
(a) Align control cable bracket with mounting pad studs and install washers and nuts.
(b) Insert control cable into bracket, align retaining plate over cable bracket, and install bolt,
washers, and nut.
(c)
Connect control cable to propeller lever arm and install bolt, washers, nut, and cotter pin.
(d) Perform Throttle Cable Adjustment/Test. (Refer to 76-10)
(e) Install Engine Cowling. (Refer to 71-10)
B. Governor Control Cable Bracket (See Figure 71-401)
(1)
(2)
Removal - Governor Control Cable Bracket
(a) Remove engine cowling. (Refer to 71-10)
(b) Remove cotter pin, nut, washers, and bolt from governor control cable at lever arm.
(c)
Remove retaining plate nut, washers, and bolt at bracket and remove control cable from
bracket.
(d) Remove nuts and washers securing cable bracket to engine mounting pad and remove
bracket from airplane.
Installation - Governor Control Cable Bracket
(a) Align control cable bracket with mounting pad studs and install washers and nuts.
(b) Insert control cable into bracket, align retaining plate over cable bracket, and install bolt,
washers, and nut.
(c)
Connect control cable to governor control lever arm and install bolt, washers, nut, and cotter pin.
(d) Perform Governor Cable Adjustment/Test. (Refer to 61-20)
(e) Install Engine Cowling. (Refer to 71-10)
C. Mixture Control Cable Bracket (See Figure 71-401)
(1)
13773-001
30 Nov 2000
Removal - Mixture Control Cable Bracket
(a) Remove engine cowling. (Refer to 71-10)
(b) Remove cotter pin, nut, washers, and bolt from mixture control cable at lever arm.
(c)
Remove retaining plate nut, washers, and bolt at bracket and remove control cable from
bracket.
71-40
Page 1
(d)
(2)
Remove nuts and washers, and spacers securing cable bracket to engine mounting pad
and remove bracket from airplane.
Installation - Mixture Control Cable Bracket
(a) Align control cable bracket with mounting pad studs and install spacers, washers, and
nuts.
(b) Insert control cable into bracket, align retaining plate over cable bracket, and install bolt,
washers, and nut.
(c)
Connect control cable to mixture control arm and install bolt, washers, nut, and cotter pin.
(d) Perform Mixture Control Adjustment/Test. (Refer to 76-10)
(e) Install Engine Cowling. (Refer to 71-10)
D. Fuel and Hose Line Stand-Off Clamps (See Figure 71-401)
(1)
(2)
Page 2
Removal - Fuel and Hose Line Stand-Off Clamps
(a) Remove nut, washer, and bolt securing component clamp to stand-off clamp.
(b) Pry stand-off clamp open and remove from airplane.
Installation - Fuel Line and Hose Stand-offs
(a) Position stand-off clamp around induction pipe.
(b) Align component clamp with stand-off clamp and install washer, bolt, and nut.
71-40
13773-001
30 Nov 2000
SR2_MM71_1449
RESERVED
Figure 71-401
Attach Fittings (Sheet 1 of 2)
13773-001
30 Nov 2000
71-40
Page 3
SR2_MM71_1449
RESERVED
Figure 71-401
Attach Fittings (Sheet 2 of 2)
Page 4
71-40
13773-001
30 Nov 2000
ELECTRICAL HARNESS
1. DESCRIPTION
This chapter describes the electrical cables, plugs, connectors, etc. which serve power plant and airplane
systems, but are banded together to facilitate removal and installation of the engine.
The airplane employs two engine wiring harnesses. The wiring harnesses connect the following components: fuel pump, landing light, fuel pressure switch, fuel flow sensor, oil temperature sensor, exhaust gas
temperature sensor, manifold air pressure sensor, oil pressure sensor, tachometer sensor, magnetos,
alternator, secondary alternator, and ground bus bar. For maintenance practices pertinent to firewall forward wiring refer to the SR20 Wiring Manual. (List of Publications)
2. MAINTENANCE PRACTICES
A. Electrical Harness
(1)
Removal - Electrical Harnesses
To remove engine wiring harnesses, disconnect all items listed in above, tag connectors, cut
cable ties or loosen clamps, disconnect firewall connectors, and remove electrical harnesses
from the airplane
(2)
Installation - Electrical Harnesses
To install electrical harnesses, connect all connectors at the tagged locations of the items listed
above, secure harnesses with cables ties or clamps, and connect firewall connectors.
Upon installation, perform Operational Check and check cockpit instrumentation for normal
operation. (Refer to 5-30)
13773-001
30 Nov 2000
71-50
Page 1
AIR INTAKES
1. DESCRIPTION
This section describes that portion of the power plant which directs mass air flow to the engine.
Induction air enters the engine through a filter mounted on the left, forward side of the engine then flows
into the induction duct assembly mounted center, forward on the engine. The induction duct assembly
employs a flapper valve which, in the case of filter blockage, or induction ice, allows alternate air to enter
the induction duct body via a flexible duct open to the RH cylinder area beneath the baffling of the engine.
The alternate air valve is manually controlled from the cabin by pulling a control knob mounted on the left
side of the center console. From the induction duct body, induction air flows to the throttle body after which
the air is distributed to each cylinder via the intake manifold and separate intake tubes.
2. MAINTENANCE PRACTICES
A. Induction Air Filter (See Figure 71-601)
(1)
(2)
Removal - Induction Air Filter
(a) Remove castellated nut, washer, cotter pin, and cover plate securing filter to assembly.
(b) Slide filter from assembly and remove from airplane.
Installation - Induction Air Filter
(a) Slide filter onto assembly.
(b) Install cover plate, washer, castellated nut, and cotter pin.
B. Alternate Air Control Cable. (See Figure 71-601)
(1)
Removal - Alternate Air Control Cable
(a) Remove engine cowling. (Refer to 71-10)
(b) Remove cotter pin, castellated nut, washers, and bolt securing alternate air control cable
to flapper valve control arm.
(c)
Remove nut, washer, bolt, and clamp securing control-cable to induction duct assembly.
(d) Remove nut, washer, bolt, and clamp securing control-cable to #3 cylinder manifold.
(e) Remove nut and washer securing alternate air control knob and cable to console mounting bracket.
Note:
Prior to removal, note routing of cable through firewall and console ribs for
aid on reinstallation and remove as much sealant as possible surrounding
cable fitting on firewall.
(f)
(2)
Gently pull throttle control cable aft, through firewall, ensuring that the control cable does
not inadvertently pull other components loose, and remove from airplane.
Installation - Alternate Air Control Cable
(a)
Acquire necessary tools, equipment, and supplies.
Description
(b)
13773-001
30 Nov 2000
P/N or Spec.
Supplier
Purpose
High Temperature Silicone
Adhesive
RTV 736
Dow Corning
Sealant
Fiber Frax
970J,TON0146
UniFrax
Firewall Insulation
Ensure cable fitting on firewall is clear and free of old sealant.
71-60
Page 1
(c)
(d)
(e)
(f)
(g)
(h)
(i)
(j)
(k)
(l)
Page 2
Route alternate air control cable through mounting bracket, firewall, and engine baffling, to
flapper valve control arm.
Install washer and nut securing alternate air control knob to cockpit mounting bracket.
Install bolt, washers, nut, and cotter pin securing control cable to flapper valve control arm.
Wrap FiberFrax paper around portion of control cable which will pass through firewall fitting so a tight fit is achieved at the cable/firewall interface.
Remove alternate air hose connected to induction duct to gain visibility to flapper valve.
Install support clamp, bolt, and nut securing control cable to engine baffling so that with
the cable control knob pushed in, the flapper valve fully closes.
Install clamp, bolt, washer, and nut securing control-cable to induction duct assembly.
Install clamp, bolt, washer, and nut securing control-cable to #3 cylinder manifold.
Apply silicone adhesive to entire firewall fitting and fitting/cable interface.
Install engine cowling. (Refer to 71-10)
71-60
13773-001
30 Nov 2000
Figure 71-601
Induction System Installation
13773-001
30 Nov 2000
71-60
Page 3
ENGINE DRAINS
1. DESCRIPTION
This section describes those components and manifold assemblies which are used to drain off excess fluids for the power plant and its accessories. This includes the fuel, oil, and battery system engine drains.
2. MAINTENANCE PRACTICES
A. System Drain Hoses (See Figure 71-701)
(1)
(2)
13773-001
30 Nov 2000
Removal - System Drain Hose
(a) Remove engine cowling. (Refer to 71-10)
(b) Determine length of new hose by measuring existing hose on airplane.
(c)
Loosen hose clamps and remove hose.
Installation - System Drain Hose.
(a) Position new hose on system component.
(b) Install hose clamp to secure to system.
(c)
Install engine cowling. (Refer to 71-10)
71-70
Page 1
SR2_MM71_1482
RESERVED
Figure 71-701
Engine Drains
Page 2
71-70
13773-001
30 Nov 2000
CHAPTER
ENGINE
CHAPTER 72 - ENGINE
LIST OF EFFECTIVE PAGES
Chapter/Section
Page
Date
72-LOEP
1
30 NOV 2000
72-TOC
1
30 NOV 2000
72-00
1
30 NOV 2000
13773-001
30 Nov 2000
72-LOEP
Page 1
CHAPTER 72 - ENGINE
TABLE OF CONTENTS
Subject
ENGINE
Chapter/Section
Page
72-00
General
13773-001
30 Nov 2000
1
72-TOC
Page 1
ENGINE
1. GENERAL
For information pertaining to this chapter such as maintenance practices, limits, and procedures for teardown, cleaning, inspection, assembly, testing, etc., refer to Teledyne Continental Motors Maintenance
Manual listed in the introduction of this manual in the List of Publications. (List of Publications)
13773-001
30 Nov 2000
72-00
Page 1
CHAPTER
ENGINE FUEL
SYSTEMS
CHAPTER 73 - ENGINE FUEL SYSTEM
LIST OF EFFECTIVE PAGES
Chapter/Section
Page
Date
73-LOEP
1
30 NOV 2000
73-TOC
1
30 NOV 2000
73-00
1
30 NOV 2000
73-00
2
30 NOV 2000
73-00
3
30 NOV 2000
73-00
4
30 NOV 2000
73-30
1
30 NOV 2000
73-30
2
30 NOV 2000
13773-001
30 Nov 2000
73-LOEP
Page 1
CHAPTER 73 - ENGINE FUEL SYSTEM
TABLE OF CONTENTS
Subject
ENGINE FUEL SYSTEM
Chapter/Section
Page
73-00
General
1
Troubleshooting
2
INDICATING
73-30
Description
1
Maintenance Practices
1
Map/Fuel Flow Gage
Fuel Flow Sensor
Removal - Fuel Flow Sensor
Installation - Fuel Flow Sensor
13773-001
30 Nov 2000
1
1
1
1
73-TOC
Page 1
ENGINE FUEL SYSTEM
1. GENERAL
This chapter describes those units and components which deliver metered fuel and air to the engine. Components covered include the manifold pressure gage/fuel flow gage. For additional information on fuel
injection system components, refer to the Teledyne Continental Motors Model IO-550 Fuel Injection Systems Overhaul and Parts Catalog indexed in the List of Publications in the front of this manual. (List of Publications)
The fuel injection system is of the multi-nozzle, continuous-flow type which controls fuel flow to match
engine air flow. Any change in throttle position, engine speed, or a combination of these, causes fuel flow
to change in the correct relation to engine air flow. (See Figure 73-001)
Fuel is drawn from the supply tanks by the engine-driven fuel pump, where the fuel is metered based on
engine and environmental conditions. Excess fuel is returned to the tank. A boost pump is installed for use
in starting and vapor suppression. When liquid fuel leaves the fuel-pump pressure chamber, it is directed to
an integral mixture control valve. The mixture control valve shaft is linked to the cockpit mixture control.
From the mixture control valve, fuel is directed to the fuel metering valve mounted on the side of the throttle body. The shaft that positions the throttle body butterfly valve also positions the metering valve and is
linked to the cockpit throttle control. From the fuel metering valve, fuel passes through the fuel flow meter,
then to the fuel manifold valve.
The fuel manifold valve contains a diaphragm chamber and the necessary ports which connect to the fuel
injector lines. When fuel pressure reaches approximately 3.5 psi, the manifold valve admits fuel to the six
ports in the manifold. The spring-loaded diaphragm works with a ported plunger which distributes the precise amount of fuel, via the fuel injector lines, to the fuel injector nozzles.
13773-001
30 Nov 2000
73-00
Page 1
2. TROUBLESHOOTING
Trouble
Probable Cause
Remedy
Engine Will Not Start And No Fuel No fuel to engine.
Check fuel tank level.
Flow Indication
Mixture control improperly rigged. Check mixture control for proper
rigging. (Refer to TCM Model IO550 Overhaul Manual)
Engine Will Not Start With Fuel
Flow Indication
Rough Idle
Poor Acceleration
Engine not primed.
Auxiliary pump switch to BOOST
position.
Selector valve in OFF position.
Position selector valve to ON position.
Engine flooded.
Turn off boost pump and ignition
switch. Advance throttle to full
OPEN, retard mixture to full LEAN,
and crank engine to clear cylinders of excess fuel. Repeat starting procedure.
No fuel to engine.
Loosen one line at cylinder nozzle.
If no fuel flow shows on gage,
replace fuel metering valve.
Nozzle restricted.
Remove nozzles and clean. (Refer
to TCM Model IO-550 Overhaul
Manual)
Improper idle mixture.
Adjust fuel-air mixture. (Refer to
TCM Model IO-550 Overhaul Manual)
Idle mixture incorrect.
Adjust fuel-air mixture. (Refer to
TCM Model IO-550 Overhaul Manual)
Unmetered fuel pressure too high. Lower unmetered fuel pressure.
(Refer to TCM Service Bulletin
SID97-3)
Engine Runs Rough
Page 2
73-00
Worn linkage.
Replace worn component of linkage.
Restricted nozzle.
Remove and clean all nozzles.
(Refer to TCM Model IO-550 Overhaul Manual)
Improper mixture.
Improper pump pressure, replace
pump. (Refer to TCM Service Bulletin SID97-3)
13773-001
30 Nov 2000
Trouble
Low Fuel Flow Indication
High Fuel Flow Indication
Probable Cause
Remedy
Restricted flow to metering valve. Check mixture control for full
travel.
Inadequate flow from fuel pump.
Verify pump pressure, adjust
engine-driven pump. (Refer to
TCM Service Bulletin SID97-3)
Restricted flow beyond metering
valve.
Check for restricted nozzles or fuel
metering valve. Clean or replace
as required. (Refer to TCM Model
IO-550 Overhaul Manual)
Restricted recirculation passage in Replace engine-driven fuel pump.
fuel pump.
(Refer to TCM Model IO-550 Overhaul Manual)
Fluctuating Or Erroneous Fuel
Flow Indication
Vapor in system, excess fuel tem- If not cleared with boost pump,
perature.
check for clogged ejector jet in
vapor separator cover.
Air in fuel flow gage line. Leak at
gage connection.
Repair leak and purge line.
Poor Idle Cut Off
Fuel flow continues to engine.
Check mixture control is in full idle
cut off. Check boost pump is OFF.
If neither, replace manifold valve.
Fluctuating Fuel Flow
Indications
Fuel vapor as a result of high
ambient temperatures
If not cleared with auxiliary
pump, check for clogged vent in
fuel pump vapor separator
cover.
Air in fuel flow gage line. Leak
at gage connection
Repair leak and purge line.
Unmetered Fuel Pressure too
High
Internal orifices plugged
Clean internal orifices injector
pump. Refer to Fuel Injection
Service Manual, Form X30593A.
Unmetered Fuel Pressure Drop
Relief valve stuck open
Repair or replace fuel pump.
Very High Idle And Full Throttle
Relief valve stuck closed
Repair or replace fuel pump.
Fuel Pressure Present
No Fuel Pressure
Check valve stuck open
Repair or replace fuel pump.
13773-001
30 Nov 2000
73-00
Page 3
Figure 73-001
Fuel System
Page 4
73-00
13773-001
30 Nov 2000
INDICATING
1. DESCRIPTION
This section describes that portion of the engine fuel system which is used to indicate the flow rate. This
includes the MAP/fuel flow gage and fuel flow transducer.
The Fuel Flow Transducer located between the throttle body metering valve and the injector manifold is
mounted on the RH inter-cylinder baffling. The electrically operated Fuel Flow Transducer transmits fuel
flow rate data to the cockpit Fuel Flow gage.
2. MAINTENANCE PRACTICES
A. Map/Fuel Flow Gage (Refer to 77-10)
B. Fuel Flow Sensor (See Figure 73-301)
(1)
(2)
13773-001
30 Nov 2000
Removal - Fuel Flow Sensor
(a) Ensure BAT 1, BAT 2, and AVIONICS master switches are in off position.
(b) Pull ENGINE INSTRUMENT circuit breaker.
(c)
Remove engine cowling. (Refer to 77-10)
(d) Disconnect transducer electrical connector at firewall
(e) Disconnect adel clamps securing transducer wiring to engine.
(f)
Disconnect fuel lines from fittings and cap.
(g) Remove bolts and washers securing fuel-flow sensor assembly to inter-cylinder baffling
and remove unit from airplane.
Installation - Fuel Flow Sensor
(a) Position fuel-flow sensor assembly on inter-cylinder baffling and install bolts and washers.
(b) Connect fuel lines to fittings.
(c)
Connect transducer electrical lead at firewall.
(d) Secure transducer wiring to engine with adel clamps.
(e) Install engine cowling. (Refer to 71-10)
(f)
Reset ENGINE INSTRUMENT circuit breaker.
73-30
Page 1
SR2_MM73_1483
RESERVED
Figure 73-301
Fuel Sensor Installation
Page 2
73-30
13773-001
30 Nov 2000
CHAPTER
IGNITION
CHAPTER 74 - IGNITION
LIST OF EFFECTIVE PAGES
Chapter/Section
Page
Date
74-LOEP
1
30 NOV 2000
74-TOC
1
30 NOV 2000
74-00
1
30 NOV 2000
74-00
2
30 NOV 2000\
74-00
3
30 NOV 2000
74-00
4
30 NOV 2000
74-00
5
30 NOV 2000
74-00
6
30 NOV 2000
74-00
7
30 NOV 2000
74-10
1
30 NOV 2000
74-10
2
30 NOV 2000
74-20
1
30 NOV 2000
74-20
2
30 NOV 2000
74-20
3
30 NOV 2000
74-20
4
30 NOV 2000
74-30
1
30 NOV 2000
74-30
2
30 NOV 2000
74-30
3
31 JULY 2001
13773-001
31 July 2001
74-LOEP
Page 1
CHAPTER 74 - IGNITION
TABLE OF CONTENTS
Subject
IGNITION
Chapter/Section
Page
74-00
General
1
Troubleshooting
2
ELECTRICAL POWER SUPPLY
74-10
Description
1
Maintenance Practices
1
Magnetos
Removal - Magnetos
Installation - Magnetos
DISTRIBUTION
1
1
1
74-20
Description
1
Maintenance Practices
1
Ignition Harness
Removal - Ignition Harness
Installation - Ignition Harness
Spark Plugs
Removal - Spark Plugs
Installation - Spark Plugs
SWITCHING
1
1
1
2
2
2
74-30
Description
1
Maintenance Practices
1
Ignition Switch
Removal - Ignition Switch
Installation - Ignition Switch
Functional Check - Ignition Switch
13773-001
30 Nov 2000
1
1
1
1
74-TOC
Page 1
IGNITION
1. GENERAL
This chapter describes those units and components which furnish, distribute, and control an electrical current to ignite the fuel-air mixture in the engine cylinders. The ignition components include magnetos, ignition harness, spark plugs, and ignition switch.
The magnetos are completely self-contained ignition generating devices. Mounted center aft on the accessory case, each magneto utilizes a rotating magnet to induce a voltage into a magnetic coil. The magnetic
coil steps up the voltage at the distributor which distributes the high-energy voltage through the ignition
harness to the spark plugs.
Ignition system operation is controlled by the ignition switch mounted on the left side of the bolster panel.
With the switch OFF, the magnetos are grounded and will not produce spark. The right magneto fires the
upper right and the lower left spark plugs. The left magneto fires the upper left and the lower right spark
plugs. The magneto cases, spark plugs, cables, and connections are shielded to prevent radio interference.
Each magneto has an impulse coupling installed for engine starting. The impulse coupling delays magneto
rotation, retarding spark until each piston reaches T.D.C. At T.D.C., the coupling spins ahead, generating
enough voltage for ignition at starting RPM. Impulse coupling disengages after engine start.(See Figure
74-001)
13773-001
30 Nov 2000
74-00
Page 1
2. TROUBLESHOOTING
Trouble
Hard Starting
Probable Cause
Remedy
Incorrect external timing to engine. (Refer to TCM Model IO-550 Overhaul Manual) Correct as required.
Incorrect internal timing.
Correct as required.
Point gap setting incorrect.
(Refer to TCM Ignition Systems
Master Service Manual) Correct
as required.
Faulty impulse coupling.
(Refer to TCM Ignition Systems
Master Service Manual) Correct
as required.
Worn pawls or stop pin.
Inspect pawls and stop pin for
wear. Correct as necessary.
Impulse coupling fails to return to Inspect impulse couple nut for
unwound position.
proper torque.
Page 2
74-00
Fouled spark plugs.
Clean spark plugs according to
manufacturer’s specifications.
Incorrect spark plug gap.
Regap spark plugs to engine manufacturer’s specifications.
Faulty ignition switch.
Inspect ignition switch for possibility of intermittent grounding and
proper operation. Repair or
replace as necessary.
Corrosion on harness lead contacts.
(Refer to TCM Ignition Systems
Master Service Manual) Cleaning
and inspection procedures. Correct as required.
Magneto internal component
failure.
(Refer to TCM Ignition Systems
Master Service Manual) Specifications and inspection procedures.
Points
Inspect for excessive burning, pitting, corrosion, gap setting, and
general condition.
Cam
Inspect cam for excessive wear or
unevenness that could cause
“point spread”.
13773-001
30 Nov 2000\
Trouble
Hard Starting
Rough Running
13773-001
30 Nov 2000
Probable Cause
Remedy
Condenser
Inspect for faulty P-lead connection, P-lead stud for overtorqued
condition, damaged pigtail connector, and integrity of windings.
Coil
Inspect for cracks, damage to high
tension strap or pigtail connector,
and integrity of windings.
Distributor Gear
Inspect electrode finger for looseness, gear teeth, and shaft.
Inspect carbon brush for damage.
Distributor Block
Inspect distributor towers for evidence of abrasion or excessive
burning. Examine rotor gear bushings for wear.
Incorrect external timing to engine. (Refer to TCM Model IO-550 Overhaul Manual) Correct as required.
Incorrect internal timing.
(Refer to TCM Ignition Systems
Master Service Manual) Correct
as required.
Fouled spark plugs.
Clean spark plugs according to
manufacturer’s specifications.
Incorrect spark plug gap.
Regap spark plugs to engine manufacturer’s specifications.
Faulty spark plug.
Test spark plug in accordance with
manufacture’s specifications.
Faulty ignition lead.
(Refer to TCM Ignition Systems
Master Service Manual) Ignition
lead troubleshooting information.
Faulty ignition switch.
Inspect ignition switch for possibility of intermittent grounding and
proper operation. Repair or
replace as necessary.
Weak condenser.
(Refer to TCM Model IO-550 Overhaul Manual) Correct as required.
74-00
Page 3
Trouble
Rough Running or Vibration in
Specific RPM Range
Probable Cause
Remedy
Magneto internal component
failure:
(Refer to TCM Ignition Systems
Master Service Manual) Specifications and inspection procedures.
Points
Inspect for excessive burning, pitting, corrosion, gap setting, and
general condition.
Cam
Inspect cam for excessive wear or
unevenness that could cause
“point spread”.
Condenser
Inspect for faulty P-lead connection, P-lead stud for overtorqued
condition, damaged pigtail connector, and integrity of windings.
Coil
Inspect for cracks, damage to high
tension strap or pigtail connector,
and integrity of windings.
Distributor Gear
Inspect electrode finger for looseness, gear teeth, and shaft.
Inspect carbon brush for damage.
Distributor Block
Inspect distributor towers for evidence of abrasion or excessive
burning. Examine rotor gear bushings for wear.
Excessive RPM Drop During Mag- Incorrect external timing to engine. (Refer to TCM Model IO-550 Overneto Check
haul Manual) Correct as required.
Page 4
74-00
Incorrect internal timing.
(Refer to TCM Ignition Systems
Master Service Manual) Correct
as required.
Fouled spark plugs.
Clean spark plugs according to
manufacturer’s specifications.
Incorrect spark plug gap.
Regap spark plugs to engine manufacturer’s specifications.
Faulty spark plug.
test spark plug in accordance with
manufacture’s specifications.
Faulty tachometer.
Confirm tachometer accuracy at
RPM where magneto drop noted.
Correct as necessary.
Faulty ignition lead.
(Refer to TCM Ignition Systems
Master Service Manual) Ignition
lead troubleshooting information.
13773-001
30 Nov 2000
Trouble
Probable Cause
Remedy
Excessive RPM Drop During Mag- Corrosion on harness lead conneto Check
tacts.
(Refer to TCM Ignition Systems
Master Service Manual) Cleaning
and inspection procedures.
Magneto Will Not Fire
Faulty ignition switch.
Inspect ignition switch for possibility of intermittent grounding and
proper operation. Repair or
replace as necessary.
Faulty condenser.
(Refer to TCM Ignition Systems
Master Service Manual) Inspect
for faulty P-lead stud, damaged
pigtail connector, and damaged
grounding.
Faulty coil.
(Refer to TCM Ignition Systems
Master Service Manual) Inspect
for cracks, damage to high tension
strap or pigtail connector, and
integrity of windings.
Point gap setting incorrect.
(Refer to TCM Ignition Systems
Master Service Manual) Point gap
specifications.
Faulty ignition switch.
Inspect ignition switch for possibility of intermittent grounding and
proper operation. Repair or
replace as necessary.
Broken P-lead wire.
Repair as necessary.
Magneto “Hot”
Power Loss
Points Burned Excessively
13773-001
30 Nov 2000
Incorrect external timing to engine. (Refer to TCM Model IO-550 Overhaul Manual) Correct as required.
Faulty tachometer.
Confirm tachometer accuracy at
RPM where magneto drop noted.
Correct as necessary.
Faulty condenser.
(Refer to TCM Ignition Systems
Master Service Manual) Inspect
for faulty P-lead stud, damaged
pigtail connector, and damaged
grounding.
Incorrect spark plug gap.
Regap spark plugs to engine manufacturer’s specifications.
Fouled spark plugs.
Clean spark plugs according to
manufacturer’s specifications.
Faulty spark plug.
Test spark plug in accordance with
manufacture’s specifications.
74-00
Page 5
Trouble
Probable Cause
Remedy
High Tension Lead on Coil Worn
or Burned Through
Improper tension between high
tension lead and carbon brush.
(Refer to TCM Ignition Systems
Master Service Manual) High tension lead loading specifications.
Coil Cracked or Arcing in Case
Faulty coil.
(Refer to TCM Ignition Systems
Master Service Manual) Inspect
for cracks, damage to high tension
strap or pigtail connector, and
integrity of windings.
Incorrect spark plug gap.
Regap spark plugs to engine manufacturer’s specifications.
Fouled spark plugs.
Clean spark plugs according to
manufacturer’s specifications.
Faulty spark plug.
Test spark plug in accordance with
manufacture’s specifications.
Electrode Finger Loose on Distrib- Timing pin wedged between elec- (Refer to TCM Ignition Systems
utor Gear
trode and distributor block during Master Service Manual) Timing
timing process.
procedures.
Distributor Block Towers Scored or Electrode finger contacting towers Inspect and replace as necessary.
Excessively Burned
Distributor Gear Bushings Exces- Improper lubrication of bushings.
sively Worn
(Refer to TCM Ignition Systems
Master Service Manual) Maintenance practices.
Bearing Bar Burned
Carbon tracking due to excessive (Refer to TCM Ignition Systems
carbon brush wear.
Master Service Manual) High tension lead loading specifications.
Mounting Flange Broken
Hold-down clamps overtorqued.
Torque hold-down clamps to 190220 inch-pounds (20.9-24.2 Nm).
Hold-down clamps torqued
unevenly.
Reinstall, ensuring clamps are
torqued with even pressure.
Magneto gasket residue on acces- Ensure mounting face is free of
sory case mounting pad.
gasket residue.
Page 6
74-00
13773-001
30 Nov 2000
Figure 74-001
Ignition System
13773-001
30 Nov 2000
74-00
Page 7
ELECTRICAL POWER SUPPLY
1. DESCRIPTION
This section describes the maintenance practices pertinent to the magnetos. For additional maintenance
practices pertaining to the magnetos, refer to the List of Publications listed in the front of this manual.
(Refer to TCM Ignition Systems Master Service Manual)
2. MAINTENANCE PRACTICES
A. Magnetos (See Figure 74-101)
(1)
Removal - Magnetos
(a) Remove cowling. (Refer to 71-10)
CAUTION:
Prior to removing harness cap, mark the harness cap and adjacent point on
distributor housing for reference on reinstallation.
CAUTION:
Protect openings exposed as a result of removing magnetos against entry
of foreign material by installing covers or sealing with tape.
WARNING:
Ensure engine magnetos are grounded (OFF) prior to rotating propeller.
(b)
(c)
(d)
(e)
(2)
13773-001
30 Nov 2000
Remove screws securing harness caps to magnetos and remove harness caps.
Remove P-lead wires connecting ignition switch to magneto condensers.
Remove ground wires to magnetos.
Ensure magnetos are supported and remove nuts and washers securing magnetos to
accessory case.
(f)
Withdraw magnetos from airplane ensuring that the coupling bushings do not dislodge
and fall into the accessory case.
Installation - Magnetos
(a) Refer to TCM Ignition Systems Master Service Manual for magneto inspection, maintenance, installation, and timing. (Refer to TCM Ignition Systems Master Service Manual)
(b) Install cowling. (Refer to 71-10)
74-10
Page 1
Figure 74-101
Magneto Installation
Page 2
74-10
13773-001
30 Nov 2000
DISTRIBUTION
1. DESCRIPTION
This section describes the maintenance practices of that portion of the ignition system which conducts
high-voltage electricity from the magnetos to the spark plugs. For additional information pertaining to the
ignition harness and spark plugs, refer to the List of Publications in the front of this manual. (Refer to TCM
Ignition Systems Master Service Manual)
2. MAINTENANCE PRACTICES
A. Ignition Harness (See Figure 74-201)
(1)
Removal - Ignition Harness
(a) Remove engine cowling. (Refer to 71-10)
CAUTION:
(2)
To prevent damage to the spark plug insulator and connector, when withdrawing insulator from spark plug, pull the harness lead straight out and at
same angle as the barrel.
(b) Remove ferrule assembly nuts securing ignition harness leads to spark plugs.
(c)
Remove clamps and ties securing ignition harness to engine.
(d) Remove screws and nuts securing harness cap to magneto.
(e) Remove ignition harness from airplane.
Installation - Ignition Harness
(a)
Acquire necessary tools, equipment, and supplies.
Description
Dow Corning 111
Note:
(b)
(c)
(d)
(e)
(g)
(h)
13773-001
30 Nov 2000
DC 111
Supplier
Any Source
Purpose
Lubricant and sealant
Prior to installing ignition harness, check mating surfaces for cleanliness.
Attach ignition harness to the appropriate magneto.
Install washers and screws securing harness cap to magneto. Torque screws 18 to 20
inch-pounds (1.98 to 2.2 Nm).
Route ignition harness leads to the appropriate spark plug position as indicated by the
alphanumeric markings on each spark plug nut.
Secure clamps and ties securing ignition harness to engine.
CAUTION:
(f)
P/N or Spec.
When tightening spark plug nut, hold ferrule with a 7/16” wrench to prevent
twisting the ignition lead.
Coat insulator with Dow Corning 111 and insert into spark plug. Torque spark plug ferrule
assembly nut 110 to 120 inch-pounds (12.1 to 13.2 Nm).
Install remaining insulators in accordance with (f).
Install engine cowling. (Refer to 71-10)
74-20
Page 1
B. Spark Plugs (See Figure 74-202)
(1)
Removal - Spark Plugs
(a) Remove engine cowling. (Refer to 71-10)
CAUTION:
(2)
To prevent damage to the spark plug insulator and connector, when withdrawing insulator from spark plug, pull the harness lead straight out and at
same angle as the barrel.
(b) Remove ferrule assembly nut on harness lead and remove insulator from spark plug.
(c)
Remove spark plug from engine and place in identification tray.
(d) Cover spark plug hole to prevent foreign materials from passing into engine.
(e) Remove remaining spark plugs in accordance with (b) through (d).
Installation - Spark Plugs
(a)
Acquire necessary tools, equipment, and supplies.
Description
Spark Plug Lubricant
(b)
(c)
(d)
(e)
(f)
(g)
(h)
Page 2
P/N or Spec.
2612
Supplier
Champion
Purpose
Lubricant
Clean spark plugs as required.
Set spark plug electrode gap to 0.015 to 0.019 inches.
Lubricate spark plugs.
Place gasket on spark plug and install spark plug. Torque plug 300 to 360 inch-pounds (33
to 39.6 Nm).
Install remaining spark plugs in accordance with (b) through (c).
Install ignition harness leads. (Refer to 74-10)
Install engine cowling. (Refer to 71-10)
74-20
13773-001
30 Nov 2000
SR2_MM74_1465
RESERVED
Figure 74-201
Ignition System Installation
13773-001
30 Nov 2000
74-20
Page 3
Figure 74-202
Spark Plug Installation
Page 4
74-20
13773-001
30 Nov 2000
SWITCHING
1. DESCRIPTION
This section describes that portion of the ignition system which provides a means of rendering the ignition
electrical power supply inoperative. This includes the ignition switch.
2. MAINTENANCE PRACTICES
A. Ignition Switch (See Figure 74-301)
(1)
(2)
(3)
Removal - Ignition Switch
(a) Turn ignition switch to the OFF position.
(b) Remove engine cowling. (Refer to 71-10)
(c)
Disconnect battery. (Refer to 24-30)
(d) Remove retaining nut securing ignition switch to bolster panel, remove placard plate, and
pull switch from forward side of bolster panel.
WARNING:
Prior to disconnecting ignition switch, ground P-leads at magnetos to
prevent accidental firing of engine.
CAUTION:
When removing wire leads from ignition switch, note EXACT location of
attaching leads for reference on reinstallation.
(e) Loosen screws from terminals on back of ignition switch and remove wire leads.
Installation - Ignition Switch
(a) Connect wire leads to ignition switch. (Refer to 91-00)
(b) Perform ignition switch functional check. (Refer to 74-30)
(c)
Position ignition switch in bolster panel, position placard on ignition switch, and install
retaining nut.
(d) Connect battery. (Refer to 24-30)
(e) Install engine cowling. (Refer to 71-10)
Functional Check - Ignition Switch
(a)
Acquire necessary tools, equipment, and supplies.
Description
Ohmmeter
P/N or Spec.
-
Supplier
Flukea
Purpose
Test continuity
a. or equivalent
(b)
(c)
(d)
(e)
13773-001
30 Nov 2000
Remove engine cowling. (Refer to 71-10)
Disconnect battery. (Refer to 24-30)
Check right P-lead continuity:
1
Remove P-lead from right magneto.
Attach P-lead to ohmmeter and to airframe ground.
2
3
With switch in OFF or L position, ohmmeter should indicate a closed circuit.
4
With ignition switch in R or BOTH position, ohmmeter should indicate an open circuit.
5
Connect P-lead to right magneto.
Check left P-lead continuity:
74-30
Page 1
(f)
(g)
Page 2
1
Remove P-lead from left magneto.
2
Attach P-lead to ohmmeter and to airframe ground
3
With switch in OFF or R position, ohmmeter should indicate a closed circuit
With ignition switch in L or BOTH position, ohmmeter should indicate an open circuit
4
5
Connect P-lead to left magneto
Connect battery. (Refer to 24-30)
Install engine cowling. (Refer to 71-10)
74-30
13773-001
30 Nov 2000
Figure 74-301
Ignition Switch Installation
13773-001
31 July 2001
74-30
Page 3
CHAPTER
ENGINE
CONTROLS
CHAPTER 76 - ENGINE CONTROLS
LIST OF EFFECTIVE PAGES
Chapter/Section
Page
Date
76-LOEP
1
31 JULY 2001
76-TOC
1
31 JULY 2001
76-00
1
30 NOV 2000
76-00
2
30 NOV 2000
76-00
3
30 NOV 2000
76-10
1
31 JULY 2001
76-10
2
31 JULY 2001
76-10
3
31 JULY 2001
76-10
4
31 JULY 2001
76-10
5
31 JULY 2001
76-10
6
31 JULY 2001
76-10
7
31 JULY 2001
76-10
8
31 JULY 2001
13773-001
31 July 2001
76-LOEP
Page 1
CHAPTER 76 - ENGINE CONTROLS
TABLE OF CONTENTS
Subject
ENGINE CONTROLS
Chapter/Section
Page
76-00
General
1
Troubleshooting
3
POWER CONTROL
76-10
Description
1
Maintenance Practices
1
Control Quadrant
Removal - Control Quadrant
Installation - Control Quadrant
Throttle Control Cable
Removal - Throttle Control Cable
Installation - Throttle Control Cable
Adjustment/Test - Throttle Control Cable
Mixture Control Cable
Removal - Mixture Control Cable
Installation - Mixture Control Cable
Adjustment/Test - Mixture Control Cable
Governor Control Cable
Removal - Governor Control Cable
Installation - Governor Control Cable
13773-001
31 July 2001
1
1
1
3
3
3
4
4
4
5
5
7
7
7
76-TOC
Page 1
ENGINE CONTROLS
1. GENERAL
This chapter describes the controls which govern operation of the engine. The engine controls for the airplane consist of the following: throttle, mixture, and propeller. The primary controls employ conventional
push-pull type levers and are connected to a control quadrant mounted forward on the center console. The
quadrant control assembly incorporates a friction lock which can be adjusted to retain the throttle and mixture control lever positions. (See Figure 76-001)
The throttle control lever is connected through a cable to the throttle body mounted forward of the induction
duct assembly. The propeller governor control cable is terminated on a cam follower plate which is integral
to the throttle control lever. This connection allows the propeller speed to be mechanically adjusted to the
throttle setting. Under this arrangement, the propeller is set to 2700 RPM for full forward throttle takeoff
and climb, 2500 RPM for cruise, and approximately 2000 RPM at propeller check detent. For additional
maintenance practices regarding the propeller governor refer to 61-00. (Refer to 61-00)
The mixture control lever is connected through a cable to the fuel pump located on the aft, centered on the
engine case.
13773-001
30 Nov 2000
76-00
Page 1
SR2_MM76_1481
RESERVED
Figure 76-001
Engine Controls
Page 2
76-00
13773-001
30 Nov 2000
2. TROUBLESHOOTING
Trouble
Power Lever Binding
Probable Cause
Remedy
Control-quadrant friction knob too Loosen friction knob.
tight.
Cable defective or worn.
Replace cable.
Quadrant assembly nuts too tight. Loosen nuts, reinstall cotter pins.
Bearing worn on cam follower.
Mixture Lever Binding
Control-quadrant friction knob too Loosen friction knob.
tight.
Cable defective or worn.
Engine Rpm Too High Or Low
During Flight
Replace bearing.
Replace cable.
Propeller governor cable rod ends Adjust governor. (Refer to 61-20)
not properly adjusted.
Tachometer malfunctioning.
Inspect and replace (if necessary).
(Refer to 77-10)
Propeller governor malfunctioning. Inspect and replace (if necessary).
(Refer to 61-20)
No Tachometer Indication When
Engine Running
Tachometer malfunctioning.
Inspect and replace (if necessary).
(Refer to 77-10)
Erratic Tachometer Indication
When Engine Running Smoothly
Tachometer malfunctioning.
Inspect and replace (if necessary).
(Refer to 77-10)
13773-001
30 Nov 2000
76-00
Page 3
POWER CONTROL
1. DESCRIPTION
This section describes those components which furnish a means of controlling engine power. Engine controls for the airplane include the following: control quadrant, throttle control cable, mixture control cable,
and governor control cable.
2. MAINTENANCE PRACTICES
A. Control Quadrant (See Figure 76-101)
(1)
(2)
13773-001
31 July 2001
Removal - Control Quadrant
(a) Remove RH cockpit seat. (Refer to 25-10)
(b) Remove control-quadrant friction knob and washer.
(c)
Remove RH and LH aft console trim panel. (Refer to 25-10)
(d) Remove throttle control cable mounted to control quadrant. (Refer to 76-10)
(e) Remove mixture control cable mounted to control quadrant. (Refer to 76-10)
(f)
Remove governor control cable mounted to control quadrant. (Refer to 76-10)
(g) Remove nuts, washers, and bolts securing control quadrant to center console framework.
(h) Remove control quadrant from airplane.
Installation - Control Quadrant
(a) Position control quadrant on center console framework and install bolts, washers, and
nuts.
(b) Install throttle control cable mounted to control quadrant. (Refer to 76-10)
(c)
Install mixture control cable mounted to control quadrant. (Refer to 76-10)
(d) Install governor control cable mounted to control quadrant. (Refer to 76-10)
(e) Perform Governor Low-Pitch Stop Adjustment/Test. (Refer to 61-20)
(f)
Perform Throttle Control Adjustment/Test. (Refer to 76-10)
(g) Perform Mixture Control Adjustment/Test. (Refer to 76-10)
(h) Install RH and LH aft console trim panel. (Refer to 25-10)
(i)
Install control-quadrant friction knob.
(j)
Install RH cockpit seat. (Refer to 25-10)
76-10
Page 1
Figure 76-101
Control Quadrant Installation
Page 2
76-10
13773-001
31 July 2001
B. Throttle Control Cable (See Figure 76-102)
(1)
Removal - Throttle Control Cable
(a) Remove engine cowling. (Refer to 71-10)
(b) At throttle body, remove cotter pin, nut, washers, and bolt securing throttle cable rod-end
bearing to throttle control arm.
(c)
Remove rod-end bearing.
(d) Remove bolts securing control-cable support bracket to engine.
(e) Remove any clamps or ties securing control cable to engine mount.
(f)
Remove control-quadrant friction knob and washer.
(g) Remove RH cockpit seat. (Refer to 25-10)
(h) Remove RH and LH aft console trim panel. (Refer to 25-10)
(i)
Remove cotter pin, castellated nut, bolt, and spacer securing throttle control rod to throttle
lever.
(j)
Remove rubber sleeves, nuts, and washers securing throttle cable to console bracket.
Note:
Prior to removal, note routing of cable and location of anti-chafing spiral
wrap to facilitate installation. Remove as much sealant as possible from
cable and cable fitting on firewall.
(k)
(2)
Gently pull throttle cable forward, through firewall, ensuring that the control cable does not
inadvertently pull other components loose, and remove from airplane.
(l)
Pull cable and bracket slightly aft and remove nut, washer, and bolt securing retaining clip
to bracket.
Installation - Throttle Control Cable
(a)
Acquire necessary tools, equipment, and supplies.
Description
(b)
(e)
(f)
(g)
(h)
13773-001
31 July 2001
Supplier
Purpose
High Temperature Silicone
Sealant
RTV 736
Dow Corning
Sealant
Fiber Frax Paper
970J,TON0146
UniFrax
Firewall Insulation
Ensure cable fitting on firewall is clear and free of old sealant.
CAUTION:
(c)
(d)
P/N or Spec.
When routing the control cable, ensure the cable does not interfere with airplane control rigging, wires, or hoses.
Route throttle cable from engine, through firewall, to cabin compartment.
Route cable assembly through engine mounting bracket and install retaining clip, washer,
and nut.
Draw cable assembly through baffling hole. Install rod linkage and rubber bushing seal.
Install rod-end bearings to both ends of control cable.
At console, install washers, nuts, and rubber sleeves securing control cable to support
bracket.
Align rod-end bearing, bolt, spacer, washer, and install castellated nut securing throttle
cable to throttle lever.
76-10
Page 3
(i)
(3)
At throttle body, secure throttle cable rod-end bearing to throttle control arm with bolt,
washers, nut, and cotter pin.
(j)
Wrap fiber paper around portion of throttle cable which passes through firewall fitting so a
tight fit is achieved at the cable/firewall interface.
(k)
Adjust slack in cable, tighten throttle bracket retaining clip nut, align throttle bracket with
engine mounting pad studs, and install nut.
(l)
Install clamps or ties securing control cable to engine mount.
(m) Perform Throttle Control Cable Adjustment/Test (Refer to 76-10)
(n) Solvent clean firewall fitting and fitting/cable interface. (Refer to 20-30)
(o) Fillet seal firewall fitting and fitting/cable interface with silicone sealant. (Refer to 20-10)
(p) Install RH and LH aft console trim panel. (Refer to 25-10)
(q) Install washer and control-quadrant friction control knob.
(r)
Install RH cockpit seat. (Refer to 25-10)
(s)
Install engine cowling. (Refer to 71-10)
Adjustment/Test - Throttle Control Cable
(a) Adjust the control cable jamnuts so the power control lever, in the full forward and aft positions, causes the throttle body control arm to make contact with the throttle body controlarm stops on both sides of travel.
(b) Ensure the power control lever is only limited by the throttle body control-arm stops and
has positive clearance to the console slot in both the full forward and full aft positions.
(c)
Perform the Governor Rigging and Low-Pitch Stop Adjustment (Refer to 61-20)
(d) Upon adjustment completion, tighten jam nuts. Verify minimum rod-end thread engagement of 0.312 inch (0.79 cm). Install cotter pins to rod-end bearing nuts.
C. Mixture Control Cable (See Figure 76-102)
(1)
Removal - Mixture Control Cable
(a) Remove engine cowling. (Refer to 71-10)
(b) Remove cotter pin, nut, washers, and bolt securing mixture control cable rod-end bearing
to fuel pump control arm.
(c)
Remove rod-end bearing.
(d) At cable support bracket mounted to engine accessory case, remove retaining plate nut,
washers, spacer, and bolt and remove control cable from support bracket.
(e) Remove any clamps or ties securing control cable to engine mount.
(f)
Remove control-quadrant friction knob and washer.
(g) Remove RH cockpit seat. (Refer to 25-10)
(h) Remove RH and LH aft console trim panel. (Refer to 25-10)
(i)
Remove nut, washer, and bolt securing clamp to center console rib and remove clamp
from cable.
(j)
Remove cotter pin, castellated nut, bolt, and spacer securing mixture control rod to mixture lever.
(k)
Remove rubber sleeve, nut, and washer securing control cable to console bracket.
Note:
(l)
Page 4
Prior to removal, note routing of cable and location of anti-chafing spiral
wrap to facilitate installation. Remove as much sealant as possible from
cable and cable fitting on firewall.
Gently pull mixture control cable aft, through firewall, ensuring that the control cable does
not inadvertently pull other components loose, and remove from airplane.
76-10
13773-001
31 July 2001
(2)
Installation - Mixture Control Cable
(a)
Acquire necessary tools, equipment, and supplies.
Description
(b)
P/N or Spec.
Supplier
Purpose
High Temperature Silicone
Sealant
RTV 736
Dow Corning
Sealant
Fiber Frax Paper
970J,TON0146
UniFrax
Firewall Insulation
Ensure cable fitting on firewall is clear and free of old sealant.
CAUTION:
When routing the control cable, ensure the cable does not interfere with airplane control rigging, wires, or hoses.
(c)
(d)
(e)
(3)
13773-001
31 July 2001
Route mixture control cable from the cabin, through firewall, to engine compartment.
Install rod-end bearings to both ends of control cable.
At console, install washers, nuts, and rubber sleeves securing control cable to support
bracket.
(f)
Align rod-end bearing, bolt, spacer, bearing, and washer on mixture lever and install castellated nut and cotter pin.
(g) Insert control cable into engine bracket, align retaining plate over cable bracket, and install
bolt, washers, spacer, and nut.
(h) At fuel pump, secure rod-end bearing to fuel pump control arm with bolt, washers, nut, and
cotter pin.
(i)
Wrap fiber paper around portion of control cable which will pass through firewall fitting so a
tight fit is achieved at the cable/firewall interface.
(j)
At center console rib, attach clamp to cable and secure with bolt, washer, and nut.
(k)
Install clamps or ties securing control cable to engine mount.
(l)
Perform Mixture Control Cable Adjustment/Test (Refer to 76-10)
(m) Solvent clean firewall fitting and fitting/cable interface. (Refer to 20-30)
(n) Fillet seal firewall fitting and fitting/cable interface with silicone sealant. (Refer to 20-10)
(o) Install RH and LH aft console trim panel. (Refer to 25-10)
(p) Install washer and control-quadrant friction control knob.
(q) Install RH cockpit seat. (Refer to 25-10)
(r)
Install engine cowling. (Refer to 71-10)
Adjustment/Test - Mixture Control Cable
(a) Adjust the control cable jamnuts so the mixture control lever in the full forward and aft
position causes the fuel pump control arm to make contact with the fuel pump control-arm
stops on both sides of travel.
(b) Ensure the mixture control lever is only limited by the fuel pump control-arm stop and has
positive clearance to the console slot in both the full forward and full aft positions.
(c)
Upon adjustment completion, tighten jam nuts. Verify minimum rod-end thread engagement of 0.312 inch (0.79 cm). Install cotter pins to rod-end bearing nuts.
76-10
Page 5
SR2_MM76_1468
RESERVED
Figure 76-102
Control Cable Installation
Page 6
76-10
13773-001
31 July 2001
D. Governor Control Cable (See Figure 76-102)
(1)
Removal - Governor Control Cable
(a) Remove engine cowling. (Refer to 71-10)
(b) Remove cotter pin, nut, washers, and bolt securing governor control cable rod-end bearing to governor control arm.
(c)
Remove rod-end bearing.
(d) At forward cable support bracket mounted to engine, remove retaining plate nut, washers,
and bolt and remove control cable from support bracket.
(e) At aft cable support bracket mounted to engine, remove adel clamp securing control cable
to support bracket.
(f)
Remove any additional clamps or ties securing control cable to engine mount.
(g) Remove control-quadrant friction knob and washer.
(h) Remove RH cockpit seat. (Refer to 25-10)
(i)
Remove RH and LH aft console trim panel. (Refer to 25-10)
(j)
Remove cotter pin, castellated nut, and bolt securing governor control rod to throttle cam
follower.
(k)
Remove rubber sleeve, nut, and washer securing control cable to console bracket.
Note:
Prior to removal, note routing of cable and location of anti-chafing spiral
wrap to facilitate installation. Remove as much sealant as possible from
cable and cable fitting on firewall.
(l)
(2)
Gently pull governor control cable aft, through firewall, ensuring that the control cable
does not inadvertently pull other components loose, and remove from airplane.
Installation - Governor Control Cable
(a)
Acquire necessary tools, equipment, and supplies.
Description
(b)
(f)
(g)
(h)
13773-001
31 July 2001
Supplier
Purpose
High Temperature Silicone
Sealant
RTV 736
Dow Corning
Sealant
Fiber Frax Paper
970J,TON0146
UniFrax
Firewall Insulation
Ensure cable fitting on firewall is clear and free of old sealant.
CAUTION:
(c)
(d)
(e)
P/N or Spec.
When routing the control cable, ensure the cable does not interfere with airplane control rigging, wires, or hoses.
Route governor control cable from the cabin, through firewall, to engine compartment.
Install rod-end bearings to both ends of control cable.
At console, install washers, nuts, and rubber sleeves securing control cable to support
bracket.
Position rod-end bearing in throttle cam follower and install bolt, washers, nut, and cotter
pin.
Attach adel clamp to control cable and install aft support bracket.
Insert control cable into forward support bracket, align retaining plate over bracket, and
install bolt, washers, and nut.
76-10
Page 7
(i)
(j)
(k)
(l)
(m)
(n)
(o)
(p)
(q)
(r)
Page 8
At governor, secure rod-end bearing to governor control arm with bolt, washers, nut, and
cotter pin
Wrap fiber paper around portion of control cable which will pass through firewall fitting so a
tight fit is achieved at the cable/firewall interface.
Install clamps or ties securing control cable to engine mount.
Perform Governor Rigging and Maximum RPM Adjustment (Refer to 61-20)
Solvent clean firewall fitting and fitting/cable interface. (Refer to 20-30)
Fillet seal firewall fitting and fitting/cable interface with silicone sealant. (Refer to 20-10)
Install RH and LH aft console trim panel. (Refer to 25-10)
Install washer and control-quadrant friction control knob.
Install RH cockpit seat. (Refer to 25-10)
Install engine cowling. (Refer to 71-10)
76-10
13773-001
31 July 2001
CHAPTER
ENGINE
INDICATING
CHAPTER 77 - ENGINE INDICATING
LIST OF EFFECTIVE PAGES
Chapter/Section
Page
Date
77-LOEP
1
31 JULY 2001
77-TOC
1
30 NOV 2000
77-00
1
30 NOV 2000
77-00
2
30 NOV 2000
77-10
1
30 NOV 2000
77-10
2
30 NOV 2000
77-10
3
30 NOV 2000
77-20
1
30 NOV 2000
77-20
2
30 NOV 2000
77-20
3
31 JULY 2001
13773-001
31 July 2001
77-LOEP
Page 1
CHAPTER 77 - ENGINE INDICATING
TABLE OF CONTENTS
Subject
ENGINE INDICATING
Chapter/Section
Page
77-00
General
1
Troubleshooting
2
POWER
77-10
Description
1
Maintenance Practices
1
Tachometer
Removal - Tachometer
Installation - Tachometer
Map/Fuel Flow Gage
Removal - MAP/Fuel Flow Gage
Installation - MAP/Fuel Flow Gage
Manifold Pressure Sensor
Removal - Manifold Pressure Sensor
Installation - Manifold Pressure Sensor
TEMPERATURE
1
1
1
1
1
1
2
2
2
77-20
Description
1
Maintenance Practices
1
EGT/CHT Gage
Removal - EGT/CHT Gage
Installation - EGT/CHT Gage
EGT Sensor
Removal - EGT Sensor
Installation - EGT Sensor
CHT Sensor
Removal - CHT Sensor
Installation - CHT Sensor
13773-001
30 Nov 2000
1
1
1
1
1
1
2
2
2
77-TOC
Page 1
ENGINE INDICATING
1. GENERAL
This chapter describes those components which indicate engine operation. The engine indicating components include the tachometer, manifold pressure, and the EGT/CHT sensors and gages.
13773-001
30 Nov 2000
77-00
Page 1
2. TROUBLESHOOTING
Trouble
No RPM indication.
Page 2
77-00
Probable Cause
Tachometer circuit breaker open.
Remedy
Check circuit breaker.
13773-001
30 Nov 2000
POWER
1. DESCRIPTION
This section describes that portion of the engine indicating system which indicates power. Included are the
Tachometer, Manifold Pressure Gage (MAP), and MAP Sensor.
A 2¼” Tachometer is mounted on the right instrument panel adjacent to the other engine instruments. The
tachometer pointer sweeps a scale marked from 0 to 3500 RPM in 100 RPM increments. The electrically
operated tachometer receives a speed signal from a the RH magneto. 28 VDC for instrument operation
and lighting is supplied through the 5-amp ENGINE INSTRUMENTS circuit breaker on the Essential Bus.
A 2¼” combination MAP/Fuel Flow Gage is mounted on the right instrument panel immediately below the
tachometer. The gage is internally lighted. 28 VDC for instrument operation is supplied through the 5-amp
ENGINE INSTRUMENTS circuit breaker on the Essential Bus.
2. MAINTENANCE PRACTICES
A. Tachometer (See Figure 77-101)
(1)
(2)
Removal - Tachometer
(a) Ensure BAT 1, BAT 2, and AVIONICS master switches are in off position.
(b) Pull ENGINE INSTRUMENT circuit breaker.
(c)
Remove MFD. (Refer to 34-40)
(d) Locate and disconnect tachometer electrical connector.
(e) While supporting tachometer, remove screws securing unit to instrument panel and
remove from airplane.
Installation - Tachometer
(a) Position tachometer in instrument panel and attach with screws.
(b) Attach electrical connector.
(c)
Reset ENGINE INSTRUMENT circuit breaker.
(d) Install MFD. (Refer to 34-40)
B. Map/Fuel Flow Gage (See Figure 77-101)
(1)
(2)
13773-001
30 Nov 2000
Removal - MAP/Fuel Flow Gage
(a) Ensure BAT 1, BAT 2, and AVIONICS master switches are in off position.
(b) Pull ENGINE INSTRUMENT circuit breaker.
(c)
Remove MFD. (Refer to 34-40)
(d) Locate and disconnect MAP/fuel flow gage electrical connector.
(e) While supporting MAP/fuel flow gage, remove screws securing unit to instrument panel.
and remove from airplane.
Installation - MAP/Fuel Flow Gage
(a) Position MAP/fuel flow gage in instrument panel and attach with screws.
(b) Attach electrical connector.
(c)
Install MFD. (Refer to 34-40)
(d) Reset ENGINE INSTRUMENT circuit breaker.
77-10
Page 1
C. Manifold Pressure Sensor (See Figure 77-101)
CAUTION:
(1)
(2)
Page 2
Protect openings exposed as a result of removing sensor against entry of foreign material by installing covers or sealing with tape.
Removal - Manifold Pressure Sensor
(a) Ensure BAT 1, BAT 2, and AVIONICS master switches are in off position.
(b) Pull ENGINE INSTRUMENT circuit breaker.
(c)
Remove engine cowling. (Refer to 71-10)
(d) Disconnect sensor electrical leads.
(e) Loosen nut securing manifold pressure sensor and withdraw sensor from manifold.
Installation - Manifold Pressure Sensor
(a) Install nut securing manifold pressure sensor to engine manifold.
(b) Connect sensor electrical leads.
(c)
Install engine cowling. (Refer to 71-10)
(d) Reset ENGINE INSTRUMENT circuit breaker.
77-10
13773-001
30 Nov 2000
Figure 77-101
MAP Sensor, MAP/Fuel Flow Gage, and Tachometer Installation
13773-001
30 Nov 2000
77-10
Page 3
TEMPERATURE
1. DESCRIPTION
This section describes that portion of the engine indicating system which indicates temperature. Included
is the EGT/CHT gage and sensors.
A 2¼” combination Exhaust Gas Temperature (EGT) and Cylinder Head Temperature (CHT) indicator is
mounted in the right instrument panel. 28 VDC for instrument operation and lighting is supplied through the
5-amp ENGINE INSTRUMENTS circuit breaker on the Essential Bus.
The EGT pointer sweeps a scale marked from 1250° F to 1650° F in 25° F increments. The EGT scale has
no limit markings. The EGT indicator receives a temperature signal from a sensor mounted on the No. 4
cylinder exhaust pipe.
The CHT pointer sweeps a scale marked from 200° F to 500° F. The CHT indicator receives a temperature
signal from a sensor mounted in the No. 6 cylinder head.
2. MAINTENANCE PRACTICES
A. EGT/CHT Gage (See Figure 77-201)
(1)
(2)
Removal - EGT/CHT Gage
(a) Ensure BAT 1, BAT 2, and AVIONICS master switches are in off position.
(b) Pull ENGINE INSTRUMENT circuit breaker.
(c)
Remove glareshield. (Refer to 25-10)
(d) Locate and disconnect EGT/CHT gage electrical connector.
(e) While supporting EGT/CHT gage, remove screws securing unit to instrument panel. and
remove from airplane.
Installation - EGT/CHT Gage
(a) Position EGT/CHT gage in instrument panel and attach with screws.
(b) Attach electrical connector.
(c)
Install glareshield. (Refer to 25-10)
(d) Reset ENGINE INSTRUMENT circuit breaker.
B. EGT Sensor (See Figure 77-201)
CAUTION:
(1)
(2)
13773-001
30 Nov 2000
Protect openings exposed as a result of removing sensor against entry of foreign material by installing covers or sealing with tape.
Removal - EGT Sensor
(a) Ensure BAT 1, BAT 2, and AVIONICS master switches are in off position.
(b) Pull ENGINE INSTRUMENT circuit breaker.
(c)
Remove engine cowling. (Refer to 71-10)
(d) Remove insulation covering EGT sensor wiring and disconnect.
(e) Remove clamp securing sensor assembly to exhaust pipe.
(f)
Remove sensor seal, sensor thimble, sensor, and clamp from exhaust pipe.
Installation - EGT Sensor
(a) Position seal, thimble, and clamp over exhaust pipe hole.
(b) Tighten clamp securing components to exhaust pipe.
(c)
Insert and firmly press sensor into thimble until Sensor snap into place.
(d) Place insulation over EGT sensor wire, connect sensor lead to harness, slide insulation
over junction and secure with cable ties.
77-20
Page 1
(e)
(f)
Install engine cowling. (Refer to 71-10)
Reset ENGINE INSTRUMENT circuit breaker.
C. CHT Sensor (See Figure 77-201)
CAUTION:
(1)
(2)
Page 2
Protect openings exposed as a result of removing sensor against entry of foreign material by installing covers or sealing with tape.
Removal - CHT Sensor
(a) Ensure BAT 1, BAT 2, and AVIONICS master switches are in off position.
(b) Pull ENGINE INSTRUMENT circuit breaker.
(c)
Remove engine cowling. (Refer to 71-10)
(d) Disconnect sensor electrical leads.
(e) Remove nut securing CHT sensor to cylinder head.
(f)
Withdraw sensor and remove from airplane.
Installation - CHT Sensor
(a) Insert sensor into cylinder head.
(b) Install nut securing sensor to cylinder head.
(c)
Connect electrical leads.
(d) Install engine cowling. (Refer to 71-10)
(e) Reset ENGINE INSTRUMENT circuit breaker.
77-20
13773-001
30 Nov 2000
Figure 77-201
EGT/CHT Sensor and Gage Installation
13773-001
31 July 2001
77-20
Page 3
CHAPTER
EXHAUST
CHAPTER 78 - EXHAUST
LIST OF EFFECTIVE PAGES
Chapter/Section
Page
Date
78-LOEP
1
30 NOV 2000
78-TOC
1
30 NOV 2000
78-00
1
30 NOV 2000
78-00
2
30 NOV 2000
78-10
1
30 NOV 2000
78-10
2
30 NOV 2000
78-20
1
30 NOV 2000
78-20
2
30 NOV 2000
78-20
3
30 NOV 2000
13773-001
30 Nov 2000
78-LOEP
Page 1
CHAPTER 78 - EXHAUST
TABLE OF CONTENTS
Subject
EXHAUST
Chapter/Section
Page
78-00
General
1
Troubleshooting
2
COLLECTOR
78-10
Description
1
Maintenance Practices
1
Tail Pipe
Removal - Tail Pipe
Installation - Tail Pipe
Exhaust Headers
Removal - Exhaust Headers
Installation - Exhaust Header Assembly
NOISE SUPPRESSOR
1
1
1
1
1
2
78-20
Description
1
Maintenance Practices
1
Exhaust Muffler/Heat Exchanger
Removal - Exhaust Muffler/Heat Exchanger
Disassembly - Exhaust Muffler/Heat Exchanger
Assembly - Exhaust Muffler/Heat Exchanger
Installation - Exhaust Muffler/Heat Exchanger
Inspection/Check - Exhaust Muffler/Heat Exchanger
13773-001
30 Nov 2000
1
1
1
1
1
2
78-TOC
Page 1
EXHAUST
1. GENERAL
This chapter describes those units and components which direct the engine exhaust gases overboard. The
engine exhaust system consists of exhaust headers, Y-pipe, midpipe, muffler, heat exchanger, tailpipe,
and associated slip joints and fasteners.
The exhaust system carries engine exhaust gasses directly from the engine exhaust ports to outside the
cowling on the underside of the fuselage. The system is a tuned design, meaning each of the six headers
are the same size and the overall length sized to provide optimum scavenging which results in maximum
horsepower and engine durability. All exhaust gas components are fabricated from stainless steel and
stainless hardware is used in all areas subject to high heat.
To provide hot air for cabin heat, a jacket around the heater muffler serves as a heat exchanger. For maintenance practices pertinent to the heater muffler, refer to 21-40 Heating and Defrosting System. (Refer to
21-40)
13773-001
30 Nov 2000
78-00
Page 1
2. TROUBLESHOOTING
Trouble
Excessive Engine Noise.
Exhaust Gas In Cabin.
Probable Cause
Defective muffler.
Replace or repair muffler. (Refer to
78-10)
Crack in exhaust system.
Inspect for leaks or cracks. Repair
of replace as required. (Refer to
78-10)
Defective heat exchanger
Weld or replace heat exchanger.
(Refer to 78-20)
Traces Of Exhaust Gas On Cylin- Defective gasket on cylinder.
der.
Bent flange.
Crack on exhaust header.
Page 2
78-00
Remedy
Replace gasket. (Refer to 78-10)
Replace leaking exhaust header.
(Refer to 78-10)
Replace leaking exhaust header.
(Refer to 78-10)
13773-001
30 Nov 2000
COLLECTOR
1. DESCRIPTION
This section describes the portion of the exhaust system which collects the exhaust gases from the cylinder and conducts them overboard. Included are the exhaust gas temperature probe, the exhaust header
assembly, and the tailpipe.
Each of the six headers are connected to the engine by brass nuts on the engines exhaust studs. Gaskets
seal the header to each cylinder. The three headers on each side of the engine are connected to a Y-pipe
weldment through a slip joint and a spring loaded bolt to allow for contraction and expansion as well as
engine movement. This Y-pipe combines the 3 header pipes on each side of the engine into 1 pipe (per
side) which is then combined into a single pipe carrying all six cylinder's exhaust gases forward. A slip joint
connects the Y-pipe to the mid-pipe which takes the exhaust gas across to the right side of the engine and
then aft to the muffler/heat exchanger. Ball joints and slip joints are employed to allow movement due to
heat expansion and normal operating loads.
2. MAINTENANCE PRACTICES
A. Tail Pipe
(1)
(2)
Removal - Tail Pipe
(a) Remove engine cowling. (Refer to 71-10)
(b) Remove screws and washers at tailpipe securing tail pipe support to firewall.
(c)
Remove bolts, washers, springs, and nuts from ball joint securing tail pipe to muffler.
(d) Remove tail pipe from airplane.
Installation - Tail Pipe
(a)
Acquire necessary tools, equipment, and supplies.
Description
(b)
(c)
(d)
(e)
(f)
P/N or Spec.
Supplier
Purpose
Permatex K133
-
Any Source
Antiseize Lubricant.
Emery Cloth
-
Any Source
Polishing.
Polish both sides of ball joint with emery cloth to ensure surface is smooth and free of
burrs and apply a thin coat of antiseize lubricant to polished ball joint surfaces.
Position tail pipe on muffler port and install ball joint bolts, washers, springs, and nut to
secure pipe to muffler
Adjust aft ball joint nuts as required to ensure the overall length of each compression
spring is 0.50 inch (1.27 cm).
Install screws and washers securing tail pipe to firewall.
Install engine cowling. (Refer to 71-10)
B. Exhaust Headers
(1)
13773-001
30 Nov 2000
Removal - Exhaust Headers
(a) Remove engine cowling. (Refer to 71-10)
(b) Remove tailpipe (Refer to 78-10), and muffler. (Refer to 78-20)
(c)
Remove cotter pin, bolt, spring, and nut securing mid-pipe to Y-pipe weldment and remove
mid-pipe.
(d) Remove cotter pin, bolt, spring, and nut securing LH headers to Y-pipe weldment.
(e) Remove CHT probe from #6 cylinder header. (Refer to 77-20)
78-10
Page 1
(f)
(g)
Remove EGT probe from #4 cylinder header. (Refer to 77-20)
Remove brass nuts attaching exhaust headers to engine cylinders.
Note:
(2)
Individual headers can be removed from the Y-pipe weldment at the slip joint.
(h) Remove exhaust headers from airplane.
(i)
Remove old gaskets from cylinders.
Installation - Exhaust Header Assembly
(a)
Acquire necessary tools, equipment, and supplies.
Description
Exhaust Header Gasket
(b)
(c)
(d)
(e)
(f)
(g)
(h)
(i)
(j)
Page 2
P/N or Spec.
649427
Supplier
TCM
Purpose
Seal
Slip exhaust header gaskets over cylinder port studs.
Position headers to cylinder head studs. Install nuts to finger tight.
Assemble RH headers to Y-pipe weldment.
Assemble LH headers to Y-pipe weldment and install bolt, spring, and nut. Tighten nut to
snug, then two complete revolutions to compress spring. Install cotter-pin. Slight adjustment of nut for cotter pin installation is allowable.
Final torque header nuts to 100-110 inch-pounds (11-12 N.m.)
Position mid-pipe to Y-pipe weldment and install bolt, spring, and nut. Tighten nut to snug,
then two complete revolutions to compress spring. Install cotter-pin. Slight adjustment of
nut for cotter pin installation is allowable.
Install muffler to mid-pipe. (Refer to 78-20)
Install tailpipe. (Refer to 78-10)
Install engine cowling. (Refer to 71-10)
78-10
13773-001
30 Nov 2000
NOISE SUPPRESSOR
1. DESCRIPTION
Noise suppression is accomplished through use of an exhaust muffler connected to the exhaust header
assembly. The muffler incorporates a heat exchanger to supply warm air to the cabin. Heat sinks are
welded to the exterior of the muffler to improve efficiency. A shroud with accommodations for ducts surrounds the muffler. Positive ventilation of the heat exchanger is provided at all times by air passing through
the outer compartment and entering the cabin, or by venting overboard depending on the cabin heat valve
position. The forward end of the muffler/heat exchanger is held in place by a support extending from the
engine mount. Ball joints support this portion of the exhaust system, allowing for relative motion between
the engine and airframe. A second ball joint connects the muffler to the exhaust tail pipe. The tail pipe provides a path for the exhaust gas from the muffler/heat exchanger though a hole in the bottom aft end of the
cowl and clear of the aircraft. The tail pipe is supported by a flexible hanger mounted to the firewall.
2. MAINTENANCE PRACTICES
A. Exhaust Muffler/Heat Exchanger (See Figure 78-201)
(1)
(2)
(3)
Removal - Exhaust Muffler/Heat Exchanger
(a) Remove engine cowling. (Refer to 71-10)
(b) Remove tail pipe. (Refer to 78-10)
(c)
Loosen hose clamps of the air intake and cabin heat hose, remove both hoses from muffler/heat exchanger.
(d) Remove cotter pins, bolts, washers, springs, and nuts securing muffler/heat exchanger to
engine mount bracket.
(e) Remove cotter pins, bolts, washers, springs, and nuts from forward ball joint securing muffler/heat exchanger to mid-pipe/exhaust header assembly.
(f)
Remove muffler from airplane.
Disassembly - Exhaust Muffler/Heat Exchanger
(a) Remove clamping screws on exhaust muffler/heat exchanger and remove heat exchanger
shroud.
Assembly - Exhaust Muffler/Heat Exchanger
CAUTION:
Failure to properly align heat exchanger shroud to exhaust muffler/heat
exchanger will result in poor cabin heating.
(a)
(4)
13773-001
30 Nov 2000
Position heat exchanger shroud on exhaust muffler/heat exchanger so that shroud baffle
is located between duct flanges and install clamping screws.
Installation - Exhaust Muffler/Heat Exchanger
(a) Position exhaust muffler/heat exchanger on mid-pipe/exhaust header assembly and install
bolts, springs, washers, nuts, and cotter pins. Tighten nuts to snug, then turn three complete revolutions to compress springs. Slight adjustment of nuts for cotter pin installation is
allowable.
(b) Install tail pipe. (Refer to 78-10)
(c)
Install bolts, springs, washers, nuts, and cotter pins securing muffler/heat exchanger to
engine mount bracket. Slight adjustment of nuts for cotter pin installation is allowable.
(d) Adjust aft ball joint nuts as required to ensure the overall length of each compression
spring is 0.50 inch (1.27 cm).
(e) Install hose clamps for air intake and cabin heat hose, and connect both hoses to muffler/
heat exchanger.
(f)
Install engine cowling. (Refer to 71-10)
78-20
Page 1
(5)
Inspection/Check - Exhaust Muffler/Heat Exchanger
The exhaust muffler/heat exchanger must be inspected for secure mounting, leakage, and general condition at each 100 hour inspection. Inspect the heater muffler visually and the heat
exchanger by pressure check to determine possible leakage which could allow carbon monoxide
to enter the heating system.
(a)
Acquire necessary tools, equipment, and supplies.
Description
(b)
(c)
(d)
(e)
(f)
(g)
(h)
(i)
(j)
(k)
(l)
(m)
Page 2
P/N or Spec.
Supplier
Purpose
Solid test plug
-
Any Source
Plug heater muffler.
Ported test plug
-
Any Source
Plug heater muffler.
Pressure source
-
Any Source
Pressurize heater
muffler.
Submerging tank filled with
soap suds solution
-
Any Source
Detect heater muffler.
Visually inspect exhaust muffler/heat exchanger welds, brackets, and joints for dents,
cracks, missing parts, soot, or evidence of exhaust gasses escaping through holes,
cracks, or around joints.
Remove exhaust muffler/heat exchanger. (Refer to 78-20)
Disassemble exhaust muffler/heat exchanger. (Refer to 78-20)
Visually inspect heat exchanger welds and joints for dents, cracks, soot, or evidence of
exhaust gasses escaping through holes, cracks, or around joints.
To ensure tight seal, wipe soot from inside of heat exchanger pipes with tack cloth.
Install solid test plug on one end of heat exchanger.
Install ported test plug on other end of heat exchanger.
Attach pressure source and pressurize to 2.5 psi for 1 minute.
Submerge pressurized heat exchanger in soap suds solution and inspect for leaks.
Repair or replace heat exchanger if leaks are detected.
Assemble exhaust muffler/heat exchanger. (Refer to 78-20)
Install exhaust muffler/heat exchanger. (Refer to 78-20)
78-20
13773-001
30 Nov 2000
Figure 78-201
Exhaust System Installation
13773-001
30 Nov 2000
78-20
Page 3
CHAPTER
OIL
CHAPTER 79 - OIL
LIST OF EFFECTIVE PAGES
Chapter/Section
Page
Date
79-LOEP
1
30 NOV 2000
79-TOC
1
30 NOV 2000
79-00
1
30 NOV 2000
79-00
2
30 NOV 2000
79-20
1
30 NOV 2000
79-20
2
30 NOV 2000
79-30
1
30 NOV 2000
79-30
2
30 NOV 2000
79-30
3
30 NOV 2000
13773-001
30 Nov 2000
79-LOEP
Page 1
CHAPTER 79 - OIL
TABLE OF CONTENTS
Subject
OIL
Chapter/Section
Page
79-00
General
1
Troubleshooting
2
DISTRIBUTION
79-20
Description
1
Maintenance Practices
1
Oil Filter
Removal - Oil Filter
Installation - Oil Filter
Oil Cooler
Removal - Oil Cooler
Installation - Oil Cooler
INDICATING
1
1
1
1
1
2
79-30
Description
1
Maintenance Practices
1
Oil Filler Cap/Dipstick
Oil Pressure/Temperature Gage
Removal - Oil Pressure/Temperature Gage
Installation - Oil Pressure/Temperature Indicator
Oil Pressure Sensor
Removal - Oil Pressure Sensor
Installation - Oil Pressure Sensor
Oil Temperature Sensor
Removal - Oil Temperature Sensor
Installation - Oil Temperature Sensor
Oil Temperature Warning Light
13773-001
30 Nov 2000
1
1
1
1
1
1
2
2
2
2
2
79-TOC
Page 1
OIL
1. GENERAL
This chapter covers those units and components external to the engine concerned with storing and delivering lubricating oil to and from the engine. These items include the oil filter, oil cooler, oil filler cap/dipstick,
oil pressure sensor/temperature indicator, oil pressure sensor, and oil temperature sensor. For additional
information on the engine oil system components, refer to the Teledyne Continental Motors Model IO-550
Overhaul Manual indexed in the List or Publications in the front of this manual. (Refer to TCM Model IO550 Overhaul Manual)
The oil supply is contained in a wet sump attached to the bottom of the crankcase. A conventional dipstick
integral to the oil filler cap is provided for determining oil quantity.
When the crankshaft is turning, oil is drawn through a screen and pick up tube which extends from the
sump to a port in the crankcase. Oil then passes to the inlet of the gear-type, engine-driven oil pump and is
forced under pressure through the pump outlet. A pressure relief valve prevents excessive oil pressure by
allowing excess oil to be returned to the sump. After exiting the pump, the pressurized oil enters a full-flow
filter and is passed on to the oil cooler. If the filter element becomes blocked, a bypass relief valve will open
to permit unfiltered oil to flow to the engine. As the oil enters the oil cooler, an oil temperature control unit
directs the flow in one of two directions; when the oil is cold, the oil temperature control unit opens and
bypasses most the oil around the cooler, as the oil warms, the oil temperature control unit closes off the
cooler bypass and forces the oil through the cooler core. In operation, the oil temperature control unit modulates to maintain oil temperature in the normal range of approximately 170° F.
After leaving the cooler, the oil enters the crankcase where various channels and passageways direct it to
the bearing surfaces and other areas requiring lubrication and cooling such as the valve lifters, inner
domes and lower cylinder walls. Oil within the engine gravity drains back into the sump.
13773-001
30 Nov 2000
79-00
Page 1
2. TROUBLESHOOTING
Trouble
High Oil Temperature Indication
Low Oil Pressure Indication
Probable Cause
Remedy
Thermostat damaged or held open Remove, clean valve and seat. If
by solid matter.
still inoperative, replace.
Oil viscosity too high.
Drain and refill with correct seasonal oil grade. (Refer to 12-20)
Prolonged ground operation.
Limit ground operation to a minimum.
Malfunctioning gage or bulb unit.
Check wiring. Check bulb unit.
Check gage. Replace malfunctioning parts.
High power, low airspeed.
Adjust power - flight altitude.
Low oil supply.
Replenish oil supply.
Cooler air passages clogged.
Clean cooler thoroughly.
Cooler core plugged.
Remove cooler and flush thoroughly.
Baffle damaged.
Inspect baffling for damage or
worn seals. Replace as required.
Fuel system set too lean.
Adjust mixture setting in accordance with TCM SID 97-3.
Low oil supply.
Replenish oil supply. (Refer to 1210)
Oil viscosity too low
Drain and refill with correct seasonal oil grade. (Refer to 12-20)
Foam in oil due to presence of
alkaline solids in system.
Drain and refill with fresh oil. (It
may be necessary to flush cooler
core if presence of alkaline solids
is due to previous cleaning with
alkaline materials.) (Refer to 1220)
Pump producing low pressure.
Replace pump.
Malfunctioning pressure gage.
Check gage. Replace if required.
Weak or broken oil pressure relief Replace spring. Adjust pressure to
valve spring.
30-60 p.s.i. with oil at normal operating temperature.
Page 2
79-00
13773-001
30 Nov 2000
DISTRIBUTION
1. DESCRIPTION
This section describes that portion of the oil system which is used to conduct oil from and to the engine.
These items include the oil filter and oil cooler. Refer to 12-20 for approved engine oil specifications and
servicing procedures. (Refer to 12-20)
2. MAINTENANCE PRACTICES
A. Oil Filter
(1)
Removal - Oil Filter
(a)
Acquire necessary tools, equipment, and supplies.
Description
Strap Wrench
P/N or Spec.
a
GA340
Supplier
Snap-On Tools
Kenosha, WI
Purpose
Oil Filter Removal
a. or equivalent
(2)
(b) Remove engine cowling. (Refer to 71-10)
(c)
Remove safety wire on oil filter.
(d) Using strap wrench, unscrew oil filter from engine.
(e) Remove oil filter from airplane.
Installation - Oil Filter
(a)
Acquire necessary tools, equipment, and supplies.
Description
P/N or Spec.
Supplier
Purpose
Strap Wrench
aGA340
Snap-On Tools
Kenosha, WI
Oil Filter Removal
Safety Wire
-
Any Source
Safetying
a. or equivalent
(b)
(c)
(d)
Using strap wrench, install oil filter. Torque filter to 18-20 foot pounds (24-27 N.m).
Safety wire filter.
Install engine cowling. (Refer to 71-10)
B. Oil Cooler
(1)
13773-001
30 Nov 2000
Removal - Oil Cooler
(a) Remove engine cowling. (Refer to 71-10)
(b) Drain engine oil. (Refer to 12-20)
(c)
Remove safety wire securing oil temperature and oil pressure sensor.
(d) Remove engine baffling bolts and washers surrounding oil cooler. (Refer to 71-00)
(e) Remove bolts, lock washers, and plain washers securing oil cooler to engine mount.
(f)
Remove oil cooler and washer gaskets.
79-20
Page 1
(2)
Installation - Oil Cooler
(a)
Acquire necessary tools, equipment, and supplies.
Description
(b)
(c)
(d)
(e)
(f)
(g)
Page 2
P/N or Spec.
Supplier
Purpose
Oil Cooler Gasket
649989
TCM
Seal
Washer Gasket
649961
TCM
Seal
Slide washer gasket and oil cooler gaskets onto crankcase studs.
Position oil cooler on engine mount and install plain washer, lock washers and bolts.
Torque bolts to 23 - 27 foot-pounds (31 - 37 N.m.)
Install bolts, lock washers, and plain washers securing oil cooler to engine.
Install bolts and washers securing engine baffling to oil cooler. (Refer to 71-00)
Replenish Oil System. (Refer to 12-20)
Install engine cowling. (Refer to 71-10)
79-20
13773-001
30 Nov 2000
INDICATING
1. DESCRIPTION
This section describes that portion of the oil system which is used to indicate the quantity, temperature,
and pressure of the oil. Components included are the oil filler cap/dipstick, oil pressure/temperature gage,
oil pressure sensor, and oil temperature sensor.
A 2¼” combination Oil Temperature and Oil Pressure indicator is mounted on the right instrument panel
immediately below the EGT/CHT indicator. The instrument is internally lighted. 28 VDC for instrument
operation is supplied through the 5-amp Engine Instruments circuit breaker on the Essential Bus.
The Oil Temperature pointer sweeps a scale marked from 75× F to 250× F in 25× F increments. The Oil
Temp indicator receives a temperature signal from a temperature sending unit mounted on the engine near
the left magneto.
The Oil Pressure pointer sweeps a scale marked from 0 psi to 100 psi. The Oil Pressure indicator receives
a pressure signal from a oil pressure sensor on the left side of the engine. Normally, oil pressure may drop
to 10 psi at idle but will be in the 30 - 60 psi range at higher RPM.
2. MAINTENANCE PRACTICES
A. Oil Filler Cap/Dipstick
An oil filler cap/dipstick is located at the rear of the engine on the top left side and is accessed through
the oil filler door on the upper cowling. The engine oil tank capacity is 8 quarts (7.57 L). Refer to 12-20
for approved engine oil specifications and servicing procedures.
B. Oil Pressure/Temperature Gage (See Figure 79-301)
(1)
(2)
Removal - Oil Pressure/Temperature Gage
(a) Ensure BAT 1, BAT 2, and AVIONICS master switches are in off position.
(b) Pull ENGINE INSTRUMENT circuit breaker.
(c)
Remove MFD. (Refer to 34-40)
(d) Remove cable connector from rear of indicator.
(e) Remove screws and washers attaching indicator to instrument panel.
(f)
Remove indicator from airplane.
Installation - Oil Pressure/Temperature Indicator
(a) Connect cable connector to indicator.
(b) Position indicator to instrument panel hole and install washers and screws.
(c)
Install MFD. (Refer to 34-40)
(d) Reset ENGINE INSTRUMENTS circuit breaker.
(e) Perform Oil Pressure Check described in the airplane Operational Check. (Refer to 5-30)
C. Oil Pressure Sensor (See Figure 79-301)
CAUTION:
(1)
13773-001
30 Nov 2000
Protect openings exposed as a result of removing sensor against entry of foreign material by installing covers or sealing with tape.
Removal - Oil Pressure Sensor
(a) Ensure BAT 1, BAT 2, and AVIONICS master switches are in off position.
(b) Pull ENGINE INSTRUMENT circuit breaker.
(c)
Remove engine cowling. (Refer to 71-10)
(d) Disconnect sensor electrical connector.
(e) Remove sensor from engine fitting.
79-30
Page 1
(2)
Installation - Oil Pressure Sensor
(a) Install sensor to engine fitting.
(b) Connect electrical connector to sensor.
(c)
Install engine cowling. (Refer to 71-10)
(d) Reset ENGINE INSTRUMENTS circuit breaker.
(e) Perform Oil System Leak Inspection/Check. (Refer to 12-20)
D. Oil Temperature Sensor (See Figure 79-301)
CAUTION:
(1)
(2)
Protect openings exposed as a result of removing sensor against entry of foreign material by installing covers or sealing with tape.
Removal - Oil Temperature Sensor
(a) Ensure BAT 1, BAT 2, and AVIONICS master switches are in off position.
(b) Pull ENGINE INSTRUMENT circuit breaker.
(c)
Remove engine cowling. (Refer to 71-10)
(d) Disconnect electrical lead at sensor.
(e) Cut safety wire.
(f)
Unscrew and remove sensor and washer from engine.
Installation - Oil Temperature Sensor
(a)
Acquire necessary tools, equipment, and supplies.
Description
Safety Wire
(b)
(c)
(d)
(e)
(f)
(g)
P/N or Spec.
-
Supplier
Any Source
Purpose
Safetying
Install new washer and sensor to engine.
Connect electrical connector to sensor.
Safety wire sensor to engine. (Refer to 20-50)
Install engine cowling. (Refer to 71-10)
Reset ENGINE INSTRUMENTS circuit breaker.
Perform Oil System Leak Inspection/Check. (Refer to 12-20)
E. Oil Temperature Warning Light
A oil temperature warning light is integrated into the annunciator assembly, mounted top center above
the flight instruments. The oil temperature light will illuminate if the oil temperature exceeds 240 ° F
(116 ° C) or if the oil pressure is less than 10 psi (68.9 kPa). For maintenance practices pertinent to the
annuciator assembly see Indicating and Recording. (Refer to 31-50)
Page 2
79-30
13773-001
30 Nov 2000
Figure 79-301
Oil Pressure Sensor and Oil Temperature Sensor Installation
13773-001
30 Nov 2000
79-30
Page 3
CHAPTER
STARTING
CHAPTER 80 - STARTING
LIST OF EFFECTIVE PAGES
Chapter/Section
Page
Date
80-LOEP
1
30 NOV 2000
80-TOC
1
30 NOV 2000
80-00
1
30 NOV 2000
80-00
2
30 NOV 2000
80-10
1
30 NOV 2000
80-10
2
30 NOV 2000
13773-001
30 Nov 2000
80-LOEP
Page 1
CHAPTER 80 - STARTING
TABLE OF CONTENTS
Subject
STARTING
Chapter/Section
Page
80-00
General
1
Troubleshooting
2
CRANKING
80-10
Description
1
Maintenance Practices
1
Starter
Removal - Starter
Installation - Starter
13773-001
30 Nov 2000
1
1
1
80-TOC
Page 1
STARTING
1. GENERAL
This chapter describes the components used for starting the airplane engine. This includes the starter. For
additional information on starter system components, refer to the Teledyne Continental Motors Model IO550 Overhaul Manual indexed in the List or Publications in the front of this manual.
The starting system employs an electric starter motor mounted on a right angled starter-to-engine adapter.
The right angle drive adapter serves to shorten the engine’s overall length. As the starter motor is electrically energized, the adapter worm shaft and gear engage the starter shaftgear by means of a spring and
clutch assembly. As the shaftgear rotates, it in turns rotates the crankshaft gear and crankshaft. When the
engine starts and accelerates, the gripping action of the clutch spring is relieved, disengaging the shaftgear from the worm shaft and electric starter motor.
13773-001
30 Nov 2000
80-00
Page 1
2. TROUBLESHOOTING
Trouble
Starter will not operate.
Probable Cause
Remedy
Defective master switch or circuit. Check continuity of master switch
or circuit. Install new switch or
wires.
Defective starter switch, contactor, Check continuity of switch, contacor switch circuit.
tor and circuit. Install new switch
or wires.
Defective starter motor power
cable.
Inspect cable. Install new cable.
Starter motor runs, but does not
turn crankshaft.
Damaged worm gear.
Remove starter and inspect worm
gear. Replace defective parts.
Starter motor drags.
Low battery.
Check battery. Charge or install
new battery.
Starter switch or relay contacts
burned or dirty.
Install serviceable unit.
Defective starter motor power
cable.
Inspect cable. Install new cable.
Defective starter motor.
Check starter motor brushes,
brush spring tension or thrown solder on brush cover. Repair or
install new starter motor.
Dirty or worn commutator.
Inspect commutator. Clean and
turn commutator.
Worn starter worm gear.
Inspect starter worm gear.
Replace defective parts.
Starter excessively noisy.
Page 2
80-00
13773-001
30 Nov 2000
CRANKING
1. DESCRIPTION
This section describes that portion of the system used to perform the cranking portion of the starting operation.
2. MAINTENANCE PRACTICES
A. Starter (See Figure 80-101)
(1)
(2)
Removal - Starter
(a) Ensure BAT 1, BAT 2, and AVIONICS master switches are in off position.
(b) Pull STARTER RELAY circuit breaker.
(c)
Remove engine cowling. (Refer to 71-10)
(d) Disconnect positive battery cable at battery.
(e) Disconnect electrical cable at starter motor.
(f)
Remove starter in accordance with Teledyne Continental Motors Model IO-550 Overhaul
Manual indexed in the List or Publications in the front of this manual. (Refer to TCM Model
IO-550 Overhaul Manual)
Installation - Starter
(a) Install starter in accordance with Teledyne Continental Motors Model IO-550 Overhaul
Manual indexed in the List or Publications in the front of this manual. (Refer to TCM Model
IO-550 Overhaul Manual)
WARNING:
(b)
(c)
(d)
(e)
13773-001
30 Nov 2000
Prior to connecting power to starter, ensure ignition switch is in OFF
position, wheels are chocked, throttle is set to IDLE, and mixture is set
to CUTOFF.
Connect electrical cable to starter motor.
Connect positive cable at battery.
Install engine cowling. (Refer to 71-10)
Reset STARTER RELAY circuit breaker.
80-10
Page 1
Figure 80-101
Starter Installation
Page 2
80-10
13773-001
30 Nov 2000
CHAPTER
CHARTS
CHAPTER 91 - CHARTS
LIST OF EFFECTIVE PAGES
Chapter/Section
Page
Date
91-LOEP
1
31 JULY 2001
91-TOC
1
31 JULY 2001
91-00
1
31 JULY 2001
91-10
1
31 JULY 2001
91-10
2
31 JULY 2001
91-10
3
31 JULY 2001
91-10
4
31 JULY 2001
91-10
5
31 JULY 2001
91-20
1
31 JULY 2001
91-20
2
31 JULY 2001
91-20
3
31 JULY 2001
91-20
4
31 JULY 2001
91-20
5
31 JULY 2001
91-30
1
31 JULY 2001
91-30
2
31 JULY 2001
91-30
3
31 JULY 2001
13773-001
31 July 2001
91-LOEP
Page 1
CHAPTER 91 - CHARTS
TABLE OF CONTENTS
Subject
CHARTS
Chapter/Section
Page
91-00
General
SYSTEM LOAD CHARTS AND BUS SCHEMATICS
1
91-10
General
REFERENCE TABLES
1
91-20
General
1
Measuring
1
Linear
Liquid Capacity
Dry Capacity
Capacity
approximate WeighT
1
2
2
2
3
Liquids
Materials
Miscellaneous Tables
3
3
3
Length
Volume
Displacement
Pressure
Speed
Torque
Temperature
MANUFACTURES AND SUPPLIERS
3
4
4
4
5
5
5
91-30
General
1
Manufactures and Suppliers
1
13773-001
31 July 2001
91-TOC
Page 1
CHARTS
1. GENERAL
This chapter includes system load charts, bus schematics, conversion charts, measurements, and supplier
addresses.
13773-001
31 July 2001
91-00
Page 1
SYSTEM LOAD CHARTS AND BUS SCHEMATICS
1. GENERAL
The airplane is equipped with a two alternator system, with each alternator operating continuously. The forward (ALT 1) alternator is a rated at 58 amps. The aft (ALT 2) alternator 2, is rated at 20 amperes. The total
system load of the airplane is supported by the two alternator configuration. The battery is charged in flight.
The total continuous connected load is held to less than 80% of the total rated generator output capacity.
During normal operation the system operates like two separate systems; ALT 1 provides power to battery 1
and the main distribution bus loads, and ALT 2 provides power to battery 2 and the essential distribution
bus loads. Low RPM operation or a failure of ALT 2 will cause all system loads and both batteries to be
powered by ALT 1 only. Because this operation is automatic, main distribution and essential distribution
bus continuous loads are held to less than 80% of the capacity of ALT 1 (80% of 58 A = 46.4 A).
Individual circuit loads have been determined by measuring the circuit loads as installed in the aircraft
using a calibrated ammeter. Loads stated for circuits with oscillating or varying power use are maximum
operating loads. These load measurements present the most accurate data for power usage available.
The airplane has seven power distribution busses with associated protection devices located within the
MCU:
Three busses are used as distribution feeders from the Main Distribution Bus.
Two busses are used as distribution feeders from the Essential Distribution Bus. All distribution feeders are routed to the circuit breaker panel located near the pilot's right knee.
One bus is used to power the landing light directly from the Main Distribution Bus through a 15 amp circuit breaker.
One bus is the clock keep-alive bus, which is protected with a five amp fuse located in the side of the
MCU. The clock bus is the only bus not controlled by the master switch arrangement.
Figures 91-102 through 91-103 show current flow and the associated values at each bus for normal operation and during circuit failure. All current values are maximum device current draw including maximum
intermittent peaks, ensuring the essential bus will be powered during any combination of device use.
13773-001
31 July 2001
91-10
Page 1
Circuit Identification
Avionics Essential
Avionics Non-Essential
Main Bus 1
Non-Essential Bus
Protector
Value
(Amps)
Electrical Load
Current
Max
Drain at
Protector Duty Cycle
28 Vdc
(Amps)
(Amps)
Avionics Essential Relay Coil 15
20
Cont.
0.08
COM 1
7.5
7.5
Cont. (Rx)
Inter. (Tx)
0.01
1.74
GPS 1
5
7.5
Cont.
1.12
Avionics Non-Essential
Relay Coil
15
20
Cont.
0.08
GPS 2
5
7.5
Cont.
1.12
Encoder
Transponder
2
7.5
Cont.
Cont.
0.48
0.35
COM 2
7.5
7.5
Cont. (Rx)
Inter. (Tx)
0.01
1.74
Multi-Function Display
5
7.5
Cont.
2.25
Audio Panel
5
7.5
Cont.
0.36
Stormscope
3
7.5
Cont.
0.6
Skywatch
5
7.5
Cont.
2.5
Cont.
0.23
Engine Instruments
Hobbs
5
5
Cont.
0.1
Pitch Trim
2
5
Inter.
0.3
Yaw Trim
2
5
Cont.
Inter.
0.26
0.4
Roll Trim
2
5
Inter.
0.75
Instrument Lights
2
5
Cont.
1.11
Cooling Fan
7.5
7.5
Cont.
0.23
Pitot Heat
7.5
7.5
Cont.
3.6
Figure 91-101 (Sheet 1 of 2)
Circuit Load Chart
Page 2
91-10
13773-001
31 July 2001
Circuit Identification
Protector
Value
(Amps)
Electrical Load
Current
Max
Drain at
Protector Duty Cycle
28 Vdc
(Amps)
(Amps)
Starter Relay
2
5
Inter.
0.1
Flaps
10
15
Cont.
Inter.
0.07
6.5
Right Strobe Light P.S.
Left Strobe Light P.S.
5
10
Cont.
2.1
2.1
Right Nav Light
Left Nav Light
5
10
Cont.
1.99
1.99
Convenience Outlet
3
5
Cont.
3.0
Stall Warning
2
5
Inter.
0.001
Turn Coordinator #1
2
5
Cont.
0.46
Attitude # 1
3
5
Cont.
0.65
HSI #1
5
5
Cont.
3.45
Annunciator
2
5
Cont.
0.22
Alternator 2 Field
5
7.5
Cont.
3.5
Fuel Pump
5
7.5
Cont.
Inter.
1.0
1.56
Flood Lights
Cabin Lights
3
5
Cont.
0.18
0.14
HSI #2
5
5
Cont.
3.45
Turn Coordinator #2
2
5
Cont.
0.46
Attitude # 2
3
5
Cont.
0.65
Alternator 1 Field
5
7.5
Cont.
3.5
Essential 2 Bus
Autopilot
5
5
Cont.
1.0
Clock Bus
Clock
5
5
Cont.
0.11
Landing Light Bus
Landing Light Coil
Cont.
0.08
Cont.
Inter.
2.1
4.4
Essential Bus
Main Bus 2
Landing Light
15
151
1. Landing Light circuit protector is allowed to be 15 amperes providing the installed wire is 8.6 feet or less.
Figure 91-101 (Sheet 2 of 2)
Circuit Load Chart
13773-001
31 July 2001
91-10
Page 3
0A
Main Distribution Bus
Essential Distribution Bus
50A
9.72 A
Non-Essential
Bus
25 A
25 A
3.25 A
11.2 A
9.72 A
Main Bus 2
25 A
8.28 A
25 A
21.40 A
25 A
Main Bus 1
Essential 1 Bus
Essential 2 Bus
2.41 A
8.28 A
1.0 A
21.40 A
15 A
8.79 A
2.25 A
15 A
Avionics NonEssential Bus
Avionics
Essential Bus
8.79 A
2.25 A
Figure 91-102 depicts the system loading during normal system operation with alternator 1 and alternator
2 generating at nominal values. Note the diode between the Main Distribution Bus and the Essential Distribution Bus is reverse biased and therefore is not conducting current between busses. All circuit breakers
and fuses are of adequate capacity when the circuit breaker rating is greater than the total load value. All
circuit breakers and fuses are of adequate capacity.
Figure 91-102
Power Distribution - Normal System Operation
Page 4
91-10
13773-001
31 July 2001
11.53 A
Main Distribution Bus
Essential Distribution Bus
50A
9.72 A
Non-Essential
Bus
25 A
25 A
3.25 A
11.2 A
9.72 A
Main Bus 2
25 A
8.28 A
25 A
21.40 A
25 A
Main Bus 1
Essential 1 Bus
Essential 2 Bus
2.41 A
8.28 A
1.0 A
21.40 A
15 A
8.79 A
2.25 A
15 A
Avionics NonEssential Bus
Avionics
Essential Bus
8.79 A
2.25 A
Figure 91-103 depicts the system loading during operation with only alternator 1 generating at nominal values, such as low RPM operation, or a failure of alternator 2. Note the diode between the Main Distribution
Bus and the Essential Distribution Bus is forward biased and therefore is conducting current between busses. All circuit breakers and fuses are of adequate capacity when the circuit breaker rating is greater than
the total load value. All circuit breakers and fuses are of adequate capacity.
Figure 91-103
Power Distribution - Alternator 1 Only
13773-001
31 July 2001
91-10
Page 5
REFERENCE TABLES
1. GENERAL
This chapter includes information on conversion factors and measurements.
2. MEASURING
Note:
To determine the opposite conversion from that given, divide by the conversion number
instead of multiplying.
A. Linear
Measurement
Equivalent to:
1 Millimeter
-
0.03937 Inch
10 Millimeters
1 Centimeter
0.3937 Inch
10 Centimeters
1 Decimeter
3.937 Inches
10 Decimeters
1 Meter
39.37 Inches
10 Meters
1 Decameter
32.8 Feet
10 Decameters
1 Hectometer
328.0 Feet
10 Hectometers
1 Kilometer
0.621 Mile
1 Inch
25.4 Millimeters
2.54 Centimeters
12 Inches
1 Foot
0.3048 Meter
3 Feet
1 Yard
0.9144 Meter
5 ½ Yards
1 Rod
5.029 Meters
40 Rods
1 Furlong
201.168 Meters
8 Furlongs
1 Statute mile
1609.344 Meters
3 Statute miles
1 Land league
4.828 Kilometers
6 Feet
1 Fathom
1.828 Meters
1.1508 Statute mile
1 Nautical mile (knot)
1.852 Kilometers
1 Millimeter
-
0.03937 Inch
10 Millimeters
1 Centimeter
0.3937 Inch
10 Centimeters
1 Decimeter
3.937 Inches
10 Decimeters
1 Meter
39.37 Inches
10 Meters
1 Decameter
32.8 Feet
10 Decameters
1 Hectometer
328.0 Feet
13773-001
31 July 2001
91-20
Page 1
B. Liquid Capacity
Measurement
Equivalent to:
1 Minim
0.004 Cubic inch
0.062 Milliliter
60 Minims
1 Fluid dram
3.697 Milliliters
8 Fluid drams
1 Fluid ounce
0.030 Liter
4 Fluid ounces
1 Gill
0.118 Liter
8 Fluid ounces
1 Cup
0.236 Liter
2 Cups
1 Pint
0.473 Liter
2 Pints
1 Quart
0.946 Liter
4 Quarts
1 Gallon
3.785 Liters
1 Teaspoon
1 1/3 Fluid drams
-
1 Tablespoon
3 Teaspoons
-
C. Dry Capacity
Measurement
Equivalent to:
1 Pint
33.60 Cubic Inches
0.551 Liter
2 Pints
1 Quart
1.101 Liters
8 Quarts
1 Peck
8.810 Liters
D. Capacity
Measurement
Page 2
Equivalent to:
1 Milliliter
-
.027 Fluid drams
10 Milliliters
1 Centiliter
.338 Fluid ounce
10 Centiliters
1 Deciliter
3.38 Fluid ounces
10 Deciliters
1 Liter
1.057 Liquid quarts
10 Deciliters
1 Liter
0.908 Dry quart
10 Liters
1 Decaliter
2.64 Gallons
10 Decaliters
1 Hectoliter
264.18 Gallons
91-20
13773-001
31 July 2001
3. APPROXIMATE WEIGHT
A. Liquids
Type
Pound per Gallon:
Alcohol
6.576
Gasoline
6.042
Kerosene
6.668
Lubricating Oil
7.584
Water
8.335
B. Materials
Type
Pound per Gallon:
Aluminum (cast)
165
Bronze (phosphor)
554
Brass (cast-rolled)
534
Copper (cast-rolled)
556
Glass (plate)
184
4. MISCELLANEOUS TABLES
A. Length
Multiply
by
To Obtain:
Inches
2.54
Centimeters
Feet
0.305
Meters
Miles
1.609
Kilometers
Kilometers
0.621
Miles
Square inches
6.452
Square centimeters
Square yards
0.836
Square meters
Square meters
1.196
Square yards
13773-001
31 July 2001
91-20
Page 3
B. Volume
Multiply
by
To Obtain:
Fluid ounces
29.57
Cubic centimeters
Quarts
0.946
Liters
Diameter circle
3.1416
Circumference of circle
Diameter circle
0.8862
Side of equal square
Diameter circle squared
0.7854
Area of circle
Diameter sphere squared
3.1416
Area of sphere
Diameter sphere cubed
0.5236
Volume of sphere
U.S. Gallons
0.8327
Imperial gallons (British)
U.S. Gallons
0.1337
Cubic feet
C. Displacement
Multiply
by
To Obtain:
Cubic inches
16.38716
Cubic centimeters
Cubic yards
0.76456
Cubic meters
Grains
64.79892
Milligrams
Ounces, dry
28.35
Grams
Pounds
453.59
Grams
Pounds
0.45359
Kilograms
D. Pressure
Multiply
Page 4
by
To Obtain:
U.S. Gallons
8.32675
Pounds of water at 20°C
Cubic feet
62.427
Pounds of water at 4°C
Feet of water at 4°C
0.4335
Pounds per square inch
Inch of mercury at 0°C
0.4912
Pounds per square inch
91-20
13773-001
31 July 2001
E. Speed
Multiply
F.
by
To Obtain:
Knots
1.1516
Miles per hour
M.p.h.
1.61
Km/h
Km/h
0.62137
M.p.h.
Torque
Multiply
by
To Obtain:
N-m
0.102
Kg-m
N-m
0.7376
Ft.-lb
N-m
8.851
In-lb
Kg-m
9.807
N-m
Kg-m
7.233
Ft.-lb
Kg-m
86.8
In-lb
Ft.-lb
12.0
In-lb
Ft.-lb
0.1383
M/Kgs.
Ft.-lb
0.13826
Kg-m
Ft.-lb
13.8
Cm. - Kgs.
In-lb
0.113
N-m
G. Temperature
Temperature Conversion
°C × 9/5 + 32 = °F
°F - 32 x 5/9 = °C
13773-001
31 July 2001
91-20
Page 5
MANUFACTURES AND SUPPLIERS
1. GENERAL
This chapter includes information on manufactures and suppliers:
2. MANUFACTURES AND SUPPLIERS
Manufacturer/Supplier
Address
ACK Technologies
440 W. Julian Street
San Jose, CA 95110
AIRTECH International Inc.
2542 East Del Amo Blvd.
P.O. Box 6207
Carson, CA
90749-6207
AMP Inc.
P.O. Box 91869
Chicago,IL 60693-1869
ARNAV Systems
P.O. Box 73730
Pullyallup, WA 98373
Automotive Refinish Technologies
Circle Pines, MN
Brackett Aircraft Company Inc.
7045 Flightline Drive
Kingman, AZ 86401
Castrol Inc.
16715 Von Karman, Suite 230-T
Irvine, CA 92714
Champion Spark Plug
900-T Upton Ave., P.O. Box 910
Toledo, OH 43661
Chevron U.S.A. Inc.
575-T Market St.
San Francisco, CA 94105
Cirrus Design
4515 Taylor Circle, Duluth, MN 55811
Cytec Engineered Materials, Inc.
Haure de Grace MD 21078
De-Comp Composites
Route 3 Box 288
Cleveland, OH 74020
Delta Petroleum Co.
P.O. Box 1133
St. Rose, LA 70087
Devcon
30 Endicott St.
Danvers, MA 01923
Dow Corning Corporation
Midland, MI 48686-0994
Exxon Company, U.S.A.
P.O. Box 2180
Houston, TX 77252
Fibre Glass - Evercoat Co.
6600 Cornell Road
Cincinnati, OH 45242
13773-001
31 July 2001
91-30
Page 1
Manufacturer/Supplier
Page 2
Address
General Electric
Waterford, NY
General Aircraft Corporation
Hanscom Field
Bedford, MA 01730
Garmin International
1200 E. 151 First St.
Olathe, KS 66062
Goal
P.O. Box 678TR
Niantic, CT 06357
Hartzell Propellers Inc.
P.O. Box 630313
Cincinnati, OH 45263-0313
Hemisphere
3415 Eastern Ave. Southeast
Grand Rapids, MI 49508
Hexcel
Knytex Con LLC
Dept. 77-3053
Chicago, IL
Integral Products
Bonder Avenue Torrance, CA 90501
John Fluke Mfg. Company, Inc.
6920-T Seaway Blvd.
Everett, WA 98203
LP Aerospace Plastics Inc.
Rd. 1 Box 201-B
Jeannette, PA 15644
LPS Laboratories
P.O. Box 105052 4647 Hugh Howell Road
Tucker, GA 30085-5052
Loctite Corp.
1001 Trout Brook Crossing
Rocking Hill, CA 96067
MO-SCI Corp.
4000 Enterprise Dr.
Hy Point Industrial Park P.O. Box 2
Rolla, MO 65402
McMaster-Carr
P.O. Box 7690
Chicago, IL 60680
MGS
Am Ostkai 21+22
D-70327 Stuttgart, Germany
Mobil Oil Corporation
150 East 42nd St.
New York, NY 10017
Phillips 66 Company
P.O. Box 792
Pasadena, TX 77501
Pennzoil Products Company
P.O. Box 2967-T
Houston, TX 77252-2967
PPG Industries, Inc.
2191 CO. Road D
Maplewood, MN
91-30
13773-001
31 July 2001
Manufacturer/Supplier
Address
Semco Application Systems
(PRC-DeSoto Intl Inc.)
Glendale, CA
Quaker State Corporation
255-T Elm St.
Oil City, PA 16301
S-TEC Corporation
One S-TEC Way
Municipal Airport
Mineral Wells, TX 76067-92
Sanford Inc Company
2740-T Washington Blvd.
Bellwood, IL 60104
Shell Oil Company
One Shell Plaza
Houston, TX 77002
Sinclair Oil Company
683-T Academ Dr.
Northbrook, IL 60062
Snap-on Tools Intl. Ltd.
2801 80th St.
Kenosha, WI 53141-1410
Sherwin Williams
4767 Miller Trunk Hwy
Duluth, MN 55811
Semco Bancroft
Rockhill Industrial Park
Cherry Hill, NJ 08003
Teledyne Continental Motors (TCM)
P.O. Box 90
Mobile, AL 36615
Tempo Products Co.
1000 Lake Rd Medina, OH 44256
Texaco Inc.
2000-T Westchester Ave.
White Plains, NY 10650
Uni Frax
2351 Whirlpool St.
Niagra Falls, NY 14305
Unison Industries
530-T Blackhawk Park Ave.
Rockford, IL 61108
U.S. Plastics Corporation
1390 Neubrecht Rd.
Lima, OH 45801
Woodward Govenor Company
5125 35th St.
Rockford, IL 61109
3-M
3211 Chesnut Expressway
Springfield, MO 65802
13773-001
31 July 2001
91-30
Page 3
CHAPTER
SPECIAL EQUIP.
CHAPTER 95 - SPECIAL PURPOSE EQUIPMENT (CAPS)
LIST OF EFFECTIVE PAGES
Chapter/Section
Page
Date
95-LOEP
1
30 NOV 2000
95-TOC
1
30 NOV 2000
95-00
1
30 NOV 2000
95-00
2
30 NOV 2000
95-00
3
30 NOV 2000
13773-001
30 Nov 2000
95-LOEP
Page 1
CHAPTER 95 - SPECIAL PURPOSE EQUIPMENT (CAPS)
TABLE OF CONTENTS
Subject
SPECIAL PURPOSE EQUIPMENT
Chapter/Section
Page
95-00
General
1
Description
1
Maintenance Practices
2
13773-001
30 Nov 2000
95-TOC
Page 1
95-00SPECIAL PURPOSE EQUIPMENT
SPECIAL PURPOSE EQUIPMENT
1. GENERAL
The airplane is equipped with a Cirrus Airplane Parachute System (CAPS) designed to bring the aircraft
and its occupants to the ground in the event of a life-threatening emergency.
CAPS consists of a parachute, a solid-propellant rocket to deploy the parachute, a rocket activation handle, and a harness imbedded within the fuselage structure.
A composite enclosure containing the parachute and solid-propellant rocket is mounted to the airplane
structure immediately aft of the baggage compartment bulkhead. The enclosure is covered and protected
from the elements by a thin composite cover.
The parachute is enclosed within a deployment bag that stages the deployment and inflation sequence.
The deployment bag creates an orderly deployment process by allowing the canopy to inflate only after the
rocket motor has pulled the parachute lines taut.
The parachute itself is a 2400-square-foot round canopy equipped with a slider, an annular-shaped fabric
panel with a diameter significantly less than the open diameter of the canopy. The canopy suspension lines
are routed through grommets so that the slider is free to move along the suspension lines. Since the slider
is positioned at the top of the suspension lines near the canopy, at the beginning of the deployment
sequence, the slider limits the initial diameter of the parachute and the rate at which the parachute inflates.
The canopy inflates as the slider moves down the suspension lines.
A three-point attachment harness connects the airplane to the parachute. The harness consists of two forward straps faired into the fuselage skin and attached to the firewall, and one rear strap attached to FS 222
bulkhead located directly forward of the CAPS enclosure. The harness system is designed to control the
pitch dynamics of the airplane during the deployment cycle by limiting the aft attachment strap’s length
until the cycle is complete. This is accomplished by utilizing a variable length aft strap section. The shorter
section, which initially supports the load, employes a mechanical release that is activated by two pyrotechnic cutters which fire when the short section is pulled taut during extraction. The harness strap then lengthens and load is transferred to the longer section.
2. DESCRIPTION (See Figure 95-001)
Two separate and deliberate pilot actions are required to deploy the CAPS parachute. The first action
requires the pilot to remove the access cover from the activation handle enclosure. The second action
requires the pilot to pull the activation handle out, and down several inches.
Upon pulling the activation handle the following sequence occurs; the activation cable compresses the
igniter’s steel spring and cocks the plunger. When one half-inch of plunger travel is reached, captured ballbearings are released allowing the plunger to strike the firing pins. The firing pins strike two primers which
ignite the primary booster. The primary booster ignites a secondary booster ensuring ignition of the larger
rocket motor. Once ignited, the rocket propellant’s hot gases are exhausted through the nozzle and the
rocket bursts through the CAPS enclosure cover pulling the suspension lines and deployment bag from the
enclosure. The deployment bag then stages the deployment and inflation of the parachute. As the parachute inflates, the forward harness assembly grows taut, pulls free of the fuselage skin, and stops at the
firewall compression tube which supports the forward portion of the airplane. The rear harness’ shorter
section is pulled taut, initiates the pyrotechnic line cutters which sever the shorter lines, and allow the
longer harness section to support the aft load. The airplane then assumes its touchdown attitude; approximately ten degrees nose down, to optimize occupant protection.
13773-001
30 Nov 2000
95-00
Page 1
3. MAINTENANCE PRACTICES
Refer to Cirrus Airframe Parachute System Maintenance Manual w/ Illustrated Parts List (P/N 12128-001)
for CAPS Maintenance Practices.
WARNING:
CAPS must be serviced and maintained by Cirrus Design trained and authorized parachute system technicians only. Airframe and Powerplant license is not sufficient credentials for performing maintenance on CAPS.
Licensed Airframe and Powerplant mechanics may visually inspect the parachute
installation and activation handle installation only as specified in 5-20 (Scheduled
Maintenance Checks).
Never activate CAPS on the ground. The rocket exits the fuselage with a velocity of
150 mph in the first tenth of a second and reaches full extension in less than one second. People near the airplane may be injured and extensive damage to the airframe
will occur. Ground activation will cause the airplane to be out of service until CAPS is
replaced and the airframe repaired and inspected.
Rocket ignition will occur at temperature above 500° F (260° C). In the event of ground
fire, use necessary precautions to avoid CAPS deployment.
FAA Type Certification for the airplane is contingent on a functional Cirrus Airframe
Parachute System (CAPS). The airplane may not be flown when CAPS is rendered
inoperative.
A label on the side of the CAPS canister shows the model and serial number along
with the manufacture date and the “Do Not Use After” date for the parachute system.
The unit was weighed before it left the manufacturer, and the weight was imprinted on
the aluminum data plate. In the unlikely event of contamination, call Cirrus Design
Customer Service Department for further instructions.
Page 2
95-00
13773-001
30 Nov 2000
Figure 95-001
CAPS Deployment
13773-001
30 Nov 2000
95-00
Page 3