Download Miro Displays TD490 Specifications
Transcript
miro TD490 Manual miro Displays GmbH · TRIFORUM · Haus A1 · Frankfurter Str. 233 · D-63263 Neu-Isenburg · Tel.0180-5 22 35 26 (0.12 Euro/Min) · Fax 06102-3667-77 · e-mail:[email protected] TABLE OF CONTENTS INTRODUCTION FCC Compliance Statement ..............................................................i Safety Instructions ..........................................................................iii General Information..........................................................................1 Equipment Checklist ........................................................................2 Monitor Features ..............................................................................3 GETTING STARTED Installation ........................................................................................4 Installation VESA Wall Mount ..........................................................6 Control Buttons ................................................................................7 On-Screen Display ..........................................................................8 ON-SCREEN CONTROLS Menu Descriptions............................................................................9 REFERENCE Power Management........................................................................11 Plug & Play ....................................................................................11 Timing Guide ..................................................................................12 Timing Table ..................................................................................13 Pin Assignment ..............................................................................14 Specifications..................................................................................15 Troubleshooting ..............................................................................16 FCC C OMPLIANCE S TATEMENT Note: This equipment has been tested and found to comply with the limits for a Class B digital device, pursuant to Part 15 of the FCC Rules. These limits are designed to provide reasonable protection against harmful interference in a residential installation. This equipment generates, uses and can radiate radio frequency energy, and if not installed and used in accordance with the instructions, may cause harmful interference to radio communications. However, there is no guarantee that interference will not occur in a particular installation. If this equipment does cause harmful interference to radio or television reception, which can be determined by turning the equipment off and on, the user is encouraged to try to correct the interference by one or more of the following measures: • Reorient or relocate the receiving antenna. • Increase the separation between the equipment and receiver. • Connect the equipment into an outlet on a circuit different from that to which the receiver is connected. • Consult the dealer or an experienced radio/TV technician for help. NOTICE 1. The changes or modifications not expressly approved by the party responsible for compliance could void the user's authority to operate the equipment. 2. Shielded interface cables and AC power cord, if any, must be used in order to comply with the emission limits. 3. The manufacturer is not responsible for any radio or TV interference caused by unauthorized modification to this equipment. It is the responsibilities of the user to correct such interference. WARNING: To prevent fire or shock hazard, do not expose the monitor to rain or moisture. Dangerously high voltages are present inside the monitor. Do not open the cabinet. Refer servicing to qualified personnel only. i S AFETY I NSTRUCTIONS HANDLING Due to its fragile glass panel, this monitor must be handled with caution and not exposed to impact or shock. Never touch the display area or rub it with a hard stiff object or tool, as the panel is easily scratched. CLEANING The display area is highly prone to scratching. Do not use ketone-type cleaners (i.e. acetone), ethyl alcohol, toluene, ethyl acid or methyl chloride to clean the panel. Doing so may result in permanent damage. Water, IPA (Iso Prophyl Alcohol) and Hexane are safe cleaners. Do not allow oil or water to penetrate the display, as droplets cause staining and discoloration with time. Keep food particles and fingerprints away from the display area at all times. STORAGE Store the monitor in a dark place away from sunlight and ultraviolet (UV) radiation, as air bubbles may develop within the glass panel with time. Do not store the display in temperatures higher than 60°C/140°F or humidity greater than 85%. Avoid condensation. ii iii S AFETY I NSTRUCTIONS G ENERAL I NFORMATION CAUTION Your new LCD monitor incorporates the latest state-of-art color Liquid Crystal Display (LCD) technology providing a wider viewing angle with higher contrast ratio for IBM compatible PC and Apple Macintosh. 1. Do not open any covers on the monitor. No user serviceable parts are inside. 2. In an emergency, disconnect the AC power plug. 3. To avoid electrical shock, disconnect the power cord from the AC adapter before connecting the signal cable to the computer. 4. Keep away from liquids and flame. Do not immerse this monitor in water or any other liquid. Do not use this device in excessively hot conditions. 5. Handle the power cord with care. Do not bend the power cord excessively or place heavy objects on it. Do not use a damaged power cord, as doing so can result in fire or electrical shock hazards. When disconnecting the power cord, always grasp the plug, not the cord. 6. The liquid crystals in the display panel contain several irritants. If the panel is damaged or broken, do not allow the liquid to come in contact with skin, eyes, or mouth. If you come in contact with the liquid, flush the affected area with running water for at least 15 minutes, then consult a doctor. 7. Handle this monitor with care when moving it. When lifting the monitor, support it with one hand holding the stand, and one hand holding the LCD screen. 8. Always disconnect the power cord when moving this monitor. 9. Do not lay this monitor in a horizontal position when operating. 10. Unplug the unit during a lightening storm or when it will not be used for long period of time. This will protect the monitor from damage due to power surges. iv Your new LCD monitor has many advantages : safe from electromagnetic wave, lights, sharps and slims. This makes the monitor extremely suitable in the environment of administration, transportation system research, etc. Your new LCD monitor is designed for Analog and Digital (DVI) input support. Your new LCD monitor is a type monitor or VESA-compatible wall mountable type. Your new LCD monitor does not emit any X-ray radiation and the magnetic emission greatly reduces the eyestrain. Moreover, our On Screen Controls on the bottom of the panel provide flexibility with simple controls. You can use these controls to adjust the display as you desire. Your new LCD monitor incorporates an active TFT module. It has a 1280 x 1024 pixel resolution, high contrast, wide viewing angle and colors up to 16.7M. 1 E QUIPMENT C HECKLIST M ONITOR F EATURES Before operating your display, please check to make sure that all of the items listed are present in your package: * Supports Analog IBM compatible PC, Apple MacintoshTM (Adapter optional) * Supports DPMS for monitor power management * Supports DDC1/2B * Digital and Analog Input * USB 2.0 Hub - 1up 4down * Built-In Speakers, 2W x 2 * On Screen Control : Auto Image Adjust, Contrast, Brightness, Input Selected, Focus, Clock, H-Position, V-Position, Language, Scaling Mode, Color Temperature (6500°K; 7800°K), RGB Color Temperature, Recall, Exit * Built-in color active matrix TFT (Thin Film Transistor) Liquid Crystal Display (LCD) that uses amorphous silicon TFTs as a switching device * max. Resolution for analog input: 1280 x 1024 @ 85Hz * max. Resolution for digital input: 1280 x 1024 @ 75Hz (DVI-D) * Color : up to 16.7 M Color support * Dot pitch : 0.294mm(H) x 0.294mm(W) * Analog input scanning frequency 24kHz ~ 93kHz (H), 55Hz ~ 85Hz (V) * Digital input scanning frequency 24kHz ~ 83kHz (H), 55Hz ~ 85 Hz (V) * Universal power supply : AC 100 - 240V allowed * Power consumption Normal : 65 Watt Max. Stand-by : 3 Watt Max. Off : 2 Watt Max. * Outside dimension : 432mm(W) x 440mm(H) x 198mm(D) * Weight (net) : 5.9kg • Color TFT LCD Monitor • Accessory Box: 1. AC to DC Adapter & Power Cord 2. 15-pin D-SUB cable 3. DVI Cable 4. USB Cable 5. Audio Cable 6. This manual Power Requirements The monitor is equipped with an auto-sensing power supply for voltage ranging from 100-240VAC, 50/60Hz. Confirm the line voltage designation then attach the power cable to the power jack. Save the carton and packaging materials in case you need to relocate the monitor. 2 3 I NSTALLATION I NSTALLATION Follow these instructions to install and remove the swivel base. Follow these steps to install the monitor 1. Before you connect the cables, make sure the monitor and system unit power switches are OFF. 2. Plug one end of the 15-pin signal cable to the rear of your system and the other end in the “Analog” video signal connector of LCD monitor. The adapter may be required for certain Apple Macintosh computers. Tighten the two screws on the cable connector. 3. Connect one end of the 24-pin DVI cable to the back of the monitor and connect the other end to the computer’s DVI port (requires a video card with DVI port). 4. Connect the audio cable between the monitor’s audio input and the PC’s audio output. 5. Attach the female end of the power cord to the adapter, then plug the adapter connector to the power “DC-IN” jack of the LCD monitor. Plug the male end of power cord into an AC wall outlet. 6. Connect a headphone to the monitor’s headphone jack (headphone not included). 7. Turn on your computer and your LCD monitor. INSTALL: REMOVE: Preparing to install the cables. 1. Remove the wall mounting hole cover. 2. Remove the cable cover. 1. External Adapter 2. 15-pin D-Sub Cable 3. DVI Cable 4. Audio Cord 5. Power Cable 6. Headphone 7. USB Cable 8. Press down on the stand and gently adjust the monitor to a suitable viewing angle. Please note that this monitor can only be tilted forward to 5° and backward to 20°. To prevent damage to the monitor, do not press the screen over its tolerant angles. 4 5 I NSTALLATION C ONTROL B UTTONS VESA WALL MOUNT Front Controls This monitor can be attached to a wall mounting arm (not included). Disconnect power before performing this procedure. Follow these steps: 1. Remove the VESA cover from the monitor. 2. Remove the stand rear cover from the base. 3. Unplug the connector. 4. Pull out the cable from the hook of base. 5. Support the base and remove the four screws. 6. Remove the base. Button Description: 7. Place the wall mounting arm (not included) onto the back of the monitor. Line up the holes of the arm with the holes in the back of the monitor. 8. Insert the 4 screws into the holes and tighten. 9. Reconnect the cables. Refer to the manual of wall mounting arm for instructions on attaching it to the wall. 6 1. Auto Adjust / Exit Before activating the OSD menu, this button can be used to automatically adjust the display to the horizontal/ vertical position, Clock and Focus. (Press button for 2 seconds) When OSD menu is in active status, press this button to exit OSD menu. 2. Brightness Adjust brightness To scroll up the menu or increase the value of selected item. 3. Contrast Adjust contrast To scroll down the menu or decrease the value of selected item. 4. Menu / Enter Press this button to turn on the OSD main menu or activate/ deactivate selected item. Press this button to exit OSD menu when in Brightness/ Contrast OSD status. 5.: Power Indicator When light is green, the power is on, orange when the power is active off. 6. Power Button Press this button to turn ON/ OFF the monitor’s power. 7. Headphone Jack 8. Volume control 7 ON-SCREEN DISPLAY MENU DESCRIPTIONS This LCD monitor features an On-Screen Display (OSD) menu. These icons are designed to make your monitor display settings easier. When highlighted, the icons illustrate the control function to assist you in identifying which control needs adjustment. Before activating the OSD menu, the “Auto Adjust” button (1) can be used to automatically adjust the display to the horizontal and vertical position, Clock and Focus. (Press button for 2 seconds.) Note: When setting up this monitor for the first time, perform Auto Image Adjust function. For screen adjustments, press the “Menu” button (4) to display the OSD (On-Screen Display) Main Menu. Press the (2) or (3) button to scroll up or down the menu to your required options then press the “Menu” button (4) to confirm your selection. Press the (2) button to increase the value and press the (3) button to decrease the value. After your adjustment, press the “Menu” button (4) to go back to previous menu. Please note that the OSD will automatically turn off in 10 seconds without any manipulation or by simply pressing the “Menu” button (4) to exit the OSD Menu. Main Menu CONTRAST Selecting this control allows you to make adjustments to the contrast of the display screen. BRIGHTNESS Selecting this control allows you to make adjustments to the luminosity level of the display screen. FOCUS (AVAILABLE IN ANALOG MODE ONLY) Selecting this control allows you to make adjustments to the picture focus (pixel clock signal). CLOCK (AVAILABLE IN ANALOG MODE ONLY ) Selecting this control allows you to make adjustments to the picture clock (pixel frequency). HORIZONTAL POSITION (AVAILABLE IN ANALOG MODE ONLY) Moving the screen image horizontally. VERTICAL POSITION (AVAILABLE IN ANALOG MODE ONLY ) Moving the screen image vertically. INPUT SELECT Switching main input signal (select analog or digital input source). 8 9 MENU DESCRIPTIONS POWER MANAGEMENT LANGUAGE The power management feature of this monitor is comprised of two stages: On or Out Of Range (Green), OFF (Amber). To choose language used in the menus and control screens. SCALING MODE To adjust the input signal to the screen size by using the following options: - Fill All: To adjust the signal to the full screen. - Fill Aspect Ratio: To adjust the horizontal signal to full screen but maintain the original vertical signal. This function only works when the resolution setting is lower than the native resolution of 1280 x 1024. C1 (6500°K) C1 Default color Temperature setting: Adjust the color temperature to 6500°K x = 0.313, y = 0.329 C2 (7800°K) C2 Default color Temperature setting: Adjust the color temperature to 7800°K x = 0.296, y = 0.311 RED Individual adjustments for red. Adjusts the intensity of red. GREEN Individual adjustments for green. Adjusts the intensity of green. BLUE Individual adjustments for blue. Adjusts the intensity of blue. RESET To set all the adjustments to factory default values. EXIT To save user adjustments and exit OSD menu. Power Mode H-Sync V-Sync Video LED Color Normal Pulse Pulse Active Green Out Of Range Pulse Pulse Active Green Off Pulse No pulse Blanked Amber. Off No pulse Pulse Blanked Amber Off No pulse No pulse Blanked Amber This monitor meets the Green Monitor standards as set by the Video Electronics Standards Association (VESA). This feature is designed to conserve electrical energy by reducing power consumption when there is no video input signal present. When there is no video input signal this monitor, following a time-out period, will automatically switch to an OFF mode. This reduces the monitor's internal power supply consumption. After the video input signal is restored, full power is restored and the display is automatically redrawn. The appearance is similar to a "Screen Saver" feature except the display is completely off. The display is restored by pressing a key on the keyboard, or clicking the mouse. PLUG & PLAY This monitor is equipped with VESA DDC1/2B capabilities according to the VESA DDC STANDARD. It allows the monitor to inform the host system of its identity and, depending on the level of DDC used, communicate additional information about its display capabilities. The communication channel is defined in two levels, DDC1 and DDC2B. The DDC1 is a unidirectional data channel from the display to the host that continuously transmits EDID information. The DDC2B is a bidirectional data channel based on the I²C protocol. The host can request EDID information over the DDC2B channel. NOTE: THIS MONITOR WILL APPEAR TO BE NON-FUNCTIONAL IF THERE IS NO VIDEO INPUT SIGNAL. IN ORDER FOR THIS MONITOR TO OPERATE PROPERLY, THERE MUST BE A VIDEO INPUT SIGNAL. 10 11 TIMING GUIDE TIMING GUIDE The LCD is a multi-frequency display. On analog input it operates at horizontal frequencies between 24KHz - 93KHz and vertical frequencies between 55Hz - 85Hz; on digital input it operates at horizontal frequencies between 24KHz - 83KHz and vertical frequencies between 55Hz - 85Hz Because of its microprocessor-based design, it offers autosynchronization and auto-sizing capabilities. This monitor offers 21 preprogrammed settings that are listed in the timing table on page 13. Timing Table These preset modes cover most of the common video modes supported by popular graphics adapters. However, each adapter’s implementation of these video modes may vary slightly. If you find it necessary to make minor display adjustments (for example, horizontal and vertical position). Please refer to the On Screen Display section of this manual for instructions. If you would like to use one of the preset timing modes, please refer to your video card manufacturer’s installation guide for instructions on how to make these changes. The video card controls the refresh rate. Most video cards provide a software utility or hardware DIP switches that allows you to change the frequency used for each resolution. Preset signal input M1 640 480 31.5kHz 60Hz analog / digital M2 640 480 35.0kHz 67Hz analog / digital M3 640 480 37.5kHz 75Hz analog / digital M4 640 480 37.9kHz 73Hz analog / digital M5 800 600 37.9kHz 60Hz analog / digital M6 800 600 46.9kHz 75Hz analog / digital SVGA M7 800 600 35.2kHz 56Hz analog / digital M8 800 600 48.0kHz 72Hz analog / digital M9 832 624 49.7kHz 75Hz analog / digital M10 1024 768 48.4kHz 60Hz analog / digital M11 1024 768 56.5kHz 70Hz analog / digital M12 1024 768 60.0kHz 75Hz analog / digital VGA XGA M13 1280 1024 64.0kHz 60Hz analog / digital SXGA M14 1280 1024 80.0kHz 75Hz analog / digital M15 1280 1024 91.2kHz 85Hz analog M16 1152 864 80.0kHz 75Hz analog / digital M17 1280 960 60.0kHz 60Hz analog / digital M18 1280 960 85.9kHz 85Hz analog M19 640 400 31.5kHz 70Hz analog / digital M20 640 350 31.5kHz 70Hz analog / digital M21 720 400 31.5kHz 70Hz analog / digital DOS 12 Resolution Frequency Horizontal Vertical Horizontal Vertical 13 SPECIFICATIONS PIN ASSIGNMENT Connector (15-pin) Connector (24-pin) LCD Type Colors Glass surface 19” (48.2cm) Active Matrix Panel, 0.294mm pixel pitch R, G, B Analog Interface Digital Interface up to 16.7M Anti-glare coating Viewing Angles (CR>5) Left / Right Up / Down 170° 170° Contrast Ratio Typ. 700 : 1 Color Filter Pin Pin Pin Pin Pin Pin Pin Pin Pin Pin Pin Pin Pin Pin Pin 1 2 3 4 5 6 7 8 9 10 11 12 13 14 15 Red Green Blue Ground Ground Red Ground Green Ground Blue Ground +5V Detect Cable No Connection DDC SDA Horizontal Sync. Vertical Sync. DDC SCL Pin Pin Pin Pin Pin Pin Pin Pin Pin Pin Pin Pin Pin Pin Pin Pin Pin Pin Pin Pin Pin Pin Pin Pin 1 2 3 4 5 6 7 8 9 10 11 12 13 14 15 16 17 18 19 20 21 22 23 24 TMDS Data 2TMDS Data 2+ TMDS Data 2/4 Shield TMDS Data 4TMDS Data 4+ DDC Clock DDC Data No Connection TMDS Data 1TMDS Data 1+ 250cd/m² Response Time Typ. 25 ms Compatibility PC IBM XT, AT, 386, 486, Pentium or PS/2 and compatibles (from VGA up to 1280 x 1024 @ 85 Hz) Refresh Rate Max. Analog Max. Digital 1280 x 1024 @ 85Hz (60Hz rec.) 1280 x 1024 @ 75Hz (60Hz rec.) TMDS Data 1/3 Shield TMDS Data 3TMDS Data 3+ +5V Ground Hot Plug Detect TMDS Data 0TMDS Data 0+ Audio TMDS Data 5TMDS Data 5+ TMDS Clock Shield TMDS Clock + TMDS Clock - Rated Power 2W rms (Per channel) Connectors Input Signal Input Signal USB Hub Power 15-pin D-SUB 24-pin DVI 1up, 4down Jack type DC + 12V In Power Input Output Consumption AC 100-240V 50-60Hz DC 12V 65 watts (Maximum) Display Area Max. 376.32mm (H) x 301.056mm (V) Operating Temperature Humidity 0°C to 40°C 20% RH to 85% RH (no condensation) Storage Conditions Temperature Humidity -10°C to 50°C TMDS Data 0/5 Shield Note: When resolutions are shown that are lower than the pixel count of the LCD panel, text may appear choppy or bold. This is normal all current flat panel technologies when displaying non-native resolutions on a full screen (below than 1280 x 1024 resolution). In flat panel technologies, each dot on the screen is actually one pixel, so to expand resolutions to full screen, an interpolation of the resolution must be down. When the interpolated resolution is not an exact multiple of the native resolution, the mathematical interpolation necessary may cause some lines to appear thicker than others. 14 Luminance of White Typ. Dimension Weight 20%RH to 85%RH (no condensation) 432mm (W) x 440mm (H) x 198mm (D) Net 5.9kg TROUBLESHOOTING TROUBLESHOOTING No power. Double (split) screen image. ü ü Flip the power switch ON. The Power LED turns on. Make sure AC power cord is securely connected to the power jack and to a power outlet. ü Entire screen image rolls (scrolls) vertically. ü Power on but no screent image. ü ü Make sure the video cable attached with this monitor is tightly secured to the video output port on the back of the computer. Adjust the brightness and contrast. Image is unstable, unfocused. ü ü Use “AUTO ADJUST” to adjust automatically. Check whether the resolution or refresh rate in windows display setting is beyond supported range(please refer to the specification of supported mode). Make sure your graphics card is set to Non-Interlaced mode. ü ü Make sure the input signals are within the LCD monitor’s specified frequency range. (Maximum Analog Input: VESA, MAC 1280 x 1024 @85Hz) Connect the video cable securely. Try the miro Monitor with another power source. Control buttons do not work. ü Press only one button at a time. Flickering. ü ü Not enough power is being supplied to the miro TD490 Monitor. Connect the miro TD490 Monitor to a different outlet. If a surge protector is being used, there may be too many devices plugged in. See Timing Guide in this manual with a list of refresh rates and frequency settings showing the recommended setting for the miro TD490 Monitor. Wrong or abnormal colors. ü ü ü 16 If any colors (Red, Green, or Blue) are missing, check the video cable to make sure it is securely connected. Loose pins in the cable connector could cause a bad connection. Connect the miro TD490 Monitor to another computer. Check the graphics card for proper sync scheme (or sync polarities) to match the miro TD490 Monitor’s specifications. 17 APPENDIX For European Countries Safety Guidelines Warning: This device must be operated with the original power supply CAUTION: The socket-outlet should be isntalles near the equipment and should be easily accessible. CAUTION: Use a power cable that is properly ground. Always use the appopriate AC cord that is certified for the individual country. Some examples are listed below. USA...................UL Canada..............CSA Germany ...........VDE Switzerland ......SEV Britain ...............BASE/BS Japan ...............Electric Appliance Control Act IMPORTANT NOTICE CONCERNING POWER CORD SELECTION The power cord set for this unit has been enclosed and been selected according to the country of destination and must be used to pervent electric shock. Use the following guidelines if it is necessary to replace the original caord set, or if the cord set is not enclosed. The female receptacle of the cord set must meet IEC-60320 requirements and may look like (Figure A1 below): FOR THE UNITED STATES AND CANADA In the United States and Canada the male plug is a NEMA5-15 style (Figure A2), UL Listed, and CSA Labeled. For units which are mounted on a desk or table, type SVT or SJT cord sets may be used. For units which sit on the floor, only SJT type cord sets may be used. The cord set must be selected according to the current rating for your unit. Please consult the table below for the selection criteria for power cords used in the United States and Canada. Code Type SJT SVT Size of Conductors in Cord 18 AWG 16 AWG 14 AWG 18 AWG 17 AWG Maximum Current Rating of Unit 10 Amps 12 Amps 12 Amps 10 Amps 12 Amps In Europe you must use a cord set which is appropriate for the receptacles in your country. The cord set is HAR-Certified, and a special mark that will appear on the outer sheath, or on the insulation of one of the inner conductors. AC PLUG CORD PRECAUTIONS FOR THE UNITED KINGDOM FOR YOUR SAFETY PLEASE READ THE FOLLOWINT TEXT CAREFULLY. IF THE FITTED MOULDED PLUG IS UNSUITABLE FOR THE SOCKET OUTLET THEN THE PLUG SHOULD BE CUT OFF AND DISPOSED OF SAFELY. THERE IS A DANGER OF SEVERE ELECTRICAL SHOCK IF THE CUT OFF PLUG IS INSERTED INTO AN APPROPRIATE SOCKET. If a new plug is to be fitted, please observe the wiring code as shown below. If in any doubt, please consult a qualified electrician. WARNING: THIS APPLIANCE MUST BE EARTHED. IMPORTANT: The wires in this mains lead are coloured in accordance with the following code: Green-and-Yellow : Earth Blue : Neutral Brown : Live If the coloured wires of the mains lead of this appliance do not correspond with the coloured markings identifying the terminals in your plug, proceed as follows: The wire which is coloured GREEN-AND-YELLOW must be connected to the terminal in the plug which is marked by the letter E or by the Earth symbol or coloured GREEN or GREEN-AND-YELLOW. The wire which is coloured BLUE must be connected to the terminal in the plug which is marked with the letter N or coloured BLACK. The wire which is coloured BROWN must be connected to the terminal in the plug which is marked with the letter L or coloured RED. If you have any questions concerning which proper power cord to use, please consult with the dealer from whom you have purchased the product. Compliance Information for U.S.A. This equipment has been tested and found to comply with the limits for a Class B digital device, pursuant to Part 15 of the FCC Rules. These limits are designed to provide reasonable protection against harmful interference in a residential installation. This equipment generates, uses and can radiate radio frequency energy, and if not installed and used in accordance with the instructions, may cause harmful interference to radio communications. However, there is no guarantee that interference will not occur in a particular installation. If this equipment does cause harmful interference to radio or television reception, which can be determined by turning the equipment off and on, the user is encouraged to try to correct the interference by one or more of the following measures: • • • • Reorient or relocate the receiving antenna. Increase the separation between the equipment and receiver. Connect the equipment into an outlet on a circuit different from that to which the receiver is connected. Consult the dealer or an experienced radio/TV technician for help. WARNING: To prevent fire or shock hazard, do not expose the monitor to rain or moisture. Dangerously high voltages are present inside the monitor. Do not open the cabinet. Refer servicing to qualified personnel only. CE Conformity for Europe The device complies with the requirements of the ECC directive 89/336/EEC as amended by 92/31/EEC and 93/68/EEC Art.5 with regard to “Electromagnetic compatibility”, and 73/23/EEC as amended by 93/68/EEC Art.13 with regard to “Safety”. INHALTSVERZEICHNIS EINFÜHRUNG Sicherheitsrichtlinien ..........................................................................i Vorsichtsmaßregeln für den Gebrauch des Monitors ........................i Pflege des Monitors ........................................................................iii Aufstellplatz des Monitors................................................................iv Allgemeine Informationen ................................................................1 Prüfliste Zubehör ..............................................................................2 Gerätemerkmale ..............................................................................3 INSTALLATION Installation des Monitors ..................................................................5 Installation VESA Wandbefestigung ................................................7 Bedienung ........................................................................................8 OSD-Bildschirm-Menü......................................................................9 OSD-BILDSCHIRM Menü Erläuterungen ......................................................................10 SONSTIGES Stromsparsystem............................................................................12 Plug & Play ....................................................................................12 Einstellungsrichtlinien (Timing Guide) ............................................13 Timing Table ..................................................................................14 Pinbelegung....................................................................................15 Spezifikationen ..............................................................................16 Im Störungsfalle..............................................................................17 S ICHERHEITSRICHTLINIEN VORSICHTSMAßREGELN FÜR DEN GEBRAUCH DES MONITORS Bei Ihrem Monitor handelt es sich um ein hochwertiges elektronisches Gerät. Zu Ihrer eigenen Sicherheit und um die Funktionalität des Monitors zu gewährleisten, empfehlen wir folgende Warnhinweise sorgfältig zu beachten. Behandeln Sie den Montior vorsichtig. • Reiben Sie nicht mit einem harten Gegenstand am Monitor und setzen Sie ihn keinen Schlägen aus, da er sonst beschädigt und die Anzeige zerkratzt werden kann. • Üben Sie keinen Druck auf den Flüssigkristall-Bildschirm durch Berühren oder verkratzen mit harten Gegenständen aus. • Stellen Sie keine Gegenstände auf dem Monitor ab und achten Sie darauf, dass nichts in die Belüftungsschlitze des Monitors fallen kann. Gegenstände, die durch diese Schlitze in das Innere des Monitors gelangen, können zu Beschädigungen führen. Zudem setzen Sie sich dabei der Gefahr eines elektrischen Stromschlages aus. • Falls der Monitor beschädigt ist, vermeiden Sie unbedingt den Kontakt der Flüssigkristalle mit Haut, Augen oder Mund. Die Flüssigkristalle des Monitors enthalten Reizstoffe, die schädlich sind. Falls doch Kontakt entsteht, waschen Sie die entsprechende Stelle unter fließendem Wasser gut ab und konsultieren Sie einen Arzt. • Beim Tragen des Monitors mit einer Hand den Standfuß des Monitors unterstützen mit der anderen dessen Display halten. Behandeln Sie das Gehäuse vorsichtig. • Unterlassen Sie das Öffnen des Gehäuses. Überlassen Sie Wartungs- bzw. Reparaturarbeiten ausschließlich qualifiziertem Fachpersonal. • Beim Transport des Monitors darauf achten, dass er keinen großen Erschütterungen ausgesetzt wird. • Wenn flüchtiges Lösungsmittel oder Klebstoff mit dem Gehäuse in Berührung kommt, kann die Oberfläche beschädigt oder die Farbe abgelöst werden. i S ICHERHEITSRICHTLINIEN S ICHERHEITSRICHTLINIEN Gehen Sie sorgsam mit dem Netzkabel um. • Speziell beim unachtsamen Gebrauch des Netzkabels besteht die Gefahr eines elektrischen Stromschlages. • Stellen Sie keine schweren Gegenstände auf das Netzkabel, schließen Sie keine Zweigleitungen an, verknoten Sie es nicht, und ziehen Sie nicht am Kabel, um den Stecker aus der Steckdose zu ziehen. Wenn das Netzkabel beschädigt ist, besteht Brand- und Stromschlaggefahr. • Fassen Sie den Netzstecker niemals mit nassen Händen an, da anderenfalls Stromschlaggefahr besteht. • Wenn Sie den Monitor bewegen, trennen Sie diesen immer von der Stromzufuhr. • In einer Notsituation sofort das Netzkabel von der Steckdose trennen. • Bevor Sie das Signalkabel des Monitors mit dem Computer verbinden, den Netzstecker immer vom Strom trennen. • Trennen Sie das Gerät während eines Gewitters vom Netz, aber auch dann, wenn Sie es für längere Zeit nicht verwenden. Dies schützt den Monitor vor Beschädigungen durch Spannungsspitzen. PFLEGE DES MONITORS ii • Reinigen Sie das Gehäuse des Monitors gelegentlich mit einem weichen, leicht mit Wasser angefeuchteten Tuch. • Verwenden Sie zur Reinigung der Bildfläche des Monitors auf keinen Fall Seife, Fensterputzmittel oder ähnliche Reinigungsmittel. Wischen Sie die Bildfläche ab und zu mit einem weichem, leicht mit Wasser angefeuchteten Tuch ab. • Verwendung eines chemisch behandelten Lappens oder eines glanzerzeugenden Reinigungsmittels kann die Oberfläche beschädigen oder ein Ablösen der Farbe verursachen. • Achten Sie darauf, dass kein Wasser oder Öl in die Sichtanzeige eindringen kann, da Tröpfchen im Laufe der Zeit Verfärbungen und Entfärbungen verursachen können. • Halten Sie Nahrungsmittelpartikel vom Anzeigefeld fern und hinterlassen Sie keine Fingerabdrücke darauf. iii S ICHERHEITSRICHTLINIEN A LLGEMEINE I NFORMATIONEN AUFSTELLPLATZ Wir gratulieren zum Kauf dieses hochauflösenden LCD-Monitors. DES MONITORS • Vermeiden Sie direktes Sonnenlicht und ultraviolette (UV-) Strahlung, die eine nachteilige Auswirkung auf Gehäuse und Teile haben. Vermeiden Sie extreme Hitze oder Kälte. • Setzen Sie den Monitor niemals einer Temperatur höher als 60°C und einer Luftfeuchtigkeit über 85% aus. • Vermeiden Sie in jedem Fall Kondensation, wird das Gerät aus einer kalten Umgebung in ein wärmeres eventuell feuchtes Umfeld gebracht, kondensiert Feuchtigkeit im Inneren Ihres Monitors. Wird anschließend der Monitor eingeschaltet, können zu diesem Zeitpunkt interne Komponenten des Monitors beschädigt werden. Aus diesem Grund warten Sie bitte mit dem Einschalten des Monitors, bis sich die Innentemperatur des Gerätes an die Umgebungstemperatur angepasst hat und eventuell entstandene Feuchtigkeit in dieser Zeit trocknen kann. • Ist der Monitor in Betrieb, legen Sie ihn nicht horizontal hin. • Stellen Sie Ihren Monitor auf eine stabile und sichere Unterlage. Sollte der Monitor fallen, können ernsthafte Schäden an dem Gerät entstehen. Außerdem besteht in diesem Fall Verletzungsgefahr. Verwenden Sie nur einen vom Hersteller empfohlenen oder mit dem Monitor gelieferten Standfuß. • Die Schlitze und Öffnungen im Monitorgehäuse dienen der Belüftung. Um einen störungsfreien Betrieb des Monitors zu gewährleisten und ihn vor Überhitzung zu schützen, dürfen Sie diese Öffnungen keinesfalls abdecken. Stellen Sie den Monitor so auf, dass eine ausreichende Luftzirkulation gewährleistet ist. Ihr LCD-Monitor ist mit der neuesten Farb-Flüssigkeitskristallanzeige (LCD-) Technologie ausgestattet. Sie bietet Ihnen bei einer Auflösung von 1280 x 1024 Bildpunkte einen hohen Kontrast und das bei einem Betrachtungswinkel von bis zu 170°. Der Monitor lässt sich auf die meisten Video-Betriebsarten sowohl bei IBM-kompatiblen PCs als auch bei Apple Macintosh-Computern synchronisieren und an diese anpassen. Der ergonomisch angepasste Flachbildschirm bietet ein erweitertes Bildschirm-Menü (OSD) mit animierten Befehls-Icons, die eine einfache und problemlose Einstellung des Monitors ermöglichen. Das vorliegende Handbuch beschreibt die Funktionen und Leistungsmerkmale des Monitors ausführlich, damit Sie ihn so effizient wie möglich einsetzen können. Schäden, die auf Missachtung obiger Warnhinweise zurückzuführen sind sowie mechanische Defekte wie z.B. Bruch des Gehäuses, Kratzer auf dem LCD-Bildschirm etc., werden nicht durch Garantieleistungen abgegolten. iv 1 P RÜFLISTE Z UBEHÖR G ERÄTEMERKMALE Bevor Sie Ihren Monitor in Betrieb nehmen, überprüfen Sie bitte den Inhalt der Verpackung auf Vollständigkeit. Folgende Komponenten sollten im Lieferumfang enthalten sein: QUALITATIV • TFT Farbflachbildschirm • mitgeliefertes Zubehör: 1. Netzadapter und Netzkabel HOCHWERTIGE FLÜSSIGKRISTALL-ANZEIGEEINHEIT • Die 19-Zoll-Anzeigeeinheit (0.294mm Pixelabstand) und die Blendschutz-Hartbeschichtung gewährleisten geringe Reflexionen, Antistatik, hohe Auflösung und starken Kontrast mit Echtfarb-Anzeige (bis zu 16.7 Mio. Farben). PLUG & PLAY • Dieses Gerät entspricht der VESA®-Norm (Video Electronics Standards Association) DDCTM 1/2B (Display Data Channel) gemäß den Windows® Spezifikationen. 2. 15-pin D-SUB Signalkabel 3. DVI-D-Digitalsignalkabel 4. USB Kabel 5. Audio Kabel 6. Benutzerhandbuch DIGITAL-MULTI-SCAN • Bei einem analogen Signaleingang arbeitet dieses Gerät mit einer Horizontalfrequenz von 24 ~ 93 kHz, einer Vertikalfrequenz von 55 ~ 85Hz und einer maximalen Auflösung von 1280 (H) x 1024 (B) bei 85Hz. • Bei einem digitalen Signaleingang arbeitet dieses Gerät mit einer Horizontalfrequenz von 24 ~ 83 kHz, einer Vertikalfrequenz von 55 ~ 85 Hz und einer maximalen Auflösung von 1280 (H) x 1024 (B) bei 75Hz. • Der Monitor ist sowohl mit IBM® PC-kompatiblen Geräten als auch Macintosh®-Geräten kompatibel. FORMATEINSTELLFUNKTION • Das Gerät verfügt über eine On-Screen-Display-Kontrolle. Diese ermöglicht über diverse Einstellungspunkte eine problemlose und einfache Installation des Monitors. Folgende Einstellmöglichkeiten sind gegeben: Automatische Anpassung, Helligkeit, Kontrast, Wahl der Eingangsquelle, Fokus, Clock, H-Position, V-Position, Sprache, Scaling, Farbtemperaturauswahl (6500°K, 7800°K), RGB Farbtemperaturauswahl, Zurücksetzen, Exit STROMZUFUHR • Der Netzadapter besteht aus zwei Teilen: einem kompakten Adapterblock mit einem Monitor-Anschlusskabel sowie dem länderspezifischen Netzkabel. • Der Netzadapter wandelt die jeweilige Netzspannung (100-240V) in die für den Monitor nötige Gleichspannung. • Stromverbrauch des Gerätes: - On mode: max. 65 Watt - Stand-by mode: max. 3 Watt - Off mode: max. 2 Watt 2 3 G ERÄTEMERKMALE I NSTALLATION DES M ONITORS WEITERE FEATURES ANBRINGUNG • Dual Input: Analog RGB Signal (15-pin D-Sub) und DVI-D (24-pin DVI-D) • USB 2.0 Hub 1 in, 4 out • 2 integrierte Lautsprecher (2W), Kopfhörerausgang Anbringung UND ENTFERNUNG DES MONITORFUSSES: Entfernung ABMESSUNGEN • Die Abmessungen des Gerätes betragen 432 x 440 x 198 in mm (B x H x T) bei einem Nettogewicht von 5.9 kg. UMWELTFREUNDLICH • Die Leistungsaufnahme des LCD-Monitors kann bei Anschluss an einem Computer, der der VESA ® DPMSTM (Display Power Management Signaling) -Norm entspricht, reduziert werden. Hinweis: Beim Anbringen und Entfernen des Monitorfusses den LCDBildschirm nicht berühren, da dies sonst zu einer Beschädigung des LCD-Bildschirms führen kann. Um das Gerät zur Kabelinstallation vorzubereiten, nehmen Sie die Abdeckung der Wandbefestigungsvorrichtung ab. Anschliessend entfernen Sie die Kabelabdeckung. 4 5 I NSTALLATION DES M ONITORS I NSTALLATION ARBEITSSCHRITTE VESA WANDBEFESTIGUNGSVORRICHTUNG ZUR INSTALLATION DES MONITORS 1. Bevor Sie das Kabel anschließen, vergewissern Sie sich unbedingt, dass sowohl der Monitor als auch Computer nicht in Betrieb und von der Stromzufuhr getrennt sind. 2. Das Ende des analogen Signalkabels an den Mini-D-Sub-Anschluss (15-pin) der Graphikkarte an Ihrem Computer anschließen. Die Schrauben des Signalkabels festziehen. 3. Verbinden Sie eine Ende des 24-pin Digitalsignalkabels (DVI) mit dem Digitalanschluss auf der Rückseite des Monitors, das andere Ende mit dem DVI-Anschluss der Graphikkarte an Ihrem Computer (Graphikkarte mit DVI-Anschluss erforderlich). 4. Schliessen Sie das Audiokabel an den Audio-Eingang auf der Rückseite des Monitors und an den Audio-Ausgang Ihres Computers an. 5. Um den Monitor mit der Stromzufuhr zu verbinden, schließen Sie das eine Ende des Netzadapters an den Stromanschluss auf der Rückseite des Monitors an, das andere stecken Sie in die Steckdose. 6. Über den Kopfhörer-Anschluss am Monitor können Kopfhörer angeschlossen werden (Kopfhörer nicht im Lieferumfang enthalten). 7. Schalten Sie erst Ihren Computer ein, anschliessend den Monitor. 1. Ext. AC Adapter 2. 15-pin D-Sub Kabel 3. DVI Kabel 4. Audio Kabel 5. Stromkabel 6. Kopfhöreranschluss 7. USB Kabel Die VESA Wandbefestigungsvorrichtung des Monitors ermöglicht die Anbringung eines Wandmontagearms (nicht im Lieferumfang enthalten). Trennen Sie vor der Montage den Monitor von der Stromversorgung. Beachten Sie folgende Schritte: 1. Nehmen Sie die Abdeckung der Wandbefestigungsvorrichtung ab. 2. Entfernen Sie die rückseitige Abdeckung des Standfusses. 3. Ziehen Sie die Stecker vom Anschluss ab und nehmen deren Kabel aus der Kabelführung am Standfuss. 4. Stützen Sie den Fuß ab und entfernen Sie die vier Schrauben. 5. Entfernen Sie den Standfuß. 6. Richten Sie die am Wandmontagearm (nicht im Lieferumfang enthalten) angebrachten Löcher an der Wandbefestigungsvorrichtung auf der Rückseite des Monitors aus. 7. Befestigen Sie den Wandmontagearm am Monitor mit 4 Schrauben und ziehen diese fest. 8. Schließen Sie die Kabel wieder am Monitor an (siehe S. 6). Anweisungen zur Befestigung des Wandmontagearms entnehmen Sie der Montageanleitung des Wandmontagearms. 8. Für einen optimalen Arbeitskomfort kann der Monitor individuell eingestellt werden. Bitte beachten Sie, dass der Monitor vorwärts bis 5° und bis zu 20° nach hinten geneigt werden kann. 6 7 B EDIENUNG OSD-BILDSCHIRM-MENÜ Bedienelemente auf der Frontseite des Monitors Dieser Monitor verfügt über ein OSD-Bildschirm-Menü mit diversen Einstellpunkten, um die Feinjustierung an Ihrem neuen Monitor zu erleichtern. Ist eines der Einstellpunkte hervorgehoben, werden die aktuellen Einstellungen angezeigt. Sie haben die Möglichkeit die Einstellungen Ihres Monitors manuell vorzunehmen oder diese durch längeres Drücken der “Auto Adjust” Taste (1) des LCD-Displays automatisiert durchzuführen. Hierbei werden folgende Einstellpunkte automatisch für den Signaleingang vom Computer durchgeführt. Einstellung der horizontalen Position, vertikalen Position, Takt und Fokus. Dank dieser Funktion ist eine effektive Einstellung gewährleistet. Beschreibung der Funktionstasten: 1. Auto Adjust / Exit Bei deaktivierten OSD-Bildschirm-Menü, führen Sie durch längeres drücken (2 Sekunden) dieser Taste die Auto-Einstell Funktion aus. Folgende Einstellpunkte werden automatisch für den Signaleingang vom Computer angepasst: horizontale/ vertikale Position, Takt und Fokus. Ist das OSD-Bildschirm-Menü aktivert, wird dieses verlassen. 2. Helligkeit Direktaufruf zur Einstellung der Helligkeitswerte. Auswahl des Einstellungspunktes und Änderung des eingestellten Wertes. 3. Kontrast Direktaufruf zur Einstellung der Kontrastwerte. Auswahl des Einstellungspunktes und Änderung des eingestellten Wertes. 4. Menü / Enter Aufruf des OSD-Bildschirm-Menüs und Bestätigung/ Verlassen des Einstellungspunktes. Bei aktivierten Helligkeits-/ Kontrast-Menüs Beenden des OSD-Menüs. 5.: LED Indicator Leuchtet der LED Indikator grün, ist der Monitor eingeschaltet; orange, wenn er ausgeschaltet ist. 6. Ein / Aus Schalter 7. Köpfhöreranschluss 8. Lautstärkeregler 8 Hinweis: Während der automatischen Einstellung keine Schirmoperationen (Maus-Cursor-Verschiebungen) vornehmen, da die Einstellung anderenfalls nicht richtig durchgeführt werden kann. Die Einstellung stets bei stillstehendem Bildinhalt vornehmen. Das OSD-Bildschirm-Menü wird durch Betätigen der “Menü” Taste (4) des LCD-Displays aktiviert. Das Einstellungsfenster erscheint dann in der Mitte des Bildausschnittes. Mit den Tasten (2) und (3) wird der gewünschte Einstellungspunkt gewählt, welcher dann hervorgehoben dargestellt wird. Um diesen dann auszuwählen, um die aktuelle Einstellung zu ändern, einfach die Taste “Menü” (4) drücken. Das Ändern der Einstellung erfolgt über die (2) und (3) Tasten; mit der “Menü” Taste (4) verlassen Sie das aufgerufene Menü, die Einstellungen werden automatisch gesichert. 9 MENÜ ERLÄUTERUNGEN MENÜ ERLÄUTERUNGEN LANGUAGE/ SPRACHE Eine der Sprachen für die Bildschirm-Menüs wählen. SCALING MODE Hauptmenü Folgende Optionen können gewählt werden, um das Eingangssignal der Bildschirmgrösse anzupassen: - Fill All: Das Signal der gesamten Bildschirmgrösse anpassen. - Fill Aspect Ratio: Das horizontale Signal wird der Bildschirmgrösse angepasst, wobei die vertikale Grösse des Originalsignals aufrecht erhalten bleibt. Diese Funktion funktioniert nur, wenn die Auflösung niedriger eingestellt ist als die geräteeigene Auflösung von 1280 x 1024. KONTRAST Einstellung des Kontrastes des Bildschirms. HELLIGKEIT C1 (6500°K) Einstellung des Helligkeitswertes des Bildschirms. C2 (7800°K) FOKUS (NUR IM ANALOG-MODUS VERFÜGBAR) Wählen Sie die Funktion Fokus und beseitigen Sie horizontales Flackern, Unschärfen und Streifen. C1 Vordefinierte Farbtemperatur: Einstellen der Farbtemperatur auf 6500°K x = 0.313, y = 0.329 C2 Vordefinierte Farbtemperatur: Einstellen der Farbtemperatur auf 7800°K x = 0.296, y = 0.311 ROT TAKT (NUR IM ANALOG-MODUS VERFÜGBAR) Individuelle Einstellung der Intensität der Farbe Rot. Wählen Sie die Funktion Takt um vertikale Streifen zu beseitigen. GRÜN HORIZONTALE POSITION (NUR IM ANALOG-MODUS VERFÜGBAR) Individuelle Einstellung der Intensität der Farbe Grün. Einstellung der horizontalen Position des Bildes. BLAU VERTIKALE POSITION (NUR IM ANALOG-MODUS VERFÜGBAR) Individuelle Einstellung der Intensität der Farbe Blau. Einstellung der vertikalen Position des Bildes. RESET / ZURÜCKSETZEN WAHL DER EINGANGSQUELLE Eingangsquelle kann hier gewählt werden (analoge oder digitale Eingangsquelle). Alle Einstellungen werden auf Werkseinstellung zurückgesetzt. EXIT / BEENDEN Speichert die Einstellungsänderungen und schließt das OSD-Menü 10 11 
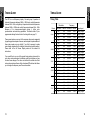
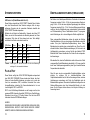
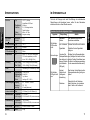
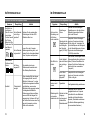
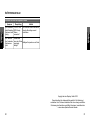
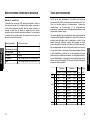
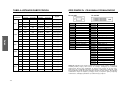
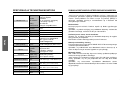
STROMSPARSYSTEM EINSTELLUNGSRICHTLINIEN (TIMING GUIDE) LED INDICATOR (POWER MANAGEMENT ACITVE) Der Monitor ist ein Mehrfrequenz-Bildschirm. Er arbeitet mit horizontalen Frequenzen zwischen 24 kHz ~ 93 kHz bei einem analogen Signal-eingang, 24 kHz ~ 83 kHz bei einem digitalen Signaleingang und vertikalen Frequenzen zwischen 55 Hz ~ 75 Hz. Durch sein Mikroprozessor-Design verfügt er über die Möglichkeiten einer automatischen Synchronisation und Größeneinstellung. Dieser Flachbildschirm bietet 21 vorprogrammierte Einstellungen, die in der nachfolgenden Tabelle aufgeführt sind. Dieser Monitor entspricht dem VESA® DPMSTM-Standard. Diese Funktion kann den Stromverbrauch Ihres Monitors verringern, falls der angeschlossene Computer und die verwendete Videokarte ebenfalls dem VESA® DPMSTM-Standard entsprechen. Befindet sich der Monitor im Bereitschafts-, Suspend- oder Active OFF Modus, so wird der Stromverbrauch des Monitors gedrosselt, um Strom einzusparen. Wird dann die Maus bewegt oder eine Taste betätigt, schaltet sich der Monitor automatisch wieder an. APM-Status H-Sync V-Sync Video LED Color Ein Aktiv Aktiv Aktiv Grün Out Of Range Aktiv Aktiv Aktiv Grün Aus Aktiv Nicht aktiv Schwarz Orange Aus Nicht aktiv Aktiv Schwarz Orange Aus Nicht aktiv Nicht aktiv Schwarz Orange Hinweis: Anweisungen zum Betrieb entnehmen Sie bitte den Bedienungsanleitungen für die verwendete Hardware. PLUG & PLAY Dieser Monitor verfügt über VESA DDC1/2B-Fähigkeiten entsprechend dem VESA DDC STANDARD. Diese erlauben dem Monitor, das HostSystem auf seine Identität aufmerksam zu machen und, je nach dem Level des verwendeten DDC, zusätzliche Information über seine Anzeigefähigkeiten mitzuteilen. Der Kommunikationskanal ist in zwei Levels aufgeteilt, DDC1 und DDC2B. DDC1 ist ein Ein-Richtungs-Datenkanal von der Anzeige zum Host, der permanent EDID Information übermittelt. DDC2B ist ein Zwei-RichtungsDatenkanal, der auf dem I²C Protokoll basiert. Der Host kann EDID Information über den DDC2B-Kanal abfragen. Diese voreingestellten Betriebsarten decken die meisten der üblichen Video-Betriebsarten ab, die von den gängigen Graphikkarten unterstützt werden. Eine jede Graphikkarten-Implementierung dieser VideoBetriebsarten kann jedoch etwas unterschiedlich sein. Wenn Sie es für erforderlich halten, kleinere Bildschirmeinstellungen (z.B. Horizontal- und Vertikalposition) vorzunehmen, so lesen Sie bitte den Abschnitt "OSDBildschirm-Menü" dieses Handbuches. Dort finden Sie die entsprechenden Anweisungen. Bitte beachten Sie, dass der Flachbildschirm nicht auf diese in der Fabrik voreingestellten Einstell-Betriebsarten beschränkt ist. Er kann eigentlich durch seine Mehrfrequenzeigenschaften jedes Signal innerhalb seines Frequenzbereiches darstellen. Wenn Sie gern eine der voreingestellten Einstellmöglichkeiten nutzen möchten, so schlagen Sie im Installationsleitfaden Ihres Graphikkartenherstellers nach, ob Sie dort Anweisungen finden, wie diese Veränderungen vorzunehmen sind. Durch die Graphikkarte wird die Bildwiederholrate gesteuert. Die meisten Graphikkarten verfügen über ein Software-Hilfsprogramm oder über Hardware-Dip-Schalter, mit dem/ denen Sie die Frequenz ändern können, die bei jeder Auflösung zur Anwendung kommt. HINWEIS: DIESER MONITOR ERSCHEINT AUSSER BETRIEB, WENN KEIN VIDEOEINGANGSSIGNAL BESTEHT. DAMIT DIESER MONITOR KORREKT ARBEITET, MUSS EIN VIDEOEINGANGSSIGNAL BESTEHEN. 12 13 TIMING TABLE Preset PINBELEGUNG Auflösung Frequenz Horizontal Vertikal Horizontal Vertikal Signaleingang M1 640 480 31.5kHz 60Hz analog / digital M2 640 480 35.0kHz 67Hz analog / digital M3 640 480 37.5kHz 75Hz analog / digital M4 640 480 37.9kHz 73Hz analog / digital M5 800 600 37.9kHz 60Hz analog / digital M6 800 600 46.9kHz 75Hz analog / digital SVGA M7 800 600 35.2kHz 56Hz analog / digital M8 800 600 48.0kHz 72Hz analog / digital M9 832 624 49.7kHz 75Hz analog / digital M10 1024 768 48.4kHz 60Hz analog / digital M11 1024 768 56.5kHz 70Hz analog / digital M12 1024 768 60.0kHz 75Hz analog / digital M13 1280 1024 64.0kHz 60Hz analog / digital SXGA M14 1280 1024 80.0kHz 75Hz analog / digital VGA XGA DOS M15 1280 1024 91.2kHz 85Hz analog M16 1152 864 80.0kHz 75Hz analog / digital M17 1280 960 60.0kHz 60Hz analog / digital M18 1280 960 85.9kHz 85Hz analog M19 640 400 31.5kHz 70Hz analog / digital M20 640 350 31.5kHz 70Hz analog / digital M21 720 400 31.5kHz 70Hz analog / digital Hinweis: Im Falle, dass Sie den Monitor an einen Macintosh anschließen möchten, benötigen Sie gegebenenfalls einen zusätzlichen Mac-Adapter. 14 Nachstehend finden Sie die Pinbelegung für die Verbindungsstecker. Dies dient lediglich zu Ihrer Information. Bitte versuchen Sie nicht, eigene Verbindungen zu konstruieren, da dadurch der Bildschirm beschädigt werden könnte. Anschluss (15-pin) Pin Pin Pin Pin Pin Pin Pin Pin Pin Pin Pin Pin Pin Pin Pin 1 2 3 4 5 6 7 8 9 10 11 12 13 14 15 Rot Grün Blau Masse Masse Rot Masse Grün Masse Blau Masse +5V Detect Kabel keine Verbindung DDC SDA Horizontal Sync. Vertikal Sync. DDC SCL Anschluss (24-pin) Pin Pin Pin Pin Pin Pin Pin Pin Pin Pin Pin Pin Pin Pin Pin Pin Pin Pin Pin Pin Pin Pin Pin Pin 1 2 3 4 5 6 7 8 9 10 11 12 13 14 15 16 17 18 19 20 21 22 23 24 TMDS Daten 2TMDS Daten 2+ TMDS Daten 2/4 Schirm TMDS Daten 4TMDS Daten 4+ DDC Takt DDC Daten keine Verbindung TMDS Daten 1TMDS Daten 1+ TMDS Daten 1/3 Schirm TMDS Daten 3TMDS Daten 3+ +5V Masse Hot-Swap-Erkennung TMDS Daten 0TMDS Daten 0+ TMDS Daten 0/5 Schirm TMDS Daten 5TMDS Daten 5+ TMDS Takt Schirm TMDS Clock + TMDS Clock - 15 SPEZIFIKATIONEN Bildröhre Typ Farben Beschichtung 19” TFT (48.2cm) Active Matrix LCD Panel 0.294mm R, G, B Analog Interface Digital Interface bis zu 16.7 Mio. Anti-glare coating Horizontal Vertikal 170° 170° Pixelabstand Farbfilter Blickwinkel (CR>10) IM STÖRUNGSFALLE Kontrastverhältnis Typ. 700 : 1 Leuchtdichte Typ. 250cd/m² LC-Reaktionszeit Typ. 25ms Kompatibilität PC IBM XT, AT, 386, 486, Pentium oder PS/2 und kompatibles (vom VGA bis zu 1280 x 1024 @ 85 Hz) Auflösung Max. Analog Max. Digital 1280 x 1024 @ 85Hz (60Hz empf.) 1280 x 1024 @ 75Hz (60Hz empf.) Audio Signaleingang Signaleingang USB Hub Strom 15-pin D-SUB 24-pin DVI 1up, 4down Jack type DC + 12V In Stromversorgung Eingang Ausgang Leistung AC 100-240V 50-60Hz DC 12V 65 watts (Maximum) sichtbare Arbeitsfläche Max. 376.32mm (B) x 301.056mm (H) Inbetriebnahme 0°C bis 40°C 20% RH bis 85% RH (nicht kondensierend) Temperatur Luftfeuchtigkeit Temperatur Luftfeuchtigkeit -10°C bis 50°C 20%RH bis 85%RH (nicht kondensierend) Abmessungen BxHxT 432mm x 440mm x 198mm Gewicht Netto 5.9kg 16 Beachten Sie bitte die folgenden Punkte Symptom Die BetriebsLED leuchtet nicht. Keine Anzeige. Nennleistung 2W eff. Mittelwert (pro Kanal) Anschlüsse Aufbewahrung Falls sich die Störungen auch nach Durchführung der nachstehenden Überprüfungen nicht beseitigen lassen, sollten Sie den Netzstecker abziehen und sich an Ihren Händler wenden. Die BetriebsLED geht nicht aus. Überprüfung Abhilfe Netzkabel/ Stecker Das Netzkabel korrekt an die Steckdose anschließen. Ein- & Austaste Drücken Sie die Ein- und Austaste. Signalkabel Schließen Sie das Signalkabel richtig an. Computer (Die Stromsparfunktion kann aktiv sein. In diesem Fall leuchtet die BetriebsLED gelb.) Schalten Sie die Stromsparfunktion aus. (Betätigen Sie hierzu die Maus oder die Tastatur. Einzelheiten lesen Sie bitte in der Bedienungsanleitung für die verwendete Hardware nach.) Kontrast, Helligkeit und Hintergrundbeleuchtung Den Kontrast, die Helligkeit und die Hintergrundbeleuchtung richtig einstellen. Steckdose Überprüfen Sie die Steckdose, indem Sie testen, ob ein anderes elektr. Gerät an ihr funktioniert. 17 IM STÖRUNGSFALLE IM STÖRUNGSFALLE Beachten Sie bitte die folgenden Punkte Symptom Das Bild ist zu groß oder zu klein. Es ist von der richtigen Position versetzt. Ein Teil des Bildes fehlt. Die Farbe eines Teils des Bildes ist verändert. Überprüfung Ist die Betriebsart nicht gespeichert? 18 Abhilfe Nehmen Sie die gewünschten Einstellungen über das OSDBildschirm-Menü vor. Symptom Auch nach der Einstellung sind die Zeichen noch undeutlich. M Ist die Betriebsart garantiert? Vert. oder hor. Streifen auf dem Ist Phase Schirm. eingestellt? Nachbild Beachten Sie bitte die folgenden Punkte Flüssigkristallanzeige Lesen Sie in der ComputerBedienungsanleitung nach, und ändern Sie die Anzeigebetriebsart Ihres Computers entsprechend. So einstellen, dass keine Streifenmuster bemerkbar sind. Das Desktop-Muster ändern. Wenn dasselbe Bild über längere Zeit angezeigt bleibt, kann der Bildschirm "einbrennen", so dass Schatten des eingebrannten Bildes zurückbleiben, wenn andere Bildschirminhalte angezeigt werden. Vorübergehende BildschirmEinbrennungen können auftreten, wenn ein Bild über längere Zeit angezeigt wird. In diesem Fall sollten Sie den Monitor etwa einen Tag lang nicht verwenden, und den Strom nicht einschalten. Das Bild ist zu dunkel. Überprüfung Einstellungen Phase Nehmen Sie die notwendigen Einstellungen vor, bis die auf dem Bildschirm angezeigten Zeichen nicht mehr flimmern. Überschreitet die Videotaktfrequenz des Bildsignals den Standardpegel (158 MHz)? Überprüfen Sie den Videosignalpegel vom Computer und stellen Sie ihn richtig ein. Vermindern Sie die Vertikalfrequenz des Bildsignals, um die Videotaktfrequenz auf einen Pegel unter dem Standardpegel (158 MHz) einzustellen. Ist die Helligkeit oder der Kontrast ganz zurückgedreht? Den Kontrast, die Helligkeit und die Hintergrundbeleuchtung richtig einstellen. (Weitere Einzelheiten entnehmen Sie bitte der Bedienungsanleitung für den verwendeten Computer.) Ist der Videopegel richtig eingestellt? Überprüfen Sie den Videosignalpegel vom Computer und stellen Sie ihn richtig ein. Signalkabel Das Signalkabel richtig anschliessen. M Die Anzeigefarbe ist nicht normal. Abhilfe Überprüfen Sie die Video-Ausgangsbetriebsart vom Computer Bildschirmgröße Befindet sich das und wählen Sie eine Betriebsart Eingangsund -position innerhalb des Monitor-Betriebsändern sich nicht. synchronsignal bereichs. (Einzelheiten entnehmen innerhalb des Betriebsbereichs? Sie bitte der Bedienungsanleitung der verwendeten Hardware.) 19 IM STÖRUNGSFALLE Beachten Sie bitte die folgenden Punkte Symptom Überprüfung Abhilfe Die Grössenautomatik-Einstellung funktioniert nicht richtig. VGA350- oder DOS-PromptModus verwendet? Den Windows-Schirm umschalten oder die Einstellung manuell durchführen. Die Tasten an der Vorderseite funktionieren nicht. Werden zwei oder mehr Tasten Betätigen Sie jeweils nur eine Taste. gleichzeitig betätigt? Copyright bei miro Displays GmbH© 2003 Dieses Handbuch ist urheberrechtlich geschützt. Alle Rechte sind vorbehalten. Kein Teil dieses Handbuchs darf ohne vorherige schriftliche Zustimmung des Herstellers vervielfältigt, übertragen, transkribiert oder in eine andere Sprache übersetzt werden. 20 21 ANHANG EUROPÄISCHE LÄNDER Sicherheitsrichtlinien Warnung: Dieses Gerät muss an das Originalnetzteil angeschlossen werden Vorsicht : Die Steckdose sollte sich in der Nähe der Geräte befinden und leicht zugänglich sein. Vorsicht : Verwenden Sie ein ordnungsgemäß geerdetes Stromkabel. Verwenden Sie ausschließlich ein in Ihrem Lan zugelassenes Wechselstromkabel. Im Folgenden finden Sie einige Beispiele: USA...................UL Kanada ..............CSA Deutschland ......VDE Schweiz.............SEV Großbritannien ..BASE/BS Japan ................Electric Appliance Control Act WICHTIGE INFORMATIONEN ZUR AUSWAHL DES STROMKABELS Das Stromkabelset für dieses Gerät liegt bei. Es wurde gemäß den im Bestimmungsland geltenden Vorschriften ausgewählt. Verwenden Sie nur dieses Stromkabel, um einen Stromschlag zu vermeiden. Wenn das Originalstromkabel fehlt oder ersetzt werden muss, beachten Sie die folgenden Richtlinien: Der Stecker am Kabelende zum Monitor muss den IEC 60320-Vorschriften entsprechen und wie in Abb. A1 angezeigt aussehen: USA UND KANADA In the United States and Canada the male plug is a NEMA5-15 style (Figure A2), UL Listed, and CSA Labeled. For units which are mounted on a desk or table, type SVT or SJT cord sets may be used. For units which sit on the floor, only SJT type cord sets may be used. The cord set must be selected according to the current rating for your unit. Please consult the table below for the selection criteria for power cords used in the United States and Canada. Code Type SJT SVT Size of Conductors in Cord 18 AWG 16 AWG 14 AWG 18 AWG 17 AWG Maximum Current Rating of Unit 10 Amps 12 Amps 12 Amps 10 Amps 12 Amps In Europa muss ein Kabelset verwendet werden, dass den Steckdosen des entsprechenden Landes angepasst ist. Das Kabelset ist HARzertifiziert, und auf der äußeren Ummantelung oder auf der Isolierung einer der inneren Leiter ist eine spezielle Markierung angebracht. AC PLUG CORD PRECAUTIONS FOR THE UNITED KINGDOM FOR YOUR SAFETY PLEASE READ THE FOLLOWINT TEXT CAREFULLY. IF THE FITTED MOULDED PLUG IS UNSUITABLE FOR THE SOCKET OUTLET THEN THE PLUG SHOULD BE CUT OFF AND DISPOSED OF SAFELY. THERE IS A DANGER OF SEVERE ELECTRICAL SHOCK IF THE CUT OFF PLUG IS INSERTED INTO AN APPROPRIATE SOCKET. If a new plug is to be fitted, please observe the wiring code as shown below. If in any doubt, please consult a qualified electrician. WARNING: THIS APPLIANCE MUST BE EARTHED. IMPORTANT: The wires in this mains lead are coloured in accordance with the following code: Green-and-Yellow : Earth Blue : Neutral Brown : Live If the coloured wires of the mains lead of this appliance do not correspond with the coloured markings identifying the terminals in your plug, proceed as follows: The wire which is coloured GREEN-AND-YELLOW must be connected to the terminal in the plug which is marked by the letter E or by the Earth symbol or coloured GREEN or GREEN-AND-YELLOW. The wire which is coloured BLUE must be connected to the terminal in the plug which is marked with the letter N or coloured BLACK. The wire which is coloured BROWN must be connected to the terminal in the plug which is marked with the letter L or coloured RED. If you have any questions concerning which proper power cord to use, please consult with the dealer from whom you have purchased the product. Compliance Information for U.S.A. This equipment has been tested and found to comply with the limits for a Class B digital device, pursuant to Part 15 of the FCC Rules. These limits are designed to provide reasonable protection against harmful interference in a residential installation. This equipment generates, uses and can radiate radio frequency energy, and if not installed and used in accordance with the instructions, may cause harmful interference to radio communications. However, there is no guarantee that interference will not occur in a particular installation. If this equipment does cause harmful interference to radio or television reception, which can be determined by turning the equipment off and on, the user is encouraged to try to correct the interference by one or more of the following measures: • • • • Reorient or relocate the receiving antenna. Increase the separation between the equipment and receiver. Connect the equipment into an outlet on a circuit different from that to which the receiver is connected. Consult the dealer or an experienced radio/TV technician for help. WARNING: To prevent fire or shock hazard, do not expose the monitor to rain or moisture. Dangerously high voltages are present inside the monitor. Do not open the cabinet. Refer servicing to qualified personnel only. CE-Konformität für Europa Das Gerät entspricht den Anforderungen der EECRichtlinie 89/336/EEC und den Abänderungen durch 92/31/EEC sowie 93/68/EEC Artikel 5 hinsichtlich “Elektromagnetischer Kompatibilität” sowie 73/23/EEC und den Abänderungen durch 93/68/EEC Artikel 13 hinsichtlich “Sicherheit”. TABLE DES MATIÈRES INTRODUCTION Déclaration de conformité FCC .....................................................i Recommandations pour la sécurité ................................................iii Informations générales ....................................................................1 Vérification de la livraison de l'équipement ......................................2 Caractéristiques du moniteur ............................................................3 INSTALLATION Commandes frontales ......................................................................7 Menu écran ......................................................................................8 MENU ÉCRAN Description des menus ....................................................................9 RÉFÉRENCE Mode économie d’énergie du moniteur ..........................................12 Table des fréquences......................................................................13 Connecteur VGA D-shell ................................................................14 Caractéristiques techniques............................................................15 Diagnostic d'erreurs ........................................................................16 D ÉCLARATION DE CONFORMITÉ FCC Note: Cet appareil a été testé et trouvé conforme à la norme établissant les limites des dispositifs numériques de classe B indiquées à la partie 15 des règles FCC. Ces limites sont destinées à offrir une protection raisonnable contre les parasites électromagnétiques dans les résidences. Cet appareil produit, utilise et peut émettre de l'énergie sur les fréquences radio. S'il n'est pas installé et utilisé conformément aux instructions, il peut perturber les communications radio. Il n'est cependant pas possible de garantir qu'aucune perturbation ne se produira dans une installation particulière. Si cet appareil perturbe la réception radio ou télévision (ce qu'on peut vérifier en l'éteignant et en l'allumant), il est conseillé à l'utilisateur d'essayer de remédier au problème en utilisant une ou plusieurs des méthodes suivantes: • • • • Réorientez ou déplacez l'antenne de réception. Augmentez la distance séparant l'appareil et le récepteur. Branchez l'appareil sur une prise de courant faisant partie d'un circuit différent de celui qui alimente le récepteur. Consultez le concessionnaire ou un technicien qualifié en radio/ télévision pour obtenir de l'aide. AVIS 1. Les changements ou les modifications qui ne sont pas expressément approuvés par tout responsable de la conformité aux règlements en vigueur peuvent annuler le droit d'utiliser l'appareil. 2. S'il y a lieu, des câbles d'interface et des cordons d'alimentation CA blindés doivent être utilisés pour que les limites d'émission soient conformes aux règlements en vigueur. 3. Le fabricant n'est responsable d'aucun problème de brouillage radio ou télévision provoqué par toute modification non autorisée de cet appareil. Il appartient à l'utilisateur de remédier à ce genre de problème. PRÉCAUTION Pour prévenir tout risque d'incendie ou de choc électrique, évitez d'exposer le moniteur à la pluie ou à l'humidité. Certains éléments de l'intérieur du moniteur sont soumis à de très hautes tensions, ce qui est dangereux. N'ouvrez pas le boîtier. Ne confiez les réparations qu'à un personnel qualifié. i R ECOMMANDATIONS POUR LA SÉCURITÉ MANIPULATION En raison de son panneau de verre fragile, ce moniteur doit être manipulé avec précaution et ne pas recevoir de coups. Ne touchez pas à la zone d'affichage et ne passez pas dessus d'objet dur car le panneau peut être facilement rayé. NETTOYAGE La zone d'affichage est très facile à rayer. N'utilisez pas de produits de type cétogène comme l'acétone, de l'alcool éthylique, du toluène, de l'acide éthylique ou du chlorure de méthyle pour nettoyer le panneau. Ces produits risquent de détériorer le panneau pour toujours. De l'eau, des produits pour laver les vitres ou des produits TFT spéciaux sont sans danger. Faites attention que de l'eau ou des produits huileux ne s'infiltrent pas à l'intérieur de l'écran, car avec le temps le verre deviendrait taché et perdrait sa couleur. Evitez le contact avec tous types de nourriture et ne touchez jamais la surface de l'écran avec les doigts. STOCKAGE Gardez le moniteur dans un endroit sombre à l'abri du soleil et des rayons ultraviolets (UV), car il se pourrait qu'apparaissent des bulles d'air à l'intérieur du panneau de verre. Ne le gardez pas non plus à un endroit où la température pourrait dépasser 60°C/ 140° F ou le taux d'humidité être supérieur à 85%. Evitez la condensation. ii iii R ECOMMANDATIONS POUR LA SÉCURITÉ I NFORMATIONS GÉNÉRALES PRÉCAUTION Votre nouveau moniteur LCD utilise la toute dernière technologie des LCD (écran à cristaux liquides) couleur, offrant un angle de visualisation plus large et un taux de contraste supérieur lors de son utilisation avec les PC IBM compatibles et les Apple Macintosh. 1. N'ouvrez aucun des éléments du boîtier du moniteur. Les pièces à l'intérieur ne nécessitent pas d´être changées par l'utilisateur. 2. En cas de danger, débranchez le câble d'alimentation de la prise secteur. 3. Pour éviter les décharges électriques, débranchez le cordon d'alimentation de l'adaptateur d'alimentation avant de connecter le câble des signaux à l'ordinateur. 4. N'approchez pas de liquides ni de flammes de l'écran. Ne plongez pas le moniteur dans de l'eau ou tout autre liquide. Ne l'utilisez pas dans des endroits particulièrement chauds. 5. Manipulez le cordon d'alimentation avec précaution. Ne le coudez pas et veillez à ne pas poser d'objets lourds sur ce cordon. N'utilisez pas un cordon d'alimentation en mauvais état, car vous risqueriez de provoquer des étincelles ou des décharges électriques. Pour débrancher le cordon d'alimentation, tirez au niveau la prise et non sur le câble lui-même. 6. Les cristaux liquides du panneau de l'écran contiennent des substances irritantes. Si le panneau est détérioré ou cassé, veillez à ce que le liquide n'entre pas en contact avec la peau, les yeux ou la bouche. Si c'était le cas, lavez à grande eau la zone affectée pendant au moins 15 minutes, puis consultez un médecin. 7. Si vous devez déplacer le moniteur, manipulez-le avec précaution. Pour le soulever, saisissez le pied d'une main et l'écran LCD de l'autre main. 8. Débranchez toujours le cordon d'alimentation avant de déplacer le moniteur. 9. Ne séparez pas le panneau LCD de son support et ne l'utilisez pas sans celui-ci. 10. Ne mettez pas le moniteur à l'horizontale quand il fonctionne. 11. Débranchez l'appareil pendant les orages ou s'il ne doit pas être utilisé pendant longtemps. Cette précaution permettra de protéger le moniteur contre les risques de surcharges électriques. iv Votre nouveau moniteur LCD a beaucoup d'avantages : il n'est pas sensible aux faisceaux hertziens ni à la lumière. Il est donc facilement utilisable dans les bureaux, les ateliers, les laboratoires de recherche, etc. Votre nouveau moniteur LCD admet uniquement les entrées analogiques et digital (DVI). Votre nouveau moniteur LCD est de type VESA ou compatible et peut être fixé au mur. Votre nouveau moniteur LCD n'émet pas de rayons X et ses radiations magnétiques réduisent considérablement la fatigue oculaire. En outre, les commandes d'écran sur le côté du panneau sont faciles et simples à utiliser. Utilisez ces commandes pour régler l'écran à votre convenance. Votre nouveau moniteur LCD est équipé d'un module TFT actif. Il possède une résolution de 1280 x 1024 pixels, un contraste élevé, un angle de visualisation très ouvert et jusqu'à 16.7 millions de couleurs. 1 VÉRIFICATION DE LA LIVRAISON DE L'ÉQUIPEMENT C ARACTÉRISTIQUES DU MONITEUR Avant de mettre en service votre moniteur, vérifiez que l'emballage contient tous les éléments suivants : * Prise en charge des signaux analogiques des PC IBM compatibles et des Apple Macintosh (adaptateur optionnel) * Prise en charge du DPMS pour le mode économie d'énergie du moniteur * Prise en charge de DDC1/2B * Entrées analogiques et digital (DVI) * USB 2.0 Hub - 1up 4down * 2 haut-parleurs (2W) * Commandes à l’écran : mise au point automatique, contraste, luminosité, Input Selected, Focus, Clock, positionnement H/V, langue, Scaling Mode, contrôle couleur (6500°K; 7800°K; RGB), Recall, Exit * Ecran LCD (écran à cristaux liquides) couleur TFT (transistor à couches minces) à matrice active utilisant des TFT de silicium amorphe comme élément de commutation * Résolution max. analogique Entrée: 1280 x 1024 @ 85Hz * Résolution max. digital Entrée: 1280 x 1024 @ 75Hz (DVI-D) * Couleurs : jusqu’à 16.7 millions de couleurs * Espacement des points : 0.294mm(I) x 0.294mm(L) * Fréquence de balayage analogique Entrée 24kHz ~ 93kHz (H), 55Hz ~ 85Hz (V) * Fréquence de balayage digital Entrée 24kHz ~ 83kHz (H), 55Hz ~ 85 Hz (V) * Alimentation universelle : AC 100 - 240V ac * Consommation électrique utilisation normale : 65 watts max. en attente : 3 watts max. inactif : 2 watts max. * Dimensions extérieures : 432mm(L) x 440mm(I) x 198mm(h) * Poids (net) : 5.9kg • Moniteur LCD TFT couleur (avec un connecteur D-sub de 15 broches) • Une boîte d'accessoires avec : 1. Un adaptateur courant alternatif/courant continu et un cordon d'alimentation 2. D-sub de 15 broches 3. DVI câble 4. USB câble 5. Audio câble 6. Guide d'installation Le moniteur est équipé d'une alimentation électrique autoadaptable fonctionnant sous des tensions allant de 100–120 V à 200–240 V ac à 50/60Hz. Vérifiez la tension du secteur puis enfichez le câble d'alimentation dans une prise électrique. 2 3 M ONTAGE MURAL DU VESA Votre nouveau moniteur LCD a été conçu pour fixer le compatible VESA au mur. Préparation du moniteur pour le montage mural: 1. Retirez les 4 vis de fixation du moniteur au socle et séparez les deux éléments (voir la figure 1) 2. fig.1 Fixez le système de montage (en option) du compatible VESA au moniteur (voir la figure 2). fig.2 4 5 M ONTAGE MURAL DU VESA C OMMANDES FRONTALES Remontage du moniteur sur son socle 1. Retirez les 4 vis du système de fixation au mur (voir la figure 3). Commandes frontales Digital Control Button Power ON/OFF Switch fig.3 Description des commandes: 1. 2. Fixez le moniteur à son socle, puis vissez les 4 vis (voir la figure 4). 2. 3. 4. : Abandonne les commandes à l'écran. Fonction de 'mise au point automatique' (maintenez enfoncée cette touche pendant deux secondes). : Déplace l'icône sélectionnée vers le bas pour sélectionner une des commandes. Diminution de la valeur de commande. : Déplace l'icône sélectionnée vers le haut pour sélectionner une des commandes. Augmentation de la valeur de commande. : Affiche le menu de commandes d'écran. Sélection du menu de commandes. fig.4 6 7 DESCRIPTION DES MENUS MENU ÉCRAN Ce moniteur LCD dispose d'icônes du menu écran (OSD - On-Screen Display) pour que vous puissiez régler plus facilement les paramètres du moniteur. Lorsqu'elles sont en surbrillance, les icônes indiquent la fonction vous permettant d'identifier les commandes qui doivent être réglées. Avant d'activer le menu OSD, vous pouvez, au moyen du bouton , régler automatiquement les dimensions et les positions horizontale et verticale de l'affichage (appuyez sur le bouton pendant 2 secondes). Le menu OSD s'active automatiquement lorsque vous appuyez sur le bouton Entrée au bas du moniteur. Le menu OSD reste au centre de l'écran pendant que vous faites les réglages. Déplacez la surbrillance à l'aide des boutons '+' ou '-' pour l'amener sur votre sélection. Un sousmenu ou une commande apparaît avec une barre d'état. La barre d'état indique le sens, selon les pré-réglages faits en usine, des réglages à effectuer. Réglez la commande à l'aide des boutons '+' ou '-'. Le menu du contraste et de la luminosité peut aussi être réglé en appuyant simplement sur les boutons '+' ou '-'. Lorsque vous avez fini les réglages, appuyez sur le bouton enregistrer et revenir au menu principal. Main Menu MISE AU POINT AUTOMATIQUE (AUTO-TUNE) Cette commande règle automatiquement les dimensions horizontale et verticale, les positions horizontale et verticale, ainsi que la phase. CONTRASTE (CONTRAST) Cette commande permet de régler le contraste des visualisations à l'écran. pour les LUMINOSITÉ (BRIGHTNESS) Cette commande permet de régler le niveau de luminosité des visualisations à l'écran. POSITION H (H-POSITION) Sélectionnez cette commande et utilisez le bouton '+' pour centrer l'image horizontalement sur l'écran. POSITION V (V-POSITION) Sélectionnez cette commande et utilisez les boutons '+' ou '-' pour centrer l'image verticalement sur l'écran. DIMENSION H (H-SIZE) Sélectionnez cette commande et utilisez les boutons '+' ou '-' pour augmenter ou diminuer la largeur de l'image dans le sens horizontal de l'écran. 8 9 DESCRIPTION DES MENUS DESCRIPTION DES MENUS TEMPORISATION OSD (OOSD PHASE (PHASE) Sélectionnez cette commande et utilisez les boutons '+' et '-' pour régler l'image à l'écran jusqu'à ce qu'elle soit au point, précise et nette. NIVEAU AUTOMATIQUE (AUTO-LEVEL) Cette commande règle automatiquement les niveaux d'entrée du signal vidéo (ex. 0.714 V p-p, 1.0 V p-p). CONTRÔLE COULEUR (COLOR CONTROL) Sélectionnez cette commande et utilisez les boutons '+' et '-' pour rechercher la température de couleur voulue. Sélectionnez, au moyen de la touche, le réglage de votre choix : 9300 K, 6500 K, 5500 K ou UTILISATEUR. TIME-OUT) Sélectionnez cette commande et utilisez la touche pour sélectionner le temps de durée pour le menu OSD. Utilisez les boutons '+' et '-' pour sélectionner la durée (5, 15, 30 ou 60 secondes). RETARD DU MODE ECONOMIE D’ENERGIE (POWER SAVE DELAY) Cette fonction indique au moniteur de rester en mode actif même après que l'ordinateur est entré en mode de 'veille'. L'utilisateur peut sélectionner des temps de 5 secondes, 1 minute ou 60 minutes, ou 'Off' pour que l'affichage apparaisse sur l'écran du moniteur. LANGUE (LANGUAGE) Sélectionnez cette commande et utilisez les boutons '+' et '-' pour choisir les langues suivantes : anglais, allemand, espagnol, italien ou français. GAIN R (ROUGE) (R-GAIN (RED)) Sélectionnez 'UTILISATEUR' puis utilisez le bouton pour déplacer le menu RVB vers le haut et vers le bas jusqu'à atteindre le R (rouge). Utilisez les boutons '+' et '-' pour régler le niveau du rouge de l'écran. GAIN V (VERT) (G-GAIN (GREEN)) Sélectionnez 'UTILISATEUR' puis utilisez le bouton pour déplacer le menu RVB vers le haut et vers le bas jusqu'à atteindre le V (vert). Utilisez les boutons '+' et '-' pour régler le niveau du rouge de l'écran. GAIN B (BLEU) (B-GAIN (BLUE)) Sélectionnez 'UTILISATEUR' puis utilisez le bouton pour déplacer le menu RVB vers le haut et vers le bas jusqu'à atteindre le B (bleu). Utilisez les boutons '+' et '-' pour régler le niveau du rouge de l'écran. INFORMATION (INFORMATION) Sélectionnez cette commande pour confirmer les informations de l'écran. * Note: Vous pouvez obtenir une qualité optimale d'une image plein écran provenant d'un ordinateur. La fonction de 'mise au point automatique' peut ne pas fonc-tionner correctement si la couleur de fond est foncée ou si l'image reçue ne remplit pas l'écran (par ex., en mode texte DOS). Nous vous recommandons fortement d'exécuter les fonctions 'niveau automatique' et 'mise au point automatique' pour obtenir la meilleure qualité d'image après avoir déballé le moniteur ou après avoir installé une carte graphique différente sur le PC. POSITION OSD (OSD POSITION) Sélectionnez cette commande et utilisez la touche pour sélectionner le sens de déplacement du menu OSD. Utilisez les boutons '+' et '-' pour déplacer le menu OSD. 10 11 MODE ÉCONOMIE D’ÉNERGIE DU MONITEUR TABLE DES FRÉQUENCES GESTION Le LCD est un écran multifréquence. Il fonctionne à des fréquences horizontales de 30 à 80 kHz et à des fréquences verticales de 55 à 75 Hz. Grâce à sa structure basée sur un microprocesseur, il dispose des caractéristiques de synchronisation et de dimensionnement automatiques. Ce moniteur possède 10 réglages préprogrammés qui sont indiqués dans le tableau ci-après. DE L'ALIMENTATION L'alimentation de ce moniteur LCD comprend trois phases : allumé ou hors commande (voyant vert), en attente (voyant orange), en suspens ou inactif (voyant orange/vert clignotant). Dans les modes en attente, en suspens ou inactif, tous les circuits du moniteur sont hors tension, excepté le circuit de détection de tension insuffisante. Ce circuit permet au moniteur de se réveiller lorsque vous bougez la souris ou que vous appuyez sur une touche du clavier. Mode d'alimentation Couleur du voyant Sous tension (fonctionnement normal) Hors commande En attente En suspens Inactif vert vert orange vert (orange clignotant une fois par seconde) vert (orange clignotant une fois toutes les 2 sec.) Ces modes préréglés couvrent la plupart des modes vidéo courants pris en charge par les adaptateurs graphiques du marché. Mais la mise au point des modes vidéo peut varier d'un adaptateur à un autre. Si vous estimez néces-saire d'effectuer quelques petits réglages de l'écran (comme les positions horizontale et verticale), vous trouverez les instructions correspondantes à la section 'Commandes frontales' de ce manuel. Si vous voulez utiliser un des modes de fréquences préréglés, consultez le guide d'installation du fabricant de la carte graphique pour savoir comment faire les modifications nécessaires. La carte graphique définit la taux de rafraîchissement. La plupart des cartes graphiques disposent d'un utilitaire logiciel ou d'interrupteurs DIP pour que vous puissiez changer la fréquence de chaque résolution. Résolution Horloge Polarity Horizontale Verticale Horizontale Verticale (MHz) (H/V) VGA M1 720 400 31.5kHz 70Hz 28.322 -/+ M2 640 480 31.5kHz 60Hz 25.175 -/- M3 640 480 37.5kHz 75Hz 31.500 -/- VESA M4 800 600 37.9kHz 60Hz 40.000 +/+ M5 800 600 46.9kHz 75Hz 49.500 +/+ M6 1024 768 48.4kHz 60Hz 65.000 -/- M7 1024 768 60.0kHz 75Hz 78.750 +/+ M8 1280 1024 64.0kHz 60Hz 108.000 +/+ M9 1280 1024 80.0kHz 75Hz 135.000 +/+ 832 624 49.7kHz 75Hz 57.284 -/- MAC M10 12 Fréquence 13 CARACTÉRISTIQUES TECHNIQUES CONNECTEUR VGA D-SHELL PRISE DE COURANT 1 1 Masse 2 DC + 12 V output Type Angles de visualisation (CR>10) Gouche/ Droit 70° / 70° 2 Affectation des broches Broche 1 Broche 2 Broche 3 Broche 4 Broche 5 Broche 6 Broche 7 Broche 8 Broche 9 Broche 10 Broche 11 Broche 12 Broche 13 Broche 14 Broche 15 Rouge Vert Bleu Non affecté Masse Rouge masse Vert masse Bleu masse Non affecté Masse Non affecté DDC SDA Sync. horizontale Sync. verticale DDC SCL CONNECTEUR VGA D-SHELL 1 5 6 10 11 15 Note: Si les résolutions sont inférieures au nombre de pixels du panneau LCD, les textes peuvent apparaître hachés ou en caractères gras. Ceci est normal avec toutes les technologies d'écran plat actuelles lorsque vous visualisez des résolutions non natives sur un plein écran (résolution inférieure à 1280 x 1024). Dans les technologies d'écran plat, chaque point de l'écran est réellement un pixel ; lorsque la résolution s'étend à tout l'écran, une interpolation de la résolution doit donc être effectuée. Si la résolution interpolée n'est pas un multiple exact de la résolution native, l'interpolation mathématique peut faire apparaître quelques lignes plus épaisses. 14 LCD écran TFT (transistor à film mince) de 17" en diagonale, panneau à matrice active, espacement entre pixel de 0,264 mm Filtre couleur bande R, V, B verticale Couleurs 16 millions Surface du verre revêtement antireflets Vers le haut/bas 45° / 65° Taux de contraste Typ. 350 : 1 Luminance du blanc Typ. 250cd/m² Temps de réponse Typ. 20 ms Compatibilité PC IBM XT, AT, 386, 486, Pentium ou PS/2 et compatibles (de VGA à 1280 x 1024 @ 75 Hz NI.) Taux de rafraîchissement Max. 1280 x 1024 @ 75Hz NI (75Hzpour affichage optimal) Connecteurs Signal d’entrée D-sub à 15 broches Prise type cc + 12V In Puissance Entrée AC 100-240V 50-60Hz moniteur DC 12V Consommation 40 watts (max) Surface d’affichage Max. 337.92mm (H) x 270.336mm (V) Fonctionnement Température Humidité Altitude 32°F à 122°F (0°C à 50°C) 0% RH à 80% RH (sans condensation) jusqu’à 3048 mêtres Conditions de stocage Température Humidité -14°F à 140°F (-20°C à 60°C) Dimension Poids 0%RH à 90%RH (sans condensation) 413mm (L) x 418mm (I) x 175mm (H) Net 6.0kg (13.2lbs) 15 DIAGNOSTIC D'ERREURS DIAGNOSTIC D'ERREURS Pas d'alimentation. Double image (fractionnée). ü ü Mettez l'interrupteur de mise sous tension sur 'On'. Le voyant de mise sous tension doit s'allumer. Vérifiez que le cordon d'alimentation est bien enfiché dans la prise d'alimentation et dans une prise du secteur. ü Toute l'image se déplace verticalement. ü Le moniteur est sous tension mais il n'y a pas d'image à l'écran. ü ü Vérifiez que le câble des signaux du moniteur est bien connecté au port de la sortie vidéo à l'arrière de l'ordinateur. Réglez la luminosité et le contraste. Assurez-vous que la carte graphique est réglée sur le mode non entrelacé. ü ü Vérifiez que les signaux d'entrée sont compatibles avec la gamme des fréquences du moniteur LCD (maximum: VESA, MAC 1280 x 1024 à 75 Hz). Connectez bien le câble vidéo. Essayez le miro moniteur avec une autre source d'alimentation. Les boutons des commandes ne fonctionnent pas. L'image est instable et pas mise au point. ü ü ü Utilisez la 'mise au point automatique' pour un réglage automatique. Si l'image est encore instable après l'exécution de la 'mise au point auto-matique', réglez manuellement la 'phase' pour mettre l'image au point. Vérifiez si la résolution ou le taux de rafraîchissement de la configuration Windows sont parmi les valeurs prises en charge (voir les spécifications du mode). ü N'appuyez que sur un bouton à la fois. Scintillements. ü ü La technologie TFT élimine tout scintillement, même à des taux de rafraîchissement faibles. Consultez la 'Table des fréquences' dans ce manuel qui contient la liste des taux de rafraîchissement et les valeurs des fréquences avec les réglages recommandés pour le moniteur. Un réglage optimal de 1280 x 1024 à 75 Hz est recommandé pour ce moniteur. Couleurs fausses ou anormales. ü ü ü 16 Si certaines couleurs (rouge, vert ou bleu) sont manquantes, vérifiez que le câble vidéo est bien connecté. Des broches tordues ou cassées sur le connecteur du câble peuvent provoquer une mauvaise connexion. Connectez le moniteur à un autre ordinateur. Vérifiez que la synchronisation ou les polarités de la carte graphique correspondent aux spécifications du moniteur. A propos du LCD Le LCD contient 3,932,160 transistors à film mince (TFT). Un petit nombre de points manquants, sans couleur ou allumés est une caractéristique intrinsèque de la technologie TFT LCD et n'est pas un défaut du LCD. Si vous visualisez une image fixe pendant plus de 10 heures, cette image peut demeurer sur l'écran superposée à une autre visualisation. 17 Spis tre ci WST P Zgodno z normami bezpiecze stwa.................................................. i Zasady bezpiecznego u ytkowania ..................................................... ii Informacje ogólne................................................................................1 Zawarto opakowania........................................................................2 Specyfikacja monitora .........................................................................3 PIERWSZE URUCHOMIENIE Podł czenie monitora..........................................................................4 Instalacja uchwytu (standard VESA) do monta u na cianie ………... 6 Przyciski kontrolne ..............................................................................7 Wy wietlanie funkcji na ekranie (OSD)…………………………………..8 PRZYCISKI FUNKCJI OSD Polish Opis menu OSD ..................................................................................9 OPIS PODSTAWOWYCH WŁA CIWO CI Funkcje zarz dzania poborem energii...............................................11 Funkcja Plug & Play .........................................................................11 Parametry od wie ania ekranu .........................................................12 Tabela ustawie fabrycznych...………………………………………….13 Opis pinów zł cza kabla sygnałowego ..............................................14 Specyfikacja techniczna monitora .....................................................15 Eliminacja podstawowych usterek eksploatacji monitora...................16 ZGODNO Z NORMAMI BEZPIECZE STWA Informacja: Polish Zasilacz monitora miro TD490 został przetestowany na zgodno z norm bezpiecze stwa „B” Polskiego Centrum Bada i Certyfikacji w Warszawie. Normy te zostały ustanowione w celu zapewnienia odpowiedniej ochrony przed zakłóceniami radiologicznymi w miejscu u ytkowania sprz tu oraz bezpiecznego u ytkowania. Monitor miro TD490 wykorzystuje energi elektryczn o cz stotliwo ciach radiowych i mo e tym samym emitowa j z pewn dopuszczaln normami amplitud . Je eli monitor nie zostanie zainstalowany i nie b dzie u ytkowany zgodnie z zasadami opisanymi w tej instrukcji, mo e spowodowa powstanie zakłóce w urz dzeniach b d cych odbiornikami energii o cz stotliwo ciach radiowych. Jest równie mo liwe, e w pewnych sytuacjach mo e wyst pi tak e wzajemne oddziaływane monitora i sprz tu radiowego. Je eli Pa stwa monitor spowoduje oddziaływanie na prac urz dze radiowych lub telewizyjnych, u ytkownik jest proszony o zastosowanie jednej z metod eliminacji zjawiska interferencji (wzajemnego oddziaływania) urz dze : • Zmiana orientacji lub poło enia anteny odbiorczej odbiornika (radiowego lub telewizyjnego) • Zwi kszenie odległo ci pomi dzy monitorem i innym sprz tem radio-elektronicznym • Podł czenie monitora do innego obwodu zasilaj cego ni ten, z którego korzysta odbiornik radiowo-telewizyjny • Skonsultowanie si z dealerem sprz tu komputerowego lub do wiadczonym technikiem radiowo-telewizyjnym w celu uzyskania pomocy UWAGA: W celu spełnienia norm dotycz cych radiacji, zawsze nale y stosowa fabryczny ekranowany kabel sygnałowy dostarczany oryginalnie z monitorem. i ZASADY BEZPIECZNEGO U YTKOWANIA 1. Nie nale y otwiera obudowy monitora. Wewn trz nie znajduj si adne elementy regulacyjne dost pne dla u ytkownika. 2. W przypadku zagro enia, nale y natychmiast odł czy przewód zasilaj cy zasilacza od sieci 240V. 3. Przed podł czeniem kabla sygnałowego do komputera, nale y odł czy kabel zasilaj cy w celu unikni cia przeci enia pr dowego. 4. Monitor nale y chroni przed zawilgoceniem i zalaniem. Nie wolno zanurza monitora do adnej cieczy lub płynu. Nie nale y u ywa monitora w zbyt mocno nagrzanych pomieszczeniach. Nigdy nie nale y wystawia monitora na działanie deszczu lub nadmiernej wilgoci, poniewa mo e to grozi zwarciem elektrycznym, pora eniem lub po arem. 5. Kabel zasilaj cy powinien by podł czany delikatnie i z nale yt starannno ci . Nie wolno zgina kabla ani stawia na nim ci kich przedmiotów. Nie nale y u ywa uszkodzonego kabla zasilaj cego, poniewa mo e to spowodowa pora enie pr dem elektrycznym. Przy odł czaniu kabla od sieci zasilaj cej, nale y zawsze trzyma w r ku wtyczk , a nie kabel. 6. Ciekłe kryształy wykorzystane do produkcji matrycy panela LCD zawieraj szereg potencjalnie szkodliwych dla zdrowia składników. W przypadku mechaniczego uszkodzenia matrycy, nale y chroni skór , oczy oraz usta przed płynem mog cym wycieka z matrycy ekranu LCD. Gdyby jednak doszło do kontaktu ciekłego kryształu z ciałem u ytkownika, nale y przemywa zainfekowan powierzchni przez co najmniej 15 minut bie c wod oraz skontaktowa si natychmiast z lekarzem. 7. Monitor LCD nale y przemieszcza lub przenosi bardzo ostro nie. W trakcie przenoszenia, jedn r k nale y trzyma podstawk monitora, a drug obudow matrycy LCD. 8. Nale y zawsze odł czy monitor od napi cia zasilaj cego przed przeniesieniem monitora w inne miejsce. 9. Nie nale y u ywa monitora LCD kład c go poziomo na powierzchni np. blatu biurka lub stołu. ii INFORMACJE O GÓLNE ZAWARTO Polish Monitor miro TD490 wyposa ony jest w nowoczesny, kolorowy wy wietlacz LCD o wysokim kontra cie, szerokich k tach widzenia i krótkim czasie relaksacji plamki (eliminacja efektu smu enia). Monitor ten został zaprojektowany tak, aby spełnia warunki kompatybilnego u ytkowania we wszystkich ustawieniach zgodnych ze specyfikacj dla 17 calowych monitorów LCD zarówno dla rodowiska u ytkowników PC, jak te Apple Macintosh. OPAKOWANIA Przed przyst pieniem do eksploatacji monitora, prosimy o sprawdzenie, e wszystkie elementy znajduj si w kartonie zbiorczym: • 19 calowy monitor LCD miro TD490 • Akcesoria: 1. Zasilacz AC/DC oraz sieciowy kabel zasilaj cy. Polish Monitor LCD miro TD490 posiada cały szereg zalet: jest całkowicie bezpieczny pod wzgl dem emisji fal elektromagnetycznych i wiatła, pozbawiony zniekształce i rozmycia obrazu. 2. 15 pinowy kabel sygnałowy typu D-SUB Monitor umo liwia monta na cianie za pomoc specjalnego uchwytu (dostarczany oddzielnie), dzi ki specjalnemu systemowi otworów w obudowie, spełniaj cych standard VESA. 3. Kabel DVI Monitor LCD nie emituje nawet najmniejszego promieniowania o cz stotliwi ciach rentgenowskich, a emisja pola magnetycznego jest na tyle znikoma, e nie stwarza najmniejszego zagro enia dla wzroku. 4. Kabel USB Monitor LCD miro TD490 posiada dwa wej cia sygnału video: wej cie analogowe oraz wej cie cyfrowe (DVI). 5. Kabel audio. 6. Poni sza instrukcja obsługi i karta gwarancyjna. Naturalna rozdzielczo ekranu monitora miro TD490, wykonanego w technologii aktywnej matrycy TFT, wynosi 1280x1024 w 16 milionach kolorów. UWAGA: je eli którykolwiek z wymienionych elementów zagin ł lub uległ uszkodzeniu, prosimy o kontakt z Pa stwa Sprzedawc . Nale y zachowa karton oraz pozostałe elementy opakowania na wypadek konieczno ci dalszego transportu. Monitor dostarczany jest z zasilaczem z funkcj auto detekcji wej ciowego napi cia zasilaj cego, dzi ki czemu akceptuje on napi cia zasilaj ce w zakresie od 100-120V do 200-240V napi cia zmiennego o cz stotliwo ci od 50 do 60Hz. Przed doł czeniem kabla do sieci, nale y upewni si , czy nie przekracza ono warto ci 240V. 1 2 SPECYFIKACJA MONITORA • • • • • • • Polish • • • • • • • • • • 3 Kompatybilny ze standardem analogowych sygnałów video zarówno PC, jak te Apple Macintosh (w tym ostatnim przypadku wymagana jest specjalna przej ciówka) Zgodno z systemem zarz dzania energi DPMS Zgodno z systemem Windows® Plug & Play (DDC 1/2B) Posiada wej cia analogowe oraz cyfrowe sygnału video Posiada wbudowany hub USB 2.0 (1 wej cie, 4 wyj cia) Posiada wbudowane gło niki stereo 2 x 2W Mikroprocesorowy system OSD pozwalaj cy na cyfrow regulacj nast puj cych funkcji: automatyczne ustawianie parametrów ekranu, kontrast, jasno , wybór wej cia, poło enie obrazu zarówno w pionie, jak i w poziomie, wysoko obrazu, przesuni cie fazowe obrazu, regulacja kolorówskalowanie obrazu, j zyk OSD, funkcja powrotu do ustawie pierwotnych obrazu, szybkie wyj cie z wy wietlania funkcji OSD Zastosowany ekran ciekłokrystaliczny w postaci aktywnej matrycy TFT (tranzystorów cienkowarstwowych na bazie amorficznego krzemu) Rozdzielczo sygnału analogowego a do naturalnej warto ci 1280x1024@85Hz (odpowiadaj cej konstrukcji matrycy) Rozdzielczo dla sygnału cyfrowego (DVI) 1280x1024@75Hz Ilo wy wietlanych kolorów: do 16 milionów Plamka: 0.294 mm (H) x 0.294 mm (W) Cz stotliwo ci skanowania dla wej cia analogowego: 24kHz – 93kHz (H); 55Hz – 85Hz (V) Cz stotliwo ci skanowania dla wej cia cyfrowego: 24kHz – 83kHz (H); 55Hz – 75Hz (V) Uniwersalny zasilacz pr du zmiennego pozwalaj cy na podł czenie do sieci zasilaj cej o warto ci napi od 100V do 240V Pobór mocy: poni ej 65W (w trakcie normalnej pracy), 3W (w trybie Stand-by) oraz poni ej 2W w stanie wył czonym (Off) Wymiary zewn trze: 432 mm(W) x 440 mm(H) x 198 mm(D) Waga (netto): 5.9kg PODŁ CZENIE MONITORA Prosimy o korzystanie z poni szych ilustracji w celu doł czenia lub odł czenia ruchomej podstawy monitora LCD. DODŁ CZENIE: ODŁ CZENIE: Przygotowanie do podł czenia kabli: 1. Nale y usun przykryw otworów do mocowania uchwytu ciennego. 2. Nast pnie nale y zdj pokryw wej i okablowania. 4 Polish PODŁ CZENIE MONITORA PODŁ CZENIE MONITORA Aby podł czy monitor, nale y wykona nast puj ce czynno ci: 1. Przed podł czeniem kabli monitora LCD nale y upewni si , e wył czone s zarówno monitor, jak te komputer. 2. Prosimy podł czy ko cówk 15 zł czowego kabla sygnałowego do analogowego wej cia video monitora oraz do wyj cia video karty graficznej komputera. W przypadku komputerów Apple Macintosh mo e by wymagana specjalna przej ciówka. Nale y dokr ci dwie rubki wzmacniaj ce poł czenie ko cówki kabla i zł cza karty graficznej oraz monitora LCD. 3. Podł czy kabel DVI do monitora i z drugiej strony do wyj cia DVI karty graficznej (je eli takie wyj cie na karcie jest dost pne). 4. Podł czy kabel audio pomi dzy wej ciem audio monitora i wyj ciem karty d wi kowej komputera (je eli jest dost pne). 5. Podł czy kabel sieciowy do zasilacza AC/DC, a nast pnie kabel zasilaj cy do monitora LCD. 6. Ewentualnie podł czy słuchawki do wyj cia słuchawkowego monitora LCD (słuchawki nie wchodz w skład zestawu). 7. Wł czy komputer a nast pnie monitor LCD. System VESA monta u na cianie 1. 2. 3. 4. 5. 6. 8. W celu ustawienia k ta patrzenia na ekran monitora LCD nale y delikatnie przytrzyma podstaw monitora i przechyli ekran trzymaj c go drug r k za kraw d obudowy (nale y pami ta , e ekran mo e by pochylany do przodu o k t do 5º i do tyłu o k t do 20º – nie nale y pochyla ekranu monitora powy ej tego zakresu). 5 Zasilacz AC/DC Kabel D-Sub Kabel DVI Kabel audio Słuchawki Kabel USB Monitor mo e by podł czony do ramienia mocowanego do ciany (rami takie nie stanowi wyposa enia monitora). Przed przyst pieniem do monta u nale y odł czy zasilanie monitora. Nast pnie nale y wykona nast puj ce czynno ci: 1. Usun pokryw otworów monta owych na obudowie monitora. 2. Usun pokryw okablowania. 3. Odł czy kable od zł czek na monitorze. 4. Usun kable. 5. Przytrzymuj c podstaw odkr ci cztery rubki mocuj ce. 6. Usun podstaw monitora. 7. Przyło y rami VESA (nie wchodzi w skład zestawu, powinno by zakupione oddzielnie) do tylnej cianki monitora. 8. Wkr ci cztery ruby mocuj ce rami do monitora. 9. Podł czy ponownie kable do monitora. Zgodnie z instrukcj ramienia, umocowa rami do ciany. 6 PRZYCISKI KONTROLNE Przyciski na panelu czołowym monitora Wy wietlanie funkcji na ekranie (OSD) Monitor LCD miro TD490 posiada opcj wy wietlania menu funkcji na ekranie (OSD). Ikony funkcji OSD zostały zaprojektowane tak, aby ułatwi u ytkownikowi ustawianie odpowiednich parametrów obrazu. Gdy dana ikona jest pod wietlona, oznacza to, e odpowiednia funkcja mo e by regulowana przez u ytkownika. Przed aktywowaniem funkcji OSD, proponujemy aktywowanie funkcji AUTO za pomoc przycisku (1) w celu automatycznego ustawienia poziomej i pionowej wielko ci obrazu, zegara procesora i fazy obrazu (przycisk nale y nacisn na 2 sekundy). Opis przycisków: Polish 1. Auto Adjust/Exit Przed aktywowaniem menu mo na wykorzysta ten przycisk do automatycznego ustawienia poło enia obrazu, fazy oraz zegara (przez naci ni cie na około 2 sekundy). Je eli menu OSD jest aktywowane (wy wietlane na ekranie), mo na je dezaktywowa (wył czy ) po naci ni ciu tego przycisku. 2. Brightness Słu y do regulacji jasno ci obrazu (lub do przewijania menu do góry albo do zwi kszania warto ci wybranego parametru). 3. Contrast Słu y do ustawiania kontrastu obrazu (lub do przewijania menu w dół albo do zmniejszania warto ci wybranego parametru). 4. Menu/Enter Naci ni cie tego przycisku wł cza menu OSD (lub aktywuje/ dezaktywuje wybrany parametr). 5. Power Indicator Kiedy wieci kolorem zielonym – zasilanie jest wł czone (on), je eli wieci na pomara czowo – jest aktywnie wył czone (off). 6. Power Button Wł cznik zasilania monitora. 7. Headphone Jack Wej cie słuchawkowe. 8. Volume control Regulator gło no ci. 7 Menu funkcji OSD wy wietla si i aktywuje automatycznie po naci ni ciu przycisku (4) na panelu czołowym monitora. Menu OSD pozostaje wy wietlone tak długo, jak jest to niezb dne do przeprowadzenia niezb dnych ustawie . Nale y wykorzystywa przyciski (2) i (3) do przemieszczania pod wietlenia ikon odpowiadaj cych zmienianym parametrom obrazu, a nast pnie nacisn przycisk (4) w celu powrotu do poprzedniego menu. Prosimy pami ta , e menu OSD wył czy si automatycznie, je eli nie b dziemy wykonywali adnych regulacji przez 10 sekund. Menu OSD mo emy wył czy w dowolnym momencie przez naci ni cie przycisku (4). 8 OPIS FUNKCJI OSD OPIS FUNKCJI OSD Language Select (J zyk Menu OSD) Pozwala wybra j zyk menu OSD. Główne menu ekranowe Polish Contrast (Kontrast) Regulacja intensywno ci obrazu w stosunku do tła. Birigtness (Jasno ) Regulacja jasno ci obrazu wraz z tłem. Focus (Ognisko) – dost pne tylko dla sygnału analogowego Pozwala na ogniskowanie obrazu (przez zmian fazy sygnału). Clock (Zegar) – dost pne tylko dla sygnału analogowego Pozwala na zmian ostro ci obrazu (przez zmian cz stotliwo ci no nej sygnału). H. Position (Poło enie Poziome) – dost Przesuwa obraz w poziomie. pne tylko dla sygnału analogowego V. Position (Poło enie Pionowe) – dost Przesuwa obraz w pionie. pne tylko dla sygnału analogowego Input Select (Wybór Wej cia) Dokonuje wyboru wej cia sygnałowego (analogowe lub cyfrowe). 9 Scaling Mode (Skalowanie Obrazu) Słu y do dostosowania sygnału do wymaganej wielko ci obrazu. Mo liwe s dwie opcje: − Fill All: do dostosowania sygnału do pełnego obrazu, − Fill Aspect Ratio: do dostosowania sygnału poziomego do pełnego obrazu, bez zmiany pionowej składowej sygnału. Funkcja ta działa tylko wówczas, kiedy rozdzielczo jest ni sza od tzw. naturalnej, wynosz cej 1280x1024. C1 C1 (6500ºK) Ustawia temperatur koloru obrazu na 6500ºK (x=0.313, y=0.329) C2 C2 (7800ºK) Ustawia temperatur koloru obrazu na 7800ºK (x=0.296, y=0.311) Red (Czerwony) Pozwala na indywidualne ustawienie intensywno ci koloru czerwonego. Green (Zielony) Pozwala na indywidualne ustawienie intensywno ci koloru zielonego. Blue (Niebieski) Pozwala na indywidualne ustawienie intensywno ci koloru niebieskiego. Reset (Reset) Pozwala na powrót do ustawie fabrycznych. Exit (Wyj cie) Słu y do zapami tywania ustawie menuOSD. u ytkownika oraz do opuszczenia 10 FUNKCJE ZARZ DZANIA POBOREM ENERGII PARAMETRY OD WIE ANIA EKRANU Funkcja zarz dzania energi tego monitora pozwala na uzyskanie dwóch stanów poboru mocy: - monitor jest w stanie działania (ON) lub, gdy przekroczona została amplituda sygnału video (Out Of Range) – wówczas dioda wieci kolorem zielonym - monitor jest w stanie u pienia (OFF) – wówczas dioda wieci kolorem pomara czowym. W stanie u pienia (OFF) wszystkie obwody monitora s wył czone, poza pobieraj cym nieznaczn moc układem detekcji napi cia zasilaj cego (zgodno ze standardem VESA). Układ ten utrzymuje monitor w stanie gotowo ci do natychmiastowego normalnego działania w przypadku, kiedy poruszymy mysz , lub naci niemy dowolny klawisz klawiatury podł czonego komputera. miro TD490 jest 19” monitorem LCD funkcjonuj cym przy wykorzystaniu wielu trybów cz stotliwo ci od wie ania ekranu. Działa on w zakresie cz stotliwo ci poziomych od 24kHz do 93kHz, oraz cz stotliwo ci pionowych od 55Hz do 85Hz. Dzi ki układom mikroprocesorowym umo liwia automatyczn synchronizacj oraz automatyczne dostosowanie rozdzielczo ci. Monitor oferuje 21 ustawie fabrycznych o parametrach podanych w tabeli na stronie 13. Polish Pobór mocy Normal Out Of Range Off Off Off Synchr. H Działa Działa Synchr. V Działa Działa Video Aktywne Aktywne Kolor diody Zielony Zielony Działa Nie działa Nie działa Nie działa Działa Nie działa Martwe Martwe Martwe Pomara czowy Pomara czowy Pomara czowy Ustawienia fabryczne monitora odpowiadaj wi kszo ci przypadków ustawie parametrów sygnałów video stosowanych kart graficznych. Jednak w poszczególnych przypadkach sygnały video kart graficznych mog si w praktyce nieznacznie ró ni . Je eli uznaj Pa stwo, e niezb dne jest nieznaczne dostosowanie obrazu do Pa stwa oczekiwa (np. poło enie obrazu w pionie lub poziomie), prosimy o skorzystanie z odpowiednich rozdziałów niniejszej instrukcji obsługi. Je eli b d chcieli Pa stwo skorzysta z jednego z ustawie fabrycznych, prosimy skorzysta z instrukcji instalacji karty graficznej. Wi kszo kart graficznych pozwala na wybór i zmian od wie ania w zale no ci od wybranej rozdzielczo ci obrazu. PLUG & PLAY Monitor miro TD490 jest zgodny ze standardem VESA DDC1/2B, który pozwala na wykrywanie zgodno ci z funkcj Plug & Play. Pozwala on na informowanie wykorzystywanego systemu komputerowego o zgodno ci z ustawieniami obrazu. Kanał komunikacyjny został zdefiniowany dla dwóch poziomów: DDC1 oraz DDC2B. DDC1 jest jednokierunkowym kanałem informacyjnym z monitora do komputera, poprzez który s stale przekazywane dane EDID. DDC2B jest dwukierunkowym kanałem danych, bazuj cym na protokole I2C. Komputer mo e za da danych EDID poprzez kanał DDC2B. UWAGA: DO UAKTYWNIENIA FUNKCJI PLUG & PLAY POTRZEBNY JEST AKTYWNY SYGNAŁ WEJ CIOWY. 11 11 12 12 TABELA USTAWE Ustawienie VGA SVGA Polish XGA SXGA DOS 13 FABRYCZNYCH Rozdzielczo Cz stotliwo OPIS PINÓW ZŁ CZA KABLA SYGNAŁOWEGO Sygnał Pozioma Pionowa Pozioma Pionowa M1 640 480 31.5kHz 60Hz analog/cyfra M2 640 480 35.0kHz 67Hz analog/cyfra M3 640 480 37.5kHz 75Hz analog/cyfra M4 640 480 37.9kHz 73Hz analog/cyfra M5 800 600 37.9kHz 60Hz analog/cyfra M6 800 600 46.9kHz 75Hz analog/cyfra M7 800 600 35.2kHz 56Hz analog/cyfra M8 800 600 48.0kHz 72Hz analog/cyfra M9 832 624 49.7kHz 75Hz analog/cyfra M10 1024 768 48.4kHz 60Hz analog/cyfra M11 1024 768 56.5kHz 70Hz analog/cyfra M12 1024 768 60.0kHz 75Hz analog/cyfra M13 1280 1024 64.0kHz 60Hz analog/cyfra M14 1280 1024 80.0kHz 75Hz analog/cyfra M15 1280 1024 91.2kHz 85Hz analg M16 1152 864 80.0kHz 75Hz analog/cyfra M17 1280 960 60.2kHz 60Hz analog/cyfra M18 1280 960 85.9kHz 85Hz analg M19 640 400 31.5kHz 70Hz analog/cyfra M20 640 350 31.5kHz 70Hz analog/cyfra M21 720 400 31.5kHz 70Hz analog/cyfra Zł cze VGA Pin 1 Pin 2 Pin 3 Pin 4 Pin 5 Pin 6 Pin 7 Pin 8 Pin 9 Pin 10 Pin 11 Pin 12 Pin 13 Pin 14 Pin 15 Czerwony Zielony Niebieski Masa Masa Masa czerwona Masa zielona Masa niebieska +5V Kabel detekcji Nie podł czony DDC SDA Synch. pozioma Synch. pionowa DDC SCL Zł cze DVI Pin 1 Pin 2 Pin 3 Pin 4 Pin 5 Pin 6 Pin 7 Pin 8 Pin 9 Pin 10 Pin 11 Pin 12 Pin 13 Pin 14 Pin 15 Pin 16 Pin 17 Pin 18 Pin19 Pin 20 Pin 21 Pin 22 Pin 23 Pin 24 TMDS Dane 2TMDS Dane 2+ TMDS Dane 2/4 ekran TMDS Dane 4TMDS Dane 4+ DDC Zegar DDC Dane Nie podł czony TMDS Dane 1TMDS Dane 1+ TMDS Dane 1/3 ekran TMDS Dane 3TMDS Dane 3+ +5V Masa Detekcja Podł czenia TMDS Dane 0TMDS Dane 0+ TMDS Dane 0/5 ekran TMDS Dane 5TMDS Dane 5+ TMDS ekran zegara TMDS Zegar + TMDS Zegar - Uwaga: W przypadku zastosowania rozdzielczo ci ni szych ni tzw. natywne (wynikaj ce z naturalnej budowy matrycy LCD monitora 19 calowego, składaj cej si z 1280x1024 trójkolorowych pikseli), tekst wy wietlany na ekranie mo e okaza si nie tak ostry i jednorodny, jak w przypadku zalecanej, maksymalnej rozdzielczo ci 1280x1024, kiedy ka dy wy wietlany punkt odpowiada dokładnie jednemu pikselowi matrycy. W przypadku rozdzielczo ci innych ni natywna, powstaj cy obraz jest wynikiem pewnej interpolacji rozdzielczo ci, zakładaj cej nakładanie s siednich wiec cych pikseli. 14 SPECYFIKACJA TECHNICZNA MONITORA Typ Monitor LCD K t widzenia Kontrast Jasno Czas reakcji Polish Kompatybilno Od wie anie ekranu (maksymalne) Zł cza Zasilanie Powierzchnia ekranu Analog Cyfra Analogowe Cyfrowe USB Zasilanie Pr d Pobór mocy Wyj cie DC 19” przek tna ekranu, TFT matryca aktywna 0.294mm R, G, B Interfejs analogowy Lub Interfejs cyfrowy 16 milionów Pokrycie antyodblaskowe 170º 170º 700:1 250cd/m² 25ms IBM XT, AT, 386, 486, Pentium lub PS/2 i inne odpowiednie (dla sygnału VGA do 1280x1024@85Hz) 1280x1024@85Hz (60Hz zalec.) 1280x1024@75Hz (60Hz zalec.) 15 pinowe D-SUB 24 pinowe DVI 1 wej cie, 4 wyj cia Jack typu DC +12V Zmienny 100-240V, 50-60Hz 43W (maksymalnie) 12V napi cia stałego Max. 376.32mm (H) x 301.056mm (V) Plamka Filtr kolorów Kolory Powierzchnia Lewo/Prawo Góra/Dół Typ. Typ. Typ. PC Temperatura Wilgotno Temperatura Warunki przechowania Wilgotno Warunki pracy Wymiary Waga 0 – 40 oC 20 – 85 % (nie skondensowana) -10 – 50 oC 20 – 85 % (nie skondensowana) ELIMINACJA PODSTAWOWYCH USTEREK EKSPLOATACJI MONITORA Je eli Pa stwa monitor nie działa prawidłowo, prosimy o zapoznanie si z poni szymi sposobami szybkiego usuwania najcz ciej wyst puj cych usterek. Je eli problemu nie mo na usun za pomoc jednego z opisanych sposobów, prosimy o skontaktowanie si z dealerem lub autoryzowanym serwisem. Brak zasilania Nacisn przycisk zasilania. Powinna zapali si dioda sygnalizacyjna zasilania. Sprawdzi , czy kabel zasilaj cy jest prawidłowo doł czony zarówno do gniazdka sieciowego, zasilacza AC/DC jak i do monitora. Zasilanie jest wł czone, ale nie ma obrazu Upewni si , e kabel sygnałowy jest dokładnie doł czony do wyj cia karty graficznej w komputerze. Ewentualnie ustawi wła ciwy poziom jasno ci i kontrastu. Obraz jest niestabilny, nieostry Prosimy wykorzysta funkcj AUTO IMAGE ADJUST do automatycznego ustawienia parametrów obrazu. Sprawdzi , czy rozdzielczo oraz od wie anie ekranu mieszcz si w zakresie dopuszczanych warto ci (zgodnie ze specyfikacj ). Migotanie obrazu Moc ródła zasilania mo e by zbyt mała. Nale y spróbowa podł czy monitor do innego gniazdka sieciowego. Je eli u ywany jest zewn trzny zasilacz typu UPS lub listwa zasilaj ca, nale y sprawdzi , czy nie jest podł czona do nich zbyt du a liczba urz dze . Sprawdzi , czy zastosowana cz stotliwo od wie ania ekranu odpowiada warto ciom rekomendowanym dla monitora LCD miro TD490 wg specyfikacji. (W) x (H) x (D) 432 mm x 40 mm x 198 mm Netto 5.9 kg 16 ELIMINACJA PODSTAWOWYCH USTEREK EKSPLOATACJI MONITORA Podwójny (podzielony) obraz na ekranie Sprawdzi , czy w ustawieniach karty graficznej nie zastosowano trybu z przeplotem. Obraz przesuwa si (przewija) poziomo Nale y sprawdzi , czy wej ciowy sygnał video mie ci si w zakresie dopuszczalnych dla 19” monitora LCD warto ci cz stotliwo ci (maksymalnie 85Hz dla rozdzielczo ci 1280x1024) Ewentualnie sprawdzi poł czenie kabla sygnałowego z komputerem. Podł czy monitor LCD miro TD490 do innego gniazdka sieciowego. Nie działaj przyciski kontrolne Nie nale y naciska jednocze nie kilku przycisków kontrolnych. Polish 17 18