1
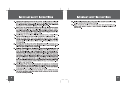
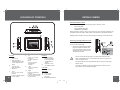
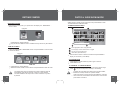
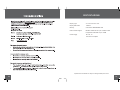
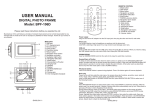
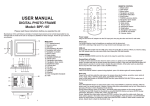
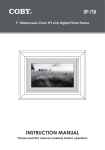
COBY Electronics Corp.
DP-352
56-65 Rust Street
Maspeth, NY 11378
www.cobyusa.com
www.ecoby.com
3.5” Widescreen Color TFT LCD Digital Photo Frame
352 CT
INSTRUCTION MANUAL
Please read this manual carefully before operation
PRECAUTIONS
PRECAUTIONS
WARNING:
To prevent fire or shock hazard, do not expose this device to rain or moisture.
Dangerous high voltage is present inside the enclosure. Do not open the
cabinet.
CAUTION:
To prevent electric shock, match wide blade of plug to wide slot of outlet and fully
insert.
The lightning flash with arrowhead symbol within an equilateral triangle is intended to alert the user to the presence of uninsulated
“dangerous voltage” within the product’s enclosure that may be of
sufficient magnitude to constitute a risk of electric shock.
The exclamation point within an equilateral triangle is intended to
alert the user to the presence of important operation and servicing
instructions in the literature accompanying the appliance.
For Customer Use:
Enter below the serial number that is located on the bottom of
the unit. Retain this information for future reference.
Model No.
DP-352 CT
Serial No.
For recycling or disposal information about this product, please contact your local authorities or the Electronics Industries Alliance: www.eiae.org.
2
3
PACKAGE CONTENTS & FEATURES
TABLE OF CONTENTS
PRECAUTIONS ..................................................................................... 2
IMPORTANT SAFETY INSTRUCTIONS...................................................4
TABLE OF CONTENTS...........................................................................8
Package Contents
Please make sure that the items shown below are included in the package. Should
an item be missing, please contact the local retailer from which you purchased this
product.
PACKAGE CONTENTS & FEATURES .....................................................9
2
1
LOCATION OF CONTROLS................................................................ 10
Top View............................................................................................................ 10
Left View ........................................................................................................... 10
Front View ......................................................................................................... 10
Right View ......................................................................................................... 10
GETTING STARTED ............................................................................. 11
Installing a Memory Card.................................................................................. 11
Powering your Digital Picture Frame ................................................................ 11
Main Menu Screen .............................................................................................12
Item List Screen .................................................................................................12
3
1. One COBY DP- 352
& One Faceplate
PHOTO&SLIDE SHOW MODE ..............................................................13
Thumbnail Mode Screen ....................................................................................13
Slideshow Mode .................................................................................................13
In Thumbnail or Slideshow Mode .......................................................................13
2.
Adaptor
3.
Manual
FILE Mode ...........................................................................................14
File Mode Screen ...............................................................................................14
To Play a File .....................................................................................................14
SETUP MENU ........................................................................................15
8
Features
Setup Menu Screen ...........................................................................................15
To Adjust the Brightness / Contrast / RGB ........................................................ 15
•
3.5 ” Widescreen TFT LCD Color Screen
•
Displays JPEG Photo Files
INTERCHANGEABLE FACEPLATE ...................................................... 16
FIRMWARE UPGRADES ......................................................................17
TROUBLESHOOTING ..........................................................................18
SPECIFICATIONS ...............................................................................19
•
The Card Slot for SD/MMC/MS Card
•
Extendable Kickstand
9
LOCATION OF CONTROLS
GETTING STARTED
Installing a Memory Card
3
1
2
Your photo frame supports the following types of memory cards:
5
4
6
•
•
•
Memory Stick(MS)
Secure Digital Card (SD)
MultiMedia Card (MMC)
Simply insert the memory card of your choice into the card slot located on the
left panel of the photo frame. Take care to orient the card in the proper direction.
9
Getting photos and files onto your picture frame for viewing couldn’t be easier!
10
Powering your Digital Picture Frame
11
Your Picture Frame should be connected to
an AC 100-240V wall outlet.
7
8
Top View
1.
12
4.
Menu
Press for exit
Press and Hold for
LCD MODE after entering
a card / USB flash drive
2.
Enter
Press for enter
Press and Hold for
Slideshow
3.
10
5.
6.
Down
Press for down during
selecting
In Photo / Slideshow Mode:
Press to Rotate
Up
Left View
Press for up during
selecting
In Photo / Slideshow
Mode:
Press to Flip photo
Horizontally or
Vertically
7.
8.
The Card Slot for :
Memory Stick(MS)
Secure Digital (SD)
/ MultiMedia Card
( MMC)
USB Port: For use
with USB flash drives
Left
Press for Left during
selecting
Right
Press for Right during
selecting
In Photo / Slideshow Mode:
Press and Hold to change
the Screen Ratio
• Using the supplied power adapter,
plug one end of the adapter into
your photo frame’s Power In Jack
and plug the other end into an AC
100-240V wall outlet.
Do not connect the power plug to a power outlet other than that
which is indicated here or on the label as this may result in the risk
of fire or electric shock.
Do not handle the power plug with wet hands. Doing so may cause
electric shock.
Use only AC adapters of the type specified here. Failure to do so
may cause a fire or damage the player.
Front View
9.
3.5” TFT LCD
Right View
10.
Power In Jack
11.
Power Switch
(On / Off)
12.
Extendable Kickstand
11
GETTING STARTED
PHOTO & SLIDE SHOW MODE
Select PHOTO / SLIDE on Item List screen and press ENTER to enter
Thumbnail Mode or Slideshow Mode.
MAIN MENU SCREEN
Upon turning on the power, your photo frame will display the “ MAIN MENU ”
shown below.
THUMBNAIL MODE SCREEN
1
Highlighted
2
Thumbnail Mode
Page:1/2
MAIN MENU
Highlighted Icon: Being Selected
Only the Slot and USB Port with an installed memory device may be selected.
2048×1536
ITEM LIST SCREEN
Select the CARD/USB on MAIN MENU screen and press ENTER to enter the ITEM
LIST shown below:
1
with Highlighted Frame: being Selected
2
Current page number/ Total number of pages
3
The size of the selected photo
Date Taken (Selected Photo)
4
Highlighted
2007/ 8 / 14
4
3
Use the direction button to select a thumbnail and press ENTER to
display it in full-screen ( Photo Mode).
SLIDESHOW MODE
ITEM LIST
Highlighted Icon: being Selected
Select the PHOTO, SLIDE, FILE or SETUP and press ENTER to enter its mode.
The digital photo frame is equipped with a demo slideshow that will
automatically start after 20 seconds, if there is no card inserted.
The demo slideshow will stop when a card is inserted or any button
is pressed.
12
Press ENTER to pause slideshow, press it again to resume .
Press MENU to exit
In THUMBNAIL or SLIDESHOW MODE
Press
Press
to rotate the current picture to a 90/180/270 degree angle.
to flip the current picture vertically or horizontally.
To adjust the photo silde show interval and Transition Effect,
Please turn to Setup section for operation details.
If the photo frame is turned off during the slideshow. With the
card unremoved, the slideshow will resume the next time the
photo frame is turned on.
13
Note: Options of the can be selected in Setup Menu.
SETUP MENU
FILE MODE
To browse and play all your digital files, select FILE from the Item List screen
and press ENTER.
To adjust the settings and options of your digital photo frame, select SETUP
from Item List and press ENTER to display the Setup Menu .
FILE MODE SCREEN
Please choose your desired settings as shown on the screens below.
The options marked “ ” are selected.
2
1
SETUP MENU SCREEN
1
Total Files: 1/15
ROOT
3
1
AAAA
BBBB
2
CCCC
DDDD
4
1
PICTURE 2
2
PICTURE 3
3
PICTURE 4
4
Exit
2
5
1
Folder & File List
2
Current File number / Total Number of Files
3
Root Folder
4
Preview of the Selected Photo
5
Size of the Selected File
6
Date Taken (Selected Photo)
2007/12/26
Brightness
Contrast
Normal
Bright
Soft
Brightness
Contrast
6
TO PLAY A FILE
Upon entering File Mode, your photo frame will scan the memory card / USB
flash drive for available files:
Use the direction buttons to select a file and press ENTER to display it in
full-screen.
To return to the File Mode, press the Menu button.
3
OSD Language
Style
Default
English
French
German
Italian
Spanish
Portuguese
Dutch
Polish
OSD Language
Style
Default
Style1
Style2
Style3
Style4
Block 7
Block 8
Block 9
Fade In Fade Out
Random
No Effect
Blind Vertical
Blind horizontal
Color Ration Ver
Color Ration Hor
Block 1
Block 2
Block 3
Block 4
Block 5
Block 6
Block 7
Block 9
-4
-3
-2
-1
0
+1
+2
+3
+4
OSD Language
Style
Default
Reset
To Adjust the Brightness / Contrast / RGB
Upon entering a memory card / USB flash drive, press and Hold the MENU button to
display the screen setting box.
RGB
RESET
14
Interval Time
Transition Effect
5 Sec.
15 Sec.
30 Sec.
1 Min.
5 Min.
30 Min.
1 Hour
12 Hours
1 Day
3
PICTURE 1
960x540
Interval Time
Transition Effect
• Press down/up direction button
to select the desired item.
• Press left/right direction button
to make an adjustment.
15
INTERCHANGEABLE FACEPLATE
There are different color faceplates supplied, so you can change the color
of your photo frame.
Interchangeable Faceplate
FIRMWARE UPGRADES
From time to time, COBY may release firmware updates to improve the performance of the DP-352 or to add additional features. Please check the COBY website periodically at www.cobyusa.com to see if new firmware has been released for
your photo frame.
To attach a faceplate to your photo frame:
1. Simply insert A into B.
2. Now it has been affixed to the surface of the photo frame.
A(X4)
B(X4)
Interchangeable Faceplate
1.
2.
To detach the faceplate from your photo frame.
1. Simply remove A from B.
2. The faceplate has been detached.
B
A
1.
16
2.
17
SPECIFICATIONS
Display Type
3.5” Full-Color TFT LCD
Display Resolution
160x234
Memory
Card Slot for MS/SD/MMC Card
Photo Format Support
Baseline JPEG files of up to 10 million Pixels
Progressive JPEG files of up to 15MB
Power Supply
DC 12V, 1A
100-240V AC Adapter
Specifications and manual are subject to change without prior notice.
18
19