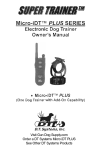
1
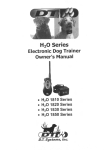
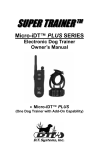
Micro-iDTTMSERIES
Electronic Dog Trainer
Owner's Manual
Micro-iDTTM23000
(One Dog Trainer)
Micro-iDTTM23002
(Two Dog Trainer)
Micro-iDTrM23003
(Three Dog Trainer)
d
%
D.Z Systems, Inc.
3
'
t
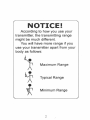
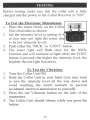
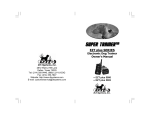
NOTICE!
According to how you use your
transmitter, the transmitting range
might be much different.
You will have more range if yclu
use your transmitter apart from your
body as follows:
k
9
Maximum Range
Typical Range
Minimum Range
J
TableofC~nknts
......................................... 3
Introduction..................................................4
Package Contents ......................................... 5
Model Features.............................................6
Adjusting and Positioning
Your Collar for Proper Fit............................ 7
Parts and Functions ...................................... 8
Turning ON and OFF ...................................13
Batteries ....................................................... 14
Testing.......................................................... 15
Reprogramming ........................................... 16
Important Safety Notes ................................17
Maintenance................................................. 18
Warranty ...................................................... 19
FCC Compliance.......................................... 19
Congratulations and thank you for purchasing our
Micro-iDTTM Training Collar. The Micro-iDTTM
series represents the absolute latest technological
advancement in the Electronic Dog Training World. It
offers Maxx-RangeTM,the industry's only internally
woven antenna in the collar. With up to a 900 yard
range, they are perfect for field or household
use. Micro-iDTTMseries collars feature Sixteen levels
of stimulation intensity, with an easy 'no-look'
clicking intensity selection dial. Easy one hand
operation allows for maximum control and safety.
This model includes both Constant and Momentary
'Nick' stimulations, and Positive Vibration. The
collars are 100% waterproof and can be worn even
when the dog is submerged. The Micro-iDTTMSeries
Dog Training Collar is durable, safe and very humane
when used correctly. The automatic safety shut-off
feature stops the stimulus from both the transmitter and
the receiver to prevent accidental or prolonged
stimulation.
Transmitter
Collar Receiver (1-for Micro-iDTm Z3000,2-for
Micro-iDTTMZ3002,3-for Micro-iDTTM23003)
Rechargeable Batteries for the Collar (already installed in collar unit)
Battery Charger
Charging Cable
Test Light
Owner's Manual
TX battery not included
IMPORTANT NOTE:
Please read this owner's manual in its entirety before
operating this unit. Should you have any questions
about ow collars or their operation please contact ow
Customer Service department (see back page for
contact information).
MODEL FEATURES
Every Micro-iDFMElectronic Dog
Training System Features:
Digital Technology
Up to 900 yard range
Lightweight, compact collar and transmitter
16 adjustable intensity levels of Momentary ('Nick')
Stimulation and Constant Stimulation
Positive Vibration
Gentle Touch SystemTMExtra Mild Stimulation
MAXX-RangeTMInvisible, Embedded Collar
Antenna
Built in safety shut-off
Rechargeable Ni-MH battery system in collar
Completely waterproof collars
Weather resistant transmitter
The Micro-iDFM23002 comes with two Collar
units, whch are operated from the same transmitter
The Micro-iDTTM23003 comes with three Collar
units, which are operated from the same transmitter
I
ADJUSTING & POSITIONING YOUR
COLLAR FOR PROPER FIT
rluper
I
r;ullal ~~yrlir
less dl IU p u s ~ i I~ u ~
are very important to insure safety
and correct functioning every time
All electronic collars need to fit
very snugly to work properly. They
must be just tight enough to allow
the "prongs" or electrodes to make
good skin contact. In most cases, you should be able
to fit no more than two fmgers between the collar
belt and your dog's neck.
Proper fit of the collar should allow the dog to breath
normally. The collar should never be so tight on the
dog's neck that it restricts the dog's normal
breathing pattern.
If your collar is too loose, you may get inconsistent
stimulation due to improper prong contact with the
skin. This can directly affect whether or not the dog
will receive a correction at the right times. Always
check for good "prong'hontact if it appears that
your dog is not responding to the stimulation.
A loose collar can also promote skin irritation from
moving or rubbing too much on a dog's neck while
they are running or training. A proper snug fit will
help prevent this from occurring.
F O proper
~
positioning of your collar receiver box, it
should be placed on the front center of the dog's
neck.
7
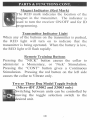
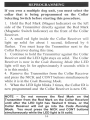
Toggle Switch
(multiple dog
units only)
I
Intensity
Selection Dial
LED
lndicatorLight
Vibration
Button-
Momentary
-''Nick''
Stimulation
Button
1
timulation
Magnet
Indicator(Red Mark)
\Model
Number
I
Transmitter
(Micro-iDT 23002 shown)
PARTS & FUNCTIONS CONT.
I
Intensitv Selection Dial
The intensity selection dial allows you t
choose between sixteen different level
of stimulation for very precise control.
select in^ P r o ~ e rIntensitv Level
The first and most important step in training your dog with
your Micro-iDTFMTraining System is determining the correct Intensity Level to provide the proper training stimulation without over-shocking your dog.
To do this, turn the Collar Unit ON and properly place it on
the dog's neck. Place the Intensity Selection dial so that
the System is set on Level One. Press either the 'NICK' or
the 'STIMU' Button. If there is no reaction fkom your dog,
increase the Intensity Level in increments of one until the
dog feels the stimulation. You should be able to tell when
the dog is feeling the shock by the outward signs of discomfort or confusion on it's face. (Note: Some dog's may
require more or less stimulation depending upon their individual nature or size.)
Transmitter Antenna
Be sure to check that the antenna is securely fastened
to the transmitter before each use. Hand-tightened
only. Be careful when screwing the antenna into the
transmitter: over-tightening can cause damage to the
antenna or the antenna mount.
Magnet Indicator (Red Mark)
RED mark indicates the location of the
agnet in the transmitter. The indicator is
sed to turn the receiver ONIOFF and for ID
rogramming.
Transmitter Indicator Light
When any of the buttons on the transmitter is pushed,
the RED light will turn on to indicate that the
transmitter is being operated. When the battery is low,
the RED light will flash rapidly.
Remote Training Buttons
Pressing the "NICK" button causes the collar to
administer a Momentary, or 'Nick' Stimulation.
Pressing the "CONT" button gives a Continuous
Stimulation. Pressing the red button on the left side
causes the collar to Vibrate only.
Two or Three Dog Model Toggle Switch
(Micro-iDT 23002 and 23003 only)
Switching between units can be controlled by
oving the toggle selection switch to the
desired unit.
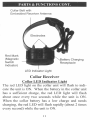
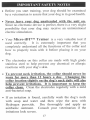
Collar Belt with
Embedded Receiver Antenna
Y
Electrodes
-ww
Red Mark
(Magnetic
Switch
Indicator)
attery Charging
I
LED Indicator Light
Collar Receiver
Collar LED Indicator Lipht
The red LED light on the collar unit will flash to indicate the unit is ON. When the battery in the collar unit
has a sufficient charge, the red LED light will flash
about once every two seconds while the unit is ON.
When the calla; battery has a low charge and needs
charging, the red LED will flash rapidly (about 2 times
every second) while the unit is ON.
Electrodes
Electrodes should fit snugly on the dog's neck to
ensure good contact with the skin. For more
information on the proper fit of the collar, see page 7.
Collar Belt with Embedded Receiver Antenna
The embedded collar antenna is woven into the collar
belt, and runs the along the entire length of the belt.
Do not cut the collar belt.
Doing so will damage the antenna and may result in
Battery Chargin? Receptacle
The battery charging receptacle is located on the side
of the Collar Unit. After charging, always close the
jack with the rubber plug to prevent foreign particles
fiom getting inside the unit.
Red Mark on the Collar Unit
he Red Mark indicates the location of the
agnet Switch in the receiver. To turn the
eceiver ONIOFF, touch and hold the Red
ark with the Magnet Indicator (Red
Mark) on the side of the transmitter until the LED light
on the Collar unit starts to flash.
k
Turning the Collar Unit ON
1. Hold the Red Mark (Magne
Indicator) on the left side of th
transmitter directly against the Re
Mark (Magnetic Switch Indicator
on the front of the collar receiver.
2. A small red LED light inside the Collar Unit will
light up solid for about 1 second, and then will
begin to flash.
3. You may remove the Transmitter away from the
Collar Unit as soon as the LED light starts flashing
4. The Collar Unit is now ON. The LED light should
continue to flash to indicate the ON status.
1.
2.
3.
4.
Turning the Collar Unit OFF
Hold the Red Mark (Magnet Indicator) on the left
side of the transmitter directly against the Red
Mark (Magnetic Switch Indicator) on the front of
the collar receiver.
A small red LED light inside the Collar Unit will
light up solid for about 1 second, and then will
begin to flash.
You may remove the Transmitter away from the
Collar Unit as soon as the LED light starts flashing
The Collar Unit is now OFF. The LED light
should no longer flash to indicate the OFF status.
All Micro-iDPM training collars are equipped with
rechargeable Nickel Metal Hydride (NiMH) batteries.
NiMH batteries are not memory sensitive and do not
require depletion before recharging.
The batteries come partially charged from the factory.
It is, however, recommended that you give the battery
a full charge before the first use. This takes about 12
hours.
Remember - Always keep batteries away from
flammable substances (especially when charging).
When storing the unit for a long period, remember to
give full charge (12 hours) to the battery regularly.
This should be done once every 4 to 6 weeks.
The transmitter uses a 9V replaceable battery (not
included). Be sure to pay attention to the "+" and "-"
charges when inserting the battery.
Battery Charging Procedure
1. Make sure the unit is off.
2. Plug the charger into a standar
electrical outlet.
3. Attach charging cable to charger an
plug into collar unit.
4. Charge the battery for no more than 12 hours.
5. After charging, disconnect the battery charging cable from the
receptacle and securely replace rubber battery receptacle cover.
6. Test the system to make sure that unit is working properly.
Before testing, make sure that the collar unit is fully
charged and the power to the Collar Receiver is "ON".
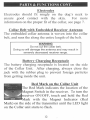
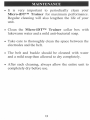
To Test the Electronic Stimulation:
1. Place the tester firmly on the Colla
Unit electrodes as shown.
2. Set the intensity level (a setting of 4
or less may not light the tester due
to its low intensity level).
3. Push either the 'NICK' or 'CONT' button.
4. The tester light will flash once for the NICK
function and will continue to light while the CONT
button is pressed (the higher the intensity level, the
brighter the test light becomes).
To Test the Vibration:
1. Turn the Collar Unit ON.
2. Hold the Collar Unit in your hand (you may want
to turn the intensity level all the way down and
avoid touching the metal contacts to prevent
accidental electrical stimulation to yourself).
3. Press the red Vibration button on the side of the
transmitter.
4. The Collar Unit should vibrate while you press the
button.
If you own a multiple dog unit, you must select the
collar that is being programmed on the Collar
Selecting Switch before starting this procedure.
1. Hold the Red Mark (Magnet Indicator) on the left
side of the Transmitter directly against the Red Mark
(Magnetic Switch Indicator) on the front of the Collar
Receiver.
2. A small red light inside the Collar Receiver will
light up solid for about 1 second, followed by 6
flashes. You must keep the Transmitter next to the
Collar Receiver during this time.
3. Continue to hold the Transmitter against the Collar
Receiver until the LED light stays on solid. The Collar
Receiver is now in the Code Running Mode (the LED
light will stay lit for app'r~ximatel~
8 seconds while it
is in this mode).
4. Remove the Transmitter from the Collar Receiver
and press the NICK and CONT buttons simultaneously
whle it is in the Code Running Mode.
5. When the LED light blinks 3 times, the Collar ID is
now programmed and the Collar Receiver is now ON.
NOTE - Do not remove the Red Mark on the
Transmitter from the Red Mark on the Collar Receiver
until after the LED light has flashed 6 times, or the
Collar Receiver will not go into the Code Running
Mode. You must press the NICK and CONT buttons
simultaneously while the LED light is lit solid.
16
Before you start training, your dog should be examined
by a veterinarian to assure that your dog is in good health.
Never leave your dog unattended with the unit on.
Since no electronic device is perfect, there is a very slight
possibility that your dog may receive an unintentional
electric stimulation.
Your Micro-iDTTMTrainer is a very valuable tool if
used correctly. It is extremely important that you
completely understand all the functions of the collar and
how to properly train with it before placing it on your
dog.
The electrodes on this collar are made with high grade
stainless steel to help prevent any chemical or allergic
reactions with your dog's skin.
To prevent neck irritation. the collar should never be
worn for more than 12 hours a dav. Changing the
collar location slightly on the dog's neck daily will also
help prevent irritations. It is important to keep the
collar clean. Clean the electrodes regularly with a mild
anti-bacterial soap.
If an irritation is found, carefully wash the dog's neck
with soap and water and then wipe the area with
Hydrogen peroxide. Dry thoroughly and apply an
antibiotic ointment. Consult your veterinarian if the
irritations look severe.
17
It is very important to periodically clean your
Micro-iDTTM Trainer for nlaxin~ulnperformance.
Regular cleaning will also lengthen the life of your
unit.
Clean the Micro-iDFM Trainer collar box with
lukewarm water and a mild anti-bacterial soap.
Take care to thoroughly clean the space between the
electrodes and the belt.
The belt and buckle should be cleaned with water
and a mild soap then allowed to dry completely.
After each cleaning, always allow the entire unit to
completely dry before use.
All Micro-iDTTM Trainer collars have a one year
parts and labor warranty, effective from the original
date of purchase. A copy of the original sales receipt
is required to validate the date of purchase.
NOTE
Micro-iDTTMTrainer batteries are not covered under
the warranty.
FCC COMPLIANCE
Your Micro-iDTTMTrainer has been manufactured
under complete compliance with the Federal
Communication Commission (FCC). The complex
internal structure of each product has been designed to
operate within specific regulations of FCC
specifications. Any unauthorized modifications to
your product is a violation of these specifications.
The Micro-iDTTMTrainer has been made with State
of the Art equipment. Any fine adjustment should be
performed only by D.T. Systems' technicians.
D,I: Systems, Inc.
2872 Walnut Hill Lane
Dallas, Texas 75229
Tel: (214) 350-9446, (888) LUV-U-DOG
Fax: (214) 350-7847
Website: http://www.dtsystems.com
E-mail: [email protected]
Printed in Korea