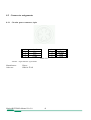
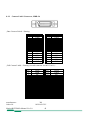
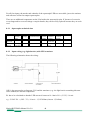
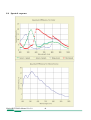
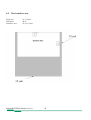
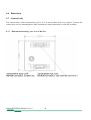
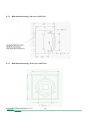
1
MotionBLITZ®Kit Instruction Manual MotionBLITZ®Kit Digital Motion Analysis Kit MotionBLITZ®Kit Manual Ver.2.0 Copyright -2006 Mikrotron GmbH Mikrotron GmbH Landshuter Str. 20-22 D-85716 Unterschleissheim Germany Tel.: +49 89 726342 00 Fax: +49 89 726342 99 [email protected] www.mikrotron.de 1 General........................................................................................................................... 5 1.1 Essentials of MotionBLITZ®Kit....................................................................................................................................... 5 1.2 Customer indications......................................................................................................................................................... 5 1.2.1 For customers in the U.S.A........................................................................................................................................ 5 1.2.2 For customers in Canada............................................................................................................................................ 5 1.2.3 Pour utilisateurs au Canada........................................................................................................................................ 6 1.2.4 Life Support Applications.......................................................................................................................................... 6 1.3 Declaration of conformity .................................................................................................................................................6 1.4 Warranty Note................................................................................................................................................................... 7 1.5 Remarks, Warnings............................................................................................................................................................7 1.6 The rear of the camera....................................................................................................................................................... 7 1.7 Scope of delivery............................................................................................................................................................... 7 2 Installation of MotionBLITZ®Kit................................................................................ 8 2.1 Minimal system requirements (PC)................................................................................................................................... 8 2.2 Installation of the Inspecta-5 frame grabber...................................................................................................................... 8 2.2.1 Before starting installation…..................................................................................................................................... 8 2.3 Installation of the software................................................................................................................................................ 8 2.4 Installation of Inspecta-5 for Windows 2000/XP.............................................................................................................. 9 2.4.1 How to install the Inspecta-5..................................................................................................................................... 9 3 Starting the Mikrotron MotionBLITZ Director program....................................... 10 4 Operating Modes.......................................................................................................... 11 4.1 Live mode........................................................................................................................................................................ 11 4.2 Prepare for recording....................................................................................................................................................... 11 4.3 Start recording on onboard memory................................................................................................................................ 11 4.3.1 Non circular mode....................................................................................................................................................11 4.3.2 Circular recording mode.......................................................................................................................................... 11 5 MotionBLITZ®Kit in practice....................................................................................12 5.1 The user interface............................................................................................................................................................ 12 5.2 Selecting resolution, speed, gain, trigger, sync and white balance..................................................................................13 5.2.1 Resolution and frame rate........................................................................................................................................ 14 5.2.2 Fixed frame geometry.............................................................................................................................................. 14 5.2.3 Fixed frame rate....................................................................................................................................................... 14 5.2.4 Region of interest centered...................................................................................................................................... 14 5.2.5 Black level............................................................................................................................................................... 14 5.2.6 Gain.......................................................................................................................................................................... 14 5.2.7 Type of exposure......................................................................................................................................................14 5.2.8 Trigger In signal....................................................................................................................................................... 15 5.2.9 Enable sync input..................................................................................................................................................... 15 5.2.10 Apply the changes ................................................................................................................................................. 15 5.3 Arrange a scene................................................................................................................................................................15 5.4 Recording in non circular mode...................................................................................................................................... 15 5.5 Recording in circular mode............................................................................................................................................. 16 5.5.1 Start recording.......................................................................................................................................................... 16 5.5.2 Stop recording.......................................................................................................................................................... 16 5.6 Playback of a sequence.................................................................................................................................................... 17 5.7 Editing and saving a sequence......................................................................................................................................... 17 5.7.1 Editing a sequence by using frame slider or keys.................................................................................................... 18 5.7.1.1 Set the beginning of a sequence....................................................................................................................... 18 5.7.1.2 Set the end of a sequence................................................................................................................................. 18 5.7.1.3 Copy the selected range into the frame list...................................................................................................... 18 5.8 Retrieving saved bmp-files.............................................................................................................................................. 19 5.9 Retrieving saved frames from raw format data file......................................................................................................... 19 5.10 Whitebalance................................................................................................................................................................. 19 5.10.1 Do the whitebalence.............................................................................................................................................. 21 6 Controls and menus in the MotionBLITZ®Kit software......................................... 22 MotionBLITZ®Kit Manual Ver.2.0 2 6.1 Moving the camera image............................................................................................................................................... 22 6.2 Zoom in and zoom out..................................................................................................................................................... 22 6.3 Brightness and contrast.................................................................................................................................................... 22 6.4 Menu File......................................................................................................................................................................... 23 6.4.1 Reload image-files.................................................................................................................................................. 24 6.4.1.1 Reload bmp files............................................................................................................................................. 24 6.4.1.2 Load Frames..................................................................................................................................................... 24 6.4.1.3 Load frame list................................................................................................................................................. 25 6.4.1.4 Load raw format from disk............................................................................................................................. 25 6.4.2 Format of the rec header.......................................................................................................................................... 26 6.4.3 Save images in files................................................................................................................................................. 27 6.4.3.1 Save images to bmp files..................................................................................................................................27 6.4.3.2 Save images in raw format............................................................................................................................... 28 6.4.3.3 Save Loop.........................................................................................................................................................28 6.4.3.4 Save frame list.................................................................................................................................................. 28 6.4.4 Make Avi File.......................................................................................................................................................... 30 6.4.5 AutoSave.................................................................................................................................................................. 31 6.5 View menu....................................................................................................................................................................... 32 6.5.1 Raw.......................................................................................................................................................................... 32 6.5.2 Display Input ports................................................................................................................................................... 32 6.5.3 Marker...................................................................................................................................................................... 32 6.5.4 Infoline..................................................................................................................................................................... 33 6.5.5 “Infotext...“............................................................................................................................................................. 33 6.5.6 Language.................................................................................................................................................................. 34 6.6 Record settings.................................................................................................................................................................34 6.6.1 Non circular mode ...................................................................................................................................................34 6.6.2 Circular mode...........................................................................................................................................................34 6.6.3 Enable trigger input for recording............................................................................................................................35 6.7 Play settings..................................................................................................................................................................... 35 6.7.1 Display of individual frames ................................................................................................................................... 35 6.7.2 Frame list................................................................................................................................................................. 36 6.7.3 Display loop with frame numbers from frame list................................................................................................... 36 6.7.4 Display loop “from ... to“.........................................................................................................................................36 6.7.5 Total number of frames............................................................................................................................................ 36 6.7.6 Slow motion (time delay in display)........................................................................................................................ 36 6.8 Info 37 7 Maintenance.................................................................................................................. 38 7.1 Cleaning of the MC1311 infrared filter........................................................................................................................... 38 8 Appendix....................................................................................................................... 40 8.1 technical data................................................................................................................................................................... 40 8.2 Connnector assignments.................................................................................................................................................. 41 8.2.1 Circular power connector, 6-pin.............................................................................................................................. 41 8.2.2 Camera Link® Connector, MDR-26....................................................................................................................... 42 8.2.3 Trigger and Synchronisation inputs......................................................................................................................... 43 8.3 Optocoupled I/O.............................................................................................................................................................. 43 8.3.1 Optocoupler technical data...................................................................................................................................... 44 8.3.2 Input wiring (e.g.: light barrier) with NPN-transistor.............................................................................................. 44 8.3.3 Input wiring (e.g.: light barrier) with PNP-transistor.............................................................................................. 45 8.3.4 Input wiring with a switch and an external voltage source...................................................................................... 45 8.3.5 Input wiring with an external 5V TTL signal.......................................................................................................... 45 8.4 Spectral response............................................................................................................................................................. 46 8.5 Pixel sensitive area ........................................................................................................................................................ 48 8.6 Dimensions...................................................................................................................................................................... 49 8.7 Camera body.................................................................................................................................................................... 49 8.7.1 Dimensioned drawing, rear view of MC13xx..........................................................................................................49 8.7.2 Dimensioned drawing, side view of MC13xx......................................................................................................... 50 MotionBLITZ®Kit Manual Ver.2.0 3 8.7.3 Dimensioned drawing, front view of MC13xx........................................................................................................ 50 MotionBLITZ®Kit Manual Ver.2.0 4 1 General Congratulations! MotionBLITZ®Kit is an excellent choice, because its an extremely versatile, advanced and self contained digital camera system. Mikrotron GmbH has combined progressive camera technology with software which is very easy to operate. Thus MotionBLITZ®Kit is the ideal solution for high speed recording. This manual provides information about the features and operating modes of MotionBLITZ®Kit. 1.1 Essentials of MotionBLITZ®Kit With the MotionBLITZ®Kit – the Digital Motion Analyzer Kit – rapidly moving or explosive processes can be continuously recorded and stored at up to 30000 images per second and can be displayed and analyzed in detail immediately after the end of a sequence. The images are always initially stored in the internal frame memory of the Inspecta-5 frame grabber. 1.2 Customer indications 1.2.1 For customers in the U.S.A. This equipment has been tested and found to comply with the limits for a Class A digital device, pursuant to Part 15 of the FCC Rules. These limits are designed to provide reasonable protection against harmful interference when the equipment is operated in a commercial environment. This equipment generates, uses, and can radiate radio frequency energy and, if not installed and used in accordance with the instruction manual, may cause harmful interference to radio communications. Operation of this equipment in a residential area is likely to cause harmful interference in which case the user will be required to correct the interference at his own expense. You are cautioned that any changes or modifications not expressly approved in this manual could void your authority to operate this equipment. The shielded interface cable recommended in this manual must be used with this equipment in order to comply with the limits for a computing device pursuant to Subpart J of Part 15 of FCC Rules. 1.2.2 For customers in Canada This apparatus complies with the Class A limits for radio noise emissions set out in Radio Interference Regulations. MotionBLITZ®Kit Manual Ver.2.0 5 1.2.3 Pour utilisateurs au Canada Cet appareil est conforme aux normes Classe A pour bruits radioélectriques, spécifiées dans le Règlement sur le brouillage radioélectrique. 1.2.4 Life Support Applications These products are not designed for use in life support appliances, devices, or systems where malfunction of these products can reasonably be expected to result in personal injury. Mikrotron customers using or selling these products for use in such applications do so at their own risk and agree to fully indemnify Mikrotron for any damages resulting from such improper use or sale. 1.3 Declaration of conformity Manufacturer: Mikrotron GmbH Address: Landshuter Str. 20-22 D-85716 Unterschleißheim Germany Product: MotionBLITZ®Kit The dedicated products conform to the requirements of the Council Directives 89/336/EWG for the approximation of the laws of the Member States relating to electromagnetic consistency. The following standards were consulted for conformity testing with regard to electromagnetic consistency. EC Regulation Description EN 61000-6-3 EN 61000-6-1 Electromagnetic compatibility Immunity Mikrotron GmbH Dipl.-Ing. Bernhard Mindermann Geschäftsführer MotionBLITZ®Kit Manual Ver.2.0 6 1.4 Warranty Note Do not open the body of the camera. The warranty becomes void if the camera body is opened. 1.5 Remarks, Warnings This document contains important remarks and warnings. See the corresponding symbols: Important remark Attention, Warning 1.6 The rear of the camera The type plate is to be found at the rear of the camera. It contains the serial number. There are two connectors for the Camera Link cables and one connector for the power cable. Make sure that both Camera Link cables are connected according to their marking with the connectors on the camera and the Inspecta-5 frame grabber. (Connecter marking “BASE” on the camera must be connected to CHANNEL-0 on the grabber.) The rear color LEDs of the MC131x camera shows the actual operating condition. Orange is shown after power up, while the cameras self-test is in progress and will then change to green. 1.7 Scope of delivery The following components are included as part of the delivery - 1 MC130x (Base CL) or 1 MC131x (Full CL) - 2 Camera Link ® cables and one power cable, 3m long - 1 Inspecta-5 PCI-X frame grabber with 1GB local memory. - 1 CD with MotionBLITZ®Kit operating software(MotionBLITZ®Director) Inspecta-5 holds 1 Gbyte internal frame memory. From this memory, a very small part (only as much as required by one frame) is used for storing the frames for the live mode. All of the remaining memory is used for sequence recording. MotionBLITZ®Kit Manual Ver.2.0 7 2 Installation of MotionBLITZ®Kit 2.1 Minimal system requirements (PC) For error-free operation of MotionBLITZ®Kit the following minimum PC specifications are required: - Pentium III 1GHz CPU with MMX-technology - Windows XP operating system - 256 Mbyte PC Ram - 10 Gbyte Harddisk - 8 Mbyte grafic memory - Display with 1280 x 1024 pixels For optimal operation of MotionBLITZ®Kit, a PC wth the following minimum specifications is recommended: - Pentium IV 2 GHz Windows XP 512 Mbyte PC Ram 40 Gbyte Harddisk 32 Mbyte grafic memory Display with 1400 x 1050 pixels / 24 Bit 2.2 Installation of the Inspecta-5 frame grabber 2.2.1 • • • Please install all device drivers and/-or updates of your motherboard before installing the inspecta-5 hard- or software. A subsequently installation of the drivers could lead to an instable or invalid computer system Before starting installation… Be sure the frame grabber is not installed in your computer. Check if there is an option called ‘plug&play operation system installed’ in your BIOS. If this option exists, set it to ‘yes’. Install the latest service packs of your operation system. 2.3 Installation of the software The MotionBLITZ® Kit is delivered with a frame-grabber and a CD for installing the grabber and the MotionBLITZ®Director software. You can also get the newest version of the driver for the framegrabber at http://www.mikrotron.de. There you can get the most recent manuals too. MotionBLITZ®Kit Manual Ver.2.0 8 2.4 Installation of Inspecta-5 for Windows 2000/XP 2.4.1 • • • • • • • • How to install the Inspecta-5 Start Windows 2000/XP. You should not have installed the framegrabber Inspecta-5 hardware for now! Insert the MotionBLITZ® Kit Setup CD or copy the Setup files to a directory and start the program SETUP.EXE from the root directory of the CD or from the directory where it is copied. Follow the instructions of the Setup program. After you have finished the Setup program, shut down your computer, switch it off and install the frame grabber hardware. Restart your computer. Wait until Windows recognizes new hardware (Video controller for multimedia). Windows needs some seconds to find the new hardware, so be patient. When the ‘Found New Hardware Wizard’ appears, select ‘Search for a suitable driver for my device(recommended)‘ and then click ‘Next‘. A warning message may appear stating that the hardware has not passed Windows Logo Testing. Select ‘Continue Anyway’ to allow the drivers to install. The hardware of the Inspecta-5 involves 1 main and 7 subcomponents. After installing the driver for the main component, windows start to request drivers for the seven subcomponents. Repeat the instructions above 7 times to satisfy the requests of the Plug&Play manager. After installing the last driver, shut down the computer, switch off the power supply and connect your camera to the frame grabber. Restart Windows. MotionBLITZ®Kit Manual Ver.2.0 9 3 Starting the Mikrotron MotionBLITZ Director program Double-click on the following symbol on the Windows XP user interface using the left mouse button: MotionBLITZ®Kit Manual Ver.2.0 10 4 Operating Modes By means of the MotionBLITZ®Kit software (control program) the camera can be set up for recording in different operating modes. 4.1 Live mode The camera images are continuously recorded and displayed. This mode is optimal for defining image detail, adjusting the focus and setting up the variuos camera parameters. Switch the camera to live mode by pressing the "Live" button.The framestamp will be displayed on the Infoline 4.2 Prepare for recording The camera parameters are adjusted according to the users needs after the camera is connected to the PC. 4.3 Start recording on onboard memory After power up, the camera starts with the last used settings. If you need another resolution/frame speed, the new parameters must be entered via the MotionBLITZ®Kit control software. To start recording press the red start recording button in the MotionBLITZ®Director program or use trigger-0 input.(see to page 16, Start recording) Inspecta-5 holds 1 Gbyte internal frame memory. From this memory, a very small part (only as much as required by one frame) is used for storing the frames for the live mode. All of the remaining memory is used for sequence recording. 4.3.1 Non circular mode The camera stops recording when the internal frame buffer is full. 4.3.2 Circular recording mode The camera records frames in a circular mode (i.e. the oldest frames are always overwritten by the newest) and waits for a signal to stop. Similar to the “Live” mode, there are 2 methods to stop recording: apply a trigger signal (rising or falling edge, depends on setting “Trigge edge” in form “Camera Setup”) to the appropriate camera input connector or press the Stop button in the MotionBLITZ®Kit control program MotionBLITZ®Kit Manual Ver.2.0 11 5 MotionBLITZ®Kit in practice The full range of functions available and all camera parameters may be set by means of the MotionBLITZ®Director software. 5.1 The user interface The camera is completely controlled through the user interface. All parameters of the camera for recording, playback and saving the frames after recording may be adjusted here. After recording, stored sequences of images maybe subsequently edited. Start the software by double clicking at the appropriate MotionBLITZ®Director symbol on the PC desktop or choose the application in the windows start menu. The following screen mask will appear: Select modes of operation or change parameters by pressing a command-button or by selecting an item in a pulldown menu. If the mouse cursor is moved slowly over the command buttons and symbols, information about each object will be displayed ("tool tip text"). The Camera Link® interface can be configured with “Camera” menu by selecting resolution, speed, gain, trigger and white balance. Click on the menu item "camera". The "camera setup" form will appear: MotionBLITZ®Kit Manual Ver.2.0 12 5.2 Selecting resolution, speed, gain, trigger, sync and white balance The Histogram button is used to adjust white balance.See details at Whitebalance The different gain options provide higher sensivity for low light conditions. Once the changes to the parameters for resolution and framerate are set, click on "Apply". Now the new parameters will be sent to the camera. All other parameters, e.g. shuttertime or gain, will be sent immediately to the camera after entering. If there is no connection to the camera, the following errormessage will appear: MotionBLITZ®Kit Manual Ver.2.0 13 Please make sure the camera is connected correctly. 5.2.1 Resolution and frame rate. You can set the width, the height and the rate of the frame. 5.2.2 Fixed frame geometry In this mode, any changes in the frame rate will have no effect in the geometry of the frame.The RoI is frozen. 5.2.3 Fixed frame rate In this mode, the changes at the geometry will be accepted if it has no effect on the given frame rate. For this frame rate the maximum allowed frame height will be calculated. 5.2.4 Region of interest centered If this option is checked the frame and the camera sensor have the same center. CoI has null offset to the sensor center. 5.2.5 Black level With the black level parameter (controlled with slider or text field) you may adjust the camera’s image sensor base black level. The base black level must be set to a value between 0 and 255. Setting to the correct value, the sensor will deliver the pixel value 0 (which means totally black) for a complete black image. If the value is too small, the sensor will deliver a pixel value above 0 (which means gray). If the value is too big, the sensor will deliver a pixel value 0 (totally black) for images, that are gray and not completely black. The whitebalance form (for color cameras) or the histogram form (for monochrome cameras) is a good tool for adjusting the black level: In live mode, close the lens of the camera for getting a completely black image, adjust the black level until the black line in the whitebalance or the histogram touches the “min” border of the chart. 5.2.6 Gain The gain may be adjusted with the ComoBox “digital gain” or with the “analog gain” slider. You may increase the digital gain up to 4, the analog gain up to 2. But please note: the quality of the image decreases the more you increase the gain. 5.2.7 Type of exposure The MC13xx can expose the images synchronous or asynchronous. An external signal on CC1 can be used to synchronize MC13xx cameras to each other or to an external event. MotionBLITZ®Kit Manual Ver.2.0 14 5.2.8 Trigger In signal The trigger input is used to stop a current recording with an external signal. See Trigger and Synchronisation inputs. The active edge of the signal of pin .. is defined together with “Trigger edge”. 5.2.9 Enable sync input For synchronizing camera you only have to connect the sync output of an external source to the sync input, as described in Trigger and Synchronisation inputs Enabling this mode and applying an external signal will be recognized at the desktop. The framerate of the external signal must be at least 2 fps less than the camera’s frame rate, and it must be kept constant during recording!! 5.2.10 Apply the changes Any changes made in resolution and/or frame rate values will be send to camera after this button is pressed.Closing the form without using this button first will cause no changes at camera setup. The changes to other parameters, other then resolution and frame rate, will be applied to camera immediately. 5.3 Arrange a scene Click on the "Live"-Button to get a live-image from the camera. The camera may now be focused and aligned for the details of the scene. 5.4 Recording in non circular mode Non-circular mode is selected in menu "Record" => "record setting" => "non circular..". To start, click on the red button. Now the camera starts recording and stops when the internal buffer is full. During reMotionBLITZ®Kit Manual Ver.2.0 15 cording, the recorded frames are displayed simultaneously. After recording, the first (oldest) recorded frame will be displayed. Recording in non circular mode may only be achieved with MotionBLITZ®Kit user interface program and not with the trigger signal! 5.5 Recording in circular mode Circular mode should be used if a trigger is applied. The trigger may be the closing of the camera's trigger switch, a trigger signal or by clicking on the stop button in the MotionBLITZ®Kit control software. A trigger is necessary if images are needed before and/or after an event. The trigger defines the point of time of your event. Circular mode is selected with menu "Record" => "record setting" => "circular..". There are 2 various methods to start and stop the circular recording as described elsewhere in this manual. In circular recording mode the recorded frames are displayed simultaneously. The number of frames that will be recorded before the trigger, called “pre-trigger frames”, is determined in menu "Record" => "record setting" => "circular.." => "Frames before trigger". After recording, the frame immediately after the trigger will be displayed, the timestamps will be set in relation to the point of time of the trigger-moment, i.e. the first frame after the trigger is set to 0 ms. Negative values indicate that the displayed frame was recorded before the trigger, positive values indicate frames after the trigger, called “post-trigger frames” 5.5.1 Start recording To start a recording: Press the start recording button (Shortcut F5-key) in the MotionBLITZ®Kit control program, Or Apply 0-V to the triger input pin-0 at least for 40ms to start recording . 5.5.2 Stop recording There are 2 methods to stop recording Apply a triggersignal to the appropriate Inspecta-5 input connector or press the stop (Shortcut F12-key) button in the MotionBLITZ®Kit control program. MotionBLITZ®Kit Manual Ver.2.0 16 5.6 Playback of a sequence The frames in the camera may be accessed after recording. Click on one of the forward or backward buttons. Now the frames will be displayed. Alternatively the play settings menu may be used for selecting the frames. playback reverse 1 frame reverse 1 frame forward playback forward The frame counter shows the position within the recorded sequence. The time stamp indicates the position relative to the trigger. Use this slider to browse through your recorded sequence. 5.7 Editing and saving a sequence In high speed recordings usually only a portion of the frames contain relevant information. Therefore, it is useful to save only that range of frames which contains this essential information. There are 2 methods of selecting the essential range of frames for saving: - Enter the range of the frame numbers in the "from" and "to" input field of the "Save" menu or the "Make Avi" menu. Alternatively you may enter the frame range by means of mouse-button and control keys as described in the next chapter. The selected range will be shown as a blue bar in the frame slider. - Create a list of frames in the "Play settings" menu. The sequence may now be saved as single bmp-files in the "Save" menu or as an avi-file in the "Make Avi" menu . See Save images in files andMake Avi File for details. MotionBLITZ®Kit Manual Ver.2.0 17 5.7.1 Editing a sequence by using frame slider or keys If the frame slider has the focus you may use the mouse buttons or the key “b”, “e” and “l” for editing a sequence. This method works only if the frame slider has the focus! Click on the frame slider for getting the focus 5.7.1.1 Set the beginning of a sequence Press the right mouse button or the key “b”. The actual frame number, 51 in the picture above, will be set as a start value for the range of frames. The selected range will be shown as a blue bar in the frame slider. 5.7.1.2 Set the end of a sequence Press the shift key and the right mouse button or the key “e”. The actual frame number, 258 in the picture above, will be set as a end value for the range of frames. The selected range will be shown as a blue bar in the frame slider. 5.7.1.3 Copy the selected range into the frame list Press the key “l” for copying the selected range into the frame list. MotionBLITZ®Kit Manual Ver.2.0 18 5.8 Retrieving saved bmp-files If the saved bmp-files are to be viewed, select the directory, the filename and the desired frame numbers in the Menu File =>Load menu (chapter 6.4.1 ). Now the image source for displaying frames is the selected directory with the appropriate files. This is indicated by the symbol in the status area of the MotionBLITZ®Director control-programm. The playback buttons or the "Play settings" menu allow navigation through the image files as described in chapter 5.6 on page 17. The MotionBLITZ®Director is set as image source by clicking on the "Live" button or the red "Start Recording" button. This is indicated by the camera symbol 5.9 Retrieving saved frames from raw format data file If the saved frames from a raw format data file are to be viewed, select the directory, the filename and the desired frame numbers in the Menu File =>”Load raw format from disk.”option. Now the image source for displaying frames is the selected directory with the appropriate files. This is indicated by the symbol in the status area of the MotionBLITZ®Director control-programm.The playback buttons or the "Play settings" menu allow navigation through the image files as described in chapter 5.6 on page 17.The MotionBLITZ®Director is set as image source by clicking on the "Live" button or the red "Start Recording" button or pressing on icon. This is indicated by the camera symbol. 5.10 Whitebalance Good illumination is extremley important for optimal true color display. Best results are achieved by using daylight or halogen light. For recalibrating the color correction, click first on "Live" and then in the menu Camera Setup on the button "white balance". The following screen mask will be shown MotionBLITZ®Kit Manual Ver.2.0 19 MotionBLITZ®Kit Manual Ver.2.0 20 5.10.1 Do the whitebalence Adjust the size of the green check-line, which is automatically displayed in the camera image, and move this line over a white area using the mouse. (Click and hold on the line and move it). The values of the pixels along this line will be shown as three curves – red, green and blue. Using the "R", "G" and "B"-sliders, move the three curves until they are nearly congruent as shown in the figure above. Click on "Apply" to assume these values. Click on "Close" to close the form. Multiple white balancing adjustments may be performed. If the images are saved to a file, it is no longer possible to correct the color of these image-files. Only frames downloaded from the camera are correctable before saving. MotionBLITZ®Kit Manual Ver.2.0 21 6 Controls and menus in the MotionBLITZ®Kit software There are several menus and controls in the MotionBLITZ®Director program. Each will be described in the following chapters 6.1 Moving the camera image Click with the left mouse button on the camera image. Hold the button and move the mouse. The image will move in the desired direction. 6.2 Zoom in and zoom out For zooming, use the left vertical scrollbar. The range of the zoom factor is from 0.5 (smaller) to 10 (bigger) than the original. Click on the zoom icon for the original size. The number next to the zoom icon indicates the actual zoom factor. 6.3 Brightness and contrast The brightness of the image (right top vertical scrollbar) and the contrast (right middle vertical scrollbar) are set. By clicking the scrollbar symbols with the left mouse button, the initial state of the appropriate parameter is set. Adjust the base value for the contrast computation using ContrastBase. This is needed only in special light conditions. MotionBLITZ®Kit Manual Ver.2.0 22 Changes to contrast and brightness are relevant for the saved frames! 6.4 Menu File The File menu allows - reloading bmp or rec -files for display start saving images as bmp or rec -files, create an avi-file and autosave exit the program MotionBLITZ®Kit Manual Ver.2.0 23 6.4.1 6.4.1.1 Reload image-files Reload bmp files MotionBLITZ®Director loads only bmp-files with 5 digit name endings. Files with the same part before these 5 digits are assumed to be from the same saved sequence. To reload a sequence (or a part of it) select the volume, the directory and the filename without the digits. There are 2 methods of selecting the single files to be loaded: Load Load frame list 6.4.1.2 Load Frames Click on the radio button "Frames". Entries can be made in the fields “From“ and “To“ by clicking on files on the file list with the mouse: - Click the contents of the “From“ field with the left mouse button (number 1 in our example). The background of the figure is blue. - Click on the desired image file with the left mouse button, e.g. Frames00016.bmp. “16“ will be added to the “From“ field. The blue background disappears. - Proceed in the same manner for the field “To“ MotionBLITZ®Kit Manual Ver.2.0 24 6.4.1.3 Load frame list Click on the radio button "Frame list" The list may be edited in the menuPlay settings. Only the files whose numbers are included in the frame list will be loaded and displayed. By clicking “OK“ the first file is loaded into the main window. Use the replay buttons as described in Playback of a sequencefor displaying the whole sequence. 6.4.1.4 Load raw format from disk. For reloading frames, that are stored in a raw file, use the “Load Raw..” in the files menu. The raw frames will be extracted form the file, converted to color and white balanced if necessary and displayed. You may export the frames to an avi-file or bmp-files as well, see chapter “Save images in files”. MotionBLITZ®Kit Manual Ver.2.0 25 6.4.2 Format of the rec header All numbers are in decimal format example [RAWHEADER] FormatIdentifier= Number of chars 32 32 MRAW HeaderVersion= OffsetToFirstFrame= VendorId= MotionBLITZ= Firmware= CameraType= CameraSerialNumber= ColorMode= FrameTopInPixel= FrameLeftInPixel= FrameWidthInPixel= FrameHeightInPixel= BitsPerPixel = BayerFilterStart= 1,0000 1310720 Mikrotron GmbH 1.10.6 BayerFilterRed= BayerFilterGreen= BayerFilterBlue= GammaRed= GammaGreen= GammaBlue= Param_1= Param_2= Param_3= FrameRate= ShutterTime_µs= TimerBasis_µs= InfoText= CompleteFixedInfoPart= 1,00000000 1,00000000 1,00000000 BaseTime= 0 1280 1024 8 0/1/2/3 1000 20 49,91319444 Experiment 26 1280x1024, 500 Hz, 564 µs, *1.5, MotionBLITZ EoSens Cube #00000, V1.10.6 2008-12-17 23:50:00 MotionBLITZ®Kit Manual Ver.2.0 26 32 32 32 32 64 32 32 32 32 32 32 32 32 32 32 32 32 32 32 32 32 32 32 32 32 32 128 128 32 remark A CRLF is included for delimter ,all fields left aligned 1=BAYER 0=MONO 1280 1024 0 = GreenRed, 1 = RedGreen, 2 = GreenBlue, 3 = BlueGreen [µs] Timestamp for value 0 of the absolute timer NumberOfSequences= [SEQUENCES] NumberofFrames_00= FirstFrameNumber_00= TriggerFrameNumber_00= Reftim1_00= 1000 1 50 (1…x) 268582,89928164 32 32 32 32 32 32 NumberofFrames_01= FirstFrameNumber_01= TriggerFrameNumber_01= Reftim1_01= 1000 1050 (1…x) 32 32 32 32 32 NumberofFrames_02= ... …. 6.4.3 1 First sequence Time of trigger frame in µsec based on BaseTime Second sequence Third and next sequences Save images in files 6.4.3.1 Save images to bmp files Select a name from the file list below the bmp name field by clicking on it or by enter MotionBLITZ®Kit Manual Ver.2.0 27 ing a name on the keyboard. On the right side of the window it is possible to set the hard disk drive and the path with the mouse. It is essential to remember that if more than of 3 characters for the name are used, the performance may decrease. Nevertheless, any name may be used which conforms to Windows. MotionBLITZ® Kit extends these characters by a 5-digit figure which corresponds to the frame number. There are 2 methods of selecting the bmp files to be saved: Load Frames Load frame list 6.4.3.2 Save images in raw format If „raw-file format” option in “Save…” menu is selected, the content of the grabber will be saved in raw-format on choosen file, with “Save” button. 6.4.3.3 Save Loop Click on "Save Frames“. The numbers of the images in the range of “From“ and “To“ fields (including the values themselves) are written to a file by clicking “Save“ button. 6.4.3.4 Save frame list Click on “Save frame list“. The numbers of the images shown in the list are written to a file by clicking “Save“button. This list may be edited in the pulldown menuPlay settings. In both cases (“from ... to“ and “Frame list“) each image and its file name are displayed while being stored. If the "display frames" checkbox is NOT active, the frames will not be displayed. In this case the saving procedure will be faster. If a file with the same name already exists, a response to a message box is required. Click on: Yes No Cancel The file will be overwritten. The image will not be stored and, if possible, the procedure continues with the next image (if the last image has not been reached). The image is not stored and no further images will be processed. The recording will be written to a file either with or without an image caption depending on whether “infoline“ has been switched on or off in the View menu. Different from saving images to bmp-files, several frames are stored in a single, so called “raw file”. This file contains a header, which describes the frames, that are stored in the file as well as the frames themselves. The frames are raw, i.e. they are stored in the same format as they were uploaded from the camera, without any conversion and filtering. If the camera holds e.g. frames with a bayer pattern, then this frames will be stored without any bayer filtering. MotionBLITZ®Kit Manual Ver.2.0 28 The selection of the frames to store operates in the same manner as described in”Save images in files” MotionBLITZ®Kit Manual Ver.2.0 29 6.4.4 Make Avi File Select the avi-filename, the numbers of the frames to be compressed and the compressor-type by clicking on the "Compressor-setup" button. If only a special region of the sequence is to be processed, select this region by clicking on the "clipping" checkbox. An rectangle named "AVI clipping area" will be overlayed in the camera image. Adjust the size as needed and move the rectangle over the region of interest with the mouse. Once all parameters have been set, click on "Make AVI.." The Avi progress bar and the estimated time to completion will appear. If you click on “Cancel” while an Avi is created, the AVI will hold only the frames up to the point of time of your cancellation. MotionBLITZ®Kit Manual Ver.2.0 30 6.4.5 AutoSave If the Auto Save mode is activated, frames will be stored to hard disk in the raw data format automatically after the end of a triggered circular recording sequence. After completion of storing the frames, a new recording sequence will be started. Autosaving will be ending when the user stops the recording sequence (by pressing the F12-key or clicking on the stop button) or if the disk runs out of space. Parameters for Auto Save could be adjusted in the form Auto Save. You may start the form by clicking on the checkbox “Show Form Auto Save” in the Recording Settings form. The number of frames before the trigger point of time and the number of frames from the trigger point of time on could be adjusted as well as the file name for the saved frames. The selected file name will be extended by a time stamp, that holds the instant of time, when autosaving started: Saving on disk: After the recording into frame grabber stopped(-either trigger or key) the squence from the “Autosave” form will be saved on disk. The name of the file, that contains the automatically saved frames, has the following format: Base name / Delimiter / YYMMDD / Delimter / HHMMSS / .rec The base name is declared in form Auto Save, e.g. in the screen shot above “auto”, the delimter is the sign “_”, YYMMDD means year, month, day and HHMMSS means hour, minutes, seconds. An example of the name of file, that contains frames, that were auto saved starting on February 9 th, 2009 at 16:09:27 is: aut_090209_160927.rec at the directory E:\sutoRaws Show the saved frames After completion of an Auto Save session, each recording sequence of the camera is stored in a different file. Select the appropriate file in the menu “File” =>”Load”. See “Load raw format from disk.“ for details MotionBLITZ®Kit Manual Ver.2.0 31 6.5 View menu 6.5.1 Raw The image is displayed as delivered from the camera without any modification and no Bayer color-calculations. Thus in Raw mode always a black and white image will be seen. 6.5.2 Display Input ports The 4 Bit digital input is stored in the 4th byte of each frame during recording. If "Infoline" is enabled (checked), the 4 Bit digital input of the frame is displayed in the toolbar and inserted in the infoline. 6.5.3 Marker Up to 4 markers may be enabled. Markers are magenta colored lines that overlay the camera image. The size may be adjusted and moved with the mouse. Markers are used for tagging the position of an interesting part in the replayed sequence. Markers have no relevance for the saved frames! MotionBLITZ®Kit Manual Ver.2.0 32 6.5.4 Infoline Attaching information to the recorded images is switched on or off. The information portion is displayed as follows: Framestamp: The upper part of this section taken from the MotionBLITZ®Director main window shows the remaining part of a recording and the information portion. It contains the following fields with information at the time of recording: Field: Date Time Frame number rel. time after trigger [ms] Camera profile used Framerate Free text to be entered via “Infotext“ Content in the example: 09.02.2006 14:00:04 42 43,4 [ms] Cam profile init (944 Hz) This ist the infotext... ... This information portion is stored along with the frames while recording in the image information block in the first image-line to save on frame memory. It is interpreted from that structure for playback and then attached to the images. 6.5.5 “Infotext...“ Open the window “Edit Info Text“: The text entered here and confirmed by clicking “OK“ is added to the information portion in the recording sequence. MotionBLITZ®Kit Manual Ver.2.0 33 6.5.6 Language German or English may be selected as language for all texts in the program. 6.6 Record settings There are two recording modes: Non circular mode Circular mode 6.6.1 Non circular mode Recording proceeds until the end of buffer and stops. 6.6.2 Circular mode The camera will record in a circular mode, i.e. the oldest frame is overwritten by the newest. After triggering or the circular recording has beed stopped by clicking the stop button or pressing the key F12 as many frames as defined in the input-field "Trigger Position, Before [Frames]" (372 in our example) will be kept and the rest of the frame buffer will be filled up with frames. With the slider you may vary the triggerposition from the first frame (“1”) to the last possible frame (“816”) as well. If you select “Before [Percent]” the before frames to total frames ratio will be retained if the total number of frames is changed (e.g. by changing the frame size) MotionBLITZ®Kit Manual Ver.2.0 34 6.6.3 Enable trigger input for recording Enabling this item lets trigger input to start recording. 6.7 Play settings In this menu the number of the images that shall be displayed is defined. This is valid for frame selection in the "file save" and "file Make Avi" menu as well. The behavior during playback in forward and reverse sequences is influenced by the radio buttons; it is possible to set a time delay between the display of individual frames. 6.7.1 Display of individual frames Click on the radio button “Single frame“. The frame with the number shown in the entry field below the "Single frame" slider is retrieved from the MotionBLITZ®Kit frame memory and displayed. Any image desired may be loaded from the memory by entering the frame number into the entry field or by operating the “Single frame“ slider. MotionBLITZ®Kit Manual Ver.2.0 35 6.7.2 Frame list The frame numbers selected via "Single frame" or “from … to” can be added to the frame list by pressing the “=> frame list“ button. By pressing “Delete“ the numbers which were marked previously with the mouse can be removed. The contents of this list can be used for saving / loading images from files (in the “File“ window), for saving frames as an AVI (in the “File” -> “Make AVI…” menu) or for defining a playback sequence. 6.7.3 Display loop with frame numbers from frame list Click on “frames list“. By clicking “Forward playback“ or “Reverse playback“ all frame numbers are processed on the list in an infinite loop, i.e. the recorded images are loaded from the MotionBLITZ®Kit frame memory and displayed. 6.7.4 Display loop “from ... to“ Click on “Loop“. By clicking “Forward playback“ or “Reverse playback“ the frame with the number entered into the entry field “From“ to the number entered in “To“ will be loaded from the MotionBLITZ®Kit frame memory and displayed in an infinite loop. 6.7.5 Total number of frames Depending on the size of the frame memory and the current frame size (line length and number of lines) the maximum permissible frame number xxx is determined and displayed in “Total number of frames(max xxx)“. It is not possible to exceed this number in the display loop or when displaying individual frames. 6.7.6 Slow motion (time delay in display) To playback a sequence in slow motion, select the desired time delay in milliseconds in the entry field “Delay [ms]:“. The time value may be entered in the field directly or changed by using the appropriate horizontal scrollbar. MotionBLITZ®Kit Manual Ver.2.0 36 6.8 Info At the Info form the details of MotionBLITZDirector and the Firmware of the connected camera will be shown. - Serialnumber of the Camera 30211 Firmware-Version V1.53-F2.52 Framegrabber info Inspecta-5 Driver Software Version The size of the Grabber memory and its serial number MotionBLITZ®Kit Manual Ver.2.0 37 7 Maintenance During normal use an occasional cleaning of the optical path is necessary. Information about cleaning the lens is provided by the respective manufacturers. 7.1 Cleaning of the MC1311 infrared filter MC1311 contains a filter to suppress infrared light. Dust and dirt, which may deposit on this filter is best removed by means of an oil free air pressure spray or with a lens cleaning tissue. Sticky mud and fingerprints may be cleared away with medical alcohol. Improper cleaning agents may damage the filter. Such damage may alter the quality of the images. Infrared light is part of the visible light spectrum and warps the color in the camera images. Therefore it is necessary to illiminate infrared light with the filter. MotionBLITZ®Kit Manual Ver.2.0 38 MotionBLITZ®Kit Manual Ver.2.0 39 8 Appendix 8.1 technical data MC133x camera Number of pixel Pixel size Active area Fill factor Sensitivity at 550 nm @ Vref = 1V (a2 = 66h) Spectral response Shutter Trigger Internal Dynamic Power supply Power consumption max., continuous recording @ 660 Mbytes/sec Thermal resistance typ. Data link Case temperature Shock & vibration Dimensions (WxHxD) Weight Lens mount Software Minimum Computer requirement File format Recording frequency Shutter time Recording modes Frame buffer Replay frequency MotionBLITZ®Kit Manual Ver.2.0 Monochrome or color withBayer Filter 1280 x 1024 12 x 12 µm 15,36 (H) x 12,29 (V) mm 40% 1600LSB/lux-sec 400..800nm Electronic „Freeze Frame“ Shutter Asynchronous shutter, shutter time selectable with internal timer 59 dB 8 ... 24 V 4.5W 6.25°/W Full Camera Link® +5..45°C 70g, 7grms 63 x 63 x 47 mm ca. 300 g C-mount "click, drag and drop" for Windows XP Pentium III 1GHz CPU with MMX-technology, 256 MB RAM, 10 Gbyte Hard disk. Windows® XP Operating System Avi or bmp Up to 32.000 frames per second Min. 4 mikroseconds Non circular or circular wih pre- an post trigger. 1 Gbyte 10 – 30, fps @ 1280 x 1024, depending on the performance of the PC 40 8.2 Connnector assignments 8.2.1 Circular power connector, 6-pin pin 1 2 3 signal VCC VCC STRB pin 4 5 6 Table 8.2-1 *DGND ... digital GND for signal STRB Manufacturer: Order no.: Hirose HR10A-7P-6S MotionBLITZ®Kit Manual Ver.2.0 41 signal DGND* GND GND 8.2.2 Camera Link® Connector, MDR-26 „Base Camera Link® “ Pinning: pin 1 2 3 4 5 6 7 8 9 10 11 12 13 signal pin signal GND 14 GND X015 X0+ X116 X1+ X217 X2+ XCLK18 XCLK+ X319 X3+ SERTC+ 20 SERTCSERTFG21 SERTFG+ CC122 CC1+ CC2+ 23 CC2CC324 CC3+ CC4+ 25 CC4GND 26 GND Table 8.2-2 „Full Camera Link® “ Pinning (second connector for MC1310/11): pin 1 2 3 4 5 6 7 8 9 10 11 12 13 signal pin GND 14 Y015 Y116 Y217 YCLK18 Y319 100 Ω Term. 20 Z021 Z122 Z223 ZCLK24 Z325 GND 26 Table 8.2-3 manufacturer: Order-Nr. MotionBLITZ®Kit Manual Ver.2.0 3M 10226-6212VC 42 signal GND Y0+ Y1+ Y2+ YCLK+ Y3+ 100 Ω Term Z0+ Z1+ Z2+ ZCLK+ Z3+ GND 8.2.3 Trigger and Synchronisation inputs Trigger Input : Opto Coupler 0 Sync Input : Opto Coupler 1 The polarity of the active edge can be selected with the check boxes in the camera menu 8.3 Optocoupled I/O The parallel I/O Port is accessible via a 26-pin male header on Inspecta-5. This header is connected with flat cable to a 25-pin male Sub-D connector on a PC-bracket. 25-pol Sub-D connector on the PC-bracket 1 2 3 4 5 6 7 8 9 10 11 12 13 14 15 16 17 18 19 20 21 22 23 24 25 26 26Pin Header on Inspecta-5 1 3 5 7 9 11 13 15 17 19 21 23 25 2 4 6 8 10 12 14 16 18 20 22 24 - MotionBLITZ®Kit Manual Ver.2.0 Name nc C2 E2 C3 E3 nc nc nc nc A0 K0 K1 A1 E1 C1 E0 C0 nc nc nc nc A3 K3 K2 A2 43 Description (Collector PPOut2) (Emitter PPOut 2) (Collector PPOut3) (Emitter PPOut 3) (Anode PPIn0) (Kathode PPIn0) (Kathode PPIn1) (Anode PPIn1) (Emitter PPOut1) (Collector PPOut1) (Emitter PPOut 0) (Collector PPOut0) (Anode PPIn3) (Kathode PPIn3) (Kathode PPIn2) (Anode PPIn2) For all four inputs, the anodes and cathodes of the optocouple LEDs are accessible, just as the emitters and collectors of the four output optocouplers. There are no additional components on the I/Os besides the optocoupler pins. If, because of excessive overvoltage and/or reversed voltage a coupler breaks, they can be easily replaced because they are socketed. 8.3.1 Optocoupler technical data Typ ILD30 Opto-Out HCPL2531 Opto-In 8.3.2 Current transfer ratio >100% Isolation Voltage Diode Forward Current 6000V 50 mA Diode Reverse Voltage 3V 27% typ 19% min 2500V 16mA 5V Transistor Collector Current 125mA UCE 10V TTL level Transistor Collector Voltage 30V Bandwidth 3 Mhz Input wiring (e.g.: light barrier) with NPN-transistor The following schematics shows the wiring: OK1 is the optocoupler on Inspecta-5; R1 and the transistor (e.g.: the light barrier containing this transistor enthält) are external components. R1 has to be calculated so that the LED current is between 10..16mA: R1 = (U-3V) / 16 mA e.g.: U=24V: R1 = (24V - 3V) / 16 mA = 1,3125 kOhm (chosen: 1,5 kOhm) MotionBLITZ®Kit Manual Ver.2.0 44 8.3.3 Input wiring (e.g.: light barrier) with PNP-transistor Calculation of R1 as above with NPN Transistor. 8.3.4 Input wiring with a switch and an external voltage source Calculation of R1 as above with NPN Transistor. 8.3.5 Input wiring with an external 5V TTL signal Make sure that the external signal can source the LED minimal current (>10mA). Use R1 also. MotionBLITZ®Kit Manual Ver.2.0 45 8.4 Spectral response MotionBLITZ®Kit Manual Ver.2.0 46 MotionBLITZ®Kit Manual Ver.2.0 47 8.5 Pixel sensitive area Pixel size: Fill factor: Sensitive area: 12 x 12 µm 40 % 10,5 x 6,5 µm MotionBLITZ®Kit Manual Ver.2.0 48 8.6 Dimensions 8.7 Camera body The camera body is with its dimensions of 63 x 63 x 41 mm (without lens) very compact. To fasten the camera there are two mounting holes M4x7mm and one tripod connection on each side available. 8.7.1 Dimensioned drawing, rear view of MC13xx MotionBLITZ®Kit Manual Ver.2.0 49 8.7.2 Dimensioned drawing, side view of MC13xx 8.7.3 Dimensioned drawing, front view of MC13xx MotionBLITZ®Kit Manual Ver.2.0 50 MotionBLITZ®Kit Manual Ver.2.0 51