1
5
Volume up and down buttons — The Volume up ( ) and Volume down ( )
buttons are used to increase and decrease the output volume and the selected
input’s audio level. See Volume adjustment on page 3-5 for more details.
The Volume buttons are also used to reset the transmitter. See Full system reset
on page 3-5.
6
Mute button and LED — Press the Mute button to toggle audio mute on and
off. When the output is muted, the transmitter outputs no audio on its local
Audio connector. The Mute LED lights to indicate that the audio is muted.
7
Faceplate posts — These posts can hold an optional custom-engraved name
plate. Extron can create a custom front plate to neatly and professionally label
each input button. Contact the Extron S3 Sales & Technical Support Hotline to
order the custom plate.
Receiver controls and indicators
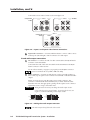
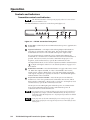
The receiver has controls on the front panel and the rear panel (figure 3-2).
C A B L E E QUA L I Z AT I O N
- ADJUST +
SELECT
LOW FREQ.
HIGH FREQ.
POWER
TPR150
Tw i s t e d Pa i r V i d e o R e c e i v e r
10
11
9 0 - 2 6 0 VAC ; 0 . 2 5 A ; 4 7 - 6 3 H z
VIDEO OUTPUT
COMPOSITE
SKEW
COMPONENT
S-VIDEO
R S - 2 3 2 P O RT
ADJ
R-Y
Y
U S E O N LY W I T H 2 5 0 V F U S E
R G B / VG A
UTP LINK
8
9
B-Y
RED BLUE GRN
F U S E : 1 . 6 A ; 2 5 0 V; T I M E D E L AY
Figure 3-2 — TPR150 receiver front panel
8
Power LED — When lit, the Power LED indicates that power is applied to the
receiver.
9
Cable Equalization Select button and LEDs — Press the Select button to
toggle between high frequency and low frequency to equalize. The High
Frequency LED and Low Frequency LED indicate the frequency range that is
selected for equalization. Equalize the cable with the Adjust button ( 10 ). See
Optimizing the Video on page 3-6 for more details.
10
Cable Equalization Adjust button — Press the + side of the button to
increase the amount of equalization applied to the selected frequency range
(high or low) of the output signal. Press the – side of the button to decrease
the amount of equalization. Select the frequency range with the Select button
( 9 ). See Optimizing the Video on page 3-6 for more details.
11
Skew Adjustment controls — Use an Extron Tweeker or other small
screwdriver to correct for the delay inherent in network (CAT 5) cable. See
Optimizing the Video on page 3-6 for more details.
TPS150 Switching and Transmission System • Operation
3-3