1
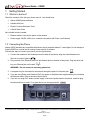
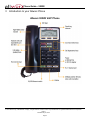
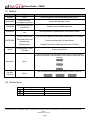
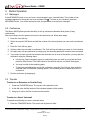
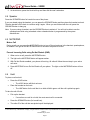
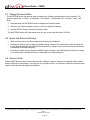
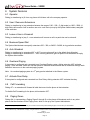
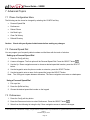
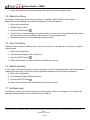
®
Allworx
Phone Guide
9202E
No part of this publication may be reproduced, stored in a retrieval system, or transmitted in any form or by
any means, electronic, mechanical, photocopy, recording, or otherwise without the prior written permission
of Allworx Corp.
© 2012 Allworx Corp, a Windstream company. All rights reserved. All other names may be trademarks or
registered trademarks of their respective owners.
Phone Guide – 9202E
Table of Contents
1
GETTING STARTED .................................................................................................................................................... 1
1.1
1.2
2
W HAT IS IN THE BOX? ............................................................................................................................................... 1
CONNECTING THE PHONE ......................................................................................................................................... 1
ADJUSTING YOUR PHONE ........................................................................................................................................ 3
2.1
2.2
3
BASE ASSEMBLY AND ADJUSTING THE ANGLE OF THE PHONE..................................................................................... 3
VOLUME .................................................................................................................................................................. 3
INTRODUCTION TO YOUR ALLWORX PHONE ........................................................................................................ 4
3.1
3.2
4
BUTTONS ................................................................................................................................................................. 5
SCREEN ICONS ........................................................................................................................................................ 5
BUTTON OPERATION ................................................................................................................................................. 6
4.1
4.2
4.3
4.4
4.5
4.6
5
MESSAGES .............................................................................................................................................................. 6
CONFERENCE .......................................................................................................................................................... 6
TRANSFER ............................................................................................................................................................... 6
SPEAKER ................................................................................................................................................................. 7
MUTE/DND ............................................................................................................................................................ 7
HOLD....................................................................................................................................................................... 7
PHONE OPERATION ................................................................................................................................................... 9
5.1
5.2
5.3
5.4
5.5
5.6
5.7
5.8
5.9
6
PLACING A CALL....................................................................................................................................................... 9
RECEIVING A CALL ................................................................................................................................................... 9
ENDING A CALL ........................................................................................................................................................ 9
HEADSET ................................................................................................................................................................. 9
REDIAL A NUMBER ................................................................................................................................................... 9
MISSED CALLS ......................................................................................................................................................... 9
CHANGE PRESENCE STATE .................................................................................................................................... 10
IGNORE AND SILENCE SOFT KEYS ........................................................................................................................... 10
INTERCOM CALLS ................................................................................................................................................... 10
SYSTEM FEATURES ................................................................................................................................................. 11
6.1
6.2
6.3
6.4
6.5
6.6
6.7
6.8
6.9
6.10
6.11
6.12
6.13
7
OPERATOR ............................................................................................................................................................ 11
USER / RESOURCE EXTENSIONS ............................................................................................................................. 11
LEAVE A USER A VOICEMAIL ................................................................................................................................... 11
BUSINESS SPEED DIAL ........................................................................................................................................... 11
AUTO ATTENDANT .................................................................................................................................................. 11
OVERHEAD PAGING ................................................................................................................................................ 11
ACTIVATE DOOR RELAY.......................................................................................................................................... 11
CALL FORWARDING ................................................................................................................................................ 11
PAGING ZONES ...................................................................................................................................................... 11
CONFERENCE CENTER ........................................................................................................................................... 12
ALLWORX MESSAGE CENTER ................................................................................................................................. 12
ANSWER RINGING PHONE USING ANOTHER HANDSET .............................................................................................. 12
PARKING................................................................................................................................................................ 12
ADVANCED TOPICS.................................................................................................................................................. 14
7.1
7.2
7.3
7.4
7.5
PHONE CONFIGURATION MENU ............................................................................................................................... 14
PERSONAL SPEED DIAL .......................................................................................................................................... 14
PREFERENCES ....................................................................................................................................................... 14
REBOOT THE PHONE .............................................................................................................................................. 16
CLEAR CALL HISTORY ............................................................................................................................................ 16
300 Main Street • East Rochester, NY 14445 • Toll Free 1-866-ALLWORX • 585-421-3850 • www.allworx.com
© 2012 Allworx Corp, a Windstream company. All rights reserved. All other names may be trademarks or registered trademarks of their respective
owners.
Revised: May 30, 2012
Page ii
Phone Guide – 9202E
7.6
7.7
REFRESH DIRECTORY ............................................................................................................................................ 16
HOT DESK LOGIN ................................................................................................................................................... 16
8
ADDITIONAL INFORMATION .................................................................................................................................... 17
9
WALL MOUNTING (OPTIONAL) ............................................................................................................................... 18
10
REGULATORY NOTICES .......................................................................................................................................... 19
11
ABBREVIATIONS ....................................................................................................................................................... 20
300 Main Street • East Rochester, NY 14445 • Toll Free 1-866-ALLWORX • 585-421-3850 • www.allworx.com
© 2012 Allworx Corp, a Windstream company. All rights reserved. All other names may be trademarks or registered trademarks of their respective
owners.
Revised: May 30, 2012
Page iii
Phone Guide – 9202E
1
Getting Started
1.1 What is in the box?
Check the contents of the box your phone came in. You should have:
•
Allworx 9202E phone and base
•
Handset with cord
•
Phone Functions Reference Card
•
A Quick Start Guide
Not included but also needed:
•
Ethernet cable to connect the phone to the network
•
Power supply: 24VDC, 400 mA (or a network connection with Power over Ethernet)
1.2 Connecting the Phone
Allworx 9202E handsets are compatible with Allworx server software release 7.4 and higher. Do not attempt to
install a 9202E on a server that is running a lower version of software.
Follow these steps to connect your phone (see the figure below):
1. Connect the handset to the Handset jack on the back of the phone using the coiled handset cord.
See icon on back of phone:
2. Plug one end of the Ethernet cable into the Network jack on the back of the phone. Plug the other end
into your Ethernet jack on the wall.
WARNING: Do not connect to an analog phone line.
3. A computer may be connected to the network through the phone’s Computer jack.
4. If you are using Power over Ethernet (PoE), the power to the phone was supplied when you connected
the Ethernet cable. If this is the case, skip to step 6.
5. If you are not using PoE, obtain a power supply, connect the power cable to the phone, and then plug
the other end into an outlet. It’s a good idea to use a surge protector.
300 Main Street • East Rochester, NY 14445 • Toll Free 1-866-ALLWORX • 585-421-3850 • www.allworx.com
© 2012 Allworx Corp, a Windstream company. All rights reserved. All other names may be trademarks or registered trademarks of their respective
owners.
Revised: May 30, 2012
Page 1
Phone Guide – 9202E
6. Thread cables through the strain relief guide.
7. After applying power, the phone will initialize itself. You can watch its progress on the phone’s screen.
A normal sequence would include:
a. Allworx Logo.
b. Profile: <profile name> (depending upon phone configuration)
c. Configuring Network
d. Starting Network.
e. Loading Config Files
f.
Station init complete.
g. After successful startup, the phone will display the current date, time, your presence, your
name, and extension.
h. If the phone does not follow this sequence or displays an error, contact your System
Administrator.
300 Main Street • East Rochester, NY 14445 • Toll Free 1-866-ALLWORX • 585-421-3850 • www.allworx.com
© 2012 Allworx Corp, a Windstream company. All rights reserved. All other names may be trademarks or registered trademarks of their respective
owners.
Revised: May 30, 2012
Page 2
Phone Guide – 9202E
2
Adjusting Your Phone
2.1 Base Assembly and Adjusting the Angle of the Phone
You can adjust the Allworx 9202E phone on its base so that it is easy to use and easy to read the screen.
1. Lay the phone face down on a soft surface with top of the phone pointed away from you.
2. The base will connect to the back of the phone in one of three positions, thus allowing the phone to be
adjusted at different angles when sitting on a desktop. The nearest set of holes provides the steepest
angle.
3. Notice that the base has both fixed and flexible tabs. Hold the base with the tabs pointed away, fixed
tabs down and flexible tabs up.
4. Place the fixed tabs in the desired holes on the back of the phone.
5. Rotate the base until the flexible tabs click into place.
To remove the base:
1. Press down on the flexible tabs and release them from their holes.
2. Rotate the base until the fixed tabs easily lifted out of their holes.
2.2 Volume
The volume of the incoming ring, handset speaker, speakerphone, and the headset is adjustable.
To adjust the Volume:
•
on the left (decrease) or right (increase) to adjust the incoming
Press the Volume bar
ring for desired audio level. Do not lift the handset or turn on speakerphone.
•
To adjust other volumes, pick up the handset, turn on the speakerphone or headset, and press the
Volume bar, as desired.
•
The screen shows which device is being adjusted.
300 Main Street • East Rochester, NY 14445 • Toll Free 1-866-ALLWORX • 585-421-3850 • www.allworx.com
© 2012 Allworx Corp, a Windstream company. All rights reserved. All other names may be trademarks or registered trademarks of their respective
owners.
Revised: May 30, 2012
Page 3
Phone Guide – 9202E
3
Introduction to your Allworx Phone
Allworx 9202E VoIP Phone
300 Main Street • East Rochester, NY 14445 • Toll Free 1-866-ALLWORX • 585-421-3850 • www.allworx.com
© 2012 Allworx Corp, a Windstream company. All rights reserved. All other names may be trademarks or registered trademarks of their respective
owners.
Revised: May 30, 2012
Page 4
Phone Guide – 9202E
3.1 Buttons
Button
Light
Purpose
Keypad
None
Use the keypad to dial numbers when placing a call.
MESSAGES
Solid red if new
messages are present
Access the Message Center.
TRANSFER
Solid red until the call
is transferred
Transfer a call to another extension.
SPEAKER
Solid green when in
use
Use the phone as a speakerphone or activate a headset.
Solid red when Mute
Turn off the microphone in the handset, speakerphone, or headset.
Solid amber in Do not
Disturb mode
Prevent incoming calls (Do Not Disturb).
Flashing amber
Indicates Presence is something other than “In Office”
Blinking green if a call
is on hold
Place a call on hold.
MUTE/DND
HOLD
Use the up arrow to move up on the LCD screen. Use the down
arrow to move down. Use the button in the center to Select and Save
settings.
Navigation
None
Soft Key
Selection
None
Use the buttons that are below the display to select a soft key.
3.2 Screen Icons
Icon
Represents
Envelope
Telephone
Handset
Indicates
New voicemails
Missed calls
On an active call
300 Main Street • East Rochester, NY 14445 • Toll Free 1-866-ALLWORX • 585-421-3850 • www.allworx.com
© 2012 Allworx Corp, a Windstream company. All rights reserved. All other names may be trademarks or registered trademarks of their respective
owners.
Revised: May 30, 2012
Page 5
Phone Guide – 9202E
4
Button Operation
4.1 Messages
If the MESSAGES button is red, you have a new message in your voicemail inbox. The number of new
messages appears on the screen next to an envelope icon . To listen to your voicemail, press the
MESSAGES button. You will be required to enter your password to access your messages.
4.2 Conference
The Allworx 9202E phone provides the ability to set up conferences between three parties (3-way
conferences).
After connecting to the first person you want on the conference call, follow these steps:
1. Press the Conf soft key.
2. Select the unused LINE button and dial the number of the second person you want on the conference
call.
3. Press the Conf soft key again.
4. All three callers are now able to conference. The Conf soft key will change to a dark In Conf indication.
5. One party may exit the conference by hanging up; the remaining parties will continue to be connected.
6. If you desire to have a private conversation that excludes one or more of the parties, you may split the
conference using the following steps:
a. Use the Up / Down navigation arrows, to select the person you wish to put on hold and then
press the HOLD button. The LINE button for the call that was put on hold will flash green.
b. You may now talk to the remaining party.
c. To have the excluded person re-join the conference, press the Conf soft key, then select the
excluded caller’s LINE button (flashing green). The excluded person is added back into the
conference.
7. End the conference by hanging up.
4.3 Transfer
Transfer to an Extension or Outside Party
1. Press the TRANSFER button. The current call is placed on hold.
2. At the dial tone, dial the number of the intended recipient of the transfer.
3. Hang up or wait on the line to announce the transfer.
Transfer to a User’s Voicemail
To transfer a call directly to a user’s voicemail inbox:
1. Press the TRANSFER button. The current call is placed on hold.
300 Main Street • East Rochester, NY 14445 • Toll Free 1-866-ALLWORX • 585-421-3850 • www.allworx.com
© 2012 Allworx Corp, a Windstream company. All rights reserved. All other names may be trademarks or registered trademarks of their respective
owners.
Revised: May 30, 2012
Page 6
Phone Guide – 9202E
2. At the dial tone, press the Vmail soft key and then dial the user's extension.
4.4 Speaker
Press the SPEAKER button for hands-free use of the phone.
If you are already using the handset, you can press the SPEAKER button and then place the handset on hook.
Take the handset off the hook to continue using it again. When you are finished with the call, press the
SPEAKER button to hang up.
Note: If you are using a headset, use the SPEAKER button to activate it. You will not be able to use the
speakerphone while using a headset unless a headset button is programmed by the system
administrator.
4.5 MUTE/DND
Mute a Call
During a call, you can press the MUTE/DND button to turn off the microphone in the handset, speakerphone,
or headset. The light on the MUTE/DND button is red when the phone is muted.
Prevent Incoming Calls using Do Not Disturb (DND)
1. When not on a call, press the MUTE/DND button.
2. The light on the MUTE/DND button will appear amber.
3. With Do Not Disturb enabled, your phone will not ring. All calls will follow the next step in your active
call route.
4. Press MUTE/DND to turn Do Not Disturb off your phone. The light on the MUTE/DND button will turn
off.
4.6
Hold
To place a call on hold:
•
Press the HOLD button.
o
•
The HOLD button will blink red once.
Place the handset on the hook.
o
The LINE button for the call that is on hold will blink green until the call is picked up again.
To take the call off hold:
•
Pick up the handset.
o
If more than one call is on hold, the most recent call is connected.
•
Press the SPEAKER button (for hands-free).
•
The caller ID of the call that was picked up will be displayed.
300 Main Street • East Rochester, NY 14445 • Toll Free 1-866-ALLWORX • 585-421-3850 • www.allworx.com
© 2012 Allworx Corp, a Windstream company. All rights reserved. All other names may be trademarks or registered trademarks of their respective
owners.
Revised: May 30, 2012
Page 7
Phone Guide – 9202E
To pick up a different call on hold:
•
Press the flashing LINE button for that call or use the Up / Down navigation arrows to display the call on
the screen, and then pick up the handset.
If you have a call on hold and a new call comes in, the new call will be answered when the handset is lifted.
If Music on Hold is enabled for your handset, callers on hold will hear music.
300 Main Street • East Rochester, NY 14445 • Toll Free 1-866-ALLWORX • 585-421-3850 • www.allworx.com
© 2012 Allworx Corp, a Windstream company. All rights reserved. All other names may be trademarks or registered trademarks of their respective
owners.
Revised: May 30, 2012
Page 8
Phone Guide – 9202E
5
Phone Operation
5.1 Placing a Call
Outbound calls can be placed by lifting the handset, by pressing one of the LINE buttons, or by pressing the
SPEAKER button. Dial the extension or press the SpDial soft key to automatically dial a programmed number.
Your phone may also be configured to allow you to begin dialing without lifting the handset or pressing a
button. If so, dialing will automatically activate the speaker phone or headset.
You may also dial using the company directory listing. Press the one of the up or down arrow buttons to display
the directory, choose a recipient using the up/down arrow buttons, then select the recipient using the SELECT
button
. The call will automatically be dialed. You can search the on-phone directory by entering letters
using the phone’s key pad.
5.2 Receiving a Call
Inbound calls can be answered by pressing the flashing LINE button.
5.3 Ending a Call
Release a call by placing the receiver back on hook, pressing the LINE button for the active call, or if you are
using the speakerphone or headset, pressing the SPEAKER button.
5.4 Headset
1. Plug the cable for the headset into the headset jack on the back side of the phone.
2. Press the SPEAKER button. (You cannot use the speakerphone and headset at the same time).
3. When finished with the call, press the SPEAKER button to disconnect.
5.5 Redial a Number
•
You can automatically dial the last number called by selecting the Redial soft key, or
•
Select the Calls soft key. Use the Up / Down navigation arrows to highlight the desired call. Press the
SELECT button
.
5.6 Missed Calls
A count of missed calls is displayed on the phone’s display, next to a phone icon
see details of the missed calls:
. Use the following steps to
1. Select the Calls soft key.
2. Use the Up / Down navigation arrows to view your missed calls.
3. Select the Detail soft key to view the date and time of the missed calls.
4. Press the SELECT button
to call the number.
300 Main Street • East Rochester, NY 14445 • Toll Free 1-866-ALLWORX • 585-421-3850 • www.allworx.com
© 2012 Allworx Corp, a Windstream company. All rights reserved. All other names may be trademarks or registered trademarks of their respective
owners.
Revised: May 30, 2012
Page 9
Phone Guide – 9202E
5.7 Change Presence State
The MUTE/DND button can also be used to change your Presence setting directly from the phone. The
Presence states are: ‘In Office’, ‘At a Meeting’, ‘On Vacation’, ‘On Business Trip’, ‘At Home’, ‘Away’, and
‘Busy’.
1. Press and hold the MUTE/DND button to display the Presence states.
2. Using the Up / Down navigation arrows, scroll to the desired Presence.
3. Use the SELECT button to save the Presence state.
The MUTE/DND button will flash amber when you are in any state other than ‘In Office’.
5.8 Ignore and Silence Soft Keys
•
While a call is ringing, the Silence and Ignore soft keys are displayed.
•
Pressing the Silence soft key stops the audible ringing. However, the information on the incoming call
will still be displayed and the LINE button that the call is coming in on will continue to flash until the call
is answered or the caller hangs up.
•
Pressing the Ignore soft key stops the audible ringing. However, the LINE button that the call is coming
in on will continue to flash until the call is answered or the caller hangs up.
5.9 Intercom Calls
Allworx 9202E phones cannot initiate intercom calls. However, intercom calls can be received. When another
person calls you on the Intercom, it will ring one of your phone’s lines. You will hear a distinctive Intercom beep
and then the call will automatically be answered.
300 Main Street • East Rochester, NY 14445 • Toll Free 1-866-ALLWORX • 585-421-3850 • www.allworx.com
© 2012 Allworx Corp, a Windstream company. All rights reserved. All other names may be trademarks or registered trademarks of their respective
owners.
Revised: May 30, 2012
Page 10
Phone Guide – 9202E
6
System Features
6.1 Operator
Dialing (or transferring to) 0† from any phone will initiate a call to the company operator.
6.2 User / Resource Extensions
Dialing (or transferring to) any extension between the range of 100 – 299†1 (3 digit mode) or 1000 – 2999† (4
digit mode) will connect a call to another user or to a call route (set up by the System Administrator) assigned
to the extension.
6.3 Leave a User a Voicemail
Dialing (or transferring to) any 3† + user extension will connect a call to a particular user’s voicemail.
6.4 Business Speed Dial
The System Administrator can specify extensions 350 – 399† or 34000 – 34999† to ring particular numbers.
6.5 Auto Attendant
Dialing (or transferring) to extension 400† or 431† from any phone will go to the default Auto Attendant.
Dialing (or transferring) to extension 431† - 439† from any phone will go to a specific Auto Attendant set up by
the System Administrator.
6.6 Overhead Paging
If the system is configured and connected to an Overhead Paging system, dialing extension 402† activates
paging. Once activated, users can use their phone to make an announcement that is transmitted through each
handset’s intercom or to the overhead paging system.
Note: An overhead paging system is a 3rd party product attached to the Allworx system.
6.7 Activate Door Relay
If the system is configured and connected to a Door Relay, dialing extension 403† activates the relay.
6.8
Call Forwarding
Dialing 45† + an extension will forward all calls that come into the phone to that extension.
†
To disable Call Forwarding for the phone, dial extension 450 .
6.9
Paging Zones
Dialing 46n† (n representing a Paging Zones 0 through 9) on the phone will broadcast audio to any other
phones that are members of the Paging Zone, which is set up by the System Administrator.
†
Digits may vary per system. Please check phone functions tab of the My Allworx Manager page or consult with your Administrator.
300 Main Street • East Rochester, NY 14445 • Toll Free 1-866-ALLWORX • 585-421-3850 • www.allworx.com
© 2012 Allworx Corp, a Windstream company. All rights reserved. All other names may be trademarks or registered trademarks of their respective
owners.
Revised: May 30, 2012
Page 11
Phone Guide – 9202E
6.10 Conference Center
The Conference Center is an optional feature. Dial 408† to access the Conference Center. For details on using
conference center refer to the Allworx User’s Guide found on the website at www.allworx.com.
6.11 Allworx Message Center
The Allworx Message Center can be reached by:
•
Pressing the MESSAGES button, or
•
Dialing 6† + your extension from your phone or from the company Auto Attendant, if you are calling
from an outside line.
The Allworx Message Center allows you to:
•
Listen to new and saved voicemails
•
Send a message to another user
•
Change presence setting
•
Change name recording
•
Manage message greetings
•
Change your password
•
Set up your one or more of your Presence-based inboxes to prevent callers from leaving messages
Note: For more information refer to the Allworx User’s Guide found on the Allworx.com website.
6.12 Answer Ringing Phone Using another Handset
A user can answer another user’s ringing phone from their own handset by dialing 7†2+ the alternate phone’s
extension.
6.13 Parking
Park the active call by pressing the Park soft key. The phone will briefly display the Parking Orbit extension
where the call is parked.
The caller will hear music while parked if Music on Hold is enabled for your company’s system.
Announced Park
A call may be parked by making an Attended Transfer to extension 700†.
Note: Do not do a Blind Transfer to 700, as the call will be disconnected.
†
Digits may vary per system. Please check phone functions tab of the My Allworx Manager page or consult with your Administrator.
300 Main Street • East Rochester, NY 14445 • Toll Free 1-866-ALLWORX • 585-421-3850 • www.allworx.com
© 2012 Allworx Corp, a Windstream company. All rights reserved. All other names may be trademarks or registered trademarks of their respective
owners.
Revised: May 30, 2012
Page 12
Phone Guide – 9202E
1. Press the Transfer button.
2. Dial extension 700 and wait for the call to be answered.
3. The Parking Orbit extension will be announced.
4. Hang up. The call is now parked in the announced location.
Retrieving a Parked Call
Parked calls can be answered by dialing the Parking Orbit extension of the call.
300 Main Street • East Rochester, NY 14445 • Toll Free 1-866-ALLWORX • 585-421-3850 • www.allworx.com
© 2012 Allworx Corp, a Windstream company. All rights reserved. All other names may be trademarks or registered trademarks of their respective
owners.
Revised: May 30, 2012
Page 13
Phone Guide – 9202E
7 Advanced Topics
7.1 Phone Configuration Menu
The following can be viewed or changed by selecting the CONFIG soft key:
•
Personal Speed Dial
•
Preferences
•
Reboot Phone
•
Hot Desk Login
•
Clear Call History
•
Refresh Directory
Caution: Check with your System Administrator before making any changes.
7.2 Personal Speed Dial
You can program your frequently called numbers and dial them with the touch of a button.
Setting up a Personal Speed Dial
1. Press the Config soft key.
2. A menu will appear. The first option will be Personal Speed Dial. Press the SELECT button
.
3. Use the Up / Down navigation arrows to choose a desired speed dial number, press the SELECT
button.
4. Use the keypad to enter the phone number or extension, press the SELECT button.
5. Use the keypad to enter a name for the speed dial, press the SELECT button.
Note: The ‘#’ key puts a space between characters. The Down navigation arrow acts as a backspace.
Using a Personal Speed Dial
1. Pick up a line.
2. Press the SpDial soft key.
3. Choose the desired speed dial number on the keypad.
7.3 Preferences
1. Press the Config soft key button.
2. Press the Down arrow button to select Preferences. Press the SELECT button
.
3. Select from the following list using the Up / Down navigation arrows to make the changes:
300 Main Street • East Rochester, NY 14445 • Toll Free 1-866-ALLWORX • 585-421-3850 • www.allworx.com
© 2012 Allworx Corp, a Windstream company. All rights reserved. All other names may be trademarks or registered trademarks of their respective
owners.
Revised: May 30, 2012
Page 14
Phone Guide – 9202E
a. LCD Settings – Controls the LCD display settings. Use the Volume bar or Up / Down navigation
arrows to adjust.
b. Call History Size – Number of calls kept in History. 0 – 99 (Default: 99).
c. Clock Mode – Time Display for LCD Screen.
d. Hold Reminder Mode – How the hold reminder behaves.
e. Redial Memory – To have the last number dialed stored in the phone.
f.
Audible Dialing – Tones are heard when a key is pressed.
g. Call Timer Display – Displays the length of time during a call.
h. Intercom Auto Answer - When a call is received over the intercom, the phone will automatically
answer using Intercom/Speakerphone.
i.
On Hook Dialing – Speaker mode will be enabled when a number on the keypad is pressed. Allows
numbers to be dialed without pressing the SPEAKER button first.
j.
Visual Ringing – The visual ring indicator on the phone will flash red with an incoming call.
k. Paging Enable Mode – If the phone is to allow pages to be received.
l.
Off Hook Answer Mode – Answers incoming calls when the phone is taken “off-hook”.
m. Off Hook Ringing – The phone will ring when a new call is received while in use.
n. Auto on Hold – When a second call comes in and you press the line button for the new call, the first
call is automatically put on hold rather than being disconnected.
o. Auto Retrieve Calls – When the phone is on hook and a call is on hold, if handset is taken off hook,
the call on hold is automatically retrieved.
p. Missed Call Tracking – Can choose what types of Appearances to track.
q. Parking Orbit Pop-ups – Displays the Parking Orbit after call has been parked.
r.
Hold Button Operation – Set the Hold button functions.
s. Force Auto Answer – Allows the phone to automatically answer incoming calls.
t.
Sidetone Disable – Allows different modes for turning off the feedback in the handset/headsets from
microphone to speaker.
u. Call Assistant CLID – Sets the call information displayed in Call Assistant and applications using the
Allworx TSP driver.
v. Emergency Caller ID - Caller ID used when an Emergency number is dialed from this handset.
w. Visual on Call - If enabled, the visual ring indicator will light when you are on a call.
x. Ringtone Family – Choose from five families of ringtones to distinguish your phone’s ringtones from
others in your office area.
y. Caller ID Preference – Controls whether the Caller ID or DNIS (the number the caller dialed) is
displayed for incoming calls.
z. Server Profile Select – Allows the selection of a network settings profile.
4. After making changes to the preferences listed above, press the SELECT button
.
5. Press the Exit soft key twice.
300 Main Street • East Rochester, NY 14445 • Toll Free 1-866-ALLWORX • 585-421-3850 • www.allworx.com
© 2012 Allworx Corp, a Windstream company. All rights reserved. All other names may be trademarks or registered trademarks of their respective
owners.
Revised: May 30, 2012
Page 15
Phone Guide – 9202E
6. Select the Yes soft key to save any changes OR select No to cancel changes made.
7.4 Reboot the Phone
On occasion, rebooting the phone may be required. For example, when the Allworx server System
Administrator makes changes to the phone’s configuration, it must be rebooted.
1. Select the Config soft key.
2. Highlight Reboot Phone.
3. Press the SELECT button
.
4. If you have any unsaved changes, you will be asked if you want to save them before rebooting. Select
the Yes soft key to save any changes OR select No to cancel changes made.
5. Select the Yes soft key on the confirmation prompt to reboot.
7.5 Clear Call History
The Allworx phone retains the history of your calls up to 99 calls. You can clear your call history by using the
following steps:
1. Select the Config soft key.
2. Scroll down and highlight Clear Call History.
3. Press the SELECT button
.
4. Select the Yes soft key to clear call history OR select No to cancel.
7.6 Refresh Directory
If new users or extensions have been set up on the Allworx server, the on-phone directory will automatically be
updated after some delay. The directory may be updated immediately using the following procedure:
7. Select the Config soft key.
8. Scroll down and highlight Refresh Directory.
9. Press the SELECT button
.
10. Select the Exit soft key to exit the Refreshing the Directory screen.
7.7 Hot Desk Login
“Hot Desking” permits you to temporarily log into a shared phone. Once you are logged in, your calls will be
directed to that phone and calls you make will use your caller ID.
300 Main Street • East Rochester, NY 14445 • Toll Free 1-866-ALLWORX • 585-421-3850 • www.allworx.com
© 2012 Allworx Corp, a Windstream company. All rights reserved. All other names may be trademarks or registered trademarks of their respective
owners.
Revised: May 30, 2012
Page 16
Phone Guide – 9202E
8
Additional Information
Your business directory, company phone list, conference scheduling page, distribution lists, and instructions for
using phone features are available on the Allworx server. Open a web browser and enter
http://ServersLANSideAddress into the address field. Accessing some feature will require that you log in using
your Message Center password.
•
ServersLANSideAddress is the IP address of your server on your local area network or the host name of
the server.
•
Your System Administrator can give you this address and the login password.
300 Main Street • East Rochester, NY 14445 • Toll Free 1-866-ALLWORX • 585-421-3850 • www.allworx.com
© 2012 Allworx Corp, a Windstream company. All rights reserved. All other names may be trademarks or registered trademarks of their respective
owners.
Revised: May 30, 2012
Page 17
Phone Guide – 9202E
9 Wall Mounting (Optional)
The Allworx 9202E can be mounted on a wall. This requires a wall mounting plate. Mounting plates should
meet the requirements of standard TIA-570-B, Section 5. The mounting plates are available from your local
telephone company or your local retailer.
Caution: If using a standard telephone wall mounting plate, DO NOT make any connection to the RJ11
jack. This connection is intended for an analog phone and may cause damage to the Allworx
phone, voiding your warranty.
The mounting plate, similar to those shown below, has mounting studs to receive the phone base and is
positioned to secure the phone flush to the wall surface.
Remove the phone base and mount the phone over the mounting plate studs. The back side of the phone
provides wire channels for power and network (RJ45) cables.
Leviton 4108W-0SP
300 Main Street • East Rochester, NY 14445 • Toll Free 1-866-ALLWORX • 585-421-3850 • www.allworx.com
© 2012 Allworx Corp, a Windstream company. All rights reserved. All other names may be trademarks or registered trademarks of their respective
owners.
Revised: May 30, 2012
Page 18
Phone Guide – 9202E
10 Regulatory Notices
This equipment has been tested and found to comply with the limits for a Class B digital device, pursuant to
Part 15 of the FCC rules. These limits are designed to provide reasonable protection against harmful
interference in a residential installation. This equipment generates, uses, and can radiate radio frequency
energy and, if not installed and used in accordance with the instructions, may cause harmful interference to
radio communications. There is no guarantee, however, that interference will not occur in a particular
installation. If this equipment causes harmful interference to radio or television reception, which can be
determined by turning the equipment off and on, the user is encouraged to try to correct the interference by
one or more of the following measures:
•
Reorient or relocate the receiving antenna.
•
Increase the separation between the equipment and the receiver.
•
Connect the equipment into an outlet on a circuit different from that to which the receiver is connected.
•
Consult the dealer or an experienced radio/TV technician for help.
You may also find helpful the following booklet, prepared by the FCC: "How to Identify and Resolve Radio-TV
Interference Problems." This booklet is available from the U.S. Government Printing Office, Washington D.C.
20402.
Changes and Modification not expressly approved by the manufacturer or registrant of this equipment can void
your authority to operate this equipment under Federal Communications Commissions rules.
The optional wall mount switching Power Supply has the following specifications: Input voltage is 100-240VAC,
50/60Hz 450mA. Output voltage is 24VDC @ 400mA. UL listed. Output connector size is 5.5 mm x 2.5 mm
(inner diameter) with center positive.
This product adheres to the IEEE 802.3af standard for Power over Ethernet (PoE).
This equipment is Hearing Aid Compatible (HAC).
This digital apparatus does not exceed the Class B limits for radio noise emissions from digital apparatus set
out in the Radio Interference Regulations of the Canadian Department of Communications.
Le present appareil numerique n'emet pas de bruits radioelectriques depassant les limites applicables aux
appareils numeriques de la class B prescrites dans le Reglement sur le brouillage radioelectrique edicte par le
ministere des Communications du Canada.
Warning:
Use only with:
A Power over Ethernet (PoE) supply - This product adheres to the IEEE 802.3af standard for Power over
Ethernet (PoE).
or:
An Allworx-approved Limited Power Source, 24 VDC, 400 mA - The optional wall mount switching Power
Supply has the following specifications: Input voltage is 100-240VAC, 50/60Hz 450mA. Output voltage is
24VDC @ 400mA. UL listed Limited Power Source. Output connector size is 5.5 mm x 2.5 mm (inner diameter)
x 9.5 mm with center positive.
Do not connect to an analog or ISDN phone line.
Caution: The earpiece region on the handset can attract and retain small objects.
300 Main Street • East Rochester, NY 14445 • Toll Free 1-866-ALLWORX • 585-421-3850 • www.allworx.com
© 2012 Allworx Corp, a Windstream company. All rights reserved. All other names may be trademarks or registered trademarks of their respective
owners.
Revised: May 30, 2012
Page 19
Phone Guide – 9202E
11 Abbreviations
PoE – Power over Ethernet
VoIP – Voice over Internet Protocol
PBX – Private Branch Exchange
DND – Do Not Disturb
300 Main Street • East Rochester, NY 14445 • Toll Free 1-866-ALLWORX • 585-421-3850 • www.allworx.com
© 2012 Allworx Corp, a Windstream company. All rights reserved. All other names may be trademarks or registered trademarks of their respective
owners.
Revised: May 30, 2012
Page 20