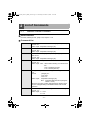
1
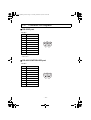
ADVC_HDM1_EN.book Page 1 Tuesday, December 19, 2006 9:20 AM User’s Guide Engineered by Canopus Co., Ltd. ADVC_HDM1_EN.book Page 2 Tuesday, December 19, 2006 9:20 AM Cautions Relating to the Use of This Product This section describes important points to note when using this product. Caution (1) Unauthorized copying of all or part of this product is prohibited. (2) Features and specifications of this product are subject to change without notice. (3) All care is taken in the production of this product. However, if you find any fault, error, omission, or other problems, please contact Canopus. (4) Regardless of item (3) above, please note that Canopus accepts no responsibility for the consequences of the use of this product. (5) Canopus accepts no responsibility for any claim relating to any special, incidental, or sequential damages, including loss of profit-that result from the use of this product, regardless of whether any misuse of the product occurred. (6) Dismantling, reverse engineering, reverse compiling, or disassembling this product or any of its associated items such as software, hardware, manuals or peripherals is prohibited. (7) CANOPUS and its logo are registered trademarks of Canopus Co. Ltd. (8) ADVC is a registered trademark of Canopus Co. Ltd. (9) Microsoft and Windows are registered trademarks of Microsoft Corporation. Any other product names or similar are trademarks or registered trademarks of their associated companies. (10) HDV is a trademark of Sony Corporation and Victor Company of Japan, Limited (JVC). Notation This manual is the ADVC-HDM1 User’s Guide. This manual describes the ADVC-HDM1 product configuration as of December 2006. In the event of any difference between the content of this manual and actual operating procedure, actual operating procedure have precedence. For convenience of explanation, some illustrations and screen images may differ from the actual product. Warning Health precautions In extremely rare cases, the stimulus from bright or flashing light emanating from a computer monitor can result in symptoms such as temporary epileptic fits or loss of consciousness. Even if this has never occurred in the past, it is possible that someone may be susceptible to this effect. Anyone who has experienced such symptoms in the past or is a relative of such a person should consult a doctor before using this product. ADVC_HDM1_EN.book Page 1 Tuesday, December 19, 2006 9:20 AM CONTENTS Checks ................................................... 1 Introduction ...................................................................................... 2 Notes regarding usage ................................................................. 2 Verifying package contents........................................................... 3 Canopus website .......................................................................... 3 Online user registration................................................................. 3 About the ADVC-HDM1.................................................................... 4 Features........................................................................................ 4 Part Names and Functions .................. 5 Part Names and Functions.............................................................. 6 ADVC-HDM1 Front Panel ............................................................. 6 ADVC-HDM1 Rear Panel ............................................................. 8 DIP Switches ................................................................................ 9 ADVC-HDM1 Input and Output ..................................................... 10 Connections and Preparations ................................................... 10 Advanced Functions ................................................................... 13 Appendix ............................................. 15 Specifications................................................................................. 16 ADVC-HDM1 Hardware Specifications....................................... 16 Connector Pin Diagrams............................................................. 18 Advanced Functions ................................................................... 20 List of Commands.......................................................................... 21 Remote Control Function ............................................................ 21 AV/C Command to RS-422 Conversion List ............................... 23 ADVC_HDM1_EN.book Page 1 Tuesday, December 19, 2006 9:20 AM Checks This chapter describes the items that should be checked before setting up the ADVC-HDM1 and explains product precautions. • Introduction. • About the ADVC-HDM1 –1– ADVC_HDM1_EN.book Page 2 Tuesday, December 19, 2006 9:20 AM 1 1-1 Introduction Notes regarding usage Regardless of whether negligence occurs during usage, the company assumes no liability, even if there is a claim, for extraordinary, incidental or derivative loss, including the loss of profits, that arise during practical application of this product. Operation of this product is not guaranteed for any specific use, on any specific platform, nor is operation guaranteed in any specific environment. Please note the following points when using this product to record the copyrighted works of others (e.g. video and audio recorded in media such as CD, DVD and videogram, or acquired through radio/TV broadcast or Internet transmission). z Subject to copyright, reproduction or editing of the copyrighted work may infringe copyright except as such reproduction is intended for personal or home use. Reproduction and editing requires permission from the author or the copyright holder through the right holder, broadcaster, sender, seller or the group of right holders which is indicated on the recording media or otherwise. z Transfer or transmission, via the Internet or otherwise (inclusive of incorporation into the user’s own web page), of media in which copyrighted works of others are reproduced or edited and then fixed without permission, regardless of whether or not compensation is received, constitutes an infringement of copyright. z Please note that Canopus is not liable for the copyrighted works or their reproductions, which are created, reproduced or edited by use of this product. –2– ADVC_HDM1_EN.book Page 3 Tuesday, December 19, 2006 9:20 AM 1-2 Verifying package contents Please verify that the following components are included in the ADVC-HDM1 package. ADVC-HDM1 AC adapter and AC cable Manual • ADVC-HDM1 User’s Guide (this one) 1-3 Canopus website The latest company information is announced at our website. http://www.canopus.com/ Visit our site to access to the latest drivers, utilities, product manuals (.pdf format), and FAQs provided there. 1-4 Online user registration Please register your ADVC-HDM1 at the Canopus website: http://www.canopus.com/support/ –3– ADVC_HDM1_EN.book Page 4 Tuesday, December 19, 2006 9:20 AM 2 2-1 About the ADVC-HDM1 Features z A compact unit compatible with HDV and HD-SDI conversion The ADVC-HDM1 is a converter unit that can encode HD-SDI signals to the HDV standard or can decode and output the HDV standard as HD-SDI signals. It can be stored in a 19-inch half rack mount. z Compatible with MPEG2-TS MP@HL encoding Eight different bit rate types at a resolution of 1920 × 1080 can be specified. Further, when controlling with advanced AV/C commands, a bit rate from 11 Mbps to 40 Mbps can be specified. z Simple to operate The front panel of the ADVC-HDM1 includes a button for switching between encode and decode and a switch for setting the time code input. There are no complex operations, enabling anyone to use it. z AV/C to RS-422 conversion function The ADVC-HDM1 is equipped with a function for outputting an AV/C command to an RS-422 terminal, enabling deck control from the RS-422 terminal of the ADVC-HDM1 when using a computer does not have an RS-422 terminal. z Remote control with RS-232C Remote control of the ADVC-HDM1 is possible via the RS-232C terminal. z Two HD-SDI output systems Two systems, a monitor and deck, can be connected to the ADVC-HDM1. z Connecting to peripheral devices The ADVC-HDM1 can be used as an encoder by connecting it to the HDCS3000, a high definition (HD) network transmission system made by Canopus. It can be used as an encoder for the live delivery of HD-SDI source with the MediaEdge-STB3, a video delivery set-top box made by Canopus. z 1920 mode Enables the encoding and decoding of resolution/frame rate 1920/59.94i images without diminishing the horizontal resolution. –4– ADVC_HDM1_EN.book Page 5 Tuesday, December 19, 2006 9:20 AM Part Names and Functions This chapter explains the functions of the ADVC-HDM1 parts. • Part Names and Functions • ADVC-HDM1 Input and Output –5– ADVC_HDM1_EN.book Page 6 Tuesday, December 19, 2006 9:20 AM 1 1-1 Part Names and Functions ADVC-HDM1 Front Panel a c b d e f g h a Encode/Decode Switch Press and hold for more than 1 second to change as follows: [Encode Mode] → [Decode Mode] or [Decode Mode] → [Encode Mode]. The default setting is [Decode Mode]. b Time Code Input Switch Press and hold for more than 1 second to change as follows: [DVITC Input] → [LTC Input] or [LTC Input] → [DVITC Input] (enabled only during [Encode Mode]). The default setting is [DVITC Input]. j k Indicates that the ADVC-HDM1 is waiting for a stream input from the IEEE1394a port. NOTE When the [Encode Selection LED] and [Decode Selection LED] flash at the same time, it indicates that the mode is in transition. e VITC Enabled LED Comes on when DVITC is enabled during encode mode. f LTC Enabled LED Comes on when LTC is enabled during encode mode. c Encode Selection LED On: Indicates that the encode mode is selected. Encode selection LED and FORMAT indicator LED flash at the same time: Indicates that the ADVC-HDM1 is waiting for a signal input from the HD-SDI. i NOTE The [VITC Enabled LED] and [LTC Enabled LED] come on when decode mode is selected and the stream is HDV. Neither come on if the stream is not HDV. d Decode Selection LED On: Indicates that the decode mode is selected. Decode selection LED and FORMAT indicator LED flash at the same time: –6– ADVC_HDM1_EN.book Page 7 Tuesday, December 19, 2006 9:20 AM g FORMAT Indicator LED i Power Indicator LED Indicates the video format being encoded or decoded. On: Indicates the 1080i format. Off: Indicates the 720p format. On: Indicates that the power is on. Flashing: Indicates an internal error. j RESET Button Use to reset the ADVC-HDM1. Press and hold for more than 3 seconds to reset. h RS-422A Port Indicator LED Indicates the selection status of the RS422A port. On: Indicates that the CONTROLLER port is selected. Off: Indicates that the DEVICE port is selected. k IEEE1394a 4-pin Terminal This is an IEEE1394a 4-pin terminal. TIP To prevent accidental operation, the settings of the [Encode/Decode Switch] and [Time Code Input Switch] are designed to change only if they are pressed and held for more than 1 second. TIP Press and hold the [Encode/Decode Switch] and [Time Code Input Switch] at the same time for more than 1 second to change the RS-422A port on the ADVC-HDM1 rear panel to CONTROLLER port or DEVICE port. –7– ADVC_HDM1_EN.book Page 8 Tuesday, December 19, 2006 9:20 AM 1-2 ADVC-HDM1 Rear Panel a g b h c d e i j a LTC Output Terminal b LTC Input Terminal This is the ACTIVE THROUGH terminal. ACTIVE THROUGH is performed for the input signal. This is the HD-SDI output terminal. f Power Switch The remote control terminal. NOTE The default setting for the encode bit rate via RS-232C terminal remote control is 11 Mbps. This is the RS-422 CONTROLLER terminal. Connect as appropriate to the device that you are using. c ACTIVE THROUGH Terminal e SDI Output Terminal l j RS-422 (CONTROLLER) Terminal This is the time code input (BNC) terminal. A time code can be input for writing to HDV during HDV encoding. This is the HD-SDI input terminal. k i RS-232C Terminal This is the time code output (BNC) terminal. The HDV time code is output during HDV decoding. d SDI Input Terminal f k RS-422 (DEVICE) Terminal This is the RS-422 DEVICE terminal. Connect as appropriate to the device that you are using. NOTE Only use one of the following terminals at any one time: RS-232C terminal, RS-422 (CONTROLLER) terminal and RS-422 (DEVICE). l Power Terminal Use to connect the supplied AC adapter. Never connect to anything other than the supplied AC adapter. This is the power switch. Use to turn the ADVC-HDM1 ON or OFF. g IEEE1394a 6-pin Terminal This is an IEEE1394a 6-pin terminal. It does not supply bus power. h DIP Switches Use to set the operation mode (refer to the next page). –8– ADVC_HDM1_EN.book Page 9 Tuesday, December 19, 2006 9:20 AM 1-3 DIP Switches Use the DIP switches on the rear panel of the ADVC-HDM1 to set the operation mode. The default setting for all the DIP switches is OFF. * Slide down the lever to set the DIP switch to ON. No. Name Function IEEE1394a data rate Selects the IEEE1394a data rate OFF: S400 ON: S200 Start mode Selects the start mode OFF: Normal operation ON: Firmware update mode Serial port switch Selects the serial port OFF: RS-422A ON: RS-232C 4 Reserved Not used 5 MP@HL 1920 encode mode Operates with MPEG2-TS 1920 × 1080/59.94i during encoding 1 2 3 * This setting is ignored if the input video is not 1920 × 1080/59.94i 6, 7, 8 Encode bit rate Selects the video bit rate for encoding * The bit rate changes are enabled from the next encoding SW6 SW7 SW8 Operation OFF OFF OFF 18.3 Mbps (HDV 720p) or 25 Mbps (HDV 1080i) * Outputs a stream compatible with the HDV standard * Encodes with MPEG2-TS and 25 Mbps when SW5 is ON and the input video is 1920 × 1080/59.94i OFF OFF ON 40 Mbps * MPEG2-TS OFF ON OFF 30 Mbps OFF ON ON 20 Mbps ON OFF OFF * MPEG2-TS * MPEG2-TS 18 Mbps * MPEG2-TS ON OFF ON 16 Mbps * MPEG2-TS ON ON OFF 14 Mbps ON ON ON 11 Mbps * MPEG2-TS * MPEG2-TS * The settings can be changed with the AV/C Canopus Vendor dependent command or via the RS-232C –9– ADVC_HDM1_EN.book Page 10 Tuesday, December 19, 2006 9:20 AM 2 2-1 ADVC-HDM1 Input and Output Connections and Preparations When using as an HDV to HD-SDI converter To SDI-IN When using LTC OUT From an HDV camera, deck, etc. To TC IN Press the [Encode/Decode Switch] on the front panel of the ADVC-HDM1 to turn on the [Decode Selection LED]. a Press for more than 1 sec. b Make sure that the light comes on Press the [Encode/Decode Switch] on the front panel of the ADVC-HDM1 to turn on the [Decode Selection LED]. TIP The time code recorded on the HDV is always output as VITC/LTC output. TIP There are two SDI output terminals, enabling two devices to be connected and used at the same time. – 10 – ADVC_HDM1_EN.book Page 11 Tuesday, December 19, 2006 9:20 AM When using as an HD-SDI to HDV converter To a monitor, etc. ACTIVE THROUGH To an HDV camera, deck, etc. From SDI-OUT When using LTC From TC-OUT Press the [Encode/Decode Switch] on the front panel of the ADVC-HDM1 to turn on the [Encode Selection LED]. a Press for more than 1 sec. b Make sure that the light comes on – 11 – ADVC_HDM1_EN.book Page 12 Tuesday, December 19, 2006 9:20 AM When using LTC, input the time code to TC IN and press the [Time Code Input Switch] on the front panel of the ADVC-HDM1 to turn on the [LTC Enabled LED]. a Press for more than 1 sec. b Make sure that the light comes on When using VITC, press the [Time Code Input Switch] on the front panel of the ADVC-HDM1 to turn on the [VITC Enabled LED]. a Press for more than 1 sec. b Make sure that the light comes on – 12 – ADVC_HDM1_EN.book Page 13 Tuesday, December 19, 2006 9:20 AM 2-2 Advanced Functions With the advanced functions described in this section, the encode bit rate can be changed or encoding can be performed with a full resolution of 1920 × 1080. Please be aware of the following information when using these functions. When not using the advanced functions (default) When using the advanced functions Output stream HDV (HD1/HD2) MPEG2-TS Time code Can be used Cannot be used Recording to an HDV deck Can be recorded Cannot be recorded Display on an HDV camera Can be displayed Cannot be displayed Changing the encode bit rate Change the bit rate with the DIP switches on the rear panel of the ADVC-HDM1. Set the DIP switches to match the bit rate that you want for encoding. Encoding with full resolution When 1080/59.94i is input as the video signal format, encoding is performed at a full horizontal resolution of 1920. Resolution SW5 OFF SW5 ON Encodes at 1440 × 1080 Encodes at 1920 × 1080 – 13 – 04_Functions_ADVC_HDM1_EN.fm Page 14 Wednesday, December 20, 2006 12:36 PM Benefits of the Advanced Functions These advanced functions are very effective when used for the network transmission of HD video with devices such as Canopus HDCS-3000S and HDCS3000R. Example: Using HDV ADVC-HDM1 HDCS-3000S HDCS-3000R Converter, etc. Input (HD-SDI signal) Output (25 Mbps video) 25 Mbps Component connection Example: When lowering the bit rate ADVC-HDM1 HDCS-3000S HDCS-3000R Converter, etc. Input (HD-SDI signal) (Network bandwidth is narrowed) 11 Mbps Component connection Example: When raising the bit rate ADVC-HDM1 HDCS-3000S HDCS-3000R Converter, etc. Input (HD-SDI signal) Output (40 Mbps video) 40 Mbps Component connection TIP The actual transmission rate also includes other packet data, so an extra transmission speed of about 5 Mbps must be added to the video bit rate. – 14 – ADVC_HDM1_EN.book Page 15 Tuesday, December 19, 2006 9:20 AM Appendix • Specifications • List of Commands – 15 – ADVC_HDM1_EN.book Page 16 Tuesday, December 19, 2006 9:20 AM 1 Specifications 1-1 ADVC-HDM1 Hardware Specifications Video input HD-SDI BNC × 1 (HD-SDI) BNC × 1 (ACTIVE THROUGH compatible with SMPTE 292M) Video output HD-SDI BNC × 2 (compatible with SMPTE 292M) Audio input HD-SDI Embedded audio (SMPTE 299M ch1 and ch2 only, ch3 - ch8 are ignored) Audio output HD-SDI Embedded audio (SMPTE 299M stereo 16-bit/ 48 kHz) Time code LTC input BNC × 1 LTC output BNC × 1 DVITC input Separated from HD-SDI DVITC output Embedded on HD-SDI IEEE1394 4-pin (front) Compatible with IEC61883-4 Stream input and output During input: Select DVITC or LTC with the front panel switch During output: Both DVITC and LTC are always output (only enabled during HDV mode) Cannot be used at the same time 6-pin (rear) Compatible with IEC61883-4 Control RS-422A CONTROLLER ×1 DEVICE × 1 RS-232C HDV encode 9-pin male × 1 HD1 720, 59.94p/50p (video: 18.3 Mbps, audio stereo: MPEG1 Audio Layer 2 384 kbps) Select to use (cannot be used at the same time), only supports output from AV/C command to RS422A Cannot be used at the same time For control Set automatically through the input signal format (720p, 1080i inter-conversion not possible) HD2 1080, 59.94i/50i (video: 25 Mbps, audio stereo: MPEG1 Audio Layer 2 384 kbps) HDV decode HD1 720, 59.94p/50p HD2 1080, 59.94i/50i – 16 – Set automatically through the output signal format (720p, 1080i inter-conversion not possible) ADVC_HDM1_EN.book Page 17 Tuesday, December 19, 2006 9:20 AM Advanced encode MP@HL, MP@H14 1080, 59.94i/50i 720, 59.94p/50p 11-40 Mbps The advanced mode stream for video transmission is an MPEG2 transport stream and is not a multiplex HDV format (LTC/DVITC input/output function cannot be used) Advanced decode MP@HL, MP@H14 1080, 59.94i/50i 720, 59.94p/50p Check in advance with the actual device which streams are available for the advanced mode decode for video transmission. Power voltage AC adapter AC 100 V - 240 V (50 Hz/60 Hz) Output: DC 12 V 3 A Unit DC12V 1A Dimensions 215.5 (W) × 246.4 (D) × 44.0 (H) mm Others Weight Approx. 1.5 kg Operating temperature range 5 - 40°C – 17 – No condensation ADVC_HDM1_EN.book Page 18 Tuesday, December 19, 2006 9:20 AM 1-2 Connector Pin Diagrams RS-232C port DSUB-9 Pin# Signal Name 1 (open) 2 RD 3 TD 4 DTR*1 5 GND 6 DSR*1 7 RTS*2 8 CTS*2 9 (open) *1 Internal short *2 Internal short RS-422 CONTROLLER port DSUB-9 Pin# Signal Name 1 GND 2 RD– 3 TD+ 4 GND 5 (open) 6 GND 7 RD+ 8 TD– 9 GND – 18 – ADVC_HDM1_EN.book Page 19 Tuesday, December 19, 2006 9:20 AM RS-422 DEVICE port DSUB-9 Pin# Signal Name 1 GND 2 TD– 3 RD+ 4 GND 5 (open) 6 GND 7 TD+ 8 RD– 9 GND – 19 – 05_Appendix_ADVC_HDM1_EN.fm Page 20 Wednesday, December 20, 2006 12:37 PM 1-3 Advanced Functions Block Diagram of ADVC-HDM1 ADVC-HDM1 LTC OUT HD-SDI OUT CONNECTOR LTC IN Cable Driver Deserializer HD-SDI IN HD-SDI OUT Cable Equalizer Cable Driver CODEC Board PLL MPEG2 HD CODEC Serializer CONNECTOR HD-SDI OUT SDI-IF Board CONNECTOR DC 12V CONNECTOR Power RS422 #1 CPU RS422 #2 RS232C PLL Push SW x2 FPGA LED x7 DIP SW 8bit CPLD IEEE1394 6in IEEE1394 I/F IEEE1394 4in MAIN Board – 20 – 05_Appendix_ADVC_HDM1_EN.fm Page 21 Wednesday, December 20, 2006 12:37 PM 2 2-1 List of Commands Remote Control Function Serial Interface RS-232C, 9600 bps, 8-bit, parity none, stop bit = 1 bit Command List PL Start playback if the current mode is not playback (encode) Format: “PL” Status report: Completion message (“R”) RC Start record if the current mode is not record (decode) Format: “RC” Status report: Completion message (“R”) SO If the current mode is playback (encode), stop playback and start record Format: “SO” Status report: Completion message (“R”) ?P Check the current operation mode Format: “?P” Status report: “P02”: ADVC-HDM1 starting or mode in transition “P04”: Playback (encode) “P14”: Record (decode) TC Change the input time code setting for encoding to VITC or LTC Format: “(Integer) TC” “1TC” VITC “2TC” LTC Status report: Completion message (“R”) E06: Command argument error (integer is neither 1 nor 2) When the input time code is changed during decode operation, the changed setting is enabled from the next encode operation. ?T Check the input time code setting of the current encoding Format: “?T” Status report: “1”: VITC “2”: LTC – 21 – ADVC_HDM1_EN.book Page 22 Tuesday, December 19, 2006 9:20 AM ?I Check whether or not there is a current HD-SDI input Format: “?I” Status report: “1”: There is an input “0”: There is no input VB Specify the video bit rate for encoding Format: “(Integer) VB” Specify the bit rate value in units of 400 bps Status report: Completion message (“R”) E06: Command argument error (when a bit rate is not specified) The video bit rate specified with this command is set during encoding when it is possible to specify the video bit rate with the DIP switch settings (SW6=SW7=SW8=ON). When the bit rate was set during encode operation, encoding is restarted if SW6=SW7=SW8=ON. When the bit rate was set during decode operation, the set value is enabled from the next encode operation. ?B Check the video bit rate that was specified during encoding Format: “?B” Status report: “(Bit rate value in units of 400 bps)” Returns the bit rate value that is used when it is possible to specify the video bit rate with the DIP switch settings (SW6=ON SW7=ON SW8=ON). – 22 – ADVC_HDM1_EN.book Page 23 Tuesday, December 19, 2006 9:20 AM 2-2 AV/C Command to RS-422 Conversion List Command List AV/C Command Deck Operation Stop Stop X1 Play AVC_RECORD_RECORD Record RECORD PAUSE Pause FAST FORWARD Fast forward HIGH SPEED REWIND Rewind REWIND Rewind EJECT Eject FORWARD PAUSE Pause NEXT FRAME Advance by 1 frame SLOWEST FORWARD 1/20 speed SLOW FORWARD 6 1/10 speed SLOW FORWARD 5 1/7 speed SLOW FORWARD 4 1/6 speed SLOW FORWARD 3 1/5 speed SLOW FORWARD 2 1/4 speed SLOW FORWARD 1 1/2 speed 1× ×1 speed FAST FORWARD 1 ×2 speed FAST FORWARD 2 ×3 speed FAST FORWARD 3 ×4 speed FAST FORWARD 4 ×5 speed FAST FORWARD 5 ×10 speed FAST FORWARD 6 ×20 speed FASTEST FORWARD ×20 speed REVERSE PAUSE Pause PREVIOUS FRAME Reverse by 1 frame SLOWEST REVERSE 1/20 speed SLOW REVERSE 6 1/10 speed SLOW REVERSE 5 1/7 speed SLOW REVERSE 4 1/6 speed – 23 – 05_Appendix_ADVC_HDM1_EN.fm Page 24 Wednesday, December 20, 2006 12:39 PM SLOW REVERSE 3 1/5 speed SLOW REVERSE 2 1/4 speed SLOW REVERSE 1 1/2 speed X1 REVERSE ×1 speed FAST REVERSE 1 ×2 speed FAST REVERSE 2 ×3 speed FAST REVERSE 3 ×4 speed FAST REVERSE 4 ×5 speed FAST REVERSE 5 ×10 speed FAST REVERSE 6 ×20 speed FASTEST REVERSE ×20 speed * Sony 9-pin control protocol is used for the output deck control commands. * The details for the AV/C commands are the same as the “Playback Mode” item in the “IEEE1394 Interface Implementation Guideline”. Changing the Video Bit Rate The following methods can be used for changing the video bit rate setting when using AV/C commands. (1) Checking the Video Bit Rate Setting Value Input ctype = STATUS(1) operand[5] = 0x01 operand[6] = 0xff operand[7] = 0xff operand[8] = 0xff operand[9] = 0xff Output rcode = STABLE(0x0c) status (operand[4]) is one of the following: 0x00 succeeded 0x01 failed 0x02 invalid parameter – 24 – 05_Appendix_ADVC_HDM1_EN.fm Page 25 Wednesday, December 20, 2006 12:39 PM If successful, video bitrate in units of 400 bps are returned as follows: operand[6] = video bitrate in units of 400 bps (bit 0 – bit 7) operand[7] = video bitrate in units of 400 bps (bit 8 – bit 15) operand[8] = video bitrate in units of 400 bps (bit 16 – bit 23) operand[9] = video bitrate in units of 400 bps (bit 24 – bit 31) (2) Video Bit Rate Setting Input ctype = CONTROL(0) operand[5] = 0x02 operand[6] = video bitrate in units of 400 bps (bit 0 – bit 7) operand[7] = video bitrate in units of 400 bps (bit 8 – bit 15) operand[8] = video bitrate in units of 400 bps (bit 16 – bit 23) operand[9] = video bitrate in units of 400 bps (bit 24 – bit 31) Output rcode = ACCEPTED(0x09) status (operand[4]) is one of the following: 0x00 succeeded 0x01 failed 0x02 invalid parameter – 25 –