1
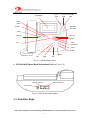
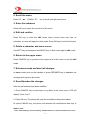
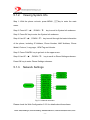
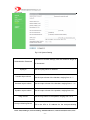
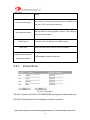
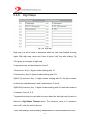
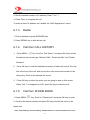
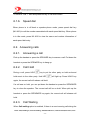
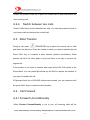
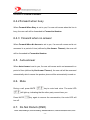
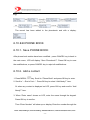
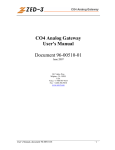
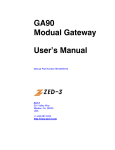
GP1260
IAX2 Phone
User Guide
Room 1004, Building 2, Phoenix Building, 2008 ShenNan Ave., Futian District,Shenzhen ,China
-1-
INDEX
1.
2.
PRODUCT OVERVIEW ......................................................................................... 4
FEATURES AND SPECIFICATION ....................................................................... 4
2.1.
Hardware Features.......................................................................................... 4
2.2.
Software Features ........................................................................................... 5
2.3.
Standard and Protocol..................................................................................... 6
2.4.
Electric Requirements ..................................................................................... 7
2.5.
Size ................................................................................................................. 7
2.6.
Operating Requirements ................................................................................. 7
3.
INSTALLATION...................................................................................................... 7
3.1.
Parts List ......................................................................................................... 7
3.2.
Connecting the Phone..................................................................................... 8
4.
GP1260 APPEARANCE ........................................................................................ 8
4.1.
GP1260 IAX2 Phone Illustration...................................................................... 8
4.2.
Function Keys ................................................................................................. 9
4.3.
LED Functions............................................................................................... 10
5.
CONFIGURATION GUIDE ................................................................................... 11
5.1.
Configuration with Keypad ............................................................................ 11
5.1.1.
Using function keys ............................................................................ 11
5.1.2.
Viewing System Info ........................................................................... 13
5.1.3.
Network Settings ................................................................................ 13
5.1.4.
Voice Settings..................................................................................... 14
5.1.5.
Protocol Settings ................................................................................ 14
5.1.6.
Dialplan Settings................................................................................. 15
5.1.7.
System Settings.................................................................................. 15
5.2.
Configuration with Web Browser ................................................................... 16
5.2.1.
Network Settings ................................................................................ 16
5.2.2.
Voice Settings..................................................................................... 18
5.2.3.
Protocol Settings ................................................................................ 19
5.2.4.
Dialplan Settings................................................................................. 21
5.2.6.
System Settings.................................................................................. 22
5.2.7.
Phone Book ........................................................................................ 24
5.2.8.
Digit Maps........................................................................................... 25
6.
USING GP1260 IAX2 PHONE ............................................................................. 26
6.1.
Placing Phone Calls ...................................................................................... 26
6.1.1.
Off-hook, On-hook and Speaker-phone Mode .................................... 26
6.1.2.
Dial Directly ........................................................................................ 26
6.1.3.
Redial ................................................................................................. 27
6.1.4.
Call from CALL HISTORY................................................................... 27
6.1.5.
Call from PHONE BOOK .................................................................... 27
6.1.6.
Speed dial........................................................................................... 28
6.2.
Answering calls ............................................................................................. 28
6.2.1.
Answering a call ................................................................................. 28
6.2.2.
Call Hold ............................................................................................. 28
Room 1004, Building 2, Phoenix Building, 2008 ShenNan Ave., Futian District,Shenzhen ,China
-2-
6.2.3.
Call Waiting ........................................................................................ 28
6.2.4.
Switch between two calls.................................................................... 29
6.3.
Blind Transfer ................................................................................................ 29
6.4.
Call Forward.................................................................................................. 29
6.4.1
Forward Unconditionally ..................................................................... 29
6.4.2
Forward when busy ............................................................................ 30
6.4.3
Forward when no answer ................................................................... 30
6.5.
Auto-answer .................................................................................................. 30
6.6.
Mute .............................................................................................................. 30
6.7.
Do Not Disturb (DND).................................................................................... 30
6.8.
Checking Voice Message .............................................................................. 31
6.9.
Save/Delete a CALL HISTORY..................................................................... 31
6.10.
Edit PHONE BOOK ....................................................................................... 32
6.10.1.
Save PHONE BOOK .......................................................................... 32
6.10.2.
Add a contact...................................................................................... 32
6.10.3.
Modify a contact ................................................................................. 33
6.10.4.
Delete a contact entry......................................................................... 34
6.10.5.
Delete all contact entry ....................................................................... 34
7.
FIRMWARE UPGRADE ....................................................................................... 34
7.1 Manually upgrade................................................................................................... 34
7.1.1.
Select upgrade item............................................................................ 35
7.1.2.
Locate upgrade file ............................................................................. 35
7.1.3.
Start upgrade ...................................................................................... 35
8.
LOAD AND STORE FACTORY SETTINGS......................................................... 36
8.1 Load Defaults Settings ........................................................................................... 36
8.2 Store Defaults Settings .......................................................................................... 36
Room 1004, Building 2, Phoenix Building, 2008 ShenNan Ave., Futian District,Shenzhen ,China
-3-
1. PRODUCT OVERVIEW
IP is the acronym for Internet Protocol. An IP phone is a telephone which
transmits voice over network based on IP protocol, for example LAN (Local
Area Network), MAN (Metropolitan Area Network) and INTERNET.
The most significant feature of IP phone is transporting voice over data
communication network with almost no extra cost and comparable voice
quality and various supplementary services. Using IP phone, you will save
tremendously on international calls and long distance calls.
GP1260 IAX2 IP phones provide an affordable IP phone system with ease of
use, superior voice quality, economic physical design, advanced services, and
features.
GP1260 IAX2 IP phones come with a four lines dot-matrix LCD display, ten
speed dial keys and all kinds of calling features and functions. User can
configure either through keypad or web browser.
2. FEATURES AND SPECIFICATION
2.1. Hardware Features
● Main chip—AR1688
(MCU 60MHz ;DSP 72MIPS)
● On chip SRAM—116KB
● 18 Bits High Performance On chip Codec
Room 1004, Building 2, Phoenix Building, 2008 ShenNan Ave., Futian District,Shenzhen ,China
-4-
● Program Memory—2 MB Flash memory
● Display LCD—128 X 64 Graphics Dot.
● Ethernet Port—2X 10/100M Connectors
2.2. Software Features
● DHCP support for LAN or Cable modem
● PPPoE dialup
● Built in web server for configuration and upgrade
● On phone menu for configuration through keypad
● Automated provisioning of firmware and configuration via HTTP
● Manual upgrade firmware via HTTP;
● Multiple audio codec support:
PCMU;PCMA;G.726-32;GSM6.10;iLBC;Speex;G.729
● VAD(Voice Activity Detection)
● CNG (Comfort Noise Generation)
● Dynamic Jitter Buffer
● G.165/168 compliant 32ms echo cancellation
● Tone generation and DTMF generation
● Call Hold with Music On Hold Support
● Call Waiting
● Call Transfer (Blind)
● Call Forwarding – Unconditional, No Answer, On Busy
Room 1004, Building 2, Phoenix Building, 2008 ShenNan Ave., Futian District,Shenzhen ,China
-5-
● Auto-Answer
● Do-Not-Disturb
● Configurable Dial Plan Support
● Phone Book with 100 entries
● Speed Dialing Support (10 entries)
● Call History: Missed, Answered, Dialed Numbers with call time (10
each)
● Adjustable volume for handset, ring volume and speaker etc.
● Hot Line Calling
2.3. Standard and Protocol
● IAX2 (Inter-Asterisk-eXchange V2)
● IEEE 802.3 /802.3 u 10 Base T / 100Base TX
●Support for Layer3 Qos (Diff-Serv) and Layer 2 Qos (802.1P/Q)
● PPPoE: PPP over Ethernet
● TCP/IP: Transmission Control Protocol / Internet Protocol
● ARP: Address Resolution Protocol
● ICMP: Internet Control Message Protocol
● DHCP:Dynamic Host Configuration Protocol
● DNS:Domain Name Server
● TFTP:Trivial File Transfer Protocol
● HTTP:Hyper Text Transfer Protocol
Room 1004, Building 2, Phoenix Building, 2008 ShenNan Ave., Futian District,Shenzhen ,China
-6-
● SNTP:Simple Network Time Protocol
● Syslog:The BSD syslog Protocol
2.4. Electric Requirements
●Voltage: 9V DC
●Power: 4.5W (max.)
2.5. Size
238 x 188 x 70 mm (L x W x H)
2.6. Operating Requirements
●Operation temperature: 0 to 45° C (32° to 113° F)
●Storage temperature: -30° to 85° C (-22° to 185° F)
●Humidity: 10 to 90% no dew
3. INSTALLATION
3.1. Parts List
Check this following list before installation to make sure that you have received
all items. If any item is not included in the package, please contact the
distributor.
1) One GP1260 IAX2 Main Case
2) One Handset
Room 1004, Building 2, Phoenix Building, 2008 ShenNan Ave., Futian District,Shenzhen ,China
-7-
3) One Universal Power Adapter
4) One product qualification and guarantee
5) One User Guide CD-ROM
6) Quick Simple User Manual
7) One RJ-45 Ethernet cable
3.2. Connecting the Phone
1. Connect handset to base: insert the handset cord into a handset cord jack
on the left side of the base.
2. Connect the phone to Network: plug the RJ-45 Ethernet cable into the
Ethernet Jack. Plug the other end of the cable into HUB or switch.
3. Power on the phone: plug one end of the power cord adapter into the
power connector on the phone. Then plug the other end of the power cord
adapter into the appropriate wall outlet.
4. GP1260 APPEARANCE
4.1. GP1260 IAX2 Phone Illustration
● GP1260 IAX2 Phone Front Illustration (Refer to Fig 4.1.1):
Room 1004, Building 2, Phoenix Building, 2008 ShenNan Ave., Futian District,Shenzhen ,China
-8-
Power
LCD Display
Network1 Network2
LED
LED
LED
Mute/
DND
Speed dial
Transfer
M1---M10
Hold
VOL+/UP
Message
Right
Menu
Left
VOL-/Down
Cancel
Redial
Speaker
OK
Flash
Call
Fig 4.1.1 GP1260 Phone Front
● GP1260 IAX2 Phone Back Illustrations(Refer to Fig 4.1.2 )
Network connect 1
Network connect 2
Power Jack
Fig 4.1.2 GP1260 IAX2 Phone Back
4.2. Function Keys
Room 1004, Building 2, Phoenix Building, 2008 ShenNan Ave., Futian District,Shenzhen ,China
-9-
Keys
Function
Keys
MENU
M1-M10
Speed-Dial key, each corresponds to
a speed dial number which will be called
by a single press.
UP(▲)
Function
When phone is idle,
press this key to enter
MENU mode.
Increase the output volume of handset or speakerphone.
In MENU mode, press this key to scroll up.
DOWN(▼)
Decrease the output volume of handset or speakerphone.
In MENU mode, press this key to scroll down menu options.
▲ )
LEFT(
▼ )
RIGHT(
In EDIT status, press this key to backspace.
In EDIT status, press this key to shift cursor right.
CANCEL
In MENU mode, press this key to go
back to the upper level of menu.
REDIAL
Dial the last called
number.
SPEAKER
Enter speakerphone mode. Press
again to switch back to the handset
mode.
OK
In MENU mode, enter
the submenu and
confirm the input.
FLASH
Press this key to accept a waiting call,
start a consulting call or switch
between two calls.
CALL
Place a call to the
number entered.
MESSAGE
TRANSFER
Place a call to the pre-configured voice
message number.
Press this key to complete a blind
transfer.
HOLD
MUTE/DND
Temporarily hold the
current call. Press
again to unhold.
Toggle DND on and off
when phone idle or
mute local voice when
in a call.
4.3. LED Functions
NETWORK1
LED
On: The connection is all right.
Flashing: Data transmitting and
receiving.
Off: Network cable is
disconnected or network error.
NETWORK2
LED
On: The connection is
all right.
Flashing: Data
transmitting and
receiving.
Off: Network cable is
disconnected or
network error.
Room 1004, Building 2, Phoenix Building, 2008 ShenNan Ave., Futian District,Shenzhen ,China
- 10 -
POWER LED
MESSAGE
LED
On: the power supply is all right.
Off: the power supply is
disconnected.
On: There are unread voice
messages.
Off: No new voice message.
HOLD LED
On: The call is on hold .
MUTE/DND LED
On: Local voice is
muted when in a call;
Do-Not-Disturbed
is
turned on when phone
idle.
5. CONFIGURATION GUIDE
After the phone is properly installed, users can use keypad or web browser to
configure its parameters.
5.1. Configuration with Keypad
5.1.1. Using function keys
1. Enter menu mode:
With the phone on-hook, press MENU
key to enter the main menu. The
screen will display “Phone Book”. Please refer to Fig 5.1.1.
Fig 5.1.1 Main Menu and Phone Settings Menu Structure
Room 1004, Building 2, Phoenix Building, 2008 ShenNan Ave., Futian District,Shenzhen ,China
- 11 -
2. Scroll the menu
Press UP(▲), DOWN(▼) key to scroll through menu items.
3. Enter the submenu
Press OK key to enter the next level of the menu.
4. Edit and confirm
Press OK key to enter the edit mode, when current menu item has no
submenu. A cursor will appear in this mode. Press OK key to confirm the input.
5. Delete a character and move cursor
Use LEFT key to backspace and RIGHT key to shift cursor right in edit mode.
6. Return to the upper menu
Press CANCEL key to go back to the upper level of the menu or exit the edit
mode.
7. Exit menu mode and abort all changes
In menu mode, pick up the handset or press SPEAKER key to abandon the
changes and return to idle mode.
8. Save/Abandon the changes
After the parameters have been modified,
1. Press CANCEL key several times to go back to the main menu, LCD will
display “Save xxxx?”.
2. Press OK key. The phone will save the modified contents and reboot.
Or press CANCEL key, the phone will abandon all modifications and stay in
menu mode.
Room 1004, Building 2, Phoenix Building, 2008 ShenNan Ave., Futian District,Shenzhen ,China
- 12 -
5.1.2. Viewing System Info
Step 1: With the phone on-hook, press MENU
key to enter the main
menu.
Step 2: Press UP(▲), DOWN(▼) key to scroll to System Info submenu.
Step 3: Press OK key to enter the System Info submenu.
Step 4: Use UP(▲), DOWN(▼) key to scroll through the basic information
of the phone, including IP Address, Phone Number, MAC Address, Phone
Model, Protocol , Language , OEM Tag and Version .
Step 5: Press CANCEL key to go back to the upper menu.
Step 6: Use UP(▲), DOWN(▼) key to scroll to Phone Settings submenu.
Press OK key to enter Phone Settings submenu.
5.1.3. Network Settings
Fig 5.1.2 Network submenu
Please check the Web Configuration 5.2.2 for details about these items.
Room 1004, Building 2, Phoenix Building, 2008 ShenNan Ave., Futian District,Shenzhen ,China
- 13 -
5.1.4. Voice Settings
Fig 5.1.3 Voice submenu
Please check the Web Configuration 5.2.3 for details about these items.
5.1.5. Protocol Settings
Fig 5.1.4 Protocol submenu
Room 1004, Building 2, Phoenix Building, 2008 ShenNan Ave., Futian District,Shenzhen ,China
- 14 -
Please check the Web Configuration 5.2.4 for details about these items.
5.1.6. Dialplan Settings
Fig 5.1.5 Dialplan submenu
Please check the Web Configuration page 5.2.5 for details about these items.
5.1.7. System Settings
Fig 5.1.6 System submenu
Please check the Web Configuration 5.2.5 for detail about these items.
Room 1004, Building 2, Phoenix Building, 2008 ShenNan Ave., Futian District,Shenzhen ,China
- 15 -
5.2. Configuration with Web Browser
Open a web browser and input the IP address of the phone into address bar
(default IP: 192.168.1.200). Then put password of the
phone into the following page. Default password is empty.
Fig 5.2.1 http settings
NOTE: Make sure that the phone is in idle mode when viewing or setting GP1260
IAX2 Phone with web browser.
5.2.1. Network Settings
The first several lines of this page give some basic information about this phone,
including Phone Model, MAC address, OEM tag and Version No..
Room 1004, Building 2, Phoenix Building, 2008 ShenNan Ave., Futian District,Shenzhen ,China
- 16 -
Fig 5.2.2
Connection Type
IP Address
Subnet Mask
Default Gateway
PPPoE User ID
Network Setting
Static IP:Select this item to let users to set IP address, subnet
mask and router IP address manually.
DHCP:Have IP address and other network parameters assigned
by the DHCP server.
Set IP address of the phone manually when Connection Type is
set to Static IP.
Set the subnet mask of the network when Connection Type is set
to Static IP.
Set the IP address of the default gateway when Connection Type
is set to Static IP.
Set the User ID of the PPPoE when Connection Type is set to
PPPoE.
Room 1004, Building 2, Phoenix Building, 2008 ShenNan Ave., Futian District,Shenzhen ,China
- 17 -
PPPoE User PIN
Set the User PIN of the PPPoE when Connection Type is set to
PPPoE.
Automatically Get
DNS Server IP
Have DHCP server assign the IP address of DNS server
automatically.
Use following DNS
Server IP
Set the IP address of DNS server manually.
Primary DNS
Secondary DNS
Set the IP address of the first DNS server.
Set the IP address of the second DNS server.
Layer 3 Qos
When Layer 3 Qos is adopted, fill in the Precedence value of IP
frames.
Layer 2 Qos
When Layer2 Qos is adopted, fill in VLAN tags (802.1Q) and
priority value of Ethernet frame respectively. (802.1P)
5.2.2. Voice Settings
Fig 5.2.3
Voice Settings
Room 1004, Building 2, Phoenix Building, 2008 ShenNan Ave., Futian District,Shenzhen ,China
- 18 -
Preferred Voice
Codec
Voice Frames
per Tx
iLBC Frame Size
Speex rate
GP1260 supports up to 7 different Voice Codec types including
PCMU, PCMA, G.726-32, GSM 6.10, iLBC, Speex, G.729.
Selecting Null disables the corresponding voice codec.
Set the number of voice frames transmitted per packet. The
suggested number is below 3(including 3) in order to reduce
delay. The maximum allowable value is 8. The default value is 1.
Select the frame size of iLBC codec: 20ms or 30ms.
Select the rate of Speex codec: 2.15kbps, 3.95 kbps, 5.95 kbps,
8 kbps, 11 kbps, 15 kbps, 18.2 kbps and 24.6 kbps.
Voice Activity
Detection(VAD)
Enable/disable VAD.
Automatic Gain
Control(AGC)
Enable/disable AGC.
Acoustic Echo
Cancellation (AEC)
Enable/disable AEC.
5.2.3. Protocol Settings
Room 1004, Building 2, Phoenix Building, 2008 ShenNan Ave., Futian District,Shenzhen ,China
- 19 -
Fig 5.2.4 Protocol Settings
Enable/disable registration with Asterisk server. To make calls
IAX2 Registration
through Asterisk Server, please check this box; otherwise, only
IP-to IP calls is allowed.
IAX2 Server
IAX2 Server Port
IAX2 User ID
IAX2 Authenticate ID
IAX2 Authenticate
PIN
User Name
Fill in the IP address or URI of Asterisk Server.
Fill in the port of Asterisk Server. The default value is 4569.
Fill in the user account information, usually has the form of digit
similar to phone number or actually the phone number.
Fill in the IAX2 service authenticate ID。
Fill in the IAX2 service password.
Fill in the user name which will be displayed on LCD.
Local IAX2 Port
Fill in the local port registered with server, which send and
receive IAX2 handshaking messages. The default value is 4569.
Register expiration
Set the interval of keep-alive message to Asterisk Server. The
minimum value is 10, maximum value is 65535. Default is 60,
with the unit of second.
Message service
number
Use service’s dialplan
Fill in the voice message service number.
Enable/disable service’s dialplan.
Room 1004, Building 2, Phoenix Building, 2008 ShenNan Ave., Futian District,Shenzhen ,China
- 20 -
5.2.4. Dialplan Settings
Fig 5.2.5 Dial settings
Forward-to Number
Enter the number to which you want to forward the call.
Forward
Unconditionally
Enable/Disable unconditional call forwarding. If set to yes, all
incoming calls will be forwarded to Forward-to Number.
Forward when busy
Enable/disable call forwarding on busy. If set to yes, the incoming
call will be forwarded to Forward-to Number when this line is
busy.
Forward when no
answer
Enable/disable call forwarding when no answer. If set to yes, the
incoming call will be forwarded to Forward-to Number when this
call is not answered within a certain period of time - No answer
timeout.
No answer timeout
Set the time in seconds before the phone answer the call
automatically or forward the calls to another party.
Auto Answer
Enable/disable auto answer. If set to yes, incoming calls will be
answered automatically if user doesn’t answer in a certain period
Room 1004, Building 2, Phoenix Building, 2008 ShenNan Ave., Futian District,Shenzhen ,China
- 21 -
of time - No answer timeout.
Enable/disable call waiting. If the phone is already in a
conversation when a new incoming call is received.
Call waiting
Enable: The new incoming call will be displayed on LCD
indicating another caller is waiting. User can press FLASH key to
hold current call and retrieve the new call.
Disable: Reject the new incoming call directly.
Dial prefix
Set the prefix added to each dialed number.
Hot line number
This number is dialed out automatically as soon as the handset is
picked up.
Use digit maps
Enable/disable digit maps.
Digit maps timeout
Use “#” To Call
Time to wait before sending out the number user dialed when
Use digit maps is enabled. The minimum value is 3 and the
maximum value is 60, with the unit of second.
Enable/disable “#” to equate “CALL” key
5.2.6. System Settings
Room 1004, Building 2, Phoenix Building, 2008 ShenNan Ave., Futian District,Shenzhen ,China
- 22 -
Fig 5.2.6 System Setting
Administration Password
Syslog IP
Handset input volume
Password to access settings, with the maximum length of
32 characters.
Set the syslog server IP address.
Set the input volume of the handset, ranging from 0 – 7.
Handset output volume
Set the output volume of the handset, ranging from 0 – 31.
Speaker output volume
Set the output volume of the speaker, ranging from 0-31.
Ring volume
Set the ring volume of the speaker, ranging from 10-31.
Auto-provisioning Server
Fill in the URI or IP address for the auto-provisioning
Room 1004, Building 2, Phoenix Building, 2008 ShenNan Ave., Futian District,Shenzhen ,China
- 23 -
server.
Auto-provisioning port
Auto-upgrade interval
Fill in the port of the auto-provisioning sever. Default is 80
(we use HTTP to do auto-provisioning).
Set the interval of auto-upgrade in minute. The maximum
value is 65535 minutes.
SNTP Server
Fill in the URI or IP address of the SNTP server.
Time Zone
Select the time zone in list box with user location.
Adjust time according to
daylight saving time
Enable/disable daylight saving time.
5.2.7. Phone Book
Fig 5.2.7 Phone Book
The first 10 entries (001-010) in PHONE BOOK are mapped to speed dial keys
(M1-M10). Press M1-M10 will immediately call these numbers.
Room 1004, Building 2, Phoenix Building, 2008 ShenNan Ave., Futian District,Shenzhen ,China
- 24 -
5.2.8. Digit Maps
Fig 5.2.8 Digit Map
Digit map is a set of rules to determine when the user has finished entering
digits. With digit map, users don’t have to press "call" key after dialing. Fig
5.2.8 gives an example of digit map.
X represents any number between 0 and 9.
13xxxxxxxxx: Any 11 digits number starting with 13.
013xxxxxxxxx: Any 12 digits number starting with 013.
02[0-57-9] xxxxxxxx: Any 11 digits number starting with 02, the third number
could be any digit between 0 and 5 and between 7 and 9.
03[02-689] xxxxxxxx: Any 11 digits number starting with 03, the third number is
0, between 2 and 6, 8, 9.
T represents the time to wait after the user dialed the last digit and its value is
defined in Digit Maps Timeout option. The minimum value is 3; maximum
value is 60, with the unit of second.
Room 1004, Building 2, Phoenix Building, 2008 ShenNan Ave., Futian District,Shenzhen ,China
- 25 -
X.T: Any digit number. The number is sent out in T seconds after user dialed
the last digits.
X. [T#*]: Any digit number ended with * or # or after T seconds of waiting.
If the number entered matches an item in the digit map perfectly, or it doesn’t
match any item at all, this number will be sent out immediately.
NOTE About the detail of digit map, refer to RFC3435 2.1.2.
6. USING GP1260 IAX2 PHONE
6.1. Placing Phone Calls
6.1.1. Off-hook,
On-hook
and
Speaker-phone
Mode
With GP1260 on-hook, it can switch to the off-hook mode by picking up the
handset. Press SPEAKER key and put down handset, the phone switches to
the speaker-phone mode.
With GP1260 on-hook, press SPEAKER key to enter the speaker-phone mode.
The SPEAKER LED on the phone is turned on when the phone is in
speaker-phone mode. Pick up handset to switch to off-hook mode.
6.1.2. Dial Directly
1. Pick up handset or press SPEAKER key.
Room 1004, Building 2, Phoenix Building, 2008 ShenNan Ave., Futian District,Shenzhen ,China
- 26 -
2. Dial the desired number or IP address (Press * for“. “).
3. Press CALL to complete the call.
To make a direct IP address call, disable the” IAX2 Registration” option.
6.1.3. Redial
1. Pick up handset or press SPEAKER key.
2. Press REDIAL key to dial the last call.
6.1.4. Call from CALL HISTORY
1. Press MENU
key. Scroll to “Call History” and press OK key to select
the desired call record type: “Missed Calls”, “Received Calls” and “Dialed
Numbers”.
2.
Press OK key to view the detailed information of each call record. The first
line is the time of the call, and second line is the name and number of the
other party. Scroll to the desired call record.
3.
Press OK key to select the action you are going to take on this record.
When “Call ?” is displayed on LCD, press OK key to make the call.
6.1.5. Call from PHONE BOOK
1. Press MENU
key. Scroll to “Phone book” and press OK key to enter.
2. Scroll to the desired contact and press OK key to select the action to be
taken next.
Room 1004, Building 2, Phoenix Building, 2008 ShenNan Ave., Futian District,Shenzhen ,China
- 27 -
3. Scroll to “Call ?” item and press OK key to call this contact.
6.1.6. Speed dial
When phone is in off-hook or speaker-phone mode, press speed dial key
(M1-M10) to call the number associated with each speed dial key. When phone
is in idle mode, press M1-M10 to view the name and number information of
each speed dial entry.
6.2. Answering calls
6.2.1. Answering a call
Pick up the handset or press the SPEAKER key to answer a call. Put down the
handset or press the SPEAKER key to hang up.
6.2.2. Call Hold
During a call, press HOLD
key to put the other party on hold and send
hold music to the other party. Hold LED
will light up. Press HOLD key
again, the current call will release call hold.
If a call was on hold, you can put down the handset or press the SPEARKER
key to close the speaker. The current call will be on hold. When pick up the
handset or press the SPEARKER key again, the current call will release call
hold.
6.2.3. Call Waiting
When Call waiting option is enabled, if there is a new incoming call during the
Room 1004, Building 2, Phoenix Building, 2008 ShenNan Ave., Futian District,Shenzhen ,China
- 28 -
current call, press FLASH key to place the current call on hold and answer the
new incoming call.
6.2.4. Switch between two calls
Press FLASH key to switch between two calls. You can also press the hook to
end current call and retrieve the on-hold call.
6.3. Blind Transfer
During a call, press
(TRANSFER) key to place the current call on hold
and obtain the dial tone. Enter the number to which you want to transfer the call.
Press CALL key to complete a blind transfer (without consultation). Blind
transfer will fail if the other party is busy and there is no way to resume the
original call.
If the number of you want to transfer was saved at the 001-010 entries of the
Phone Book. You can press Speed dial key M1-M10 to replace the number of
you want to transfer the call.
If Digitmap check box of AR168G phone was selected, you can dispense with
the press CALL key to complete a blind transfer.
6.4. Call Forward
6.4.1 Forward Unconditionally
When Forward Unconditionally is set to yes, all incoming calls will be
Room 1004, Building 2, Phoenix Building, 2008 ShenNan Ave., Futian District,Shenzhen ,China
- 29 -
forwarded to Forward-to Number.
6.4.2 Forward when busy
When Forward When Busy is set to yes, If a new call comes when the line is
busy, the new call will be forwarded to Forward-to Number.
6.4.3 Forward when no answer
When Forward When No Answer is set to yes, if a new call comes and is not
answered in a period of time (defined by No Answer Timeout), the new call
will be forwarded to Forward-to Number.
6.5. Auto-answer
When Auto Answer is set to yes, if a new call comes and is not answered in a
period of time (defined by No Answer Timeout), the new call will be answered
automatically which means the speaker phone will be automatically turned on.
6.6. Mute
During a call, press MUTE
key to mute local voice. The mute LED
will light up, indicating that the other party cannot hear you.
Press MUTE
key again to resume the conversation, the mute LED will
turn off.
6.7. Do Not Disturb (DND)
Room 1004, Building 2, Phoenix Building, 2008 ShenNan Ave., Futian District,Shenzhen ,China
- 30 -
When phone is on-hook, press MUTE
DND status. The mute LED
key to put the phone into
will light up indicating that phone will
reject all incoming calls.
To accept incoming calls, press MUTE
key again and the mute LED
will turn off.
6.8. Checking Voice Message
A flashing message LED indicates there are new voice messages. Press
MESSAGE
key to call the pre-set voice message number to check the
new voice message. The message LED will be turned off after that.
6.9. Save/Delete a CALL HISTORY
1. Press MENU
key. Scroll to “Call History” and press OK key to enter.
2. Select the desired call record type from “Missed Calls”, “Received Calls”,
and “Dialed Numbers”.
3. Delete all call records:Press OK key and scroll to “Delete ALL?” item. Then
press OK to delete all call records.
4. Save a call record:
1). Press OK key and scroll to “Add to Phonebook” item.
2). Press OK key to confirm.
3). Press CANCEL key twice. “Save Phonebook?” will show up.
4). Press OK to save the phone book.
Room 1004, Building 2, Phoenix Building, 2008 ShenNan Ave., Futian District,Shenzhen ,China
- 31 -
E.g.
The record has been added to the phonebook and with a display:
.
6.10. Edit PHONE BOOK
6.10.1. Save PHONE BOOK
After phone book entries have been modified,press CANCEL key to back to
the main menu, LCD will display “Save Phonebook?”. Press OK key to save
the modifications, or press CANCEL key to reject all modifications.
6.10.2. Add a contact
1. Press MENU
key. Scroll to “Phone Book” and press OK key to enter.
2. Scroll to “—End of List—“. Press OK key to select “Add Newly?” item.
Or when any contact is displayed on LCD, press OK key and scroll to “Add
Newly?” item.
3. When “Enter name” shows on LCD, enter the name through the keypad.
Press OK key to confirm.
Then “Enter Number” will show up on display. Enter the number through the
Room 1004, Building 2, Phoenix Building, 2008 ShenNan Ave., Futian District,Shenzhen ,China
- 32 -
keypad. Press OK key to confirm.
E.g. Add Aimee to phonebook
6.10.3. Modify a contact
1. Press MENU
key. Scroll to “Phone Book” and press OK key to enter.
2. Scroll to the desired contact and press OK key to select the action to be
taken next.
3. Scroll to “Edit ?” and press OK key to enter.
When “Enter name” item displayed on LCD, enter the name through keypad.
Use UP key or LEFT key to delete unwanted input. Press OK key to confirm.
Then “Enter number” item will be displayed on LCD, enter the phone number
through keypad. Press OK key to confirm.
4. Repeat step 2 and 3 to modify more contacts.
E.g. Edit Aimee (82378008) to Kingon (100083)
Room 1004, Building 2, Phoenix Building, 2008 ShenNan Ave., Futian District,Shenzhen ,China
- 33 -
6.10.4. Delete a contact entry
1. Press MENU
key. Scroll to “Phone Book” and press OK key to enter.
2. Scroll to the desired contact and press OK key to select the action to be
taken next.
3. Scroll to “Delete ?” and press OK key to enter.
4. Repeat step 2 and 3 to delete more contacts.
E.g. Delete contact Aimee
6.10.5. Delete all contact entry
1. Press MENU
key. Scroll to “Phone Book” and press OK key to enter.
2. Press OK key to select the action to be taken next.
3. Scroll to “Delete All?” item and press OK key to confirm.
E.g.
7. FIRMWARE UPGRADE
7.1 Manually upgrade
Room 1004, Building 2, Phoenix Building, 2008 ShenNan Ave., Futian District,Shenzhen ,China
- 34 -
Select Upgrade item in the login page and enter the upgrade page below.
Fig 7.1.1 manually upgrade
7.1.1. Select upgrade item
The available options include Firmware, Settings, Phonebook, Ring tone and
Call Hold Music.
7.1.2. Locate upgrade file
Use“browse……”button to select the upgrade file. As to how to get these files,
please refer to AR1688 Develop Manual.
7.1.3. Start upgrade
Click “Start Upgrade” button to start the upgrade.
Room 1004, Building 2, Phoenix Building, 2008 ShenNan Ave., Futian District,Shenzhen ,China
- 35 -
NOTE: Upgrade must NOT be interrupted! Upgrading firmware may take a few
minutes, Please don’t turn off the power.
8. LOAD AND STORE FACTORY SETTINGS
8.1 Load Defaults Settings
1. Press MENU
key. Scroll to “Phone Settings” and press OK key to
enter this submenu.
2. Scroll to “Load Defaults” and press OK key.
Will be displayed on LCD. Press OK key to confirm.
3.
GP1260 IAX2 IP phone will reboot and come up with the factory default
settings.
8.2 Store Defaults Settings
1. Press MENU
key. Scroll to “Phone Settings” and press OK key to
enter this submenu.
2. Scroll to “Store Defaults” and press OK key.
3.
Will be displayed on LCD. Press OK key to confirm.
GP1260 IAX2 IP phone will reboot and store the current settings to the
factory default settings.
Room 1004, Building 2, Phoenix Building, 2008 ShenNan Ave., Futian District,Shenzhen ,China
- 36 -
Annex: GP1260 IP phone digital-character key map
Keys
Once
Twice
Thrice
quartic
quintic
sixth
seventh
eighth
ninth
1
1
.
_
-
@
:
;
/
,
2
2
a
b
c
A
B
C
3
3
d
e
f
D
E
F
4
4
g
h
i
G
H
I
5
5
j
k
l
J
K
L
6
6
m
n
o
M
N
O
7
7
p
q
r
s
P
Q
R
S
8
8
t
u
v
T
U
V
9
9
w
x
y
z
W
X
Y
Z
0
0
space
Room 1004, Building 2, Phoenix Building, 2008 ShenNan Ave., Futian District,Shenzhen ,China
- 37 -