1
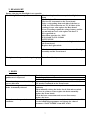
10. DIAGNOSTICS
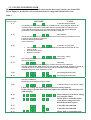
5.1 Diagnosing and troubleshooting using programmer diagnostics mode
Connect the programmer. Turn the key switch on. Press the DIAGNOSTICS key.
The display should indicate NO FAULTS FOUND. If there is a problem the Status indicator will
flash a diagnostic code and the programmer will display a diagnostic message.
List of messages:
You should read the explanations included in the paragraph 1.2 too.
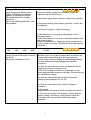
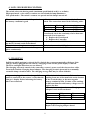
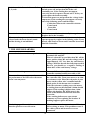
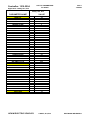
PROGRAMMER DISPLAY
THERMAL CUTBACK
THROTTLE FAULT 1
SPD LIMIT POT FAULT
LOW BATTERY VOLTAGE
MAIN OFF FAULT
MAIN ON FAULT
MAIN CONT WELDED
MAIN ON FAULT
PROC / WIRING FAULT
PRECHARGE FAULT
HW FAILSAFE
EEPROM FAULT
NO KNOWN FAULTS
POWER SECTION FAULT
HPD
EXPLANATION
Cut back due to over-temperature
Throttle input voltage out of range
Loose connection
Front board faulty
Controller faulty
Battery voltage too low
Main controller driver fault
Main controller driver fault
Main controller driver fault
Main controller driver fault
HPD fault is present more than 10s
The fault caused by misadjusted
potentiometer, broken throttle
potentiometer or broken throttle
mechanism
Controller failure or low battery
voltage
Motor voltage fault
EEPROM Fault-controller faulty
Status Led code
(1,1)
(1, 2)
(1, 3)
Check controller and motor power
connection
The HPD feature prevents
controller output if the vehicle is
powered when the throttle is not in
neutral. If the controller latches
cycle the key switch for resuming.
(4, 4)
(1, 4)
(2,1)
(2,4)
(2, 2)
(2, 4)
(3,1)
(3, 3)
(4, 2)
(4, 3)
(3, 4)
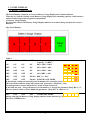
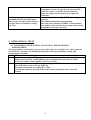
EXAMPLE 1
Symptom: the scooter appears to run only in reduced speed range.
The handheld programmer set in Diagnostic mode indicates NO KNOWN FAULTS.
Put the programmer in TEST mode and scroll down to observe the line MODE INPUT A.
Turn the switch LOW / HIGH switch into LOW position.
You should see MODE INPUT A OFF. Turn the switch into HIGH position. You should see
MODE INPUT A ON. If the reading does not appear correctly proceed by:
- Checking the cable that interfaces Front board with the Controller.
- Checking the switch connection with Front board
- Checking and replacing the switch
If the reading is correct then replace the controller.
14