1
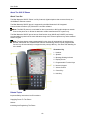
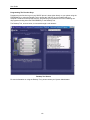
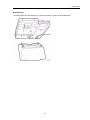
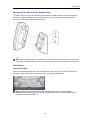
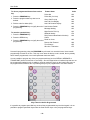
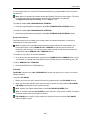
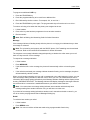
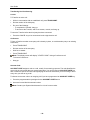
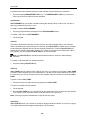
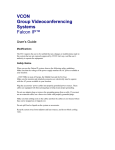
USER GUIDE
Table of Contents
5005 IP PHONE ......................................................................................................... 1
Mitel Networks™ 5005 IP User Guide ............................................................................... 1
Notice...............................................................................................................................................1
Disclaimer ........................................................................................................................................1
About The 5005 IP Phone ................................................................................................. 2
About Your Set ................................................................................................................................2
Related Topics .................................................................................................................. 2
Important Safety Instructions And Precautions ...............................................................................3
Supplying Power To The Phone......................................................................................................3
Notices .............................................................................................................................................3
Symbols ............................................................................................................................ 3
Initializing And Registering The Phone............................................................................................4
Using The 5005 IP Phone ................................................................................................. 4
About Using The 5005 IP Phone .....................................................................................................4
Telephone Status Indicators ............................................................................................................4
Adjusting Volume Levels .................................................................................................................5
Adjusting Display Contrast ..............................................................................................................5
Programming The Function Keys ....................................................................................................6
Desktop Stand .................................................................................................................................7
Mounting The Phone On The Wall ..................................................................................................8
Mounting On The Wall Using A Bracket (North America)................................................... 8
Mounting On The Wall Using The Desktop Stand.............................................................. 9
Call Handling..................................................................................................................... 9
About Call Handling .........................................................................................................................9
Making And Answering Calls .........................................................................................................11
Program .........................................................................................................................................11
Hold................................................................................................................................................13
Call Forward Variations .................................................................................................................13
Call Me Back..................................................................................................................................16
Camp-On .......................................................................................................................................16
Cancel............................................................................................................................................16
Line Keys .......................................................................................................................................16
Message ........................................................................................................................................17
Redial.............................................................................................................................................17
Transferring And Conferencing .....................................................................................................18
Account Code ................................................................................................................................18
Advisory Messages........................................................................................................................19
Answer Variations..........................................................................................................................19
- iii -
Table of Contents
Calls For ........................................................................................................................................ 20
Call Park........................................................................................................................................ 20
Call Pickup .................................................................................................................................... 20
Cancel Message Waiting .............................................................................................................. 21
Do Not Disturb............................................................................................................................... 21
Direct Station Selection/Busy Lamp Field (DSS/BLF) .................................................................. 21
Extension Group............................................................................................................................ 22
Extension Paging .......................................................................................................................... 22
Group Listen.................................................................................................................................. 22
Hold Variations .............................................................................................................................. 23
Exclusive Hold............................................................................................................................... 23
Last Call Duration Display............................................................................................................. 24
Line Group..................................................................................................................................... 24
Locking/Unlocking The Phone ...................................................................................................... 24
Night Service ................................................................................................................................. 25
Re-establish .................................................................................................................................. 26
Ringer On/Off ................................................................................................................................ 26
Speed Call..................................................................................................................................... 26
Swap ............................................................................................................................................. 27
Index ................................................................................................................................28
- iv -
5005 IP Phone
Mitel Networks™ 5005 IP User Guide
Notice
The information contained in this document is believed to be accurate in all respects but is not
warranted by Mitel Networks Corporation (Mitel). The information is subject to change without notice
and should not be construed in any way as a commitment by Mitel or any of its affiliates or
subsidiaries. Mitel and its affiliates and subsidiaries assume no responsibility for any errors or
omissions in this document. Revisions of this document or new editions of it may be issued to
incorporate any such changes.
Nothing in this document may be reproduced in any manner, either wholly or in part for any use
whatsoever, without written permission from Mitel Networks Corporation.
Disclaimer
DUE TO THE DYNAMIC NATURE OF THE PRODUCT DESIGN, THE INFORMATION
CONTAINED IN THIS DOCUMENT IS SUBJECT TO CHANGE WITHOUT NOTICE.
MITEL NETWORKS CORPORATION, ITS AFFILIATES, AND/ OR ITS SUBSIDIARIES
ASSUME NO RESPONSIBILITY FOR ERRORS AND/OR OMISSIONS CONTAINED
IN THIS INFORMATION.
®, ™ Trademark of Mitel Networks Corporation
© Copyright 2002, Mitel Networks Corporation
All rights reserved.
-1-
User Guide
About The 5005 IP Phone
About Your Set
The Mitel Networks 5005 IP Phone is a fully-featured, digital telephone that connects directly to a
10/100BaseT Ethernet network.
The Mitel Networks 5005 IP phone is supported by the Mitel Networks 3100 Integrated
Communications Platform (ICP) Release 3.0 and later software.
Note: The 5005 IP phone is not suitable for direct connection to ANY public telephone network.
Connect the phone to a LAN that is attached to a Mitel-manufactured ICP system only.
The Mitel Networks 5005 IP phone has two fixed-function keys (HOLD and CANCEL) and twenty
programmable keys with built-in status indicators along with a Volume Up/Down key and a standard
numeric keypad.
Note: The three bottom-most programmable function keys will automatically be assigned the
REDIAL, MESSAGE and TRANS/CONF features automatically and the top-left programmable
function key will automatically be assigned as the primary LINE key. See About Call Handling for
more details.
Illustration Key
1. Handset
2. Speaker
3. Message Waiting Indicator
4. Display Screen
5. Programmable Function Keys
6. Numeric Keypad
7. Volume Control
8. Cancel Key
9. Hold Key
Related Topics
Important Safety Instructions And Precautions
Supplying Power To The Phone
Notices
Initializing And Registering The Phone
-2-
User Guide
Important Safety Instructions And Precautions
When using your telephone equipment, basic safety precautions should always be followed to reduce
the risk of fire, electric shock and injury to persons, including the following:
•
Do not use this product near water, for example, near a bathtub, wash bowl, kitchen sink or
laundry tub, in a wet basement or near a swimming pool.
•
Avoid using a telephone (other than a cordless type) during an electrical storm. There may be a
remote risk of electric shock from lightning.
•
Do not use the telephone to report a gas leak in the vicinity of a leak.
Tips for Your Comfort and Safety
Don’t cradle the handset!
Prolonged use of the handset can lead to neck, shoulder, or back discomfort, especially if you
cradle the handset between your ear and shoulder. If you use your phone a lot, you may find it
more comfortable to use a headset. See the section on headset usage elsewhere in this guide for
more information.
Protect your hearing
Your phone has a control for adjusting the volume of the handset receiver. Because continuous
exposure to loud sounds can contribute to hearing loss, keep the volume at a moderate level.
Supplying Power To The Phone
The phone may be powered from any of the following sources:
•
A Mitel Networks 3100 Integrated Communications Platform (ICP).
•
A Mitel-supplied DC power adapter (part numbers 50002070 [North America], 50002080 [UK],
and 50002090 [Europe]).
•
A power source meeting the requirements of IEEE 802.3af for Power Over LAN, as well as
CAN/CSA C22.2 No. 60950-2000 3rd. Ed., UL 60950 3rd. Ed., and/or EN60950:2000 3rd. Ed. for
Safety.
•
Any other Mitel-recommended power source.
Notices
These notices may appear on the product and in the technical documentation.
DANGER
WARNING
CAUTION
Danger indicates an imminently hazardous situation which, if not avoided, will
result in death or serious injury.
Warning indicates a potentially hazardous situation which, if not avoided, could
result in death or serious injury.
Caution indicates a potentially hazardous situation which, if not avoided, may
result in minor or moderate injury and/or damage to the equipment or property.
Symbols
This symbol may appear on the product.
The exclamation point within an equilateral triangle indicates that important operating
and maintenance (servicing) instructions are included in the literature accompanying
the product.
-3-
User Guide
Initializing And Registering The Phone
IP phone initialization occurs automatically when the set is connected to the network.
CAUTION: During the initialization process, the phone may download crucial "boot" data from
the TFTP server on the network. This will be indicated by the display screen showing DO NOT
POWER DOWN and the light indicator (LED) flashing. DO NOT POWER DOWN OR TURN OFF
THE PHONE DURING THIS PROCESS! If the phone is powered down at this point, "boot" data
is likely to be corrupted and the phone will not boot up properly when powered on.
All IP sets are required to complete PIN registration. This registration results in a MAC address being
assigned in the MAC Address Assignment form. The 5005 IP phone will register with the 3100 ICP
automatically.
Once the phone is registered, it can be moved to any switched 10/100baseT port that is reachable by
the 3100 ICP, DHCP and TFTP servers servicing the IP phones so long as the phone is locally
powered. The phone will automatically boot and re-register with the 3100 ICP system whenever it is
moved.
Note: Initializing and registering the 5005 IP phone is a procedure that should only be carried out
either by a trained technician or your System Administrator. Please consult with your System
Administrator before performing any procedures that may have an adverse effect on the
performance of the phone.
Using The 5005 IP Phone
About Using The 5005 IP Phone
The 5005 IP Phone is a single-port telephone designed for use with a Mitel Networks 3100 Integrated
Communications Platform (ICP) integrated with your organization’s network.
Related Topics
Adjusting Volume Levels
Telephone Status Indicators
Adjusting Display Contrast
Programming The Function Keys
Desktop Stand
Mounting The Phone On The Wall
About Call Handling
Telephone Status Indicators
Situation:
Line is idle
Line is ringing
Message waiting/Voicemail
The message waiting indicator is:
Off
Flashing rapidly
Flashing slowly
-4-
User Guide
Adjusting Volume Levels
Ringer Control
To adjust the Ringer Volume while the set is ringing:
•
Press
to increase the volume.
•
Press
to decrease the volume.
Handset Receiver Volume Control
To adjust the Handset Receiver Volume when you are using the handset:
•
Press
to increase the volume.
•
Press
to decrease the volume.
Adjusting Display Contrast
To adjust the contrast level of the display screen while the phone is not in use:
•
Press
to brighten the contrast.
•
Press
to dim the contrast.
-5-
User Guide
Programming The Function Keys
Programming the function keys on your 5005 IP phone is done either directly on your phone using the
PROGRAM key or using the Desktop Tool to access the 3100 ICP on your network with your
computer. Features such as speed dial keys, programming key definitions and Call Forwarding can
all programmed using either the PROGRAM key or the Desktop Tool.
The Desktop Tool, as seen below, is accessed through a web browser.
Desktop Tool Screen
For more information on using the Desktop Tool, please contact your System Administrator.
-6-
User Guide
Desktop Stand
To tilt the 5005 IP phone towards you, it can be mounted on a stand as illustrated below.
-7-
User Guide
Mounting The Phone On The Wall
Mounting On The Wall Using Screws (UK/Europe)
The 5005 IP phone can be mounted directly on a wall using mounting screws:
1. Select a location away from electrical cables, pipes or other items
behind the mounting location that could cause a hazard when inserting
screws in the wall.
CAUTION: Make sure the wall material is capable of
supporting the weight of the unit. For additional security,
it is recommended that you mount the phone on a
plywood backboard. Mitel Networks is not responsible
for units damaged as a result of improper wall mounting.
2. Insert two mounting screws 3 5/16 inches (8.4 cm) apart as illustrated to
the right. Allow about 3/16 of an inch (0.5 cm) between the wall and
screw heads for mounting the phone.
3. Use #10 screws 1 to 1.5 inches (2.5 to 4 cm) in length for mounting
screws and anchoring devices suitable for the wall material on which
the unit will be mounted.
4. Align the mounting slots on the back of the phone with the heads of the
screws and push until the unit is firmly seated
Mounting On The Wall Using A Bracket (North America)
The 5005 IP phone can be mounted directly on a wall using a standard telephone wall mount bracket
available from your telephone equipment dealer.
Simply align the mounting slots on the back of the phone with the posts on the bracket and push until
the unit is firmly seated.
-8-
User Guide
Mounting On The Wall Using The Desktop Stand
The 5005 IP phone can also be mounted on a wall using the desktop stand. To mount the phone in
this fashion, attach the stand to the base of the phone in an inverted position and then place the
stand on the wall mounting bracket as illustrated.
Note: While mounting screws or a standard wall mount bracket may be used to mount the phone
on the wall, standard telephone jacks are not used as the phone is connected directly to the LAN.
Call Handling
About Call Handling
Please ensure that the designation card on the 5005 IP Phone, sitting on your desk, has the same
annotations as shown below. If not, please contact your System Administrator.
Note: The three bottom-most programmable function keys should be labelled REDIAL,
MESSAGE and TRANS/CONF. The top-left programmable function key will automatically be
assigned as the primary LINE key.
-9-
User Guide
Related Topics
Standard Usage
Keys Programmed By User
•
Making & Answering Calls
•
Account Code
•
Program (& Advisory Messages)
•
Answer External Call
•
Hold
•
Answer Next Call
•
Cancel
•
Call Forward
•
Redial
•
Call Me Back
•
Message
•
Call Park
•
Transfer/Conference
•
Call Pickup
•
Calls For
•
Cancel Message Waiting
•
Do Not Disturb
•
DSS/BLF
•
Extension Group
•
Extension Paging
•
Group Listen
•
Hold - Call Store
•
Hold - Exclusive Hold
•
Last Call Duration Display
•
Line Group
•
Line Keys
•
Locking/Unlocking
•
Night Service Monitoring
•
Night Service Pick-up
•
Re-establish
•
Ringer On/Off
•
Speed Call
•
Swap
- 10 -
User Guide
Making And Answering Calls
To make a call using the handset:
•
Lift the handset.
•
Dial the number.
Note: To use a line other than the primary one assigned to the set, press one of the Line keys
before you dial the number.
To make a call using a Speed Call key:
•
Lift the handset.
•
Press the Speed Call key to dial a pre-programmed number.
Note: Speed Call keys must be programmed using the Desktop Tool as described in
Programming The Function Keys. Speed Call keys may be used either for telephone numbers or
to send a multi-digit password during a call.
To answer a call:
•
Lift the handset.
Program
The PROGRAM key is automatically programmed by the 3100 ICP to allow you to assign features to
programmable keys. It is the programmable function key located second from the bottom on the right
(above the TRANS/CONF key).
It will not be possible to program a feature or short code on this key.
To program a feature under a
programmable key:
Feature Name
Code
Account Codes
665
1. Press the PROGRAM key.
Alarm Calls
668
2. Press the programmable key that is to be
programmed.
Alarm Call Cancel
669
Call Park Pick-up
660
3. Dial the code for the feature (i.e. 616 for
divert all calls)
Cancel Call Forward
617
4. Dial a parameter if required.
5. Press the PROGRAM key to signify the
end of programming.
To program a speed dial key:
Cancel Message Waiting
628
Date Change
656
Directed Call Pick-up
677
Directed Message Waiting
673
Call Forward All to Extension
616
1. Press the PROGRAM key.
Call Forward All to Extension Group
607
2. Press the REDIAL key
Call Forward No Answer or Busy to
Extension
620
Call Forward No Answer or Busy to
Extension Group
605
Do Not Disturb (DND)
619
Extension Paging
613
External Call Waiting
687
3. Press the programmable key that is to be
programmed.
4. Dial the speed dial number
5. Press the PROGRAM key to signify the
end of programming.
- 11 -
User Guide
To clear a programmed feature from under a
key:
Feature Name
Code
Follow Me
622
1. Press the PROGRAM key.
Follow Me (I’m Here)
626
2. Press the programmable key that is to be
deleted.
Group Call Pick-Up
666
Last Call Cost Display
664
3. Dial the code for delete (603)
Last Call Duration Display
4. Press the PROGRAM key to signify the end of Last Number Redial
programming.
Message Waiting
To cancel a speed dial key:
1. Press the PROGRAM key.
2. Press the REDIAL key
663
600
643
Night Service Pick-Up
633
Withhold Identity
676
PIN (Personal Identification Number)
Codes
634
3. Press the PROGRAM key to signify the end of Recall on Lines
programming.
Remote Call Forward
602
688
Time Change
655
Who Am I? Indication
675
Successful programming using the PROGRAM key will result in a normal dial tone. Unsuccessful
programming will result in no tone. This may occur when the dial-up code is invalid, the key already
has a feature programmed, or an invalid parameter has been dialed.
It is not possible to program any of the pre-programmed keys (such as REDIAL, MESSAGE or
TRANS/CONF) as this will result in an error beep. See the image below to illustrate keys that can not
be programmed (marked in red). In addition, the keys marked in purple on the image below can not
be programmed as SPEED CALL keys although they may be programmed to use other features.
Keys That Can Not Be Programmed
It is possible to program speed dial keys under all the programmable keys and the keypad. It is not
possible to program speed dial keys under the fixed function keys or the pre-programmed keys.
- 12 -
User Guide
Note: A key must not have an existing feature assigned to it before it can be programmed.
Note: It is not possible to answer a call while programming a key. It is only possible to program a
key when in a free state or off hook (state dial tone). Pressing the Program Key in other states will
result in an error beep. The 5005 IP Phone will appear busy when programming a key.
Hold
To place a call on Hold:
•
Press HOLD and replace the handset in the cradle.
To retrieve a call from Hold:
•
Lift the handset.
•
Press the LINE key to retrieve the call.
Note: A call placed on hold in this manner is held under the primary line assigned to the set.
Note: This form of hold is a ’System Hold’ as any other extension can pick up this held call if they
have a DSS/BLF key programmed for the initial holding extension.
Related Topics
Call Store
Exclusive Hold
Call Forward Variations
About Call Forward
Incoming internal and external calls presented at your extension can be forwarded in the following
ways:
•
Call Forward All (CFA) - forwards all your calls to another extension or extension group without
first presenting the calls at your extension.
•
Call Forward on No Answer or Busy (CFN/CFB) - forwards your calls to another extension or
extension group when you are busy on another call or away from your desk.
•
Remote Call Forward - forwards all your incoming calls to an external destination; for example, a
cellular phone or your home number.
•
Follow Me and Follow Me (I’m Here) - forwards your calls to another extension where you wish to
take your calls.
Each type of forwarding can be assigned to one of the programmable function keys and invoked by
pressing that key, or by dialing the appropriate feature access code.
Note: To cancel forwarding, dial the Cancel Call Forward feature access code, 617. For more
information on feature access codes, consult your System Administrator.
You can also forward your calls to voicemail, if available. Contact your System Administrator for the
extension number of the voicemail system.
- 13 -
User Guide
Call Forward All
This feature allows you to forward all your calls to another extension or an extension group without
ringing at your extension first. If you always forward your calls to the same extension or extension
group, you can program a CALL FORWARD ALL key with this number. Alternatively, you can
program the CALL FORWARD ALL key without specifying a destination number, which means that
you must dial an extension or extension group number each time you want to forward your calls. You
can setup a number of CALL FORWARD ALL keys on your extension, each holding a different
destination extension or extension group number.
To forward all of your calls to another extension or extension group:
1. Press the function key that has been programmed for CALL FORWARD ALL.
2. If you have not programmed a specific number, enter the number manually to which your calls
should be forwarded. When you lift your handset, you should hear an interrupted dial tone
indicating that your calls are being forwarded.
To cancel forwarding:
1. Press the active CALL FORWARD ALL key.
2. When you lift your handset, you should hear a normal dial tone indicating that your calls are no
longer being forwarded.
Call Forward No Answer
This feature allows you to forward your calls to a nominated extension or extension group when you
are busy on another call or you are unable to answer the call. If you always forward your calls to the
same extension or extension group, you can program the CALL FORWARD NO ANSWER
(CFN/CFB) key with this number. Alternatively, you can program the CFN/CFB key without specifying
a destination number, which means that you must dial an extension or extension group number each
time you want to forward your calls. You can setup a number of CFN/CFB keys on your extension,
each holding a different extension or extension group number.
To forward your calls to another extension or extension group when your extension is busy or you are
unable to answer the call:
1. Press the function key that has been programmed for CFN/CFB.
2. If you have not programmed a specific number, enter the number manually to which your calls
should be forwarded. From this point, any calls to your set that are not answered or receive a
busy signal will be forwarded to the number you have indicated. When you lift your handset, you
should hear an interrupted dial tone indicating that your calls are being forwarded.
To cancel forwarding:
1. Press the active CFN/CFB key.
Call Forward Busy
There are two variations of the Call Forward Busy feature:
•
CALL FORWARD BUSY INTERNAL sends your internal calls to another extension when you are
busy on another call.
•
CALL FORWARD BUSY EXTERNAL sends your external calls to another extension when you
are busy on another call.
- 14 -
User Guide
You can assign either one of these Call Forwarding features to a programmable key but not both to
the same key.
Note: When you program this feature through the Desktop Tool, there are two stages. The first is
to program the number of the extension that calls will be forwarded to by selecting
"Configure/Activate Call Forwarding" in the "I want to..." list.
To enable or disable CALL FORWARD BUSY INTERNAL:
•
Press the programmable key assigned to the CALL FORWARD BUSY INTERNAL feature.
To enable or disable CALL FORWARD BUSY EXTERNAL:
•
Press the programmable key assigned to the CALL FORWARD BUSY EXTERNAL feature.
Remote Call Forward
This feature allows you to forward your incoming calls to an external destination, for example, a
cellular phone or your home number.
Note: This feature is not available at all extensions, please contact your Administrator if you
require this feature. Invoking REMOTE CALL FORWARD cancels any active internal call
forwarding, and vice versa. You cannot store the target external number under a personal key
programmed with the REMOTE CALL FORWARD feature.
To forward all your calls to an external destination:
1. Press the function key that has been programmed for REMOTE CALL FORWARD. When you lift
your handset, you should hear interrupted dial tone indicating that you are forwarding your calls.
To cancel REMOTE CALL FORWARD:
1. Press the REMOTE CALL FORWARD key.
Follow Me
FOLOW ME is similar to the CALL FORWARD ALL function but allows you to receive your calls at
another extension.
To activate FOLOW ME:
1. Before you leave your desk, press the function key programmed for the FOLOW ME function.
2. When you are at the extension from which you wish to receive your calls, dial the FOLLOW ME
(I’M HERE) code followed by the extension number.
Note: Contact your System Administrator for the FOLLOW ME (I’M HERE) code.
Note: To be able to activate FOLLOW ME from any extension, select "None" instead of a specific
extension number when you program the feature.
FOLLOW ME will not function if the "pulled-from" extension does not have the FOLLOW ME
feature enabled or active.
- 15 -
User Guide
Call Me Back
CALL ME BACK allows you to request a call back after reaching a busy extension or busy external
line. The system monitors the extension or line and calls you when it’s free.
To request a callback when you reach a busy or unanswered telephone:
1. Wait until you hear a busy signal when making a call.
2. Press the CALL ME BACK key.
To answer a callback:
1. Lift the handset.
Camp-On
CAMP-ON, or CALL WAITING, lets you notify someone who is using a telephone that you are
waiting to be connected. An attendant may also camp a call onto a busy station. Upon hearing the
CAMP-ON tone, the busy party can either respond or finish the current call.
To CAMP-ON to a busy station:
•
Press the programmable key assigned to the CAMP-ON feature when you hear the busy signal.
To retrieve a call when you hear a CAMP-ON tone:
•
Press the programmable key assigned to the CAMP-ON feature.
Cancel
The Cancel key is a fixed-function key that allows you to cancel the current operation and return to a
dial tone. Pressing this key is equivalent to replacing your handset and lifting it up again. When this
key is pressed during programming, you are returned to the previous programming step.
Pressing the Cancel key will reconnect the user to the original active call if the user is in the middle of
a Transfer.
Line Keys
The top-left programmable function key on your set will automatically be programmed as a LINE key
(referred to as either an ’intercom’ or ’Prime Line’ key). Additional programmable keys can be set up
to access other lines so that you can answer or make calls on multiple lines.
Programmable keys designated as LINE keys will indicate the status of a line with the key light as
follows:
Key Status
Explanation
Lit
Unlit
Flashing with ringing cadence
Flashing with held cadence
The line is in use.
The line is idle (or free).
An external call is ringing on this line.
A call on this line is currently on hold.
- 16 -
User Guide
To program an additional LINE key:
1. Press the PROGRAM key.
2. Press the programmable key to be used for an additional line.
3. Dial 9 followed by the line number. For example, 001, to use Line 1.
4. Press the PROGRAM key once again. The programmable key will now be set to use Line 1.
To make a call using a line other than the primary one assigned to the set:
1. Lift the handset.
2. Press a line key that has been programmed to use another extension.
3. Dial the number.
Note: Refer to Making And Answering Calls for further information.
Message
If the message indicator is flashing slowly while the phone is not ringing, this indicates that you have
a message or voicemail.
Note: For voicemail to work properly with the 5005 IP phone, Call Forwarding must be activated
on the set. Refer to ICP technical documentation for further information.
The response to a message indication changes depending on whether the caller wants you to call
back or if they have left a voice message.
To respond to a message indication:
•
Lift the handset.
•
Press MESSAGE.
•
If the caller has left a voice message, the phone will automatically call the voicemail system.
OR
•
If the caller has activated your message indicator instead of leaving a voice message, the phone
will automatically call their number.
When you call another extension and your call is unanswered or the called extension is busy, you can
leave a message waiting indication to alert the user to return your call. The called extension user is
informed of the message waiting indication by their Message Indicator flashing and the display screen
showing "MESSAGE WAITING". The Message Indicator and display message at the target extension
are removed when a connection is established between you and the called extension.
Note: You cannot leave a message waiting indicator at an extension which already has a
message waiting from another extension user; you will hear a re-order tone.
If you have left a message waiting indication at another user’s extension and wish to cancel it, you
can do so via the pre-programmed Cancel Message Waiting key.
Redial
To redial the last number you called:
•
Lift the handset.
•
Press REDIAL twice.
Note: You can not redial a call that was made using a programmable function key.
- 17 -
User Guide
Transferring And Conferencing
Transfer
To Transfer an active call:
•
While in conversation with an established call, press TRANS/CONF.
•
Dial the number of the third party.
•
Do one of the following:
- To complete the Transfer, hang up.
- To announce the Transfer, wait for an answer, consult, and hang up.
To cancel a Transfer before the third party has been connected:
•
Press the CANCEL key to be reconnected to the original active call.
Conference
To form a Conference when a two-party call is already in place, or to add another party to an existing
Conference:
•
Press TRANS/CONF.
•
Dial the number of the next party.
•
Wait for an answer.
•
Press TRANS/CONF.
Note: The display screen will display "3 PARTY CONF" during a Conference call.
To leave a Conference:
•
Hang up.
Account Code
ACCOUNT CODE assigns a code to a call, usually for accounting purposes. The code identifies the
account in the call records that your system generates. You can program an ACCOUNT CODE key
with or without a specific account code. Specifying the account code saves you from having to dial it
every time you want to log a call.
To allocate an account code to an outgoing call if you have programmed an ACCOUNT CODE key:
1. Press the programmable key assigned to the ACCOUNT CODE feature.
2. Access a line and dial the external number.
Note: Contact your System Administrator for a list of account codes.
- 18 -
User Guide
Advisory Messages
You can program your extension to display a message at a calling extension; the message remains
on the calling extension’s LCD for the duration of ringing and is cleared when the caller hangs up or
you answer the call.
Msg. No.
1
2
3
4
5
6
7
8
9
*
0
#
Message
Away Sick
Away on Holiday
Back Tomorrow/Monday...Sunday
Back AM/11am...1am
Gone To Lunch
Back PM/1pm...Midnight
Gone Home
Please Call Back
Busy in Meeting
Back Soon
No Calls Please
Away on Business
To activate Advisory Messages:
1. Press the PROGRAM key.
2. Press the key on the numeric keypad corresponding to the appropriate message.
3. Press the PROGRAM key again. The Advisory Message is displayed immediately.
To deactivate Advisory Messages:
1. Press the PROGRAM key twice. The date will then return to the display screen.
Answer Variations
Answer External Call
If you want to answer external calls in the order that they arrive at your extension, you need to
program an ANSWER EXTERNAL key. You answer the incoming call by pressing the flashing, preprogrammed ANSWER EXTERNAL key. The ANSWER EXTERNAL key continues to flash until all
incoming external calls have been answered.
To answer external calls using the ANSWER EXTERNAL key:
1. Press the flashing ANSWER EXTERNAL key. The ANSWER EXTERNAL key continues to flash
until all the incoming external calls have been answered.
Answer Next Call
This feature is similar to Answer External Call, however, it applies to all incoming internal and external
calls. Answer Next Call allows you to answer all calls in the order that they are presented at your
extension. You answer the incoming call by pressing the flashing, pre-programmed ANSWER NEXT
CALL key. The ANSWER NEXT CALL key continues to flash until you have answered all the calls.
- 19 -
User Guide
To answer internal and external calls in the order that they are presented at your extension:
•
Press the flashing ANSWER NEXT CALL key. The ANSWER NEXT CALL key continues to
flash until all incoming calls have been answered.
Auto-Answer
AUTO-ANSWER lets you answer calls without lifting the handset. When a call arrives, you hear a
short ring, followed by the caller’s voice.
To enable or disable AUTO-ANSWER:
•
Press the programmable key assigned to the AUTO-ANSWER feature.
To answer a call while on AUTO-ANSWER:
•
Lift the handset.
Calls For
This feature identifies the extension number of a user who has forwarded calls to your extension.
When a forwarded call is presented at your extension, the CALLS FOR key flashes and your display
screen temporarily displays who the call was originally intended for. Press the CALLS FOR key to
answer the call (with the appropriate greeting). If a number of extension users forward their calls to
you regularly, you can program a CALLS FOR key for each extension.
Note: The CALLS FOR key should be labeled with the name or number of the forwarding
extension.
To answer a call forwarded from another extension:
1. Press the flashing CALLS FOR key.
Call Park
CALL PARK places an external call on hold for pick up by any extension in the system. CALL PARK
is similar to HOLD except that you use a different key. You also do not need a special key to retrieve
the held call as you can use a feature access code. Multiple calls can be placed on hold using CALL
PARK.
To place a call on CALL PARK:
1. Press the function key that has been programmed for CALL PARK.
To retrieve a call that has been parked:
1. Lift the handset.
2. Dial the CALL PARK pick-up code followed by the number of the line on which the call is parked.
Your display screen shows the number of the line that the call is parked on.
Note: Consult your System Administrator for specific function codes.
Call Pickup
CALL PICK-UP allows you to answer a call that is ringing at another extension in your pick-up group.
Your System Administrator assigns membership in a pick-up group.
- 20 -
User Guide
To answer a call that is ringing at another station in your pick-up group:
1. Lift the handset.
2. Press the programmable key assigned to the CALL PICK-UP feature.
Cancel Message Waiting
If you have left a message waiting indication at another user’s extension and wish to cancel it, you
can do so via the pre-programmed CANCEL MESSAGE key.
To cancel a Message Waiting indication using a CANCEL MESSAGE key which does not include an
extension number:
1. Press the CANCEL MESSAGE key.
2. Dial the extension number of the called extension or press the relevant DSS/BLF key.
To cancel a Message Waiting indication using a CANCEL MESSAGE key which is programmed with
an extension number:
1. Press the CANCEL MESSAGE key.
Do Not Disturb
When DO NOT DISTURB is on, your phone will not ring when you get a call. Extension users that call
you will hear a busy tone; external callers will hear ringing.
To activate or deactivate DO NOT DISTURB:
1. Press the programmable key assigned to the DO NOT DISTURB feature.
Note: "DO NOT DISTURB" will appear in the display screen.
Direct Station Selection/Busy Lamp Field (DSS/BLF)
A DSS/BLF (Direct Station Selection/Busy Lamp Field) key allows you to call another extension user
with a single key press. It also allows you to pick up calls to a specified extension or retrieve calls
that have been held at the specified extension.
The DSS/BLF key lights to indicate the status of the extension:
Key Status
Explanation
Lit
Unlit
Flashing with ringing
cadence
Flashing with held cadence
Programmed extension is busy, off-hook, or has set Do Not Disturb.
The extension is idle.
Programmed extension is ringing and the call can be picked up by
the extension with the DSS/BLF key.
Programmed extension has placed a call on System Hold and the
call can be picked up.
To call a pre-programmed extension:
1. Lift the handset.
2. Press the programmable key assigned to the DSS/BLF feature.
- 21 -
User Guide
To pick up a call to a pre-programmed extension:
1. When the DSS/BLF key is flashing with ringing cadence, lift the handset.
2. Press the programmable key assigned to the DSS/BLF feature.
To retrieve a call that has been held by a pre-programmed extension:
1. When the DSS/BLF key is flashing with held cadence, lift the handset.
2. Press the programmable key assigned to the DSS/BLF feature.
Extension Group
An EXTENSION GROUP key allows you to call an extension group with a single key. Membership of
an extension group is set up by your System Administrator (and can be, for example, all members of
the Sales Department). When an extension group is called, all extensions in the group ring until the
call is answered.
Contact your System Administrator for a list of extension group numbers.
The status of an extension group is indicated by the EXTENSION GROUP key light as follows:
Key Status
Explanation
Lit
Unlit
Flashing
All extensions in the extension group are busy.
At least one extension in the extension group is idle.
Extension group is ringing.
To call an extension group:
1. Lift the handset.
2. Press the programmable key assigned to the EXTENSION GROUP feature.
Extension Paging
EXTENSION PAGING allows you to make an announcement through an extension’s speaker. You
can program a key to page a single extension, an extension group, or all extensions effectively
turning the telephone system into an intercom.
To use EXTENSION PAGING:
1. Lift the handset.
2. Press the programmable key assigned to the EXTENSION PAGING feature.
3. Dial the extension number or the paging zone number (if applicable).
4. Make the announcement.
5. Replace the handset to complete the page.
Group Listen
During a handset call, this feature turns on your extension’s speaker to allow others nearby to listen to
your current call while your handset microphone remains on allowing you to speak to the other
person.
- 22 -
User Guide
To activate your extension’s speaker during a call:
1. Press the GROUP LISTEN key. The GROUP LISTEN key lights solid when the loudspeaker is
enabled and the following message is displayed: "GROUP LISTEN".
To de-activate your extension’s speaker:
1. Press the GROUP LISTEN key again. The GROUP LISTEN key extinguishes and the display
screen returns to normal.
Hold Variations
Call Store
This feature allows you to place an external call on hold under a key and leave it on hold for a predefined time.
Note: Only external calls may be held using this feature.
Note: The number of STORE keys that you can have programmed at your extension is limited by
the number of available personal keys to a maximum of thirty (30).
Note: A stored call cannot be picked by another extension user and you cannot transfer the
stored call to another extension.
To store a call:
1. While in conversation with another party, press a STORE key.
To retrieve a call that has been stored:
1. While your extension is idle, press the flashing STORE key.
Exclusive Hold
EXCLUSIVE HOLD places a call on hold that may only be retrieved from the originating set. This type
of hold allows you to place a single party on hold if you do not have any dedicated LINE or DSS/BLF
keys on your set. If you do have dedicated LINE or DSS/BLF keys, a number of parties can be placed
on Exclusive Hold.
To place a call on exclusive hold to make an enquiry call or answer another call:
•
While in conversation with an established call, press the EXCLUSIVE HOLD key. The current call
is placed on hold. Any DSS/BLF or LINE keys associated with the call will flash with held
cadence.
To retrieve a call from exclusive hold that is not associated with a DSS/BLF or LINE key:
•
Press the EXCLUSIVE HOLD key. You are re-connected to the held party.
To retrieve a call from exclusive hold that is associated with a DSS/BLF or LINE key:
•
Press the flashing DSS/BLF or LINE key. You are re-connected to the held party.
- 23 -
User Guide
Last Call Duration Display
This feature enables the duration of the last external call that was made from your extension to be
displayed on your set’s display screen. The duration of the current call is dynamically displayed during
the call.
To display the duration of the last external call:
1. While your extension is idle, press the CALL DURATION key.
Line Group
A LINE GROUP key allows you to access and answer calls from a specified line group with a single
key.
The LINE GROUP key light indicates the status of a line group:
Status
Explanation
Lit
Unlit
Flashing
All lines in the line group are busy.
At least one line in the line group is idle.
Line group is ringing.
To make a call using a line group:
1. Lift the handset.
2. Press the programmable key assigned to the LINE GROUP feature.
3. Dial the number or press a Speed Call key to dial a pre-programmed number.
To answer a call on a line group:
1. When the LINE GROUP key is flashing, lift the handset.
2. Press the programmable key assigned to the LINE GROUP feature.
Locking/Unlocking The Phone
Your System Administrator can assign a PIN (Personal Identification Number) code to you which,
when invoked, prevents unauthorized users from making external calls from your telephone. That is, it
locks your extension to prevent unauthorized use. You can also use your PIN code at another
extension to access features or make external calls which would not normally be available from that
extension.
Note: You can still make internal calls and dial emergency numbers from a locked extension.
To lock your extension:
1. While your extension is idle, press the programmable key assigned to the PIN CODE feature.
2. Dial your PIN code. If programmed, the PIN CODE key lights solid indicating that your extension
is locked.
3. Replace your handset.
- 24 -
User Guide
To unlock your extension:
1. While your extension is idle, press the programmable key assigned to the PIN CODE feature.
2. Dial your PIN code. If programmed, your PIN CODE key extinguishes.
3. Replace your handset.
To make an external call from another user’s locked extension:
1. While the extension is idle, press the programmable key assigned to the PIN CODE feature.
2. Dial your PIN code.
3. Access a line and dial the required external number.
4. At the end of the call, replace your handset. This extension remains unlocked for 60 seconds
(default) allowing you to make further calls if required, after this time the extension returns to its
locked state.
Night Service
About Night Service
Placing the system into Night Service mode is only available from an Administrator Extension,
however, an extension user can setup a NIGHT SERVICE key at their extension to monitor whether
the system is in Day or Night Service mode.
Two night service modes are available: Night Service 1 and 2. An Administrator can setup the system
to direct incoming calls to an extension or a number of extensions which will be answered outside of
regular working hours.
Each Night Service mode has an associated pick-up group, and when a night service mode is
operating, incoming calls can be picked up by any extension user in the group. Refer to Night Service
Pick-up.
To monitor whether the system is in Day or Night Service mode:
1. When the system moves into Night Service 1 or 2 mode the programmed NIGHT SERVICE 1 or
NIGHT SERVICE 2 key lights and the following message is displayed: NIGHT SERVICE x, where
x indicates the Night Service mode.
Night Service Pick-up
When Night Service is active, this feature allows you to pick up an incoming external call which is
ringing at another extension in your Night Service Pick-up group.
Note: Your System Administrator can set up the system so that a single-digit can be used to pickup the call instead of using the three-digit access code. Contact your System Administrator for a
list of single-digit access codes.
To answer a call that is ringing at another extension in your Night Service Pick-up group:
•
Press the NIGHT SERV PICKUP key, or dial the Call Pick-up single-digit access code. You are
connected to the caller of the ringing extension.
- 25 -
User Guide
Re-establish
If an external call you have transferred to another extension user is unanswered, the call returns to
your extension. This feature allows you to re-attempt the transfer. When the returned call rings at your
extension, the associated key flashes with rapid cadence and a message similar to the following is
displayed: "EXTN xxxx REVERTED".
To re-establish a returned call without speaking to the caller:
1. Press the RE-ESTABLISH key.
To speak to the caller of the returned call and re-establish the call:
1. Lift your handset.
2. Speak to the caller. The RE-ESTABLISH key lights solid.
3. Press the RE-ESTABLISH key.
4. Replace your handset.
Ringer On/Off
All incoming external calls that arrive at your extension under programmed personal keys ring to
indicate the arrival of the call. This feature allows you to turn off your extension’s ringer. All external
calls that arrive at your extension, under a programmed personal key, will be indicated by the key
flashing. The keys affected by this feature are:
•
LINE key;
•
LINE GROUP key
•
CALLS FOR key;
•
ANSWER EXTERNAL key
•
ANSWER NEXT CALL key.
Note: You will not be able to use the Ringer On/Off feature unless one of the features listed
above has previously been programmed into one of the function keys on the telephone.
To turn the Ringer off or on:
1. Press the RINGER ON/OFF key. The RINGER ON/OFF key lights solid and "RINGER OFF" is
displayed indicating that your extension does not ring when an external call arrives.
Repeatedly pressing the RINGER ON/OFF key toggles between switching your extension’s Ringer on
and off.
Speed Call
You may use Speed Call keys to make a call or to send a string of digits during a call (press a Speed
Call Key during a call to send a multi-digit password, for instance).
To dial a stored Speed Call number:
1. Lift the handset.
2. Press the key programmed for the Speed Call number you wish to dial.
- 26 -
User Guide
To use a stored Speed Call number during a call:
1. Make a call as per the usual procedure for making and answering calls.
2. When you need to enter the pre-programmed number you have already stored, press the key
programmed for the Speed Call number you wish to be transmitted.
Note: Speed call numbers are stored as detailed in the Programming The Function Keys topic.
Swap
SWAP allows you to alternate between two calls by pressing a key. Each call is kept private as
neither person can overhear your conversation with the other.
To use the SWAP feature to alternate between calls:
1. Make or answer a call, consult and then press the SWAP key to place that call on hold.
2. While the first call is on hold, make or answer a second call.
3. Press the programmable key assigned to the SWAP feature to alternate back and forth between
the two calls.
Note: This feature may only be available on this set provided that Exclusive Hold has already
been activated. Consult your System Administrator for more information.
- 27 -
User Guide
Index
1
10/100BaseT Ethernet .......................................................................................................................... 2
A
Account Code ..................................................................................................................................... 18
Adjusting ................................................................................................................................................. 5
Display Contrast ............................................................................................................................... 5
Handset Receiver Volume.................................................................................................................. 5
Ringer Volume .................................................................................................................................... 5
Volume Levels .................................................................................................................................... 5
Advisory Messages ............................................................................................................................ 19
Answer External Call ............................................................................................................................ 19
Answer Next Call .................................................................................................................................. 19
Auto-Answer ......................................................................................................................................... 20
B
Busy Lamp Field/Direct Station Selection ....................................................................................... 21
C
Call Forward .................................................................................................................................... 6, 13
Call Forward All ................................................................................................................................ 14
Call Forward Busy ............................................................................................................................ 14
Cancel Call Forward ......................................................................................................................... 13
Call Me Back ....................................................................................................................................... 16
Call Park .............................................................................................................................................. 20
Call Pickup .......................................................................................................................................... 20
Call Store .............................................................................................................................................. 23
Calls For .............................................................................................................................................. 20
Camp-On ............................................................................................................................................. 16
Cancel .................................................................................................................................................. 16
CFN/CFB .............................................................................................................................................. 14
Conference ........................................................................................................................................... 18
D
Desktop Stand ...................................................................................................................................... 7
Desktop Tool................................................................................................................................... 6, 11
DO NOT DISTURB............................................................................................................................... 21
DSS/BLF ........................................................................................................................................ 21, 23
E
Exclusive Hold ...................................................................................................................................... 23
Extension Group................................................................................................................................. 22
- 28 -
User Guide
F
Follow Me..............................................................................................................................................15
G
Group Listen........................................................................................................................................22
H
Hold ................................................................................................................................................13, 20
L
Last Call Duration Display .................................................................................................................24
Locking/Unlocking The Phone ..........................................................................................................24
M
Message ...............................................................................................................................................17
Message Waiting.................................................................................................................................21
Mitel Networks 3100 Integrated Communications Platform .................................................2, 3, 4, 9
Mitel Networks 3300 Integrated Communications Platform .............................................................2
Mitel Networks Corporation.....................................................................................................................1
Mounting .................................................................................................................................................8
On The Wall Using Screws .................................................................................................................8
On The Wall Using The Desktop Stand ..............................................................................................8
N
Night Service.........................................................................................................................................25
Night Service Pick-up............................................................................................................................25
Notices ...................................................................................................................................................3
Numeric Keypad....................................................................................................................................2
P
Paging ..................................................................................................................................................22
Personal Identification Number.........................................................................................................24
PIN ........................................................................................................................................................24
Prime Line key.................................................................................................................................2, 24
Program Key........................................................................................................................................11
Programmable Function Keys .............................................................................................................2
R
Redial ...................................................................................................................................................17
Re-establish.........................................................................................................................................26
Register..................................................................................................................................................4
Remote Call Forward ............................................................................................................................15
Ringer On/Off.......................................................................................................................................26
- 29 -
User Guide
S
Safety ..................................................................................................................................................... 3
Speed Call ..................................................................................................................................... 11, 26
Swap .................................................................................................................................................... 27
System Administrator ............................................................................4, 6, 13, 15, 18, 20, 24, 25, 27
T
Telephone Status Indicators................................................................................................................... 4
TRANS/CONF .................................................................................................................................. 9, 18
Transfer ................................................................................................................................................ 18
announce .......................................................................................................................................... 18
cancel ............................................................................................................................................... 18
complete ........................................................................................................................................... 18
V
Voicemail .................................................................................................................................. 13, 14, 17
Volume Control..................................................................................................................................... 2
- 30 -