1
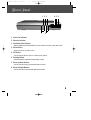
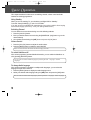
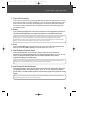
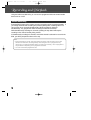
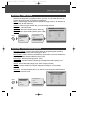
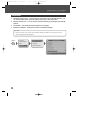
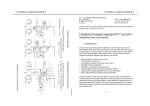
DSD-9502T
2006.9.13 2:16 PM
˘
` 1
mac001
1200DPI 90LPI
USER’S GUIDE
DSD-9502T/9503T
Twin digital terrestrial Receiver &
Hard disc Recorder
DSD-9502T
2006.9.13 2:16 PM
˘
` 1
mac001
1200DPI 90LPI
Introduction
Thank you for purchasing the Digital PVR.
Equipped with the latest technology and design, the DSD-9502T/9503T is a set-top box
ideal for digital terrestrial broadcast reception. The simple installation and operation, userfriendly three-dimensional OSD, Digital audio output with Dolby Digital ready, and
advanced video clarity made for TV and VCR are all designed to enrich the viewer
experience.
As a digital set-top box, it can receive FTA broadcasts. Outstanding stability and comfort
are its built in features. In addition to delivering more channels with its new highly
sensitive tuner, DSD-9502T/9503T boasts the Electronic Program Guide (EPG), for even
better program information on all channels, and information that enables subtitles and
teletext for a bounty of useful information on programs and broadcast signals.
As a twin tuner PVR, you can see picture in picture (PIP) to see two programmes on one
screen, you can record one channel while watching another. Furthermore, you can record
two channels simultaneously while playing back a previous recording from the HDD.
As a PVR, DSD-9502T/9503T utilizes the preloaded software functions by incorporating
the hard disk drive. This allows for assorted trick play, diverse formats of recording, and
recordings playback, all through the time shift recording function.
New versions can be updated through automatic software upgrade service (OAD). With
the latest software, viewers are always sure to enjoy endless hours of extraordinary digital
broadcasts and an abundance of data.
If you have any difficulties concerning the operation of your PVR, please refer to the
relevant section of this manual. This manual will provide you with useful information on
using the PVR.
1
DSD-9502T
2006.9.13 2:16 PM
˘
` 2
mac001
1200DPI 90LPI
Important care and safety advice
This Digital PVR has been manufactured to meet international safety standards, but you
must take care to operate it safely.
It is important that you read these safety instructions.
If you have any doubts about the installation, operation, or safety of this Digital PVR,
contact Daewoo, as shown in the next page.
CAUTION
RISK OF ELECTRIC SHOCK
DO NOT OPEN
CAUTION: TO REDUCE THE RISK OF
ELECTRIC SHOCK, DO NOT REMOVE
COVER (OR BACK). NO USERSERVICEABLE PARTS INSIDE. REFER
SERVICING TO QUALIFIED SERVICE
PERSONNEL.
The lightning flash with arrowhead
symbol, within an equilateral triangle, is
intended to alert the user to the presence
of uninsulated “dangerous voltage” within
the product’s enclosure that may be of
sufficient magnitude to constitute a risk of
electric shock.
The exclamation point within an
equilateral triangle is intended to alert the
user to the presence of important
operating and servicing instructions in the
literature accompanying the appliance.
Electrical warning
•
•
•
•
Your Digital PVR contains a high voltage which is sufficient to cause a dangerous
electric shock.
Never remove the Digital PVR cover.
There are no user-serviceable parts inside.
Switch off the power supply from the mains wall socket. before you disconnect any
equipment from the Digital PVR.
Never push anything into holes, slots or other openings in the case.
Positioning the PVR
•
•
•
•
•
•
2
The Digital PVR and cables should be placed so that they not likely to be walked on or
pinched by items placed upon or against them.
Do not expose your Digital PVR to direct sunlight or to extreme temperatures (above
40°C or below -5°C), high moisture levels or dust.
The apparatus shall not be exposed to dripping or splashing and that no objects filled
with liquids, such as vases, shall be placed on the apparatus.
The ventilation should not be impeded by covering the ventilation openings with
items,such as newspapers,table-cloths,curtains,etc.
Do not Place the Digital PVR on an unstable surface or on a bed, sofa, rug, or similar
surface as this may block air ventilation and cause it to overheat.
Never place the Digital PVR over a radiator or in an unventilated cabinet. No naked
flame sources, such as candles, should be placed on the apparatus.
DSD-9502T
2006.9.13 2:16 PM
˘
` 3
mac001
1200DPI 90LPI
Important care and safety advice
Cleaning
•
Cleaning : always disconnect from the mains supply before cleaning. Wipe with a lintfree cloth or one that has been slightly dampened with clean water. Never use
detergents, liquid cleaners.
Unplug when not in use
•
When not in use for an extended period, unplug the Digital PVR from the mains outlet.
Do not overload wall outlets and extension adapters as this can result in a risk of fire or
electric shock.
Use only authorized servicing
Earthing : The antenna cable must be earthed.
If any of the following occur
•
•
•
•
Any of the cables or plugs are damaged.
Liquid has spilled onto, or objects have fallen into, the Digital PVR.
The Digital PVR has been dropped or the casing has been damaged.
The Digital PVR does not operate normally.
Carefully unplug the Digital PVR from the electrical outlet and
•
•
Contact the retailer/ supplier who sold you the Digital PVR
Call the Daewoo Helpline : 0870 100 2525
Or e-mail us at [email protected]
End User licence
This hardware and software of this product are licensed to the user as a single product
that cannot be separated.
It is intended as domestic product for the purposes of receiving digital television services;
any other use is done so at the users risk.
In relation to the software the end user is prohibited from copying,transferring to a 3rd
party, modifying or otherwise attempting to derive the source code of any part or whole of
the software in the product.The software is not sold, but licensed for use in the European
Union to the owner of the hardware. New software maybe transmitted to the box by the
manufacturer in which case the licence transfers to the new software.
3
DSD-9502T
2006.9.13 2:31 PM
˘
` 4
mac001
1200DPI 90LPI
Table of Contents
Introduction ____________________________________________________________ 1
Important care and safety advice ____________________________________________2
Table of Contents _______________________________________________________ 4
Package contents ________________________________________________________4
Front Panel ____________________________________________________________ 5
Rear Panel _____________________________________________________________6
Remote Control _________________________________________________________ 7
Connecting the PVR ______________________________________________________8
Installation wizard _______________________________________________________11
Basic Operation ________________________________________________________12
PIP and Time Shifted Recording ____________________________________________14
Recording and Playback __________________________________________________16
Using the Main &Setup Menu ’s ____________________________________________19
Where to get more help __________________________________________________25
Specification ___________________________________________________________26
Package contents
When you open the packaging you should find
1) Daewoo Digital PVR
2) Remote Control & Batteries
3) RF-lead
4) User’s Guide & Quick start Guide
•
4
If any parts are missing, do not attempt to install this product.
Please contact the Daewoo Careline on 0870 100 2525.
DSD-9502T
2006.9.13 2:16 PM
˘
` 5
mac001
1200DPI 90LPI
Front Panel
1 2 3
7
4 5 6
8
1 Power On indicator
2 Remote indicator
3 Hard disk drive indicator
; will be visible when hard disk drive is in use ie when in record or time shift mode.
4 Menu Button
; allows access to on screen menu.
5 OK button
; can be used to select a menu or confirm menu options.
6 Standby Button
; switches between Operation and Standby modes.
7 Menu up/down Buttons
; can be used for moving up and down Menu screens.
8 Menu left/right Buttons
; can be used for moving left and right Menu screens.
5
DSD-9502T
2006.9.13 2:16 PM
˘
` 6
mac001
1200DPI 90LPI
Rear Panel
1
2
3
TV
L
RF IN
100-240V50/60Hz, 18W
R
Manufactuered under license from Dolby Laboratories.
"Dolby" and the double-D symbol are
trade marks of Dolby Laboratories.
DIGITAL TERRESTRIAL RECEIVER
HARD DISC RECORDER
MADE IN UK
RF OUT
S/PDIF
OUT
VCR
DVD
AUDIO
OUT
4
5
1 RF IN
; connects your aerial.
2 Audio L/R
; connects to your TV or VCR and outputs audio signals.
3 T V Scart
; connects a T V SCART cable.
4 RF OUT
; connects an RF to the RF (ANT) input on your TV or VCR.
5 S/PDIF
; outputs the digital audio signals.
6 VCR/DVD SCART
; connects to your VCR/DVD.
6
6
DSD-9502T
2006.9.13 2:16 PM
˘
` 7
mac001
1200DPI 90LPI
Remote Control
1
2
3
4
5
Mute ; pauses the audio temporarily.
TV/DVR ; switches between DVR and TV.
Number buttons
EPG ; Electronic Programme Guide
Menu ; choose and change a wide range of PVR’s
features. Or exit the menu.
6 Arrow buttons ; allows you to move through
menu’s. Or navigates in playback mode.
7 Record ; initialises the record - see relevant section
in this manual.
8 Channel +/- ; allows you to change channel.
9 Playback control buttons ; Includes Play, Fast
Forward, Rewind, Pause and Stop.
10 Time Shift ; activates time shift function -see
relevant section in this manual)
11 Colour buttons ; used for selecting interactive
applications.
12
13
14
15
16
17
18
19
20
21
22
23
24
25
26
Subtitle ; switch ON/OFF programme subtitles.
Audio ; displays audio language menu.
Wide ; sets display format.
FAV ; moves to favourite TV channels (List 1 - List 2...)
Standby ; switches between operation and standby modes.
Info ; displays information on the current and next programs on the channel.
Library ; displays Recording library menu.
Timer ; accesses the timer programming channels
TEXT ; enters TeleText service.
OK ; selects channel list or confirms the selected operation.
BACK ; exits from TeleText service.
Volume +/- ; allows volume control.
Swap ; swaps the focus between the main and the PIP screen.
PIP ; displays the picture in picture (PIP) screen.
PIP+/- ; changes the PIP Channel.
7
DSD-9502T
2006.9.13 2:16 PM
˘
` 8
mac001
1200DPI 90LPI
Connecting the PVR
SCART connections offer the best picture and sound quality.
They can also tell your TV when the Digital PVR is switched on and off and whether
widescreen pictures are being broadcast. Therefore this is the way this box has been
designed to be connected.
1. Connect your aerial to the Digital PVR.
•
•
Make sure your TV is switched off, together with any other equipment you are
connecting to it.
Insert the cable from your aerial into the Digital PVR socket marked ‘RF IN’.
2. Connect the SCART cable.
Choose the option below that best suits your TV (and VCR, if you have one). If you need a
longer SCART cable, you can find one at most TV or electronics retailers.
Ask for a “fully-populated” SCART lead.
Option 1: connecting to a TV only
•
•
Connect the SCART cable between the ‘TV’ socket on your Digital PVR’s rear panel
and your TV’s SCART socket.
Connect an RF cable between the ‘RF OUT’ output on the Digital PVR and the RF
socket on your TV (where you normally connect the aerial).
TV
AERIAL
RF Cable
SCART Cable
(Not supplied)
TV
L
RF IN
100-240V50/60Hz, 18W
R
Manufactuered under license from Dolby Laboratories.
"Dolby" and the double-D symbol are
trade marks of Dolby Laboratories.
8
DIGITAL TERRESTRIAL RECEIVER
HARD DISC RECORDER
MADE IN UK
RF OUT
AUDIO
OUT
S/PDIF
OUT
VCR
DVD
DSD-9502T
2006.9.13 2:16 PM
˘
` 9
mac001
1200DPI 90LPI
Connecting the PVR
Option 2: connecting to a TV and VCR
•
•
•
•
Connect the SCART cable between the VCR socket on your Digital PVR and your
VCR’s SCART IN socket.
Connect a SCART cable between the SCART TV socket on your Digital PVR and your
TV SCART IN socket.
Connect an RF cable between the ‘RF OUT’ socket on the Digital PVR and the RF
input socket on your VCR.
If there isn’t already one in place, connect a second RF cable between the RF output
on your VCR and the RF input socket on your TV.
TV
AERIAL
RF Cable
SCART Cable
(Not supplied)
TV
L
RF IN
100-240V50/60Hz, 18W
R
Manufactuered under license from Dolby Laboratories.
"Dolby" and the double-D symbol are
trade marks of Dolby Laboratories.
DIGITAL TERRESTRIAL RECEIVER
HARD DISC RECORDER
MADE IN UK
RF OUT
S/PDIF
OUT
AUDIO
OUT
VCR
DVD
SCART Cable
(Not supplied)
VCR
3. Connect the POWER cable.
4. Switch on your TV.
•
•
•
•
Switch on your TV
Switch on the mains outlet for the Digital PVR.
Press [POWER] on your PVR remote. The PVR’s green light should go on.
Your TV should switch to the Digital PVR automatically. If no, select the AV channel
using the button on your TV remote marked AV, EXT, TV/AV, O/E or a
symbol, or
9
DSD-9502T
2006.9.13 2:16 PM
˘
` 10
mac001
1200DPI 90LPI
Connecting the PVR
•
refer to your TV manual.
If you cannot see the picture from the Digital PVR, please refer to the “where to get
more help” section towards the end of this user’s guide.
You are now ready to tune in to the digital TV service.
10
DSD-9502T
2006.9.13 2:16 PM
˘
` 11
mac001
1200DPI 90LPI
Installation wizard
Using your Digital PVR for the first time.
The first time you use your Digital PVR, you will see a screen like the one
below. The Digital PVR now needs to scan for available Digital TV channels.
•
Press [OK] on your Digital PVR’s remote control to begin
searching for digital channels. The search will take between 2
and 5 minutes, depending on the digital TV service in your
area.
•
As channels are found, their names are listed on the
TV screen.
When the scan has finished, the Digital PVR will
automatically switch to the first channel in the list.
•
You can now explore and enjoy the channels available on your Digital TV
service.
Please read on to find out more about the features offered by your Digital
PVR.
11
DSD-9502T
2006.9.13 2:16 PM
˘
` 12
mac001
1200DPI 90LPI
Basic Operation
This chapter describes functions such as switching channel, volume control and basic
features for watching programmes.
Using Standby
When you are not watching TV, you should set your Digital PVR to ‘Standby’.
To do this: Press [POWER(√)] to switch to STANDBY.
If you plan to leave your Digital PVR unattended for a long period, switch it off and unplug
it at the mains supply. (Don’t worry - all of your settings will be saved.)
Switching Channel
You can switch the current channel using one of the following methods.
1 Press the [CH-/CH+] button.
2 Enter your desired channel numeric using the [NUMERICAL (0-9)] button to go to the
channel directly.
3 Go to desired channel using the […/†] button and press the [OK] button.
Volume Control
1 Press the [Vol+/Vol-] buttons to adjust the audio volume.
2 Press the [MUTE] button to switch the sound ON/OFF.
Note: The mute function will remain off after changing channels.
To switch Subtitle on/off
If the current programme provides Subtitle information, you can switch the Subtitle on or
off by pressing [SUBTITLE] button.
You can select a default subtitle language by selecting SETUP - Language - Subtitle
Language.
To change Audio language
If the current programme is available in multiple audio languages, you can select the
language that you wish to listen to.
1 Press the [AUDIO] button to display the audio language menu.
2 Select your desired audio language using the [œ/√] button and press the [OK] button.
You can select a default audio language by selecting SETUP - Language - Audio Language.
12
DSD-9502T
2006.9.13 2:16 PM
˘
` 13
mac001
1200DPI 90LPI
Basic Operation
Using the TV Guide (EPG)
The TV Guide shows a full list of available channels and programmes.
To view the Guide :
1 Press [EPG].
2 Press […/†] to scroll through the list of channels.
3 To scroll through the programmes press [œ/√].
To scroll forwards and backwards, one day at a time,
press the blue and the yellow colour buttons.
To preview the highlighted channel, press [INFO].
To add the selected programme to your Timer, press
the [REC] button.
4 To go up or down to next page, press [CH+/–].
5 To view the highlighted channel, press [OK].
6 To exit the TV Guide without changing channel, press [MENU] or [EPG].
Now and Next Information
Now and Next gives you information on the current and next programmes on each
channel.
1 To open the Now/Next menu press [INFO]. This
displays information on the programme showing
Now.
2 To see more detailed information press [INFO] again.
3 To see information on the programme showing Next,
press [√].
4 To change the channel you want information for
press […/†].
5 To watch the highlighted channel press [OK].
13
DSD-9502T
2006.9.13 2:16 PM
˘
` 14
mac001
1200DPI 90LPI
PIP and T ime Shifted Recording
Picture-in-Picture (PIP) Screen
If you press the [PIP] button on the remote control while watching TV, you can watch 2
channels at the same time. The Audio from the Main screen will be outputted.
Each time you press the [PIP] button, the PIP screen is switched on or off.
PIP screen
Normal screen
Note:
• The PIP screen is not available while recording two channels simultaneously.
• The subtitle is not available when you are watching PIP screen
• The teletext (MHEG) is only available on the main screen.
1. Swapping the PIP screen.
Press the [SWAP] button on the remote control to swap the main screen for the PIP
screen. Press the [CH-/CH+] button to change the main screen channel.
Playback is available only on the main screen (swapping is not available).
2. Switching channels in the PIP screen
You can change the PIP channel using the [PIP+/PIP-] button.
Press the PIP button on the remote control to display the PIP screen, then press the
[PIP+/PIP-] button to change the channel on the only PIP screen.
Time Shifted Recording (TSR)
You can perform the time shift operations like VCR
functions using the Playback control buttons while
playing a programme.
To save the programme on the screen to the installed
hard disk drive temporarily press [TIME SHIFT] button,
so that users can pause, play, fast rewind, fast forward,
replay, etc. even while watching the currently
broadcasting TV programme.
14
DSD-9502T
2006.9.14 10:31 AM
˘
` 15
mac001
1200DPI 90LPI
PIP and Time Shifted Recording
1. Time shift information
First enter time shift mode by pressing [TIME SHIFT] button this will pause live TV and
press [PLAY] button to continue watching TV or if you press the [INFO] button in TSR
mode, the time shift information will be displayed. The time shift information displays
the current operation status and the time difference between the broadcasting point
and watching point.
2. Pause
If you press the [PAUSE] button on the remote control, the current programme is paused. If
you press the [PAUSE] button once again, the programme is resumed from that point.
Note: Pause makes the time difference or delay between the broadcasting (live) point and
watching point. The time difference is equal to the period the programme was paused.
Operations like slow motion and fast rewind also make the time difference. Press the STOP
button to remove the time difference and go to the live programme.
3. Slow
If you press the [œ/√] button in pause screen, the screen enters into slow playback mode.
When you press the [œ/√] repeatedly, the speed will be set to 1/4 or 1/2.
4. Fast Rewind to Previous Scene
Press the [REW] button on the remote control to watch the scene passed by.
Whenever you press the [REW] button, the rewind speed increases. (x1.5, x3, x6, x12,
x24) If you press the [PLAY] button, the fast rewind operation stops and the
programme is played at normal speed.
Note: You can fast rewind back to the point. If you reach the start point while rewinding, the
programme is automatically played at normal speed from that point.
5. Fast Forward to the Next Scene
Press the [FF] button on the remote control to fast forward the programme. Whenever
you press [FF] button, the speed increases. (x1.5, x3, x6, x12, x24) If you press the
[PLAY] button, the fast forward operation stops and the programme is played at normal
speed.
Note: If you reach the live screen while in fast forward operation, the time shift operations is
stopped and goes to the live mode automatically.
15
DSD-9502T
2006.9.13 2:16 PM
˘
` 16
mac001
1200DPI 90LPI
Recording and Playback
Using the built-in hard disk drive, you can record a programme without an external media
device such as a VCR.
Instant Recording
Press the [REC] button on the remote control to record the current programme instantly. If
you change channels while recording and press the [REC] button, recording starts. You
can record up to two channels simultaneously. While recording two channels
simultaneously, only programmes which are being recorded can be viewed.
While simultaneously recording two channels, pressing the stop button will stop the
recording on the channel currently being viewed.
If simultaneously recording two channels, and a third channel is selected for record via the
EPG, you will be prompted to select one to stop.
Note:
• Ensure that there is enough free space before recording. If the free space on the hard
disk drive is insufficient, recording will stop. Recording one hour of programme may
require up to 2 or 3GB of hard disk space. The space for recording 1 hour of programme
may be different depending on the programme recorded.
• You can record radio programmes also.
16
DSD-9502T
2006.9.13 2:16 PM
˘
` 17
mac001
1200DPI 90LPI
Recording and Playback
Timer
You can set a programme to record automatically by going to Menu - Recording - Timers.
Or easily by pressing the [TIMER] button.
You can record up to two channels simultaneously. While recording two channels
simultaneously, only programmes being record can be viewed.
MENU
1 Programming the PVR to record
1 Press the yellow button to add a new recording
schedule.
2 Change the Channel and Date using the [œ/√] button.
3 Change the Date and Time using the [œ/√] button and
the [NUMERICAL (0~9)] button.
4 Select one of Repeat mode options among Once,
Daily and Weekly using the [œ/√] button.
5 Select Playback and Change/Delete preference using
the [œ/√] button.
6 Press the green button to complete entering.
7 Press the red button to cancel the reservation.
Recording
Programme guide
Setup
Installation
Recordings library
TIMER
Timers
Guide search
Recording configuration
Note:
• You can reserve 2 programmes to record
simultaneously.
• If the target channel is locked, restricted by watching
time or parental control, you have to enter a
password for reservation.
2 Editing the Recording Schedule
1 Select a reserved programme list and press the
green button to edit the reserved recording schedule.
2 Change each item like above steps.
17
DSD-9502T
2006.9.13 2:16 PM
˘
` 18
mac001
1200DPI 90LPI
Recording and Playback
Programme Playback
You can view the recorded programmes in the Menu - Recording - Recording library. You
also can easily view the recorded programme list by pressing the [LIBRARY] button.
1 Select the desired programme to playback using the […/†] button and then press the
[PLAY] button to playback the programme.
2 Press the [STOP] button to stop the current programme and go to the current live
programme.
The eye icon in front of programme names highlights recordings which have not been
watched fully.
3 You can see various play options when you press [OK] button on a highlighted
recording.
play from start : plays from the beginning
resume : plays from the last watched scene
play from offset : plays from inputted offset minute
manage chapters : delete chapters or play from a marked chapter
create archive : plays several tagged recordings sequentially
4 If you press the [MENU] button during playback, chapter option shows up. Then you
can create a new chapter or move to last or next chapter.
Programme playback from recording library
MENU
18
Recording
Recordings library
Programme guide
Timers
Setup
Guide search
Installation
Recording configuration
DSD-9502T
2006.9.13 2:16 PM
˘
` 19
mac001
1200DPI 90LPI
Using the Main & Setup Menu’s
The Main menu lets you choose and change a wide range of your Digital PVR’s features.
• To access the Main Menu, press [MENU].
Recording
Recordings library
Programme guide
Timers
Setup
Guide search
Installation
Recording configuration
Recording
Programme guide
Setup
enters into EPG
screen.
Installation
Recording
Channel list
Programme guide
Favourites
Setup
Configuration
Installation
Language
Recording
Automatic channel scan
Programme guide
Manual channel scan
Setup
Format disk
Installation
First time installation
Recording - Recording library
- lets you see a recording list. Refer to page 18 for more information.
Recording - Timers
- lets you set a timer so that the Digital PVR changes to a specific channel at a certain
time (such as when you wish to record a programme).
Refer to page 17 for more information.
19
DSD-9502T
2006.9.13 2:16 PM
˘
` 20
mac001
1200DPI 90LPI
Using the Main & Setup Menu’s
Recording - Guide search
-
searches and finds out the programmes which you want. You can enter this menu by
pressing the [TEXT] button in programme guide [EPG].
Search : selects target channels (current channel list, single channel, all channels, all
TV channels, all radio channels)
Channel : selects a target channel when you search single channel
From, Until : sets search time
Search by : sets search method (Genre, Name by)
Match on : sets search details (specific genre or title)
MENU
Recording
Recordings library
Programme guide
Timers
Setup
Guide search
Installation
Recording configuration
Recording - Recording configuration
Start early, End late : sets the start and end timing for programme guide recording.
These menus are valid only when record type is 'time'.
Max timeshift : sets the maximum timeshift time. But this time is not exact because the
size of broadcasting stream is different case by case.
Record type : sets the record type (Event, Time)
Auto discard : sets the method of discarding recordings when HDD capacity is not
enough.
discard : sets the discarding target (none, oldest, longest, shortest)
Unplayed : selects whether you discard unplayed recordings or not. (Excluded,
Included)
Watershed : sets the watershed time. If you want to record during the watershed time,
you have to enter PIN code.
MENU
20
Recording
Recordings library
Programme guide
Timers
Setup
Guide search
Installation
Recording configuration
DSD-9502T
2006.9.13 2:16 PM
˘
` 21
mac001
1200DPI 90LPI
Using the Main & Setup Menu’s
Programme guide
-
-
displays programme information about each channel, based on the date and time. You
can also schedule your recording using the information given.
Refer to page 13 for more information.
You can shrink and expand time range and navigate to previous or next day by colour
buttons. Searching is available by pressing [TEXT] button and recording is also
available by pressing [REC] button.
MENU
Recording
Programme guide
Setup
Installation
21
DSD-9502T
2006.9.13 2:16 PM
˘
` 22
mac001
1200DPI 90LPI
Using the Main & Setup Menu’s
Setup - Channel list
- lets you delete, reorder, lock, favourite and rename the channel line up.
Channel list shows only favorite list channels when favourite mode is on.
You can easily enter channel list menu by pressing [OK] button while watching a
channel.
MENU
Recording
Channel list
Programme guide
Favourites
Setup
Configuration
Installation
Language
Setup - Favourites
-
lets you edit favorite channel list. After you set favourite list and switch favourite mode
on, channel list shows only favourite channel list.
You can move to other channels by entering channel number by [numerical] buttons.
5 favourite lists are available and you can move to another list by pressing [FAV]
button (list1 - list2 - list3 - list4 - list5 - all channel - list1 - ...).
MENU
22
Recording
Channel list
Programme guide
Favourites
Setup
Configuration
Installation
Language
DSD-9502T
2006.9.13 2:16 PM
˘
` 23
mac001
1200DPI 90LPI
Using the Main & Setup Menu’s
Setup - Configuration
1 Country : sets country. Broadcasting RF band is different for each country.
2 Subtitle : sets subtitle on/off
3 TV type : lets you change how programmes are displayed on your TV (widescreen
16:9 or normal 4:3).
4 TV Out : set TV output option among RGB and CVBS.
5 Favourite mode : sets favourite mode (Off, list 1~5)
6 Channel list : sets channel list (Show all, TV only, Radio only, text only)
7 Receiver Upgrade : confirm current software version
8 Parental control : set parental control for each programme and change your Password.
Enter password using numerical [0 -9] buttons when prompted.
Note: The Default Password is 0000. If you have forgotten your Password, please
contact your local product distributor.
9 Recordings configuration : Refer to page 20 for more information.
10 Hard disk info : You can check the free space of the hard disk drive.
MENU
Recording
Channel list
Programme guide
Favourites
Setup
Configuration
Installation
Language
Setup - Language
You can set Language for Menu, Audio and Subtitle. You also can easily view by pressing
the [AUDIO] button.
MENU
Recording
Channel list
Programme guide
Favourites
Setup
Configuration
Installation
Language
23
DSD-9502T
2006.9.13 2:16 PM
˘
` 24
mac001
1200DPI 90LPI
Using the Main & Setup Menu’s
Installation
1 Automatic channel scan - If your product is connected to the aerial and television, you
can automatically search channels without entering any other information.
2 Manual channel scan - You can search channels manually by pressing the [numerical]
buttons.
3 Format disk - can format (erase) the disk drive if necessary.
4 First time installation - restores the product to the default settings.
Warning :
• Please note that once you set to the default settings, all data such as channel list and
user configured data are deleted.
MENU
24
Recording
Automatic channel scan
Programme guide
Manual channel scan
Setup
Format disk
Installation
First time installation
DSD-9502T
2006.9.13 2:16 PM
˘
` 25
mac001
1200DPI 90LPI
W here to get more help
If you have any problems using your Digital PVR and cannot find a solution in this user
guide:
For general problems contact
Daewoo helpline on 0870 100 25 25
Or e-mail us at [email protected]
If possible when calling, you should be close to your TV and have your Digital PVR and TV
switched on.
For general Freeview reception enquires
Freeview : 08708 80 99 80 or www.freeview.co.uk
Digital TV Group : www.dtg.org.uk
For aerial and signal problems
Euro Aerials on 0870 412 4862 (lines open Monday to Saturday, 8:30am to 5:30pm)
The product referred to in this manual is a Digital Terrestrial PVR supplied by Daewoo
Electronics UK, Rathenraw Ind. Est. 62-82 Greystone Road Antrim, Co. Antrim, BT41
1NU
25
DSD-9502T
2006.9.13 2:16 PM
˘
` 26
mac001
1200DPI 90LPI
Specification
UHF Channel
DVB Compatible
Decoding
Video
Audio
Symbol rate
Power
Power requirements
RF Connection
TV Connection
Accessories
Channel 21-69
-75 to -20 dBm
Bandwidth 8 MHz
ETS 300 744
MPEG2 compatible (DVB/Main profile@Main level)
1.5~15Mb/s (720 x 576)
MPEG2 - Musicam (layer 1&2) (32, 44.1, 48kHz)
2~40 Mbaud
Input Voltage : 240V, 50/60Hz
20Wmax
18W in operation
11W in standby
IEC connector 169-2 (female),diameter 9.5mm
Two SCART
RGB / CVBS
Remote Control, Batteries, RF lead, User Guide,
Quick start Guide
Due to continued product improvement,this specification may change without notice.
This product complies with the following European Council Directive
EN60065
73/23/EEC (the Low Voltage Directive) as amended
89/336/EEC (the EMC Directive) as amended
Digital Terrestrial Television Broadcast Receiver and Decoder
MADE IN UK
26
DSD-9502T
2006.9.13 2:16 PM
˘
` 27
mac001
1200DPI 90LPI
Specification
Disposal of Used Electrical &Electronic Equipment
The meaning of the symbol on the product, its accessory or packaging indicates that this
product shall not be treated as household waste.
Please, dispose of this equipment at your applicable collection point for the recycling of
electrical & electronic equipments waste.In the European Union and Other European
countries which there are separate collection systems for used electrical and electronic
products.
By ensuring the correct disposal of this product, you will help prevent potentially
hazardous release to the environment and damage to human health, which could
otherwise be caused by unsuitable waste handling of this product.
The recycling of materials will help conserve natural resources.
Please do not therefore dispose of your old electrical and electronic
equipment with your household waste.For more detailed
information about recycling of this product, please contact your
local city office,your household waste disposal service or the shop
where you purchased the product.
27