1
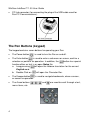
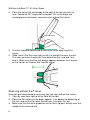
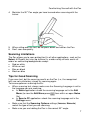
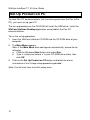
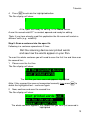
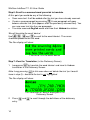
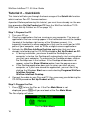
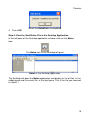
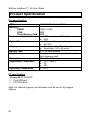
Table of Contents
Familiarizing Yourself with the Pen.................................................... 3
The Pen Buttons (keypad)............................................................. 4
Scanning ....................................................................................... 5
What is on the Pen ........................................................................ 9
The Notes application................................................................ 9
The Scan to PC application ....................................................... 9
Scanning Languages................................................................. 9
Interface Languages.................................................................. 9
Set Up Product on PC ..................................................................... 10
Tutorials........................................................................................ 11
Tutorial 1 – Notes ........................................................................ 11
Tutorial 2 – QuickLink.................................................................. 16
Tutorial 3 – Scan to PC ............................................................... 20
Product Specification....................................................................... 22
Worldwide Limited Warranty ........................................................... 23
WEEE ............................................................................................. 24
Registration .....................................................................................25
Copyrights and Trademarks
© 2006 WizCom Technologies Ltd. All rights reserved.
WizCom Technologies Ltd. uses the Ligature OCR-on-a-Chip copyright
© 1995-2006, Ligature Compression Technology copyright © 1996-2006, and
Ligature reverse inflection and derivation technology copyright © 1997-2006
under license from Ligature Ltd. All rights reserved.
WizCom InfoScan, QuickLink-Pen, Quicktionary, Reading Pen, WizCom
SuperPen, WizCom and Quicktionary pen shaped design are trademarks or
registered trademarks of WizCom Technologies Ltd. All rights reserved.
All other brands and product names appearing here are registered
trademarks or trademarks of their respective holders.
2
Familiarizing Yourself with the Pen
Familiarizing Yourself with the Pen
The scanning device (‘Pen’) contains the following parts:
• Pen Tip with optical scanning head
• Protective cover
• Power button
• Keypad
• Display
•
•
•
Battery compartment cover
Battery compartment
Flash memory card socket
3
WizCom InfoScan™ 1.00 User Guide
•
PC link connector (for connecting the plug of the USB cable used for
Pen-PC Communications).
The Pen Buttons (keypad)
The keypad contains seven buttons for operating your Pen:
•
The Power button
•
is used to enter a sub menu or screen, confirm a
The Enter button
selection or perform an operation. In addition, the
button has special
functionalities on text in an open Notes file:
will open the Hebrew translation for the current
a. Long pressing
English word.
b. Double-Click on
will open the Character Bar.
•
is used to navigate backwards, close a screen,
The Escape button
or cancel an operation.
•
The Arrow buttons
menu items, etc.
4
is used to turn the Pen on and off.
,
,
and
are used to scroll through a text,
Familiarizing Yourself with the Pen
Scanning
Scanning means to roll the Pen over printed text. When scanning, the optical
head of the Pen scans the surface and creates a bitmap copy of the scanned
text. In all applications the image is processed resulting in the actual letters
by using OCR (Optical Character Recognition).
How to Scan
Following are instructions on how to scan.
For a short movie, demonstrating scanning, please access
http://www.wizcomtech.com/presentations/main_18.html.
Always make sure that:
1. The Pen is on.
2. The Pen Cap has been removed.
3. The Pen is in scanning mode – denoted by the red blinking light at
the tip of the Pen.
If you are Left Handed:
The Pen default is set to right handed scanning. To change it to left handed
scanning:
1. In the Preferences menu, scroll using
and
until the option
Right-/Left-Handed appears on the screen and press
.
2. Scroll to the mode you prefer by using
or
.
.
3. Press
Scanning with the Trainer
The transparent trainer is used for the initial scan practice:
1. Slide the trainer on to the tip of the Pen (instead of the cap) and
press firmly into place.
5
WizCom InfoScan™ 1.00 User Guide
2. Place the trainer flat and steady to the right of the text you wish to
scan. Notice the 90˚ angle that is created. This is the angle you
should preserve whenever scanning, even without the trainer.
3. The text should be positioned at the center of the opening of the
trainer.
4. Glide (‘scan’) the Pen from right to left in a straight line over the text.
The area you scan should start 1cm before the text, and end 1cm
after it. Make sure that the text always appears between the 2 arrows
on the trainer, as if being “fed” into the trainer.
Scanning without the Trainer
Once you get accustomed to scanning, you can scan without the trainer:
1. You can scan from right to left or from left to right.
2. Place the Pen rollers on the page, approx. 1 cm before the beginning of
the text, and roll the Pen over the text until 1 cm after the text.
3. Make sure that the white guidelines at the Pen’s tip pass exactly over the
middle of the scanned text.
6
Familiarizing Yourself with the Pen
4. Maintain the 90˚ Pen angle you have learned when scanning with the
trainer.
5. When rolling over the text, do not press down too hard on the Pen.
6. Don’t scan too quickly.
Scanning Limitations
The Pen allows you to scan printed text (in all other applications, such as the
Notes) 6-22 point font size (up to 8mm) in a wide variety of fonts and in all
colors on contrasting backgrounds except:
• Red on white
• White on red
• Blue on black
• Black on blue
Tips for Good Scanning
If you scan text, but the scanning results on the Pen (i.e., the recognized
text) are not satisfactory, simply try scanning again.
To ensure optimum scanning results:
• When scanning text, always make sure the Scanning Language is set to
the language you are scanning.
o In Notes application: check the scanning language set in the Edit
Menu (to view the Edit Menu press
from within an open Notes
file).
o In Scan to PC application: check the scanning language set in the
Settings menu.
• Make sure that the Scanning Options settings (Inverse, Numeric)
match the type of text you are scanning.
• Make sure you are holding the Pen in the correct 90˚ angle.
7
WizCom InfoScan™ 1.00 User Guide
•
•
•
•
Place the book/page on a flat surface.
The page must be light while the text or image you scan must be dark.
Make sure the printout is of good quality and the page is not creased.
Note that poorly photocopied materials may provide bad results.
Do not scan too fast.
Editing Text (without Scanning)
In addition to scanning, the Character Bar can be used as input method –
that do not involve scanning.
They can be used to edit scanned text and are also useful to enter text
manually (when words or phrases cannot be scanned because letters are too
large, handwritten, or are on a type of background that the Pen does not
scan, see Scanning Limitations on page 7).
The Character Bar
The Character Bar enables you to enter text manually by overwriting or
inserting characters. The language of the Character Bar is the same as the
current Scanning Language set in the file you are editing.
Accessing the Character Bar
To access the Character Bar:
1. When inside an open Notes file, double click
Character Bar.
to access the
The Latin Character Bar
The Hebrew Character Bar
2. The Character Bar opens and the string of text you are editing is
displayed above it. The first letter of the active character sequence is
highlighted on the Character Bar and appears in the string of text where
it will be entered if you select it.
8
Familiarizing Yourself with the Pen
3. Press
or
to scroll along the Character Bar. As you move from
character to character, each character is highlighted and appears in the
string of text.
4. Press
to select the highlighted character. The character is entered
into the text string (the character is inserted – when in insert mode, or
the character overwrites the highlighted character – when in overwrite
mode).
5. If you are in Multiple Character mode (
), you can add additional
characters. To do so, repeat steps 3 and 4. When you are done, press
to close the Character Bar. If you are in Single Character mode
), the Character Bar automatically closes.
(
What is on the Pen
The Pen is preloaded with the following:
The Notes application
Used for scanning printed text in various languages, and storing the text in
files on the Pen. Stored Notes files can be:
• Sent to your computer (using the QuickLink option)
• Sent to a PDA or Smartphone (using the Beaming options).
In addition, stored English text can be translated into Hebrew.
The Scan to PC application
Used for scanning text and sending it directly to applications on your
computer.
Scanning Languages
Printed text can be scanned in English, Hebrew, French, German or
Spanish according to the selected scanning language.
Interface Languages
The Interface Language is the language in which the menus and
messages appear. The Pen is provided with 2 interface languages –
English and Hebrew.
Important: If for some reason software has been erased from your Pen, use
the CD-ROM Restore Pen option to restore the Pen’s original software.
9
WizCom InfoScan™ 1.00 User Guide
Set Up Product on PC
To allow Pen-PC communications (for transferring data from the Pen to the
PC), you must set up your PC.
The set up procedure on the CD-ROM will install the USB driver, install the
WizCom InfoScan Desktop application and establish the Pen-PC
communications.
To run the set up procedure:
1. Insert the WizCom InfoScan CD-ROM into the CD-ROM drive of your
computer.
2. The Main Menu appears.
Note: If the Main Menu does not appear automatically, please do the
following:
a. Click the Windows Start button and select Run.
b. Type x: \setup.exe (where ‘x’ is your CD-ROM drive letter), then
click OK.
3. Click on the Set Up Product on PC button and follow the online
instructions of the 3 stage setup procedure provided.
Note: You will only have to do this setup once.
10
Tutorials
Tutorials
The following are tutorials to help you learn the basics of the WizCom
InfoScan™:
Tutorial 1 – Notes
Tutorial 2 – QuickLink
Tutorial 3 – Scan to PC
Important: Please refer to How to Scan on page 5 for additional information
on scanning.
Tutorial 1 – Notes
This tutorial will take you through the basic usage of the Notes application on
the Pen.
Step 1: Turn the Pen on
Remove the protective cover from the Pen & press
to turn the Pen on. If
the Pen Main Menu is not displayed, press
until you are back at the Pen
Main Menu.
The Pen display will show:
The Pen Main Menu
Step 2: Set Scanning Language
1. Press
2. Press
until the option Preferences appears on the screen.
to enter the Preferences menu.
3. Press
to enter the current option Scanning Language and view the
list of scanning languages. The black arrow indicates the current
scanning language.
4. Confirm that the arrow is pointing at the option English. If not, Press
and
until it is.
11
WizCom InfoScan™ 1.00 User Guide
The Pen display will show:
The list of Scanning Languages with English marked
5. Press
to activate the selection.
Your Pen is now set to scan English printed text.
6. Press
Menu.
until you are back at the beginning of the Pen Main
The Pen display will show:
The Pen Main Menu
Step 3: Start the Notes application
Press
to activate the current option and enter the Notes application.
The Pen display will show:
The main menu of the Notes application
Note: if you have already used this application, the screen will show the
name of the last file you edited in the caption and the Edit Current File
option will be highlighted.
Step 4: Create a new file and open it
1. Confirm that New File option is highlighted. If not, press
until it is.
2. Press
to activate the highlighted option.
3. Press
12
to scroll to the OK button and highlight it.
and
Tutorials
4. Press
to activate the highlighted button.
The Pen display will show:
A file, open and ready for editing, in the Notes screen
A new file named note001* is created, opened and ready for editing.
*Note: if you have already used this application the file name will contain a
different suffix (e.g., note004).
Step 5: Scan a sentence into the open file
Following is a sentence spread over 2 lines:
Roll the scanning device over printed words
and see how the words appear on your Pen.
To scan this whole sentence you will need to scan the first line and then scan
the second line:
1. Please scan the first line.
The Pen display will show:
The first line you have scanned appears highlighted
Note: If the scanned line was not recognized correctly, long press
delete the highlighted text – and scan again.
to
2. Now, continue and scan the second line.
The Pen display will show:
The whole sentence appears, the second line you have just scanned is
highlighted
13
WizCom InfoScan™ 1.00 User Guide
Step 6: Scroll to a scanned word you wish to translate
At this point you could do any of the following:
• Scan more text. It will be added after the text you have already scanned.
• Create a new paragraph by pressing
.A new paragraph will open
below a division line (that appears after the previously scanned text). You
can now scan text into the new paragraph.
• Translate scanned English words and view their Hebrew translation:
We will translate the word ‘device’:
Use
,
,
and
to scroll to the word ‘device’. The cursor
should be placed within the word.
The Pen display will show:
The cursor is in the word ‘device’
Step 7: View the Translation (in the Dictionary Screen)
1. Long press
to translate the word ‘device’ and view its Hebrew
translation in the Dictionary Screen.
in this case does not delete the text (as it would
Note: Long pressing
have in step 5) – because the text is not highlighted.
The Pen display will show:
The translation of ‘device’ displayed in the
Dictionary Screen
2. Press
entry.
14
and
to scroll through the definitions of the dictionary
Tutorials
Step 8: Return to the open file
Press
to return to the open file.
The Pen display will show:
The cursor is still in the word ‘device’
At this point you can continue to do any of the following:
•
Scroll through the words of the scanned text and translate any of them
(long press
).
•
Open new paragraphs by pressing
•
Place the cursor at any point where you would like to scan in new text –
and just scan.
at the end of the scanned text.
Step 9: Return to the Pen Main Menu
Press
until the Notes application is closed and you are back at the Pen
Main Menu.
15
WizCom InfoScan™ 1.00 User Guide
Tutorial 2 – QuickLink
This tutorial will take you through the basic usage of the QuickLink function
which involves Pen-PC Communications.
Important: Before performing this tutorial, you must have already run the one
time procedure Set Up Product on PC from the WizCom InfoScan™ CDROM (see Set Up Product on PC on page 10).
Step 1: Prepare the PC
1. Turn your PC on.
2. Close any applications that are running on your computer. The icons of
applications that are running appear in the notification area of the taskbar
(located at the bottom right corner of the Windows screen). It is
especially important to close applications that use the serial port or USB
ports of your computer, such as PDAs or digital camera applications.
3. Activate the WizCom InfoScan Desktop application that you have
already installed during the CD-ROM procedure Set Up Product on PC:
o If, during installation, you chose to add the Desktop to your
computer’s startup, the Desktop will automatically start running when
you start your computer. To maximize the Desktop window, click on
the Desktop icon in the taskbar. If the Desktop window does not
appear, select the Show Window option from the pop-up menu.
o If the Desktop application does not run when you start up your
computer, or if you have closed the application, you can start it by
clicking the Windows Start menu and selecting Programs\WizCom
InfoScan Desktop\
WizCom InfoScan Desktop.
4. Connect the cable to your Pen and PC (the same way you did during the
CD-ROM procedure Set Up Product on PC).
Step 2: Prepare the Pen
to turn the Pen on. If the Pen Main Menu is not
1. Press
displayed, press
until you are back at the Pen Main Menu.
The Pen display will show:
The Pen Main Menu
16
Tutorials
2. Press
until the option QuickLink appears on the screen.
The Pen display will show:
The Pen Main Menu
Step 3: QuickLink the Notes Files to the Desktop Application
1. Press
to activate the QuickLink function.
The Pen display will show:
If First Time:
If this is the first time you have ever performed a QuickLink, you will see the
following dialog on the PC:
2. Press Next.
17
WizCom InfoScan™ 1.00 User Guide
3. Press Finish.
If NOT First Time:
If this is not the first time you have performed a QuickLink or if you have just
closed the above 2 dialogs, you will see the following dialogs on the PC:
During the QuickLink
18
Tutorials
When the QuickLink is completed
4. Press OK.
Step 4: View the Sent Notes File in the Desktop Application
In the left pane of the Desktop application window, click on the Notes
icon:
The Notes icon in the Desktop left pane
Notes in the Desktop application
The Desktop will open the Notes application and display its list of files, in the
middle pane and its current file, in the right pane. This is the file you scanned
in tutorial 1.
19
WizCom InfoScan™ 1.00 User Guide
Tutorial 3 – Scan to PC
This tutorial will take you through the basic usage of the Scan to PC
application which involves Pen-PC Communications.
Important: Before performing this tutorial, you must have already run the one
time procedure Set Up Product on PC from the WizCom InfoScan™ CDROM (see Set Up Product on PC on page 10).
Step 1: Prepare the PC
1. Turn your PC on.
2. Close any applications that are running on your computer. The icons of
applications that are running appear in the System Tray. It is especially
important to close applications that use the serial port or USB ports of
your computer, such as PDAs or digital camera applications.
3. Activate the WizCom InfoScan Desktop application that you have
already installed during the CD-ROM procedure Set Up Product on PC:
o If, during installation, you chose to add the Desktop to your
computer’s startup, the Desktop should already be active (see if the
Desktop icon appears in the system tray at the bottom right side of
the screen).
o If the Desktop application does not run when you start up your
computer, or if you had closed it, you can start it by clicking the
Windows Start menu and selecting Programs\
WizCom InfoScan Desktop\WizCom InfoScan Desktop.
4. Open the text file you wish to scan text into. The Pen can send text into
any open file with an active cursor. For example, activate the Notepad
application (click the Windows Start menu and select
Programs\Accessories\Notepad. The Notepad application opens and
an “Untitled” file is opened and ready for editing.
5. Connect the cable to your Pen and PC.
Step 2: Prepare the Pen
1. Press
press
to turn the Pen on. If the Pen Main Menu is not displayed,
until you are back at the Pen Main Menu.
The Pen display will show:
The Pen Main Menu
20
Tutorials
2. Press
until the option Scan to PC appears on the screen.
The Pen display will show:
The Pen Main Menu
3. Press
to activate the Scan to PC application.
The Pen display will show:
The Scan to PC screen
Step 3: Scan a sentence and send it to the PC
1. Scan the first line of the following sentence:
Roll the scanning device over printed words
and see how the words appear in Notepad.
After the sending is carried out, you will see the scanned line in Notepad. The
cursor will blink right after the text, awaiting additional input.
2. Now scan the second line of the above sentence.
The second line appears right after the first line – completing the sentence.
Step 4: Return to the Main Menu
Press
to return to the Pen Main Menu.
21
WizCom InfoScan™ 1.00 User Guide
Product Specification
Pen specification:
CPU
Memory:
SRAM
ROM
Flash Memory Card
Communication Interface
Optical Scanner
Display
Battery Type
Weight
Dimension
Regulations Compliance
Operating Temperature
ARM 7 ASIC, 16 bit, 80 MHz
128K x 16 bit
2MB
8MB
o USB connection (PC side)
o IrDA
o 128 pixels linear array image sensor
o 400 DPI
o Dimension: 61 x 20 x 2 (mm)
o Resolution: 122 x 32 pixels
2 x 1.5v AAA alkaline
90gr, 3oz (not including batteries and/or
flash memory card)
163 x 38 x 23 (mm)
o FCC Class B
o UL
o CE
0 ~ 40ºC
PC specification
Window 98/NT/2000/XP
• Free USB port
• CD-ROM drive
Note: For Hebrew support your Windows must be set to fully support
Hebrew.
22
Worldwide Limited Warranty
Worldwide Limited Warranty
WizCom Technologies Ltd. (hereinafter - "WizCom") warrants the initial purchaser
(hereinafter - "PURCHASER") of each of the products bearing the trade names or
trademarks Quicktionary, ReadingPen, SuperPen, InfoScan, QuickLink or MEK
(hereinafter - "PRODUCT") sold by WizCom (including sale through WizCom's Web Site)
or WizCom's authorized local retail dealer (hereinafter - "AUTHORIZED RETAILER") as
follows:
WizCom warrants that your PRODUCT, under normal use, will be free of defects in
materials and workmanship for a period of one (1) year from the date of original purchase
from WizCom or from WizCom's AUTHORIZED RETAILER.
This limited warranty extends only to the original Purchaser of the PRODUCT and is not
assignable or transferable to any subsequent purchaser/end-user.
WizCom's sole obligation, and Purchaser exclusive remedy, under this express warranty,
in lieu of all other warranties express or implied by law or otherwise, shall be, at WizCom's
option and expense, to repair or replace- either with new parts or used parts, without
charge, PRODUCTS that are found to be defective and malfunctioning during normal
usage and returned within the warranty period, provided that:
(i) The PRODUCT has not been damaged or subjected to mishandling, improper storage,
misuse, neglect, abuse, accident, alteration, abnormal operation or conditions, operation
in an unsuitable environment or in a manner for which it is not intended, unauthorized
repair, unauthorized modifications, or other acts which are not the fault of WizCom.
(ii) The PRODUCT has not been damaged from external causes such as fire, flooding,
sand, dirt, storm or any other damage from weather conditions, an Act of God, theft, or
battery leakage, blown fuse, or improper use of any electrical source, damage caused by
computer or internet viruses, bugs, worms, Trojan Horses, cancelbots or damage caused
by the connection to other products not recommended for interconnection by WizCom.
(iii) No one other than an authorized WizCom representative opens the casing of the
PRODUCT.
(iv) WizCom has been advised in writing by the PURCHASER of the alleged defect or
malfunction of the Product within fourteen (14) days after the expiration of the applicable
limited warranty period.
(v) This limited warranty does not cover physical damage to the surface of the product,
including breakage, cracks or scratches on the LCD screen or outside casing.
(vi) The liability under this warranty is limited to the actual cash value of the PRODUCT,
determined by the price paid by the Consumer for the Product less a reasonable amount
for usage.
Repair or replacement of the PRODUCT shall not extend the original warranty period.
PURCHASER will be charged for all PRODUCT repairs for damage or failure not covered
by this limited warranty. Return of the PRODUCT for repair or replacement under this
warranty, must be made to PURCHASER'S local dealer and must be accompanied by
proof of date of purchase, identification of the PRODUCT by model number and serial
number and complete description of the problem.
WizCom makes no warranty or representation that the PRODUCT will meet the
PURCHASER'S requirements or will work in combination with any hardware or software
products provided by third parties, that the operation of the PRODUCT will be
uninterrupted or error free, or that all defects in the PRODUCT will be corrected.
23
WizCom InfoScan™ 1.00 User Guide
EXCEPT AS EXPRESSLY SET FORTH IN THIS WARRANTY, WIZCOM MAKES NO
OTHER WARRANTIES EXPRESSED OR IMPLIED, AND TO THE FULLEST EXTENT
PERMITTED BY LAW, WIZCOM DISCLAIMS ALL OTHER WARRANTIES EXPRESSED
OR IMPLIED, INCLUDING BUT NOT LIMITED TO ANY IMPLIED WARRANTIES OF
MERCHANTABILITY OR FITNESS FOR A PARTICULAR PURPOSE OR USE.
In no event shall WizCom, its agents, officers or employees be liable for any damages
whatsoever, including (without limitation) special, direct or indirect, punitive, consequential
or incidental damages, including, without limitation, damages resulting from use of or
reliance on the products and/or services and/or advertisements regarding the PRODUCT,
loss of revenues, loss of profit, business interruption, loss of information or costs of
replacement goods, loss of use of the product or any associated equipment, cost of
capital, loss of enjoyment of the PRODUCT, arising from claims of third parties, including
customers or arising from breach of the warranty, breach of contract , negligence, strict
tort, or any other legal or equitable theory without limitation.
WizCom reserves its right to make technical alterations to the PRODUCT and such
alterations shall not be considered as breach of warranty.
WizCom shall not be liable for any delays or defaults hereunder by reason of fire, floods,
acts of God, labor troubles, accidents to machinery, delays of carriers or suppliers,
inability of suppliers to supply, the impositions of priorities, restrictions or other acts of
government, or other causes beyond its reasonable control.
The agents, dealers and employees of WizCom are not authorized to make modifications
to the warranty, or additional warranties that are binding on WizCom.
WEEE
The symbol of the trash bin indicates that this
product contains electrical or electronic materials.
We at WizCom are dedicated to continually improve
the environmental impacts that may be caused by
improper disposal of electrical or electronic
materials.
The presence of this label indicates that this product
should not be disposed as unsorted waste, and
must be collected separately.
As a WizCom customer, you can return your used
products to any electronics waste collection point,
most of which are operated by municipalities in the
EU countries. You can always consult your sales
contact for disposal instructions.
In case you have any further questions concerning
our products and their impacts to sustainability,
please contact our sustainability team at
[email protected] or log to our website
www.wizcomtech.com
24