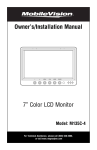
1
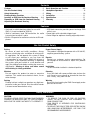
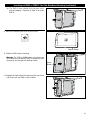
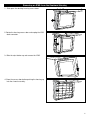
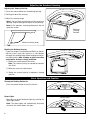
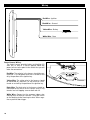
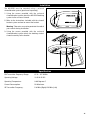
Owner’s/Installation Manual Docking Station for use with IPAD and IPAD 2 Model: MV-IPAD2 For operational or technical assistance, after reading this manual, please call us toll free at (800) 638-3600 or visit www.magnadyne.com Contents Features . . . . . . . . . . . . . . . . . . . . . . . . . . . . . . . 2 Use this Product Safely . . . . . . . . . . . . . . . . . . . . 2 Safety Information . . . . . . . . . . . . . . . . . . . . . . . . 2 Docking Station Functions . . . . . . . . . . . . . . . . . . 3 Inserting an IPAD into the Overhead Housing . . . 4-6 Removing an IPAD from the Overhead Housing . . 7 Adjusting the Overhead Housing . . . . . . . . . . . . . 8 Basic Operation and Function . . . . . . . . . . . . . . . 8-9 Headphone Operation. . . . . . . . . . . . . . . . . . . . . 9 Wiring . . . . . . . . . . . . . . . . . . . . . . . . . . . . . . . . . 10 Installation . . . . . . . . . . . . . . . . . . . . . . . . . . . . . 11 Specification . . . . . . . . . . . . . . . . . . . . . . . . . . . . 11 Warranty . . . . . . . . . . . . . . . . . . . . . . . . . . . . . 12 Features • Overhead in-vehicle docking station for use with IPAD 1. (Insert included for IPAD 2). • Built-in continuous band FM transmitter for audio transmission to vehicle’s radio. • Built-in IR repeater for audio transmission to IR headphones. • IPOD dock connector provides power to charge IPAD while in use. • Dome lights with selectable trigger input. • Swivel hinge for optimum viewing angle adjustment. Use this Product Safely Driving Be aware of road and traffic conditions. Always observe safe driving rules and follow all existing traffic regulations. Do not operate this system if doing so will divert your attention in any way from the safe operation of your vehicle. Keep the volume at a low level. If you experience difficulty in operating the system, park your vehicle in a safe location and apply the parking brake before making the necessary adjustments. Viewing of driver seat video source while driving is strictly prohibited. Proper Power Supply This product is designed to operate with a 12 Volt DC, negative ground battery system. Moisture Do not expose the product to water or excessive moisture. This could cause electrical shorts, fire or other damage. Cleaning Use a soft cloth with some purified water to clean the unit. Do not use any cleaner or chemical to clean the unit. Usually, a dry cloth will do. Parking Parking in direct sunlight can produce very high temperatures inside your vehicle. Give the vehicle interior a chance to cool down before using. Warning Be careful when inserting the IPAD. Do not apply undue pressure to the IPAD. Repairs Contact our customer service representatives. Do not attempt to disassemble or adjust this product yourself. Installation The unit should be installed in a horizontal position. Safety Information CAUTION: FCC REGULATIONS STATE THAT ANY UNAUTHORIZED CHANGES OR MODIFICATIONS TO THIS EQUIPMENT MAY VOID THE USER’S AUTHORITY TO OPERATE IT. 2 WARNING: • TO REDUCE THE RISK OF FIRE OR ELECTRIC SHOCK, DO NOT EXPOSE THIS EQUIPMENT TO RAIN OR MOISTURE. • THIS DEVICE IS INTENDED FOR CONTINUOUS OPERATION. • TO REDUCE THE RISK OF FIRE OR ELECTRIC SHOCK AND ANNOYING INTERFERENCE, USE ONLY THE RECOMMENDED ACCESSORIES. Docking Station Functions 1 2 7 3 4 5 6 9 8 10 1. FM Transmitter Adjustment Button: Push the (-) button to tune to a lower radio frequency, press the (+) button to tune to a higher radio frequency. 6. Dome Lights. 2. FM Transmitter LCD Display: Displays the audio transmission frequency. 8. IPAD Docking Housing Access Door: See the installation part of this manual for more information. 3. Dome Light Button: Press to turn on or off the dome lights. 4. IPAD Docking Housing Release Button: To release the docking housing, push the button then gently pull down the housing. Adjust the housing to the desired viewing position. 7. IR Repeater: The audio signal is converted to an infrared light and transmitted to the headphones. 9. IPAD Eject Button: See the installation part of this manual for more information. 10. IPAD Sleep/Wake Button: Press this button to activate the IPAD’s sleep/wake button. 5. Power Button: Press this button to turn the docking station on or off. 3 Inserting an IPAD or IPAD 2 into the Overhead Housing 1. Press the release button on the docking housing. Gently pull down the housing. Release Button 2. Slide open the docking housing access door. 3. Next rotate the housing access door until it locks in the vertical position. Note 1: Make sure the IPOD dock connector is out of the way before inserting the IPAD. Note 2: • If you are using Original IPAD go to step 4. • If you are using IPAD 2 please see steps 3a-3c. 3a. Slide the IPAD 2 insert into the housing. Warning: The IPAD 2 insert should be inserted with the straight edge on the left and the cutouts on the right side (as shown in illustration). 3b. Support the right side of the housing with your hand and slide in insert from the left side. 4 USB Power Plug Inserting an IPAD or IPAD 2 into the Overhead Housing (continued) 3c. The IPAD 2 insert should click into place when inserted properly. Continue to Step 4 to insert IPAD 2. 4. Adjust the volume level of the IPAD to 100%. Volume Button 5. Slide the IPAD into the housing. Warning: The IPAD’s HOME button must be on the left side when inserting the IPAD. Inserting the IPAD incorrectly will damage the docking station. Home Button 6. Support the right side of the housing with your hand and make sure the IPAD is fully inserted. 5 Inserting an IPAD or IPAD 2 into the Overhead Housing (continued) 7. Connect the IPOD dock connector. Warning: IPOD dock connector can only be inserted one way. The icon on the connector must be facing forward. Inserting the IPOD dock connector incorrectly will damage the connector or IPAD. Note: Tuck the USB power plug cord under the IPAD so it will not interfere with closing the housing access door. 8. Rotate the housing access door. 9. Slide the housing access door closed until a click sound is heard. Note: Make sure the IPOD dock connector is not in the way. Also make sure the door aligns properly with the housing. 6 IPOD Dock Connector Removing an IPAD from the Overhead Housing 1. Slide open the docking housing access door. 2. Rotate the housing access door and unplug the IPOD dock connector. 3. Slide the eject button up and remove the IPAD. 4. Close the access door before pushing the housing up into the shroud assembly. 7 Adjusting the Overhead Housing Adjusting the Viewing Position: 1. Press the release button on the docking housing. 2. Gently pull down the housing. 3. Adjust the viewing angle. Note 1: Do not force the housing past the maximum opening angle or damage will occur to the housing. Note 2: For optimum viewing performance do not rotate the screen. Optimum Viewing Position. Maximum Viewing Angle Rotating the Docking Housing: If your passengers are experience difficulty in operating the system, park your vehicle in a safe location and apply the parking brake before making the necessary adjustments. Note: Viewing of driver seat video source while driving is strictly prohibited. 1. Rotate the screen towards the driver. Note: The screen can only be rotated 900 towards the driver. 2. Make the necessary adjustments. 3. Rotate the screen back to its optimum viewing position. Basic Operation and Function Turning the Docking Station On: Press the power button to turn the unit on. Dome Lights: Manually turn on/off the dome lights by pushing the dome light button. Note: The dome lights will automatically illuminate whenever the vehicle doors are open. 8 Dome Lights Basic Operation and Function (continued) Playing Audio Through the Vehicle’s Radio: 1. Press the power button to turn the docking station on. 2. Press the IPAD Sleep/Wake button and select a program that will play audio. Note: Volume level of the IPAD should be at least 100%. If the IPAD level is set at 0% no audio will be heard through the radio or headphones. Docking Station Power Button IPAD Wake/Sleep Button 3. Use the FM transmitter adjustment buttons to select a frequency not being used by a local radio station. 4. Tune the vehicle’s radio to the same frequency that is on the IPAD docking station. The audio from the IPAD will now be playing through the vehicle’s audio system. Use the controls on the vehicle’s radio to adjust the audio output. FM Transmitter Adjustment Buttons Same Frequency as IPAD Docking Station Headphone Operation IR Repeater The audio signal is converted to an infrared light and transmitted to the headphones (purchased separately). Refer to the owner’s manual included with the headphone on how to adjust the volume to suit the listener’s taste. Note 1: Volume level of the IPAD should be set to 100%. If the IPAD level is set at 0% no audio will be heard through the radio or headphones. Note 2: For optimal performance a clear line of sight is required between the docking station’s IR repeater and the headphones. IR Repeater HP-400 Headphones (Purchased Separately) 9 Wiring Red Wire - Ignition BlackW ire - Ground Yellow Wire - Battery 2A White Wire - Door Power Harness Wiring: The 4-wire harness provides battery and ignition (12 volts DC) as well as a chassis ground. Route the power harness to the point in the vehicle that you will make the connections. Red Wire: The red wire in the harness should be connected to a +12 volt power wire that is turned on and of by the position of the ignition key. Yellow Wire: The yellow wire in the harness should be connected to a constant +12 volt wire that is NOT turned on and off by the position of the ignition key. Black Wire: The black wire in the harness should be connected to the chassis of the vehicle using a ring terminal and self tapping screw or bolt and nut. White Wire: Connect to the common trigger wire coming from all door pin switches. Using the switch on the docking station housing to select either negative or positive door trigger. 10 Negative Trigger Door Switch Positive Trigger Door Switch Dome light Trigger Installation The MV-IPAD must be mounted using a universal shroud/bracket system (purchased separately). 1. Using the screws provided with the universal shroud/bracket system attach the MV-IPAD docking system to the universal shroud. 2. Refer to the instructions included with the shroud/ bracket system on how to mount the bracket. Warning: Take extra care not to penetrate the roof of your vehicle during installation. 3. Using the screws provided with the universal shroud/bracket system attach the docking station/ shroud assembly to the bracket. Specification FM Transmitter Frequency Range: 87.5 – 107.9 MHz Operating Voltage: 10.5-14.5V DC Operating Temperature: 0-60 Degrees C Current Consumption: 2A Maximum IR Transmitter Frequency: 2.8 MHz (Right)/2.3 MHz (Left) 11 Warranty ONE (1) YEAR LIMITED WARRANTY Magnadyne Corporation or its authorized agents will within 1 year from the date of sale to you, repair, replace or refund the retail sales price of said product or any part thereof, at the option of the Magnadyne Corporation or its authorized agents, if said product or part is found defective in materials or workmanship, when properly connected and operating on the correct power requirements designated for the specific product. This warranty and Magnadyne Corporation or its authorized agents obligations hereunder do not apply where the product was; damaged while in the possession of the consumer, subjected to unreasonable or unintended use, not reasonably maintained, utilized in commercial or industrial operations, or serviced by anyone other than Magnadyne Corporation or its authorized agents, or where the warning seal on the product is broken or the power and/or plugs are detached from the unit. Magnadyne Corporation or any of its authorized agents will not assume any labor costs for the removal and re-installation of any product found to be defective, or the cost of transportation to Magnadyne Corporation or its authorized agents. Such cost are the sole responsibility of the purchaser. This warranty does not cover the cabinet appearance items or accessories used in connection with this product, or any damage to recording or recording tape, or any damage to the products resulting from improper installation, alteration, accident, misuse, abuse or acts of nature. MAGNADYNE CORPORATION OR ITS AUTHORIZED AGENTS SHALL NOT BE LIABLE TO ANYONE FOR CONSEQUENTIAL OR INCIDENTAL DAMAGES OR CLAIMS EXCEPT THOSE ACCORDED BY LAW. NO EXPRESSED WARRANTY OR IMPLIED WARRANTY IS GIVEN EXCEPT THOSE SET FORTH HEREIN. NO IMPLIED WARRANTY SHALL EXTEND BEYOND 1 YEAR FROM THE DATE OF SALE. This warranty extends only to the original purchaser of the product and is not transferable. Some states do not allow limitations on how long an implied warranty lasts and some states do not allow the exclusion or limitation of incidental or consequential damages, so the above limitations or exclusion may not apply to you. This warranty gives you specific legal rights and you may have other rights that vary from state to state. Defective merchandise should be returned to the original point of purchase or secondly, to Magnadyne Corporation, 1111 W. Victoria Street, Compton CA 90220. Return Authorization must be obtained before sending, or merchandise may be refused. © Copyright 2011 Magnadyne Corporation MV-IPAD2-UM Rev. A 5-18-11