1
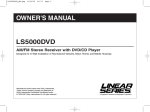
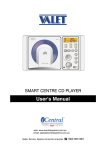
HTS-ES1-UM1 (First Lot).qxp
2/7/08
2:29 PM
Page 1
®
Installation
and Operations
Manual
MENU
VOLUME
OPEN/
CLOSE
+
®
EQ
BAND
ENTER
MODE
SCAN
AM
MIC
MUTE
USB
MIC VOL 1
MIC 1
MIC VOL 2
MIC 2
ECHO
AUX IN
SPEAKERS
A
A+B
B
HTS-ES1
DVD/CD Home Theater System with AM/FM Tuner
U.S. PATENT NO.: D561755
HTS-ES1-UM1 (First Lot).qxp
2/7/08
2:29 PM
Page 2
Introduction
Please carefully read all of the information in this manual. Familiarity with operation and installation procedures will help you obtain the best possible performance from your new AM/FM Stereo Receiver with
CD/DVD Player.
WARNING! To prevent fire or electrical shock hazard, do not expose this product to moisture or remove
its cover or bottom screws. No user-serviceable parts inside. Refer servicing to qualified personnel.
Index
Button Locations and Functions . . . . . . . . . . . . . . . . . . . . . . . . . . . . . . . . . . . . . . . . . . . . . . . . . . . . .
Remote Control Button Locations and Functions. . . . . . . . . . . . . . . . . . . . . . . . . . . . . . . . . . . . . . . . .
General Operation . . . . . . . . . . . . . . . . . . . . . . . . . . . . . . . . . . . . . . . . . . . . . . . . . . . . . . . . . . . . . . . .
Sound Controls . . . . . . . . . . . . . . . . . . . . . . . . . . . . . . . . . . . . . . . . . . . . . . . . . . . . . . . . . . . . . . . . . .
AM/FM Operation. . . . . . . . . . . . . . . . . . . . . . . . . . . . . . . . . . . . . . . . . . . . . . . . . . . . . . . . . . . . . . . . .
3-4
5
6
6-7
8-9
Disc Warnings . . . . . . . . . . . . . . . . . . . . . . . . . . . . . . . . . . . . . . . . . . . . . . . . . . . . . . . . . . . . . . . . . . .
CD Operation (Compact Disc) . . . . . . . . . . . . . . . . . . . . . . . . . . . . . . . . . . . . . . . . . . . . . . . . . . . . . . .
MP3 Disc Operation . . . . . . . . . . . . . . . . . . . . . . . . . . . . . . . . . . . . . . . . . . . . . . . . . . . . . . . . . . . . . . .
DVD Operation . . . . . . . . . . . . . . . . . . . . . . . . . . . . . . . . . . . . . . . . . . . . . . . . . . . . . . . . . . . . . . . . . . .
Karaoke Operation . . . . . . . . . . . . . . . . . . . . . . . . . . . . . . . . . . . . . . . . . . . . . . . . . . . . . . . . . . . . . . . .
10
11-12
13
14-17
18-20
Setup Menu . . . . . . . . . . . . . . . . . . . . . . . . . . . . . . . . . . . . . . . . . . . . . . . . . . . . . . . . . . . . . . . . . . . . . 21-22
Speaker Selector Switch . . . . . . . . . . . . . . . . . . . . . . . . . . . . . . . . . . . . . . . . . . . . . . . . . . . . . . . . . . . 23
Auxiliary Audio Input . . . . . . . . . . . . . . . . . . . . . . . . . . . . . . . . . . . . . . . . . . . . . . . . . . . . . . . . . . . . . . 23
TV Audio Input. . . . . . . . . . . . . . . . . . . . . . . . . . . . . . . . . . . . . . . . . . . . . . . . . . . . . . . . . . . . . . . . . . . 23
Satellite Radio Input. . . . . . . . . . . . . . . . . . . . . . . . . . . . . . . . . . . . . . . . . . . . . . . . . . . . . . . . . . . . . . . 23
USB Input . . . . . . . . . . . . . . . . . . . . . . . . . . . . . . . . . . . . . . . . . . . . . . . . . . . . . . . . . . . . . . . . . . . . . . 24
Installation
Speaker Connections . . . . . . . . . . . . . . . . . . . . . . . . . . . . . . . . . . . . . . . . . . . . . . . . . . . . . . . . . . . . 25
Auxiliary Connections . . . . . . . . . . . . . . . . . . . . . . . . . . . . . . . . . . . . . . . . . . . . . . . . . . . . . . . . . . . . 26
Input Connections . . . . . . . . . . . . . . . . . . . . . . . . . . . . . . . . . . . . . . . . . . . . . . . . . . . . . . . . . . . . . . 27
Warranty . . . . . . . . . . . . . . . . . . . . . . . . . . . . . . . . . . . . . . . . . . . . . . . . . . . . . . . . . . . . . . . . . . . . . . . 28
2
HTS-ES1-UM1 (First Lot).qxp
2/7/08
2:29 PM
Page 3
Button Locations and Functions
1
2
3
4
MENU
5
6 7
8
9
10 11 12
13
VOLUME
OPEN/
CLOSE
+
®
EQ
BAND
MODE
SCAN
ENTER
AM
MIC
MUTE
USB
MIC VOL 1
MIC 1
MIC VOL 2
MIC 2
ECHO
AUX IN
SPEAKERS
29 28 27 26 25
24
23
22
21
20
19
18 17
A
16
A+B B
15
14
1. Power On/Off: Press to turn the unit On or Off.
2. Enter Button: Press to enter selection from DVD menu.
3. EQ Button: Press to select between the preset sound equalization settings.
4. Menu Button: Press to view the DVD menu.
5. Open/Close Button: Press to open or close the CD/DVD door.
6. Band Button: Press to choose the AM or FM radio band.
7. Infrared Eye: Receives the signals from the remote control.
8. CD/DVD Door: To play a CD/DVD, insert the disc into the tray with the label facing up.
9. Display Area: Displays all function information for the radio and CD/DVD player.
10. Reverse Button
:
Radio Mode: Press to manually tune-in a lower radio station frequency.
CD/DVD Mode: Press to fast reverse disc play. Each time the button is pressed, the speed changes.
11. Play/Pause Button
12. Stop Button
: Press to pause disc play, press again to resume play.
: Press to stop play of video or audio.
13. Forward Button
:
Radio Mode: Press to manually tune-in a higher radio station frequency.
CD/DVD Mode: Press to fast forward disc play. Each time the button is pressed, the speed changes.
14. Volume Knob: Rotate to increase or decrease the Volume Level.
Press to adjust the output level of Treble, Bass and Speaker Levels.
15. Next Button
:
Radio Mode: Press and the tuner will search-up for the next radio station.
CD/DVD Mode: Press to search for the beginning of the next chapter or track.
16. A, A+B and B Selector Switch: Selects the different sets of speakers installed.
17. Previous Button
:
Radio Mode: Press and the tuner will search-down for the previous radio station.
CD/DVD Mode: Press to search for the beginning of the previous chapter or track.
18. Auxiliary Input Jack: Press the MODE button until “AU In” appears in the display, then plug in the
device with a 3.5mm audio input plug.
3
HTS-ES1-UM1 (First Lot).qxp
2/7/08
2:29 PM
Page 4
Button Locations and Functions (Continued)
19. Echo Knob: Rotate the knob to adjust the amount of echo effect coming from the microphones.
20. Mic 2 Jack: Insert microphone.
21. Mic 2 Volume Knob: Rotate the knob to control microphone 2’s volume.
22. Mic 1 Jack: Insert microphone.
23. Mic 1 Volume Knob: Rotate the knob to control microphone 1’s volume.
24. USB Input: Press the MODE button and “dISC” appears in the display. Then plug in any USB device,
and “USb” appears in the display.
Note: The HTS-ES1 will control the USB audio device. (See “USB Input” for more details).
25. Radio Scan Button: Automatic radio station scanning. See “AM/FM Operation” for more details.
26. Mute Button: Press to mute sound. Press again to cancel.
27. Mic Button: Press to mute the microphones.
28. Mode Button: Press to choose between:
Radio: AM or FM
External Satellite Radio Audio Input: Rear chassis input.
TV Audio Input: Rear chassis input.
Auxiliary Audio Input: Front panel mounted 3.5mm input
jack (AUX IN).
CD, DVD, MP3 and USB Input: Front panel mounted USB
input jack (USB).
29. Navigation Buttons:
DVD Mode: Press arrows to navigate through the DVD menu options.
4
HTS-ES1-UM1 (First Lot).qxp
2/7/08
2:29 PM
Page 5
Remote Control Button Locations and Functions
11. Band Button: Press to select the desired radio
band: FM1, FM2, FM3, AM1 or AM2.
2
1
POWER
MODE
15
MUTE
16
3
17
4
6
9
5
RANDOM
7
ZOOM
8
10
12
14
18
REPEAT
SETUP
+
ENTER
AS/PS
VOL
TONE
14. Numeric Buttons
21
15. Open/Close Button: Press to open or close the
CD/DVD door.
16. Mute Button: Press to mute the volume level.
Press again to restore.
22
23
11
BAND
EQ
AUDIO
SUB.TT
13
MENU
1
2
3
4
5
6
7
8
9
10/0
10+
24
13. Menu Button: Displays the root menu that is
stored on the DVD disc.
19
20
SLOW
ELAPSE
12. EQ Button (Equalizer): Press to select between
preset sound equalization settings.
25
1. Power On/Of Button: Press to turn the unit On
or Off.
17. Reverse and Forward Buttons: Press the
button to manually tune-in a higher radio station frequency (radio mode) or to fast forward
disc play (CD/DVD mode). Press the
button to manually tune-in a lower radio station
frequency (radio mode) or to fast reverse disc
play (CD/DVD mode).
18. Next Button:
Radio Mode: Press and the tuner will search
up for the next radio station.
CD/DVD Mode: Press to search for the beginning of the next chapter or track.
2. Mode Button: Press to choose between Radio,
External Satellite Radio Audio Input, TV Audio
Input, Auxiliary Audio Input and
CD/DVD/MP3/USB Input.
19. Previous Button:
Radio Mode: Press and the tuner will search
down for the previous radio station.
CD/DVD Mode: Press to search for the beginning of the previous chapter or track.
3. Play/Pause Button:
CD/DVD Mode: Press to pause disc play, press
again to resume play.
20. VOL/TONE Button (Volume/Tone): Press to
select the different sound controls: Volume,
Treble, Bass and Speaker Controls.
4. Stop Button: Press to stop play of video or
audio.
21. Setup Button: Displays the SETUP menu.
5. Random Button: Press to play all the tracks on
the CD in random order. Press again to cancel.
6. Repeat Button: Press to repeat a CD track or to
repeat a DVD title or chapter. Press again to
cancel.
7. Zoom Button: Press to enlarge the DVD’s
onscreen image.
8. Navigation Buttons: In the DVD menu mode,
these buttons serve as cursor buttons to select
a item left/right, up/down.
22. Volume, Treble, Bass and Speaker
Adjustment Buttons: Press to adjust the
Volume. The adjustment buttons will also
adjust the Treble, Bass and Speaker Levels
when selected.
23. Slow Motion Button: Press to play the DVD in
slow motion.
24. Subtitle Button: Press to access the the DVD’s
subtitle languages.
25. Audio Button: Press to access DVD’s audio
settings.
9. Enter Button: Confirms the selected menu item.
10. AS/PS Button: Automatic radio station memory
storing (AS) and Preset radio station scanning
(PS). See “AM/FM Operation” for more details.
In CD and DVD modes press to display disc running times.
5
HTS-ES1-UM1 (First Lot).qxp
2/7/08
2:29 PM
Page 6
General Operation
Power On/Off:
Press the
button to turn the unit On or Off.
MENU
OPEN/
CLOSE
®
EQ
BAND
ENTER
MODE
MIC
SCAN
USB
MUTE
MIC VOL 1
MIC 1
MIC 1
MIC VOL 2
MIC VOL 2
MIC
Selecting the Mode:
To select a source, press the MODE button until
the desired source appears in the display:
Radio (rAdIO),
Satellite Radio In (SAt In) Rear chassis input,
TV Audio In (tV AUd IO) Rear chassis input,
Auxiliary In (AV In) Front panel input and
Disc and USB Input (dISC) Front panel input.
MENU
OPEN/
CLOSE
®
EQ
BAND
MODE
SCAN
ENTER
AM
MIC
USB
MUTE
MIC VOL 1
MIC 2
Sound Controls
Decrease
Volume:
Increase
Increase the volume by rotating the volume knob
clockwise. Decrease the volume by rotating the
volume knob counterclockwise.
VOLUME
L2
MIC 2
ECHO
+
AUX IN
SPEAKERS
A
A+B
B
Bass, Treble and Speaker Adjustment Control
Select the desired sound mode by pressing the VOLUME knob. The modes will be displayed in the following order: bAS (Bass), trE (Treble), L F (left front speaker), r F (right front speaker), L r (left rear
speaker), r r (right rear speaker), CEn (center speaker) and SUb (Subwoofer).
Bass:
Select the Bass mode by pressing the VOLUME
knob. Increase the Bass by rotating the volume
knob clockwise. Decrease the Bass by rotating
the volume knob counterclockwise. After 10 seconds the control reverts back to volume control.
VOLUME
+
®
OL 1
MIC 1
MIC VOL 2
MIC 2
ECHO
AUX IN
SPEAKERS
A
A+B
B
Treble:
Select the Treble mode by pressing the VOLUME
knob. Increase the Treble by rotating the volume
knob clockwise. Decrease the Treble by rotating
the volume knob counterclockwise. After 10 seconds the control reverts back to volume control.
6
VOLUME
®
OL 1
MIC 1
MIC VOL 2
MIC 2
ECHO
AUX IN
SPEAKERS
A
A+B
B
+
ECH
HTS-ES1-UM1 (First Lot).qxp
2/7/08
2:29 PM
Page 7
Sound Controls (Continued)
Speaker Output Adjustment Control:
1. Select the desired speaker by pressing the
VOLUME knob. The speakers will be displayed
in the following order: bAS (Bass), trE
(Treble), L F (left front speaker), r F (right
front speaker), L r (left rear speaker), r r (right
rear speaker), CEn (center speaker) and SUb
(Subwoofer).
VOLUME
VOL 2
MIC 2
ECHO
+
AUX IN
SPEAKERS
2. Use the volume knob to adjust the speaker to
the desired output.
A
A+B
B
Decrease
Increase
3. Wait 10 seconds for the unit to revert to the
previous mode or select another speaker by
pressing the VOLUME knob again.
VOLUME
MIC VOL 2
MIC 2
ECHO
+
AUX IN
SPEAKERS
A
A+B
B
Equalizer (EQ):
Press the EQ button to choose between preset
equalizer settings: Classic, Rock, Pop, Jazz and
Off.
MENU
OPEN/
CLOSE
®
EQ
BAND
MODE
SCAN
ENTER
MIC
Note: Visual confirmation of EQ setting does not
appear in the unit's display area, but will appear
in the optional monitor’s display (if installed).
MUTE
DVD
USB
MIC VOL 1
MIC 1
MIC VOL 2
MIC 2
ECHO
Mute:
Press the MUTE button to mute the audio.
“MUTE” will appear in the display. Press again to
restore the audio level.
MENU
OPEN/
CLOSE
®
EQ
BAND
MODE
SCAN
ENTER
DVD
MIC
MUTE
USB
MIC VOL 1
MIC 1
MIC VOL 2
MIC 2
ECHO
7
HTS-ES1-UM1 (First Lot).qxp
2/7/08
2:29 PM
Page 8
AM/FM Operation
Selecting the Play Source:
Press the MODE button until “rAdIO” appears in
the display. After a brief moment either AM or
FM frequency will appear in the display.
Selecting the AM or FM Band:
Press the BAND button repeatedly to select from
FM1, FM2, FM3, AM1 or AM2.
OPEN/
CLOSE
MENU
®
EQ
BAND
MODE
SCAN
ENTER
AM
MIC
USB
MUTE
MIC VOL 1
MIC 1
Bank Preset
MIC VOL 2
MIC 2
ECHO
Frequency Band
AM
Manually Tuning in a Radio Station:
Press the
or
button until the desired
radio station appears in the display. Press the
button to tune-in a lower radio station.
Press the
button to tune-in a higher radio
station.
Down
Up
AM
C VOL 2
MIC 2
ECHO
AUX IN
SPEAKERS
Note: The unit will automatically switch from FM
Mono to FM Stereo when the signal strength
increases to a stereo level. If the stereo signal
should become weak, the unit will switch back to
Mono. FM Stereo reception is indicated when
"ST" appears in the display.
A
A+B
B
Seek Tuning-In a Radio Station:
Press the
button and the tuner will scandown to the next strong station, stop scanning
and play. Press the
button and the tuner
will scan-down to the next strong station, stop
scanning and play.
VOLUME
+
AM
1
MIC VOL 2
MIC 2
ECHO
AUX IN
SPEAKERS
B
A
Down
A+B
Up
Tuning-In a Radio Station Using Scan:
1. Press the BAND button to select either the FM
or AM radio band.
2. Press the SCAN button.
3. The tuner will search for the next strong station and play for 13 seconds, then scan for
the next strong station. To cancel this function
press the scan button again.
8
MENU
OPEN/
CLOSE
®
EQ
BAND
ENTER
MODE
SCAN
AM
MIC
MUTE
USB
MIC VOL 1
MIC 1
MIC VOL 2
MIC 2
ECHO
HTS-ES1-UM1 (First Lot).qxp
2/7/08
2:29 PM
Page 9
AM/FM Operation (Continued)
Manually Storing Radio Stations:
1. Press the BAND button to select either the
FM1, FM2, FM3, AM1 or AM2 radio band.
2. Tune-in the desired radio station.
3. Press and hold anyone of the station recall
buttons on the remote (Buttons 1-6) until the
display begins to flash and memorizes the
station.
Automatically Store Radio Stations:
1. Press the BAND button to select either the
AM1 or AM 2 band to automatically store AM
Stations. Or press the BAND button to select
either the FM1, FM2 or FM3 radio band to
automatically store FM Stations.
2. Press and hold the AS/PS button and the tuner
will search for the strongest stations and store
them into memory. 6 stations will be stored into
each the AM1 and AM 2 bands, or the FM1,
FM2 and FM3 bands.These new stations will
replace stations that were previously stored.
3. After the new stations are stored into memory
the tuner will start playing stored station 1.
AS/PS
SLOW
ELAPSE
BAND
EQ
AUDIO
SUB.TT
MENU
1
2
3
4
5
6
7
8
9
10/0
10+
RANDOM
Radio Station
Recall Buttons
(Buttons 1-6)
REPEAT
ZOOM
SETUP
VOL
TONE
+
ENTER
AS/PS
SLOW
SUB.TT
ELAPSE
BAND
EQ
AUDIO
MENU
1
2
3
4
5
6
7
8
9
10/0
10+
Scanning Stored Radio Stations:
1. Press the BAND button to select either the
AM1, AM2, F1, F2 or F3 radio band.
2. Press the AS/PS button and the tuner will
scan the stored stations in the current band
and pause for 5 seconds at each station.
When a desired station is reached, press the
AS/PS button again to stop the scan and that
station will begin playing.
9
HTS-ES1-UM1 (First Lot).qxp
2/7/08
2:29 PM
Page 10
Disc Warnings
Disc Formats Supported by this Player:
DVD
12cm disc
(Single-sided disc only)
CD
12cm disc
MP3
12cm disc
Handling and Cleaning:
• Dirt, dust, scratches and warping discs will cause
problems with operation.
• Do not place stickers on disc or scratch disc.
• Do not warp discs.
• Keep discs in cases when not in use to
prevent damage.
• Do not place discs in the following places:
1. Direct sunlight.
2. Dirty, dusty and damp areas.
3. Near car heaters.
4. Car seats or dashboard.
Label side up
Do not touch
the underside
of the disc
Do not bend
Disc Cleaning:
Use a dry soft cloth to wipe the disc surface. If the
disc is quite dirty, use a soft cloth slightly moist
with isopropyl (rubbing) alcohol. Never use solvents such as benzine, thinner or conventional
record cleaners as they may mar the surface of the
disc.
Wipe the disc from
the center toward
the outside edge
Note: A disc may become somewhat scratched
(although not enough to make it unusable) depending on handling and conditions in the usage environment.
Preparing New Discs with Rough Spots:
A new disc may have rough edges on its inside and
outside edges. If a disc with rough edges is used,
the proper setting will not be performed and the
player will not play the disc. Remove the rough
edges in advance by using a ball point pen or pencil as shown. To do this, press the side of the pen
or pencil against the inside and outside edges of
the disc.
10
Rough spots on
outside edge
Rough spots on
inside edge
Ball point pen
or pencil
HTS-ES1-UM1 (First Lot).qxp
2/7/08
2:29 PM
Page 11
CD Operation (Compact Disc)
General Operations
1. Press the
button to turn the unit On.
2. Press the MODE button until “dISC” appears
in the display.
3. Press the OPEN/CLOSE button to open the
CD/DVD door.
4. Insert the disc into the tray with the label side
up.
5. Press the OPEN/CLOSE button to close the
CD/DVD door.
6. The unit will automatically load and start playing the disc during which “LOAd” will appear
in the display.
Label Side Up
CD Track Selection:
Press the
button to select a lower track.
Press the
button to select a higher track.
The track number will appear in the display.
VOLUME
MIC VOL 2
MIC 2
ECHO
Tracks can also be selected by using the remote
control. Press the track selection’s number that
corresponds with the track you want to play then
press the ENTER button.
Example: If you want to play track 8, press button 8, then the ENTER button.
+
AUX IN
SPEAKERS
A
B
A+B
Down
Up
Track
Elapse Time
CD
If you want to play track 12, press 10+ button
once, immediately followed by pressing button 2,
and then the ENTER button. Track 12 will start
playing and “12” will appear in the display.
TONE
+
ENTER
AS/PS
Note: To select a track in the twenties, press the
10+ twice, immediately followed by pressing the
button that corresponds to the second digit of
the CD track.
SLOW
ELAPSE
EQ
AUDIO
SUB.TT
MENU
1
2
3
4
5
6
7
8
9
10/0
10+
BAND
Track Selection
Numbers
(Buttons 1-10+)
Pausing a CD:
Press the
button to pause the disc. Press it
again to resume play.
VOLUME
MIC VOL 2
MIC 2
ECHO
+
AUX IN
SPEAKERS
A
B
A+B
11
HTS-ES1-UM1 (First Lot).qxp
2/7/08
2:29 PM
Page 12
CD Operation (Compact Disc) (Continued)
Stopping a CD:
Press the
button to stop the disc. “STOP”
will appear in the display. Press the
button
to start playing the disc from where it was playing before stopped.
VOLUME
MIC VOL 2
MIC 2
ECHO
+
AUX IN
Press the
button 2 times. Then press
the
button and the disc will start playing
from the beginning.
SPEAKERS
A
A+B
B
Muting a CD:
Press the MUTE button to “Mute” the disc. Press
again to cancel mute.
OPEN/
CLOSE
MENU
®
EQ
BAND
MODE
SCAN
ENTER
CD
MIC
USB
MUTE
MIC VOL 1
MIC 1
MIC VOL 2
MIC 2
ECHO
Repeating a CD Track or Entire CD:
Select the desired track to repeat, then press the
REPEAT button, and the repeat icon will appear
in the display. The track presently playing will be
repeated. Press the REPEAT button again and the
entire CD will be repeated. Press the button one
more time and the repeat icon will disappear and
the repeat function will be cancelled.
POWER
MODE
RANDOM
REPEAT
ZOOM
MUTE
VOL
SETUP
Repeat Icon
CD
Random CD Track Play Order:
Press the RANDOM button until “RANDOM”
appears in the display. The tracks on the disc will
play in random order. To cancel this feature,
press the RANDOM button on more time.
POWER
MODE
RANDOM
REPEAT
MUTE
VOL
Elapse Times:
ZOOM
Press the ELAPSE button to display the running
time of the CD track. Press the button again to
display the time remaining on the CD track.
Press it one more time to display time remaining
one the CD.
VOL
TONE
SETUP
+
ENTER
AS/PS
SLOW
ELAPSE
BAND
AUDIO
EQ
SUB.TT
Removing a CD:
Press the OPEN/CLOSE button to open the
CD/DVD door to remove a CD.
MENU
OPEN/
CLOSE
®
EQ
BAND
MODE
SCAN
ENTER
CD
MIC
12
MUTE
USB
MIC VOL 1
MIC 1
MIC VOL 2
MIC 2
ECHO
HTS-ES1-UM1 (First Lot).qxp
2/7/08
2:29 PM
Page 13
MP3 Disc Operation
General Operations
1. Press the
button to turn the unit On.
2. Press the MODE button until “dISC” appear in
the display.
3. Press the OPEN/CLOSE button to open the
CD/DVD door.
4. Insert the disc into the tray with the label side
up.
5. Press the OPEN/CLOSE button to close the
CD/DVD door.
6. The unit will automatically load and start playing the disc during which “LOAd” will appear
in the display.
Label Side Up
MP3 File Selection:
Press the
button to select a lower file.
Press the
button to select a higher file. The
file number will appear in the display.
VOLUME
MIC VOL 2
MIC 2
ECHO
Files can also be selected by using the remote
control. Press the file selection’s number that
corresponds to the file you want to play then
press the ENTER button.
Example: If you want to play file 8, press button
8, then the ENTER button.
+
AUX IN
SPEAKERS
A
B
A+B
Down
Up
File
Elapse Time
MP3
If you want to play file 12, press 10+ button
once, immediately followed by pressing button 2,
and then the ENTER button. File 12 will start
playing and “12” will appear in the display.
ZOOM
SETUP
AS/PS
Note: To select a file in the twenties, press the
10+ twice, immediately followed by pressing the
button that corresponds to the second digit of
the file number.
TONE
+
ENTER
SLOW
ELAPSE
BAND
EQ
AUDIO
SUB.TT
MENU
1
2
3
4
5
6
7
8
9
10/0
10+
File Selection
Numbers
(Buttons 1-10+)
Pausing a MP3 Disc:
Press the
button to pause the disc. Press it
again to resume play.
VOLUME
+
Removing a MP3 Disc:
Press the OPEN/CLOSE button to open the
CD/DVD door to remove a disc.
MIC VOL 2
MIC 2
ECHO
AUX IN
SPEAKERS
A
B
A+B
13
HTS-ES1-UM1 (First Lot).qxp
2/7/08
2:29 PM
Page 14
DVD Operation
General Operations
1. Press the
button to turn the unit On.
2. Press the MODE button until “dISC” appears
in the display.
3. Press the OPEN/CLOSE button to open the
CD/DVD door.
4. Insert the disc into the tray with the label side
up.
5. Press the OPEN/CLOSE button to close the
CD/DVD door.
6. The unit will automatically load and start playing the disc during which “LOAd” will appear
in the display.
Label Side Up
Pausing a DVD:
Press the
button to pause the disc. Press it
again to resume play.
VOLUME
MIC VOL 2
MIC 2
ECHO
+
AUX IN
SPEAKERS
A
B
A+B
Stopping a DVD:
Press the
button to stop the disc. “STOP”
will appear in the display. Press the
button
to start playing the disc from where it was playing before stopped.
VOLUME
MIC VOL 2
MIC 2
Press the
button 2 times. Then press
the
button and the disc will start playing
from the beginning.
ECHO
+
AUX IN
SPEAKERS
B
A
A+B
Muting a DVD:
Press the MUTE button to “Mute” the disc. Press
it again to cancel mute.
MENU
OPEN/
CLOSE
®
EQ
BAND
MODE
SCAN
ENTER
DVD
MIC
14
MUTE
USB
MIC VOL 1
MIC 1
MIC VOL 2
MIC 2
ECHO
HTS-ES1-UM1 (First Lot).qxp
2/7/08
2:29 PM
Page 15
DVD Operation (Continued)
Fast Forward / Fast Reverse Disc Play:
Fast
Reverse
Press the
or
button during play. Each
time the button is pressed, the speed of fast forward/fast reverse changes in the following order:
Fast
Forward
2X, 4X, 8X, 16X, 32X.
To resume normal play, press the
button.
MIC VOL 2
MIC 2
ECHO
AUX IN
SPEAKERS
Slow Motion:
ZOOM
A+B
VOL
TONE
+
ENTER
1/2, 1/4, 1/8, 1/16 then
1/2, 1/4, 1/8, 1/16.
AS/PS
SLOW
ELAPSE
BAND
To resume normal play, press the
B
SETUP
Press the SLOW button to play the DVD in slow
motion at the following speeds:
Forward
Reverse
A
AUDIO
EQ
SUB.TT
button.
DVD Chapter Selection:
Press the
button to select a lower chapter.
Press the
button to select a higher chapter.
The chapter number will appear in the display.
C VOL 2
Chapters can also be selected by using the
remote control. Press the chapter’s selection
number that corresponds to the chapter you
want to play, then press the ENTER button.
MIC 2
ECHO
AUX IN
SPEAKERS
Lower Chapter
If you want to play chapter 12, press 10+ button
once, immediately followed by pressing button
2, and then press the ENTER button. Chapter 12
will start playing and “12” will appear in the display.
Note: To select a chapter in the twenties, press
the 10+ twice, immediately followed by pressing
the button that corresponds to the second digit
of the chapter.
B
A+B
Higher Chapter
Chapter
Example: If you want to play chapter 8, press
button 8, then the ENTER button.
A
Elapse Time
DVD
+
ENTER
AS/PS
SLOW
ELAPSE
BAND
EQ
AUDIO
SUB.TT
MENU
1
2
3
4
5
6
7
8
9
10/0
10+
Chapter Selection
Numbers
(Buttons 1-10+)
15
HTS-ES1-UM1 (First Lot).qxp
2/7/08
2:29 PM
Page 16
DVD Operation (Continued)
Repeating a DVD Chapter, Title or All:
Select the desired chapter to repeat. Then press
the REPEAT button and the repeat icon will
appear in the display, and
will
appear on the installed monitor. The chapter
presently playing will be repeated. Press the
REPEAT button again and the Title will be repeated. Press the button a third time and the entire
DVD will be repeated. Press the button one more
time and the repeat icon will disappear and the
repeat function will be cancelled.
POWER
MODE
RANDOM
REPEAT
ZOOM
MUTE
VOL
SETUP
Repeat Icon
DVD
Menu Function:
Press the MENU button during disc play and the
main disc menu will be displayed. Scroll through
the menu with the navigation buttons to select a
feature. Press the ENTER button to confirm the
selection.
Navigation
Buttons
MENU
OPEN/
CLOSE
®
EQ
BAND
ENTER
MODE
MIC
SCAN
Enter Button
Elapse Times:
Continue pressing the ELAPSE button during
DVD play to display the following disc information in the following order:
Title Elapse, Title Remain, Chapter Elapse,
Chapter Remain and Display Off.
Audio Language Menu:
Press the AUDIO button during playback to
review the current setting. Most DVDs have their
own audio setup. Go to the disc's onscreen
menu to select desired audio language.
ZOOM
Press the SUB.TT button during playback. Each
time the button is pressed, the subtitle language
changes in sequential order.
Note: Some discs may only contain one subtitle
language.
16
SLOW
ELAPSE
BAND
VOL
TONE
+
ENTER
AS/PS
EQ
ZOOM
AUDIO
SUB.TT
SETUP
VOL
TONE
+
ENTER
AS/PS
SLOW
ELAPSE
EQ
AUDIO
SUB.TT
MENU
1
2
3
4
5
6
7
SETUP
VOL
TONE
BAND
Subtitle Language Menu:
SETUP
ZOOM
+
ENTER
AS/PS
SLOW
ELAPSE
DVD
USB
MUTE
BAND
EQ
AUDIO
SUB.TT
MENU
1
2
3
4
5
6
7
MIC VOL 1
MIC 1
HTS-ES1-UM1 (First Lot).qxp
2/7/08
2:29 PM
Page 17
DVD Operation (Continued)
Zooming the Image:
To enlarge the onscreen image during disc play,
press the ZOOM button. Each time the button is
pressed, the magnification increment changes in
the following order:
MUTE
RANDOM
ZOOM
2X, 3X, 4X, 1/2, 1/3, 1/4.
Use the navigation buttons to move the image on
the screen
REPEAT
SETUP
+
ENTER
AS/PS
ELAPSE
VOL
TONE
SLOW
17
HTS-ES1-UM1 (First Lot).qxp
2/7/08
2:29 PM
Page 18
Karaoke Operation
Note: Before inserting the microphone plug into
the microphone jack, make sure the MIC VOL
(microphone volumes) are set to the minimum.
®
AM
MIC VOL 1
MIC 1
MIC VOL 2
MIC 2
Minimum
Volume
ECHO
AUX IN
Maximum
Volume
Connecting the Microphone(s):
(microphones not supplied)
1. Turn the microphones Off.
2. Insert the microphone plug into the microphone jack. If only connecting one microphone, insert it into the MIC 1 jack.
3. Turn the microphone(s) On.
4. Adjust the microphone(s) volume to the
desired level.
MENU
VOLUME
OPEN/
CLOSE
+
®
EQ
BAND
MODE
SCAN
ENTER
MIC
USB
MUTE
MIC VOL 1
MIC 1
MIC VOL 2
MIC 2
ECHO
AUX IN
SPEAKERS
EQ
A
B
A+B
EQ
Microphone 2
Microphone 1
Echo Control:
Rotate the ECHO knob clockwise to increase the
echo of both microphones. Rotate counterclockwise to decrease the echo.
AM
MIC 1
MIC VOL 2
MIC 2
ECHO
AUX IN
SPEAKERS
Decrease
Increase
Muting the Microphone(s):
Press the MIC button to turn On/Off the microphones.
MENU
OPEN/
CLOSE
®
EQ
BAND
MODE
SCAN
ENTER
DVD
MIC
18
MUTE
USB
MIC VOL 1
MIC 1
MIC VOL 2
MIC 2
ECHO
A
HTS-ES1-UM1 (First Lot).qxp
2/7/08
2:29 PM
Page 19
Karaoke Operation (Continued)
Playing a DVD
1. Press the
button to turn the unit On.
2. Press the MODE button until “dISC” appears
in the display.
3. Press the OPEN/CLOSE button to open the
CD/DVD door.
4. Insert the disc into the tray with the label side
up.
5. Press the OPEN/CLOSE button to close the
CD/DVD door.
6. The unit will automatically load and start playing the disc during which “LOAD” will appear
in the display.
Label Side Up
DVD Track Selection:
Press the
button to select a lower track.
Press the
button to select a higher track.
The track number will appear in the display.
VOLUME
MIC VOL 2
MIC 2
Tracks can also be selected by using the remote
control. Press the track selection number that
corresponds to the track you want to play, then
press the ENTER button.
Example: If you want to play track 8, press button 8, then the ENTER button.
ECHO
AUX IN
SPEAKERS
Down
A
B
A+B
Up
Track
Elapse Time
CD
If you want to play track 12, press 10+ button
once, immediately followed by pressing button 2,
and then press the ENTER button. Track 12 will
start playing and “12” will appear in the display.
Note: To select a track in the twenties, press the
10+ twice immediately followed by pressing the
button that corresponds to the second digit.
+
TONE
+
ENTER
AS/PS
SLOW
ELAPSE
BAND
EQ
AUDIO
SUB.TT
MENU
1
2
3
4
5
6
7
8
9
10/0
10+
Track Selection
Numbers
(Buttons 1-10+)
19
HTS-ES1-UM1 (First Lot).qxp
2/7/08
2:29 PM
Page 20
Karaoke Operation (Continued)
Pausing a DVD:
Press the
button to pause the disc. Press it
again to resume play.
VOLUME
MIC VOL 2
MIC 2
ECHO
+
AUX IN
SPEAKERS
A+B
B
A
Stopping a DVD:
Press the
button to stop the disc, “STOP”
will appear in the display. Press the
button
to start playing the disc from where it was playing before stopped.
VOLUME
MIC VOL 2
MIC 2
ECHO
+
AUX IN
Press the
button 2 times. Then press
the
button and the disc will start playing
from the beginning.
SPEAKERS
A
A+B
B
Removing a DVD:
Press the OPEN/CLOSE button to open the
CD/DVD door to remove a disc.
MENU
OPEN/
CLOSE
®
EQ
BAND
MODE
SCAN
ENTER
CD
MIC
20
MUTE
USB
MIC VOL 1
MIC 1
MIC VOL 2
MIC 2
ECHO
HTS-ES1-UM1 (First Lot).qxp
2/7/08
2:29 PM
Page 21
Setup Menu
Audio Setup
Page
General Setup
Page
Video Setup
Page
Preference
Page
Password Setup
Page
- - General S e t u p Page - TV Display
Angle Mark
OSD Language
Captions
Screen Saver
Memor y
Exit Setup
Menu
PS
On
ENG
Off
On
Off
Go To General Setup Page
General Setup Page:
Use the navigation buttons to scroll between the
menu items. Make a selection by pressing the
ENTER button. Language Submenu Options:
• TV Display: Normal/PS, Normal/LB, Wide,
Wide Squeeze.
Note: Disc must be stopped to make selection.
• Angle Mark: On, Off.
• OSD Language: English, Chinese.
• Captions: On, Off.
• Screen Saver: On, Off.
• Last Memory: On, Off.
Audio Setup Page:
Use the navigation buttons to scroll between the
menu items. Make a selection by pressing the
ENTER button. Audio Setup Options:
• Speaker Setup Page
Downmix: LT/RT, Stereo, V SURR, Off.
Front Speaker: Large, Small.
Center Speaker: Large, Small, Off.
Rear Speaker: Large, Small, Off.
Subwoofer: On, Off.
Test Tone: On, Off.
Dialog: On, Off.
Post DRC: Auto, On, Off.
• SPDIF Setup Page
SPDIF Output: SPDIF Off, SPDIF/Raw,
SPDIF/PCM
LPCM Out: 48K
• Channel Trim
• 3D Processing:
PRO Logic ll: On, Off, Auto.
Mode: Music, Movie, PRO Logic, Auto.
Panorama: On, Off.
Dimension: Size -3 to Size 3.
Center Width: Level 0 - 7.
Reverb Mode: On, Off.
Audio Setup Page (continued):
• Karaoke Setup:
MIC Setup: Mic Vol 1, Mic Vol 2, Echo level.
MIC Threshold
Video Setup Page:
Use the navigation buttons to scroll between the
menu items. Make a selection by pressing the
ENTER button. Video Submenu Options:
• Component: Off, YUV.
• Quality:
Sharpness: High, Medium, Low.
Brightness: -20 to 20.
Contrast: -20 to 20.
Gamma: High, Medium, Low, None.
Saturation: -20 to 20.
Luma Delay: 0 T, 1 T.
• DivX VOD: Done.
Preference Page:
Use the navigation buttons to scroll between the
menu items. Make a selection by pressing the
ENTER button. Preference Options:
• TV Type: PAL, Multi, NTSC
• PBC: On, Off.
• Parental: 1 KID SAFE
2G
3 PG
4 PG13
5 PGR
6R
7 NC17
8 ADULT
• Default: Reset
21
HTS-ES1-UM1 (First Lot).qxp
2/7/08
2:29 PM
Page 22
Setup Menu (continued)
Password Setup Page:
Use the navigation buttons to scroll between the
menu items. Make a selection by pressing the
ENTER button. Password Submenu Options:
• Password Mode: On, Off.
• Password: Change.
22
Exit Setup Menu:
Press the ENTER button to exit the setup menu.
HTS-ES1-UM1 (First Lot).qxp
2/7/08
2:29 PM
Page 23
Speaker Selector Switch
Speakers A and B:
VOLUME
+
Slide the speaker switch to play audio through
speaker Set A, speaker Set B or both speaker
Sets A + B.
AUX IN
SPEAKERS
A A+B
B
Speakers
Sets A and B
Speakers
Set A
Speakers
Set B
Auxiliary Audio Input
Selecting the Auxiliary Audio Play Source
To select a Auxiliary Audio play source (AUX IN),
press the MODE button until “AU In” appears in
the display. Refer to the audio device’s owner’s
manual for proper operation.
VOLUME
MIC 1
MIC VOL 2
MIC 2
ECHO
+
AUX IN
SPEAKERS
A
B
A+B
EQ
MENU
TV Audio Input
Selecting the TV Audio Input
To select an external TV audio (TV AUDIO),
press the MODE button until “tV AUdIO” appears
in the display.
Satellite Radio Input
Selecting the Satellite Audio In Source
To select Satellite Audio In source, press the
MODE button until “SAt In” appears in the
display. Refer to your satellite radio's owners
manual for proper operation.
23
HTS-ES1-UM1 (First Lot).qxp
2/7/08
2:29 PM
Page 24
USB Input
Selecting USB Audio Play Source:
To select a USB play source, press the MODE button until “dISC” appears in the display. Insert the
USB connector from the player into the HTS-ES1’s
USB jack. The audio from the player can now be
heard through the speakers. Use the HTS-ES1’s
controls to select the desired file to play.
OPEN/
CLOSE
MENU
®
EQ
BAND
MODE
SCAN
ENTER
MIC
USB
MUTE
MIC VOL 1
MIC 1
Disc File Selection:
Press the
button to select a lower file number. Press the
button to select a higher file
number. The file number will appear in the display.
VOLUME
MIC VOL 2
MIC 2
ECHO
AUX IN
SPEAKERS
Files can also be selected by using the remote
control. Press the file selection number that corresponds to the file you want to play, then press
the ENTER button.
For example: If you want to play file 8, press button 8, then the ENTER button.
+
A
B
A+B
Down
Up
File
Elapse Time
MP3
If you want to play file 12, press 10+ button
once, immediately followed by pressing button
2, and then press the ENTER button. File 12 will
start playing and 12 will appear in the display.
+
ENTER
AS/PS
SLOW
ELAPSE
Note: To select a file in the twenties, press the
10+ twice, immediately followed by pressing the
button that corresponds to the second digit.
BAND
EQ
AUDIO
SUB.TT
MENU
1
2
3
4
5
6
7
8
9
10/0
10+
File Selection
Numbers
(Buttons 1-10+)
Pausing Playback:
Press the
button to pause play. Press it
again to resume play.
VOLUME
MIC VOL 2
MIC 2
ECHO
+
AUX IN
SPEAKERS
A
B
A+B
Stopping Playback:
Press the
button to stop the playback.
“STOP” will appear in the display. Press the
button to start playing the disc from where it
was playing before stopped.
VOLUME
MIC VOL 2
Press the
button 2 times. Then press
the
button, and the disc will start playing
from the beginning.
24
MIC 2
ECHO
AUX IN
SPEAKERS
A
B
A+B
+
HTS-ES1-UM1 (First Lot).qxp
2/7/08
2:29 PM
Page 25
Speaker Connections
AUDIO
VIDEO
TV IN
Y
DIGITAL
COAXIAL
Cr
Cb
12 V 12 V
BAT IGN
ANTENNA
FM (75Ω)
GND
S-VIDEO
L
SAT
RADIO
IN
SPEAKER OUTPUT
DC INPUT
OPTICAL
R
VIDEO OUTPUT
Center Speaker
(not supplied)
–
+
Green Wire
Green/Black Wire
Front
Left Speaker
(not supplied)
+
Front
Right Speaker
(not supplied)
White Wire
Yellow Wire
White/Black Wire
Yellow/Black Wire
–
–
Rear
Left Speaker
(not supplied)
+
Rear
Right Speaker
(not supplied)
Blue Wire
Gray Wire
Blue/Black Wire
Gray/Black Wire
–
+
–
B
Left Speaker
(not supplied)
+
+
B
Right Speaker
(not supplied)
Brown Wire
Orange Wire
Brown/Black Wire
Orange/Black Wire
+
–
–
Subwoofer
(not supplied)
Purple Wire
+
Purple/Black Wire
–
25
HTS-ES1-UM1 (First Lot).qxp
2/7/08
2:29 PM
Page 26
Auxiliary Connections
TV (Optional)
Digital Audio
Amplifier
(Optional)
Component
Video
OR
Digital Coaxial
Audio
AUDIO
VIDEO
TV IN
Y
DIGITAL
COAXIAL
Cr
Cb
12 V 12 V
BAT IGN
ANTENNA
FM (75Ω)
GND
S-VIDEO
L
SAT
RADIO
IN
SPEAKER OUTPUT
DC INPUT
OPTICAL
R
VIDEO OUTPUT
Optical
Audio
Composite
Video
TV (Optional)
26
Composite
Video
TV (Optional)
Composite
Video
TV (Optional)
S-Video
TV (Optional)
HTS-ES1-UM1 (First Lot).qxp
2/7/08
2:29 PM
Page 27
Input Connections
In-Wall Antenna
Model: DP36AXT
(Optional)
AUDIO
TV IN
VIDEO
Y
Cb
DIGITAL
COAXIAL
Cr
12 V 12 V
BAT IGN
ANTENNA
GND
S-VIDEO
L
FM (75Ω)
SAT
RADIO
IN
SPEAKER OUTPUT
DC INPUT
OPTICAL
R
VIDEO OUTPUT
Plug Either
Type of
Antenna
into the
Female
Antenna
Receptacle
3.5mm
Mini Jack
Red Wire (+) 12 Volt DC Power In
Male
RCA
Jacks
Black Wire Ground
Blue Wire (+) 12 Volt DC Power Out
External
Automotive-Type
Antenna
(Optional)
Satellite Radio Receiver
(Optional)
Satellite Radio Input
TV Audio Input
TV (Optional)
27
HTS-ES1-UM1 (First Lot).qxp
2/7/08
2:29 PM
Page 28
Warranty
ONE (1) YEAR LIMITED WARRANTY
Magnadyne Corporation or its authorized agents will within one year from the date of sale
to you, repair, replace or refund the retail sales price of said product or any part thereof, at
the option of the Magnadyne Corporation or its authorized agents, if said product or part
is found defective in materials or workmanship, when properly connected and operating on
the correct power requirements designated for the specific product. This warranty and
Magnadyne Corporation or its authorized agent’s obligations hereunder do not apply where
the product was; damaged while in the possession of the consumer, subjected to unreasonable or unintended use, not reasonably maintained, utilized in commercial or industrial
operations, or serviced by anyone other than Magnadyne Corporation or its authorized
agents, or where the warning seal on the product is broken or the power and/or plugs are
detached from the unit. Magnadyne Corporation or any of its authorized agents will not
assume any labor costs for the removal and reinstallation of any product found to be defective, or the cost of transportation to Magnadyne Corporation or its authorized agents. Such
cost are the sole responsibility of the purchaser.
This warranty does not cover the cabinet appearance items or accessories used in connection with this product, or any damage to recording or recording tape, or any damage to
the products resulting from improper installation, alteration, accident, misuse, abuse or
acts of nature.
MAGNADYNE CORPORATION OR ITS AUTHORIZED AGENTS SHALL NOT BE LIABLE TO
ANYONE FOR CONSEQUENTIAL OR INCIDENTAL DAMAGES OR CLAIMS EXCEPT THOSE
ACCORDED BY LAW. NO EXPRESSED WARRANTY OR IMPLIED WARRANTY IS GIVEN
EXCEPT THOSE SET FORTH HEREIN. NO IMPLIED WARRANTY SHALL EXTEND BEYOND
ONE YEAR FROM THE DATE OF SALE.
This warranty extends only to the original purchaser of the product and is not
transferable. Some states do not allow limitations on how long an implied warranty lasts,
and some states do not allow the exclusion or limitation of incidental or consequential
damages, so the above limitations or exclusion may not apply to you. This warranty gives
you specific legal rights, and you may have other rights that vary from state to state.
“NOTE: The manufacturer is not responsible for any radio or TV interference caused by
unauthorized modifications to this equipment. Such modifications could void the User’s
authority to operate the equipment.”
Defective merchandise should be returned to the original point of purchase or
secondly, to Magnadyne Corporation, 1111 W. Victoria Street, Compton CA 90220.
Return Authorization must be obtained before sending, or merchandise may be refused.
© Copyright 2007
Magnadyne Corporation
HTS-ES1-UM1
Rev. B 2-6-08