1
3M™ Digital Library Assistant
User Guide
3M 2012. All rights reserved.
3M™ Digital Library Assistant User Guide, 78-8126-8418-7e
3M and Digital Library Assistant are trademarks of 3M. Microsoft and Windows are registered trademarks of Microsoft
Corporation in the United States and other countries. All other trademarks are the property of their respective owners.
3M™ Digital Library Assistant User Guide
Table of Contents
3M™ Digital Library Assistant Software License.......................................................................................................8
Overview..............................................................................................................................................................................9
DLA Home screen menu selections............................................................................................................................9
Frequently asked questions.......................................................................................................................................10
Related documents.....................................................................................................................................................11
Getting Started.................................................................................................................................................................. 12
DLA hardware components........................................................................................................................................12
Using DLA front panel controls and indicators........................................................................................................13
Before using the DLA for the first time......................................................................................................................14
Requirement 1—Convert items with 3M™ RFID Tags ............................................................................... 14
Requirement 2—Use 3M™ Digital Data Manager software to export DLA software, lists and collection
categories to a memory card........................................................................................................................14
Requirement 3—Refer to the 3M™ Handheld RFID Reader Owners Manual for DLA start-up procedures
......................................................................................................................................................................14
Installing DLA software...............................................................................................................................................15
Overview.......................................................................................................................................................15
Step 1—Install DLA software on your computer’s hard drive......................................................................15
Model 803/804 Only — Optional tag formats.............................................................................................. 16
Step 2—Install DLA software on the DLA....................................................................................................17
DLA reset procedure...................................................................................................................................................18
To reset the DLA...........................................................................................................................................18
Staff-level setup options..................................................................................................................................................19
Accessing staff setup options....................................................................................................................................19
Staff-level setup options
page...........................................................................................................19
To display the Options screen......................................................................................................................19
To change a setting...................................................................................................................................... 19
Setting general options....................................................................................................................................................20
Adjusting the sound volume.......................................................................................................................................20
Changing the item width setting................................................................................................................................20
Item width recommendations....................................................................................................................... 20
Selecting a language..................................................................................................................................................21
Changing the Reader Timeout setting......................................................................................................................21
Changing the Items Order Right-to-left setting........................................................................................................21
Enabling Check Shelf alerts.......................................................................................................................................22
Enabling Backgound inventory..................................................................................................................................22
Changing the Verify setting........................................................................................................................................23
Enabling the Verify option............................................................................................................................ 23
Identifying security status.............................................................................................................................23
Changing the Time and Date settings......................................................................................................................24
78-8126-8418-7e
© 3M 2012. All rights reserved.
3
3M™ Digital Library Assistant User Guide
Handheld Model 803/804............................................................................................................................. 24
Handheld Mode 702 and Model 802............................................................................................................24
Setting screen contrast...............................................................................................................................................24
Handheld Model 803/804............................................................................................................................. 24
Handheld Model 702 and Model 802...........................................................................................................25
Setting screen alignment............................................................................................................................................25
Handheld Model 803/804............................................................................................................................. 25
Handheld Model 702 and Model 802...........................................................................................................25
Setting the find function default prefix......................................................................................................................26
To set a default prefix (Handheld Model 803/804).......................................................................................26
To set a default prefix and keyboard type (Handheld Model 702 and Model 802)..................................... 26
Using the Setup Lists screen.....................................................................................................................................27
DLA Lists.......................................................................................................................................................27
Deactivating search lists.............................................................................................................................. 27
Viewing collection categories.......................................................................................................................28
Administrator level setup options...................................................................................................................................29
Accessing the Admin menu........................................................................................................................................29
Using the administrator setup options......................................................................................................................29
Auto test option.............................................................................................................................................29
Barcode filter test option.............................................................................................................................. 30
Memory card test option...............................................................................................................................30
Home screen setup option........................................................................................................................... 30
Location settings option (location ID users only).........................................................................................30
Contrast test option (Models 702/802 only).................................................................................................31
Firmware update option (Models 803/804)..................................................................................................31
Copy log option.............................................................................................................................................31
Admin settings option...................................................................................................................................31
Tag Data Format option (Model 803/804)................................................................................................................34
TDFM Status option (Model 803/804)......................................................................................................................35
End Admin Mode option.............................................................................................................................................35
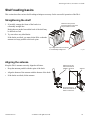
Shelf reading basics.........................................................................................................................................................36
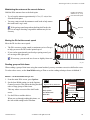
Straightening the shelf................................................................................................................................................36
Aligning the antenna...................................................................................................................................................36
Adjusting the antenna.................................................................................................................................................37
Separating the tags from metal.................................................................................................................................37
Method 1—create a gap between the metal and the book......................................................................... 37
Method 2—pull any item that is against metal approximately 2.5 inches (6,35 cm) out from the shelf.....37
Maintaining the antenna at the correct distance..........................................................................................38
Moving the DLA at the correct speed...........................................................................................................38
Reading groups of thin items....................................................................................................................... 38
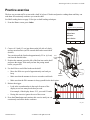
Practice exercise.............................................................................................................................................................. 40
78-8126-8418-7e
© 3M 2012. All rights reserved.
4
3M™ Digital Library Assistant User Guide
Managing the DLA work flow..........................................................................................................................................41
Best practices.............................................................................................................................................................. 41
Shelf order lists.............................................................................................................................................41
Updating lists................................................................................................................................................41
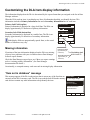
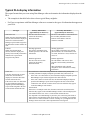
Customizing the DLA item display information.............................................................................................................42
Missing information.....................................................................................................................................................42
“Item not in database” message................................................................................................................................42
Typical DLA display information................................................................................................................................43
Typical DLA work flow.................................................................................................................................................44
Performing tasks...............................................................................................................................................................46
Preparing the DLA for user........................................................................................................................................46
Checking the battery charge........................................................................................................................ 46
Checking lists............................................................................................................................................... 47
Battery management..................................................................................................................................................47
Handheld Model 803/804............................................................................................................................. 47
Handheld Model 702 and Model 802...........................................................................................................48
Common DLA tasks....................................................................................................................................................48
Selecting DLA functions............................................................................................................................... 48
Using the Change Battery function.............................................................................................................. 49
Using display lists.........................................................................................................................................49
Saving Item IDs to the memory card........................................................................................................... 50
Using the DLA trigger lock............................................................................................................................51
Using the Background Inventory function....................................................................................................52
Using the screen light option (Handheld Model 702 and Model 802 only)................................................. 52
Using the Verify option................................................................................................................................. 53
Quick access to Volume, Change Battery, About DLA (Model 803/804 only).............................................53
Task quick reference guides.........................................................................................................................54
Using the Check Shelf Order function...........................................................................................................................57
Before you begin….....................................................................................................................................................57
DLA staff options that affect the Check Shelf Order function...................................................................... 57
Shelf Order display graphics........................................................................................................................58
Step 1—Use the DLA to read all the items on the shelf.............................................................................. 60
Step 2—Correct any shelf order errors........................................................................................................61
Checkshelf alerts..........................................................................................................................................62
Using the Collect Data function......................................................................................................................................63
Before you begin….....................................................................................................................................................63
Collection display features.........................................................................................................................................63
Display list counter....................................................................................................................................... 63
Item information............................................................................................................................................63
Not in database items...................................................................................................................................64
Search items.................................................................................................................................................64
78-8126-8418-7e
© 3M 2012. All rights reserved.
5
3M™ Digital Library Assistant User Guide
Verify icon..................................................................................................................................................... 64
Step 1—Use the Collect Data function to collect item IDs.....................................................................................65
When the DLA reads an item for the first time.............................................................................................65
When the DLA reads a search item for the first time ..................................................................................65
Step 2—Save the collected data to a collection category......................................................................................66
Duplicate data...............................................................................................................................................66
Clearing the IDs from a collection category.............................................................................................................67
Using the Pull Items function..........................................................................................................................................68
Overview....................................................................................................................................................................... 68
Each time you import pull results................................................................................................................. 68
Using the DLA to locate and pull items..........................................................................................................................69
Step 1—Select a pull list............................................................................................................................................69
Between option selection criteria................................................................................................................. 69
Step 2—Use the DLA to find items on the pull list..................................................................................................70
Finding items with the Between option ON (selected).................................................................................70
Finding items with the Between option OFF (deselected)...........................................................................71
Step 3—Remove the pulled items from the pull list................................................................................................71
To remove an item from a pull list................................................................................................................ 71
Restoring pull lists.......................................................................................................................................................71
To restore a pull list...................................................................................................................................... 72
Using the Sort-and-shelve function................................................................................................................................73
Overview....................................................................................................................................................................... 73
Shelving-order list.........................................................................................................................................73
Locating search items.................................................................................................................................. 73
Collecting in-house item IDs........................................................................................................................ 73
Finding items................................................................................................................................................ 73
Shelve function.............................................................................................................................................73
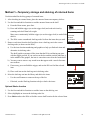
Method 1—Temporary storage and shelving of returned items............................................................................75
Optional Shelve function ............................................................................................................................. 75
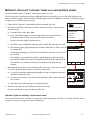
Method 2—Fine sort “in-house” items on a cart and then shelve.........................................................................76
Optional- If you are shelving “in-house use items”...................................................................................... 76
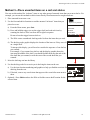
Method 3—Place unsorted items on a cart and shelve.........................................................................................77
Using the Find Items function.........................................................................................................................................78
To use the Find function.............................................................................................................................................78
Step 1—Use the Specify Criteria screen to enter the item that you want to find........................................78
Step 2—Use the DLA to help locate items...................................................................................................79
Using the Search for Items function...............................................................................................................................81
Procedure..................................................................................................................................................................... 81
Using the Shelve Items function.....................................................................................................................................82
Before you begin….....................................................................................................................................................82
78-8126-8418-7e
© 3M 2012. All rights reserved.
6
3M™ Digital Library Assistant User Guide
Distance indicator........................................................................................................................................................82
Step 1—Use the DLA to find the correct shelf.........................................................................................................83
Step 2—Use the DLA to find the shelf location.......................................................................................................84
Using the Change Security function..............................................................................................................................85
Procedure..................................................................................................................................................................... 85
Using the Show Item Info function.................................................................................................................................86
Procedure..................................................................................................................................................................... 86
Only for libraries using location tags..............................................................................................................................87
Using the Check Location function................................................................................................................................88
Procedure..................................................................................................................................................................... 88
Using the Check Location+Order function....................................................................................................................89
Procedure..................................................................................................................................................................... 89
Using the Inventory Location function...........................................................................................................................90
Procedure..................................................................................................................................................................... 90
Troubleshooting................................................................................................................................................................ 91
DLA startup problems.................................................................................................................................................91
DLA staff training.............................................................................................................................................................. 95
About staff training......................................................................................................................................................95
Staff training outline....................................................................................................................................................95
Overview of operation (data source, etc.)....................................................................................................95
Battery management....................................................................................................................................95
Memory card procedures............................................................................................................................. 96
Using the Check Shelf Order function......................................................................................................... 97
Other DLA functions (as required)............................................................................................................... 98
Battery replacement..................................................................................................................................... 98
Memory card removal...................................................................................................................................98
Tightening the DLA antenna (for key users/administrators only)................................................................ 98
Warranty............................................................................................................................................................................ 99
3M Service...................................................................................................................................................................... 100
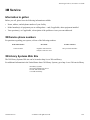
Information to gather.................................................................................................................................................100
3M Service phone numbers.....................................................................................................................................100
3M Library Systems Web Site.................................................................................................................................100
78-8126-8418-7e
© 3M 2012. All rights reserved.
7
3M™ Digital Library Assistant User Guide
3M™ Digital Library Assistant Software License
Use of the 3M Digital Library Assistant Software ("DLA Software"), is governed by the terms of the license between 3M and Customer. The Software may be used
by Customer and its employees and agents only for Customer’s benefit and in accordance with the license between 3M and Customer, as set forth below.
1. Software. As used in this License, "Software" means the DLA Software licensed to Customer, including any updates (e.g., maintenance releases, modifications
to existing functionality or new functionality) that may be provided to Customer by 3M during the term of this License. 3M is under no obligation to issue
updates.
2. Software License. During the term of this license, 3M grants the Customer the nonexclusive, nontransferable right to use the Software solely on associated 3M
Digital Library Assistant handheld units at the Site. Title to all copies of the Software will be and remain vested in 3M or its licensors. 3M’s grant of a license is
expressly conditioned upon Licensee’s use of the Software pursuant to this License; any other use shall be considered unlicensed and shall subject Customer to
any and all remedies available to 3M at law or equity, including but not limited to claims of copyright infringement.
3. Prohibitions. Customer may not, without 3M’s prior written consent (i) sublicense, lease, lend or transfer the Software to any third party; (ii) use, or permit the
use of, the Software for the benefit of, or by, any third party such as use of the Software as a service bureau; (iii) make copies of the Software except in the normal
course of use or for archival purposes; (iv) use the Software at any location other than the Site; or (v) disassemble, reverse engineer or create derivative works of
the Software except as permitted by law.
4. Operating Results. Customer is solely responsible for the use it makes of the Software, including, but not limited to, monitoring and verifying the input to and
output from the Software.
5. LIMITED WARRANTY AND DISCLAIMER 3M warrants to Customer that, for a ninety (90) day period following delivery of the Software, the then-current version
of the Software will perform in substantial accordance with the corresponding documentation when used as instructed. If the Software fails to meet this warranty,
3M’s sole obligation and Customer’s sole remedy will be, at 3M’s option, correction of the Software to perform as warranted or refund of the applicable separate
license fee paid. This warranty is void if the Software is modified or used with software or equipment for which it was not intended. EXCEPT FOR THIS LIMITED
WARRANTY, 3M DISCLAIMS ANY AND ALL WARRANTIES, WHETHER EXPRESS OR IMPLIED, INCLUDING WITHOUT LIMITATION ANY IMPLIED WARRANTIES OF
MERCHANTABILITY, FITNESS FOR A PARTICULAR PURPOSE, NON-INFRINGEMENT AND TITLE AND THOSE ALLEGEDLY ARISING FROM TRADE USAGE OR
COURSE OF DEALING. 3M DOES NOT WARRANT THAT THE SOFTWARE IS FREE FROM ALL BUGS, ERRORS OR OMISSIONS.
6. Limitation of Liability. 3M will not be liable to Customer for any loss or damage resulting from lost data or information. Further, except for personal injury, 3M
will not be liable for any indirect, special, incidental or consequential damages or economic loss based upon breach of warranty, breach of contract, negligence,
strict liability in tort or any other legal theory, even if 3M has been advised of the possibility of such damages. THE PARTIES AGREE THAT 3M’S MAXIMUM
CUMULATIVE LIABILITY FOR ACTUAL DAMAGES FOR ALL MATTERS ARISING OUT OF OR RELATING TO THIS LICENSE SHALL NOT EXCEED TEN THOUSAND
DOLLARS ($10,000).
7. Term and Termination. This License will terminate (i) if either party materially breaches a provision of this License and fails to cure such breach within thirty
(30) days after receiving a written notice of breach from the nonbreaching party; or (ii) if Customer discontinues use of the Software. Upon termination of this
License for any reason, Customer shall cease all further use of the Software and destroy or return to 3M all copies then in its possession or under its control. At
3M’s request, Customer will certify to 3M in writing that it is in full compliance with the requirements of this paragraph.
8. U.S. Government End Users. This provision applies to all acquisitions of this Software by or for the Federal Government or by any prime contractor or
subcontractor (at any tier) for the Federal Government under any contract, grant, cooperative agreement, other transaction, or other agreement with the Federal
Government. By accepting delivery of this Software, the Federal Government hereby agrees that this Software qualifies as "commercial" computer software
within the meaning of the acquisition or financial assistance regulations applicable to this procurement. The terms and conditions of this License shall apply to
the Government’s use and disclosure of this Software and shall supersede any conflicting contract terms and conditions. If this License fails to meet the
Government’s needs or is inconsistent with federal law, the Federal Government agrees to return this Software, unused, to 3M. The following additional statement
applies only to acquisitions governed by DFARS Subpart 227.4 (October 1988): "Restricted Rights—Use, duplication and disclosure by the Government is subject
to restrictions as set forth in subparagraph (c)(1)(ii) of the Rights in Technical Data and Computer Software clause at DFARS 252.227-7013 (OCT. 1988)."
9. General Provisions. This License constitutes the entire agreement between 3M and Customer with respect to use of the Software. This License is governed by
and construed under Minnesota law, excluding its conflicts of law provisions. This License may not be amended, assigned, sublicensed or transferred by
Customer without 3M’s prior written consent. Failure of 3M to enforce any provision will not constitute a waiver of such provision or of the right to enforce such
provision. If any provision of this License is held to be unenforceable by a court, the validity and enforceability of the other provisions will not be affected.
3M Library Systems
3M Center, Building 225-4N-14
St. Paul, MN 55144-1000
78-8126-8418-7e
© 3M 2012. All rights reserved.
8
3M™ Digital Library Assistant User Guide
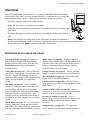
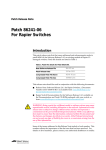
Overview
The 3M™ Digital Library Assistant (DLA) consists of a handheld RFID reader running
DLA software. This battery-powered portable unit offers a comprehensive set of advanced
functions that a library can use to efficiently and accurately manage its collection.
Digital Library Assistant
Check Shelf Order
Collect Data
Pull Items
•
Simplifies otherwise impractical or difficult tasks.
•
Helps find data errors in circulation system records.
•
Helps find errors in bibliographic records such as incorrect barcodes, call numbers and
spine labels.
•
Provides a full range of functions for all libraries, including location tag processing if
used.
•
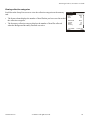
Home screen displays a scrolling menu of DLA functions, which can be customized to
include only the functions used by your library. Prioritize the menu by moving most often used functions to
the top of the list. Each Home screen menu selection is listed below.
Sort & Shelve
Order Collect
Sort
Pull
DLA_071
DLA Home screen menu selections
Check Shelf Order (see page 57) - Finds misshelved items and graphically shows current
position and where they belong. Also provides
Goes Between information to help shelve
misshelved items.
Shelve Items (see page 82) – Helps you find item
shelf locations. Sounds, lights, text and graphics guide
you to the correct shelf location, which increases the
accuracy of shelving and saves the time typically
needed to inspect each call number.
Collect Data (see page 63) - Collects and saves
Item IDs to a memory card. After collecting data,
use 3M™ Digital Data Manager software to
import data from a memory card. Import function
creates text files to update your circulation
system.
Change Security (see page 85) – Scan an item and
change its security status (on/secure or off/unsecure).
Pull Items (see page 68) – After using Data
Manager to export pull lists to a memory card,
select a pull list and use this DLA function to
locate and pull items. Functions include pulling
items that are on hold, or weed items. Data
Manager can import pull results (items found or
not found) as text files to update your circulation
system.
Sort & Shelve (see page 73) – Use to help shelve
items by temporarily storing and shelving finesorted items, fine-sorting items on a cart and then
shelving, or placing unsorted items on a cart and
78-8126-8418-7e
Show Item Info (see page 86) – Scan an item and
display item ID and other information.
Check Location (see page 88) – Only for libraries
using location tags. Scan a location tag and an item to
check location.
Check Location+Order (see page 89) – Only for
libraries using location tags. Scan a location tag and
multiple items to check location and order.
Inventory Location (see page 90) – Only for
libraries using location tags. Scan a location tag and
all items in that location to check that location’s
inventory.
Change Battery (see page 98) – DLA goes into
“sleep” mode so you can change batteries or remove
© 3M 2012. All rights reserved.
9
3M™ Digital Library Assistant User Guide
then shelving.
the battery to shut off the DLA.
Find Items (see page 73) – Quickly find a single
item without using Data Manager to create a pull
list or search list. This configurable search
function finds any item included on one of a
memory card’s lists.
Setup Lists (see page 27) – Allows you to view and
activate the lists and collection categories on the
memory card.
Search for Items (see page 64) – DLA memory
cards can contain search lists that enable the DLA
to search for items, and the search function can
identify items on user-defined lists such as
missing-items lists. Searching can be combined
with other tasks, enabling you to locate and gather
search items during routine shelf reading or data
collection.
Setup Options (see page 20) – Allows you to access
staff-level setup options such as sound volume,
language used and time/date settings. (No password
required.)
User Mode Status (see page 29) – Allows you to
access the admin-level setup options available on the
Admin menu. (Password required.)
About DLA – Displays DLA software information
such as version number and tag data formats.
Frequently asked questions
How does the DLA know what is out of order, missing, on hold, etc.?
The DLA uses data from your circulation system. 3M provides Data Manager software, which runs on a librarysupplied PC, to transfer this data to the DLA. The DLA’s accuracy depends on the accuracy of your circulation
system data.
How much data can the DLA hold?
Circulation system data is transferred onto a memory card. These are the same type of cards typically used in
digital cameras.
•
The amount of data stored depends on the size of the memory card. A single 32-MB card can store data for
approx. 230,000 items, while a
1-GB card can store data for approx. 7,000,000 items.
•
Additionally, you may prepare multiple memory cards and insert the appropriate card into the DLA to work
with a specific library section or to search for specific items of interest.
Do I need to tag the entire collection to use the DLA?
The DLA can provide immediate benefits without converting the entire library to tags.
•
Initially focus on the problem areas or sections that get the most use. Even when a small section or part of a
section is tagged, you receive immediate benefits.
•
Tag additional sections while you continue to use the DLA.
78-8126-8418-7e
© 3M 2012. All rights reserved.
10
3M™ Digital Library Assistant User Guide
Related documents
3M Digital Library Assistant User Guide
This guide focuses on setting up and using DLA software.
3M Handheld RFID Reader Owner’s Manual
Provides information on battery charging and other hardware features.
Before you can use the DLA, you must also be familiar with the functions of Data Manager software as
described in the following documents:
3M Digital Data Manager Data Format Guide
This guide includes detailed descriptions of the data formats supported by Data Manager software. (This
document also includes a separate 3M Digital Data Manager Data Format Worksheet.)
3M Digital Data Manager Installation and Setup Guide
This guide includes instructions on how to set up data format parameters, specify barcode validation
parameters, and plan the types of information that the DLA will display.
3M Digital Data Manager Staff Guide
This guide includes instructions on how to manage and export the list files that are used by the DLA and other
3M equipment.
78-8126-8418-7e
© 3M 2012. All rights reserved.
11
3M™ Digital Library Assistant User Guide
Getting Started
This section provides basic instructions on how to set up the 3M™ Digital Library Assistant. The DLA consists
of the 3M™ Handheld RFID Reader hardware (Handheld) running DLA software.
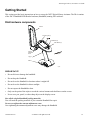
DLA hardware components
Antenna
Indicator Lights (3)
Scroll Buttons (2)
Menu Buttons (4)
Antenna
Adjustment
Screw
Stylus
Trigger
Battery
702_002
IMPORTANT!
•
Be careful not to damage the handheld.
•
Do not drop the Handheld.
•
Do not leave the Handheld in locations where it might fall.
•
Do not leave the Handheld in direct sunlight.
•
Do not expose the Handheld to heat.
•
Only use the point of the stylus to touch the various buttons and checkboxes on the screen.
•
Never use a pen, pencil, or other sharp object on the display screen.
Save all the original handheld packing materials.
You will need the packing materials if you return the Handheld for repair.
Do not over-tighten the antenna adjustment screw.
Over tightening the antenna adjustment screw may damage the Handheld.
78-8126-8418-7e
© 3M 2012. All rights reserved.
12
3M™ Digital Library Assistant User Guide
Always use the Change Battery function when you change the battery.
If you do not use the Change Battery function when changing the battery, you may lose collected data and/or
corrupt the memory card. Also, you may have to reset the Handheld.
Always return to the Home screen before removing the memory card.
This helps avoid corrupting data that you collected with the Handheld and saved to the memory card.
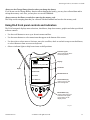
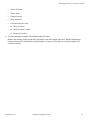
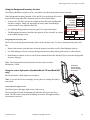
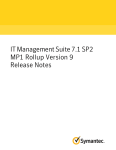
Using DLA front panel controls and indicators
The DLA front panel displays menu selections, checkboxes, drop-down menus, graphics and other specialized
software controls.
•
Use the scroll buttons to move up or down in menus and lists.
•
Use the menu buttons to select menu items that appear at the bottom of the screen.
•
Use the stylus to select menu or list items, move the scroll bar, check or uncheck setup screen checkboxes,
or select characters from an on-screen keyboard.
•
Observe indicator lights to help locate items or shelf positions.
Indicator Lights
used to help locate items
and shelf positions
Display
Digital Library Assistant
Stylus
Scroll Bar
Check Shelf Order
Collect Data
Menu Selections
Pull Items
Sort & Shelve
Order Collect
Pull
Sort
Scroll Buttons (2)
used to move up and
down through lists
Menu Buttons (4)
used to select the menu
selections that appear
on the bottom of the
display screen
DLA_004
78-8126-8418-7e
© 3M 2012. All rights reserved.
13
3M™ Digital Library Assistant User Guide
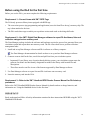
Before using the DLA for the first time
Before you use the DLA, you must complete the following requirements:
Requirement 1—Convert items with 3M™ RFID Tags
The DLA only processes library items equipped with RFID tags.
•
The conversion process (tag programming and application) saves the Item ID to the tag’s memory chip. The
tag is then attached to the item.
•
The DLA reads these tags to enable you to perform various tasks such as checking shelf order.
Requirement 2—Use 3M™ Digital Data Manager software to export DLA software, lists and
collection categories to a memory card
The Data Manager package includes the software and hardware required to process lists generated from your
circulation system and export them onto memory cards. The DLA uses these lists to perform collectionmanagement tasks.
1. Install and set up Data Manager software and DLA software on a library computer.
See Data Manager documentation for details on how to set up and use Data Manager software.
2. Generate accurate shelf-order lists, search lists and pull lists from your circulation system.
•
Important! If your library uses a location-based shelving system, your circulation system must also
generate Location Lists that identify designated locations in the library with location IDs and
descriptions.
•
These lists must be text files in one of the formats supported by Data Manager software.
3. Use Data Manager software to export lists and DLA software onto a memory card.
4. Insert the memory card into the DLA.
Requirement 3—Refer to the 3M™ Handheld RFID Reader Owners Manual for DLA start-up
procedures
Refer to the 3M™ Handheld RFID Reader Owners Manual for details on how to charge batteries, and
information on “Using the Handheld device for the first time.”
IMPORTANT !
Read, understand and follow all safety information contained in these instructions BEFORE using the 3M™
Handheld RFID Reader.
78-8126-8418-7e
© 3M 2012. All rights reserved.
14
3M™ Digital Library Assistant User Guide
Installing DLA software
To install new DLA software, you must export the new software to a memory card and insert the card into the
DLA.
The installation process supports both the Handheld Model 702 and Model 802 (Palm platform), and the
Handheld Model 803/804 (Windows CE platform).
Overview
1. First install DLA software on the computer you will use to run Data Manager software.
2. Each time you export lists using Data Manager software, the DLA software you installed on the computer
will be automatically installed on the memory card.
3. When you insert the memory card into the DLA, a dialog box asks you if you want to update the software
with the new version.
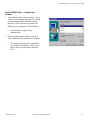
Step 1—Install DLA software on your computer’s hard drive
Install DLA software onto the hard drive of the
computer that you use to run Data Manager
software.
1. Insert the 3M™ Digital Library Assistant
Software CD-ROM into your computer’s CDROM drive.
•
An installation program automatically
starts.
2. Follow the installation instructions that ask
you to select a Destination folder, languages,
etc.
•
The installation process copies the DLA
program files from the CD-ROM and
saves them on your hard drive.
You can install a maximum of four
languages. Be sure to install all languages that
you will use. Languages that are not installed
at this time will not be available for use on the
DLA.
3. When the installation is complete, click
Finish.
•
The DLA software is now installed on
your computer’s hard drive.
78-8126-8418-7e
© 3M 2012. All rights reserved.
15
3M™ Digital Library Assistant User Guide
Model 803/804 Only — Optional tag
formats
1. After installing DLA software (above): If you
wish to use tag formats other than the 3M and
generic formats included with the system,
insert the 3M™ Optional Tag Formats CDROM into your computer’s CD-ROM drive.
•
The installation program starts
automatically.
2. Follow the instructions on the screen, then
click Finish when the installation is complete.
•
The optional tag formats are installed on
your computer’s hard drive, and you are
able to select specific formats from the
DLA.
78-8126-8418-7e
© 3M 2012. All rights reserved.
16
3M™ Digital Library Assistant User Guide
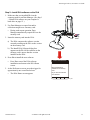
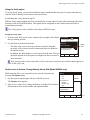
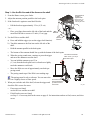
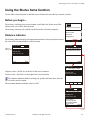
Step 2—Install DLA software on the DLA
1. Make sure that you installed DLA on the
computer used to run Data Manager. (See Step 1
—Install DLA software on your computer’s
hard drive on page 15.)
2. Use Data Manager to export lists and/or
collection categories to a memory card.
•
During each export operation, Data
Manager automatically exports DLA to the
memory card.
Memory
Card
3. Insert the memory card into the DLA.
a) The DLA compares the software version
currently running on the DLA to the version
on the memory card.
b) The Install DLA Software dialog box
appears on the DLA if the software on the
memory card is newer than the version
installed on the DLA.
4. Press Yes to install the new software.
•
Press No to cancel the DLA software
installation and return to the DLA Home
screen.
5. At the Preferences screen, press the trigger for
approximately one second and release.
•
The DLA Home screen appears.
Install DLA Software?
New DLA software is
available on the memory
card.
Do you want to install the
new software?
Yes
78-8126-8418-7e
© 3M 2012. All rights reserved.
No
DLA_003
17
3M™ Digital Library Assistant User Guide
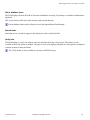
DLA reset procedure
If the DLA screen locks up or stops working, you need to reset the DLA.
A fully discharged battery may cause a blank screen.
To reset the DLA
As described below, the reset procedure is different for the
Model 803/804 and Models 702/802 Handheld models.
The Handheld model number appears on the label on the
bottom of the DLA base.
Handheld Model 803/804 reset procedure
1. Insert a memory card (with DLA on it) into the DLA.
2. Press and hold the reset button for approximately one
second.
3. The DLA loads.
4. The Home screen appears.
Reset
Button
Handheld Model 702 and Model 802 reset procedure
1. Insert a memory card (with DLA software on it) into the
DLA.
2. Press and hold the reset button for approximately one
second.
Model
Number
3. Press the trigger.
The DLA loads.
4. At the Set Clock screen, set the correct time and date.
COM/STATUS
The Preferences screen appears.
PWR
5. Press OK.
The Home screen appears.
U.S. Pat. No. 6486780, U.S. Pat. No. 6232870
U.S. Pat. No. 6448886, U.S. Pat. No. 6768419
U.S. Pat. No. D470847
Model 803
FCC ID: DGF-LSD702
CANADA: ______
S/N: 803XXXX
3M Security Systems Division
St. Paul, Minnesota 55144
I.T.E.
LISTED
4P24
N1108
DLA_087
78-8126-8418-7e
© 3M 2012. All rights reserved.
18
3M™ Digital Library Assistant User Guide
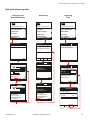
Staff-level setup options
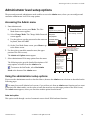
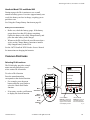
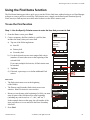
Accessing staff setup options
The Setup Options and Setup Lists screens listed below provide staff-configurable options that allow you to
customize DLA operation. No password is required to access or modify these options.
Staff-level setup options
page
Adjusting the sound volume
Changing the item width setting
Selecting a language
Changing the Reader Timeout setting
Changing the Items Order Right-to-left setting
Enabling Check Shelf alerts
Enabling Backgound inventory
Changing the Verify setting
Changing the Time and Date settings
Setting the find function default prefix
Using the Setup Lists screen
20
20
21
21
21
22
22
23
24
26
27
Digital Library Assistant
Setup Lists
Setup Options
DLA
Stylus
User Mode Status
About DLA
Lists Options
Mode About
Options: General
Sound volume: Medium
Item Width: Medium
Language: English
Thin
Medium
Thick
Reader Timeout: 10
Items ordered right-to-left
To display the Options screen
“Check Shelf” alerts
1. Use the scroll buttons to move down the list on the Home
screen until you see the Setup Options selection.
Background inventory
2. Press the Options button.
Set Clock
The Options: General screen appears.
English
Français
Italiano
Verify:
Prev
Next
6/14/05 4:29 pm
Home
Options: Find
To change a setting
Prefix
1. Use the DLA stylus to tap the drop-down menu icon ( ) to
display a menu.
2. From the menu, use the stylus to select the new setting.
The menu closes and the new setting appears.
© 3M 2012. All rights reserved.
5
10
15
20
25
30
Item ID:
Primary Info:
Secondary Info:
Prev
78-8126-8418-7e
Off
Low
Medium Low
Medium
Medium High
High
Next
Home
DLA_031
19
3M™ Digital Library Assistant User Guide
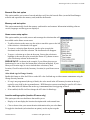
Setting general options
Use the Options: General screen to customize the operation of the DLA.
Adjusting the sound volume
Use the Sound volume setting to adjust the volume of the DLA pacing and alert
sounds.
From the pop-up menu, use the stylus to select the desired setting.
The menu closes and the new setting appears.
After you select a sound volume setting, the DLA plays a series of beeps at the new
volume.
If you are using the Handheld Model 803/804, you can also use the Options
menu to adjust the sound volume.
Options: General
Sound volume: Medium
Medium
Item Width: Off
English
Language: Low
Low
Reader Timeout: Medium
10
Medium
Items ordered right-to-left
“Check Shelf” alertsMedium High
High
Background inventory
Verify:
Set Clock
Prev
6/14/05 4:29 pm
Next
Home
DLA_041
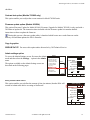
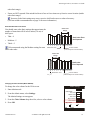
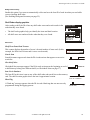
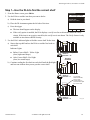
Changing the item width setting
You can change the Item Width setting to match the thickness of the items that you
are reading.
•
Use the Medium setting for most applications.
•
You may want to select the Thin setting if you are working with large groups of
thin items. This reduces the number of shelf-order errors reported for items that
are in the correct position.
If you use the "thick" order-limit setting for thin items,
you may encounter excessive false shelf-order errors for items that are in the
correct position.
Options: General
Sound volume: Medium
Item Width: Medium
English
Language: Thin
Reader Timeout: Medium
10
Thick
Items ordered right-to-left
“Check Shelf” alerts
Background inventory
Verify:
Set Clock
Prev
If you use the "thin" setting for normal or thick items,
you may notice reduced accuracy (some detectable shelf-order errors may not be reported).
Next
6/14/05 4:29 pm
Home
DLA_042
Item width recommendations
Thin – less than ½ inch (1.5cm) thick
Medium – ½ inch to 1 ½ inches (1.5 to 4cm) thick
Thick – greater than 1 ½ inches (4 cm) thick
Note: For instructions on how to customize the Item Width settings (thin, medium, thick), see Setting order
limits on page 32.
78-8126-8418-7e
© 3M 2012. All rights reserved.
20
3M™ Digital Library Assistant User Guide
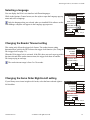
Selecting a language
You can display the DLA's user interface in different languages.
While in the Options: General screen, use the stylus to open the Language pop-up
menu and select a language.
Only the languages that you selected when you installed DLA software on the
Data Manager computer will appear in the Language pop-up menu.
Options: General
Sound volume: Medium
Item Width: Medium
Language: English
Reader Timeout: English
10
Items ordered right-to-left
Français
Italiano
“Check Shelf” alerts
Background inventory
Verify:
Set Clock
6/14/05 4:29 pm
Next
Prev
Home
DLA_032
Changing the Reader Timeout setting
This setting only affects the trigger lock feature. The reader timeout setting
determines how quickly the DLA releases the trigger-lock function. (See Using the
DLA trigger lock on page 51.)
When the DLA trigger lock is activated, if the DLA does not read a new tag within
the time selected in the reader timeout menu, the trigger lock shuts off and the
DLA stops trying to read tags.
The reader timeout range is from 5 to 30 seconds.
Options: General
Sound volume: Medium
Item Width: Medium
Language: English
Reader Timeout: 10
Items ordered right-to-left
“Check Shelf” alerts
Background inventory
Verify:
Set Clock
Prev
6/14/05 4:29 pm
Next
Home
DLA_044
Changing the Items Order Right-to-left setting
If your library stores items in right-to-left order, select the Items ordered right-toleft checkbox.
Options: General
Sound volume: Medium
Item Width: Medium
Language: English
Reader Timeout: 10
Items ordered right-to-left
“Check Shelf” alerts
Background inventory
Verify:
Set Clock
Prev
Next
6/14/05 4:29 pm
Home
DLA_044
78-8126-8418-7e
© 3M 2012. All rights reserved.
21
3M™ Digital Library Assistant User Guide
Enabling Check Shelf alerts
During the Check Shelf Order function, the DLA displays Checkshelf alert
messages that can help you identify items that may belong on a different shelf
(even though they are in the correct shelf order for the shelf that you just scanned).
Options: General
Sound volume: Medium
Item Width: Medium
Language: English
Reader Timeout: 10
Items ordered right-to-left
“Check Shelf” alerts
"Checkshelf" items appear near the beginning or end of the shelf.
You may want to disable (uncheck) the “Check Shelf” alerts checkbox to
avoid excessive alert messages when checking the shelf order of shelving carts.
Background inventory
Verify:
Set Clock
Prev
6/14/05 4:29 pm
Next
Home
DLA_078
If you read a shelf where a patron misplaced a book near the end of the shelf and, the book’s correct shelf
location is after the shelf that you just read.
The book is in the correct shelf order (at the end of the shelf you just read) but it may not be in the correct
location. The DLA will display an alert message and you can determine if you must re-shelve the book.
If you read a shelf where a patron misplaced a book near the beginning of the shelf and, the book’s correct
shelf location is before the shelf that you just read.
The book is in the correct shelf order (at the beginning of the shelf you just read) but it may not be in the correct
location. The DLA will display an alert message and you can determine if you must re-shelve the book.
If, while reading a shelf, you accidentally move the DLA into an adjacent shelf (left or right), the DLA may
read one of the books on the adjacent shelf.
The book was detected in the correct shelf order but it is located on an adjacent shelf.
The DLA will display an alert message and you can determine if the book is correctly shelved.
Adjust your scanning technique to avoid accidentally reading items on adjacent shelves.
Enabling Backgound inventory
Select (check) the Background inventory checkbox to save the Item ID of each tag
read while using other DLA functions (such as Check Shelf Order).
•
The Background inventory checkbox only appears if you selected User choice
in the Admin Settings screen.
•
The Item IDs read while background inventory is active are always saved in
the Inventory category.
•
To view the number of Item IDs saved in the Inventory category, select the
Setup Lists function from the Home menu.
The Background Inventory function does not collect Item ID location
information, if used.
78-8126-8418-7e
© 3M 2012. All rights reserved.
Options: General
Sound volume: Medium
Item Width: Medium
Language: English
Reader Timeout: 10
Items ordered right-to-left
“Check Shelf” alerts
Background inventory
Verify:
Set Clock
Prev
Next
6/14/05 4:29 pm
Home
DLA_079
22
3M™ Digital Library Assistant User Guide
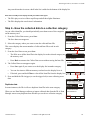
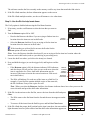
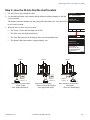
Changing the Verify setting
With the Verify option enabled, the DLA can identify the security status of items while performing other DLA
functions (such as Check Shelf Order). This option can be configured to detect either unsecured items or
secured items (not both).
The Verify option is only available at sites that use ISO tags to provide RFID Security.
Enabling the Verify option
To use the Verify option, you must first enable the option and define the
type of security status that you want the DLA to identify (secured item or
unsecured item).
Options: General
Sound volume: Medium
Item Width: Medium
Language: English
Reader Timeout: 10
Items ordered right-to-left
The Verify option only appears if your site uses RFID Security. If a
tag protocol that does not support RFID Security (e.g., D1) is selected,
the Verify option will not appear in the Options screen. For information
on setting Tag Protocol, see Changing the Tag Protocol setting on page
34.
“Check Shelf” alerts
1. From the main DLA screen, press Options.
Set Clock
Background inventory
Verify:
3. Select one of the two verify icons to select the type of security status
that you want to identify.
•
•
Select the unsecured icon
if you want the DLA to alert you if
it reads an item whose security status is unsecured.
Next
Prev
2. To enable the Verify option, select the Verify checkbox.
6/14/05 4:29 pm
Home
To enable the verify option, select the Verify checkbox
and define what type of item security (secured or
unsecured) that the DLA will detect.
Verify:
Display
icon if an
unsecured item is read
Display
icon if a
secured item is read
Select the secured icon
if you want the DLA to alert you if it
reads an item whose security status is secured.
DLA_076
4. Press Home.
Identifying security status
The DLA will identify a particular security status much the same way that it
identifies items that are o n an active search list.
•
•
Collect Data
0/3 Press Trigger To Begin
The DLA emits a series of beeps each time it reads an item that meets the Queen Lear
PS3515.E42.A698 V.1
verify criteria (secured or unsecured) that you defined in the Options
screen.
The Poisoned Orchard
In addition, the DLA displays a verify icon next to the item. The icon
displayed depends on if the option is configured to detect secured or
unsecured items.
If an item meets the verify criteria and it is also on an active search list,
the search list name appears in place of the verify icon.
78-8126-8418-7e
© 3M 2012. All rights reserved.
Verify
icon
PS3515.E42.B765 V.1
Clear
Save
Home
DLA_077
23
3M™ Digital Library Assistant User Guide
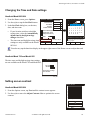
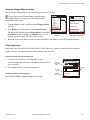
Changing the Time and Date settings
Handheld Model 803/804
1. From the Home screen, press Options.
June 2005
Item Width: Medium
Language: English
Reader Timeout: 10
S
“Check Shelf” alerts
Background inventory
T
W
T
F
S
1
2
3
4
19 20 21 22 23 24 25
26 27 28 29 30
Verify:
(GMT-06:00) Central Time (US & Can
Set Clock
Prev
M
5 6 7 8 9 10 11
12 13 14 15 16 17 18
Items ordered right-to-left
If your location switches to daylight
savings time, select the Automatically
adjust time for daylight savings
changes checkbox.
The time zone and daylight savings time
settings are only available on the Model
803/804.
AM PM
Sound volume: Medium
3. In the Set Clock dialog box, set the time,
date, and time zone.
•
: 4 1
3
2. Use the stylus to tap the Set Clock button.
•
Set Clock
Options: General
Automatically adjust time for daylight
saving changes
6/14/05 4:29 pm
Next
Home
Cancel
OK
D LA _0 8 1
You also may tap the date/time display in the upper right corner of the Home screen to adjust date and
time.
Handheld Mode 702 and Model 802
The time zone and daylight savings time settings
are not available on the Model 702 and Model 802.
Set Clock
Set Time: 13:53
Set Date: 3/5/03
Touch boxes to change
time and date
OK
DLA_085
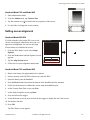
Setting screen contrast
Options: Screen
Handheld Model 803/804
2
1. From the Options screen, tap Next until the contrast screen appears.
6
4
2. Use the stylus to move the Adjust Contrast slider to optimize the screen
contrast.
8
10
12
14
16
0
Adjust Contrast
100
Align Screen
Prev
Next
Home
D LA_0 8 2
78-8126-8418-7e
© 3M 2012. All rights reserved.
24
3M™ Digital Library Assistant User Guide
Handheld Model 702 and Model 802
1. Enter administrator mode.
2. From the Admin menu, tap Contrast Test.
3. Tap the contrast icon ( ) located in the lower portion of the screen.
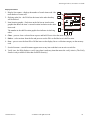
4. Use the slider to change the screen contrast.
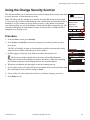
Setting screen alignment
Handheld Model 803/804
If, while using the stylus on the DLA screen, the
various screen targets (drop-down list icons, etc.)
appear out of alignment, you can use the Align
Screen feature to recalibrate the screen.
1. From the DLA Home screen, select Setup
Options.
Options: Screen
Press and hold stylus on center of target.
Repeat as target moves around screen.
2
4
6
8
10
12
14
16
2. Press the Next button until the Options: Screen
appears.
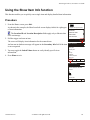
0
3. Tap the Align Screen button.
Adjust Contrast
100
Align Screen
4. Follow the on-screen alignment instructions.
Prev
Next
Home
D LA_0 8 4
Handheld Model 702 and Model 802
1. Remove the battery for approximately five minutes.
2. Insert a memory card with DLA software on it into the DLA.
3. Insert the battery into the handheld.
4. Press the Reset button (located on the bottom of the handheld near the antenna).
5. Follow the instructions to calibrate the screen using the handheld stylus.
6. At the Country/Date/Time screen, tap Next.
7. At the Setup Complete screen, tap Done.
8. Press and release the trigger.
9. At the Preferences screen, press and release the trigger to display the Set Clock screen.
10. Set the time and date.
11. Press OK.
The DLA Home screen appears.
78-8126-8418-7e
© 3M 2012. All rights reserved.
25
3M™ Digital Library Assistant User Guide
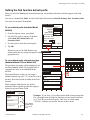
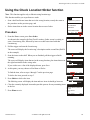
Setting the find function default prefix
When you select the Find option from the main menu, any default prefix that you define appears in the find
field(s).
You can set a default find Prefix for each of the find field selections (Item ID, Primary Info, Secondary Info).
You can leave the prefix fields blank.
Options: General
To set a default prefix (Handheld Model
803/804)
1. From the Options screen, press Next.
2. Use the DLA stylus to tap any of the three
fields (Item ID, Primary Info, and
Secondary Info).
3. Use the stylus to enter the desired prefix.
4. Tap OK.
Sound volume: Medium
Item Width: Medium
Language: English
Reader Timeout: 10
Items ordered right-to-left
“Check Shelf” alerts
Background inventory
Verify:
Set Clock
Prev
Next
6/14/05 4:29 pm
Home
Whenever you use the Find function, any
Options: Find
default prefix that you assign will appear in the Prefix
appropriate box.
Item ID:
Keyboard
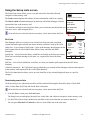
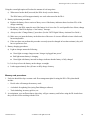
To set a default prefix and keyboard type
(Handheld Model 702 and Model 802)
The procedure for setting a default find prefix for
an older Handheld Model 702 and Model 802 is
essentially the same as the Handheld Model
803/804.
The main difference is that you can assign a
default keyboard type (abc, 123, or Int) for each of
the three find-criteria fields available in the Find
function.
When using the Find function, the default
keyboard is the keyboard type that first appears
when you tap one of these fields.
1
3114700
Primary Info:
1 2 3 4 5 6 7 8 9 0 - =
Tab q w e r t y u i o p [ ]
CAP a s d f g h j k l ;
Secondary Info:
Prev
Next
Home
Options: Find
Prefix
Shift z x c v b n m , . /
` \
Ctl á ü
OK
Item ID:
3114700
DLA_088
Primary Info:
Secondary Info:
Prev
Next
Home
Options: Find
Keyboard
Prefix
Item ID:
3114700
123
Primary Info:
abc
Secondary Info:
Prev
Next
123
Example: If you often if you often perform finds of items using Item
IDs, you might enter the first few characters of your branch’s barcode
(e.g., 3114700) as an Item ID prefix. This saves you from typing
“3114700” each time you need to find one of these items.
Select default
keyboard type
for each find
field.
Home
DLA_089
78-8126-8418-7e
© 3M 2012. All rights reserved.
26
3M™ Digital Library Assistant User Guide
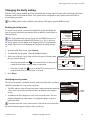
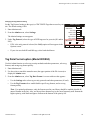
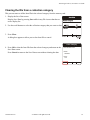
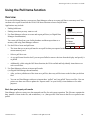
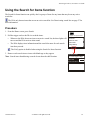
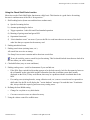
Using the Setup Lists screen
The Setup Lists screen allows you to view and activate the lists and collection
categories on the memory card.
Digital Library Assistant
The Items column displays the number of items contained in each list or category.
The Date Loaded information displays the date/time when Data Manager software
exported the lists to the memory card.
Setup Lists
The checkbox in front of each search list allows you to select the search lists that you
want to be active while using the DLA.
User Mode Status
Setup Options
About DLA
Lists Options Mode About
All search lists are selected each time a memory card is inserted into the DLA.
DLA Lists
Setup Lists
Order Lists
1st Floor
2nd Floor
Annex
Search Lists
Missing
Data Manager software is used to create various lists from extracted circulation
system data, and export selected lists onto a memory card that is used by the DLA.
Order lists – a list of items in shelf order—in the order that they should appear on the
shelf (required for the Check Shelf Order, Shelve Items, and Sort and Shelve
functions).
Search lists – a list of items the library would like to find (the order does not matter).
These lists can include missing or lost items, etc. (required for Search for Items
function).
Items
693,230
2,343
345
Items
4,145
Pull Lists
Weed
Items
4,145
Data Loaded: 11/15/01 9:35
Uncheck
Home
DLA_007
Pull lists – a list of items (hold lists, weed lists, etc.) that you intend to pull (required for the Pull Items
function).
Collection categories – the Collection Category labels that you created in Data Manager software and exported
to the memory card (required for the Collect Data function).
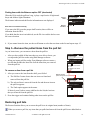
The DLA’s Save function allows you to save the Item IDs of any currently displayed items to a specific
category.
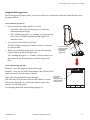
Deactivating search lists
All items on any active (checked) search list will be searched for during the Search for Items, Check Shelf
Order, Collect Data, Pull, Find, and Sort & Shelve functions.
All search lists are selected each time a memory card is inserted into the DLA.
1. From the Home screen, press the Lists button.
The Setup Lists screen displays the order lists, search lists, and collection categories on the memory card.
2. Use the DLA stylus to clear (uncheck) the checkbox of any search list that you want to deactivate.
You can press Check all or Uncheck to select or clear all the lists at the same time.
78-8126-8418-7e
© 3M 2012. All rights reserved.
27
3M™ Digital Library Assistant User Guide
Viewing collection categories
Scroll down the Setup Lists screen to view the collection categories on the memory
card.
•
•
The Items column displays the number of Item IDs that you have saved in each of
the collection categories.
The Inventory collection category displays the number of Item IDs collected
when the Background Inventory function was active.
Setup Lists
Pull Lists
Hold
Weed
Items
22
42
Collect Lists
In House
Default
Inventory
Items
78
43
2,343
Data Loaded:
Check all
11/15/01 9:35
Home
DLA_008
78-8126-8418-7e
© 3M 2012. All rights reserved.
28
3M™ Digital Library Assistant User Guide
Administrator level setup options
The password-protected administrator mode enables access to the Admin menu, where you can configure and
customize administrator level DLA setup options.
Accessing the Admin menu
1. Enter Admin mode.
User Mode Status
a) From the Home screen, press Mode. The User
Mode Status screen appears.
Current mode: Staff
Time remaining: unlimited
b) Select Change Mode. The Change Mode Password
screen appears.
Setup Lists
c) Use the stylus to type the password on the onscreen
keyboard, then select OK.
User Mode Status
d) On the User Mode Status screen, press Home to go
to the Home screen.
Change Mode
Digital Library Assistant
Setup Options
About DLA
1
Lists Options Mode About
2. Use the stylus to touch the menu bar area (the upper
portion of the DLA screen).
The Admin and Options menus appear.
3. Select administrator DLA setup options from the menu.
The following topics provide detailed descriptions of all
setup options accessible from the Admin menu.
To return to the Staff mode, select End Admin
Mode at the bottom of the Admin menu.
2
Home
Touch the stylus anywhere
in the menu bar area to
display the Admin menu.
Admin Options
Auto Test
Barcode Filter Test
Memory Card Test
Digital Library Assistant
Home Screen Setup
Location Settings
Check Shelf Order
Firmware Update
Copy Log...
Collect
Data
Settings...
Tag Data
Format...
Sort
& Shelve
TDFM Status
End Admin
Mode
Search
for
Items
Order Collect
Pull
Sort
Using the administrator setup options
First access the administrator mode as described above, then use the Admin menu selections as described on the
following pages.
On many (but not all) Admin-level screens, if you wish to exit from an Admin menu function and you want
to remain in the Admin mode, use the stylus to touch the menu bar area (the upper portion of the DLA screen).
The Admin menu appears, where you can select another option from the menu.
Auto test option
This option scrolls through a series of automatic tests to check DLA hardware functions.
78-8126-8418-7e
© 3M 2012. All rights reserved.
29
3M™ Digital Library Assistant User Guide
Barcode filter test option
This option enables you to enter a barcode and then verify how the barcode filter (created in Data Manager
software and exported to the memory card) modifies the barcode.
Memory card test option
This option automatically checks the memory card interface and contents. Information including software
version, languages and font types are displayed.
Home screen setup option
This option enables you to add, remove and rearrange the selections that will
be available on the Home screen menu:
•
To add a selection to the menu, use the stylus to touch the space to the left
of the selection. A checkmark will appear.
•
To remove a selection from the menu, use the stylus to touch the
checkmark to the left of the selection. The checkmark will disappear.
•
To move a selection up or down in the menu, first tap the selection to
highlight it, then use the stylus to touch the Down or Up button to move
your selection up or down in the menu list.
IMPORTANT ! As shown in the example, if your library does not use
location tags be sure to leave the bottom three selections unchecked. If your
library uses location tags, be sure to include those selections (Check
Location, Check Location+Order, Inventory Location) in your Home screen
menu.
Allow blank tags in Change Security
Enable this feature to allow the DLA to set the AFI value for blank tags to either secure or unsecure using the
Change Security function.
•
If a tag is not programmed (the tag is blank), the value stored in the AFI memory location on the tag is
typically set to 0x00 by the tag manufacturer. RFID detection systems searching for specific AFI values
other than 0x00 will indicate that such a tag is unsecured, thus not triggering an alarm.
•
If not enabled, the DLA will not change the AFI value for blank tags.
Location Settings
Display locations in Check Shelf Order
Clear location after save in Inventory
Location settings option (location ID users only)
This option provides two checkboxes that enable you to:
•
Display or do not display the location description with each scanned item.
•
Clear or do not clear your current location information after you select Save.
To toggle the checkmark (select/unselect an option), use the stylus to tap the
Home
DLA_044d
78-8126-8418-7e
© 3M 2012. All rights reserved.
30
3M™ Digital Library Assistant User Guide
checkbox.
Contrast test option (Models 702/802 only)
This option enables you to adjust the screen contrast for Model 702/802 units.
Firmware update option (Models 803/804)
This option (Firmware Update for Model 803/804, Firmware Upgrade for Models 702/802) is only used with a
3M firmware update kit. The instruction sheet included with the firmware update kit contains detailed
instructions on how to update the firmware.
During this process a firmware update utility is launched which locates new reader firmware on the
memory card and then updates the DLA’s firmware.
Copy log option
IMPORTANT! Do not use this option unless directed to by 3M Technical Service.
Admin settings option
To access the Admin Settings screen, first enter the Admin
mode and then select the Settings… option in the Admin
menu.
The options available on the Admin Settings screen are
described on the following pages.
Admin Settings
Admin Options
Auto Test
Barcode Filter Test
Memory Card Test
Digital Library Assistant
Home Screen Setup
Location Settings
Check Shelf Order
Firmware Update
Copy Log...
Collect
Data
Settings...
Tag Data
Format...
Sort
& Shelve
TDFM Status
End Admin
Mode
Search
for
Items
Order Collect
Pull
Sort
Admin Timeout: 10
Order Limits
Thin Items: 9
Medium Items: 5
Thick Items: 2
Bkgr Inventory: User Choice
Color Scheme: Standard
Tag Protocol
ISO
D1
OK
Cancel
DLA_045b
Setting the Admin Mode timeout
Admin Settings
This option enables you to define the amount of time (in minutes) that the DLA will
remain in Admin mode before reverting to Staff mode.
Admin Timeout: 10
Order Limits
Thin Items: 9
Medium Items: 5
Thick Items: 2
Bkgr Inventory: User Choice
Color Scheme: Standard
Tag Protocol
D1
OK
ISO
Cancel
DLA_035a
78-8126-8418-7e
© 3M 2012. All rights reserved.
31
3M™ Digital Library Assistant User Guide
Enabling the Background Inventory function
Admin Settings
Use the Bkgr inventory setting to define how the Background Inventory setting
appears in the Options: General screen.
•
With background inventory enabled, as you use the DLA, the DLA collects Item
IDs from each tag that the DLA reads and automatically saves them in the
Inventory category.
•
When Data Manager software imports the collection data, the backgroundinventory text files are saved to the Inventory collection category.
•
To check the number of Item IDs stored in the Inventory category, select Setup
Lists from the Home screen.
Admin Timeout: 10
Order Limits
Thin Items: 9
Medium Items: 5
Thick Items: 2
Bkgr Inventory: User Choice
On
Color Scheme: Always
Standard
Always Off
Tag Protocol
User choice
ISO
D1
Cancel
OK
DLA_035
Data Manager software automatically creates the Inventory collection category on the memory card. This
category is reserved for background inventory only.
Background inventory settings
User choice – Allows staff to turn background inventory on and off from the Options: General screen.
Always on – Keeps background inventory on all the time, and removes the Background Inventory selection
from the staff Options: General screen. This ensures that staff cannot inadvertently turn the background
inventory function off.
Always off – Keeps background inventory off all the
time, and removes the Background Inventory selection
from the staff Options: General screen.
Setting order limits
Order Limit settings define the order limit range for
each of the three Item Width settings (thin, medium,
and thick) that appear in the Options: General dialog
box.
To access the Order Limits settings, enter Admin mode
and select Settings from the Admin menu.
Any shelf-order errors that occur within the order limit
range will not be reported.
Admin Options
Auto Test
Barcode Filter Test
Memory Card Test
Home Screen Setup
Location Settings
Firmware Update
Copy Log...
Settings...
Tag Data Format...
TDFM Status
End Admin Mode
DLA_052
Admin Settings
Admin Timeout: 10
Order Limits
Thin Items: 9
Medium Items: 5
Thick Items: 2
Example: If the order limit range is set to four, the
order-limit range extends four items on both sides of a
misshelved item.
•
Errors are reported if the misshelved item is five or
more items away from its correct location (outside
78-8126-8418-7e
Options: General
Sound volume: Medium
Item Width: Medium
Bkgr Inventory: User Choice
English
Language: Thin
Reader Timeout: Medium
10
Thick
Items ordered right-to-left
“Check Shelf” alerts
Color Scheme: Standard
Background inventory
Tag Protocol
D1
OK
© 3M 2012. All rights reserved.
Cancel
Verify:
ISO
Set Clock
Prev
Next
6/14/05 4:29 pm
Home
32
3M™ Digital Library Assistant User Guide
order-limit range).
•
Errors are NOT reported if the misshelved item is four or fewer items away from its correct location (inside
order-limit range).
Incorrect Order-limit settings may cause excessive shelf-order errors or reduced accuracy.
(See Item width recommendations on page 20 for more information.)
Recommended order limit values
Order Limit
Range
You should enter order-limit settings that approximate the
number of items that will fit in four inches (10 cm) of
shelf space.
•
Thin—9
•
Medium—5
•
Thick—2
(4 items)
Shelf-order Error
Not Reported
1
3M recommends using the Medium setting for most
Shelf-order tasks.
2
3
4 5
6
8
7
9 10 11 12 13
Correct Location
(1 item away from current location)
Misshelved item
Order Limit
Range
(4 items)
Shelf-order
Error Reported
1
8
2
3 4
5
6
Misshelved item
DLA_021
7
9 10 11 12 13
Correct Location
(6 items away from current location)
Changing the Color Scheme (Model 803/804)
Admin Settings
To change the color scheme for the DLA screen:
Admin Timeout: 10
1. Enter Admin mode.
2. From the Admin menu, select Settings.
The Admin Settings screen appears.
Order Limits
Thin Items: 9
Medium Items: 5
Thick Items: 2
Bkgr Inventory: User Choice
3. From the Color Scheme drop-down list, select a color scheme.
4. Press OK.
Color Scheme: Standard
Tag Protocol
D1
OK
ISO
Cancel
DLA_035b
78-8126-8418-7e
© 3M 2012. All rights reserved.
33
3M™ Digital Library Assistant User Guide
Changing the Tag Protocol setting
Admin Settings
Set the Tag Protocol setting to the type(s) of 3M™ RFID Tags that are used at your
site. The default setting is ISO.
Admin Timeout: 10
Order Limits
Thin Items: 9
Medium Items: 5
Thick Items: 2
1. Enter Admin mode.
2. From the Admin menu, select Settings.
The Admin Settings screen appears.
Bkgr Inventory: User Choice
Color Scheme: Standard
3. Under Tag Protocol, select the type of RFID tags used at your site (D1 and/or
ISO).
•
•
If D1 is the only protocol selected, the Verify option will not appear in the
Options screen.
Tag Protocol
ISO
D1
OK
Cancel
DLA_035c
If your site uses both D1 and ISO tags, select both checkboxes.
Tag Data Format option (Model 803/804)
Use this Admin function to select tag security methods and other parameters, select tag
formats, and arrange tag format priority.
1. Enter Admin mode.
2. Use the stylus to touch the menu bar area (the upper portion of the DLA screen) to
display the Admin menu.
3. From the Admin menu, select Tag Data Format. A screen with two tabs appears.
•
Use the Settings tab to select tag security protocols and other parameters (if used).
•
Use the Tag Formats tab to enable/disable specific tag formats, and to set tag
format priority.
Admin Options
Auto Test
Barcode Filter Test
Memory Card Test
Home Screen Setup
Location Settings
Firmware Update
Copy Log...
Settings...
Tag Data Format...
TDFM Status
End Admin Mode
Note: For optimal performance, only the formats used in your library should be enabled (disable all
unused formats in the list). Also, use the up/down buttons to give the most frequently used formats the
highest priority, with blank and ignore formats at the bottom of the priority list.
78-8126-8418-7e
© 3M 2012. All rights reserved.
34
3M™ Digital Library Assistant User Guide
TDFM Status option (Model 803/804)
Use this Admin function to view the current status of tag formats loaded in the DLA.
1. Enter Admin mode.
2. Use the stylus to touch the menu bar area (the upper portion of the DLA screen) to
menu.
3. From the Admin menu, select TDFM Status.
The current status of all tag formats loaded in the DLA is displayed.
Admin Options
Auto Test
Barcode Filter Test
Memory Card Test
display Home
the Admin
Screen Setup
Location Settings
Firmware Update
Copy Log...
Settings...
Tag Data Format...
TDFM Status
End Admin Mode
End Admin Mode option
To return to Staff mode, select End Admin Mode at the bottom of the Admin menu.
78-8126-8418-7e
© 3M 2012. All rights reserved.
35
3M™ Digital Library Assistant User Guide
Shelf reading basics
This section describes various shelf-reading techniques necessary for the successful operation of the DLA.
Straightening the shelf
Books that are pushed
toward the back of the shelf
may be difficult to read.
1. If possible, arrange the fronts of the books in a
reasonably straight line.
Books that are pushed toward the back of the shelf may
be difficult to read.
2. Try not to have any tilted books.
If the books are tilted, you must tilt the DLA so that the
antenna is always parallel to the book spine.
Try to align the front of the books
in a reasonably straight line.
DLA_064
Aligning the antenna
Keep the DLA’s antenna correctly aligned at all times.
•
Keep the antenna parallel with the spine of the book.
•
Align the bottom of the antenna with the bottom of the book.
•
If the books are tilted, tilt the antenna.
Keep the front and
side of the antenna
parallel to the book.
Align the bottom of
the antenna with the
bottom of the book.
78-8126-8418-7e
© 3M 2012. All rights reserved.
Antenna
DLA_072
36
3M™ Digital Library Assistant User Guide
Adjusting the antenna
Adjust the antenna to keep it correctly aligned while
working at shelves with different heights.
•
The antenna pivots to allow you to read upper
and lower shelves.
•
The bottom edge of the antenna should line up
with the bottom of the item.
DLA_012
Separating the tags from metal
A vertical metal surface may affect the DLA’s shelf-reading accuracy.
Method 1—create a gap between the metal and the book
If the left side of a book is against a metal surface, you need to separate
it by about 0.5 inch (1.3 cm).
•
Make sure that there is a finger’s-width gap (approximately 0.5 inch,
1.3 cm) between any metal structure (e.g., shelf divider) and the first
item on the left-hand side of the shelf.
•
Create a gap on the left side of any book that is next to a metal
surface (such as a metal shelf divider located in the middle of the
shelf).
.5 in.
(1,3 cm)
Gap
Metal
Surface
DLA_057
Method 2—pull any item that is against metal approximately 2.5 inches (6,35 cm) out from the
shelf
If the left side of a book is against a metal surface, pull the item out away
from the shelf a minimum of 2.5 inches (6,35 cm) as you begin scanning
the shelf.
If the left side of
an item is
against metal
Pull the item out
before you start
scanning the shelf
This helps ensure that the DLA reads the first item’s tag.
Metal
Surface
2.5 in.
(6,35 cm)
minimum
DLA_070
78-8126-8418-7e
© 3M 2012. All rights reserved.
37
3M™ Digital Library Assistant User Guide
Maintaining the antenna at the correct distance
Position the antenna
within 0.5 in. (1,3 cm)
from the book’s spine.
Hold the DLA antenna close to the book spine.
•
Try to keep the antenna approximately 0.5 in. (1,3 cm) or less
from the book spines.
•
You may want to touch the antenna to each book to help ensure
that each book’s tag is read.
If the pacing sound stops when checking shelf order, the
DLA is no longer detecting a tag and the antenna may be too
far away.
Antenna
DLA_010
Moving the DLA at the correct speed
Move the DLA at the correct speed.
•
The DLA creates a pacing sound (a continuous series of beeps)
to help you move the DLA at the optimal speed.
•
If you read at approximately one book per pacing sound, you
are moving at the right speed.
If necessary, you can read at a slower or slightly faster rate.
DLA_055
Reading groups of thin items
When reading a group of thin items using the normal method, you may encounter excessive shelf-order errors.
To reduce these errors, set the Item Width setting to Thin or use the reading technique shown in Method 2.
Method 1 – Set the Item Width setting to Thin
1. From the main DLA screen, press Options.
2. Set the Item Width setting (set in the Options:
General screen) to Thin when checking the shelf
order of large groups of thin items.
This may reduce excessive false shelf-order
errors.
3. Use the DLA to read the shelves.
When you are through reading thin items, set
the item width setting back to Medium.
78-8126-8418-7e
Options: General
Sound volume: Medium
Setup Options
Item Width: Thin
English
Language: Thin
Medium
Reader Timeout: 10
Items ordered right-toThick
“Check Shelf” alerts
User Mode Status
Background inventory
About DLA
Verify:
Digital Library Assistant
Setup Lists
Set Clock
Lists
Options
© 3M 2012. All rights reserved.
Mode
About
Prev
Next
6/14/05 4:29 pm
Home
DLA_011
38
3M™ Digital Library Assistant User Guide
Method 2 – Move the items past the DLA
This method may only be necessary if you are reading very
thin items.
1. Hold the DLA stationary (near the shelf).
2. Move each of the thinner items past the DLA antenna.
3. Continue down the shelf (moving the DLA as necessary).
If the pacing sound stops, the DLA is no longer detecting a
tag and the antenna may be too far away.
DLA_056
78-8126-8418-7e
© 3M 2012. All rights reserved.
39
3M™ Digital Library Assistant User Guide
Practice exercise
The best way to train staff is to start with a shelf of at least 15 books and practice reading them until they can
read them all consistently each time you scan the shelf.
See Shelf reading basics on page 36 for tips on shelf-reading techniques.
1. From the Home screen, press Order.
Digital Library Assistant
Check Shelf Order
Collect Data
Pull Items
Sort & Shelve
Order Collect
Pull
Sort
DLA_002
2. Create a 0.5-inch (1,3-cm) gap between the left side of a book
and any metal surface (such as a metal shelf end or metal shelf
divider).
You can also pull the first book approximately 2.5 in. (6,4 cm)
out from the metal divider.
.5 in.
(1,3 cm)
Gap
3. Position the antenna just to the left of the first item on the shelf
and press the trigger. Wait until you hear the pacing sound
before you proceed.
4. Use the DLA to read all the books on the shelf.
•
Move the DLA at a speed of approximately one book per
beep.
Metal
Surface
•
Make sure that the antenna is close to or touches each book.
•
Make sure that the DLA antenna is always parallel to the book spine.
DLA_057
5. Release the trigger.
•
Look at the second number in the top-left corner of the
display to see how many books that you read.
For example, if the display shows 2/15, you read 15 books.
•
During this exercise, ignore the rest of the screen.
6. Press the Clear button and continue this exercise until you can
consistently read all the books each time.
DLA_055
78-8126-8418-7e
© 3M 2012. All rights reserved.
40
3M™ Digital Library Assistant User Guide
Managing the DLA work flow
Once you become familiar with the capabilities of the DLA, you should develop in-house policies and
procedures that optimize work flow.
Each site should develop a custom work-flow-management plan for using the DLA. Your plan may include
defining the following policies:
•
Determine what types of information should be displayed on the DLA. This is defined using Data Manager
software and can be customized for different DLA tasks.
•
Create a schedule for how often you update the various lists (using Data Manager software)
•
Determine task scheduling, inventory policies, etc.
•
Make sure that your staff knows where they will get a memory card before using the DLA, and where they
will take it after working with the DLA.
Best practices
Shelf order lists
If possible, export all of your shelf-order and search lists onto a single memory card.
•
This ensures that the DLA can provide “shelf location” information when using
various functions.
•
This also helps prevent “not in database” messages.
Digital Library Assistant
Setup Lists
Setup Options
User Mode Status
Updating lists
About DLA
Because your search requirements are constantly changing, you should develop a
policy that specifies how often you update the search lists on your memory card(s).
Lists Options Mode About
You may want to update Search Lists on a regular basis.
You should periodically update your Order Lists as you add new items to your
collection.
Setup Lists
Order Lists
1st Floor
2nd Floor
Annex
Search Lists
Missing
Pull Lists
Weed
Items
693,230
2,343
345
Items
4,145
Items
4,145
Data Loaded: 11/15/01 9:35
Uncheck
Home
DLA_007
78-8126-8418-7e
© 3M 2012. All rights reserved.
41
3M™ Digital Library Assistant User Guide
Customizing the DLA item display information
The information displayed on the DLA is determined by the export format that you assigned to the list in Data
Manager software.
When the DLA reads an item, it can display two lines of information that help you identify the item. This
information includes a Primary Information line and a Secondary Information line for each item.
Primary Info Field (top line)
Primary information is displayed in a large, bold font. The DLA can
display approximately 25 characters of primary information.
Secondary Info Field (bottom line)
Secondary information is displayed in a smaller font. The DLA can
display approximately 29 characters of secondary information.
Both display fields use proportionally spaced fonts, so the actual
number of characters may vary.
Missing information
If portions of the item information displayed on the DLA are missing,
you may have problems with your circulation data or Data Manager
software export formats.
Check the Data Manager export log to see if there are export warnings
such as “missing primary information.” (See Data Manager
documentation for details.)
Check Shelf Order
6/24 Ready to Find Items
Someday Soon
PS3513.A413 S5 1941
2
Lost
The Walking Spell
PS3513.A632 C3
Clear Shelve
Save
Home
DLA_073
Primary Info Field
(approximately 25
characters)
Secondary Info Field
(approximately 29
characters)
The Walking Spell
PS3513.A632 C3
Occasionally, a corrupted memory card can result in missing display information.
“Item not in database” message
This message appears if the DLA reads an item that is not on any of the lists that are
currently on the DLA’s memory card. The DLA can read the Item ID but the memory
card does not contain any other information to help identify the item.
Collect Data
0/3 Press Trigger To Begin
(8345567973C)
Item not in database
The Poisoned Orchard
PS3515.E42.B765 V.1
Clear
Save
Home
DLA_025
78-8126-8418-7e
© 3M 2012. All rights reserved.
42
3M™ Digital Library Assistant User Guide
Typical DLA display information
The export formats that you create using Data Manager software determine the information displayed on the
DLA.
•
The examples in the table below show what a typical library might do.
•
Feel free to experiment with Data Manager software to customize the types of information that appear on
your DLA.
List Type
Shelf order lists
When using the Check Shelf Order
function, the information displayed
on the DLA is defined in Data
Manager export format assigned to
the shelf-order list that contains the
item.
Pull lists
When using the Pull Items
function, the DLA displays the
primary and secondary information
defined in the export format
assigned to the pull list.
Search lists
Typically, when the DLA reads a
search item, the information
displayed is from the shelf-order
list that contains the item.
If the item is NOT on a shelf-order
list, the information displayed
depends upon the Data Manager
export format assigned to the first
search list that contains the item.
78-8126-8418-7e
Primary Information
(approximately 25 characters)
The title of the item is often
selected as the Primary
Information field.
Secondary Information
(approximately 29 characters)
The item’s call number is often included in
the Secondary Information field.
Portions of the author’s name are
sometimes included.
Weeding application
The primary information often
includes portions of the title and
call number.
Weeding application
The secondary information may include:
publication date, last circulated date, total
circ count, internal circ count, external circ
count, etc.
Hold-list application
The title of the item is often
selected as the Primary
Information field.
Hold-list application
The call number of the item is often
selected as the Secondary Information
field.
Other information such as branch
designators can be included as secondary
information.
If a search item is found while using another DLA function, the primary and
secondary information displayed depends upon which list(s) that item is on:
•
If the item is on a shelf-order list, the information displayed depends upon the
Data Manager export format assigned to the shelf-order list.
If the item is NOT on a shelf-order list, the information displayed depends
upon the Data Manager export format assigned to the first search list that
contains the item. The DLA searches these lists in the order that they appear
in the Data Manager main window.
Search Labels
If the item is on multiple search lists, the DLA searches the search lists in the
order that they appear in the main Data Manager window. The DLA displays the
search label from the first “active” search list that contains the item.
It is important to use Data Manager to prioritize your search lists (place them in
order with the most important search list at the top). For example, if you had the
same item on a “claims returned” list and a “missing” list you might decide that
finding a claims return item is more important than a missing item.
•
© 3M 2012. All rights reserved.
43
3M™ Digital Library Assistant User Guide
Typical DLA work flow
1. Generate lists from circulation system.
Library
Circulation
System
Generate reports (lists) from your circulation system to create
the lists used by the DLA.
•
Shelf Order Lists – lists of items in shelf order (the order
in which they should appear on the shelf).
•
Search Lists – lists of items the library would like to find
(the order does not matter).
•
Pull Lists – lists of items that you will use the DLA to find
(using the Pull Items function).
•
Collection Categories – user-defined categories where you
can save Item IDs that the DLA read while using the
Collect Items function.
•
Location Lists – If your circulation system uses a locationbased shelving system, your system must generate
Location Lists that identify specific locations in the library.
1
Shelf
Order
Lists
Pull
Lists
Search
Lists
Data
Manager
Database
3M Data Manager
Software
2
2. Use Data Manager software to export lists onto a memory
card.
Data Manager software processes lists extracted from the
circulation system and exports them onto a memory card.
Memory
Card
3. Step 3—Insert memory card into the DLA.
Library
Computer
3
Remove the memory card from the Data Manager memorycard drive and insert it into the DLA.
5
Memory
Card Drive
4. Step 4 – Check the date and time on the DLA.
If the date/time displayed on the DLA Home screen is
incorrect, tap the date/time display with the stylus to adjust the
Set Clock window. Important: The Collect Data, Background
Inventory and Inventory Location functions rely on accurate
date/time to function properly.
Memory
Card
4
5. Step 5—Use the DLA to perform tasks.
DLA_009
The DLA uses the lists and collection categories on the memory card to perform the following tasks:
•
Check Shelf Order
•
Collect Data
•
Pull Items
•
Sort & Shelve
•
Find Items
78-8126-8418-7e
© 3M 2012. All rights reserved.
44
3M™ Digital Library Assistant User Guide
•
Search for Items
•
Shelve Items
•
Change Security
•
Show Item Info
•
If Location tags are used:
Check Location
Check Location + Order
Inventory Location
6. Use Data Manager to import collected data and pull results.
Remove the memory card from the DLA and insert it into the memory-card drive. When Data Manager
software imports the collected data and pull results, it creates text files that you can use to update your
circulation system.
78-8126-8418-7e
© 3M 2012. All rights reserved.
45
3M™ Digital Library Assistant User Guide
Performing tasks
Successful operation of the DLA depends upon proper shelf-reading techniques, accurate circulation system
data lists, and proper Data Manager software setup.
Important notes:
•
Be careful not to damage the Handheld.
•
DO NOT drop the Handheld.
•
DO NOT leave the Handheld in locations where it might fall.
•
DO NOT leave the Handheld in direct sunlight.
•
DO NOT expose the Handheld to heat.
•
Only use the point of the stylus to touch the various buttons and checkboxes on the screen.
•
Never use a pen, pencil, or other sharp object on the display screen.
•
Save all the original Handheld packing materials.
You will need the packing materials if you return the Handheld for repair.
•
Do not over tighten the antenna adjustment screw.
Over tightening the antenna adjustment screw may damage the Handheld.
•
Always use the Change Battery function when you change the battery.
If you do not use the Change Battery function when changing the battery, you may lose collected data
and/or corrupt the memory card. Also, you may have to reset the Handheld.
•
Always return to the Home screen before removing the memory card.
This helps avoid corrupting data that you collected with the Handheld and saved to the memory card.
Preparing the DLA for user
Battery Gauge
?
Checking the battery charge
Before using the DLA, check the battery charge indicator (located in the upper
right hand corner of each task screen).
If the battery gauge shows less than 50% charge remaining, replace the battery
with a fully charged battery, and place the other battery in the charger. (See the
3M™ Handheld RFID Reader Owners Manual for battery charging and
replacement procedures.)
Indicates that the battery
gauge will display shortly.
100% charge remaining
50% charge remaining
25% charge remaining
0/0 Press Trigger To Begin
During use, the DLA warns the user if the battery level is too low. To avoid
possible loss of data, change the battery if the DLA displays a “low battery”
message.
Home
78-8126-8418-7e
© 3M 2012. All rights reserved.
702_005
46
3M™ Digital Library Assistant User Guide
Checking lists
Before using the DLA, make sure that the correct lists and collection categories are
on the memory card.
1. From the Home screen, press Lists.
Digital Library Assistant
2. Check the Data Loaded date to help determine if the lists on the memory card are
current.
Setup Lists
3. Make sure that the shelf-order lists appear in the order that matches the physical
layout of your library.
User Mode Status
Use Data Manager software to change the order of these lists.
Setup Options
About DLA
Lists Options Mode About
Setup Lists
Order Lists
1st Floor
2nd Floor
Annex
Search Lists
Missing
Pull Lists
Weed
Items
693,230
2,343
345
Items
4,145
Items
4,145
Data Loaded: 11/15/01 9:35
Uncheck
Home
DLA_007
Battery management
Handheld Model 803/804
During storage, the DLA continues to use a small amount of battery power. Over time (approximately 2-3 days),
the battery can lose its charge.
Battery-use recommendations
•
Start each day with a fully charged battery.
•
Whenever the DLA is not in use, remove the battery.
See Using the Change Battery function on page 49.
See the 3M™ Handheld RFID Reader Owners Manual for instructions on charging the batteries.
Important notes:
Always use the Change Battery function when you remove the battery.
If you do not use the Change Battery function when removing the battery, you may lose collected data and/or
corrupt the memory card.
78-8126-8418-7e
© 3M 2012. All rights reserved.
47
3M™ Digital Library Assistant User Guide
Handheld Model 702 and Model 802
During storage, the DLA continues to use a small
amount of battery power. Over time (approximately one
week), the battery can lose its charge, requiring you to
perform a reset.
See Using the Change Battery function on page 49.
Battery-use recommendations
•
Before use, check the battery gauge. If the battery
gauge shows less than 50% charge remaining,
replace the battery with a fully charged battery, and
place the other battery in the charger.
•
Whenever the DLA will not be used for more that a
week, use the Change Battery function to install a
fully charged battery in the DLA.
See the 3M™ Handheld RFID Reader Owners Manual
for instructions on charging the batteries.
Common DLA tasks
Selecting DLA functions
The DLA display provides a simple
menu structure that allows you to
select various DLA functions.
Stylus
Digital Library Assistant
To select a DLA function
Check Shelf Order
Press the menu button that
corresponds to the desired function.
Collect Data
Pull Items
Digital Library Assistant
•
•
For example, press the menu
button under the word Order to
select the Check Shelf Order
function.
Check Shelf Order
Order Collect Pull
Collect Data
Sort
Pull Items
If necessary, use the scroll buttons
to display the desired function.
Menu
Selections
Sort & Shelve
Order Colle Pull
Menu
Buttons
(4)
Scroll
Buttons
(2)
78-8126-8418-7e
Sort & Shelve
© 3M 2012. All rights reserved.
Sort
Use the Menu
Buttons to select the
menu selections that
appear on the bottom
of the display screen.
Use the Scroll
Buttons to move up
and down through
the menu selections.
DLA_013
48
3M™ Digital Library Assistant User Guide
Using the Change Battery function
Always use the Change Battery function when you remove the battery.
If you do not use the Change Battery function when
removing the battery, you may lose collected data and/or
corrupt the memory card.
1. From the Home screen, scroll down until Change Battery
appears.
2. Press Battery or use the stylus to tap Change Battery.
The Model 803/804 also has a Change Battery function in
the Options menu. To display the Options menu, use the
stylus to tap in the upper left corner of the screen.
Sound volume:
Off
Digital
Library Assistant
Low
Medium
Find
ItemsLow
Medium
Medium High
Search
for Items
High
About DLA
Shelve
Change Items
Battery
Digital Library Assistant
Find Items
Search for Items
Shelve Items
Change Battery
Change Battery
Find Search Shelve Battery
Find Search Shelve Battery
Model 702 and Model 802
Model 803
DLA_090
3. When the screen goes dark, it is safe to remove the battery and replace it with a fully charged battery.
Using display lists
Performing some DLA tasks (Check Shelf Order, Collect Data, etc.) results in a display list that includes a
number of items. The display list shows the items that were just read.
To remove a single item from the display list
1. Use the scroll buttons to select (highlight) an item.
A black background with white text indicates that an item or
error is selected.
Check Shelf Order
6/24 Ready to Find Items
Selected
(highlighted)
Item
2. Press Clear to remove the item from the list.
Primary
Info Field
To remove all items from the display list
Press and hold Clear for approximately two seconds.
78-8126-8418-7e
© 3M 2012. All rights reserved.
Secondary
Info Field
Someday Soon
PS3513.A413 S5 1941
2
Lost
Display
List
The Walking Spell
PS3513.A632 C3
Clear Shelve
Save
Home
DLA_048
49
3M™ Digital Library Assistant User Guide
Saving Item IDs to the memory card
The DLA allows you to save the current list of Item IDs (the Item IDs of the items currently displayed on the
DLA) into a user-defined collection category.
Sort & Shelve
3/14 Ready to Find Items
To save Item IDs to a collection category
1. Press Save to display the Save Data
screen.
2
2. Select the collection category where Under a Wing
629.13 Lindber
you want to save the display list.
Clear Shelve Save
3. Press Save to save the display list
and return to the previous screen.
•
•
Weed
Home
The DLA saves the Item IDs of
all the items in the display list to
the collection category that you
selected.
All collected data that you save
is written to the memory card.
4. At this point, you can either clear
the items from the screen or save
the Item IDs in a different category.
78-8126-8418-7e
© 3M 2012. All rights reserved.
Check Shelf Order
Collect Data
6/24 Ready to Find Items
7/34 Press Trigger To Begin
Someday Soon
PS3513.A413 S5 1941
Queen Lear
PS3515.E42.A698 V.1
2
The Walking Spell
PS3513.A632 C3
Clear Shelve
The Poisoned Orchard
PS3515.E42.B765 V.1
Lost
Save
Lost
Clear
Home
Save
Home
Save Data
Select Category
lost
Weed
Default
Clear
48
132
25
Save
Back
DLA_018
50
3M™ Digital Library Assistant User Guide
Using the DLA trigger lock
The DLA trigger-lock feature allows you to place the DLA in a continuous read mode without having to keep
the trigger pressed.
To turn the DLA trigger lock on
1. Press and release the trigger within 1/2 second.
•
The DLA’s reader stays ON allowing you to read items
without pressing the trigger.
•
The “scanning in progress” or “scanning” message at the top
of the screen will flash to indicate that the trigger-lock
function is active.
2. You can now use the DLA to read items.
The DLA will stay in trigger-lock mode as long as it continues
to read new items.
3. When you are finished reading items, use one of the methods
below to deactivate the DLA trigger lock.
Press and release
the trigger within
1/2 second to
activate the
trigger lock
The “scanning in progress” or “scanning” message at the top of
the screen will stop flashing when you turn the trigger-lock
OFF.
To turn the DLA trigger lock OFF
Collect Data
Method 1—Press the trigger to stop the DLA reader.
0/0
Method 2—Press any one of the menu buttons. This will turn off the
trigger lock and execute the button’s function.
Note: The DLA automatically turns the trigger
lock OFF if the DLA does not read a new tag within 10 seconds.
If necessary, change the 10-second reader timeout value in the
Options: General setup screen.
See Changing the Reader Timeout setting on page 21.
78-8126-8418-7e
© 3M 2012. All rights reserved.
Scan in Progress
The "Scan in
Progress"
message flashes
when the trigger
lock is active.
Home
DLA_062
51
3M™ Digital Library Assistant User Guide
Using the Background Inventory function
Your library should have a policy on how and when to use the background inventory function.
If the background inventory function is ON, the DLA saves the Item ID of each
tag read while using other DLA functions (such as Check Shelf Order).
•
In most cases, the DLA will not save duplicate Item IDs to the Background
Inventory category. When you import this inventory data, Data Manager
software removes any duplicate Item IDs.
•
See Enabling Backgound inventory on page 22 for setup information.
•
The Background inventory checkbox only appears if you selected User choice
in the Admin Settings screen.
Options: General
Sound volume: Medium
Item Width: Medium
Language: English
Reader Timeout: 10
Items ordered right-to-left
“Check Shelf” alerts
Background inventory
Verify:
6/14/05 4:29 pm
Set Clock
Prev
Next
Home
DLA_079
Using background inventory data
The DLA saves the background inventory data onto the memory card. To create a background inventory text
file:
•
Remove the memory card and insert it into the memory-card drive used by Data Manager software.
•
Use Data Manager software to import background inventory data and any pull results or collected data.
•
Data Manager software creates a text file that contains the Item IDs that the DLA saved to the Background
inventory category.
Note: The background inventory function does not collect location
information, if used.
Using the screen light option (Handheld Model 702 and Model 802
only)
Touch this
area to toggle
the screen light
on and off.
The DLA includes a back-lighted screen option.
Note: If you use the DLA screen light, you may have to recharge the battery
more often.
To turn the screen light on or off
Touch the stylus to the upper right corner of the screen.
The screen light will turn off automatically when the DLA goes into sleep
mode. The DLA enters sleep mode (blanking the screen) after approximately
two minutes of non-use.
78-8126-8418-7e
© 3M 2012. All rights reserved.
DLA_063
52
3M™ Digital Library Assistant User Guide
Using the Verify option
To use the Verify option, you must first enable the option and then define the type of security status that you
want the DLA to identify (secured item or unsecured item).
See Enabling the Verify option on page 23.
With the Verify option enabled, the DLA can identify the security status of items while performing other DLA
functions (such as Check Shelf Order). This option can be configured to detect either unsecured items or
secured items (not both).
The Verify option is only available at sites that use RFID Security.
Identifying security status
1. From the main DLA screen, select a function (for example Collect Data)
that you want to perform.
2. Use the DLA to perform the function.
•
•
The DLA emits a series of beeps each time it reads an item that
meets the verify criteria (secured or unsecured) that you defined in
the Options screen.
In addition, the DLA displays a verify icon next to the item. The icon
displayed depends on if the option is configured to detect secured or
unsecured items.
Collect Data
0/3 Press Trigger To Begin
Queen Lear
PS3515.E42.A698 V.1
Verify
icon
The Poisoned Orchard
PS3515.E42.B765 V.1
Clear
Save
Home
DLA_077
If an item meets the verify criteria and it is also on an active search list, the search list name appears in
place of the verify icon.
Quick access to Volume, Change Battery, About DLA (Model 803/804 only)
While using the DLA, you can quickly access some key functions by
selecting the Options menu.
1. Use the stylus to tap the upper left area of the DLA screen.
The Options menu appears.
2. Select a new volume level, change the battery, or display DLA software
information such as version number and tag data formats.
Options
3
Sound volume:
Off
Digital
Library Assistant
Low
Medium low
Medium
Setup
ListsHigh
Medium
High
Setup Options
About DLA
User
Mode
Status
Change
Battery
About DLA
Lists
78-8126-8418-7e
© 3M 2012. All rights reserved.
Options
Mode
About
DLA_086
53
3M™ Digital Library Assistant User Guide
Task quick reference guides
Reshelving
Checking Shelf
Order/Reshelving
Digital Library Assistant
Collecting
Data
Digital Library Assistant
Digital Library Assistant
Check Shelf Order
Find Items
Check Shelf Order
Collect Data
Search for Items
Collect Data
Pull Items
Shelve Items
Pull Items
Change Battery
Sort & Shelve
Sort & Shelve
Order Collect
Pull
Sort
Find
Search Shelve Battery
Check Shelf Order
Shelve Items
0/0
+0
Press Trigger To Begin
Order Collect
Pull
Sort
Collect Data
Press Trigger To Begin
0/0 Press Trigger To Begin
Read a single item to shelve
Goes Between:
Home
Home
Home
Check Shelf Order
Shelve Items
6/24 Ready to Find Items
+0
Press Trigger To Begin
Collect Data
7/34 Press Trigger To Begin
Someday Soon
PS3513.A413 S5 1941
Someday Soon
PS3513.A413 S5 1941
Queen Lear
PS3515.E42.A698 V.1
Goes Between:
2
The Walking Spell
PS3513.A632 C3
Clear Shelve
Save
Home
Clear
Home
Optional
Shelving
-8 Press Trigger to Begin
+2
Someday Soon
PS3513.A413 S5 1941
Goes Between:
The Fire Eaters
PS3513.A413 B6 1974
The Poisoned Orchard
PS3513.A632 B5
Someday Soon
PS3513.A413 S5 1941
Clear Cancel
The Poisoned Orchard
PS3515.E42.B765 V.1
Clear
Shelve Items
Save
Home
DLA_024
Press Trigger To Begin
Save Data
Goes Between:
The Fire Eaters
PS3513.A413 B6 1974
The Poisoned Orchard
PS3513.A632 B5
Clear
Home
Home
Lost
DLA_046
Select Category
In-house
Weeded
Default
48
132
25
DLA_047
Clear
Save
Back
DLA_049
78-8126-8418-7e
© 3M 2012. All rights reserved.
54
3M™ Digital Library Assistant User Guide
Find Function
Pull Items
Digital Library Assistant
Digital Library Assistant
Find Items
Check Shelf Order
Search for Items
Collect Data
Pull Items
Shelve Items
Sort & Shelve
Change
Battery
1
Find
Order Collect
Search Shelve Battery
Specify Find Criteria
Pull
Sort
Pull Lists
Touch screen
Select List
Item ID:
Keyboard
620.11
Primary Info:
2b
1 2 3 4 5 6 7 8 9 0 - =
Pull 1
Pull 2
Pull 3
32/32
22/25
125/125
Tab q w e r t y u i o p [ ]
CAP a s d f g h j k l ;
Secondary Info:
2a
Home
Shift z x c v b n m , . /
` \
Ctl á ü
Use
Specify Find Criteria
Touch screen area:
Home
Done
Pull Items
Item ID:
24/32 Press Trigger
Primary Info:
Pull1
The new alchemists : brea
620.11 Hazen
Secondary Info:
620.11
3
Find
Clear
0
Between:
Pulled
Lists
Home
Find Items
Home
DLA_058
5/5 Press Trigger
The new alchemists : brea
620.11 Hazen
4
Clear
78-8126-8418-7e
Between:
New
Home
© 3M 2012. All rights reserved.
55
3M™ Digital Library Assistant User Guide
Sort and Shelve
Search Function
Digital Library Assistant
Digital Library Assistant
Check Shelf Order
Find Items
Collect Data
Search for Items
Pull Items
Shelve Items
Change Battery
Sort & Shelve
Order Collect
Pull
Sort
Sort & Shelve
0/0 Press Trigger To Begin
Find Search Shelve Battery
Search for Items
1/24 Press Trigger To Begin
Queen Lear
PS3515.E42.A698 V.1
Lost
Home
Home
DLA_060
Sort & Shelve
3/14 Ready to Find Items
2
Under a Wing
629.13 Lindber
Weed
Clear Shelve Save
78-8126-8418-7e
Home
© 3M 2012. All rights reserved.
56
3M™ Digital Library Assistant User Guide
Using the Check Shelf Order function
Use the Check Shelf Order function to read a shelf and find items that are in the
wrong shelf position.
While performing check shelf order, any items that you read that are on an active
search list appear with the search-list name next to it (enclosed in a box).
Digital Library Assistant
Check Shelf Order
Collect Data
Pull Items
Before you begin…
Sort & Shelve
The memory card that you insert into the DLA should contain current versions of
the various lists and collection categories required to perform tasks:
Order Collect
•
A shelf-order list for the items that you will be checking. The shelf-order lists
should appear in the order that they are physically located in the library.
•
Any search list that contains items that you want to search for while checking
shelf order.
•
Any data collection categories required for data-collection tasks.
Pull
Check Shelf Order
0/0
Press Trigger To Begin
Home
DLA staff options that affect the Check Shelf Order function
Check Shelf Order
Options: General
Digital Library Assistant
Setup Lists
Setup Options
User Mode Status
About DLA
Lists Option Mode About
DLA_044a
6/24 Ready to Find Items
Sound volume: Medium
Item Width: Medium
English
Language: Thin
Reader Timeout: Medium
10
Thick
Items ordered right-to-left
The Walking Spell
PS3513.A632 C3
Background inventory
Verify:
Prev
Someday Soon
PS3513.A413 S5 1941
2
“Check Shelf” alerts
Clear Shelve
Set Clock
Next
Sort
Save
Home
6/14/05 4:29 pm
Home
Shelving
Press Trigger to Begin
Item Width
3M recommends using the medium setting for most applications. An incorrect
setting may result in excessive shelf-order errors or reduced accuracy. (See
Changing the item width setting on page 20.)
Clear Cancel
Checkshelf Alerts
This setting is typically enabled to alert you to items that may belong on a different
shelf. (See Enabling Check Shelf alerts on page 22.)
78-8126-8418-7e
Someday Soon
PS3513.A413 S5 1941
-8
Goes Between:
The Fire Eaters
PS3513.A413 B6 1974
The Poisoned Orchard
PS3513.A632 B5
© 3M 2012. All rights reserved.
Home
DLA_046
57
3M™ Digital Library Assistant User Guide
Background Inventory
Enable this option if you want to automatically collect and save the Item ID of each item that you read while
you are checking shelf order.
(See Enabling Backgound inventory on page 22.)
Shelf Order display graphics
After reading a shelf, the DLA lists any shelf-order errors and search results in the
order that they were found.
•
The shelf-order graphics help you identify the items and their location.
•
All shelf errors are numbered in the order that they were found.
Shelf errors
Shelf Error/Items Read Counter
This counter displays the number of errors / the total number of items read. (In this
example, the DLA read 24 items and 6 errors were detected.)
Check Shelf Order
6/24 Ready to Find Items
SO_1
Search Item
Search-list names appear each time the DLA reads an item that appears on an active
search list.
2
Lost
SO_2
Checkshelf Alert
Checkshelf alert messages appear if the DLA reads an item near the beginning or end of
SO_3
a shelf that may belong on a different shelf (see Checkshelf Alerts on page 57).
4 Checkshelf
Item Not in Database
The Item ID for this item is not on any of the shelf-order and search lists on the memory
card. The shelf-location graphic shows the item’s approximate location.
Blank Tag
A "blank tag" message appears when the DLA reads a blank tag that was not correctly
programmed during the tagging process.
78-8126-8418-7e
© 3M 2012. All rights reserved.
5
(3456700021014)
Item not in database
SO_4
6
(BLANK TAG)
SO_5
58
3M™ Digital Library Assistant User Guide
Shelf Order information
On-Shelf Graphic
Current shelf location
Each shelf error includes a shelf graphic that shows the item’s approximate position
(where the item was read in relation to the number of items read).
1
The arrow points to the
correct shelf location.
Off-Shelf Graphic
SO_6
Current shelf location
If the shelving arrow points off the shelf, the item belongs on a different shelf.
If the Checkshelf alert setting is not enabled, the arrow will point at the end of the
shelf instead of off the shelf:
2
SO_7
If the arrow points to the right,
the item belongs after this shelf.
2
If the arrow points to the left,
the item belongs before this shelf.
SO_8
Item Data
Each shelf error includes the primary and secondary information fields that you
defined in Data Manager.
1
Primary
Secondary
SO_9
Someday Soon
PS3513.A413 S5 1941
Item Verify Icon
If the verify option is enabled, the DLA displays a verify icon for each item that meets
the verify criteria. If the item is on an active search list, the verify icon is not shown.
The Verify feature is only available at sites that use RFID Security.
78-8126-8418-7e
© 3M 2012. All rights reserved.
1
SO_10
59
3M™ Digital Library Assistant User Guide
Step 1—Use the DLA to read all the items on the shelf
1. From the Home screen, press Order.
If the left side of
an item is
against metal
Pull the item out
before you start
scanning the shelf
2. Adjust the antenna position parallel to the book spine.
3. If the first book is against a metal shelf divider:
•
Pull the book out approximately 2.5 in. (6,35 cm)
- or •
Place your finger between the left side of the book and the
metal shelf divider to create a 0.5-inch (1.3-cm) gap.
Metal
Surface
4. Use the DLA to read the shelf.
a) Press and hold the trigger (or use the trigger lock function).
2.5 in.
(6,35 cm)
minimum
b) Touch the antenna to the first item on the left side of the
shelf.
•
Hold the antenna parallel to the book spine.
•
The bottom of the antenna should line up with the bottom of the book spine.
DLA_070
The antenna should be
within 0.5 in. (1,3 cm) of
the book’s spine.
c) When the pacing sound starts, continue to press the trigger
and move the antenna across the shelf.
•
You can hold the antenna up to 0.5 in.
(1,3 cm) from the book spine but it is often best to lightly
touch the antenna to each book.
•
Move the DLA at a rate of approximately one book per
pacing sound.
•
The pacing sound stops if the DLA is not reading tags.
The pacing sound is only a reference. You can move the
DLA at a slightly slower or faster speed.
5. When you reach the end of the shelf, release the trigger and
check the DLA screen for errors:
The bottom of the
antenna should line
up with the bottom
of the book.
DLA_065
•
If no errors are found,
use the DLA to read the next shelf.
•
If shelf-order errors are found,
see Step 2—Correct any shelf order errors on page 61 for instructions on how to find, correct, and clear
errors.
78-8126-8418-7e
© 3M 2012. All rights reserved.
60
3M™ Digital Library Assistant User Guide
Step 2—Correct any shelf order errors
1. Locate and remove the selected (highlighted) item from the shelf.
Check Shelf Order
6/24 Ready to Find Items
a) Press the trigger and read the shelf with the DLA to find the
misshelved item.
•
The shelf graphics show the item’s approximate location.
•
The DLA emits rapid beeps and turns all three lights ON when
it finds the item.
Someday Soon
PS3513.A413 S5 1941
2
The Walking Spell
PS3513.A632 C3
Clear Shelve
b) Remove the item from the shelf.
Home
Distance
Indicator
2. Press Shelve and shelve the selected item.
a) Use the DLA to find the correct shelf location.
•
Save
Shelving
The indicator lights, sounds, and distance indicator show when
the DLA is to the left, right, or at the correct shelf position.
•
The distance indicator displays the approximate number of item
positions between the current DLA location and the correct
location.
•
You can also use the Goes Between listing and the shelflocation arrow to help find the correct shelf location.
Press Trigger to Begin
Someday Soon
PS3513.A413 S5 1941
-8
Goes Between:
The Fire Eaters
PS3513.A413 B6 1974
The Poisoned Orchard
PS3513.A632 B5
Clear Cancel
Home
b) Place the item in correct shelf location.
DLA_017
3. Press Clear to remove the item from the list.
a) The display will return to the shelf-order error listing.
b) Repeat steps 1-3 to shelve the rest of the items.
If desired, press and hold Clear for approximately two seconds to clear all items from the error
listing.
4. Optional – After shelving items, recheck the shelf order.
Correct
Location
Correct
Location
Correct
Location
Distance
Indicator: 0
Distance
Indicator: -4
Distance
Indicator: +3
DLA_019
DLA is left of the correct location
78-8126-8418-7e
DLA is at the correct location
© 3M 2012. All rights reserved.
DLA is right of the correct location
61
3M™ Digital Library Assistant User Guide
Checkshelf alerts
During the Check Shelf Order function, the DLA will
display Checkshelf alert messages that can help you identify
items that may belong on a different shelf (even though they
are in the correct shelf order for the shelf that you just
scanned).
Check Shelf Order
6/24 Ready to Find Items
"Checkshelf" items appear near the beginning or end of the
shelf.
1. When you see a Checkshelf Alert, locate the item and
check if it is correctly shelved.
The Check shelf alert
Someday Soon
PS3513.A413 S5 1941
indicates that this item is
in correct shelf order but
2
Lost
may belong on a
The Walking Spell
PS3513.A632 C3
Clear Shelve
Save
different shelf.
Home
Misshelved Item
(Check shelf Alert)
If the verify option is enabled, the DLA displays a verify
icon for each item that meets the verify criteria. If the
item meets the verify criteria and is a Check-shelf item,
the verify icon is displayed and there will be no
indication of a Check shelf alert.
The Verify feature is only available at sites that use
RFID Security.
2. If the item is misshelved, remove it from the shelf for
future re-shelving.
Excessive Checkshelf alerts
To avoid excessive alert messages, you can disable
(uncheck) the “Checkshelf” alerts setting (Options screen)
when checking the shelf order of shelving carts.
Correct
Location
(See Enabling Check Shelf alerts on page 22.)
DLA_069
78-8126-8418-7e
© 3M 2012. All rights reserved.
62
3M™ Digital Library Assistant User Guide
Using the Collect Data function
The Collect Data function allows you to save collected Item IDs to a memory card. Data Manager software can
import collected Item IDs from a memory card and save them as formatted text files. You can use these text files
to update the data in your circulation system (for example, in-house use).
Before you begin…
Use Data Manager software to create different collection category labels. Once created, export the collection
categories (along with lists) to a memory card.
When you use the DLA to collect Item IDs from RFID tags you can save the Item IDs to the memory card in
any of the collection categories that you exported onto the memory card.
You can save collected data to a specific category. This helps ensure that the imported text files do not
contain “mixed use” Item IDs. For example, you would not want to save “in-house” and “weeded” items in the
same category.
Collection display features
You can clear individual items from the display list before
you save the data to the memory card. You can also clear the Display
List
entire display list.
Counter
Collect Data
7/34 Press Trigger To Begin
Queen Lear
PS3515.E42.A698 V.1
Display list counter
The Poisoned Orchard
PS3515.E42.B765 V.1
Displays the number of search items read / the total number
of items in the display list.
In the example:
•
The display list contains 34 items.
•
Seven of these items are search items.
Lost
Item is
on an
active
search
list
Item
Info
Clear
Save
Home
Collect Data
0/3 Press Trigger To Begin
Item information
The DLA displays the primary and secondary lines for each
item on the display list.
•
•
Item is
not on
any list
This information only appears if the memory card
contains a shelf-order or search list that includes the
item.
The information displayed in the primary and secondary
lines is defined by the export format assigned to the list
in Data Manager software.
78-8126-8418-7e
© 3M 2012. All rights reserved.
(8345567973C)
Item not in database
Verify
icon
The Poisoned Orchard
PS3515.E42.B765 V.1
Clear
Save
Home
DLA_027
Item is
Item is
unsecured secured
63
3M™ Digital Library Assistant User Guide
Not in database items
The DLA displays the Item ID with an "Item not in Database" message. No primary or secondary information is
displayed.
This occurs if none of the lists on the memory card contains the item.
Not-in-database items can be collected, saved, and imported into Data Manager.
Search items
Items that are on a search list appear in the display list with a search-list label.
Verify icon
The DLA displays a verify icon when it reads any item that meets the verify criteria. This feature is only
available if the Verify option is enabled. The type of verify icon displayed depends on if the option is configured
to detect secured or unsecured items.
The Verify feature is only available at sites that use RFID Security.
78-8126-8418-7e
© 3M 2012. All rights reserved.
64
3M™ Digital Library Assistant User Guide
Step 1—Use the Collect Data function to collect item IDs
1. Insert a memory card into the DLA.
The memory card should contain the data collection-category labels that you
exported from Data Manager.
Note: If you want to display primary and secondary information on the DLA,
the memory card should contain shelf-order lists or search lists that include the
items that you will read.
•
•
The DLA will display the Item ID with an "Item not in Database" message if
the item does not appear on a shelf-order or search list.
The DLA will collect and allow you to save the Item IDs of “not in database”
items.
2. From the Home menu, press Collect.
Digital Library Assistant
Check Shelf Order
Collect Data
Pull Items
Sort & Shelve
Order Collect
Pull
Sort
Collect Data
0/0 Press Trigger To Begin
The Collect Data screen appears.
3. Use the Collect function to collect data.
a) Press and hold the trigger (or use trigger lock) and begin reading items.
As the DLA reads each item, the primary and secondary fields appear on the
display list.
Home
b) Release the trigger to stop reading items.
4. You can repeat Step 3 to continue to add items to the display list.
You can add up to 255 Item IDs to the display list before saving them to a
collection category.
When the DLA reads an item for the first time
•
•
A single beep plays and the green light illuminates.
The item appears on the display list.
Collect Data
7/34 Press Trigger To Begin
Queen Lear
PS3515.E42.A698 V.1
Lost
The Poisoned Orchard
PS3515.E42.B765 V.1
Clear
Save
Home
DLA_024
Items that are on a shelf-order list appear in shelf order.
Items that are not on a shelf-order list appear at the bottom of the display list.
•
If the item is already on the display list and you read the item again:
The green light illuminates and no sound is played.
When the DLA reads a search item for the first time
•
The DLA plays a series of three rapid beeps and all three lights illuminate.
•
In most cases, the DLA adds search items (that are also on a shelf-order list) to the display list in sort order.
78-8126-8418-7e
© 3M 2012. All rights reserved.
65
3M™ Digital Library Assistant User Guide
Any search item that is not on a shelf-order list is added to the bottom of the display list.
If the item is already on the display list and you read the item again:
•
The DLA plays a series of three rapid beeps and all three lights illuminate.
•
The DLA displays the search item’s information.
Step 2—Save the collected data to a collection category
As you collect Item IDs, you should periodically save them to one of the categories
on the memory card.
1. From the Collect Data screen, press Save.
The Save data screen appears.
2. Select the category where you want to store the collected Item IDs.
This screen displays the current number of collected Item IDs saved in each
category.
Collect Data
7/34 Press Trigger To Begin
Queen Lear
PS3515.E42.A698 V.1
Lost
The Poisoned Orchard
PS3515.E42.B765 V.1
Clear
Save
Home
3. From the Save Data screen, press Save.
•
•
The DLA saves all the Item IDs in the display list to the selected category on
the memory card.
Save Data
Select Category
Press Back to return to the Collect Data screen without saving the Item IDs.
4. The Collect Data screen appears again.
•
Press Save again if you want to save the display list in another category.
•
You can also insert a different memory card and save the display list to it.
•
If desired, press and hold Clear to clear all the Item IDs from the display list.
5. Press and hold the DLA trigger (or use the trigger lock) to start collecting more
data.
In-house
Weeded
Default
Clear
48
132
25
Save
Back
Collect Data
7/34 Press Trigger To Begin
Duplicate data
In some instances, the DLA will save duplicate Item IDs in the same category.
When you use Data Manager software to import collected data from the DLA, Data
Manager removes any duplicate Item IDs that you saved to a collection category.
Queen Lear
PS3515.E42.A698 V.1
Lost
The Poisoned Orchard
PS3515.E42.B765 V.1
Clear
Save
Home
DLA_022
78-8126-8418-7e
© 3M 2012. All rights reserved.
66
3M™ Digital Library Assistant User Guide
Clearing the IDs from a collection category
This process removes all the Item IDs in the selected category from the memory card.
1. Display the Save Data screen.
Display Save Data by pressing Save while in any DLA screen that has an
active display list.
2. Use the scroll buttons to select the collection category that you want to clear.
3. Press Clear.
A dialog box appears to allow you to clear Item IDs or cancel.
Clear Category
4. Press OK to clear the Item IDs from the selected category and return to the
Save Data screen.
Press Cancel to return to the Save Data screen without clearing the data.
Clear all items from:
Name:
Weeded
Items:
132
OK
Cancel
DLA_033
78-8126-8418-7e
© 3M 2012. All rights reserved.
67
3M™ Digital Library Assistant User Guide
Using the Pull Items function
Overview
To use the Pull Items function, you must use Data Manager software to export pull lists to a memory card. You
can then select a pull list and use the DLA’s Pull Items function to locate and pull items.
Applications may include:
•
Finding hold items
•
Finding items that you may want to weed
1. Use Data Manager software to create and export pull lists (see Digital Data
Manager documentation).
You create pull lists from your facility database and then export them to a
memory card using Data Manager software.
2. Use the DLA to locate and pull items.
Digital Library Assistant
Check Shelf Order
Collect Data
Pull Items
Sort & Shelve
Order Collect
Pull
Sort
•
The items that you want to pull must be on a pull list that you exported to the
current memory card.
•
Select a pull list to use.
•
As you pull items from the shelf, you can press Pulled to remove the item from the display and specify it
as pulled.
•
Additionally, while using the Pull Items function, the DLA can find and help identify items that are on
active search lists.
DLA_002r
3. Use Data Manager software to import pull results
(see Digital Data Manager documentation).
•
After you have pulled most of the items on a pull list, there may still be items on the list that you did not
find.
•
You can use Data Manager software to import these “pulled” and “not pulled” lists as text files. You can
print or use these text files to update the “request status” on your facility’s item database or for other
purposes.
Each time you import pull results
Data Manager software creates two date-stamped text files for each export operation. The file name contains the
date, number of items in the file, and an indicator (+ or -) that specifies if the items in the file were pulled or not
pulled.
78-8126-8418-7e
© 3M 2012. All rights reserved.
68
3M™ Digital Library Assistant User Guide
Using the DLA to locate and pull items
Step 1—Select a pull list
1. From the Home screen, press Pull.
The Pull Lists screen displays all the pull lists on the memory card.
2. Select the pull list that contains the item(s) that you want to pull.
Digital Library Assistant
The numbers above the pull-list name indicate: number of items that still
need to be pulled/ total number of items in the original list. For example,
22/25 indicates that the original pull list had 25 items, three items were
pulled and removed from the list, and 22 items have not been pulled yet.
Check Shelf Order
Collect Data
Pull Items
3. Press Use, to select the currently highlighted pull list.
Sort & Shelve
1
Order Collect
Pull
The Pull Items screen displays the first item on the pull list.
Sort
Pull Lists
If necessary, use the scroll buttons to move down the list and select the
item that you want to pull.
Select List
2
The items in the pull list appear in the order that your circulation system
placed them in when you created the list.
Pull 1
Pull 2
Pull 3
Large pull lists (3000 items or more) may take up to 90 seconds to
load.
32/32
22/25
125/125
3
Use
4. Set the Between option ON (selected) or OFF (deselected).
(See the descriptions below.)
Home
Pull Items
24/32 Press Trigger
Pull 1
The new alchemists : brea
620.11 Hazen
Between option selection criteria
Between:
Between
Checkbox
If the items are stored in shelf order
Select the Between option when pulling items from locations where the items
are stored in shelf order.
This allows you to use the distance indicator, alert sounds, indicator lights,
and the shelf-order information while you use the DLA to find the item.
4
Pulled
Lists
Home
DLA-040
If items are stored in random order
Deselect the Between option when pulling items from locations where the items are not stored in shelf order.
With this function OFF, the distance indicator and shelf-order information will not appear. This eliminates false
readings on the distance indicator, alert sounds, indicator lights, and shelving information.
78-8126-8418-7e
© 3M 2012. All rights reserved.
69
3M™ Digital Library Assistant User Guide
Step 2—Use the DLA to find items on the pull list
1. Use the scroll buttons to move down the list and select the item that you want to pull.
2. Locate the shelf area where the item should be located.
This is the area where you will start using the DLA.
3. Press the trigger and use the DLA to locate the pull item.
The method used to locate the item varies depending on whether the Between option is ON or OFF. (See the
descriptions below.)
Finding items with the Between option ON (selected)
The distance indicator and shelf-order information only appear if the item on
the pull list is also on a shelf-order list on the same memory card.
a) Use the distance indicator to determine how close you are and in
which direction to move the DLA.
Pull Items
Pull List
Name
3/3 Press Trigger
Distance
Indicator
Pull 1
The new alchemists : brea
620.11 Hazen
Between
+0
The DLA also displays shelf-order information (the two items that should Checkbox
be on either side of the pull item’s shelf location).
Shelf-order
Information
Between:
The science of structures
620.11 Gor
The substance of civiliza
620.11 Sass
Pulled Lists
Home
To find the approximate location, press the trigger and move the
DLA_039
DLA down the left sides of the shelves until the indicator light turns from
yellow to red. At that point, you know that the item (or position) is somewhere between the last yellow
indication and the red indication. (See Using the Change Security function on page 85.)
b) When the DLA reads the pull item’s tag, it plays a rapid series of high-toned beeps.
Distance Indicator
+ The DLA is reading items that are to the right of the correct location of the pull item.
- The DLA is reading items that are to the left of the correct location of the pull item.
If the item is not shelved correctly
If the DLA finds the proper shelf location but the item is not there, the tone and light alternate between
yellow/red and the shelf-order information appears. (This indicates that the item is missing or misshelved).
If you think that the item is misshelved, use the DLA to read the shelves near the correct location.
78-8126-8418-7e
© 3M 2012. All rights reserved.
70
3M™ Digital Library Assistant User Guide
Finding items with the Between option OFF (deselected)
When the DLA reads the pull item’s tag, it plays a rapid series of high-toned
beeps and all three lights illuminate.
Pull Items
Pull List
Name
3/3 Press Trigger
Pull 1
The new alchemists : brea
620.11 Hazen
The distance indicator and shelf-order information are not displayed.
Between:
Between
Checkbox
If the item is not shelved correctly
If you move the DLA past the proper shelf location, there will be no
indication from the DLA.
Home
Lists
Pulled
DLA_038
If you think that the item is misshelved, use the DLA to read the shelves near
the correct location.
4. If you cannot locate the item, use the scroll button to select the next item on the list and repeat steps 1-3.
Step 3—Remove the pulled items from the pull list
As you locate items, you can remove them from the pull list.
•
•
After you have pulled all the items that you were able to locate, you
can import the pull-list results using Data Manager software.
When you import pull-list results, Data Manager software creates a
text file that includes the Item IDs of all the items that you removed
from the pull list.
Pull Items
3/3 Press Trigger
Pull 1
The new alchemists : brea
620.11 Hazen
+0
Between:
The science of structures
620.11 Gor
The substance of civiliza
To remove an item from a pull list
1. After you remove the item from the shelf, press Pulled.
a) The Pull-list Counter shows that one item was found and
removed from the pull list.
b) The selected item is removed from the list and the next item on
the pull list appears.
c) The Undo option appears in the menu.
620.11 Sass
Pulled
Home
Lists
Pull-list counter
(items left/original items)
Pull Items
2/3 Press Trigger
Pull 1
The ancient engineers.
620.9 De
__
Between:
If desired, press Undo to restore (add back to the list) the last item
that you removed from the pull list.
2. Press the trigger and continue finding other items on the pull list.
Pulled
Lists
Undo
Home
DLA_036
Restoring pull lists
The Restore function allows you to restore the pull list to its original state (number of items).
When you restore a pull list, any items that you pulled and removed from the pull list are added back to
78-8126-8418-7e
© 3M 2012. All rights reserved.
71
3M™ Digital Library Assistant User Guide
the pull list.
Pull Items
24/32 Press Trigger
To restore a pull list
Digital Library Assistant
1. Display the Pull Lists screen.
Pull 1
The new alchemists : brea
620.11 Hazen
Check Shelf Order
2. Select the pull list that you want to restore.
Use the scroll buttons or stylus to select a list.
3. Press Restore.
Collect Data
+0
Between:
The science of structures
Pull Items
620.11 Gor
Sort & Shelve
Order Collect
The substance of civiliza
Pull
620.11 Sass
Sort
Pulled Lists
Home
The Restore Pull List dialog box appears.
4. Press OK.
1
The Pull Lists screen appears.
Pull Lists
Any items that you removed from the original pull list are
restored (added back to the pull list).
Select List
2
Pull 1
Pull 2
Pull 3
24/32
22/25
125/125
3
Restore Use
In the example shown at right
Eight items out of 32 were removed from pull list Pull 1 (24/32).
After pressing Restore, the eight items that were removed are added
back to the pull list (32/32).
Home
Restore Pull List
Restore all items in:
Name:
Pull 1
Not pulled / Total:
24/32
4
OK
Cancel
Pull Lists
Select List
5
Pull 1
Pull 2
Pull 3
Restore
32/32
22/25
125/125
Use
Home
DLA_034
78-8126-8418-7e
© 3M 2012. All rights reserved.
72
3M™ Digital Library Assistant User Guide
Using the Sort-and-shelve function
The Sort and Shelve function can greatly simplify the process of fine sorting and shelving items.
Overview
This section describes three basic ways to use the Sort-and-shelve function. You may find other ways to use the
Sort-and-shelve function.
Shelving-order list
When you use the Sort-and-shelve function to read a group of items, the DLA generates a shelving-order list
(the order that you will shelve the items). You can use this list to locate each item and fine sort them onto a
shelving cart (in the order that you will shelve them).
When fine sorting items, use the item-location graphics and numbering to help you find each item and
determine its shelving order.
•
The position of the item-location graphics indicates the item’s current location relative to the items that you
just read.
•
The number in the item-location graphic box indicates the order in which the items should be shelved.
Locating search items
While using the sort-and-shelve function, any items that are on an active search list appear in the shelving-order
list. This allows you to process these items before you shelve them.
•
The display-list counter shows the number of search-list items that the DLA found.
•
Search-list names appear in a box next to each search item in the shelving-order list.
Collecting in-house item IDs
You can save the Item IDs from a shelving-order list (e.g., in-house items) to a collection category. You can then
use Data Manager software to import the collected IDs as text files to update your circulation system records.
Finding items
Once you generate a shelving-order list, you can select an item on the list and use the DLA to find that item.
The DLA illuminates all three lights and plays a series of rapid beeps when it finds the item.
Shelve function
Once you generate a shelving-order list, you can select an item and use the Shelve function to help shelve that
item.
78-8126-8418-7e
© 3M 2012. All rights reserved.
73
3M™ Digital Library Assistant User Guide
Display-list features
1. Display list counter—displays the number of search items read / the
total number of items read.
2. Shelving-order list – the DLA lists the items in the order that they
will be shelved.
3. Item-location graphic—Each item on the list has an item-location
graphic that shows the item’s current location in relation to the other
items read.
The number in the shelf-location graphic box indicates its shelving
order.
1
Sort & Shelve
3/14 Ready to Find Items
2
8
3
2
Under a Wing
629.13 Lindber
4
7
Weed
Clear Shelve Save
Home
DLA_006
5
6
4. Clear – press to clear a selected item or press and hold Clear to clear the entire display list.
5. Shelve – select an item from the list and press to use the DLA to find the item’s shelf location.
6. Save – press to save the Item IDs of all the items on the display list to a collection category on the memory
card.
7. Search-list name—search-list names appear next to any item read that is on an active search list.
8. Verify icon– the DLA displays a verify icon when it reads any item that meets the verify criteria. (The Verify
feature is only available at sites that use RFID Security.)
78-8126-8418-7e
© 3M 2012. All rights reserved.
74
3M™ Digital Library Assistant User Guide
Method 1—Temporary storage and shelving of returned items
Use this method for shelving groups of returned items.
1. After checking in returned items, place the unsorted items on temporary shelves.
2. Use the Sort-and-shelve function to read the unsorted items on the shelf.
a) From the Home menu, press Sort.
b) Press and hold the trigger (or use the trigger lock) and read each item by
scanning each shelf from left to right.
Digital Library Assistant
Check Shelf Order
Many users continuously hold the trigger (or use the trigger lock) to read all the
shelves.
Collect Data
Pull Items
c) The DLA creates a numbered shelving-order list from the items that you read.
Sort & Shelve
Order Collect
3. Remove each item from the shelf and place it on a shelving cart in the correct
shelving order (as shown on the DLA).
a) Use the item-location numbering and graphics to help you find each item and
determine its shelving order.
Pull
Sort
Sort & Shelve
0/0 Press Trigger To Begin
The shelf graphic represents all the items that the DLA read during one pass
with the trigger pressed. If you read seven shelves and the position indicator is
in the middle of the graphic, the item is somewhere on or near the fourth shelf.
b) You may want to remove any search items that appear with a search-list name
next to them.
Home
c) If necessary, press and hold the trigger, and use the DLA to find the selected
item.
d) Place each item on the shelving cart in shelving order.
4. Move the shelving cart into the library and shelve the items.
•
Use the scroll buttons to return to the top of the list.
•
If desired, use the Shelving function to help re-shelve the items.
Sort & Shelve
3/14 Ready to Find Items
2
Under a Wing
629.13 Lindber
Optional Shelve function
Weed
Clear Shelve Save
1. Use the Sort-and-shelve function to read the items on the shelving cart.
Home
DLA_054.cdr
2. Select (highlight) an item on the shelving-order list.
3. Press Shelve and use the DLA to find the correct shelf location for the selected item.
78-8126-8418-7e
© 3M 2012. All rights reserved.
75
3M™ Digital Library Assistant User Guide
Method 2—Fine sort “in-house” items on a cart and then shelve
Use this method to shelve “in-house” items that you place on a cart.
The Sort-and-shelve function provides the additional benefit of allowing you to save the item listing in an inhouse collection category. You can then use Data Manager software to import the “in-house” collection category
to update your circulation system records.
1. Gather all the “in-house” items and place them (unsorted) on a cart.
2. Use the Sort-and-shelve function to read the unsorted “in-house” items that you
placed on a cart.
a) From the Home menu, press Sort.
b) Press and hold the trigger (or use the trigger lock) and read each item by
scanning the shelves of the cart from left to right in sequence.
Do not release the trigger between shelves.
Digital Library Assistant
Check Shelf Order
Collect Data
Pull Items
Sort & Shelve
Order Collect
Pull
Sort
c) The DLA creates a numbered shelving-order list from the items that you read.
d) The shelving-order graphic displays the location of the items as if they were all
on a single shelf.
Sort & Shelve
0/0 Press Trigger To Begin
To interpret this display, you will need to consider the sequence of cart shelves
you scanned.
For example, if you scanned two shelves and the display graphic shows the
item near the middle of the shelf, you should find that item near the end of the
first shelf that you scanned, or near the start of the second shelf that you
scanned.
3. Rearrange the items on the cart in shelving order. (You may want to use two carts,
one for the unsorted items and one for the fine-sorted items.)
a) Use the item-location numbering and graphics to help you find each item and
determine its shelving order.
b) You may want to remove any search items that appear with a search-list name
next to them.
c) Place the items on the shelving cart in shelving order.
4. Move the shelving cart into the library and shelve the items.
Home
Sort & Shelve
3/14 Ready to Find Items
2
Under a Wing
629.13 Lindber
Weed
Clear Shelve Save
Home
DLA_054.cdr
Use the scroll buttons to return to the top of the list.
Optional- If you are shelving “in-house use items”
Save the Item IDs from the “in-house” use items to a collection category. See Step 2—Save the collected data to
a collection category on page 66 for more information.
78-8126-8418-7e
© 3M 2012. All rights reserved.
76
3M™ Digital Library Assistant User Guide
Method 3—Place unsorted items on a cart and shelve
You can use this method for “in-house” items or any other group of unsorted items that you want to shelve. For
example, you can use this method to shelve items directly from an unsorted or rough-sorted cart.
1. Place unsorted items onto a cart.
2. Use the Sort-and-shelve function to read the unsorted “in-house” items that you
placed on a cart.
a) From the Home menu, press Sort.
b) Press and hold the trigger (or use the trigger lock) and read each item by
scanning the shelves of the cart from left to right in sequence.
Do not release the trigger between shelves.
Digital Library Assistant
Check Shelf Order
Collect Data
Pull Items
Sort & Shelve
Order Collect
Pull
Sort
c) The DLA creates a numbered shelving-order list from the items that you read.
d) The shelving-order graphic displays the location of the items as if they were all
on a single shelf.
Sort & Shelve
0/0 Press Trigger To Begin
To interpret this display, you will need to consider the sequence of cart shelves
you scanned.
For example, if you scanned two shelves and the display graphic shows the
item near the middle of the shelf, you should find that item near the end of the
first shelf that you scanned, or near the start of the second shelf that you
scanned.
Home
3. Move the shelving cart into the library.
4. Use the shelving-order list to assist you in shelving the items on the cart.
a) Use the item-location numbering and graphics to help you find the next item for
shelving from the cart.
b) If desired, remove any search items that appear with a search-list name next to
them.
5. Optional—Press Shelve and use the DLA to find the correct shelf location for the
selected item.
Sort & Shelve
3/14 Ready to Find Items
2
Under a Wing
629.13 Lindber
Weed
Clear Shelve Save
Home
DLA_054.cdr
78-8126-8418-7e
© 3M 2012. All rights reserved.
77
3M™ Digital Library Assistant User Guide
Using the Find Items function
The Find Items function provides a quick way to use the DLA to find items without having to use Data Manager
software to create a pull list or search list. This function uses a simple user-defined search function (Specify
Find Criteria) to find any item on a shelf-order list that is on the DLA's memory card.
To use the Find function
Step 1—Use the Specify Criteria screen to enter the item that you want to find
1. From the Home screen, press Find.
2. Create a temporary find list (similar to a pull list) that
includes the item(s) that you want to find.
a) Tap one of the following buttons:
Digital Library Assistant
Find Items
Search for Items
Shelve Items
Item ID
Change Battery
1
Primary Info
Find
Search
Shelve
Battery
Secondary Info
b) Use the keyboard screen to enter unique find criteria
(numbers or letters) that occur at the beginning of the
selected field.
If you enter multiple find criteria, all find criteria must
be matched.
Specify Find Criteria
Touch screen area:
Item ID:
Keyboard
620.11
Primary Info:
12 3 4 5 6 7 8 9 0 - =
Secondary Info:
Tab q w e r t y u i o p [ ]
CAP a s d f g h j k l ;
2a
c) Tap Done.
Home
d) If desired, repeat steps a-c to define additional Find
criteria.
Specify Find Criteria
Touch screen area:
Item ID:
Find criteria
•
•
•
Shift z x c v b n m , . /
Ctl á ü ` \
Done
DLA_030
Primary Info:
The find criteria must occur at the beginning
of the field(s).
The Primary and Secondary find criteria are not case
sensitive. Item ID criteria are case sensitive.
Because a search starts at the beginning of a field, you must
enter all parts of the field that occur at the beginning
(including any articles such as “a”, “the”, and “an”).
In the example shown on this page, the call number of the
item was known so it was entered in the Enter Secondary
Info field.
Secondary Info:
620.11
© 3M 2012. All rights reserved.
3
Find
Clear
Home
Find Items
5/5 Press Trigger
The new alchemists : brea
620.11 Hazen
4
Clear
3. Press Find.
78-8126-8418-7e
2b
Between:
New
Home
78
3M™ Digital Library Assistant User Guide
The software searches the lists currently on the memory card for any items that match the find criteria.
4. If the DLA finds matches, the Item information appears on the screen.
If the DLA finds multiple matches, use the scroll buttons to view other items.
Step 2—Use the DLA to help locate items
The Verify option is disabled when using the Find Items function.
Find Items
1. If necessary, use the scroll buttons to select the item that you want to
find.
3/3 Press Trigger
2. Turn the Between option ON or OFF.
The new alchemists : brea
620.11 Hazen
•
Deselect the Between checkbox if you are trying to find an item in a
location where the items are not in shelf order.
•
Select the Between checkbox if you are trying to find an item in a
location where the items are in shelf order.
Between:
Between
Checkbox
Clear
New
Home
DLA_020
If the item that you wish to find is not on a shelf-order list the
Between option will not be available.
Note: Leave the Between checkbox deselected if you are trying to find an item in a location where the
items are not in shelf order (such as a pre-shelving or processing area).
3. Locate the shelf area where you believe the item(s) are located.
Find Items
4. Press and hold the trigger (or use the trigger lock) and begin to read the
shelf.
•
•
If the Between option is ON, the distance indicator, LED indicators,
and alert beeps will tell you how close you are to the area where the
item is expected to be. (Note: shelf-order information may be
incorrect if the items are not in the correct location or if the area is
not in shelf order.)
3/3 Press Trigger
Distance
Indicator
Between
Checkbox
The new alchemists : brea
620.11 Hazen
+0
Between:
The science of structures
620.11 Gor
Shelf-order
Information
The DLA will indicate if it reads any of the items on a find list. For
example, if your find list contains multiple copies of the same title,
the DLA indicates if any of the copies are read.
The substance of civiliza
620.11 Sass
Clear
New
Home
DLA_023
Note: When you select the Between: checkbox, the distance indicator shows how close you are to the
correct location and provides shelf-order information.
5. If the DLA reads an item on the find list, remove the item from the shelf and press
Clear.
•
The DLA removes the find item from the list and the next item appears on the
screen.
•
To remove all the items from the find list, press and hold the Clear button.
6. If the DLA finds the proper shelf position but the item is not there, the tone and the
light alternates between yellow and red and the shelf-order information appears on
Find Items
11/12
Press Trigger
Queen Lear
PS3515.E42A698V.1
v v v v v v v
Other Find Item:
Roget's Thesaurus
PA3513.A7217 A6 1992
Clear
New
Home
DLA_074
78-8126-8418-7e
© 3M 2012. All rights reserved.
79
3M™ Digital Library Assistant User Guide
the screen (indicating that the item is missing or misshelved).
If you think that the item is mis-shelved, use the DLA to read the shelves near the correct location to see if
you can locate it.
Note: When reading the shelves to locate the first item on the find list, the DLA displays the Other Find
Item box if it reads another item on the current find list.
7. Press New to return to the Specify Find Criteria screen and specify new find criteria.
78-8126-8418-7e
© 3M 2012. All rights reserved.
80
3M™ Digital Library Assistant User Guide
Using the Search for Items function
The Search for Items function can quickly check a group of items for any items that may be on any active
search list.
The DLA only detects items that are on an active search list. See Deactivating search lists on page 27 for
more information.
Procedure
1. From the Home screen, press Search.
2. Pull the trigger and use the DLA to read the items.
•
•
Whenever the DLA detects an item on an active search list, the three lights will
turn on and the DLA emits an alert sound.
The DLA displays item information and the search-list name for each search
item that you read.
Digital Library Assistant
Find Items
Search for Items
Shelve Items
Change Battery
Find Search Shelve Battery
The Verify option is disabled when using the Search for Items function.
3. Remove each search item or items with blank tags as they appear.
Note: Search items found during a search do not show the shelf location.
Search for Items
1/24 Press Trigger To Begin
Queen Lear
PS3515.E42.A698 V.1
Lost
Home
DLA_067
78-8126-8418-7e
© 3M 2012. All rights reserved.
81
3M™ Digital Library Assistant User Guide
Using the Shelve Items function
Use the Shelve Items function to find the correct location for items that you want to re-shelve.
Before you begin…
The memory card that you use must contain a shelf-order list for the area of the
library where you will be shelving items.
The memory card may also include search lists and/or collection categories.
Digital Library Assistant
Find Items
Search for Items
Shelve Items
Distance indicator
Change Battery
The distance indicator displays the approximate number of item positions between
the current DLA location and the correct location.
Shelve Items
Distance
Indicator
Find
Search Shelve Battery
Shelve Items
+7 Scan in Progress
+0
Press Trigger To Begin
Read a single item to shelve
Someday Soon
PS3513.A413 S5 1941
Goes Between:
Clear
Goes Between:
Home
Home
DLA_052a
Shelve Items
+0
Negative value = the DLA is to the left of the correct location.
Positive value = the DLA is to the right of the correct location.
Press Trigger To Begin
Someday Soon
PS3513.A413 S5 1941
Goes Between:
The distance indicator number can help you quickly determine how close the
DLA is to the correct location.
The maximum distance indicator value is 9,999.
Clear
Home
Shelve Items
+2
Press Trigger To Begin
Someday Soon
PS3513.A413 S5 1941
Goes Between:
The Fire Eaters
PS3513.A413 B6 1974
The Poisoned Orchard
PS3513.A632 B5
Clear
Home
DLA_047
78-8126-8418-7e
© 3M 2012. All rights reserved.
82
3M™ Digital Library Assistant User Guide
Step 1—Use the DLA to find the correct shelf
1. From the Home screen, press Shelve.
2. Use the DLA to read the item that you want to shelve.
Shelve Items
+0
Press Trigger To Begin
Someday Soon
PS3513.A413 S5 1941
a) Hold the item in your hand.
b) Place the DLA antenna against the left side of the item.
Goes Between:
c) Press the trigger.
The item should appear on the display.
Clear
Home
DLA_051
If the verify option is enabled, the DLA displays a verify icon for each item that meets the verify
criteria. If the item is on an active search list, the verify icon is not shown. The Verify feature is only
available at sites that use RFID Security.
3. Use the DLA’s indicator lights to find the correct shelf for the item.
a) Start at the top shelf and use the DLA to read the first book on
each shelf.
Indicator Lights
Before Correct Shelf = Yellow Light
(slow, high-toned beeps)
After Correct Shelf = Red Light
(slow, low-toned beeps)
Top Shelf
Distance
Indicator: -18
Correct
Location
b) Continue reading the first book on each shelf until the Red light
and low tone indicate that you are past the correct shelf.
Middle Shelf
Distance
Indicator: -6
The red light,
distance indicator,
and low tone
indicate that you
moved the DLA past
the correct shelf
Bottom Shelf
Distance
Indicator: +6
78-8126-8418-7e
© 3M 2012. All rights reserved.
DLA_014
83
3M™ Digital Library Assistant User Guide
Step 2—Use the DLA to find the shelf location
1. Use the DLA to start reading the shelf.
Shelve Items
2. Use the indicator lights, alert sounds, and the distance indicator number to find the
correct location.
The distance indicator number can help you quickly determine how close the DLA is
to the correct location.
- 14
Scan in Progress
Someday Soon
PS3513.A413 S5 1941
Goes Between:
3. When the DLA is at the correct location:
Clear
•
The Yellow, Green, and Red lights are all ON.
•
The DLA emits fast, high-toned beeps.
•
The Goes Between area of the display shows the surrounding items.
•
The distance indicator number is approximately zero.
Home
Shelve Items
+1
Press Trigger To Begin
Someday Soon
PS3513.A413 S5 1941
Goes Between:
The Fire Eaters
PS3513.A413 B6 1974
The Poisoned Orchard
PS3513.A632 B5
Clear
Home
DLA_050
Correct
Location
Distance
Indicator: -4
Correct
Location
Correct
Location
Distance
Indicator: 0
Distance
Indicator: +3
DLA_019
DLA is left of the correct location
Yellow Light
Slow, high-toned beeps
78-8126-8418-7e
DLA is at the correct location
Yellow+Green+Red Lights
Fast, high-toned beeps
© 3M 2012. All rights reserved.
DLA is right of the correct location
Red Light
Slow, low-toned beeps
84
3M™ Digital Library Assistant User Guide
Using the Change Security function
This function enables you to scan one or more items to change their security status from
secure to unsecure, or from unsecure to secure.
Note: The DLA will only attempt to set security on items that are not in the selected
security state. The list that is built during the scan contains only the items that the DLA
attempts to set. The counters at the top of the screen are 1) the number of items that
were unsuccessfully set, and 2) the number of items that the DLA attempted to set. The
Scanned field displays the total number of items seen by the DLA, whether the DLA
attempted to set security or not.
Digital Library Assistant
Find Items
Search for Items
Shelve Items
Change Security
Find
Search
Shelve
Security
Change Security
0/0 Press Trigger To Begin
Secure
Scanned: 0
Procedure
1. From the Home screen, press Security.
2. Press Secure or Unsecure to select the operation you wish to perform on one or
more items.
The DLA will display an open or closed padlock symbol to represent the security
status the items will have after they have been scanned.
3. Pull the trigger to begin the scan. Each item will be entered into a list.
The last screen in the example shows two lines of Item ID information
displayed. If Location Descriptions are used by the library, a third line containing
the location description will be displayed below the item information.
Secure Unsecure
.
Home
Change Security
0/1 Press Trigger To Begin
Secure
Scanned: 1
Grand Passion
641.76
4. When you are finished, pull the trigger to end the scanning process.
5. If you wish to remove an item from the list of scanned items, scroll to the item using
the scroll buttons or the scroll bar and press Clear.
6. If you wish to save the current list of items to a collection category, press Save.
Clear
.
Save
Home
DLA_067a
7. Press Home to exit.
78-8126-8418-7e
© 3M 2012. All rights reserved.
85
3M™ Digital Library Assistant User Guide
Using the Show Item Info function
This function enables you to quickly scan a single item and display detailed item information.
Procedure
1. From the Home screen, press Info.
As shown in the example, the Show Item Info screen displays labels for eight types
of item information.
The Location ID and Location Description fields apply only to libraries that
use Location tags.
2. Pull the trigger and scan an item.
Digital Library Assistant
Find Items
Search for Items
Shelve Items
Show Item Info
Find
Search Shelve
Info
The screen will display item information for the scanned item.
An Item not in database message will appear in the Secondary Info field if the item
is not recognized.
Show Item Info
Press Trigger To Begin
Item ID:
Primary Info:
3. You may toggle the Labels/Values button to easily identify specific item
information.
Secondary Info:
4. Press Home to exit.
Location ID:
Set:
Security:
Location Description:
Search Lists:
Values
.
.
Home
Show Item Info
Press Trigger To Begin
34567000219798
A Random Walk Down Wall Street
641.6374
1/1
SHELF6
Shelf6
No search lists.
Labels
.
.
Home
DLA_067b
78-8126-8418-7e
© 3M 2012. All rights reserved.
86
3M™ Digital Library Assistant User Guide
Only for libraries using location tags
Location tags are used by many libraries, especially larger facilities, to clearly identify
specific areas in a building such as individual shelving units, groups of units, and areas
located on different floors or wings throughout the facility.
If location tags are used with 3M™ Digital Data Manager software and the DLA, Data
Manager export-format parameters are used to prepare location barcodes and
descriptions for display on the DLA.
When location tags are used, the DLA displays corresponding location information near
the top of the screen and/or directly below the primary and secondary information. As
shown in the example:
•
Primary Information: The Age of Reason
•
Secondary Information: 641.76
•
Location Description: Floor 2 Shelf 10
0/1 Press Trigger To Begin
The Age of Reason
641.76
Floor 2 Shelf 10
Clear
.
Save
Home
DLA_067c
Three DLA functions designed specifically for location-based processing are described on the following pages:
•
Check Location
•
Check Location+Order
•
Inventory Location
78-8126-8418-7e
© 3M 2012. All rights reserved.
87
3M™ Digital Library Assistant User Guide
Using the Check Location function
Note: This function applies only to libraries using location tags.
This function enables you to perform two tasks:
scan a shelf and locate items that are in the wrong location, exactly the same as the
procedure on the previous page, and
shelve items that are in the correct location but are out of order.
Digital Library Assistant
Find Items
Search for Items
Shelve Items
Check Location+Order
Procedure
Find
1. From the Home screen, press Loc+Order.
As shown in the example, the first Check Location+ Order screen is waiting to
scan a Location tag first, followed by items on a shelf associated with that
Location tag.
Search
Shelve
Loc+Order
Check Location+Order
0/0 Press Trigger To Begin
- - - Scan location tag first
2. Pull the trigger and scan the Location tag.
The screen will display the Location tag’s description on the second line (Shelf 6
in the example).
3. Scan the items on the shelf. When you are finished, pull the trigger to finish
scanning.
The screen will display items that are in the wrong location, plus items that are in
the right location but in the wrong order.
If you wish to save a list of the displayed items, press Save.
.
.
.
Home
Check Location+Order
S
1/8 Ready to Find Item
Shelf 6
The Complete Office Handbook
641.6374 Cho
4. At this point, you may choose to Find Item or Shelve.
To find the item, refer to steps 4 through 7 on the previous page.
Clear.
Shelve
Save
Home
To shelve the item, proceed to step 5.
Shelving
5. Press Shelve to shelve the item.
Press Trigger to Begin
The Shelving screen will display the item and two items it should go between.
6. Clear the currently displayed item and repeat this process for any remaining items
in the list.
7. Press Home to exit.
The Complete Office Handbook
641.6374 Cho
–
Goes Between:
A Random Walk Down Wall Street
641.6374
Lady of the Glen
641.71
Clear Cancel
Home
DLA_067e
78-8126-8418-7e
© 3M 2012. All rights reserved.
88
3M™ Digital Library Assistant User Guide
Using the Check Location+Order function
Note: This function applies only to libraries using location tags.
This function enables you to perform two tasks:
•
•
Scan a shelf and locate items that are in the wrong location, exactly the same as
the procedure on the previous page, and
Shelve items that are in the correct location but are out of order.
Digital Library Assistant
Find Items
Search for Items
Shelve Items
Check Location+Order
Procedure
Find
1. From the Home screen, press Loc+Order.
As shown in the example, the first Check Location+ Order screen is waiting to
scan a Location tag first, followed by items on a shelf associated with that
Location tag.
Search
Shelve
Loc+Order
Check Location+Order
0/0 Press Trigger To Begin
- - - Scan location tag first
2. Pull the trigger and scan the Location tag.
The screen will display the Location tag’s description on the second line (Shelf 6
in the example).
3. Scan the items on the shelf. When you are finished, pull the trigger to finish
scanning.
The screen will display items that are in the wrong location, plus items that are in
the right location but in the wrong order.
If you wish to save a list of the displayed items, press Save.
.
.
.
Home
Check Location+Order
S
1/8 Ready to Find Item
Shelf 6
The Complete Office Handbook
641.6374 Cho
4. At this point, you may choose to Find Item or Shelve.
To find the item, refer to steps 4 through 7 on the previous page.
Clear.
Shelve
Save
Home
To shelve the item, proceed to step 5.
Shelving
5. Press Shelve to shelve the item.
Press Trigger to Begin
The Shelving screen will display the item and two items it should go between.
6. Clear the currently displayed item and repeat this process for any remaining items
in the list.
7. Press Home to exit.
The Complete Office Handbook
641.6374 Cho
–
Goes Between:
A Random Walk Down Wall Street
641.6374
Lady of the Glen
641.71
Clear Cancel
Home
DLA_067e
78-8126-8418-7e
© 3M 2012. All rights reserved.
89
3M™ Digital Library Assistant User Guide
Using the Inventory Location function
Note: This function applies only to libraries using location tags.
This function enables you to a) collect item IDs, and b) automatically assign all
scanned items to a specific location ID in the library. Location information is
displayed on the second line from the top, and primary and secondary information are
displayed for each item.
Procedure
1. Select one or more items that you wish to scan and assign to a specific location ID
in the library.
2. From the Home screen, press Inventory.
As shown in the example, the first Inventory Location screen is waiting for you to
scan the Location tag.
3. Pull the trigger and scan the Location tag.
The screen displays the Location tag’s description on the second line (Shelf 6 in
the example).
4. Scan the items that you want to assign to the Location tag you scanned in Step 2.
When you are finished, pull the trigger to finish scanning.
The screen will display a list of scanned items, with primary and secondary
information displayed for each item.
5. To view an abbreviated list (titles only), press View. Press View again to view
primary and secondary information for each item.
6. If you need to delete one or more items from the list, move through the list using
the scroll buttons until an item you wish to delete is highlighted. Press Clear to
delete the item.
7. To a) assign all scanned items to the Location tag you scanned in Step 3 and b)
save the list of collected item IDs, press Save. Your new list will be saved to the
memory card.
8. Press Home to exit.
78-8126-8418-7e
© 3M 2012. All rights reserved.
90
3M™ Digital Library Assistant User Guide
Troubleshooting
This section includes solutions to some common problems that may occur.
DLA startup problems
Problem
Solution
The DLA does not appear to work.
The power will not come on (screen remains blank).
Perform the DLA Reset Procedure described in the 3M™
Handheld RFID Reader Owner's Manual.
The DLA Home screen does not appear.
Insert a fully charged battery into the DLA and follow the
startup instructions (See the 3M™ Handheld RFID Reader
Owner's Manual.)
The DLA displays “No Database” or “Invalid Database”
messages when you insert a memory card.
Either of these two messages is usually the result of
corrupted data on the memory card.
Lines appear on display or the display appears distorted.
Invalid Database
Problem
Invalid database found on
memory card.
This data corruption is usually the result of removing the
memory card from the memory-card drive before the Data
Manager export is complete.
-orNot using the Windows Eject command before removing
the memory card from the Data Manager memory-card
drive.
Export data to memory
card again.
OK
DLA_061
No Database
Solutions
Try the export procedure again.
No database found on
Memory card.
If the DLA continues to display database error messages
when you insert the memory card, reformat the memory
card.
(See the 3M™ Handheld RFID Reader Owner’s Manual for
format instructions.)
Insert a memory card with a
Valid database.
3M recommends using only SanDisk memory cards
and SanDisk memory-card readers for use with the DLA
and Data Manager software.
OK
DLA_053
Some of the information on the DLA display is missing.
For example, the first line (primary information) may be
missing but the second line is okay.
Check the Data Manager software export log for instances
of missing primary and/or secondary information fields. The
error log allows you to trace the problem back to an
individual record.
Check for missing primary and/or secondary information
fields in the list files generated by your circulation system.
You may want to correct any errors in your circulation
system item records.
Occasionally, a corrupted memory card can result in
missing display information. If this occurs, format the
memory card. See the 3M™ Handheld RFID Reader
Owner’s Manual for information.
78-8126-8418-7e
© 3M 2012. All rights reserved.
91
3M™ Digital Library Assistant User Guide
Problem
Solution
The DLA displays incorrect item information.
Start Data Manager software, check (preview) the export
For example, the DLA displays a title where there should be format that you assigned to the list.
an author.
If the export format is set up correctly, check for problems in
the various lists generated from your circulation system.
If the DLA indicates a misshelved item but the item is
shelved correctly.
Catalog errors
Check the spine label to make sure it matches the item
data displayed on the DLA. If the two are different, the
circulation system record may have an error or the spine
label may be incorrect.
The call number in your circulation system database may
be incorrect.
Other
The shelf-order list (exported from Data Manager) may be
out of order, or the items are shelved differently than what
the shelf-order list indicates. Make sure that the shelf-order
lists in the Data Manager screen are in the order that
matches the physical shelving of items.
Thin items: In some situations (such as large groups of thin
items,) you can change the item-width setting. If you are
reading thin items and the item-width setting is set to
medium or thick, you may experience excessive false shelf
error alerts.
An item appears to be out of order but the DLA indicates
that it is correctly shelved.
The DLA will not report any shelf-order errors that occur
within the order limit range assigned to the Item Width
Setting.
If you use the thin setting for normal or thick items, you may
notice reduced accuracy (some detectable shelf-order
errors may not be reported).
The DLA is finding excessive shelf-order errors.
If you use the thick or medium order-limit setting for thin
items, you may experience excessive false shelf-order
errors for items that are in the correct position.
The call number in your circulation system database may
be incorrect.
The shelf-order list(s) (exported from Data Manager) may
be out of order, or the items are shelved differently than
what the shelf-order list indicates.
Thin items: In some situations (such as large groups of thin
items,) you can change the Item Width Setting.
“Item not in database” message appears.
The order and search lists on the memory card do not
include this item.
Check your Data Manager software for the following:
Check the Data Manager export log to make sure that you
exported the correct shelf-order lists to the memory card.
78-8126-8418-7e
© 3M 2012. All rights reserved.
92
3M™ Digital Library Assistant User Guide
Problem
Solution
Check the Data Manager software setup to make sure that
any new circulation system records were added to the
shelf-order and/or search lists. This usually requires
generating new lists from your circulation system and
exporting them to a memory card.
If applicable, make sure that the correct barcode filter was
exported to the memory card. In addition, you can use the
DLA’s admin menu Barcode Filter Test to test the barcode
filter that is on the memory card.
“Item not in database” message will not affect the data
collection function. You can still collect data and save it to
the memory card.
The Find function does not locate the item.
The item that you are trying to find must be on one of the
shelf-order or search lists located on the memory card.
The find criteria must occur at the beginning of the field(s).
If a title is entered as find criteria, you must include all the
characters at the beginning of the title (including any
articles such as “a”, “the”, and “an”).
DLA is not reading any tags
Make sure the Tag Protocol setting is set for the type of
tags used at your site. For more information on Tag
Protocol settings, see Changing the Tag Protocol setting on
page 34.
The DLA is not reading all of the items.
Determine which items are not being read and/or why they
aren’t being read:
Metal shelf dividers – items must be separated by 0.5 in.
(1.3 cm) from metal shelf dividers.
Metallic book covers – metallic materials used in some
book covers can interfere with tag reading.
Improper antenna positioning – see Shelf reading basics on
page 36 for more information.
Moving the DLA too fast – move the DLA at a rate of about
one item per beep when the pacing tone is heard. (See
Shelf reading basics on page 36 for more information.)
Make sure the Tag Protocol setting is set for the type of
tags used at your site. For more information on Tag
Protocol settings, see Changing the Tag Protocol setting on
page 34.
Damaged tags
Missing tags
Thin items
Battery life seems too short
Handheld Model 702 and Model 802
(Model 802)
Excessive use of the screen backlight option will reduce
battery life.
Battery life seems too short
Handheld Model 803/804 hardware
(Model 803/804)
When not in use, remove the battery to conserve the
78-8126-8418-7e
© 3M 2012. All rights reserved.
93
3M™ Digital Library Assistant User Guide
Problem
Solution
charge.
Start each day with a fully charged battery.
If your site has a Handheld Model 803/804 and a Handheld
Model 702 or Model 802, do not use the batteries that came
with the Model 702/802 in the newer Handheld Model
803/804. They will not last as long as the batteries shipped
with the Model 803/804.
Always use 2400mA/hr or greater batteries in the
Model 803/804.
78-8126-8418-7e
© 3M 2012. All rights reserved.
94
3M™ Digital Library Assistant User Guide
DLA staff training
About staff training
Use the following DLA Training Outline to develop your in-house staff-training program. This outline gives
you the main training points in a logical sequence.
You may want to add to this outline and develop some examples that you can demo in the stacks.
Time—Allow approximately 1.5 hours for basic training with a class size of two people per DLA. Of this time,
approximately one hour is spent performing tasks with the DLA.
Class size – because training involves a lot of practice with the DLA, you may want to limit class size to no
more than four. Larger class sizes can reduce the effectiveness of the training.
It is best to train between two and four people (with no more than two people per DLA). By training more than
one person at a time, the students will learn from each other’s questions.
Staff training outline
Overview of operation (data source, etc.)
1. Provide an overview of the DLA’s physical components
Buttons, trigger, antenna, memory card, battery, etc.
2. Explain the kinds of tasks that can be performed using the DLA.
Shelf order, finding missing items, etc.
3. Explain how the DLA works—uses item identifier read from the tag to look up item data (from the
circulation system) on the memory card.
The DLA uses data from the circulation system (in the form of user-created lists) that are exported by Data
Manager software, onto a memory card. The DLA can read data from and write data to the memory card.
Each tag includes an Item ID that should correspond to an item record on the memory card.
4. A 32-MB memory card can store information for 200,000+ items.
If necessary, larger cards are available.
Battery management
Refer to the 3M™ Handheld RFID Reader Owners Manual for information on battery management.
To avoid draining the battery, remove the battery during long-term storage (more than one week).
1. Battery life expectations:
a) Approximately four hours of trigger time per fully charged battery.
b) Expect approximately 6+ hours of real usage time in most scenarios.
78-8126-8418-7e
© 3M 2012. All rights reserved.
95
3M™ Digital Library Assistant User Guide
Using the screen light option will reduce the amount of real usage time.
c) When stored on the shelf (not used) the DLA slowly uses the battery.
The DLA battery will last approximately one week when stored in the DLA.
2. Battery replacement procedures:
a) Replace the battery after a session of heavy use or if the battery indicator shows less than 50% of the
charge remaining.
b) During use, the DLA warns the user if the battery level is too low. To avoid possible loss of data, change
the battery if the DLA displays a “low battery” message.
c) Always use the “Change Battery” procedure. (See the 3M™ Digital Library Assistant User Guide.)
d) Make sure you insert the battery in the direction of the arrow. It is more difficult to insert it backward,
but not impossible.
e) If the user does not perform this procedure correctly (must be changed in less than a minute), they will
have to perform a reset.
3. Battery charging procedures:
a) Light on charger means the following:
Green light on empty charger means “charger is plugged into power”
Red light means battery is charging.
Green light with battery inserted in charger indicates that the battery is fully charged.
b) It is okay to leave the battery on the charger overnight.
c) It takes approximately four (4) hours to fully charge a battery.
Memory card procedures
1. Each site should develop a custom work flow-management plan for using the DLA. This plan should
include:
•
Decide who will manage the memory cards.
•
A schedule for updating lists (using Data Manager software)
•
Task scheduling, inventory policies, etc.
2. At a minimum, your staff must know where they will get a memory card before using the DLA and where
they will take it after working with the DLA.
78-8126-8418-7e
© 3M 2012. All rights reserved.
96
3M™ Digital Library Assistant User Guide
Using the Check Shelf Order function
Most sites use the Check Shelf Order function on a daily basis. This function is a good choice for training
because it combines most of the DLA “best practices.”
1. Shelf-reading basics (demo once and then have students start)
a) Speed of scanning shelves
b) Antenna positioning for shelves
c) Trigger operation – both click on/off and standard operation
d) Meaning of pacing sound and green LED
e) Separation from metal
f) “Not in database errors” can occur if you use the DLA to read items that are not on any of the shelforder lists that you exported to the memory card.
2. Finding misshelved items
3. Finding search items (missing items, etc.)
All search lists are active at startup.
Use Setup Lists screen to examine and/or deactivate search lists.
It may be useful to create a search list just for training. This list should include items that are shelved in
the area where you will be training.
4. Checkshelf alerts (easy to create and demo)
5. Finding catalog errors – useful to demonstrate if you can find one.
•
If the DLA flags a misshelved item that appears to be shelved correctly, look for discrepancies between
the call number on the spine label and the call number from the circulation system data (usually
displayed on the DLA). If they are different, there may be a problem with the circulation data or the
label.
•
If a catalog error (missing barcode, wrong collection code, etc.) causes a record to not be exported in a
shelf-order list, the DLA will display the “”not in database” message if it reads this item. To minimize
this, always check the export log and correct any catalog errors.
6. Defining the Item Width setting
•
Change for very thin or very thick books
•
Can cause excessive errors or reduced accuracy
7. Using the volume control for audible tones
78-8126-8418-7e
© 3M 2012. All rights reserved.
97
3M™ Digital Library Assistant User Guide
Other DLA functions (as required)
•
Data Collection / Inventory / In-House Use (optional)
•
Find Items (optional)
•
Pull Items (optional)
•
Sort & Shelve (optional)
•
Shelve Items (optional)
•
Search for Items (optional)
•
Change Battery
•
Setup Lists (optional)
•
Trigger Lock
•
Screen Light
Battery replacement
Explain battery replacement procedure outlined in the 3M™ Handheld RFID Reader Owners Manual.
Memory card removal
Only remove a memory card when the DLA displays the Home screen (main menu screen).
Tightening the DLA antenna (for key users/administrators only)
If necessary, the antenna can be gently tightened if it becomes loose during use.
This typically only happens after substantial periods of heavy use.
78-8126-8418-7e
© 3M 2012. All rights reserved.
98
3M™ Digital Library Assistant User Guide
Warranty
78-8126-8418-7e
© 3M 2012. All rights reserved.
99
3M™ Digital Library Assistant User Guide
3M Service
Information to gather
Before you call, please have the following information available:
•
Name, address, and telephone number of your facility
•
Model number(s) of equipment you are calling about —and, if applicable, other equipment installed
•
Your question(s), or if applicable, a description of the problem or issue you want addressed
3M Service phone numbers
For questions regarding your system, call one of the following numbers.
In the United States
In Canada
In other countries
1-800-328-0067
English 1-800-268-6235
Français 1-800-567-3193
Call your local 3M office.
3M Library Systems Web Site
The 3M Library Systems Web site can be located at http://www.3M.com/library.
For additional information in the United States about 3M Library Systems, go to http://www.3M.com/us/library.
3M Library Systems
3M Center, Building 225-4N-14
St. Paul, MN 55144-1000
www.3M.com/library
78-8126-8418-7e
© 3M 2012. All rights reserved.
100