1
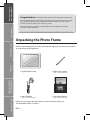
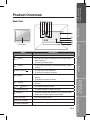
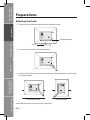
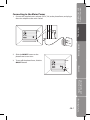
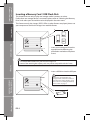
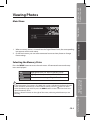
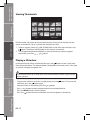
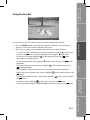
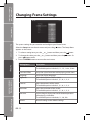
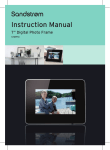
Instruction Manual
10” Digital Photo Frame
S10DPF10
Contents
Unpacking the Photo Frame................................................................................4
Product Overview.................................................................................................5
Preparations.........................................................................................................6
Attaching the Stand................................................................................................................. 6
Connecting to the Mains Power........................................................................................... 7
Inserting a Memory Card / USB Flash Drive..................................................................... 8
Viewing Photos.....................................................................................................9
Main Menu................................................................................................................................... 9
Selecting the Memory Drive................................................................................................. 9
Viewing Thumbnails...............................................................................................................10
Playing a Slideshow................................................................................................................10
Using The Tool Bar...................................................................................................................11
Changing Frame Settings................................................................................. 12
Troubleshooting................................................................................................ 13
Specifications..................................................................................................... 14
Safety Warnings................................................................................................. 15
Introduction and
Product Overview
Congratulations on the purchase of your new Sandstrøm Digital Photo Frame.
We recommend that you spend some time reading this instruction manual in order
that you fully understand all the operational features it offers. You will also find
some hints and tips to help you resolve any issues.
Preparations
Read all the safety instructions carefully before use and keep this instruction
manual for future reference.
Unpacking the Photo Frame
Basic Operation
Remove all packaging from the unit. Retain the packaging. If you dispose it please do
so according to local regulations.
Settings
1. Digital Photo Frame
2. Photo Frame Stand
3. Mains Adapter
4. Instruction Manual
(P.N. : 27-155-06550200)
Troubleshooting
and Specification
(P.N. : 49-501-01001059)
(P.N. : 46-007-45010109)
Safety Warnings
If items are missing or damaged, please contact partmaster (UK only).
Tel: 0844 800 3456 for assistance.
GB-4
Introduction and
Product Overview
Main Unit
1 2 3 4 5 6 7
8
9
Preparations
Product Overview
12
LCD Display
3
button
4
Play / Pause
5
button
6
button
button
• Press to move right in the menu / thumbnail mode /
option settings
• To display the next photo
• To move up in the menu / thumbnail mode / option
settings
• To start / pause the slideshow
• To confirm a setting or function
• To move left in the menu / thumbnail mode / option
settings
• To display the previous photo
• To move down in the menu / thumbnail mode / option
settings
• To return to the main menu
7
Esc /
8
SD/MMC/MS slot
• To accommodate SD, MMC, MS cards
9
USB host
• To accommodate USB devices such as portable USB
flash drives or flash memory card readers
10
DC-IN socket
• To connect to the mains
11
ON / OFF button
• To turn the photo frame on and off
12
Stand receptacle
• To attach the supplied stand
GB-5
Settings
button
Troubleshooting
and Specification
2
Description
• To access the menu mode.
MENU
Safety Warnings
Name
1
Basic Operation
10
11
Introduction and
Product Overview
Preparations
Attaching the Stand
1. Take out the stand attached at the back of the photo frame.
Preparations
Stand Receptacle
Basic Operation
Stand
2. Screw in the stand into the stand receptacle.
Settings
3. Now the stand is fixed, you can choose to display your photo frame in a landscape
or portrait position.
Troubleshooting
and Specification
Safety Warnings
Landscape Position
To take off the stand, unscrew it from its receptacle.
GB-6
Portrait Position
Basic Operation
DC IN
Preparations
Introduction and
Product Overview
Connecting to the Mains Power
1. Connect the supplied mains adapter (5V DC, 2A) to the photo frame, and plug in
the mains adapter to the mains socket.
2. Slide the ON/OFF button on the
photo frame to turn it on.
GB-7
Safety Warnings
Troubleshooting
and Specification
Settings
3. To turn off the photo frame, slide the
ON/OFF button.
Introduction and
Product Overview
Inserting a Memory Card / USB Flash Disk
This photo frame can only display one storage media’s contents at a time.
If more than one storage device is connected, please refer to “Selecting the Memory
Drive” and select your desired drive to be displayed in the main menu.
This frame can only play images (JPEG). If files in other formats are played, please use
your computer to convert the images to a readable format.
Preparations
MMC
SD
Basic Operation
• Insert your memory card into the
appropriate slot following the
orientation marked on the photo
frame.
1. To remove MMC/SD/MS card, pull the card straight out.
2. Some of the newer higher capacity cards may not be compatible with this frame.
Settings
• Insert a USB drive into the USB port.
Troubleshooting
and Specification
This device can only display one
storage media’s contents at a time. If
more than one storage media is used,
please refer to “Selecting the Memory
Drive” section on page 9.
Safety Warnings
GB-8
Introduction and
Product Overview
Viewing Photos
1. When a memory device is inserted into the Digital Photo Frame, the corresponding
icon appears on the main menu.
2. On the main menu, you can select connected source to view photos or change
frame settings.
Basic Operation
Preparations
Main Menu
Highlighted when you select a USB flash driver.
Card
Highlighted when you select a SD / MMC / MS card.
Setup
To customise the settings of Digital Photo Frame.
•In the main menu, if you insert a SD / MMC / MS card or a USB device, the frame will start
to the slideshow automatically. In the slideshow mode, press the
button to return
to the thumbnail page and then press the MENU button to access the main menu and
select the memory drive.
•There is a button indicator on the right of the screen, indicating which button you are
pressing.
GB-9
Troubleshooting
and Specification
USB
Safety Warnings
Press the MENU button to access the main menu. All connected source and setup
icons are displayed.
Settings
Selecting the Memory Drive
Introduction and
Product Overview
Viewing Thumbnails
Preparations
Basic Operation
In Photo mode, the photos on the selected memory source can be displayed on the
screen as thumbnails. Up to 15 photos are displayed at a time.
1. Select a memory source (e.g. USB, SD/MMC/MS) on the main menu and press the
button. The photos are displayed on the screen as thumbnails.
2. To navigate through the thumbnails or move to the next or previous page of
thumbnails, press the , , or button.
Playing a Slideshow
Settings
In thumbnail mode, select a photo and then press the button to start a slide show
from the current photo. The selected photo is displayed on the screen, and a “hint” pop
up window will appear to guide user.
Do not set hint time to “0” in setup menu, if you want the Photo Frame to display a hint for
button operation.
Troubleshooting
and Specification
• To pause the slideshow and view a single photo, press the button. To resume the
slideshow, press the button again.
• Skip to previous or next photo, press the or button.
• Press or button to rotate a photo clockwise or counterclockwise.
• Press the MENU button to show tool bar.
• Press the
button to exit the slideshow and view the photos in thumbnail.
Safety Warnings
GB-10
• To delete a photo, highlight on the screen and press the button.
• To exit and close the tool bar, highlight on the screen and press the
Introduction and
Product Overview
button.
GB-11
Settings
Troubleshooting
and Specification
1. Press the MENU button during viewing a photo or slideshow. The OSD menu
appears on the screen and the slideshow will pause.
2. Press the or button to navigate between the icons on the OSD menu.
• To start or resume a slideshow from the current photo, highlight on the screen
and press the button, and then the icon will change to on the screen.
on the screen and press the button
• To zoom in on a photo, highlight
repeatedly to magnify a photo.
• To rotate a photo clockwise, highlight on the screen and press the button
repeatedly.
• To rotate a photo counterclockwise, highlight on the screen and press the
button repeatedly.
• To set a photo to display on full screen or standard screen if its resolution is
on the screen and press the
higher than the resolution of the screen, highlight
button.
• To change the slideshow into 4 split screen, highlight
on the screen and press
the button.
Safety Warnings
You also can use the OSD menu to view the photos one by one manually.
Basic Operation
Preparations
Using the Tool Bar
Introduction and
Product Overview
Changing Frame Settings
Preparations
Basic Operation
The system settings let you customize and configure your Photo Frame.
Select the Setup icon on the main menu and press the
appears on the screen.
button. The Setup Menu
1. To select a setting item, press the or button and then press the button.
2. To change the value, press the or button and then press the button. Or
press
button to exit.
3. Press the MENU button to return to the main menu.
Settings
Troubleshooting
and Specification
Safety Warnings
Setting Items
Description
Slide show time
Set up the interval time for slideshow.
The available options include: 3s, 5s, 15s, 1 min, 15min.
Transition Effect
Set up the style of transition while playing a slide show.
Language
Set up the display language.
Brightness
Adjust the brightness of the screen.
The available options include: 3, 2, 1, 0, -1, -2, -3.
Contrast
Adjust the contrast of the screen.
The available options include: 3, 2, 1, 0, -1, -2, -3.
Saturation
Adjust the saturation of the screen.
The available options include: 3, 2, 1, 0, -1, -2, -3.
Hint time
Set how long to display the hint for button operation
while playing a slideshow.
The available options include: 0s, 5s, 10s, 20s.
Default
Reset all settings to the default settings.
GB-12
Introduction and
Product Overview
Troubleshooting
No power
Unable to view photos on the Digital Photo Frame
• Not all JPEG files are compatible. Please open the files in a computer and resave
them as JPEG files and then try to playback in the photo frame.
• Check if the memory card is compatible.
Preparations
• Check to make sure the mains plug is plugged into the mains socket.
• Make sure there is power in the mains socket.
• Go to the main menu, then the SETUP and change the display mode to match your
photo (Full / Standard).
If photo display seems slow
• Use lower resolution photos.
The image is distorted or blurred.
Basic Operation
If the photo display is distorted or cannot display properly
• Resolution of the image is too low. Try playing a file with a higher resolution.
Resolution of 800 X 600 pixels is recommended.
Settings
Cannot detect any external device via the USB 2.0 A-Type port
• This photo frame only support a USB flash drives and it does not support any
external hard disks or MP3 player via the USB port.
The photo frame does not work properly
GB-13
Safety Warnings
Troubleshooting
and Specification
• Please switch off the photo frame and on again.
Introduction and
Product Overview
Specifications
Display
Digital LCD, TFT
Panel size: 10 inches
Preparations
Screen aspect ratio: 4:3
Resolution: 1024*768 pixels
I/O
DC in
Power Supply
AC Adapter (Input: 100~240V AC, 50~60Hz;
Output: DC 5V 2A)
USB Port
USB Host 2.0 (High Speed)
Supports USB flash media
Basic Operation
USB Max Load : DC 5V, 400mA
Settings
Supported Peripheral
Devices
SD™ (Secure Digital Card), MMC™ (MultiMedia Card),
MS™ (Memory Stick)
Supported Photo Format
JPEG only
Storage Condition
Humidity <95%, -20~60°C
Working Condition
Humidity <80%, 0~45°C
Size L x W x H : (mm)
265.5 x 215 x 22.5 mm
Weight (g)
638.6g
Features and specifications are subject to change without prior notice.
Troubleshooting
and Specification
Safety Warnings
GB-14
The LCD screen is manufactured using
high-precision technology. However,
some tiny black points and/or bright
points (red, blue or green in colour) may
constantly appear on the LCD screen.
These points are generated in the
manufacturing process and are normal.
Introduction and
Product Overview
Preparations
Settings
Note about LCD screen
Troubleshooting
and Specification
• Read all the instructions and retain this
instruction manual.
• Ensure that all electrical connections
(including the mains adaptor and
power cable) are properly made and
in accordance with the manufacturer’s
instructions. Switch off and withdraw
the mains adaptor before making or
changing connections.
• Consult your dealer if you are ever in
doubt about the installation, operation
or safety of your photo frame.
• Do not allow the photo frame to be
exposed to dripping or splashing.
• Never store in hot or very cold areas.
Recommended operating temperature
is 0~40°C.
• Do not use the photo frame in areas
with high moisture (e.g. bathroom) or
dusty areas.
• Do not place hot objects or naked
flame sources such as lighted candles
or night lights on or close to the photo
frame. High temperatures can melt
plastic and lead to fires.
• Do not obstruct the ventilation
openings of the photo frame with
items such as newspapers, tablecloths,
curtains, etc. Overheating will cause
damage and shorten the life of the
photo frame.
• Do not handle the power cable with
wet hands.
• Be careful with the LCD panels on the
photo frame.
• Only use attachments/accessories
specified by the manufacturer.
• When the photo frame is not in use or
unattended for a long period of time,
disconnect it from the mains socket.
• Do not remove any fixed cover as this
may expose dangerous voltages.
• Do not continue to operate the photo
frame if you are in any doubt about it
working normally, or if it is damaged
in any way - switch off, withdraw the
mains adaptor and consult your dealer.
• Never let anyone especially children
push anything into holes, slots or any
other opening on the case - this could
result in a fatal electrical shock.
• Route the power cable so that it is not
likely to be walked on, crushed, chafed,
or subjected to excessive wear, tear
or heat.
GB-15
Safety Warnings
When using electrical appliances, basic
precautions should always be followed,
including the following:
Basic Operation
Safety Warnings
Note: If you require a replacement for any of the items listed below, please quote
their corresponding part numbers:
Replacement Part
Part Number
Photo Frame Stand
27-155-06550200
Mains Adapter
49-501-01001059
Instruction Manual
46-007-45010109
Visit Partmaster.co.uk today for the easiest way
to buy electrical spares and accessories. With
over 1 million spares and accessories available
we can deliver direct to your door the very
next day. Visit www.partmaster.co.uk or call 0844 800 3456 (UK customers only)
Calls charged at National Rate.
This symbol on the product or in the instructions means that
your electrical and electronic equipment should be disposed at
the end of its life separately from your household waste. There
are separate collection systems for recycling in the EU.
For more information, please contact the local authority or your
retailer where you purchased the product.
DSG Retail Ltd • Maylands Avenue • Hemel Hempstead
Herts • HP2 7TG • England
(P.N.: 46-007-45010109)