1
DENON
AM-FM STEREO RECEIVER
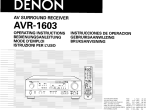
DRA-297
OPERATING INSTRUCTIONS
MODE D'EMPLOI
ENGLISH
FRANCAIS
SAFETY INSTRUCTIONS
DSAFETY PRECAUTIONS
A.
~
ELECTR~C
RISK OF
SHOCK
L--_.=.D.=.O...:..;N=-=O:....:,T......;:O::....:..P.=E:..:....:N:......------l
Read Instructions - All the safety and operating instructions should be read
before the product is operated.
2. Retain Instructions ~ The safety and operating instructions should be
retained for future reference.
3. Heed Warnings - All warnings on the product and in the operating
instructions should be adhered to.
4. Follow Instructions - All operating and use instructions should be followed.
5. Cleaning - Unplug this product from the wall outlet before cleaning. Do not
use liquid cleaners or aerosol cleaners.
6. Attachments - Do not use attachments not recommended by the product
manufacturer as they may cause hazards.
7. Water and Moisture - Do not use this product near water - for example,
near a bath tub, wash bowl, kitchen sink, or laundry tub; in a wet basement;
or near a swimming pool; and the like.
8. Accessories - Do not place this product on an unstable cart, stand, tripod,
bracket, or table. The product may fall, causing serious injury to a child or
adult, and serious damage to the product. Use only with a cart, stand,
tripod, bracket, or table recommended by the manufacturer, or sold with
the product. Any mounting of the product should
follow the manufacturer's instructions, and should
use a mounting accessory recommended by the
manufacturer.
9. A product and cart combination should be moved
with care. Quick stops, excessive force, and
uneven surfaces may cause the product and cart
combination to overturn.
10. Ventilation - Slots and openings in the cabinet are provided for ventilation
and to ensure reliable operation of the product and to protect it from
overheating, and these openings must not be blocked or covered. The
openings should never be blocked by placing the product on a bed, sofa,
rug, or other similar surface. This product should not be placed in a built-in
installation such as a bookcase or rack unless proper ventilation is provided
or the manufacturer's instructions have been adhered to.
11. Power Sources - This product should be operated only from the type of
power source indicated on the marking label. If you are not sure of the type
of power supply to your home, consult your product dealer or local power
company. For products intended to operate from battery power, or other
sources, refer to the operating instructions.
12. Grounding or Polarization - This product may be equipped with a polarized
alternating-current line plug (a plug having one blade wider than the other).
This plug will fit into the power outlet only one way. This is a safety feature.
If you are unable to insert the plug fully into the outlet, try reversing the
plug. If the plug should still fail to fit, contact your electrician to replace
your obsolete outlet. Do not defeat the safety purpose of the polarized
plug.
1.
It..
~
CAUTION:
TO REDUCE THE RISK OF ELECTRIC SHOCK; DO NOT REMOVE
COVER (OR BACK). NO USER-SERVICEABLE PARTS INSIDE.
REFER SERVICING TO QUALIFIED SERVICE PERSONNEL.
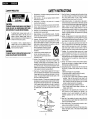
The lightning flash with arrowhead symbol, within an
equilateral triangle, is intended to alert the user to the
presence of uninsulated "dangerous voltage" within the
product's enclosure that may be of sufficient magnitude to .
constitute a risk of electric shock to persons.
The exclamation point within an equilateral triangle is
intended to alert the user to the presence of important
operating and maintenance (servicing) instructions in the
literature accompanying the appliance.
WARNING:
TO REDUCE THE RISK OF FIRE OR ELECTRIC SHOCK; DO NOT
EXPOSE THIS APPLIANCE TO RAIN OR MOISTURE.
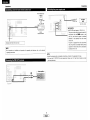
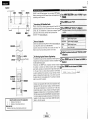
FIGURE A
eXAMPLE OF ANTENNA GROUNDING
AS PER NATIONAL
ELECTRICAL CODE
ANTENNA
LEAD IN
WIRE
ANTENNA
DISCHARGE UNIT
(NEC SECTION 810-20)
GROUNDING CONDUCTORS
(NEC SECTION 810·21)
GROUND CLAMPS
_POWER SERVICE GROUNDING
ELECTRODE SYSTEM
(NEC ART 250, PART H)
NEC - NATIONAL ELECTRICAL CODE
I
13. Power-Cord Protection - Power-supply cords should be routed so that they
are not likely to be walked on or pinched by items placed upon or against
them, paying particular attention to cords at plugs, convenience
receptacles, and the point where they exit from the product.
14. Outdoor Antenna Grounding - If an outside antenna or cable system is
connected to the product, be sure the antenna or cable system is grounded
so as to provide some protection against voltage surges and built-up static
charges. Article 810 of the National Electrical Code, ANSI/NFPA 70,
provides information with regard to proper grounding of the mast and
supporting structure, grounding of the lead-in wire to an antenna discharge
unit, size of grounding conductors, location of antenna-discharge unit,
connection to grounding electrodes, and requirements for the grounding
electrode. See Figure A.
15, Lightning - For added protection for this product during a lightning storm,
or when it is left unattended and unused for long periods of time, unplug it
from the wall outlet and disconnect the antenna or cable system. This will
prevent damage to the product due to lightning and power-line surges.
16. Power Lines - An outside antenna system should not be located in the
vicinity of overhead power lines or other electric light or power circuits, or
where it can fall into such power lines or circuits. When installing an
outside antenna system, extreme care should be taken to keep from
touching such power lines or circuits as contact with them might be fatal.
17. Overloading - Do not overload wali outlets, extension cords, or integral
convenience receptacles as this can result in a risk of fire or electric shock.
18. Object and Liquid Entry - Never push objects of any kind into this product
through openings as they may touch dangerous voltage points or short-out
parts that could result in a fire or electric shock. Never spill liquid of any
kind on the product.
19. Servicing - Do not attempt to service this product yourself as opening or
removing covers may expose you to dangerous voltage or other hazards.
Refer all servicing to qualified service personnel.
20. Damage Requiring Service - Unplug this product from the wall outlet and
refer servicing tQ qualified service personnel under the following
conditions:
al When the power-supply cord or plug is damaged,
bl If liquid has been spilled, or objects have fallen into the product,
c) If the product has been exposed to rain or water,
dl If the product does not operate normally by following the operating
instructions. Adjust only those controls that are covered by the
operating instructions as an improper adjustment of other controls may
result in damage and will often require extensive work by a qualified
technician to restore the product to its normal operation,
e) If the product has been dropped or damaged in any way, and
f) When the product exhibits a distinct change in performance - this
indicates a need for service.
21. Replacement Parts - When replacement parts are required, be sure the
service technician has used replacement parts specified by the
manufacturer or have the same characteristics as the original part.
Unauthorized substitutions may result in fire, electric shock, or other
hazards.
22. Safety Check - Upon completion of any service or repairs to this product,
ask the service technician to perform safety checks to determine that the
product is in proper operating' condition.
23. Wall or Ceiling Mounting - The product should be mounted to a wall or
ceiling only as recommended by the manufacturer.
24. Heat - The product should be situated away from heat sources such as
radiators, heat registers, stoves, or other products (including amplifiers)
that produce heat.
FRANCAIS
FCC INFORMATION (For US customers)
ENGLISH
ONOTE ON USE I OBSERVATIONS RELATIVES A L'UTILISATION
1. PRODUCT
This product complies with Part 15 of the FCC Rules. Operation is subject
to the following two conditions: (1) this product may not cause harmful
interference, and (2) this product must accept any interference received,
including interference that may cause undesired operation.
2. IMPORTANT NOTICE: DO NOT MODIFY THIS PRODUCT
This product, when installed as indicated in the instructions contained in this
manual, meets FCC requirements. Modification not expressly approved by
DENON may void your authority, granted by the FCC, to use the product.
3. NOTE
This product has been tested and found to comply with the limits for a Class
B digital device, pursuant to Part 15 of the FCC Rules. These limits are
designed to provide reasonable protection against harmful interference in a
residential installation.
This product generates, uses and can radiate radio frequency energy and, if
not installed and used in accordance with the instructions, may cause
harmful interference to radio communications. However, there is no
guarantee that interference will not occur in a particular installation. If this
product does cause harmful interference to radio or television reception,
which can be determined by turning the product OFF and ON, the user is
encouraged to try to correct the interference by one or more of the following
measures:
• Reorient or relocate the receiving antenna.
• Increase the separation between the equipment and receiver.
• Connect the product into an outlet on a circuit different from that to
which the receiver is connected.
• Consult the local retailer authorized to distribute this type of product or
an experienced radio!TV technician for help.
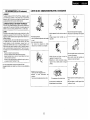
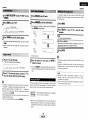
• Do not let foreign objects into the apparatus.
• Keep the apparatus free from moisture, water, and • Ne pas laisser des objets etrangers dans I'appareil.
dust.
• Avoid high temperatures.
• Proteger I'appareil contre I'humidite, I'eau et
Allow for sufficient heat dispersion when installed
lapoussiere.
in a rack.
• Eviter des temperatures elevees
Tenir compte d'une dispersion de chaleur
suffisante lors de I'installation sur une etagere.
• Do not let insecticides, benzene, and thinner come
in contact with the apparatus.
using the
• Unplug the power cord when not
• Ne pas mettre en contact des insecticides, du
apparatus for long periods of time.
benzene et un diluant avec I'appareil.
• Debrancher Ie cordon d'alimentation lorsque
I'appareil n'est pas utilise pendant de longues I - - - - - - - - - - - - - - - - - - - - - - i
periodes.
This Class B digital apparatus complies with Canadian ICES-003.
Cet appareil numerique de la c1asse Best conforme a la norme NMB-003 du
Canada.
• Handle the power cord carefully.
Hold the plug when unplugging the cord.
• Manipuler Ie cordon d'alimentation avec
precaution.
Tenir la prise lors du debranchement du cordon.
~
o{/ ----
-
* (For apparatuses with ventilation· holes)
• Do not obstruct the ventilation holes.
• Ne pas obstruer les trous d'aeration.
n
• Never disassemble or modify the apparatus in any
way.
• Ne jamais demonter ou modifier I'appareil d'une
maniere ou d'une autre.
ENGLISH
Thank you for choosing the DENON DRA-297 AM-FM Stereo Receiver. This remarkable component has been engineered to provide outstanding high fidelity reproduction of your favorite music sources.
As this product is provided with an immense array of features, we recommend that before you begin hookup and operation that you review the contents of this manual before proceeding.
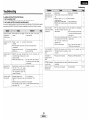
Contents
Accessories·····
·········2
Before using
·······························2
Cautions on installation
·····································2
About the remote control unit
·.. ·· ····3
Inserting the batteries····································································3
Operating range of the remote control unit .. ·.:···· .. ·.. ·.. ··· .. ·...... ····3
Part names and· functions
Front panel·····················································································4
Display .. ··················· .. ········ .. ·· .. ····· .. ····· .. ······ .. ····· .. ·············· .. ·.. ····· ..4
Rear panel··· ·.. ·.. ··· ·· .. ········· .. ········· .. ··········· .. ···· .. ···
·5
Remote control unit· .. ·· .. ·.. ······· .. ·· .. ············ .. ····· .. ······ ········· .. ··5, 6
:.. ······················6
Cable indications
Speaker connections······································································7
Connecting a DVD player and monitor········································8
Connecting a. TV/DBS tuner·
···8
Connecting a CD player ·································································8
Connecting a tape deck, CD recorderorMD recorder.. ·.. ·..........8
Connecting a VCR···········································································9
Connecting the antenna terminals ···············································9
Connecting the XM terminal··········
·10
Connecting the·iPod8
·····················10
Connecting a room-to-room remote control unit
·
11
Connecting the PRE OUT terminals
·
·.. ·
·
11
Connectil1g the power supply -cord··········································· ·11
.
Before operating,
·12
·12
Playing the input source
Turningthe-soundoff temporarily (MUTING)· .. ··· .. ··· .. ·· .. ····· .. ·······12
Listening over headphones··· .. ······· .. ·
······ .. · ······· .. ·· ·· .. ···· ·12
Switching the front speakers
·12
13
Checking the currently playing program source, etc
Switching' the brightness of the display·· .. ·.. ·;· .. ·· ········ .. ·· ···· ·13
Selecting the play mode (PURE DIRECT)
·.. ·
· · ·.. ·.. 13
Setting the tone-.control
·······13
Adjusting the speaker volume .. ··· .. ····· .. ·.. ·· .. ·· .. ·· .. ····· .. ·.. ··· ······ ·13
Combining. the. currently' playing sound
with the desired image (VIDEO SELECT function)······ ··············13
Listening to the radio···································································14
Auto preset memory,··· .. ············ .. ··
·14
Auto tuning·······················:···················· ···································14
Manual tuning
~
··14
Preset memory············································································14
Recalling preset stations .. ····· .. ········ .. ············ .. ·· .. ··· .. ···· .. ···· .. ······· ·14
XMSatellite.· Radio·················
·15
·.. 15
Checking the XMsignal strength and Radio ID .. ·.. · ·.. ·
Channel selection .. ··· ······ .. ····· ········· .. ··· ·· ······· .. ···· .. ······· ·16
Category' search
·16
·.. ·.. ·.. · ·
·
16
Direct access of channels·
Playing the iPod8
·16
·16
Setting the iPodAssignment
Listening to·music········································································17
Listening to music in the Browse mode .. ·.. ·.... ·.... ·...... ·..........·.. ··17
Viewing still pictures and· videos (only for iPods
equipped with the slideshow I video function)
18
·18
Disconnecting theiPod···· .. ··
Recording the .program source
(recording the <sourc:e currel1tlybeingmonitored)··················· ·18
Aboutthememoryfunetiolls····
·18
Initialization of themicroproce~sor·········
·18
n
1
ENGLISH
•••••••••••• •••• ••• • ••••••
Operating DENON audio components· · ·
·
·19
Setting the preset memory function········································· ·19
Operating a component stored in the preset memory····20 - 22
Setting the punch through function···········································23
ENGLISH
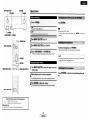
Getting Started
Accessories
Cautions on installation
Before using
Check that the following parts are attached in additio!1 to the main
unit:
CD Operating instructions
1
1
1
1
2
1
1
@ Warranty (for North America model only)
® Service station list
® Remote control unit (RC-1 053)
® R6P/AA batteries
® AM loop antenna
(j) FM indoor antenna
®
@
Pay attention to the following before using this unit:
• Moving the unit.
To prevent short-circuits or damaged wires in the connection cables,
always unplug the power supply cord and disconnect the connection
cables between all other audio components when moving the unit.
Note:
For heat dispersal, do not install this unit in a confined space
such as a bookca"se or similar enclosure.
• Cautions on using mobile phones.
Using a mobile phone near this unit may result in noise. If so, move
the mobile phone away from this unit when it is in use.
• Before turning the power operation button on.
Check once again that all connections are correct and that there are
not problems with the connection cables. Always set the power
operation button to the standby position before connecting and
disconnecting connection cables.
• Store the operating instructions in a safe place.
®
After reading the operating instructions, store them in a safe place
as they could come in handy in the future.
• Whenever the power operation button is in the STANDBY state,
the unit is still connected to AC line voltage.
Please be sure to turn off the power operation button or unplug
the cord when you leave home for, say, a vacation.
• Note that the illustrations in these instructions may differ from
the actual unit for explanation purposes.
2
ENGLISH
Wall
ENGLISH
Getting Started
Getting Started
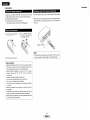
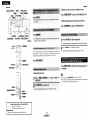
About the remote control unit
In addition to controlling the DRA-297, the attached remote control
unit (RC-1053) can also be used to control the following products:
CD DENON component products
@ Component products other than DENON:
• Set using the preset memory function (~page 23).
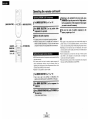
Operating range of the remote control unit
• Point the remote control unit at the remote sensor when operating
it.
• The remote control unit can be used from a distance of approximately
23 feet/7 meters, at a horizontal angle of up to 30° with respect to
the sensor.
Inserting the batteries
CD
Remove the remote control
unit's rear cover.
@ Set two· R6P/AA batteries in
the battery compartment in
the indicated direction.
Approx. 23 feet/7 m
NOTE:
®
Put the rear cover back on.
• It may be difficult to operate the remote control unit if the remote
sensor is exposed to direct sunlight or strong artificial light.
Notes on batteries:
• Replace the batteries with new ones if the set does not operate
even when the remote control unit is operated nearby the unit.
(The attached batteries are only for verifying operation.)
• When inserting the batteries, be sure to do so in the proper
direction, following the "ffi" and "e" marks in the battery
compartment.
• To prevent damage or leakage of battery fluid:
• Do not use a new battery together with an old one.
• Do not use two different types of batteries.
• Do not short-circuit, disassemble, heat or dispose of batteries
in flames.
• Remove the batteries from the remote if it will not be in use for
long periods.
• If the battery fluid should leak, carefully wipe the fluid off the
inside of the battery compartment and insert new batteries.
• When replacing the batteries, have the new batteries ready and
insert them as quickly as possible.
3
ENGLISH
ENGLISH
Getting Started
Getting Started
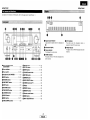
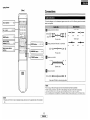
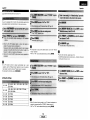
Part names and functions
For details on the functions of these parts, refer to the pages given in parentheses ( ).
....................
I-I-~
o Signal channel indicator
Lights when the preset channel is displayed at
8·
f) Information display
(
suu:
)
8
Volume indicator
This displays the volume level.
e STEREO indicator
This lights when an FM stereo broadcast has
been received.
o Power operation button
(ON/STANDBY) ··················
······ .. ··· .. ·· .. ···(12)
f) Power indicator
8
Power switch ·
···(12)
·.. ·
·.. ·.. ·.. ·.. ··
·
·(12, 18)
e Headphones jack (Pt:l0NES)
·(12)
e MODE button
·(14, 18)
o SPEAKER buttons······································(12)
8
8
d9 SELECT knob········
·(13, 17)
4D CH VOL button···········································(13)
4i ENTER button ········ .. ····················· .. ·····(17,18)
~ VOLUME control knob··············
·(12)
i> MUTING button·········
·(12)
~ DIMMER button ·········································(13)
~
VIDEO SEL~CT button
PURE DIRECT button .. ·· .. ·· .... ·· .... ·· .... ····· .. ··(13)
@l TUNING buttons (.,
SHIFT button ··············································(14)
@) Display
··(13)
T) ········ .. ······ .. ···········(14)
~
····(4)
0XM RADIO button .. ······················.. ············(16)
~ PRESET buttons·········································(14)
~
····(13)
~
MEMORY button .. ·········
·····(14)
·.. (13)
~
Remote control sensor·
·(3)
TONE DEFEAT button· .,
_ LOUDNESS button
e STATUS button·
··· .. (13)
~ MENU button·······································(16, 17)
~ BAND button························ .. ····················(14)
@) INPUT SELECTOR knob
(12)
4D TONE CONTROL button .. ··············· .. ·········(13)
4
ENGLISH
..... ..... ..... ..... ..... ~~~~~ I
: _
•••••
_ - - - I
e AUTO indicator
This lights when the broadcast station is
selected in the AUTO tuning mode.
o TUNED indicator
This lights when an FM/AM broadcast has been
received.
ENGLISH
Getting Started
[ Front]
r - - - - - - - - t Remote control signal
transmitter······ .. ·············· .. (3)
f~~~mmm~
:[?j,R
f~
i.
t~
I
Indicator
AC12ll\1l1llHz
'"
I
SHIFT buttons·
TDTALl2OW1IA.1MAX.
(14l
.
=
=
=
=
=
=
=
I
11------
,·(19) 1"-------------1
.
~---Ipowerbuttons
(12l
I
CHANNEL buttons .. ·...... (14)
Input source selector
buttons ·····························(12)
=
I
System buttons· ...... ·(20, 23)
o AUDIO OUT terminals·································(8) o Power supply cord·····································(11)
SUBWOOFER PRE OUT terminal
·· ·(11)
o VIDEO OUT terminals · · ·· ··· .. ··· .. ·.. ·..
AUDIO IN terminals ...... ·· ...... ·.. ·· .. ·
·· .. ·(8)
4D> DOCK CONTROL jack
···
·
·
e PRE OUT terminals···································· (11 ) 4D XM terminal
8
8
o VIDEO IN terminals
o Speaker terminals·
f) AC outlets·····················
11-----Volume control
~---t buttons
(12)
·(8)
·(10)
MUTING button .......... ·.. ·(12)
·(10)
·(8)
(7)
48 ANTENNA terminals · ··
4& REMOTE CONTROL jacks········
·
~------lIDIMMER
·(9)
·(11)
button
(13l
Cursor buttons
··(11)
(~,
\1, <1, [»· ........ ·.. (16 ,.., 18)
ENTER button ........ ·.. (17, 18)
STATUS button
·(13)
VIDEO SELECT
button······························(13)
PURE DIRECT/SET UP
button······························(13)
Mode selector
switches
·
·(12, 19)
DENON
RC-'053
NOTE:
• If buttons on the front or rear are pressed strongly, the button on the opposite side will be activated
too.
5
ENGLISH
I
ENGLISH
Getting Started
[ Rear]
Connections
Cable indications
---------------------,
VD/VDP
VCR
DBS/CABLE
TV
Power buttons·············· .. (20) 1---~Q
The hookup diagrams on the subsequent pages assume the use of the following optional connection
cables (not supplied).
__ .92__ Q __ .92j
I
III
Number buttons
(0 - 9, +10) ·· .. ····· .. ·····(14,20)
I
BAND button ·.. ···· .... ····.. ·(14)
(White) ~
I~-"""""'--
Audio signal
Analog connections (Stereo)
(Red)
~
~r-c::
IN
~~----tMODE
Input source selector
buttons···························· (12)
III
button· .. ·.. ······(14, 18)
OUT
IN
Video signal
Pin-plug cable
Memory block
buttons (A - G) ·········· .... ·(14)
OUT
Analog connections (Monaural, for subwoofer)
IN
MEMORY button .. ········· ·(14)
OUT
OUT
IN
Pin-plug cable
Ii
TUNING buttons ···· .. ······(14)
Speaker connections
+
+
Speaker cable
iii
=
=
=
=
=
Video connections
(Yellow) ~
~_.---;~Ia(--~
~
Video cable (75 Q/ohms video pin-plug cable)
NOTE:
• Do not plug in the power supply cord until all connections have been completed.
• When making connections, also refer to the operating instructions of the other components.
• Be sure to connect the left and right channels properly (left with left, right with right).
• Do not bundle power cords together with speaker cables. Doing so could result in humming or noise.
NOTE:
• If buttons on the front or rear are pressed strongly, the button on the opposite side will be activated
too.
6
ENGLISH
ENGLISH
Connections
Connections
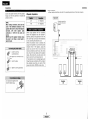
o Connections
Speaker connections
Connect the speaker terminals with the speakers
making sure that like polarities are matched (€f)
with €f), 8·with 8).
NOTE:
When making connections, take care that
none of the individual conductors of the
speaker cable come in contact with adjacent
terminals, with other speaker cable
conductors, . or with ~he rear panel and
screws.
NEVER touch the speaker terminals when
the power is on. Doing so could result in
electric shocks.
~
S~
~
1. Loosen by turning
counterclockwise.
Either tightly twist or terminate the core
wires.
2. Insert the cable.
{}Jl
~
'
0
• When making connections, also refer to the operating instructions of the other components.
Speaker impedance
I Subwoofer I
[J
e:
~
.00'
Note on speaker impedance
When using speakers with an impedance
below the designated value (for example 4
Q/ohms), playing for long periods of time with
the volume high could cause the temperature
to rise, activating the protection circuit.
When the protection circuit is activated, the
output to the speakers is cut off and the power
indicator blinks. If this happens, unplug the
power cord, wait for the set to cool off and
improve ventilation around the unit. Also check
the wiring of the input cables and the speaker
cables. After doing this, plug the power cord
back in and turn the unit's power back on.
If the protection circuit is activated again even
though there are no problems with the wiring or
the ventilation around the unit, switch off the
power and contact a DENON service center.
insert the banana plug.
~IN
DD
3. Tighten by turning clockwise.
Turn clockwise to tighten, then
Connection terminal for
subwoofer with built-in
amplifier.
~
:b~~
~,~
~~~
7
ENGLISH
DD
Speakers
Speakers
(8)
(A)
ENGLISH
Connections
Connections
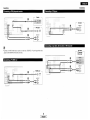
Connecting a DVD player and monitor
Connecting a CD player
m
CD player
AUDIO OUT
[
~~0L
~~0R
Connecting a tape deck, CD recorder or MD recorder
• Connect a non-DVD video disc player (such as a laser disc, VCD/SVCD, or future high definition disc
player) to the DVDNDP terminals in the same way.
Tape deck!
CD recorderl
MD recorder
Connecting a TV IDBS tuner
8
ENGLISH
ENGLISH
Connections
Connections
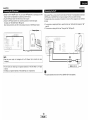
o AM loop antenna assembly
Connecting a VCR
.::==::===i;;;;;;;;=====;;;;;"'---I:1lIIr-- OJ
e:fI8;;
~
r;;
Video deck
CD
.
,...-----.. . . -:. IJ-. G v~u~o
I1l 0
~etheVinYI~ ~
@)
tt!l
a. With the antenna
top any stable
surlace.
1. Push the lever.
®
0
and take out the
connection line.
Gct~~D
Connect to the AM
antenna terminals.
M\
Bend in the reverse
direction.
on~.
j!<~
..
0
~
2. Insert the conductor.
3. Return the lever.
Mount
b. With the antenna
attached to a wall.
Installation hole Mount on wall, etc.
Connecting the antenna terminals
>
NOTE:
An F-type FM antenna cable plug can be connected directly.
• Do not connect two FM antennas
simultaneously.
• Even if an external AM antenna is used, do
not disconnect the AM loop antenna.
• Make sure the AM loop antenna lead
terminals do not touch metal parts of the
panel.
Direction of broadcasting station
"-
AM loop antenna
(Supplied)
FM antenna
75 Q/ohms Coaxial
cable
~,--....--.....
I
~
FM indoor antenna (Supplied)
AM outdoor antenna
Ground
9
ENGLISH
Note to CATV system installer:
This reminder is provided to call the CATV
system installer's attention to Article 820-40 of
the NEC which provides guidelines for proper
grounding and, in particular, specifies that the
cable ground shall be connected to the
grounding system of the building, as close to
the point of cable entry as practical.
ENGLISH
Connections
connections
Connecting the iPod®
Connecting the XM terminal
• DRA-297 is the XM Ready® receiver. You can receive XM® Satellite Radio by connecting to the XM
Passport System (sold separately) and subscribing to the XM service.
• Plug the XM Passport System into XM terminal on the rear panel.
• Position the XM Passport System near a south-facing. window to receive the best signal.
For details, see "XM Satellite Radio" (~page 15).
When making connections, also refer to the operating instructions of the XM Passport System.
When using an iPod, you must connect the Control Dock for iPod (ASD-1 R, sold separately) and the DOCK
CONTROL jack on the DRA-297 with a mini-jack and assign the iPod to any AUDIO terminal(s).
The diagram below shows an example of connections for when the iPod is assigned to the CD-RfTAPE
terminals.
* For instructions on assigning the iPod to a specific terminal, see "Setting the iPod Assignment"
page 16).
* For instructions on playing the iPod, see "Playing the iPod"
16).
(~
(~page
XM Passport System
, . - - - iPod -------..
~ ' J r - - a -
---'l
~~~----------cCt
NOTE:
~(
fit
• Keep the power supply cord unplugged until the XM Passport System connection has been
completed.
'-------Cl-::::>--t~
AUDIO OUT
Monitor (8 VIDEO IN)
• The XM name and related logo are registered trademarks of XM Satellite Radio Inc. All rights
reserved.
• XM Ready is a registered trademark of XM Satellite Radio Inc. All rights reserved.
• The optional standard Control Dock for iPod is DENON ASD-1 R sold separately.
10
ENGLISH
ENGLISH
Connections
Connections
Connecting the power supply cord
Connecting a room-to-room remote control unit
RC-617 Infrared sensor
AC outlet
(wall)
AC 120 V, 60 Hz
AUX OUT
!i~~~"'-""~----~I1111111-"'~~~---------....iJ
!l.===============;i!
AC OUTLETS
• SWITCHED (total capacity - 120 W (1 A))
The power to the outlet is turned on and off in
conjunction with the POWER switch on the
main unit, and when the power is switched
between on and standby from the remote
control unit.
No power is supplied from this outlet when
this unit's power is at standby. Never connect
equipment whose total power consumption
exceeds 120 W (1 A).
RC-616
Infrared retransmitter
NOTE:
• For instructions on installation and operation of separately sold devices, refer to the devices'
operating instructions.
NOTE:
• Insert the plugs securely. Incomplete connections will result in the generation of noise.
• Only use the AC OUTLETS for audio equipment. Never use it for hair driers, monitors or other
electrical appliances.
Connecting the PRE OUT terminals
Ii
Power amplifier
11
ENGLISH
ENGLISH
INPUT SELECTOR
<SPEAKER>
MUTING
VOLUME
Operation
Before operating
~
.f.=r
~
~
©.Q
.~ :.~
©I.Q
. .•.; ;
.
• Canceling MUTING mode:
To cancel the muting mode, either press MUTING or adjust the
volume.
<POWER>
<ON/STANDBY> <PHONES>
3 Set [MOD'E :SELECTOR 2] to "CD/iPod".
4 Press
lIQIlV> or [POWER ON].
.
Connect the headphones to <PHONES>.
• No' sound is produced from the speakers automatically.
• The power in€licatmblinks green and the power turns on.
NOTE:
• To prevent hearing loss, be careful not to raise the volume level
excessively when using headphones.
Playing the input source
Press <SPEAKER> to turn the corresponding speaker pair
on.
INPUT SELECTOR
<
About the button names in this explanation
: Buttons on the main unit
]
: Buttons on the remote control unit
>
[
Button name only:
Buttons on the main unit and remote control unit
12
ENGLISH
ENGLISH
Operation
Operation
o When you do not want to adjust the tone
Press <TONE DEFEAT> to select "TONE DEFEAT ON".
o When listening with the volume turned low
~
~I~URE
<ON/STANDBY>
Press <LOUDNESS> to select "LOUDNESS ON".
F·· ~l~======j- ~
~ELECT>
DIRE:7:LOUDNESS>
<TONE DEFEAT> <TONE CONTROL>
<CH VOL>
* The brig
1 Press <CH VOl> to sekct the Speaker.
display can also betur
* The settable speaker switches each time this button is pressed.
2 Use <SELECT> to adjust the volume.
This mode reproduces the sound with extremely high quality. The
audio signals do not pass through the tone circuits, etc., and the
display that could affect the audio signals are turned "OFF".
DIMMER
STATUS
PURE DIRECT ---:'~.--..;.;I<.
* Can be adjusted within the range of -12 dB to +12 dB.
Combining the currently playing sound with the
desired image (VIDEO SELECT function)
Press PURE DIRECT.
VIDEO SELECT
Press VIDEO SELECT until the desired image appears on
the display.
o Adjusting the tone
• To cancel, press VIDEO SELECT to select "SOURCE".
• The video source selected with the video select function is stored in
the memory for the different input sources.
BAND ---';~_~':.~
[MEMORY BLOCK]
I"'
[TUNER]--------.-....-...r-
~III
MODE
MEMORY
TUNING
About the button
: Buttons on the
[
]
: Buttons on the
Button name only:
Buttons on the main unit
<
>
names in this explanation
main unit
remote control unit
and remote control unit
13
ENGLISH
ENGLISH
Operation
operation
Listening to the radio
Check that the remote control unit is set to A".
II
This unit is equipped with a function for automatically searching for
FM broadcast stations and storing them in the preset memory.
• If tuning does not stop at the desired station, use to the "Manual
tuning" operation.
• "AM" or "FM" can be selected directly by pressing [FM/AM].
• If an FM station cannot be preset automatically due to poor
reception, use the "Manual tuning" operation to tune in the station,
then preset it using the manual" Preset memory" operation.
• To interrupt this function, pres's <ON/STANDBY>.
o Default settings
A1 -A8
B1 - B8
C1-C8
D1 - D8
E1,.., E8
F1 ,.., F8
G1,..,G8
87.5/89.1/98.1 /107.9/90.1 /90.1 /90.1 /
90.1 MHz
520/600/1000/ 1400/1500/1710 kHz,
90.1 / 90.1 MHz
90.1 MHz
90.1 MHz
90.1 MHz
90.1 MHz
90.1 MHz
•
• When the manual tuning mode is set, FM stereo broadcasts are
received in monaural and the "STEREO" indicator turns off.
• "AM" or FM" can be selected directly by pressing [FM/AM].
II
14
ENGLISH
• To preset other channels, repeat steps 2 to 4.
A total of 56 broadcast stations can be preset - 8 stations (channels
1 to 8) in each of blocks A to G.
ENGLISH
Operation
Operation
<INPUT SELECTOR>
BAND
STATUS
TUNING
XM Satellite Radio
<SELECT>
DRA-297 is the XM Ready receiver. You can receive XM® Satellite
Radio by connecting to the XM Passport System (sold separately) and
subscribing to the XM service.
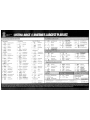
o Introducing XM Satellite Radio
There's a world of audio listening pleasure beyond AM and FM. XM
Satellite Radio. Select from over 170 channels of music, news, sports,
comedy, talk, and entertainment. Coast-to-coast coverage. Digital
quality sound. With all music channels 1000/0 commercial free.
Questions?: Visit www.xmradio.com.
XM RADIO
[
IIi ~
o How to Subscribe
-:::::=-:=:~
Listeners can subscribe by visiting XM on the Web at www.xmradio.com
or by calling XM's Listener Care at (800) 967-2346.
Customers should have their Radio ID and credit card ready. The
Radio I'D can be found by selecting channel 0 on the radio.
~
Ii~~~cc(QSc iI
MENU
STATUS
li~.·il
i~c'S?
II
"S=;>
[NUMBER]
(0 - 9, +10)
BAND ----:.~ ...·J:I
ENTER
.~ i I [~ V <11>]
!
TUNING
About the button
: Buttons on the
[
]
: Buttons on the
Button name only :
Buttons on the main unit
>
It is prohibited to copy, decompile, disassemble, reverse engineer, or
manipulate any technology incorporated in receivers compatible with
the XM Satellite Radio system.
Furthermore, the AMBE® voice compression software included in
this product is protected by intellectual property rights including
patent rights, copyrights, and trade secrets of Digital Voice Systems,
Inc. The user of this or any other software contained in an XM Radio
is explicitly prohibited from attempting to copy, decompile, reverse
engineer, or disassemble the object code, or in any other way convert
the object code into human-readable form. The software is licensed
solely for use within this product.
[SEARCH]
[TUNER] ---:..,;;,;"",;;;;;~
<
o A Warning Against Reverse Engineering
names in this explanation
main unit
remote control unit
Hardware and required $12.95 monthly service subscription sold
separately. Other fees and taxes, including a one-time activation
fee may apply. Subscription fee is consumer only. All fees and
programming subject to change. Channels with frequent explicit
language are indicated with an XL. Channel blocking is available for
XM radio receivers by calling 1-800-XMRADIO. Subscriptions subject
to Customer Agreement available at xmradio.com. XM service only
available in the 48 contiguous United States. ©2006 XM Satellite
Radio Inc. All rights reserved.
and remote control unit
15
ENGLISH
4 cAdjust the 8ntennalacatiml wttil "stGNR:GD0D"
is displayed.
6 Press TUNING to select chauneI8(XM08&}.
I
/ri0ti0
Rad;
Co
ID ;;J-Radio
ENGLISH
Operation
operation
It is possible to assign the Control Dock for iPod's (ASD-1 R, sold
separately) audio and video signals to any input terminals on the DRA297 and play them.
R" orpress
cj
~lL
I
I
.s .-• .s
.-.
1 Press MENU.
select "XM".
2 PressBAN
,
Channel number
:-.
-:-
LJeeFo'
n:s
I
;;;+c
nel name
sired channel.
123 (ex.XM 123)
2 Use <SELECT> or press ['<1 t>] to select the ~pnt
terminals.
NONE:
This is the factory default setting.
DVD, VCR, \/.A, CDR, CD:
* The channel changes continuously when you press and hold
TUNING.
* When· the artist name and song title are received, they are
When using a' Control Dock for iPod, it is possible to connect with
the audio input terminal of the assigned function.
displayed.
I ~\M123
3 Press ENTER.
(Remote control
1 Press ['<1 I>lintbe Qlmoie.
iSdiSPlay~
30nce aIlnumber havebeeninpnt, press ENTER to
change the channel.
• Tnecurrentcategory name
I
CAT :
Roc k
P-
Channel category
2 Press
[ '<1.l>] to select the category, and press [~ \7] to
select the channel within the selected category.
* If the next [NUMBER] is·· not pressed within several seconds, the
channel automaticalfyswitches to the channel number that was
input.
Playing the iPod®
u
• uLOADING is displayed while receiving the channel or information.
• uUPDATING" is displayed while updating encryption code.
• When the selected channel is not available, UXM - is displayed.
• Information on the artist name, song title, category and signal level
can be checked using STATUS.
• The XM Satellite Radio channels can be preset in the same way as
AM/FM band (~page 14).
• uXM" can be selected directly by pressing XM RADIO.
The music recorded on the iPod can be played when using a Control
Dock for iPod (ASD-1 R, sold separately). The iPod can be controlled
using the buttons on the main unit and the remote control unit.
_II
iPod is a trademark of Apple Computer, Inc., registered
in the U.S. and other countries.
* With the iPod, non-copyrighted contents and contents that may be
legally reproduced or played may be reproduced and played by
individuals for their personal use. Violating copyrights is prohibited
by law.
16
ENGLISH
• The optional standard Control Dock for iPod is DENON ASD-1 R sold
separately.
• To assign to a different function after a function has already been
assigned, switch to a function other than the one that is assigned
then repeat the procedure.
NOTE:
• DENON will accept no responsibility whatsoever for loss or
damage of data on an iPod occurring when the iPod is used
connected to the DRA-297.
• Some of the functions may not operate, depending on the type
of iPod and the software version.
ENGLISH
Operation
Operation
MODE
STATUS
MEMORY
~1~f
I-:;OVVER><SPEAKER>
ENTER
MENU
<SELECT>
<ON/STANDBY>
[POWER OFF]
---++-8
j
!
I''''
jtQ~ ;;r':,,'
I
1:0. -1"'\\ (f~ !
INPUT SELECTOR ---++! ~·~'-·cD~;,1
I:.Q..Q..QJI
I
* If the screens a... e are not displayed, the iPod may not be
,>,
properly
CD
connected~. Check
the
ions .andse1ttin!Js.
4 Operateusing MENU, <SELECT>, lAV<l t>], and
10°!
ENTER wblle watching the iP~'s screen.
Shuffl
Press
DRY.
The mode switches as follows each time MEMORY is pressed.
• Shuffle Songs: Single track shuffle
• Shuffle Albums:
Album shuffle
* ·In the Remote mode, only <SELECT>, [h. \l <3 t>], and ENTER can
• The optional standard Control Dock for iPod is DENON ASD-1 R sold
separately.
The mode switches between the Remote mode and the Browse
mode if MODE is pressed for at least 2 seconds.
INPUT SELECTOR
About the button
: Buttons on the
[
]
: Buttons on the
Button name only :
Buttons on the main unit
<
>
MODE
MEMORY
names in this explanation
main unit
remote control unit
and remote control unit
17
ENGLISH
be used.
• When STATUS is pressed during playback, the front panel display
switches between the title name, artist name and album name.
• Depending on the iPod's software version, it may not be possible to
operate the iPod from the DRA-297. Use the latest version of the
software. Information on the latest version of the software can be
obtained on the Apple Computer website.
• With the DRA-297 it is possible to display folder names and file
names on the screen like titles. The DRA-297 can display up to 64
characters, consisting of numbers, capital letters and small letters.
A II?" mark is displayed in place of non-compatible characters.
ENGLISH
Operation
Operation
Recording the program source (recording the
source currently being monitored)
About the memory functions
o Last function memory
The various settings set when the DRA-297's power is switched to
standby are stored in the memory. When the power is turned back on,
the settings made when the power was switched to standby are
recalled.
Use this procedure to view photo and video data stored on the iPod
on a monitor.
o Backup memory
The various settings are stored in the memory for about 1 week, even
when the power is turned off or the power cord is unplugged.
• The AUDIO IN's signal selected with INPUT SELECTOR are output to
the CD-RffAPE and VCR AUDIO OUT terminals.
Initialization of the microprocessor
o Simultaneous recording
• To output photo or video data recorded on the iPod to the monitor,
the iPod's "TV Out" setting (under "Video Settings") must be set to
"ON".
For details, refer to the iPod's operating instructions.
The signals of the source selected with INPUT SELECTOR are output
simultaneously to the CD-RffAPE and VCR REC OUT terminals. If a
total of two tape and/or video decks are connected and set to the
recording mode, the same source can be recorded simultaneously on
every decks.
If the indication on the display is not normal or if the operation of the
unit is not correct, then the microprocessor should be reset by the
following procedure.
1.Switm off the lIDitusiog<POWEB>.
3Check that the entire eli ay is ftasbiDg at l-second
intervals and release the buttons.
• The microprocessor will be initialized.
* The iPod can be disconnected after switching toafunction other
than the one to which the iPod input is assigned.
• If step 3 does not work, start over from step 1.
• If the microprocessor has been reset, all the button settings are
reset to the default values (the values set upon shipment from the
factory).
18
ENGLISH
ENGLISH
Operating the remote control unit
Operating DENON audio components
4.R:ef~rring
to. the included list of preset' codes,. press
[NIUMI:BER]·to input the preset code (a 3-digit number)
for the manufacturer of the component whose signals
youwant·to store in the memory.
[MODE SELECTOR 1] ----:...:....rmmO;:::""-CO'I~~~-- [MODE SELECTOR 2]
5To' store ,the codes of another .component in the
memory, repeat steps 1 to 4.
*
[DVDNDP
POWER ON]
[NUMBER]
(0 - 9, +10)
[TV POWER ON]
det
,
ponen
eratil1g
ctions.
his remote control is compatible with a wide range of
infrared controlled components, it may be the . case that some
component models cannot be operated with this remote control.
Setting the preset memory function
• DENON and other makes of components can be operated by setting
the preset memory.
• This remote control unit can be used to operate components of
other manufacturers without using the learning function by
registering the manufacturer of the component as shown in the list
of preset codes (!&' End of this manual).
• Operation is not possible for some models.
1 Set lM.ODE SELECTOR 1] to "A" or "B".
* Set to
the A· side for· the CD/iPod, TV, DBS/CABLE or DVD
position, andtotheB s' f the CDE or VCR position.
19
ENGLISH
• The signals for the pressed buttons are emitted while setting the
preset memory. To avoid accidental operation, cover the remote
control unit's transmitting window while setting the preset memory.
• Depending on the model and year of manufacture, this function
cannot be used for some models, even if they are of makes listed in
the list of preset codes.
• Some manufacturers use more than one type of remote control
code. Refer to the included list of preset codes to change the
.
number and verify correct operation.
• The preset memory can be set for one component only among the
following: CD/iPod, DBS/CABLE and CD-RITAPE.
ENGLISH
Operating the remote control unit
Operating the remote control unit
Operating a component stored in the preset
memory
[POWER OFF]
(~.~
.•ll~I
[POWER ON]
I r:
1++-- [CHANNEL +-]
8
15 '7~"o'l
I:~':I
I!~!i
:-=-CHANNE
[.],[~],[II],
[.... ~], ---n
[VCR CH + -],
[~~]
[.....l. [SKIP;]
(0..
k(~:~~ I
I:~:\,,--j! I
I~~~) I
1/~~;,-------~~'>7J
i~.
=
0
r
[MODE SELECTOR 1]
[NUMBER] (0 - 9, +10)
® ··@.l·)1
Ii
PLAY
·.: iUs
I
.
~
d
RETURNi
[TOP MENU],
[DISPLAY],
[ENTER], [.6. V <ll>],
[MENU], [RETURN],
[SETUP]
r';":~[MODE
'\
j
\~/
20
ENGLISH
[POWER]
SELECTOR 2]
[BAND], [TVNCR] ~1:::.·_:~.i;:I:::::::;"",B'!1
[AUDIO], [SUBTITLE],
[ANGLE], [PICT ADJ.],
[So MODE]
[TUNING +-]
ENGLISH
Operating the remote control unit
Operating the remote control unit
o Functions of buttons for the different devices
[Front]
CD/iPod
DBS/CABLE
TV
DVD
Power off
CD-R/TAPE
VCR
Power off
Power off
Power off
Power off
Power on
Power on
Power on
Power on
Power on
Power on
Power on
Power on
Power on
Preset -
TV channels -
Channels -
Channels -
Preset -
Preset -
Preset-
Preset -
TV channels -
Preset +
TV channels +
Channels +
Channels +
Preset +
Preset +
Preset +
Preset +
TV channels +
Play
Punch through
Punch through
Punch through
Play
Play
Forward play
Play
Play
Stop
Punch through
Punch through
Punch through
Stop
Stop
Stop
Stop
Stop
Pause
Punch through
Punch through
Punch through
Pause
Pause
AlB switching
Pause
Pause
Disc skip +
Punch through
Punch through
Punch through
Disc skip +
Search (reverse)
Punch through
Punch througn
Punch through
Search (reverse)
Search (reverse)
Rewind
Search (reverse)
Search (reverse)
Search (forward)
Punch through
Punch through
Punch through
Search (forward)
Search (forward)
Fast forward
Search (forward)
Search (forward)
Skip (reverse)
Punch through
Punch through
Punch through
Skip (reverse)
Skip (reverse)
Skip (reverse)
Channel-
Skip (forward)
Punch through
Punch through
Punch through
Skip (forward)
Skip (forward)
Skip (forward)
Channel +
Menu
Menu
Menu
Menu
Top menu
Menu
Menu
Menu
Cursor operation
Cursor operation
Cursor operation
Cursor operation
Cursor operation
Cursor operation
Cursor operation
Cursor operation
Dimmer
Dimmer
Dimmer
Dimmer
Menu
Dimmer
Dimmer
Dimmer
Enter
Enter
Enter
Enter
Enter
Enter
Enter
Enter
Status
Display
Display
Display
Display
Status
Status
Status
Video selection
Return
Return
Return
Return
Video selection
Video selection
Video selection
Pure direct
Pure direct
Pure direct
Pure direct
Set up
Pure direct
Pure direct
Pure direct
21
ENGLISH
Reverse play
Dimmer
Pure direct
I
ENGLISH
Operating the remote control unit
Operating the remote control unit
[Rear]
CD/iPod
1V
Power on/off
Power on/off
Power on/off
Power on/off
Power on/off
Power on/off
Power on/off
Power on/off
Power on/off
Channels
Channels
Channels
Channels
Channels
Channels
Channels
Channels
Channels
FM/AM/XM switching
TVNCR switching
TVNCR switching
TVNCR switching
TVNCR switching
FM/AM/XM switching
FM/AM/XM switching
FM/AM/XM switching
TVNCR switching
Memory block
Audio
Memory block
Memory block
Memory block
Memory block
Subtitle
Memory block
Memory block
Memory block
Memory block
Angle
Memory block
Memory block
Memory block
Memory block
Picture adjust
Memory block
Memory block
Memory block
Memory block
Search mode
Memory block
Memory block
Memory block
DBS/CABLE
CD-RITAPE
DVD
VCR
Tuning +
TV volume +
Volume +
Volume +
TV volume +
Tuning +
Tuning +
Tuning +
TV volume +
Tuning -
TV volume -
Volume -
Volume -
TVvolume-
Tuning -
Tuning -
Tuning -
TV volume-
DENON
HITACHI
(134)
ABC
(007)
DENON
DENON
(111)
(111)
(114)
HITACHI
(108)
CD
CD,@
CD,@
CD
CD
CD,@
Special remarks:
CD It is only possible to set the preset memory for one device per mode. When a new code is preset, the previous code is automatically deleted.
@ Note that the function names of the DVD buttons on the remote control unit may differ for some brands. Check beforehand.
@ The CD, TAPE/CD-R/MD, VCR or DVDNDP buttons can be assigned to a TV or satellite tuner (or cable TV) (~ page 23).
22
ENGLISH
ENGLISH
Operating the remote control unit
Operating the remote control unit
Setting the punch through function
Punch Through" is a function allowing you to operate ~, _, ......, II,
..... , ~, ~ and ~ on CD, DVDNDP, TAPE/CD-R/MD or VCR
components when in the TV or DBS/CABLE mode. By default, nothing
is set.
II
[MODE SELECTOR 1] ~""'""!~ITIlJB;"')_O~'""Zf.¥;:;'~~- [MODE SELECTOR 2]
3 PressIA] D]attheS$le tinle.
4 Input thenumtier of the component you want to set.
. . . . • The indieator starts flashing.
[A]
[0]
23
ENGLISH
ENGLISH
Troubleshooting
Troubleshooting
This unit does not
operate properly when
remote control unit is
used.
If a problem should arise, first check the following.
1. Are the connections correct?
2. Have you operated the receiver according to the Operating Instructions1
3. Are the speakers and other components operating properly?
If this unit is not operating properly, check the items listed in the table below. Should the problem persist,
there may be a malfunction. Disconnect the power immediately and contact your store of purchase.
e
Power has turned off
and the power indicator
is blinking red.
Display not lit and sound
not produced when
POWER switch set to
on.
• Power supply cord not plugged in • Check the insertion of the power
securely.
supply cord plug.
Display lit but sound not
produced.
• Speaker
cables
not
securely.
connected.
• INPUT SELECTOR knob position is •
not appropriate.
• Volume control set to minimum.
•
•
• MUTING is on.
Nothing is displayed on
monitor.
11
Connect securely.
7
Switch to the proper position.
12
Turn volume up to suitable level.
Switch off MUTING.
12
12
• DRA-297's video output terminals • Check that the connections are
and monitor's input terminals are not
correct.
properly connected.
• Monitor's input setting is wrong.
• Set the monitor's input selector to
the terminals to which video signals
are connected.
Copying from DVD to
VCR is not possible.
• Copying between a source such as • Copying is not possible.
DVD and a VCR is not usually
possible, as DVDs are often encoded
with copy-protection signals that
prevent VCR recording.
No sound is produced
from subwoofer.
• Subwoofer's power is not on.
• Subwoofer's initial setting is set to
"NO".
• Subwoofer's output is not connected.
• The subwoofer's channel volume
level is set to "OFF".
8
• Replace with new batteries.
• Move closer.
• Press the proper button.
• Insert batteries properly.
"NO SIGNAL" is
displayed in the XM
mode.
• The signal cannot be received.
"OFF AIR" is displayed
in the XM mode.
• The selected channel is not currently • Select the another channel.
broadcasting.
Receiving only XM
channels 0 and 1.
• The XM Tuner is not activated.
24
ENGLISH
3
• The set's internal temperature has • Put the DRA-297 in a well-ventilated
risen and the protection circuit has
place.
been activated.
• Turn off the power, then wait for the
set to fully cool off before turning the
power back on.
• The core wires of the speaker cables • Check the connections of all the
are touching each other or the DRAspeaker cables.
297's rear panel, activating the
protection circuit.
• DRA-297 is malfunctioning.
• Turn off the power and contact a
DENON customer service center.
• DRA-297's XM connectors and the • Check that
XM Passport System is not properly
correct.
connected.
11
13
3
3
• Remove obstacle.
"CHECK ANTENNA" is
displayed in the XM
mode.
• Turn on the power.
• Set the setting to "YES".
• Connect properly.
• Turn the subwoofer's channel volume
level up.
• Batteries dead.
• Remote control unit too far from this
unit.
• Obstacle between this unit and
remote control unit.
• Different button is being pressed.
• EP> and·
ends of batteries inserted
in reverse.
the
connection
are
• Reposition your XM Passport System.
• Contact XM Radio.
7
7
7
7
10,15
15
15
10,15
ENGLISH
Specifications
o Audio section
• Power amplifier
Rated output:
Output terminals:
• Analog
(LINE input-PRE OUT)
Input sensitivity I input impedance:
Frequency response:
SIN:
Total harmonic distortion:
Rated output:
50 W + 50 W (8 Q/ohms, 20 Hz ,... 20 kHz with 0.08 % T.H.D.)
A or B
4 ,... 16 Q/ohms
A + B
8 ,... 16 Q/ohms
200 mV / 47 kQ/kohms
10Hz,... 100 kHz: + 1, -3 dB (TONE DEFEAT ON)
98 dB (IHF-A weighted) (TONE DEFEAT ON)
0.009 % (-3 dB at rated output, 8 Q/ohms) (1 kHz)
1.2 V
o Video section
• Standard video terminals
Input I output level and impedance:
Frequency response:
o Tuner section
Receiving Range:
Usable Sensitivity:
50 dB Quieting Sensitivity:
SIN UHF-A):
Total Harmonic Distortion (at 1 kHz):
1 Vp-p, 75 Q/ohms
5 Hz ,... 10MHz - + 1, -3 dB
[AM]
[FM]
(note: IJV at 75 Q/ohms, 0 dBf = 1 x 10-15 W)
87.5 MHz,... 107.9 MHz
1.0 IJV (11 .2 dBf)
MONO
1.6 IJV (15.3 dBf)
STEREO
23 IJV (38.5 dBf)
MONO
77 dB (IHF-A weighted)
STEREO
72 dB (IHF-A weighted)
MONO
0.15 % (1 kHz)
STEREO
0.3 % (1 kHz)
520 kHz,... 1710 kHz
18IJV
o General
Power supply:
Power consumption:
Maximum external dimensions:
Mass:
AC 120 V, 60 Hz
3.0A
434 (W) x 147 (H) x 417 (D) mm (17-3/32" x 5-25/32" x 16-27/64")
8.5 kg (18 Ibs 11.8 oz)
o Remote control unit (RC-1053)
Batteries:
External dimensions:
Mass:
R6P/AA Type (Two batteries)
52 (W) x 243 (H) x 21 (D) mm (2-3/64" x 9-9/16" x 53/64")
175 g (Approx. 6.2 oz) (included batteries)
* For purposes of improvement, specifications and design are subject to change without notice.
25
ENGLISH
NGLISH
FRANCAIS
FRANCAIS
ENGLISH'
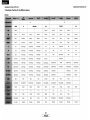
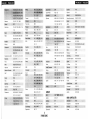
o List of preset codes I Liste de codes preregles
DVD
Asha
Aiwa
JVC
Magnavox
Pioneer
Goldstar
000,006,012,062,088
Mitsubishi
001,003,008,013,014,
017,027,029,039,040,
009
Audiovox
088
Grundig
042
Broksonic
086, 093
Harman Kardon
040, 062
041,045,097
006,011
Montgomery Ward
001,002,007,009,049,
063, 081, 11 5, 11 7
005
Candle
Panasonic
087
006, 087, 088, 089, 090
Hitachi
009,013,023,026,058,
*[108], 109, 110, 111
014
Capehart
025, 055, 056, 071
CCE
095
Multitech
007,009,011,087,090,
094
003, 008
Sony
002,019,020
Zenith
023
Jensen
013,026
NEC
004,005,006,018,026,
029,045,061,062,085
Craig
007,087,088,091,115
Kenwood
004, 005, 006, 026, 029,
Noblex
087
Optonica
021
Perdio
009
Philco
015,016,049
Pilot
088
Portland
025, 055, 090
Pulsar
060
Quasar
034, 035, 049
033, 045, 085, 090
VDP
Cybernex
Magnavox
Panasonic
Pioneer
087
Lloyd
009, 094
Magnavox
015,016,042,049,063,
026
029, 030
028, 031
Daytron
Dumont
106
025, 055
053
Marantz
004,005,006,015,042,
049, 085, 090
Sony
033, 034, 035, 036
Electrohome
001,088,097
MEl
VCR
Emerson
001,009,017,027,086,
08a
Aiko
08~
092,
09~
097,
100, 101, 102, -103, 104,
095
117
Akai
049
Metz
123,124,125,126,127,
128
026, 027, 070, 072, 082,
083, 084
GE
Amstrad
009
007,011,049,050,051,
MGN Technology
052, 073, 080, 087
1
I PRESET CODE I
087
ENGLISH
FRANCAIS
FRANCAIS
Randex
088
Teknika
Bradford
061
Funai
004, 062
Candle
003,030,031,032,038,
GE
020, 036, 037, 040, 044,
058,066,088,119,120,
047,049,050, 122
Realistic
125,147
009,021,031,033,049,
Celebrity
053,081,087,088,091,
094, 097, 098
Unirech
033,041
Victor
046
087
Citizen
Salora
ENGLIS:,
029,030,031,032,034,
038, 047, 049, 050, 054,
005, 045, 046, 085
Grundy
062
Hitachi Pay TV
151
Janeil
122
JC Penny
020,034,039,040,041,
061,095, 122, 123
Videosonic
Sanky
007, 087
Colortyme
081
Cony
Sanyo
032,033,053,087,091,
XR-1000
017,020,086,089,093,
Crown
Zenith
044, 048, 050, 058, 066,
Daewoo
TV
Sentra
125, 136, 159
Dimensia
044
Electroband
046
016,027,046
087
023
Anam
AGC
Symphonic
069, 076, 088, 090, 095,
JVC
019,051,052,072,073,
091,117,126
A-Mark
STS
122
027, 029, 039, 048, 049,
054,055,106, 107, 137
055
Akai
Shogun
029
060, 078, 079
117
Adventura
051,052,061
094
115,116
Scott
003,047,049, 135
Elta
007
038, 056, 057
Kloss Novabeam
005, 122, 127, 131
Loewe
071
Luxman
031
027
006, 007, 036
Envision
003, 007, 033, 038, 039,
038
047,048,049, 133
009, 094
Kenwood
Fisher
Tashiko
009, 088
Audiovox
007, 061
Teac
004, 009, 026, 094
Belcor
047
014,021,063,064,065,
118
Fortress
2
I PRESET CODE I
012
ENGLISH
FRANCAIS
FRANCAIS
Supre-Macy
Pioneer
Marantz
Memorex
MGA
124,128,142
Sylvania
032, 122
Garrard
011
005,010,017,030,078,
General Instrument
030,031,032
131,132,145,155
Jasco
011
079,085,089,101, 127,
015,017,071,080
Price Club
095
144
Proton
035,051,092,129
Tandy
012,121
Magnavox
018
001,039,048,056,057,
Quasar
036, 037, 074, 141
Technics
037
NSC
019
RCA
040,044, 125, 130, 137,
Panasonic
001,005
Pioneer
002, 003, 022
Regency
015
159
Scientific Atlanta
004, 024, 025
Victor
019,073, 126
SL Marx
014
Viking
032, 122
Stargate
014
Tocom
007,016
Unika
011
Universal
010: 011
Zenith
027, 028
014,027,045,083,118,
058,065,081,083
Minutz
151,152
066
Saisho
Montgomery Ward
National
NEC
035,129
Toshiba
008, 014, 034, 063,
027
075~
076,095,097,136,158,
011,020,144,145,146
Sansui
MTC
Tera
139
031,034,039,048,095
002,036,061,147
031,038,039,048,057,
SBR
Scott
015
062
084,086, 135, 147
NTC
054
Zenith
042,114,115,140,144,
149
Optonica
011,012,093,121
Sharp
Panasonic
011,012,013,026,093,
099, 100, 104, 121
CABLE
Sign~ture
045, 144
Archer
010, 011
DBS (SATELLITE)
Sony
043,046, 138, 146, 150
Citizen
011
Chaparral
035, 036
Spectricon
007, 033
Comtronic
014
Drake
037, 038
002,009,017,036,037,
071, 141, 143, 147
3
I PRESET CODE I
ENGLISH
ENGLISH
FRANCAIS
GE
048, 055, 056
Marantz
Panasonic
016,028,035
021
0
-CD
Grundig
070,071,072,073
Onkyo
025, 027
Pioneer
016,017,018
E
:::J
c
ill
~
Hughes Network
063, 064, 065, 069
Philips
014, 032, 033, 035
Technics
021
Kathrein
074, 075, 076, 083
Sears
006
Wards
016
-a
0
~
-0
z
CD
-a
0
~
Nokia
070, 080, 084, 085, 086
Teac
002, 009, 028
*[
Primestar
051
Wards
] : Preset codes set upon shipment from the
factory.
035, 037
*[
RCA
048, 055, 056, 068
Zenith
Sierra I
036
CDR
Sierra ill
036
Philips
STS1
043
MD
STS3
045
Kenwood
003, 004
Technisat
077,078,079,081,082
Sharp
005
Uniden
061
] : Les codes preregles different en fonctiom
des livraison de I'usine.
042
112
TAPE
CD
Aiwa
Carver
Fisher
Kenwood
Aiwa
010, 011
Harman/Kardon
011,012
Kenwood
015
Marantz
011
001,035,043
003, 035
003,008,009,010
011,012,013,014,017
4
I PRESET CODE I
z
z
w
0
0
DVD-555
DVD-755
DVD-900
DVD-910
DVD-955
DVD-1000
DVD-1200
DVD-1500
DVD-1710
DVD-1910
DVD-2200
DVD-2800
DVD-2800n
DVD-2900
DVD-2910
DVD-3800
DVD-3910
DVD-5900
DVD-5910
DVD-9000
DVM-715
DVM-1800
DVM-1805
DVM-1815
DVM-2815
DVM-4800
DVD-800
DVD-1600
DVD-2000
DVD-2500
DVD-3000
DVD-3300
DENON
TOKYO, JAPAN
www.denon.com
Oenon Brand Company, D&M Holdings Inc.
Printed in China 000 511 4540008
<
,
',,"".;
"
,"
,'"
"
~
Z ~~~~;lITE
•
•
x
"
"',"
~~!!~!C,"
_
,
"
,.,,.,
n,
'""
~!I,~n ~ (MI.
... , , "
;r.->Y.
....
'lC'Y.«:~w.,.,.,.>;rfl'7'n>;r,..
~:-',:?
c..,.;r:-:~
~;r{~m~"":.'/.~ojo
~~
,-
"
~
0/"
'
-.
,~
-,<,~~~~~•..,.-",.....",~y,.,.""
,--,"''''
.... III_ _ ~ . ~.• "
,
llig6ancliSwilq/Fmtks
(hri5til~Ro&
lrditionalJilzz
fifti~sfiits
Christj;mrcj>
Smeolllktz
SiKties H~1S
fhdemlau
Gcspel
33
rM:@{:Z4:
S~v~n!ies H~ts
Eigiltiesfiits
4C
NinctiesHits
41
Amenc.nSt"nd.rds
(leep (ii;"k Rack
w;,M9-_
'30sHaidlk&.,.:
Blues
Indie!(allegeRoci.
75
+:=-rR
Gilssic(oul1try
¥
,Fred·
Cassk Alternative
76
fiilefunirrq
'Ws&Today's(GU/1t1y
45
);<s.~I1~J~
AdultAibumfb±
77
Newl\ge
8!oombergRadio
12
Americal!a
;U;
tmm
(lasskR(){K
MSNSC
News 2, lnfcrmatbn
13
hditian,,1 (o~~try
47
l1cllse/?ragressive
B1K Wct!d Service
News &infcmtatior.
Blt:eg,ilss
48
New Hard Ro(\(
ao m%~Ffd~
m *f?'f11)
Dmcel1its
C~SPI\N
Folk
50
AtoustkRo(k
82
&T'!E1
Electmnlci<JTmnw
51
Jam 3andsRrogressive
83
.~
!htc/Cl~S5k Da~(e
52
New/tm~'9if'gl:{(}w
ga
8~J0
R,-,ggaet(m!LatiilH~t5
[onsi!f~ativeTalk
92
tJ!lf?f!JtJ
t~@~Jrf!Y~:tr
;0
11
14
0.!lJ~
c".&f,.~~r-~~~_~
15
16
~i
43
NewConf,tryHits
53
IUtemativeRo(\(
)eJJl,;:;
jf.m1mA
P~d/flad,oreJS~.
54
23
tk:.
14
(!>unny
25
~
1.(}veSo~g5!LitePop
8l
G·';'
~
BeilutifulMusi<
61
Adult COl1teITipOrarj fik,
62
27
Movie )(lund,radls
64
28
Sr,owTune,
55
,~!f[;,JI§i!'il
66
U;:{lli';~\f'
29
~
htem~tioMj
Kits
67
{!d}~""t',}
The Sm.md ofStarb±5
E&,ctic/freeform
XMHD
&:pens& Advke
Reg~@alMeJ(iC<ll1
PmgressiveTaik
'l4
Tmpkai
FOX ~jews Ta!k
95
tatiflhzz
NoV/Sou!
;{tbltR&2fiits
Gral:lCUOC Old 51\(101 R&8
t~~irc ~f~~~P/Ril~ . ,
New &Emergi~g M~sk
Reggae
Pop Hitj
New UnM Hip,Hop'.
Urinn COf'temporilr}'
Radio
TmditionillCl<lsskai
(lpe"aiGils5kal'JoCil!S
17G
&f~~iiY
£hri5tianTaJk
lrud:er>'Chi!@ei
DENON SERVICE NETWORK I
nIXBMm!
Please consult the outlet where the equipment was purchased.
Bitte wenden Sie sich an den Handler, bei dem Sie das Produkt gekaufthaben.
SVP veuillez consulter votre revendeur.
Neemt u alstublieft contact op met het verkooppuntwaar u de apparatuur heeft gekocht.
Por favor consulte en el establecimiento donde compr6 el equipo.
• Van ligen ta kontakt med butiken dar du kopt utrustningen.
• Rivolgetevi al rivenditore che vi ha venduto I'apparecchio.
• Contacte a loja onde comprou 0 equipamento.
• allSJf,jt.A~tla9ii.iM~j]
• iWIDH$JiJffiiJ~*ma9iftj1T~jBj
Australia
Audio Products Group Pty Ltd. 67 O'Riordan Street Alexandria NSW 2015, PO Box 150, Mascot NSW 1460 Australia
Tel: 1300 134400 Fax: +61 2 9578 0159
Austria
Digital-Professional-Audio Vertriebsges.m.b.H., Seebockgasse 59, A-1160 Wien Tel: 01-480-1006 Fax: 01-485-7679
Transtel-Sabima P.v.B.A. Duboisstraat 48, B~2060 Antwerpen, Belgium Tel: 03-237-3607
Belgium
D&M CANADA INC. 5-505 Apple Creek Blvd., Markham, Ontario, L3R 5Bl Tel: 905-475-4085 Fax: 905-475-4159
Canada
E!! 1f~~1fUiPJm ~ (J:.~) fH&.0 'gj J:.~$$~t:p Jf&381 ~ J:.~t:pff rtm3204 ~
China
~i~:(Q21 )639151181~.:(021)63915119 m~~: 200020 ~::t~F~&~1.M~: 021-62949285
EUROSTAR OSTRAVA s.r.o. areal Vodni stavby Praha, budova A2 Dobronicka 635,148 00 Praha 4 Czech Rep.
Czech republic
Tel: 261-112-901 Fax: 261-112~904
Denmark
Hifi Klubben NS Dali Aile 1, 9610 Noerager, Denmark Tel: 45-96 72 10 00 Fax: 45-96 72 10 14
Soundata Oy Hameentie 157 5th floor 00560 Helsinki Finland Tel: +358-(0)9-47693300 Fax: +358-(0)9-47693310
Finland
DEN ON FRANCE A division of D&M France SAS Tour Ventose, 2 rue des Bourets, 92156 Suresnes Cedex, France
France
Tel:+33(0)1-41-383230 Fax: +33(0}1-41-38011 0
DEN ON DEUTSCHLAND A division of D&M Germany GmbH An der Landwehr 19, D-41334 Nettetal, Germany
Germany
Tel: +49(0)2157-1208-0 Fax: +49(0)2157-1208-10
KINOTECHNIKI LTD. 14, PYRGOU STR. 16675, GLYFADA ATHENS Tel: +302109601071 Fax: +302109601072
Greece
DENON ASIA COMPANY LTD. Suite 501, Ocean Centre, Harbour City, 5 Canton Road, Tsimshatsui, Kowloon, Hong Kong
Hong Kong
Tel: 852-2516-6862 Fax: 852-2516-5940
7(nif~(.5.21HI)~~N0'gj ~~f1n~¥j/U].JJUfU~5~$~~$W$,C.\5f1501~ ~~: 852-2516-6862 {$J!:: 852-2516-5940
A.I.DA Audio Kft. 1112 'Budapest Olt u. 37. Hungary Tel: 01-248-2030 Fax: 01-248-2039
Hungary
Einar Farestveit & co hf., Borgartun 28, P.Box 5440, 125 Reykjavik. Tel: +3545207900 Fax: +3545207910
Iceland
Pro FX Dynamic House. 64, Church Street, Bangalore-560 001, India Tel: +91-80-5768-6722 Fax: +91-80-2559-4298
India
PT Autoaccindo Jaya. Cideng Barat NO.7 Jakarta, Indonesia Tel: +62-21-633-2730 Fax: +62-21-632-2886
Indonesia
Newpan Ltd. 14 Rosansky st. Rishon Lezion 75706, Israel. Tel: +972-3-953-5900 Fax: +972-3-961-6193
Israel
Audiodelta S.r.1.19 Via Pietro Calvi 20129 Milano Italy Tel: 39-02-5411-6008/39-02-5412-8253 Fax: 39-02-5412-0258
Italy
SAMWON KOREA Co., Ltd. 1613-13 SEOCHO-DONG, SEOCHO-KU, SEOUL, KOREA 137-070
Korea
Tel: 02-521-1404 Fax: 02-3486-2135
Malaysia
IMS Distribution (M) Sdn. Bhd. No.4, Jalan BP 4/2, Bandar Bukit Puchong, 47100 Puchong, Selangor, Malaysia
Tel: (03)8062 1477 Fax: (03)8062 1468
Labrador, SA de C.v. Callejon del Naranjo 35, Nauealpan, 53560, Edo. Mex., Mexico Tel: 52-5359-5161 Fax: 52-5357-1775
Mexico
Netherlands
Penhold BV Poppenbouwing 58, NL-4191 NZ Geldermalsen, Netherland Tel: 31-345-588080 Fax: 31-345-588 085
New Zealand
Avalon Pacific Marketing Limited. 15e Vestey Drive, Mt Wellington, Auckland, New Zealand.
PO Box 11 631 Ellerslie, Auckland, New Zealand Tel: +64-9-573-5933 Fax: +64-9-573-3720
Norway
Hi-Fi Klubben Marcus Thranes gate 4-6, 0473 Oslo, Norway Tel: +47228063 10 Fax: +4722806329
Philippines
Lotteworld Audio Video Systems Incorporated CET Building Mezzannine Floor NO.4 Mindanao Avenue, Barangay
Bahay Toro, Project 8, Quezon City, Philippines. Tel: +632-929-5334 Fax: +632-929-1343
HORN DISTRIBUTION SA Ulica Kurantow 34,02-873 Warszawa Poland Tel: +4822331 5533 Fax: +4822331 5500
Poland
Videoacustica Qta. Do Paizinho-Armazem 5-Estrada De Circunvalagao-Apart. 3127 1303 Lisboa Codex
Portugal
Tel: +351 214241770 Fax: +351 214188093
Singapore
ALL (E&El Service Center Pte Ltd. Machtech Industrial Building, #06-04, No.2, Kallang Pudding Road, Singapore 349307
Tel: 6747-8274 Fax: 6748-9007
BIS AUDIO s.r.o. Dobronivska eesta 1642/6 960 01 Zvolen Tel:045-5400 703 Fax:045-5400 704
Slovakia
Mandarin Distributors SA 10 Thora Crescent, Wynberg Ext.3 Sandton, P.O. Box 5137, Johannesburg Republic of South Africa
South Africa
Tel: 27-11-444-8445 Fax: 27-11-444-8363
Gaplasa SAAV. Ing. Conde de Torroja, 25, 28022 Madrid Tel: 91-746-00-45 Fax: 91-329-44-57
Spain
Hi-Fi Klubben Goteborg Skanegatan 25, 41252 Goteborg Tel:031 33 51010 Fax:031 33 51019
Sweden
KOENIG APPARATE AG, Abteilung Elektronik. Eggbuhlstrasse 28, CH-8052 Zurich, Switzerland
Switzerland
Tel: 01-306-1626 Fax: 01-306-1690
KOLIN-DENON Entertainment INC. 5F-3, No. 14, Shiwei Street, Sanchung City, Taipei Hsien, 241 Taiwan, R.O.C.
Taiwan R.O.C.
~**~nif~$~~{51fW~N0aj $::Itu~mm¥~~m14~5FZ3 ~~: (02)8287-2618 {$J!:: (02)8287-1384
Realise Tech-Service Co., Ltd. 2F, No. 14, Shiwei Street, Sanchung City, Taipei Hsien, 241 Taiwan, RO.C.
:Effil**f4:IXij&~~{51fW~N0aj $::ItU~mm1~~m14~2F ~~3( {--t~~): (02)8287-6668 {$J!:: (02)8287-6272
Mahajak Development Co., Ltd. 46 Mahajak Building, Sukhumvit Soi 3 (Nana-Nual Klongtoey, Wattana, Bangkok
Thailand
Thailand. 10110 Tel: 66-2-256-0020 Fax: 66-2-253-1696
Ertekin electronik tic. ve san. a.s. Galipdede Caddesi No.: 113 Kuledibi-Karakoy / Istanbul, Turkey
Turkey
Tel: +90(212)293-9515 Fax: +90(212)249-3512
v.v. & SONS L.L.C. Street No-11/B, Road NO-128, Shed No-39 AI Khabisi, Deira, Dubai. UAE
U.A.E.
Tel: +971-4-266-2435,268-4575 Fax: +971-4-266-2052
United
DENON UK A division of D&M Audiovisual Ltd. Moorbridge House, Padbury Oaks, 579 Bath Road,
Kingdom & Eire
Longford, Middlesex, UB7 OEH, United Kingdom Tel: +44(0)1753-680568 Fax: +44(0)1753-689697
U.S.A.
DENON ELECTRONICS (USA), LLC (a D&M Holdings Company)
19C Chapin Road, Suite 205, Pine Brook, NJ 07058-9385 Tel: 973-396-0810 Fax: 973-396-7448
1100 Maplewood Drive, Itasca, IL 60143-3205 Tel: 630-741-0660 Fax: 630-741-0301
Anh Duy Company., Ltd. 148/8D Xo Viet Nghe Tinh St, ward 25, Binh Thanh Diet Ho Chi Minh City, Vietnam
Vietnam
Tel: +84 8 898 3424 Fax: +84 8 898 3425
•
•
•
•
•
Q
Q
* If there is no service center in your local area, please contact one of our overseas service centers, listed above, for follow-up service consultation.
* 1st kein Service-Center in lhrer Nahe, setzen Sie sich bitte miteinem der hier aufgelisteten Adressen in Verbindung.
* Si il n'y a pas destation technique proche de chez vous, veuillez contacter nos I' un de noscentres techniques, listes ci dessous, pour toutes demandes techniques.
* Ais er geen servicecenter bij uin de buurt is, neem dan contact op een een van onze bovengenoemdeservicecenters voor ondersteuning.
* Si no hay un servicio tecnico en su zona, por favor contacte con uno de los servicios tecnicos centrales, indicados abajo, para realizar un seguimiento de su consult.
* Om det inte finns nagon auktoriserad Denon-verkstad dar du bor, kontakta en av vara internationella servicecentra (se ovan).
* Se non ci sono dei centri assistenza autorizzati nella vostra zona, potete fare riferimento agli altri centri assistenza autorizzati, vedi elenco sopra, per qualsiasi
consultazione tecnica.
* Caso nao exista um centro de assistencia tecnica na sua area, consulte um dos centros acima apresentados
* ~D;g:,&,tfu.\1H'\liOIUJiep{J\' ~~f!l...t~pJT)iU*01iJ~5'H~:mepJc.\]t~ilJ~1&mU~*:§:
¢
* :5~tfu7Gij&9§-9J}L', l~JI**J:J£pJT37IJJJt1Tli¥JmH'j.ij&9§-$IL\, f)~~lf*ij~9§-~lliJ
¢
DENON
www.denon.eom
H51101
Denon Brand Company, D&M Holdings Inc.
OOD 515 0921 607 &1 511
DENON~
LIMITED WARRANTY
(USA / CANADA)
PAGE
2
3
4
USA (ENGLISH)
CANADA (ENGLISH)
CANADA (FRENCH)
~-------~'------------------------------'"~------,
USA
DENON ELECTRONICS (USA), LLC
(a D&M Holdings Company)
19C Chapin Road, Suite 205
Pine Brook, NJ 07058-9385
(973) 396-0810
(973) 396-7448 Fax
1100 Maplewood Drive
Itasca, IL 60143-3205
(630) 741~0660
(630) 741-0301 Fax
DENON REGIONAL SUPER SERVICE CENTERS (Repair only-No parts orders please)
PYRAMID AUDIO
UNITED RADIO SERVICE
AUDIO SERVICES
305 E. Braker Lane
Austin, TX 78753-2746
(512) 458-8292
(512) 453-4542 Fax
5717 Enterprise Parkway
E. Syracuse, NY 13057-2905
(800) 634-8606
(315) 446-8505 Fax
544 Central Dr., Suite 101
Virginia Beach, VA 23454-5245
(757) 498-8277
(757) 498-9554 Fax
INNER SOUND
NORMAN'S ELECTRONICS
GOLD CROWN ELECTRONICS
1416 S.E. Morrison Street
Portland, OR 97214~2646
(503) 238-1955
(503) 238-1787 Fax
3653 Clairmont Road
Atlanta, GA 30341-4907
(770) 451-5057
(770) 455-8337 Fax
Victoria Business Park
129 E. Savarona Way
Carson, CA 90746-1406
(310) 538-8282
(310) 538-8281 Fax
CANADA
D&M CANADA INC.
5-505 Apple Creek Boulevard
Markham Ontario, L3R 581
(905) 475-4085
(905) 475-4159 Fax
WARRANTY (HOME)
000 5150944422
1
DEN 0 N
i
LIMITED WARRANTY
!
~"I"I"~"I""'~"I"/"~"I"/'~~"I"I"~"I""'~"I""'~"II~"'~"I""'~"I"'I'~"I"/"~"I""'~"I""'~"I""'~'II""'~'II"II'~"I"II'~'II"I"~'II"'''~''IIIII'~''1""'~'IIIIII'~'II"II'~'III/l"~'II"'''~''I''/I'~'IIII/I'~''11I11'~'IIIIII'~"II/lI'~'II"'I'~"II/l'
I
i
TIns warranty wIll be honored only ill the U.S.A
®
Length of Non-Transferable Warranty
This warranty on your DENON product which is distributed and warranted by DENON ELECTRONICS (USA), LLC remains in effect for the following periods from
the date of the original consumer purchase from an AUTHORIZED DENON ELECTRONICS (USA), LLC DEALER.
Product Category
A / V Controller, A / V Receiver, AM / FM Receiver
DVD Receiver, DVD Home Theater System
Digital Surround Decoder
Pre-Amplifier, Digital Pre-Amplifier
Power-Amplifier, Head Amplifier
Tuner, Integrated Amplifier
CD Player, DVD Player
Tape Recorder, CD Recorder, MD Recorder
AVC, AVR, ORA
ADV, S-Series
AVO
System Audio
Turntable
Speaker
Sub-woofer
Network Multimedia Server
/ Client (Hard Disc Only)
:
~
~_.
~_.
:
~
.
:
~
!_., '
~
~
~
~_.
~_.
~
~
~
1
2
I Autolift / Manual
I Full Automatic
I
I
1
2
I Excluded Hard Disk Drive Unit
I Hard Disk Drive Unit
Microphone
Control Dock for iPod®
Cartridge
Remote Controller
Headphone
~
~_.
I
I
2
1
3
PRA, AVP, DAP, POA, HA
3
TU, PMA
DCD, DCM, DP, DA, DVD, DVM
DRM, ORR, DRS, DRW, CDR, CDRW, DMD
D-(UPA, UTU, UDCM, UDR, USC, USR, UCD, UDRA)
D-A, D-F, D-G, D-M, CDR-M, DRR-M
3
DP-L,DP-M
DP-F
SC
DSW
NS
4
DM-S
ASD
DL
RC
AH-D
YEAR(S)
1
1
1
2
1
2
3
1
2
1
90
90
90
DAYS
iPod is a trademark of Apple Computer. Inc.. registered in the U.S. and other countries.
What is Covered
Except as specified below, this Warranty covers all defects in material and workmanship in this product occurring during the above warranty periods. The following are
not covered by the Warranty: (1) Any product which is not distributed in the U.S.A. by DENON ELECTRONICS (USA), LLC. (2) Any product which is not purchased in
the U.S.A. from an authorized DENON dealer, unless the product is purchased through the U.S.A. Military Exchange Service where the Warranty will be One (1) year for
all products listed above except in the case of Cartridges, Accessories, Remote Controller and Headphone which will remain at 90 days. (Note: AUTHORIZED DENON
DEALERS can be identified by DENON AUTHORIZED DEALER sticker displayed in the stores. If you are uncertain as to whether a dealer is a DENON
AUTHORIZED DEALER, please contact DENON as listed below). (3) Any product on which the serial number has been defaced, modified or removed. (4) Damaged
deterioration or malfunction resulting from: a) Accident, act of nature, abuse, misuse, neglect, unauthorized product repair, opening of or modification or failure to follow
instructions supplied with the product. b) Repair or attempted repair by anyone not authorized by DENON. c) Any shipment of the product (claim must be presented to
carrier). (5) Items subject to wear from normal usage (tape heads, cartridges, stylus, battery, etc.). (6) Periodic check-ups which do not disclose any defect. (7) Use of the
product outside the U.S.A. (8) Damaged magnetic tape or CD/DVD discs. (9) Use in industrial, commercial, and/or professional applications. (10) Any installation or
g
;:::::h;~:S;::u;:r from product failure.
If during the applicable warranty period from the date of original consumer purchase your DENON product is found to be defective by DENON, DENON will
repair, or at its option, replace with new, used or equivalent model, such defective product without charge for parts or labor.
How to Obtain Warranty Performance
If your unit ever needs service, it may be taken or shipped to any authorized DENON service station or DENON ELECTRONICS (if you are uncertain as to
whether a service station is DENON authorized, please contact DENON as listed below.) In all other cases, the following procedures apply.whenever your unit must
be transported for warranty service;
a.
b.
c.
d.
You are responsible for transporting your unit or arranging for its transportation.
If shipment of your unit is required;
You must pay the initial shipping charges, but we will pay the return shipping charges if the repairs are covered by the 'Narranty.
WHEN RETURNING YOUR UNIT FOR WARRANTY SERVICE, A COpy OF THE ORIGINAL SALES SLIP MUST BE ATTACHED.
You should include the following: your name, address, daytime telephone number, model and serial number of the product and a description of the
problem. In the case of a CD or DVD Player, please enclose ONE (1) disc that the unit has failed with for test reasons. It will be returned with the unit.
THIS WARRANTY IS VALID IN THE U.S.A. ONLY.
,,
,
i
i
i
,
,
,
t
,
,
,
,
i
,
,
~
;
i
,
i
,
t
,
,
,
~ T:::;;:::~~;n:;:~:~;~:~:t;~uL:~ ~:~:~s~~:::~:::=~:~::,;;~a:~~u~~c::~~~~~:~~~~::e~~~~Tb~::TATION,
,
,
~
WARRANTIES OF MERCHANTABILITY AND FITNESS FOR A PARTICULAR PURPOSE.
.
:
•
OUR LIABILITY IS LIMITED TO THE REPAIR OR REPLACEMENT, AT OUR OPTION, OF ANY DEFECTIVE PRODUCT AND SHALL IN NO EVENT
INCLUDE INCIDENTAL OR CONSEQUENTIAL COMMERCIAL OR PROPERTY DAMAGES OF ANY KIND. WE ARE NOT RESPONSIBLE FOR
PRODUCTS LOST, STOLEN AND/OR DAMAGED DURING SHIPPING.
.
,
:
SOME STATES DO NOT ALLOW LIMITATIONS ON HOW LONG AN IMPLIED WARRANTY LASTS AND/OR DO NOT ALLOW THE EXCLUSION OF
INCIDENTAL OR CONSEQUENTIAL DAMAGES, SO THE ABOVE LIMITATIONS AND EXCLUSIONS MAY NOT APPLY TO YOU.
;
,
•
This warranty gives you specific legal rights, but you may also have other rights which vary from state to state. This Warranty may not be altered other than in a
,.
~
~_ -.,:
,
~
w
:
t
writing signed by an officer of Denon Electronics
USA'~~~ON
ELECTRONICS (USA), LLC
(a D&M Holdings Company)
19C Chapin Road, Suite 205
Pine Brook, NJ 07058-9385
Product Information: Visit our w~bsite (~.usa.denon.com) or Call (973) 396-0810
Warranty Repair Information: Call (630) 741-0660
~
i~:_
.'.
,
W
~
,
~
·111I11·~·IIIIII·~·IIII"'~·IIIII'·~'IIIIII·~"IIlII'~"IIIII.~"IIII"~"IIII"~"IIII"~"IIII"~"IIII"~"IIII"~"IIII1'~"IIl"'~"IIIII'~'IIIIII'~'IIIIII'~"IIIII'~"IIII"~"11II"~"IIII"~"IIII"~"IIII"~"IIII"~"IIII"~"IIII',~.,IIII'·~·'IIII'·~·'IIII'·~·'IIII'·~·'IIII'.~
2