1
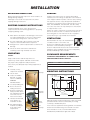
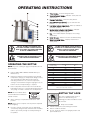
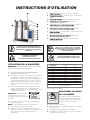
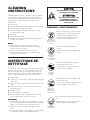
KYM APPROVED - MARCH 30, 2011
Operators Manual /
Manuel de l'opérateur
Gas Table Top Kettles / Marmites gaz de table
Installation & Operation / Installation et fonctionnement
KGT6T
KGT12T
KGT12TGB
For models built after January 2011.
Pour les modèles construits après
janvier 2011.
For your future reference.
Model # ______________________________________
N° du modèle
Serial # _______________________________________
N° de série
Model # & Serial #.
N° du modèle et N° de série.
™
Cleveland
1333 East 179th St., Cleveland, Ohio, U.S.A. 44110
Ph: 216.481.4900 Fx: 216.481.3782
www.clevelandrange.com
SE95010 Rev. 11
May / Mai, 2011
DONE, TAKEN FROM KGL- MARCH 11, 2011
FOR THE USER
IMPORTANT! Prior to removing any fittings ensure kettle is at room temperature
and pressure gauge is showing zero or less pressure.
FOR YOUR SAFETY
Do not store or use gasoline or
any other flammable liquids
and vapours in the vicinity of
this or any other appliance.
WARNING: Improper installation, adjustment,
alteration, service or maintenance can cause
property damage, injury or death. Read the
installation and operating instructions thoroughly
before installing or servicing this equipment.
IMPORTANT
Post in a prominent location, instructions to be followed in the event the user smells gas. This information
shall be obtained by consulting your local gas supplier.
The following points are to insure the safe installation and operation of this equipment:
• Insure all gas and electrical supplies match rating plate and electrical stickers.
• Observe all clearance requirements.
• All service must be performed by a qualified Cleveland Range Technician.
• Do not obstruct the flow of combustion and ventilation air.
RETAIN THIS MANUAL FOR YOUR REFERENCE
POUR L’UTILISATEUR
IMPORTANT! Avant de retirer les pièces de fixation, s’assurer que la chaudière est à
température ambiante et le manomètre indique zéro ou moins de pression.
POUR VOTRE SÉCURITÉ
Ne pas stocker ni utiliser de
l’essence ou tout autre vapeur
ou liquide inflammable à
proximité de cet appareil ou de
tout autre dispositif.
AVERTISSEMENT: Une installation, un réglage,
une modification, un entretien ou une
maintenance incorrect peut provoquer des dégâts
matériels, des blessures voire la mort. Veuillez lire
soigneusement les instructions d’installation et
de fonctionnement avant d’installer ou d’effectuer
l’entretien de cet équipement.
IMPORTANT
Dans un lieu bien en vue, placez les instructions à suivre dans l'éventualité où l'utilisateur respirerait du
gaz. Ces informations peuvent être obtenues en contactant votre fournisseur de gaz local.
Les points ci-dessous permettent de s’assurer que ce matériel a été installé et fonctionne en toute sécurité:
• Assurez-vous que toutes les alimentations en gaz et en électricité correspondent à la plaque signalétique et aux
étiquettes des propriétés électriques.
• Respectez toutes les conditions en terme d’espacement.
• Tous les travaux d’entretien doivent être réalisés par un technicien qualifié sur la gamme de Cleveland.
• N’obstruez pas le flux de combustion ni l’air de ventilation.
CONSERVEZ CE MANUEL POUR VOTRE RÉFÉRENCE
DONE, KYM STILL TO APPROVE- MARCH 14, 2011
FOR YOUR SAFETY / POUR VOTRE SÉCURITÉ /
PARA SU SEGURIDAD / PER LA VOSTRA SICUREZZA /
FÜR IHRE SICHERHEIT
DANGER / DANGER / PELIGRO / PERICOLO / GEFAHR
Keep hands away from moving parts and pinch points. /
Gardez les mains loin des pièces mobiles et des points de
pincement. / Mantenga las manos lejos de piezas movibles y
puntos de presión muy localizada. / Tenere lontane le mani
dalle parti in movimento e dalle strozzature. / Die Hände von
beweglichen Teilen und Klemmstellen weghalten.
Keep clear of pressure relief discharge. / Restez à
l'écart de la soupape de sureté. / Permanezca
alejado de la descarga de presión. / Stare lontani
dalla valvola di sfiato. / Den Austritt des
Druckablassventils vermeiden.
IMPORTANT / IMPORTANT / IMPORTANTE / IMPORTANTE / WICHTIG
Do not fill kettle above recommended level marked on outside
of kettle. / Ne remplissez pas la chaudière en excès du niveau
recommandé marqué sur la chaudière. / No llene la marmita
arriba del nivel recomendado marcado fuera de la marmita. /
Non riempire il bollitore al di sopra del livello raccomandato
indicato sull'esterno del bollitore stesso. / Den Kessel nicht
über das empfohlene, auf der Kesselaußenseite
gekennzeichnete Niveau auffüllen.
Inspect unit daily for proper operation. / Inspectez
l’unité tous les jours pour son bon
fonctionnement. / Inspeccione diariamente el
funcionamiento correcto de la unidad. /
Ispezionare l'apparecchio quotidianamente per
verificarne il buon funzionamento. / Die Einheit
täglich auf richtige Funktion untersuchen.
CAUTION / ATTENTION / PRECAUCIÓN / ATTENZIONE / VORSICHT
Wear protective equipment when discharging hot
product. / Portez un équipement de protection pour
décharger un produit chaud. / Use equipo protector al
descargar producto caliente. / Usare
equipaggiamento di protezione quando si versa
liquido bollente. / Schutzausrüstung beim Auslassen
des heißen Produkts tragen.
Surfaces may be extremely hot! / Use protective equipment. / Les
surfaces peuvent surchauffer! Utilisez un équipement de
protection. / ¡Las superficies pueden estar extremadamente
calientes! Use equipo protector. / Le superfici possono essere
estremamente calde! Usare equipaggiamento di protezione. / Die
Oberflächen können sehr heiß sein! Schutzausrüstung
verwenden.
Stand clear of product discharge path when
discharging hot product. / Écartez-vous du chemin de
décharge d’un produit chaud. / Permanezca alejado
de la ruta de descarga del producto al vaciar producto
caliente. / Stare lontani dal getto quando si versa
liquido bollente. / Beim Auslassen des heißen
Produkts den Produktauslasspfad vermeiden.
Do not lean on or place objects on kettle lip. / Ne vous appuyez
pas et ne placez pas d’objets sur le bec de la chaudière. / No
se apoye o coloque objetos en el borde de la marmita. / Non
appoggiarsi né posare oggetti sull'orlo del bollitore. / Nicht auf
den Kesselrand lehnen oder Gegenstände daraufstellen.
SERVICING / ENTRETIEN / SERVICIO / RIPARAZIONI / WARTUNG
Remove electrical power prior to servicing. / Coupez
l'alimentation électrique avant l'entretien. / Desconecte
la energía eléctrica antes de darle servicio. / Staccare
la corrente prima effettuare riparazioni. / Den Strom
vor der Wartung trennen.
0
Ensure kettle is at room temperature and pressure gauge is showing zero
or less prior to removing any fittings. / Assurez-vous que la chaudière est à
température ambiante et que le manomètre est à zéro ou moins avant de
retirer des accessoires. / Asegúrese de que la marmita esté a temperatura
ambiente y el manómetro esté mostrando cero o menos antes de retirar
cualquier accesorio. / Assicurarsi che il bollitore sia a temperatura ambiente
e che il manometro sia a zero prima di rimuovere qualsiasi accessorio. /
Vergewissern Sie, dass der Kessel auf Raumtemperatur abgekühlt ist und
das Druckmessgerät auf Null steht, ehe Armaturen abgenommen werden.
GAS APPLIANCES / APPAREILS À GAZ / APARATOS A GAS / APPARECCHI A GAS / GASGERÄTE
Keep appliance and area free and clear of combustibles. /
Gardez l'appareil et son entourage libre de tous
combustibles. / Mantenga el aparato y el área libres de
combustibles. / Tenere l'apparecchio e la zona
circostante sgombri da sostanze combustibili. / Das
Gerät und seine Umgebung von brennbaren
Materialien freihalten.
Do not attempt to operate this appliance during a power failure. /
N’essayez pas de faire fonctionner cet appareil lors d'une panne
de courant. / No intente poner en marcha este aparato durante
un fallo de suministro eléctrico. / Non tentare di usare questo
apparecchio durante una mancanza di corrente. / Nicht
versuchen, diese Einheit während eines Stromausfalls zu
bedienen.
Shut gas supply off prior to servicing. / Fourniture de gaz fermée au loin avant d'entretenir. / Suministro de gas cerrado apagado antes del
mantenimiento. / Approvvigionamento di gas chiuso fuori prima dell'assistenza. / Geschlossene Gasversorgung weg vor der Instandhaltung.
Unit exhaust contains carbon monoxide. Operate only under a properly functioning hood with adequate makeup air. / L'échappement de l'unité émet
du monoxyde de carbone. Exploiter uniquement sous une hotte fonctionnant correctement avec une source adéquate d'air d'appoint. / El escape de
la unidad contiene monóxido de carbono. Operar solamente bajo una campana en buen funcionamiento con aire de relleno adecuado. / L'unità
emette fumi contenenti monossido di carbonio. Utilizzare solamente sotto una cappa aspirante adeguatamente ventilata. / Das Abgas der Einheit
enthält Kohlenmonoxid. Nur unter einer richtig funktionierenden Haube mit ausreichender Ersatzluftzufuhr betreiben.
KYM TO APPROVES - APRIL 1, 2011
INSTALLATION
RECEIVING INSPECTION
GENERAL
Before unpacking visually inspect the unit for evidence of
damage during shipping.
Installation of the kettle must be accomplished by qualified
installation personnel working to all applicable local and national
codes. Improper installation of product could cause injury or damage.
If damage is noticed, do not unpack the unit, follow
shipping damage instructions.
SHIPPING DAMAGE INSTRUCTIONS
If shipping damage to the unit is discovered or
suspected, observe the following guidelines in preparing
a shipping damage claim.
1. Write down a description of the damage or the reason
for suspecting damage as soon as it is discovered.
This will help in filling out the claim forms later.
2. As soon as damage is discovered or suspected,
notify the carrier that delivered the shipment.
3. Arrange for the carrier's representative to examine the
damage.
4. Fill out all carrier claims forms and have the
examining carrier sign and date each form.
UNCRATING
This equipment is built to comply with applicable standards for
manufacturers. Included among those approval agencies are: UL,
A.G.A., NSF, ASME/N.Bd., CSA, CGA, ETL, and others. Many
local codes exist, and it is the responsibility of the owner/installer
to comply with these codes.
Observe all clearance requirements to provide proper make-up air
flow. Do not obstruct the flow of combustion and ventilation air.
Check rating plate to ensure that kettle has been equipped to
operate with the type of gas available at the installation.
VENTILATION
Gas fired kettles are only to be installed under
a ventilation hood in a room which has
provisions for adequate make up air. Further
information can be obtained by referring to
the U.S.A. National Fire Protection Associations NFPA96
regulations. These standards have also been adopted by
the National Building Code in Canada.
CLEARANCE REQUIREMENTS
Caution:
Straps under tension and will snap when cut.
Carton may contain staples and Skid contains Nails.
CLEARANCE REQUIREMENTS TO COMBUSTIBLE
AND NONCOMBUSTIBLE SURFACES.
Use proper safety equipment and precautions.
Model #
Back
Left Side
Right Side
Unit is heavy use adequate help or lifting equipment as
needed.
KGT6T
4”
0
0
KGT12T/GB
4”
0
0
1. Carefully cut any
straps from container.
2. Lift off carton.
MOUNTING INSTRUCTIONS
Cut Straps
3. Inspect for hidden
damage. If found
refer to “SHIPPING
DAMAGE
INSTRUCTIONS”.
2 1/4" - KGT6T
3 1/4" - KGT12T/GB
14 1/2"
10"
4. Cut strap holding unit.
2
14 5/8"
5. Remove wooden 1x6
holding unit to skid.
6. Remove manual from
kettle pot. Write down
the model# and serial#
of the unit onto the
front of this manual.
7. Lift kettle off skid and
move kettle to its
installation location.
8. Discard packaging
material according to
local and or state
requirements.
Mounting
Hardware
24" - KGT6T
27" - KGT12T/GB
Model
Serial #
1x6
Cut Straps
Table-top models must be positioned on a firm, level stand
(Cleveland ST-28 or ST-55 recommended), or existing
counter top, and bolted in place.
These models are supplied with mounting hardware. This hardware
threads into the welded bushing on the underside of the base.
Once the kettle is secure, screw tilt handle into the
threaded hole provided at the right side of kettle.
KYM APPROVED - MARCH 25, 2011
GAS
ENSURE THE GAS SUPPLY MATCHES THE KETTLE'S
REQUIREMENTS AS STATED ON THE RATING LABEL.
Installation must conform, with local codes or in the
absence of local codes, with the National Fuel Gas Code
ANSI Z223.1/NFPA 54, or the Natural Gas and Propane
Installation Code, CSA B149.1.
The appliance and its individual shut-off valve must be
disconnected from the gas supply piping system during
any pressure testing of that system at test pressures in
excess of 1/2 psi (3.45 kPa).
Use a gas pipe joint compound which is resistant to L.P.
gas. Test all pipe joints for leaks with soap and water
solution. Ensure that the gas pressure regulator is set for
the manifold pressure indicated on the gas rating plate.
BACK OF KETTLE
1. Removed supplied manual shut-off valve and establish
mounting location.
GAS
SUPPLY
UNION
NIPPLE
The kettle can be equipped with optional hot and cold
water taps, requiring 1/2" copper tubing supply lines.
After installation the kettle must be thoroughly cleaned and
sanitized prior to cooking.
It is recommended that a sediment trap (drip leg) be installed in the
gas supply line. If the gas pressure exceeds 14” water column, a
pressure regulator must be installed, to provide a maximum of 14”
water column gas pressure to the gas control valve.
3. Connect the gas
line to the manual
shut-off valve.
The sealed jacket of the gas-fired kettle is precharged with
the correct amount of a water-based formula, and therefore,
no water connection is required to the kettle jacket.
CLEANING
The appliance must be isolated from the gas supply piping
system by closing its individual manual shut-off valve during
any pressure testing of the gas supply piping system at test
pressures equal to or less than 1/2 psi (3.45 kPa).
2. Add union and
piping as required.
WATER
SHUT-OFF
VALVE
ELECTRICAL
ENSURE THE ELECTRICAL SUPPLY MATCHES THE
KETTLE'S REQUIREMENTS AS STATED ON THE
RATING LABEL.
A cord and plug are supplied with the unit. Simply plug the
unit into any grounded outlet rated for a minimum of 10 amps.
The kettle must be electrically installed and grounded in
WARNING: Electrical Grounding Instructions.
This unit is equipped with a three-prong (grounding)
plug for your protection against shock hazard and
should be plugged directly into a properly grounded
three-prong receptacle. Do not cut or remove the
grounding prong from this plug.
accordance with local codes, or in the absence of local
codes, with National Electrical Code, ANSI/NFPA 70 (USA)
or the Canadian Electrical Code, CSA C22.2, (Canada).
Standard supply voltage is 115 volts A.C., however,
optional A.C. voltages can be supplied on special order. A
separate fused disconnect switch must be supplied and
installed in the high voltage electrical supply line.
The wiring diagram is located under the cover of kettle
control box.
NOTE: Units are tested on a in-house ground fault system.
However, there is no guarantee the unit will work on all
ground fault systems. If you are having problems you can
hard wire the unit.
INSTALLATION CHECKS
Although the kettle has been thoroughly tested before
leaving the factory, the installer is responsible for ensuring
the proper operation of kettle once installed.
1. Before turning the kettle on, read the vacuum/pressure
gauge. The gauge's needle should be in the green
zone. If the needle is in the "VENT AIR" zone, follow air
venting procedure.
2. Unit has been thoroughly checked for gas leaks at the
factory however the installer should check all
connections using soap bubble or gas detector for any
leaks which may have resulted from shipping or
installation.
3. Supply power to the kettle by placing the fused
disconnect switch to the "ON" position.
4. Open gas shut-off valve to turn on main gas supply..
5. Turn the temperature control dial to "1" (Min.). The green
LED light should remain lit, indicating the burner is lit, until
the set temperature is reached. Then the green light will
cycle on and off, indicating the burner is cycling on and
off to maintain temperature.
6. Tilt the kettle forward. After a few seconds the red
"LOW WATER" light should be lit when the kettle is in a
tilted position. This light indicates that the burner has
automatically been shut off by the kettle's safety circuit.
This is a normal condition when the kettle is in a tilted
position.
7. Raise the kettle to the upright position. The red "LOW
WATER" light should go out when the kettle is upright.
8. Turn the temperature control dial to "10" (Max.) and allow
the kettle to preheat. The green light should remain on
until the set temperature is reached. Then the green
light will cycle ON and OFF, indicating the burner is
cycling ON and OFF to maintain temperature.
9. Turn unit OFF.
INSTALLATION
INSPECTION À LA RÉCEPTION
GÉNÉRALITÉS
Avant le déballage, procédez à l’inspection visuelle de l’unité afin
de rechercher des traces de dommages survenus pendant
l’expédition.
L’installation de la chaudière doit être effectuée par un personnel
d’installation qualifié conformément à tous les codes nationaux et locaux
applicables. Une installation inappropriée du produit pourrait entraîner des
blessures ou des dommages.
Si vous constatez des dommages, ne déballez pas l’unité, suivez
les instructions sur les dommages dus à l’expédition.
INSTRUCTIONS SUR LES
DOMMAGES DUS À L’EXPÉDITION
Si vous découvrez ou soupçonnez des dommages survenus au
cours de l’expédition, respectez les directives suivantes lorsque
vous établissez la déclaration sur les dommages survenus
pendant l’expédition.
1. Notez une description du dommage ou la raison qui vous fait
soupçonner des dommages dès que vous les constatez.
Cela permettra de remplir les formulaires de déclaration plus
tard.
2. Dès que vous découvrez des dommages ou les
soupçonnez, informez le transporteur qui a livré le colis.
3. Faites examiner les dommages par le représentant du
transporteur.
4. Remplissez tous les formulaires de déclaration du
transporteur et faites signer et dater chaque formulaire par
l’examinateur.
DÉBALLAGE
Les bandes sont tendues et se cassent lorsque vous les coupez.
Le carton peut contenir des agrafes et le patin contient des clous.
Utilisez l’équipement de protection approprié et prenez des
précautions.
L’unité est lourde, utilisez des outils d'aide appropriés ou un
équipement de levage si nécessaire.
2. Soulevez le carton
de nombreux codes locaux et le respect de ceux-ci relève de la
responsabilité du propriétaire/installateur.
Respectez toutes les exigences de dégagement pour faciliter la
circulation appropriée de l’air d’appoint. N’obstruez pas le flux de la
combustion et la circulation de l’air de ventilation. Consultez la plaque
signalétique pour vous assurer que la chaudière a été équipée pour
fonctionner avec le type de gaz disponible à l’installation.
VENTILATION
Les chaudières à gaz doivent être installées
uniquement sous une hotte aspirante dans une
pièce aménagée pour une bonne circulation de l’air
d’appoint. Pour obtenir plus d’informations,
reportez-vous à la réglementation NFPA96 de l’U.S.A. National Fire
Protection Associations (Association nationale pour la protection
incendie). Ces normes ont également été adoptées par le Code
national du bâtiment du Canada.
EXIGENCES DE DÉGAGEMENT
Mise en garde :
1. Coupez toutes les
bandes du contenant
avec précaution.
La conception de cet équipement est conforme aux normes applicables
aux fabricants. Quelques-unes des agences d’agrément sont UL A.G.A.,
NSF, ASME/N.Bd., CSA, CGA, ETL et d’autres. Il existe
Coupez les
bandes
3. Inspectez le carton pour
déceler tout dommage
caché. Si vous
découvrez des
dommages, reportezvous aux
«INSTRUCTIONS SUR
LES DOMMAGES DUS
EXIGENCES DE DÉGAGEMENT POUR LES SURFACES
COMBUSTIBLES ET NON COMBUSTIBLES.
N° modèle
Arrière Côté gauche
Côté droite
KGT6T
4”
0
0
KGT12T/GB
4”
0
0
INSTRUCTIONS DE MONTAGE
2 1/4" - KGT6T
3 1/4" - KGT12T/GB
14 1/2"
10"
2
14 5/8"
À L’EXPÉDITION».
4. Coupez la bande qui
maintient l’unité.
Matériel de
montage
5. Déposez le support 1x6 en
bois qui maintient l’unité au
patin.
6. Déposez le manuel de la
chaudière. Notez le n° du
modèle et le n° de série sur
la couverture de ce manuel.
7. Soulevez la chaudière du
plateau et placez-la à
son emplacement
d’installation.
24" - KGT6T
27" - KGT12T/GB
N° du modèle
et N° de série
Les modèles de table doivent être placés sur une surface ferme et
plate (Cleveland ST-28 ou ST-55 recommandé) ou sur le plan de
travail existant et, immobilisés à l’aide de vis.
1x6
Ces modèles sont fournis avec le matériel de montage. Ce
matériel est introduit par filetage dans un manchon soudé en
dessous de la base.
Coupez les
bandes
8. Mettez le matériel
d’emballage au rebut conformément aux exigences locales
et/ou nationales.
Une fois la chaudière sécurisée, vissez la poignée inclinée dans le
trou fileté prévu sur le côté droit de la chaudière.
KYM APPROVED - MARCH 25, 2011
GAZ
ASSUREZ-VOUS QUE L’ALIMENTATION EN GAZ RÉPOND AUX
EXIGENCES DE LA CHAUDIÈRE COMME LE SPÉCIFIE LA
PLAQUE SIGNALÉTIQUE.
L’installation doit être conforme aux codes locaux. En l’absence de
codes locaux, elle doit être conforme au Code national du gaz
combustible, ANS Z223.1/NFPA 54, ou au Code d’installation du
gaz naturel et du propane, CSA B149.1.
L’appareil et toutes les vannes d’isolement doivent être
déconnectés de la tuyauterie d’alimentation de gaz lors des tests
de pression du système, effectués à une pression supérieure à 1/2
psi (3,45 kPa).
L’appareil doit être isolé de la tuyauterie d’alimentation de gaz par
la fermeture de toutes les vannes d’isolement pendant les tests de
pression de la tuyauterie effectués à une pression inférieure ou
égale à 1/2 psi (3,45 kPa).
Il est recommandé d’installer un piège à sédiments (point de
purge) dans le tuyau d’alimentation de gaz. Si la pression du gaz
dépasse la colonne d’eau 14’’, un régulateur de pression doit être
installé pour fournir une pression de gaz maximale de colonne
d’eau 14’’ au régulateur de pression du gaz.
Utilisez une pâte à joint résistant au gaz de PL. Testez toutes les
pâtes à joint afin de déceler des traces de fuite à l’aide d’une
solution d’eau savonneuse. Assurez-vous que le régulateur de
pression de gaz est réglé à la pression d’admission indiquée sur la
plaque signalétique.
1. Déposez la vanne d’isolement manuelle fournie et choisissez
3. Connectez la
conduite de gaz à la
vanne d’isolement
manuelle.
Arrière de la
BACKchaudière
OF KETTLE
l’emplacement de montage.
2. Ajoutez un raccord
et des tuyaux si
nécessaire.
GAS
Aliment.
SUPPLY
en gaz
Mamelon
NIPPLE
Vanne
SHUT-OFF
Raccord
UNION
d’isolement
VALVE
CONNEXIONS ÉLECTRIQUES
protection contre les défauts à la terre. Cependant, il n’existe
aucune garantie que l’unité fonctionnera avec tous les systèmes
de protection contre les défauts à la terre. En cas de problèmes,
vous pouvez opter pour un raccordement fixe.
EAU
L’enveloppe scellée de la chaudière à gaz est préchargée d’une
formule à base d’eau en quantité suffisante, par conséquent,
aucun raccordement d’eau n’est nécessaire pour l’enveloppe de la
chaudière.
La chaudière peut être équipée de robinets d’eau chaude et froide
optionnels, nécessitant des canalisations en tube de cuivre d’1/2’’.
NETTOYAGE
Après l’installation, la chaudière doit être soigneusement
nettoyée et désinfectée avant la cuisson des aliments.
VÉRIFICATIONS D’INSTALLATION
La chaudière a certes été minutieusement testée avant de quitter
l’usine, cependant l’installateur est chargé d’assurer son bon
fonctionnement une fois installée.
1. Avant d’allumer la chaudière, lisez le vacuomètre/manomètre.
Les aiguilles des indicateurs doivent être dans la zone verte.
Si l’aiguille se trouve dans la zone « AIR DE VENTILATION »,
suivez une procédure d’aération.
2. L’unité a été minutieusement vérifiée à l’usine à la recherche
de fuites de gaz, cependant l’installateur doit vérifier tous les
raccords à l’eau savonneuse ou à l’aide d’un détecteur de gaz
afin de déceler d’éventuelles fuites pouvant résulter de
l’expédition ou de l’installation.
3. Mettez la chaudière sous tension en plaçant l’interrupteur
général à fusible sur la position ON (marche).
4. Ouvrez la vanne d’isolement du gaz pour mettre la principale
conduite de gaz en marche.
5.
ASSUREZ-VOUS QUE L’ALIMENTATION ÉLECTRIQUE
RÉPOND AUX EXIGENCES DE LA CHAUDIÈRE COMME LE
SPÉCIFIE LA PLAQUE SIGNALÉTIQUE.
Une rallonge et une fiche sont fournies avec l’unité. Branchez
simplement l’unité sur une prise mise à la terre d’une capacité
nominale de 10 amps minimum.
AVERTISSEMENT: Instructions de mise à la terre électrique.
Cette unité est équipée d’une fiche à trois broches (mise à la
terre) pour vous protéger contre les risques d’électrocution et
doit être branchée directement à une prise à trois broches mise
à la terre. Ne coupez pas et ne retirez pas la broche de masse
de cette fiche.
L’installation électrique de la chaudière doit être mise à la terre
conformément aux codes locaux. En l’absence de codes locaux,
elle doit être conforme au Code national de l’électricité ANSI/NFPA
70 (É.-U.) ou au Code canadien de l’électricité CSA C22.2,
(Canada).
La tension d'alimentation normale est de 115 volts c.a., cependant,
des tensions c.a. peuvent être fournies en option sur commande
spéciale. Un interrupteur général à fusible distinct peut être fourni
et installé sur la conduite d’alimentation électrique haute tension
Le schéma de câblage figure sous le couvercle de la boîte des
commandes de la chaudière.
NOTE: Les unités ont été testées sur un système en interne de
Placez le bouton de réglage de la température sur “1 (Min.).
Le voyant DEL vert doit rester allumé, indiquant ainsi que le
brûleur est allumé jusqu’à l'atteinte de la température réglée.
Puis, le voyant vert fonctionne par intermittence, indiquant
ainsi que le brûleur est commandé par cycles pour maintenir
la température.
6. Inclinez la chaudière vers l’avant. Après quelques secondes,
le voyant rouge NIVEAU D’EAU BAS doit être allumé lorsque
la chaudière est en position inclinée. Ce voyant indique que le
brûleur a été automatiquement arrêté par le circuit de sécurité
de la chaudière. Cet état est normal lorsque la chaudière est
en position inclinée.
7.
Soulevez la chaudière et placez-la en position verticale. Le
voyant rouge NIVEAU D’EAU BAS s’éteint lorsque la chaudière
est en position verticale.
8.
Placez le bouton de réglage de la température sur "10" (max)
et laissez la chaudière préchauffer. Le voyant vert doit rester
allumé jusqu’à l’atteinte de la température définie. Puis le
voyant vert fonctionne par intermittence, indiquant ainsi que le
brûleur est commandé par cycles pour maintenir la
température.
9.
Arrêtez l’unité.
!
OPERATING INSTRUCTIONS
1.
Tilting Handle - Used for tilting the kettle.
2.
Vacuum/Pressure Gauge - Indicates steam pressure
and vacuum.
3.
Pressure Relief Valve - Pressure safety device.
4.
Heat Indicator Light (Green) - Cycles ON-OFF with
burner.
2
5.
Low Water Indicator Light (Red) - When lit, indicates a
low water condition.
4
6.
Ignition Failure Indicator Light (Amber) - Indicates
failure of heating system to ignite.
7.
Dial - Turns kettle ON/OFF and adjusts the cooking
temperature.
8.
Kettle Tilt Lock - Prevents unit from accidental tilting.
9.
Water Level Sight Glass - Displays water level in
steam jacket.
1
9
5
6
7
0
8
!
!
DO NOT ATTEMPT TO OPERATE THIS
APPLIANCE DURING A POWER FAILURE.
KEEP APPLIANCE AND AREA FREE AND
CLEAR OF COMBUSTIBLES.
DO NOT LEAN ON OR PLACE OBJECTS
ON KETTLE LIP. SERIOUS INJURY COULD
RESULT IF KETTLE TIPPED OVER,
SPILLING HOT CONTENTS.
SURFACES MAY BE EXTREMELY HOT!
USE PROTECTIVE EQUIPMENT.
WEAR PROTECTIVE EQUIPMENT WHEN
DISCHARGING HOT PRODUCT.
0
OPERATING THE KETTLE
Temperature
Control Setting
NOTE: If you are cooking an egg or milk product, do not
pre-heat kettle.
1.
2.
3.
120
49
1.
130
54
2.
145
63
Perform DAILY PRE-STARTUP INSPECTION (see
Maintenance).
3.
160
71
4.
170
77
Preheat the kettle by turning the dial to the desired
temperature setting (see0"Temperature Range
Chart").
0
The Heat Indicator Light (Green) will remain lit,
indicating the burner is on, until the temperature
setting is reached. When the green light goes off, the
burners are off, and preheating is complete.
5.
185
85
6.
195
91
7.
210
99
8.
230
110
118
130
KETTLE TILT LOCK
Your unit is equipped with a lock to
prevent accidental tilting. The
following procedure should be used to
tilt the kettle.
When cooking is completed turn dial to the "OFF'
position.
Pour the contents of the kettle into an appropriate
container by tilting the kettle forward. Care should be
taken to pour slowly enough to avoid splashing off
the product.
245
265
Temperature Range Chart
NOTE: A five minute complete shut-of period is required
before relighting.
5.
9.
MAX.
NOTE: Certain combinations of ingredients
will result in temperature variations
NOTE: Do not fill kettle above
recommended level marked on
outside of kettle.
4.
Approximate Product Temperature
°F
°C
MIN.
Place food product into the kettle. The Heat Indicator
Light (Green) will cycle on and off indicating the burners
are cycling on and off to maintain the set temperature.
!
1. Grasp the tilt handle.
2.
Hold the latch down to unlock tilting mechanism.
3.
Pull the handle to tilt kettle.
4.
To lock, return the kettle to its upright position and
push handle back.
!
INSTRUCTIONS D’UTILISATION
1
9
1.
Poignée basculante - utilisée pour incliner la chaudière.
2.
Vacuomètre/manomètre - indique la pression de la vapeur et
du vide
Soupape de décharge - appareil de sécurité de pression.
Voyant lumineux de chaleur (vert) - fonctionne par
intermittence avec le brûleur.
A
Voyant lumineux de niveau d’eau bas (rouge) - lorsqu’il est
allumé, il indique que le niveau d’eau est bas. C
5.
2
6.
Voyant lumineux d’échec d’allumage (orange) - indique
l’échec de l’allumage du système de chauffage. D
7.
Bouton de réglage - met la chaudière en marche/arrêt
et règle
E
la température de cuisson.
8.
Basculement à blocage de la chaudière - empêche le
basculement accidentel de l’unité.
9.
Voyant de niveau d’eau - affiche le niveau d’eau B
dans
l’enveloppe de vapeur.
4
5
6
7
0
8
!
!
3.
4.
!
NE VOUS REPOSEZ PAS ET NE PLACEZ PAS DES
OBJETS SUR LE COUVERCLE DE LA CHAUDIÈRE.
DE GRAVES BLESSURES POURRAIENT S’ENSUIVRE
SI LA CHAUDIÈRE SE RENVERSE ET DÉVERSE
SON CONTENU CHAUD.
N’ESSAYEZ PAS DE FAIRE FONCTIONNER CET
APPAREIL PENDANT UNE COUPURE DE COURANT.
DÉBARRASSEZ L’APPAREIL ET LA ZONE DE TOUT
COMBUSTIBLE.
LES SURFACES PEUVENT ÊTRE
EXTRÊMEMENT CHAUDES !
PORTEZ UN ÉQUIPEMENT DE PROTECTION
LORS DU DÉVERSEMENT DU PRODUIT CHAUD.
UTILISEZ UN ÉQUIPEMENT DE PROTECTION.
UTILISATION DE LA CHAUDIÈRE
REMARQUE : Si vous préparez un œuf ou un produit
laitier, ne préchauffez pas la chaudière.
1.
Procédez à l’INSPECTION QUOTIDIENNE DE PRÉDÉMARRAGE (voir Maintenance).
2.
Préchauffez la chaudière en plaçant le bouton de réglage à
la température souhaitée (voir
0 « Tableau de plage de
température »). Le voyant lumineux de chaleur 0(vert) reste
allumé indiquant que le brûleur est en marche, jusqu’à
l’atteinte de la température réglée. Lorsque le voyant vert
s’éteint, les brûleurs sont à l’arrêt et le préchauffage est
terminé.
3.
Placez le produit alimentaire dans la chaudière. Le voyant
lumineux de chaleur (vert) fonctionne par intermittence,
indiquant ainsi que le brûleur est commandé par cycles pour
maintenir la température.
REMARQUE : Ne remplissez pas la
chaudière au dessus du niveau
recommandé, marqué à l’extérieur de
la chaudière.
4.
À la fin de la cuisson, placez le bouton de réglage en
position OFF (Arrêt).
NOTE: Une période d’arrêt complet de cinq minutes est
nécessaire avant le rallumage de la chaudière.
5.
Versez le contenu de la chaudière dans un contenant
approprié en inclinant la chaudière vers l’avant. Prenez soin
de verser lentement le produit afin d’éviter toute
éclaboussure.
0
Réglage de la
température
Température approximative du produit
°F
°C
MIN.
1.
2.
3.
4.
5.
6.
7.
8.
9.
MAX.
120
130
145
160
170
185
195
210
230
245
265
49
54
63
71
77
85
91
99
110
118
130
REMARQUE : Certains mélanges d’ingrédients entraînent des
variations de température.
Tableau de plage de température
BASCULEMENT À BLOCAGE
DE LA CHAUDIÈRE
Votre unité est équipée d’un dispositif de
blocage pour prévenir tout basculement
accidentel. La procédure suivante doit être
utilisée pour incliner la chaudière.
1. Tenez la poignée basculante.
2. Abaissez le taquet de sécurité pour débloquer le mécanisme
de basculement.
3. Tirez la poignée pour faire basculer la chaudière.
4. Pour bloquer la chaudière, replacez-la en position verticale et
remettez la poignée en place.
CLEANING
INSTRUCTIONS
CAUTION:
SURFACES MAY BE EXTREMELY HOT!
USE PROTECTIVE EQUIPMENT.
ATTENTION:
Cooking equipment must be cleaned regularly to maintain
its fast, efficient cooking performance and to ensure its
continued safe, reliable operation. The best time to clean
is shortly after each use (allow unit to cool to a safe
temperature).
1.
2.
3.
4.
5.
6.
7.
Turn unit off.
Prepare a warm water and mild detergent solution in the unit.
Remove food soil using a nylon brush.
Loosen food which is stuck by allowing it to soak at a
low temperature setting.
Drain unit.
Rinse interior thoroughly.
Using mild soapy water and a damp sponge, wash the
Steel Pads
exterior, rinse, and dry.
NOTES
➩ For more difficult cleaning applications one of the
following can be used: alcohol, baking soda, vinegar, or
a solution of ammonia in water.
➩ Leave the cover off when the kettle is not in use.
➩ For more information on stainlesss steel epuipment and
cleaning go to www.nafem.org.
Steel Pads
Chloride Cleaners
INSTRUCTIONS DE
NETTOYAGE
Le matériel de cuisson doit être nettoyé régulièrement pour
maintenir ses capacités de cuisson rapides et efficaces et
assurer continuellement son fonctionnement sécurisé et
fiable. Il faut nettoyer l’unité juste après chaque utilisation
(laissez l'unité refroidir jusqu’à une température sûre).
1.
2.
3.
4.
5.
6.
7.
Arrêtez l’unité.
Préparez une solution d'eau chaude et de détergent doux
dans l'unité.
Retirez les souillures alimentaires à l’aide d’une brosse en
nylon.
Pads
Chloride Cleaners
Wire Brush &
Éliminez les Steel
aliments
collés en
les laissant trempés
à
Scrapers
température basse.
Vidangez l’unité.
Rincez soigneusement
l’intérieur.
Steel Pads
Chloride Cleaners
Wire Brush &
Scrapers
Lavez l’extérieur à l’eau savonneuse douce et à l’aide
d’une éponge humide, puis rincez et séchez.
REMARQUES
➩ Pour des applications de nettoyage plus difficiles, l’un de
ces produits peut être utilisé : Alcool, bicarbonate de soude,
vinaigre ou une solution d’ammoniaque dans de l’eau.
➩ Déposez le couvercle lorsque la chaudière n’est pas
utilisée.
➩ Pour plus d’informations sur le matériel en acier inoxydable
et le nettoyage, visitez le site Web www.nafem.org.
LES SURFACES PEUVENT ÊTRE
EXTRÊMEMENT CHAUDES !
PORTEZ UN ÉQUIPEMENT DE
PROTECTION.
WARNINGS / AVERTISSEMENTS
Do not use detergents or cleansers that are
chloride based or contain quaternary salt.
Chloride Cleaners
Chloride Cleaners /
Nettoyants à base
de chlorure
N'utilisez pas de détergents ni de
nettoyant à base de chlorure ou qui
0
contiennent
Wire Brush & du sel quaternaire.
High Pressure
Scrapers
Spray Hose
Do not use a metal bristle brush or
scraper.
N'utilisez pas de brosseStagnant
métallique ni de
Water
raclette.
Wire Brush &
Scrapers
Wire Brush &
Scrapers /
Brosse métallique
et raclettes
High Pressure
Spray Hose
Steel wool should never be used for
cleaning the stainless steel.
Stagnant
N'utilisez
Waterjamais de laine d'acier pour
nettoyer l'acier inoxydable.
Steel Pads
Chloride Cleaners
Wire Brush &
Scrapers
High Pressure
Spray Hose
Steel Wool /
Coussinets
d'acier
Unit should never be cleaned with a high
pressure spray hose.
Stagnant
L'unité ne doit jamais être nettoyée avec un
Water
tuyau d'arrosage à haute pression.
High Pressure
Spray Hose
High Pressure
Spray Hose /
Tuyau d'arrosage
à haute pression
High Pressure
Spray Hose
Stagnant
Water
Do not leave water sitting in unit when not in
use.
Ne laissez pas d'eau stagner au fond de
l'unité lorsqu'elle n'est pas utilisée.
Stagnant
Water
Stagnet Water /
Eau stagnante
KYM TO APPROVED - MARCH 25, 2011
MAINTENANCE
FOR MAINTENANCE AND REPAIRS CONTACT YOUR AUTHORIZED MANITOWOC SERVICE AGENCY
AND HAVE A QUALIFIED SERVICE TECHNICIAN MAINTAIN YOUR EQUIPMENT.
DANGER:
DANGER:
DANGER:
ENSURE KETTLE IS AT
0
ROOM TEMPERATURE AND
PRESSURE GAUGE IS
SHOWING ZERO OR LESS
PRIOR
TO REMOVING ANY FITTINGS.
Ensure kettle is at room
temperature
Shut off power at main
Cleveland Range equipment requires little preventativeand
maintenance.
pressure gauge is showing zero
fuse disconnect prior
We do however to
provide
the following chart as
0 a guideline
or for
less prior to removing any fittings.
servicing.
SHUT GAS SUPPLY
OFF PRIOR TO
SERVICING.
REMOVE ELECTRICAL
POWER PRIOR0 TO
SERVICING.
inspection and maintenance to keep your unit functioning at 100%.
9
DAILY
PRE-STARTUP
INSPECTION
1
2
A
C
1. Tilt Handle (A) is tight and knob is in place.
2. Kettle Tilt Lock (B) is functioning correctly.
4
D
3. Pressure Gauge (C) is in the green
5 when unit is cold.
E
4. Green Light (D) comes on when unit
is energized.
6
5. Red Light (E) comes on when unit7 is tilted.
8
SIX MONTH SERVICE INSPECTION
1. Perform daily startup inspection.
2. Screws holding top cover are in place and tight.
3. Flue gasket is in place and in good condition.
4. Burner is held firmly in place and in good condition.
5. Fasteners securing base and support leg are in place and tight.
6. Perform pressure relief valve periodic test (see Pressure Relief Valve Periodic Testing Procedure).
7. Adequate exhaust and makeup air is supplied to working area.
YEARLY SERVICE INSPECTION
1. Perform six month service inspection.
2. Check kettle maximum temperature setting (see Calibrating Procedure).
3. Perform pressure relief valve periodic test (see Pressure Relief Valve Periodic Testing Procedure).
4. Inspect safety thermostat for proper connections (see Safety Thermostat section).
5. Inspect Low water probe for proper connections (see Low Water Probe section).
B
MAINTENANCE
POUR LA MAINTENANCE ET LES RÉPARATIONS, CONTACTEZ VOTRE AGENCE D’ENTRETIEN MANITOWOC ET
FAITES ENTRETENIR VOTRE ÉQUIPEMENT PAR UN TECHNICIEN QUALIFIÉ.
DANGER:
DANGER:
COUPER L’ALIMENTATION
EN GAZ AVANT
D’EFFECTUER LES
TRAVAUX D’ENTRETIEN
COUPER L’ALIMENTATION
0
ÉLECTRIQUE AVANT
D’EFFECTUER LES
TRAVAUX D’ENTRETIEN
Ensure kettle is at
Shut off power at main
DANGER:
AVANT DE RETIRER LES
0
RACCORDS, S’ASSURER QUE LA
CHAUDIÈRE EST À LA
TEMPÉRATURE AMBIANTE ET
LE MANOMÈTRE EST À ZÉRO OU MOINS.
roomQUE
temperature
La gamme des matériels Cleveland nécessite une maintenance
and pressure gauge is showing zero
fuse disconnect prior
préventive minimale.
Cependant, nous proposons
suivant
0 le tableau
or less
prior to removing any fittings.
to servicing.
comme guide d’inspection et de maintenance pour assurer le bon fonctionnement intégral de votre unité..
9
INSPECTION
QUOTIDIENNE DE
PRÉ-DÉMARRAGE
1
A
A) est serrée et le bouton de
1. La poignée basculante (A
réglage est en place.
C
B) fonctionne
2. Le basculement à blocage de la chaudière
(B
4
correctement.
D
2
5
E
C) est au vert lorsque l’unité est froide.
3. Le manomètre (C
6
D) s’allume lorsque l’unité est mise sous
4. Le voyant vert (D
7
tension.
E) s’allume lorsque 8l’unité est inclinée.
5. Le voyant rouge (E
B
INSPECTION TOUS LES SIX MOIS
1. Effectuez l’inspection quotidienne de démarrage.
2. Les vis qui maintiennent le couvercle supérieur sont en place et serrées.
3. Le joint d’étanchéité du tube de fumée est en place et en bon état.
4. Le brûleur est fermement immobilisé et en bon état.
5. Les pièces de fixation immobilisant la base et la patte de support sont en place et bien serrés.
6. Effectuez un test périodique de la soupape de décharge (voir la procédure d’exécution du test périodique de la
soupape de décharge).
7 La zone de travail est suffisamment alimentée en air de ventilation et d’appoint.
INSPECTION ANNUELLE
1. Procédez à la routine d’inspection semestrielle.
2. Vérifiez le réglage de la température maximale de la chaudière (voir la procédure d’étalonnage).
3. Effectuez le test périodique de la soupape de décharge (voir la procédure d’exécution du test périodique de la soupape de décharge).
4. Inspectez le thermostat de sécurité pour vous assurer que les connexions sont appropriées (voir la section Thermostat de sécurité).
5. Inspectez la sonde de niveau d’eau bas afin de vous assurer que les connexions sont correctes (voir la section Sonde de niveau d’eau bas)
KGT
SERVICE PARTS
WARRANTY
Our Company supports a worldwide network of Maintenance and Repair Centers. Contact your nearest Maintenance and Repair
Centre for replacement parts, service, or information regarding the proper maintenance and repair of your cooking equipment.
In order to preserve the various agency safety certification (UL, NSF, ASME/Ntl. Bd., etc.), only factory-supplied replacement parts
should be used. The use of other than factory supplied replacement parts will void warranty.
14
FAUCET ASSEMBLY
13
13
11
1
10
2
6
3
9
8
7
5
4
12
6
8
ITEM #
7
5
PART #
DESCRIPTION
QTY.
SPK2
SINGLE PANTRY FAUCET (includes items 1-10)
DPK2
DOUBLE PANTRY FAUCET (includes items 1-8 & 11)
1.
2.
3.
4.
5.
6.
7.
8.
9.
10.
11.
12.
13.
KE50825-2
FA95007-10
FA05002-19
KE51736
KE54159
FA11258
FA31029
FA210028
KE51401
KE50335
KE51403
SE50447
SE50021
3/4" SPOUT . . . . . . . . . . . . . . . . . . . . . . . . . . . . . . . . . . . . . . . . . . . . . . . . . . . . . . . . . . . . .1
RETAINING RING . . . . . . . . . . . . . . . . . . . . . . . . . . . . . . . . . . . . . . . . . . . . . . . . . . . . . . . .1
"O" RING . . . . . . . . . . . . . . . . . . . . . . . . . . . . . . . . . . . . . . . . . . . . . . . . . . . . . . . . . . . . . . .1
LONG FAUCET NUT . . . . . . . . . . . . . . . . . . . . . . . . . . . . . . . . . . . . . . . . . . . . . . . . . . . . . .1
FAUCET MOUNTING BRACKET . . . . . . . . . . . . . . . . . . . . . . . . . . . . . . . . . . . . . . . . . . . . .1
HEX CAP SCREW . . . . . . . . . . . . . . . . . . . . . . . . . . . . . . . . . . . . . . . . . . . . . . . . . . . . . . . .2
LOCK WASHER . . . . . . . . . . . . . . . . . . . . . . . . . . . . . . . . . . . . . . . . . . . . . . . . . . . . . . . . . .2
HEX NUT . . . . . . . . . . . . . . . . . . . . . . . . . . . . . . . . . . . . . . . . . . . . . . . . . . . . . . . . . . . . . . .2
SINGLE PANTRY BODY (c/w item 13) . . . . . . . . . . . . . . . . . . . . . . . . . . . . . . . . . . . . . . . .1
ADAPTER WASHER . . . . . . . . . . . . . . . . . . . . . . . . . . . . . . . . . . . . . . . . . . . . . . . . . . . . . .1
DOUBLE PANTRY BODY (c/w item 13 & 14) . . . . . . . . . . . . . . . . . . . . . . . . . . . . . . . . . . .1
REPLACEMENT HORSESHOE WASHER . . . . . . . . . . . . . . . . . . . . . . . . . . . . . . . . . . . . . .1
REPLACEMENT STEM ASSEMBLY, COLD WATER . . . . . . . . . . . . . . . . . . . . . . . . . . . . . .1
14.
SE50020
REPLACEMENT STEM ASSEMBLY, HOT WATER . . . . . . . . . . . . . . . . . . . . . . . . . . . . . . . .1
1
22
MAIN
COMPONENTS
23
7
8
24
9
4
17
18
19
SEE FAUCET
ASSEMBLY
25
2
27
1
26
3
29
28
5
6
ITEM #
PART #
DESCRIPTION
1.
2.
3.
4.
5.
6.
7.
8.
9.
17.
18.
SK50403
SK50434
FA95081-3
FA11258
KE02004-2
KE50474
KE50429-5
KE54941-5
KE50997
KE50151-2
KE54670-4
KE54670-5
FA30501-1
KE54821-8
KE54721-2
KE54468
KE003672
KE01914
KE01914-1
KE54419-6
KE54419-7
FA21051-2
FA30505-1
BRONZE BEARING . . . . . . . . . . . . . . . . . . . . . . . . . . . . . . . . . . . . . . . . . . . . . . .1
WASHER . . . . . . . . . . . . . . . . . . . . . . . . . . . . . . . . . . . . . . . . . . . . . . . . . . . . . . .1
BOLT, MODIFIED . . . . . . . . . . . . . . . . . . . . . . . . . . . . . . . . . . . . . . . . . . . . . . . . .1
HEX BOLT, 14-20 X 3/4" LG. . . . . . . . . . . . . . . . . . . . . . . . . . . . . . . . . . . . . . . . . .2
TRUNNION SUPPORT BAR AND BRACE ASSEMBLY (KGT6/12T) . . . . . . . . . .1
FOOT . . . . . . . . . . . . . . . . . . . . . . . . . . . . . . . . . . . . . . . . . . . . . . . . . . . . . . . . . .1
PRESSURE GAUGE . . . . . . . . . . . . . . . . . . . . . . . . . . . . . . . . . . . . . . . . . . . . . .1
SAFETY VALVE, 50 PSI, 1/2" (NORTH AMERICA) . . . . . . . . . . . . . . . . . . . . . . .1
BLOW DOWN TUBE . . . . . . . . . . . . . . . . . . . . . . . . . . . . . . . . . . . . . . . . . . . . . .1
KNOB . . . . . . . . . . . . . . . . . . . . . . . . . . . . . . . . . . . . . . . . . . . . . . . . . . . . . . . . .1
HANDLE, 6 GALLON . . . . . . . . . . . . . . . . . . . . . . . . . . . . . . . . . . . . . . . . . . . . .1
HANDLE, 12 GALLON . . . . . . . . . . . . . . . . . . . . . . . . . . . . . . . . . . . . . . . . . . . .1
FIBER WASHER FOR HANDLE . . . . . . . . . . . . . . . . . . . . . . . . . . . . . . . . . . . . . .1
ELECTRICAL CORD . . . . . . . . . . . . . . . . . . . . . . . . . . . . . . . . . . . . . . . . . . . . . .1
CORD CONNECTOR . . . . . . . . . . . . . . . . . . . . . . . . . . . . . . . . . . . . . . . . . . . . .1
WATER LEVEL SIGHT GLASS . . . . . . . . . . . . . . . . . . . . . . . . . . . . . . . . . . . . . . .1
MARINE LOCK ASSEMBLY . . . . . . . . . . . . . . . . . . . . . . . . . . . . . . . . . . . . . . . . .1
FLUE (KGT6/T) . . . . . . . . . . . . . . . . . . . . . . . . . . . . . . . . . . . . . . . . . . . . . . . . . . .1
FLUE (KGT12T) . . . . . . . . . . . . . . . . . . . . . . . . . . . . . . . . . . . . . . . . . . . . . . . . . .1
GASKET, KGT6T . . . . . . . . . . . . . . . . . . . . . . . . . . . . . . . . . . . . . . . . . . . . . . . . .1
GASKET, KGT6/12T . . . . . . . . . . . . . . . . . . . . . . . . . . . . . . . . . . . . . . . . . . . . . . .1
ACCORN NUT. 1/4-20 . . . . . . . . . . . . . . . . . . . . . . . . . . . . . . . . . . . . . . . . . . . . .4
FLAT WASHER . . . . . . . . . . . . . . . . . . . . . . . . . . . . . . . . . . . . . . . . . . . . . . . . . .4
19.
22.
23.
24.
25.
26.
27.
28.
29.
QTY.
KE95467, KGT6T, KGT12T
2
KYM TO APPROVED
- MARCH 25, 2011
GAS
VALVE
7
16
ASSEMBLY
7
5
GAS
ORIFICE
(SEE
CHART)
COMPLETE ASSEMBLIES
PART #
KE02366-1
14 13
KE02366-2
GAS
4
TYPE
3
5
NATURAL
NATURAL
15
14
KE02366-3
KE02366-4
PROPANE
PROPANE
FOR
UNITS
4
KGT6/12T
KGT12TGB
(gearbox option)
KGT6/12T
KGT12TGB
(gearbox option)
1
3
6
2
11
ITEM #
PART #
DESCRIPTION
1.
KE55240-8
GAS VALVE, NATURAL . . . . . . . . . . . . . . . . . . . . . . . . . . . . . . . . . . . . . . . . . . . . .1
(for conversion to propane gas see GAS VALVE REPLACEMENT KIT)
N0440C3.125
N0440C6.25
NIPPLE, 1/2” X 3 1/8” (KGT6/12T) . . . . . . . . . . . . . . . . . . . . . . . . . . . . . . . . . . . . .1
NIPPLE, 1/2” X 6 1/4” (KGT6/12TGB, gearbox option) . . . . . . . . . . . . . . . . . . . . .1
FI00073
FI05163-1
FI05222-2
N0640A6.188
FI05222-3
1/2'' BLACK IRON UNION . . . . . . . . . . . . . . . . . . . . . . . . . . . . . . . . . . . . . . . . . . .1
ADAPTER, 1/2” NPT . . . . . . . . . . . . . . . . . . . . . . . . . . . . . . . . . . . . . . . . . . . . . . . .1
SWIVEL CONNECTOR, TRUNNION . . . . . . . . . . . . . . . . . . . . . . . . . . . . . . . . . . .1
NIPPLE . . . . . . . . . . . . . . . . . . . . . . . . . . . . . . . . . . . . . . . . . . . . . . . . . . . . . . . . . .1
“O” RING (c/w item #7) . . . . . . . . . . . . . . . . . . . . . . . . . . . . . . . . . . . . . . . . . . . . .1
2.
12
3.
4.
5.
6.
7.
QTY.
5
SWITCHES &
INDICATORS
6
1
2
3
4
8
6
5
9
7
8
4
9
3
10
2
1
-D
0560
KE60
OFF
7
ITEM #
PART #
DESCRIPTION
QTY.
1.
2.
3.
4.
5.
6.
7.
8.
9.
KE55486-3
KE55486-2
KE55486-4
KE600537
FA21006
KE600560
SE00114
KE51005
KE50569-1
INDICATOR LIGHT, GREEN . . . . . . . . . . . . . . . . . . . . . . . . . . . . . . . . . . . . . . . . 1
INDICATOR LIGHT, RED . . . . . . . . . . . . . . . . . . . . . . . . . . . . . . . . . . . . . . . . . . 1
INDICATOR LIGHT, AMBER . . . . . . . . . . . . . . . . . . . . . . . . . . . . . . . . . . . . . . . . 1
BRACKET, LIGHT . . . . . . . . . . . . . . . . . . . . . . . . . . . . . . . . . . . . . . . . . . . . . . . . 1
#10-24, HEX NUT, S.S. . . . . . . . . . . . . . . . . . . . . . . . . . . . . . . . . . . . . . . . . . . . . 2
LABEL . . . . . . . . . . . . . . . . . . . . . . . . . . . . . . . . . . . . . . . . . . . . . . . . . . . . . . . . . 1
POTENTIOMETER WITH ON/OFF SWITCH, C/W ITEM #8 . . . . . . . . . . . . . . . . 1
ROTARY SEAL . . . . . . . . . . . . . . . . . . . . . . . . . . . . . . . . . . . . . . . . . . . . . . . . . . 1
KNOB, POTENTIOMETER . . . . . . . . . . . . . . . . . . . . . . . . . . . . . . . . . . . . . . . . . 1
KE000545, KE02366
KYM APPROVED - FEB. 24, 2011
ELECTRICAL COMPONENTS
13
5
3
2
7
12
6
8
10
4
1
ITEM #
9
11
14
PART #
DESCRIPTION
QTY.
KE000565-1
COMPONENT ASSEMBLY, 120V (includes items 1-7, 8A & 9A) . . . . . . . . . . . . . .1
KE000565-2
COMPONENT ASSEMBLY, 240V (includes items 1-7, 8B & 9B) . . . . . . . . . . . . . .1
1.
2.
3.
4.
5.
6.
7.
KE600545
KE50753-7
KE00458-1
KE50303-1
FA11145
FA15018-7
FA11091
COMPONENT MOUNTING BRACKET . . . . . . . . . . . . . . . . . . . . . . . . . . . . . . . . . . . .
RELAY . . . . . . . . . . . . . . . . . . . . . . . . . . . . . . . . . . . . . . . . . . . . . . . . . . . . . . . . . . . .
SOLID STATE CONTROL BOX . . . . . . . . . . . . . . . . . . . . . . . . . . . . . . . . . . . . . . . . . .
BLACK BOX BRACKET . . . . . . . . . . . . . . . . . . . . . . . . . . . . . . . . . . . . . . . . . . . . . . .
SCREW, #10-32 X 3/8 S.S. . . . . . . . . . . . . . . . . . . . . . . . . . . . . . . . . . . . . . . . . . . . . .
SCREW, ZINC PLATED, #6-32 X 1/4 SEMS HEAD . . . . . . . . . . . . . . . . . . . . . . . . . .
MACHINE SCREW, PHILIPS HEAD, #8-32 x 3/8 . . . . . . . . . . . . . . . . . . . . . . . . . . . .
8. A/
B/
KE53838-20
KE53838-18
TRANSFORMER, 120/24V OPTION . . . . . . . . . . . . . . . . . . . . . . . . . . . . . . . . . . . . . . 1
TRANSFORMER, 240/24V OPTION . . . . . . . . . . . . . . . . . . . . . . . . . . . . . . . . . . . . . . 1
9. A/
B/
KE53838-27
KE53838-21
TRANSFORMER, 120/14V OPTION . . . . . . . . . . . . . . . . . . . . . . . . . . . . . . . . . . . . . . 1
TRANSFORMER, 240/16V OPTION . . . . . . . . . . . . . . . . . . . . . . . . . . . . . . . . . . . . . . 1
10.
KE55069-6
SAFETY THERMOSTAT . . . . . . . . . . . . . . . . . . . . . . . . . . . . . . . . . . . . . . . . . . . . . . . 1
11.
KE50294-1
MERCURY SWITCH . . . . . . . . . . . . . . . . . . . . . . . . . . . . . . . . . . . . . . . . . . . . . . . . . . 1
12.
KE00515
THERMISTOR ASSEMBLY . . . . . . . . . . . . . . . . . . . . . . . . . . . . . . . . . . . . . . . . . . . . . 1
13.
KE50556-1
PROBE, LOW WATER . . . . . . . . . . . . . . . . . . . . . . . . . . . . . . . . . . . . . . . . . . . . . . . . 1
14.
WHKGT-2
WIRING HARNESS . . . . . . . . . . . . . . . . . . . . . . . . . . . . . . . . . . . . . . . . . . . . . . . . . . 1
1
1
1
1
2
2
3
KE000565 rev. B
FIRST DRAFT - FEB. 28, 2011 - NEEDS APPROVAL
CONSOLE COMPONENTS
2
4
3
1
2
12
7
5
6
16
10
5
10
19
15
17
8
18
SEE GAS
VALVE
ASSEMBLY
SEE
ELECTRICAL
COMPONENTS
9
20
13
14
11
ITEM #
PART #
DESCRIPTION
QTY.
1.
2.
3.
4.
5.
6.
7.
8.
9.
10.
11.
12.
13.
14.
15.
16.
17.
18.
19.
20.
FA11323
KE600343
FA31030
FA21024
FA05002-45
FA05002-49
KE01917-1
KE002948-1
KE002948-2
FA21006
FA21026
FA95074
KE603870
FA31010
KE54308-3
KE600567
KE53469-2
KE54309
FA15018-8
KE54907-19
SCREW, HEX CAP, 5/16-18 X 3/4 . . . . . . . . . . . . . . . . . . . . . . . . . . . . . . . . . . . . . . .
WASHER, 5/16 . . . . . . . . . . . . . . . . . . . . . . . . . . . . . . . . . . . . . . . . . . . . . . . . . . . . . .
WASHER, SPRING LOCK, 5/16 . . . . . . . . . . . . . . . . . . . . . . . . . . . . . . . . . . . . . . . . .
HEX NUT, 1/16-18 . . . . . . . . . . . . . . . . . . . . . . . . . . . . . . . . . . . . . . . . . . . . . . . . . . .
O-RING, 2 1/4 X 2 1/2 . . . . . . . . . . . . . . . . . . . . . . . . . . . . . . . . . . . . . . . . . . . . . . . .
O-RING, 31D X 31 1/16 OD . . . . . . . . . . . . . . . . . . . . . . . . . . . . . . . . . . . . . . . . . . . .
BEARING SUPPORT WELDMENT . . . . . . . . . . . . . . . . . . . . . . . . . . . . . . . . . . . . . . .
LOUVER PANEL . . . . . . . . . . . . . . . . . . . . . . . . . . . . . . . . . . . . . . . . . . . . . . . . . . . . .
LOUVER PANEL . . . . . . . . . . . . . . . . . . . . . . . . . . . . . . . . . . . . . . . . . . . . . . . . . . . . .
NUT, 10-24 . . . . . . . . . . . . . . . . . . . . . . . . . . . . . . . . . . . . . . . . . . . . . . . . . . . . . . . . .
HEX NUT, 3/8-16 . . . . . . . . . . . . . . . . . . . . . . . . . . . . . . . . . . . . . . . . . . . . . . . . . . . .
NYLON ANCORE NUT . . . . . . . . . . . . . . . . . . . . . . . . . . . . . . . . . . . . . . . . . . . . . . . .
WASHER . . . . . . . . . . . . . . . . . . . . . . . . . . . . . . . . . . . . . . . . . . . . . . . . . . . . . . . . . .
WASHER, SPRING LOCK, 3/8 . . . . . . . . . . . . . . . . . . . . . . . . . . . . . . . . . . . . . . . . .
HIGH VOLTAGE LIGHT ASSEMBLY . . . . . . . . . . . . . . . . . . . . . . . . . . . . . . . . . . . . . .
BRACKET, IGNITION MODULE . . . . . . . . . . . . . . . . . . . . . . . . . . . . . . . . . . . . . . . . .
IGNITION CONTROL MODULE . . . . . . . . . . . . . . . . . . . . . . . . . . . . . . . . . . . . . . . . .
LOW VOLTAGE LEAD ASSEMBLY . . . . . . . . . . . . . . . . . . . . . . . . . . . . . . . . . . . . . . .
SCREW, 6-32 X 3/4 . . . . . . . . . . . . . . . . . . . . . . . . . . . . . . . . . . . . . . . . . . . . . . . . . .
PLUG . . . . . . . . . . . . . . . . . . . . . . . . . . . . . . . . . . . . . . . . . . . . . . . . . . . . . . . . . . . . .
4
8
4
4
2
1
1
1
1
6
6
4
1
6
1
1
2
4
4
1
KE000545
DONE NOT APPROVED - MARCH 10, 2011
GAS TRAIN ASSEMBLY
1
2
10
9
7
16
GAS
ORIFICES
SIZE
6
GAL
12
GAL
6
ELEVATION BTU'S /
ABOVE
HR.
SEA LEVEL
SEA LEVEL 34,000
up to 2000'
2,000' up to 32,300
4,000'
4,000' up to 30,700
6,000'
6,000' up to 29,200
8,000'
8,000' up to 27,700
10,000'
SEA LEVEL 53,000
up to 2000'
2,000' up to 50,400
4,000'
4,000' up to 47,800
6,000'
6,000' up to 45,400
8,000'
8,000' up to 43,200
10,000'
GAS
TYPE
PART
NUMBER
NATURAL
PROPANE
NATURAL
PROPANE
NATURAL
PROPANE
NATURAL
PROPANE
NATURAL
PROPANE
NATURAL
PROPANE
NATURAL
PROPANE
NATURAL
PROPANE
NATURAL
PROPANE
NATURAL
PROPANE
KE53406-1
KE53406-2
KE53406-3
KE53406-4
KE53406-5
KE53406-6
KE53406-7
KE53406-8
KE53406-9
KE53406-10
KE53406-11
KE53406-12
KE53406-13
KE53406-14
KE53406-15
KE53406-16
KE53406-17
KE53406-18
KE53406-19
KE53406-20
GAS
ORIFICE
(SEE
CHART)
3
4
5
14 13
15
14
11
SEE GAS
VALVE
ASSEMBLY
12
ITEM #
PART #
DESCRIPTION
QTY.
1.
KE02012-1
COMPRESSION FITTING (STRAIGHT) & NIPPLE ASS'Y . . . . . . . . . . . . . . . . . . . . . .1
2.
KE003084-1
KE003084-2
KGT6T . . . . . . . . . . . . . . . . . . . . . . . . . . . . . . . . . . . . . . . . . . . . . . . . . . . . . . . . . . . . .1
KGT12T . . . . . . . . . . . . . . . . . . . . . . . . . . . . . . . . . . . . . . . . . . . . . . . . . . . . . . . . . . . .1
3.
KE603085
COMPRESSION ELBOW . . . . . . . . . . . . . . . . . . . . . . . . . . . . . . . . . . . . . . . . . . . . . .1
4.
KE54666
ORIFICE ADAPTER . . . . . . . . . . . . . . . . . . . . . . . . . . . . . . . . . . . . . . . . . . . . . . . . . . .1
5.
KE54700
ORIFICE SUPPORT BLOCK (KGT6T) . . . . . . . . . . . . . . . . . . . . . . . . . . . . . . . . . . . .1
6.
KE01500-3
KE01500-8
BURNER ASSEMBLY (KGT6T), C/W IGNITOR . . . . . . . . . . . . . . . . . . . . . . . . . . . . . .1
BURNER ASSEMBLY (KGT12T), C/W IGNITOR . . . . . . . . . . . . . . . . . . . . . . . . . . . . .1
7.
KE53437-2
IGNITOR . . . . . . . . . . . . . . . . . . . . . . . . . . . . . . . . . . . . . . . . . . . . . . . . . . . . . . . . . . .1
9.
FA95007-11
RETAINING RING . . . . . . . . . . . . . . . . . . . . . . . . . . . . . . . . . . . . . . . . . . . . . . . . . . . .1
10.
KE54434-1
WASHER . . . . . . . . . . . . . . . . . . . . . . . . . . . . . . . . . . . . . . . . . . . . . . . . . . . . . . . . . . .1
11.
12.
13.
14.
15.
16.
KE603869
FA95092-2
FA30505-1
FA31029
FA21008
FA11145
CLAMPING BRACKET . . . . . . . . . . . . . . . . . . . . . . . . . . . . . . . . . . . . . . . . . . . .1
U BOLT, 1/4-20 UNC . . . . . . . . . . . . . . . . . . . . . . . . . . . . . . . . . . . . . . . . . . . . . .1
FLAT WASHER, 1/4 . . . . . . . . . . . . . . . . . . . . . . . . . . . . . . . . . . . . . . . . . . . . . . . 2
LOCK WASHER, 1/4 SS . . . . . . . . . . . . . . . . . . . . . . . . . . . . . . . . . . . . . . . . . . . 4
HEX NUT, 1/4-20 UNC . . . . . . . . . . . . . . . . . . . . . . . . . . . . . . . . . . . . . . . . . . . . 4
SCREW . . . . . . . . . . . . . . . . . . . . . . . . . . . . . . . . . . . . . . . . . . . . . . . . . . . . . . . . 2
KGT6T, KGT12T, KE01500
8
KYM APPROVED - MARCH 16
GEARBOX
9
ASSEMBLIES
10
9
5
6
3
4
(KGT12TGB,
gearbox option only)
7
27
8
2
1
ITEM 26
#
PART #
DESCRIPTION
1.
2.
3.
4.
5.
6.
7.
8.
9.
10.
KE02004-3
SK50403-2
KE54656-4
FA11140
KE02062-2
KE54732
FA11256
FA31029
KE54729-2
FA11145
TRUNNION SUPPORT BAR AND BRACE ASSEMBLY . . . . . . . . . . . . . . . . . . . . .1
BEARING, BRONZE . . . . . . . . . . . . . . . . . . . . . . . . . . . . . . . . . . . . . . . . . . . . . . . .1
TRUNNION SUPPORT BAR TOP END . . . . . . . . . . . . . . . . . . . . . . . . . . . . . . . . .1
SCREW . . . . . . . . . . . . . . . . . . . . . . . . . . . . . . . . . . . . . . . . . . . . . . . . . . . . . . . . . .2
TILTING GEARBOX ASSEMBLY . . . . . . . . . . . . . . . . . . . . . . . . . . . . . . . . . . . . . . .1
HEX BOLT, MODIFIED . . . . . . . . . . . . . . . . . . . . . . . . . . . . . . . . . . . . . . . . . . . . . .1
HEX BOLT . . . . . . . . . . . . . . . . . . . . . . . . . . . . . . . . . . . . . . . . . . . . . . . . . . . . . . .1
LOCKWASHER . . . . . . . . . . . . . . . . . . . . . . . . . . . . . . . . . . . . . . . . . . . . . . . . . . . .1
GEARBOX COVER . . . . . . . . . . . . . . . . . . . . . . . . . . . . . . . . . . . . . . . . . . . . . . . . .1
SCREW . . . . . . . . . . . . . . . . . . . . . . . . . . . . . . . . . . . . . . . . . . . . . . . . . . . . . . . . . .4
29
28
QTY.
9
13
5
12
11
10
8
6
7
15
2
14
1
4
3
ITEM #
PART #
DESCRIPTION
QTY.
1.
2.
3.
4.
5.
6.
7.
8.
9.
10.
11.
12.
13.
14.
15.
KE02060-1
KE02059
KE02061
KE54738-1
KE54750-1
KE54738-3
KE50306-1
KE52192
KE52191
KE50426-3
KE50315
FA95005
KE54737
FA10485
FA20026
GEAR BOX WELDMENT . . . . . . . . . . . . . . . . . . . . . . . . . . . . . . . . . . . . . . . . . . . .1
SPACER GEAR AND SEGMENT ASSEMBLY . . . . . . . . . . . . . . . . . . . . . . . . . . . . .1
TRUNNION BEARING HOUSING HOLDER ASSEMBLY . . . . . . . . . . . . . . . . . . . .1
BRASS WASHER (TRUNNION SPACER) . . . . . . . . . . . . . . . . . . . . . . . . . . . . . . . .2
TILT BRACKET . . . . . . . . . . . . . . . . . . . . . . . . . . . . . . . . . . . . . . . . . . . . . . . . . . . .1
WASHER . . . . . . . . . . . . . . . . . . . . . . . . . . . . . . . . . . . . . . . . . . . . . . . . . . . . . . . .1
TUKT SHAFT . . . . . . . . . . . . . . . . . . . . . . . . . . . . . . . . . . . . . . . . . . . . . . . . . . . . .1
BEARING WASHER . . . . . . . . . . . . . . . . . . . . . . . . . . . . . . . . . . . . . . . . . . . . . . . .2
BEARING . . . . . . . . . . . . . . . . . . . . . . . . . . . . . . . . . . . . . . . . . . . . . . . . . . . . . . . .1
SPACER FOR WORM GEAR . . . . . . . . . . . . . . . . . . . . . . . . . . . . . . . . . . . . . . . . .1
WORM GEAR . . . . . . . . . . . . . . . . . . . . . . . . . . . . . . . . . . . . . . . . . . . . . . . . . . . . .1
TENSION PIN . . . . . . . . . . . . . . . . . . . . . . . . . . . . . . . . . . . . . . . . . . . . . . . . . . . . .1
TILT SHAFT, END SPACER . . . . . . . . . . . . . . . . . . . . . . . . . . . . . . . . . . . . . . . . . .1
HEX BOLT . . . . . . . . . . . . . . . . . . . . . . . . . . . . . . . . . . . . . . . . . . . . . . . . . . . . . . .1
HEX NUT . . . . . . . . . . . . . . . . . . . . . . . . . . . . . . . . . . . . . . . . . . . . . . . . . . . . . . . .1
KGT12TGB, KE02062-2
KYM TO APPROVED - MARCH 25, 2011
150
200
100
250
20
50
30
10
300
40
SERVICE PROCEDURES
0
0
IR
NT A
VE
50
350
FOR MAINTENANCE AND REPAIRS CONTACT YOUR AUTHORIZED MANITOWOC SERVICE AGENCY
AND HAVE A QUALIFIED SERVICE TECHNICIAN MAINTAIN YOUR EQUIPMENT.
60
400
psi
DANGER:
100
REMOVE ELECTRICAL
0
20
POWER PRIOR
50 TO
10
SERVICING.
0
200
250
20
50
0
150
30
ENSURE KETTLE IS AT
0
ROOM TEMPERATURE AND
300
40
PRESSURE GAUGE IS
50
SHOWING ZERO OR LESS
350
60 PRIOR TO REMOVING ANY FITTINGS.
400
250
30
0
psi
10
0
kPa
300
40
50
IR
NT A
VE
200
IR
NT A
VE
150
DANGER:
DANGER:
SHUT GAS SUPPLY
OFF PRIOR TO
SERVICING.
100
kPa
60
350
400
psi
kPa
KETTLE VENTING INSTRUCTIONS
150
200
100
250
20
50
150
250
20
50
0
Pressure
Gauge
200
100
30
10
0
IR
NT A
VE
50
60
psi
Pressure
Relief
Valve
350
400
kPa
The following procedure should be followed when the
Vacuum/Pressure
Gauge needle is in the "VENT AIR" zone:
150
200
!
100
50
60
psi
300
40
300
40
0
IR
NT A
VE
0
30
10
350
400
kPa
3. Turn kettle OFF. Add cold
water to kettle until its surface
temperature is below 100°F.
The pressure gauge needle
should be in the green zone,
indicating a vacuum in the
kettle’s jacket.
REPAIRING LEAKS IN STEAM
JACKETED KETTLE FITTINGS
250
20 30 for and eliminate leaks prior to venting (See
NOTE:
Check
50
10
Repairing
Leaks40 in 300
Steam Jacketed Kettle Fittings.
0
50
IR
NT A
VE
0
60
350
DANGER: PRESSURE RELIEF
VALVE WILL EXHAUST HIGH
TEMPERATURE STEAM. CONTACT
WITH SKIN COULD RESULT IN
SERIOUS BURNS. KEEP FACE,
HANDS AND BODY CLEAR OF DISCHARGE.
psi
kPa
6
5
7
4
8
1. Turn kettle ON and set dial to
10 (Max.), heat the empty
kettle until unit cycles off.
3
Pressure
Relief Valve
Sight
Glass
Water Level
Probe
If unit will not hold a vacuum the most likely cause is a
leak at one of the components threaded fittings, or within
the component itself.
9
2
1
Pressure
Gauge
400
10
There are two methods available for preventing leaks. The
advantage of the “Preferred Method” is that you eliminate
all potential leaks.
OFF
2. Vent kettle by pulling safety
valve ring 8-10 times in short
2-3 second blasts with a 5
second interval between pulls.
NOTE: If unit cycles ON, stop
venting and wait for kettle to
cycle OFF before continuing.
Preferred Method: Replace (using teflon tape)
Pressure Relief Valve, Pressure Guage, Water Level Probe
and Sight Glass.
Second Method: Remove and reinstall (using teflon
tape) all of the above four components. If unit continues
to lose vacuum replace components as per “Preferred
Method”.
KYM APPROVED - MARCH 14, 2011
CALIBRATING PROCEDURE
Insure the unit has a vacuum before you begin
calibrating procedures. If unit requires venting refer
to Kettle Venting Instructions.
2.
Turn dial to "10" (Max.).
3.
Allow the unit to cycle twice.
4.
Check temperature of the inner kettle surface with a
digital surface thermometer.
5.
Temperature should be between 260° F and 265° F.
6.
Using a screw driver adjust temperature by turning
the potentiometer on the black box. Turn very little.
Turn clockwise to INCREASES and counter-clockwise
to DECREASE temperature.
7.
Allow the unit to cycle twice.
8.
Check temperature of the inner kettle surface with a
digital surface thermometer.
DANGER:
PRESSURE RELIEF VALVE WILL
EXHAUST HIGH TEMPERATURE STEAM.
CONTACT WITH SKIN COULD RESULT IN
SERIOUS BURNS. KEEP FACE, HANDS
AND BODY CLEAR OF DISCHARGE.
!
DANGER:
REMOVE 0ELECTRICAL POWER
PRIOR TO SERVICING.
C. Fill unit via 1/2” Street Elbow
B.
Attach Street
Elbow
9. Repeat steps 4. through 8. until unit is calibrated.
PRESSURE
RELIEF
VALVE
PERIODIC
TESTING
PROCEDURE
A.*
Remove Pressure
Relief Valve
*Important-
150
200
100
250
IR
NT A
VE
20 30
Pull ring on Pressure Relief
Valve
50
10
300
40
prior to removal
0
0to
50
350
insure vessel is not pressurized.
60
400
psi
kPa
DISTILLED WATER REQUIREMENTS
0
150
200
100
DANGER:
PRESSURE RELIEF VALVE WILL
EXHAUST HIGH TEMPERATURE STEAM.
CONTACT WITH SKIN COULD RESULT IN
SERIOUS BURNS. KEEP FACE, HANDS
AND BODY CLEAR OF DISCHARGE.
!
Kettle
Capacity
250
When red “Low Water Light” comes on,
add distilled or botttled water.
20
50
0
6 gallon
70 ounces
12 gallon
120 ounces
1. Ensure kettle is at room temperature
and pressure gauge showing zero
or less pressure.
30
10
0
50
60
150
350
400
psi
kPa
200
100
250
20
50
300
40
IR
NT A
VE
1.
RESERVOIR FILL PROCEDURES
30
10
300
40
WARNING: Kettle surface will be hot and steam will be
released during testing. Take necessary precautions
including the use of gloves and eye protection to prevent
personal injury.
2. Remove electrical plug from
power source.
1.
With the kettle empty, turn dail to "10" (Max.). Allow the
kettle to heat until the unit cycles off.
3. Pull Pressure Relief Valve (A) open to insure vessel
is not pressurized.
2.
Turn dial to "0" (Off).
3.
Stand to the side of the pressure relief valve discharge
tube and pull valve open for a maximum of one
second. Repeat test three to four times. Each time the
mechanism should move freely and be accompanied
by a rapid escape of steam.
0
IR
NT A
VE
0
50
60
psi
350
400
kPa
Shut off gas supply to kettle.
4. Remove Pressure Relief Valve (A).
5. Replace Pressure Relief Valve (A) with 1/2” Street
Elbow (B).
If valve appears to be sticking replace pressure relief valve.
6. Add distilled or bottled water (C)
through the Street Elbow (B),
using a funnel if necessary. Fill
the unit to the high level mark on
the Sight Glass.
If foreign material is discharged then drain kettle and
replace pressure relief valve.
7. Apply a thread sealant (i.e. Teflon tape) to the
Pressure Relief Valve's (A) thread and replace.
If Low Water Light comes on after this procedure, you need
to add water to the jacket (see RESERVOIR FILL
0
PROCEDURE).
8. Reconnect gas and electrical supplies.
9. The kettle must now be vented. (Refer to the
KETTLE VENTING INSTRUCTIONS).
Sight
Glass
APPROVED - MARCH 18, 2011
KETTLE JACKET CLEANOUT AND PASSIVATION PROCEDURES
The following procedure should be preformed at least once every three years to prevent possible corrosion
and ensure the optimum life of the kettle.
DANGER:
DANGER:
WORKING0 ON MACHINES WITH
POWER COULD RESULT IN SEVERE
ELECTRICAL SHOCK.
RUST INHIBITOR CAN BE DANGEROUS.
READ LABEL AND FOLLOW SAFETY
INSTRUCTIONS.
Remove
Pressure
Relief
Valve
Attach
Street
Elbow
!
DANGER:
PRESSURE RELIEF VALVE WILL
EXHAUST HIGH TEMPERATURE STEAM.
CONTACT WITH SKIN COULD RESULT IN
SERIOUS BURNS. KEEP FACE, HANDS
AND BODY CLEAR OF DISCHARGE.
Fill unit via Street Elbow
!
DANGER:
Important-
EXTREMELY HOT SURFACES.WORK
ONLY ON COLD KETTLE.
Pull pressure relief valve
ring open to insure vessel
is not pressurized.
RUST INHIBITOR
150
10. Tilt kettle upright, apply a thread sealant (i.e. Teflon
tape) to the sight glass threads and replace.
200
100
250
20
50
30
10
Use a “radiator rust inhibitor” that can be purchased at
your local
automotive centre. It should not contain any
psi
anti-freeze and preferably no lubricant.
0
300
40
0
IR
NT A
VE
50
350
60
11. Refer to chart below to determine the required
volume of water.
400
kPa
To ensure satisfactory mixing follow the manufacturer’s
instructions.
150
Kettle Size
200
100
250
20
30
DISPOSAL - Follow all Federal, State and local codes
when disposing of product.
50
0
10
50
IR
NT A
VE
6 U.S. Gal.
12 U.S. Gal.
300
40
0
350
60
400
psi
kPa
PROCEDURE
150
250
20
30
10
50
60
psi
13. Fill jacket via the street elbow
with the mixture.
0
300
40
0
IR
NT A
VE
0
12. In a separate container mix water with the required
rust inhibitor.
1. Ensure kettle is at room temperature and
pressure gauge showing zero or less pressure.
200
100
50
Volume of Mixture
U.S. Gal.
Liters
1.6
5.8
0
2.2
8.3
350
400
kPa
2. Shut off and disconnect gas supply.
14. Remove street elbow.
3. Remove electrical plug from power source.
15. Apply a thread sealant (i.e. Teflon tape) to the pressure
relief valve and replace.
4. Remove bolts holding kettle to tabletop.
5.
Pull ring on pressure relief valve to insure there
is no pressure within the kettle jacket.
16. Reconnect gas and electrical supplies.
6.
Remove pressure relief valve.
18. Cool kettle.
7.
Replace pressure relief valve with street elbow (see
above illustration).
19. Repeat steps 5-15.
8.
Remove sight glass from left side of kettle.
9.
Tilt kettle on its side (sight glass opening facing
downwards) and allow to drain. Flush out with water.
✔
SAFETY
1
2
THERMOSTAT
CONNECTION
17. Turn kettle on, vent and heat to high for 1/2 hour.
20. Replace bolts holding kettle to tabletop.
21. Reconnect gas and electrical supplies.
22. Turn kettle on and vent kettle.
3
LOW WATER
LEVEL PROBE
CONNECTION
Probe
fully
inserted
in tube
✘
Wiring is properly
connected
Probe
removed
partially
✘
Probe
removed
completely
✘
Thermostat
electrically
bypassed
✔
Probe properly
attached
APPROVED - APRIL 1, 2011
NATURAL GAS TO PROPANE
CONVERSION KIT
(for KGT6T & KGT12T/GB)
UNIT EXHAUST CONTAINS CARBON MONOXIDE.
OPERATE ONLY UNDER A PROPERLY FUNCTIONING
HOOD WITH ADEQUATE MAKEUP AIR.
THIS CONVERSION KIT SHALL ONLY BE INSTALLED BY A
QUALIFIED SERVICE AGENCY
For use at 0-2000 feet elevation on Honeywell valves Model
8305. For higher elevations consult the factory.
PART #’s
KE003716-1 kit for KGT6T (34,000 BTU)
KE003716-2 kit for KGT12T/GB (52,000 BTU)
Includes parts listed below:
Photo showing manometer hooked up to outlet side of
valve.
INSTRUCTIONS
PART #
DESCRIPTION
QTY.
1.
Shut off gas supply.
KE53406-2
Orifice, 1.75mm, Propane Gas (for KGT6T) . . . . . . .1
2.
Unplug electrical cord from source.
KE53406-12
Orifice, 2.15mm, Propane Gas (for KGT12T/GB) . . .1
3.
Replace the gas orifice with the one supplied.
KE603911-1
Conversion Label (for KGT6T) . . . . . . . . . . . . . . . . . .1
4.
Remove cover.
KE603911-2
Conversion Label (for KGT12T/GB) . . . . . . . . . . . . . .1
KE55240-4
Gas Valve Conversion Kit . . . . . . . . . . . . . . . . . . . . .1
5.
KE603910
Instruction Sheet . . . . . . . . . . . . . . . . . . . . . . . . . . . .1
Remove component mounting plate to get
access to the gas valve.
6.
Follow instructions in KE55240-4, GAS VALVE
CONVERSION KIT to convert gas valve to 10 in
W.C.
7.
Check inlet pressure is between 12-14 inches
W.C.
8.
Using instructions from kit KE55240-4 check
input rate of unit.
9.
On the underside of the console cover with
indelible marker place the following information:
Company, Name, Address & Date of Conversion.
WARNING
This conversion kit shall be installed by a qualified
service agency in accordance with the manufacturer’s
instructions and all applicable codes and requirements
of the authority having jurisdiction. If the information in
these instructions is not followed exactly, a fire, and
explosion or production of carbon monoxide may result
causing property damage, personal injury or loss of life.
The qualified service agency is responsible for the
proper installation of this kit. The installation is not proper
and complete until the operation of the converted
appliance is checked as specified in the manufacturer’s
instructions supplied with the kit.
10. Reassemble unit.
11. Install conversion label as close as possible to
the existing rating plate.
CAUTION
Install
conversion
label here.
The gas supply shall be shut off prior to disconnecting
the electrical power, before proceeding with the
conversion.
12. Reconnect gas and electrical supply.
13. Test kettle operation buy following
“INSTALLATION CHECK” section of the service
manual.
KE603910
OPERATING SEQUENCES
1.
Turn On-Off / Temperature Dial
*
*
*
*
14 volt transformer is energized and powers solid state control system.
Temperature knob is turned up and control box calls for heat.
Relay (RY-1) closes and powers 24 volt transformer.
Ignition control box is powered.
3.
Ignitor Sparks
*
*
Gas valve is energized.
Ignitor sparks and ignition occurs.
4.
Temperature Reached
*
*
*
*
Solid state controls senses temperature reached.
Relay (RY-1) opens and 24 volt transformer loses power.
Ignition control box is turned off.
Gas valve closes.
5.
Maintaining Temperature
*
*
*
*
Solid state controls senses temperature drop.
Relay (RY-1) closes and powers 24 volt transformer.
Ignitor control box is powered.
Steps three and four are repeated.
SOLID STATE CONTROL SEQUENCE
Our solid state controls consist of the following components.
On-Off / Temperature
Dial (Potentiometer)
*
*
*
Provides or interrupts electrical power to the control system.
Rotate to change resistance from 0 to 50,000 ohms. This resistance is
compared to the resistance on the thermistor using a voltage comparator
circuit inside the control box.
If the resistance is lower than the thermistor resistance then the control box will
provide 14v dc to pin #8. The green indicator light illuminates and the control
relay (RY-1) is energized closed to provide power to the heating system.
Control Box
*
*
Analyzes inputs from water level probe, tilt switch, potentiometer, thermistor.
Energizes control relay (RY-1)
Water Level Probe
*
Senses water in jacket.
Tilt Switch
*
When kettle is in upright position tilt switch is closed to complete circuit
between pin #8, the relay (RY-1) and green indicator light.
Thermistor
*
The thermistor resistance decreases as temperature increases. When the
thermistor resistance equals the potentiometer then 14v dc is removed from
pin #8. The control relay (RY-1) returns to the normally open position.
Green LED Light
Indicates that the control box is calling for heat. Pin #8 powered.
Red LED Light
Indicates that the water level probe is not immersed in water. Not enough water
in the jacket or kettle tilted.
Relay (RY-1)
When energized allows the heating circuit to function. Electric elements or gas
burner system.
NOTES:
* A ground loop circuit must be established between kettle body, water in jacket, water level probe and
control box. If this loop is present, it indicates that there is sufficient water in the kettle for safe operation.
* If there is not sufficient water in the jacket then the loop is broken and the control box will prevent 14v DC
from being supplied to pin #8. The control relay (RY-1) will remain (or return) to the normally open
position and the unit cannot heat. The red LED light will be illuminated.
KYM TO APPROVED - MARCH 25, 2011
WIRING
DIAGRAM
4
1
2
6
4
7
9
5
8
10
8
12
3
14
13
11
ITEM #
PART #
DESCRIPTION
1.
2
3.
4.
5.
6.
7.
8.
9.
10.
KE55486-2
KE55486-3
KE55486-4
SE00114
KE00458-1
KE00515
KE50556-1
KE50753-7
KE50294-1
KE53838-27
KE53838-21
KE53437-2
KE55069-6
KE53469-2
KE53838-20
KE53838-18
KE55240-8
L.E.D., RED
L.E.D., GREEN
L.E.D., AMBER
POTENTIOMETER WITH ON/OFF SWITCH, C/W RUBBER BOOT
SOLID STATE CONTROL BOX
THERMISTOR ASSEMBLY
WATER LEVEL PROBE
RELAY
MERCURY SWITCH
TRANSFORMER, 120/14V OPTION
TRANSFORMER, 240/16V OPTION
IGNITOR
SAFETY THERMOSTAT
IGNITION CONTROL #05-296466-151
TRANSFORMER, 120/24V OPTION
TRANSFORMER, 240/24V OPTION
GAS VALVE, NATURAL
11.
12.
14.
15.
15.
15
For conversion to propane gas see GAS VALVE REPLACEMENT KIT