1
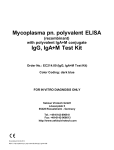
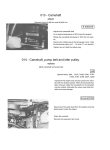
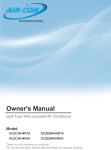
RCD 1 2 0BT
manual
• GB •
RCD 120BT MANUAL
Installation . . . ... ............. ........ ..... .. ..... . ...... . .. . 02
Additional information ................................. 04
General operations ...................................... 05
Radio operations ......................................... 09
CD/SD/MMC/USB Operations ................... .. 11
RDS operation ............................................. 14
BLUETOOTH ...............................................15
MP3 WMA overview .............................. . . . . . .. 16
Specification ................................................. 17
Before playing discs ................................. . ... 18
Trouble shooting ............................................ 19
01
RCD 120BT MANUAL
INSTALLATION
PRECAUTION S
Cho os e the moun ting loc at ion whe re the un it wi ll no t int er fer e wi th the no rmal
driving function of the driver.
Bef or e final ly ins tal ling the uni t, co nne ct the wi ring tem por ar ily and mak e su re
it is all connected up properly and the unit and the system work properly.
Use onl y the par ts incl uded wi th the uni t to ens ur e pr oper inst al lat ion. The use
of unauthorized parts can cause ma lfunctions.
Con sul t wi th you r ne ar es t de al er if ins tal lat ion req ui res the dr illing of ho les or
other mo difications of the vehicle.
Install the unit where it does not get in the driver's way and cannot injure the
passenger if there is a sudden stop. Like an eme rgency stop.
If installation angle exceeds 30 from horizontal, the unit mi ght not give its
optimu m performa nce.
0
30
Avoid installing the unit where it would be subject to high temp erature, such
as from direct sunlight, or from hot air, form the heater, or where it would be
subject to dust, dirt or excessive vibration. Do not expose this equipme nt
to rain or mo isture.
DIN FRON T-MOU NT (Me thod A)
Installing the unit
1. Dashboard
2. Holder
After inserting the holder into
the dashboard, select the
appropriate tab according to
the thickness of the dashboard
ma terial and bend them
inwards to secure the holder in
(Fig. 1)
place.
3. Screw
02
2
1
3
(Fig. 1)
RCD 120BT • MANUAL
INSTALLATION
1
Removing the unit
6
1
7
4
2
5
2
3
3
( Fig . 2 )
( Fig . 3 )
1. Dashboard
2. Nut (5mm)
3. Spring Washer
4. Screw (5 x 25mm)
5. Screw
6. Strap
Be sure to use the strap to
secure the back of the unit in
place. The strap can be bent by
hand to the desired angle.
7. Plain Washer
2.Insert fingers into the groove in the
front of frame and pul l out to remove
the frame. (When reatt achi ng the
frame , point the side wi th a groove
dow nwards and attach it.)
3.Leve r
Insert the leve rs sup plied with the
uni t into the grooves at both sides of
the uni t and show n in figure unti l they
click. Pulling the levers makes possible
to remove the unit fro m the dashboard.
Fastening the unit to the factory
radio mounting bracket:
2
3
2
1. Select a position where the screw
holes of the bracket and the
screw holes of the main unit
become aligned (are fitted), and
tighten the screws at 2 places on
each side. Use either truss screws
(5 x 5mm) or flush surface screws
(4 x 5mm)
2. Screw
3. Dashboard or Console
DIN REAR-MOUNT (Method B)
Installation using the screw holes on
the sides of the unit
INPUT THE SD CARD
The SD oblique angle keeps
rightward exposure , put into
the SD slot and press it again
to eject .
03
RCD 120BT • MANUAL
ADDITIONAL INFORMATION
B. T. ANT EN NA
RE AR Rc h LI NE OUT
RE AR Lc h LI NE OUT
RED
BLUE
WHITE
WHITE/BLACK
GREEN
GREEN/BLACK
04
YELLOW
BLACK
GREY
GREY/BLACK
VIOLET
VIOLET/BLACK
RCD 120BT • MANUAL
GENERAL OPERATIONS
FRONT PANEL LAYOUT
2
4
3
6
5
10
DISP
9
1
AMS
MENU
MODE
MU
BND
1/
19
2/INT
3/RPT
4/RDM
12
13
14
11
15
16
21
20
7
8
17
1. Power / Mode / Next / Previous Button
2. Release Button
3.
4.
5.
6.
7.
8.
Menu / Volume Button
Mute /
Button
Display Button
LCD Display
Flashing LED
Reset Button
9. Band/
switch /ID3 select
10. Automatically memory storing
11. Play / Pause & Preset Button 1
18
12. Intro & Preset Button 2
13. Repeat & Preset Button 3
14. Random & Preset Button 4
15. Preset Button 5
16. Preset Button 6
17. Eject knob
18. CD Slot
19. USB connecter
20. SD/MMC Slot
21. AUX IN JACK
05
RCD 120BT • MANUAL
GENERAL OPERATIONS
GENERAL OPERATIONS
POWER /MOD conversion
2. Under power off status,short press is power on,
Under power on status,short press is switching mode,long press is power off.
FRONT PANEL RELEASE
Press REL button (2) to detach the removable front panel
SOUND ADJUSTMENT
Turn on (3) can adjust the desired volume quality.
A).Press MENU button (3) will change in the following order.
Option:
VOL
( Volume)
BAS
TRE
(Bass)
(Treble)
BAL
( Balance)
FAD
( Fader)
Volume control/MENU
Rotating this knob, you can adjust VOL/BASS/TREB/BAL/FAD . To select the
functions, press the VOL knob shortly until the desired functions are shown on the
display.
Increase or decrease the volume by turn the VOL knob right or left. These buttons
can be used to adjust the BASS, TREBLE, BALANCE and FADER.
BASS
Press MENU/VOL button(3) one time. Adjust bass level by using MENU/VOL(3)Knob.
TREBLE
Press MENU/VOL button(3) two times. Adjust treble level by using MENU/VOL(3)
Knob
BALANCE
Press MENU/VOL button(3) three times. Adjust sound balance between left and
right speakers by using MENU/VOL(3)Knob .
MENU
06
MENU/VOL
RCD 120BT • MANUAL
GENERAL OPERATIONS
MENU/VOL
DSP OFF/ON
AREA EUR/USA
LOUD OFF/ON
DEMO OFF/ON
VOL ADT/LAST
DX/LOCAL
AEM OFF/ON
BEEP ON/OFF
MONO/STEREO
SEEK
MENU/VOL
MENU/VOL
07
RCD 120BT • MANUAL
GENERAL OPERATIONS
DISPLAY
Press DISP button (5) to operate as the conversion of each display mode as follow:
- Time is displayed for 5sec when DISP key is pressed, and it returns to its
previous display ( Folder, File name...) unless DISP key is pressed again.
3) From the clock mode, when DISP Key is pressed for longer than 1sec,
clock mode switches to clock Adjusting mode and the clock display
begins flashing. At this time clock can be changed by pressing ( + / -) ,
or the ENCODER VOLUME.
LIQUID CRYSTAL DISPLAY
Exhibit current frequency and activated functions on the display (6).
FLASHING LED
When ACC off ,take out the front panel from main unit that the LED (7) will be flashing.
08
RCD 120BT • MANUAL
GENERAL OPERATIONS
MENU/VOL
DSP OFF/ON
AREA EUR/USA
LOUD OFF/ON
DEMO OFF/ON
VOL ADT/LAST
DX/LOCAL
AEM OFF/ON
BEEP ON/OFF
MONO/STEREO
SEEK
MENU/VOL
MENU/VOL
07
RCD 120BT • MANUAL
RADIO OPERATIONS
LOCAL RADIO STATION SEARCH
Press MENU button repeatedly to choose LOCAL(DX).Rotate VOL regulator or
press VOL+/- buttons on the RCto switch between LOCAL and DX.When the
LOCAL function is on the local stations(stations with weak radio)
Press MENU button repeatedly until LOUD ON is displayed.Rotate VOL regulator
on the front panel or press VOL+/VOL- buttons on the RC to select loudness
ON or OFF.
MOno/Stereo control (in FM radio mode)
Press MENU button repeatedly until the display shows STEREO (MONO).Rotate
VOL regulator or press VOL+/- buttons on the RC to switch between STEREO
reception and MONO reception.Improvement of reception of distant stations
can be done by selecting mono mode,which may cut down some reception noise.
AREA USA/EUR SETUP
In Radio mode. Press MENU button for several seconds. LCD will be show from
DSP OFF/ON AREA USA/EUR. At AREA USA/EUR. You can use VOL +/to select the AREA frequency.
10
RCD 120BT • MANUAL
CD/SD/MMC/USB OPERATIONS
Discs for playback:
This unit can play disc types: CD/CD -R/-RW.
Compatible with formats: CDDA/MP3/WMA.
Loading and ejecting a disc
1. Turn the power on.
2. Insert the disc with the printed side facing upward into the slot.
3. Press EJECT button to eject the disc.
Multi-media card MMC/SD card slot
Support MP3/WMA ID3 format music only. Detach the front panel. Carefully
insert the SD/MMC card into the card slot on the inner panel. Attach the panel.
Unit starts playback automatically.
USB jack
Carefully connect the USB driver to the USB adapter cable and then insert it into
the USB jack on the front panel. Unit starts playback automatically.
USB/SD/MMC notes:
USB functions (flash memory type) MP3 music play.
1. SD/ MMC card support.
2. FAT 12/ FAT 16/ FAT 32 is possible
- FAT 12/16 (dir: 200 support, file:500 support),
- FAT 32 (dir: 200 support, file:500 support).
3. Filename: 32 byte/ Dir name: 32byte.
4. Tag (id3tag ver2.0)
- Title/ Artist/ Album: 32 byte support.
5. Multi card reader not support.
6. USB 2.0 support.
Note:
USB format supports 2.0.
Capacity: up to 16 GB.
SD cards brands: Cannon, Fuji film, Palm, Motorola, Microsoft, IBM, HP,
Compaq, Sharp, Samsung, etc.
Capacity: up to 16 GB.
MMC cards brands: Ericsson, Nokia, Motorola, HP, Palm, Sanyo, Microsystems,
etc.
Capacity: up to 16 GB.
Note: Because of the great variety of products with SD and MMC card slots and
their sometimes quite manufacturer-specific functions the producer can neither
guarantee that all devices will be recognized nor that all operating options that
are possible in theory will actually work.
11
RCD 120BT • MANUAL
CD/SD/MMC/USB OPERATIONS
Id3 Tag information
This unit supports ID3 tag ver2.0. If an MP3/WMA file has ID3 Tag information,
it will be displayed on the LCD. If there is no ID3 Tag information, nothing will be
shown on LCD. The ID3 Tag information may include File, Folder, Music,Album
or Artist data.
NEXT/PREVIOUS
Rotate the NEXT/PREVIOUS button to choose next or previous track. Press
longer than 1 sec., to choose forward playback or backward playback.
PLAY/PAUSE
Press PAUSE button to pause the playback, press one more time to resume the
normal playback.
INTRO (Preview all Tracks)
When this button is pressed, "INT ON" indication is displayed and the first
several seconds of each track of the disc is played. Press again to stop intro and
listen to track.
REPEAT
When RPT button is pressed, "RPT ON" indication is displayed and playback of
the selected track will be continually repeated until the track repeat mode is
cancelled by pressing RPT button again.
RANDOM
When RDM button is pressed,"RDM ON" indication is displayed and each track
of the disc is played in random instead of normal order. To cancel RANDOM
mode, press RDM button again.
TRACK DOWN/UP SELECT (In case of MP3/WMA files)
-10/5 button: 10 Track down
+10/6 button: 10 Track up
Selection of MP3/WMA files
1.Searching Time
•Press AMS one time, then searching time is activated.
•Turn VOL knob to right or left, select the time you want.
•Press VOL knob, then the select time of the song will play
12
RCD 120BT • MANUAL
GENERAL OPERATIONS
DISPLAY
Press DISP button (5) to operate as the conversion of each display mode as follow:
- Time is displayed for 5sec when DISP key is pressed, and it returns to its
previous display ( Folder, File name...) unless DISP key is pressed again.
3) From the clock mode, when DISP Key is pressed for longer than 1sec,
clock mode switches to clock Adjusting mode and the clock display
begins flashing. At this time clock can be changed by pressing ( +/-),
or the ENCODER VOLUME.
LIQUID CRYSTAL DISPLAY
Exhibit current frequency and activated functions on the display (6).
FLASHING LED
When ACC off ,take out the front panel from main unit that the LED (7) will be flashing.
08
RCD 120BT • MANUAL
Long press SEL key,select AF and TA ON, AF flashing on display
TA appears on display.
SEL
Press SEL key,PTY flashing on display when select PTY.
Press SEL enter TA,
14
3
RCD 120BT • MANUAL
BLUETOOTH
1.Pairing connect.
Turn on car unit, put your mobile near the unit, activate your mobile bluetooth
function.Soon the phone will find the new bluetooth device "CAR AUDIO" .
Input the pairing password “8888” and clik OK. The phone will prompt the
matching successful.When the pairing connect is successful,on the LCD, it shows
BT ON, and the bluetooth logo “ ”will stop blinking .Then you may perform the
bluetooth operation.
REMARK:depend on bluetooth mobile, the bluetooth system support “HSP” “HFP”
“A2DP” and AVRCP bluetooth profile.
2.Handsfree phone service
If your mobile phone have matched with the unit. You can dial calls out through your
mobile phone. It will turn to unit automatically when calling come in and the calling
phone number will indicat on the LCD screen.
-Press the “BAND” button shortly to accept the call .Then you can talk with the
other party through the mic on the panel.
-Press “MUTE” button shortly to reject the call when calling come in.
-Press “MUTE” button shortly to hang up after you finish the talk.
3.Advance Audio distributing profile(A2DP) playing.
Through mobile and unit A2DP connected, the music playing in mobile can turn
to the unit audio system play. Press button “ ”and “ ” in the panel can select
the music track.
-Press “ ” button shortly to pause the music playing.
-Press “BAND”(mode) longly to temporarily discommect the bluetooth.
-Press “BAND”(mode) button longly again to reconnect the bluetooth.
4.Phone number book.
This bluetooth system can automatically store incoming call numbers, up to
10 phone numbers.
-Press “MUTE”(mode) button longly to enter the phone number book and press
VOL button to look up the phone number.
-Press “BAND” button once can call out you desired phone number.
5. Interrupt bluetooth connection/reconnection.
Pressing the “BAND” button shortly to interrupt the bluetooth connection when
your are talking a call and the voice can turn to mobile speaker.
Press “BAND” button again to reconnection.
NOTE:Different mobile phone have different responses.We do not guarantee all the
operation of connectable devices.
6. How to delete stored phone number?
You jus t can store ten number of missed ,rejected and ANS under separately,
and the first number will auto deleted when the 11th number calling
7. How to use “Missed”,”Rejected””Auto ANS” Functions.
Press MUTE button for 3 seconds to enter into REVIEVED /MISSED/REJECTED/
ANTO .ANS .Turn VOL button for choosing the telephone number.
15
RCD 120BT • MANUAL
MP3 is short for MPEG Audio Layer 3 and refers to an audio compression
technology standard.
· This product allows playback of MP3 files on CD-ROM, CD-R or CD-RW discs.
· The unit can read MP3 files written in the format compliant with ISO 9660.
However it does not support the MP3 data written by the method of packet write.
· The unit can not read an MP3 file that has a file extension other than “.mp3”
· If you play a non- MP3 file that has the “.mp3” extension, you may hear some
noise.
· In this manual, we refer to what are called “MP3 file” and “ folder” in PC
terminology as “ track ” and “ album ”, respectively.
· Maximum number of directory level is 8, including the root directory. Maximum
number of files and folders per disc is 256.
· The unit may not play tracks in the order of Track numbers.
· The unit plays only the audio tracks if a disc contains both audio tracks and
MP3 files.
· When playing a disc of 8 kbps or “VBR”, the elapsed playing time in the display
window will not be correct and also the intro play may not function properly.
“ VBR ”:Variable Bit Rate.
· The unit supports the playback of WMA files. The playback of ID3 tags for WMA
format is not guaranteed, it depends on versions and availability of Cyrillic
alphabet.
· WMA (Windows Media Audio) -music data compression format, created by
Microsoft Corporation. This format uses coding algorithm for compression of
initial audio-record, greatly decreasing the file size, but, saving the good sound
quality even when the bit rate is low (for example, 64 Kbit/s).
· Remember that the unit may not play the tracks in order they are written on disc.
·
Notes on creating your own CD-R or CD-RW containing MP3 files:
To enjoy high quality sound, we recommend converting to MP3 files with a
sampling frequency of 44.1 kHz and a fixed bit rate o f 128 kbps.
· DO NOT store more than 256 MP3 files per disc.
· For ISO 9660 - compliant format, the maximum allowable depth of nested
folders is 8, including the root directory (folder).
· When CD-R disc is used, playback is possible only for discs, which have been
finalized.
· Make sure that when MP3 CD-R or CD-RW is burned that it is formatted as a
data disc and NOT as an audio disc.
· You should not write non-MP3 files or unneeded folders along with MP3 files
on the disc otherwise it takes a long time until the unit starts to play MP3 files.
· With some CD-R or CD-RW media, data may not be properly written depending
on its manufacturing quality. In this case, data may not be reproduced correctly.
High quality CD-R or CD-RW disc is recommended.
· Up to 16 characters are displayed for the name of an Album or a Track. ID3TAG
version 1.x is required.
· Note that the unit may not play Tracks in the order that you wrote them to the
disc.
·
16
RCD 120BT • MANUAL
GENERAL OPERATIONS
FRONT PANEL LAYOUT
2
4
3
6
5
10
DISP
9
1
AMS
MENU
MODE
MU
BND
1/
19
2/INT
3/RPT
4/RDM
12
13
14
11
15
16
21
20
7
8
17
1. Power / Mode / Next / Previous Button
2. Release Button
3.
4.
5.
6.
7.
8.
Menu / Volume Button
Mute /
Button
Display Button
LCD Display
Flashing LED
Reset Button
9. Band/
switch /ID3 select
10. Automatically memory storing
11. Play / Pause & Preset Button 1
18
12. Intro & Preset Button 2
13. Repeat & Preset Button 3
14. Random & Preset Button 4
15. Preset Button 5
16. Preset Button 6
17. Eject knob
18. CD Slot
19. USB connecter
20. SD/ MMC Slot
21. AUX IN JACK
05
RCD 120BT • MANUAL
BEFORE PLAYING DISCS
Cleaning the CD
Before playing a CD, wipe it off with a clean, dust-free cleaning cloth.
Wipe the disc in the direction of the arrow.
Always insert the CD with the label side facing upwards.
If the CD is inserted with the printed side facing downwards, the device
may be damaged.
Note: If there is already a CD in the CD slot , do not try to insert a second
CD. This may damage the device.
Always hold CDs by the edge. In order to keep the CD clean do not touch
the surface. Pull out the CD as follows.
Do not attach any sticker or adhesive tape on the CD.
Do not expose the CD to direct sunlight or sources of heating.
Do not leave CDs in a car if it parked in direct sunlight as that will lead to
a considerable rise in the temperature inside the car.
Note: Do not use any solvents such as petrol or thinning agents. Commercially
available cleaning substances of antistatic spray will damage the device.
18
RCD 120BT • MANUAL
TROUBLE SHOOTING
Before going through the check list, check wiring connection. If any of the
problems persist after checklist has been made, consult your nearest service
dealer
Symptom
Causes
Solution
The car ignition key not
been switched on
If the power supply is properly
connected to the car accessory
terminal, switch the ignition
key to ACC
The fuse is blown
Replace a new fuse
A CD is already inside the
player slot
Remove the CD from the player
and insert the new one
Inserting the CD in reverse
direction
Insert the CD with the label
facing up
The CD is extremely dirty or
defected
Clean the CD or try to play
a new one
Temperature inside the car is
too high
Cool off until the ambient
temperature return to normal
Condensation
Leave the player off for an
hour or so and try again
Volume is at minimum
Adjust volume to desired level
Wiring is not properly
connected
Check wiring connection
The installation angle is more
o
than 30
Adjust the installation angle to
o
less than 30
CD is extremely dirty or
Defected
Clean the CD or try to play
a new one
Do Not Work
The built-in microcomputer is
not operating properly due to
Interference
Press the RESET button or
reinstall the front panel
properly
The Radio or
The antenna cable is not
connected correctly
Connect the antenna cable
correctly
The signals are too weak
Select the station manually
No Power
CD Cannot Be
Loaded or Ejected
No Sound
Sound Skipping
The Operation Keys
Automatic Selection
Does Not Work
19
WWW.CALIBER.NL
Caliber Head Office • The Netherlands • Fax: +31 (0)416 69 90 01 • E-mail: [email protected]