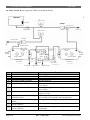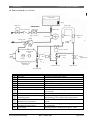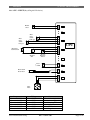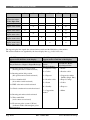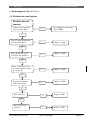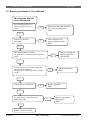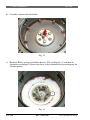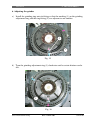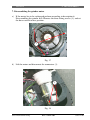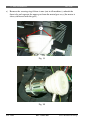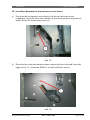
1
ROYAL CLASSIC
ROYAL EXCLUSIV
ROYAL DIGITAL
ROYAL DIGITAL REDESIGN
ROYAL DIGITAL PLUS
ROYAL PROFESSIONAL
ROYAL PROFESSIONAL REDESIGN
ROYAL CAPPUCCINO
ROYAL CAPPUCCINO REDESIGN
ROYAL COFFEEBAR
ROYAL OFFICE
SERVICE
MANUAL
Revision 4
Saeco
Saeco International Group
SEPT.: 2003
All parts of the present service manual are the property of Saeco International Group. All rights reserved. The manufacturer
is not responsible for any errors or omissions in the present document. Any reproduction or unauthorised use of this manual
without the prior written permission of the manufacturer or by contractual agreement is prohibited.
Table of contents
1.
Introduction
2.
Technical data
3.
Operation
4.
Functions and timing
5.
Service programme
6.
Faults
7.
Fault diagnosis
8.
Repairs / Service schedule
9.
Disassembly
10.
Saeco International Group
Circuit diagrams
REV.4 SEPT.2003
CHAPTER 1
INTRODUCTION
Page
1. Documents required
2. Equipment
3. Material
4. Safety instructions
5. Overview of product range
Saeco International Group
REV.4 SEPT.2003
1
1
1
1
2
ROYAL
1. INTRODUCTION
1. Documents required
The following documents and requirements are necessary to qualify for an authorised repair.
•
•
Service manual
Operating instructions where available
2. Tools
In addition to an electrical workshop, the following standard tools are necessary:
1
1
1
1
Description
Special screwdriver (Pozi)
Special screwdriver (Pozi)
Special screwdriver (Torx)
Temperature measuring device
Comments
Size: PZ1
Size: PZ2
Size: T10
Temperature range > 150ºC
Suitable for point measurements
3. Material
Description
Heat conductive paste
Bolt adhesive
Descaler
Grease solvent
Silicone grease (food safe)
Comments
Temperature resistance ≥ 200°
Temperature resistance ≥ 200°
Brand
User's choice
User's choice
Saeco
User's choice
Saeco
4. Safety instructions
All prescriptions and regulations in force regarding the repair of electrical equipment must be
observed!
The machine must be disconnected from the main power supply before performing repair work.
Switching the machine off is not an adequate measure.
The Royal coffee machine is classified under Protection Class 1. Protective devices must be tested
once the repair work has been completed.
Saeco International Group
REV.4 SEPT.2003
Page 1/2
1. INTRODUCTION
ROYAL
5. Overview of product range
Royal Redesign
TYPE
Classic *
Exclusive
Digital
Digital
Redesign
Digital Plus
Professional
(Instant
Steam)
Professional
(Rapid Steam)
Professional
Redesign
Cappuccino
Pregrinding/
brewing
Prebrewing
x
x
x
Royal
Cappuccino
maker
Steam system
Second
pump
Second
heating
system
Display
Dial control
x
x
x
x
Rapid Steam
x
x
Instant Steam
x
x
x
Rapid Steam
x
x
Rapid Steam
x
x
Instant Steam
x
Cappuccino
Redesign
Coffeebar **
x
x
Instant Steam
x
x
x
Rapid Steam
Office***
x
Pipe
heater
Flow
heater
Pipe
heater
Pipe
heater
Flow
heater
Pipe
heater
Pipe
heater
x
x
x
x
x
x
x
x
Note:
* All machines, with the exception of the Royal Classic, are fitted with a powder coffee feed.
** The Royal Coffeebar has a fixed water connection (reversible).
***Royal Office – no steam function.
Output capacity:
Royal Series (Household): Maximum average daily output: 30 coffees
Royal Office / Coffeebar: Maximum average daily output: 50 coffees
Page 2/2
REV.4 SEPT.2003
Saeco International Group
CHAPTER 2
TECHNICAL DATA
Page
Saeco International Group
1. Technical Data Royal
(Classic)
1
2. Technical Data Royal
(Digital/Digital Redesign/Exclusive)
2
3. Technical Data Royal
(Cappuccino/Professional Instant Steam/
Cappuccino Redesign)
3
4. Technical Data Royal
(Professional-Rapid Steam/Prof. Redes.
Digital Plus/Coffeebar)
4
5. Technical Data Royal
(Office)
5
REV.4 SEPT.2003
ROYAL
2. TECHNICAL DATA
1. Technical data (Royal Classic)
Royal Classic
Power supply/output:
Safety system:
Temperature monitoring:
Continuous flow thermoblock:
Pump:
Safety valve:
Water filter:
Gearmotor:
Cup warmer/gear resistor:
Grinder (conical grinder):
Motor:
Second doser:
Power consumption:
Pump pressure:
Dimensions W x D x H in mm:
Weight:
Capacity of coffee bean container:
Capacity of water tank:
Instantaneous water heater capacity:
De-aeration time:
Heating time:
Re-heating time:
Steam heating time:
Coffee dispensing temperature:
Grinding time:
Time to make expresso:
Time to make cup of coffee:
Saeco International Group
Technical data
230V 50Hz 1250W
170°C Safety thermostat for instantaneous water heater
KTY Temperature sensors transmit respective
temperatures to electronic system
Instantaneous water heater (1090 W) for coffee and hot
water dispensing
Ulka reciprocating piston pump with angle connector
and thermostat - 48 W, 230V, 50 Hz.
Type EX5, 20 l/h
Conventional safety valve connected to pump
Installed in machine in front of the turbine and pump.
Direct current, 30 - 35 V
Approx. 437W / 130Ω (only activated when gears are
operational)
Plastic grinding screw, galvanised steel grinding cone
and grinding disc
260 V Direct current
230 V - Magnet coil
During heating - approx. 4.5 A
Standby - Approx. 0.04 A
Max. 15 bar
330/385/395
Approx. 15 kg
Approx. 300g
Approx. 2.4 l max. filling volume
Approx. 1.0 ccm, 10 ml volume
Approx. 1 - 2 sec. for initial star-up
Approx. 80 sec. with water at 10°C to operating
temperature
None due to boiler
From coffee temperature to 127°C - Approx. 50 sec.
Approx. 86° C
Initial grinding with completely empty machine:
Approx. 15 sec. / subsequent grinding: approx. 5.5 sec.
Approx. 28 sec. for 50 ml
Approx. 40 sec. for 100 ml
REV.4 SEPT.2003
Page 1/5
2. TECHNICAL DATA
ROYAL
2. Technical data (Royal Digital / Exclusive/ Digital Redesign)
Royal Digital / Exclusive / Digital Redesign
Power supply/output:
Safety system:
Temperature monitoring:
Continuous flow thermoblock:
Pump:
Safety valve:
Water filter:
Gearmotor:
Cup warmer/gear resistor:
Grinder (conical grinder):
Motor:
Second doser:
Second doser:
Power consumption:
Pump pressure:
Dimensions W x D x H in mm:
Weight:
Capacity of coffee bean container:
Capacity of water tank:
Boiler - Capacity:
De-aeration time:
Heating time:
Re-heating time:
Steam heating time:
Coffee dispensing temperature:
Grinding time:
Time to make expresso:
Time to make cup of coffee:
Page 2/5
Technical data
230V 50Hz 1250W
170°C Safety thermostat for instantaneous water heater
KTY Temperature sensors transmit respective
temperatures to electronic system
Instantaneous water heater (1090 W) for coffee and hot
water dispensing
Ulka reciprocating piston pump with angle connector
and thermostat - 48 W, 230V, 50 Hz.
Type EX5, 20 l/h
Conventional safety valve connected to pump
Installed in machine in front of the turbine and pump.
Direct current, 30 - 35 V
Approx. 437W / 130Ω
Plastic grinding screw, galvanised steel grinding cone
and grinding disc
Direct current, 260 V
Coffee dose adjustable by means of lever (6 - 9g) outside
housing
230 V - Magnet coil
Doser for powder coffee, by means of measuring spoon
During heating - approx. 4.5 A
Standby - Approx. 0.04 A
Max. 15 bar
330/385/395 (Digital)
385/450/395(Exclusive)
Approx. 15 kg
Approx. 300g
Approx. 2.4 l max.
Approx. 1.0 ccm, 10 ml volume
Approx. 1 - 2 sec. for initial star-up
Approx. 80 sec. with water at 10°C
None due to boiler
From coffee temperature to 127°C - Approx. 50 sec.
Approx. 86° C
Initial grinding with completely empty machine:
Approx. 15 sec. / subsequent grinding: approx. 5.5 sec.
Approx. 28 sec. for 50 ml
Approx. 40 sec. for 100 ml
REV.4 SEPT.2003
Saeco International Group
ROYAL
2. TECHNICAL DATA
3. Technical data (Royal Professional Instant Steam / Cappuccino / Cappuccino Redesign)
Royal Professional Instant Steam / Cappuccino / Cappuccino Redesign
Power supply/output:
Safety system:
Temperature monitoring:
Continuous flow thermoblock:
Second thermoblock:
Pump:
Second pump:
Safety valve:
Water filter:
Gearmotor:
Cup heater/Gear resistor:
Grinder (conical grinder):
Motor:
Second doser:
Second doser:
Power consumption:
Pump pressure:
Dimensions W x D x H in mm:
Weight:
Capacity of coffee bean container:
Capacity of water tank:
Instantaneous water heater capacity:
De-aeration time:
Heating time:
Re-heating time:
Steam heating time:
Coffee dispensing temperature:
Grinding time:
Time to make expresso:
Time to make cup of coffee:
Saeco International Group
Technical data
230V 50Hz 2300W
170°C Safety thermostat for instantaneous water heater
KTY Temperature sensors transmit respective
temperatures to electronic system
Instantaneous water heater - 1090 W, supplementary
heating 437 W for coffee and hot water dispensing
Instantaneous water heater for steam dispensing
(instant steam) - 1090 W
In Redesign this feature takes the form of pipe heating.
Ulka reciprocating piston pump with angle connector
and thermostat - 48 W, 230V, 50 Hz.
Type EX5, 20 l/h
Technical data as above (for instant steam function)
Conventional safety valve connected to pump
Installed in machine in front of the turbine and pump.
Direct current, 30 - 35 V
Approx. 437W / 130Ω
Plastic grinding screw, galvanised steel grinding cone
and grinding disc
260 V Direct current
Coffee dose adjustable by means of lever (6 - 9g) outside
housing
230 V - Magnet coil
Doser for powder coffee, by means of measuring spoon
During heating - approx. 9 A
Standby - Approx. 0.04 A
Max. 15 bar
385/450/395
Approx. 16 kg
Approx. 300g
Approx. 2.4 l max.
Approx. 1.0 ccm, 10 ml volume
Approx. 1 - 2 sec. for initial star-up
Approx. 80 sec. with water at 10°C
None due to boiler
None due to second instantaneous water heater (steam
dispensing possible even during coffee dispensing /
second pump)
Approx. 86° C
Initial grinding with completely empty machine:
Approx. 15 sec. / subsequent grinding: approx. 5.5 sec.
Approx. 28 sec. for 50 ml
Approx. 40 sec. for 100 ml
REV.4 SEPT.2003
Page 3/5
2. TECHNICAL DATA
ROYAL
4. Technical data (Royal Digital Plus / Professional Rapid Steam / Prof. Redesign / Coffeebar)
Royal Digital Plus / Professional Rapid Steam / Prof. Redesign / Coffeebar
Power supply/output:
Safety system:
Temperature monitoring:
Continuous flow thermoblock:
Pipe heating:
Pump:
Safety valve:
Water filter:
Gearmotor:
Cup heater/Gear resistor:
Grinder (conical grinder):
Motor:
Second doser:
Second doser:
Power consumption:
Pump pressure:
Dimensions W x D x H in mm:
Weight:
Capacity of coffee bean container:
Capacity of water tank:
Fixed water connection:
(only for Royal Coffeebar)
Instantaneous water heater capacity:
De-aeration time:
Heating time:
Re-heating time:
Steam heating time:
Coffee dispensing temperature:
Grinding time:
Time to make expresso:
Time to make cup of coffee:
Page 4/5
Technical data
230V 50Hz 1600W
170°C Safety thermostat for instantaneous water heater
KTY Temperature sensors transmit respective
temperatures to electronic system
Instantaneous water heater - 1090 W - supplementary
heating 437 W for coffee and hot water dispensing
1000W – Steam dispensing (rapid steam)
Ulka reciprocating piston pump with angle connector
and thermostat - 48 W, 230V, 50 Hz.
Type EX5, 20 l/h
Conventional safety valve connected to pump
Installed in machine in front of the turbine and pump.
Direct current, 30 - 35 V
Approx. 437W / 130Ω
Plastic grinding screw, galvanised steel grinding cone
and grinding disc
260 V Direct current
Coffee dose adjustable by means of lever (6 - 9g) outside
housing
230 V - Magnet coil
Doser for powder coffee, by means of measuring spoon
During heating - approx. 5.7 A
Standby - Approx. 0.04 A
Max. 15 bar
385/450/395 (Royal Profi new)
385/480/395 (Royal Coffeebar)
Approx. 16 kg
Approx. 300g
Approx. 2.4 l max.
Inlet valve / non-return valve
Pressure control - 0.8 bar
Approx. 1.0 ccm, 10 ml volume
Approx. 1 - 2 sec. for initial star-up
Approx. 90 sec. with water at 10°C
None due to boiler
None, due to pipe heating
Approx. 86° C
Initial grinding with completely empty machine:
Approx. 15 sec. / subsequent grinding: approx. 5.5 sec.
Approx. 28 sec. for 50 ml
Approx. 40 sec. for 100 ml
REV.4 SEPT.2003
Saeco International Group
ROYAL
2. TECHNICAL DATA
5. Technical data (Royal Office)
Royal Office
Power supply/output:
Safety system:
Temperature monitoring:
Continuous flow thermoblock:
Pump:
Safety valve:
Water filter:
Gearmotor:
Gear resistor:
Grinder (conical grinder):
Motor:
Second doser:
Second doser:
Power consumption:
Pump pressure:
Dimensions W x D x H in mm:
Weight:
Capacity of coffee bean container:
Capacity of water tank:
Instantaneous water heater capacity:
De-aeration time:
Heating time:
Re-heating time:
Steam heating time:
Coffee dispensing temperature:
Grinding time:
Time to make expresso:
Time to make cup of coffee:
Saeco International Group
Technical data
230V 50Hz 1500W
170°C Safety thermostat for instantaneous water heater
KTY Temperature sensors transmit respective
temperatures to electronic system
Instantaneous water heater (1090 W) for coffee and hot
water dispensing
Ulka reciprocating piston pump with angle connector
and thermostat - 48 W, 230V, 50 Hz., Type EX5
20 l/h
Conventional safety valve connected to pump
Installed in machine in front of the turbine and pump.
Direct current, 30 - 35 V
Approx. 437W / 130Ω
Plastic grinding screw, galvanised steel grinding cone
and grinding disc
260 V Direct current
Coffee dose adjustable by means of lever (6 - 9g) outside
housing
230 V - Magnet coil
No
During heating - approx. 5.7 A
Standby - Approx. 0.04 A
Max. 15 bar
385/450/460
Approx. 14 kg
Approx. 1,000g
Approx. 6 l max.
Approx. 1.0 ccm, 10 ml volume
Approx. 1 - 2 sec. for initial star-up
Approx. 90 sec. with water at 10°C
None due to boiler
From coffee temperature to 127°C - Approx. 50 sec.
Approx. 86° C
Initial grinding with completely empty machine:
Approx. 15 sec. / subsequent grinding: approx. 5.5 sec.
Approx. 28 sec. for 50 ml
Approx. 40 sec. for 100 ml
REV.4 SEPT.2003
Page 5/5
CHAPTER 3
OPERATION
Page
1. Operation (Royal Classic)
1.1. Operating instructions
1
1
2.
Operation
(Royal Exclusive/Digital/Digital Redes.)
2.1. Operating instructions
2.2. User programme
3
3
5
3.
Operation
(Profess. Instant Steam Cappuccino/
Cappuccino Redesign / Profess. Redesign) 7
3.1. Operating instructions
7
3.2. User programme
10
4.
Operation
(Professional-Rapid Steam/Coffeebar/
Digital Plus)
4.1. Operating instructions
4.2. User programme
4.3. Vending menu
5.
5.1.
5.2.
5.3.
Saeco International Group
Operation (Royal Office)
Operating instructions
User programme
Vending menu
REV.4 SEPT.2003
12
12
15
17
19
19
21
24
ROYAL
3. OPERATION
1. Operation (Royal Classic)
1.1. Operating instructions (quick reference)
Action
1
2
3
4
5
6
7
8
9
Comments
Getting started
Unpack machine.
Check for damage.
Fill water tank
Fill coffee beans container.
Connect mains plug.
Turn on main switch.
De-aerate water circuit.
Open hot water pressure valve
until water flows.
Heating stage (approx. 1.5
min).
Ready
Making coffee
Select coffee quantity using
Depending on cup size.
the control dial.
Place cup under dispenser.
Press start button (coffee
Press once = 1 cup of coffee.
button).
Press twice = 2 cups of coffee.
10
To interrupt coffee making.
11
Press steam button.
12
13
14
Empty dregs drawer
Empty drip tray
Clean water tank
Clean coffee bean
container.
Clean the housing
Rinse brewing unit
Clean brewing unit and
oil filter
Descale
Saeco International Group
Ready
To warm coffee.
To froth milk.
Cooling stage (can be
accelerated by de-aerating)
Ready (to make coffee)
Temp.
LED
Steam
LED
Light on
Light on
Light on
Light on
Light
flashes
Light on
Light on
Light on
Light on
Light on
Light on
Flashes
once
Flashes
twice
Press start button again.
Dispensing steam
Heating stage.
Steam dispensing.
Open tap valve.
Press steam button /
deactivate steam function.
HS LED
Light on
Light on
Light on
Light on
Light on
Light
flashes
Light on
Light on
Light
Light
flashes
flashes
Light on
Cleaning
Storage capacity of 30 tablespoons (dreg counter reset only if warning to
empty grounds container is triggered and machine is turned on)
After 30 servings
As required
As required
As required
1 x per week
1 x per month
Depending on water hardness
REV.4 SEPT.2003
Page 1/25
3. OPERATION
ROYAL
Descale
Water hardness
Descaling frequency
Very hard water (over 21ºdH)
About every 4 weeks
Hard water
(15º-21ºdH)
About every 6 weeks
Medium water
(15º-21ºdH)
About every 2 months
Soft water
(up to 7ºdH)
About every 3 months
Do not use vinegar! (damages the pump)
Descaling procedure:
1. Place Saeco descaler into fresh water tank.
2. Fill with about one litre of hot water.
3. Make 2-3 coffees to descale coffee circuit.
4. Remove the remaining descaler mixture in cupfuls via the HWS valve in intervals of
about 5 – 10 min.
6. Rinse the machine with about 2 litres of fresh water. Make 2-3 coffees to rinse coffee
circuit (brewing unit filter(s) must be cleaned before descaling).
Troubleshooting
Fault
Does not function
Possible cause
Brewing unit does not turn
on (alarm LED flashes)
Brewing unit not properly installed
or not closed.
Coffee grinds container not properly
installed.
Remedy
Check mains plug / mains
circuit breaker /
and ensure machine door is
closed.
Install brewing unit
correctly.
Install brewing unit
correctly.
Brewing unit does not turn
on (alarm LED on)
Coffee bean container is empty.
Fill coffee beans container.
Water tank is empty.
Fill water tank.
Brewing unit does not turn
on (steam LED flashes)
No water / steam
After steam dispensing the system is
not or is insufficiently de-aerated.
Air in the circuit.
De-aerate machine.
Steam nozzle blocked.
Free opening using a thin
needle.
Select lower grind level;
e.g. change from 5 to 3.
Select higher grind level;
e.g. change from 5 to 7.
Change brand of coffee.
Use fresh coffee.
Change grind level.
Decalcify machine.
No power
The coffee flows too quickly
Beans ground too coarsely.
The coffee flows too slowly
Beans ground too finely.
Coffee has no froth.
Unsuitable coffee blend.
Coffee is no longer freshly roasted.
Beans ground too coarsely or finely.
The machine is calcified.
Longer heating time or less
hot water.
The brewing unit cannot be
removed.
2/25
The brewing unit is not in home
position.
REV.4 SEPT.2003
De-aerate.
Turn machine on, close
service door and check
dregs drawer
(the brewing unit goes
automatically to home
position).
Saeco International Group
ROYAL
3. OPERATION
2. Operation (Royal Digital / Exclusive / Digital Redesign)
2.1. Operating instructions (quick reference)
Action
Comments
1
2
3
4
5
Getting started
Unpack machine.
Check for damage.
Fill water tank
Fill coffee beans container.
Connect mains plug.
Turn on main switch.
6
De-aerate water circuit.
7
8
9
10
11
12
Open hot water pressure valve
until water flows.
Heating stage (approx. 80 sec.)
Ready
Making coffee
Programme coffee quantity for Depending on cup size.
each selection button.
Programme by keeping the
coffee selection button pressed
•
Expresso lungo
until the desired quantity is
•
Coffee
reached.
•
Expresso
Place cup under dispenser.
Elect programme and press
appropriate button.
Press once = 1 cup of coffee
Press twice = 2 cups of coffee.
Coffee dispensing / Powder coffee
Place cup under dispenser.
Place powder coffee in powder
container (1 measuring
spoonful)
Select powder button and
Only one coffee can be
relevant coffee button (long
dispensed at a time.
coffee / coffee / expresso)
Press steam button.
Dispensing steam
Heating stage.
Ready
14
15
16
Steam dispensing.
Open HWS valve
Press steam button / deactivate
steam function.
De-aerate
To warm coffee.
To froth milk.
Cooling stage (can be
accelerated by de-aerating)
Ready (to make coffee)
Display
Self test/
Heating
Heating
Heating
Select product
Ready for operation
Quantity programme
Select product
Ready for operation
1 Coffee
2 Coffees
Select product
Powder coffee
Steam
Heating
Steam
Ready for operation
Steam
Overheating
Hot water
Overheating
Ready for operation
Descale: See Royal Cappuccino
Saeco International Group
REV.4 SEPT.2003
Page 3/25
3. OPERATION
Empty dregs drawer
Empty drip tray
Clean water tank.
Clean coffee bean
container.
Clean the housing.
Rinse brewing unit
Clean brewing unit and
oil filter
Descale
ROYAL
Cleaning
Storage capacity of 30 tablespoons (dreg counter reset only if warning to
empty grounds container is triggered and machine is turned on).
After 30 servings
As required.
As required.
As required.
1 x per week
1 x per month
Depending on water hardness.
Troubleshooting
Fault/Indicator
Does not function
BREWING UNIT NOT
DETECTED
GRINDS CONTAINER
NOT DETECTED
COFFEE BEAN
CONTAINER EMPTY
FILL WATER
DE-AERATE
OVERHEATING
Possible cause
No power
Brewing unit not properly installed
or not closed.
Coffee grinds container not properly
installed.
Coffee bean container is empty.
Install brewing unit correctly.
Water tank is empty.
Water tank
After steam dispensing the system is
not or is insufficiently de-aerated.
De-aerate machine.
GRINDER OBSTRUCTED
DE-AERATE
Air in water system.
Instead of coffee, only water
is dispensed.
No water / steam
Coffee powder selection button is
pressed, but no coffee is dispensed.
Steam nozzle blocked.
The coffee flows too quickly
Beans ground too coarsely.
The coffee flows too slowly
Beans ground too finely.
Coffee is not hot enough
The cups are cold.
Boiler temperature too low.
Coffee has no froth.
Unsuitable coffee blend.
Coffee is no longer freshly roasted.
Beans ground too coarsely or finely.
The machine is calcified.
Longer heating time or less
hot water.
The brewing unit cannot be
removed.
4/25
Remedy
Check mains plug / mains
circuit breaker / Ensure
machine door is closed.
The brewing unit is not in home
position.
REV.4 SEPT.2003
Brewing unit correctly
installed.
Fill coffee container.
Clean grinder.
Open water nozzle.
Add one level measure of
coffee powder.
Free opening using a thin
needle.
Select lower grind level;
e.g. change from 5 to 3.
Select higher grind level;
e.g. change from 5 to 7.
Pre-heat cups.
Increase temperature in user
programme.
Change brand of coffee.
Use fresh coffee.
Change grind level.
Decalcify machine.
Turn machine on, close
service door and check dregs
drawer.(the brewing unit goes
automat. to home position)
Saeco International Group
ROYAL
3. OPERATION
2.2. User programme (Royal Digital / Exclusive / Digital Redesign)
The table below indicates the various values, settings and programmes which can be read and selected
through the user programme options.
Various cleaning programmes can also be activated.
Access (Royal Digital / Exclusive): Access via the ENTER button.
Access (Royal Digital Redesign): Selection entry via menu button.
- Digital display/indicator
- Steam selection
- Pre-selection powder compartment
or scroll in menu or change value
- Standby or save value
- Coffee or scroll in menu and change value
- Expresso or exit menu
- Expresso lungo
- Programme menu selection
Menu procedure:
1. Select desired programme using the cursor buttons (arrow buttons).
2. Access appropriate item using the ENTER button.
3. Use the arrow buttons to handle each item.
4. Confirm with the ENTER button.
Item
Language
Rinse
Setting/Indicator
Country
ON/OFF
Water hardness 1 – 500 l
2 – 300 l
3 – 150 l
4 – 80 l
Saeco International Group
Standard
German
OFF
3
Function
Display language
Rinses residual water from circuit every
time the machine is turned on (temp. of
instantaneous water heater < 50°C) (not in
Royal Exclusive).
Change in coffee quantity until descaling
required (1-4).
REV.4 SEPT.2003
Page 5/25
3. OPERATION
Item
Setting/Indicator
Heating plate
ON/OFF
Temperature
Maximum
High
Medium
Low
Minimum
ON
LONG
AUS
ON/OFF
Number
Pre-brewing
Pre-grinding
Total coffee
Descale
Scale indicator
reset
YES/NO
Timer
0-12.45 hours
Cleaning cycle
Factory
settings
ROYAL
Standard
Function
Activate / deactivate heating plate.
Medium
Adjustment of coffee temperature.
ON
Coffee is moistened before actual brewing
(better aroma)
OFF
Pre-grinds the next coffee dose.
Coffee quantity indicator
Activate descaling programme (when
descaling required)
Counter reset (only if descaling indicator is
activated).
With the exception of Royal Exclusive:
Reset via steam button.
Machine switches to standby mode if not
used within the programmed time.
(Standby mode can also be activated at any
time via the menu buttons.)
Cleaning programme for brewing unit
Initialise standard settings
(only for Royal Dig. Redesign)
0
Exit: ESC button / Menu item - EXIT and ENTER (depending on programme).
6/25
REV.4 SEPT.2003
Saeco International Group
ROYAL
3. OPERATION
3. Operation (Royal Professional Instant Steam / Prof. Redesign / Cappuccino / Capp. Redesign)
3.1. Operating instructions (quick reference)
Action
Comments
1
2
3
4
5
Getting started
Unpack machine.
Check for damage.
Fill water tank
Fill coffee beans container.
Connect mains plug.
Turn on main switch.
6
De-aerate water circuit.
7
Activate the hot water button
until water flows continuously
Heating stage (approx. 80 sec.)
Ready
Making coffee
Programme coffee quantity for Depending on cup size.
each selection button.
Programme by keeping the
programme selection button
•
Expresso lungo
pressed until the desired
•
Coffee
quantity is reached.
•
Expresso
8
Place cup under dispenser.
9
Elect programme and press
appropriate button.
10
11
14
15
16
Press once = 1 cup of coffee.
Press twice = 2 cups of coffee.
Coffee dispensing / Powder coffee
Place cup under dispenser.
Place powder coffee in powder
container (1 measuring
spoonful)
Select powder button and
Only one coffee can be
relevant coffee button (long
dispensed at a time.
coffee / coffee / expresso)
Steam dispensing.
Open steam valve
Dispensing steam
To warm coffee.
To froth milk.
Hot water
Hot water
Press the hot water button
(only when hot water
briefly to start hot water
programme is deactivated in
dispensing; press again to stop.
the user menu).
Hot water quantity
Keep the hot water button
programming
pressed for the desired time.
(only when hot water
The last programme entered is
programme is activated in the saved
user menu).
Saeco International Group
REV.4 SEPT.2003
Display
Self test/
Heating
Heating
Heating
Select product
Ready for
operation
Quantity
programme
Select product
Ready for
operation
1 Coffee
2 Coffees
Select product
Powder coffee
Steam
Hot water
Hot water
Quantity
programme
Page 7/25
3. OPERATION
Action
17
18
19
20
Hot water
Quantity programme
ROYAL
Comments
The last programme saved is
activated by pressing the hot
water button briefly.
Cappuccino maker
Cappuccino
Press the cappuccino button
(only when cappuccino
briefly to start cappuccino
maker programme is
dispensing; press again to stop.
deactivated in the user menu)
Cappuccino
Keep the cappuccino button
Quantity programme
pressed for the desired time.
(only when cappuccino
The last programme entered is
maker programme is
saved
activated in the user menu)
Cappuccino
The last programme saved is
Quantity programme
activated by pressing the
Cappuccino button briefly.
Display
Hot water
Cappuccino
Cappuccino
Quantity
programme
Cappuccino
Note: The Steam and Cappuccino functions can be used parallel to the coffee programme in the Royal
Professional Instant Steam, Royal Cappuccino and Royal Cappuccino Redesign systems.
Empty dregs drawer
Empty drip tray
Clean water tank.
Clean coffee bean container.
Clean the housing.
Rinse brewing unit
Clean brewing unit and
lubricate
Clean filter
Descale
Descale:
Cleaning
Storage capacity of 30 tablespoons (dreg counter reset only if warning
to empty grounds container is triggered and machine is turned on)
After 30 servings
As required
As required
As required
1 x per week
1 x per month
Depending on water hardness.
1. Place Saeco descaler into fresh water tank.
2. Fill with about one litre of hot water.
3. Remove about two to three cups via the brewing unit (cannot be poured).
4. Activate the Descale item in the user menu by selecting OK and open the HWS valve
(place a sufficiently large container under the steam pipe). The descaler mixture is pumped
at intervals through the circuit.
5. Rinse: Fill the water tank once again and open the steam valve (about 2-3 cups via
brewing unit).
Reset: Under the descale indicator item (Enter - YES - Enter).
8/25
REV.4 SEPT.2003
Saeco International Group
ROYAL
3. OPERATION
Troubleshooting
Fault/Indicator
Does not function
BREWING UNIT NOT
DETECTED
GRINDS CONTAINER
NOT DETECTED
COFFEE BEAN
CONTAINER EMPTY
FILL WATER
DE-AERATE
OVERHEATING
GRINDER OBSTRUCTED
DE-AERATE
Possible cause
No power
Brewing unit not properly installed
or not closed.
Coffee grinds container not properly
installed.
Coffee bean container is empty.
Install brewing unit
correctly.
Brewing unit correctly
installed.
Fill coffee container.
Water tank is empty.
Water tank
After steam dispensing the system is
not or is insufficiently de-aerated.
De-aerate machine.
Air in water system.
No water / steam
Coffee powder selection button is
pressed, but no coffee powder is
dispensed.
Steam nozzle blocked.
The coffee flows too quickly
Beans ground too coarsely.
The coffee flows too slowly
Beans ground too finely.
Coffee is not hot enough
The cups are cold.
Instantaneous water heater
temperature too low.
Unsuitable coffee blend.
Coffee is no longer freshly roasted.
Beans ground too coarsely or finely.
The machine is calcified.
Instead of coffee, only water
is dispensed.
Coffee has no froth.
Longer heating time or less
hot water.
The brewing unit cannot be
removed.
Saeco International Group
Remedy
Check mains plug / mains
circuit breaker /
Ensure machine door is
closed.
The brewing unit is not in home
position.
REV.4 SEPT.2003
Clean grinder.
Press hot water button.
Add one level measure of
coffee powder.
Free opening using a thin
needle.
Select lower grind level;
e.g. change from 5 to 3.
Select higher grind level;
e.g. change from 5 to 7.
Pre-heat cups.
Increase temperature in user
programme.
Change brand of coffee.
Use fresh coffee.
Change grind level.
Decalcify machine.
Turn machine on, close
service door and check
dregs drawer.
(the brewing unit goes
automatically to home
position)
Page 9/25
3. OPERATION
ROYAL
3.2. User programme (Royal Professional Instant Steam / Royal Cappuccino)
The table below indicates the various values, settings and programmes which can be read and selected
through the user programme options.
Various cleaning programmes can also be activated.
Access: Access is via the ENTER button (keep pressed for a few seconds).
Access (Royal Prof. Redesign / Capp Redesign): Selection entry via menu button.
Select product - Standby
- Digital display/indicator
- Hot water
- Pre-selection powder compartment
or scroll in menu and change value
- Cappuccino or save value
- Coffee or scroll in menu and change value
- Expresso or exit menu
- Expresso lungo
- Programme menu selection
Menu procedure:
1. Select desired programme using the cursor buttons (arrow buttons).
2. Access appropriate item using the ENTER button.
3. Use the arrow buttons to handle each item.
4. Confirm with the ENTER button.
Item
Setting/Indicator
Standby
Standby
Language
Rinse
Country
ON/OFF
10/25
Standard
German
OFF
Function
Only for Redesign Series
Display language
Rinses every time the machine is turned
on (temp. of instantaneous water heater <
50°C)
Not Roy. Cappuccino
REV.4 SEPT.2003
Saeco International Group
ROYAL
Item
3. OPERATION
Setting/Indicator
System 2
ON/OFF
Water hardness
1 – 500 l
2 – 300 l
3 – 150 l
4 – 80 l
ON/OFF
Maximum
High
Medium
Low
Minimum
Maximum
High
Medium
Low
Minimum
Maximum
High
Medium
Low
Minimum
ON
LONG
OFF
ON/OFF
ON/OFF
Heating plate
Temperature
(Expresso lungo)
Temperature
(Coffee)
Temperature
(Expresso)
Pre-brewing
Pre-grinding
Hot water
programme
Cappuccino
programme
Total coffee
Descale
Scale indicator
Timer
Standard
3
Activate / deactivate heating plate.
Adjustment of coffee temperature.
Medium
Adjustment of coffee temperature.
Medium
Adjustment of expresso temperature.
ON
Coffee is moistened before actual
brewing
(better aroma)
Pre-grinds the next coffee dose.
Activates or deactivates the hot water
quantity programme (see Operation)
Activates or deactivates the cappuccino
quantity programme (see Operation)
Indicates the number of coffees dispensed
Activate descaling programme
Counter reset (only if descaling indicator
is activated).
Machine switches to standby mode if not
used within the programmed time.
(Standby mode can also be activated at
any time via the menu buttons.)
Programming for the purposes of vending
Not relevant in Austria
Not Roy. Cappuccino
Reset standard values
Not Roy. Cappuccino
Exit
Not Roy. Redesign
OFF
Number
YES/NO
Vending
Cleaning cycle
Factory settings
Exit
Steam function deactivation
Not for Roy. Prof. Redes.
Change in coffee quantity until descaling
required (1-4).
OFF
Medium
ON/OFF
0-12.45 hours
Function
0
Exit: Exit – Enter / ESC depending on type
Saeco International Group
REV.4 SEPT.2003
Page 11/25
3. OPERATION
ROYAL
4. Operation (Professional Rapid Steam / Coffeebar / Digital Plus)
4.1. Operating instructions (quick reference)
Action
Comments
1
2
3
4
5
Getting started
Unpack machine.
Check for damage.
Fill water tank
Fill coffee beans container.
Connect mains plug.
Turn on main switch.
6
De-aerate water circuit.
7
Activate the hot water button
until water flows continuously
Heating stage (approx. 80 sec.)
Ready
Making coffee
Programme coffee quantity for Depending on cup size.
each selection button.
Programme by keeping the
programme selection button
•
Expresso lungo
pressed until the desired
•
Coffee
quantity is reached.
•
Expresso
8
Place cup under dispenser.
9
Elect programme and press
appropriate button.
10
11
14
15
16
12/25
Press once = 1 cup of coffee.
Press twice = 2 cups of coffee.
Coffee dispensing / Powder coffee
Place cup under dispenser.
Place powder coffee in powder
container (1 measuring
spoonful)
Select powder button and
Only one coffee can be
relevant coffee button (long
dispensed at a time.
coffee / coffee / expresso)
Steam dispensing.
Open steam valve
Dispensing steam
To warm coffee.
To froth milk.
Hot water
Hot water
Press the hot water button
(only when hot water
briefly to start hot water
programme is deactivated in
dispensing; press again to stop.
the user menu).
Hot water quantity
Keep the hot water button
programming
pressed for the desired time.
(only when hot water
The last programme entered is
programme is activated in the saved .
user programme).
REV.4 SEPT.2003
Display
Self test/
Heating
Heating
Heating
Select product
Ready for operation
Quantity programme
Select product
Ready for operation
1 Coffee
2 Coffees
Select product
Powder coffee
Steam
Hot water
Hot water
Quantity programme
Saeco International Group
ROYAL
3. OPERATION
Action
17
18
19
20
Hot water
Quantity programme
Comments
The last programme saved is
activated by pressing the hot
water button briefly.
Cappuccino Maker (not in Royal Digital+)
Cappuccino
Press the cappuccino button
(only when cappuccino
briefly to start cappuccino
maker programme is
dispensing; press again to stop.
deactivated in the user menu)
Cappuccino
Keep the cappuccino button
Quantity programme
pressed for the desired time.
(only when cappuccino
The last programme entered is
maker programme is
saved
activated in the user menu)
Cappuccino
The last programme saved is
Quantity programme
activated by pressing the
Cappuccino button briefly.
Display
Hot water
Cappuccino
Cappuccino
Quantity
programme
Cappuccino
Note: The Steam and Cappuccino functions cannot be used parallel to the coffee programme in the
Royal Professional Rapid Steam, Royal Coffeebar and Royal Digital + systems.
Cleaning
Empty dregs drawer
Empty drip tray
Clean water tank.
Clean coffee bean
container.
Clean the housing.
Clean brewing unit and
grease filter.
Descale
Descale:
Storage capacity of 30 tablespoons (dreg counter reset only if warning to
empty grounds container is triggered and machine is turned on).
As required
As required
As required
As required
1 x per month
According to indicator
1. Place Saeco descaler into fresh water tank.
2. Fill with about one litre of hot water.
3. Remove about two to three cups via the brewing unit.
4. Activate the Descale item in the user menu by selecting OK and open the HWS valve
(place a sufficiently large container under the steam pipe). The descaler mixture is pumped
at intervals through the circuit.
5. Rinse: Fill the water tank once again and open the steam valve (about 2 cups via
brewing unit).
Reset: Under the descale indicator item Enter - YES - Enter.
Saeco International Group
REV.4 SEPT.2003
Page 13/25
3. OPERATION
ROYAL
Troubleshooting
Fault/Indicator
Does not function
BREWING UNIT NOT
DETECTED
GRINDS CONTAINER
NOT DETECTED
COFFEE BEAN
CONTAINER EMPTY
FILL WATER
DE-AERATE
OVERHEATING
GRINDER OBSTRUCTED
DE-AERATE
Possible cause
No power
Brewing unit not properly installed
or not closed.
Coffee grinds container not properly
installed.
Coffee bean container is empty.
Install brewing unit
correctly.
Brewing unit correctly
installed.
Fill coffee container.
Water tank is empty.
Water tank
After steam dispensing the system is
not or is insufficiently de-aerated.
De-aerate machine.
Air in water system.
No water / steam
Coffee powder selection button is
pressed, but no coffee powder is
dispensed.
Steam nozzle blocked.
The coffee flows too quickly
Beans ground too coarsely.
The coffee flows too slowly
Beans ground too finely.
Coffee is not hot enough
The cups are cold.
Boiler temperature too low.
Coffee has no froth.
Unsuitable coffee blend.
Coffee is no longer freshly roasted.
Beans ground too coarsely or finely.
The machine is calcified.
Instead of coffee, only water
is dispensed.
Longer heating time or less
hot water.
The brewing unit cannot be
removed.
14/25
Remedy
Check mains plug / mains
circuit breaker /
Ensure machine door is
closed.
The brewing unit is not in home
position.
REV.4 SEPT.2003
Clean grinder.
Press hot water button.
Add one level measure of
coffee powder.
Free opening using a thin
needle.
Select lower grind level;
e.g. change from 5 to 3.
Select higher grind level;
e.g. change from 5 to 7.
Pre-heat cups.
Increase temperature in user
programme.
Change brand of coffee.
Use fresh coffee.
Change grind level.
Decalcify machine.
Turn machine on, close
service door and check
dregs drawer.
(the brewing unit goes
automatically to home
position)
Saeco International Group
ROYAL
3. OPERATION
4.2. User programme (Royal Professional Rapid Steam / Coffeebar / Digital Plus)
The table below indicates the various values, settings and programmes which can be read and selected
through the user programme options.
Various cleaning programmes can also be activated.
Access: Access is via the ENTER button.
Access (Digital+): Selection entry via menu button.
- Digital display/indicator
- Hot water
- Pre-selection powder compartment
or scroll in menu and change value
- Standby or save value
- Coffee or scroll in menu and change value
- Expresso or exit menu
- Expresso lungo
- Programme menu selection
Menu procedure:
1. Select desired programme using the cursor buttons (arrow buttons).
2. Access appropriate item using the ENTER button.
3. Use the arrow buttons to handle each item.
4. Confirm with the ENTER button.
Item
Language
Rinse
Setting/Indicator
ON/OFF
Water hardness 1 – 500 l
2 – 300 l
3 – 150 l
4 – 80 l
Saeco International Group
Standard
German
OFF
3
REV.4 SEPT.2003
Function
Select display language.
Rinses residual water through pipes
each time machine turned on
(only when machine is cold).
Change in coffee quantity until
descaling required (1-4).
Page 15/25
3. OPERATION
Item
Setting/Indicator
Heating plate
ON/OFF
Temperature
(Expresso
lungo)
Maximum
High
Medium
Low
Minimum
Maximum
High
Medium
Low
Minimum
Maximum
High
Medium
Low
Minimum
ON
LONG
OFF
ON/OFF
ON/OFF
Temperature
(Coffee)
Temperature
(Expresso)
Pre-brewing
Pre-grinding
Hot water
programme
Cappuccino
programme
ROYAL
Standard
Medium
Activate / deactivate heating plate.
Heating plate
Adjustment of coffee temperature.
Medium
Adjustment of coffee temperature.
Medium
Adjustment of expresso temperature.
ON
Coffee is moistened before actual
brewing (better aroma)
OFF
Pre-grinds the next coffee dose.
Activates or deactivates the hot water
quantity programme (see Operation)
Activates or deactivates the cappuccino
quantity programme (see Operation)
(not for Digital+)
Coffee quantity indicator
Activate descaling programme (when
descaling required)
Counter reset (only if descaling
indicator is activated).
Machine switches to standby mode if
not used within the programmed time.
(Standby mode can also be activated at
any time via the standby button.)
Programming for the purposes of
vending
(not for Digital+)
Activates the cleaning programme for
the brewing unit.
Activates fixed water connection.
(only Roy. Digital+)
ON/OFF
Total coffee
Descale
Number
Scale indicator
YES/NO
Timer
0-12.45 hours
0
Vending
Cleaning cycle
YES/NO
Factory
settings
YES/NO
Fixed water
YES/NO
Function
Activates fixed water connection.
(only Roy. Coffeebar/ Professional)
Exit: ESC button
16/25
REV.4 SEPT.2003
Saeco International Group
ROYAL
3. OPERATION
4.3. Vending menu:
Action
Access
Call up code entry
Code entry
Procedure
Enter code
Confirm vending in user menu via
ENTER.
Press ENTER
Confirm code
Enter required number combination
by using the arrow and enter buttons
Use arrow button to select Yes
Confirm code
Press ENTER
Use arrow button to access menu
items.
Access
Call up code entry
Code entry
Change code
Confirm vending in user menu via
ENTER.
Press ENTER
Confirm code
Enter number combination by using
the arrow and enter buttons
Enter required number combination
by using the arrow and enter buttons
Use arrow button to select Yes
Confirm code
Press ENTER
Code entry
Use arrow button to access menu
items.
Item
1 expresso lungo
Total
Number
1 coffees
Total
Number
1 expresso
Total
Number
Hot water
Total
Number
Counter
Lock:
Number
Counter
Cycles
Number
Saeco International Group
Vending menu
Indication
Number of expresso lungo
dispensed since last reset
Number of coffees dispensed
since last reset
Number of expresso dispensed
since last reset
Number of hot water portions
dispensed since last reset
Number of coffees dispensed
Number of coffees dispensed
since last reset
REV.4 SEPT.2003
Display
Code
****
Change code /
New code?
0***
New code = number
Save
No
New code = number
Save
Yes
Code
****
Code
****
Change code /
Old code?
0***
New code?
0***
New code = number
Save
No
New code = number
Save
Yes
Code
****
Comments
Reset: Expresso lungo + ESC
Reset: Expresso lungo + ESC
Reset: Expresso lungo + ESC
Reset: Expresso lungo + ESC
Reset: Expresso lungo + ESC
Change value: Arrow button
Expresso lungo + arrow button
Reset: Expresso lungo + ESC
Change value: Arrow button
Expresso lungo + arrow button
Page 17/25
3. OPERATION
ROYAL
Note:
•
•
•
The vending menu can also be used unsecured (no code entry / skip code entry via arrow button).
Cancelling code: Enter with new code 0000.
If the programmed code is only used to read the counter reading, the code entry can also be
skipped. However, if an attempt is made to change the counter reading, the code request appears.
Attention: If you forget the code, a new code must be requested from Saeco Austria!
18/25
REV.4 SEPT.2003
Saeco International Group
ROYAL
3. OPERATION
5. Operation (Royal Office)
5.1. Operating instructions (quick reference)
Action
Comments
1
2
3
4
5
Getting started
Unpack machine.
Check for damage.
Fill water tank
Fill coffee beans container.
Connect mains plug.
Turn on main switch.
6
De-aerate water circuit.
7
8
Activate the hot water button
until water flows continuously
Heating stage (approx. 80 sec.)
Ready
Making coffee
Programme coffee quantity for Depending on cup size.
each selection button.
Programme by keeping the
programme selection button
pressed until the desired
•
Coffee
quantity is reached.
•
Expresso
Programming is only possible
when quantity programme in
the user menu is ON.
Place cup under dispenser.
9
Elect programme and press
appropriate button.
15
Hot water
Press once = 1 cup of coffee.
Press twice = 2 cups of coffee.
Hot water
Press the hot water button
briefly to start hot water
dispensing; press again to stop.
Display
Self test/
Heating
Heating
Heating
Select product
Ready for
operation
Quantity
programme
Select product
Ready for
operation
1 Coffee
2 Coffees
Hot water
Counter reading indicator:
Indication
Total coffee
Number
1 coffee
Total
2 coffees
Total
Number
Total
Number
Hot water
Total
Number
Command
C
C + Expresso
Number
C + Coffee
C + Espr. + Coffee
C + Hot water
Saeco International Group
Comments
Indicates the expressos and coffees
dispensed
Not resettable
Indicates the expressos dispensed
Resettable (in vending menu)
Indicates the coffees dispensed
Resettable (in vending menu)
Indicates the expressos and coffees
dispensed
Resettable (in vending menu)
Indicates the hot water dispensed
Resettable (in vending menu)
REV.4 SEPT.2003
Page 19/25
3. OPERATION
Empty dregs drawer
Empty drip tray
Clean water tank.
Clean coffee bean container.
Clean the housing.
Rinse brewing unit
Clean brewing unit and
lubricate
Clean filter
Descale
Descale:
ROYAL
Cleaning
Storage capacity of 30 tablespoons (dreg counter reset only if warning
to empty grounds container is triggered and machine is turned on).
With dregs drawer
As required
As required
As required
1 x per week
1 x per month
According to indicator
1. Place Saeco descaler into fresh water tank.
2. Fill with about one litre of hot water.
3. Remove about two to three cups via the brewing unit.
4. Confirm the Descale item in the user menu by pressing twice the E-button (place a
sufficiently large container under the hot water pipe). The descaler mixture is pumped at
intervals through the circuit.
5. Rinse: Fill the water tank once again and press the E-button twice (about 2 cups via
brewing unit).
Reset: Under the descale indicator item Enter - YES - Enter.
Troubleshooting
Fault/Indicator
Does not function
BREWING UNIT NOT
DETECTED
GRINDS CONTAINER NOT
DETECTED
COFFEE BEAN
CONTAINER EMPTY
FILL WATER
DE-AERATE
OVERHEATING
GRINDER OBSTRUCTED
DE-AERATE
Instead of coffee, only water is
dispensed.
No water / steam
Possible cause
No power
Brewing unit not properly installed
or not closed.
Coffee grinds container not properly
installed.
Coffee bean container is empty.
Water tank is empty.
After steam dispensing the system is
not or is insufficiently de-aerated.
Air in water system.
Coffee powder selection button is
pressed, but no coffee powder is
dispensed.
Steam nozzle blocked.
Remedy
Check mains plug / mains
circuit breaker /
Ensure machine door is
closed.
Install brewing unit correctly.
Brewing unit correctly
installed.
Fill coffee container.
Reset: Enter button
Water tank
De-aerate machine.
Clean grinder.
Press hot water button.
Add one level measure of
coffee powder.
Free opening using a thin
needle.
Attention: The coffee beans low indicator must be reset (keep the enter button pressed for a
minimum of 5 sec.).
20/25
REV.4 SEPT.2003
Saeco International Group
ROYAL
3. OPERATION
Troubleshooting
Fault/Indicator
The coffee flows too quickly
Possible cause
Beans ground too coarsely.
The coffee flows too slowly
Beans ground too finely.
Coffee is not hot enough
The cups are cold.
Boiler temperature too low.
Unsuitable coffee blend.
Coffee is no longer freshly roasted.
Beans ground too coarsely or finely.
Longer heating time or less hot The machine is calcified.
water.
The brewing unit is not in home
The brewing unit cannot be
position.
removed.
Coffee has no froth.
Saeco International Group
REV.4 SEPT.2003
Remedy
Select lower grind level;
e.g. change from 5 to 3.
Select higher grind level;
e.g. change from 5 to 7.
Pre-heat cups.
Increase temperature in user
programme.
Change brand of coffee.
Use fresh coffee.
Change grind level.
Decalcify machine.
Turn machine on, close
service door and check dregs
drawer.
(the brewing unit goes
automatically to home
position)
Page 21/25
3. OPERATION
ROYAL
5.2. User programme (Royal Office):
Access programming by keeping the V (hot
water) and C (Esc) buttons pressed and
switching the machine on from the main
swtich.
(a) C button ESC – Return to previous
progrmme level.
(b) E button ENT – Expresso. To select and
save a value entered.
(c) ↑ button UP – Coffee. Scroll in menu
and change value.
(d) ↓ button DOWN – Hot water. Scroll in
menu and change value.
a
b
c
d
When entering the code
or PUC code, the buttons
have the following value:
E = Expresso = 1
↓ = Coffee = 2
↑ = Hot water = 3
C = ESC = 4
Item
Setting/Indicator
Code
Standard
111111
Vending
Language
Rinse
Country
ON/OFF
Water hardness 1 – 500 l
2 – 300 l
3 – 150 l
4 – 80 l
Temperature
Maximum
(Expresso)
High
Medium
Low
Minimum
22/25
German
OFF
3
Medium
Function
Programme protection
If the code is entered five times
incorrectly, the PUC code must be
entered.
Request from Saeco Austria.
The counter can be read and locking
function activated via the vending menu.
Display language
Rinses every time the machine is turned
on (temp. of instantaneous water heater <
50°C)
Change in coffee quantity until descaling
required (1-4).
Adjustment of expresso temperature.
REV.4 SEPT.2003
Saeco International Group
ROYAL
Item
Temperature
(Coffee)
Pre-brewing
Pre-grinding
Quantity
programme
Descale
3. OPERATION
Setting/Indicator
Maximum
High
Medium
Low
Minimum
ON
LONG
OFF
ON/OFF
ON/OFF
Scale indicator
YES/NO
Timer
0-12.45 hours
Cleaning cycle
Saeco International Group
Standard
Function
Medium
Adjustment of coffee temperature.
ON
Coffee is moistened before actual
brewing
(better aroma)
Pre-grinds the next coffee dose.
Locking or releasing of quantity
programme
Activate descaling programme
Duration: Approx. 45 min
Counter reset (only if descaling indicator
is activated).
Machine switches to standby mode if not
used within the programmed time.
(Standby mode can also be activated at
any time via the menu buttons.)
No relevant in Austria
OFF
OFF
0
REV.4 SEPT.2003
Page 23/25
3. OPERATION
ROYAL
5.3. Vending menu:
Access: In user menu (C+Expresso button+turn on machine), enter code and confirm item Vending with
the E-button.
Item
Reset counter
Vending menu
Indication
1 expresso
Total
1 coffees
Total
Hot water
Total
Counter
Cycles
Comments
Reset: Expresso counter
Coffee counter
Hot water counter
Cycle counter
Number of expressos
Number dispensed since last reset
Number of coffees dispensed
Number since last reset
Number of hot water portions
Number dispensed since last reset
Counts the coffees dispensed
Number since last reset and locks
machine for coffee dispensing
when a specific number is
reached
Counter
Number of coffees dispensed
Programmable via arrow
Lock:
Number
buttons
Total coffee
Number of total coffees
Not resettable
Total:
dispensed
Number
Beverages
Number of total beverages
Not resettable
Total
Number dispensed
Action
Procedure
Display
Change code
Access
Confirm vending in user menu via
Reset counter
ENTER.
Call up code entry
Press up arrow once
******
Call up code entry
Confirm with E-button
Change code /
Old code?
******
Call up code entry
Old code by:
Change code /
Expresso button = 1
Old code?
Coffee button = 2
******
Hot water button = 3
C-button = 4
Enter and confirm with E-button.
Code entry
New code by:
New code?
Expresso button = 1
******
Coffee button = 2
Hot water button = 3
C-button = 4
Enter and confirm with E-button.
24/25
REV.4 SEPT.2003
Saeco International Group
ROYAL
3. OPERATION
Action
Confirm code
Procedure
Change code
Enter required number combination
by using the arrow and enter buttons
Use arrow button to select Yes
Confirm code
Press ENTER
Exit
Press C-button twice
Code entry
Display
New code = number
Save
No
New code = number
Save
Yes
Code
******
Attention: If you forget the code, a new code must be requested from Saeco Austria!
Saeco International Group
REV.4 SEPT.2003
Page 25/25
CHAPTER 4
FUNCTIONS AND TIMING
Page
1.
Water system
1.1.
1.2
1.3.
1.4.
1.4.
1.4.
1.5.
WSP (R. Classic/Digital/
Exclusive/Digit. Redes)
1
WSP (Digital Plus)
2
WSP (R. Prof. Rapid Steam/Prof. Red.) 3
WSP (R. Cappuccino/Prof. Instant Steam) 4
WSP (R. Cappuccino Redesign)
6
WSP (R. Coffeebar)
9
WSP (R..Office)
11
2.
Electrical system
2.1.1. CPU – IN / OUT (R. Classic)
2.2.1. CPU – INPUT
(Royal Digital/Exclusive)
2.2.2. Control panel
(Royal Digital/Exclusive)
2.3.1. CPU – INPUT
(Cappuccino/Professional Instant Steam)
2.3.2. Control panel
(Cappuccino/Professional Instant Steam)
2.4.1. CPU – INPUT
(R. Profess. Rapid Steam / Coffebar)
2.4.2. Control panel
(R. Profess. Rapid Steam / Coffeebar)
Saeco International Group
REV.4 SEPT.2003
1
8
12
13
14
15
16
17
18
ROYAL
4. FUNCTION/TIMING
1. Water system
1.1. Water system (Royal Classic / Digital / Exclusive / Digital Redesign)
Boiler J
Durchlauferhitzer
Thermal
sensor
Temp.sensor
KTY KTY
Water
tank
Wassertank
Float
Schwimmer
Water filter
Wasserfilter
Getriebevor
Gear
resistor
-widerstand
2x Thermostat
2 Thermostate
Heizung
Heating
1090
W
1090W
Water filter
Wasserfilter
Pumpe
Pump
Boiler pin
Ventilzapfen
Flow meter
Flowmeter
Component
Water tank
Float
Water filter
Flow meter (turbine)
Pump
Safety valve
Boiler (flow heater)
Sensor (KTY)
Thermostat
Boiler pin (Valve plug)
HWS valve
Saeco International Group
HWS Valve
HWD-Ventil
Savety valve
Überdruckventil
To brew unit
Brühgruppe
Hot water //steam
Heißwasser
Dampf
Function
Water supply
Water level monitoring
Water cleaned of solid matter (one or two depending)
Measure flow rate
Water flow/Pressure build-up (13 to15 bar)
Protect boiler against overpressure (opens at 17 bar)
Heats water to approx. 84°C (for brewing process)
Transmits current temperature value to electronic system
Interrupts complete flow supply if overheating.
Opens when brewing unit is aligned with water circuit to the unit itself.
For hot water and steam dispensing
REV.4 SEPT.2003
Page 1/22
4. FUNCTION/TIMING
ROYAL
1.2. Water system (Royal Digital Plus)
Thermal sensor
Temp.sensor
KTY KTY
Wassertank
Water tank
Water filter
Wasserfilter
Boiler J
Durchlauferhitzer
Rohrheizung
Pipe
heating
Sensor
pipe heating
Schwimmer
Float
Thermostat
170ºC
GearGetriebevor
resistor
-widerstand
Thermostat
pipe heating
2x Thermostat
2 Thermostate
Heizung
1090W
1090 W
Heizung
Heating
1090 W
Water filter
Wasserfilter
1090W
El.valve Steam
Pumpe
Pump
Boiler
pin
Ventilzapfen
Steam valve
HWD-Ventil
El.valve hot water
Flowmeter
Flow
meter
Component
Water tank
Float
Water filter
Flow meter (turbine)
Pump
Safety valve
Instantaneous water heater/Heating
(coffee/hot water)
Pipe heating
Sensor (KTY)
Instantaneous water heater
Thermostat (170°C)
Instantaneous water heater
Sensor (KTY)
Pipe heating
Thermostat (170°C)
Pipe heating
Boiler pin (Valve plug)
Steam valve
Elecrto-valve (hot water)
Elecrto-valve (for boiler filling)
Page 2/22
Überdruckventil
Savety valve
To
brew unit
Brühgruppe
Heißwasser
/ Dampf
Hot
water / steam
Function
Water supply
Water level monitoring
Water cleaned of solid matter (one or two depending)
Measure flow rate
Water flow/Pressure build-up (13 to15 bar)
Protect instantaneous water heater against overpressure
Heats water to approx. 94°C
(for brewing process and hot water preparation)
Steam generation / Temperature approx. 130°C
Transmits current temperature value to electronic system
Alternates current supply for heating system in event of
overheating.
Transmits current temperature value to electronic system
Alternates current supply for heating system in event of
overheating.
Opens when brewing unit is aligned with water circuit to the
unit itself.
For hot water and steam dispensing
Solenoid valve for water dispensing
Solenoid valve for filling pipe heating system
REV.4 SEPT.2003
Saeco International Group
ROYAL
4. FUNCTION/TIMING
1.3. Water system (Royal Professional Rapid Steam / Professional Redesign)
Thermal
sensor
Temp.sensor
KTY KTY
Wassertank
Water tank
Water filter
Wasserfilter
Boiler J
Durchlauferhitzer
Rohrheizung
Pipe
heating
Sensor pipe
heating
Schwimmer
Float
GearGetriebevor
resistor
Thermostat
170ºC
-widerstand
Thermostat
pipe heating
2x Thermostat
2 Thermostate
Heizung
1090W
1090 W
Heizung
Heating
1090 W
Water filter
Wasserfilter
1090W
El. Valve
Cappucinatore
El.valve Steam
Pumpe
Pump
Boiler pin
Ventilzapfen
Steam valve
HWD-Ventil
El.valve hot water
Flowmeter
Flow
meter
Überdruckventil
Savety
valve
Component
Water tank
Float
Water filter
Flow meter (turbine)
Pump
Safety valve
Instantaneous water heater/Heating
(coffee/hot water)
Pipe heating
Sensor (KTY)
Instantaneous water heater
Thermostat (170°C)
Instantaneous water heater
Sensor (KTY)
Pipe heating
Thermostat (170°C)
Pipe heating
Boiler pin (Valve plug)
To
brew unit
Brühgruppe
Hot water
/ steam Cappucinatore
Heißwasser / Dampf
Function
Water supply
Water level monitoring
Water cleaned of solid matter
Measure flow rate
Water flow/Pressure build-up (13 to15 bar)
Protect instantaneous water heater against overpressure
Heats water to approx. 94°C
(for brewing process and hot water preparation)
Steam generation / Temperature approx. 130°C
Transmits current temperature value to electronic system
Alternates current supply for heating system in event of
overheating.
Transmits current temperature value to electronic system
Alternates current supply for heating system in event of
overheating.
Opens when brewing unit is aligned with water circuit to the
unit itself.
Steam-valve
For hot water and steam dispensing
Electro-valve (for cappuccino maker) Solenoid valve/steam dispensing for cappuccino
Electro-valve (water)
Solenoid valve for water dispensing
Electro-valve (steam)
Solenoid valve for filling pipe heating system
Saeco International Group
REV.4 SEPT.2003
Page 3/22
4. FUNCTION/TIMING
ROYAL
1.4. Water system (Royal Cappuccino / Professional Instant Steam)
1Water tank
5 Flow meter
2 Float
7 Pump2
8 Savety valve
3 Water filter
8 Savety valve
4 Flow meter
6 Pump1
Heating 437W
12 Thermostat
170°C
Heating
1090W
15Boiler
Pin
9 Instantaneous
water heater
to brew unit
Component
Water tank
Float
Water filter
Flow meter (turbine) System 1
Flow meter (turbine) System 2
Pump System 1
7
Pump System 2
8
Safety valve
9
Instantaneous water heater/Heating
(coffee/hot water)
Instantaneous water heater/Heating
(steam)
Sensor (KTY)
System 1 (Water)
Thermostat
System 1 (Water)
12
Page 4/22
17Valve
Cappuc
Cappuccinatore
1
2
3
4
5
6
11
Heating
1090W
19Valve
Steam
11 Sensor KTY
10
14 Thermostat
170°C
18Valve
Water
13 Sensor KTY
Steam valve
10 Instantaneous
water heater
Steam/hot water
Function
Water supply
Water level monitoring
Water cleaned of solid matter
Measure flow rate
Measure flow rate
Water flow/Pressure build-up
(13 to15 bar)
Steam dispensing/Pressure build-up
(13 to15 bar)
Protect instantaneous water heater against overpressure
(opens at 17 bar)
Heats water to approx. 94°C
(for brewing process and hot water preparation)
Steam generation / Temperature approx. 130°C
Transmits current temperature value to electronic system
Alternates current supply for heating system in event of
overheating.
REV.4 SEPT.2003
Saeco International Group
ROYAL
13
14
15
16
17
18
19
Component
Sensor (KTY)
System 2 (steam)
Thermostat
System 2 (steam)
Boiler pin (Valve plug)
Steam valve
Valve cappuccinatore
(for cappuccino maker)
Valve (water)
Valve (steam)
Saeco International Group
4. FUNCTION/TIMING
Function
Transmits current temperature value to electronic
system
Alternates current supply for heating system in event
of overheating.
Opens when brewing unit is aligned with water circuit
to the unit itself.
For steam dispensing
Solenoid valve/steam dispensing for cappuccino
Solenoid valve for water dispensing
Solenoid valve for steam dispensing (turbowater)
REV.4 SEPT.2003
Page 5/22
4. FUNCTION/TIMING
ROYAL
1.5. Water system (Royal Cappuccino Redesign)
1Water tank
2 Float
5 Flow meter
7 Pump2
3 Water filter
8 Savety valve
6 Pump1
19 Valve
steam
4 Flow meter
10 Pipe heating
8 Savety valve
Heating
437W
20 Valve
Bypass
Heating
1090W
14 Thermostat
170°C
Heating
1090W
11 Sensor
15 Boiler
pin
9 Instanteanous
water heater
To brewing unit
1
2
3
4
5
6
Component
Water tank
Float
Water filter
Flow meter System 1
Flow meter System 2
Pump System 1
7
Pump System 2
8
Safety valve
9
Instantaneous water heater/Heating
(coffee/hot water)
Pipe heating / Heating (steam)
Sensor (KTY)
System 1 (Water)
Thermostat
System 1 (Water)
10
11
12
Page 6/22
18
valve
water
16Steam
valve
Hot water/steam
13 Sensor
14 Thermostat
170°C
17 valve
cappuccinatore
Cappuccinatore
Function
Water supply
Water level monitoring
Water cleaned of solid matter
Measure flow rate
Measure flow rate
Water flow/Pressure build-up
(13 to15 bar)
Steam dispensing/Pressure build-up
(13 to15 bar)
Protect instantaneous water heater against overpressure
(opens at 17 bar)
Heats water to approx. 94°C
(for brewing process and hot water preparation)
Steam generation / Temperature approx. 130°C
Transmits current temperature value to electronic
system
Alternates current supply for heating system in event
of overheating.
REV.4 SEPT.2003
Saeco International Group
ROYAL
15
Component
Sensor (KTY)
System 2 (steam)
Thermostat
System 2 (steam)
Valve plug
16
17
18
19
20
Steam valve
Valve (for cappuccino maker)
Valve (water)
Valve (steam)
Valve (by-pass)
13
14
4. FUNCTION/TIMING
Function
Transmits current temperature value to electronic system
Alternates current supply for heating system in event of
overheating.
Opens when brewing unit is aligned with water circuit to
the unit itself.
For steam dispensing
Solenoid valve/steam dispensing for cappuccino
Solenoid valve for water dispensing
Solenoid valve for steam dispensing (turbowater)
Solenoid valve for water dispensing
1. General functioning
The electromagnetic valve EV1 is a by-pass valve located between pump 2 and pump 1. It must be
installed in the opposite direction to the flow.
When coffee and steam are dispensed simultaneously, a pressure difference exists between the two water
circuits (up to 12 bar for the water system as opposed to 4 bar for the steam system), which enables the
electromagnetic valve EV1 to open.
In the event of a fault, very humid steam and inconsistent coffee quantities are obtained since the quantity of
water, determined by Turbine 1, does not completely reach the coffee/steam system.
2. Simultaneous coffee and steam dispensing
Solenoid valve EV1: Closed
Solenoid valve EV2: Open
Solenoid valve EV3: Closed
Solenoid valve EV4: Closed or open, depending on whether the steam is dispensed via the
Cappumore or the rotary valve.
Pump 1 functions for coffee production, while pump 2 pulses the steam.
3. Simultaneous hot water and steam dispensing
Solenoid valve EV1: Closed
Solenoid valve EV2: Open
Solenoid valve EV3: Open
Solenoid valve EV4: Closed or open, depending on whether the steam is dispensed via the
Cappumore or the rotary valve.
Pump 1 functions for hot water production, while pump 2 pulses the steam.
4. Dispensing only hot water
Solenoid valve EV1: Open
Solenoid valve EV2: Closed
Solenoid valve EV3: Open
Solenoid valve EV4: Closed
Pump 2 functions to produce hot water. This ensures that both pumps are regularly flushed with
water and no damage is caused by standing dry for too long.
Saeco International Group
REV.4 SEPT.2003
Page 7/22
4. FUNCTION/TIMING
ROYAL
5. Automatic descaling
Stage 1)
Solenoid valve EV1: Closed
Solenoid valve EV2: Open
Solenoid valve EV4: Open
55 pulses are generated via pump 1 and 55 pulses via pump 2.
Stage 2)
Solenoid valve EV1: Open
Solenoid valve EV2: Closed
Solenoid valve EV3: Open
30 water pulses are generated via pump 2.
Stage 3)
Solenoid valve EV1: Closed
Solenoid valve EV2: Open
One minute pause is allowed for the descaling solution to take effect. All solenoid valves,
EV1-2-3-4 are open to prevent an increased pressure in the water system caused by the descaling
solution.
All three processes are repeated several times automatically (about 45 minutes).
A final rinse with no descaling solution must be performed.
Page 8/22
REV.4 SEPT.2003
Saeco International Group
ROYAL
4. FUNCTION/TIMING
1.6. Water system (Royal Coffeebar)
4 Water tank
5 Float
1 Inlet valve
13 Pipe heater
3 Pressure adjuster
2 Non-return valve
6 Water filter
approx. 0,8 bar
14 Sensor
7 Flow meter
8 Pump
9 Safety valve
15 Thermostat
170°C
Heating
1090W
Heating
437W
17 Valve (steam)
12 Thermostat
170°C
20 Valve
water
Heating
1090W
19 Steam
valve
11 Sensor
18 Valve
cappuccinatore
16 Boiler
pin
10 Instantaneous
water heater
Steam/hot water
cappuccinatore
To brewing unit
1
2
3
4
5
6
7
8
9
10
11
12
13
Component
Inlet valve
Non-return valve
Pressure adjuster
Water tank
Float
Water filter
Flow meter (turbine)
Pump
Function
Activates external water supply
Safety valve
Instantaneous water heater/Heating
(coffee/hot water)
Sensor (KTY)
Instantaneous water heater
Thermostat
Instantaneous water heater
Pipe heating
Saeco International Group
Reduces the water circuit pressure to about 0.8 bar
Water supply
Water level monitoring
Water cleaned of solid matter
Measure flow rate
Water flow/Pressure build-up
(13 to15 bar)
Protect instantaneous water heater against overpressure
Heats water to approx. 94°C
(for brewing process and hot water preparation)
Transmits current temperature value to electronic
system
Alternates current supply for heating system in event
of overheating.
Steam generation / Temperature approx. 130°C
REV.4 SEPT.2003
Page 9/22
4. FUNCTION/TIMING
15
Component
Sensor (KTY)
Pipe heating
Pipe heating thermostat
16
Valve plug
17
18
19
20
Valve (for boiler filling)
Valve (Cappumore)
Valve (steam)
Valve (water)
14
Note:
ROYAL
Function
Transmits current temperature value to electronic
system
Alternates current supply for heating system in event
of overheating.
Opens when brewing unit is aligned with water circuit
to the unit itself.
Solenoid valve for filling pipe heating system
Solenoid valve/steam dispensing for Cappumore
For hot water and steam dispensing
Solenoid valve for water dispensing
In the Royal Coffeebar it is possible to operate the machine directly from the fixed water
connection. The inlet valve is activated via the user programme (Chap. 3, Page 16).
A pressure reducer installed at the inlet point maintains an almost pressureless operation before
the pump.
However, a separate flow meter is used to measure the flow rate.
Page 10/22
REV.4 SEPT.2003
Saeco International Group
ROYAL
4. FUNCTION/TIMING
1.7. Water system (Office)
1 Water tank
4 Flow meter
2 Float
5 Pump
6 Safety valve
3 Water filter
9 Thermostat
170°C
Heating
1090W
8 Sensor
7 Instantenous
water heater
1
2
3
4
5
Component
Water tank
Float
Water filter
Flow meter (turbine)
Pump
6
Safety valve
7
8
9
Instantaneous water
heater/Heating
Sensor (KTY)
Thermostat
10
Valve plug
11
Magnet valve (water)
Saeco International Group
10 Boiler pin
11 Magnet valve
(water)
To Brewing unit
Function
Water supply
Water level monitoring
Water cleaned of solid matter
Measure flow rate
Water flow/Pressure build-up
(13 to15 bar)
Protect instantaneous water heater against overpressure
(opens at 17 bar)
Heats water to approx. 94°C (for brewing process)
Transmits current temperature value to electronic system
Alternates current supply for heating system in event of
overheating.
Opens when brewing unit is aligned with water circuit to the
unit itself.
Solenoid valve for water dispensing
REV.4 SEPT.2003
Page 11/22
4. FUNCTION/TIMING
ROYAL
2. Electrical system
2.1. CPU – IN / OUT (Royal Classic)
NFilt
TürDoor
schalter
switch
Grinder
Mahlwerkmotor
motor
Dosing
magnet
M1
JP1
JP11
Dosier
magnet
TS
JP10
JP2
P
TSIT-fuse
Pumpe
HauptMain
schalter
switch
JP13
CPU
Pump
Pumpe
Boilerheiz.
Boiler
JP12
Thermostat
Thermostat
BoilerBoiler
heating
Getriebemotor
Gear
motor
M2
JP8
TassenCup warmer
wärmer
TSIT-fuse
Tassenwärmer
cupwarmer
JP15
JP14
JP4
JP7
TSIT-fuse
Tassenwärmer
cupwarmer
MS1MS1
Getriebe
Gear
schalter
switch
home pos.
JP3
MS
MS
brew
Brühunit
gruppe
MS2MS2
Getriebe
Gear
schalter
switch
Temp.
Dosing
Dosier
switch
schalter
Thermo
Sensor
sensor
MS
MS dregs
Satzdrawer
schublade
brew pos.
Flow-
HWD-schalter
Hot water/
Flow
meter
meter
Steam switch
Page 12/22
REV.4 SEPT.2003
Saeco International Group
ROYAL
4. FUNCTION/TIMING
2.2.1. CPU – INPUT (Royal Digital / Exclusive)
Temp.
Thermo
Sensor
sensor
JP2
JP9
MS2
MS2Gear
Getriebe
switch
schalter
brew
pos.
MS1
Gear
MS1switch
Getriebe
schalter
home
pos.
JP1
CPU
Hot water/
HWDSteam schalter
switch
JP4
MS
MSdregs
SatzMS
schublade
drawer
MSBrühbrew
gruppe
unit
JP6
Doser
Dosier
switch
schalter
JP3
Reed
switch
Wasserstands
anzeige
Water
level
JP5
JP8
FlowFlow
meter
meter
Component
Microswitch MS1
Microswitch MS2
Microswitch MS3
Microswitch MS4
Microswitch MS5
Microswitch MS6
Saeco International Group
Voltage
15/5V =
15/5V =
15/5V =
15/5V =
15/5V =
15/5V =
Comments
Gears in home position
Gears in brewing position
Brewing unit
Doser
HWS valve
Dregs drawer
REV.4 SEPT.2003
Page 13/22
4. FUNCTION/TIMING
ROYAL
2.2.2. Control panel (Royal Digital / Exclusive)
HauptMain
schalter
switch
TürDoor
schalter
switch
J2
N-Filt
J1
Grinder
Mahlwerkmotor
motor
M1
JP2
Thermostat
Thermostat
Boiler
heating
Durchlauferh.
TS
Durchlauferh.
Boiler
Getriebemotor
Gear motor
T-fuse
TSICup warmer
Tassenwärmer
Tassenwärmer
Cup warmer
JP7
Dosing
magnet
PumpePump
System 1
Pump
Mains switch
Door microswitch
Doser coil
Microfuse F1
Page 14/22
JP9
M2
T-fuse
TSICup warmer
Tassenwärmer
T-fuse
TSIBoiler
Durchlauferh.
Dosiermagnet
Leistungsplatine
JP16
JP3
T-fuse
TSI-Pumpe
P
Approx. 190V~
230 V~
230 V~
230 V~ / 300Ohm
230 V~ / 8AT
JP1
Diode in pump
REV.4 SEPT.2003
Saeco International Group
ROYAL
4. FUNCTION/TIMING
2.3.1. CPU – INPUT (Royal Cappuccino / Professional Instant Steam)
Thermo
sensor
Temp. Sensor
System
System
1 1
JP2
Temp. Sensor
Thermo sensor
System 2
System 2
JP9
MS1
MS1Gear
Getriebe
switch
schalter
home pos.
MS2
MS2Gear
Getriebe
switch
schalter
brew pos.
JP1
CPU
Hot water/
HWDschalter
Steam
switch
JP4
MS Brüh-
MSdregs
SatzMS
schublade
drawer
MSgruppe
brew
unit
JP6
Doser
Dosier
switch
schalter
Flowmeter
Flow
meter
System 2
JP3
system 2
JP5
Wasserstands
Reed
switch
Wateranzeige
level
JP8
Flow meter
Flow-meter
system
1
System 1
Component
Microswitch MS1
Microswitch MS2
Microswitch MS3
Microswitch MS4
Microswitch MS5
Microswitch MS6
Saeco International Group
Voltage
15/5V =
15/5V =
15/5V =
15/5V =
15/5V =
15/5V =
Comments
Gears in home position
Gears in brewing position
Brewing unit
Doser
HWS valve
Dregs drawer
REV.4 SEPT.2003
Page 15/22
4. FUNCTION/TIMING
ROYAL
2.3.2. Control panel (Royal Cappuccino / Professional Instant Steam)
HauptMain
schalter
Tür-
Door
schalter
switch
switch
J2
N-Filt
J1
JP15
MahlwerkGrinder
motor
motor
M1
JP2
JP16
TS
Thermostat
Thermostat
Durchlauferh.
Boiler 1
TS
Boiler 2
JP9
M2
T-fuse
TSICup warmer
Tassenwärmer
TassenCup
warmer
wärmer
Pump
PumpeSystem 22
System
JP5
TSIT-fuse
Durchlauferh.
Boiler 1
Durchlauferh.
Boiler 11
System
Getriebemotor
Gear motor
T-fuse
TSICup warmer
Tassenwärmer
TSIT-fuse
Durchlauferh.
Durchlauferh.
Boiler
2
System 2
JP7
Dosing
magnet
TSI-Pumpe
T-fuse
- Pump 2
Dosiermagnet
JP3
Leistungsplatine
Thermostat
Thermostat
Durchlauferh.
Boiler 2
P
E-Vent.
E-valve
Cappucc.
Cappucc
E-Vent.
E-valve
Heissw.
H-water
PumpePump
System 11
System
Thermostat
Thermostat
Suppl.
heating
Zusatzheiz.
Microfuse F1
Microfuse F2
Microfuse F3
Page 16/22
TS
E-Vent.
E-valve
Dampf
steam
T-fuse
- Pump 1
TSI-Pumpe
P
T-fuse
TSISuppl. heating
Zusatzheiz.
Zusatzheiz. heating
Supplementary
230 V~ / 32mAT
230 V~ / 8AT
230 V~ / 8AT
JP17
Control
Pipe heating
Instantaneous water heater
REV.4 SEPT.2003
Saeco International Group
ROYAL
4. FUNCTION/TIMING
2.4.1. CPU – INPUT (Royal Professional Rapid Steam / Royal Coffeebar)
Temp. Sensor
Thermo
sensor
System
System
1 1
JP2
Temp. Sensor
Thermo
sensor
System
2
System 2
JP9
MS1
MS1Gear
Getriebe
switch
schalter
home pos.
MS2
MS2Gear
Getriebe
switch
schalter
brew pos.
JP1
CPU
Hot water/
HWDSteamschalter
switch
JP4
MS brew
BrühMS
gruppe
unit
MSdregs
SatzMS
schublade
drawer
nur Roy.
only
Royal
Coffeebar
Coffebar
Doser
Dosier
switch
schalter
Flowmeter
System 2
JP6
JP3
JP5
Wasserstands
Reed
switch
anzeige
Water level
JP8
Flow-meter
Flow
meter1
System
Component
Microswitch MS1
Microswitch MS2
Microswitch MS3
Microswitch MS4
Microswitch MS5
Microswitch MS6
Saeco International Group
Voltage
15/5V =
15/5V =
15/5V =
15/5V =
15/5V =
15/5V =
Comments
Gears in home position
Gears in brewing position
Brewing unit
Doser
HWS valve
Dregs drawer
REV.4 SEPT.2003
Page 17/22
4. FUNCTION/TIMING
ROYAL
2.4.2 Control panel (Royal Professional Rapid Steam / Royal Coffeebar)
HauptMain
schalter
switch
TürDoor
schalter
switch
J2
N-Filt
J1
JP15
Grinder
Mahlwerkmotor
motor
M1
JP2
JP16
Rohrheizung
Boiler 2
System 2
TS
Thermostat
Thermostat
Rohrheizung
Boiler 1
JP5
TSIT-fuse
Rohrheizung
Boiler 1
Durchlauferh.
Boiler 11
System
TS
JP9
M2
Getriebemotor
Gear motor
T-fuse
TSICup warmer
Tassenwärmer
TSIT-fuse
Durchlauferh.
Boiler 2
TassenCup
warmer
TSIT-fuse
Cup warmer
Tassenwärmer
JP7
Dosiermagnet
JP3
wärmer
Dosing
magnet
Leistungsplatine
Thermostat
Thermostat
Durchlauferh.
Boiler 2
E-Vent.
FWA
Inlet
valve
Nur Coffeebar
Coffeebar
only
E-valve
E-Vent.
Cappucc.
Cappucc
E-valve
E-Vent.
Heissw.
H-water
PumpePump1
System
Thermostat
Thermostat
Suppl.
heating
Zusatzheiz.
Microfuse F1
Microfuse F2
Microfuse F3
Page 18/22
E-Vent.
E-valve
Dampf
steam
T-fuse
- Pump 1
TSI-Pumpe
P
T-fuse
TSISuppl. heating
TS
Zusatzheiz.heating
Supplementary
230 V~ / 32mAT
230 V~ / 8AT
230 V~ / 8AT
Zusatzheiz.
JP17
Control
Pipe heating
Instantaneous water heater
REV.4 SEPT.2003
Saeco International Group
ROYAL
4. FUNCTION/TIMING
3. Timing
The following time chart indicates the functions of the individual components in terms to time (excluding
Royal Classic, see process for Vienna)
app.5.5se c
G rin de r mo to r
Do se r
ap p . 1 .5 min
Statu s
de pendi ng on coffee qty
up
up
G ear mo to r
au f
Hea tin g stag e
Stan d b y
ab
up
*
down
Pu mp
down
He ating
Co ffee d isp en sin g p ro ce ss
No te : * O n ly in ma ch in es w ith pr e-b rew in g sy stem s
Explanation:
Two processes start when the main switch is activated:
Firstly, the gearmotor is initialised. The gears move to MS1 (lower limit switch), change rotating direction,
leave MS1 and move to the home position (about 2 mm after MS1). Exception: Royal Classic – process as
for Vienna (moves to brewing position and back / see Vienna).
The instantaneous water heater is then activated for about 1 min 30 sec., heating the water to operating
temperature, whereby heating takes place for about 60 sec. continuously and then is alternated for the rest of
the time.
After activating the start button:
1.
2.
3.
4.
5.
6.
The grinder starts operating (about 5.5 sec.).
The doser is activated twice.
The gears move to brewing position.
Depending on the type of machine, pre-brewing begins (brief pump activation).
Main brewing process (duration of pump activation depending on selected coffee quantity).
The gears move to home position (dregs are discarded).
Note:
If the machine is disconnected from the main power supply during operation (power failure/side doors
opened), the gears will complete the function commenced but without brewing (if the interruption occurs
before brewing, the coffee will be dispensed dry).
If operation is interrupted by removal of the dregs drawer, the machine will continue its function
unrestricted once the drawer is returned.
Saeco International Group
REV.4 SEPT.2003
Page 19/22
4. FUNCTION/TIMING
ROYAL
4. Function
4.1. Gearmotor
The gearmotor is a direct current motor and is controlled by the CPU at approx. 30 – 35 V.
In order to perform forwards and backwards movements, the gearmotor is controlled alternately with a
positive and negative half wave.
In the event of overload the motor's electronic system switches off after 8-10 sec. and the machine is
stopped. This situation is indicated by the flashing fault LED. In digital display indicator systems: brewing
unit locked.
red
blue
Home position
setting cam
Gear
Motor
black
red
Brewing position
setting microswitch
Large
gear
wheel
Small
gear
wheel
Home position
setting microswitch
brown
black
Home position
setting cam
Important: During installation of the large gear wheel care must be taken that the marking on the large gear
wheel always faces the direction of the small gear wheel axis, and that both limit switches are positioned in
the larger segment between both switching cams.
If the motor is replaced, it is important that the blue cable (-) is fitted onto the motor connection near the
writing "Italy" (+ and – are not marked).
4.2. Heating plate (Gear resistor)
The heating plate is operated with a wave packet control system. The ratio of the power-on time is approx.
1:40 (0.1 sec on, 3.9 sec. off). The heating plate is activated via the corresponding item in the user menu. It
is only active when the machine is not operational. The heating plate output is approx. 437 W.
In order to reduce the total power output of the machine, the heating plate is turned off during the heating
stage.
The heating plate can act as a resistor for the gearmotor.
In the event that several coffees are brewed consecutively, the heating plate warms up without being turned
on. The heating plate is protected against overload by 2 thermal fuses.
If one of the thermal fuses is compromised or the heating plate is defective, the gearmotor also does not
function.
Exception: The Royal Office does not have a heating plate. The gear resistor is the small resistor on the
instantaneous water heater.
Page 20/22
REV.4 SEPT.2003
Saeco International Group
ROYAL
4. FUNCTION/TIMING
4.3. Water level indicator
The water level in the water tank is monitored by a float fitted with a magnet core. If the water level is too
low, the magnet is no longer within the range of the reed contact, which transmits the low water level signal
to the CPU.
4.4. Flow meter (Turbine)
The machine is also equipped with a flow rate monitoring system. The system checks whether the water
monitoring flow meter (turbine) turns. If no pulses are generated from the flow meter within 10 seconds, the
current cycle is interrupted. The fault is indicated by the water low indicator (machine without float) or by
the de-aerate indicator in machines with float (reed sensor). If this control mechanism is activated, the
machine must be de-aerated. During these signals, the pump operates at maximum output. As soon as the
pump has created sufficient flow, the pump output is reduced to approx. 20 l/hr.
The water quantity is generally controlled according to the coffee quantity programmed through the flow
meter (turbine) pulses.
4.5. HWS valve (steam operation)
The HWS valve is required for water and steam dispensing, as well as during de-aeration.
If the hot water valve is opened during brewing, the coffee flow is interrupted and the Water Low indicator
begins to flash or the message Close Dial appear on the display. As soon as the hot water valve is closed, the
brewing process will continue (only in machines without Instant Steam).
The operating temperature during steam dispensing is approx. 125°C. The steam button is pressed to activate
steam production (in machines without Rapid or Instant Steam). Steam dispensing occurs via the HWS
valve.
In machines with Rapid Steam, the steam can be dispensed immediately after the end of the coffee cycle
(second instantaneous water heater).
In machines with Instant Steam, the steam or cappuccino can be dispensed even during the coffee cycle.
The pump pulses the steam dispensed. This means that constant steam dispensing is ensured over a long
period of time. The flow rate of the pump is adjusted on the basis of the thermoblock temperature. If the
temperature is too low, the pump pulses are slowed down. This may occur, for instance, when the hot water
valve opens before the temperature indicator lights up.
In machines with Instant Steam, the steam is added during hot water dispensing in order to reach an even
higher water temperature. The flow volume can be adjusted under the items HOT WATER or
TURBOWATER (when System 2 is turned on).
Once the steam has been dispensed, the steam valve closes and the steam button must be pressed for normal
operating mode. The steam and coffee temperature indicators flash or the message OVERHEATING
appears in machines with digital display, until the machine has cooled and the machine cannot dispense
coffee. Cooling can be achieved by dispensing hot water. The pump functions at maximum output and the
heating remains turned off as long as the temperature indicator flashes (R. Classic) / Overheating signal
remains on (Royal Digital/Exclusive). These measures ensure that the cooling process is accelerated and the
overheating signal will disappear after a few seconds (only in machines without Instant or Rapid Steam).
Saeco International Group
REV.4 SEPT.2003
Page 21/22
4. FUNCTION/TIMING
ROYAL
4.6. Temperature sensor (KTY 10)
The temperature sensor is a temperature-sensitive resistance mechanism, converting the instantaneous water
heater temperature into an electrical signal which is measurable by the CPU.
The CPU compares this signal with the programmed reference signal and, depending on the outcome of the
comparison, controls the instantaneous water heater output.
The resistance applied has a positive temperature coefficient; i.e. higher instantaneous water heater
temperature - higher sensor resistance.
The table below indicates the trend in resistance values in relation to the temperature.
Measured values:
Temperature
0
15
20
40
90
100
130
140
Resistance (Ω)
1629
1845
1922
2246
3168
3366
3979
4188
Resistance trend (Ω)
0
216
77
324
922
198
613
209
At room temperature the resistance is 1.9KΩ.
4.7. Grinder
The grinder is a conical grinder with upper and lower grinding disc. The grind level is set by adjusting the
height of the upper grinding disc by means of the screw thread.
If the grinding discs are drawn apart by turning the grind level adjusting ring (turning anti-clockwise), the
grind is coarser, while turning the adjusting ring clockwise will result in a finer grind.
ATTENTION: Adjust the grind level only when the grinder is in operation!
The grinder operates with a direct current motor and the grinding disc rotation speed is determined by a
gearmotor. The grinder motor operates with a voltage of 260 V.
4.8. Doser
The coffee quantity for the current coffee process is portioned (dosed) in the doser chamber; a higher dose
results in a stronger (more concentrated) coffee. A lower dose results in a weaker (less concentrated coffee).
The doser is controlled by a microswitch. The ground coffee is pressed into the doser chamber from the
grinder. When the dosing chamber is full, the microswitch is activated and transmits to the CPU the signal to
turn the grinding motor OFF.
Grinding is stopped, the dosing magnet engages (2x), opens the dosing flap and the coffee falls into the
brewing unit.
If the dosing microswitch is not activated within 20 seconds from start of the grinder motor, the coffee beans
low signal appears.
The dosing quantity is set automatically by shifting the doser housing wall together with its microswitch.
Page 22/22
REV.4 SEPT.2003
Saeco International Group
CHAPTER 5
SERVICE PROGRAMME
Page
1. Service programme (R. Classic)
1.1. Test mode
1
1
2.
2
Service programme
(Royal Digital/Exclusive/Digital Redes.)
2.1. Test mode
2.2. Diagnosis menu
2
5
3.
7
Service programme
(Professional Instant Steam/Cappuccino/
Cappuccino Redesign)
3.1. Test mode
3.2. Diagnosis menu
7
10
4.
14
Service programme
(R. Professional Rapid Steam/
Profess. Redes./Digital Plus/Coffeebar)
4.1. Test mode
4.2. Diagnosis menu
5.
Service Programme (Royal Office)
5.1. Test mode
5.2. Diagnosis menu
Saeco International Group
REV.4 SEPT.2003
14
18
21
21
23
ROYAL
5. SERVICE PROGRAMME
1. Service programme (Royal Classic):
1.1. Test mode
Access:
Access the service mode by turning on the machine and simultaneously pressing the
Coffee and steam buttons.
Press Coffee and Steam buttons.
Various test functions can be activated in the service mode by activating either the coffee or steam
buttons in conjunction with various coffee quantity settings.
Programme table
Function
Button
Control
setting
LED Indicator
Pump/Turbine *
Coffee
Fault LED
(flow meter pulses)
Brewing unit
(Gearmotor)
Steam
Heating
Coffee
Coffee LED
Gear switch
(brewing setting)
Brewing unit
(Gearmotor)
Steam
Dosing magnet
Coffee
Grinder
Steam
Coffee LED
Gear switch
(home position)
Steam LED
Doser full
HWS microswitch
Steam LED
* The HWS valve must be open.
The current boiler temperature can be read in service mode by pressing the coffee and steam buttons at
the same time.
Each combination of LEDs provides an indication on the current boiler temperature
(see table below).
Temperature table
Temperature
status
T ≤ 94ºC
T = 95ºC
T = 96ºC
T = 97ºC
T ≥ 98ºC
Saeco International Group
Coffee LED
Steam LED
X
X
X
REV.4 SEPT.2003
Fault LED
X
X
X
X
Page 1/24
5. SERVICE PROGRAMME
ROYAL
2. Service programme (Royal Digital / Exclusive / Digital Redesign)
2.1. Test mode
Access (Royal Digital / Exclusive):
Access the test mode by turning on the machine and simultaneously pressing the coffee and
steam buttons.
Keep the EXPRESSO and STEAM buttons pressed, whilst pressing the STANDBY button.
Access (Digital Redesign):
Access the service programme from the standby mode (Menu + Enter) by keeping the coffee,
powder coffee and expresso buttons pressed, whilst pressing the Menu button. (Important:
Press the menu button only briefly to enter the service mode!)
Digital display / indicator
Steam selection
Pre-select powder compartment or
scroll in menu and change value
Standby or save value
Coffee or scroll in menu and
change value
Expresso or exit menu
Expresso lungo
Selection of programming menu
The various functions indicated in the table can be checked by pressing the button combinations listed
below.
Page 2/24
REV.4 SEPT.2003
Saeco International Group
ROYAL
5. SERVICE PROGRAMME
Programme table (test menu)
Royal Excl./Digital
Buttons
Royal Digital Redes.
S1
Expresso
lungo
S2
Coffee
S2
S3
Powder
Expresso
coffee
S1
Steam
Unit up
S4
Powder
coffee
S4
Expresso
lungo
S6
ON
S5
Coffee
S6
Expresso
x
Grinder
x
x
x
Doser
Heating plate
S5
Steam
x
Unit down
Pump
S3
Expresso
x
x
x
Heating
x
x
Temperature indicator
in °C
x
x
x
The upper display line signals the activated microswitch and the Hall effect of the flow meter.
The activated buttons are signalled by the lower display line (e.g. 1=S1, 2=S2, etc.).
All CPU input signals from the machine
appear in the first line of the display.
All CPU input signals from the control board
appear in the second line of the display.
Royal Exclusive / Digital / Digital Redesign
Royal Excl. / Digital
Royal Digital Redesign
1 = Brewing unit in brewing position
(brewing unit microswitch activated)
1 = Expresso lungo
1 = Steam
2 = Coffee
2 = Powder coffee
3 = Expresso
3 = Standby
4 = Powder coffee
4 = Expresso lungo
5 = Steam
5 = Coffee
6 = Standby
6 = Expresso
2 = Brewing unit in idle position
(idle position microswitch activated)
3 = Doser chamber full
(doser microswitch activated)
4 = HWS valve microswitch activated
5 = Grinds container microswitch activated
6 = Brewing unit microswitch activated
7 = Menu
7 = Water tank filled
(reed contact not activated)
8 = Flow meter pulses
(indicator flashes when magnet passes
Hall generator)
Saeco International Group
REV.4 SEPT.2003
Page 3/24
5. SERVICE PROGRAMME
Flow rate
ROYAL
If the pump is activated during test mode and the hot water valve opened, a two-digit number
appears at the bottom right side indicating the flow rate. This value must be between 40 - 60.
Grinder rate
If no button is activated, a number appears at the bottom right side referring to the grinder
rate. This value must be between 125 - 135.
Exit: Switch the machine off from the main switch.
Page 4/24
REV.4 SEPT.2003
Saeco International Group
ROYAL
5. SERVICE PROGRAMME
2.2. Diagnosis menu (Royal Digital / Exclusive / Digital Redesign)
The values below can be read and adjusted in the diagnosis menu as shown in the table.
Access:
The following button combinations can be used in standby mode to access the diagnosis
menu as indicated in the table below.
TYPE
Digital / Exclusive
Digital Redesign
Press simultaneously
EXPRESSO LUNGO
EXPRESSO
EXPRESSO LUNGO
Powder coffee
STEAM
EXPRESSO
Whilst pressing
STANDBY
COFFEE
(The user programme is also available in this mode.)
Using the button scroll to the menu item "Diagnosis" and confirm via the ENTER button.
Access appropriate item using the ENTER button.
Change value with ARROW buttons
Save value by using the ENTER button.
Changing programme values:
Programme table (diagnosis menu)
Function/Standard
Setting range
EXPRESSO LUNGO
50 – 1,000 Pulses
No. of PULSES
600
EXPRESSO
No. of PULSES
195
COFFEE
No. of PULSES
360
----HEATING---PARAMETER K1 7
----HEATING---PARAMETER K2 30
NORMAL TEMP.
°C
86
HIGH TEMP.
°C
92
TEMP.OF 1st COFFEE
°C
94
Saeco International Group
Increment
+/- 1
Comments
Number of flow meter pulses for
each saved cup fill volume, where
300 pulses correspond to approx.
100 ml.
50 – 1,000 Pulses
+/- 1
50 – 1,000 Pulses
+/- 1
1 – 50
+/- 1
Do not change!
1 – 50
+/- 1
Do not change!
70- 130°C
+/- 1
70- 130°C
+/- 1
70- 130°C
+/- 1
Normal temperature is used if not
more than 6 min. have elapsed
since last coffee dispensed.
If no coffee is dispensed for an
extended time (over 6 min.), the
next coffee will be heated to a
higher temperature to compensate
for cooling of the brewing unit and
the associated temperature loss.
Used when dispensing the first
coffee after the machine has been
turned on, to compensate for the
high temperature loss due to the
cold brewing unit and water pipes.
REV.4 SEPT.2003
Page 5/24
5. SERVICE PROGRAMME
Function
TEMP. INCREASE
°C
10
GRINDS COUNTER
Setting range
0-50°C
ROYAL
Increment
+/-1
0-50
+/-1
5-50
+/-1
--TOTAL WATER-(ml)
Number
WATER DESCALING
(ml)
HOT WATER
FLOW (l/h) 20
---------------------
6 - 34 1/h
------------------------------------------+/- 2 1/h
--HOT WATER--PUMP ADJUST. 63000
58,000 - 65,500
+/- 1
MACHINE STATUS
--DATE OF MANUF--DAY
--DATE OF MANUF--MONTH
--DATE OF MANUF--YEAR
--SERVICE DATE-DAY
--SERVICE DATE-MONTH
--SERVICE DATE-YEAR
0 - 255
---------------------
Number
GRINDS STOP
30
---------------------
----------------------------------------0 - 31
0 - 12
1996 - 2050
Comments
The boiler temperature is increased
by a set value shortly before
brewing in order to pre-heat the
boiler. and compensate for the
temperature drop during the first
water flow.
Counts number of coffee cycles.
When this value reaches the
Grinds Stop value, "GRINDS
CONTAINER EMPTY" will be
displayed. (Reset by removing
dregs drawer for emptying - min. 6
sec.)
Number of cycles until "EMPTY
GRINDS CONTAINER" is
displayed.
Total water flow volume (in ml) /
not resettable
Total water flow (in ml) since last
descaling / resettable
The pump delivery rate for hot
water can be expressed in litres per
hour.
The pump delivery rate is adjusted
in relation to the HOT WATER
FLOW setting by means of a phase
controlled modulator. Pump
tolerances can thus also be
adjusted. An equivalent value is
saved under HOT WATER PUMP
ADJUSTMENT.
36
This date indicates when the
machine was manufactured. This
date cannot be changed.
---------------------------------------------------------------+/- 1
The service date indicates the date
of the machine's last service. This
date can be changed and must be
+/- 1
updated at each service.
+/- 1
Exit: Switch the machine off at the main switch or by pressing ESC twice.
Page 6/24
REV.4 SEPT.2003
Saeco International Group
ROYAL
5. SERVICE PROGRAMME
3. Service programme (Royal Professional Instant Steam / Cappuccino / Cappuccino Redesign)
3.1. Test mode
Access (Royal Professional Instant Steam/ Cappuccino):
Access the test mode from the standby mode by keeping the EXPRESSO and HOT WATER
button pressed, whilst pressing the STANDBY button again.
Access (Cappuccino Redesign):
Access the service programme from the standby mode (Menu + Enter) by keeping the coffee, powder
coffee and expresso buttons pressed, whilst pressing the Menu button button.(Important: Press the
menu button only briefly to enter the service mode!)
Digital display / indicator
Hot water
Pre-select powder compartment or
scroll in menu and change value
Cappuccino or save value
Coffee or scroll in menu and
change value
Expresso or exit menu
Expresso lungo
Selection of programming menu
The various functions indicated in the table can be checked by pressing the button combinations listed
below.
Saeco International Group
REV.4 SEPT.2003
Page 7/24
5. SERVICE PROGRAMME
ROYAL
Programme table (test menu)
S2
Coffee
S3
Expresso
S2
Powder
coffee
S3
Cappuccino
x
x
x
Doser rinse
x
Heating (System 1)
x
Supplementary
heating (System 1)
x
x
Heating (System 2)
Magnet valve steam
x
x
x
x
x
x
x
x
x
x
x
x
x
Pump System 2 +
Magnet steam valve
x
x
Pump System 1 +
Steam + Water valve
Page 8/24
x
x
Magnet valve water
Pump System 1 +
Magnet water valve
Magnet valve
By-Pass
Pump System 2 +
Magnet By-Pass
valve
Magnet valve steam
Open steam valve!
Pump System 2 +
Magnet By-Pass
valve
Magnet water valve
S5
Coffee
S6
Standby Cappuccino
S6
Expresso Menu
x
Grinder
Temperature
indicator
in °C
Magnet valve
Cappuccino maker
Pump
System 1 (Water)
Pump
System 2 (steam)
S5
Water
x
Unit down
Heating plate
S4
Powder
coffee
S4
Expresso
lungo
x
x
x
x
x
x
x
x
x
x
x
x
REV.4 SEPT.2003
Royal Professional
Royal Cappuccino
Unit up
S1
Expresso
lungo
S1
Water
Royal Capp. Redes.
Buttons
Royal Professional
Royal Cappuccino
Royal Digital
Redes.
x
Saeco International Group
ROYAL
5. SERVICE PROGRAMME
The upper display line signals the activated microswitch and the Hall effect of the turbine.
The activated buttons are signalled by the lower display line (e.g. 1=S1, 2=S2, etc.).
All CPU input signals from the machine
appear in the first line of the display.
Royal Exclusive / Digital / Digital Redesign
1 = Brewing unit in brewing position
(brewing unit microswitch activated)
2 = Brewing unit in idle position
(idle position microswitch activated)
3 = Doser chamber full
(doser microswitch activated)
4 = HWS valve microswitch activated
5 = Grinds container microswitch activated
6 = Brewing unit microswitch activated
All CPU input signals from the control board
appear in the second line of the display.
Royal Professional
Royal Cappuccino
1 = Expresso lungo
Royal Capp. Redesign
1 = Water
2 = Coffee
2 = Powder coffee
3 = Expresso
3 = Cappuccino maker
4 = Powder coffee
4 = Expresso lungo
5 = Steam
5 = Coffee
6 = Standby
6 = Expresso
7 = Cappuccino
maker
7 = Menu
7 = Water tank filled
(reed contact not activated)
8 = Flow meter pulse system 1 (Water)
(indicator flashes when magnet passes
Hall generator)
9 = Flow meter pulse system 2 (steam)
(indicator flashes when magnet passes
Hall generator)
Flow rate:
If the pump is activated during test mode and the hot water valve opened, a two-digit number
appears at the bottom right side indicating the flow rate. This value must be between 40 - 60.
Grinder rate:
If no button is activated, a number appears at the bottom right side referring to the grinder
rate. This value must be between 125 - 135.
Exit: Switch the machine off at the main switch.
Saeco International Group
REV.4 SEPT.2003
Page 9/24
5. SERVICE PROGRAMME
ROYAL
3.2. Diagnosis menu (Royal Professional Instant Steam / Cappuccino / Cappuccino Redesign)
The values below can be read and adjusted in the diagnosis menu as shown in the table.
Access:
The following button combinations can be used in standby mode to access the diagnosis
menu as indicated in the table below. (press menu buttons briefly)
TYPE
Prof. / Cappuccino
Cappuccino Redes.
Press simultaneously
EXPRESSO LUNGO EXPRESSO
EXPRESSO LUNGO Powder coffee
HOT WATER
EXPRESSO
Whilst pressing
STANDBY
MENU
(The user programme is also available in this mode.)
Using the button scroll to the menu item "Diagnosis" and confirm via the ENTER button.
Changing programme values:
Access appropriate item using the ENTER button.
Change value with ARROW buttons
Save value by using the ENTER button.
Programme table (diagnosis menu):
Function/Standard
EXPRESSO LUNGO
No. of PULSES 600
Setting range
50 – 1,000 Pulses
EXPRESSO
No. of PULSES 195
COFFEE
No. of PULSES 360
HOT WATER
No. of PULSES 360
CAPPUCCINO TIME
SEC.
7
50 – 1,000 Pulses
+/- 1
50 – 1,000 Pulses
+/- 1
50 – 1,000 Pulses
+/- 1
240
+/- 1
----HEATING---PARAMETER K1 7
----HEATING---PARAMETER K2 30
1 – 50
+/- 1
The time for cappuccino
dispensing is saved under this item
(cup filling volume).
Do not change!
1 – 50
+/- 1
Do not change!
New processor
40
From 2003 version
----HEATING---SENSOR ADJUST.
96
Increment
+/- 1
Comments
Number of flow meter pulses for
each saved cup fill volume, where
300 pulses correspond to approx.
100 ml.
To adjust processor tolerances.
If the temperature in test mode
with a set measuring resistance of
3246Ω exceeds or falls short of the
specified temperature value (96°C)
by more than 1°C, the value
indicated in test mode must be
applied to adjust the sensor.
No measuring resistance: Do not
change!
86 – 106
From 2003 version
Page 10/24
REV.4 SEPT.2003
Saeco International Group
ROYAL
5. SERVICE PROGRAMME
Function
NORMAL TEMP.
°C
86/90
HIGH TEMP.
°C
Setting range
70- 130°C
Increment
+/- 1
70- 130°C
+/- 1
TEMP. OF 1st
COFFEE
°C
94/100
70- 130°C
+/- 1
STEAM TEMP.
°C
130/110
70- 135°C
+/-1
COFFEE TEMP.
INCREASE
°C
10/7
0-50°C
+/-1
STEAM TEMP. INCR.
°C
15
0-50°C
+/-1
STEAM
20-50
+/-1
20-50
+/-1
0-50
+/-1
5-50
+/-1
CAPPUCCINO
92/98
35
30
GRINDS COUNTER
Number
GRINDS STOP
30
TOTAL WATER....S1
(ml)
Number
WATER DESCALING
S1
(ml)
Saeco International Group
REV.4 SEPT.2003
Comments
Normal temperature is used if not
more than 6 min. have elapsed since
last coffee dispensed.
If no coffee is dispensed for an
extended time (over 6 min.), the next
coffee will be heated to a higher
temperature to compensate for
cooling of the brewing unit and the
associated temperature loss.
Used when dispensing the first
coffee after the machine has been
turned on, to compensate for the high
temperature loss due to the cold
brewing unit and water pipes.
Steam temperature 110°C only in
Redesign machines under the item:
STEAM TEMP. INC.
(steam temperature increase)
The boiler temperature is increased
by a set value shortly before brewing
in order to pre-heat the boiler. and
compensate for the temperature drop
during the first water flow.
In Redesign models the constant
temperature of 110°C is increased by
15°C during steam dispensing.
Pulsing of pump during steam
dispensing.
Pulsing of pump during cappuccino
dispensing.
Counts number of coffee cycles.
When this value reaches the Grinds
Stop value, "GRINDS CONTAINER
EMPTY" will be displayed. (Reset
by removing dregs drawer for
emptying - min. 6 sec.)
Number of cycles until "EMPTY
GRINDS CONTAINER" is
displayed.
Pump system 1
Total water flow volume (in ml) / not
resettable
Pump system 1:
Total water flow (in ml) since last
descaling.
Reset: Press cappuccino button for 5
sec.
Redesign - Expresso lungo
+ESC
Page 11/24
5. SERVICE PROGRAMME
Function
Setting range
TOTAL WATER....S2
(ml)
Number
ROYAL
Increment
WATER DESCALING
S2
(ml)
HOT WATER
FLOW (l/h) 20
(Only in System 2: OFF
for Royal Cappucc.)
HOT WATER
PUMP ADJUST. 63000
6 – 34 1/h
+/- 2 1/h
58,000 - 65,500
+/- 1
6 - 34 1/h
+/- 2 1/h
58,000 - 65,500
+/- 1
(Only in System 2: OFF
for Royal Cappucc.)
TURBOWATER
FLOW (l/h) 20
(Only in System 2: ON)
only Royal Cappucc.)
TURBOWATER
PUMP ADJUST. 63000
(Only in System 2: ON)
(only Royal Cappucc.)
WATER RESERVE
NUMBER
No. of PULSES
NUMBER
From Version: 2003
Page 12/24
1-2500
REV.4 SEPT.2003
Comments
Pump system 2
Total water flow volume (in ml) /
not resettable
Pump system 2:
Total water flow (in ml) since last
descaling.
Reset: See S1
The pump delivery rate for hot
water can be expressed in litres per
hour.
The pump delivery rate is adjusted
in relation to the HOT WATER
FLOW setting by means of a phase
controlled modulator. Pump
tolerances can thus also be
adjusted. An equivalent value is
saved under HOT WATER PUMP
ADJUSTMENT.
The pump delivery rate for
turbowater can be expressed in
litres per hour.
(only active when System 2 steam
cycle is active; mixes with hot
water System 1 and System 2)
The pump delivery rate is adjusted
in relation to the TURBOWATER
FLOW setting by means of a phase
controlled modulator. Pump
tolerances can thus also be
adjusted. An equivalent value is
saved under TURBOWATER
PUMP ADJUSTMENT.
Only when System 2 is activated.
When the water tank is full, the
value from WATER RESERVE
STOP is applied. The flow meter
pulses are counted from when the
reed switch is switched and
deducted from the value. If a
beverage is chosen for which the
saved pulse number is higher than
the remaining pulses, the message
FILL WATER TANK appears.
Saeco International Group
ROYAL
Function
WATER RESERVE
STOP
No. of PULSES
1000
From Version: 2003
MACHINE STATUS
5. SERVICE PROGRAMME
Setting range
1-2500
Increment
0 - 255
Comments
Water reserve from when the read
switch is switched to pulses.
100
--DATE OF MANUF--- --------------------- --------------------- This date indicates when the
DAY
machine was manufactured. This
---DATE OF MANUF--- --------------------- --------------------- date cannot be changed.
MONTH
---DATE OF MANUF--- --------------------- --------------------YEAR
---SERVICE DATE-0 - 31
+/- 1
The service date indicates the date
DAY
of the machine's last service. This
date can be changed and must be
--SERVICE DATE-0 - 12
+/- 1
updated at each service.
MONTH
--SERVICE DATE-1996 - 2050
+/- 1
YEAR
Exit: Switch the machine off at the main switch.
Saeco International Group
REV.4 SEPT.2003
Page 13/24
5. SERVICE PROGRAMME
ROYAL
4. Service programme (Royal Professional Rapid Steam / Coffeebar / Profess. Redesign / Digital Plus)
4.1. Test mode
Access (Royal Professional Rapid Steam / Coffeebar):
Access the test mode by turning on the machine and simultaneously pressing the coffee and
steam buttons.
Keep the EXPRESSO and HOT WATER buttons pressed, whilst pressing the STANDBY
button.
Access (Professional Redesign):
Access the service programme from the standby mode (Menu + Enter) by keeping the coffee,
powder coffee and expresso buttons pressed, whilst pressing the Menu button. (Attention:
press menu button briefly)
Digital display / indicator
Hot water
Pre-select powder compartment or
scroll in menu and change value
Cappuccino or save value
Coffee or scroll in menu and
change value
Expresso or exit menu
Expresso lungo
Selection of programming menu
Page 14/24
REV.4 SEPT.2003
Saeco International Group
ROYAL
5. SERVICE PROGRAMME
Access (Digital Plus):
Access the service programme from the standby mode (standby button) by keeping the
powder coffee , expresso and coffee buttons pressed.
Digital display / indicator
Steam selection
Pre-select powder compartment or
scroll in menu and change value
Standby or save value
Coffee or scroll in menu and
change value
Expresso or exit menu
Expresso lungo
Selection of programming menu
The various functions indicated in the table can be checked by pressing the button combinations listed
below.
Programme table (test menu)
Buttons
S1
Profess. Rapid Steam Expresso
Royal Coffeebar
lungo
Royal Profes.
S1 Water
Redes. Buttons
Royal Digital Plus
button
S1 Water
Unit up
Heating (System 1)
Supplementary
heating (System 1)
S3
Expresso
S2
Powder
coffee
S3
Cappuccino
S2
Powder
coffee
S3
Standby
S4
Powder
coffee
S4
Expresso
lungo
S4
Expresso
lungo
S5
Coffee
S6
S7
Standby Cappuccino
S6
S7
Expresso Menu
S5
Coffee
S6
Expresso
S7
Menu
x
x
x
x
x
x
x
x
Heating (System 2)
Temperature
indicator
in °C
Saeco International Group
S5
Water
x
Unit down
Grinder
Heating plate
Doser rinse
S2
Coffee
REV.4 SEPT.2003
x
x
x
x
x
x
Page 15/24
5. SERVICE PROGRAMME
Buttons
Magnet valve
Cappuccino maker
Not for Digit. Plus
Pump
S1
S2
S3
S4
S5
S6
S7
x
x
Magnet valve steam
Magnet valve water
ROYAL
x
x
x
Pump +
Magnet water valve
Pump +
Magnet steam valve
Pump +
Magnet steam valve
Magnet water valve
x
x
x
x
x
x
x
x
x
x
The upper display line signals the activated microswitch and the Hall effect of the turbine.
The activated buttons are signalled by the lower display line (e.g. 1=S1, 2=S2, etc.).
All CPU input signals from the machine
appear in the first line of the display.
Royal Exclusive / Digital / Digital Redesign
1 = Brewing unit in brewing position
(brewing unit microswitch activated)
2 = Brewing unit in idle position
(idle position microswitch activated)
3 = Doser chamber full
(doser microswitch activated)
4 = HWS valve microswitch activated
5 = Grinds container microswitch activated
6 = Brewing unit microswitch activated
All CPU input signals from the control board
appear in the second line of the display.
Profess. Rapid
Steam
Royal Coffeebar
1 = Expresso lungo
Royal Profes. Redes.
Royal Digital Plus
1 = Water
2 = Coffee
2 = Powder coffee
3 = Expresso
4 = Powder coffee
3 = Cappuccino maker
Standby (Digit. Plus)
4 = Expresso lungo
5 = Steam
5 = Coffee
6 = Standby
6 = Expresso
7 = Cappuccino
maker
7 = Menu
7 = Water tank filled
(reed contact not activated)
8 = Flow meter pulse system 1 (Water)
(indicator flashes when magnet passes
Hall generator)
Page 16/24
REV.4 SEPT.2003
Saeco International Group
ROYAL
5. SERVICE PROGRAMME
Flow rate:
If the pump is activated during test mode and the hot water valve opened, a two-digit number
appears at the bottom right side indicating the flow rate. This value must be between 40 - 60.
Grinder rate:
If no button is activated, a number appears at the bottom right side referring to the grinder
rate. This value must be between 125 - 135.
Exit: Switch the machine off at the main switch.
Saeco International Group
REV.4 SEPT.2003
Page 17/24
5. SERVICE PROGRAMME
ROYAL
4.2. Diagnosis menu (Royal Professional Rapid Steam / Coffeebar / Profess. Redesign / Digital Plus)
The values below can be read and adjusted in the diagnosis menu as shown in the table.
Access:
The following button combinations can be used in standby mode to access the diagnosis
menu as indicated in the table below (press menu buttons briefly).
TYPE
Press simultaneously
Prof. / Coffeebar
EXPRESSO LUNGO EXPRESSO
Prof. Redes./ Dig. + EXPRESSO LUNGO Powder coffee
HOT WATER
EXPRESSO
Whilst pressing
STANDBY
MENU
(The user programme is also available in this mode.)
Using the button scroll to the menu item "Diagnosis" and confirm via the ENTER button.
Changing programme values:
Access appropriate item using the ENTER button.
Change value with ARROW buttons
Save value by using the ENTER button.
Programme table (diagnosis menu):
Function/Standard
EXPRESSO LUNGO
No. of PULSES 600
Setting range
50 – 1,000 Pulses
EXPRESSO
No. of PULSES 195
COFFEE
No. of PULSES 360
HOT WATER
No. of PULSES 360
CAPPUCCINO TIME
SEC.
7
50 – 1,000 Pulses
+/- 1
50 – 1,000 Pulses
+/- 1
50 – 1,000 Pulses
+/- 1
240
+/- 1
----HEATING---PARAMETER K1 7
----HEATING---PARAMETER K2 30
1 – 50
+/- 1
The time for cappuccino
dispensing is saved under this item
(cup filling volume).
Do not change!
1 – 50
+/- 1
Do not change!
New processor
40
From 2003 version
----HEATING---SENSOR ADJUST.
96
Increment
+/- 1
Comments
Number of flow meter pulses for
each saved cup fill volume, where
300 pulses correspond to approx.
100 ml.
To adjust processor tolerances.
If the temperature in test mode
with a set measuring resistance of
3246Ω exceeds or falls short of the
specified temperature value (96°C)
by more than 1°C, the value
indicated in test mode must be
applied to adjust the sensor.
No measuring resistance: Do not
change!
86 – 106
From 2003 version
Page 18/24
REV.4 SEPT.2003
Saeco International Group
ROYAL
5. SERVICE PROGRAMME
Function
NORMAL TEMP.
°C
86/90
Setting range
70- 130°C
Increment
+/- 1
70- 130°C
+/- 1
TEMP. OF 1st
COFFEE
°C
94/100
70- 130°C
+/- 1
STEAM TEMP.
°C
130/110
70- 135°C
+/-1
COFFEE TEMP.
INCR.
°C
10/7
0-50°C
+/-1
STEAM TEMP. INCR.
°C
15
0-50°C
+/-1
STEAM
20-50
+/-1
20-50
+/-1
0-50
+/-1
5-50
+/-1
HIGH TEMP.
°C
CAPPUCCINO
92/98
35
30
GRINDS COUNTER
Number
GRINDS STOP
30
TOTAL WATER....S1
(ml)
Number
WATER DESCALING
S1
(ml)
Saeco International Group
REV.4 SEPT.2003
Comments
Normal temperature is used if not
more than 6 min. have elapsed since
last coffee dispensed.
If no coffee is dispensed for an
extended time (over 6 min.), the next
coffee will be heated to a higher
temperature to compensate for
cooling of the brewing unit and the
associated temperature loss.
Used when dispensing the first
coffee after the machine has been
turned on, to compensate for the high
temperature loss due to the cold
brewing unit and water pipes.
Steam temperature 110°C only in
Redesign machines under the item:
STEAM TEMP. INC.
(steam temperature increase)
The boiler temperature is increased
by a set value shortly before brewing
in order to pre-heat the boiler. and
compensate for the temperature drop
during the first water flow.
In Redesign models the constant
temperature of 110°C is increased by
15°C during steam dispensing.
Pulsing of pump during steam
dispensing.
Pulsing of pump during cappuccino
dispensing.
Counts number of coffee cycles.
When this value reaches the Grinds
Stop value, "GRINDS CONTAINER
EMPTY" will be displayed. (Reset
by removing dregs drawer for
emptying - min. 6 sec.)
Number of cycles until "EMPTY
GRINDS CONTAINER" is
displayed.
Pump system 1
Total water flow volume (in ml) / not
resettable
Pump system 1:
Total water flow (in ml) since last
descaling.
Reset: Press cappuccino button for 5
sec.
Redesign: Expresso lungo
+ESC
Page 19/24
5. SERVICE PROGRAMME
Function
Setting range
TOTAL WATER....S2
(ml)
Number
ROYAL
Increment
WATER DESCALING
S2
(ml)
HOT WATER
FLOW (l/h) 20
HEISSWASSER--PUMPENREG 63000
WATER RESERVE
NUMBER
No. of PULSES
1000
From Version: 2003
WATER RES. STOP
No. of PULSES
NUMBER
From Version: 2003
TURBO FACTOR
MACHINE STATUS
100
--DATE OF MANUF--DAY
--DATE OF MANUF--MONTH
--DATE OF MANUF--YEAR
--SERVICE DATE-DAY
--SERVICE DATE-MONTH
--SERVICE DATE-YEAR
6 – 34 1/h
+/- 2 1/h
58,000 - 65,500
+/- 1
1-2500
1-2500
10 - 250
0 - 255
---------------------
0 - 31
---------------------------------------------------------------+/- 1
0 - 12
+/- 1
1996 - 2050
+/- 1
-----------------------------------------
Comments
Pump system 2
Total water flow volume (in ml) /
not resettable
Pump system 2:
Total water flow (in ml) since last
descaling.
Reset: See S1
The pump delivery rate for hot
water can be expressed in litres per
hour.
The pump delivery rate is adjusted
in relation to the HOT WATER
FLOW setting by means of a phase
controlled modulator. Pump
tolerances can thus also be
adjusted. An equivalent value is
saved under HOT WATER PUMP
ADJUSTMENT.
Counts the pulses programmed
under water reserve stop from
when the reed switch switches.
The indicator signalling the need
to fill the water tank then appears.
Number of residual pulses from
when the reed switch switches to
when the water low indicator
appears. (can be changed)
Conversion factor for pressureresistant flow meter.
(Setting value for Roy. Profess.:
100
(Setting value for Roy. Coffeebar:
77
Operating status
This date indicates when the
machine was manufactured. This
date cannot be changed.
The service date indicates the date
of the machine's last service. This
date can be changed and must be
updated at each service.
Exit: Switch the machine off at the main switch.
Page 20/24
REV.4 SEPT.2003
Saeco International Group
ROYAL
5. SERVICE PROGRAMME
5. Service programme (Royal Office)
5.1. Test mode
Access (Royal Office):
Keep the water and expresso buttons pressed and turn machine on. While the buttons are
pressed, the E-Prom Version is displayed (e.g. Version 0.13).
The various functions indicated in the table can be checked by pressing the button combinations listed
below.
Programme table (test menu)
Buttons
S1 Expresso
Unit up
Unit down
Heating 1-1090 W
Grinder
Doser
Heating 2 – 437W
Pump
Hot water magnet valve
Coin validator price 1
Coin validator price 2
Reset coin validator
Temperature
S2 Coffee
S3 Hot water
x
x
x
x
x
x
S4 cup warmer
M1
M1
M1
M2
M2
M2
M3
M3
M4
M4
M4
M5
The upper display line signals the activated microswitch and the Hall effect of the flow meter.
The activated buttons are signalled by the lower display line (e.g. 1=S1, 2=S2, etc.).
All CPU input signals from the machine appear in the first line of the display.
1 = Brewing unit in brewing position
(brewing unit microswitch activated)
2 = Brewing unit in idle position
(idle position microswitch activated)
3 = Doser microswitch activated (full)
4 = HWS valve microswitch activated
5 = Grinds container microswitch activated
6 = Brewing unit microswitch activated
7 = Water tank full (reed contact not activated)
8 = Flow meter pulses (indicator appears as soon as the magnet passes the sensor)
Saeco International Group
REV.4 SEPT.2003
Page 21/24
5. SERVICE PROGRAMME
ROYAL
All CPU input signals from the control board appear in the second line of the
display.
1 = Coffee
2 = Expresso
3 = Hot water
Flow rate
If the pump is activated during test mode and the hot water valve opened, a two-digit number
appears at the bottom right side indicating the flow rate. This value must be between 40 - 60.
Grinder rate
If no button is activated, a number appears at the bottom right side referring to the grinder
rate. This value must be between 125 - 135.
Exit: Switch the machine off at the main switch.
Page 22/24
REV.4 SEPT.2003
Saeco International Group
ROYAL
5. SERVICE PROGRAMME
5.2. Diagnosis menu (Royal Office)
The values below can be read and adjusted in the diagnosis menu as shown in the table.
Access:
Access the user menu (Keep the C + hot water button pressed and turn machine on from
main switch).
Enter code: 111111 = Press the expresso button six times.
Using the button scroll to the menu item "Diagnosis" and confirm with the E = Expresso button.
Access appropriate item using the E-button.
Change value with ARROW buttons
Save value by using the E-button.
Changing programme values:
Programme table (diagnosis menu)
Function/Standard
EXPRESSO
No. of PULSES
Setting range
Increment
Comments
Number of flow meter pulses for
each saved cup fill volume, where
300 pulses correspond to approx.
100 ml.
50 - 800 Pulses
+/- 1
50 - 800 Pulses
+/- 1
50 - 800 Pulses
+/- 1
1 – 50
+/- 1
Saved pulse number for hot water
quantity programme
Do not change!
1 – 50
+/- 1
Do not change!
70- 130°C
+/- 1
70- 130°C
+/- 1
TEMP. OF 1st COFFEE
°C
94
70- 130°C
+/- 1
TEMP. INCREASE
°C
10
0-50°C
+/-1
Normal temperature is used if not
more than 6 min. have elapsed since
last coffee dispensed.
If no coffee is dispensed for an
extended time (over 6 min.), the
next coffee will be heated to a
higher temperature to compensate
for cooling of the brewing unit and
the associated temperature loss.
Used when dispensing the first
coffee after the machine has been
turned on, to compensate for the
high temperature loss due to the
cold brewing unit and water pipes.
The boiler temperature is increased
by a set value shortly before
brewing in order to pre-heat the
boiler. and compensate for the
temperature drop during the first
water flow.
195
COFFEE
No. of PULSES 360
HOT WATER
No. of PULSES 360
----HEATING---PARAMETER K1 7
----HEATING---PARAMETER K2 40
NORMAL TEMP.
°C
86
HIGH TEMP.
°C
92
Saeco International Group
REV.4 SEPT.2003
Page 23/24
5. SERVICE PROGRAMME
Function
GRINDS COUNTER
Setting range
0-50
Increment
+/-1
Number
GRINDS STOP
30
5-50
--TOTAL WATER-(ml)
Number
WATER DESCALING
(ml)
Number
HOT WATER
FLOW (l/h) 20
---------------------
--HOT WATER--PUMP ADJUST. 63000
58,000 - 65,500
TURBO FACTOR
100
MACHINE STATUS
160
--DATE OF MANUF--DAY
--DATE OF MANUF--MONTH
--DATE OF MANUF--YEAR
ROYAL
--------------------6 - 34 1/h
10 - 250
Comments
Counts number of coffee cycles.
When this value reaches the
Grinds Stop value, "GRINDS
CONTAINER EMPTY" will be
displayed. (Reset by removing
dregs drawer for emptying - min.
6 sec.)
+/-1
Number of cycles until "EMPTY
GRINDS CONTAINER" is
displayed.
----------------- Total water flow volume (in ml) /
not resettable
---------------------- Total water flow (in ml) since last
descaling / resettable
-----+/- 2 1/h
The pump delivery rate for hot
water can be expressed in litres
per hour.
+/- 1
The pump delivery rate is adjusted
in relation to the HOT WATER
FLOW setting by means of a
phase controlled modulator. Pump
tolerances can thus also be
adjusted. An equivalent value is
saved under HOT WATER PUMP
ADJUSTMENT.
Flow meter conversion factor
0 - 255
-------------------------------------------------------------
----------------- This date indicates when the
machine was manufactured. This
---------------------- date cannot be changed.
---------------------------
Exit: Switch the machine off at the main switch.
Page 24/24
REV.4 SEPT.2003
Saeco International Group
CHAPTER 6
FAULTS
Page
1. Faults
Saeco International Group
1
REV.4 SEPT.2003
ROYAL
6. FAULTS
1. Faults:
The following table indicates the most common faults, listed by component.
Heating
Electronics
Part
Fault
Cause
Does not function
No display
SI on mains filter defective
Main switch defective
Door switch defective
Electronic system defective
Cold coffee
Standby LED lights up
continuously
Temperature differences
No froth
Heating remains cold
Heating indicator remains lit up
KTY defective
Electronic system defective
Doser
Water instead of coffee
Weak coffee
Recurring indicator
COFFEE BEANS LOW
- Brewing unit overfull
- Gearmotor obstructed
Saeco International Group
REV.4 SEPT.2003
KTY defective
Electronic system defective
Heating - Interruption
Heating plug connection
Thermal fuse
Fusible cut-out
(No grinder function)
Doser switch constantly
activated / Dirt
Defective doser rinse
Dose quantity too low
Dose chamber - coffee residues
Doser switch does not work
Doser flap does not close
Electronic system defective
Page 1/3
6. FAULTS
Part
ROYAL
Fault
Cause
HWS system
Brewing unit
Gearmotor
Grinder
Coffee too strong / flows too
slowly
Coffee too weak / flows too fast,
no froth
Page 2/3
Grinder functions until the
COFFEE BEANS LOW indicator
appears on the display
(insufficient beans in bean
container)
Grinder does not work
Grinding set too finely
Grind set too coarsely
Grinder motor not properly
installed
Grinding disc worn
Water in grinder
Grinding set too finely
Motor defective
Electronic system defective
Doser switch constantly
activated
Brewing unit malfunctions
- does not move to home position
MS defective
Motor defective
Cup warmer defective
Fusible cut-out
Cup warmer defective
Gear wheel defective
Electronic system defective
Sluggish / obstructed
Plunger stiff
Piston O-ring swollen
Gasket of valve plug swollen
(black O-ring)
Grinding too coarse
Over-dosage
Water drips from steam pipe
(with closed valve)
Securing tab on tea nozzle
spout broken / bent
Valve gasket calcified
Fracture in steam pipe
Defective O-ring
Defective O-ring
Hairline crack in HWS valve
threaded joint
Water drips from steam pipe shaft
Water leakage from HWS spout
Water leakage at joint
REV.4 SEPT.2003
Saeco International Group
ROYAL
Overpress
ure valve
Part
6. FAULTS
Fault
Cause
Varying cup filling volume
More water in drip tray
Pump
No suction when pump is in
operation
Dry coffee in dregs drawer / water
low indicator (fault LED)
Water leakage at overpressure
valve threaded joint
Runs dry / Not de-aerated
before initial heating.
Inject water jet while pump is
in operation.
Defective pump
Thermal fuse defective
Hairline crack in joint area
Different cup filling volumes Water low indicator flashes
Turbine calcified / other
deposits
Hall sensor defective
WATER LOW INDICATOR
indicator
(water level over reserve)
Float not watertight
Float jammed
Magnet in float too weak
Electronic system defective
Reed sensor defective
Float
Flow meter
Overpressure valve does not
seal / calcified
Saeco International Group
REV.4 SEPT.2003
Page 3/3
CHAPTER 7
FAULT DIAGNOSIS
Page
1.
Fault detection (Royal Classic)
1.1. Does not function
1.2. Machine does not function
(red LED flashes)
1.3. Machine does not function
(red LED lights up)
1.4. Water low
1.5. Brewing unit / Gearmotor obstructed
2.
Fault detection
(R. Dig./Excl./Prof./Coffeeb.)
2.1. Does not function
2.2. Machine does not function
(grinds container not detected)
2.3. Water low
2.4. De-aerate
2.5. Coffee beans low
2.6. Brewing unit / Gearmotor obstructed
Saeco International Group
REV.4 SEPT.2003
1
1
2
3
5
6
7
7
8
9
10
11
12
ROYAL
7. FAULT DIAGNOSIS
1. Fault diagnosis (Royal Classic)
1.1 Machine does not function
Machine does not
function
Is there current upstream
from the mains filter?
No
Test mains fuse and machine
cable - END
Yes
Is there current downstream
from the mains filter?
No
Replace - END
Yes
Does current flow to the
fuse inside the machine?
No
Replace - END
Yes
Does current flow to the
door switch when the front
door is closed?
No
Replace - END
Yes
Does the current flow
to the main switch?
No
Replace - END
Yes
KTY defective?
Yes
Replace - END
No
Electronic system
defective?
Saeco International Group
Yes
REV.5 SEPT.2004
Replace - END
Page1/12
7. FAULT DIAGNOSIS
ROYAL
1.2. Machine does not function (red LED flashes)
Machine does not
function (red
LED flashes)
Dregs drawer installed?
No
Yes
Can dregs drawer
be installed?
END
No
Activate dregs drawer
switch manually
- Can dregs drawer be
fitted?
No
Yes
Check if brewing
unit is blocked
No
Is brewing unit installed?
No
Can brewing unit
be installed?
Yes
END
Yes
Does brewing unit MS
function correctly?
Replace MS
END
No
Yes
Does dregs drawer MS
function correctly?
Page 2/12
No
REV.5 SEPT.2004
Replace MS
END
Saeco International Group
ROYAL
7. FAULT DIAGNOSIS
1.3. Machine does not function (red LED lights up)
Machine does not function
Red LED lights up
(water or coffee beans low)
Does signal occur immediately
after machine is turned on?
Check water level
YES
No
Does red LED light up within
first 20 sec. after start button is
activated?
Yes
Is coffee bean container empty?
Fill
END
Yes
No
Does grinder motor
work after start button
has been activated?
Does current reach grinding motor
at a specific time?
No
No
Yes
Yes
Check cable / Replace
electronic system
END
Does coffee dispensing stop
after grinding (coffee beans low
signal again)?
No
Replace motor
END
END
Yes
Saeco International Group
REV.5 SEPT.2004
Page3/12
7. FAULT DIAGNOSIS
ROYAL
Yes
Set coarser grind
- Is coffee dispensing
complete?
Grinding can be made
coarser
No
No
Ye
s
Does coffee have enough froth /
Is grain size of dregs correct?
Test motor retainer OK?
No
Yes
Yes
END
Page 4/12
Replace grinding disc
END
REV.5 SEPT.2004
No
Lock motor retainer
into place - END
Saeco International Group
ROYAL
7. FAULT DIAGNOSIS
1.4. Water low (red LED lights up)
Water low
(red LED lights)
Can pump activity
be detected at a
specific time?
Is the pump
energised?
No
Yes
Check polarity /
Replace pump
END
No
Is pump thermal
fuse OK?
Yes
Is water tank
empty?
Yes
Replace electronic
system - END
Fill water tank.
END
Yes
No
Tank valve faulty
(foreign objects)?
Yes
Remove foreign objects
END
No
Is water filter
calcified / dirty?
Descale / Replace
END
Yes
No
Flow meter pulses for
hot water supply OK?
No
Flow meter calcified/
Other dirt
Yes
Replace
END
Yes
No
Check valve plugs
Calcified / Damaged
Check brewing unit END
Saeco International Group
Instantaneous water heater
calcified / Piping calcified Descale / Replace
REV.5 SEPT.2004
Page5/12
7. FAULT DIAGNOSIS
ROYAL
1.5. Brewing unit blocked / Gears blocked
Brewing unit blocked
Gears obstructed
Does brewing unit move to
home position in service
mode?
Remove brewing unit and check
for overdosing and friction
END
Yes
No
Is the noise emission
abnormal?
Check / Replace gear
wheels and microswitch
END
Yes
No
Disconnect gearmotor switch
Do gears move to home position in service
mode?
Yes
Remove brewing unit
Replace gearmotor
switch END
No
Unscrew water sleeve from brewing unit
and remove brewing unit
Do gears move to home position in service
mode?
Yes
Check brewing unit
END
No
Is the gearmotor energised?
Replace gearmotor
END
Yes
No
Is current flow to cup warmer and
thermal fuse OK?
No
Replace cup warmer /
thermal fuse
END
Yes
Replace electronic system
Page 6/12
REV.5 SEPT.2004
Saeco International Group
ROYAL
7. FAULT DIAGNOSIS
2. Fault diagnosis (Magic de luxe, Comfort and Comfort+)
2.1. Machine
does not function
Machine does not
function
Is there current upstream
from the mains filter?
No
Test mains fuse and machine
cable - END
Yes
Is there current downstream
from the mains filter?
No
Replace - END
Yes
Does current flow to the
fuse inside the machine?
No
Replace - END
Yes
Does current flow to the
door switch when the front
door is closed?
No
Replace - END
Yes
Does the current flow
to the main switch?
No
Replace - END
Yes
KTY defective?
Yes
Replace - END
No
Electronic system
defective?
Saeco International Group
Yes
REV.5 SEPT.2004
Replace - END
Page7/12
7. FAULT DIAGNOSIS
ROYAL
2.2. Machine does not function (Indicator: grinds container not detected)
Machine does not
function
Grinds container not
detected
Is grinds container
installed?
Yes
Does grinds container
MS function correctly?
No
Can grinds container
be installed?
No
Replace MS
END
No
Yes
Does indicator stop?
Yes
END
No
Is the brewing unit in
home position?
No
Does brewing unit
microswitch function
correctly?
No
Replace MS
END
Yes
Check if brewing
unit is blocked
Page 8/12
REV.5 SEPT.2004
Saeco International Group
ROYAL
7. FAULT DIAGNOSIS
2.3. Water low
Water low
Water in tank?
(over reserve)
Fill water
END
No
Yes
Has float sunk or is
jammed?
Replace /
Remove
END
Yes
No
Is magnet old?
Yes
Replace float
END
No
Is reed sensor
defective?
Replace reed sensor
END
Yes
No
Electronic system
defective?
Saeco International Group
Yes
Replace - END
REV.5 SEPT.2004
Page9/12
7. FAULT DIAGNOSIS
ROYAL
2.4. De-aerate
De-aerate
Can pump activity
be detected at a
specific time?
Is the pump
energised?
No
Check polarity /
Replace pump
END
Yes
No
Is pump thermal
fuse OK?
Yes
Is water tank
empty?
Replace electronic
system END
Yes
Fill water tank
END
Yes
Tank valve faulty
(foreign objects)?
Yes
Remove foreign objects
END
No
Is water filter
calcified / dirty?
Descale / Replace
END
Yes
No
Flow meter pulses for
hot water supply OK?
No
Flow meter calcified/
Other dirt
Yes
Replace
END
Yes
No
Check valve plugs
Calcified / Damaged
Check brewing unit END
Page 10/12
Instantaneous water heater
calcified / Piping calcified Descale / Replace
REV.5 SEPT.2004
Saeco International Group
ROYAL
7. FAULT DIAGNOSIS
2.5 Coffee Beans Low indicator
Coffee beans low
Is coffee bean container
empty?
Fill
END
Yes
No
Does grinder motor
work after start button
has been activated?
Does current reach grinding motor
at a specific time?
No
No
Yes
Yes
Replace electronic
system
END
Does coffee dispensing stop
after grinding (coffee beans low
signal again)?
No
Replace motor
END
END
Yes
Yes
Set coarser grind
- Is coffee dispensing
complete?
No
Grind can be made
coarser
No
Yes
Does coffee have enough froth /
Do dregs have correct
consistency?
No
Yes
Yes
END
Saeco International Group
Test motor retainer OK?
Replace grinding disc
END
REV.5 SEPT.2004
No
Lock motor retainer
into place - END
Page11/12
7. FAULT DIAGNOSIS
ROYAL
2.6. Brewing unit blocked / Gears blocked
Brewing unit blocked
Gears obstructed
Does brewing unit move to
home position in service
mode?
Remove brewing unit and check
for overdosing and friction
END
Yes
No
Is the noise emission
abnormal?
Check / Replace gear
wheels and microswitch
END
Yes
No
Disconnect gearmotor switch
Do gears move to home position in service
mode?
Yes
Remove brewing unit
Replace gearmotor
switch END
No
Unscrew water sleeve from brewing unit
and remove brewing unit
Do gears move to home position in service
mode?
Yes
Check brewing unit
END
No
Is the gearmotor energised?
Replace gearmotor
END
Yes
No
Is current flow to cup warmer and
thermal fuse OK?
No
Replace cup warmer /
thermal fuse
END
Yes
Replace electronic system
Page 12/12
REV.5 SEPT.2004
Saeco International Group
CHAPTER 8
REPAIRS /
SERVICE SCHEDULE
Page
1. Repairs schedule
2. Service schedule
3. Final test
Saeco International Group
REV.4 SEPT.2003
1
1
2
ROYAL
8. REPAIR/SERVICE SCHEDULE
1. Repairs schedule:
The repairs schedule, together with the service schedule, lists all relevant activities to be
performed in an efficient sequence.
1
2
3
4
5
6
7
8
9
10
11
12
13
14
15
16
17
18
Activity
Visual check (transport damage)
Record of machine data
Functional check / Error analysis
Opening of machine
Visual check (leakages)
Mechanical systems check (functional test)
Defect detection
Modifications check
Service operations according to service schedule
Internal cleaning
Functional test (with open machine / leakage test)
Assembly
Final test according to test schedule
Steam off (winter)
External cleaning
Lubrication of brewing unit
Insulation test
Documentation
2. Service schedule:
Service activities
R = Replace
AT = Acoustic test
Component
Water filter
Lip seal / Water tank
Coffee return flow valve
Valve spring
Valve plug O-ring
Valve plug O-ring
Filter (brewing unit)
Hose connections
Pump
Gearmotor
Grinder
Doser
Water circuit
HWS valve
Water outlet (valve plug)
O-ring (boiler connection /
instantaneous water heater)
Saeco International Group
C = Clean
D = Descale
Activity
R
R
R
R
R
R
C / VC
VC
VC / AT
AT / VC
C/A
C
D
VC / R
C
R
REV.4 SEPT.2003
VC = Visual check
A = Adjustment
Equipment
Grease solvent
Vacuum cleaner / brush
Vacuum cleaner / brush
Descaler (Saeco)
Grease solvent / brush
Page 1/2
ROYAL
8. REPAIR/SERVICE SCHEDULE
3. Final test:
Test
Cup fill volume
Cup fill volume
Procedure
2-3 cups on expresso
setting
2-3 cups on coffee setting
Noise emission
Froth quantity
Equipment
Measuring
beaker
Measuring
beaker
Carefully froth coffee in
cup until froth separates
Froth colour
Temperature
Measurement of
dispensed coffee stream
Grind level
Check grain size of coffee
grinds
Dispense hot water
Dispense steam
Remove tank
Hot water
Steam function
Water Low
indicator
Grinds Container
Absent indicator
Coffee Beans
Low indicator
Insulation test
Temperature measuring
device
Remove grinds container
Start coffee programme coffee bean container
empty
Saeco International Group
REV.4 SEPT.2003
Instruction
Equal quantity
Tolerance
15%
Equal quantity
15%
Empirical value
Standard noise
Froth cover must
subsequently close
completely
Textured light
brown
84 ˚C
± 4 ˚C
See Training
Fill water tank
indicator
Grinds Container
Absent indicator
Coffee Beans Low
indicator
HG 701
Page 2/2
CHAPTER 9
DISASSEMBLY
Page
1.
2.
3.
4.
5.
6.
7.
8.
9.
10.
11.
12.
Saeco International Group
Disassemble housing
Disassembling the electronic system
Disassembling doser flap valve
Disassembling doser switch
Disassembling the grinder
Adjusting the grinder
Disassembling the grinder motor
Disassemble the
instantaneous water heater
Disassembling the gears
Assembly/adjustment of
instantaneous water heater
Disassembling the pump
Disassembling System 2 (Rapid steam)
REV.4 SEPT.2003
1
3
4
6
7
9
11
13
15
17
18
19
ROYAL
9. DISASSEMBLY
1. Disassembly of the housing
a) Remove: Driptray, dreg drawer, water tank and brew unit.
b) Unscrew the bean container by removing the two screws (1). New models may
have a additional housing screw below the bean container to be unscrewed.
c) Remove the two screws (2) below the water tank (Torx/T10).
2
1
Fig. 1
d) Remove the two bottom housing screws (1).
1
Fig. 2
Saeco International Group
REV.4 SEPT.2003
Seite 1/20
9. DEMONTAGE
e)
ROYAL
Release the two hooks by using a screw driver (1).Remove the grinder setting
lever (2) carefully in order not to break the fixing hooks.
1
2
Fig. 3
f)
Lift the housing at the rear side and pull water hose off. Than remove the
housing. When reassembling make sure, that the water hose is connected
correctly!
Seite 2/20
REV.4 SEPT.2003
Saeco International Group
ROYAL
9. DISASSEMBLY
2. Disassembling the electronic system
a)
Number the connections on the control board and remove.
Fig. 4
b) Unscrew the electronic system by removing the two fixing screws (1) and
remove.
1
1
Fig. 5
Saeco International Group
REV.4 SEPT.2003
Seite 3/20
9. DISASSEMBLY
ROYAL
3. Disassembling the doser
a)
Unscrew the doser cover by removing the screw (1).
1
Fig. 6
b) Using a screwdriver, release the fastening tab (1) and push dosing magnet out
of its fitting.
1
2
Fig. 7
Seite 4/20
REV.4 SEPT.2003
Saeco International Group
ROYAL
c)
9. DISASSEMBLY
Using a screwdriver, first push the doser flap out of the open end (1). Than
slide it out of the closed bearing (2) and remove.
1
2
1
Fig. 8
Saeco International Group
REV.4 SEPT.2003
Seite 5/20
9. DISASSEMBLY
ROYAL
4. Disassembling doser switch
a)
Push the powder coffee compartment in direction of the arrow (1) and lift it
(2). Carefully pull out the two rubber holders (3).
2
1
3
Fig. 9
b) Disconnect the switch. Lift the doser switch using a screwdriver (1) and push
it out of ist fitting (2).
1
2
Fig. 10
Seite 6/20
REV.4 SEPT.2003
Saeco International Group
ROYAL
9. DISASSEMBLY
5. Disassembling the grinder
a)
Turn the grinding adjustment ring (1) counter clockwise until the three lugs of
the grinding disc fitting (2) are clearly visible and remove the upper grinding
disc from the grinder. Using a vacuum cleaner remove the ground coffee.
2
1
Fig. 11
b) Remove the fixing screw (1) of the grinding cone (note: left thread).
c) Carefully remove the grinding cone (2) (take care of balls and springs of
friction clutch).
1
2
Fig. 12
Saeco International Group
REV.4 SEPT.2003
Seite 7/20
9. DISASSEMBLY
ROYAL
d) Carefully remove the clutch disc.
Fig. 13
e)
Remove: Balls, springs and rubber drivers. The sealing felt (1) can then be
cleaned or exchanged. (Same steps have to be performed when exchanging the
Grinder motor)
1
Fig. 14
Seite 8/20
REV.4 SEPT.2003
Saeco International Group
ROYAL
9. DISASSEMBLY
6. Adjusting the grinder
a)
Install the grinding ring onto its fitting so that the marking (1) on the grinding
adjustment ring and the ring fitting (2) are adjacent to one another.
2
1
Fig. 15
b) Turn the grinding adjustment ring (1) clockwise until a certain friction can be
felt.
1
Fig. 16
Saeco International Group
REV.4 SEPT.2003
Seite 9/20
9. DISASSEMBLY
c)
ROYAL
Turn about 12-14 notches in an anti-clockwise direction and check the grind
level by making a test coffee (Crema / dregs grain size). Adjust the grind level
as required (max. 3-5 notches). Attach the housing and mount the lever in
position 5.
Seite 10/20
REV.4 SEPT.2003
Saeco International Group
ROYAL
9. DISASSEMBLY
7. Disassembling the grinder motor
a)
If the motor has to be exchanged perform according to description 6.
Disassembling the grinder first. Remove the three fixing screws (1), and set
the doser switch to max position.
1
Fig. 17
b) Lift the motor and disconnect the connectors (1).
1
Fig. 18
Saeco International Group
REV.5 SEPT.2004
Seite 11/20
9. DISASSEMBLY
c)
ROYAL
Remove the securing ring if there is one (not in all machines), unhook the
three tabs and seperate the upper part from the motor/gear assy (the motor is
alwasy delivered with the gear).
1
Fig. 19
Fig. 20
Seite 12/20
REV.4 SEPT.2003
Saeco International Group
ROYAL
9. DISASSEMBLY
8. Disassembling the instantaneous water heater
a)
Remove the hose clip of the HWS-valve (1) and the instantaneous water
heater (2) and remove the Water hose.
1
2
Fig. 21
b) Remove the two fixing screws (1) of the instantaneous water heater (new
version / boiler J is fixed with 3 screws).
1
Fig. 22
Saeco International Group
REV.4 SEPT.2003
Seite 13/20
9. DISASSEMBLY
c)
ROYAL
Lift the heater out of the machine and exchange parts as necessary. In
order to exchange the thermostat or the sensor, remove screw (1) and the
fixing clamb.
1
Fig. 23
d) Attention: The metal cylinder (Fig. 24/1) of the thermal sensor (KTY)
must be transferred from the old sensor to the new sensor when the sensor
is replaced!.
1
2
Fig. 24
e)
When re-assembling ensure that sufficient heat conductive paste is used
(Fig. 24/2).
Seite 14/20
REV.4 SEPT.2003
Saeco International Group
ROYAL
9. DISASSEMBLY
9. Disassembling of the gear
a) Remove the housing
b) Remove loosen the instantaneous water heater
c) Remove the gear fixing screws (1).
1
Fig. 25
d) Remove the gear by lifting it a bit – pulling out the bottom side of the gear
first, and thereafter the upper side. Unscrew the screws of the gear cover and
remove the cover.
Abb. 26
1
Fig. 26
Saeco International Group
REV.4 SEPT.2003
Seite 15/20
9. DISASSEMBLY
e)
f)
ROYAL
Replace parts as necessary.
When replacing the gear wheel ensure that the arrow on the large gear wheel
points towards the achsle of the small gear wheel. The brewing unit cannot be
installed in this position. (Install all components, switch on machine - gears go
to home position - install brewing unit.) The small gear wheel can be
assembled as required
a)
b)
c)
d)
Micro switch brew position
Micro switch home position
Micro switch dreg drawer
Micro switch brew unit
d
a
2
1
c
b
Abb. 27
Seite 16/20
REV.4 SEPT.2003
Saeco International Group
ROYAL
9. DISASSEMBLY
10. Assembly/adjustment of instantaneous water heater
a)
Screw on the instantanous water heater, but do not fasten the screws
completely. Insert the brew unit and drive it into brew position using the test
mode. Fasten the lower fixing screw (1).
1
Abb. 28
b) Drive the brew unit into home position, remove the brew unit and fasten the
upper screw (1). (Attention: Boiler J is fixed with three screws)
1
Abb. 29
Saeco International Group
REV.4 SEPT.2003
Seite 17/20
9. DISASSEMBLY
ROYAL
11. Disassembling the pump
a)
Pull off the adapter angle (1) and pump holder (2).
2
1
Abb. 30
Abb. 31
b) Remove the locking spring (1).
c) Push down the fixing tab (2) and remove pump and holder (3).
1
2
3
Abb. 32
Seite 18/20
REV.4 SEPT.2003
Saeco International Group
ROYAL
9. DEMONTAGE
12. Disassembly System 2 (Rapid steam)
a)
Loosen nut (1) and remove cappuccino valve.
1
Abb. 1
b) Unscrew system two holding device, by removing the five screws (1).
1
Abb. 2
Saeco International Group
REV.4 SEPT.2003
Seite 19/20
9. DEMONTAGE
c)
ROYAL
Lift system two as much as possible and remove the hose (1) from the pressure
relief valve
1
Abb. 3
d) Remove the locking spring of the steam hose and remove the steam hose (1).
Place the unit on the rim of the housing and change parts as necessary.
1
Abb. 4
Seite 20/20
REV.4 SEPT.2003
Saeco International Group
CHAPTER 10
CIRCUIT DIAGRAMS
Saeco International Group
REV.4 SEPT.2003