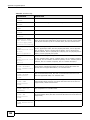
1
NXC Series
Wireless LAN Controller
Version 4.10
Edition 1, 01/2014
Quick Start Guide
User’s Guide
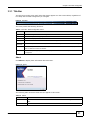
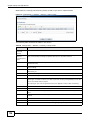
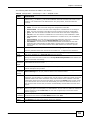
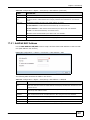
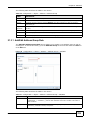
Default Login Details
IP Address
https://192.168.1.1
User Name
admin
www.zyxel.com
Password
1234
Copyright © 2014 ZyXEL Communications Corporation
IMPORTANT!
READ CAREFULLY BEFORE USE.
KEEP THIS GUIDE FOR FUTURE REFERENCE.
Screenshots and graphics in this book may differ slightly from your product due to differences in
your product firmware or your computer operating system. Every effort has been made to ensure
that the information in this manual is accurate.
Related Documentation
• Quick Start Guide
The Quick Start Guide is designed to show you how to make the NXC hardware connections and
access the Web Configurator.
• CLI Reference Guide
The CLI Reference Guide explains how to use the Command-Line Interface (CLI) and CLI
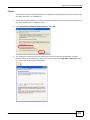
commands to configure the NXC.
Note: It is recommended you use the Web Configurator to configure the NXC.
• Web Configurator Online Help
Click the help icon in any screen for help in configuring that screen and supplementary
information.
2
NXC Series User’s Guide
Contents Overview
Contents Overview
User’s Guide .......................................................................................................................................15
Introduction .............................................................................................................................................16
Hardware Installation and Connection ....................................................................................................22
The Web Configurator .............................................................................................................................28
Technical Reference ..........................................................................................................................45
Dashboard ...............................................................................................................................................46
Monitor ....................................................................................................................................................56
Registration .............................................................................................................................................86
Wireless ..................................................................................................................................................92
Interfaces .............................................................................................................................................. 110
Policy and Static Routes .......................................................................................................................134
Zones ....................................................................................................................................................144
NAT .......................................................................................................................................................147
ALG .......................................................................................................................................................154
IP/MAC Binding .....................................................................................................................................156
Captive Portal ........................................................................................................................................161
RTLS .....................................................................................................................................................178
Firewall ..................................................................................................................................................181
User/Group ............................................................................................................................................190
AP Profile ..............................................................................................................................................208
MON Profile ...........................................................................................................................................227
ZyMesh Profile ......................................................................................................................................232
Addresses .............................................................................................................................................236
Services ................................................................................................................................................241
Schedules .............................................................................................................................................246
AAA Server ...........................................................................................................................................251
Authentication Method ..........................................................................................................................263
Certificates ............................................................................................................................................266
DHCPv6 ................................................................................................................................................283
System ..................................................................................................................................................285
Log and Report .....................................................................................................................................326
File Manager .........................................................................................................................................341
Diagnostics ............................................................................................................................................352
Packet Flow Explore .............................................................................................................................363
Reboot ...................................................................................................................................................370
Shutdown ..............................................................................................................................................371
Troubleshooting ....................................................................................................................................372
NXC Series User’s Guide
3
Table of Contents
Table of Contents
Contents Overview ..............................................................................................................................3
Table of Contents .................................................................................................................................4
Part I: User’s Guide ......................................................................................... 15
Chapter 1
Introduction.........................................................................................................................................16
1.1 Overview ...........................................................................................................................................16
1.2 Zones, Interfaces, and Physical Ports ...............................................................................................16
1.2.1 Interface Types ........................................................................................................................17
1.2.2 Interface and Zone Configuration ............................................................................................17
1.3 Applications .......................................................................................................................................18
1.3.1 AP Management ......................................................................................................................18
1.3.2 Wireless Security .....................................................................................................................18
1.3.3 Captive Portal ..........................................................................................................................19
1.3.4 Load Balancing ........................................................................................................................19
1.3.5 Dynamic Channel Selection ....................................................................................................19
1.3.6 User-Aware Access Control .....................................................................................................19
1.4 Management Overview .....................................................................................................................20
1.5 Object-based Configuration ..............................................................................................................20
1.6 Starting and Stopping the NXC .........................................................................................................21
Chapter 2
Hardware Installation and Connection .............................................................................................22
2.1 Rack-mounted Installation .................................................................................................................22
2.1.1 Rack-Mounted Installation Procedure ......................................................................................22
2.2 Front Panel ........................................................................................................................................23
2.2.1 NXC2500 .................................................................................................................................23
2.2.2 NXC5500 .................................................................................................................................23
2.2.3 Front Panel LEDs ....................................................................................................................25
2.3 Rear Panel ........................................................................................................................................26
Chapter 3
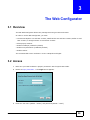
The Web Configurator ........................................................................................................................28
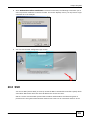
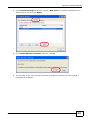
3.1 Overview ...........................................................................................................................................28
3.2 Access ...............................................................................................................................................28
3.3 The Main Screen ...............................................................................................................................29
4
NXC Series User’s Guide
Table of Contents
3.3.1 Title Bar ...................................................................................................................................31
3.3.2 Navigation Panel .....................................................................................................................37
3.3.3 Warning Messages ..................................................................................................................40
3.3.4 Tables and Lists .......................................................................................................................41
Part II: Technical Reference............................................................................ 45
Chapter 4
Dashboard ...........................................................................................................................................46
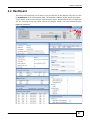
4.1 Overview ...........................................................................................................................................46
4.1.1 What You Can Do in this Chapter ............................................................................................46
4.2 Dashboard .........................................................................................................................................47
4.2.1 CPU Usage ..............................................................................................................................51
4.2.2 Memory Usage ........................................................................................................................52
4.2.3 Session Usage ........................................................................................................................53
4.2.4 DHCP Table .............................................................................................................................54
4.2.5 Number of Login Users ............................................................................................................55
Chapter 5
Monitor.................................................................................................................................................56
5.1 Overview ...........................................................................................................................................56
5.1.1 What You Can Do in this Chapter ............................................................................................56
5.2 What You Need to Know ...................................................................................................................57
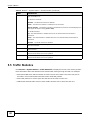
5.3 Port Statistics ...................................................................................................................................57
5.3.1 Port Statistics Graph ...............................................................................................................59
5.4 Interface Status .................................................................................................................................60
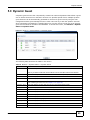
5.5 Traffic Statistics .................................................................................................................................62
5.6 Session Monitor ...............................................................................................................................65
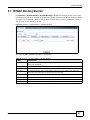
5.7 IP/MAC Binding Monitor ....................................................................................................................67
5.8 Login Users ......................................................................................................................................68
5.9 Dynamic Guest .................................................................................................................................69
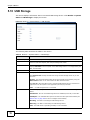
5.10 USB Storage ..................................................................................................................................70
5.11 AP List ............................................................................................................................................71
5.11.1 Station Count of AP ...............................................................................................................73
5.12 Radio List .......................................................................................................................................75
5.12.1 AP Mode Radio Information ..................................................................................................77
5.13 ZyMesh Link Info .............................................................................................................................78
5.14 Station List ......................................................................................................................................79
5.15 Detected Device .............................................................................................................................80
5.16 View Log .........................................................................................................................................81
5.17 View AP Log ...................................................................................................................................84
NXC Series User’s Guide
5
Table of Contents
Chapter 6
Registration.........................................................................................................................................86
6.1 Overview ...........................................................................................................................................86
6.1.1 What You Can Do in this Chapter ............................................................................................86
6.1.2 What you Need to Know ..........................................................................................................86
6.2 Registration .......................................................................................................................................87
6.2.1 NXC2500 .................................................................................................................................87
6.2.2 NXC5500 .................................................................................................................................89
6.3 Service ..............................................................................................................................................89
6.3.1 NXC2500 .................................................................................................................................89
6.3.2 NXC5500 .................................................................................................................................90
Chapter 7
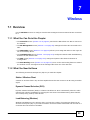
Wireless ...............................................................................................................................................92
7.1 Overview ...........................................................................................................................................92
7.1.1 What You Can Do in this Chapter ............................................................................................92
7.1.2 What You Need to Know ..........................................................................................................92
7.2 Controller ..........................................................................................................................................93
7.3 AP Management ...............................................................................................................................93
7.3.1 Edit AP List .............................................................................................................................95
7.3.2 Port Setting Edit .......................................................................................................................97
7.3.3 VLAN Add/Edit .........................................................................................................................97
7.3.4 AP Policy .................................................................................................................................99
7.4 MON Mode ........................................................................................................................................99
7.4.1 Add/Edit Rogue/Friendly List .................................................................................................101
7.5 Load Balancing ...............................................................................................................................102
7.5.1 Disassociating and Delaying Connections ............................................................................103
7.6 DCS ................................................................................................................................................104
7.7 Auto Healing ....................................................................................................................................107
7.8 Technical Reference ........................................................................................................................108
7.8.1 Dynamic Channel Selection ..................................................................................................108
7.8.2 Load Balancing ......................................................................................................................109
Chapter 8
Interfaces........................................................................................................................................... 110
8.1 Interface Overview .......................................................................................................................... 110
8.1.1 What You Can Do in this Chapter .......................................................................................... 110
8.1.2 What You Need to Know ........................................................................................................ 110
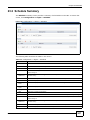
8.2 Ethernet Summary ......................................................................................................................... 111
8.2.1 Edit Ethernet ......................................................................................................................... 112
8.2.2 Object References ................................................................................................................. 119
8.2.3 Add DHCPv6 Request Options ............................................................................................. 119
8.2.4 Add/Edit DHCP Extended Options ........................................................................................120
6
NXC Series User’s Guide
Table of Contents
8.3 VLAN Interfaces .............................................................................................................................122
8.3.1 VLAN Summary .....................................................................................................................124
8.3.2 Add/Edit VLAN ......................................................................................................................125
8.4 Technical Reference ........................................................................................................................131
Chapter 9
Policy and Static Routes ..................................................................................................................134
9.1 Overview .........................................................................................................................................134
9.1.1 What You Can Do in this Chapter ..........................................................................................134
9.1.2 What You Need to Know .......................................................................................................134
9.2 Policy Route ...................................................................................................................................135
9.2.1 Add/Edit Policy Route ............................................................................................................138
9.3 Static Route ....................................................................................................................................140
9.3.1 Static Route Setting ...............................................................................................................141
9.4 Technical Reference ........................................................................................................................142
Chapter 10
Zones .................................................................................................................................................144
10.1 Overview .......................................................................................................................................144
10.1.1 What You Can Do in this Chapter ........................................................................................144
10.1.2 What You Need to Know ......................................................................................................144
10.2 Zone ..............................................................................................................................................145
10.2.1 Add/Edit Zone .....................................................................................................................146
Chapter 11
NAT.....................................................................................................................................................147
11.1 Overview .......................................................................................................................................147
11.1.1 What You Can Do in this Chapter ........................................................................................147
11.2 NAT Summary ...............................................................................................................................147
11.2.1 Add/Edit NAT .......................................................................................................................149
11.3 Technical Reference ......................................................................................................................152
Chapter 12
ALG ....................................................................................................................................................154
12.1 Overview .......................................................................................................................................154
12.1.1 What You Can Do in this Chapter ........................................................................................154
12.1.2 What You Need to Know ......................................................................................................154
12.1.3 Before You Begin .................................................................................................................154
12.2 ALG ..............................................................................................................................................155
12.3 Technical Reference ......................................................................................................................155
Chapter 13
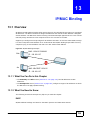
IP/MAC Binding.................................................................................................................................156
NXC Series User’s Guide
7
Table of Contents
13.1 Overview .......................................................................................................................................156
13.1.1 What You Can Do in this Chapter ........................................................................................156
13.1.2 What You Need to Know ......................................................................................................156
13.2 IP/MAC Binding Summary ............................................................................................................157
13.2.1 Edit IP/MAC Binding ............................................................................................................158
13.2.2 Add/Edit Static DHCP Rule ..................................................................................................159
13.3 IP/MAC Binding Exempt List .........................................................................................................160
Chapter 14
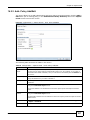
Captive Portal....................................................................................................................................161
14.1 Overview .......................................................................................................................................161
14.1.1 Captive Portal Type .............................................................................................................162
14.1.2 What You Can Do in this Chapter ........................................................................................162
14.2 Captive Portal ................................................................................................................................163
14.2.1 Add Exceptional Services ....................................................................................................165
14.2.2 Auth. Policy Add/Edit ...........................................................................................................167
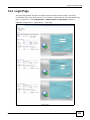
14.3 Login Page ....................................................................................................................................169
14.3.1 Custom Login and Access Pages ........................................................................................172
14.3.2 External or Uploaded Web Portal Details ............................................................................174
Chapter 15
RTLS ..................................................................................................................................................178
15.1 Overview .......................................................................................................................................178
15.1.1 What You Can Do in this Chapter ........................................................................................178
15.2 Before You Begin ..........................................................................................................................179
15.3 Configuring RTLS ..........................................................................................................................179
Chapter 16
Firewall ..............................................................................................................................................181
16.1 Overview .......................................................................................................................................181
16.1.1 What You Can Do in this Chapter ........................................................................................181
16.1.2 What You Need to Know ......................................................................................................181
16.2 Firewall ..........................................................................................................................................183
16.2.1 Add/Edit Firewall Screen .....................................................................................................185
16.3 Session Control ............................................................................................................................187
16.3.1 Add/Edit Session Limit .........................................................................................................188
Chapter 17
User/Group ........................................................................................................................................190
17.1 Overview .......................................................................................................................................190
17.1.1 What You Can Do in this Chapter ........................................................................................190
17.1.2 What You Need To Know .....................................................................................................190
17.2 User Summary ..............................................................................................................................193
8
NXC Series User’s Guide
Table of Contents
17.2.1 Add/Edit User ......................................................................................................................194
17.3 Group Summary ............................................................................................................................196
17.3.1 Add/Edit Group ...................................................................................................................197
17.4 Setting ..........................................................................................................................................197
17.4.1 Edit User Authentication Timeout Settings ..........................................................................201
17.4.2 Add/Edit Dynamic Guest Group ..........................................................................................202
17.4.3 User Aware Login Example .................................................................................................203
17.4.4 Guest Manager Login Example ...........................................................................................204
17.5 MAC Address ................................................................................................................................206
17.5.1 Add/Edit MAC Address ........................................................................................................207
Chapter 18
AP Profile...........................................................................................................................................208
18.1 Overview .......................................................................................................................................208
18.1.1 What You Can Do in this Chapter ........................................................................................208
18.1.2 What You Need To Know .....................................................................................................208
18.2 Radio .............................................................................................................................................209
18.2.1 Add/Edit Radio Profile ......................................................................................................... 211
18.3 SSID .............................................................................................................................................214
18.3.1 SSID List ..............................................................................................................................214
18.3.2 Security List .........................................................................................................................218
18.3.3 MAC Filter List .....................................................................................................................223
18.3.4 Layer-2 Isolation List ...........................................................................................................225
Chapter 19
MON Profile .......................................................................................................................................227
19.1 Overview .......................................................................................................................................227
19.1.1 What You Can Do in this Chapter ........................................................................................227
19.1.2 What You Need To Know .....................................................................................................227
19.2 MON Profile ...................................................................................................................................228
19.2.1 Add/Edit MON Profile ..........................................................................................................229
19.3 Technical Reference ......................................................................................................................230
Chapter 20
ZyMesh Profile ..................................................................................................................................232
20.1 Overview .......................................................................................................................................232
20.1.1 What You Can Do in this Chapter ........................................................................................233
20.2 ZyMesh Profile ..............................................................................................................................234
20.2.1 Add/Edit ZyMesh Profile ......................................................................................................234
Chapter 21
Addresses .........................................................................................................................................236
21.1 Overview .......................................................................................................................................236
NXC Series User’s Guide
9
Table of Contents
21.1.1 What You Can Do in this Chapter ........................................................................................236
21.1.2 What You Need To Know .....................................................................................................236
21.2 Address Summary .........................................................................................................................236
21.2.1 Add/Edit Address ................................................................................................................237
21.3 Address Group Summary ..............................................................................................................238
21.3.1 Add/Edit Address Group Rule ............................................................................................239
Chapter 22
Services .............................................................................................................................................241
22.1 Overview .......................................................................................................................................241
22.1.1 What You Can Do in this Chapter ........................................................................................241
22.1.2 What You Need to Know ......................................................................................................241
22.2 Service Summary ..........................................................................................................................242
22.2.1 Add/Edit Service Rule .........................................................................................................243
22.3 Service Group Summary ..............................................................................................................244
22.3.1 Add/Edit Service Group Rule ..............................................................................................245
Chapter 23
Schedules..........................................................................................................................................246
23.1 Overview .......................................................................................................................................246
23.1.1 What You Can Do in this Chapter ........................................................................................246
23.1.2 What You Need to Know ......................................................................................................246
23.2 Schedule Summary .......................................................................................................................247
23.2.1 Add/Edit Schedule One-Time Rule .....................................................................................248
23.2.2 Add/Edit Schedule Recurring Rule .....................................................................................249
Chapter 24
AAA Server........................................................................................................................................251
24.1 Overview .......................................................................................................................................251
24.1.1 What You Can Do in this Chapter ........................................................................................251
24.1.2 What You Need To Know .....................................................................................................251
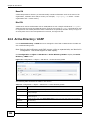
24.2 Active Directory / LDAP .................................................................................................................254
24.2.1 Add/Edit Active Directory / LDAP Server .............................................................................256
24.3 RADIUS .........................................................................................................................................259
24.3.1 Add/Edit RADIUS ...............................................................................................................260
Chapter 25
Authentication Method.....................................................................................................................263
25.1 Overview .......................................................................................................................................263
25.1.1 What You Can Do in this Chapter ........................................................................................263
25.1.2 Before You Begin .................................................................................................................263
25.2 Authentication Method ..................................................................................................................263
25.2.1 Add Authentication Method .................................................................................................264
10
NXC Series User’s Guide
Table of Contents
Chapter 26
Certificates ........................................................................................................................................266
26.1 Overview .......................................................................................................................................266
26.1.1 What You Can Do in this Chapter ........................................................................................266
26.1.2 What You Need to Know ......................................................................................................266
26.1.3 Verifying a Certificate ...........................................................................................................268
26.2 My Certificates .............................................................................................................................269
26.2.1 Add My Certificates .............................................................................................................271
26.2.2 Edit My Certificates ..............................................................................................................274
26.2.3 Import Certificates ..............................................................................................................276
26.3 Trusted Certificates .......................................................................................................................277
26.3.1 Edit Trusted Certificates ......................................................................................................279
26.3.2 Import Trusted Certificates ..................................................................................................281
26.4 Technical Reference ......................................................................................................................282
Chapter 27
DHCPv6..............................................................................................................................................283
27.1 Overview .......................................................................................................................................283
27.1.1 What You Can Do in this Chapter ........................................................................................283
27.2 DHCPv6 Request .........................................................................................................................283
27.2.1 Add/Edit DHCPv6 Request Object .....................................................................................284
Chapter 28
System ...............................................................................................................................................285
28.1 Overview .......................................................................................................................................285
28.1.1 What You Can Do in this Chapter ........................................................................................285
28.2 Host Name ....................................................................................................................................286
28.3 USB Storage .................................................................................................................................286
28.4 Date and Time ..............................................................................................................................287
28.4.1 Pre-defined NTP Time Servers List .....................................................................................290
28.4.2 Time Server Synchronization ...............................................................................................290
28.5 Console Speed ..............................................................................................................................291
28.6 DNS Overview ..............................................................................................................................291
28.6.1 DNS Server Address Assignment .......................................................................................292
28.6.2 Configuring the DNS Screen ...............................................................................................292
28.6.3 Address Record ..................................................................................................................294
28.6.4 PTR Record .........................................................................................................................294
28.6.5 Adding an Address/PTR Record .........................................................................................295
28.6.6 Domain Zone Forwarder .....................................................................................................296
28.6.7 Add Domain Zone Forwarder ..............................................................................................296
28.6.8 MX Record ..........................................................................................................................297
28.6.9 Add MX Record ...................................................................................................................297
28.6.10 Add Service Control ...........................................................................................................297
NXC Series User’s Guide
11
Table of Contents
28.7 WWW Overview ...........................................................................................................................298
28.7.1 Service Access Limitations ..................................................................................................298
28.7.2 System Timeout ...................................................................................................................299
28.7.3 HTTPS .................................................................................................................................299
28.7.4 Configuring WWW Service Control .....................................................................................300
28.7.5 Service Control Rules ..........................................................................................................302
28.7.6 HTTPS Example ..................................................................................................................303
28.8 SSH
............................................................................................................................................309
28.8.1 How SSH Works ..................................................................................................................310
28.8.2 SSH Implementation on the NXC ........................................................................................ 311
28.8.3 Requirements for Using SSH ............................................................................................... 311
28.8.4 Configuring SSH .................................................................................................................. 311
28.8.5 Examples of Secure Telnet Using SSH ...............................................................................312
28.9 Telnet ............................................................................................................................................314
28.10 FTP ............................................................................................................................................315
28.11 SNMP .........................................................................................................................................317
28.11.1 Supported MIBs .................................................................................................................318
28.11.2 SNMP Traps ......................................................................................................................318
28.11.3 Configuring SNMP .............................................................................................................319
28.11.4 Adding or Editing an SNMPv3 User Profile ........................................................................321
28.12 Authentication Server .................................................................................................................321
28.12.1 Add/Edit Trusted RADIUS Client ......................................................................................323
28.13 Language ...................................................................................................................................324
28.14 IPv6 .............................................................................................................................................324
Chapter 29
Log and Report .................................................................................................................................326
29.1 Overview .......................................................................................................................................326
29.1.1 What You Can Do In this Chapter ........................................................................................326
29.2 Email Daily Report ........................................................................................................................326
29.3 Log Settings .................................................................................................................................328
29.3.1 Log Settings Summary ........................................................................................................329
29.3.2 Edit System Log Settings ...................................................................................................331
29.3.3 Edit USB Storage Log Settings ...........................................................................................333
29.3.4 Edit Remote Server Log Settings .......................................................................................336
29.3.5 Log Category Settings ........................................................................................................337
Chapter 30
File Manager......................................................................................................................................341
30.1 Overview .......................................................................................................................................341
30.1.1 What You Can Do in this Chapter ........................................................................................341
30.1.2 What you Need to Know ......................................................................................................341
30.2 Configuration File ..........................................................................................................................343
12
NXC Series User’s Guide
Table of Contents
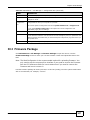
30.3 Firmware Package .......................................................................................................................347
30.4 Shell Script ...................................................................................................................................350
Chapter 31
Diagnostics .......................................................................................................................................352
31.1 Overview .......................................................................................................................................352
31.1.1 What You Can Do in this Chapter ........................................................................................352
31.2 Diagnostics ...................................................................................................................................352
31.2.1 Diagnostics Files .................................................................................................................353
31.3 Packet Capture ............................................................................................................................354
31.3.1 Packet Capture Files ..........................................................................................................356
31.3.2 Example of Viewing a Packet Capture File ..........................................................................357
31.4 Core Dump ....................................................................................................................................357
31.4.1 Core Dump Files ..................................................................................................................358
31.5 System Log ..................................................................................................................................359
31.6 Wireless Frame Capture ..............................................................................................................360
31.6.1 Wireless Frame Capture Files ............................................................................................361
Chapter 32
Packet Flow Explore.........................................................................................................................363
32.1 Overview .......................................................................................................................................363
32.1.1 What You Can Do in this Chapter ........................................................................................363
32.2 The Routing Status Screen ...........................................................................................................363
32.3 The SNAT Status Screen ..............................................................................................................366
Chapter 33
Reboot ...............................................................................................................................................370
33.1 Overview .......................................................................................................................................370
33.1.1 What You Need To Know .....................................................................................................370
33.2 Reboot ...........................................................................................................................................370
Chapter 34
Shutdown...........................................................................................................................................371
34.1 Overview .......................................................................................................................................371
34.1.1 What You Need To Know .....................................................................................................371
34.2 Shutdown ......................................................................................................................................371
Chapter 35
Troubleshooting................................................................................................................................372
35.1 Overview .......................................................................................................................................372
35.1.1 General ................................................................................................................................372
35.1.2 Wireless ...............................................................................................................................377
35.2 Resetting the NXC ........................................................................................................................379
NXC Series User’s Guide
13
Table of Contents
35.3 Getting More Troubleshooting Help ..............................................................................................380
Appendix A Log Descriptions...........................................................................................................381
Appendix B Common Services ........................................................................................................408
Appendix C Importing Certificates ................................................................................................... 411
Appendix D Wireless LANs..............................................................................................................424
Appendix E IPv6 ..............................................................................................................................436
Appendix F Customer Support ........................................................................................................445
Appendix G Legal Information .........................................................................................................451
Index ..................................................................................................................................................454
14
NXC Series User’s Guide
P ART I
User’s Guide
15
C HAPT ER
1
Introduction
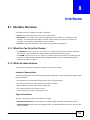
1.1 Overview
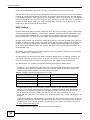
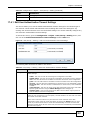
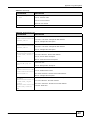
This User’s Guide covers the following models: NXC2500 and NXC5500.
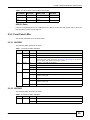
Table 1 NXC Series Comparison Table
FEATURES
NXC2500
Two USB Ports
Console Port (Serial Port)
NXC5500
Yes
Yes
DB-9 Connector
RJ-45 Connector
The NXC is a comprehensive wireless LAN controller. Its flexible configuration helps network
administrators set up wireless LAN networks and efficiently enforce security policies over them. In
addition, the NXC provides excellent throughput, making it an ideal solution for reliable, secure
service.
The NXC’s security features include firewall and certificates. It also provides captive portal
configuration, NAT, port forwarding, policy routing, DHCP server, extensive wireless AP control
options, and many other powerful features. Flexible configuration helps you set up the network and
enforce security policies efficiently.
The front panel physical Gigabit Ethernet ports (labeled P1, P2, P3, and so on) are mapped to
Gigabit Ethernet (ge) interfaces. By default P1 is mapped to ge1, P2 is mapped to ge2 and so on.
• The default LAN IP address is 192.168.1.1.
• The default administrator login user name and password are “admin” and “1234” respectively.
1.2 Zones, Interfaces, and Physical Ports
Here is an overview of zones, interfaces, and physical ports in the NXC.
Table 2 Zones, Interfaces, and Physical Ethernet Ports
Zones
A zone is a group of interfaces. Use zones to apply security settings such as firewall.
(LAN)
Interfaces
(Ethernet, VLAN)
Interfaces are logical entities that (layer-3) packets pass through. Use interfaces in
configuring zones, policy routes, static routes, and NAT.
Port combine physical ports into interfaces.
Physical Ethernet
Ports
The physical port is where you connect a cable.
(P1, P2, P3, and so
on)
NXC Series User’s Guide
16
Chapter 1 Introduction
1.2.1 Interface Types
There are two types of interfaces in the NXC. In addition to being used in various features,
interfaces also describe the network that is directly connected to it.
• Ethernet interfaces are the foundation for defining other interfaces and network policies.
• VLAN interfaces recognize tagged frames. The NXC automatically adds or removes the tags as
needed. Each VLAN can only be associated with one Ethernet interface.
Note: By default, all Ethernet interfaces are placed into vlan0, allowing the NXC to
function as a bridge device.
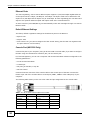
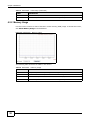
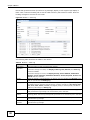
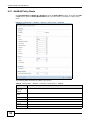
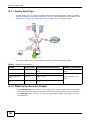
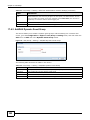
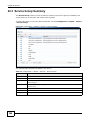
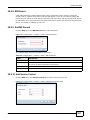
1.2.2 Interface and Zone Configuration
This section introduces the NXC’s default zone member physical interfaces and the default
configuration of those interfaces. This section uses the NXC500 drawings as an example.
Figure 1 Default Network Topology
Table 3 Default Interfaces Configuration
PORT
INTERFACE
ZONE
IP ADDRESS AND DHCP
SETTINGS
SUGGESTED USE WITH DEFAULT
SETTINGS
P1~P6
ge1~ge6
LAN
(vlan0)
192.168.1.1, DHCP server
disabled
Dedicated LAN connections
CONSOLE
N/A
None
None
Local management
• The LAN zone contains the ge1~ ge6 interfaces (physical ports P1~P6). By default, all LAN
interfaces are put in vlan0.
• The console port is not in a zone and can be directly accessed by a computer attached to it using
a special console-to-Ethernet adapter.
NXC Series User’s Guide
17
Chapter 1 Introduction
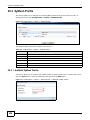
1.3 Applications
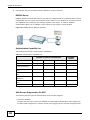
These are some example applications for your NXC.
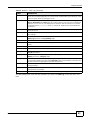
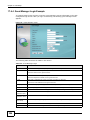
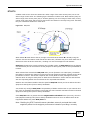
1.3.1 AP Management
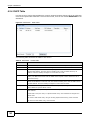
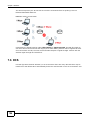
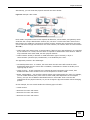
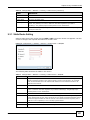
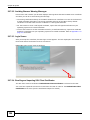
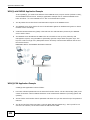
Manage multiple separate Access Points (APs) from a single, persistent location. APs can also be
configured to monitor for rogue APs.
Figure 2 AP Management Example
B
C
D
A
Here, the NXC (A) connects to a number of Power over Ethernet (PoE) devices (B). They connect
to the managed Access Points (C), such as NWA5123-NI, which in turn provide access to the
network for the wireless clients (D) within their broadcast radius.
1.3.2 Wireless Security
Keep the connections between wireless clients and your APs secure with the NXC’s comprehensive
wireless security tools. APs can be configured to require WEP and WPA encryption from all wireless
clients attempting to associate with them. Furthermore, you can protect your network by
monitoring for rogue APs. Rogue APs are wireless access points operating in a network’s coverage
area that are not under the control of the network’s administrators, and can potentially open up
critical holes in a network’s security policy.
18
NXC Series User’s Guide
Chapter 1 Introduction
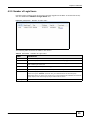
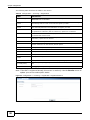
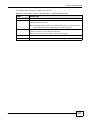
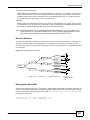
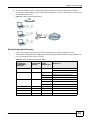
1.3.3 Captive Portal
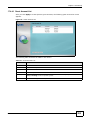
The NXC can be configured with a captive portal, which intercepts all network traffic, regardless of
address or port, until a connecting user authenticates his or her session, through a designated login
Web page.
Figure 3 Applications: Captive Portal
The captive portal page only appears once per authentication session. Unless a session times out or
a user closes the connection, he or she generally will not see it again during the same session.
1.3.4 Load Balancing
With load balancing you can easily distribute wireless traffic across multiple APs to relieve strain on
your network. When a station becomes overloaded, it can automatically delay a connection until the
client associates with another network, or it can alternatively disassociate idle clients or those
clients with weak connections from the network.
1.3.5 Dynamic Channel Selection
The NXC can automatically select the radio channel upon which its APs broadcast by scanning the
area around those APs and determining what channels are currently being used by other devices
not connected to the network.
1.3.6 User-Aware Access Control
Set up security policies that restrict access to sensitive information and shared resources based on
the user who is trying to access it.
NXC Series User’s Guide
19
Chapter 1 Introduction
1.4 Management Overview
You can use the following ways to manage the NXC.
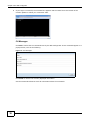
Web Configurator
The Web Configurator allows easy NXC setup and management using an Internet browser. This
User’s Guide provides information about the Web Configurator.
Command-Line Interface (CLI)
The CLI allows you to use text-based commands to configure the NXC. You can access it using
remote management (for example, SSH or Telnet) or via the physical or Web Configurator console
port. See the Command Reference Guide for CLI details. The default settings for the console port
are as follows:
Table 4 Console Port Default Settings
SETTING
VALUE
Speed
115200 bps
Data Bits
8
Parity
None
Stop Bit
1
Flow Control
Off
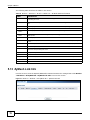
1.5 Object-based Configuration
The NXC stores information or settings as objects. You use these objects to configure many of the
NXC’s features and settings. Once you configure an object, you can reuse it in configuring other
features.
When you change an object’s settings, the NXC automatically updates all the settings or rules that
use the object.
You can create address objects based on an interface’s IP address, subnet, or gateway. The NXC
automatically updates every rule or setting that uses these objects whenever the interface’s IP
address settings change. For example, if you change an Ethernet interface’s IP address, the NXC
automatically updates the rules or settings that use the interface-based, LAN subnet address
object.
You can use the Configuration > Object screens to create objects before you configure features
that use them. If you are in a screen that uses objects, you can also usually select Create new
Object to be able to configure a new object.
Use the Object Reference screen to see what objects are configured and which configuration
settings reference specific objects.
20
NXC Series User’s Guide
Chapter 1 Introduction
1.6 Starting and Stopping the NXC
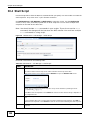
Here are some of the ways to start and stop the NXC.
Always use Maintenance > Shutdown or the shutdown command before
you turn off the NXC or remove the power. Not doing so can cause the
firmware to become corrupt.
Table 5 Starting and Stopping the NXC
METHOD
DESCRIPTION
Turning on the power
A cold start occurs when you turn on the power to the NXC. The NXC powers up,
checks the hardware, and starts the system processes.
Rebooting the NXC
A warm start (without powering down and powering up again) occurs when you use
the Reboot button in the Reboot screen or when you use the reboot command. The
NXC writes all cached data to the local storage, stops the system processes, and then
does a warm start.
Using the RESET
button
If you press the RESET button, the NXC sets the configuration to its default values
and then reboots.
Clicking
Maintenance >
Shutdown >
Shutdown or using
the shutdown
command
Clicking Maintenance > Shutdown > Shutdown or using the shutdown command
writes all cached data to the local storage and stops the system processes. Wait for
the device to shut down and then manually turn off or remove the power. It does not
turn off the power.
Disconnecting the
power
Power off occurs when you turn off the power to the NXC. The NXC simply turns off. It
does not stop the system processes or write cached data to local storage.
The NXC does not stop or start the system processes when you apply configuration files or run shell
scripts although you may temporarily lose access to network resources.
NXC Series User’s Guide
21
C HAPT ER
2
Hardware Installation and Connection
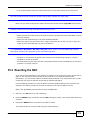
2.1 Rack-mounted Installation
Note: ZyXEL provides a sliding rail accessory for your use with your device. Please
contact your local vendor for details.
The NXC can be mounted on an EIA standard size, 19-inch rack or in a wiring closet with other
equipment. Follow the steps below to mount your NXC on a standard EIA rack using a rackmounting kit. Make sure the rack will safely support the combined weight of all the equipment it
contains and that the position of the NXC does not make the rack unstable or top-heavy. Take all
necessary precautions to anchor the rack securely before installing the unit.
Note: Leave 10 cm of clearance at the sides and 20 cm in the rear.
Use a #2 Phillips screwdriver to install the screws.
Note: Failure to use the proper screws may damage the unit.
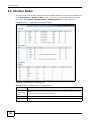
2.1.1 Rack-Mounted Installation Procedure
This section uses the NXC5500 drawings as an example.
1
Align one bracket with the holes on one side of the NXC and secure it with the included bracket
screws (smaller than the rack-mounting screws).
2
Attach the other bracket in a similar fashion.
NXC Series User’s Guide
22
Chapter 2 Hardware Installation and Connection
3
After attaching both mounting brackets, position the NXC in the rack by lining up the holes in the
brackets with the appropriate holes on the rack. Secure the NXC to the rack with the rack-mounting
screws.
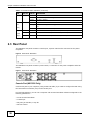
2.2 Front Panel
This section gives you an overview of the front panel.
2.2.1 NXC2500
There are LEDs, one reset button, two USB ports and six Ethernet ports on the NXC2500 front
panel.
Figure 4 Front Panel: NXC2500
2.2.2 NXC5500
There are one reset button, six Ethernet ports, one console port, two USB ports and LEDs on the
NXC5500 front panel.
Figure 5 Front Panel: NXC5500
NXC Series User’s Guide
23
Chapter 2 Hardware Installation and Connection
Ethernet Ports
The auto-negotiating, auto-crossover Ethernet ports support 10/100/1000 Mbps Gigabit Ethernet
so the speed can be 10 Mbps, 100 Mbps or 1000 Mbps. The duplex mode can be both half or full
duplex at 10/100 Mbps and full duplex only at 1000 Mbps. An auto-negotiating port can detect and
adjust to the optimum Ethernet speed and duplex mode of the connected device.
An auto-crossover (auto-MDI/MDI-X) port automatically works with a straight-through or crossover
Ethernet cable.
Default Ethernet Settings
The factory default negotiation settings for the Ethernet ports on the NXC are:
• Speed: Auto
• Duplex: Auto
• Flow control: On (you cannot configure the flow control setting, but the NXC can negotiate with
the peer and turn it off if needed)
Console Port (NXC5500 Only)
Connect this port to your computer (using an RJ-45-to-DB-9 console cable) if you want to configure
the NXC using the command line interface (CLI) via the console port.
For local management, you can use a computer with terminal emulation software configured to the
following parameters:
• VT100 terminal emulation
• 115200 bps
• No parity, 8 data bits, 1 stop bit
• No flow control
Connect the RJ-45 connector of the console cable to the console port of the NXC. Connect the
female 9-pin end of the console cable to a serial port (COM1, COM2 or other COM port) of your
computer.
The following table shows you the wire color codes and pin assignment for the console cable.
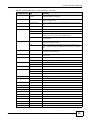
Table 6 RJ-45-to-DB-9 Console Cable Color Codes
24
DB-9 SIGNAL
DB-9 PIN#
WIRE COLOR
RJ45 PIN#
CTS
8
White/Orange
1
DSR/DCD
6+1
Orange
2
RD
2
White/Green
3
GND
5
Blue
4
GND
5
White/Blue
5
NXC Series User’s Guide
Chapter 2 Hardware Installation and Connection
Table 6 RJ-45-to-DB-9 Console Cable Color Codes
DB-9 SIGNAL
DB-9 PIN#
WIRE COLOR
RJ45 PIN#
TD
3
Green
6
DTR
4
White/Brown
7
RTS
7
Brown
8
USB 2.0 Ports
Connect a USB storage device to a USB port on the NXC to archive the NXC system logs or save the
NXC operating system core dump to it.
2.2.3 Front Panel LEDs
This section describes the front panel LEDs.
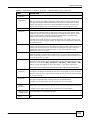
2.2.3.1 NXC2500
The following table describes the LEDs.
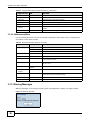
Table 7 Front Panel LEDs: NXC2500
LED
COLOR
PWR
SYS
P1~P6
STATUS
DESCRIPTION
Off
The NXC is turned off.
Green
On
The NXC is turned on.
Red
On
There is a hardware component failure. Shut down the device, wait for a few
minutes and then restart the device (see Section 1.6 on page 21). If the LED
turns red again, then please contact your vendor.
Green
Off
The NXC is not ready or has failed.
On
The NXC is ready and running.
Blinking
The NXC is booting.
Red
On
The NXC had an error or has failed.
Green
On
This port has a successful link to a 10/100 Mbps Ethernet network
Blinking
The NXC is sending or receiving packets to/from a 10/100 Mbps Ethernet
network on this port
On
This port has a successful link to a 1000 Mbps Ethernet network.
Blinking
The NXC is sending or receiving packets to/from a 1000 Mbps Ethernet
network on this port
Off
There is no connection on this port.
Orange
2.2.3.2 NXC5500
The following table describes the LEDs.
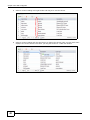
Table 8 Front Panel LEDs: NXC5500
LED
COLOR
STATUS
DESCRIPTION
PWR
Green
Off
The NXC is turned off.
On
The NXC is turned on.
NXC Series User’s Guide
25
Chapter 2 Hardware Installation and Connection
Table 8 Front Panel LEDs: NXC5500 (continued)
LED
COLOR
SYS
Green
P1~P6
Green
Link
(Left)
STATUS
DESCRIPTION
Off
The NXC is not ready or has failed.
On
The NXC is ready and running.
Blinking
The NXC is booting.
On
This port has a successful link to an Ethernet network
Blinking
The NXC is sending or receiving packets to/from an Ethernet network on this
port
Off
There is no connection on this port.
P1~P6
Green
On
This Ethernet connection speed is 100 Mbps on this port.
Speed
Orange
On
This Ethernet connection speed is 1000 Mbps on this port.
Off
This Ethernet connection speed is 10 Mbps on this port.
(Right)
2.3 Rear Panel
The NXC2500 rear panel contains a console port, a power switch and a connector for the power
receptacle.
Figure 6 Rear Panel: NXC2500
The NXC5500 rear panel contains a power switch, a connector for the power receptacle and a fan
module.
Figure 7 Rear Panel: NXC5500
Console Port (NXC2500 Only)
Connect this port to your computer (using an RS-232 cable) if you want to configure the NXC using
the command line interface (CLI) via the console port.
For local management, you can use a computer with terminal emulation software configured to the
following parameters:
• VT100 terminal emulation
• 115200 bps
• No parity, 8 data bits, 1 stop bit
• No flow control
26
NXC Series User’s Guide
Chapter 2 Hardware Installation and Connection
Connect the male 9-pin end of the RS-232 console cable to the console port of the NXC. Connect
the female end to a serial port (COM1, COM2 or other COM port) of your computer.
NXC Series User’s Guide
27
C HAPT ER
3
The Web Configurator
3.1 Overview
The NXC Web Configurator allows easy management using an Internet browser.
In order to use the Web Configurator, you must:
• Use Internet Explorer 7.0 and later versions, Mozilla Firefox 9.0 and later versions, Safari 4.0 and
later versions, or Google Chrome 10.0 and later versions.
• Allow pop-up windows
• Enable JavaScript (enabled by default)
• Enable Java permissions (enabled by default)
• Enable cookies
The recommended screen resolution is 1024 x 768 pixels and higher.
3.2 Access
1
Make sure your NXC hardware is properly connected. See the Quick Start Guide.
2
Browse to http://192.168.1.1. The Login screen appears.
3
Enter the user name (default: “admin”) and password (default: “1234”).
NXC Series User’s Guide
28
Chapter 3 The Web Configurator
4
Click Login. If you logged in using the default user name and password, the Update Admin Info
screen appears. Otherwise, the dashboard appears.
This screen appears every time you log in using the default user name and default password. If you
change the password for the default user account, this screen does not appear anymore.
3.3 The Main Screen
This guide uses the NXC5500 screens as an example. The screens may vary slightly for different
models.
NXC Series User’s Guide
29
Chapter 3 The Web Configurator
The Web Configurator’s main screen is divided into these parts:
Figure 8 The Web Configurator’s Main Screen
A
C
B
• A - Title Bar
• B - Navigation Panel
• C - Main Window
30
NXC Series User’s Guide
Chapter 3 The Web Configurator
3.3.1 Title Bar
The title bar provides some useful links that always appear over the screens below, regardless of
how deep into the Web Configurator you navigate.
Figure 9 Title Bar
The icons provide the following functions.
Table 9 Title Bar: Web Configurator Icons
LABEL
DESCRIPTION
Logout
Click this to log out of the Web Configurator.
Help
Click this to open the help page for the current screen.
About
Click this to display basic information about the NXC.
Site Map
Click this to see an overview of links to the Web Configurator screens.
Object
Reference
Click this to open a screen where you can check which configuration items reference an object.
Console
Click this to open the console in which you can use the command line interface (CLI). See the
NXC CLI Reference Guide for details.
CLI
Click this to open a popup window that displays the CLI commands sent by the Web
Configurator.
About
Click About to display basic information about the NXC.
Figure 10 About
The following table describes labels that can appear in this screen.
Table 10 About
LABEL
DESCRIPTION
Boot Module
This shows the version number of the software that handles the booting process of the
NXC.
Current Version
This shows the firmware version of the NXC.
NXC Series User’s Guide
31
Chapter 3 The Web Configurator
Table 10 About (continued)
LABEL
DESCRIPTION
Released Date
This shows the date (yyyy-mm-dd) and time (hh:mm:ss) when the firmware is released.
OK
Click this to close the screen.
Site Map
Click Site MAP to see an overview of links to the Web Configurator screens. Click a screen’s link to
go to that screen.
Figure 11 Site Map
Object Reference
Click Object Reference to open the Object Reference screen. Select the type of object and the
individual object and click Refresh to show which configuration settings reference the object.
Figure 12 Object Reference
32
NXC Series User’s Guide
Chapter 3 The Web Configurator
The fields vary with the type of object. The following table describes labels that can appear in this
screen.
Table 11 Object References
LABEL
DESCRIPTION
Object Name
This identifies the object for which the configuration settings that use it are displayed. Click
the object’s name to display the object’s configuration screen in the main window.
#
This field is a sequential value, and it is not associated with any entry.
Service
This is the type of setting that references the selected object. Click a service’s name to display
the service’s configuration screen in the main window.
Priority
If it is applicable, this field lists the referencing configuration item’s position in its list,
otherwise N/A displays.
Name
This field identifies the configuration item that references the object.
Description
If the referencing configuration item has a description configured, it displays here.
Refresh
Click this to update the information in this screen.
Cancel
Click Cancel to close the screen.
Console
The Console allows you to use CLI commands from directly within the Web Configurator rather than
having to use a separate terminal program. In addition to logging in directly to the NXC’s CLI, you
can also log into other devices on the network through this Console. It uses SSH to establish a
connection.
Note: To view the functions in the Web Configurator user interface that correspond
directly to specific NXC CLI commands, use the CLI Messages window (see CLI
Messages on page 36) in tandem with this one.
Figure 13 Console
NXC Series User’s Guide
33
Chapter 3 The Web Configurator
The following table describes the elements in this screen.
Table 12 Console
LABEL
DESCRIPTION
Command Line
Enter commands for the device that you are currently logged into here. If you are logged
into the NXC, see the CLI Reference Guide for details on using the command line to
configure it.
Device IP
Address
This is the IP address of the device that you are currently logged into.
Logged-In User
This displays the username of the account currently logged into the NXC through the
Console Window.
Note: You can log into the Web Configurator with a different account than used to log into the
NXC through the Console.
Connection
Status
This displays the connection status of the account currently logged in.
If you are logged in and connected, then this displays ‘Connected’.
If you lose the connection, get disconnected, or logout, then this displays ‘Not Connected’.
Tx/RX Activity
Monitor
This displays the current upload / download activity. The faster and more frequently an
LED flashes, the faster the data connection.
Before you use the Console, ensure that:
• Your web browser of choice allows pop-up windows from the IP address assigned to your NXC.
• Your web browser allows Java programs.
• You are using the latest version of the Java program (http://www.java.com).
To login in through the Console:
1
34
Click the Console button on the Web Configurator title bar.
NXC Series User’s Guide
Chapter 3 The Web Configurator
2
Enter the IP address of the NXC and click OK.
3
Next, enter the User Name of the account being used to log into your target device and then click
OK.
4
You may be prompted to authenticate your account password, depending on the type of device that
you are logging into. Enter the password and click OK.
NXC Series User’s Guide
35
Chapter 3 The Web Configurator
5
If your login is successful, the command line appears and the status bar at the bottom of the
Console updates to reflect your connection state.
CLI Messages
Click CLI to look at the CLI commands sent by the Web Configurator. These commands appear in a
popup window, such as the following.
Figure 14 CLI Messages
Click Clear to remove the currently displayed information.
See the Command Reference Guide for information about the commands.
36
NXC Series User’s Guide
Chapter 3 The Web Configurator
3.3.2 Navigation Panel
Use the menu items on the navigation panel to open screens to configure NXC features. Click the
arrow in the middle of the right edge of the navigation panel to hide the navigation panel menus or
drag it to resize them. The following sections introduce the NXC’s navigation panel menus and their
screens.
Figure 15 Navigation Panel
3.3.2.1 Dashboard
The dashboard displays general device information, system status, system resource usage, licensed
service status, and interface status in widgets that you can re-arrange to suit your needs.
For details on the Dashboard’s features, see Chapter 4 on page 46.
3.3.2.2 Monitor Menu
The monitor menu screens display status and statistics information.
Table 13 Monitor Menu Screens Summary
FOLDER OR LINK
TAB
FUNCTION
System Status
Port Statistics
Display packet statistics for each physical port.
Interface Status
Display general interface information and packet statistics.
Traffic Statistics
Collect and display traffic statistics.
Session Monitor
Display the status of all current sessions.
IP/MAC Binding
List the devices that have received an IP address from NXC interfaces
using IP/MAC binding.
Login Users
List the users currently logged into the NXC.
Dynamic Guest
List the dynamic guest accounts in the NXC’s local database.
USB Storage
Display details about a USB device connected to the NXC.
Wireless
AP Information
NXC Series User’s Guide
AP List
Display information about the connected APs.
37
Chapter 3 The Web Configurator
Table 13 Monitor Menu Screens Summary (continued)
FOLDER OR LINK
TAB
FUNCTION
Radio List
Display information about the radios of the connected APs.
All ZyMesh AP
ZyMesh Link
Info
Display statistics about the ZyMesh/WDS connections between the
managed APs.
Station Info
Station List
Display information about the connected stations.
Detected Device
Log
Display information about suspected rogue APs.
View Log
List log entries for the NXC.
View AP Log
Allow you to query connected APs and view log entries for them.
3.3.2.3 Configuration Menu
Use the configuration menu screens to configure the NXC’s features.
Table 14 Configuration Menu Screens Summary
FOLDER OR LINK
TAB
FUNCTION
Registration
Register the device.
Service
View the licensed service status and upgrade licensed services.
Controller
Configuration
Configure how the NXC handles APs that newly connect to the
network.
AP Management
Mgnt. AP List
Edit wireless AP information, remove APs, and reboot them.
AP Policy
Configure the AP controller’s IP address on the managed APs and
determine the action the managed APs take if the current AP
controller fails.
Rogue/Friendly AP
List
Configure how the NXC monitors for rogue APs.
Licensing
Registration
Wireless
MON Mode
Load Balancing
Configure load balancing for traffic moving to and from wireless
clients.
DCS
Configure dynamic wireless channel selection.
Auto Healing
Enable auto healing to extend the wireless service coverage area
of the managed APs when one of the APs fails.
Network
Interface
Routing
Ethernet
Manage Ethernet interfaces and virtual Ethernet interfaces.
VLAN
Create and manage VLAN interfaces and virtual VLAN interfaces.
Policy Route
Create and manage routing policies.
Static Route
Create and manage IP static routing information.
Zone
Configure zones used to define various policies.
NAT
Set up and manage port forwarding rules.
ALG
IP/MAC Binding
Captive Portal
38
Configure FTP pass-through settings.
Summary
Configure IP to MAC address bindings for devices connected to
each supported interface.
Exempt List
Configure ranges of IP addresses to which the NXC does not apply
IP/MAC binding.
Captive Portal
Assign the captive portal web page to various network services.
Login Page
Assign and customize the login page user’s see when they hit the
captive portal.
NXC Series User’s Guide
Chapter 3 The Web Configurator
Table 14 Configuration Menu Screens Summary (continued)
FOLDER OR LINK
TAB
FUNCTION
RTLS
Real Time Location
System
Use the managed APs as part of an Ekahau RTLS to track the
location of Ekahau Wi-Fi tags.
Firewall
Firewall
Enable or disable the firewall and asymmetrical routes, and
configure firewall rules.
Session Control
Limit the number of concurrent NAT/firewall sessions a client can
use.
User
Create and manage users.
Group
Create and manage groups of users.
Setting
Manage default settings for all users, general settings for user
sessions, and rules to force user authentication.
MAC Address
Map wireless client MAC addresses to MAC roles (MAC address
user accounts).
Radio
Create and manage wireless radio settings files that can be
associated with different APs.
SSID
Create and manage wireless SSID, security, MAC filtering and
Layer-2 isolation settings files that can be associated with different
APs.
Object
User/Group
AP Profile
MON Profile
Create and manage rogue AP monitoring files that can be
associated with different APs.
ZyMesh Profile
ZyMesh
Create and manage ZyMesh files that can be associated with
different APs.
Address
Address
Create and manage host, range, and network (subnet) addresses.
Address Group
Create and manage groups of addresses.
Service
Create and manage TCP and UDP services.
Service Group
Create and manage groups of services.
Service
Schedule
AAA Server
Create one-time and recurring schedules.
Active Directory
Configure the default Active Directory settings.
LDAP
Configure the default LDAP settings.
RADIUS
Configure the default RADIUS settings.
Auth. Method
Certificate
DHCPv6
Create and manage ways of authenticating users.
My Certificates
Create and manage the NXC’s certificates.
Trusted Certificates
Import and manage certificates from trusted sources.
Request
Configure DHCPv6 request type objects.
System
Host Name
USB Storage
Configure the system and domain name for the NXC.
Settings
Configure the settings for the connected USB devices.
Date/Time
Configure the current date, time, and time zone in the NXC.
Console Speed
Set the console speed.
DNS
Configure the DNS server and address records for the NXC.
WWW
Configure HTTP, HTTPS, and general authentication.
SSH
Configure SSH server and SSH service settings.
TELNET
Configure telnet server settings for the NXC.
FTP
Configure FTP server settings.
NXC Series User’s Guide
39
Chapter 3 The Web Configurator
Table 14 Configuration Menu Screens Summary (continued)
FOLDER OR LINK
TAB
FUNCTION
SNMP
Configure SNMP communities and services.
Auth. Server
Configure the NXC to act as a RADIUS server.
Language
Select the Web Configurator language.
IPv6
Enables or disables IPv6 support on the NXC.
Log & Report
Email Daily
Report
Configure where and how to send daily reports and what reports
to send.
Log Settings
Configure the system log, e-mail logs, and remote syslog servers.
3.3.2.4 Maintenance Menu
Use the maintenance menu screens to manage configuration and firmware files, run diagnostics,
and reboot or shut down the NXC.
Table 15 Maintenance Menu Screens Summary
FOLDER OR LINK
File Manager
Diagnostics
Packet Flow
Explore
TAB
FUNCTION
Configuration File
Manage and upload configuration files for the NXC.
Firmware Package
View the current firmware version and to upload firmware.
Shell Script
Manage and run shell script files for the NXC.
Diagnostic
Collect diagnostic information.
Packet Capture
Capture packets for analysis.
Core Dump
Connect a USB device to the NXC and save the NXC operating
system kernel to it here.
System Log
Connect a USB device to the NXC and archive the NXC system
logs to it here.
Wireless Frame
Capture
Capture wireless frames from APs for analysis.
Routing Status
Check how the NXC determines where to route a packet.
SNAT Status
View a clear picture on how the NXC converts a packet’s source IP
address and check the related settings.
Reboot
Restart the NXC.
Shutdown
Turn off the NXC.
3.3.3 Warning Messages
Warning messages, such as those resulting from misconfiguration, display in a popup window.
Figure 16 Warning Message
40
NXC Series User’s Guide
Chapter 3 The Web Configurator
3.3.4 Tables and Lists
The Web Configurator tables and lists are quite flexible and provide several options for how to
display their entries.
Manipulating Table Display
Here are some of the ways you can manipulate the Web Configurator tables.
1
Click a column heading to sort the table’s entries according to that column’s criteria.
2
Click the down arrow next to a column heading for more options about how to display the entries.
The options available vary depending on the type of fields in the column. Here are some examples
of what you can do:
• Sort in ascending alphabetical order
• Sort in descending (reverse) alphabetical order
• Select which columns to display
• Group entries by field
• Show entries in groups
• Filter by mathematical operators (<, >, or =) or searching for text.
NXC Series User’s Guide
41
Chapter 3 The Web Configurator
42
3
Select a column heading cell’s right border and drag to re-size the column.
4
Select a column heading and drag and drop it to change the column order. A green check mark
displays next to the column’s title when you drag the column to a valid new location.
NXC Series User’s Guide
Chapter 3 The Web Configurator
5
Use the icons and fields at the bottom of the table to navigate to different pages of entries and
control how many entries display at a time.
Working with Table Entries
The tables have icons for working with table entries. A sample is shown next. You can often use the
[Shift] or [Ctrl] key to select multiple entries to remove, activate, or deactivate.
Table 16 Common Table Icons
Here are descriptions for the most common table icons.
Table 17 Common Table Icons
LABEL
DESCRIPTION
Add
Click this to create a new entry. For features where the entry’s position in the numbered
list is important (features where the NXC applies the table’s entries in order), you can
select an entry and click Add to create a new entry after the selected entry.
Edit
Double-click an entry or select it and click Edit to open a screen where you can modify
the entry’s settings. In some tables you can just click a table entry and edit it directly in
the table. For those types of tables small red triangles display for table entries with
changes that you have not yet applied.
Remove
To remove an entry, select it and click Remove. The NXC confirms you want to remove
it before doing so.
Activate
To turn on an entry, select it and click Activate.
Inactivate
To turn off an entry, select it and click Inactivate.
NXC Series User’s Guide
43
Chapter 3 The Web Configurator
Table 17 Common Table Icons (continued)
LABEL
DESCRIPTION
Object Reference
Select an entry and click Object Reference to open a screen that shows which settings
use the entry.
Move
To change an entry’s position in a numbered list, select it and click Move to display a
field to type a number for where you want to put that entry and press [ENTER] to move
the entry to the number that you typed. For example, if you type 6, the entry you are
moving becomes number 6 and the previous entry 6 (if there is one) gets pushed up (or
down) one.
Working with Lists
When a list of available entries displays next to a list of selected entries, you can often just doubleclick an entry to move it from one list to the other. In some lists you can also use the [Shift] or
[Ctrl] key to select multiple entries, and then use the arrow button to move them to the other list.
Figure 17 Working with Lists
44
NXC Series User’s Guide
P ART II
Technical Reference
45
C HAPT ER
4
Dashboard
4.1 Overview
Use the Dashboard screens to check status information about the NXC.
4.1.1 What You Can Do in this Chapter
• The main Dashboard screen (Section 4.2 on page 47) displays the NXC’s general device
information, system status, system resource usage, licensed service status, and interface status.
You can also display other status screens for more information.
• The DHCP Table screen (Section 4.2.4 on page 54) displays the IP addresses currently assigned
to DHCP clients and the IP addresses reserved for specific MAC addresses.
• The Number of Login Users screen (Section 4.2.5 on page 55) displays the users currently
logged into the NXC.
NXC Series User’s Guide
46
Chapter 4 Dashboard
4.2 Dashboard
This screen is the first thing you see when you log into the NXC. It also appears every time you click
the Dashboard icon in the navigation panel. The Dashboard displays general device information,
system status, system resource usage, licensed service status, and interface status in widgets that
you can re-arrange to suit your needs. You can also collapse, refresh, and close individual widgets.
Figure 18 Dashboard
A
B
C
NXC Series User’s Guide
D E
47
Chapter 4 Dashboard
The following table describes the labels in this screen.
Table 18 Dashboard
LABEL
DESCRIPTION
Widget Settings (A)
Use this link to re-open closed widgets. Widgets that are already open appear grayed
out.
Arrow (B)
Click this to collapse or expand a widget.
Refresh Time
Setting (C)
Set the interval for refreshing the information displayed in the widget.
Refresh Now (D)
Click this to update the widget’s information immediately.
Close Widget (E)
Click this to close the widget. Use Widget Settings to re-open it.
Virtual Device
Hover your cursor over a LED or connected Ethernet port to view details about the
status of the NXC’s LEDs and connections. See Section 2.2.3 on page 25 for LED
descriptions. An unconnected interface appears grayed out.
The following labels display when you hover your cursor over a connected interface.
Name
This field displays the name of the interface or slot.
Status
This field displays the current status of each interface or device installed in a slot. The
possible values depend on what type of interface it is.
Inactive - The Ethernet interface is disabled.
Down - The Ethernet interface is enabled but not connected.
Speed / Duplex - The Ethernet interface is enabled and connected. This field displays
the port speed and duplex setting (Full or Half).
Zone
This field displays the zone to which the interface is currently assigned.
IP Address/Mask
This field displays the current IP address and subnet mask assigned to the interface.
Device Information
System Name
This field displays the name used to identify the NXC on any network. Click the link to
open the screen where you can change it.
Model Name
This field displays the model name of this NXC.
Serial Number
This field displays the serial number of this NXC.
MAC Address
Range
This field displays the MAC addresses used by the NXC. Each physical port has one MAC
address. The first MAC address is assigned to physical port 1, the second MAC address
is assigned to physical port 2, and so on.
Firmware
Version
This field displays the version number and date of the firmware the NXC is currently
running. Click the link to open the screen where you can upload firmware.
System Status
48
System Uptime
This field displays how long the NXC has been running since it last restarted or was
turned on.
Current Date/
Time
This field displays the current date and time in the NXC. The format is yyyy-mm-dd
hh:mm:ss. Click the link to open the screen where you can configure the NXC’s date
and time.
DHCP Table
This field displays the number of IP addresses the NXC has assigned via DHCP. Click the
link to look at the IP addresses currently assigned to the NXC’s DHCP clients and the IP
addresses reserved for specific MAC addresses.
Current Login
User
This field displays the user name used to log in to the current session, the amount of
reauthentication time remaining, and the amount of lease time remaining.
Number of Login
Users
This field displays the number of users currently logged in to the NXC. Click the link to
pop-open a list of the users who are currently logged in to the NXC.
NXC Series User’s Guide
Chapter 4 Dashboard
Table 18 Dashboard (continued)
LABEL
Boot Status
DESCRIPTION
This field displays details about the NXC’s startup state.
OK - The NXC started up successfully.
Firmware update OK - A firmware update was successful.
Problematic configuration after firmware update - The application of the
configuration failed after a firmware upgrade.
System default configuration - The NXC successfully applied the system default
configuration. This occurs when the NXC starts for the first time or you intentionally
reset the NXC to the system default settings.
Fallback to lastgood configuration - The NXC was unable to apply the startupconfig.conf configuration file and fell back to the lastgood.conf configuration file.
Fallback to system default configuration - The NXC was unable to apply the
lastgood.conf configuration file and fell back to the system default configuration file
(system-default.conf).
Booting in progress - The NXC is still applying the system configuration.
Licensed Service
Status
#
This shows how many licensed services there are.
Status
This is the current status of the license.
Name
This identifies the licensed service.
Version
This is the version number of the service.
Expiration
If the service license is valid, this shows when it will expire. n/a displays if the service
license does not have a limited period of validity. 0 displays if the service is not licensed
or has expired.
Count
This field displays how many managed APs the NXC can support with your current
license. This field does not apply to the other services.
Extension Slot
This section of the screen displays the status of the USB ports.
#
This field displays how many USB ports there are.
Extension Slot
This field displays the name of each extension slot.
Device
This field displays the name of the device connected to the extension slot (or none if no
device is detected).
Status
Ready - A USB storage device connected to the NXC is ready for the NXC to use.
none - The NXC is unable to mount a USB storage device connected to the NXC.
Top 5 Station
Displays the top 5 Access Points (AP) with the highest number of station (aka wireless
client) connections.
#
This field displays the rank of the station.
AP MAC
This field displays the MAC address of the AP to which the station belongs.
Max. Station
Count
This field displays the maximum number of wireless clients that have connected to this
AP.
AP Description
This field displays the AP’s description. The default description is “AP-” followed by the
AP’s MAC address.
System Resources
CPU Usage
NXC Series User’s Guide
This field displays what percentage of the NXC’s processing capability is currently being
used. Hover your cursor over this field to display the Show CPU Usage icon that takes
you to a chart of the NXC’s recent CPU usage.
49
Chapter 4 Dashboard
Table 18 Dashboard (continued)
LABEL
DESCRIPTION
Memory Usage
This field displays what percentage of the NXC’s RAM is currently being used. Hover
your cursor over this field to display the Show Memory Usage icon that takes you to a
chart of the NXC’s recent memory usage.
Flash Usage
This field displays what percentage of the NXC’s onboard flash memory is currently
being used.
USB Storage
Usage
This field shows how much storage in the USB device connected to the NXC is in use.
Active Sessions
This field displays how many traffic sessions are currently open on the NXC. These are
the sessions that are traversing the NXC. Hover your cursor over this field to display
icons. Click the Detail icon to go to the Session Monitor screen to see details about
the active sessions. Click the Show Active Sessions icon to display a chart of NXC’s
recent session usage.
Interface Status
Summary
Name
This field displays the name of each interface.
Status
This field displays the current status of each interface. The possible values depend on
what type of interface it is.
Inactive - The Ethernet interface is disabled.
Down - The Ethernet interface is enabled but not connected.
Speed / Duplex - The Ethernet interface is enabled and connected. This field displays
the port speed and duplex setting (Full or Half).
Zone
This field displays the zone to which the interface is currently assigned.
IP Addr/
Netmask
This field displays the current IP address and subnet mask assigned to the interface. If
the IP address is 0.0.0.0, the interface is disabled or did not receive an IP address and
subnet mask via DHCP.
IP Assignment
This field displays how the interface gets its IP address.
Static - This interface has a static IP address.
DHCP Client - This interface gets its IP address from a DHCP server.
Action
Use this field to get or to update the IP address for the interface.
Click Renew to send a new DHCP request to a DHCP server.
The Latest Alert
Logs
50
This section of the screen displays recent logs generated by the NXC.
#
This is the entry’s rank in the list of alert logs.
Time
This field displays the date and time the log was created.
Priority
This field displays the severity of the log.
Category
This field displays the type of log generated.
Message
This field displays the actual log message.
Source
This field displays the source address (if any) in the packet that generated the log.
Destination
This field displays the destination address (if any) in the packet that generated the log.
AP Information
This shows a summary of connected wireless Access Points (APs).
All AP
This section displays a summary for all connected wireless APs. Click the link to go to
the AP information > AP List screen.
Online
Management AP
This displays the number of currently connected management APs.
Offline
Management AP
This displays the number of currently offline managed APs.
NXC Series User’s Guide
Chapter 4 Dashboard
Table 18 Dashboard (continued)
LABEL
Un-Management
AP
All Station
Station
All Sensed Device
DESCRIPTION
This displays the number of non-managed APs.
This section displays a summary of connected stations. Click the link to go to the
Station Info > Station List screen.
This displays the number of stations currently connected to the network.
This sections displays a summary of all wireless devices detected by the network. Click
the link to go to the Rogue AP > Detected Device screen.
Un-Classified AP
This displays the number of detected unclassified APs.
Rogue AP
This displays the number of detected rogue APs.
Friendly AP
This displays the number of detected friendly APs.
ZyMesh AP
Information
This shows a summary of managed APs that act as a root AP or a repeater to form a
ZyMesh/WDS.
All ZyMesh AP
This section displays a summary for all ZyMesh APs. Click the link to go to the Monitor
> Wireless > All ZyMesh AP > ZyMesh Link Info screen.
Online ZyMesh
AP
This displays the number of currently connected ZyMesh APs.
Offline ZyMesh
AP
This displays the number of currently offline ZyMesh APs.
4.2.1 CPU Usage
Use this screen to look at a chart of the NXC’s recent CPU usage. To access this screen, click Show
CPU Usage in the dashboard.
Figure 19 Dashboard > CPU Usage
The following table describes the labels in this screen.
Table 19 Dashboard > CPU Usage
LABEL
DESCRIPTION
The y-axis represents the percentage of CPU usage.
The x-axis shows the time period over which the CPU usage occurred
NXC Series User’s Guide
51
Chapter 4 Dashboard
Table 19 Dashboard > CPU Usage (continued)
LABEL
DESCRIPTION
Refresh Interval
Enter how often you want this window to be automatically updated.
Refresh Now
Click this to update the information in the window right away.
4.2.2 Memory Usage
Use this screen to look at a chart of the NXC’s recent memory (RAM) usage. To access this screen,
click Show Memory Usage in the dashboard.
Figure 20 Dashboard > Memory Usage
The following table describes the labels in this screen.
Table 20 Dashboard > Memory Usage
LABEL
DESCRIPTION
The y-axis represents the percentage of RAM usage.
The x-axis shows the time period over which the RAM usage occurred
52
Refresh Interval
Enter how often you want this window to be automatically updated.
Refresh Now
Click this to update the information in the window right away.
NXC Series User’s Guide
Chapter 4 Dashboard
4.2.3 Session Usage
Use this screen to look at a chart of the NXC’s recent traffic session usage. To access this screen,
click Show Active Sessions in the dashboard.
Figure 21 Dashboard > Session Usage
The following table describes the labels in this screen.
Table 21 Dashboard > Session Usage
LABEL
DESCRIPTION
Sessions
The y-axis represents the number of session.
The x-axis shows the time period over which the session usage occurred
Refresh Interval
Enter how often you want this window to be automatically updated.
Refresh Now
Click this to update the information in the window right away.
NXC Series User’s Guide
53
Chapter 4 Dashboard
4.2.4 DHCP Table
Use this screen to look at the IP addresses currently assigned to DHCP clients and the IP addresses
reserved for specific MAC addresses. To access this screen, click the icon beside DHCP Table in the
dashboard.
Figure 22 Dashboard > DHCP Table
The following table describes the labels in this screen.
Table 22 Dashboard > DHCP Table
LABEL
DESCRIPTION
#
This field is a sequential value, and it is not associated with a specific entry.
Interface
This field identifies the interface that assigned an IP address to a DHCP client.
IP Address
This field displays the IP address currently assigned to a DHCP client or reserved for a
specific MAC address. Click the column’s heading cell to sort the table entries by IP
address. Click the heading cell again to reverse the sort order.
Host Name
This field displays the name used to identify this device on the network (the computer
name). The NXC learns these from the DHCP client requests. “None” shows here for a
static DHCP entry.
MAC Address
This field displays the MAC address to which the IP address is currently assigned or for
which the IP address is reserved. Click the column’s heading cell to sort the table entries
by MAC address. Click the heading cell again to reverse the sort order.
Description
For a static DHCP entry, the host name or the description you configured shows here. This
field is blank for dynamic DHCP entries.
Reserve
If this field is selected, this entry is a static DHCP entry. The IP address is reserved for the
MAC address.
If this field is clear, this entry is a dynamic DHCP entry. The IP address is assigned to a
DHCP client.
To create a static DHCP entry using an existing dynamic DHCP entry, select this field.
To remove a static DHCP entry, clear this field.
54
NXC Series User’s Guide
Chapter 4 Dashboard
4.2.5 Number of Login Users
Use this screen to look at a list of the users currently logged into the NXC. To access this screen,
click the dashboard’s Number of Login Users icon.
Figure 23 Dashboard > Number of Login Users
The following table describes the labels in this screen.
Table 23 Dashboard > Number of Login Users
LABEL
DESCRIPTION
#
This field is a sequential value and is not associated with any entry.
User ID
This field displays the user name of each user who is currently logged in to the NXC.
Reauth Lease T.
This field displays the amount of reauthentication time remaining and the amount of lease
time remaining for each user.
Type
This field displays the way the user logged in to the NXC.
IP address
This field displays the IP address of the computer used to log in to the NXC.
User Info
This field displays the types and user names of user accounts the NXC uses.
If the user type is ext-user (external user), this field will show its external-group
information when you move your mouse over it. If the external user matches two externalgroup objects, both external-group object names will be shown.
Force Logout
NXC Series User’s Guide
Click this icon to end a user’s session.
55
C HAPT ER
5
Monitor
5.1 Overview
Use the Monitor screens to check status and statistics information.
5.1.1 What You Can Do in this Chapter
• The Port Statistics screen (Section 5.3 on page 57) displays packet statistics for each physical
port.
• The Port Statistics Graph screen (Section 5.3.1 on page 59) displays a line graph of packet
statistics for each physical port.
• The Interface Status screen (Section 5.4 on page 60) displays all of the NXC’s interfaces and
their packet statistics.
• The Traffic Statistics screen (Section 5.5 on page 62) allows you to start or stop data collection
and view statistics.
• The Session Monitor screen (Section 5.6 on page 65) displays sessions by user or service.
• The IP/MAC Binding screen (Section 5.7 on page 67) displays lists of the devices that have
received an IP address from NXC interfaces with IP/MAC binding enabled.
• The Login Users screen (Section 5.8 on page 68) displays a list of the users currently logged
into the NXC.
• The Dynamic Guest screen (Section 5.9 on page 69) displays a list of the guest user accounts,
which are created automatically and allowed to access the NXC’s services for a certain period of
time.
• The USB Storage screen (Section 5.10 on page 70) displays information about a connected USB
storage device.
• The AP List screen (Section 5.11 on page 71) displays which APs are currently connected to the
NXC.
• The Radio List screen (Section 5.12 on page 75) displays statistics about the wireless radio
transmitters in each of the APs connected to the NXC.
• The ZyMesh Link Info screen (Section 5.13 on page 78) displays statistics about the ZyMesh/
WDS connections between the managed APs.
• The Station List screen (Section 5.14 on page 79) displays statistics pertaining to the connected
stations (or “wireless clients”).
• The Detected Device screen (Section 5.15 on page 80) displays the wireless devices passively
detected by the NXC.
• The View Log screen (Section 5.16 on page 81) displays the NXC’s current log messages. You
can change the way the log is displayed, you can e-mail the log, and you can also clear the log in
this screen.
• The View AP Log screen (Section 5.17 on page 84) displays the NXC’s current wireless AP log
messages.
NXC Series User’s Guide
56
Chapter 5 Monitor
5.2 What You Need to Know
The following terms and concepts may help as you read through the chapter.
Rogue AP
Rogue APs are wireless access points operating in a network’s coverage area that are not under the
control of the network’s administrators, and can open up holes in a network’s security. See Chapter
19 on page 227 for details.
Friendly AP
Friendly APs are other wireless access points that are detected in your network, as well as any
others that you know are not a threat (those from neighboring networks, for example). See
Chapter 19 on page 227 for details.
5.3 Port Statistics
Use this screen to look at packet statistics for each Gigabit Ethernet port. To access this screen,
click Monitor > System Status > Port Statistics.
Figure 24 Monitor > System Status > Port Statistics
The following table describes the labels in this screen.
Table 24 Monitor > System Status > Port Statistics
LABEL
DESCRIPTION
Poll Interval
Enter how often you want this window to be updated automatically, and click Set Interval.
Set Interval
Click this to set the Poll Interval the screen uses.
Stop
Click this to stop the window from updating automatically. You can start it again by setting
the Poll Interval and clicking Set Interval.
Switch to
Graphic View
Click this to display the port statistics as a line graph.
NXC Series User’s Guide
57
Chapter 5 Monitor
Table 24 Monitor > System Status > Port Statistics (continued)
LABEL
DESCRIPTION
#
This field displays the port’s number in the list.
Port
This field displays the physical port number.
Status
This field displays the current status of the physical port.
Down - The physical port is not connected.
Speed / Duplex - The physical port is connected. This field displays the port speed and
duplex setting (Full or Half).
58
TxPkts
This field displays the number of packets transmitted from the NXC on the physical port
since it was last connected.
RxPkts
This field displays the number of packets received by the NXC on the physical port since it
was last connected.
Collisions
This field displays the number of collisions on the physical port since it was last connected.
Tx B/s
This field displays the transmission speed, in bytes per second, on the physical port in the
one-second interval before the screen updated.
Rx B/s
This field displays the reception speed, in bytes per second, on the physical port in the
one-second interval before the screen updated.
Up Time
This field displays how long the physical port has been connected.
System Up Time
This field displays how long the NXC has been running since it last restarted or was turned
on.
NXC Series User’s Guide
Chapter 5 Monitor
5.3.1 Port Statistics Graph
Use the port statistics graph to look at a line graph of packet statistics for each physical port. To
view, click Monitor > System Status > Port Statistics and then the Switch to Graphic View
Button.
Figure 25 Monitor > System Status > Port Statistics > Switch to Graphic View
The following table describes the labels in this screen.
Table 25 Monitor > System Status > Port Statistics > Switch to Graphic View
LABEL
DESCRIPTION
Refresh Interval
Enter how often you want this window to be automatically updated.
Refresh Now
Click this to update the information in the window right away.
Port Selection
Select the number of the physical port for which you want to display graphics.
Switch to Grid
View
Click this to display the port statistics as a table.
Mbps
The y-axis represents the speed of transmission or reception.
time
The x-axis shows the time period over which the transmission or reception occurred
TX
This line represents traffic transmitted from the NXC on the physical port since it was last
connected.
RX
This line represents the traffic received by the NXC on the physical port since it was last
connected.
Last Update
This field displays the date and time the information in the window was last updated.
NXC Series User’s Guide
59
Chapter 5 Monitor
5.4 Interface Status
This screen lists all of the NXC’s interfaces and gives packet statistics for them. If you enabled IPv6
in the Configuration > System > IPv6 screen, you can also view your IPv6 interface status on
this screen. Click Monitor > System Status > Interface Status to access this screen.
Figure 26 Monitor > System Status > Interface Status
Each field is described in the following table.
Table 26 Monitor > System Status > Interface Status
LABEL
DESCRIPTION
Interface Status
Use the Interface Status section for IPv4 network settings. Use the IPv6 Interface
Status section for IPv6 network settings if you connect your NXC to an IPv6 network. Both
sections have similar fields as described below.
IPv6 Interface
Status
60
Name
This field displays the name of each interface.
Port
This field displays the physical port number.
NXC Series User’s Guide
Chapter 5 Monitor
Table 26 Monitor > System Status > Interface Status (continued)
LABEL
DESCRIPTION
Status
This field displays the current status of each interface. The possible values depend on what
type of interface it is.
For Ethernet interfaces:
Inactive - The Ethernet interface is disabled.
Down - The Ethernet interface is enabled but not connected.
Speed / Duplex - The Ethernet interface is enabled and connected. This field displays the
port speed and duplex setting (Full or Half).
For VLAN interfaces:
Up - The VLAN interface is enabled and one of its member Ethernet interfaces is
connected.
Down - The VLAN interface is enabled but none of its member Ethernet interfaces is
connected.
Inactive - The VLAN interface is disabled.
Zone
This field displays the zone to which the interface is assigned.
IP Addr/Netmask
This field displays the current IP address (and subnet mask) of the interface. If the IP
address and subnet mask are 0.0.0.0 (in the IPv4 network) or the IP address is :: (in the
IPv6 network), the interface is disabled or does not have an IP address yet.
IP Address
In the IPv6 network, this screen also shows whether the IP address is a static IP address
(STATIC), link-local IP address (LINK LOCAL), dynamically assigned (DHCP), or an IPv6
StateLess Address AutoConfiguration IP address (SLAAC). See Appendix E on page 436 for
more information about IPv6.
IP Assignment
This field displays how the interface gets its IP address.
Static - This interface has a static IP address.
DHCP Client - This interface gets its IP address from a DHCP server.
Services
This field lists which services the interface provides to the network. Examples include
DHCP relay and DHCP server. This field displays n/a if the interface does not provide
any services to the network.
Action
Use this field to get or to update the IP address for the interface. Click Renew to send a
new DHCP request to a DHCP server. Click Connect to try to connect the interface. If the
interface cannot use one of these ways to get or to update its IP address, this field displays
n/a.
Interface
Statistics
This table provides packet statistics for each interface.
Refresh
Click this button to update the information in the screen.
Name
This field displays the name of each interface.
NXC Series User’s Guide
61
Chapter 5 Monitor
Table 26 Monitor > System Status > Interface Status (continued)
LABEL
DESCRIPTION
Status
This field displays the current status of each interface. The possible values depend on what
type of interface it is.
For Ethernet interfaces:
Inactive - The Ethernet interface is disabled.
Down - The Ethernet interface is enabled but not connected.
Speed / Duplex - The Ethernet interface is enabled and connected. This field displays the
port speed and duplex setting (Full or Half).
For VLAN interfaces:
Up - The VLAN interface is enabled and one of its member Ethernet interfaces is
connected.
Down - The VLAN interface is enabled but none of its member Ethernet interfaces is
connected.
Inactive - The VLAN interface is disabled.
TxPkts
This field displays the number of packets transmitted from the NXC on the interface since it
was last connected.
RxPkts
This field displays the number of packets received by the NXC on the interface since it was
last connected.
Tx B/s
This field displays the transmission speed, in bytes per second, on the interface in the onesecond interval before the screen updated.
Rx B/s
This field displays the reception speed, in bytes per second, on the interface in the onesecond interval before the screen updated.
5.5 Traffic Statistics
Click Monitor > System Status > Traffic Statistics to display this screen. This screen provides
basic information about the different kinds of data traffic moving through the NXC. For example:
• Most-visited Web sites and the number of times each one was visited. This count may not be
accurate in some cases because the NXC counts HTTP GET packets.
• Most-used protocols or service ports and the amount of traffic on each one.
• LAN IP with heaviest traffic and how much traffic has been sent to and from each one.
62
NXC Series User’s Guide
Chapter 5 Monitor
You use the Traffic Statistics screen to tell the NXC when to start and when to stop collecting
information for these reports. You cannot schedule data collection; you have to start and stop it
manually in the Traffic Statistics screen.
Figure 27 Monitor > System Status > Traffic Statistics
There is a limit on the number of records shown in the report. See Table 28 on page 64 for more
information. The following table describes the labels in this screen.
Table 27 Monitor > System Status > Traffic Statistics
LABEL
DESCRIPTION
Data Collection
Collect Statistics
Select this to have the NXC collect data for the report. If the NXC has already been
collecting data, the collection period displays to the right. The progress is not tracked here
real-time, but you can click the Refresh button to update it.
Apply
Click Apply to save your changes back to the NXC.
Reset
Click Reset to return the screen to its last-saved settings.
Statistics
Interface
Select the interface from which to collect information. You can collect information from
Ethernet or VLAN interfaces.
Sort By
Select the type of report to display. Choices are:
Host IP Address/User - displays the IP addresses or users with the most traffic and how
much traffic has been sent to and from each one.
Service/Port - displays the most-used protocols or service ports and the amount of traffic
for each one.
Web Site Hits - displays the most-visited Web sites and how many times each one has
been visited.
Each type of report has different information in the report (below).
Refresh
Click this button to update the report display.
Flush Data
Click this button to discard all of the screen’s statistics and update the report display.
These fields are available when the report type is Host IP Address/User.
NXC Series User’s Guide
63
Chapter 5 Monitor
Table 27 Monitor > System Status > Traffic Statistics (continued)
LABEL
DESCRIPTION
#
This field is the rank of each record. The IP addresses and users are sorted by the amount
of traffic.
Direction
This field indicates whether the IP address or user is sending or receiving traffic.
Rx From- traffic is coming from the IP address or user to the NXC.
Tx To - traffic is going from the NXC to the IP address or user.
IP Address/User
This field displays the IP address or user in this record. The maximum number of IP
addresses or users in this report is indicated in Table 28 on page 64.
Amount
This field displays how much traffic was sent or received from the indicated IP address or
user. If the Direction is Rx From, a red bar is displayed; if the Direction is Tx To, a blue
bar is displayed. The unit of measure is bytes, Kbytes, Mbytes or Gbytes, depending on the
amount of traffic for the particular IP address or user. The count starts over at zero if the
number of bytes passes the byte count limit. See Table 28 on page 64.
These fields are available when the report type is Service/Port.
#
This field is the rank of each record. The protocols and service ports are sorted by the
amount of traffic.
Service Port
This field displays the service and port in this record. The maximum number of services
and service ports in this report is indicated in Table 28 on page 64.
Protocol
This field indicates what protocol the service was using.
Direction
This field indicates whether the indicated protocol or service port is sending or receiving
traffic.
Ingress - traffic is coming into the NXC through the interface.
Egress - traffic is going out from the NXC through the interface.
Amount
This field displays how much traffic was sent or received from the indicated service / port.
If the Direction is Ingress, a red bar is displayed; if the Direction is Egress, a blue bar
is displayed. The unit of measure is bytes, Kbytes, Mbytes, Gbytes, or Tbytes, depending
on the amount of traffic for the particular protocol or service port. The count starts over at
zero if the number of bytes passes the byte count limit. See Table 28 on page 64.
#
This field is the rank of each record. The domain names are sorted by the number of hits.
Web Site
This field displays the domain names most often visited. The NXC counts each page viewed
on a Web site as another hit. The maximum number of domain names in this report is
indicated in Table 28 on page 64.
Hits
This field displays how many hits the Web site received. The NXC counts hits by counting
HTTP GET packets. Many Web sites have HTTP GET references to other Web sites, and the
NXC counts these as hits too. The count starts over at zero if the number of hits passes the
hit count limit. See Table 28 on page 64.
These fields are available when the report type is Web Site Hits.
The following table displays the maximum number of records shown in the report, the byte count
limit, and the hit count limit.
Table 28 Maximum Values for Reports
64
LABEL
DESCRIPTION
Maximum Number of Records
20
Byte Count Limit
264 bytes; this is just less than 17 million terabytes.
Hit Count Limit
264 hits; this is over 1.8 x 10¹⁹ hits.
NXC Series User’s Guide
Chapter 5 Monitor
5.6 Session Monitor
This screen displays information about active sessions for debugging or statistical analysis. It is not
possible to manage sessions in this screen. The following information is displayed.
• User who started the session
• Protocol or service port used
• Source IP address
• Destination IP address
• Number of bytes received (so far)
• Number of bytes transmitted (so far)
• Duration (so far)
You can look at all the active sessions by user, service, source IP address, or destination IP address.
You can also filter the information by user, protocol / service or service group, source address, and/
or destination address and view it by user.
Click Monitor > System Status > Session Monitor to display the following screen.
Figure 28 Monitor > System Status > Session Monitor
NXC Series User’s Guide
65
Chapter 5 Monitor
The following table describes the labels in this screen.
Table 29 Monitor > System Status > Session Monitor
LABEL
DESCRIPTION
View
Select how you want the information to be displayed. Choices are:
sessions by users - display all active sessions grouped by user
sessions by services - display all active sessions grouped by service or protocol
sessions by source IP - display all active sessions grouped by source IP address
sessions by destination IP - display all active sessions grouped by destination IP
address
all sessions - filter the active sessions by the User, Service, Source Address, and
Destination Address, and display each session individually (sorted by user).
Refresh
Click this button to update the information on the screen. The screen also refreshes
automatically when you open and close the screen.
The User, Service, Source Address, and Destination Address fields display if you view
all sessions. Select your desired filter criteria and click the Search button to filter the list of
sessions.
User
This field displays when View is set to all sessions. Type the user whose sessions you
want to view. It is not possible to type part of the user name or use wildcards in this field;
you must enter the whole user name.
Service
This field displays when View is set to all sessions. Select the service or service group
whose sessions you want to view. The NXC identifies the service by comparing the protocol
and destination port of each packet to the protocol and port of each services that is
defined. (See Chapter 22 on page 241 for more information about services.)
Source
This field displays when View is set to all sessions. Type the source IP address whose
sessions you want to view. You cannot include the source port.
Destination
This field displays when View is set to all sessions. Type the destination IP address whose
sessions you want to view. You cannot include the destination port.
Search
This button displays when View is set to all sessions. Click this button to update the
information on the screen using the filter criteria in the User, Service, Source Address,
and Destination Address fields.
#
This field displays the index number of each active session.
User
This field displays the user in each active session.
If you are looking at the sessions by users (or all sessions) report, click + or - to
display or hide details about a user’s sessions.
Service
This field displays the protocol used in each active session.
If you are looking at the sessions by services report, click + or - to display or hide
details about a protocol’s sessions.
Source
This field displays the source IP address and port in each active session.
If you are looking at the sessions by source IP report, click + or - to display or hide
details about a source IP address’s sessions.
Destination
This field displays the destination IP address and port in each active session.
If you are looking at the sessions by destination IP report, click + or - to display or hide
details about a destination IP address’s sessions.
66
Rx
This field displays the amount of information received by the source in the active session.
Tx
This field displays the amount of information transmitted by the source in the active
session.
Duration
This field displays the length of the active session in seconds.
NXC Series User’s Guide
Chapter 5 Monitor
5.7 IP/MAC Binding Monitor
Click Monitor > System Status > IP/MAC Binding to display the following screen. This screen
lists the devices that have received an IP address from NXC interfaces with IP/MAC binding enabled
and have ever established a session with the NXC. Devices that have never established a session
with the NXC do not display in the list.
Figure 29 Monitor > System Status > IP/MAC Binding
The following table describes the labels in this screen.
Table 30 Monitor > System Status > IP/MAC Binding
LABEL
DESCRIPTION
Interface
Select a NXC interface that has IP/MAC binding enabled to show to which devices it has
assigned an IP address.
#
This is the index number of an IP/MAC binding entry.
IP Address
This is the IP address that the NXC assigned to a device.
Host Name
This field displays the name used to identify this device on the network (the computer
name). The NXC learns these from the DHCP client requests.
MAC Address
This field displays the MAC address to which the IP address is currently assigned.
Last Access
This is when the device last established a session with the NXC through this interface.
Description
This field displays the descriptive name that helps identify the entry.
Refresh
Click this button to update the information in the screen.
NXC Series User’s Guide
67
Chapter 5 Monitor
5.8 Login Users
Use this screen to look at a list of the users currently logged into the NXC. To access this screen,
click Monitor > System Status > Login Users.
Figure 30 Monitor > System Status > Login Users
The following table describes the labels in this screen.
Table 31 Monitor > System Status > Login Users
LABEL
DESCRIPTION
Force Logout
Select a user ID and click this icon to end a user’s session.
#
This field is a sequential value and is not associated with any entry.
User ID
This field displays the user name of each user who is currently logged in to the NXC.
Reauth Lease T.
This field displays the amount of reauthentication time remaining and the amount of lease
time remaining for each user. See Chapter 17 on page 190.
Type
This field displays the way the user logged in to the NXC.
IP address
This field displays the IP address of the computer used to log in to the NXC.
MAC
For an IEEE 802.1x or MAC authentication login, this field displays the MAC address of the
user’s computer. A “-” displays for other types of login.
User Info
This field displays the types of user accounts the NXC uses.
If the user type is ext-user (external user), this field will show its external-group
information when you move your mouse over it. If the external user matches two externalgroup objects, both external-group object names will be shown.
Acct. Status
For a captive portal login, this field displays the accounting status of the account used to
log into the NXC.
Accounting-on means accounting is being performed for the user login.
Accounting-off means accounting has stopped for this user login. A “-” displays if
accounting is not enabled for this login.
68
RADIUS Profile
Name
This field displays the name of the RADIUS profile used to authenticate the login through
the captive portal. N/A displays for logins that do not use the captive portal and RADIUS
server authentication.
Refresh
Click this button to update the information in the screen.
NXC Series User’s Guide
Chapter 5 Monitor
5.9 Dynamic Guest
A dynamic guest account has a dynamically-created user name and password that allows a guest
user to access the Internet or the NXC’s services in a specified period of time. Multiple dynamic
guest accounts can be automatically generated at one time for guest users by using the web
configurator and the guest-manager account. Guest users can log in with the dynamic accounts
when connecting to an SSID for a specified time unit. Use this screen to look at a list of dynamic
guest user accounts on the NXC’s local database. To access this screen, click Monitor > System
Status > Dynamic Guest.
Figure 31 Monitor > System Status > Dynamic Guest
The following table describes the labels in this screen.
Table 32 Monitor > System Status > Dynamic Guest
LABEL
DESCRIPTION
Remove
Select an entry and click this button to remove it from the list.
Note: If you delete a valid user account which is in use, the NXC ends the user session.
#
This field is a sequential value and is not associated with any entry.
Status
This field displays whether an account expires or not.
User ID
This field displays the user name of the user account.
Reauth Lease T.
This field displays the amount of reauthentication time remaining and the amount of lease
time remaining for each user. See Chapter 17 on page 190.
Expiration Time
This field displays the date and time the user account becomes invalid.
IP address
This field displays the IP address of the computer used to log in to the NXC.
Group
This field displays the name of the dynamic guest group to which the account belongs.
Guest Name
This field displays the name of the person that uses the account.
Phone
This field displays the telephone number for the user account.
Email
This field displays the E-mail address for the user account.
Address
This field displays the geographic address for the user account.
Company
This field displays the company name for the user account.
Other
This field displays the additional information for the user account.
Refresh
Click this button to update the information in the screen.
NXC Series User’s Guide
69
Chapter 5 Monitor
5.10 USB Storage
This screen displays information about a connected USB storage device. Click Monitor > System
Status > USB Storage to display this screen.
Figure 32 Monitor > System Status > USB Storage
The following table describes the labels in this screen.
Table 33 Monitor > System Status > USB Storage
LABEL
DESCRIPTION
Device description
This is a basic description of the type of USB device.
Usage
This field displays how much of the USB storage device’s capacity is currently being
used out of its total capacity and what percentage that makes.
File System
This field displays what file system the USB storage device is formatted with. This field
displays Unknown if the file system of the USB storage device is not supported by the
NXC, such as NTFS.
Speed
This field displays the connection speed the USB storage device supports.
Status
Ready - you can have the NXC use the USB storage device.
Click Remove Now to stop the NXC from using the USB storage device so you can
remove it.
Unused - the connected USB storage device was manually unmounted by using the
Remove Now button or for some reason the NXC cannot mount it.
Click Use It to have the NXC mount a connected USB storage device. This button is
grayed out if the file system is not supported (unknown) by the NXC.
none - no USB storage device is connected.
Detail
This field displays any other information the NXC retrieves from the USB storage
device.
Deactivated - the use of a USB storage device is disabled (turned off) on the NXC.
OutofSpace - the available disk space is less than the disk space full threshold (see
Section 28.3 on page 286 for how to configure this threshold).
Mounting - the NXC is mounting the USB storage device.
Removing - the NXC is unmounting the USB storage device.
none - the USB device is operating normally or not connected.
70
NXC Series User’s Guide
Chapter 5 Monitor
5.11 AP List
Use this screen to view which APs are currently connected to the NXC. To access this screen, click
Monitor > Wireless > AP Information > AP List.
Figure 33 Monitor > Wireless > AP Information > AP List
The following table describes the labels in this screen.
Table 34 Monitor > Wireless > AP Information > AP List
LABEL
DESCRIPTION
Add to Mgnt AP
List
Click this to add the selected AP to the managed AP list.
More
Information
Click this to view a daily station count about the selected AP. The count records station
activity on the AP over a consecutive 24 hour period.
#
This is the AP’s index number in this list.
Status
This visually displays the AP’s connection status with icons. For details on the different
Status states, see the next table.
Registration
This indicates whether the AP is registered with the managed AP list.
CPU Usage
This displays what percentage of the AP’s processing capability is currently being used.
IP Address
This displays the AP’s IP address.
MAC Address
This displays the AP’s MAC address.
Model
This displays the AP’s model number.
Mgnt. VLAN
ID(AC/AP)
This displays the Access Controller (the NXC) management VLAN ID setting for the AP and
the runtime management VLAN ID setting on the AP.
VLAN Conflict displays if the AP’s management VLAN ID does not match the NXC’s
management VLAN ID setting for the AP. This field displays n/a if the NXC cannot get
VLAN information from the AP.
Description
This displays the AP’s associated description. The default description is “AP-” + the AP’s
MAC Address.
Station
This displays the number of stations (aka wireless clients) associated with the AP.
Recent On-line
Time
This displays the most recent time the AP came on-line. N/A displays if the AP has not
come on-line since the NXC last started up.
Last Off-line
Time
This displays the most recent time the AP went off-line. N/A displays if the AP has either
not come on-line or gone off-line since the NXC last started up.
NXC Series User’s Guide
71
Chapter 5 Monitor
The following table describes the icons in this screen.
Table 35 Monitor > Wireless > AP Information > AP List Icons
LABEL
DESCRIPTION
This AP is not on the management list.
This AP is on the management list and online.
This AP is in the process of having its firmware updated.
This AP is on the management list but offline.
This indicates one of the following cases:
•
•
•
72
This AP has a runtime management VLAN ID setting that conflicts with the VLAN ID setting on
the Access Controller (the NXC).
A setting the NXC assigns to this AP does not match the AP’s capability.
Packets sent out on a LAN port of this AP loop back to the AP.
NXC Series User’s Guide
Chapter 5 Monitor
5.11.1 Station Count of AP
Use this screen to look at configuration information, port status and station statistics for the
connected AP. To access this screen, select an entry and click the More Information button in the
AP List screen.
Figure 34 Monitor > Wireless > AP Information > AP List > AP Information
NXC Series User’s Guide
73
Chapter 5 Monitor
The following table describes the labels in this screen.
Table 36 Monitor > Wireless > AP Information > AP List > AP Information
LABEL
DESCRIPTION
Configuration
Status
This displays whether or not any of the AP’s configuration is in conflict with the NXC’s
settings for the AP.
Non Support
If any of the AP’s configuration conflicts with the NXC’s settings for the AP, this field
displays which configuration conflicts. It displays n/a if none of the AP’s configuration
conflicts with the NXC’s settings for the AP.
Port Status
Port
This shows the name of the physical Ethernet port on the NXC.
Status
This field displays the current status of each physical port on the AP.
Down - The port is not connected.
Speed / Duplex - The port is connected. This field displays the port speed and duplex
setting (Full or Half).
PVID
This shows the port’s PVID.
A PVID (Port VLAN ID) is a tag that adds to incoming untagged frames received on a port
so that the frames are forwarded to the VLAN group that the tag defines.
Up Time
This field displays how long the physical port has been connected.
VLAN
Configuration
74
Name
This shows the name of the VLAN.
Status
This displays whether or not the VLAN is activated.
VID
This shows the VLAN ID number.
Member
This field displays the Ethernet port(s) that is a member of this VLAN.
Station Count
The y-axis represents the number of connected stations.
Time
The x-axis shows the time over which a station was connected.
Last Update
This field displays the date and time the information in the window was last updated.
NXC Series User’s Guide
Chapter 5 Monitor
5.12 Radio List
Use this screen to view statistics about the wireless radio transmitters in each of the APs connected
to the NXC. To access this screen, click Monitor > Wireless > AP Information > Radio List.
Figure 35 Monitor > Wireless > AP Information > Radio List
The following table describes the labels in this screen.
Table 37 Monitor > Wireless > AP Information > Radio List
LABEL
DESCRIPTION
More
Information
Click this to view additional information about the selected radio’s SSID(s), wireless traffic
and wireless clients. Information spans a 24 hour period.
#
This is the radio’s index number in this list.
Loading
This indicates the AP’s load balance status (UnderLoad or OverLoad) when load
balancing is enabled on the AP. Otherwise, it shows - when load balancing is disabled or
the radio is in monitor mode.
AP Description
This displays the description of the AP to which the radio belongs.
Model
This displays the model of the AP to which the radio belongs.
MAC Address
This displays the MAC address of the radio.
Radio
This indicates the radio number on the AP to which it belongs.
OP Mode
This indicates the radio’s operating mode. Operating modes are AP (access point), MON
(monitor), Root AP or Repeater.
AP / ZyMesh
Profile
This indicates the AP radio and ZyMesh profile names to which the radio belongs.
Frequency Band
This indicates the wireless frequency currently being used by the radio.
Channel ID
This indicates the radio’s channel ID.
Tx Power
This shows the radio’s output power (in dBm).
Station
This displays the number of stations (aka wireless clients) associated with the radio.
Rx PKT
This displays the total number of packets received by the radio.
Tx PKT
This displays the total number of packets transmitted by the radio.
Rx FCS Error
Count
This indicates the number of received packet errors accrued by the radio.
Tx Retry Count
This indicates the number of times the radio has attempted to re-transmit packets.
This shows - when the radio is in monitor mode.
NXC Series User’s Guide
75
Chapter 5 Monitor
The following table describes the icons in this screen.
Table 38 Monitor > Wireless > AP Information > Radio List Icons
LABEL
DESCRIPTION
When an AP is being load balanced, this icon means it is operating over the maximum
allocated bandwidth.
When an AP is being load balanced, this icon means it is operating under the maximum
allocated bandwidth.
76
NXC Series User’s Guide
Chapter 5 Monitor
5.12.1 AP Mode Radio Information
This screen allows you to view detailed information about a selected radio’s SSID(s), wireless traffic
and wireless clients for the preceding 24 hours. To access this window, select an entry and click the
More Information button in the Radio List screen.
Figure 36 Monitor > Wireless > AP Information > Radio List > AP Mode Radio Information
NXC Series User’s Guide
77
Chapter 5 Monitor
The following table describes the labels in this screen.
Table 39 Monitor > Wireless > AP Info > Radio List > AP Mode Radio Information
LABEL
DESCRIPTION
MBSSID Detail
This list shows information about the SSID(s) that is associated with the radio over the
preceding 24 hours.
#
This is the items sequential number in the list. It has no bearing on the actual data in this
list.
SSID Name
This displays an SSID associated with this radio. There can be up to eight maximum.
BSSID
This displays the MAC address associated with the SSID.
Security
Mode
This displays the security mode in which the SSID is operating.
Forwarding
Mode
This field indicates the forwarding mode (Local Bridge or Tunnel) associated with the
SSID profile.
VLAN
Traffic Statistics
This displays the VLAN ID associated with the SSID.
This graph displays the overall traffic information about the radio over the preceding 24
hours.
y-axis
This axis represents the amount of data moved across this radio in megabytes per second.
x-axis
This axis represents the amount of time over which the data moved across this radio.
Station Count
This graph displays information about all the wireless clients that have connected to the
radio over the preceding 24 hours.
y-axis
The y-axis represents the number of connected wireless clients.
x-axis
The x-axis shows the time over which a wireless client was connected.
Last Update
This field displays the date and time the information in the window was last updated.
OK
Click this to close this window.
Cancel
Click this to close this window.
5.13 ZyMesh Link Info
Use this screen to view the ZyMesh/WDS traffic statistics between the managed APs. Click Monitor
> Wireless > All ZyMesh AP > ZyMesh Link Info to access this screen.
Figure 37 Monitor > Wireless > All ZyMesh AP > ZyMesh Link Info
78
NXC Series User’s Guide
Chapter 5 Monitor
The following table describes the labels in this screen.
Table 40 Monitor > Wireless > All ZyMesh AP > ZyMesh Link Info
LABEL
DESCRIPTION
#
This is the index number of the managed AP in this list.
IP Address
This is the IP address of the managed AP.
MAC Address
This is the MAC address of the managed AP.
Root AP MAC
This is the MAC address of the root AP to which the managed AP is connected wirelessly.
Uplink AP Role
This shows whether the managed AP to which this managed AP is connected wirelessly is
acting as a root AP or repeater in a ZyMesh.
Uplink AP Info
This shows the information about the managed AP to which this managed AP is connected
wirelessly.
SSID Name
This indicates the name of the wireless network (SSID) the managed AP uses to associated
with another managed AP.
Signal Strength
This is the signal strength of the wireless connection between the managed AP and a root
AP or repeater.
Tx Rate
This is the maximum transmission rate of the root AP or repeater to which the managed AP
is connected.
Rx Rate
This is the maximum reception rate of the root AP or repeater to which the managed AP is
connected.
Link Up Time
This displays the time the managed AP first associated with the root AP or repeater.
5.14 Station List
Use this screen to view statistics pertaining to the associated stations (or “wireless clients”). Click
Monitor > Wireless > Station Info > Station List to access this screen.
Figure 38 Monitor > Wireless > Station Info > Station List
The following table describes the labels in this screen.
Table 41 Monitor > Wireless > Station Info > Station List
LABEL
DESCRIPTION
SSID Name
This field displays the SSID name with which at least one station is associated.
Click + or - to display or hide details about wireless stations that connected to the SSID.
#
NXC Series User’s Guide
This is the station’s index number in this list.
79
Chapter 5 Monitor
Table 41 Monitor > Wireless > Station Info > Station List (continued)
LABEL
DESCRIPTION
MAC Address
This is the station’s MAC address.
Associated AP
This indicates the AP through which the station is connected to the network.
SSID Name
This indicates the name of the wireless network to which the station is connected. A single
AP can have multiple SSIDs or networks.
Security Mode
This indicates which secure encryption methods is being used by the station to connect to
the network.
Signal Strength
This indicates the strength of the signal. The signal strength mainly depends on the
antenna output power and the distance between the station and the AP.
Channel
This indicates the number the channel used by the station to connect to the network.
IP Address
This is the station’s IP address. An 169.x.x.x IP address is a private IP address that means
the station didn't get the IP address from a DHCP server.
Tx Rate
This indicates the current data transmission rate of the station.
Rx Rate
This indicates the current data receiving rate of the station.
Tx
This field displays the number of packets transmitted from the station.
Rx
This field displays the number of packets received by the station.
Association Time
This displays the time a wireless station first associated with the AP.
Refresh
Click this to refresh the items displayed on this page.
5.15 Detected Device
Use this screen to view information about wireless devices detected by the AP. Click Monitor >
Wireless > Detected Device to access this screen.
Note: At least one radio of the APs connected to the NXC must be set to monitor mode (in
the Configuration > Wireless > AP Management screen) in order to detect
other wireless devices in its vicinity.
Figure 39 Monitor > Wireless > Detected Device
80
NXC Series User’s Guide
Chapter 5 Monitor
The following table describes the labels in this screen.
Table 42 Monitor > Wireless > Rogue AP > Detected Device
LABEL
DESCRIPTION
Mark as Rogue
AP
Click this button to mark the selected AP as a rogue AP. A rogue AP can be contained in the
Configuration > Wireless > MON Mode screen (Chapter 7 on page 92).
Mark as Friendly
AP
Click this button to mark the selected AP as a friendly AP. For more on managing friendly
APs, see the Configuration > Wireless > MON Mode screen (Chapter 7 on page 92).
#
This is the station’s index number in this list.
Status
This indicates the detected device’s status.
Device
This indicates the detected device’s network type (such as infrastructure or ad-hoc).
Role
This indicates the detected device’s role (such as friendly or rogue).
MAC Address
This indicates the detected device’s MAC address.
SSID Name
This indicates the detected device’s SSID.
Channel ID
This indicates the detected device’s channel ID.
802.11 Mode
This indicates the 802.11 mode (a/b/g/n) transmitted by the detected device.
Security
This indicates the encryption method (if any) used by the detected device.
Description
This displays the detected device’s description. For more on managing friendly and rogue
APs, see the Configuration > Wireless > MON Mode screen (Chapter 7 on page 92).
Last Seen
This indicates the last time the device was detected by the NXC.
Refresh
Click this to refresh the items displayed on this page.
5.16 View Log
Log messages are stored in two separate logs, one for regular log messages and one for debugging
messages. In the regular log, you can look at all the log messages by selecting All Logs, or you can
select a specific category of log messages (for example, user). You can also look at the debugging
log by selecting Debug Log. All debugging messages have the same priority.
To access this screen, click Monitor > Log. The log is displayed in the following screen.
Note: When a log reaches the maximum number of log messages, new log messages
automatically overwrite existing log messages, starting with the oldest existing log
message first.
• For individual log descriptions, see Appendix A on page 381.
• For the maximum number of log messages in the NXC, see the datasheet.
NXC Series User’s Guide
81
Chapter 5 Monitor
Events that generate an alert (as well as a log message) display in red. Regular logs display in
black. Click a column’s heading cell to sort the table entries by that column’s criteria. Click the
heading cell again to reverse the sort order.
Figure 40 Monitor > View Log
The following table describes the labels in this screen.
Table 43 Monitor > View Log
LABEL
DESCRIPTION
Show Filter /
Hide Filter
Click this button to show or hide the filter settings.
If the filter settings are hidden, the Display, Email Log Now, Refresh, and Clear Log
fields are available.
If the filter settings are shown, the Display, Priority, Source Address, Destination
Address, Source Interface, Destination Interface, Service, Keyword, Protocol and
Search fields are available.
82
Display
Select the category of log message(s) you want to view. You can also view All Logs at one
time, or you can view the Debug Log.
Priority
This displays when you show the filter. Select the priority of log messages to display. The
log displays the log messages with this priority or higher. Choices are: any, emerg, alert,
crit, error, warn, notice, and info, from highest priority to lowest priority. This field is
read-only if the category is Debug Log.
Source Address
This displays when you show the filter. Type the source IP address of the incoming packet
that generated the log message. Do not include the port in this filter.
Destination
Address
This displays when you show the filter. Type the IP address of the destination of the
incoming packet when the log message was generated. Do not include the port in this filter.
Source Interface
This displays when you show the filter. Select the source interface of the packet that
generated the log message.
Destination
Interface
This displays when you show the filter. Select the destination interface of the packet that
generated the log message.
NXC Series User’s Guide
Chapter 5 Monitor
Table 43 Monitor > View Log (continued)
LABEL
DESCRIPTION
Service
This displays when you show the filter. Select the service whose log messages you would
like to see. The Web Configurator uses the protocol and destination port number(s) of the
service to select which log messages you see.
Keyword
This displays when you show the filter. Type a keyword to look for in the Message,
Source, Destination and Note fields. If a match is found in any field, the log message is
displayed. You can use up to 63 alphanumeric characters and the underscore, as well as
punctuation marks ()’ ,:;?! +-*/= #$% @ ; the period, double quotes, and brackets are
not allowed.
Protocol
This displays when you show the filter. Select a service protocol whose log messages you
would like to see.
Search
This displays when you show the filter. Click this button to update the log using the current
filter settings.
Email Log Now
Click this button to send log messages to the Active e-mail addresses specified in the
Send Log To field on the Log Settings page.
Refresh
Click this button to update the log table.
Clear Log
Click this button to clear the whole log, regardless of what is currently displayed on the
screen.
#
This field is a sequential value, and it is not associated with a specific log message.
Time
This field displays the time the log message was recorded.
Priority
This field displays the priority of the log message. It has the same range of values as the
Priority field above.
Category
This field displays the log that generated the log message. It is the same value used in the
Display and (other) Category fields.
Message
This field displays the reason the log message was generated. The text “[count=x]”, where
x is a number, appears at the end of the Message field if log consolidation is turned on and
multiple entries were aggregated to generate into this one.
Source
This field displays the source IP address and the port number in the event that generated
the log message.
Destination
This field displays the destination IP address and the port number of the event that
generated the log message.
Note
This field displays any additional information about the log message.
The Web Configurator saves the filter settings if you leave the View Log screen and return to it
later.
NXC Series User’s Guide
83
Chapter 5 Monitor
5.17 View AP Log
Use this screen to view the NXC’s current wireless AP log messages. Click Monitor > Log > View
AP Log to access this screen.
Figure 41 Monitor > Log > View AP Log
The following table describes the labels in this screen.
Table 44 Monitor > Log > View AP Log
LABEL
DESCRIPTION
Show/Hide Filter
Click this to show or hide the AP log filter.
Select an AP
Select an AP from the list and click Query to view its log messages.
Log Query
Status
This indicates the current log query status.
init - Indicates the query has not been initialized.
querying - Indicates the query is in process.
fail - Indicates the query failed.
success - Indicates the query succeeded.
AP Information
This displays the MAC address for the selected AP.
Log File Status
This indicates the status of the AP’s log messages.
Last Log Query
Time
This indicates the last time the AP was queried for its log messages.
Display
Select the log file from the specified AP that you want displayed.
Note: This criterion only appears when you Show Filter.
84
NXC Series User’s Guide
Chapter 5 Monitor
Table 44 Monitor > Log > View AP Log
LABEL
DESCRIPTION
Priority
Select a priority level to use for filtering displayed log messages.
Note: This criterion only appears when you Show Filter.
Source Address
Enter a source IP address to display only the log messages that include it.
Note: This criterion only appears when you Show Filter.
Destination
Address
Enter a destination IP address to display only the log messages that include it.
Note: This criterion only appears when you Show Filter.
Source Interface
Enter a source interface to display only the log messages that include it.
Note: This criterion only appears when you Show Filter.
Destination
Interface
Enter a destination interface to display only the log messages that include it.
Note: This criterion only appears when you Show Filter.
Service
Select a service type to display only the log messages related to it.
Note: This criterion only appears when you Show Filter.
Keyword
Enter a keyword to display only the log messages that include it.
Protocol
Select a protocol to display only the log messages that include it.
Note: This criterion only appears when you Show Filter.
Note: This criterion only appears when you Show Filter.
Search
Click this to start the log query based on the selected criteria. If no criteria have been
selected, then this displays all log messages for the specified AP regardless.
Email Log Now
Click this open a new e-mail in your default e-mail program with the selected log attached.
Refresh
Click this to refresh the log table.
Clear Log
Click this to clear the log on the specified AP.
#
This field is a sequential value, and it is not associated with a specific log message.
Time
This indicates the time that the log messages was created or recorded on the AP.
Priority
This indicates the selected log message’s priority.
Category
This indicates the selected log message’s category.
Message
This displays content of the selected log message.
Source
This displays the source IP address of the selected log message.
Destination
This displays the source IP address of the selected log message.
Note
This displays any notes associated with the selected log message.
NXC Series User’s Guide
85
C HAPT ER
6
Registration
6.1 Overview
Use the Configuration > Licensing > Registration screens to register your NXC and manage its
service subscriptions.
6.1.1 What You Can Do in this Chapter
• The Registration screen (Section 6.2 on page 87) registers your NXC with myZyXEL.com.
• The Service screen (Section 6.3 on page 89) displays the status of your service registrations and
upgrade licenses.
6.1.2 What you Need to Know
This section introduces the topics covered in this chapter.
myZyXEL.com
myZyXEL.com is ZyXEL’s online services center where you can register your NXC and manage
subscription services available for the NXC. To use a subscription service, you have to register the
NXC and activate the corresponding service at myZyXEL.com (through the NXC).
Note: You need to create a myZyXEL.com account before you can register your device
and activate the services at myZyXEL.com.
For the NXC2500, you can directly create a myZyXEL.com account, register your NXC and activate
a service using the Registration screen. Alternatively, go to http://www.myZyXEL.com with the
NXC’s serial number and LAN MAC address to register it. Refer to the web site’s on-line help for
details.
For the NXC5500, go to http://portal.myZyXEL.com with the NXC’s serial number and LAN MAC
address to register it. Refer to the web site’s on-line help for details.
Note: To activate a service on a NXC, you need to access myZyXEL.com via that NXC.
Maximum Number of Managed APs
The NXC2500 is initially configured to support up to 8 managed APs (such as the NWA5123-NI).
You can increase this by subscribing to additional licenses. As of this writing, each license upgrade
allows an additional 8 managed APs while the maximum number of APs a single NXC can support is
64.
NXC Series User’s Guide
86
Chapter 6 Registration
The NXC5500 is initially configured to support up to 64 managed APs (such as the NWA512x series
or NWA5301-NJ). You can increase this by subscribing to additional licenses. As of this writing, a
license upgrade allows an additional 8 or 64 managed APs while the maximum number of APs a
single NXC can support is 512.
Maximum Number of ZyMesh Root APs
The NXC by default allows up to one ZyMesh root AP, which means only one radio of the managed
AP can be set to root AP mode. You can remove the limit by subscribing to the ZyMesh license.
6.2 Registration
This screen varies depending on your NXC model.
6.2.1 NXC2500
Use this screen to register your NXC with myZyXEL.com. Click Configuration > Licensing >
Registration in the navigation panel to open the screen as shown next.
Figure 42 Configuration > Licensing > Registration
NXC Series User’s Guide
87
Chapter 6 Registration
The following table describes the labels in this screen.
Table 45 Configuration > Licensing > Registration
LABEL
DESCRIPTION
General Settings
If you select existing myZyXEL.com account, only the User Name and
Password fields are available.
new myZyXEL.com
account
If you haven’t created an account at myZyXEL.com, select this option and configure
the following fields to create an account and register your NXC.
existing myZyXEL.com
account
If you already have an account at myZyXEL.com, select this option and enter your
user name and password in the fields below to register your NXC.
UserName
Enter a user name for your myZyXEL.com account. The name should be from six to
20 alphanumeric characters (and the underscore). Spaces are not allowed.
Check
Click this button to check with the myZyXEL.com database to verify the user name
you entered has not been used.
Password
Enter a password of between six and 20 alphanumeric characters (and the
underscore). Spaces are not allowed.
Confirm Password
Enter the password again for confirmation.
E-Mail Address
Enter your e-mail address. You can use up to 80 alphanumeric characters (periods
and the underscore are also allowed) without spaces.
Country
Select your country from the drop-down box list.
Seller Details
Use this section to enter your seller information.
Seller’s Name
Enter your seller’s name.
Seller’s E-mail
Enter your seller’s e-mail address.
Seller’s Contact
Number
Enter your seller’s phone number.
VAT Number
Enter your seller’s Value-Added Tax number, if you bought your NXC from Europe.
I accept the terms in
the Privacy Policy
If you accept the privacy policy statement shown above this field, select this check
box.
Apply
Click Apply to save your changes back to the NXC.
Note: If the NXC is registered already, this screen is read-only. Use the Service screen to
update your service subscription status.
Figure 43 Configuration > Licensing > Registration: Registered Device
88
NXC Series User’s Guide
Chapter 6 Registration
6.2.2 NXC5500
Click the link in this screen to register your NXC with myZyXEL.com. The NXC should already have
Internet access before you can register it. Click Configuration > Licensing > Registration in the
navigation panel to open the screen as shown next.
Figure 44 Configuration > Licensing > Registration
6.3 Service
This screen varies depending on your NXC model.
6.3.1 NXC2500
Use this screen to display the status of your service registrations and upgrade licenses. To activate
or extend a standard service subscription, purchase an iCard and enter the iCard’s PIN number
(license key) in this screen. Click Configuration > Licensing > Registration > Service to open
the screen as shown next.
Figure 45 Configuration > Licensing > Registration > Service
NXC Series User’s Guide
89
Chapter 6 Registration
The following table describes the labels in this screen.
Table 46 Configuration > Licensing > Registration > Service
LABEL
DESCRIPTION
License Status
#
This is the entry’s position in the list.
Service
This lists the services that are available on the NXC.
Status
This field displays whether this is a default service (Default) or an activated license
upgrade (Licensed).
Registration Type
This field displays standard when you registered a service with your iCard’s PIN
number.
Expiration Date
This field displays the date your service expires.
Count
This field displays how many managed APs the NXC can support with your current
license. This field does not apply to the other services.
License Activation
License Key
Enter your iCard’s PIN number and click Activation to activate or extend a standard
service subscription. If a standard service subscription runs out, you need to buy a
new iCard (specific to your NXC) and enter the new PIN number to extend the
service.
Service License Refresh Click this button to renew service license information (such as the registration status
and expiration day).
6.3.2 NXC5500
Use this screen to display the status of your service registrations and upgrade licenses. To activate
or extend a standard service subscription, purchase an iCard and enter the iCard’s PIN number
(license key) in this screen. Click Configuration > Licensing > Registration > Service to open
the screen as shown next.
Figure 46 Configuration > Licensing > Registration > Service
90
NXC Series User’s Guide
Chapter 6 Registration
The following table describes the labels in this screen.
Table 47 Configuration > Licensing > Registration > Service
LABEL
DESCRIPTION
License Status
#
This is the entry’s position in the list.
Service
This lists the services that are available on the NXC.
Status
This field displays whether this is a default service (Default) or an activated license
upgrade (Licensed).
Registration Type
This field displays standard when you registered a service with your iCard’s PIN
number.
Expiration Date
This field displays the date your service expires.
Count
This field displays how many managed APs the NXC can support with your current
license. This field does not apply to the other services.
License Refresh
Service License Refresh Click this button to renew service license information (such as the registration status
and expiration day).
NXC Series User’s Guide
91
C HAPT ER
7
Wireless
7.1 Overview
Use the Wireless screens to configure how the NXC manages the Access Point that are connected
to it.
7.1.1 What You Can Do in this Chapter
• The Controller screen (Section 7.2 on page 93) sets how the NXC allows new APs to connect to
the network.
• The AP Management screen (Section 7.3 on page 93) manages all of the APs connected to the
NXC.
• The MON Mode screen (Section 7.4 on page 99) allows you to assign APs either to the rogue AP
list or the friendly AP list.
• The Load Balancing screen (Section 7.5 on page 102) configures network traffic load balancing
between the APs and the NXC.
• The DCS screen (Section 7.6 on page 104) configures dynamic radio channel selection on
managed APs.
• The Auto Healing screen (Section 7.7 on page 107) turns on the auto healing feature to extend
the wireless service coverage area of the managed APs when one of the APs fails.
7.1.2 What You Need to Know
The following terms and concepts may help as you read this chapter.
Station / Wireless Client
A station or wireless client is any wireless-capable device that can connect to an AP using a wireless
signal.
Dynamic Channel Selection (DCS)
Dynamic Channel Selection (DCS) is a feature that allows an AP to automatically select the radio
channel upon which it broadcasts by scanning the area around it and determining what channels
are currently being used by other devices.
Load Balancing (Wireless)
Wireless load balancing is the process where you limit the number of connections allowed on an
wireless access point (AP) or you limit the amount of wireless traffic transmitted and received on it
so the AP does not become overloaded.
NXC Series User’s Guide
92
Chapter 7 Wireless
7.2 Controller
Use this screen to set how the NXC allows new APs to connect to the network. Click Configuration
> Wireless > Controller to access this screen.
Figure 47 Configuration > Wireless > Controller
Each field is described in the following table.
Table 48 Configuration > Wireless > Controller
LABEL
DESCRIPTION
Registration
Type
Select Manual to add each AP to the NXC for management, or Always Accept to
automatically add APs to the NXC for management.
Note: Select the Manual option for managing a specific set of APs. This is recommended as the
registration mechanism cannot automatically differentiate between friendly and rogue
APs. For details on how to handle rogue APs, see Section 5.15 on page 80.
APs must be connected to the NXC by a wired connection or network.
Apply
Click Apply to save your changes back to the NXC.
Reset
Click Reset to return the screen to its last-saved settings.
7.3 AP Management
Use this screen to manage all of the APs connected to the NXC. Click Configuration > Wireless >
AP Management to access this screen.
Figure 48 Configuration > Wireless > AP Management
NXC Series User’s Guide
93
Chapter 7 Wireless
Each field is described in the following table.
Table 49 Configuration > Wireless > AP Management
LABEL
DESCRIPTION
Edit
Select an AP and click this button to edit its properties.
Remove
Select an AP and click this button to remove it from the list.
Note: If in the Configuration > Wireless > Controller screen you set the Registration
Type to Always Accept, then as soon as you remove an AP from this list it
reconnects.
94
Reboot
Select an AP and click this button to force it to restart.
#
This field is a sequential value, and it is not associated with any interface.
IP Address
This field displays the IP address of the AP.
MAC Address
This field displays the MAC address of the AP.
Model
This field displays the AP’s hardware model information. It displays N/A (not
applicable) only when the AP disconnects from the NXC and the information is
unavailable as a result.
R1 Mode / AP Profile
/ ZyMesh Profile
This field displays the operating mode (AP, MON, root, or repeater), AP radio profile
name and ZyMesh profile name for Radio 1. It displays n/a for the AP profile for a radio
not using an AP profile or - for the ZyMesh profile for a radio not using a ZyMesh profile.
R2 Mode / AP Profile
/ ZyMesh Profile
This field displays the operating mode (AP, MON, root, or repeater), AP radio profile
name and ZyMesh profile name for Radio 2. It displays n/a for the AP radio profile for a
radio not using an AP radio profile or - for the ZyMesh profile for a radio not using a
ZyMesh profile.
Mgnt. VLAN ID(AC)
This displays the Access Controller (the NXC) management VLAN ID setting for the AP.
Mgnt. VLAN ID(AP)
This displays the runtime management VLAN ID setting on the AP. VLAN Conflict
displays if the AP’s management VLAN ID does not match the Mgnt. VLAN ID(AC).
This field displays n/a if the NXC cannot get VLAN information from the AP.
Description
This field displays the AP’s description, which you can configure by selecting the AP’s
entry and clicking the Edit button.
NXC Series User’s Guide
Chapter 7 Wireless
7.3.1 Edit AP List
Select an AP and click the Edit button in the Configuration > Wireless > AP Management table
to display this screen.
Figure 49 Configuration > Wireless > AP Management > Edit AP List
Each field is described in the following table.
Table 50 Configuration > Wireless > AP Management > Edit AP List
LABEL
DESCRIPTION
Create new Object
Use this menu to create a new Radio Profile, MON Profile or ZyMesh Profile object
to associate with this AP.
MAC
This displays the MAC address of the selected AP.
NXC Series User’s Guide
95
Chapter 7 Wireless
Table 50 Configuration > Wireless > AP Management > Edit AP List (continued)
LABEL
DESCRIPTION
Model
This field displays the AP’s hardware model information. It displays N/A (not
applicable) only when the AP disconnects from the NXC and the information is
unavailable as a result.
Description
Enter a description for this AP. You can use up to 31 characters, spaces and underscores
allowed.
Radio 1/2 OP Mode
Select the operating mode for radio 1 or radio 2.
AP Mode means the AP can receive connections from wireless clients and pass their
data traffic through to the NXC to be managed (or subsequently passed on to an
upstream gateway for managing).
MON Mode means the AP monitors the broadcast area for other APs, then passes their
information on to the NXC where it can be determined if those APs are friendly or
rogue. If an AP is set to this mode it cannot receive connections from wireless clients.
Root AP means the radio acts as an AP and also supports the wireless connections with
other APs (in repeater mode) to form a ZyMesh/WDS to extend its wireless network.
Repeater AP means the radio can establish a wireless connection with other APs (in
either root AP or repeater mode).
Note: To prevent bidge loops, do NOT set both radios on a managed AP to Repeater AP
mode.
Note: Ensure you restart the managed AP after you change its operating mode.
Radio 1/2 AP Profile
Select an AP profile from the list. If no profile exists, you can create a new one through
the Create new Object menu.
Radio 1/2 Profile
Select a monitor mode profile profile from the list. If no profile exists, you can create a
new one through the Create new Object menu.
Radio 1/2 ZyMesh
Profile
This field is available only when the radio is in Root AP or Repeater AP mode.
Force Overwrite
VLAN Config
Select this to have the NXC change the AP’s management VLAN to match the
configuration in this screen.
Management VLAN
ID
Enter a VLAN ID for this AP.
As Native VLAN
Select this option to treat this VLAN ID as a VLAN created on the NXC and not one
assigned to it from outside the network.
Select the ZyMesh profile the radio uses to connect to a root AP or repeater.
Port Setting
#
This is the port’s index number in this list.
Status
This displays whether or not the port is activated.
Port
This shows the name of the physical Ethernet port on the managed AP.
PVID
This shows the port’s PVID.
A PVID (Port VLAN ID) is a tag that adds to incoming untagged frames received on a
port so that the frames are forwarded to the VLAN group that the tag defines.
VLAN Configuration
96
#
This is the VLAN’s index number in this list.
Status
This displays whether or not the VLAN is activated.
Name
This shows the name of the VLAN.
VID
This shows the VLAN ID number.
Member
This field displays the Ethernet port(s) that is a member of this VLAN.
NXC Series User’s Guide
Chapter 7 Wireless
Table 50 Configuration > Wireless > AP Management > Edit AP List (continued)
LABEL
DESCRIPTION
OK
Click OK to save your changes back to the NXC.
Cancel
Click Cancel to close the window with changes unsaved.
7.3.2 Port Setting Edit
Use this screen to enable or disable a port on the managed AP and configure the port’s PVID.
To access this screen, select a port and click the Edit button in the Port Setting table of the
Configuration > Wireless > AP Management > Edit AP List screen.
Figure 50 Configuration > Wireless > AP Management > Edit AP List > Edit Port
Each field is described in the following table.
Table 51 Configuration > Wireless > AP Management > Edit AP List > Edit Port
LABEL
DESCRIPTION
Enable
Select this option to activate the port. Otherwise, deselect it.
Name
This shows the name of the port.
Native VID (PVID)
A PVID (Port VLAN ID) is a tag that adds to incoming untagged frames received on a
port so that the frames are forwarded to the VLAN group that the tag defines.
Enter the PVID from 1 to 4094 for this port.
OK
Click OK to save your changes back to the NXC.
Cancel
Click Cancel to close the window with changes unsaved.
7.3.3 VLAN Add/Edit
Use this screen to create a new VLAN or configure an existing VLAN on the NXC.
NXC Series User’s Guide
97
Chapter 7 Wireless
To access this screen, click Add or select a VLAN and click the Edit button in the VLAN Member
Configuration table of the Configuration > Wireless > AP Management > Edit AP List
screen.
Figure 51 Configuration > Wireless > AP Management > Edit AP List > Edit VLAN
Each field is described in the following table.
Table 52 Configuration > Wireless > AP Management > Edit AP List > Edit VLAN
LABEL
DESCRIPTION
Enable
Select this option to activate the VLAN. Otherwise, deselect it.
Name
This field is read-only if you are editing an existing VLAN.
Enter the number of the VLAN. You can use a number from 0~4095. For example,
vlan0, vlan8, and so on.
VID
Enter the VLAN ID. This 12-bit number uniquely identifies each VLAN. Allowed values
are 1 - 4094. (0 and 4095 are reserved.)
Member
Configuration
Use these settings to assign ports to this VLAN as members.
Edit
Click this to edit the selected port’s membership values.
#
This is sequential indicator of the port number.
Port Name
This indicates the port name.
Member
This indicates whether the selected port is a member or not of the VLAN which is
currently being edited.
Click this field to edit the value.
Tx Tagging
This indicates whether the selected port tags outbound traffic with this VLAN’s ID .
Click this field to edit the value.
98
OK
Click OK to save your changes back to the NXC.
Cancel
Click Cancel to close the window with changes unsaved.
NXC Series User’s Guide
Chapter 7 Wireless
7.3.4 AP Policy
Use this screen to configure the AP controller’s IP address on the managed APs and determine the
action the managed APs take if the current AP controller fails. Click Configuration > Wireless >
AP Management > AP Policy to access this screen.
Figure 52 Configuration > Wireless > AP Management > AP Policy
Each field is described in the following table.
Table 53 Configuration > Wireless > AP Management > AP Policy
LABEL
DESCRIPTION
Force Override AC
IP Config on AP
Select this to have the NXC change the AP controller’s IP address on the managed AP(s)
to match the configuration in this screen.
Override Type
Select Auto to have the managed AP(s) automatically send broadcast packets to find
any other available AP controllers.
Select Manual to replace the AP controller’s IP address configured on the managed
AP(s) with the one(s) you specified below.
Primary Controller
Specify the IP address of the primary AP controller if you set Override Type to
Manual.
Secondary
Controller
Specify the IP address of the secondary AP controller if you set Override Type to
Manual.
Fall back to Primary
Controller when
possible
Select this option to have the managed AP(s) change back to associate with the
primary AP controller as soon as the primary AP controller is available.
Fall Back Check
Interval
Set how often the managed AP(s) check whether the primary AP controller is available.
Apply
Click Apply to save your changes back to the NXC.
Reset
Click Reset to return the screen to its last-saved settings.
7.4 MON Mode
Use this screen to assign APs either to the rogue AP list or the friendly AP list. A rogue AP is a
wireless access point operating in a network’s coverage area that is not under the control of the
network administrator, and which can potentially open up holes in a network’s security.
NXC Series User’s Guide
99
Chapter 7 Wireless
Click Configuration > Wireless > MON Mode to access this screen.
Figure 53 Configuration > Wireless > MON Mode
Each field is described in the following table.
Table 54 Configuration > Wireless > MON Mode
LABEL
DESCRIPTION
General Settings
Enable Rogue AP
Containment
Select this to enable rogue AP containment.
Rogue/Friendly AP List
Add
Click this button to add an AP to the list and assign it either friendly or rogue
status.
Edit
Select an AP in the list to edit and reassign its status.
Remove
Select an AP in the list to remove.
Containment
Click this button to quarantine the selected AP.
A quarantined AP cannot grant access to any network services. Any stations that
attempt to connect to a quarantined AP are disconnected automatically.
Dis-Containment
Click this button to take the selected AP out of quarantine.
An unquarantined AP has normal access to the network.
#
This field is a sequential value, and it is not associated with any interface.
Containment
This field indicates the selected AP’s containment status.
Role
This field indicates whether the selected AP is a rogue-ap or a friendly-ap. To
change the AP’s role, click the Edit button.
MAC Address
This field indicates the AP’s radio MAC address.
Description
This field displays the AP’s description. You can modify this by clicking the Edit
button.
Rogue/Friendly AP List
Importing/Exporting
100
These controls allow you to export the current list of rogue and friendly APs or
import existing lists.
NXC Series User’s Guide
Chapter 7 Wireless
Table 54 Configuration > Wireless > MON Mode (continued)
LABEL
DESCRIPTION
File Path / Browse /
Importing
Enter the file name and path of the list you want to import or click the Browse
button to locate it. Once the File Path field has been populated, click Importing
to bring the list into the NXC.
Exporting
Click this button to export the current list of either rogue APs or friendly APS.
Apply
Click Apply to save your changes back to the NXC.
Reset
Click Reset to return the screen to its last-saved settings.
7.4.1 Add/Edit Rogue/Friendly List
Select an AP and click the Edit button in the Configuration > Wireless > MON Mode table to
display this screen.
Figure 54 Configuration > Wireless > MON Mode > Add/Edit Rogue/Friendly
Each field is described in the following table.
Table 55 Configuration > Wireless > MON Mode > Add/Edit Rogue/Friendly
LABEL
DESCRIPTION
MAC Address
Enter the MAC address of the AP you want to add to the list. A MAC address is a unique
hardware identifier in the following hexadecimal format: xx:xx:xx:xx:xx:xx where xx is a
hexadecimal number separated by colons.
Description
Enter up to 60 characters for the AP’s description. Spaces and underscores are allowed.
Role
Select either Rogue AP or Friendly AP for the AP’s role.
OK
Click OK to save your changes back to the NXC.
Cancel
Click Cancel to close the window with changes unsaved.
NXC Series User’s Guide
101
Chapter 7 Wireless
7.5 Load Balancing
Use this screen to configure wireless network traffic load balancing between the APs on your
network. Click Configuration > Wireless > Load Balancing to access this screen.
Figure 55 Configuration > Wireless > Load Balancing
Each field is described in the following table.
Table 56 Configuration > Wireless > Load Balancing
LABEL
DESCRIPTION
Enable Load
Balancing
Select this to enable load balancing on the NXC.
Mode
Select a mode by which load balancing is carried out.
Select By Station Number to balance network traffic based on the number of specified
stations connect to an AP.
Select By Traffic Level to balance network traffic based on the volume generated by the
stations connected to an AP.
Once the threshold is crossed (either the maximum station numbers or with network
traffic), then the AP delays association request and authentication request packets from
any new station that attempts to make a connection. This allows the station to
automatically attempt to connect to another, less burdened AP if one is available.
Max Station
Number
Enter the threshold number of stations at which an AP begins load balancing its
connections.
Traffic Level
Select the threshold traffic level at which the AP begins load balancing its connections
(low, medium, high).
Disassociate
station when
overloaded
Select this option to disassociate wireless clients connected to the AP when it becomes
overloaded. If you do not enable this option, then the AP simply delays the connection
until it can afford the bandwidth it requires, or it transfers the connection to another AP
within its broadcast radius.
The disassociation priority is determined automatically by the NXC and is as follows:
•
•
Idle Timeout - Devices that have been idle the longest will be disassociated first. If
none of the connected devices are idle, then the priority shifts to Signal Strength.
Signal Strength - Devices with the weakest signal strength will be disassociated first.
Note: If you enable this function, you should ensure that there are multiple APs within the
broadcast radius that can accept any rejected or kicked wireless clients; otherwise, a
wireless client attempting to connect to an overloaded AP will be kicked continuously
and never be allowed to connect.
102
NXC Series User’s Guide
Chapter 7 Wireless
Table 56 Configuration > Wireless > Load Balancing (continued)
LABEL
DESCRIPTION
Apply
Click Apply to save your changes back to the NXC.
Reset
Click Reset to return the screen to its last-saved settings.
7.5.1 Disassociating and Delaying Connections
When your AP becomes overloaded, there are two basic responses it can take. The first one is to
“delay” a client connection. This means that the AP withholds the connection until the data transfer
throughput is lowered or the client connection is picked up by another AP. If the client is picked up
by another AP then the original AP cannot resume the connection.
For example, here the AP has a balanced bandwidth allotment of 6 Mbps. If laptop R connects and
it pushes the AP over its allotment, say to 7 Mbps, then the AP delays the red laptop’s connection
until it can afford the bandwidth or the laptop is picked up by a different AP with bandwidth to
spare.
Figure 56 Delaying a Connection
NXC Series User’s Guide
103
Chapter 7 Wireless
The second response your AP can take is to kick the connections that are pushing it over its
balanced bandwidth allotment.
Figure 57 Kicking a Connection
Connections are kicked based on either idle timeout or signal strength. The NXC first looks to
see which devices have been idle the longest, then starts kicking them in order of highest idle time.
If no connections are idle, the next criteria the NXC analyzes is signal strength. Devices with the
weakest signal strength are kicked first.
7.6 DCS
Use DCS (Dynamic Channel Selection) in an environment where are many APs and there may be
interference. DCS allows APs to automatically find a less-used channel in such an environment. Use
104
NXC Series User’s Guide
Chapter 7 Wireless
this screen to configure dynamic radio channel selection on managed APs. Click Configuration >
Wireless > DCS to access this screen.
Figure 58 Configuration > Wireless > DCS
Each field is described in the following table.
Table 57 Configuration > Wireless > DCS
LABEL
DESCRIPTION
General Settings
Select Now
Click this to have the managed APs scan for and select an available channel
immediately.
Enable Dynamic
Channel Selection
Select this to turn on dynamic channel selection for the APs that the NXC manages.
DCS Time Interval
Enter a number of minutes. This regulates how often the NXC surveys the other APs
within its broadcast radius. If the channel on which it is currently broadcasting suddenly
comes into use by another AP, the NXC will then dynamically select the next available
clean channel or a channel with lower interference.
Enable DCS Client
Aware
Select this to have the AP wait until all connected clients have disconnected before
switching channels.
If you disable this then the AP switches channels immediately regardless of any client
connections. In this instance, clients that are connected to the AP when it switches
channels are dropped.
2.4 GHz Settings
NXC Series User’s Guide
105
Chapter 7 Wireless
Table 57 Configuration > Wireless > DCS (continued)
LABEL
DESCRIPTION
2.4 GHz Channel
Selection Method
Select auto to have the AP search for available channels automatically in the 2.4 GHz
band. The available channels vary depending on what you select in the 2.4 GHz
Channel Deployment field.
Select manual and specify the channels the AP uses in the 2.4 GHz band.
Available
channels
This text box lists the channels that are available in the 2.4 GHz band. Select the
channels that you want the AP to use, and click the right arrow button to add them.
Channels
selected
This text box lists the channels that you allow the AP to use. Select any channels that
you want to prevent the AP from using it, and click the left arrow button to remove
them.
2.4 GHz Channel
Deployment
This field is available only when you set 2.4 GHz Channel Selection Method to auto.
Select Three-Channel Deployment to limit channel switching to channels 1,6, and
11, the three channels that are sufficiently attenuated to have almost no impact on one
another. In other words, this allows you to minimize channel interference by limiting
channel-hopping to these three “safe” channels.
Select Four-Channel Deployment to limit channel switching to four channels.
Depending on the country domain, if the only allowable channels are 1-11 then the NXC
uses channels 1, 4, 7, 11 in this configuration; otherwise, the NXC uses channels 1, 5,
9, 13 in this configuration. Four channel deployment expands your pool of possible
channels while keeping the channel interference to a minimum.
5 GHz Settings
Enable 5 GHz DFS
Aware
Select this if your APs are operating in an area known to have RADAR devices. This
allows the device to downgrade its frequency to below 5 GHz in the event a RADAR
signal is detected, thus preventing it from interfering with that signal.
Enabling this forces the AP to select a non-DFS channel.
5 GHz Channel
Selection Method
Select auto to have the AP search for available channels automatically in the 5 GHz
band.
Select manual and specify the channels the AP uses in the 5 GHz band.
106
Available
channels
This text box lists the channels that are available in the 5 GHz band. Select the
channels that you want the AP to use, and click the right arrow button to add them.
Channels
selected
This text box lists the channels that you allow the AP to use. Select any channels that
you want to prevent the AP from using it, and click the left arrow button to remove
them.
Apply
Click Apply to save your changes back to the NXC.
Reset
Click Reset to return the screen to its last-saved settings.
NXC Series User’s Guide
Chapter 7 Wireless
7.7 Auto Healing
Use this screen to enable auto healing, which allows you to extend the wireless service coverage
area of the managed APs when one of the APs fails. Click Configuration > Wireless > Auto
Healing to access this screen.
Figure 59 Configuration > Wireless > Auto Healing
Each field is described in the following table.
Table 58 Configuration > Wireless > Auto Healing
LABEL
DESCRIPTION
Enable Auto
Healing
Select this option to turn on the auto healing feature.
Save Current
State
Click this button to have all manged APs immediately scan their neighborhoods three
times in a row and update their neighbor lists to the AP controller (NXC).
Auto Healing
Interval
Set the time interval (in minutes) at which the managed APs scan their neighborhoods
and report the status of neighbor APs to the AP controller (NXC).
An AP is considered “failed” if the AP controller obtains the same scan result that the AP is
missing from the neighbor list of other APs three times.
Power Threshold
Set the power level (in dBm) to which the neighbor APs of the failed AP increase their
output power in order to extend their wireless service coverage areas.
When the failed AP is working again, its neighbor APs return their output power to the
original level.
Apply
Click Apply to save your changes back to the NXC.
Reset
Click Reset to return the screen to its last-saved settings.
NXC Series User’s Guide
107
Chapter 7 Wireless
7.8 Technical Reference
The following section contains additional technical information about the features described in this
chapter.
7.8.1 Dynamic Channel Selection
When numerous APs broadcast within a given area, they introduce the possibility of heightened
radio interference, especially if some or all of them are broadcasting on the same radio channel. If
the interference becomes too great, then the network administrator must open his AP configuration
options and manually change the channel to one that no other AP is using (or at least a channel
that has a lower level of interference) in order to give the connected stations a minimum degree of
interference. Dynamic channel selection frees the network administrator from this task by letting
the AP do it automatically. The AP can scan the area around it looking for the channel with the least
amount of interference.
In the 2.4 GHz spectrum, each channel from 1 to 13 is broken up into discrete 22 MHz segments
that are spaced 5 MHz apart. Channel 1 is centered on 2.412 GHz while channel 13 is centered on
2.472 GHz.
Figure 60 An Example Three-Channel Deployment
Three channels are situated in such a way as to create almost no interference with one another if
used exclusively: 1, 6 and 11. When an AP broadcasts on any of these three channels, it should not
interfere with neighboring APs as long as they are also limited to same trio.
Figure 61 An Example Four-Channel Deployment
However, some regions require the use of other channels and often use a safety scheme with the
following four channels: 1, 4, 7 and 11. While they are situated sufficiently close to both each other
and the three so-called “safe” channels (1,6 and 11) that interference becomes inevitable, the
severity of it is dependent upon other factors: proximity to the affected AP, signal strength, activity,
and so on.
108
NXC Series User’s Guide
Chapter 7 Wireless
Finally, there is an alternative four channel scheme for ETSI, consisting of channels 1, 5, 9, 13. This
offers significantly less overlap that the other one.
Figure 62 An Alternative Four-Channel Deployment
7.8.2 Load Balancing
Because there is a hard upper limit on an AP’s wireless bandwidth, load balancing can be crucial in
areas crowded with wireless users. Rather than let every user connect and subsequently dilute the
available bandwidth to the point where each connecting device receives a meager trickle, the load
balanced AP instead limits the incoming connections as a means to maintain bandwidth integrity.
There are two kinds of wireless load balancing available on the NXC:
Load balancing by station number limits the number of devices allowed to connect to your AP. If
you know exactly how many stations you want to let connect, choose this option.
For example, if your company’s graphic design team has their own AP and they have 10 computers,
you can load balance for 10. Later, if someone from the sales department visits the graphic design
team’s offices for a meeting and he tries to access the network, his computer’s connection is
delayed, giving it the opportunity to connect to a different, neighboring AP. If he still connects to
the AP regardless of the delay, then the AP may boot other people who are already connected in
order to associate with the new connection.
Load balancing by traffic level limits the number of connections to the AP based on maximum
bandwidth available. If you are uncertain as to the exact number of wireless connections you will
have then choose this option. By setting a maximum bandwidth cap, you allow any number of
devices to connect as long as their total bandwidth usage does not exceed the configured
bandwidth cap associated with this setting. Once the cap is hit, any new connections are rejected or
delayed provided that there are other APs in range.
Imagine a coffee shop in a crowded business district that offers free wireless connectivity to its
customers. The coffee shop owner can’t possibly know how many connections his AP will have at
any given moment. As such, he decides to put a limit on the bandwidth that is available to his
customers but not on the actual number of connections he allows. This means anyone can connect
to his wireless network as long as the AP has the bandwidth to spare. If too many people connect
and the AP hits its bandwidth cap then all new connections must basically wait for their turn or get
shunted to the nearest identical AP.
NXC Series User’s Guide
109
C HAPT ER
8
Interfaces
8.1 Interface Overview
Use these screens to configure the NXC’s interfaces.
• Ports are the physical ports to which you connect cables.
• Interfaces are used within the system operationally. You use them in configuring various
features. An interface also describes a network that is directly connected to the NXC. For
example, You connect the LAN network to the interface.
• Zones are groups of interfaces used to ease security policy configuration.
8.1.1 What You Can Do in this Chapter
• The Ethernet screens (Section 8.2 on page 111) configure the Ethernet interfaces. Ethernet
interfaces are the foundation for defining other interfaces and network policies.
• The VLAN screens (Section 8.3 on page 122) divide the physical network into multiple logical
networks. VLAN interfaces receive and send tagged frames. The NXC automatically adds or
removes the tags as needed..
8.1.2 What You Need to Know
The following terms and concepts may help as you read this chapter.
Interface Characteristics
Interfaces generally have the following characteristics (although not all characteristics apply to each
type of interface).
• An interface is a logical entity through which (layer-3) packets pass.
• An interface is bound to a physical port or another interface.
• Many interfaces can share the same physical port.
• An interface belongs to at most one zone.
• Many interfaces can belong to the same zone.
Types of Interfaces
You can create several types of interfaces in the NXC.
• Ethernet interfaces are the foundation for defining other interfaces and network policies.
• VLAN interfaces receive and send tagged frames. The NXC automatically adds or removes the
tags as needed.
NXC Series User’s Guide
110
Chapter 8 Interfaces
8.2 Ethernet Summary
This screen lists every Ethernet interface. If you enabled IPv6 in the Configuration > System >
IPv6 screen, you can also configure VLAN interfaces used for your IPv6 networks on this screen. To
access this screen, click Configuration > Network > Interface.
Unlike other types of interfaces, you cannot create new Ethernet interfaces nor can you delete any
of them. If an Ethernet interface does not have any physical ports assigned to it, it is effectively
removed from the NXC even though you can still configure it.
Ethernet interfaces are similar to other types of interfaces in many ways. They have an IP address,
subnet mask, and gateway used to make routing decisions. They restrict the amount of bandwidth
and packet size. They can provide DHCP services, and they can verify the gateway is available.
Use Ethernet interfaces to control which physical ports exchange routing information with other
routers and how much information is exchanged through each one. The more routing information is
exchanged, the more efficient the routers should be. However, the routers also generate more
network traffic, and some routing protocols require a significant amount of configuration and
management.
Figure 63 Configuration > Network > Interface > Ethernet
NXC Series User’s Guide
111
Chapter 8 Interfaces
Each field is described in the following table.
Table 59 Configuration > Network > Interface > Ethernet
LABEL
DESCRIPTION
Configuration/IPv6
Configuration
Use the Configuration section for IPv4 network settings. Use the IPv6 Configuration
section for IPv6 network settings if you connect your NXC to an IPv6 network. Both
sections have similar fields as described below.
Edit
Double-click an entry or select it and click Edit to open a screen where you can modify
the entry’s settings.
Activate
To turn on an interface, select it and click Activate.
Inactivate
To turn off an interface, select it and click Inactivate.
Object Reference
Select an entry and click Object Reference to open a screen that shows which settings
use the entry.
#
This field is a sequential value, and it is not associated with any interface.
Status
This icon is lit when the entry is active and dimmed when the entry is inactive.
Name
This field displays the name of the interface.
IP Address
This field displays the current IP address of the interface. If the IP address is 0.0.0.0 (in
the IPv4 network) or :: (in the IPv6 network), the interface does not have an IP address
yet.
In the IPv4 network, this screen also shows whether the IP address is a static IP
address (STATIC) or dynamically assigned (DHCP).
In the IPv6 network, this screen also shows whether the IP address is a static IP
address (STATIC), link-local IP address (LINK LOCAL), dynamically assigned (DHCP),
or an IPv6 StateLess Address AutoConfiguration IP address (SLAAC). See Appendix E
on page 436 for more information about IPv6.
Mask
This field displays the interface’s subnet mask in dot decimal notation.
PVID
This field indicates the interface’s PVID.
Apply
Click Apply to save your changes back to the NXC.
Reset
Click Reset to return the screen to its last-saved settings.
8.2.1 Edit Ethernet
This screen lets you configure IP address assignment and interface parameters. To access this
screen, select an interface and click its Edit icon in the Ethernet screen.
112
NXC Series User’s Guide
Chapter 8 Interfaces
Note: If you create IP address objects based on an interface’s IP address, subnet, or
gateway, the NXC automatically updates every rule or setting that uses the object
whenever the interface’s IP address settings change. For example, if you change
LAN’s IP address, the NXC automatically updates the corresponding interfacebased, LAN subnet address object.
Figure 64 Configuration > Network > Interface > Ethernet > Edit (general)
NXC Series User’s Guide
113
Chapter 8 Interfaces
This screen’s fields are described in the table below.
Table 60 Configuration > Network > Interface > Ethernet > Edit
LABEL
DESCRIPTION
IPv4/IPv6 View /
IPv4 View / IPv6
View
Use this button to display both IPv4 and IPv6, IPv4-only, or IPv6-only configuration
fields.
Show / Hide
Advanced Settings
Click this button to display a greater or lesser number of configuration fields.
Create New Object
Click this button to create a DHCPv6 request object that you may use for the DHCPv6
settings in this screen.
General Settings
Enable Interface
Select this to enable this interface. Clear this to disable this interface.
Interface Properties
Interface Type
Select to which type of network you will connect this interface. When you select
internal or external the rest of the screen’s options automatically adjust to
correspond. The NXC automatically adds default route and SNAT settings for traffic it
routes from internal interfaces to external interfaces; for example LAN to WAN traffic.
Select internal to connect to a local network. Other corresponding configuration
options: DHCP server and DHCP relay. The NXC automatically adds default SNAT
settings for traffic flowing from this interface to an external interface.
Select external to connect to an external network (like the Internet).
If you select general, the rest of the screen’s options do not automatically adjust and
you must manually configure a policy route to add routing and SNAT settings for the
interface.
Interface Name
Specify a name for the interface. It can use alphanumeric characters, hyphens, and
underscores, and it can be up to 11 characters long.
Port
This indicates the port that you are currently editing.
PVID
A PVID (Port VLAN ID) is a tag that adds to incoming untagged frames received on a
port so that the frames are forwarded to the VLAN group that the tag defines.
Enter the PVID for this port (1~4094).
Zone
Select a zone with which to associate this port.
MAC Address
This field is read-only. This is the MAC address that the Ethernet interface uses.
Description
Enter a description of this interface. It is not used elsewhere. You can use alphanumeric
and ()+/:=?!*#@$_%- characters, and it can be up to 60 characters long.
IP Address
Assignment
These IP address fields configure an IP address on the interface itself. If you change
this IP address on the interface, you may also need to change a related address object
for the network connected to the interface. For example, if you use this screen to
change the IP address of your LAN interface, you should also change the corresponding
LAN subnet address object.
Get
Automatically
This option appears when you set the Interface Type to external or general. Select
this to make the interface a DHCP client and automatically get the IP address, subnet
mask, and gateway address from a DHCP server.
Use Fixed IP
Address
This option appears when you set the Interface Type to external or general. Select
this if you want to specify the IP address, subnet mask, and gateway manually.
IP Address
This field is enabled if you set the Interface Type to internal or you select Use Fixed
IP Address.
Enter the IP address for this interface.
114
NXC Series User’s Guide
Chapter 8 Interfaces
Table 60 Configuration > Network > Interface > Ethernet > Edit (continued)
LABEL
Subnet Mask
DESCRIPTION
This field is enabled if you set the Interface Type to internal or you select Use Fixed
IP Address.
Enter the subnet mask of this interface in dot decimal notation. The subnet mask
indicates what part of the IP address is the same for all computers in the network.
Gateway
This field is enabled if you select Use Fixed IP Address.
Enter the IP address of the gateway. The NXC sends packets to the gateway when it
does not know how to route the packet to its destination. The gateway should be on the
same network as the interface.
Metric
This field is enabled if you set the Interface Type to external or general and select
Get Automatically.
Enter the priority of the gateway (if any) on this interface. The NXC decides which
gateway to use based on this priority. The lower the number, the higher the priority. If
two or more gateways have the same priority, the NXC uses the one that was
configured first.
IPv6 Address
Assignment
These IP address fields configure an IPv6 address on the interface itself.
Enable Stateless
Address Autoconfiguration
(SLAAC)
Select this to enable IPv6 stateless auto-configuration on this interface. The interface
will generate an IPv6 address itself from a prefix obtained from an IPv6 router in the
network.
Link-Local
Address
This displays the IPv6 link-local address and the network prefix that the NXC generates
itself for the interface.
IPv6 Address/
Prefix Length
Enter the IPv6 address and the prefix length for this interface if you want to use a static
IP address. This field is optional.
The prefix length indicates what the left-most part of the IP address is the same for all
computers in the network, that is, the network address.
Gateway
Enter the IPv6 address of the default outgoing gateway using colon (:) hexadecimal
notation.
Metric
Enter the priority of the gateway (if any) on this interface. The NXC decides which
gateway to use based on this priority. The lower the number, the higher the priority. If
two or more gateways have the same priority, the NXC uses the one that was
configured first.
DHCPv6 Setting
DHCPv6
Select N/A to not use DHCPv6.
Select Client to set this interface to act as a DHCPv6 client.
DUID
This field displays the DHCP Unique IDentifier (DUID) of the interface, which is unique
and used for identification purposes when the interface is exchanging DHCPv6
messages with others. See Appendix E on page 436 for more information.
DUID as MAC
Select this if you want the DUID to be generated from the interface’s default MAC
address.
Customized DUID
If you want to use a customized DUID, enter it here for the interface.
Enable Rapid
Commit
Select this to shorten the DHCPv6 message exchange process from four to two steps.
This function helps reduce heavy network traffic load.
Note: Make sure you also enable this option in the DHCPv6 server to make rapid commit
work.
Request Address
Select this to get an IPv6 address for this interface from the DHCP server. Clear this to
not get any IP address information through DHCPv6.
DHCPv6 Request
Options
If this interface is a DHCPv6 client, use this section to configure DHCPv6 request
settings that determine what additional information to get from the DHCPv6 server.
NXC Series User’s Guide
115
Chapter 8 Interfaces
Table 60 Configuration > Network > Interface > Ethernet > Edit (continued)
LABEL
DESCRIPTION
Add
Click this to create an entry in this table. See Section 8.2.3 on page 119 for more
information.
Remove
Select an entry and click this to delete it from this table.
Object
Reference
Select an entry and click Object Reference to open a screen that shows which settings
use the entry. See Section 8.2.2 on page 119 for an example.
#
This field is a sequential value, and it is not associated with any entry.
Name
This field displays the name of the DHCPv6 request object.
Type
This field displays the type of the object.
Value
This field displays the IPv6 address that the NXC obtained from an uplink router.
Interface
Parameters
Egress
Bandwidth
Enter the maximum amount of traffic, in kilobits per second, the NXC can send through
the interface to the network. Allowed values are 0 - 1048576.
Ingress
Bandwidth
This is reserved for future use.
MTU
Maximum Transmission Unit. Type the maximum size of each data packet, in bytes, that
can move through this interface. If a larger packet arrives, the NXC divides it into
smaller fragments. Allowed values are 576 - 1500. Usually, this value is 1500.
Connectivity Check
Enter the maximum amount of traffic, in kilobits per second, the NXC can receive from
the network through the interface. Allowed values are 0 - 1048576.
These fields appear when you set the Interface Type to External or General.
The interface can regularly check the connection to the gateway you specified to make
sure it is still available. You specify how often the interface checks the connection, how
long to wait for a response before the attempt is a failure, and how many consecutive
failures are required before the NXC stops routing to the gateway. The NXC resumes
routing to the gateway the first time the gateway passes the connectivity check.
Enable
Connectivity
Check
Select this to turn on the connection check.
Check Method
Select the method that the gateway allows.
Select icmp to have the NXC regularly ping the gateway you specify to make sure it is
still available.
Select tcp to have the NXC regularly perform a TCP handshake with the gateway you
specify to make sure it is still available.
Check Period
Enter the number of seconds between connection check attempts.
Check Timeout
Enter the number of seconds to wait for a response before the attempt is a failure.
Check Fail
Tolerance
Enter the number of consecutive failures before the NXC stops routing through the
gateway.
Check Default
Gateway
Select this to use the default gateway for the connectivity check.
Check this
address
Select this to specify a domain name or IP address for the connectivity check. Enter
that domain name or IP address in the field next to it.
Check Port
This field only displays when you set the Check Method to tcp. Specify the port
number to use for a TCP connectivity check.
DHCP Setting
116
These fields appear when you set the Interface Type to Internal or General.
NXC Series User’s Guide
Chapter 8 Interfaces
Table 60 Configuration > Network > Interface > Ethernet > Edit (continued)
LABEL
DHCP
DESCRIPTION
Select what type of DHCP service the NXC provides to the network. Choices are:
None - the NXC does not provide any DHCP services. There is already a DHCP server
on the network.
DHCP Relay - the NXC routes DHCP requests to one or more DHCP servers you specify.
The DHCP server(s) may be on another network.
DHCP Server - the NXC assigns IP addresses and provides subnet mask, gateway, and
DNS server information to the network. The NXC is the DHCP server for the network.
These fields appear if the NXC is a DHCP Relay.
Relay Server 1
Enter the IP address of a DHCP server for the network.
Relay Server 2
This field is optional. Enter the IP address of another DHCP server for the network.
These fields appear if the NXC is a DHCP Server.
IP Pool Start
Address
Enter the IP address from which the NXC begins allocating IP addresses. If you want to
assign a static IP address to a specific computer, use the Static DHCP Table.
If this field is blank, the Pool Size must also be blank. In this case, the NXC can assign
every IP address allowed by the interface’s IP address and subnet mask, except for the
first address (network address), last address (broadcast address) and the interface’s IP
address.
Pool Size
Enter the number of IP addresses to allocate. This number must be at least one and is
limited by the interface’s Subnet Mask. For example, if the Subnet Mask is
255.255.255.0 and IP Pool Start Address is 10.10.10.10, the NXC can allocate
10.10.10.10 to 10.10.10.254, or 245 IP addresses.
If this field is blank, the IP Pool Start Address must also be blank. In this case, the
NXC can assign every IP address allowed by the interface’s IP address and subnet
mask, except for the first address (network address), last address (broadcast address)
and the interface’s IP address.
First DNS
Server, Second
DNS Server,
Third DNS
Server
Specify the IP addresses up to three DNS servers for the DHCP clients to use. Use one
of the following ways to specify these IP addresses.
Custom Defined - enter a static IP address.
From ISP - select the DNS server that another interface received from its DHCP server.
EnterpriseWLAN - the DHCP clients use the IP address of this interface and the NXC
works as a DNS relay.
First WINS
Server, Second
WINS Server
Type the IP address of the WINS (Windows Internet Naming Service) server that you
want to send to the DHCP clients. The WINS server keeps a mapping table of the
computer names on your network and the IP addresses that they are currently using.
Default Router
If you set this interface to DHCP Server, you can either select gex IP (where x is the
interface number) to use the interface’s IP address or use another IP address as the
default router. This default router will become the DHCP clients’ default gateway.
To use another IP address as the default router, select Custom Defined and enter the
IP address.
Lease time
Specify how long each computer can use the information (especially the IP address)
before it has to request the information again. Choices are:
infinite - select this if IP addresses never expire.
days, hours, and minutes - select this to enter how long IP addresses are valid.
Extended
Options
Add
NXC Series User’s Guide
This table is available if you selected DHCP server.
Configure this table if you want to send more information to DHCP clients through DHCP
packets.
Click this to create an entry in this table. See Section 8.2.4 on page 120.
117
Chapter 8 Interfaces
Table 60 Configuration > Network > Interface > Ethernet > Edit (continued)
LABEL
DESCRIPTION
Edit
Select an entry in this table and click this to modify it.
Remove
Select an entry in this table and click this to delete it.
#
This field is a sequential value, and it is not associated with any entry.
Name
This is the name of the DHCP option.
Code
This is the code number of the DHCP option.
Type
This is the type of the set value for the DHCP option.
Value
This is the value set for the DHCP option.
Enable IP/MAC
Binding
Select this option to have this interface enforce links between specific IP addresses and
specific MAC addresses. This stops anyone else from manually using a bound IP address
on another device connected to this interface. Use this to make use only the intended
users get to use specific IP addresses.
Enable Logs for
IP/MAC Binding
Violation
Select this option to have the NXC generate a log if a device connected to this interface
attempts to use an IP address that is bound to another device’s MAC address.
Static DHCP
Table
Configure a list of static IP addresses the NXC assigns to computers connected to the
interface. Otherwise, the NXC assigns an IP address dynamically using the interface’s
IP Pool Start Address and Pool Size.
Add
Click this to create a new entry.
Edit
Select an entry and click this to be able to modify it.
Remove
Select an entry and click this to delete it.
#
This field is a sequential value, and it is not associated with a specific entry.
IP Address
Enter the IP address to assign to a device with this entry’s MAC address.
MAC
Enter the MAC address to which to assign this entry’s IP address.
Description
Enter a description to help identify this static DHCP entry. You can use alphanumeric
and ()+/:=?!*#@$_%- characters, and it can be up to 60 characters long.
MAC Address
Setting
These fields appear when you set the Interface Type to External or General.
Have the interface use either the factory assigned default MAC address, a manually
specified MAC address, or clone the MAC address of another device or computer.
Use Default MAC
Address
Select this option to have the interface use the factory assigned default MAC address.
By default, the NXC uses the factory assigned MAC address to identify itself.
Overwrite
Default MAC
Address
Select this option to have the interface use a different MAC address. Either enter the
MAC address in the fields or click Clone by host and enter the IP address of the device
or computer whose MAC you are cloning. Once it is successfully configured, the address
will be copied to the configuration file. It will not change unless you change the setting
or upload a different configuration file.
Related Setting
Configure Policy
Route
Click Policy Route to go to the policy route summary screen where you can manually
associate traffic with this interface.
You must manually configure a policy route to add routing and SNAT settings for an
interface with the Interface Type set to General. You can also configure a policy route
to override the default routing and SNAT behavior for an interface with the Interface
Type set to Internal or External.
118
OK
Click OK to save your changes back to the NXC.
Cancel
Click Cancel to exit this screen without saving.
NXC Series User’s Guide
Chapter 8 Interfaces
8.2.2 Object References
When a configuration screen includes an Object Reference icon, select a configuration object and
click Object Reference to open the Object References screen. This screen displays which
configuration settings reference the selected object. The fields shown vary with the type of object.
Figure 65 Object References
The following table describes labels that can appear in this screen.
Table 61 Object References
LABEL
DESCRIPTION
Object Name
This identifies the object for which the configuration settings that use it are displayed. Click
the object’s name to display the object’s configuration screen in the main window.
#
This field is a sequential value, and it is not associated with any entry.
Service
This is the type of setting that references the selected object. Click a service’s name to
display the service’s configuration screen in the main window.
Priority
If it is applicable, this field lists the referencing configuration item’s position in its list,
otherwise N/A displays.
Name
This field identifies the configuration item that references the object.
Description
If the referencing configuration item has a description configured, it displays here.
Refresh
Click this to update the information in this screen.
Cancel
Click Cancel to close the screen.
8.2.3 Add DHCPv6 Request Options
When you configure an interface as a DHCPv6 client, you can additionally add DHCPv6 request
options which have the NXC to add more information in the DHCPv6 packets. To open the screen,
click Configuration > Network > Interface > Ethernet > Edit, set DHCPv6 to Client in the
DHCPv6 Setting section, and then click Add in the DHCPv6 Request Options table.
Select a DHCPv6 request object in the Select one object field and click OK to save it. Click Cancel
to exit without saving the setting.
NXC Series User’s Guide
119
Chapter 8 Interfaces
Figure 66 Configuration > Network > Interface > Ethernet > Edit > Add DHCPv6 Request Options
8.2.4 Add/Edit DHCP Extended Options
When you configure an interface as a DHCPv4 server, you can additionally add DHCP extended
options which have the NXC to add more information in the DHCP packets. The available fields vary
depending on the DHCP option you select in this screen. To open the screen, click Configuration >
Network > Interface > Ethernet > Edit, select DHCP Server in the DHCP Setting section, and
then click Add or Edit in the Extended Options table.
Figure 67 Configuration > Network > Interface > Ethernet > Edit > Add/Edit Extended Options
The following table describes labels that can appear in this screen.
Table 62 Configuration > Network > Interface > Ethernet > Edit > Add/Edit Extended Options
120
LABEL
DESCRIPTION
Option
Select which DHCP option that you want to add in the DHCP packets sent through the
interface. See Table 63 on page 121 for more information.
Name
This field displays the name of the selected DHCP option. If you selected User Defined in
the Option field, enter a descriptive name to identify the DHCP option. You can enter up
to 16 characters (“a-z”, “A-Z, “0-9”, “-”, and “_”) with no spaces allowed. The first
character must be alphabetical (a-z, A-Z).
Code
This field displays the code number of the selected DHCP option. If you selected User
Defined in the Option field, enter a number for the option. This field is mandatory.
Type
This is the type of the selected DHCP option. If you selected User Defined in the Option
field, select an appropriate type for the value that you will enter in the next field. Only
advanced users should configure User Defined. Misconfiguration could result in interface
lockout.
NXC Series User’s Guide
Chapter 8 Interfaces
Table 62 Configuration > Network > Interface > Ethernet > Edit > Add/Edit Extended Options
LABEL
DESCRIPTION
Value
Enter the value for the selected DHCP option. For example, if you selected TFTP Server
Name (66) and the type is TEXT, enter the DNS domain name of a TFTP server here. This
field is mandatory.
First IP Address,
Second IP
Address, Third IP
Address
If you selected Time Server (4), NTP Server (42), SIP Server (120), CAPWAP AC
(138), or TFTP Server (150), you have to enter at least one IP address of the
corresponding servers in these fields. The servers should be listed in order of your
preference.
First Enterprise
ID, Second
Enterprise ID
If you selected VIVC (124) or VIVS (125), you have to enter at least one vendor’s 32bit enterprise number in these fields. An enterprise number is a unique number that
identifies a company.
First Class,
Second Class
If you selected VIVC (124), enter the details of the hardware configuration of the host on
which the client is running, or of industry consortium compliance.
First
Information,
Second
Information
If you selected VIVS (125), enter additional information for the corresponding enterprise
number in these fields.
OK
Click this to close this screen and update the settings to the previous Edit screen.
Cancel
Click Cancel to close the screen.
The following table lists the available DHCP extended options (defined in RFCs) on the NXC. See
RFCs for more information.
Table 63 DHCP Extended Options
OPTION NAME
CODE
DESCRIPTION
Time Offset
2
This option specifies the offset of the client's subnet in seconds from
Coordinated Universal Time (UTC).
Time Server
4
This option specifies a list of Time servers available to the client.
NTP Server
42
This option specifies a list of the NTP servers available to the client by IP
address.
TFTP Server Name
66
This option is used to identify a TFTP server when the “sname” field in the
DHCP header has been used for DHCP options. The minimum length of the
value is 1.
Bootfile
67
This option is used to identify a bootfile when the “file” field in the DHCP
header has been used for DHCP options. The minimum length of the value is
1.
SIP Server
120
This option carries either an IPv4 address or a DNS domain name to be used
by the SIP client to locate a SIP server.
VIVC
124
Vendor-Identifying Vendor Class option
A DHCP client may use this option to unambiguously identify the vendor that
manufactured the hardware on which the client is running, the software in
use, or an industry consortium to which the vendor belongs.
VIVS
125
Vendor-Identifying Vendor-Specific option
DHCP clients and servers may use this option to exchange vendor-specific
information.
NXC Series User’s Guide
121
Chapter 8 Interfaces
Table 63 DHCP Extended Options (continued)
OPTION NAME
CODE
DESCRIPTION
CAPWAP AC
138
CAPWAP Access Controller addresses option
The Control And Provisioning of Wireless Access Points Protocol allows a
Wireless Termination Point (WTP) to use DHCP to discover the Access
Controllers to which it is to connect. This option carries a list of IPv4 addresses
indicating one or more CAPWAP ACs available to the WTP.
TFTP Server
150
The option contains one or more IPv4 addresses that the client may use. The
current use of this option is for downloading configuration from a VoIP server
via TFTP; however, the option may be used for purposes other than contacting
a VoIP configuration server.
8.3 VLAN Interfaces
A Virtual Local Area Network (VLAN) divides a physical network into multiple logical networks. The
standard is defined in IEEE 802.1q.
Note: By default, the NXC acts a bridge device. This means all interfaces (ge1~g6) are
grouped together into a single VID, vlan0. Also note that vlan0 cannot be removed
and the VID cannot be changed.
Figure 68 Example: Before VLAN
A
B
C
In this example, there are two physical networks and three departments A, B, and C. The physical
networks are connected to hubs, and the hubs are connected to the router.
122
NXC Series User’s Guide
Chapter 8 Interfaces
Alternatively, you can divide the physical networks into three VLANs.
Figure 69 Example: After VLAN
A
B
Each VLAN is a separate network with separate IP addresses, subnet masks, and gateways. Each
VLAN also has a unique identification number (ID). The ID is a 12-bit value that is stored in the
MAC header. The VLANs are connected to switches, and the switches are connected to the router.
(If one switch has enough connections for the entire network, the network does not need switches
A and B.)
• Traffic inside each VLAN is layer-2 communication (data link layer, MAC addresses). It is handled
by the switches. As a result, the new switch is required to handle traffic inside VLAN 2. Traffic is
only broadcast inside each VLAN, not each physical network.
• Traffic between VLANs (or between a VLAN and another type of network) is layer-3
communication (network layer, IP addresses). It is handled by the router.
This approach provides a few advantages.
• Increased performance - In VLAN 2, the extra switch should route traffic inside the sales
department faster than the router does. In addition, broadcasts are limited to smaller, more
logical groups of users.
• Higher security - If each computer has a separate physical connection to the switch, then
broadcast traffic in each VLAN is never sent to computers in another VLAN.
• Better manageability - You can align network policies more appropriately for users. For example,
you can create different policy route rules for each VLAN (each department in the example
above), and you can set different bandwidth limits for each VLAN. These rules are also
independent of the physical network, so you can change the physical network without changing
policies.
In this example, the new switch handles the following types of traffic:
• Inside VLAN 2.
• Between the router and VLAN 1.
• Between the router and VLAN 2.
• Between the router and VLAN 3.
NXC Series User’s Guide
123
Chapter 8 Interfaces
8.3.1 VLAN Summary
This screen lists every VLAN interface. If you enabled IPv6 in the Configuration > System > IPv6
screen, you can also configure VLAN interfaces used for your IPv6 networks on this screen. To
access this screen, click Configuration > Network > Interface > VLAN.
Figure 70 Configuration > Network > Interface > VLAN
Each field is explained in the following table.
Table 64 Configuration > Network > Interface > VLAN
124
LABEL
DESCRIPTION
Configuration /
IPv6
Configuration
Use the Configuration section for IPv4 network settings. Use the IPv6 Configuration
section for IPv6 network settings if you connect your NXC to an IPv6 network. Both sections
have similar fields as described below.
Add
Click this to create a new VLAN.
Edit
Double-click an entry or select it and click Edit to open a screen where you can modify the
entry’s settings.
Remove
To remove an entry, select it and click Remove. The NXC confirms you want to remove it
before doing so.
Activate
To turn on an entry, select it and click Activate.
Inactivate
To turn off an entry, select it and click Inactivate.
Object
Reference
Select an entry and click Object Reference to open a screen that shows which settings use
the entry.
#
This field is a sequential value, and it is not associated with any interface.
Status
This icon is lit when the entry is active and dimmed when the entry is inactive.
Name
This field displays the name of the interface.
NXC Series User’s Guide
Chapter 8 Interfaces
Table 64 Configuration > Network > Interface > VLAN (continued)
LABEL
DESCRIPTION
IP Address
This field displays the current IP address of the interface. If the IP address is 0.0.0.0 (in the
IPv4 network) or :: (in the IPv6 network), the interface does not have an IP address yet.
In the IPv4 network, this screen also shows whether the IP address is a static IP address
(STATIC) or dynamically assigned (DHCP).
In the IPv6 network, this screen also shows whether the IP address is a static IP address
(STATIC), link-local IP address (LINK LOCAL), dynamically assigned (DHCP), or an IPv6
StateLess Address AutoConfiguration IP address (SLAAC). See Appendix E on page 436 for
more information about IPv6.
VID
This field displays the VLAN ID number.
Member
This field displays the Ethernet interface(s) that is a member of this VLAN.
Apply
Click Apply to save your changes back to the NXC.
Reset
Click Reset to return the screen to its last-saved settings.
8.3.2 Add/Edit VLAN
This screen lets you configure IP address assignment, interface bandwidth parameters, DHCP
settings, and connectivity check for each VLAN interface. To access this screen, click the Add icon
at the top of the Add column or click an Edit icon next to a VLAN interface in the VLAN Summary
screen. The following screen appears.
NXC Series User’s Guide
125
Chapter 8 Interfaces
Figure 71 Configuration > Network > Interface > VLAN > Add/Edit
126
NXC Series User’s Guide
Chapter 8 Interfaces
Each field is explained in the following table.
Table 65 Configuration > Network > Interface > VLAN > Add/Edit
LABEL
DESCRIPTION
IPv4/IPv6 View /
IPv4 View / IPv6
View
Use this button to display both IPv4 and IPv6, IPv4-only, or IPv6-only configuration
fields.
Show / Hide
Advanced Settings
Click this button to display a greater or lesser number of configuration fields.
Create New Object
Click this button to create a DHCPv6 request object that you may use for the DHCPv6
settings in this screen.
General Settings
Enable
Select this to turn this interface on. Clear this to disable this interface.
Interface Properties
Interface Name
This field is read-only if you are editing an existing VLAN interface. Enter the number of
the VLAN interface. You can use a number from 0~4094. For example, vlan0, vlan8,
and so on.
VID
Enter the VLAN ID. This 12-bit number uniquely identifies each VLAN. Allowed values
are 1 - 4094. (0 and 4095 are reserved.)
Zone
Select the zone to which the VLAN interface belongs.
Description
Enter a description of this interface. It is not used elsewhere. You can use alphanumeric
and ()+/:=?!*#@$_%- characters, and it can be up to 60 characters long.
Member
Configuration
Use these settings to assign interfaces to this VLAN as members.
Edit
Click this to edit the selected interface’s membership values.
#
This is sequential indicator of the interface number.
Port Name
This indicates the interface name.
Member
This indicates whether the selected interface is a member or not of the VLAN which is
currently being edited.
Click this field to edit the value.
Tx Tagging
This indicates whether the selected interface tags outbound traffic with this VLAN’s ID .
Click this field to edit the value.
IP Address
Assignment
Get
Automatically
Select this if this interface is a DHCP client. In this case, the DHCP server configures the
IP address, subnet mask, and gateway automatically.
Use Fixed IP
Address
Select this if you want to specify the IP address, subnet mask, and gateway manually.
IP Address
This field is enabled if you select Use Fixed IP Address.
Enter the IP address for this interface.
Subnet Mask
This field is enabled if you select Use Fixed IP Address.
Enter the subnet mask of this interface in dot decimal notation. The subnet mask
indicates what part of the IP address is the same for all computers in the network.
Gateway
This field is enabled if you select Use Fixed IP Address.
Enter the IP address of the gateway. The NXC sends packets to the gateway when it
does not know how to route the packet to its destination. The gateway should be on the
same network as the interface.
NXC Series User’s Guide
127
Chapter 8 Interfaces
Table 65 Configuration > Network > Interface > VLAN > Add/Edit (continued)
LABEL
Metric
IPv6 Address
Assignment
DESCRIPTION
Enter the priority of the gateway (if any) on this interface. The NXC decides which
gateway to use based on this priority. The lower the number, the higher the priority. If
two or more gateways have the same priority, the NXC uses the one that was
configured first.
These IP address fields configure an IPv6 address on the interface itself.
Enable Stateless
Address Autoconfiguration
(SLAAC)
Select this to enable IPv6 stateless auto-configuration on this interface. The interface
will generate an IPv6 address itself from a prefix obtained from an IPv6 router in the
network.
Link-Local
Address
This displays the IPv6 link-local address and the network prefix that the NXC generates
itself for the interface.
IPv6 Address/
Prefix Length
Enter the IPv6 address and the prefix length for this interface if you want to use a static
IP address. This field is optional.
The prefix length indicates what the left-most part of the IP address is the same for all
computers in the network, that is, the network address.
Gateway
Enter the IPv6 address of the default outgoing gateway using colon (:) hexadecimal
notation.
Metric
Enter the priority of the gateway (if any) on this interface. The NXC decides which
gateway to use based on this priority. The lower the number, the higher the priority. If
two or more gateways have the same priority, the NXC uses the one that was
configured first.
DHCPv6 Setting
DHCPv6
Select N/A to not use DHCPv6.
DUID
This field displays the DHCP Unique IDentifier (DUID) of the interface, which is unique
and used for identification purposes when the interface is exchanging DHCPv6
messages with others. See Appendix E on page 436 for more information.
DUID as MAC
Select this if you want the DUID to be generated from the interface’s default MAC
address.
Customized DUID
If you want to use a customized DUID, enter it here for the interface.
Enable Rapid
Commit
Select this to shorten the DHCPv6 message exchange process from four to two steps.
This function helps reduce heavy network traffic load.
Select Client to set this interface to act as a DHCPv6 client.
Note: Make sure you also enable this option in the DHCPv6 server to make rapid commit
work.
128
Request Address
Select this to get an IPv6 address for this interface from the DHCP server. Clear this to
not get any IP address information through DHCPv6.
DHCPv6 Request
Options
If this interface is a DHCPv6 client, use this section to configure DHCPv6 request
settings that determine what additional information to get from the DHCPv6 server.
Add
Click this to create an entry in this table. See Section 8.2.3 on page 119 for more
information.
Remove
Select an entry and click this to delete it from this table.
Object
Reference
Select an entry and click Object Reference to open a screen that shows which settings
use the entry. See Section 8.2.2 on page 119 for an example.
#
This field is a sequential value, and it is not associated with any entry.
Name
This field displays the name of the DHCPv6 request object.
Type
This field displays the type of the object.
Value
This field displays the IPv6 address that the NXC obtained from an uplink router.
NXC Series User’s Guide
Chapter 8 Interfaces
Table 65 Configuration > Network > Interface > VLAN > Add/Edit (continued)
LABEL
DESCRIPTION
Interface
Parameters
Egress
Bandwidth
Enter the maximum amount of traffic, in kilobits per second, the NXC can send through
the interface to the network. Allowed values are 0 - 1048576.
Ingress
Bandwidth
This is reserved for future use.
MTU
Maximum Transmission Unit. Type the maximum size of each data packet, in bytes, that
can move through this interface. If a larger packet arrives, the NXC divides it into
smaller fragments. Allowed values are 576 - 1500. Usually, this value is 1500.
Enter the maximum amount of traffic, in kilobits per second, the NXC can receive from
the network through the interface. Allowed values are 0 - 1048576.
DHCP Setting
DHCP
Select what type of DHCP service the NXC provides to the network. Choices are:
None - the NXC does not provide any DHCP services. There is already a DHCP server
on the network.
DHCP Relay - the NXC routes DHCP requests to one or more DHCP servers you specify.
The DHCP server(s) may be on another network.
DHCP Server - the NXC assigns IP addresses and provides subnet mask, gateway, and
DNS server information to the network. The NXC is the DHCP server for the network.
These fields appear if the NXC is a DHCP Relay.
Relay Server 1
Relay Server 2
Enter the IP address of a DHCP server for the network.
This field is optional. Enter the IP address of another DHCP server for the network.
These fields appear if the NXC is a DHCP Server.
IP Pool Start
Address
Enter the IP address from which the NXC begins allocating IP addresses. If you want to
assign a static IP address to a specific computer, click Add Static DHCP.
If this field is blank, the Pool Size must also be blank. In this case, the NXC can assign
every IP address allowed by the interface’s IP address and subnet mask, except for the
first address (network address), last address (broadcast address) and the interface’s IP
address.
Pool Size
Enter the number of IP addresses to allocate. This number must be at least one and is
limited by the interface’s Subnet Mask. For example, if the Subnet Mask is
255.255.255.0 and IP Pool Start Address is 10.10.10.10, the NXC can allocate
10.10.10.10 to 10.10.10.254, or 245 IP addresses.
If this field is blank, the IP Pool Start Address must also be blank. In this case, the
NXC can assign every IP address allowed by the interface’s IP address and subnet
mask, except for the first address (network address), last address (broadcast address)
and the interface’s IP address.
First DNS Server
Second DNS
Server
Third DNS
Server
Specify the IP addresses up to three DNS servers for the DHCP clients to use. Use one
of the following ways to specify these IP addresses.
Custom Defined - enter a static IP address.
From ISP - select the DNS server that another interface received from its DHCP server.
EnterpriseWLAN - the DHCP clients use the IP address of this interface and the NXC
works as a DNS relay.
First WINS
Server, Second
WINS Server
NXC Series User’s Guide
Type the IP address of the WINS (Windows Internet Naming Service) server that you
want to send to the DHCP clients. The WINS server keeps a mapping table of the
computer names on your network and the IP addresses that they are currently using.
129
Chapter 8 Interfaces
Table 65 Configuration > Network > Interface > VLAN > Add/Edit (continued)
LABEL
Lease time
DESCRIPTION
Specify how long each computer can use the information (especially the IP address)
before it has to request the information again. Choices are:
infinite - select this if IP addresses never expire
days, hours, and minutes - select this to enter how long IP addresses are valid.
Enable IP/MAC
Binding
Select this option to have the NXC enforce links between specific IP addresses and
specific MAC addresses for this VLAN. This stops anyone else from manually using a
bound IP address on another device connected to this interface. Use this to make use
only the intended users get to use specific IP addresses.
Enable Logs for
IP/MAC Binding
Violation
Select this option to have the NXC generate a log if a device connected to this VLAN
attempts to use an IP address that is bound to another device’s MAC address.
Static DHCP
Table
Configure a list of static IP addresses the NXC assigns to computers connected to the
interface. Otherwise, the NXC assigns an IP address dynamically using the interface’s
IP Pool Start Address and Pool Size.
Add
Click this to create a new entry.
Edit
Select an entry and click this to be able to modify it.
Remove
Select an entry and click this to delete it.
#
This field is a sequential value, and it is not associated with a specific entry.
IP Address
Enter the IP address to assign to a device with this entry’s MAC address.
MAC Address
Enter the MAC address to which to assign this entry’s IP address.
Description
Enter a description to help identify this static DHCP entry. You can use alphanumeric
and ()+/:=?!*#@$_%- characters, and it can be up to 60 characters long.
Connectivity Check
The NXC can regularly check the connection to the gateway you specified to make sure
it is still available. You specify how often to check the connection, how long to wait for a
response before the attempt is a failure, and how many consecutive failures are
required before the NXC stops routing to the gateway. The NXC resumes routing to the
gateway the first time the gateway passes the connectivity check.
Enable
Connectivity
Check
Select this to turn on the connection check.
Check Method
Select the method that the gateway allows.
Select icmp to have the NXC regularly ping the gateway you specify to make sure it is
still available.
Select tcp to have the NXC regularly perform a TCP handshake with the gateway you
specify to make sure it is still available.
Check Period
Enter the number of seconds between connection check attempts.
Check Timeout
Enter the number of seconds to wait for a response before the attempt is a failure.
Check Fail
Tolerance
Enter the number of consecutive failures before the NXC stops routing through the
gateway.
Check Default
Gateway
Select this to use the default gateway for the connectivity check.
Check this
address
Select this to specify a domain name or IP address for the connectivity check. Enter
that domain name or IP address in the field next to it.
Check Port
This field only displays when you set the Check Method to tcp. Specify the port
number to use for a TCP connectivity check.
Related Setting
Configure Policy
Route
130
Click Policy Route to go to the screen where you can manually configure a policy route
to associate traffic with this VLAN.
NXC Series User’s Guide
Chapter 8 Interfaces
Table 65 Configuration > Network > Interface > VLAN > Add/Edit (continued)
LABEL
DESCRIPTION
OK
Click OK to save your changes back to the NXC.
Cancel
Click Cancel to exit this screen without saving.
8.4 Technical Reference
The following section contains additional technical information about the features described in this
chapter.
IP Address Assignment
Most interfaces have an IP address and a subnet mask. This information is used to create an entry
in the routing table.
In most interfaces, you can enter the IP address and subnet mask manually.
In many interfaces, you can also let the IP address and subnet mask be assigned by an external
DHCP server on the network. In this case, the interface is a DHCP client.
In general, the IP address and subnet mask of each interface should not overlap, though it is
possible for this to happen with DHCP clients.
In the example above, if the NXC gets a packet with a destination address of 5.5.5.5, it might not
find any entries in the routing table. In this case, the packet is dropped. However, if there is a
default router to which the NXC should send this packet, you can specify it as a gateway in one of
the interfaces. For example, if there is a default router at 200.200.200.100, you can create a
gateway at 200.200.200.100 on ge2. In this case, the NXC creates the following entry in the
routing table.
Table 66 Example: Routing Table Entry for a Gateway
IP ADDRESS(ES)
DESTINATION
0.0.0.0/0
200.200.200.100
The gateway is an optional setting for each interface. If there is more than one gateway, the NXC
uses the gateway with the lowest metric, or cost. If two or more gateways have the same metric,
the NXC uses the one that was set up first (the first entry in the routing table).
If the interface gets its IP address and subnet mask from a DHCP server, the DHCP server also
specifies the gateway, if any.
Interface Parameters
The NXC restricts the amount of traffic into and out of the NXC through each interface.
• Egress bandwidth sets the amount of traffic the NXC sends out through the interface to the
network.
• Ingress bandwidth sets the amount of traffic the NXC allows in through the interface from the
network.1
NXC Series User’s Guide
131
Chapter 8 Interfaces
If you set the bandwidth restrictions very high, you effectively remove the restrictions.
The NXC also restricts the size of each data packet. The maximum number of bytes in each packet
is called the maximum transmission unit (MTU). If a packet is larger than the MTU, the NXC divides
it into smaller fragments. Each fragment is sent separately, and the original packet is re-assembled
later. The smaller the MTU, the more fragments sent, and the more work required to re-assemble
packets correctly. On the other hand, some communication channels, such as Ethernet over ATM,
might not be able to handle large data packets.
DHCP Settings
Dynamic Host Configuration Protocol (DHCP, RFC 2131, RFC 2132) provides a way to automatically
set up and maintain IP addresses, subnet masks, gateways, and some network information (such
as the IP addresses of DNS servers) on computers in the network. This reduces the amount of
manual configuration you have to do and usually uses available IP addresses more efficiently.
In DHCP, every network has at least one DHCP server. When a computer (a DHCP client) joins the
network, it submits a DHCP request. The DHCP servers get the request; assign an IP address; and
provide the IP address, subnet mask, gateway, and available network information to the DHCP
client. When the DHCP client leaves the network, the DHCP servers can assign its IP address to
another DHCP client.
In the NXC, some interfaces can provide DHCP services to the network. In this case, the interface
can be a DHCP relay or a DHCP server.
As a DHCP relay, the interface routes DHCP requests to DHCP servers on different networks. You
can specify more than one DHCP server. If you do, the interface routes DHCP requests to all of
them. It is possible for an interface to be a DHCP relay and a DHCP client simultaneously.
As a DHCP server, the interface provides the following information to DHCP clients.
• IP address - If the DHCP client’s MAC address is in the NXC’s static DHCP table, the interface
assigns the corresponding IP address. If not, the interface assigns IP addresses from a pool,
defined by the starting address of the pool and the pool size.
Table 67 Example: Assigning IP Addresses from a Pool
START IP ADDRESS
POOL SIZE
RANGE OF ASSIGNED IP ADDRESS
50.50.50.33
5
50.50.50.33 - 50.50.50.37
75.75.75.1
200
75.75.75.1 - 75.75.75.200
99.99.1.1
1023
99.99.1.1 - 99.99.4.255
120.120.120.100
100
120.120.120.100 - 120.120.120.199
The NXC cannot assign the first address (network address) or the last address (broadcast
address) in the subnet defined by the interface’s IP address and subnet mask. For example, in
the first entry, if the subnet mask is 255.255.255.0, the NXC cannot assign 50.50.50.0 or
50.50.50.255. If the subnet mask is 255.255.0.0, the NXC cannot assign 50.50.0.0 or
50.50.255.255. Otherwise, it can assign every IP address in the range, except the interface’s IP
address.
If you do not specify the starting address or the pool size, the interface the maximum range of IP
addresses allowed by the interface’s IP address and subnet mask. For example, if the interface’s
IP address is 9.9.9.1 and subnet mask is 255.255.255.0, the starting IP address in the pool is
9.9.9.2, and the pool size is 253.
1.
132
At the time of writing, the NXC does not support ingress bandwidth management.
NXC Series User’s Guide
Chapter 8 Interfaces
• Subnet mask - The interface provides the same subnet mask you specify for the interface.
• Gateway - The interface provides the same gateway you specify for the interface.
• DNS servers - The interface provides IP addresses for up to three DNS servers that provide DNS
services for DHCP clients. You can specify each IP address manually (for example, a company’s
own DNS server), or you can refer to DNS servers that other interfaces received from DHCP
servers (for example, a DNS server at an ISP). These other interfaces have to be DHCP clients.
It is not possible for an interface to be the DHCP server and a DHCP client simultaneously.
WINS
WINS (Windows Internet Naming Service) is a Windows implementation of NetBIOS Name Server
(NBNS) on Windows. It keeps track of NetBIOS computer names. It stores a mapping table of your
network’s computer names and IP addresses. The table is dynamically updated for IP addresses
assigned by DHCP. This helps reduce broadcast traffic since computers can query the server instead
of broadcasting a request for a computer name’s IP address. In this way WINS is similar to DNS,
although WINS does not use a hierarchy (unlike DNS). A network can have more than one WINS
server. Samba can also serve as a WINS server.
NXC Series User’s Guide
133
C HAPT ER
9
Policy and Static Routes
9.1 Overview
Use policy routes and static routes to override the NXC’s default routing behavior in order to send
packets through the appropriate interface.
9.1.1 What You Can Do in this Chapter
• The Policy Route screens (Section 9.2 on page 135) list and configure policy routes.
• The Static Route screens (Section 9.3 on page 140) list and configure static routes.
9.1.2 What You Need to Know
The following terms and concepts may help as you read this chapter.
Policy Routing
Traditionally, routing is based on the destination address only and the NXC takes the shortest path
to forward a packet. IP Policy Routing (IPPR) provides a mechanism to override the default routing
behavior and alter the packet forwarding based on the policy defined by the network administrator.
Policy-based routing is applied to incoming packets on a per interface basis, prior to the normal
routing.
How You Can Use Policy Routing
• Source-Based Routing – Network administrators can use policy-based routing to direct traffic
from different users through different connections.
• Cost Savings – IPPR allows organizations to distribute interactive traffic on high-bandwidth, highcost paths while using low-cost paths for batch traffic.
• Load Sharing – Network administrators can use IPPR to distribute traffic among multiple paths.
Static Routes
The NXC usually uses the default gateway to route outbound traffic from computers on the LAN to
the Internet. To have the NXC send data to devices not reachable through the default gateway, use
static routes.
Policy Routes Versus Static Routes
• Policy routes are more flexible than static routes. You can select more criteria for the traffic to
match and can also use schedules and NAT.
NXC Series User’s Guide
134
Chapter 9 Policy and Static Routes
• Policy routes are only used within the NXC itself. Static routes can be propagated to other
routers.
• Policy routes take priority over static routes. If you need to use a routing policy on the NXC and
propagate it to other routers, you could configure a policy route and an equivalent static route.
DiffServ
QoS is used to prioritize source-to-destination traffic flows. All packets in the same flow are given
the same priority. CoS (class of service) is a way of managing traffic in a network by grouping
similar types of traffic together and treating each type as a class. You can use CoS to give different
priorities to different packet types.
DiffServ (Differentiated Services) is a class of service (CoS) model that marks packets so that they
receive specific per-hop treatment at DiffServ-compliant network devices along the route based on
the application types and traffic flow. Packets are marked with DiffServ Code Points (DSCPs)
indicating the level of service desired. This allows the intermediary DiffServ-compliant network
devices to handle the packets differently depending on the code points without the need to
negotiate paths or remember state information for every flow. In addition, applications do not have
to request a particular service or give advanced notice of where the traffic is going.
DSCP Marking and Per-Hop Behavior
DiffServ defines a new DS (Differentiated Services) field to replace the Type of Service (TOS) field
in the IP header. The DS field contains a 2-bit unused field and a 6-bit DSCP field which can define
up to 64 service levels. The following figure illustrates the DS field.
DSCP (6 bits)
Unused (2 bits)
DSCP is backward compatible with the three precedence bits in the ToS octet so that non-DiffServ
compliant, ToS-enabled network device will not conflict with the DSCP mapping.
The DSCP value determines the forwarding behavior, the PHB (Per-Hop Behavior), that each packet
gets across the DiffServ network. Based on the marking rule, different kinds of traffic can be
marked for different kinds of forwarding. Resources can then be allocated according to the DSCP
values and the configured policies.
9.2 Policy Route
Click Configuration > Network > Routing to open this screen. Use this screen to see the
configured policy routes and turn policy routing based bandwidth management on or off.
A policy route defines the matching criteria and the action to take when a packet meets the criteria.
The action is taken only when all the criteria are met. The criteria can include the user name,
source address and incoming interface, destination address, schedule, IP protocol (ICMP, UDP, TCP,
etc.) and port.
The actions that can be taken include:
• Routing the packet to a different gateway or outgoing interface.
• Limiting the amount of bandwidth available and setting a priority for traffic.
NXC Series User’s Guide
135
Chapter 9 Policy and Static Routes
IPPR follows the existing packet filtering facility of RAS in style and in implementation.
Figure 72 Configuration > Network > Routing > Policy Route
The following table describes the labels in this screen.
Table 68 Configuration > Network > Routing > Policy Route
LABEL
DESCRIPTION
Show / Hide
Advanced
Settings
Click this button to display a greater or lesser number of configuration fields.
Use Policy
Route to
Override Direct
Route
Select this to have the NXC forward packets that match a policy route according to the
policy route instead of sending the packets directly to a connected network.
Add
Click this to create a new entry. Select an entry and click Add to create a new entry after
the selected entry.
Edit
Double-click an entry or select it and click Edit to open a screen where you can modify the
entry’s settings.
Remove
To remove an entry, select it and click Remove. The NXC confirms you want to remove it
before doing so.
Activate
To turn on an entry, select it and click Activate.
Inactivate
To turn off an entry, select it and click Inactivate.
Move
To change a rule’s position in the numbered list, select the rule and click Move to display a
field to type a number for where you want to put that rule and press [ENTER] to move the
rule to the number that you typed.
The ordering of your rules is important as they are applied in order of their numbering.
136
#
This is the number of an individual policy route.
Status
This icon is lit when the entry is active and dimmed when the entry is inactive.
User
This is the name of the user (group) object from which the packets are sent. any means all
users.
Schedule
This is the name of the schedule object. none means the route is active at all times if
enabled.
Incoming
This is the interface on which the packets are received.
Source
This is the name of the source IP address (group) object. any means all IP addresses.
Destination
This is the name of the destination IP address (group) object. any means all IP addresses.
NXC Series User’s Guide
Chapter 9 Policy and Static Routes
Table 68 Configuration > Network > Routing > Policy Route (continued)
LABEL
DESCRIPTION
DSCP Code
This is the DSCP value of incoming packets to which this policy route applies.
any means all DSCP values or no DSCP marker.
default means traffic with a DSCP value of 0. This is usually best effort traffic
The “af” entries stand for Assured Forwarding. The number following the “af” identifies one
of four classes and one of three drop preferences.
The “wmm” entries are for QoS. For more information on QoS and WMM categories, see
page 143.
Service
This is the name of the service object. any means all services.
Source Port
This is the name of a service object. The NXC applies the policy route to the packets sent
from the corresponding service port. any means all service ports.
Next-Hop
This is the next hop to which packets are directed. It helps forward packets to their
destinations and can be a router or outgoing interface.
DSCP Marking
This is how the NXC handles the DSCP value of the outgoing packets that match this route.
If this field displays a DSCP value, the NXC applies that DSCP value to the route’s outgoing
packets.
preserve means the NXC does not modify the DSCP value of the route’s outgoing packets.
default means the NXC sets the DSCP value of the route’s outgoing packets to 0.
The “af” choices stand for Assured Forwarding. The number following the “af” identifies one
of four classes and one of three drop preferences.
The “wmm” entries are for QoS. For more information on QoS and WMM categories, see
page 143.
SNAT
This is the source IP address that the route uses.
It displays none if the NXC does not perform NAT for this route.
Apply
Click Apply to save your changes back to the NXC.
Reset
Click Reset to return the screen to its last-saved settings.
NXC Series User’s Guide
137
Chapter 9 Policy and Static Routes
9.2.1 Add/Edit Policy Route
Click Configuration > Network > Routing to open the Policy Route screen. Then click the Add
or Edit icon to open the Policy Route Edit screen. Use this screen to configure or edit a policy
route.
Figure 73 Configuration > Network > Routing > Policy Route > Add/Edit
The following table describes the labels in this screen.
Table 69 Configuration > Network > Routing > Policy Route > Add/Edit
LABEL
DESCRIPTION
Show / Hide
Advanced
Settings
Click this button to display a greater or lesser number of configuration fields.
Create new
Object
Use this to configure any new settings objects that you need to use in this screen.
Configuration
Enable
Select this to activate the policy.
Description
Enter a descriptive name of up to 60 printable ASCII characters for the policy.
Criteria
User
138
Select a user name or user group from which the packets are sent.
NXC Series User’s Guide
Chapter 9 Policy and Static Routes
Table 69 Configuration > Network > Routing > Policy Route > Add/Edit (continued)
LABEL
DESCRIPTION
Incoming
Select where the packets are coming from; any, an interface, or the NXC itself
(EnterpriseWLAN). For an interface, you also need to select the individual interface.
Please select one
member
This field displays only when you set Incoming to Interface. Select an interface from
which the packets are sent.
Source Address
Select a source IP address object from which the packets are sent.
Destination
Address
Select a destination IP address object to which the traffic is being sent.
DSCP Code
Select a DSCP code point value of incoming packets to which this policy route applies or
select User Defined to specify another DSCP code point. The lower the number the higher
the priority with the exception of 0 which is usually given only best-effort treatment.
any means all DSCP value or no DSCP marker.
default means traffic with a DSCP value of 0. This is usually best effort traffic
The “af” choices stand for Assured Forwarding. The number following the “af” identifies
one of four classes and one of three drop preferences.
The “wmm” entries are for QoS. For more information on QoS and WMM categories, see
page 143.
User-Defined
DSCP Code
Use this field to specify a custom DSCP code point.
Schedule
Select a schedule to control when the policy route is active. none means the route is
active at all times if enabled.
Service
Select a service or service group to identify the type of traffic to which this policy route
applies.
Source Port
Select a service or service group to identify the source port of packets to which the policy
route applies.
Next-Hop
Type
Select Auto to have the NXC use the routing table to find a next-hop and forward the
matched packets automatically.
Select Gateway to route the matched packets to the next-hop router or switch you
specified in the Gateway field. You have to set up the next-hop router or switch as a
HOST address object first.
Select Interface to route the matched packets through the specified outgoing interface to
a gateway (which is connected to the interface).
Gateway
This field displays when you select Gateway in the Type field. Select a HOST address
object. The gateway is an immediate neighbor of your NXC that will forward the packet to
the destination. The gateway must be a router or switch on the same segment as your
NXC's interface(s).
Interface
This field displays when you select Interface in the Type field. Select an interface to have
the NXC send traffic that matches the policy route through the specified interface.
Auto-Disable
This field displays when you select Interface in the Type field. Select this to have the
NXC automatically disable this policy route when the next-hop’s connection is down.
DSCP Marking
NXC Series User’s Guide
139
Chapter 9 Policy and Static Routes
Table 69 Configuration > Network > Routing > Policy Route > Add/Edit (continued)
LABEL
DESCRIPTION
DSCP Marking
Set how the NXC handles the DSCP value of the outgoing packets that match this route.
Select one of the pre-defined DSCP values to apply or select User Defined to specify
another DSCP value. The “af” choices stand for Assured Forwarding. The number following
the “af” identifies one of four classes and one of three drop preferences. Select preserve
to have the NXC keep the packets’ original DSCP value.
Select default to have the NXC set the DSCP value of the packets to 0.
The “wmm” entries are for QoS. For more information on QoS and WMM categories, see
page 143.
User-Defined
DSCP Code
Use this field to specify a custom DSCP value.
Address
Translation
Use this section to configure NAT for the policy route.
Source Network
Address
Translation
Select none to not use NAT for the route.
Select outgoing-interface to use the IP address of the outgoing interface as the source
IP address of the packets that matches this route. If you select outgoing-interface, you
can also configure port trigger settings for this interface.
Otherwise, select a pre-defined address (group) to use as the source IP address(es) of the
packets that match this route.
Use Create new Object if you need to configure a new address (group) to use as the
source IP address(es) of the packets that match this route.
OK
Click OK to save your changes back to the NXC.
Cancel
Click Cancel to exit this screen without saving.
9.3 Static Route
Click Configuration > Network > Routing > Static Route to open the Static Route screen.
This screen displays the configured static routes.
Figure 74 Configuration > Network > Routing > Static Route
The following table describes the labels in this screen.
Table 70 Configuration > Network > Routing > Static Route
140
LABEL
DESCRIPTION
Add
Click this to create a new static route.
Edit
Double-click an entry or select it and click Edit to open a screen where you can modify the
entry’s settings.
Remove
To remove an entry, select it and click Remove. The NXC confirms you want to remove it
before doing so.
NXC Series User’s Guide
Chapter 9 Policy and Static Routes
Table 70 Configuration > Network > Routing > Static Route (continued)
LABEL
DESCRIPTION
#
This is the number of an individual static route.
Destination
This is the destination IP address.
Subnet Mask
This is the IP subnet mask.
Next-Hop
This is the IP address of the next-hop gateway or the interface through which the traffic is
routed. The gateway is a router or switch on the same segment as your NXC's
interface(s). The gateway helps forward packets to their destinations.
Metric
This is the route’s priority among the NXC’s routes. The smaller the number, the higher
priority the route has.
9.3.1 Static Route Setting
Select a static route index number and click Add or Edit. The screen shown next appears. Use this
screen to configure the required information for a static route.
Figure 75 Configuration > Network > Routing > Static Route > Add/Edit
The following table describes the labels in this screen.
Table 71 Configuration > Network > Routing > Static Route > Add/Edit
LABEL
DESCRIPTION
Destination IP
This parameter specifies the IP network address of the final destination. Routing is always
based on network number. If you need to specify a route to a single host, use a subnet
mask of 255.255.255.255 in the subnet mask field to force the network number to be
identical to the host ID.
Subnet Mask
Enter the IP subnet mask here.
Gateway IP
Select the radio button and enter the IP address of the next-hop gateway. The gateway is a
router or switch on the same segment as your NXC's interface(s). The gateway helps
forward packets to their destinations.
Interface
Select the radio button and a predefined interface through which the traffic is sent.
Metric
Metric represents the “cost” of transmission for routing purposes. IP routing uses hop count
as the measurement of cost, with a minimum of 1 for directly connected networks. Enter a
number that approximates the cost for this link. The number need not be precise, but it
must be 0~127. In practice, 2 or 3 is usually a good number.
OK
Click OK to save your changes back to the NXC.
Cancel
Click Cancel to exit this screen without saving.
NXC Series User’s Guide
141
Chapter 9 Policy and Static Routes
9.4 Technical Reference
The following section contains additional technical information about the features described in this
chapter.
NAT and SNAT
NAT (Network Address Translation - NAT, RFC 1631) is the translation of the IP address in a packet
in one network to a different IP address in another network. Use SNAT (Source NAT) to change the
source IP address in one network to a different IP address in another network.
Assured Forwarding (AF) PHB for DiffServ
Assured Forwarding (AF) behavior is defined in RFC 2597. The AF behavior group defines four AF
classes. Inside each class, packets are given a high, medium or low drop precedence. The drop
precedence determines the probability that routers in the network will drop packets when
congestion occurs. If congestion occurs between classes, the traffic in the higher class (smaller
numbered class) is generally given priority. Combining the classes and drop precedence produces
the following twelve DSCP encodings from AF11 through AF43. The decimal equivalent is listed in
brackets.
Table 72 Assured Forwarding (AF) Behavior Group
142
Class 1
Class 2
Class 3
Class 4
Low Drop Precedence
AF11 (10)
AF21 (18)
AF31 (26)
AF41 (34)
Medium Drop Precedence
AF12 (12)
AF22 (20)
AF32 (28)
AF42 (36)
High Drop Precedence
AF13 (14)
AF23 (22)
AF33 (30)
AF43 (38)
NXC Series User’s Guide
Chapter 9 Policy and Static Routes
WMM
Wi-Fi Multimedia (WMM) provides basic Quality of Service (QoS) features to wireless networks. The
four categories of QoS described by WMM are: voice (VO), video (VI), best effort (BE), and
background (BK). These categories, known as a “access categories” (AC), are mapped to 802.1D
priority values which can then be mapped to their corresponding DSCP hex values.
Table 73 WMM to DiffServ Conversion on the NXC
Priority
WMM AC
802.1D Priority
DSCP Hex Value
Lowest
BK
1
0x08
BK
2
0x10
BE
0
0x00
BE
3
0x18
VI
4
0x20
VI
5
0x28
VO
6
0x30
VO
7
0x38
Highest
The WMM ACs as implemented on the NXC have the following functions:
VOICE: All wireless traffic to the SSID is tagged as voice data. This is recommended if an SSID is
used for activities like placing and receiving VoIP phone calls.
VIDEO: All wireless traffic to the SSID is tagged as video data. This is recommended for activities
like video conferencing.
BEST EFFORT: All wireless traffic to the SSID is tagged as “best effort,” meaning the data travels
the best route it can without displacing higher priority traffic. This is good for activities that do not
require the best bandwidth throughput, such as surfing the Internet.
BACKGROUND: All wireless traffic to the SSID is tagged as low priority or “background traffic”,
meaning all other access categories take precedence over this one. If traffic from an SSID does not
have strict throughput requirements, then this access category is recommended. For example, an
SSID that only has network printers connected to it.
NXC Series User’s Guide
143
C HAPTER
10
Zones
10.1 Overview
Set up zones to configure network security and network policies in the NXC. A zone is a group of
interfaces. The NXC uses zones instead of interfaces in many security and policy settings, such as
firewall rules. Zones cannot overlap. Each interface can be assigned to just one zone.
10.1.1 What You Can Do in this Chapter
The Zone screens (see Section 10.2 on page 145) manage the NXC’s zones.
10.1.2 What You Need to Know
The following terms and concepts may help as you read this chapter.
Effects of Zones on Different Types of Traffic
Zones effectively divide traffic into three types--intra-zone traffic, inter-zone traffic, and extra-zone
traffic--which are affected differently by zone-based security and policy settings.
Intra-zone Traffic
• Intra-zone traffic is traffic between interfaces in the same zone.
• In each zone, you can either allow or prohibit all intra-zone traffic.
• You can also set up firewall rules to control intra-zone traffic, but many other types of zone-based
security and policy settings do not affect intra-zone traffic.
Inter-zone Traffic
Inter-zone traffic is traffic between interfaces in different zones.
Extra-zone Traffic
• Extra-zone traffic is traffic to or from any interface that is not assigned to a zone.
• Some zone-based security and policy settings may apply to extra-zone traffic, especially if you
can set the zone attribute in them to Any or All. See the specific feature for more information.
NXC Series User’s Guide
144
Chapter 10 Zones
10.2 Zone
The Zone screen provides a summary of all zones. In addition, this screen allows you to add, edit,
and remove zones. To access this screen, click Configuration > Network > Zone.
Figure 76 Configuration > Network > Zone
The following table describes the labels in this screen.
Table 74 Configuration > Network > Zone
LABEL
DESCRIPTION
Add
Click this to create a new, user-configured zone.
Edit
Double-click an entry or select it and click Edit to open a screen where you can modify
the entry’s settings.
Remove
To remove a user-configured zone, select it and click Remove. The NXC confirms you
want to remove it before doing so.
Object Reference
Select an entry and click Object Reference to open a screen that shows which settings
use the entry.
#
This field is a sequential value, and it is not associated with any interface.
Name
This field displays the name of the zone.
Block Intra-zone
This field indicates whether or not the NXC blocks network traffic between members in
the zone.
Member
This field displays the names of the interfaces that belong to each zone.
NXC Series User’s Guide
145
Chapter 10 Zones
10.2.1 Add/Edit Zone
This screen allows you to add or edit a zone. To access this screen, go to the Zone screen, and click
the Add icon or an Edit icon.
Figure 77 Network > Zone > Add/Edit
The following table describes the labels in this screen.
Table 75 Network > Zone > Add/Edit
LABEL
DESCRIPTION
Name
Type the name used to refer to the zone. You may use 1-31 alphanumeric characters,
underscores(_), or dashes (-), but the first character cannot be a number. This value is
case-sensitive.
Block Intra-zone
Traffic
Select this check box to block network traffic between members in the zone.
Member List
Available lists the interfaces that do not belong to any zone. Select the interfaces that
you want to add to the zone you are editing, and click the right arrow button to add
them.
Member lists the interfaces that belong to the zone. Select any interfaces that you want
to remove from the zone, and click the left arrow button to remove them.
146
OK
Click OK to save your customized settings and exit this screen.
Cancel
Click Cancel to exit this screen without saving.
NXC Series User’s Guide
C HAPTER
11
NAT
11.1 Overview
NAT (Network Address Translation - NAT, RFC 1631) is the translation of the IP address of a host in
a packet. For example, the source address of an outgoing packet, used within one network is
changed to a different IP address known within another network. Use Network Address Translation
(NAT) to make computers on a private network behind the NXC available outside the private
network. If the NXC has only one public IP address, you can make the computers in the private
network available by using ports to forward packets to the appropriate private IP address.
Suppose you want to assign ports 21-25 to one FTP, Telnet and SMTP server (A in the example),
port 80 to another (B in the example) and assign a default server IP address of 192.168.1.35 to a
third (C in the example). You assign the LAN IP addresses and the ISP assigns the WAN IP address.
The NAT network appears as a single host on the Internet.
Figure 78 Multiple Servers Behind NAT Example
11.1.1 What You Can Do in this Chapter
The NAT screens (see Section 11.2 on page 147) display and manage the list of NAT rules and see
their configuration details. You can also create new NAT rules and edit or delete existing ones.
11.2 NAT Summary
The NAT summary screen provides a summary of all NAT rules and their configuration. In addition,
this screen allows you to create new NAT rules and edit and delete existing NAT rules. To access this
NXC Series User’s Guide
147
Chapter 11 NAT
screen, login to the Web Configurator and click Configuration > Network > NAT. The following
screen appears, providing a summary of the existing NAT rules.
Figure 79 Configuration > Network > NAT
The following table describes the labels in this screen.
Table 76 Configuration > Network > NAT
148
LABEL
DESCRIPTION
Add
Click this to create a new entry.
Edit
Double-click an entry or select it and click Edit to open a screen where you can modify
the entry’s settings.
Remove
To remove an entry, select it and click Remove. The NXC confirms you want to remove it
before doing so.
Activate
To turn on an entry, select it and click Activate.
Inactivate
To turn off an entry, select it and click Inactivate.
#
This field is a sequential value, and it is not associated with a specific entry.
Status
This icon is lit when the entry is active and dimmed when the entry is inactive.
Name
This field displays the name of the entry.
Mapping Type
This field displays what kind of NAT this entry performs: Virtual Server, 1:1 NAT, or
Many 1:1 NAT.
Interface
This field displays the interface on which packets for the NAT entry are received.
Original IP
This field displays the original destination IP address (or address object) of traffic that
matches this NAT entry. It displays any if there is no restriction on the original
destination IP address.
Mapped IP
This field displays the new destination IP address for the packet.
Protocol
This field displays the service used by the packets for this NAT entry. It displays any if
there is no restriction on the services.
Original Port
This field displays the original destination port(s) of packets for the NAT entry. This field
is blank if there is no restriction on the original destination port.
Mapped Port
This field displays the new destination port(s) for the packet. This field is blank if there is
no restriction on the original destination port.
Apply
Click this button to save your changes to the NXC.
Reset
Click this button to return the screen to its last-saved settings.
NXC Series User’s Guide
Chapter 11 NAT
11.2.1 Add/Edit NAT
This screen lets you create new NAT rules and edit existing ones. To open this window, open the
NAT summary screen. Then, click on an Add icon or Edit icon to open the following screen.
Figure 80 Configuration > Network > NAT > Add/Edit
The following table describes the labels in this screen.
Table 77 Configuration > Network > NAT > Add/Edit
LABEL
DESCRIPTION
Create new
Object
Use to configure any new settings objects that you need to use in this screen.
Enable Rule
Use this option to turn the NAT rule on or off.
Rule Name
Type in the name of the NAT rule. The name is used to refer to the NAT rule. You may use
1-31 alphanumeric characters, underscores(_), or dashes (-), but the first character
cannot be a number. This value is case-sensitive.
NXC Series User’s Guide
149
Chapter 11 NAT
Table 77 Configuration > Network > NAT > Add/Edit (continued)
LABEL
DESCRIPTION
Classification
Select what kind of NAT this rule is to perform.
Virtual Server - This makes computers on a private network behind the NXC available to
a public network outside the NXC (like the Internet).
1:1 NAT - If the private network server will initiate sessions to the outside clients, select
this to have the NXC translate the source IP address of the server’s outgoing traffic to the
same public IP address that the outside clients use to access the server.
Many 1:1 NAT - If you have a range of private network servers that will initiate sessions
to the outside clients and a range of public IP addresses, select this to have the NXC
translate the source IP address of each server’s outgoing traffic to the same one of the
public IP addresses that the outside clients use to access the server. The private and public
ranges must have the same number of IP addresses.
One many 1:1 NAT rule works like multiple 1:1 NAT rules, but it eases configuration effort
since you only create one rule.
Incoming
Interface
Select the interface on which packets for the NAT rule must be received. It can be an
Ethernet or VLAN interface.
Original IP
Specify the destination IP address of the packets received by this NAT rule’s specified
incoming interface.
any - Select this to use all of the incoming interface’s IP addresses including dynamic
addresses.
User Defined - Select this to manually enter an IP address in the User Defined field. For
example, you could enter a static public IP assigned by the ISP.
Host address - select a host address object to use the IP address it specifies. The list also
includes address objects based on interface IPs. So for example you could select an
address object based on a WAN interface even if it has a dynamic IP address.
User Defined
Original IP
This field is available if Original IP is User Defined. Type the destination IP address that
this NAT rule supports.
Original IP
Subnet/Range
This field displays for Many 1:1 NAT. Select the destination IP address subnet or IP address
range that this NAT rule supports. The original and mapped IP address subnets or ranges
must have the same number of IP addresses.
Mapped IP
Select to which translated destination IP address this NAT rule forwards packets.
User Defined - this NAT rule supports a specific IP address, specified in the User Defined
field.
HOST address - the drop-down box lists all the HOST address objects in the NXC. If you
select one of them, this NAT rule supports the IP address specified by the address object.
150
User Defined
Original IP
This field is available if Mapped IP is User Defined. Type the translated destination IP
address that this NAT rule supports.
Mapped IP
Subnet/Range
This field displays for Many 1:1 NAT. Select to which translated destination IP address
subnet or IP address range this NAT rule forwards packets. The original and mapped IP
address subnets or ranges must have the same number of IP addresses.
NXC Series User’s Guide
Chapter 11 NAT
Table 77 Configuration > Network > NAT > Add/Edit (continued)
LABEL
DESCRIPTION
Port Mapping
Type
Use the drop-down list box to select how many original destination ports this NAT rule
supports for the selected destination IP address (Original IP). Choices are:
Any - this NAT rule supports all the destination ports.
Service - this NAT rule supports the destination port(s) used by the specified service(s).
Port - this NAT rule supports one destination port.
Ports - this NAT rule supports a range of destination ports. You might use a range of
destination ports for unknown services or when one server supports more than one
service.
This field is read-only and displays any for Many 1:1 NAT.
Original Service
This field is available if Port Mapping Type is Service. Select the original service whose
destination port(s) is supported by this NAT rule.
Mapped Service
This field is available if Port Mapping Type is Service. Select the translated service
whose destination port(s) is supported if this NAT rule forwards the packet.
Protocol Type
This field is available if Port Mapping Type is Port or Ports. Select the protocol (TCP,
UDP, or Any) used by the service requesting the connection.
Original Port
This field is available if Port Mapping Type is Port. Enter the original destination port this
NAT rule supports.
Mapped Port
This field is available if Port Mapping Type is Port. Enter the translated destination port if
this NAT rule forwards the packet.
Original Start
Port
This field is available if Port Mapping Type is Ports. Enter the beginning of the range of
original destination ports this NAT rule supports.
Original End Port
This field is available if Port Mapping Type is Ports. Enter the end of the range of original
destination ports this NAT rule supports.
Mapped Start
Port
This field is available if Port Mapping Type is Ports. Enter the beginning of the range of
translated destination ports if this NAT rule forwards the packet.
Mapped End Port
This field is available if Port Mapping Type is Ports. Enter the end of the range of
translated destination ports if this NAT rule forwards the packet. The original port range
and the mapped port range must be the same size.
Enable NAT
Loopback
Enable NAT loopback to allow users connected to any interface (instead of just the
specified Incoming Interface) to use the NAT rule’s specified Original IP address to
access the Mapped IP device. For users connected to the same interface as the Mapped
IP device, the NXC uses that interface’s IP address as the source address for the traffic it
sends from the users to the Mapped IP device.
For example, if you configure a NAT rule to forward traffic from the WAN to a LAN server,
enabling NAT loopback allows users connected to other interfaces to also access the server.
For LAN users, the NXC uses the LAN interface’s IP address as the source address for the
traffic it sends to the LAN server.
If you do not enable NAT loopback, this NAT rule only applies to packets received on the
rule’s specified incoming interface.
OK
Click OK to save your changes back to the NXC.
Cancel
Click Cancel to return to the NAT summary screen without creating the NAT rule (if it is
new) or saving any changes (if it already exists).
NXC Series User’s Guide
151
Chapter 11 NAT
11.3 Technical Reference
The following section contains additional technical information about the features described in this
chapter.
NAT Loopback
Suppose a NAT 1:1 rule maps a public IP address to the private IP address of a LAN SMTP e-mail
server to give WAN users access. NAT loopback allows other users to also use the rule’s original IP
to access the mail server.
For example, a LAN user’s computer at IP address 192.168.1.89 queries a public DNS server to
resolve the SMTP server’s domain name (xxx.LAN-SMTP.com in this example) and gets the SMTP
server’s mapped public IP address of 1.1.1.1.
Figure 81 LAN Computer Queries a Public DNS Server
DNS
xxx.LAN-SMTP.com = ?
1.1.1.1
xxx.LAN-SMTP.com = 1.1.1.1
LAN
192.168.1.21
152
192.168.1.89
NXC Series User’s Guide
Chapter 11 NAT
The LAN user’s computer then sends traffic to IP address 1.1.1.1. NAT loopback uses the IP address
of the NXC’s LAN interface (192.168.1.1) as the source address of the traffic going from the LAN
users to the LAN SMTP server.
Figure 82 LAN to LAN Traffic
NAT
Source 192.168.1.1
Source 192.168.1.89
SMTP
SMTP
LAN
192.168.1.21
192.168.1.89
The LAN SMTP server replies to the NXC’s LAN IP address and the NXC changes the source address
to 1.1.1.1 before sending it to the LAN user. The return traffic’s source matches the original
destination address (1.1.1.1). If the SMTP server replied directly to the LAN user without the traffic
going through NAT, the source would not match the original destination address which would cause
the LAN user’s computer to shut down the session.
Figure 83 LAN to LAN Return Traffic
NAT
Source 192.168.1.21
Source 1.1.1.1
SMTP
SMTP
LAN
192.168.1.21
NXC Series User’s Guide
192.168.1.89
153
C HAPTER
12
ALG
12.1 Overview
Application Layer Gateway (ALG) allows the following application to operate properly through the
NXC’s NAT.
• FTP - File Transfer Protocol - an Internet file transfer service.
The ALG feature is only needed for traffic that goes through the NXC’s NAT.
12.1.1 What You Can Do in this Chapter
The ALG screen (Section 12.2 on page 155) configures the FTP ALG settings.
12.1.2 What You Need to Know
The following terms and concepts may help as you read this chapter.
Application Layer Gateway (ALG) and NAT
The NXC can function as an Application Layer Gateway (ALG) to allow certain NAT un-friendly
applications to operate properly through the NXC’s NAT. The NXC dynamically creates an implicit
NAT session for the application’s traffic from the WAN to the LAN. The ALG on the NXC supports all
of the NXC’s NAT mapping types.
FTP ALG
The FTP ALG allows TCP packets with a specified port destination to pass through. If the FTP server
is located on the LAN, you must also configure NAT (port forwarding) rules if you want to allow
access to the server from the WAN.
12.1.3 Before You Begin
You must also enable NAT in the NXC to allow sessions initiated from the WAN.
NXC Series User’s Guide
154
Chapter 12 ALG
12.2 ALG
Click Configuration > Network > ALG to open this screen. Use this screen to turn the ALG off or
on, configure the port numbers to which it applies.
Figure 84 Configuration > Network > ALG
The following table describes the labels in this screen.
Table 78 Configuration > Network > ALG
LABEL
DESCRIPTION
Enable FTP ALG
Turn on the FTP ALG to detect FTP (File Transfer Program) traffic and help build FTP
sessions through the NXC’s NAT.
Enable FTP
Transformations
Select this option to have the NXC modify IP addresses and port numbers embedded in
the FTP data payload to match the NXC’s NAT environment.
Clear this option if you have an FTP device or server that will modify IP addresses and
port numbers embedded in the FTP data payload to match the NXC’s NAT environment.
FTP Signaling Port
If you are using a custom TCP port number (not 21) for FTP traffic, enter it here.
Additional FTP
Signaling Port for
Transformations
If you are also using FTP on an additional TCP port number, enter it here.
Apply
Click Apply to save your changes back to the NXC.
Reset
Click Reset to return the screen to its last-saved settings.
12.3 Technical Reference
The following section contains additional technical information about the features described in this
chapter.
FTP
File Transfer Protocol (FTP) is an Internet file transfer service that operates on the Internet and over
TCP/IP networks. A system running the FTP server accepts commands from a system running an
FTP client. The service allows users to send commands to the server for uploading and downloading
files.
NXC Series User’s Guide
155
C HAPTER
13
IP/MAC Binding
13.1 Overview
IP address to MAC address binding helps ensure that only the intended devices get to use privileged
IP addresses. The NXC uses DHCP to assign IP addresses and records to MAC address it assigned
each IP address. The NXC then checks incoming connection attempts against this list. A user cannot
manually assign another IP to his computer and use it to connect to the NXC.
Suppose you configure access privileges for IP address 192.168.1.27 and use static DHCP to assign
it to Tim’s computer’s MAC address of 12:34:56:78:90:AB. IP/MAC binding drops traffic from any
computer trying to use IP address 192.168.1.27 with another MAC address.
Figure 85 IP/MAC Binding Example
MAC: 12:34:56:78:90:AB
Bob
Jim
IP: 192.168.1.27
MAC: AB:CD:EF:12:34:56
IP: 192.168.1.27
13.1.1 What You Can Do in this Chapter
• The Summary and Edit screens (Section 13.2 on page 157) bind IP addresses to MAC
addresses.
• The Exempt List screen (Section 13.3 on page 160) configures ranges of IP addresses to which
the NXC does not apply IP/MAC binding.
13.1.2 What You Need to Know
The following terms and concepts may help as you read this chapter.
DHCP
IP/MAC address bindings are based on the NXC’s dynamic and static DHCP entries.
NXC Series User’s Guide
156
Chapter 13 IP/MAC Binding
Interfaces Used With IP/MAC Binding
IP/MAC address bindings are grouped by interface. You can use IP/MAC binding with Ethernet and
VLAN interfaces. You can also enable or disable IP/MAC binding and logging in an interface’s
configuration screen.
13.2 IP/MAC Binding Summary
Click Configuration > Network > IP/MAC Binding to open the IP/MAC Binding Summary
screen. This screen lists the total number of IP to MAC address bindings for devices connected to
each supported interface.
Figure 86 Configuration > Network > IP/MAC Binding > Summary
The following table describes the labels in this screen.
Table 79 Configuration > Network > IP/MAC Binding > Summary
LABEL
DESCRIPTION
Edit
Double-click an entry or select it and click Edit to open a screen where you can modify the
entry’s settings.
Activate
To turn on an entry, select it and click Activate.
Inactivate
To turn off an entry, select it and click Inactivate.
#
This field is a sequential value, and it is not associated with a specific entry.
Status
This icon is lit when the entry is active and dimmed when the entry is inactive.
Interface
This is the name of an interface that supports IP/MAC binding.
Number of
Binding
This field displays the interface’s total number of IP/MAC bindings and IP addresses that
the interface has assigned by DHCP.
Apply
Click Apply to save your changes back to the NXC.
NXC Series User’s Guide
157
Chapter 13 IP/MAC Binding
13.2.1 Edit IP/MAC Binding
Click Configuration > Network > IP/MAC Binding > Edit to open this screen. Use this screen
to configure an interface’s IP to MAC address binding settings.
Figure 87 Configuration > Network > IP/MAC Binding > Edit
The following table describes the labels in this screen.
Table 80 Configuration > Network > IP/MAC Binding > Edit
LABEL
DESCRIPTION
IP/MAC Binding
Settings
158
Interface
Name
This field displays the name of the interface within the NXC and the interface’s IP address
and subnet mask.
Enable IP/
MAC Binding
Select this option to have this interface enforce links between specific IP addresses and
specific MAC addresses. This stops anyone else from manually using a bound IP address on
another device connected to this interface. Use this to make use only the intended users
get to use specific IP addresses.
Enable Logs
for IP/MAC
Binding
Violation
Select this option to have the NXC generate a log if a device connected to this interface
attempts to use an IP address not assigned by the NXC.
Static DHCP
Bindings
This table lists the bound IP and MAC addresses. The NXC checks this table when it assigns
IP addresses. If the computer’s MAC address is in the table, the NXC assigns the
corresponding IP address. You can also access this table from the interface’s edit screen.
Add
Click this to create a new entry.
Edit
Double-click an entry or select it and click Edit to open a screen where you can modify the
entry’s settings.
Remove
To remove an entry, select it and click Remove. The NXC confirms you want to remove it
before doing so.
#
This is the index number of the static DHCP entry.
NXC Series User’s Guide
Chapter 13 IP/MAC Binding
Table 80 Configuration > Network > IP/MAC Binding > Edit (continued)
LABEL
DESCRIPTION
IP Address
This is the IP address that the NXC assigns to a device with the entry’s MAC address.
MAC Address
This is the MAC address of the device to which the NXC assigns the entry’s IP address.
Description
This helps identify the entry.
OK
Click OK to save your changes back to the NXC.
Cancel
Click Cancel to exit this screen without saving.
13.2.2 Add/Edit Static DHCP Rule
Click Configuration > Network > IP/MAC Binding > Edit to open this screen. Click the Add or
Edit icon to open the following screen. Use this screen to configure an interface’s IP to MAC address
binding settings.
Figure 88 Configuration > Network > IP/MAC Binding > Edit > Add/Edit
The following table describes the labels in this screen.
Table 81 Configuration > Network > IP/MAC Binding > Edit > Add/Edit
LABEL
DESCRIPTION
Interface Name
This field displays the name of the interface within the NXC and the interface’s IP address
and subnet mask.
IP Address
Enter the IP address that the NXC is to assign to a device with the entry’s MAC address.
MAC Address
Enter the MAC address of the device to which the NXC assigns the entry’s IP address.
Description
Enter up to 64 printable ASCII characters to help identify the entry. For example, you may
want to list the computer’s owner.
OK
Click OK to save your changes back to the NXC.
Cancel
Click Cancel to exit this screen without saving.
NXC Series User’s Guide
159
Chapter 13 IP/MAC Binding
13.3 IP/MAC Binding Exempt List
Click Configuration > Network > IP/MAC Binding > Exempt List to open the IP/MAC
Binding Exempt List screen. Use this screen to configure ranges of IP addresses to which the NXC
does not apply IP/MAC binding.
Figure 89 Configuration > Network > IP/MAC Binding > Exempt List
The following table describes the labels in this screen.
Table 82 Configuration > Network > IP/MAC Binding > Exempt List
LABEL
160
DESCRIPTION
Add
Click this to create a new entry.
Edit
Click an entry or select it and click Edit to modify the entry’s settings.
Remove
To remove an entry, select it and click Remove. The NXC confirms you want to remove it
before doing so.
#
This is the index number of the IP/MAC binding list entry.
Name
Enter a name to help identify this entry.
Start IP
Enter the first IP address in a range of IP addresses for which the NXC does not apply IP/
MAC binding.
End IP
Enter the last IP address in a range of IP addresses for which the NXC does not apply IP/
MAC binding.
Apply
Click Apply to save your changes back to the NXC.
NXC Series User’s Guide
C HAPTER
14
Captive Portal
14.1 Overview
A captive portal can intercepts network traffic, according to the authentication policies, until the
user authenticates his or her connection, usually through a specifically designated login web page.
As an added security measure, the NXC contains captive portal functionality. This means all web
page requests can initially be redirected to a special web page that requires you to authenticate
your session. Once authentication is successful, you can then connect to the rest of the network or
Internet.
Typically, you often find captive portal pages in public hotspots such as bookstores, coffee shops,
and hotel rooms, to name a few; as soon as you attempt to open a web page, the hotspot’s AP
reroutes your browser to a captive portal page that prompts you to log in.
Figure 90 Captive Portal Example
The captive portal page only appears once per authentication session. Unless a user idles out or
closes the connection, he or she generally will not see it again during the same session.
NXC Series User’s Guide
161
Chapter 14 Captive Portal
14.1.1 Captive Portal Type
The NXC allows you to use either an internal captive web portal (built into the NXC) or external
captive web portal (on an external web server). You can even customize the portal page(s). See
Section 14.3.1 on page 172 and Section 14.3.2 on page 174 for portal pages details.
The following table shows you the differences between available web portal options.
Table 83 Captive Portal Options
OPTION
PORTAL TYPE
USER-DEFINED PORTAL PAGES
WHERE TO CONFIGURE
External Web Portal
External
Login, Logout, Welcome, Session,
Error
Captive Portal > Captive
Portal
Default Login Page
Internal
N/A
Customized Login
Page
Internal
Login, Access
Uploaded Web Portal
File
Internal
Login, Logout, Welcome, Session,
Error
Captive Portal > Login
Page
14.1.2 What You Can Do in this Chapter
• The Captive Portal screen (Section 14.2 on page 163) configures which HTTP-based network
services default to the captive portal page when a client makes an initial network connection.
• The Login Page screen (Section 14.3 on page 169) assigns a default login page or create a
customized one.
162
NXC Series User’s Guide
Chapter 14 Captive Portal
14.2 Captive Portal
This screen allows you to configure which HTTP-based network services default to the captive portal
page when client makes an initial network connection.
Click Configuration > Captive Portal to access this screen.
Note: You can configure the look and feel of the captive portal web page on the Login
Page screen; see Section 14.3 on page 169 for details.
Figure 91 Configuration > Captive Portal
NXC Series User’s Guide
163
Chapter 14 Captive Portal
The following table describes the labels in this screen.
Table 84 Configuration > Captive Portal
LABEL
DESCRIPTION
Enable Captive
Portal
Select this to turn on the captive portal feature.
Internal Web
Portal
Select this to use the login page built into the NXC.
External Web
Portal
Select this to use a custom login page from an external web portal instead of the one built
into the NXC. You can configure the look and feel of the web portal page.
Once enabled, all network traffic is blocked until a client authenticates with the NXC
through the specifically designated captive portal page.
The login page appears whenever the web portal intercepts network traffic, preventing
unauthorized users from gaining access to the network.
Note: It is recommended to have the external web server on the same subnet as the login
users.
Login URL
Specify the login page’s URL; for example, http://IIS server IP Address/login.asp. You must
configure this field if you select External Web Portal.
The Internet Information Server (IIS) is the web server on which the web portal files are
installed.
Logout URL
Specify the logout page’s URL; for example, http://IIS server IP Address/logout.asp.
The Internet Information Server (IIS) is the web server on which the web portal files are
installed.
Welcome
URL
Specify the welcome page’s URL; for example, http://IIS server IP Address/welcome.asp.
Session URL
Specify the session page’s URL; for example, http://IIS server IP Address/session.asp. This
page records the lease-timeout, reauth-timeout, and session-timeout for a user. The user
can also click a logout button to log out.
The Internet Information Server (IIS) is the web server on which the web portal files are
installed.
The Internet Information Server (IIS) is the web server on which the web portal files are
installed.
Error URL
Specify the error page’s URL; for example, http://IIS server IP Address/error.asp.
The Internet Information Server (IIS) is the web server on which the web portal files are
installed.
User-logout
URL
Specify the URL of the page from which users can terminate their sessions; for example,
http://IIS server IP Address/userlogout.asp.
The Internet Information Server (IIS) is the web server on which the web portal files are
installed.
Download
Click this to download an example web portal file for your reference.
Authentication
Method
Select an authentication method for the captive portal page. You can configure the
authentication method in the Configuration > Object > Auth. Method screen (Chapter
25 on page 263).
This sets the default for all wireless clients interacting with the network through the captive
portal page. You can override this in the Auth. Policy Edit screen (Section 14.2.2 on page
167).
164
Exceptional
Services
This table allows you to configure exceptions to the captive portal interception of network
traffic.
Add
Click to add a service that is allowed to by-pass the captive portal. This allows certain
networking features (such as being able to connect to a DNS server, one of the preconfigured default exceptions), to remain unhindered.
NXC Series User’s Guide
Chapter 14 Captive Portal
Table 84 Configuration > Captive Portal (continued)
LABEL
DESCRIPTION
Remove
Select an exception from the table then click this button to remove it. Once removed, all
traffic from the specified protocol goes back to being intercepted by the captive portal.
#
This is the index number of the Exceptional Services list entry.
Exceptional
Services
This column lists the services that you have flagged as exceptions to captive portal
interception.
Authentication
Policy Summary
This table defines how captive portal interception is implemented using the source IPs, and
destination IPs that you specify.
Add
Click this to create a new entry.
Edit
Double-click an entry or select it and click Edit to open a screen where you can modify the
entry’s settings.
Remove
To remove an entry, select it and click Remove. The NXC confirms you want to remove it
before doing so.
Activate
To turn on an entry, select it and click Activate.
Inactivate
To turn off an entry, select it and click Inactivate.
Move
Click this to assign the selected policy a new Priority.
When you click the button, an entry box opens beside it. Enter the priority value, then
press [Enter].
Status
This indicates whether a policy is active or inactive.
Priority
This indicates the priority of a policy.
Priority values are unique to each policy. If you want to adjust the priority, use the Move
button.
Source
This indicates the source IP address to be monitored by the policy.
All traffic from the source IP has the policy applied to it.
Destination
This indicates the destination IP address to be monitored by the policy.
All traffic going to the destination IP has the policy applied to it.
Schedule
This indicates which Schedule objects (if any) is applied to the policy. A schedule object
allows you to configure which times the rule is in effect.
Authentication
This indicates whether authentication is required for the policy.
Description
This displays the description of the policy. It has no intrinsic value to the system.
Apply
Click Apply to save your changes back to the NXC.
Reset
Click Reset to return the screen to its last-saved settings.
14.2.1 Add Exceptional Services
This screen allows you to manage exceptions to captive portal interception. Click the Add button in
the Exceptional Services table on the Captive Portal screen to access this screen.
NXC Series User’s Guide
165
Chapter 14 Captive Portal
Note: If you want 802.1x to work properly, you must set BOOTP_Client and DNS as
exceptional services.
Figure 92 Configuration > Captive Portal > Add Exceptional Services
The following table describes the labels in this screen.
Table 85 Configuration > Captive Portal > Add Exceptional Services
166
LABEL
DESCRIPTION
Available
This lists all available network services eligible for being excepted from captive portal
interception.
Member
This lists all networks services currently assigned to the Exceptional Services table.
OK
Click OK to save your changes back to the NXC.
Cancel
Click Cancel to exit this screen without saving.
NXC Series User’s Guide
Chapter 14 Captive Portal
14.2.2 Auth. Policy Add/Edit
This screen allows you to add authentication policies to captive portal interception. Click the Add or
Edit button (for an existing policy) in the Authentication Policy Summary table on the Captive
Portal screen to access this screen.
Figure 93 Configuration > Captive Portal > Auth. Policy Add/Edit
The following table describes the labels in this screen.
Table 86 Configuration > Captive Portal > Auth. Policy Add/Edit
LABEL
DESCRIPTION
Create New
Object
Select an object (SSID Profile, Address, or Service) from the list to create a new one. You
can then use the object with the authentication policy rule. For example, if you create a
new SSID Profile called ‘CoffeeBar’, then you can select it immediately from the SSID list in
this screen.
Enable Policy
Select this to enable the new authentication policy. You can later edit the authentication
policy and deselect it if you want to disable it.
Description
Enter an optional description of the authentication policy. You can enter up to 60
characters.
Source Address
Select an address object from the list. If none are available, you can create a new one
using the Create New Object button.
The source address is an IP address for which the captive portal intercepts all network
traffic.
Destination
Address
Select an address object from the list. If none are available, you can create a new one
using the Create New Object button.
The destination address is an IP address for which the captive portal intercepts all network
traffic toward.
Schedule
Select a schedule from the list. If none are available, you can create one in Configuration
> Object > Schedule.
Authentication
Select whether authentication is required or not necessary for this rule.
NXC Series User’s Guide
167
Chapter 14 Captive Portal
Table 86 Configuration > Captive Portal > Auth. Policy Add/Edit
168
LABEL
DESCRIPTION
Force User
Authentication
Select this option to redirect HTTP traffic to the login screen if the user has not logged in
yet.
OK
Click OK to save your changes back to the NXC.
Cancel
Click Cancel to exit this screen without saving.
NXC Series User’s Guide
Chapter 14 Captive Portal
14.3 Login Page
The login page appears whenever the captive portal intercepts network traffic, preventing
unauthorized users from gaining access to the network. Use this page to select the default login
page or customize it. Click Configuration > Captive Portal > Login Page to display it.
Figure 94 Configuration > Captive Portal > Login Page
NXC Series User’s Guide
169
Chapter 14 Captive Portal
The following table describes the labels in this screen.
Table 87 Configuration > Captive Portal > Login Page
LABEL
DESCRIPTION
Select Type
Use Default Login
Page
Select this to use the default login page built into the device. If you later create a custom
login page, you can still return to the NXC’s default page as it is saved indefinitely.
Use Customized
Login Page
Select this to use a custom login page instead of the default one built into the NXC. Once
this option is selected, the custom login page controls below become active.
Use uploaded file
Select this to upload a web portal file with custom html pages to the NXC and use it. Once
this option is selected, the screen changes.
Logo File
This section allows you to choose and upload a custom logo image for the customized
login page.
This corresponds to the “ZyXEL” logo image in the default page.
File Path /
Browse /
Upload
Browse for the image file or enter the file path in the available input box, then click the
Upload button to put it on the NXC. Once uploaded, this image file replaces the default
“ZyXEL” logo on the login page.
You can use the following image file formats: GIF, PNG, or JPG.
Customized Login
Page
Title
This section allows you to customize the other elements on the captive portal login page.
Enter 1-64 characters for the page title. Spaces are allowed.
This corresponds to the “NXC” title in the default page.
Title Color
Select a font color for the page title. You can use the color palette chooser, or enter a
color value of your own.
Message Color
Specify the color of the screen’s text.
Note Message
Enter a note to display below the title. Use up to 1024 printable ASCII characters. Spaces
are allowed.
Background
Set how the window’s background looks.
To use a graphic, select Picture and upload a graphic. Specify the location and file name
of the logo graphic or click Browse to locate it. You can use the following image file
formats: GIF, PNG, or JPG.
To use a color, select Color and specify the color.
Customized
Access Page
This section allows you to customize elements on the ‘access’ page that appears upon
successful login.
Title
Enter 1-64 characters for the page title. Spaces are allowed.
Message Color
Specify the color of the screen’s text.
Note Message
Enter a note to display below the title. Use up to 1024 printable ASCII characters. Spaces
are allowed.
Background
Set how the window’s background looks.
To use a graphic, select Picture and upload a graphic. Specify the location and file name
of the logo graphic or click Browse to locate it. You can use the following image file
formats: GIF, PNG, or JPG.
To use a color, select Color and specify the color.
Customized Userlogout Page
170
This section allows you to customize elements on the user logout page that appears upon
successful login.
Title
Enter 1-64 characters for the page title. Spaces are allowed.
Message Color
Specify the color of the screen’s text.
NXC Series User’s Guide
Chapter 14 Captive Portal
Table 87 Configuration > Captive Portal > Login Page
LABEL
DESCRIPTION
Note Message
Enter a note to display below the title. Use up to 1024 printable ASCII characters. Spaces
are allowed.
Background
Set how the window’s background looks.
To use a graphic, select Picture and upload a graphic. Specify the location and file name
of the logo graphic or click Browse to locate it. You can use the following image file
formats: GIF, PNG, or JPG.
To use a color, select Color and specify the color.
Upload File
This section appears when you select Use uploaded file. It allows you to choose and
upload a zipped web portal file to the NXC.
Download
Click this to download an example web portal file for your reference.
File Path /
Browse /
Upload
Browse for the web portal file or enter the file path in the available input box, then click
the Upload button to put it on the NXC.
Download
customized zip
Click Download to download the web portal file from the NXC to your computer.
Preview
Click a button to display the corresponding portal page you uploaded to the NXC.
This button is clickable only after you upload a zipped web port file to the NXC.
The buttons are clickable only after you upload the corresponding portal pages to the
NXC.
Restore
customization
file to default
Click Restore to set the NXC back to use the default built-in login page.
Apply
Click Apply to save your changes back to the NXC.
Reset
Click Reset to return the screen to its last-saved settings.
NXC Series User’s Guide
171
Chapter 14 Captive Portal
14.3.1 Custom Login and Access Pages
The following identify the parts you can customize in the login and access pages.
Figure 95 Login Page Customization
Logo
Title
Message Color
(color of all text)
Background
Note Message
(last line of text)
Figure 96 Access Page Customization
Logo
Title
Message Color
(color of all text)
Background
Note Message
(last line of text)
172
NXC Series User’s Guide
Chapter 14 Captive Portal
Figure 97 User Logout Page Customization
Logo
Title
Message Color
(color of all text)
Note Message
(last line of text)
Background
You can specify colors in one of the following ways:
• Click Color to display a screen of web-safe colors from which to choose.
• Enter the name of the desired color.
• Enter a pound sign (#) followed by the six-digit hexadecimal number that represents the desired
color. For example, use “#000000” for black.
• Enter “rgb” followed by red, green, and blue values in parenthesis and separate by commas. For
example, use “rgb(0,0,0)” for black.
Your desired color should display in the preview screen on the right after you click in another field,
click Apply, or press [ENTER]. If your desired color does not display, your browser may not support
it. Try selecting another color.
NXC Series User’s Guide
173
Chapter 14 Captive Portal
14.3.2 External or Uploaded Web Portal Details
You can also configure the look and feel of the web portal page if you use an external web portal or
upload a web portal file to the NXC. Here are some examples.
Figure 98 External Web Portal Login Page Example
Figure 99 External Web Portal Welcome Page Example
174
NXC Series User’s Guide
Chapter 14 Captive Portal
Figure 100 External Web Portal Session Page Example
Figure 101 External Web Portal Logout Page Example
NXC Series User’s Guide
175
Chapter 14 Captive Portal
Figure 102 External Web Portal User Logout Page Example
Figure 103 External Web Portal Error Page Example
Here are the error codes the NXC sends to the External Web Portal Error page.
Table 88 External Web Portal Error Page Error Codes
ERROR CODE TITLE
176
MESSAGE
-1
Login denied
Validation failed
-2
Login denied
Login attempt from a locked out address
-3
Login denied
Simultaneous admin/access logons or users have reached the maximum
number
NXC Series User’s Guide
Chapter 14 Captive Portal
Here are the HTTP parameters the NXC uses with the external URL.
Table 89 HTTP Parameters for External URL
PARAMETER DESCRIPTION
LOGIN WELCOME SESSION LOGOUT ERROR
gw_addr
NXC IP Address
error_num
Login error code
auth_hour
The remaining hours before
authentication timeout
V
auth_min
The remaining minutes before
authentication timeout
V
auth_sec
The remaining seconds before
authentication timeout
V
lease_time
Total remaining seconds before lease
timeout
V
username
Login username
V
cgi_str
The CGI for user login. The admin
type is “admin.cgi” and the user
related type is “login.cgi”.
Ses_time
Accounting session timeout
NXC Series User’s Guide
V
V
V
V
V
V
V
177
C HAPTER
15
RTLS
15.1 Overview
Ekahau RTLS (Real Time Location Service) tracks battery-powered Wi-Fi tags attached to APs
managed by the NXC to create maps, alerts, and reports.
The Ekahau RTLS Controller is the centerpiece of the RTLS system. This server software runs on a
Windows computer to track and locate Ekahau tags from Wi-Fi signal strength measurements. Use
the NXC with the Ekahau RTLS system to take signal strength measurements at the APs (Integrated
Approach / Blink Mode).
The following example shows the Ekahau RTLS Integrated Approach (Blink Mode).
1
The Wi-Fi tag sends blink packets at specified intervals (or triggered by something like motion or
button presses).
2
The APs pick up the blink packets, measure the signal strength, and send it to the NXC.
3
The NXC forwards the signal measurements to the Ekahau RTLS Controller.
4
The Ekahau RTLS Controller calculates the tag positions.
Figure 104 RTLS Example
15.1.1 What You Can Do in this Chapter
Use the RTLS screen (Section 15.3 on page 179) to use the managed APs as part of an Ekahau
RTLS to track the location of Ekahau Wi-Fi tags.
NXC Series User’s Guide
178
Chapter 15 RTLS
15.2 Before You Begin
You need:
• At least three APs managed by the NXC (the more APs the better since it increases the amount of
information the Ekahau RTLS Controller has for calculating the location of the tags)
• IP addresses for the Ekahau Wi-Fi tags
• A dedicated RTLS SSID is recommended
• Ekahau RTLS Controller in blink mode with TZSP Updater enabled
• Firewall rules to allow RTLS traffic if the NXC firewall is enabled or the Ekahau RTLS Controller is
behind a firewall.
For example, if the Ekahau RTLS Controller is behind a firewall, open ports 8550, 8553, and 8569 to
allow traffic the APs send to reach the Ekahau RTLS Controller.
The following table lists default port numbers and types of packets RTLS uses.
Table 90 RTLS Traffic Port Numbers
PORT NUMBER
TYPE
DESCRIPTION
8548
TCP
Ekahau T201 location update.
8549
UDP
Ekahau T201 location update.
8550
TCP
Ekahau T201 tag maintenance protocol and Ekahau RTLS Controller user
interface.
8552
UDP
Ekahau Location Protocol
8553
UDP
Ekahau Maintenance Protocol
8554
UDP
Ekahau T301 firmware update.
8560
TCP
Ekahau Vision web interface
8562
UDP
Ekahau T301W firmware update.
8569
UDP
Ekahau TZSP Listener Port
15.3 Configuring RTLS
Click Configuration > RTLS to open this screen. Use this screen to turn RTLS (Real Time Location
System) on or off and specify the IP address and server port of the Ekahau RTLS Controller.
Figure 105 Configuration > RTLS
NXC Series User’s Guide
179
Chapter 15 RTLS
The following table describes the labels in this screen.
Table 91 Configuration > RTLS
180
LABEL
DESCRIPTION
Enable
Select this to use Wi-Fi to track the location of Ekahau Wi-Fi tags.
IP Address
Specify the IP address of the Ekahau RTLS Controller.
Server Port
Specify the server port number of the Ekahau RTLS Controller.
Apply
Click Apply to save your changes back to the NXC.
Reset
Click Reset to return the screen to its last-saved settings.
NXC Series User’s Guide
C HAPTER
16
Firewall
16.1 Overview
Use the firewall to block or allow services that use static port numbers. The firewall can also limit
the number of user sessions.
16.1.1 What You Can Do in this Chapter
• The Firewall screens (Section 16.2 on page 183) enable or disable the firewall and asymmetrical
routes, and manage and configure firewall rules.
• The Session Control screens (Section 16.3 on page 187) limit the number of concurrent NAT/
firewall sessions a client can use.
16.1.2 What You Need to Know
The following terms and concepts may help as you read this chapter.
Stateful Inspection
The NXC has a stateful inspection firewall. The NXC restricts access by screening data packets
against defined access rules. It also inspects sessions. For example, traffic from one zone is not
allowed unless it is initiated by a computer in another zone first.
Zones
A zone is a group of interfaces. Group the NXC’s interfaces into different zones based on your
needs. You can configure firewall rules for data passing between zones or even between interfaces
in a zone.
Default Firewall Behavior
Firewall rules are grouped based on the direction of travel of packets to which they apply. Here is
the default firewall behavior for traffic going through the NXC in various directions.
Table 92 Default Firewall Behavior
FROM ZONE TO ZONE
BEHAVIOR
From ANY to ANY
Traffic that does not match any firewall rule is allowed. So for example, LAN to
WAN, LAN to DMZ, and LAN to WLAN traffic is allowed. This also includes traffic
to or from interfaces that are not assigned to a zone (extra-zone traffic).
NXC Series User’s Guide
181
Chapter 16 Firewall
To-NXC Rules
Rules with EnterpriseWLAN as the To Zone apply to traffic going to the NXC itself. By default:
• The firewall allows any computers to access or manage the NXC.
When you configure a firewall rule for packets destined for the NXC itself, make sure it does not
conflict with your service control rule. The NXC checks the firewall rules before the service control
rules for traffic destined for the NXC.
You can configure a To-NXC firewall rule (with From Any To EnterpriseWLAN direction) for traffic
from an interface which is not in a zone.
Global Firewall Rules
Firewall rules with from any and/or to any as the packet direction are called global firewall rules.
The global firewall rules are the only firewall rules that apply to an interface that is not included in a
zone. The from any rules apply to traffic coming from the interface and the to any rules apply to
traffic going to the interface.
Firewall Rule Criteria
The NXC checks the schedule, user name (user’s login name on the NXC), source IP address,
destination IP address and IP protocol type of network traffic against the firewall rules (in the order
you list them). When the traffic matches a rule, the NXC takes the action specified in the rule.
User Specific Firewall Rules
You can specify users or user groups in firewall rules. For example, to allow a specific user from any
computer to access a zone by logging in to the NXC, you can set up a rule based on the user name
only. If you also apply a schedule to the firewall rule, the user can only access the network at the
scheduled time. A user-aware firewall rule is activated whenever the user logs in to the NXC and
will be disabled after the user logs out of the NXC.
Session Limits
Accessing the NXC or network resources through the NXC requires a NAT session and corresponding
firewall session. Peer to peer applications, such as file sharing applications, may use a large number
of NAT sessions. A single client could use all of the available NAT sessions and prevent others from
connecting to or through the NXC. The NXC lets you limit the number of concurrent NAT/firewall
sessions a client can use.
Asymmetrical Routes
If an alternate gateway on the LAN has an IP address in the same subnet as the NXC’s LAN IP
address, return traffic may not go through the NXC. This is called an asymmetrical or “triangle”
route. This causes the NXC to reset the connection, as the connection has not been acknowledged.
You can have the NXC permit the use of asymmetrical route topology on the network (not reset the
connection). However, allowing asymmetrical routes may let traffic from the WAN go directly to the
LAN without passing through the NXC.
182
NXC Series User’s Guide
Chapter 16 Firewall
16.2 Firewall
The following describes the firewall screen functions.
Click Configuration > Firewall to open the Firewall screen. Use this screen to enable or disable
the firewall and asymmetrical routes, and display the configured firewall rules. Specify from which
zone packets come and to which zone packets travel to display only the rules specific to the
selected direction. Note the following.
• If you enable intra-zone traffic blocking (see the chapter about zones), the firewall automatically
creates (implicit) rules to deny packet passage between the interfaces in the specified zone.
• Besides configuring the firewall, you also need to configure NAT rules to allow computers on the
WAN to access LAN devices.
• The NXC applies NAT (Destination NAT) settings before applying the firewall rules. So for
example, if you configure a NAT entry that sends WAN traffic to a LAN IP address, when you
configure a corresponding firewall rule to allow the traffic, you need to set the LAN IP address as
the destination.
• The ordering of your rules is very important as rules are applied in sequence.
Figure 106 Configuration > Firewall
The following table describes the labels in this screen.
Table 93 Configuration > Firewall
LABEL
DESCRIPTION
General Settings
Enable Firewall
NXC Series User’s Guide
Select this check box to activate the firewall. The NXC performs access control when the
firewall is activated.
183
Chapter 16 Firewall
Table 93 Configuration > Firewall (continued)
LABEL
DESCRIPTION
Allow
Asymmetrical
Route
If an alternate gateway on the LAN has an IP address in the same subnet as the NXC’s
LAN IP address, return traffic may not go through the NXC. This is called an asymmetrical
or “triangle” route. This causes the NXC to reset the connection, as the connection has not
been acknowledged.
Select this check box to have the NXC permit the use of asymmetrical route topology on
the network (not reset the connection).
Note: Allowing asymmetrical routes may let traffic from the WAN go directly to the LAN
without passing through the NXC.
From Zone / To
Zone
This is the direction of travel of packets. Select from which zone the packets come and to
which zone they go.
Firewall rules are grouped based on the direction of travel of packets to which they apply.
For example, from LAN to LAN means packets traveling from a computer or subnet on
the LAN to either another computer or subnet on the LAN.
From any displays all the firewall rules for traffic going to the selected To Zone.
To any displays all the firewall rules for traffic coming from the selected From Zone.
From any to any displays all of the firewall rules.
To EnterpriseWLAN rules are for traffic that is destined for the NXC and control which
computers can manage the NXC.
Add
Click this to create a new entry. Select an entry and click Add to create a new entry after
the selected entry.
Edit
Double-click an entry or select it and click Edit to open a screen where you can modify the
entry’s settings.
Remove
To remove an entry, select it and click Remove. The NXC confirms you want to remove it
before doing so.
Activate
To turn on an entry, select it and click Activate.
Inactivate
To turn off an entry, select it and click Inactivate.
Move
To change a rule’s position in the numbered list, select the rule and click Move to display
a field to type a number for where you want to put that rule and press [ENTER] to move
the rule to the number that you typed.
The ordering of your rules is important as they are applied in order of their numbering.
The following read-only fields summarize the rules you have created that apply to traffic traveling in the
selected packet direction.
Status
This icon is lit when the entry is active and dimmed when the entry is inactive.
Priority
This is the position of your firewall rule in the global rule list (including all through-NXC
and to-NXC rules). The ordering of your rules is important as rules are applied in
sequence.
Default displays for the default firewall behavior that the NXC performs on traffic that
does not match any other firewall rule.
From
This is the direction of travel of packets to which the firewall rule applies.
To
184
Schedule
This field tells you the schedule object that the rule uses. none means the rule is active at
all times if enabled.
User
This is the user name or user group name to which this firewall rule applies.
IPv4 Source
This displays the source address object to which this firewall rule applies.
IPv4 Destination
This displays the destination address object to which this firewall rule applies.
Service
This displays the service object to which this firewall rule applies.
NXC Series User’s Guide
Chapter 16 Firewall
Table 93 Configuration > Firewall (continued)
LABEL
DESCRIPTION
Access
This field displays whether the firewall silently discards packets (deny), discards packets
and sends a TCP reset packet to the sender (reject) or permits the passage of packets
(allow).
Log
This field shows you whether a log (and alert) is created when packets match this rule or
not.
Apply
Click Apply to save your changes back to the NXC.
Reset
Click Reset to return the screen to its last-saved settings.
16.2.1 Add/Edit Firewall Screen
In the Firewall screen, click the Edit or Add icon to display this screen.
Figure 107 Configuration > Firewall > Add/Edit
The following table describes the labels in this screen.
Table 94 Configuration > Firewall > Add/Edit
LABEL
DESCRIPTION
Create new Object
Use to configure any new settings objects that you need to use in this screen.
Enable
Select this check box to activate the firewall rule.
From
For through-NXC rules, select the direction of travel of packets to which the rule applies.
To
any means all interfaces.
Description
Enter a descriptive name of up to 60 printable ASCII characters for the firewall rule.
Spaces are allowed.
Schedule
Select a schedule that defines when the rule applies. Otherwise, select none and the
rule is always effective.
EnterpriseWLAN means packets destined for the NXC itself.
NXC Series User’s Guide
185
Chapter 16 Firewall
Table 94 Configuration > Firewall > Add/Edit (continued)
LABEL
DESCRIPTION
User
This field is not available when you are configuring a to-NXC rule.
Select a user name or user group to which to apply the rule. The firewall rule is activated
only when the specified user logs into the system and the rule will be disabled when the
user logs out.
Otherwise, select any and there is no need for user logging.
Note: If you specified a source IP address (group) instead of any in the field below, the
user’s IP address should be within the IP address range.
Source
Select a source address or address group for whom this rule applies. Select any if the
policy is effective for every source.
Destination
Select a destination address or address group for whom this rule applies. Select any if
the policy is effective for every destination.
Service
Select a service or service group from the drop-down list box.
Access
Use the drop-down list box to select what the firewall is to do with packets that match
this rule.
Select deny to silently discard the packets without sending a TCP reset packet or an
ICMP destination-unreachable message to the sender.
Select reject to deny the packets and send a TCP reset packet to the sender. Any UDP
packets are dropped without sending a response packet.
Select allow to permit the passage of the packets.
186
Log
Select whether to have the NXC generate a log (log), log and alert (log alert) or not
(no) when the rule is matched.
OK
Click OK to save your customized settings and exit this screen.
Cancel
Click Cancel to exit this screen without saving.
NXC Series User’s Guide
Chapter 16 Firewall
16.3 Session Control
Click Configuration > Firewall > Session Control to display the Firewall Session Control
screen. Use this screen to limit the number of concurrent NAT/firewall sessions a client can use. You
can apply a default limit for all users and individual limits for specific users, addresses, or both. The
individual limit takes priority if you apply both.
Figure 108 Configuration > Firewall > Session Control
The following table describes the labels in this screen.
Table 95 Configuration > Firewall > Session Control
LABEL
DESCRIPTION
General Settings
UDP Session Time
Out
Set how many seconds (from 1 to 300) the NXC will allow a UDP session to remain idle
(without UDP traffic) before closing it.
Session Limit
Settings
Enable Session
limit
Select this check box to control the number of concurrent sessions hosts can have.
IPv4 Rule
Summary
This table lists the rules for limiting the number of concurrent sessions hosts can have.
Default Session per
Host
This field is configurable only when you enable session limit.
Use this field to set a common limit to the number of concurrent NAT/firewall sessions
each client computer can have.
If only a few clients use peer to peer applications, you can raise this number to improve
their performance. With heavy peer to peer application use, lower this number to ensure
no single client uses too many of the available NAT sessions.
Create rules below to apply other limits for specific users or addresses.
NXC Series User’s Guide
187
Chapter 16 Firewall
Table 95 Configuration > Firewall > Session Control (continued)
LABEL
DESCRIPTION
Add
Click this to create a new entry. Select an entry and click Add to create a new entry after
the selected entry.
Edit
Double-click an entry or select it and click Edit to open a screen where you can modify
the entry’s settings.
Remove
To remove an entry, select it and click Remove. The NXC confirms you want to remove
it before doing so.
Activate
To turn on an entry, select it and click Activate.
Inactivate
To turn off an entry, select it and click Inactivate.
Move
To change a rule’s position in the numbered list, select the rule and click Move to display
a field to type a number for where you want to put that rule and press [ENTER] to move
the rule to the number that you typed.
The ordering of your rules is important as they are applied in order of their numbering.
Status
This icon is lit when the entry is active and dimmed when the entry is inactive.
#
This is the index number of a session limit rule. It is not associated with a specific rule.
User
This is the user name or user group name to which this session limit rule applies.
IPv4 Address
This is the address object to which this session limit rule applies.
Description
This is the description for the rule.
Limit
This is how many concurrent sessions this user or address is allowed to have.
Apply
Click Apply to save your changes back to the NXC.
Reset
Click Reset to return the screen to its last-saved settings.
16.3.1 Add/Edit Session Limit
Click Configuration > Firewall > Session Limit and the Add or Edit icon to display the Firewall
Session Limit Edit screen. Use this screen to configure rules that define a session limit for specific
users or addresses.
Figure 109 Configuration > Firewall > Session Limit > Add/Edit
188
NXC Series User’s Guide
Chapter 16 Firewall
The following table describes the labels in this screen.
Table 96 Configuration > Firewall > Session Limit > Add/Edit
LABEL
DESCRIPTION
Create new Object
Use to configure any new settings objects that you need to use in this screen.
Enable Rule
Select this check box to turn on this session limit rule.
Description
Enter information to help you identify this rule. Use up to 60 printable ASCII characters.
Spaces are allowed.
User
Select a user name or user group to which to apply the rule. The rule is activated only
when the specified user logs into the system and the rule will be disabled when the user
logs out.
Otherwise, select any and there is no need for user logging.
Note: If you specified an IP address (or address group) instead of any in the field below,
the user’s IP address should be within the IP address range.
Address
Select a source address or address group for whom this rule applies. Select any if the
policy is effective for every source address.
Session Limit per
Host
Use this field to set a limit to the number of concurrent NAT/firewall sessions this rule’s
users or addresses can have.
For this rule’s users and addresses, this setting overrides the Default Session per Host
setting in the general Firewall Session Limit screen.
OK
Click OK to save your customized settings and exit this screen.
Cancel
Click Cancel to exit this screen without saving.
NXC Series User’s Guide
189
C HAPTER
17
User/Group
17.1 Overview
This chapter describes how to set up user accounts, user groups, and user settings for the NXC. You
can also set up rules that control when users have to log in to the NXC before the NXC routes traffic
for them.
17.1.1 What You Can Do in this Chapter
• The User screen (see Section 17.2 on page 193) lets you see, add, and edit user accounts.
• The Group screen (see Section 17.3 on page 196) provides a summary of all user groups. In
addition, this screen allows you to add, edit, and remove user groups. User groups may consist of
access users and other user groups. You cannot put admin users in user groups
• The Setting screen (see Section 17.4 on page 197) controls default settings, login settings,
lockout settings, and other user settings for the NXC. You can also use this screen to specify
when users must log in to the NXC before it routes traffic for them.
• The MAC Address screen (see Section 17.5 on page 206) lists all the mappings of MAC
addresses to MAC address user accounts (MAC roles).
17.1.2 What You Need To Know
The following terms and concepts may help as you read this chapter.
User Account
A user account defines the privileges of a user logged into the NXC. User accounts are used in
controlling access to configuration and services in the NXC.
User Types
These are the types of user accounts the NXC uses.
Table 97 Types of User Accounts
TYPE
ABILITIES
LOGIN METHOD(S)
admin
Change NXC configuration (web, CLI)
WWW, TELNET, SSH, FTP, Console
limited-admin
Look at NXC configuration (web, CLI)
WWW, TELNET, SSH, Console
Admin Users
Perform basic diagnostics (CLI)
Access Users
NXC Series User’s Guide
190
Chapter 17 User/Group
Table 97 Types of User Accounts (continued)
TYPE
ABILITIES
LOGIN METHOD(S)
user
Access network services
Captive Portal, TELNET, SSH
Browse user-mode commands (CLI)
guest
Access network services
Captive Portal
ext-user
External user account
Captive Portal
ext-group-user
External group user account
Captive Portal
guest-manager
Create dynamic guest accounts
WWW
dynamic guest
Access network services
Captive Portal
mac-address
As permitted by the user-aware feature
configuration.
MAC Authentication
Note: The default admin account is always authenticated locally, regardless of the
authentication method setting.
Ext-User Accounts
Set up an ext-user account if the user is authenticated by an external server and you want to set
up specific policies for this user in the NXC. If you do not want to set up policies for this user, you do
not have to set up an ext-user account.
All ext-user users should be authenticated by an external server, such as AD, LDAP or RADIUS. If
the NXC tries to use the local database to authenticate an ext-user, the authentication attempt
always fails.
Note: If the NXC tries to authenticate an ext-user using the local database, the attempt
always fails.
Once an ext-user user has been authenticated, the NXC tries to get the user type from the
external server. If the external server does not have the information, the NXC sets the user type for
this session to User.
Ext-Group-User Accounts
Ext-Group-User accounts work are similar to ext-user accounts but allow you to group users by
the value of the group membership attribute configured for the AD or LDAP server.
Ext-Server Accounts
Ext-Server accounts are admin accounts that can log into the NXC from the WAN and which are
authenticated by an associated RADIUS server.
Dynamic Guest Accounts
Dynamic guest accounts are guest accounts, but are created dynamically with the guest manager
account and stored in the NXC’s local user database. A dynamic guest account has a dynamicallycreated user name and password. A dynamic guest account user can access the NXC’s services only
within a given period of time and will become invalid after the expiration date/time. You cannot
modify or edit a dynamic guest account.
NXC Series User’s Guide
191
Chapter 17 User/Group
MAC Address Accounts
Use an external server to authenticate wireless clients by MAC address. After authentication the
NXC maps the wireless client to a mac-address user account (MAC role). Configure user-aware
features to control MAC address user access to network services.
For example, do the following to give a notebook access to a network printer.
1
Configure the external server to authenticate the notebook’s wireless client MAC address.
2
Click Configuration > Object > AP Profile > SSID > Security List > Add/Edit Security
Profile and configure an SSID security profile’s MAC authentication settings to have the AP use the
external server to authenticate wireless clients by MAC address (see Section 18.3.2.1 on page
220).
3
Click Configuration > Object > User/Group > User > Add and create a MAC address user
account (see Section 17.2.1 on page 194).
4
Click Configuration > Object > User/Group > MAC Address > Add and map the notebook’s
MAC address to the MAC address user account (also called a MAC role). See Section 17.5 on page
206.
User Groups
User groups may consist of user accounts or other user groups. Use user groups when you want to
create the same rule for several user accounts, instead of creating separate rules for each one.
Note: You cannot put access users and admin users in the same user group.
Note: You cannot put the default admin account into any user group.
User Awareness
By default, users do not have to log into the NXC to use the network services it provides. The NXC
automatically routes packets for everyone. If you want to restrict network services that certain
users can use via the NXC, you can require them to log in to the NXC first. The NXC is then ‘aware’
of the user who is logged in and you can create ‘user-aware policies’ that define what services they
can use.
User Role Priority
The NXC checks the following in order of priority.
192
1
User role setting in ext-user.
2
User role setting in ext-group-user.
3
User role setting in default user (ldap-users, ad-users, radius-users).
NXC Series User’s Guide
Chapter 17 User/Group
17.2 User Summary
The User screen provides a summary of all user accounts. To access this screen click
Configuration > Object > User/Group.
Figure 110 Configuration > Object > User/Group > User
The following table describes the labels in this screen.
Table 98 Configuration > Object > User/Group > User
LABEL
DESCRIPTION
Add
Click this to create a new entry.
Edit
Double-click an entry or select it and click Edit to open a screen where you can modify the
entry’s settings.
Remove
To remove an entry, select it and click Remove. The NXC confirms you want to remove it
before doing so.
Object Reference
Select an entry and click Object Reference to open a screen that shows which settings
use the entry.
#
This field is a sequential value, and it is not associated with a specific user.
User Name
This field displays the user name of each user.
User Type
This field displays the kind of account of each user. These are the kinds of user account the
NXC supports.
•
•
•
•
•
•
•
•
Description
NXC Series User’s Guide
admin - this user can look at and change the configuration of the NXC
limited-admin - this user can look at the configuration of the NXC but not to change it
user - this user has access to the NXC’s services but cannot look at the configuration.
guest - this user has access to the NXC’s services but cannot look at the configuration.
ext-user - this user account is maintained in a remote server, such as RADIUS or
LDAP.
ext-group-user - this user account is maintained in a remote server, such as RADIUS
or LDAP.
guest-manager - this user can log in via the web configurator login screen and create
dynamic guest accounts using the Master Manager screen that pops up.
mac-address - an external server authenticates wireless clients based on their MAC
addresses. After authentication the NXC maps a wireless client to a MAC address user
account (MAC role). User-aware features control MAC address user access to specific
resources.
This field displays the description for each user.
193
Chapter 17 User/Group
17.2.1 Add/Edit User
The User Add/Edit screen allows you to create a new user account or edit an existing one.
17.2.1.1 Rules for User Names
Enter a user name from 1 to 31 characters.
The user name can only contain the following characters:
• Alphanumeric A-z 0-9 (there is no unicode support)
• _ [underscores]
• - [dashes]
The first character must be alphabetical (A-Z a-z), an underscore (_), or a dash (-). Other
limitations on user names are:
• User names are case-sensitive. If you enter a user 'bob' but use 'BOB' when connecting via CIFS
or FTP, it will use the account settings used for 'BOB' not ‘bob’.
• User names have to be different than user group names.
• Here are the reserved user names:
•
adm
•
admin
•
any
•
bin
•
daemon
•
debug
•
devicehaecived
•
ftp
•
games
•
halt
•
ldap-users
•
lp
•
mail
•
news
•
nobody
•
operator
•
radius-users
•
root
•
shutdown
•
sshd
•
sync
•
uucp
•
zyxel
To access this screen, go to the User screen, and click Add or Edit.
Figure 111 Configuration > User/Group > User > Add/Edit A User
194
NXC Series User’s Guide
Chapter 17 User/Group
The following table describes the labels in this screen.
Table 99 Configuration > User/Group > User > Add/Edit A User
LABEL
DESCRIPTION
User Name
Type the user name for this user account. You may use 1-31 alphanumeric characters,
underscores(_), or dashes (-), but the first character cannot be a number. This value is casesensitive. User names have to be different than user group names, and some words are
reserved.
User Type
Select what type of user this is. Choices are:
•
•
•
•
•
•
•
•
Password
admin - this user can look at and change the configuration of the NXC
limited-admin - this user can look at the configuration of the NXC but not to change it
user - this user has access to the NXC’s services but cannot look at the configuration
guest - this user has access to the NXC’s services but cannot look at the configuration
ext-user - this user account is maintained in a remote server, such as RADIUS or LDAP.
ext-group-user - this user account is maintained in a remote server, such as RADIUS or
LDAP.
guest-manager - this user can log in via the web configurator login screen and create
dynamic guest accounts using the Master Manager screen that pops up
mac-address - an external server authenticates wireless clients based on their MAC
addresses. After authentication the NXC maps a wireless client to a MAC address user
account (MAC role). User-aware features control MAC address user access to specific
resources.
This field is not available if you select the ext-user or ext-group-user type.
Enter the password of this user account. It can consist of 4 - 31 alphanumeric characters.
Retype
This field is not available if you select the ext-user or ext-group-user type.
Group
Identifier
This field is available for a ext-group-user type user account.
Specify the value of the AD or LDAP server’s Group Membership Attribute that identifies the
group to which this user belongs.
Associated
AAA Server
Object
This field is available for a ext-group-user type user account. Select the AAA server to use to
authenticate this account’s users.
Description
Enter the description of each user, if any. You can use up to 60 printable ASCII characters.
Default descriptions are provided.
Authenticati
on Timeout
Settings
If you want to set authentication timeout to a value other than the default settings, select Use
Manual Settings then fill your preferred values in the fields that follow.
Lease Time
Enter the number of minutes this user has to renew the current session before the user is
logged out. You can specify 1 to 1440 minutes. You can enter 0 to make the number of minutes
unlimited. Admin users renew the session every time the main screen refreshes in the Web
Configurator. Access users can renew the session by clicking the Renew button on their screen.
If you allow access users to renew time automatically, the users can select this check box on
their screen as well. In this case, the session is automatically renewed before the lease time
expires.
Reauthentic
ation Time
Type the number of minutes this user can be logged into the NXC in one session before the user
has to log in again. You can specify 1 to 1440 minutes. You can enter 0 to make the number of
minutes unlimited. Unlike Lease Time, the user has no opportunity to renew the session
without logging out.
Configuratio
n Validation
Use a user account from the group specified above to test if the configuration is correct. Enter
the account’s user name in the User Name field and click Test.
OK
Click OK to save your changes back to the NXC.
Cancel
Click Cancel to exit this screen without saving your changes.
NXC Series User’s Guide
195
Chapter 17 User/Group
17.3 Group Summary
User groups consist of access users and other user groups. You cannot put admin users in user
groups. The Group screen provides a summary of all user groups. In addition, this screen allows
you to add, edit, and remove user groups. To access this screen, login to the Web Configurator, and
click Configuration > Object > User/Group > Group.
Figure 112 Configuration > Object > User/Group > Group
The following table describes the labels in this screen.
Table 100 Configuration > Object > User/Group > Group
196
LABEL
DESCRIPTION
Add
Click this to create a new entry.
Edit
Double-click an entry or select it and click Edit to open a screen where you can modify the
entry’s settings.
Remove
To remove an entry, select it and click Remove. The NXC confirms you want to remove it
before doing so. Removing a group does not remove the user accounts in the group.
Object Reference
Select an entry and click Object Reference to open a screen that shows which settings
use the entry.
#
This field is a sequential value, and it is not associated with a specific user group.
Group Name
This field displays the name of each user group.
Description
This field displays the description for each user group.
Member
This field lists the members in the user group. Each member is separated by a comma.
NXC Series User’s Guide
Chapter 17 User/Group
17.3.1 Add/Edit Group
This screen allows you to add a new user group or edit an existing one. To access this screen, go to
the Group screen, and click either the Add icon or an Edit icon.
Figure 113 Configuration > User/Group > Group > Add/Edit Group
The following table describes the labels in this screen.
Table 101 Configuration > User/Group > Group > Add/Edit Group
LABEL
DESCRIPTION
Name
Type the name for this user group. You may use 1-31 alphanumeric characters,
underscores(_), or dashes (-), but the first character cannot be a number. This value is casesensitive. User group names have to be different than user names.
Description
Enter the description of the user group, if any. You can use up to 60 characters, punctuation
marks, and spaces.
Member List
The Member list displays the names of the users and user groups that have been added to the
user group. The order of members is not important. Select users and groups from the
Available list that you want to be members of this group and move them to the Member list.
You can double-click a single entry to move it or use the [Shift] or [Ctrl] key to select multiple
entries and use the arrow button to move them.
OK
Click OK to save your changes back to the NXC.
Cancel
Click Cancel to exit this screen without saving your changes.
Move any members you do not want included to the Available list.
17.4 Setting
This screen controls default settings, login settings, lockout settings, and other user settings for the
NXC. You can also use this screen to specify when users must log in to the NXC before it routes
traffic for them.
To access this screen, login to the Web Configurator, and click Configuration > Object > User/
Group > Setting.
NXC Series User’s Guide
197
Chapter 17 User/Group
Figure 114 Configuration > Object > User/Group > Setting
198
NXC Series User’s Guide
Chapter 17 User/Group
The following table describes the labels in this screen.
Table 102 Configuration > Object > User/Group > Setting
LABEL
DESCRIPTION
User Default
Settings
Default
Authentication
Timeout Settings
These authentication timeout settings are used by default when you create a new user
account. They also control the settings for any existing user accounts that are set to
use the default settings. You can still manually configure any user account’s
authentication timeout settings.
Edit
Double-click an entry or select it and click Edit to open a screen where you can modify
the entry’s settings.
#
This field is a sequential value, and it is not associated with a specific entry.
User Type
These are the kinds of user account the NXC supports.
•
•
•
•
•
•
•
•
•
Lease Time
admin - this user can look at and change the configuration of the NXC
limited-admin - this user can look at the configuration of the NXC but not to
change it
user - this user has access to the NXC’s services but cannot look at the
configuration.
guest - this user has access to the NXC’s services but cannot look at the
configuration.
ext-user - this user account is maintained in a remote server, such as RADIUS or
LDAP.
ext-group-user - this user account is maintained in a remote server, such as
RADIUS or LDAP.
guest-manager - this user can log in via the web configurator login screen and
create dynamic guest accounts using the Master Manager screen that pops up.
dynamic-guest - this user has access to the NXC’s services within a given period of
time but cannot look at the configuration.
mac-address - an external server authenticates wireless clients based on their
MAC addresses. After authentication the NXC maps a wireless client to a MAC
address user account (MAC role). User-aware features control MAC address user
access to specific resources. You do not need to set the lease time and
reauthentication time for this type of user account.
This is the default lease time in minutes for each type of user account. It defines the
number of minutes the user has to renew the current session before the user is logged
out.
Admin users renew the session every time the main screen refreshes in the Web
Configurator. Access users can renew the session by clicking the Renew button on their
screen. If you allow access users to renew time automatically, the users can select this
check box on their screen as well. In this case, the session is automatically renewed
before the lease time expires.
Reauthenticatio
n Time
This is the default reauthentication time in minutes for each type of user account. It
defines the number of minutes the user can be logged into the NXC in one session
before having to log in again. Unlike Lease Time, the user has no opportunity to renew
the session without logging out.
Miscellaneous
Settings
Allow renewing
lease time
automatically
Select this check box if access users can renew lease time automatically, as well as
manually, simply by selecting the Updating lease time automatically check box on
their screen.
Enable user idle
detection
This is applicable for access users.
NXC Series User’s Guide
Select this check box if you want the NXC to monitor how long each access user is
logged in and idle (in other words, there is no traffic for this access user). The NXC
automatically logs out the access user once the User idle timeout has been reached.
199
Chapter 17 User/Group
Table 102 Configuration > Object > User/Group > Setting (continued)
LABEL
User idle
timeout
DESCRIPTION
This is applicable for access users.
This field is effective when Enable user idle detection is checked. Type the number of
minutes each access user can be logged in and idle before the NXC automatically logs
out the access user.
User Logon Settings
Limit the
number of
simultaneous
logons for
administration
account
Select this check box if you want to set a limit on the number of simultaneous logins by
admin users. If you do not select this, admin users can login as many times as they
want at the same time using the same or different IP addresses.
Maximum
number per
administration
account
This field is effective when Limit ... for administration account is checked. Type the
maximum number of simultaneous logins by each admin user.
Limit the
number of
simultaneous
logons for
access account
Select this check box if you want to set a limit on the number of simultaneous logins by
non-admin users. If you do not select this, access users can login as many times as
they want as long as they use different IP addresses.
Maximum
number per
access account
This field is effective when Limit ... for access account is checked. Type the
maximum number of simultaneous logins by each access user.
User Lockout
Settings
Enable logon
retry limit
Select this check box to set a limit on the number of times each user can login
unsuccessfully (for example, wrong password) before the IP address is locked out for a
specified amount of time.
Maximum retry
count
This field is effective when Enable logon retry limit is checked. Type the maximum
number of times each user can login unsuccessfully before the IP address is locked out
for the specified lockout period. The number must be between 1 and 99.
Lockout period
This field is effective when Enable logon retry limit is checked. Type the number of
minutes the user must wait to try to login again, if logon retry limit is enabled and the
maximum retry count is reached. This number must be between 1 and 65,535 (about
45.5 days).
Dynamic Guest
Settings
200
Add
Click this to create a new entry.
Edit
Double-click an entry or select it and click Edit to open a screen where you can modify
the entry’s settings.
Remove
To remove an entry, select it and click Remove. The NXC confirms you want to remove
it before doing so. Removing a group does not remove the user accounts in the group.
Object Reference
Select an entry and click Object Reference to open a screen that shows which settings
use the entry.
#
This field is a sequential value, and it is not associated with a specific user group.
Group Name
This field displays the name of each dynamic guest group.
Description
This field displays the description for each dynamic guest group.
Account Deleted
After Expiration
Select this check box to remove the dynamic guest accounts from the Monitor >
System Status > Dynamic Guest screen when they expire.
Dynamic Guest
Note
Enter the notes (such as the SSID and security key the dynamic guests can use to
access the network services) you wan to display in the paper along with the account
information you print out for dynamic guest users. You can enter up to 1024 ASCII
characters.
NXC Series User’s Guide
Chapter 17 User/Group
Table 102 Configuration > Object > User/Group > Setting (continued)
LABEL
DESCRIPTION
Apply
Click Apply to save the changes.
Reset
Click Reset to return the screen to its last-saved settings.
17.4.1 Edit User Authentication Timeout Settings
This screen allows you to set the default authentication timeout settings for the selected type of
user account. These default authentication timeout settings also control the settings for any
existing user accounts that are set to use the default settings. You can still manually configure any
user account’s authentication timeout settings.
To access this screen, go to the Configuration > Object > User/Group > Setting screen, and
click one of the Default Authentication Timeout Settings section’s Edit icons.
Figure 115 User/Group > Setting > Edit User Authentication Timeout Settings
The following table describes the labels in this screen.
Table 103 User/Group > Setting > Edit User Authentication Timeout Settings
LABEL
DESCRIPTION
User Type
This read-only field identifies the type of user account for which you are configuring the
default settings.
•
•
•
•
•
•
•
•
Lease Time
admin - this user can look at and change the configuration of the NXC
limited-admin - this user can look at the configuration of the NXC but not to change it
user - this user has access to the NXC’s services but cannot look at the configuration.
guest - this user has access to the NXC’s services but cannot look at the configuration.
ext-user - this user account is maintained in a remote server, such as RADIUS or LDAP.
ext-group-user - this user account is maintained in a remote server, such as RADIUS
or LDAP.
guest-manager - this user can log in via the web configurator login screen and create
dynamic guest accounts using the Master Manager screen that pops up.
dynamic-guest - this user has access to the NXC’s services within a given period of
time but cannot look at the configuration.
Enter the number of minutes this type of user account has to renew the current session
before the user is logged out. You can specify 1 to 1440 minutes. You can enter 0 to make
the number of minutes unlimited.
Admin users renew the session every time the main screen refreshes in the Web
Configurator. Access users can renew the session by clicking the Renew button on their
screen. If you allow access users to renew time automatically, the users can select this
check box on their screen as well. In this case, the session is automatically renewed before
the lease time expires.
NXC Series User’s Guide
201
Chapter 17 User/Group
Table 103 User/Group > Setting > Edit User Authentication Timeout Settings (continued)
LABEL
DESCRIPTION
Reauthentication
Time
Type the number of minutes this type of user account can be logged into the NXC in one
session before the user has to log in again. You can specify 1 to 1440 minutes. You can
enter 0 to make the number of minutes unlimited. Unlike Lease Time, the user has no
opportunity to renew the session without logging out.
OK
Click OK to save your changes back to the NXC.
Cancel
Click Cancel to exit this screen without saving your changes.
17.4.2 Add/Edit Dynamic Guest Group
This screen allows you to create a dynamic guest group or edit an existing one. To access this
screen, go to the Configuration > Object > User/Group > Setting screen, and click either the
Add icon or an Edit icon in the Dynamic Guest Group section.
Figure 116 User/Group > Setting > Add/Edit Dynamic Guest Group
The following table describes the labels in this screen.
Table 104 User/Group > Setting > Add/Edit Dynamic Guest Group
202
LABEL
DESCRIPTION
Name
Specify the name used to identify the dynamic guest group.
Description
Enter a description for the dynamic guest group.
OK
Click OK to save your changes back to the NXC.
Cancel
Click Cancel to exit this screen without saving your changes.
NXC Series User’s Guide
Chapter 17 User/Group
17.4.3 User Aware Login Example
Access users cannot use the Web Configurator to browse the configuration of the NXC. Instead,
after access users log into the NXC, the following user aware login screen appears.
Figure 117 User Aware Login
The following table describes the labels in this screen.
Table 105 User Aware Login
LABEL
DESCRIPTION
User-defined
lease time (max
... minutes)
Access users can specify a lease time shorter than or equal to the one that you specified.
The default value is the lease time that you specified.
Renew
Access users can click this button to reset the lease time, the amount of time remaining
before the NXC automatically logs them out. The NXC sets this amount of time according
to the
•
•
•
User-defined lease time field in this screen.
Lease time field in the User Add/Edit screen.
Lease time field in the Setting > Edit screen.
Updating lease
time
automatically
This box appears if you checked the Allow renewing lease time automatically box in
the Setting screen. Access users can select this check box to reset the lease time
automatically 30 seconds before it expires. Otherwise, access users have to click the
Renew button to reset the lease time.
Remaining time
before lease
timeout
This field displays the amount of lease time that remains, though the user might be able to
reset it.
Remaining time
before auth.
timeout
This field displays the amount of time that remains before the NXC automatically logs the
access user out, regardless of the lease time.
Remaining time
before session
timeout
This field displays how much longer the user can use the session before the NXC
automatically logs the access user out.
NXC Series User’s Guide
203
Chapter 17 User/Group
17.4.4 Guest Manager Login Example
To create dynamic guest accounts, enter the guest-manager account information in the Web
Configurator login screen. After you log in successfully, the following guest manager screen
appears.
Figure 118 Guest Manager Login
The following table describes the labels in this screen.
Table 106 Guest Manager Login
LABEL
DESCRIPTION
Create account
Enter the number (up to 32) of dynamic guest accounts you want to create.
Guest Name
This field is available only when you want to create one account.
Enter the name for the guest account.
Phone
This field is available only when you want to create one account.
Enter the telephone number for the guest account.
E-mail
This field is available only when you want to create one account.
Enter the E-mail address for the guest account.
204
Company
Enter the company name (up to 64 characters) for the guest account(s).
Address
Enter the geographic address (up to 64 characters) for the guest account(s).
Other
Enter the additional information (up to 60 characters) for the guest account(s).
Account
Expiration Date
Select the date when the account(s) becomes invalid.
Account
Expiration Time
Select the time when the account(s) becomes invalid.
Dynamic Guest
User Group
Select the dynamic guest group with which the dynamic guest account(s) is associated.
Apply
Click this icon to create the account(s).
Logout
Click this icon to exit and go back to the Web Configurator login screen.
NXC Series User’s Guide
Chapter 17 User/Group
17.4.4.1 Guest Account List
After you click Apply to create dynamic guest accounts, the following guest account list screen
appears.
Figure 119 Guest Account List
The following table describes the labels in this screen.
Table 107 Guest Account List
LABEL
DESCRIPTION
#
This is the rank of an account in the list.
Guest Name
This is the descriptive name for an account.
User Name
This is the user name of an account.
Password
This is the password of an account.
Guest(s) Print
Click this icon to print out the account information and the notes you specified in the User/
Group > Setting screen for dynamic guests.
Return
Click this icon to go back to the previous screen.
NXC Series User’s Guide
205
Chapter 17 User/Group
The following figure shows the dynamic guest account printout example.
Figure 120 Preview of Dynamic Guest Account Printout
Dynamic
Guest
Note
17.5 MAC Address
The MAC Address screen maps wireless client MAC addresses to MAC roles (MAC address user
accounts). See MAC Address Accounts on page 192 for more on MAC address user accounts and
MAC roles. Click Configuration > Object > User/Group > MAC Address to open this screen.
Figure 121 Configuration > Object > User/Group > MAC Address
The following table describes the labels in this screen.
Table 108 Configuration > Object > User/Group > MAC Address
206
LABEL
DESCRIPTION
Add
Click this to create a new entry.
Edit
Double-click an entry or select it and click Edit to open a screen where you can modify the
entry’s settings.
Remove
To remove an entry, select it and click Remove. The NXC confirms you want to remove it
before doing so.
NXC Series User’s Guide
Chapter 17 User/Group
Table 108 Configuration > Object > User/Group > MAC Address (continued)
LABEL
DESCRIPTION
#
This field is a sequential value, and it is not associated with a specific entry.
MAC Address/
OUI
The wireless client MAC address or OUI (Organizationally Unique Identifier). The OUI is the
first three octets in a MAC address and uniquely identifies the manufacturer of a network
device.
MAC Type
This displays whether the entry is for a MAC address or an OUI.
ext-mac-address is a MAC address authenticated by an external server.
int-mac-address is a MAC address authenticated by the NXC’s local user database.
ext-oui is an OUI authenticated by an external server.
int-oui is an OUI authenticated by the NXC’s local user database.
MAC Role
The MAC address user account to which the NXC maps the entry’s MAC address or OUI.
Description
This field displays the description for each mapping.
17.5.1 Add/Edit MAC Address
Use the MAC Address Add/Edit screen to map a wireless client’s MAC address or OUI to a MAC
role (MAC address user account).
Figure 122 Configuration > Object > User/Group > MAC Address > Add
The following table describes the labels in this screen.
Table 109 Configuration > Object > User/Group > MAC Address > Add/Edit
LABEL
DESCRIPTION
MAC Address/
OUI
Specify the wireless client’s MAC address or OUI (Organizationally Unique Identifier). The
OUI is the first three octets in a MAC address and uniquely identifies the manufacturer of a
network device.
MAC Role
Select one of the MAC address user accounts that you have configured to which to map
this entry’s MAC address or OUI.
Save it into Local
Database
Select this option to save the mapping settings into the NXC’s local user database and to
have the NXC authenticate the MAC address or OUI using the local user database.
Description
Enter the description of the mapping, if any.
OK
Click OK to save your changes back to the NXC.
Cancel
Click Cancel to exit this screen without saving your changes.
NXC Series User’s Guide
207
C HAPTER
18
AP Profile
18.1 Overview
This chapter shows you how to configure preset profiles for the Access Points (APs) connected to
your NXC’s wireless network.
18.1.1 What You Can Do in this Chapter
• The Radio screen (Section 18.2 on page 209) creates radio configurations that can be used by
the APs.
• The SSID screen (Section 18.3 on page 214) configures three different types of profiles for your
networked APs.
18.1.2 What You Need To Know
The following terms and concepts may help as you read this chapter.
Wireless Profiles
At the heart of all wireless AP configurations on the NXC are profiles. A profile represents a group of
saved settings that you can use across any number of connected APs. You can set up the following
wireless profile types:
• Radio - This profile type defines the properties of an AP’s radio transmitter. You can have a
maximum of 32 radio profiles on the NXC.
• SSID - This profile type defines the properties of a single wireless network signal broadcast by
an AP. Each radio on a single AP can broadcast up to 8 SSIDs. You can have a maximum of 32
SSID profiles on the NXC.
• Security - This profile type defines the security settings used by a single SSID. It controls the
encryption method required for a wireless client to associate itself with the SSID. You can have a
maximum of 32 security profiles on the NXC.
• MAC Filtering - This profile provides an additional layer of security for an SSID, allowing you to
block access or allow access to that SSID based on wireless client MAC addresses. If a client’s
MAC address is on the list, then it is either allowed or denied, depending on how you set up the
MAC Filter profile. You can have a maximum of 32 MAC filtering profiles on the NXC.
• Layer-2 Isolation - This profile can be used to prevent connected wireless clients from
communicating with each other in the NXC’s wireless network(s), on which layer-2 isolation is
enabled, except the devices in the layer-2 isolation list.
NXC Series User’s Guide
208
Chapter 18 AP Profile
SSID
The SSID (Service Set IDentifier) is the name that identifies the Service Set with which a wireless
station is associated. Wireless stations associating to the access point (AP) must have the same
SSID. In other words, it is the name of the wireless network that clients use to connect to it.
WEP
WEP (Wired Equivalent Privacy) encryption scrambles all data packets transmitted between the AP
and the wireless stations associated with it in order to keep network communications private. Both
the wireless stations and the access points must use the same WEP key for data encryption and
decryption.
WPA and WPA2
Wi-Fi Protected Access (WPA) is a subset of the IEEE 802.11i standard. WPA2 (IEEE 802.11i) is a
wireless security standard that defines stronger encryption, authentication and key management
than WPA. Key differences between WPA(2) and WEP are improved data encryption and user
authentication.
IEEE 802.1x
The IEEE 802.1x standard outlines enhanced security methods for both the authentication of
wireless stations and encryption key management. Authentication is done using an external
RADIUS server.
18.2 Radio
This screen allows you to create radio profiles for the APs on your network. A radio profile is a list of
settings that a supported managed AP (NWA5121-N for example) can use to configure either one of
its two radio transmitters. To access this screen click Configuration > Object > AP Profile.
Note: You can have a maximum of 32 radio profiles on the NXC.
Figure 123 Configuration > Object > AP Profile > Radio
NXC Series User’s Guide
209
Chapter 18 AP Profile
The following table describes the labels in this screen.
Table 110 Configuration > Object > AP Profile > Radio
210
LABEL
DESCRIPTION
Add
Click this to add a new radio profile.
Edit
Click this to edit the selected radio profile.
Remove
Click this to remove the selected radio profile.
Activate
To turn on an entry, select it and click Activate.
Inactivate
To turn off an entry, select it and click Inactivate.
Object Reference
Click this to view which other objects are linked to the selected radio profile.
#
This field is a sequential value, and it is not associated with a specific profile.
Status
This icon is lit when the entry is active and dimmed when the entry is inactive.
Profile Name
This field indicates the name assigned to the radio profile.
Frequency Band
This field indicates the frequency band which this radio profile is configured to use.
Channel ID
This field indicates the broadcast channel which this radio profile is configured to use.
Apply
Click Apply to save your changes back to the NXC.
Reset
Click Reset to return the screen to its last-saved settings.
NXC Series User’s Guide
Chapter 18 AP Profile
18.2.1 Add/Edit Radio Profile
This screen allows you to create a new radio profile or edit an existing one. To access this screen,
click the Add button or select a radio profile from the list and click the Edit button.
Figure 124 Configuration > Object > AP Profile > Add/Edit Radio Profile
NXC Series User’s Guide
211
Chapter 18 AP Profile
The following table describes the labels in this screen.
Table 111 Configuration > Object > AP Profile > Add/Edit Radio Profile
LABEL
DESCRIPTION
Hide / Show
Advanced Settings
Click this to hide or show the Advanced Settings in this window.
Create New Object
Select an item from this menu to create a new object of that type. Any objects created
in this way are automatically linked to this radio profile.
General Settings
Activate
Select this option to make this profile active.
Profile Name
Enter up to 31 alphanumeric characters to be used as this profile’s name. Spaces and
underscores are allowed.
802.11 Band
Select the wireless band which this radio profile should use.
2.4 GHz is the frequency used by IEEE 802.11b/g/n wireless clients.
5 GHz is the frequency used by IEEE 802.11a/n wireless clients.
Mode
Select how to let wireless clients connect to the AP.
When using the 2.4 GHz band, select b/g to let IEEE 802.11b and IEEE 802.11g
compliant WLAN devices associate with the AP.
When using the 2.4 GHz band, select b/g/n to let IEEE 802.11b, IEEE 802.11g, and
IEEE 802.11n compliant WLAN devices associate with the AP.
When using the 5 GHz band, select a to let only IEEE 802.11a compliant WLAN devices
associate with the AP.
When using the 5 GHz band, select a/n to let IEEE 802.11a and IEEE 802.11n
compliant WLAN devices associate with the AP.
Channel
Select the wireless channel which this radio profile should use.
It is recommended that you choose the channel least in use by other APs in the region
where this profile will be implemented. This will reduce the amount of interference
between wireless clients and the AP to which this profile is assigned.
Some 5 GHz channels include the label indoor use only. These are for use with an
indoor AP only. Do not use them with an outdoor AP.
Advanced Settings
Channel Width
Select the channel bandwidth you want to use for your wireless network.
Select Auto to allow the NXC to adjust the channel bandwidth to 40 MHz or 20 MHz
depending on network conditions.
Select 20 MHz if you want to lessen radio interference with other wireless devices in
your neighborhood.
Guard Interval
Set the guard interval for this radio profile to either short or long.
The guard interval is the gap introduced between data transmission from users in order
to reduce interference. Reducing the interval increases data transfer rates but also
increases interference. Increasing the interval reduces data transfer rates but also
reduces interference.
212
Enable A-MPDU
Aggregation
Select this to enable A-MPDU aggregation.
A-MPDU Limit
Enter the maximum frame size to be aggregated.
Message Protocol Data Unit (MPDU) aggregation collects Ethernet frames along with
their 802.11n headers and wraps them in a 802.11n MAC header. This method is useful
for increasing bandwidth throughput in environments that are prone to high error
rates.
NXC Series User’s Guide
Chapter 18 AP Profile
Table 111 Configuration > Object > AP Profile > Add/Edit Radio Profile (continued)
LABEL
DESCRIPTION
A-MPDU
Subframe
Enter the maximum number of frames to be aggregated each time.
Enable A-MSDU
Aggregation
Select this to enable A-MSDU aggregation.
Mac Service Data Unit (MSDU) aggregation collects Ethernet frames without any of
their 802.11n headers and wraps the header-less payload in a single 802.11n MAC
header. This method is useful for increasing bandwidth throughput. It is also more
efficient than A-MPDU except in environments that are prone to high error rates.
A-MSDU Limit
Enter the maximum frame size to be aggregated.
RTS/CTS
Threshold
Use RTS/CTS to reduce data collisions on the wireless network if you have wireless
clients that are associated with the same AP but out of range of one another. When
enabled, a wireless client sends an RTS (Request To Send) and then waits for a CTS
(Clear To Send) before it transmits. This stops wireless clients from transmitting
packets at the same time (and causing data collisions).
A wireless client sends an RTS for all packets larger than the number (of bytes) that
you enter here. Set the RTS/CTS equal to or higher than the fragmentation threshold
to turn RTS/CTS off.
Beacon Interval
When a wirelessly networked device sends a beacon, it includes with it a beacon
interval. This specifies the time period before the device sends the beacon again. The
interval tells receiving devices on the network how long they can wait in low-power
mode before waking up to handle the beacon. A high value helps save current
consumption of the access point.
DTIM
Delivery Traffic Indication Message (DTIM) is the time period after which broadcast and
multicast packets are transmitted to mobile clients in the Active Power Management
mode. A high DTIM value can cause clients to lose connectivity with the network. This
value can be set from 1 to 255.
Output Power
Set the output power of the AP in this field. If there is a high density of APs in an area,
decrease the output power of the managed AP to reduce interference with other APs.
Select one of the following Max, -3db (50%), -6db (25%), -9dB (12.5%) or Min.
See the product specifications for more information on your NXC’s output power.
Note: Reducing the output power also reduces the NXC’s effective broadcast radius.
Enable Signal
Threshold
Select the check box to use the signal threshold to ensure wireless clients receive good
throughput. This allows only wireless clients with a strong signal to connect to the AP.
Clear the check box to not require wireless clients to have a minimum signal strength
to connect to the AP.
Station Signal
Threshold
Set a minimum client signal strength. A wireless client is allowed to connect to the AP
only when its signal strength is stronger than the specified threshold.
-20 dBm is the strongest signal you can require and -76 is the weakest.
Disassociate
Station
Threshold
Set a minimum kick-off signal strength. When a wireless client’s signal strength is
lower than the specified threshold, the NXC disconnects the wireless client from the AP.
-20 dBm is the strongest signal you can require and -90 is the weakest.
Allow Station
Connection after
Multiple Retries
Select this option to allow a wireless client to try to associate with the AP again after it
is disconnected due to weak signal strength.
Station Retry
Count
Set the maximum number of times a wireless client can attempt to re-connect to the
AP
NXC Series User’s Guide
213
Chapter 18 AP Profile
Table 111 Configuration > Object > AP Profile > Add/Edit Radio Profile (continued)
LABEL
DESCRIPTION
Rate Configuration
This section controls the data rates permitted for clients.
For each Rate, select a rate option from its list. The rates are:
•
•
•
Multicast Settings
Transmission
Mode
Basic Rate (Mbps) - Set the basic rate configuration in Mbps.
Support Rate (Mbps) - Set the support rate configuration in Mbps.
MCS Rate - Set the MCS rate configuration. IEEE 802.11n supports many different
data rates which are called MCS rates. MCS stands for Modulation and Coding
Scheme. This is an 802.11n feature that increases the wireless network
performance in terms of throughput.
Use this section to set a transmission mode and maximum rate for multicast traffic.
Set how the AP handles multicast traffic.
Select Multicast to Unicast to broadcast wireless multicast traffic to all of the wireless
clients as unicast traffic. Unicast traffic dynamically changes the data rate based on the
application’s bandwidth requirements. The retransmit mechanism of unicast traffic
provides more reliable transmission of the multicast traffic, although it also produces
duplicate packets.
Select Fixed Multicast Rate to send wireless multicast traffic at a single data rate.
You must know the multicast application’s bandwidth requirements and set it in the
following field.
Multicast Rate
(Mbps)
MBSSID Settings
If you set the multicast transmission mode to fixed multicast rate, set the data rate for
multicast traffic here. For example, to deploy 4 Mbps video, select a fixed multicast
rate higher than 4 Mbps.
This section allows you to associate an SSID profile with the radio profile.
Edit
Select and SSID and click this button to reassign it. The selected SSID becomes
editable immediately upon clicking.
SSID Profile
Indicates which SSID profile is associated with this radio profile.
OK
Click OK to save your changes back to the NXC.
Cancel
Click Cancel to exit this screen without saving your changes.
18.3 SSID
The SSID screens allow you to configure three different types of profiles for your networked APs: an
SSID list, which can assign specific SSID configurations to your APs; a security list, which can
assign specific encryption methods to the APs when allowing wireless clients to connect to them;
and a MAC filter list, which can limit connections to an AP based on wireless clients MAC addresses.
18.3.1 SSID List
This screen allows you to create and manage SSID configurations that can be used by the APs. An
SSID, or Service Set IDentifier, is basically the name of the wireless network to which a wireless
client can connect. The SSID appears as readable text to any device capable of scanning for
wireless frequencies (such as the WiFi adapter in a laptop), and is displayed as the wireless network
name when a person makes a connection to it.
To access this screen click Configuration > Object > AP Profile > SSID.
214
NXC Series User’s Guide
Chapter 18 AP Profile
Note: You can have a maximum of 32 SSID profiles on the NXC.
Figure 125 Configuration > Object > AP Profile > SSID List
The following table describes the labels in this screen.
Table 112 Configuration > Object > AP Profile > SSID List
LABEL
DESCRIPTION
Add
Click this to add a new SSID profile.
Edit
Click this to edit the selected SSID profile.
Remove
Click this to remove the selected SSID profile.
Object Reference
Click this to view which other objects are linked to the selected SSID profile (for example,
radio profile).
#
This field is a sequential value, and it is not associated with a specific profile.
Profile Name
This field indicates the name assigned to the SSID profile.
SSID
This field indicates the SSID name as it appears to wireless clients.
Security Profile
This field indicates which (if any) security profile is associated with the SSID profile.
QoS
This field indicates the QoS type associated with the SSID profile.
Forwarding Mode
This field indicates the forwarding mode (local bridge or tunnel) associated with the
SSID profile.
MAC Filtering
Profile
This field indicates which (if any) MAC filtering profile is associated with the SSID profile.
Layer-2 Isolation
Profile
This field indicates which (if any) layer-2 isolation profile is associated with the SSID
profile.
VLAN ID
This field indicates the VLAN ID associated with the SSID profile.
NXC Series User’s Guide
215
Chapter 18 AP Profile
18.3.1.1 Add/Edit SSID Profile
This screen allows you to create a new SSID profile or edit an existing one. To access this screen,
click the Add button or select an SSID profile from the list and click the Edit button.
Figure 126 Configuration > Object > AP Profile > Add/Edit SSID Profile
The following table describes the labels in this screen.
Table 113 Configuration > Object > AP Profile > Add/Edit SSID Profile
LABEL
DESCRIPTION
Create new
Object
Select an object type from the list to create a new one associated with this SSID profile.
Profile Name
Enter up to 31 alphanumeric characters for the profile name. This name is only visible in
the Web Configurator and is only for management purposes. Spaces and underscores are
allowed.
SSID
Enter the SSID name for this profile. This is the name visible on the network to wireless
clients. Enter up to 32 characters, spaces and underscores are allowed.
Security Profile
Select a security profile from this list to associate with this SSID. If none exist, you can use
the Create new Object menu to create one.
Note: It is highly recommended that you create security profiles for all of your SSIDs to
enhance your network security.
MAC Filtering
Profile
Select a MAC filtering profile from the list to associate with this SSID. If none exist, you can
sue the Create new Object menu to create one.
MAC filtering allows you to limit the wireless clients connecting to your network through a
particular SSID by wireless client MAC addresses. Any clients that have MAC addresses not
in the MAC filtering profile of allowed addresses are denied connections.
The disable setting means no MAC filtering is used.
216
NXC Series User’s Guide
Chapter 18 AP Profile
Table 113 Configuration > Object > AP Profile > Add/Edit SSID Profile (continued)
LABEL
DESCRIPTION
Layer-2 Isolation
Profile
Select a layer-2 isolation profile from the list to associate with this SSID. If none exist, you
can sue the Create new Object menu to create one.
The disable setting means no layer-2 isolation is used.
QoS
Select a Quality of Service (QoS) access category to associate with this SSID. Access
categories minimize the delay of data packets across a wireless network. Certain
categories, such as video or voice, are given a higher priority due to the time sensitive
nature of their data packets.
QoS access categories are as follows:
disable: Turns off QoS for this SSID. All data packets are treated equally and not tagged
with access categories.
WMM: Enables automatic tagging of data packets. The NXC assigns access categories to
the SSID by examining data as it passes through it and making a best guess effort. If
something looks like video traffic, for instance, it is tagged as such.
WMM_VOICE: All wireless traffic to the SSID is tagged as voice data. This is
recommended if an SSID is used for activities like placing and receiving VoIP phone calls.
WMM_VIDEO: All wireless traffic to the SSID is tagged as video data. This is
recommended for activities like video conferencing.
WMM_BEST_EFFORT: All wireless traffic to the SSID is tagged as “best effort,” meaning
the data travels the best route it can without displacing higher priority traffic. This is good
for activities that do not require the best bandwidth throughput, such as surfing the
Internet.
WMM_BACKGROUND: All wireless traffic to the SSID is tagged as low priority or
“background traffic”, meaning all other access categories take precedence over this one. If
traffic from an SSID does not have strict throughput requirements, then this access
category is recommended. For example, an SSID that only has network printers connected
to it.
Rate Limiting
Downlink
Define the maximum incoming transmission data rate (either in mbps or kbps) on a perstation basis.
Uplink
Define the maximum outgoing transmission data rate (either in mbps or kbps) on a perstation basis.
Band Select
To improve network performance and avoid interference in the 2.4 GHz frequency band,
you can enable this feature to use the 5 GHz band first. You should set 2.4GHz and 5 GHz
radio profiles to use the same SSID and security settings.
Select standard to have the AP try to connect the wireless clients to the same SSID using
the 5 GHZ band. Connections to an SSID using the 2.4GHz band are still allowed.
Select force to have the wireless clients always connect to an SSID using the 5 GHZ band.
Connections to an SSID using the 2.4GHz band are not allowed. It is recommanded you
select this option when the AP and wireless clients can function in either frequency band.
Otherwise, select disable to turn off this feature.
Forwarding Mode
Select a forwarding mode for traffic from this SSID.
VLAN ID
If you selected the Local Bridge forwarding mode, enter the VLAN ID that will be used to
tag all traffic originating from this SSID if the VLAN is different from the native VLAN.
VLAN
Interface
If you selected the Tunnel forwarding mode, select a VLAN interface.
NXC Series User’s Guide
217
Chapter 18 AP Profile
Table 113 Configuration > Object > AP Profile > Add/Edit SSID Profile (continued)
LABEL
DESCRIPTION
Hidden SSID
Select this if you want to “hide” your SSID from wireless clients. This tells any wireless
clients in the vicinity of the AP using this SSID profile not to display its SSID name as a
potential connection. Not all wireless clients respect this flag and display it anyway.
When an SSID is “hidden” and a wireless client cannot see it, the only way you can connect
to the SSID is by manually entering the SSID name in your wireless connection setup
screen(s) (these vary by client, client connectivity software, and operating system).
Enable Intra-BSS
Traffic Blocking
Select this option to prevent crossover traffic from within the same SSID.
Note: If you associate a layer-2 isolation profile with the SSID, this option will be selected
automatically and cannot be configured.
OK
Click OK to save your changes back to the NXC.
Cancel
Click Cancel to exit this screen without saving your changes.
18.3.2 Security List
This screen allows you to manage wireless security configurations that can be used by your SSIDs.
Wireless security is implemented strictly between the AP broadcasting the SSID and the stations
that are connected to it.
To access this screen click Configuration > Object > AP Profile > SSID > Security List.
Note: You can have a maximum of 32 security profiles on the NXC.
Figure 127 Configuration > Object > AP Profile > SSID > Security List
The following table describes the labels in this screen.
Table 114 Configuration > Object > AP Profile > SSID > Security List
218
LABEL
DESCRIPTION
Add
Click this to add a new security profile.
Edit
Click this to edit the selected security profile.
Remove
Click this to remove the selected security profile.
Object Reference
Click this to view which other objects are linked to the selected security profile (for
example, SSID profile).
#
This field is a sequential value, and it is not associated with a specific profile.
NXC Series User’s Guide
Chapter 18 AP Profile
Table 114 Configuration > Object > AP Profile > SSID > Security List (continued)
LABEL
DESCRIPTION
Profile Name
This field indicates the name assigned to the security profile.
Security Mode
This field indicates this profile’s security mode (if any).
NXC Series User’s Guide
219
Chapter 18 AP Profile
18.3.2.1 Add/Edit Security Profile
This screen allows you to create a new security profile or edit an existing one. To access this screen,
click the Add button or select a security profile from the list and click the Edit button.
Note: This screen’s options change based on the Security Mode selected. Only the
default screen is displayed here.
Figure 128 Configuration > Object > AP Profile > SSID > Security Profile > Add/Edit Security Profile
220
NXC Series User’s Guide
Chapter 18 AP Profile
The following table describes the labels in this screen.
Table 115 Configuration > Object > AP Profile > SSID > Security Profile > Add/Edit Security Profile
LABEL
DESCRIPTION
Profile Name
Enter up to 31 alphanumeric characters for the profile name. This name is only visible in
the Web Configurator and is only for management purposes. Spaces and underscores
are allowed.
Security Mode
Select a security mode from the list: wep, wpa, wpa2, or wpa2-mix.
Radius Server Type
Select Internal to use the NXC’s internal authentication database, or External to use
an external RADIUS server for authentication.
Primary /
Secondary Radius
Server Activate
Select this to have the NXC use the specified RADIUS server.
Radius Server IP
Address
Enter the IP address of the RADIUS server to be used for authentication.
Radius Server Port
Enter the port number of the RADIUS server to be used for authentication.
Radius Server
Secret
Enter the shared secret password of the RADIUS server to be used for authentication.
MAC Authentication
Select this to use an external server to authenticate wireless clients by their MAC
addresses. Users cannot get an IP address if the MAC authentication fails. See page 192
for information on MAC address user accounts.
An external server can use the wireless client’s account (username/password) or Calling
Station ID for MAC authentication. Configure the ones the external server uses.
Auth. Method
This field is available only when you set the RADIUS server type to Internal.
Select an authentication method if you have created any in the Configuration >
Object > Auth. Method screen.
Delimiter (Account)
Select the separator the external server uses for the two-character pairs within account
MAC addresses.
Case (Account)
Select the case (upper or lower) the external server requires for letters in the account
MAC addresses.
Delimiter (Calling
Station ID)
RADIUS servers can require the MAC address in the Calling Station ID RADIUS attribute.
Case (Calling
Station ID)
Select the case (upper or lower) the external server requires for letters in the calling
station MAC addresses.
Select the separator the external server uses for the pairs in calling station MAC
addresses.
Authentication
Settings
802.1X
Select this to enable 802.1x secure authentication.
Reauthentication
Timer
Enter the interval (in seconds) between authentication requests. Enter a 0 for unlimited
requests.
Idle Timeout
Enter the idle interval (in seconds) that a client can be idle before authentication is
discontinued.
Authentication Type
Select a WEP authentication method. Choices are Open or Share key.
NXC Series User’s Guide
221
Chapter 18 AP Profile
Table 115 Configuration > Object > AP Profile > SSID > Security Profile > Add/Edit Security Profile
LABEL
DESCRIPTION
Key Length
Select the bit-length of the encryption key to be used in WEP connections.
If you select WEP-64:
•
Enter 10 hexadecimal digits in the range of “A-F”, “a-f” and “0-9” (for example,
0x11AA22BB33) for each Key used.
or
•
Enter 5 ASCII characters (case sensitive) ranging from “a-z”, “A-Z” and “0-9” (for
example, MyKey) for each Key used.
If you select WEP-128:
•
Enter 26 hexadecimal digits in the range of “A-F”, “a-f” and “0-9” (for example,
0x00112233445566778899AABBCC) for each Key used.
or
•
Enter 13 ASCII characters (case sensitive) ranging from “a-z”, “A-Z” and “0-9” (for
example, MyKey12345678) for each Key used.
Key 1~4
Based on your Key Length selection, enter the appropriate length hexadecimal or
ASCII key.
PSK
Select this option to use a Pre-Shared Key with WPA encryption.
Pre-Shared Key
Enter a pre-shared key of between 8 and 63 case-sensitive ASCII characters (including
spaces and symbols) or 64 hexadecimal characters.
Cipher Type
Select an encryption cipher type from the list.
•
•
•
auto - This automatically chooses the best available cipher based on the cipher in
use by the wireless client that is attempting to make a connection.
tkip - This is the Temporal Key Integrity Protocol encryption method added later to
the WEP encryption protocol to further secure. Not all wireless clients may support
this.
aes - This is the Advanced Encryption Standard encryption method. It is a more
recent development over TKIP and considerably more robust. Not all wireless clients
may support this.
Group Key Update
Timer
Enter the interval (in seconds) at which the AP updates the group WPA encryption key.
Pre-Authentication
This field is available only when you set Security Mode to wpa2 or wpa2-mix and
enable 802.1x authentication.
Enable or Disable pre-authentication to allow the AP to send authentication
information to other APs on the network, allowing connected wireless clients to switch
APs without having to re-authenticate their network connection.
222
OK
Click OK to save your changes back to the NXC.
Cancel
Click Cancel to exit this screen without saving your changes.
NXC Series User’s Guide
Chapter 18 AP Profile
18.3.3 MAC Filter List
This screen allows you to create and manage MAC filtering profiles that can be used by your SSIDs.
To access this screen click Configuration > Object > AP Profile > SSID > MAC Filter List.
Note: You can have a maximum of 32 MAC filtering profiles on the NXC.
Figure 129 Configuration > Object > AP Profile > SSID > MAC Filter List
The following table describes the labels in this screen.
Table 116 Configuration > Object > AP Profile > SSID > MAC Filter List
LABEL
DESCRIPTION
Add
Click this to add a new MAC filtering profile.
Edit
Click this to edit the selected MAC filtering profile.
Remove
Click this to remove the selected MAC filtering profile.
Object Reference
Click this to view which other objects are linked to the selected MAC filtering profile (for
example, SSID profile).
#
This field is a sequential value, and it is not associated with a specific profile.
Profile Name
This field indicates the name assigned to the MAC filtering profile.
Filter Action
This field indicates this profile’s filter action (if any).
NXC Series User’s Guide
223
Chapter 18 AP Profile
18.3.3.1 Add/Edit MAC Filter Profile
This screen allows you to create a new MAC filtering profile or edit an existing one. To access this
screen, click the Add button or select a MAC filtering profile from the list and click the Edit button.
Figure 130 SSID > MAC Filter List > Add/Edit MAC Filter Profile
The following table describes the labels in this screen.
Table 117 SSID > MAC Filter List > Add/Edit MAC Filter Profile
224
LABEL
DESCRIPTION
Profile Name
Enter up to 31 alphanumeric characters for the profile name. This name is only visible in the
Web Configurator and is only for management purposes. Spaces and underscores are
allowed.
Filter Action
Select allow to permit the wireless client with the MAC addresses in this profile to connect to
the network through the associated SSID; select deny to block the wireless clients with the
specified MAC addresses.
Add
Click this to add a MAC address to the profile’s list.
Edit
Click this to edit the selected MAC address in the profile’s list.
Remove
Click this to remove the selected MAC address from the profile’s list.
#
This field is a sequential value, and it is not associated with a specific profile.
MAC
This field specifies a MAC address associated with this profile.
Description
This field displays a description for the MAC address associated with this profile. You can click
the description to make it editable. Enter up to 60 characters, spaces and underscores
allowed.
OK
Click OK to save your changes back to the NXC.
Cancel
Click Cancel to exit this screen without saving your changes.
NXC Series User’s Guide
Chapter 18 AP Profile
18.3.4 Layer-2 Isolation List
This screen allows you to create and manage layer-2 isolation profiles that can be used by your
SSIDs. To access this screen click Configuration > Object > AP Profile > SSID > Layer-2
Isolation List.
If a device’s MAC addresses is NOT listed in a layer-2 isolation profile, it is blocked from
communicating with other devices in an SSID on which layer-2 isolation is enabled.
Note: You can have a maximum of 32 layer-2 isolation profiles on the NXC.
Figure 131 Configuration > Object > AP Profile > SSID > Layer-2 Isolation List
The following table describes the labels in this screen.
Table 118 Configuration > Object > AP Profile > SSID > Layer-2 Isolation List
LABEL
DESCRIPTION
Add
Click this to add a new layer-2 isolation profile.
Edit
Click this to edit the selected layer-2 isolation profile.
Remove
Click this to remove the selected layer-2 isolation profile.
Object Reference
Click this to view which other objects are linked to the selected layer-2 isolation profile (for
example, SSID profile).
#
This field is a sequential value, and it is not associated with a specific profile.
Profile Name
This field indicates the name assigned to the layer-2 isolation profile.
18.3.4.1 Add/Edit Layer-2 Isolation Profile
This screen allows you to create a new layer-2 isolation profile or edit an existing one. To access
this screen, click the Add button or select a layer-2 isolation profile from the list and click the Edit
button.
NXC Series User’s Guide
225
Chapter 18 AP Profile
Note: You need to know the MAC address of each device that you want to allow to be
accessed by other devices in the SSID to which the layer-2 isolation profile is
applied.
Figure 132 SSID > MAC Filter List > Add/Edit Layer-2 Isolation Profile
The following table describes the labels in this screen.
Table 119 SSID > MAC Filter List > Add/Edit Layer-2 Isolation Profile
226
LABEL
DESCRIPTION
Profile Name
Enter up to 31 alphanumeric characters for the profile name. This name is only visible in the
Web Configurator and is only for management purposes. Underscores are allowed.
Add
Click this to add a MAC address to the profile’s list.
Edit
Click this to edit the selected MAC address in the profile’s list.
Remove
Click this to remove the selected MAC address from the profile’s list.
#
This field is a sequential value, and it is not associated with a specific profile.
MAC
This field specifies a MAC address associated with this profile.
Description
This field displays a description for the MAC address associated with this profile. You can click
the description to make it editable. Enter up to 60 characters, spaces and underscores
allowed.
OK
Click OK to save your changes back to the NXC.
Cancel
Click Cancel to exit this screen without saving your changes.
NXC Series User’s Guide
C HAPTER
19
MON Profile
19.1 Overview
This screen allows you to set up monitor mode configurations that allow your connected APs to scan
for other wireless devices in the vicinity. Once detected, you can use the MON Mode screen
(Chapter 7 on page 92) to classify them as either rogue or friendly and then manage them
accordingly.
19.1.1 What You Can Do in this Chapter
The MON Profile screen (Section 19.2 on page 228) creates preset monitor mode configurations
that can be used by the APs.
19.1.2 What You Need To Know
The following terms and concepts may help as you read this chapter.
Active Scan
An active scan is performed when an 802.11-compatible wireless monitoring device is explicitly
triggered to scan a specified channel or number of channels for other wireless devices broadcasting
on the 802.11 frequencies by sending probe request frames.
Passive Scan
A passive scan is performed when an 802.11-compatible monitoring device is set to periodically
listen to a specified channel or number of channels for other wireless devices broadcasting on the
802.11 frequencies.
NXC Series User’s Guide
227
Chapter 19 MON Profile
19.2 MON Profile
This screen allows you to create monitor mode configurations that can be used by the APs. To
access this screen, login to the Web Configurator, and click Configuration > Object > MON
Profile.
Figure 133 Configuration > Object > MON Profile
The following table describes the labels in this screen.
Table 120 Configuration > Object > MON Profile
228
LABEL
DESCRIPTION
Add
Click this to add a new monitor mode profile.
Edit
Click this to edit the selected monitor mode profile.
Remove
Click this to remove the selected monitor mode profile.
Activate
To turn on an entry, select it and click Activate.
Inactivate
To turn off an entry, select it and click Inactivate.
Object Reference
Click this to view which other objects are linked to the selected monitor mode profile (for
example, an AP management profile).
#
This field is a sequential value, and it is not associated with a specific user.
Status
This icon is lit when the entry is active and dimmed when the entry is inactive.
Profile Name
This field indicates the name assigned to the monitor profile.
Apply
Click Apply to save your changes back to the NXC.
Reset
Click Reset to return the screen to its last-saved settings.
NXC Series User’s Guide
Chapter 19 MON Profile
19.2.1 Add/Edit MON Profile
This screen allows you to create a new monitor mode profile or edit an existing one. To access this
screen, click the Add button or select and existing monitor mode profile and click the Edit button.
Figure 134 Configuration > Object > MON Profile > Add/Edit MON Profile
The following table describes the labels in this screen.
Table 121 Configuration > Object > MON Profile > Add/Edit MON Profile
LABEL
DESCRIPTION
Activate
Select this to activate this monitor mode profile.
Profile Name
This field indicates the name assigned to the monitor mode profile.
Channel dwell time
Enter the interval (in milliseconds) before the AP switches to another channel for
monitoring.
Scan Channel Mode
Select auto to have the AP switch to the next sequential channel once the Channel
dwell time expires.
Select manual to set specific channels through which to cycle sequentially when the
Channel dwell time expires. Selecting this options makes the Scan Channel List
options available.
NXC Series User’s Guide
229
Chapter 19 MON Profile
Table 121 Configuration > Object > MON Profile > Add/Edit MON Profile (continued)
LABEL
DESCRIPTION
Set Scan Channel
List (2.4 GHz)
Move a channel from the Available channels column to the Channels selected
column to have the APs using this profile scan that channel when Scan Channel Mode
is set to manual.
These channels are limited to the 2 GHz range (802.11 b/g/n).
Set Scan Channel
List (5 GHz)
Move a channel from the Available channels column to the Channels selected
column to have the APs using this profile scan that channel when Scan Channel Mode
is set to manual.
These channels are limited to the 5 GHz range (802.11 a/n).
OK
Click OK to save your changes back to the NXC.
Cancel
Click Cancel to exit this screen without saving your changes.
19.3 Technical Reference
The following section contains additional technical information about the features described in this
chapter.
Rogue APs
Rogue APs are wireless access points operating in a network’s coverage area that are not under the
control of the network’s administrators, and can open up holes in a network’s security. Attackers
can take advantage of a rogue AP’s weaker (or non-existent) security to gain access to the network,
or set up their own rogue APs in order to capture information from wireless clients. If a scan reveals
a rogue AP, you can use commercially-available software to physically locate it.
Figure 135 Rogue AP Example
X
A
RG
C
B
In the example above, a corporate network’s security is compromised by a rogue AP (RG) set up by
an employee at his workstation in order to allow him to connect his notebook computer wirelessly
(A). The company’s legitimate wireless network (the dashed ellipse B) is well-secured, but the
rogue AP uses inferior security that is easily broken by an attacker (X) running readily available
230
NXC Series User’s Guide
Chapter 19 MON Profile
encryption-cracking software. In this example, the attacker now has access to the company
network, including sensitive data stored on the file server (C).
Friendly APs
If you have more than one AP in your wireless network, you should also configure a list of “friendly”
APs. Friendly APs are other wireless access points that are detected in your network, as well as any
others that you know are not a threat (those from recognized networks, for example). It is
recommended that you export (save) your list of friendly APs often, especially if you have a
network with a large number of access points.
NXC Series User’s Guide
231
C HAPTER
20
ZyMesh Profile
20.1 Overview
This chapter shows you how to configure ZyMesh profiles for the NXC to apply to the managed APs.
ZyMesh is a ZyXEL-proprietary feature. In a ZyMesh, multiple managed APs form a WDS (Wireless
Distribution System) to expand the wireless network and provide services or forward traffic
between the NXC and wireless clients. ZyMesh also allows the NXC to use CAPWAP to automatically
update the configuration settings on the managed APs (in repeater mode) through wireless
connections. The managed APs (in repeater mode) are provisioned hop by hop.
The managed APs in a WDS or ZyMesh must use the same SSID, channel number and pre-shared
key. A manged AP can be either a root AP or repeater in a ZyMesh.
Note: All managed APs should be connected to the NXC directly to get the configuration
file before being deployed to build a ZyMesh/WDS. Ensure you restart the managed
AP after you change its operating mode using the Configuration > Wireless >
AP Management screen (see Section 7.3 on page 93).
• Root AP: a managed AP that can transmit and receive data from the NXC via a wired Ethernet
connection.
• Repeater: a managed AP that transmit and/or receive data from the NXC via a wireless
connection through a root AP.
Note: When managed APs are deployed to form a ZyMesh/WDS for the first time, the root
AP must be connected to an AP controller (the NXC).
NXC Series User’s Guide
232
Chapter 20 ZyMesh Profile
In the following example, managed APs 1 and 2 act as a root AP and managed APs A, B and C are
repeaters.
The maximum number of hops (the repeaters beteen a wireless client and the root AP) you can
have in a ZyMesh varies according to how many wireless clients a managed AP can support.
Note: A ZyMesh/WDS link with more hops has lower throughput.
Note: When the wireless connection between the root AP and the repeater is up, in order
to prevent bridge loops, the repeater would not be able to transmit data through its
Ethernet port(s). The repeater then could only receive power from a PoE device if
you use PoE to provide power to the managed AP via an 8-ping Etherent cable.
20.1.1 What You Can Do in this Chapter
The ZyMesh Profile screen (Section 20.2 on page 234) creates preset ZyMesh configurations that
can be used by the NXC.
NXC Series User’s Guide
233
Chapter 20 ZyMesh Profile
20.2 ZyMesh Profile
This screen allows you to manage and create ZyMesh profiles that can be used by the APs. To
access this screen, click Configuration > Object > ZyMesh Profile.
Figure 136 Configuration > Object > ZyMesh Profile
The following table describes the labels in this screen.
Table 122 Configuration > Object > ZyMesh Profile
LABEL
DESCRIPTION
Add
Click this to add a new profile.
Edit
Click this to edit the selected profile.
Remove
Click this to remove the selected profile.
#
This field is a sequential value, and it is not associated with a specific profile.
Profile Name
This field indicates the name assigned to the profile.
ZyMesh SSID
This field shows the SSID specified in this ZyMesh profile.
20.2.1 Add/Edit ZyMesh Profile
This screen allows you to create a new ZyMesh profile or edit an existing one. To access this screen,
click the Add button or select and existing profile and click the Edit button.
Figure 137 Configuration > Object > ZyMesh Profile > Add/Edit ZyMesh Profile
234
NXC Series User’s Guide
Chapter 20 ZyMesh Profile
The following table describes the labels in this screen.
Table 123 Configuration > Object > ZyMesh Profile > Add/Edit ZyMesh Profile
LABEL
DESCRIPTION
Profile Name
Enter up to 31 alphanumeric characters for the profile name.
ZyMesh SSID
Enter the SSID with which you want the managed AP to connect to a root AP or
repeater to build a ZyMesh link.
Note: The ZyMesh SSID is hidden in the outgoing beacon frame so a wireless device
cannot obtain the SSID through scanning using a site survey tool.
Pre-Shared Key
Enter a pre-shared key of between 8 and 63 case-sensitive ASCII characters (including
spaces and symbols) or 64 hexadecimal characters.
The key is used to encrypt the wireless traffic between the APs.
OK
Click OK to save your changes back to the NXC.
Cancel
Click Cancel to exit this screen without saving your changes.
NXC Series User’s Guide
235
C HAPTER
21
Addresses
21.1 Overview
Address objects can represent a single IP address or a range of IP addresses.
21.1.1 What You Can Do in this Chapter
• The Address screen (Section 21.2 on page 236) provides a summary of all addresses in the
NXC.
• The Address Group summary screen (Section 21.3 on page 238) and the Address Group
Add/Edit screen maintain address groups in the NXC.
21.1.2 What You Need To Know
The following terms and concepts may help as you read this chapter.
Addresses
Address objects and address groups are used in dynamic routes and firewall rules. Please see the
respective sections for more information about how address objects and address groups are used in
each one.
Address groups are composed of address objects and address groups. The sequence of members in
the address group is not important.
21.2 Address Summary
The address screens are used to create, maintain, and remove addresses. There are the types of
address objects.
• HOST - a host address is defined by an IP Address.
• RANGE - a range address is defined by a Starting IP Address and an Ending IP Address.
• SUBNET - a network address is defined by a Network IP address and Netmask subnet mask.
NXC Series User’s Guide
236
Chapter 21 Addresses
The Address screen provides a summary of all addresses in the NXC. To access this screen, click
Configuration > Object > Address > Address. Click a column’s heading cell to sort the table
entries by that column’s criteria. Click the heading cell again to reverse the sort order.
Figure 138 Configuration > Object > Address > Address Summary
The following table describes the labels in this screen.
Table 124 Configuration > Object > Address > Address Summary
LABEL
DESCRIPTION
Add
Click this to create a new entry.
Edit
Double-click an entry or select it and click Edit to be able to modify the entry’s settings.
Remove
To remove an entry, select it and click Remove. The NXC confirms you want to remove it
before doing so.
Object Reference
Select an entry and click Object Reference to open a screen that shows which settings
use the entry.
#
This field is a sequential value, and it is not associated with a specific address.
Name
This field displays the configured name of each address object.
Type
This field displays the type of each address object. “INTERFACE” means the object uses
the settings of one of the NXC’s interfaces.
IPv4 Address
This field displays the IP addresses represented by each address object. If the object’s
settings are based on one of the NXC’s interfaces, the name of the interface displays first
followed by the object’s current address settings.
21.2.1 Add/Edit Address
The Add/Edit Address screen allows you to create a new address or edit an existing one. To
access this screen, go to the Address screen, and click either the Add icon or an Edit icon.
Figure 139 Configuration > Object > Address > Address > Add/Edit
NXC Series User’s Guide
237
Chapter 21 Addresses
The following table describes the labels in this screen.
Table 125 Configuration > Object > Address > Address > Add/Edit
LABEL
DESCRIPTION
Name
Type the name used to refer to the address. You may use 1-31 alphanumeric characters,
underscores(_), or dashes (-), but the first character cannot be a number. This value is
case-sensitive.
Address Type
Select the type of address you want to create. Choices are: HOST, RANGE, SUBNET,
INTERFACE IP, INTERFACE SUBNET, and INTERFACE GATEWAY.
Note: The NXC automatically updates address objects that are based on an interface’s IP
address, subnet, or gateway if the interface’s IP address settings change. For
example, if you change ge1’s IP address, the NXC automatically updates the
corresponding interface-based, LAN subnet address object.
IP Address
This field is only available if the Address Type is HOST. This field cannot be blank. Enter
the IP address that this address object represents.
Starting IP
Address
This field is only available if the Address Type is RANGE. This field cannot be blank. Enter
the beginning of the range of IP addresses that this address object represents.
Ending IP
Address
This field is only available if the Address Type is RANGE. This field cannot be blank. Enter
the end of the range of IP address that this address object represents.
Network
This field is only available if the Address Type is SUBNET, in which case this field cannot
be blank. Enter the IP address of the network that this address object represents.
Netmask
This field is only available if the Address Type is SUBNET, in which case this field cannot
be blank. Enter the subnet mask of the network that this address object represents. Use
dotted decimal format.
Interface
If you selected INTERFACE IP, INTERFACE SUBNET, or INTERFACE GATEWAY as the
Address Type, use this field to select the interface of the network that this address object
represents.
OK
Click OK to save your changes back to the NXC.
Cancel
Click Cancel to exit this screen without saving your changes.
21.3 Address Group Summary
The Address Group screen provides a summary of all address groups. To access this screen, click
Configuration > Object > Address > Address Group. Click a column’s heading cell to sort the
table entries by that column’s criteria. Click the heading cell again to reverse the sort order.
Figure 140 Configuration > Object > Address > Address Group
238
NXC Series User’s Guide
Chapter 21 Addresses
The following table describes the labels in this screen.
Table 126 Configuration > Object > Address > Address Group
LABEL
DESCRIPTION
Add
Click this to create a new entry.
Edit
Double-click an entry or select it and click Edit to be able to modify the entry’s settings.
Remove
To remove an entry, select it and click Remove. The NXC confirms you want to remove it
before doing so.
Object
Reference
Select an entry and click Object Reference to open a screen that shows which settings use
the entry.
#
This field is a sequential value, and it is not associated with a specific address group.
Name
This field displays the name of each address group.
Description
This field displays the description of each address group, if any.
21.3.1 Add/Edit Address Group Rule
The Add/Edit Address Group Rule screen allows you to create a new address group or edit an
existing one. To access this screen, go to the Address Group screen and click either the Add icon
or an Edit icon.
Figure 141 Configuration > Object > Address > Address Group > Add/Edit
The following table describes the labels in this screen.
Table 127 Configuration > Object > Address > Address Group > Add/Edit
LABEL
DESCRIPTION
Name
Enter a name for the address group. You may use 1-31 alphanumeric characters,
underscores(_), or dashes (-), but the first character cannot be a number. This value is
case-sensitive.
Description
This field displays the description of each address group, if any. You can use up to 60
characters, punctuation marks, and spaces.
NXC Series User’s Guide
239
Chapter 21 Addresses
Table 127 Configuration > Object > Address > Address Group > Add/Edit (continued)
LABEL
DESCRIPTION
Member List
The Member list displays the names of the address and address group objects that have
been added to the address group. The order of members is not important.
Select items from the Available list that you want to be members and move them to the
Member list. You can double-click a single entry to move it or use the [Shift] or [Ctrl] key
to select multiple entries and use the arrow button to move them.
Move any members you do not want included to the Available list.
240
OK
Click OK to save your changes back to the NXC.
Cancel
Click Cancel to exit this screen without saving your changes.
NXC Series User’s Guide
C HAPTER
22
Services
22.1 Overview
Use service objects to define TCP applications, UDP applications, and ICMP messages. You can also
create service groups to refer to multiple service objects in other features.
22.1.1 What You Can Do in this Chapter
• The Service screens (Section 22.2 on page 242) display and configure the NXC’s list of services
and their definitions.
• The Service Group screens (Section 22.2 on page 242) display and configure the NXC’s list of
service groups.
22.1.2 What You Need to Know
The following terms and concepts may help as you read this chapter.
IP Protocols
IP protocols are based on the eight-bit protocol field in the IP header. This field represents the nextlevel protocol that is sent in this packet. This section discusses three of the most common IP
protocols.
Computers use Transmission Control Protocol (TCP, IP protocol 6) and User Datagram Protocol
(UDP, IP protocol 17) to exchange data with each other. TCP guarantees reliable delivery but is
slower and more complex. Some uses are FTP, HTTP, SMTP, and TELNET. UDP is simpler and faster
but is less reliable. Some uses are DHCP, DNS, RIP, and SNMP.
TCP creates connections between computers to exchange data. Once the connection is established,
the computers exchange data. If data arrives out of sequence or is missing, TCP puts it in sequence
or waits for the data to be re-transmitted. Then, the connection is terminated.
In contrast, computers use UDP to send short messages to each other. There is no guarantee that
the messages arrive in sequence or that the messages arrive at all.
Both TCP and UDP use ports to identify the source and destination. Each port is a 16-bit number.
Some port numbers have been standardized and are used by low-level system processes; many
others have no particular meaning.
Unlike TCP and UDP, Internet Control Message Protocol (ICMP, IP protocol 1) is mainly used to send
error messages or to investigate problems. For example, ICMP is used to send the response if a
computer cannot be reached. Another use is ping. ICMP does not guarantee delivery, but networks
often treat ICMP messages differently, sometimes looking at the message itself to decide where to
send it.
NXC Series User’s Guide
241
Chapter 22 Services
Service Objects and Service Groups
Use service objects to define IP protocols.
• TCP applications
• UDP applications
• ICMP messages
• user-defined services (for other types of IP protocols)
These objects are used in policy routes.
Use service groups when you want to create the same rule for several services, instead of creating
separate rules for each service. Service groups may consist of services and other service groups.
The sequence of members in the service group is not important.
22.2 Service Summary
The Service summary screen provides a summary of all services and their definitions. In addition,
this screen allows you to add, edit, and remove services.
To access this screen, log in to the Web Configurator, and click Configuration > Object > Service
> Service. Click a column’s heading cell to sort the table entries by that column’s criteria. Click the
heading cell again to reverse the sort order.
Figure 142 Configuration > Object > Service > Service
242
NXC Series User’s Guide
Chapter 22 Services
The following table describes the labels in this screen.
Table 128 Configuration > Object > Service > Service
LABEL
DESCRIPTION
Add
Click this to create a new entry.
Edit
Double-click an entry or select it and click Edit to be able to modify the entry’s settings.
Remove
To remove an entry, select it and click Remove. The NXC confirms you want to remove it
before doing so.
Object
Reference
Select an entry and click Object Reference to open a screen that shows which settings use
the entry.
#
This field is a sequential value, and it is not associated with a specific service.
Name
This field displays the name of each service.
Content
This field displays a description of each service.
22.2.1 Add/Edit Service Rule
The Add/Edit Service Rule screen allows you to create a new service or edit an existing one. To
access this screen, go to the Service screen and click either the Add icon or an Edit icon.
Figure 143 Configuration > Object > Service > Service > Add/Edit
The following table describes the labels in this screen.
Table 129 Configuration > Object > Service > Service > Add/Edit
LABEL
DESCRIPTION
Name
Type the name used to refer to the service. You may use 1-31 alphanumeric characters,
underscores(_), or dashes (-), but the first character cannot be a number. This value is casesensitive.
IP Protocol
Select the protocol the service uses. Choices are: TCP, UDP, ICMP, and User Defined.
Starting Port
Ending Port
This field appears if the IP Protocol is TCP or UDP. Specify the port number(s) used by this
service. If you fill in one of these fields, the service uses that port. If you fill in both fields, the
service uses the range of ports.
ICMP Type
This field appears if the IP Protocol is ICMP Type.
Select the ICMP message used by this service. This field displays the message text, not the
message number.
IP Protocol
Number
This field appears if the IP Protocol is User Defined.
Enter the number of the next-level protocol (IP protocol). Allowed values are 0 - 255.
OK
Click OK to save your changes back to the NXC.
Cancel
Click Cancel to exit this screen without saving your changes.
NXC Series User’s Guide
243
Chapter 22 Services
22.3 Service Group Summary
The Service Group summary screen provides a summary of all service groups. In addition, this
screen allows you to add, edit, and remove service groups.
To access this screen, log in to the Web Configurator, and click Configuration > Object > Service
> Service Group.
Figure 144 Configuration > Object > Service > Service Group
The following table describes the labels in this screen.
Table 130 Configuration > Object > Service > Service Group
244
LABEL
DESCRIPTION
Add
Click this to create a new entry.
Edit
Double-click an entry or select it and click Edit to be able to modify the entry’s settings.
Remove
To remove an entry, select it and click Remove. The NXC confirms you want to remove it
before doing so.
Object Reference
Select an entry and click Object Reference to open a screen that shows which settings
use the entry.
#
This field is a sequential value, and it is not associated with a specific service group.
Name
This field displays the name of each service group.
Description
This field displays the description of each service group, if any.
NXC Series User’s Guide
Chapter 22 Services
22.3.1 Add/Edit Service Group Rule
The Add/Edit Service Group Rule screen allows you to create a new service group or edit an
existing one. To access this screen, go to the Service Group screen and click either the Add icon
or an Edit icon.
Figure 145 Configuration > Object > Service > Service Group > Add/Edit
The following table describes the labels in this screen.
Table 131 Configuration > Object > Service > Service Group > Add/Edit
LABEL
DESCRIPTION
Name
Enter the name of the service group. You may use 1-31 alphanumeric characters,
underscores(_), or dashes (-), but the first character cannot be a number. This value is
case-sensitive.
Description
Enter a description of the service group, if any. You can use up to 60 printable ASCII
characters.
Member List
The Member list displays the names of the service and service group objects that have
been added to the service group. The order of members is not important.
Select items from the Available list that you want to be members and move them to the
Member list. You can double-click a single entry to move it or use the [Shift] or [Ctrl] key
to select multiple entries and use the arrow button to move them.
Move any members you do not want included to the Available list.
OK
Click OK to save your changes back to the NXC.
Cancel
Click Cancel to exit this screen without saving your changes.
NXC Series User’s Guide
245
C HAPTER
23
Schedules
23.1 Overview
Use schedules to set up one-time and recurring schedules for policy routes. The NXC supports onetime and recurring schedules. One-time schedules are effective only once, while recurring
schedules usually repeat. Both types of schedules are based on the current date and time in the
NXC.
Note: Schedules are based on the NXC’s current date and time.
23.1.1 What You Can Do in this Chapter
• The Schedule screen (Section 23.2 on page 247) displays a list of all schedules in the NXC.
• The One-Time Schedule Add/Edit screen (Section 23.2.1 on page 248) creates or edits a onetime schedule.
• The Recurring Schedule Add/Edit screen (Section 23.2.2 on page 249) creates or edits a
recurring schedule.
23.1.2 What You Need to Know
The following terms and concepts may help as you read this chapter.
One-time Schedules
One-time schedules begin on a specific start date and time and end on a specific stop date and
time. One-time schedules are useful for long holidays and vacation periods.
Recurring Schedules
Recurring schedules begin at a specific start time and end at a specific stop time on selected days of
the week (Sunday, Monday, Tuesday, Wednesday, Thursday, Friday, and Saturday). Recurring
schedules always begin and end in the same day. Recurring schedules are useful for defining the
workday and off-work hours.
NXC Series User’s Guide
246
Chapter 23 Schedules
23.2 Schedule Summary
The Schedule summary screen provides a summary of all schedules in the NXC. To access this
screen, click Configuration > Object > Schedule.
Figure 146 Configuration > Object > Schedule
The following table describes the labels in this screen.
Table 132 Configuration > Object > Schedule
LABEL
DESCRIPTION
One Time
Add
Click this to create a new entry.
Edit
Double-click an entry or select it and click Edit to be able to modify the entry’s settings.
Remove
To remove an entry, select it and click Remove. The NXC confirms you want to remove it
before doing so.
Object
Reference
Select an entry and click Object Reference to open a screen that shows which settings
use the entry.
#
This field is a sequential value, and it is not associated with a specific schedule.
Name
This field displays the name of the schedule, which is used to refer to the schedule.
Start Day /
Time
This field displays the date and time at which the schedule begins.
Stop Day /
Time
This field displays the date and time at which the schedule ends.
Recurring
Add
Click this to create a new entry.
Edit
Double-click an entry or select it and click Edit to be able to modify the entry’s settings.
Remove
To remove an entry, select it and click Remove. The NXC confirms you want to remove it
before doing so.
Object
Reference
Select an entry and click Object Reference to open a screen that shows which settings
use the entry.
#
This field is a sequential value, and it is not associated with a specific schedule.
Name
This field displays the name of the schedule, which is used to refer to the schedule.
NXC Series User’s Guide
247
Chapter 23 Schedules
Table 132 Configuration > Object > Schedule (continued)
LABEL
DESCRIPTION
Start Time
This field displays the time at which the schedule begins.
Stop Time
This field displays the time at which the schedule ends.
23.2.1 Add/Edit Schedule One-Time Rule
The Add/Edit Schedule One-Time Rule screen allows you to define a one-time schedule or edit
an existing one. To access this screen, go to the Schedule screen and click either the Add icon or
an Edit icon in the One Time section.
Figure 147 Configuration > Object > Schedule > Add/Edit (One-Time)
The following table describes the labels in this screen.
Table 133 Configuration > Object > Schedule > Add/Edit (One-Time)
LABEL
DESCRIPTION
Configuration
Name
Type the name used to refer to the one-time schedule. You may use 1-31 alphanumeric
characters, underscores(_), or dashes (-), but the first character cannot be a number. This
value is case-sensitive.
Date Time
StartDate
Specify the year, month, and day when the schedule begins.
Year - 1900 - 2999
Month - 1 - 12
Day - 1 - 31 (it is not possible to specify illegal dates, such as February 31.)
StartTime
Specify the hour and minute when the schedule begins.
Hour - 0 - 23
Minute - 0 - 59
StopDate
Specify the year, month, and day when the schedule ends.
Year - 1900 - 2999
Month - 1 - 12
Day - 1 - 31 (it is not possible to specify illegal dates, such as February 31.)
248
NXC Series User’s Guide
Chapter 23 Schedules
Table 133 Configuration > Object > Schedule > Add/Edit (One-Time) (continued)
LABEL
StopTime
DESCRIPTION
Specify the hour and minute when the schedule ends.
Hour - 0 - 23
Minute - 0 - 59
OK
Click OK to save your changes back to the NXC.
Cancel
Click Cancel to exit this screen without saving your changes.
23.2.2 Add/Edit Schedule Recurring Rule
The Add/Edit Schedule Recurring Rule screen allows you to define a recurring schedule or edit
an existing one. To access this screen, go to the Schedule screen and click either the Add icon or
an Edit icon in the Recurring section.
Figure 148 Configuration > Object > Schedule > Add/Edit (Recurring)
The Year, Month, and Day columns are not used in recurring schedules and are disabled in this
screen. The following table describes the remaining labels in this screen.
Table 134 Configuration > Object > Schedule > Add/Edit (Recurring)
LABEL
DESCRIPTION
Configuration
Name
Type the name used to refer to the recurring schedule. You may use 1-31 alphanumeric
characters, underscores(_), or dashes (-), but the first character cannot be a number. This
value is case-sensitive.
Date Time
StartTime
Specify the hour and minute when the schedule begins each day.
Hour - 0 - 23
Minute - 0 - 59
StopTime
Specify the hour and minute when the schedule ends each day.
Hour - 0 - 23
Minute - 0 - 59
NXC Series User’s Guide
249
Chapter 23 Schedules
Table 134 Configuration > Object > Schedule > Add/Edit (Recurring) (continued)
LABEL
DESCRIPTION
Weekly
Week Days
250
Select each day of the week the recurring schedule is effective.
OK
Click OK to save your changes back to the NXC.
Cancel
Click Cancel to exit this screen without saving your changes.
NXC Series User’s Guide
C HAPTER
24
AAA Server
24.1 Overview
You can use a AAA (Authentication, Authorization, Accounting) server to provide access control to
your network. The AAA server can be a Active Directory, LDAP, or RADIUS server. Use the AAA
Server screens to create and manage objects that contain settings for using AAA servers. You use
AAA server objects in configuring ext-group-user user objects and authentication method objects.
24.1.1 What You Can Do in this Chapter
• The Active Directory / LDAP screens (Section 24.2 on page 254) configure Active Directory or
LDAP server objects.
• The RADIUS screen (Section 24.3 on page 259) configures the default external RADIUS server
to use for user authentication.
24.1.2 What You Need To Know
The following terms and concepts may help as you read this chapter.
Directory Service (AD/LDAP)
LDAP/AD allows a client (the NXC) to connect to a server to retrieve information from a directory. A
network example is shown next.
Figure 149 Example: Directory Service Client and Server
The following describes the user authentication procedure via an LDAP/AD server.
1
A user logs in with a user name and password pair.
2
The NXC tries to bind (or log in) to the LDAP/AD server.
3
When the binding process is successful, the NXC checks the user information in the directory
against the user name and password pair.
NXC Series User’s Guide
251
Chapter 24 AAA Server
4
If it matches, the user is allowed access. Otherwise, access is blocked.
RADIUS Server
RADIUS (Remote Authentication Dial-In User Service) authentication is a popular protocol used to
authenticate users by means of an external server instead of (or in addition to) an internal device
user database that is limited to the memory capacity of the device. In essence, RADIUS
authentication allows you to validate a large number of users from a central location.
Figure 150 RADIUS Server Network Example
Authentication Capability List
This list displays the NXC’s authentication capabilities:
Table 135 Authentication Capability List
INTERNAL AUTHENTICATION METHOD
EAP-TLS
EAP-TTLS
( Mschapv2/Mschap)
EXTERNAL
RADIUS
AD
LDAP
RADIUS
O
O
O
O
O
O
O
O
A
EAP-TTLS
(eap)
X
X
X
O
EAP-TTLS
(pap)
O
O
O
O
EAP-PEAP
(Mschapv2)
OA
O
O
O
EAP-PEAP
(TLS)
X
X
X
O
EAP-MD5
X
X
X
O
A. Must set domain authentication.
AAA Servers Supported by the NXC
The following lists the types of authentication server the NXC supports.
• Local user database
The NXC uses the built-in local user database to authenticate administrative users logging into
the NXC’s Web Configurator or network access users logging into the network through the NXC.
252
NXC Series User’s Guide
Chapter 24 AAA Server
• Directory Service (LDAP/AD)
LDAP (Lightweight Directory Access Protocol)/AD (Active Directory) is a directory service that is
both a directory and a protocol for controlling access to a network. The directory consists of a
database specialized for fast information retrieval and filtering activities. You create and store
user profile and login information on the external server.
• RADIUS
RADIUS (Remote Authentication Dial-In User Service) authentication is a popular protocol used
to authenticate users by means of an external or built-in RADIUS server. RADIUS authentication
allows you to validate a large number of users from a central location.
Note: Because the NXC has an internal authentication database, you can create local
login accounts on it without needing to rely on an external authentication server.
The built-in authentication server supports PEAP/EAP-TLS/EAP-TTLS.
Directory Structure
The directory entries are arranged in a hierarchical order much like a tree structure. Normally, the
directory structure reflects the geographical or organizational boundaries. The following figure
shows a basic directory structure branching from countries to organizations to organizational units
to individuals.
Figure 151 Basic Directory Structure
Sales
Sprint
RD3
US
QA
UPS
CSO
Root
Japan
Countries (c)
Sales
NEC
Organizations
RD
Organization Units
Unique
Common Name
(cn)
Distinguished Name (DN)
A DN uniquely identifies an entry in a directory. A DN consists of attribute-value pairs separated by
commas. The leftmost attribute is the Relative Distinguished Name (RDN). This provides a unique
name for entries that have the same “parent DN” (“cn=domain1.com, ou=Sales, o=MyCompany” in
the following examples).
cn=domain1.com, ou = Sales, o=MyCompany, c=US
cn=domain1.com, ou = Sales, o=MyCompany, c=JP
NXC Series User’s Guide
253
Chapter 24 AAA Server
Base DN
A base DN specifies a directory. A base DN usually contains information such as the name of an
organization, a domain name and/or country. For example, o=MyCompany, c=UK where o means
organization and c means country.
Bind DN
A bind DN is used to authenticate with an LDAP/AD server. For example a bind DN of cn=zyAdmin
allows the NXC to log into the LDAP/AD server using the user name of zyAdmin. The bind DN is used
in conjunction with a bind password. When a bind DN is not specified, the NXC will try to log in as
an anonymous user. If the bind password is incorrect, the login will fail.
24.2 Active Directory / LDAP
Use the Active Directory or LDAP screen to manage the list of AD or LDAP servers the NXC can
use in authenticating users.
Note: Both the Active Directory and LDAP screens, while on separate tabs, are identical in
configuration. This section applies to both equally.
Click Configuration > Object > AAA Server > Active Directory/LDAP to display the Active
Directory / LDAP screen.
Figure 152 Configuration > Object > AAA Server > Active Directory/LDAP
The following table describes the labels in this screen.
Table 136 Configuration > Object > AAA Server > Active Directory/LDAP
254
LABEL
DESCRIPTION
Add
Click this to create a new entry.
Edit
Double-click an entry or select it and click Edit to open a screen where you can modify the
entry’s settings.
Remove
To remove an entry, select it and click Remove. The NXC confirms you want to remove it
before doing so.
Object
Reference
Select an entry and click Object Reference to open a screen that shows which settings
use the entry.
#
This field displays the index number.
Name
This is the name that you specified to identify the server.
NXC Series User’s Guide
Chapter 24 AAA Server
Table 136 Configuration > Object > AAA Server > Active Directory/LDAP (continued)
LABEL
DESCRIPTION
Server Address
This is the address of the AD or LDAP server.
Base DN
This specifies a directory. For example,
NXC Series User’s Guide
o=ZyXEL, c=US.
255
Chapter 24 AAA Server
24.2.1 Add/Edit Active Directory / LDAP Server
Click Object > AAA Server > Active Directory/LDAP to display the Active Directory (or
LDAP) screen. Click the Add icon or an Edit icon to display the following screen. Use this screen to
create a new entry or edit an existing one.
Note: The Active Directory and LDAP server setup screens are almost identical, so the
features for both screens are described in this section.
Figure 153 Configuration > Object > AAA Server > Active Directory > Add/Edit
256
NXC Series User’s Guide
Chapter 24 AAA Server
Figure 154 Configuration > Object > AAA Server > LDAP > Add/Edit
The following table describes the labels in these screens.
Table 137 Configuration > Object > AAA Server > Active Directory (or LDAP) > Add/Edit
LABEL
DESCRIPTION
Name
Enter a descriptive name (up to 63 alphanumerical characters) for identification purposes.
Description
Enter the description of each server, if any. You can use up to 60 printable ASCII
characters.
Server Address
Enter the address of the AD or LDAP server.
Backup Server
Address
If the AD or LDAP server has a backup server, enter its address here.
Port
Specify the port number on the AD or LDAP server to which the NXC sends authentication
requests. Enter a number between 1 and 65535.
This port number should be the same on all AD or LDAP server(s) in this group.
Base DN
Specify the directory (up to 127 alphanumerical characters). For example,
c=US.
Use SSL
Select Use SSL to establish a secure connection to the AD or LDAP server(s).
NXC Series User’s Guide
o=ZyXEL,
257
Chapter 24 AAA Server
Table 137 Configuration > Object > AAA Server > Active Directory (or LDAP) > Add/Edit
LABEL
DESCRIPTION
Search time limit
Specify the timeout period (between 1 and 300 seconds) before the NXC disconnects from
the AD server. In this case, user authentication fails.
Search timeout occurs when either the user information is not in the AD or LDAP server or
the AD or LDAP server is down.
Case-sensitive
User Names
Select this if the server checks the case of the usernames.
Bind DN
Specify the bind DN for logging into the AD or LDAP server. Enter up to 127
alphanumerical characters.
Password
If required, enter the password (up to 15 alphanumerical characters) for the NXC to bind
(or log in) to the AD or LDAP server.
Retype to Confirm
Retype your new password for confirmation.
Login Name
Attribute
Enter the type of identifier the users are to use to log in. For example “name” or “e-mail
address”.
Alternative Login
Name Attribute
If there is a second type of identifier that the users can use to log in, enter it here. For
example “name” or “e-mail address”.
Group
Membership
Attribute
Enter the name of the attribute that the NXC is to check to determine to which group a
user belongs. The value for this attribute is called a group identifier; it determines to
which group a user belongs. You can add ext-group-user user objects to identify groups
based on these group identifier values.
For example,
cn=zyAdmin specifies zyAdmin as the user name.
For example you could have an attribute named “memberOf” with values like “sales”,
“RD”, and “management”. Then you could also create a ext-group-user user object for
each group. One with “sales” as the group identifier, another for “RD” and a third for
“management”.
Enable
Select this to enable domain authentication for MSChap. MS-CHAP Microsoft CHAP
(Challenge Handshake Authentication Protocol) uses a challenge-response mechanism
where the response is encrypted.
Note: This is only for Active Directory.
User Name
Enter the user name for the user who has rights to add a machine to the domain.
Note: This is only for Active Directory.
User Password
Enter the password for the associated user name.
Note: This is only for Active Directory.
Retype to Confirm
Retype your new password for confirmation.
Realm
Enter the AD server’s realm (network domain).
Note: This is only for Active Directory.
NetBIOS Name
Enter the NetBIOS name of the AD or LDAP server. If you enter this, the NXC uses it with
the user name in the format NetBIOS\USERNAME to do authentication.
If you do not configure this, the NXC uses the format USERNAME@realm to do
authentication.
258
Configuration
Validation
Use a user account from the server specified above to test if the configuration is correct.
Enter the account’s user name in the Username field and click Test.
OK
Click OK to save the changes.
Cancel
Click Cancel to discard the changes.
NXC Series User’s Guide
Chapter 24 AAA Server
24.3 RADIUS
Use the RADIUS screen to manage the list of RADIUS servers the NXC can use in authenticating
users. Click Configuration > Object > AAA Server > RADIUS to display the RADIUS screen.
Figure 155 Configuration > Object > AAA Server > RADIUS
The following table describes the labels in this screen.
Table 138 Configuration > Object > AAA Server > RADIUS
LABEL
DESCRIPTION
Add
Click this to create a new entry.
Edit
Double-click an entry or select it and click Edit to open a screen where you can modify the
entry’s settings.
Remove
To remove an entry, select it and click Remove. The NXC confirms you want to remove it
before doing so.
Object
Reference
Select an entry and click Object Reference to open a screen that shows which settings
use the entry.
#
This field displays the index number.
Name
This is the name of the RADIUS server entry.
Server Address
This is the address of the AD or LDAP server.
NXC Series User’s Guide
259
Chapter 24 AAA Server
24.3.1 Add/Edit RADIUS
Click Configuration > Object > AAA Server > RADIUS to display the RADIUS screen. Click the
Add icon or an Edit icon to display the following screen. Use this screen to create a new entry or
edit an existing one.
Figure 156 Configuration > Object > AAA Server > RADIUS > Add/Edit
The following table describes the labels in this screen.
Table 139 Configuration > Object > AAA Server > RADIUS > Add/Edit
LABEL
DESCRIPTION
General Settings
Name
260
Enter a descriptive name (up to 63 alphanumerical characters) for identification
purposes.
NXC Series User’s Guide
Chapter 24 AAA Server
Table 139 Configuration > Object > AAA Server > RADIUS > Add/Edit (continued)
LABEL
DESCRIPTION
Description
Enter the description of each server, if any. You can use up to 60 printable ASCII
characters.
Authentication
Server Settings
Server Address
Enter the address of the RADIUS authentication server.
Authentication
Port
Specify the port number on the RADIUS server to which the NXC sends authentication
requests. Enter a number between 1 and 65535.
Backup Server
Address
If the RADIUS server has a backup authentication server, enter its address here.
Backup
Authentication
Port
Specify the port number on the RADIUS server to which the NXC sends authentication
requests. Enter a number between 1 and 65535.
Key
Enter a password (up to 15 alphanumeric characters) as the key to be shared between
the external authentication server and the NXC.
The key is not sent over the network. This key must be the same on the external
authentication server and the NXC.
Accounting Server
Settings
Server Address
Enter the IP address or Fully-Qualified Domain Name (FQDN) of the RADIUS accounting
server.
Accounting Port
Specify the port number on the RADIUS server to which the NXC sends accounting
information. Enter a number between 1 and 65535.
Backup Server
Address
If the RADIUS server has a backup accounting server, enter its address here.
Backup
Accounting Port
Specify the port number on the RADIUS server to which the NXC sends accounting
information. Enter a number between 1 and 65535.
Key
Enter a password (up to 15 alphanumeric characters) as the key to be shared between
the external authentication server and the NXC.
The key is not sent over the network. This key must be the same on the external
authentication server and the NXC.
Maximum Retry
Count
At times the NXC may not be able to use the primary RADIUS accounting server. Specify
the number of times the NXC should reattempt to use the primary RADIUS server before
attempting to use the secondary RADIUS server. This also sets how many times the NXC
will attempt to use the secondary RADIUS server.
For example, you set this field to 3. If the NXC does not get a response from the primary
RADIUS server, it tries again up to three times. If there is no response, the NXC tries the
secondary RADIUS server up to three times.
If there is also no response from the secondary RADIUS server, the NXC stops attempting
to authenticate the subscriber. The subscriber will see a message that says the RADIUS
server was not found.
Enable Accounting
Interim update
Select this to have the NXC send subscriber status updates to the RADIUS server at the
interval you specify.
Interim Interval
Specify the time interval for how often the NXC is to send a subscriber status update to
the RADIUS server.
General Server
Settings
NXC Series User’s Guide
261
Chapter 24 AAA Server
Table 139 Configuration > Object > AAA Server > RADIUS > Add/Edit (continued)
LABEL
DESCRIPTION
Timeout
Specify the timeout period (between 1 and 300 seconds) before the NXC disconnects
from the RADIUS server. In this case, user authentication fails.
Search timeout occurs when either the user information is not in the RADIUS server or
the RADIUS server is down.
NAS IP Address
If the RADIUS server requires the NXC to provide the Network Access Server IP address
attribute with a specific value, enter it here.
NAS Identifier
If the RADIUS server requires the NXC to provide the Network Access Server identifier
attribute with a specific value, enter it here.
Case-sensitive
User Names
Select this if the server checks the case of the usernames.
User Login
Settings
Group
Membership
Attribute
A RADIUS server defines attributes for its accounts. Select the name and number of the
attribute that the NXC is to check to determine to which group a user belongs. If it does
not display, select User Defined and specify the attribute’s number.
This attribute’s value is called a group identifier; it determines to which group a user
belongs. You can add ext-group-user user objects to identify groups based on these
group identifier values.
For example you could have an attribute named “memberOf” with values like “sales”,
“RD”, and “management”. Then you could also create a ext-group-user user object for
each group. One with “sales” as the group identifier, another for “RD” and a third for
“management”.
262
OK
Click OK to save the changes.
Cancel
Click Cancel to discard the changes.
NXC Series User’s Guide
C HAPTER
25
Authentication Method
25.1 Overview
Authentication method objects set how the NXC authenticates wireless, HTTP/HTTPS clients, and
captive portal clients. Configure authentication method objects to have the NXC use the local user
database, and/or the authentication servers and authentication server groups specified by AAA
server objects. By default, user accounts created and stored on the NXC are authenticated locally.
25.1.1 What You Can Do in this Chapter
The Auth. Method screens (Section 25.2 on page 263) create and manage authentication method
objects.
25.1.2 Before You Begin
Configure AAA server objects before you configure authentication method objects.
25.2 Authentication Method
Click Configuration > Object > Auth. Method to display this screen.
Note: You can create up to 16 authentication method objects.
Figure 157 Configuration > Object > Auth. Method
NXC Series User’s Guide
263
Chapter 25 Authentication Method
The following table describes the labels in this screen.
Table 140 Configuration > Object > Auth. Method
LABEL
DESCRIPTION
Add
Click this to create a new entry.
Edit
Double-click an entry or select it and click Edit to open a screen where you can modify the
entry’s settings.
Remove
To remove an entry, select it and click Remove. The NXC confirms you want to remove it
before doing so.
Object Reference
Select an entry and click Object Reference to open a screen that shows which settings
use the entry.
#
This field displays the index number.
Method Name
This field displays a descriptive name for identification purposes.
Method List
This field displays the authentication method(s) for this entry.
25.2.1 Add Authentication Method
Follow the steps below to create an authentication method object.
1
Click Configuration > Object > Auth. Method.
2
Click Add.
3
Specify a descriptive name for identification purposes in the Name field. You may use 1-31
alphanumeric characters, underscores(_), or dashes (-), but the first character cannot be a number.
This value is case-sensitive. For example, “My_Device”.
4
Click Add to insert an authentication method in the table.
5
Select a server object from the Method List drop-down list box.
6
You can add up to four server objects to the table. The ordering of the Method List column is
important. The NXC authenticates the users using the databases (in the local user database or the
external authentication server) in the order they appear in this screen.
If two accounts with the same username exist on two authentication servers you specify, the NXC
does not continue the search on the second authentication server when you enter the username
and password that doesn’t match the one on the first authentication server.
264
NXC Series User’s Guide
Chapter 25 Authentication Method
7
Click OK to save the settings or click Cancel to discard all changes and return to the previous
screen.
The following table describes the labels in this screen.
Table 141 Configuration > Object > Auth. Method > Add
LABEL
DESCRIPTION
Name
Specify a descriptive name for identification purposes.
You may use 1-31 alphanumeric characters, underscores(_), or dashes (-), but the first
character cannot be a number. This value is case-sensitive. For example, “My_Device”.
Add
Click this to create a new entry. Select an entry and click Add to create a new entry after
the selected entry.
Edit
Double-click an entry or select it and click Edit to modify the entry’s settings.
Remove
To remove an entry, select it and click Remove. The NXC confirms you want to remove it
before doing so.
Move
To change a method’s position in the numbered list, select the method and click Move to
display a field to type a number for where you want to put it and press [ENTER] to move
the rule to the number that you typed.
The ordering of your methods is important as NXC authenticates the users using the
authentication methods in the order they appear in this screen.
#
This field displays the index number.
Method List
Select a server object from the drop-down list box. You can create a server object in the
AAA Server screen.
The NXC authenticates the users using the databases (in the local user database or the
external authentication server) in the order they appear in this screen.
If two accounts with the same username exist on two authentication servers you specify,
the NXC does not continue the search on the second authentication server when you
enter the username and password that doesn’t match the one on the first authentication
server.
OK
Click OK to save the changes.
Cancel
Click Cancel to discard the changes.
NXC Series User’s Guide
265
C HAPTER
26
Certificates
26.1 Overview
The NXC can use certificates (also called digital IDs) to authenticate users. Certificates are based
on public-private key pairs. A certificate contains the certificate owner’s identity and public key.
Certificates provide a way to exchange public keys for use in authentication.
26.1.1 What You Can Do in this Chapter
• The My Certificate screens (Section 26.2 on page 269) generate and export self-signed
certificates or certification requests and import the NXC’s CA-signed certificates.
• The Trusted Certificates screens (Section 26.3 on page 277) save CA certificates and trusted
remote host certificates to the NXC. The NXC trusts any valid certificate that you have imported
as a trusted certificate. It also trusts any valid certificate signed by any of the certificates that
you have imported as a trusted certificate.
26.1.2 What You Need to Know
The following terms and concepts may help as you read this chapter.
When using public-key cryptology for authentication, each host has two keys. One key is public and
can be made openly available. The other key is private and must be kept secure.
These keys work like a handwritten signature (in fact, certificates are often referred to as “digital
signatures”). Only you can write your signature exactly as it should look. When people know what
your signature looks like, they can verify whether something was signed by you, or by someone
else. In the same way, your private key “writes” your digital signature and your public key allows
people to verify whether data was signed by you, or by someone else.
This process works as follows:
1
Tim wants to send a message to Jenny. He needs her to be sure that it comes from him, and that
the message content has not been altered by anyone else along the way. Tim generates a public
key pair (one public key and one private key).
2
Tim keeps the private key and makes the public key openly available. This means that anyone who
receives a message seeming to come from Tim can read it and verify whether it is really from him
or not.
3
Tim uses his private key to sign the message and sends it to Jenny.
4
Jenny receives the message and uses Tim’s public key to verify it. Jenny knows that the message is
from Tim, and that although other people may have been able to read the message, no-one can
have altered it (because they cannot re-sign the message with Tim’s private key).
NXC Series User’s Guide
266
Chapter 26 Certificates
5
Additionally, Jenny uses her own private key to sign a message and Tim uses Jenny’s public key to
verify the message.
The NXC uses certificates based on public-key cryptology to authenticate users attempting to
establish a connection, not to encrypt the data that you send after establishing a connection. The
method used to secure the data that you send through an established connection depends on the
type of connection.
The certification authority uses its private key to sign certificates. Anyone can then use the
certification authority’s public key to verify the certificates.
A certification path is the hierarchy of certification authority certificates that validate a certificate.
The NXC does not trust a certificate if any certificate on its path has expired or been revoked.
Certification authorities maintain directory servers with databases of valid and revoked certificates.
A directory of certificates that have been revoked before the scheduled expiration is called a CRL
(Certificate Revocation List). The NXC can check a peer’s certificate against a directory server’s list
of revoked certificates. The framework of servers, software, procedures and policies that handles
keys is called PKI (public-key infrastructure).
Advantages of Certificates
Certificates offer the following benefits.
• The NXC only has to store the certificates of the certification authorities that you decide to trust,
no matter how many devices you need to authenticate.
• Key distribution is simple and very secure since you can freely distribute public keys and you
never need to transmit private keys.
Self-signed Certificates
You can have the NXC act as a certification authority and sign its own certificates.
Factory Default Certificate
The NXC generates its own unique self-signed certificate when you first turn it on. This certificate is
referred to in the GUI as the factory default certificate.
Certificate File Formats
Any certificate that you want to import has to be in one of these file formats:
• Binary X.509: This is an ITU-T recommendation that defines the formats for X.509 certificates.
• PEM (Base-64) encoded X.509: This Privacy Enhanced Mail format uses lowercase letters,
uppercase letters and numerals to convert a binary X.509 certificate into a printable form.
• Binary PKCS#7: This is a standard that defines the general syntax for data (including digital
signatures) that may be encrypted. A PKCS #7 file is used to transfer a public key certificate. The
private key is not included. The NXC currently allows the importation of a PKS#7 file that
contains a single certificate.
• PEM (Base-64) encoded PKCS#7: This Privacy Enhanced Mail (PEM) format uses lowercase
letters, uppercase letters and numerals to convert a binary PKCS#7 certificate into a printable
form.
NXC Series User’s Guide
267
Chapter 26 Certificates
• Binary PKCS#12: This is a format for transferring public key and private key certificates.The
private key in a PKCS #12 file is within a password-encrypted envelope. The file’s password is not
connected to your certificate’s public or private passwords. Exporting a PKCS #12 file creates this
and you must provide it to decrypt the contents when you import the file into the NXC.
Note: Be careful not to convert a binary file to text during the transfer process. It is easy
for this to occur since many programs use text files by default.
26.1.3 Verifying a Certificate
Before you import a trusted certificate into the NXC, you should verify that you have the correct
certificate. You can do this using the certificate’s fingerprint. A certificate’s fingerprint is a message
digest calculated using the MD5 or SHA1 algorithm. The following procedure describes how to check
a certificate’s fingerprint to verify that you have the actual certificate.
268
1
Browse to where you have the certificate saved on your computer.
2
Make sure that the certificate has a “.cer” or “.crt” file name extension.
3
Double-click the certificate’s icon to open the Certificate window. Click the Details tab and scroll
down to the Thumbprint Algorithm and Thumbprint fields.
4
Use a secure method to verify that the certificate owner has the same information in the
Thumbprint Algorithm and Thumbprint fields. The secure method may very based on your
situation. Possible examples would be over the telephone or through an HTTPS connection.
NXC Series User’s Guide
Chapter 26 Certificates
26.2 My Certificates
Click Configuration > Object > Certificate > My Certificates to open this screen. This is the
NXC’s summary list of certificates and certification requests.
Figure 158 Configuration > Object > Certificate > My Certificates
The following table describes the labels in this screen.
Table 142 Configuration > Object > Certificate > My Certificates
LABEL
DESCRIPTION
PKI Storage
Space in Use
This bar displays the percentage of the NXC’s PKI storage space that is currently in use.
When the storage space is almost full, you should consider deleting expired or
unnecessary certificates before adding more certificates.
Add
Click this to go to the screen where you can have the NXC generate a certificate or a
certification request.
Edit
Double-click an entry or select it and click Edit to open a screen with an in-depth list of
information about the certificate.
Remove
The NXC keeps all of your certificates unless you specifically delete them. Uploading a
new firmware or default configuration file does not delete your certificates. To remove an
entry, select it and click Remove. The NXC confirms you want to remove it before doing
so. Subsequent certificates move up by one when you take this action.
Object Reference
You cannot delete certificates that any of the NXC’s features are configured to use. Select
an entry and click Object Reference to open a screen that shows which settings use the
entry.
#
This field displays the certificate index number. The certificates are listed in alphabetical
order.
Name
This field displays the name used to identify this certificate. It is recommended that you
give each certificate a unique name.
Type
This field displays what kind of certificate this is.
REQ represents a certification request and is not yet a valid certificate. Send a
certification request to a certification authority, which then issues a certificate. Use the
My Certificate Import screen to import the certificate and replace the request.
SELF represents a self-signed certificate.
CERT represents a certificate issued by a certification authority.
NXC Series User’s Guide
269
Chapter 26 Certificates
Table 142 Configuration > Object > Certificate > My Certificates (continued)
270
LABEL
DESCRIPTION
Subject
This field displays identifying information about the certificate’s owner, such as CN
(Common Name), OU (Organizational Unit or department), O (Organization or company)
and C (Country). It is recommended that each certificate have unique subject
information.
Issuer
This field displays identifying information about the certificate’s issuing certification
authority, such as a common name, organizational unit or department, organization or
company and country. With self-signed certificates, this is the same information as in the
Subject field.
Valid From
This field displays the date that the certificate becomes applicable.
Valid To
This field displays the date that the certificate expires. The text displays in red and
includes an Expired! message if the certificate has expired.
Import
Click Import to open a screen where you can save a certificate to the NXC.
Refresh
Click Refresh to display the current validity status of the certificates.
NXC Series User’s Guide
Chapter 26 Certificates
26.2.1 Add My Certificates
Click Configuration > Object > Certificate > My Certificates and then the Add icon to open
the My Certificates Add screen. Use this screen to have the NXC create a self-signed certificate,
enroll a certificate with a certification authority or generate a certification request.
Figure 159 Configuration > Object > Certificate > My Certificates > Add
NXC Series User’s Guide
271
Chapter 26 Certificates
The following table describes the labels in this screen.
Table 143 Configuration > Object > Certificate > My Certificates > Add
LABEL
DESCRIPTION
Name
Type a name to identify this certificate. You can use up to 31 alphanumeric and
;‘~!@#$%^&()_+[]{}’,.=- characters.
Subject Information
Use these fields to record information that identifies the owner of the certificate. You
do not have to fill in every field, although you must specify a Host IP Address, Host
Domain Name, or E-Mail. The certification authority may add fields (such as a serial
number) to the subject information when it issues a certificate. It is recommended
that each certificate have unique subject information.
Select a radio button to identify the certificate’s owner by IP address, domain name or
e-mail address. Type the IP address (in dotted decimal notation), domain name or email address in the field provided. The domain name or e-mail address is for
identification purposes only and can be any string.
A domain name can be up to 255 characters. You can use alphanumeric characters,
the hyphen and periods.
An e-mail address can be up to 63 characters. You can use alphanumeric characters,
the hyphen, the @ symbol, periods and the underscore.
Organizational Unit
Identify the organizational unit or department to which the certificate owner belongs.
You can use up to 31 characters. You can use alphanumeric characters, the hyphen
and the underscore.
Organization
Identify the company or group to which the certificate owner belongs. You can use up
to 31 characters. You can use alphanumeric characters, the hyphen and the
underscore.
Town (City)
Identify the town or city where the certificate owner is located. You can use up to 31
characters. You can use alphanumeric characters, the hyphen and the underscore.
State (Province)
Identify the state or province where the certificate owner is located. You can use up to
31 characters. You can use alphanumeric characters, the hyphen and the underscore.
Country
Identify the nation where the certificate owner is located. You can use up to 31
characters. You can use alphanumeric characters, the hyphen and the underscore.
Key Type
Select RSA to use the Rivest, Shamir and Adleman public-key algorithm.
Select DSA to use the Digital Signature Algorithm public-key algorithm.
Key Length
Select a number from the drop-down list box to determine how many bits the key
should use. The longer the key, the more secure it is. A longer key also uses more PKI
storage space.
These radio buttons deal with how and when the certificate is to be generated.
272
Create a self-signed
certificate
Select this to have the NXC generate the certificate and act as the Certification
Authority (CA) itself. This way you do not need to apply to a certification authority for
certificates.
Create a certification
request and save it
locally for later
manual enrollment
Select this to have the NXC generate and store a request for a certificate. Use the My
Certificate Details screen to view the certification request and copy it to send to the
certification authority.
Copy the certification request from the My Certificate Details screen and then send
it to the certification authority.
NXC Series User’s Guide
Chapter 26 Certificates
Table 143 Configuration > Object > Certificate > My Certificates > Add (continued)
LABEL
DESCRIPTION
Create a certification
request and enroll for
a certificate
immediately online
Select this to have the NXC generate a request for a certificate and apply to a
certification authority for a certificate.
You must have the certification authority’s certificate already imported in the Trusted
Certificates screen.
When you select this option, you must select the certification authority’s enrollment
protocol and the certification authority’s certificate from the drop-down list boxes and
enter the certification authority’s server address. You also need to fill in the
Reference Number and Key if the certification authority requires them.
Enrollment Protocol
This field applies when you select Create a certification request and enroll for a
certificate immediately online. Select the certification authority’s enrollment
protocol from the drop-down list box.
Simple Certificate Enrollment Protocol (SCEP) is a TCP-based enrollment
protocol that was developed by VeriSign and Cisco.
Certificate Management Protocol (CMP) is a TCP-based enrollment protocol that
was developed by the Public Key Infrastructure X.509 working group of the Internet
Engineering Task Force (IETF) and is specified in RFC 2510.
CA Server Address
This field applies when you select Create a certification request and enroll for a
certificate immediately online. Enter the IP address (or URL) of the certification
authority server.
For a URL, you can use up to 511 of the following characters. a-zA-Z0-9'()+,/
:.=?;!*#@$_%-
CA Certificate
This field applies when you select Create a certification request and enroll for a
certificate immediately online. Select the certification authority’s certificate from
the CA Certificate drop-down list box.
You must have the certification authority’s certificate already imported in the Trusted
Certificates screen. Click Trusted CAs to go to the Trusted Certificates screen
where you can view (and manage) the NXC's list of certificates of trusted certification
authorities.
Request
Authentication
When you select Create a certification request and enroll for a certificate
immediately online, the certification authority may want you to include a reference
number and key to identify you when you send a certification request.
Fill in both the Reference Number and the Key fields if your certification authority
uses the CMP enrollment protocol. Just the Key field displays if your certification
authority uses the SCEP enrollment protocol.
For the reference number, use 0 to 99999999.
For the key, use up to 31 of the following characters. a-zA-Z09;|`~!@#$%^&*()_+\{}':,./<>=-
OK
Click OK to begin certificate or certification request generation.
Cancel
Click Cancel to quit and return to the My Certificates screen.
If you configured the My Certificate Create screen to have the NXC enroll a certificate and the
certificate enrollment is not successful, you see a screen with a Return button that takes you back
to the My Certificate Create screen. Click Return and check your information in the My
Certificate Create screen. Make sure that the certification authority information is correct and that
your Internet connection is working properly if you want the NXC to enroll a certificate online.
NXC Series User’s Guide
273
Chapter 26 Certificates
26.2.2 Edit My Certificates
Click Configuration > Object > Certificate > My Certificates and then the Edit icon to open
the My Certificate Edit screen. You can use this screen to view in-depth certificate information
and change the certificate’s name.
Figure 160 Configuration > Object > Certificate > My Certificates > Edit
274
NXC Series User’s Guide
Chapter 26 Certificates
The following table describes the labels in this screen.
Table 144 Configuration > Object > Certificate > My Certificates > Edit
LABEL
DESCRIPTION
Name
This field displays the identifying name of this certificate. You can use up to 31
alphanumeric and ;‘~!@#$%^&()_+[]{}’,.=- characters.
Certification Path
This field displays for a certificate, not a certification request.
Click the Refresh button to have this read-only text box display the hierarchy of
certification authorities that validate the certificate (and the certificate itself).
If the issuing certification authority is one that you have imported as a trusted
certification authority, it may be the only certification authority in the list (along with
the certificate itself). If the certificate is a self-signed certificate, the certificate itself is
the only one in the list. The NXC does not trust the certificate and displays “Not trusted”
in this field if any certificate on the path has expired or been revoked.
Refresh
Click Refresh to display the certification path.
Certificate
Information
These read-only fields display detailed information about the certificate.
Type
This field displays general information about the certificate. CA-signed means that a
Certification Authority signed the certificate. Self-signed means that the certificate’s
owner signed the certificate (not a certification authority). “X.509” means that this
certificate was created and signed according to the ITU-T X.509 recommendation that
defines the formats for public-key certificates.
Version
This field displays the X.509 version number. “
Serial Number
This field displays the certificate’s identification number given by the certification
authority or generated by the NXC.
Subject
This field displays information that identifies the owner of the certificate, such as
Common Name (CN), Organizational Unit (OU), Organization (O), State (ST), and
Country (C).
Issuer
This field displays identifying information about the certificate’s issuing certification
authority, such as Common Name, Organizational Unit, Organization and Country.
With self-signed certificates, this is the same as the Subject Name field.
“none” displays for a certification request.
Signature Algorithm
This field displays the type of algorithm that was used to sign the certificate. The NXC
uses rsa-pkcs1-sha1 (RSA public-private key encryption algorithm and the SHA1 hash
algorithm). Some certification authorities may use rsa-pkcs1-md5 (RSA public-private
key encryption algorithm and the MD5 hash algorithm).
Valid From
This field displays the date that the certificate becomes applicable. “none” displays for a
certification request.
Valid To
This field displays the date that the certificate expires. The text displays in red and
includes an Expired! message if the certificate has expired. “none” displays for a
certification request.
Key Algorithm
This field displays the type of algorithm that was used to generate the certificate’s key
pair (the NXC uses RSA encryption) and the length of the key set in bits (1024 bits for
example).
Subject Alternative
Name
This field displays the certificate owner‘s IP address (IP), domain name (DNS) or e-mail
address (EMAIL).
Key Usage
This field displays for what functions the certificate’s key can be used. For example,
“DigitalSignature” means that the key can be used to sign certificates and
“KeyEncipherment” means that the key can be used to encrypt text.
Basic Constraint
This field displays general information about the certificate. For example, Subject
Type=CA means that this is a certification authority’s certificate and “Path Length
Constraint=1” means that there can only be one certification authority in the
certificate’s path. This field does not display for a certification request.
NXC Series User’s Guide
275
Chapter 26 Certificates
Table 144 Configuration > Object > Certificate > My Certificates > Edit
LABEL
DESCRIPTION
MD5 Fingerprint
This is the certificate’s message digest that the NXC calculated using the MD5
algorithm.
SHA1 Fingerprint
This is the certificate’s message digest that the NXC calculated using the SHA1
algorithm.
Certificate in PEM
(Base-64) Encoded
Format
This read-only text box displays the certificate or certification request in Privacy
Enhanced Mail (PEM) format. PEM uses lowercase letters, uppercase letters and
numerals to convert a binary certificate into a printable form.
You can copy and paste a certification request into a certification authority’s web page,
an e-mail that you send to the certification authority or a text editor and save the file on
a management computer for later manual enrollment.
You can copy and paste a certificate into an e-mail to send to friends or colleagues or
you can copy and paste a certificate into a text editor and save the file on a
management computer for later distribution (via floppy disk for example).
Export
This button displays for a certification request. Use this button to save a copy of the
request without its private key. Click this button and then Save in the File Download
screen. The Save As screen opens, browse to the location that you want to use and
click Save.
Export Certificate
Only
Use this button to save a copy of the certificate without its private key. Click this button
and then Save in the File Download screen. The Save As screen opens, browse to the
location that you want to use and click Save.
Password
If you want to export the certificate with its private key, create a password and type it
here. Make sure you keep this password in a safe place. You will need to use it if you
import the certificate to another device.
Export Certificate
with Private Key
Use this button to save a copy of the certificate with its private key. Type the
certificate’s password and click this button. Click Save in the File Download screen.
The Save As screen opens, browse to the location that you want to use and click Save.
OK
Click OK to save your changes back to the NXC. You can only change the name.
Cancel
Click Cancel to quit and return to the My Certificates screen.
26.2.3 Import Certificates
Click Configuration > Object > Certificate > My Certificates > Import to open the My
Certificate Import screen. Follow the instructions in this screen to save an existing certificate to
the NXC.
Note: You can import a certificate that matches a corresponding certification request that
was generated by the NXC. You can also import a certificate in PKCS#12 format,
including the certificate’s public and private keys.
The certificate you import replaces the corresponding request in the My Certificates screen.
276
NXC Series User’s Guide
Chapter 26 Certificates
You must remove any spaces in the certificate’s filename before you can import it.
Figure 161 Configuration > Object > Certificate > My Certificates > Import
The following table describes the labels in this screen.
Table 145 Configuration > Object > Certificate > My Certificates > Import
LABEL
DESCRIPTION
File Path
Type in the location of the file you want to upload in this field or click Browse to find it.
You cannot import a certificate with the same name as a certificate that is already in the NXC.
Browse
Click Browse to find the certificate file you want to upload.
Password
This field only applies when you import a binary PKCS#12 format file. Type the file’s password
that was created when the PKCS #12 file was exported.
OK
Click OK to save the certificate on the NXC.
Cancel
Click Cancel to quit and return to the My Certificates screen.
26.3 Trusted Certificates
Click Configuration > Object > Certificate > Trusted Certificates to open the Trusted
Certificates screen. This screen displays a summary list of certificates that you have set the NXC
to accept as trusted. The NXC also accepts any valid certificate signed by a certificate on this list as
NXC Series User’s Guide
277
Chapter 26 Certificates
being trustworthy; thus you do not need to import any certificate that is signed by one of these
certificates.
Figure 162 Configuration > Object > Certificate > Trusted Certificates
The following table describes the labels in this screen.
Table 146 Configuration > Object > Certificate > Trusted Certificates
278
LABEL
DESCRIPTION
PKI Storage
Space in Use
This bar displays the percentage of the NXC’s PKI storage space that is currently in use.
When the storage space is almost full, you should consider deleting expired or
unnecessary certificates before adding more certificates.
Edit
Double-click an entry or select it and click Edit to open a screen with an in-depth list of
information about the certificate.
Remove
The NXC keeps all of your certificates unless you specifically delete them. Uploading a new
firmware or default configuration file does not delete your certificates. To remove an
entry, select it and click Remove. The NXC confirms you want to remove it before doing
so. Subsequent certificates move up by one when you take this action.
Object Reference
You cannot delete certificates that any of the NXC’s features are configured to use. Select
an entry and click Object Reference to open a screen that shows which settings use the
entry.
#
This field displays the certificate index number. The certificates are listed in alphabetical
order.
Name
This field displays the name used to identify this certificate.
Subject
This field displays identifying information about the certificate’s owner, such as CN
(Common Name), OU (Organizational Unit or department), O (Organization or company)
and C (Country). It is recommended that each certificate have unique subject information.
Issuer
This field displays identifying information about the certificate’s issuing certification
authority, such as a common name, organizational unit or department, organization or
company and country. With self-signed certificates, this is the same information as in the
Subject field.
Valid From
This field displays the date that the certificate becomes applicable.
Valid To
This field displays the date that the certificate expires. The text displays in red and
includes an Expired! message if the certificate has expired.
Import
Click Import to open a screen where you can save the certificate of a certification
authority that you trust, from your computer to the NXC.
Refresh
Click this button to display the current validity status of the certificates.
NXC Series User’s Guide
Chapter 26 Certificates
26.3.1 Edit Trusted Certificates
Click Configuration > Object > Certificate > Trusted Certificates and then a certificate’s Edit
icon to open the Trusted Certificates Edit screen. Use this screen to view in-depth information
about the certificate, change the certificate’s name and set whether or not you want the NXC to
check a certification authority’s list of revoked certificates before trusting a certificate issued by the
certification authority.
Figure 163 Configuration > Object > Certificate > Trusted Certificates > Edit
NXC Series User’s Guide
279
Chapter 26 Certificates
The following table describes the labels in this screen.
Table 147 Configuration > Object > Certificate > Trusted Certificates > Edit
LABEL
DESCRIPTION
Name
This field displays the identifying name of this certificate. You can change the name. You
can use up to 31 alphanumeric and ;‘~!@#$%^&()_+[]{}’,.=- characters.
Certification Path
Click the Refresh button to have this read-only text box display the end entity’s
certificate and a list of certification authority certificates that shows the hierarchy of
certification authorities that validate the end entity’s certificate. If the issuing
certification authority is one that you have imported as a trusted certificate, it may be
the only certification authority in the list (along with the end entity’s own certificate).
The NXC does not trust the end entity’s certificate and displays “Not trusted” in this field
if any certificate on the path has expired or been revoked.
Refresh
Click Refresh to display the certification path.
Enable X.509v3 CRL
Distribution Points
and OCSP checking
Select this check box to have the NXC check incoming certificates that are signed by
this certificate against a Certificate Revocation List (CRL) or an OCSP server. You also
need to configure the OSCP or LDAP server details.
OCSP Server
Select this check box if the directory server uses OCSP (Online Certificate Status
Protocol).
URL
Type the protocol, IP address and pathname of the OCSP server.
ID
The NXC may need to authenticate itself in order to assess the OCSP server. Type the
login name (up to 31 ASCII characters) from the entity maintaining the server (usually
a certification authority).
Password
Type the password (up to 31 ASCII characters) from the entity maintaining the OCSP
server (usually a certification authority).
LDAP Server
Select this check box if the directory server uses LDAP (Lightweight Directory Access
Protocol). LDAP is a protocol over TCP that specifies how clients access directories of
certificates and lists of revoked certificates.
Address
Type the IP address (in dotted decimal notation) of the directory server.
Port
Use this field to specify the LDAP server port number. You must use the same server
port number that the directory server uses. 389 is the default server port number for
LDAP.
ID
The NXC may need to authenticate itself in order to assess the CRL directory server.
Type the login name (up to 31 ASCII characters) from the entity maintaining the server
(usually a certification authority).
Password
Type the password (up to 31 ASCII characters) from the entity maintaining the CRL
directory server (usually a certification authority).
Certificate
Information
These read-only fields display detailed information about the certificate.
Type
This field displays general information about the certificate. CA-signed means that a
Certification Authority signed the certificate. Self-signed means that the certificate’s
owner signed the certificate (not a certification authority). X.509 means that this
certificate was created and signed according to the ITU-T X.509 recommendation that
defines the formats for public-key certificates.
Version
This field displays the X.509 version number.
Serial Number
This field displays the certificate’s identification number given by the certification
authority.
Subject
This field displays information that identifies the owner of the certificate, such as
Common Name (CN), Organizational Unit (OU), Organization (O) and Country (C).
Issuer
This field displays identifying information about the certificate’s issuing certification
authority, such as Common Name, Organizational Unit, Organization and Country.
With self-signed certificates, this is the same information as in the Subject Name field.
280
NXC Series User’s Guide
Chapter 26 Certificates
Table 147 Configuration > Object > Certificate > Trusted Certificates > Edit (continued)
LABEL
DESCRIPTION
Signature Algorithm
This field displays the type of algorithm that was used to sign the certificate. Some
certification authorities use rsa-pkcs1-sha1 (RSA public-private key encryption
algorithm and the SHA1 hash algorithm). Other certification authorities may use rsapkcs1-md5 (RSA public-private key encryption algorithm and the MD5 hash algorithm).
Valid From
This field displays the date that the certificate becomes applicable. The text displays in
red and includes a Not Yet Valid! message if the certificate has not yet become
applicable.
Valid To
This field displays the date that the certificate expires. The text displays in red and
includes an Expiring! or Expired! message if the certificate is about to expire or has
already expired.
Key Algorithm
This field displays the type of algorithm that was used to generate the certificate’s key
pair (the NXC uses RSA encryption) and the length of the key set in bits (1024 bits for
example).
Subject Alternative
Name
This field displays the certificate’s owner‘s IP address (IP), domain name (DNS) or email address (EMAIL).
Key Usage
This field displays for what functions the certificate’s key can be used. For example,
“DigitalSignature” means that the key can be used to sign certificates and
“KeyEncipherment” means that the key can be used to encrypt text.
Basic Constraint
This field displays general information about the certificate. For example, Subject
Type=CA means that this is a certification authority’s certificate and “Path Length
Constraint=1” means that there can only be one certification authority in the
certificate’s path.
MD5 Fingerprint
This is the certificate’s message digest that the NXC calculated using the MD5
algorithm. You can use this value to verify with the certification authority (over the
phone for example) that this is actually their certificate.
SHA1 Fingerprint
This is the certificate’s message digest that the NXC calculated using the SHA1
algorithm. You can use this value to verify with the certification authority (over the
phone for example) that this is actually their certificate.
Certificate in PEM
(Base-64) Encoded
Format
This read-only text box displays the certificate or certification request in Privacy
Enhanced Mail (PEM) format. PEM uses lowercase letters, uppercase letters and
numerals to convert a binary certificate into a printable form.
You can copy and paste the certificate into an e-mail to send to friends or colleagues or
you can copy and paste the certificate into a text editor and save the file on a
management computer for later distribution (via floppy disk for example).
Export Certificate
Click this button and then Save in the File Download screen. The Save As screen
opens, browse to the location that you want to use and click Save.
OK
Click OK to save your changes back to the NXC. You can only change the name.
Cancel
Click Cancel to quit and return to the Trusted Certificates screen.
26.3.2 Import Trusted Certificates
Click Configuration > Object > Certificate > Trusted Certificates > Import to open the
Trusted Certificates Import screen. Follow the instructions in this screen to save a trusted
certificate to the NXC.
NXC Series User’s Guide
281
Chapter 26 Certificates
Note: You must remove any spaces from the certificate’s filename before you can import
the certificate.
Figure 164 Configuration > Object > Certificate > Trusted Certificates > Import
The following table describes the labels in this screen.
Table 148 Configuration > Object > Certificate > Trusted Certificates > Import
LABEL
DESCRIPTION
File Path
Type in the location of the file you want to upload in this field or click Browse to find it.
You cannot import a certificate with the same name as a certificate that is already in the NXC.
Browse
Click Browse to find the certificate file you want to upload.
OK
Click OK to save the certificate on the NXC.
Cancel
Click Cancel to quit and return to the previous screen.
26.4 Technical Reference
The following section contains additional technical information about the features described in this
chapter.
OCSP
OCSP (Online Certificate Status Protocol) allows an application or device to check whether a
certificate is valid. With OCSP the NXC checks the status of individual certificates instead of
downloading a Certificate Revocation List (CRL). OCSP has two main advantages over a CRL. The
first is real-time status information. The second is a reduction in network traffic since the NXC only
gets information on the certificates that it needs to verify, not a huge list. When the NXC requests
certificate status information, the OCSP server returns a “expired”, “current” or “unknown”
response.
282
NXC Series User’s Guide
C HAPTER
27
DHCPv6
27.1 Overview
This chapter describes how to configure DHCPv6 request type objects.
27.1.1 What You Can Do in this Chapter
The Request screen (Section 27.2 on page 283) allows you to configure DHCPv6 request type
objects.
27.2 DHCPv6 Request
The Request screen allows you to add, edit, and remove DHCPv6 request type objects. To access
this screen, click Configuration > Object > DHCPv6 > Request.
Figure 165 Configuration > Object > DHCPv6 > Request
The following table describes the labels in this screen.
Table 149 Configuration > Object > DHCPv6 > Request
LABEL
DESCRIPTION
Configuration
Add
Click this to create a new entry.
Edit
Double-click an entry or select it and click Edit to open a screen where you can modify the
entry’s settings.
Remove
To remove an entry, select it and click Remove. The NXC confirms you want to remove it
before doing so.
Note: You cannot delete an entry which is in use.
NXC Series User’s Guide
283
Chapter 27 DHCPv6
Table 149 Configuration > Object > DHCPv6 > Request (continued)
LABEL
DESCRIPTION
Object Reference
Select an entry and click Object Reference to open a screen that shows which settings
use the entry.
#
This field is a sequential value, and it is not associated with a specific object.
Name
This field displays the name of each request object.
Type
This field displays the request type of each request object.
Interface
This field displays the interface used for each request object.
Value
This field displays the value for each request object.
27.2.1 Add/Edit DHCPv6 Request Object
The Request Add/Edit screen allows you to create a new request object or edit an existing one.
To access this screen, go to the Request screen and click either the Add icon or an Edit icon.
Figure 166 Configuration > Object > DHCPv6 > Request > Add
The following table describes the labels in this screen.
Table 150 Configuration > Object > DHCPv6 > Request > Add/Edit
284
LABEL
DESCRIPTION
Name
Type the name for this request object. You may use 1-31 alphanumeric characters,
underscores(_), or dashes (-), but the first character cannot be a number. This value is
case-sensitive.
Request Type
Select the request type for this request object. You can choose from DNS Server, or NTP
Server.
Interface
Select the interface for this request object.
OK
Click OK to save your changes back to the NXC.
Cancel
Click Cancel to exit this screen without saving your changes.
NXC Series User’s Guide
C HAPTER
28
System
28.1 Overview
Use the system screens to configure general NXC settings.
28.1.1 What You Can Do in this Chapter
• The Host Name screen (Section 28.2 on page 286) configures a unique name for the NXC in
your network.
• The USB Storage screen (Section 28.3 on page 286) configures the settings for the connected
USB devices.
• The Date/Time screen (Section 28.4 on page 287) configures the date and time for the NXC.
• The Console Speed screen (Section 28.5 on page 291) configures the console port speed when
you connect to the NXC via the console port using a terminal emulation program.
• The DNS screen (Section 28.6 on page 291) configures the DNS (Domain Name System) server
used for mapping a domain name to its corresponding IP address and vice versa.
• The WWW screens (Section 28.7 on page 298) configure settings for HTTP or HTTPS access to
the NXC and how the login and access user screens look.
• The SSH screen (Section 28.8 on page 309) configures SSH (Secure SHell) for securely
accessing the NXC’s command line interface. You can specify which zones allow SSH access and
from which IP address the access can come.
• The Telnet screen (Section 28.9 on page 314) configures Telnet for accessing the NXC’s
command line interface. Specify which zones allow Telnet access and from which IP address the
access can come.
• The FTP screen (Section 28.10 on page 315) specifies from which zones FTP can be used to
access the NXC. You can also specify from which IP addresses the access can come. You can
upload and download the NXC’s firmware and configuration files using FTP. Please also see
Chapter 30 on page 341 for more information about firmware and configuration files.
• The SNMP screen (Section 28.11 on page 317) configures the device’s SNMP settings, including
from which zones SNMP can be used to access the NXC. You can also specify from which IP
addresses the access can come.
• The Auth. Server screen (Section 28.12 on page 321) configures the device to operate as a
RADIUS server.
• The Language screen (Section 28.13 on page 324) sets the user interface language for the
NXC’s Web Configurator screens.
• The IPv6 screen (Section 28.14 on page 324) enables or disables IPv6 support on the NXC.
NXC Series User’s Guide
285
Chapter 28 System
28.2 Host Name
A host name is the unique name by which a device is known on a network. Click Configuration >
System > Host Name to open this screen.
Figure 167 Configuration > System > Host Name
The following table describes the labels in this screen.
Table 151 Configuration > System > Host Name
LABEL
DESCRIPTION
System Name
Choose a descriptive name to identify your NXC device. This name can be up to 64
alphanumeric characters long. Spaces are not allowed, but dashes (-) underscores (_) and
periods (.) are accepted.
Domain Name
Enter the domain name (if you know it) here. This name is propagated to DHCP clients
connected to interfaces with the DHCP server enabled. This name can be up to 254
alphanumeric characters long. Spaces are not allowed, but dashes “-” are accepted.
Apply
Click Apply to save your changes back to the NXC.
Reset
Click Reset to return the screen to its last-saved settings.
28.3 USB Storage
The NXC can use a connected USB device to store the system log and other diagnostic information.
Use this screen to turn on this feature and set a disk full warning limit.
Note: Only connect one USB device. It must allow writing (it cannot be read-only) and
use the FAT16, FAT32, EXT2, or EXT3 file system.
Click Configuration > System > USB Storage to open the screen as shown next.
286
NXC Series User’s Guide
Chapter 28 System
Figure 168 Configuration > System > USB Storage
The following table describes the labels in this screen.
Table 152 Configuration > System > USB Storage
LABEL
DESCRIPTION
Activate USB
storage service
Select this if you want to use the connected USB device(s).
Disk full warning
when remaining
space is less than
Set a number and select a unit (MB or %) to have the NXC send a warning message
when the remaining USB storage space is less than the value you set here.
Apply
Click Apply to save your changes back to the NXC.
Reset
Click Reset to return the screen to its last-saved settings.
28.4 Date and Time
For effective scheduling and logging, the NXC system time must be accurate. The NXC’s Real Time
Chip (RTC) keeps track of the time and date. There is also a software mechanism to set the time
manually or get the current time and date from an external server.
NXC Series User’s Guide
287
Chapter 28 System
To change your NXC’s time based on your local time zone and date, click Configuration > System
> Date/Time. The screen displays as shown. You can manually set the NXC’s time and date or
have the NXC get the date and time from a time server.
Figure 169 Configuration > System > Date/Time
The following table describes the labels in this screen.
Table 153 Configuration > System > Date/Time
LABEL
DESCRIPTION
Current Time and
Date
Current Time
This field displays the present time of your NXC.
Current Date
This field displays the present date of your NXC.
Time and Date
Setup
288
Manual
Select this radio button to enter the time and date manually. If you configure a new time
and date, time zone and daylight saving at the same time, the time zone and daylight
saving will affect the new time and date you entered. When you enter the time settings
manually, the NXC uses the new setting once you click Apply.
New Time
(hh:mm:ss)
This field displays the last updated time from the time server or the last time configured
manually.
When you set Time and Date Setup to Manual, enter the new time in this field and
then click Apply.
New Date
(yyyy-mm-dd)
This field displays the last updated date from the time server or the last date configured
manually.
When you set Time and Date Setup to Manual, enter the new date in this field and
then click Apply.
NXC Series User’s Guide
Chapter 28 System
Table 153 Configuration > System > Date/Time (continued)
LABEL
DESCRIPTION
Get from Time
Server
Select this radio button to have the NXC get the time and date from the time server you
specify below. The NXC requests time and date settings from the time server under the
following circumstances.
•
•
•
When the NXC starts up.
When you click Apply or Synchronize Now in this screen.
24-hour intervals after starting up.
Time Server
Address
Enter the IP address or URL of your time server. Check with your ISP/network
administrator if you are unsure of this information.
Sync. Now
Click this button to have the NXC get the time and date from a time server (see the
Time Server Address field). This also saves your changes (except the daylight saving
settings).
Time Zone Setup
Time Zone
Choose the time zone of your location. This will set the time difference between your
time zone and Greenwich Mean Time (GMT).
Enable Daylight
Saving
Daylight saving is a period from late spring to early fall when many countries set their
clocks ahead of normal local time by one hour to give more daytime light in the evening.
Select this option if you use Daylight Saving Time.
Start Date
Configure the day and time when Daylight Saving Time starts if you selected Enable
Daylight Saving. The at field uses the 24 hour format. Here are a couple of examples:
Daylight Saving Time starts in most parts of the United States on the second Sunday of
March. Each time zone in the United States starts using Daylight Saving Time at 2 A.M.
local time. So in the United States you would select Second, Sunday, March and type
2 in the at field.
Daylight Saving Time starts in the European Union on the last Sunday of March. All of
the time zones in the European Union start using Daylight Saving Time at the same
moment (1 A.M. GMT or UTC). So in the European Union you would select Last,
Sunday, March. The time you type in the at field depends on your time zone. In
Germany for instance, you would type 2 because Germany's time zone is one hour
ahead of GMT or UTC (GMT+1).
End Date
Configure the day and time when Daylight Saving Time ends if you selected Enable
Daylight Saving. The at field uses the 24 hour format. Here are a couple of examples:
Daylight Saving Time ends in the United States on the first Sunday of November. Each
time zone in the United States stops using Daylight Saving Time at 2 A.M. local time. So
in the United States you would select First, Sunday, November and type 2 in the at
field.
Daylight Saving Time ends in the European Union on the last Sunday of October. All of
the time zones in the European Union stop using Daylight Saving Time at the same
moment (1 A.M. GMT or UTC). So in the European Union you would select Last,
Sunday, October. The time you type in the at field depends on your time zone. In
Germany for instance, you would type 2 because Germany's time zone is one hour
ahead of GMT or UTC (GMT+1).
Offset
Specify how much the clock changes when daylight saving begins and ends.
Enter a number from 1 to 5.5 (by 0.5 increments).
For example, if you set this field to 3.5, a log occurred at 6 P.M. in local official time will
appear as if it had occurred at 10:30 P.M.
Apply
Click Apply to save your changes back to the NXC.
Reset
Click Reset to return the screen to its last-saved settings.
NXC Series User’s Guide
289
Chapter 28 System
28.4.1 Pre-defined NTP Time Servers List
When you turn on the NXC for the first time, the date and time start at 2003-01-01 00:00:00. The
NXC then attempts to synchronize with one of the following pre-defined list of Network Time
Protocol (NTP) time servers.
The NXC continues to use the following pre-defined list of NTP time servers if you do not specify a
time server or it cannot synchronize with the time server you specified.
Table 154 Default Time Servers
0.pool.ntp.org
1.pool.ntp.org
2.pool.ntp.org
When the NXC uses the pre-defined list of NTP time servers, it randomly selects one server and
tries to synchronize with it. If the synchronization fails, then the NXC goes through the rest of the
list in order from the first one tried until either it is successful or all the pre-defined NTP time
servers have been tried.
28.4.2 Time Server Synchronization
Click the Synchronize Now button to get the time and date from the time server you specified in
the Time Server Address field.
When the Loading message appears, you may have to wait up to one minute.
Figure 170 Loading
The Current Time and Current Date fields will display the appropriate settings if the
synchronization is successful.
If the synchronization was not successful, a log displays in the View Log screen. Try re-configuring
the Date/Time screen.
To manually set the NXC date and time:
290
1
Click System > Date/Time.
2
Select Manual under Time and Date Setup.
3
Enter the NXC’s time in the New Time field.
4
Enter the NXC’s date in the New Date field.
5
Under Time Zone Setup, select your Time Zone from the list.
6
As an option you can select the Enable Daylight Saving check box to adjust the NXC clock for
daylight savings.
7
Click Apply.
NXC Series User’s Guide
Chapter 28 System
To get the NXC date and time from a time server:
1
Click System > Date/Time.
2
Select Get from Time Server under Time and Date Setup.
3
Under Time Zone Setup, select your Time Zone from the list.
4
Under Time and Date Setup, enter a Time Server Address.
5
Click Apply.
28.5 Console Speed
This section shows you how to set the console port speed when you connect to the NXC via the
console port using a terminal emulation program. See Table 4 on page 20 for default console port
settings.
Click Configuration > System > Console Speed to open this screen.
Figure 171 Configuration > System > Console Speed
The following table describes the labels in this screen.
Table 155 Configuration > System > Console Speed
LABEL
DESCRIPTION
Console Port Speed
Use the drop-down list box to change the speed of the console port. Your NXC supports
9600, 19200, 38400, 57600, and 115200 bps (default) for the console port.
The Console Port Speed applies to a console port connection using terminal emulation
software and NOT the Console in the NXC Web Configurator Status screen.
Apply
Click Apply to save your changes back to the NXC.
Reset
Click Reset to return the screen to its last-saved settings.
28.6 DNS Overview
DNS (Domain Name System) is for mapping a domain name to its corresponding IP address and
vice versa. The DNS server is extremely important because without it, you must know the IP
address of a machine before you can access it.
NXC Series User’s Guide
291
Chapter 28 System
28.6.1 DNS Server Address Assignment
The NXC can get the DNS server addresses in the following ways.
• The ISP tells you the DNS server addresses, usually in the form of an information sheet, when
you sign up. If your ISP gives you DNS server addresses, manually enter them in the DNS server
fields.
• If your ISP dynamically assigns the DNS server IP addresses (along with the NXC’s WAN IP
address), set the DNS server fields to get the DNS server address from the ISP.
• You can manually enter the IP addresses of other DNS servers.
28.6.2 Configuring the DNS Screen
Click Configuration > System > DNS to change your NXC’s DNS settings. Use the DNS screen to
configure the NXC to use a DNS server to resolve domain names for NXC system features like the
time server. You can also configure the NXC to accept or discard DNS queries. Use the Network >
Interface screens to configure the DNS server information that the NXC sends to the specified
DHCP client devices.
Figure 172 Configuration > System > DNS
292
NXC Series User’s Guide
Chapter 28 System
The following table describes the labels in this screen.
Table 156 Configuration > System > DNS
LABEL
DESCRIPTION
Address/PTR
Record
This record specifies the mapping of a Fully-Qualified Domain Name (FQDN) to an IP
address. An FQDN consists of a host and domain name. For example, www.zyxel.com.tw
is a fully qualified domain name, where “www” is the host, “zyxel” is the third-level
domain, “com” is the second-level domain, and “tw” is the top level domain.
Add
Click this to create a new entry.
Edit
Double-click an entry or select it and click Edit to be able to modify the entry’s settings.
Remove
To remove an entry, select it and click Remove. The NXC confirms you want to remove it
before doing so. Note that subsequent entries move up by one when you take this action.
#
This is the index number of the address/PTR record.
FQDN
This is a host’s fully qualified domain name.
IP Address
This is the IP address of a host.
Domain Zone
Forwarder
This specifies a DNS server’s IP address. The NXC can query the DNS server to resolve
domain zones for features like the time server.
When the NXC needs to resolve a domain zone, it checks it against the domain zone
forwarder entries in the order that they appear in this list.
Add
Click this to create a new entry. Select an entry and click Add to create a new entry after
the selected entry.
Edit
Double-click an entry or select it and click Edit to be able to modify the entry’s settings.
Remove
To remove an entry, select it and click Remove. The NXC confirms you want to remove it
before doing so. Note that subsequent entries move up by one when you take this action.
Move
To change an entry’s position in the numbered list, select the method and click Move to
display a field to type a number for where you want to put it and press [ENTER] to move
the rule to the number that you typed.
#
This is the index number of the domain zone forwarder record. The ordering of your rules
is important as rules are applied in sequence.
A hyphen (-) displays for the default domain zone forwarder record. The default record is
not configurable. The NXC uses this default record if the domain zone that needs to be
resolved does not match any of the other domain zone forwarder records.
Domain Zone
A domain zone is a fully qualified domain name without the host. For example,
zyxel.com.tw is the domain zone for the www.zyxel.com.tw fully qualified domain name.
A “*” means all domain zones.
Type
This displays whether the DNS server IP address is assigned by the ISP dynamically
through a specified interface or configured manually (User-Defined).
DNS Server
This is the IP address of a DNS server. This field displays N/A if you have the NXC get a
DNS server IP address from the ISP dynamically but the specified interface is not active.
Query Via
This is the interface through which the NXC sends DNS queries to the entry’s DNS server.
MX Record (for My
FQDN)
A MX (Mail eXchange) record identifies a mail server that handles the mail for a particular
domain.
Add
Click this to create a new entry.
Edit
Double-click an entry or select it and click Edit to be able to modify the entry’s settings.
Remove
To remove an entry, select it and click Remove. The NXC confirms you want to remove it
before doing so. Note that subsequent entries move up by one when you take this action.
#
This is the index number of the MX record.
Domain Name
This is the domain name where the mail is destined for.
IP/FQDN
This is the IP address or Fully-Qualified Domain Name (FQDN) of a mail server that
handles the mail for the domain specified in the field above.
NXC Series User’s Guide
293
Chapter 28 System
Table 156 Configuration > System > DNS (continued)
LABEL
DESCRIPTION
Service Control
This specifies from which computers and zones you can send DNS queries to the NXC.
Add
Click this to create a new entry. Select an entry and click Add to create a new entry after
the selected entry.
Edit
Double-click an entry or select it and click Edit to be able to modify the entry’s settings.
Remove
To remove an entry, select it and click Remove. The NXC confirms you want to remove it
before doing so. Note that subsequent entries move up by one when you take this action.
Move
To change an entry’s position in the numbered list, select the method and click Move to
display a field to type a number for where you want to put it and press [ENTER] to move
the rule to the number that you typed.
#
This the index number of the service control rule. The ordering of your rules is important
as rules are applied in sequence.
The entry with a hyphen (-) instead of a number is the NXC’s (non-configurable) default
policy. The NXC applies this to traffic that does not match any other configured rule. It is
not an editable rule. To apply other behavior, configure a rule that traffic will match so the
NXC will not have to use the default policy.
Zone
This is the zone on the NXC the user is allowed or denied to access.
Address
This is the object name of the IP address(es) with which the computer is allowed or
denied to send DNS queries.
Action
This displays whether the NXC accepts DNS queries from the computer with the IP
address specified above through the specified zone (Accept) or discards them (Deny).
28.6.3 Address Record
An address record contains the mapping of a Fully-Qualified Domain Name (FQDN) to an IP
address. An FQDN consists of a host and domain name. For example, www.zyxel.com is a fully
qualified domain name, where “www” is the host, “zyxel” is the second-level domain, and “com” is
the top level domain. mail.myZyXEL.com.tw is also a FQDN, where “mail” is the host, “myZyXEL” is
the third-level domain, “com” is the second-level domain, and “tw” is the top level domain.
The NXC allows you to configure address records about the NXC itself or another device. This way
you can keep a record of DNS names and addresses that people on your network may use
frequently. If the NXC receives a DNS query for an FQDN for which the NXC has an address record,
the NXC can send the IP address in a DNS response without having to query a DNS name server.
28.6.4 PTR Record
A PTR (pointer) record is also called a reverse record or a reverse lookup record. It is a mapping of
an IP address to a domain name.
294
NXC Series User’s Guide
Chapter 28 System
28.6.5 Adding an Address/PTR Record
Click the Add icon in the Address/PTR Record table to add an address/PTR record.
Figure 173 Configuration > System > DNS > Add Address/PTR Record
The following table describes the labels in this screen.
Table 157 Configuration > System > DNS > Add Address/PTR Record
LABEL
DESCRIPTION
FQDN
Type a Fully-Qualified Domain Name (FQDN) of a server. An FQDN starts with a host name and
continues all the way up to the top-level domain name. For example, www.zyxel.com.tw is a
fully qualified domain name, where “www” is the host, “zyxel” is the third-level domain, “com”
is the second-level domain, and “tw” is the top level domain. Underscores are not allowed.
Use "*." as a prefix in the FQDN for a wildcard domain name (for example, *.example.com).
IP Address
Enter the IP address of the host in dotted decimal notation.
OK
Click OK to save your customized settings and exit this screen.
Cancel
Click Cancel to exit this screen without saving
NXC Series User’s Guide
295
Chapter 28 System
28.6.6 Domain Zone Forwarder
A domain zone forwarder contains a DNS server’s IP address. The NXC can query the DNS server to
resolve domain zones for features like the time server. A domain zone is a fully qualified domain
name without the host. For example, zyxel.com is the domain zone for the www.zyxel.com fully
qualified domain name.
28.6.7 Add Domain Zone Forwarder
Click the Add icon in the Domain Zone Forwarder table to add a domain zone forwarder record.
Figure 174 Configuration > System > DNS > Add Domain Zone Forwarder
The following table describes the labels in this screen.
Table 158 Configuration > System > DNS > Add Domain Zone Forwarder
LABEL
DESCRIPTION
Domain Zone
A domain zone is a fully qualified domain name without the host. For example, zyxel.com.tw
is the domain zone for the www.zyxel.com.tw fully qualified domain name. For example,
whenever the NXC receives needs to resolve a zyxel.com.tw domain name, it can send a
query to the recorded name server IP address.
Enter * if all domain zones are served by the specified DNS server(s).
DNS Server
Select DNS Server(s) from ISP if your ISP dynamically assigns DNS server information.
You also need to select an interface through which the ISP provides the DNS server IP
address(es). The interface should be activated and set to be a DHCP client. The fields below
display the (read-only) DNS server IP address(es) that the ISP assigns. N/A displays for any
DNS server IP address fields for which the ISP does not assign an IP address.
Note: If all interfaces are static, then this field is hidden.
Select Public DNS Server if you have the IP address of a DNS server. Enter the DNS
server's IP address in the field to the right. The NXC must be able to connect to the DNS
server. The DNS server could be on the Internet or one of the NXC’s local networks. You
cannot use 0.0.0.0. Use the Query via field to select the interface through which the NXC
sends DNS queries to a DNS server.
296
OK
Click OK to save your customized settings and exit this screen.
Cancel
Click Cancel to exit this screen without saving.
NXC Series User’s Guide
Chapter 28 System
28.6.8 MX Record
A MX (Mail eXchange) record indicates which host is responsible for the mail for a particular
domain, that is, controls where mail is sent for that domain. If you do not configure proper MX
records for your domain or other domain, external e-mail from other mail servers will not be able to
be delivered to your mail server and vice versa. Each host or domain can have only one MX record,
that is, one domain is mapping to one host.
28.6.9 Add MX Record
Click the Add icon in the MX Record table to add a MX record.
Figure 175 Configuration > System > DNS > Add MX Record
The following table describes the labels in this screen.
Table 159 Configuration > System > DNS > Add MX Record
LABEL
DESCRIPTION
Domain Name
Enter the domain name where the mail is destined for.
IP Address/FQDN
Enter the IP address or Fully-Qualified Domain Name (FQDN) of a mail server that handles
the mail for the domain specified in the field above.
OK
Click OK to save your customized settings and exit this screen.
Cancel
Click Cancel to exit this screen without saving
28.6.10 Add Service Control
Click the Add icon in the Service Control table to add a service control rule.
Figure 176 Configuration > System > DNS > Add Service Control Rule
NXC Series User’s Guide
297
Chapter 28 System
The following table describes the labels in this screen.
Table 160 Configuration > System > DNS > Add Service Control Rule
LABEL
DESCRIPTION
Create new
Object
Use this to configure any new settings objects that you need to use in this screen.
Address Object
Select ALL to allow or deny any computer to send DNS queries to the NXC.
Select a predefined address object to just allow or deny the computer with the IP address
that you specified to send DNS queries to the NXC.
Zone
Select ALL to allow or prevent DNS queries through any zones.
Select a predefined zone on which a DNS query to the NXC is allowed or denied.
Action
Select Accept to have the NXC allow the DNS queries from the specified computer.
Select Deny to have the NXC reject the DNS queries from the specified computer.
OK
Click OK to save your customized settings and exit this screen.
Cancel
Click Cancel to exit this screen without saving
28.7 WWW Overview
The following figure shows secure and insecure management of the NXC coming in from the WAN.
HTTPS and SSH access are secure. HTTP, and Telnet management access are not secure.
Figure 177 Secure and Insecure Service Access From the WAN
28.7.1 Service Access Limitations
A service cannot be used to access the NXC when:
298
1
You have disabled that service in the corresponding screen.
2
The allowed IP address (address object) in the Service Control table does not match the client IP
address (the NXC disallows the session).
3
The IP address (address object) in the Service Control table is not in the allowed zone or the
action is set to Deny.
NXC Series User’s Guide
Chapter 28 System
28.7.2 System Timeout
There is a lease timeout for administrators. The NXC automatically logs you out if the management
session remains idle for longer than this timeout period. The management session does not time
out when a statistics screen is polling.
Each user is also forced to log in the NXC for authentication again when the reauthentication time
expires.
You can change the timeout settings in the User/Group screens.
28.7.3 HTTPS
You can set the NXC to use HTTP or HTTPS (HTTPS adds security) for Web Configurator sessions.
Specify which zones allow Web Configurator access and from which IP address the access can
come.
HTTPS (HyperText Transfer Protocol over Secure Socket Layer, or HTTP over SSL) is a web protocol
that encrypts and decrypts web pages. Secure Socket Layer (SSL) is an application-level protocol
that enables secure transactions of data by ensuring confidentiality (an unauthorized party cannot
read the transferred data), authentication (one party can identify the other party) and data
integrity (you know if data has been changed).
It relies upon certificates, public keys, and private keys (see Chapter 26 on page 266 for more
information).
HTTPS on the NXC is used so that you can securely access the NXC using the Web Configurator. The
SSL protocol specifies that the HTTPS server (the NXC) must always authenticate itself to the
HTTPS client (the computer which requests the HTTPS connection with the NXC), whereas the
HTTPS client only should authenticate itself when the HTTPS server requires it to do so (select
Authenticate Client Certificates in the WWW screen). Authenticate Client Certificates is
optional and if selected means the HTTPS client must send the NXC a certificate. You must apply for
a certificate for the browser from a CA that is a trusted CA on the NXC.
Please refer to the following figure.
1
HTTPS connection requests from an SSL-aware web browser go to port 443 (by default) on the
NXC’s web server.
2
HTTP connection requests from a web browser go to port 80 (by default) on the NXC’s web server.
Figure 178 HTTP/HTTPS Implementation
NXC Series User’s Guide
299
Chapter 28 System
Note: If you disable HTTP in the WWW screen, then the NXC blocks all HTTP connection
attempts.
28.7.4 Configuring WWW Service Control
Click Configuration > System > WWW to open the WWW screen. Use this screen to specify
from which zones you can access the NXC using HTTP or HTTPS. You can also specify which IP
addresses the access can come from.
Note: Admin Service Control deals with management access (to the Web Configurator).
User Service Control deals with user access to the NXC.
Figure 179 Configuration > System > WWW > Service Control
300
NXC Series User’s Guide
Chapter 28 System
The following table describes the labels in this screen.
Table 161 Configuration > System > WWW > Service Control
LABEL
DESCRIPTION
HTTPS
Enable
Select the check box to allow or disallow the computer with the IP address that
matches the IP address(es) in the Service Control table to access the NXC Web
Configurator using secure HTTPs connections.
Server Port
The HTTPS server listens on port 443 by default. If you change the HTTPS server port
to a different number on the NXC, for example 8443, then you must notify people who
need to access the NXC Web Configurator to use “https://NXC IP Address:8443” as
the URL.
Authenticate Client
Certificates
Select Authenticate Client Certificates (optional) to require the SSL client to
authenticate itself to the NXC by sending the NXC a certificate. To do that the SSL
client must have a CA-signed certificate from a CA that has been imported as a
trusted CA on the NXC.
Server Certificate
Select a certificate the HTTPS server (the NXC) uses to authenticate itself to the
HTTPS client. You must have certificates already configured in the My Certificates
screen.
Redirect HTTP to
HTTPS
To allow only secure Web Configurator access, select this to redirect all HTTP
connection requests to the HTTPS server.
Admin/User Service
Control
Admin Service Control specifies from which zones an administrator can use HTTPS
to manage the NXC (using the Web Configurator). You can also specify the IP
addresses from which the administrators can manage the NXC.
User Service Control specifies from which zones a user can use HTTPS to log into
the NXC. You can also specify the IP addresses from which the users can access the
NXC.
Add
Click this to create a new entry. Select an entry and click Add to create a new entry
after the selected entry.
Edit
Double-click an entry or select it and click Edit to be able to modify the entry’s
settings.
Remove
To remove an entry, select it and click Remove. The NXC confirms you want to
remove it before doing so. Note that subsequent entries move up by one when you
take this action.
Move
To change an entry’s position in the numbered list, select the method and click Move
to display a field to type a number for where you want to put it and press [ENTER] to
move the rule to the number that you typed.
#
This is the index number of the service control rule.
The entry with a hyphen (-) instead of a number is the NXC’s (non-configurable)
default policy. The NXC applies this to traffic that does not match any other configured
rule. It is not an editable rule. To apply other behavior, configure a rule that traffic will
match so the NXC will not have to use the default policy.
Zone
This is the zone on the NXC the user is allowed or denied to access.
Address
This is the object name of the IP address(es) with which the computer is allowed or
denied to access.
Action
This displays whether the computer with the IP address specified above can access
the NXC zone(s) configured in the Zone field (Accept) or not (Deny).
HTTP
Enable
Select the check box to allow or disallow the computer with the IP address that
matches the IP address(es) in the Service Control table to access the NXC Web
Configurator using HTTP connections.
Server Port
You may change the server port number for a service if needed, however you must
use the same port number in order to use that service to access the NXC.
NXC Series User’s Guide
301
Chapter 28 System
Table 161 Configuration > System > WWW > Service Control (continued)
LABEL
DESCRIPTION
Admin/User Service
Control
Admin Service Control specifies from which zones an administrator can use HTTP to
manage the NXC (using the Web Configurator). You can also specify the IP addresses
from which the administrators can manage the NXC.
User Service Control specifies from which zones a user can use HTTP to log into the
NXC. You can also specify the IP addresses from which the users can access the NXC.
Add
Click this to create a new entry. Select an entry and click Add to create a new entry
after the selected entry.
Edit
Double-click an entry or select it and click Edit to be able to modify the entry’s
settings.
Remove
To remove an entry, select it and click Remove. The NXC confirms you want to
remove it before doing so. Note that subsequent entries move up by one when you
take this action.
Move
To change an entry’s position in the numbered list, select the method and click Move
to display a field to type a number for where you want to put it and press [ENTER] to
move the rule to the number that you typed.
#
This is the index number of the service control rule.
The entry with a hyphen (-) instead of a number is the NXC’s (non-configurable)
default policy. The NXC applies this to traffic that does not match any other configured
rule. It is not an editable rule. To apply other behavior, configure a rule that traffic will
match so the NXC will not have to use the default policy.
Zone
This is the zone on the NXC the user is allowed or denied to access.
Address
This is the object name of the IP address(es) with which the computer is allowed or
denied to access.
Action
This displays whether the computer with the IP address specified above can access
the NXC zone(s) configured in the Zone field (Accept) or not (Deny).
Authentication
Client Authentication
Method
Select a method the HTTPS or HTTP server uses to authenticate a client.
Apply
Click Apply to save your changes back to the NXC.
Reset
Click Reset to return the screen to its last-saved settings.
You must have configured the authentication methods in the Auth. method screen.
28.7.5 Service Control Rules
Click Add or Edit in the Service Control table in a WWW, SSH, TELNET, FTP or SNMP screen to
add a service control rule.
Figure 180 Configuration > System > Service Control Rule > Add/Edit
302
NXC Series User’s Guide
Chapter 28 System
The following table describes the labels in this screen.
Table 162 Configuration > System > Service Control Rule > Add/Edit
LABEL
DESCRIPTION
Create new
Object
Use this to configure any new settings objects that you need to use in this screen.
Address Object
Select ALL to allow or deny any computer to communicate with the NXC using this service.
Select a predefined address object to just allow or deny the computer with the IP address
that you specified to access the NXC using this service.
Zone
Select ALL to allow or prevent any NXC zones from being accessed using this service.
Action
Select Accept to allow the user to access the NXC from the specified computers.
Select a predefined NXC zone on which a incoming service is allowed or denied.
Select Deny to block the user’s access to the NXC from the specified computers.
OK
Click OK to save your customized settings and exit this screen.
Cancel
Click Cancel to exit this screen without saving
28.7.6 HTTPS Example
If you haven’t changed the default HTTPS port on the NXC, then in your browser enter “https://NXC
IP Address/” as the web site address where “NXC IP Address” is the IP address or domain name of
the NXC you wish to access.
28.7.6.1 Internet Explorer Warning Messages
When you attempt to access the NXC HTTPS server, a Windows dialog box pops up asking if you
trust the server certificate. Click View Certificate if you want to verify that the certificate is from
the NXC.
You see the following Security Alert screen in Internet Explorer. Select Yes to proceed to the Web
Configurator login screen; if you select No, then Web Configurator access is blocked.
Figure 181 Security Alert Dialog Box (Internet Explorer)
NXC Series User’s Guide
303
Chapter 28 System
28.7.6.2 Avoiding Browser Warning Messages
Here are the main reasons your browser displays warnings about the NXC’s HTTPS server certificate
and what you can do to avoid seeing the warnings:
• The issuing certificate authority of the NXC’s HTTPS server certificate is not one of the browser’s
trusted certificate authorities. The issuing certificate authority of the NXC's factory default
certificate is the NXC itself since the certificate is a self-signed certificate.
• For the browser to trust a self-signed certificate, import the self-signed certificate into your
operating system as a trusted certificate.
• To have the browser trust the certificates issued by a certificate authority, import the certificate
authority’s certificate into your operating system as a trusted certificate. Refer to Appendix C on
page 411 for details.
28.7.6.3 Login Screen
After you accept the certificate, the NXC login screen appears. The lock displayed in the bottom of
the browser status bar denotes a secure connection.
Figure 182 Login Screen (Internet Explorer)
28.7.6.4 Enrolling and Importing SSL Client Certificates
The SSL client needs a certificate if Authenticate Client Certificates is selected on the NXC.
You must have imported at least one trusted CA to the NXC in order for the Authenticate Client
Certificates to be active (see the Certificates chapter for details).
304
NXC Series User’s Guide
Chapter 28 System
Apply for a certificate from a Certification Authority (CA) that is trusted by the NXC (see the NXC’s
Trusted Certificates Web Configurator screen).
Figure 183 Trusted Certificates
The CA sends you a package containing the CA’s trusted certificate(s), your personal certificate(s)
and a password to install the personal certificate(s).
28.7.6.5 Installing the CA’s Certificate
1
Double click the CA’s trusted certificate to produce a screen similar to the one shown next.
2
Click Install Certificate and follow the wizard as shown earlier in this appendix.
NXC Series User’s Guide
305
Chapter 28 System
28.7.6.6 Installing a Personal Certificate
You need a password in advance. The CA may issue the password or you may have to specify it
during the enrollment. Double-click the personal certificate given to you by the CA to produce a
screen similar to the one shown next
306
1
Click Next to begin the wizard.
2
The file name and path of the certificate you double-clicked should automatically appear in the File
name text box. Click Browse if you wish to import a different certificate.
NXC Series User’s Guide
Chapter 28 System
3
Enter the password given to you by the CA.
4
Have the wizard determine where the certificate should be saved on your computer or select Place
all certificates in the following store and choose a different location.
NXC Series User’s Guide
307
Chapter 28 System
5
Click Finish to complete the wizard and begin the import process.
6
You should see the following screen when the certificate is correctly installed on your computer.
28.7.6.7 Using a Certificate When Accessing the NXC
To access the NXC via HTTPS:
1
308
Enter ‘https://NXC IP Address/ in your browser’s web address field.
NXC Series User’s Guide
Chapter 28 System
2
When Authenticate Client Certificates is selected on the NXC, the following screen asks you to
select a personal certificate to send to the NXC. This screen displays even if you only have a single
certificate as in the example.
3
You next see the Web Configurator login screen.
28.8 SSH
You can use SSH (Secure SHell) to securely access the NXC’s command line interface. Specify which
zones allow SSH access and from which IP address the access can come.
SSH is a secure communication protocol that combines authentication and data encryption to
provide secure encrypted communication between two hosts over an unsecured network. In the
NXC Series User’s Guide
309
Chapter 28 System
following figure, computer A on the Internet uses SSH to securely connect to the WAN port of the
NXC for a management session.
Figure 184 SSH Communication Over the WAN Example
28.8.1 How SSH Works
The following figure is an example of how a secure connection is established between two remote
hosts using SSH v1.
Figure 185 How SSH v1 Works Example
1
Host Identification
The SSH client sends a connection request to the SSH server. The server identifies itself with a
host key. The client encrypts a randomly generated session key with the host key and server key
and sends the result back to the server.
The client automatically saves any new server public keys. In subsequent connections, the server
public key is checked against the saved version on the client computer.
2
Encryption Method
Once the identification is verified, both the client and server must agree on the type of encryption
method to use.
310
NXC Series User’s Guide
Chapter 28 System
3
Authentication and Data Transmission
After the identification is verified and data encryption activated, a secure tunnel is established
between the client and the server. The client then sends its authentication information (user
name and password) to the server to log in to the server.
28.8.2 SSH Implementation on the NXC
Your NXC supports SSH versions 1 and 2 using RSA authentication and four encryption methods
(AES, 3DES, Archfour, and Blowfish). The SSH server is implemented on the NXC for management
using port 22 (by default).
28.8.3 Requirements for Using SSH
You must install an SSH client program on a client computer (Windows or Linux operating system)
that is used to connect to the NXC over SSH.
28.8.4 Configuring SSH
Click Configuration > System > SSH to change your NXC’s Secure Shell settings. Use this screen
to specify from which zones SSH can be used to manage the NXC. You can also specify from which
IP addresses the access can come.
Note: It is recommended that you disable Telnet and FTP when you configure SSH for
secure connections.
Figure 186 Configuration > System > SSH
NXC Series User’s Guide
311
Chapter 28 System
The following table describes the labels in this screen.
Table 163 Configuration > System > SSH
LABEL
DESCRIPTION
Enable
Select the check box to allow or disallow the computer with the IP address that matches
the IP address(es) in the Service Control table to access the NXC CLI using this service.
Version 1
Select the check box to have the NXC use both SSH version 1 and version 2 protocols. If
you clear the check box, the NXC uses only SSH version 2 protocol.
Server Port
You may change the server port number for a service if needed, however you must use the
same port number in order to use that service for remote management.
Server
Certificate
Select the certificate whose corresponding private key is to be used to identify the NXC for
SSH connections. You must have certificates already configured in the My Certificates
screen.
Service Control
This specifies from which computers you can access which NXC zones.
Add
Click this to create a new entry. Select an entry and click Add to create a new entry after
the selected entry.
Edit
Double-click an entry or select it and click Edit to be able to modify the entry’s settings.
Remove
To remove an entry, select it and click Remove. The NXC confirms you want to remove it
before doing so. Note that subsequent entries move up by one when you take this action.
Move
To change an entry’s position in the numbered list, select the method and click Move to
display a field to type a number for where you want to put it and press [ENTER] to move
the rule to the number that you typed.
#
This the index number of the service control rule.
Zone
This is the zone on the NXC the user is allowed or denied to access.
Address
This is the object name of the IP address(es) with which the computer is allowed or denied
to access.
Action
This displays whether the computer with the IP address specified above can access the
NXC zone(s) configured in the Zone field (Accept) or not (Deny).
Apply
Click Apply to save your changes back to the NXC.
Reset
Click Reset to return the screen to its last-saved settings.
28.8.5 Examples of Secure Telnet Using SSH
This section shows two examples using a command interface and a graphical interface SSH client
program to remotely access the NXC. The configuration and connection steps are similar for most
SSH client programs. Refer to your SSH client program user’s guide.
28.8.5.1 Example 1: Microsoft Windows
This section describes how to access the NXC using the Secure Shell Client program.
312
1
Launch the SSH client and specify the connection information (IP address, port number) for the
NXC.
2
Configure the SSH client to accept connection using SSH version 1.
NXC Series User’s Guide
Chapter 28 System
3
A window displays prompting you to store the host key in you computer. Click Yes to continue.
Figure 187 SSH Example 1: Store Host Key
Enter the password to log in to the NXC. The CLI screen displays next.
28.8.5.2 Example 2: Linux
This section describes how to access the NXC using the OpenSSH client program that comes with
most Linux distributions.
1
Test whether the SSH service is available on the NXC.
Enter “telnet 192.168.1.1 22” at a terminal prompt and press [ENTER]. The computer
attempts to connect to port 22 on the NXC (using the default IP address of 192.168.1.1).
A message displays indicating the SSH protocol version supported by the NXC.
Figure 188 SSH Example 2: Test
$ telnet 192.168.1.1 22
Trying 192.168.1.1...
Connected to 192.168.1.1.
Escape character is '^]'.
SSH-1.5-1.0.0
2
Enter “ssh –1 192.168.1.1”. This command forces your computer to connect to the NXC using
SSH version 1. If this is the first time you are connecting to the NXC using SSH, a message displays
prompting you to save the host information of the NXC. Type “yes” and press [ENTER].
Then enter the password to log in to the NXC.
Figure 189 SSH Example 2: Log in
$ ssh –1 192.168.1.1
The authenticity of host '192.168.1.1 (192.168.1.1)' can't be established.
RSA1 key fingerprint is 21:6c:07:25:7e:f4:75:80:ec:af:bd:d4:3d:80:53:d1.
Are you sure you want to continue connecting (yes/no)? yes
Warning: Permanently added '192.168.1.1' (RSA1) to the list of known hosts.
[email protected]'s password:
3
The CLI screen displays next.
NXC Series User’s Guide
313
Chapter 28 System
28.9 Telnet
You can use Telnet to access the NXC’s command line interface. Specify which zones allow Telnet
access and from which IP address the access can come. Click Configuration > System > TELNET
to configure your NXC for remote Telnet access. Use this screen to specify from which zones Telnet
can be used to manage the NXC. You can also specify from which IP addresses the access can
come.
Figure 190 Configuration > System > TELNET
The following table describes the labels in this screen.
Table 164 Configuration > System > TELNET
LABEL
DESCRIPTION
Enable
Select the check box to allow or disallow the computer with the IP address that matches the
IP address(es) in the Service Control table to access the NXC CLI using this service.
Server Port
You may change the server port number for a service if needed, however you must use the
same port number in order to use that service for remote management.
Service Control
This specifies from which computers you can access which NXC zones.
Add
Click this to create a new entry. Select an entry and click Add to create a new entry after
the selected entry.
Edit
Double-click an entry or select it and click Edit to be able to modify the entry’s settings.
Remove
To remove an entry, select it and click Remove. The NXC confirms you want to remove it
before doing so. Note that subsequent entries move up by one when you take this action.
Move
To change an entry’s position in the numbered list, select the method and click Move to
display a field to type a number for where you want to put it and press [ENTER] to move
the rule to the number that you typed.
#
This the index number of the service control rule.
The entry with a hyphen (-) instead of a number is the NXC’s (non-configurable) default
policy. The NXC applies this to traffic that does not match any other configured rule. It is
not an editable rule. To apply other behavior, configure a rule that traffic will match so the
NXC will not have to use the default policy.
314
Zone
This is the zone on the NXC the user is allowed or denied to access.
Address
This is the object name of the IP address(es) with which the computer is allowed or denied
to access.
Action
This displays whether the computer with the IP address specified above can access the NXC
zone(s) configured in the Zone field (Accept) or not (Deny).
NXC Series User’s Guide
Chapter 28 System
Table 164 Configuration > System > TELNET (continued)
LABEL
DESCRIPTION
Apply
Click Apply to save your changes back to the NXC.
Reset
Click Reset to return the screen to its last-saved settings.
28.10 FTP
You can upload and download the NXC’s firmware and configuration files using FTP. To use this
feature, your computer must have an FTP client. See Chapter 30 on page 341 for more information
about firmware and configuration files.
To change your NXC’s FTP settings, click Configuration > System > FTP tab. The screen appears
as shown. Use this screen to specify from which zones FTP can be used to access the NXC. You can
also specify from which IP addresses the access can come.
Figure 191 Configuration > System > FTP
The following table describes the labels in this screen.
Table 165 Configuration > System > FTP
LABEL
DESCRIPTION
Enable
Select the check box to allow or disallow the computer with the IP address that matches
the IP address(es) in the Service Control table to access the NXC using this service.
TLS required
Select the check box to use FTP over TLS (Transport Layer Security) to encrypt
communication.
This implements TLS as a security mechanism to secure FTP clients and/or servers.
Server Port
You may change the server port number for a service if needed, however you must use the
same port number in order to use that service for remote management.
Server
Certificate
Select the certificate whose corresponding private key is to be used to identify the NXC for
FTP connections. You must have certificates already configured in the My Certificates
screen.
Service Control
This specifies from which computers you can access which NXC zones.
NXC Series User’s Guide
315
Chapter 28 System
Table 165 Configuration > System > FTP (continued)
LABEL
DESCRIPTION
Add
Click this to create a new entry. Select an entry and click Add to create a new entry after
the selected entry.
Edit
Double-click an entry or select it and click Edit to be able to modify the entry’s settings.
Remove
To remove an entry, select it and click Remove. The NXC confirms you want to remove it
before doing so. Note that subsequent entries move up by one when you take this action.
Move
To change an entry’s position in the numbered list, select the method and click Move to
display a field to type a number for where you want to put it and press [ENTER] to move
the rule to the number that you typed.
#
This the index number of the service control rule.
The entry with a hyphen (-) instead of a number is the NXC’s (non-configurable) default
policy. The NXC applies this to traffic that does not match any other configured rule. It is
not an editable rule. To apply other behavior, configure a rule that traffic will match so the
NXC will not have to use the default policy.
316
Zone
This is the zone on the NXC the user is allowed or denied to access.
Address
This is the object name of the IP address(es) with which the computer is allowed or denied
to access.
Action
This displays whether the computer with the IP address specified above can access the NXC
zone(s) configured in the Zone field (Accept) or not (Deny).
Apply
Click Apply to save your changes back to the NXC.
Reset
Click Reset to return the screen to its last-saved settings.
NXC Series User’s Guide
Chapter 28 System
28.11 SNMP
Simple Network Management Protocol is a protocol used for exchanging management information
between network devices. Your NXC supports SNMP agent functionality, which allows a manager
station to manage and monitor the NXC through the network. The NXC supports SNMP version one
(SNMPv1), version two (SNMPv2c) and version three (SNMPv3). The next figure illustrates an SNMP
management operation.
Figure 192 SNMP Management Model
An SNMP managed network consists of two main types of component: agents and a manager.
An agent is a management software module that resides in a managed device (the NXC). An agent
translates the local management information from the managed device into a form compatible with
SNMP. The manager is the console through which network administrators perform network
management functions. It executes applications that control and monitor managed devices.
The managed devices contain object variables/managed objects that define each piece of
information to be collected about a device. Examples of variables include such as number of
packets received, node port status etc. A Management Information Base (MIB) is a collection of
managed objects. SNMP allows a manager and agents to communicate for the purpose of accessing
these objects.
SNMP itself is a simple request/response protocol based on the manager/agent model. The
manager issues a request and the agent returns responses using the following protocol operations:
• Get - Allows the manager to retrieve an object variable from the agent.
• GetNext - Allows the manager to retrieve the next object variable from a table or list within an
agent. In SNMPv1, when a manager wants to retrieve all elements of a table from an agent, it
initiates a Get operation, followed by a series of GetNext operations.
• Set - Allows the manager to set values for object variables within an agent.
NXC Series User’s Guide
317
Chapter 28 System
• Trap - Used by the agent to inform the manager of some events.
28.11.1 Supported MIBs
The NXC supports MIB II that is defined in RFC-1213 and RFC-1215. The NXC also supports private
MIBs (zywall.mib and zyxel-zywall-ZLD-Common.mib) to collect information about CPU and
memory usage. The focus of the MIBs is to let administrators collect statistical data and monitor
status and performance. You can download the NXC’s MIBs from www.zyxel.com.
28.11.2 SNMP Traps
The NXC will send traps to the SNMP manager when any one of the following events occurs.
Table 166 SNMP Traps
318
OBJECT LABEL
OBJECT ID
DESCRIPTION
Cold Start
1.3.6.1.6.3.1.1.5.1
This trap is sent when an agent reinitialized its configuration
tables.
linkDown
1.3.6.1.6.3.1.1.5.3
This trap is sent when the Ethernet link is down.
linkUp
1.3.6.1.6.3.1.1.5.4
This trap is sent when the Ethernet link is up.
authenticationFailure
1.3.6.1.6.3.1.1.5.5
This trap is sent when an SNMP request comes from nonauthenticated hosts.
NXC Series User’s Guide
Chapter 28 System
28.11.3 Configuring SNMP
Your NXC can act as an SNMP agent, which allows a manager station to manage and monitor the
NXC through the network.
To change your NXC’s SNMP settings, click Configuration > System > SNMP tab. The screen
appears as shown. Use this screen to configure your SNMP settings, including from which zones
SNMP can be used to access the NXC. You can also specify from which IP addresses the access can
come and configure user profiles that define allowed SNMPv3 access.
Figure 193 Configuration > System > SNMP
The following table describes the labels in this screen.
Table 167 Configuration > System > SNMP
LABEL
DESCRIPTION
Enable
Select the check box to allow or disallow the computer with the IP address that matches the
IP address(es) in the Service Control table to access the NXC using this service.
Server Port
You may change the server port number for a service if needed, however you must use the
same port number in order to use that service for remote management.
Trap
NXC Series User’s Guide
319
Chapter 28 System
Table 167 Configuration > System > SNMP (continued)
LABEL
DESCRIPTION
Community
Type the trap community, which is the password sent with each trap to the SNMP manager.
The default is public and allows all requests.
Destination
Type the IP address of the SNMP manager to which your SNMP traps are sent.
Trap CAPWAP
Event
Select this option to have the NXC send a trap to the SNMP manager when a managed AP is
connected to or disconnected from the NXC.
SNMPv2c
Select this to allow SNMP managers using SNMPv2c to access the NXC.
Get Community
Enter the Get Community, which is the password for the incoming Get and GetNext
requests from the management station. The default is public and allows all requests.
Set Community
Enter the Set community, which is the password for incoming Set requests from the
management station. The default is private and allows all requests.
SNMPv3
Select this to allow SNMP managers using SNMPv3 to access the NXC.
Add
Click this to create a new entry.
Edit
Double-click an entry or select it and click Edit to be able to modify the entry’s settings.
Remove
To remove an entry, select it and click Remove. The NXC confirms you want to remove it
before doing so. Note that subsequent entries move up by one when you take this action.
#
This the index number of an SNMPv3 user profile.
User
This is the name of the user for which this SNMPv3 user profile is configured.
Authentication
This field displays the type of authentication the SNMPv3 user must use to connect to the
NXC using this SNMPv3 user profile.
Privacy
This field displays the type of encryption the SNMPv3 user must use to connect to the NXC
using this SNMPv3 user profile.
Privilege
This field displays whether the SNMPv3 user can have read-only or read and write access to
the NXC using this SNMPv3 user profile.
Service Control
This specifies from which computers you can access which NXC zones.
Add
Click this to create a new entry. Select an entry and click Add to create a new entry after
the selected entry.
Edit
Double-click an entry or select it and click Edit to be able to modify the entry’s settings.
Remove
To remove an entry, select it and click Remove. The NXC confirms you want to remove it
before doing so. Note that subsequent entries move up by one when you take this action.
Move
To change an entry’s position in the numbered list, select the method and click Move to
display a field to type a number for where you want to put it and press [ENTER] to move
the rule to the number that you typed.
#
This the index number of the service control rule.
The entry with a hyphen (-) instead of a number is the NXC’s (non-configurable) default
policy. The NXC applies this to traffic that does not match any other configured rule. It is
not an editable rule. To apply other behavior, configure a rule that traffic will match so the
NXC will not have to use the default policy.
320
Zone
This is the zone on the NXC the user is allowed or denied to access.
Address
This is the object name of the IP address(es) with which the computer is allowed or denied
to access.
Action
This displays whether the computer with the IP address specified above can access the NXC
zone(s) configured in the Zone field (Accept) or not (Deny).
Apply
Click Apply to save your changes back to the NXC.
Reset
Click Reset to return the screen to its last-saved settings.
NXC Series User’s Guide
Chapter 28 System
28.11.4 Adding or Editing an SNMPv3 User Profile
This screen allows you to add or edit an SNMPv3 user profile. To access this screen, click the
Configuration > System > SNMP screen’s Add button or select a SNMPv3 user profile from the
list and click the Edit button.
Figure 194 Configuration > System > SNMP > Add
The following table describes the labels in this screen.
Table 168 Configuration > System > SNMP
LABEL
DESCRIPTION
User Name
Select the user name of the user account for which this SNMPv3 user profile is configured.
Authentication
Select the type of authentication the SNMPv3 user must use to connect to the NXC using
this SNMPv3 user profile.
Select MD5 to require the SNMPv3 user’s password be encrypted by MD5 for
authentication.
Select SHA to require the SNMPv3 user’s password be encrypted by SHA for
authentication.
Privacy
Select the type of encryption the SNMPv3 user must use to connect to the NXC using this
SNMPv3 user profile.
Select NONE to not encrypt the SNMPv3 communications.
Select DES to use DES to encrypt the SNMPv3 communications.
Select AES to use AES to encrypt the SNMPv3 communications.
Privilege
Select whether the SNMPv3 user can have read-only or read and write access to the NXC
using this SNMPv3 user profile.
OK
Click OK to save your changes back to the NXC.
Cancel
Click Cancel to exit this screen without saving your changes.
28.12 Authentication Server
You can set the NXC to work as a RADIUS server to exchange messages with a RADIUS client, such
as an AP for user authentication and authorization. Click Configuration > System > Auth.
NXC Series User’s Guide
321
Chapter 28 System
Server tab. The screen appears as shown. Use this screen to enable the authentication server
feature of the NXC and specify the RADIUS client’s IP address.
Figure 195 Configuration > System > Auth. Server
The following table describes the labels in this screen.
Table 169 Configuration > System > Auth. Server
322
LABEL
DESCRIPTION
Enable
Select the check box to have the NXC act as a RADIUS server.
Authentication
Server
Certificate
Select the certificate whose corresponding private key is to be used to identify the NXC to
the RADIUS client. You must have certificates already configured in the My Certificates
screen.
Authentication
Method
Select an authentication method if you have created any in the Configuration > Object >
Auth. Method screen.
Service Control
This specifies from which computers you can access which NXC zones.
Add
Click this to create a new entry. Select an entry and click Add to create a new entry after
the selected entry.
Edit
Double-click an entry or select it and click Edit to be able to modify the entry’s settings.
Remove
To remove an entry, select it and click Remove. The NXC confirms you want to remove it
before doing so. Note that subsequent entries move up by one when you take this action.
Activate
To turn on an entry, select it and click Activate.
Inactivate
To turn off an entry, select it and click Inactivate.
#
This is the index number of the entry.
Status
This icon is lit when the entry is active and dimmed when the entry is inactive.
Profile Name
This field indicates the name assigned to the profile.
IP Address
This is the IP address of the RADIUS client that is allowed to exchange messages with the
NXC.
Mask
This is the subnet mask of the RADIUS client.
Description
This is the description of the RADIUS client.
Apply
Click Apply to save your changes back to the NXC.
Reset
Click Reset to return the screen to its last-saved settings.
NXC Series User’s Guide
Chapter 28 System
28.12.1 Add/Edit Trusted RADIUS Client
Click Configuration > System > Auth. Server to display the Auth. Server screen. Click the Add
icon or an Edit icon to display the following screen. Use this screen to create a new entry or edit an
existing one.
Figure 196 Configuration > System > Auth. Server > Add/Edit
The following table describes the labels in this screen.
Table 170 Configuration > System > Auth. Server > Add/Edit
LABEL
DESCRIPTION
Activate
Select this check box to make this profile active.
Profile Name
Enter a descriptive name (up to 31 alphanumerical characters) for identification purposes.
IP Address
Enter the IP address of the RADIUS client that is allowed to exchange messages with the
NXC.
Netmask
Enter the subnet mask of the RADIUS client.
Secret
Enter a password (up to 64 alphanumeric characters) as the key to be shared between the
NXC and the RADIUS client.
The key is not sent over the network. This key must be the same on the external
authentication server and the NXC.
Description
Enter the description of each server, if any. You can use up to 60 printable ASCII
characters.
OK
Click OK to save the changes.
Cancel
Click Cancel to discard the changes.
NXC Series User’s Guide
323
Chapter 28 System
28.13 Language
Click Configuration > System > Language to open this screen. Use this screen to select a
display language for the NXC’s Web Configurator screens.
Figure 197 Configuration > System > Language
The following table describes the labels in this screen.
Table 171 Configuration > System > Language
LABEL
DESCRIPTION
Language Setting
Select a display language for the NXC’s Web Configurator screens. You also need to open
a new browser session to display the screens in the new language.
Apply
Click Apply to save your changes back to the NXC.
Reset
Click Reset to return the screen to its last-saved settings.
28.14 IPv6
Click Configuration > System > IPv6 to open the following screen. Use this screen to enable
IPv6 support on the NXC.
Figure 198 Configuration > System > IPv6
The following table describes the labels in this screen.
Table 172 Configuration > System > IPv6
324
LABEL
DESCRIPTION
Enable IPv6
Select this to have the NXC support IPv6 and make IPv6 settings be available on the
screens that the functions support, such as the Configuration > Network > Interface
> Ethernet, and VLAN screens. The NXC discards all IPv6 packets if you clear this check
box.
NXC Series User’s Guide
Chapter 28 System
Table 172 Configuration > System > IPv6
LABEL
DESCRIPTION
Apply
Click Apply to save your changes back to the NXC.
Reset
Click Reset to return the screen to its last-saved settings.
NXC Series User’s Guide
325
C HAPTER
29
Log and Report
29.1 Overview
Use the system screens to configure daily reporting and log settings.
29.1.1 What You Can Do In this Chapter
• The Email Daily Report screen (Section 29.2 on page 326) configures how and where to send
daily reports and what reports to send.
• The Log Settings screens (Section 29.3 on page 328) specify which logs are e-mailed, where
they are e-mailed, and how often they are e-mailed.
29.2 Email Daily Report
Use this screen to start or stop data collection and view various statistics about traffic passing
through your NXC.
Note: Data collection may decrease the NXC’s traffic throughput rate.
NXC Series User’s Guide
326
Chapter 29 Log and Report
Click Configuration > Log & Report > Email Daily Report to display the following screen.
Configure this screen to have the NXC e-mail you system statistics every day.
Figure 199 Configuration > Log & Report > Email Daily Report
The following table describes the labels in this screen.
Table 173 Configuration > Log & Report > Email Daily Report
LABEL
DESCRIPTION
Enable Email
Daily Report
Select this to send reports by e-mail every day.
Mail Server
Type the name or IP address of the outgoing SMTP server.
NXC Series User’s Guide
327
Chapter 29 Log and Report
Table 173 Configuration > Log & Report > Email Daily Report (continued)
LABEL
DESCRIPTION
Mail Subject
Type the subject line for the outgoing e-mail. Select Append system name to add the
NXC’s system name to the subject. Select Append date time to add the NXC’s system date
and time to the subject.
Mail From
Type the e-mail address from which the outgoing e-mail is delivered. This address is used in
replies.
Mail To
Type the e-mail address (or addresses) to which the outgoing e-mail is delivered.
SMTP
Authentication
Select this check box if it is necessary to provide a user name and password to the SMTP
server.
User Name
This box is effective when you select the SMTP Authentication check box. Type the user
name to provide to the SMTP server when the log is e-mailed.
Password
This box is effective when you select the SMTP Authentication check box. Type the
password to provide to the SMTP server when the log is e-mailed.
Retype to
Confirm
Retype your new password for confirmation.
Send Report
Now
Click this button to have the NXC send the daily e-mail report immediately.
Time for
sending report
Select the time of day (hours and minutes) when the log is e-mailed. Use 24-hour notation.
Report Items
Select the information to include in the report. Select Reset counters after sending
report successfully if you only want to see statistics for a 24 hour period.
Reset All
Counters
Click this to discard all report data and start all of the counters over at zero.
Apply
Click Apply to save your changes back to the NXC.
Reset
Click Reset to return the screen to its last-saved settings.
29.3 Log Settings
These screens control log messages and alerts. A log message stores the information for viewing
(for example, in the View Log tab) or regular e-mailing later, and an alert is e-mailed immediately.
Usually, alerts are used for events that require more serious attention, such as system errors and
attacks.
The NXC provides a system log and supports e-mail profiles and remote syslog servers. The system
log is available on the View Log tab, the e-mail profiles are used to mail log messages to the
specified destinations, and the other four logs are stored on specified syslog servers.
The Log Settings tab also controls what information is saved in each log. For the system log, you
can also specify which log messages are e-mailed, where they are e-mailed, and how often they are
e-mailed.
For alerts, the Log Settings tab controls which events generate alerts and where alerts are emailed.
The Log Settings Summary screen provides a summary of all the settings. You can use the Log
Settings Edit screen to maintain the detailed settings (such as log categories, e-mail addresses,
server names, etc.) for any log. Alternatively, if you want to edit what events is included in each
log, you can also use the Log Category Settings screen to edit this information for all logs at the
same time.
328
NXC Series User’s Guide
Chapter 29 Log and Report
29.3.1 Log Settings Summary
To access this screen, click Configuration > Log & Report > Log Settings.
Figure 200 Configuration > Log & Report > Log Settings
The following table describes the labels in this screen.
Table 174 Configuration > Log & Report > Log Settings
LABEL
DESCRIPTION
Edit
Double-click an entry or select it and click Edit to open a screen where you can modify the
entry’s settings.
Activate
To turn on an entry, select it and click Activate.
Inactivate
To turn off an entry, select it and click Inactivate.
#
This field is a sequential value, and it is not associated with a specific log.
Status
This icon is lit when the entry is active and dimmed when the entry is inactive.
Name
This field displays the name of the log (system log or one of the remote servers).
Log Format
This field displays the format of the log.
Internal - system log; you can view the log on the View Log tab.
VRPT/Syslog - ZyXEL’s Vantage Report, syslog-compatible format.
CEF/Syslog - Common Event Format, syslog-compatible format.
Summary
NXC Series User’s Guide
This field is a summary of the settings for each log.
329
Chapter 29 Log and Report
Table 174 Configuration > Log & Report > Log Settings (continued)
330
LABEL
DESCRIPTION
Log Category
Settings
Click this button to open the Log Category Settings screen.
Apply
Click this button to save your changes (activate and deactivate logs) and make them take
effect.
NXC Series User’s Guide
Chapter 29 Log and Report
29.3.2 Edit System Log Settings
This screen controls the detailed settings for each log in the system log (which includes the e-mail
profiles). Go to the Log Settings Summary screen and click the system log Edit icon.
Figure 201 Configuration > Log & Report > Log Settings > Edit (System Log)
NXC Series User’s Guide
331
Chapter 29 Log and Report
The following table describes the labels in this screen.
Table 175 Configuration > Log & Report > Log Settings > Edit (System Log)
LABEL
DESCRIPTION
E-Mail Server 1/2
Active
Select this to send log messages and alerts according to the information in this
section. You specify what kinds of log messages are included in log information and
what kinds of log messages are included in alerts in the Active Log and Alert
section.
Mail Server
Type the name or IP address of the outgoing SMTP server.
Mail Subject
Type the subject line for the outgoing e-mail.
Send From
Type the e-mail address from which the outgoing e-mail is delivered. This address is
used in replies.
Send Log To
Type the e-mail address to which the outgoing e-mail is delivered.
Send Alerts To
Type the e-mail address to which alerts are delivered.
Sending Log
Select how often log information is e-mailed. Choices are: When Full, Hourly and
When Full, Daily and When Full, and Weekly and When Full.
Day for Sending
Log
This field is available if the log is e-mailed weekly. Select the day of the week the log
is e-mailed.
Time for Sending
Log
This field is available if the log is e-mailed weekly or daily. Select the time of day
(hours and minutes) when the log is e-mailed. Use 24-hour notation.
SMTP
Authentication
Select this check box if it is necessary to provide a user name and password to the
SMTP server.
User Name
This box is effective when you select the SMTP Authentication check box. Type the
user name to provide to the SMTP server when the log is e-mailed.
Password
This box is effective when you select the SMTP Authentication check box. Type the
password to provide to the SMTP server when the log is e-mailed.
Retype to Confirm
Retype your new password for confirmation.
Active Log and Alert
System log
Use the System Log drop-down list to change the log settings for all of the log
categories.
disable all logs (red X) - do not log any information for any category for the system
log or e-mail any logs to e-mail server 1 or 2.
enable normal logs (green check mark) - create log messages and alerts for all
categories for the system log. If e-mail server 1 or 2 also has normal logs enabled,
the NXC will e-mail logs to them.
enable normal logs and debug logs (yellow check mark) - create log messages,
alerts, and debugging information for all categories. The NXC does not e-mail
debugging information, even if this setting is selected.
E-mail Server 1
Use the E-Mail Server 1 drop-down list to change the settings for e-mailing logs to
e-mail server 1 for all log categories.
Using the System Log drop-down list to disable all logs overrides your e-mail server
1 settings.
enable normal logs (green check mark) - e-mail log messages for all categories to
e-mail server 1.
enable alert logs (red exclamation point) - e-mail alerts for all categories to e-mail
server 1.
332
NXC Series User’s Guide
Chapter 29 Log and Report
Table 175 Configuration > Log & Report > Log Settings > Edit (System Log) (continued)
LABEL
E-mail Server 2
DESCRIPTION
Use the E-Mail Server 2 drop-down list to change the settings for e-mailing logs to
e-mail server 2 for all log categories.
Using the System Log drop-down list to disable all logs overrides your e-mail server
2 settings.
enable normal logs (green check mark) - e-mail log messages for all categories to
e-mail server 2.
enable alert logs (red exclamation point) - e-mail alerts for all categories to e-mail
server 2.
#
This field is a sequential value, and it is not associated with a specific address.
Log Category
This field displays each category of messages. It is the same value used in the
Display and Category fields in the View Log tab. The Default category includes
debugging messages generated by open source software.
System log
Select which events you want to log by Log Category. There are three choices:
disable all logs (red X) - do not log any information from this category
enable normal logs (green check mark) - create log messages and alerts from this
category
enable normal logs and debug logs (yellow check mark) - create log messages,
alerts, and debugging information from this category; the NXC does not e-mail
debugging information, however, even if this setting is selected.
E-mail Server 1
Select whether each category of events should be included in the log messages when
it is e-mailed (green check mark) and/or in alerts (red exclamation point) for the email settings specified in E-Mail Server 1. The NXC does not e-mail debugging
information, even if it is recorded in the System log.
E-mail Server 2
Select whether each category of events should be included in log messages when it
is e-mailed (green check mark) and/or in alerts (red exclamation point) for the email settings specified in E-Mail Server 2. The NXC does not e-mail debugging
information, even if it is recorded in the System log.
Log Consolidation
Active
Select this to activate log consolidation. Log consolidation aggregates multiple log
messages that arrive within the specified Log Consolidation Interval. In the View
Log tab, the text “[count=x]”, where x is the number of original log messages, is
appended at the end of the Message field, when multiple log messages were
aggregated.
Log Consolidation
Interval
Type how often, in seconds, to consolidate log information. If the same log message
appears multiple times, it is aggregated into one log message with the text
“[count=x]”, where x is the number of original log messages, appended at the end of
the Message field.
OK
Click this to save your changes and return to the previous screen.
Cancel
Click this to return to the previous screen without saving your changes.
29.3.3 Edit USB Storage Log Settings
The Edit Log on USB Storage Setting screen controls the detailed settings for saving logs to a
connected USB storage device. Go to the Log Settings Summary screen, and click the USB
storage Edit icon.
NXC Series User’s Guide
333
Chapter 29 Log and Report
Figure 202 Configuration > Log & Report > Log Settings > Edit (USB Storage)
The following table describes the labels in this screen.
Table 176 Configuration > Log & Report > Log Settings > Edit (USB Storage)
LABEL
DESCRIPTION
Duplicate logs to
USB storage (if
ready)
Select this to have the NXC save a copy of its system logs to a connected USB storage
device. Use the Active Log section to specify what kinds of messages to include.
Active Log
Selection
Use the Selection drop-down list to change the log settings for all of the log categories.
disable all logs (red X) - do not send the remote server logs for any log category.
enable normal logs (green check mark) - send the remote server log messages and
alerts for all log categories.
enable normal logs and debug logs (yellow check mark) - send the remote server log
messages, alerts, and debugging information for all log categories.
334
#
This field is a sequential value, and it is not associated with a specific entry.
Log Category
This field displays each category of messages. The Default category includes debugging
messages generated by open source software.
NXC Series User’s Guide
Chapter 29 Log and Report
Table 176 Configuration > Log & Report > Log Settings > Edit (USB Storage) (continued)
LABEL
Selection
DESCRIPTION
Select what information you want to log from each Log Category (except All Logs; see
below). Choices are:
disable all logs (red X) - do not log any information from this category
enable normal logs (green check mark) - log regular information and alerts from this
category
enable normal logs and debug logs (yellow check mark) - log regular information,
alerts, and debugging information from this category
OK
Click this to save your changes and return to the previous screen.
Cancel
Click this to return to the previous screen without saving your changes.
NXC Series User’s Guide
335
Chapter 29 Log and Report
29.3.4 Edit Remote Server Log Settings
This screen controls the settings for each log in the remote server (syslog). Go to the Log Settings
Summary screen and click a remote server Edit icon.
Figure 203 Configuration > Log & Report > Log Settings > Edit (Remote Server)
336
NXC Series User’s Guide
Chapter 29 Log and Report
The following table describes the labels in this screen.
Table 177 Configuration > Log & Report > Log Settings > Edit (Remote Server)
LABEL
DESCRIPTION
Log Settings for
Remote Server
Active
Select this check box to send log information according to the information in this section.
You specify what kinds of messages are included in log information in the Active Log
section.
Log Format
This field displays the format of the log information. It is read-only.
VRPT/Syslog - ZyXEL’s Vantage Report, syslog-compatible format.
CEF/Syslog - Common Event Format, syslog-compatible format.
Server
Address
Type the server name or the IP address of the syslog server to which to send log
information.
Log Facility
Select a log facility. The log facility allows you to log the messages to different files in the
syslog server. Please see the documentation for your syslog program for more information.
Active Log
Selection
Use the Selection drop-down list to change the log settings for all of the log categories.
disable all logs (red X) - do not send the remote server logs for any log category.
enable normal logs (green check mark) - send the remote server log messages and
alerts for all log categories.
enable normal logs and debug logs (yellow check mark) - send the remote server log
messages, alerts, and debugging information for all log categories.
#
This field is a sequential value, and it is not associated with a specific address.
Log Category
This field displays each category of messages. It is the same value used in the Display
and Category fields in the View Log tab. The Default category includes debugging
messages generated by open source software.
Selection
Select what information you want to log from each Log Category (except All Logs; see
below). Choices are:
disable all logs (red X) - do not log any information from this category
enable normal logs (green check mark) - log regular information and alerts from this
category
enable normal logs and debug logs (yellow check mark) - log regular information,
alerts, and debugging information from this category
OK
Click this to save your changes and return to the previous screen.
Cancel
Click this to return to the previous screen without saving your changes.
29.3.5 Log Category Settings
This screen allows you to view and to edit what information is included in the system log, USB
storage, e-mail profiles, and remote servers at the same time. It does not let you change other log
settings (for example, where and how often log information is e-mailed or remote server names).
NXC Series User’s Guide
337
Chapter 29 Log and Report
To access this screen, go to the Log Settings Summary screen, and click the Log Category
Settings button.
Figure 204 Configuration > Log & Report > Log Settings > Log Category Settings
This screen provides a different view and a different way of indicating which messages are included
in each log and each alert. (The Default category includes debugging messages generated by open
source software.)
338
NXC Series User’s Guide
Chapter 29 Log and Report
The following table describes the fields in this screen.
Table 178 Configuration > Log & Report > Log Settings > Log Category Settings
LABEL
DESCRIPTION
System log
Use the System Log drop-down list to change the log settings for all of the log categories.
disable all logs (red X) - do not log any information for any category for the system log
or e-mail any logs to e-mail server 1 or 2.
enable normal logs (green check mark) - create log messages and alerts for all
categories for the system log. If e-mail server 1 or 2 also has normal logs enabled, the
NXC will e-mail logs to them.
enable normal logs and debug logs (yellow check mark) - create log messages, alerts,
and debugging information for all categories. The NXC does not e-mail debugging
information, even if this setting is selected.
USB Storage
Use the USB Storage drop-down list to change the log settings for saving logs to a
connected USB storage device.
disable all logs (red X) - do not log any information for any category to a connected USB
storage device.
enable normal logs (green check mark) - create log messages and alerts for all
categories and save them to a connected USB storage device.
enable normal logs and debug logs (yellow check mark) - create log messages, alerts,
and debugging information for all categories and save them to a connected USB storage
device.
E-mail Server 1
Use the E-Mail Server 1 drop-down list to change the settings for e-mailing logs to e-mail
server 1 for all log categories.
Using the System Log drop-down list to disable all logs overrides your e-mail server 1
settings.
enable normal logs (green check mark) - e-mail log messages for all categories to e-mail
server 1.
enable alert logs (red exclamation point) - e-mail alerts for all categories to e-mail
server 1.
E-mail Server 2
Use the E-Mail Server 2 drop-down list to change the settings for e-mailing logs to e-mail
server 2 for all log categories.
Using the System Log drop-down list to disable all logs overrides your e-mail server 2
settings.
enable normal logs (green check mark) - e-mail log messages for all categories to e-mail
server 2.
enable alert logs (red exclamation point) - e-mail alerts for all categories to e-mail
server 2.
Remote Server
1~4
For each remote server, use the Selection drop-down list to change the log settings for all
of the log categories.
disable all logs (red X) - do not send the remote server logs for any log category.
enable normal logs (green check mark) - send the remote server log messages and
alerts for all log categories.
enable normal logs and debug logs (yellow check mark) - send the remote server log
messages, alerts, and debugging information for all log categories.
#
This field is a sequential value, and it is not associated with a specific address.
Log Category
This field displays each category of messages. It is the same value used in the Display
and Category fields in the View Log tab. The Default category includes debugging
messages generated by open source software.
NXC Series User’s Guide
339
Chapter 29 Log and Report
Table 178 Configuration > Log & Report > Log Settings > Log Category Settings (continued)
LABEL
DESCRIPTION
System log
Select which events you want to log by Log Category. There are three choices:
disable all logs (red X) - do not log any information from this category
enable normal logs (green check mark) - create log messages and alerts from this
category
enable normal logs and debug logs (yellow check mark) - create log messages, alerts,
and debugging information from this category; the NXC does not e-mail debugging
information, however, even if this setting is selected.
USB Storage
Select which event log categories to save to a connected USB storage device. There are
three choices:
disable all logs (red X) - do not log any information from this category
enable normal logs (green check mark) - save log messages and alerts from this
category
enable normal logs and debug logs (yellow check mark) - save log messages, alerts,
and debugging information from this category.
E-mail Server 1
E-mail
Select whether each category of events should be included in the log messages when it is
e-mailed (green check mark) and/or in alerts (red exclamation point) for the e-mail
settings specified in E-Mail Server 1. The NXC does not e-mail debugging information,
even if it is recorded in the System log.
E-mail Server 2
E-mail
Select whether each category of events should be included in log messages when it is emailed (green check mark) and/or in alerts (red exclamation point) for the e-mail settings
specified in E-Mail Server 2. The NXC does not e-mail debugging information, even if it is
recorded in the System log.
Remote Server
1~4
For each remote server, select what information you want to log from each Log Category
(except All Logs; see below). Choices are:
disable all logs (red X) - do not log any information from this category
enable normal logs (green check mark) - log regular information and alerts from this
category
enable normal logs and debug logs (yellow check mark) - log regular information,
alerts, and debugging information from this category
340
OK
Click this to save your changes and return to the previous screen.
Cancel
Click this to return to the previous screen without saving your changes.
NXC Series User’s Guide
C HAPTER
30
File Manager
30.1 Overview
Configuration files define the NXC’s settings. Shell scripts are files of commands that you can store
on the NXC and run when you need them. You can apply a configuration file or run a shell script
without the NXC restarting. You can store multiple configuration files and shell script files on the
NXC. You can edit configuration files or shell scripts in a text editor and upload them to the NXC.
Configuration files use a .conf extension and shell scripts use a .zysh extension.
30.1.1 What You Can Do in this Chapter
• The Configuration File screen (Section 30.2 on page 343) stores and names configuration files.
You can also download and upload configuration files.
• The Firmware Package screen (Section 30.3 on page 347) checks your current firmware
version and uploads firmware to the NXC.
• The Shell Script screen (Section 30.4 on page 350) stores, names, downloads, uploads and runs
shell script files.
30.1.2 What you Need to Know
The following terms and concepts may help as you read this chapter.
Configuration Files and Shell Scripts
When you apply a configuration file, the NXC uses the factory default settings for any features that
the configuration file does not include. When you run a shell script, the NXC only applies the
commands that it contains. Other settings do not change.
NXC Series User’s Guide
341
Chapter 30 File Manager
These files have the same syntax, which is also identical to the way you run CLI commands
manually. An example is shown below.
Figure 205 Configuration File / Shell Script: Example
# enter configuration mode
configure terminal
# change administrator password
username admin password 4321 user-type admin
# configure ge3
interface ge3
ip address 172.16.37.240 255.255.255.0
ip gateway 172.16.37.254 metric 1
exit
# create address objects for remote management
# use the address group in case we want to open up remote management later
address-object TW_SUBNET 172.16.37.0/24
object-group address TW_TEAM
address-object TW_SUBNET
exit
# enable Telnet access (not enabled by default, unlike other services)
ip telnet server
# open WLAN-to-NXC firewall for TW_TEAM for remote management
firewall WLAN NXC insert 4
sourceip TW_TEAM
service TELNET
action allow
exit
write
While configuration files and shell scripts have the same syntax, the NXC applies configuration files
differently than it runs shell scripts. This is explained below.
Table 179 Configuration Files and Shell Scripts in the NXC
Configuration Files (.conf)
Shell Scripts (.zysh)
•
•
•
•
•
Resets to default configuration.
Goes into CLI Configuration mode.
Runs the commands in the configuration file.
Goes into CLI Privilege mode.
Runs the commands in the shell script.
You have to run the aforementioned example as a shell script because the first command is run in
Privilege mode. If you remove the first command, you have to run the example as a configuration
file because the rest of the commands are executed in Configuration mode.
Comments in Configuration Files or Shell Scripts
In a configuration file or shell script, use “#” or “!” as the first character of a command line to have
the NXC treat the line as a comment.
Your configuration files or shell scripts can use “exit” or a command line consisting of a single “!” to
have the NXC exit sub command mode.
Note: “exit” or “!'” must follow sub commands if it is to make the NXC exit sub command
mode.
342
NXC Series User’s Guide
Chapter 30 File Manager
Line 3 in the following example exits sub command mode.
interface ge1
ip address dhcp
!
Lines 1 and 3 in the following example are comments and line 4 exits sub command mode.
!
interface ge1
# this interface is a DHCP client
!
Lines 1 and 2 are comments. Line 5 exits sub command mode.
! this is from Joe
# on 2008/04/05
interface ge1
ip address dhcp
!
Errors in Configuration Files or Shell Scripts
When you apply a configuration file or run a shell script, the NXC processes the file line-by-line. The
NXC checks the first line and applies the line if no errors are detected. Then it continues with the
next line. If the NXC finds an error, it stops applying the configuration file or shell script and
generates a log.
You can change the way a configuration file or shell script is applied. Include setenv stop-onerror off in the configuration file or shell script. The NXC ignores any errors in the configuration
file or shell script and applies all of the valid commands. The NXC still generates a log for any
errors.
30.2 Configuration File
Click Maintenance > File Manager > Configuration File to open this screen. Use the
Configuration File screen to store, run, and name configuration files. You can also download
configuration files from the NXC to your computer and upload configuration files from your
computer to the NXC.
Once your NXC is configured and functioning properly, it is highly recommended that you back up
your configuration file before making further configuration changes. The backup configuration file
will be useful in case you need to return to your previous settings.
NXC Series User’s Guide
343
Chapter 30 File Manager
Configuration File Flow at Restart
• If there is not a startup-config.conf when you restart the NXC (whether through a
management interface or by physically turning the power off and back on), the NXC uses the
system-default.conf configuration file with the NXC’s default settings.
• If there is a startup-config.conf, the NXC checks it for errors and applies it. If there are no
errors, the NXC uses it and copies it to the lastgood.conf configuration file as a back up file. If
there is an error, the NXC generates a log and copies the startup-config.conf configuration file
to the startup-config-bad.conf configuration file and tries the existing lastgood.conf
configuration file. If there isn’t a lastgood.conf configuration file or it also has an error, the NXC
applies the system-default.conf configuration file.
• You can change the way the startup-config.conf file is applied. Include the setenv-startup
stop-on-error off command. The NXC ignores any errors in the startup-config.conf file and
applies all of the valid commands. The NXC still generates a log for any errors.
Figure 206 Maintenance > File Manager > Configuration File
Do not turn off the NXC while configuration file upload is in progress.
344
NXC Series User’s Guide
Chapter 30 File Manager
The following table describes the labels in this screen.
Table 180 Maintenance > File Manager > Configuration File
LABEL
DESCRIPTION
Rename
Use this button to change the label of a configuration file on the NXC. You can only rename
manually saved configuration files. You cannot rename the lastgood.conf, systemdefault.conf and startup-config.conf files.
You cannot rename a configuration file to the name of another configuration file in the
NXC.
Click a configuration file’s row to select it and click Rename to open the Rename File
screen.
Specify the new name for the configuration file. Use up to 25 characters (including a-zAZ0-9;‘~!@#$%^&()_+[]{}’,.=-).
Click OK to save the duplicate or click Cancel to close the screen without saving a
duplicate of the configuration file.
Remove
Click a configuration file’s row to select it and click Remove to delete it from the NXC. You
can only delete manually saved configuration files. You cannot delete the systemdefault.conf, startup-config.conf and lastgood.conf files.
A pop-up window asks you to confirm that you want to delete the configuration file. Click
OK to delete the configuration file or click Cancel to close the screen without deleting the
configuration file.
Download
Click a configuration file’s row to select it and click Download to save the configuration to
your computer.
Copy
Use this button to save a duplicate of a configuration file on the NXC.
Click a configuration file’s row to select it and click Copy to open the Copy File screen.
Specify a name for the duplicate configuration file. Use up to 25 characters (including azA-Z0-9;‘~!@#$%^&()_+[]{}’,.=-).
Click OK to save the duplicate or click Cancel to close the screen without saving a
duplicate of the configuration file.
NXC Series User’s Guide
345
Chapter 30 File Manager
Table 180 Maintenance > File Manager > Configuration File (continued)
LABEL
DESCRIPTION
Apply
Use this button to have the NXC use a specific configuration file.
Click a configuration file’s row to select it and click Apply to have the NXC use that
configuration file. The NXC does not have to restart in order to use a different configuration
file, although you will need to wait for a few minutes while the system reconfigures.
The following screen gives you options for what the NXC is to do if it encounters an error in
the configuration file.
Immediately stop applying the configuration file - this is not recommended because
it would leave the rest of the configuration blank. If the interfaces were not configured
before the first error, the console port may be the only way to access the device.
Immediately stop applying the configuration file and roll back to the previous
configuration - this gets the NXC started with a fully valid configuration file as quickly as
possible.
Ignore errors and finish applying the configuration file - this applies the valid parts
of the configuration file and generates error logs for all of the configuration file’s errors.
This lets the NXC apply most of your configuration and you can refer to the logs for what to
fix.
Ignore errors and finish applying the configuration file and then roll back to the
previous configuration - this applies the valid parts of the configuration file, generates
error logs for all of the configuration file’s errors, and starts the NXC with a fully valid
configuration file.
Click OK to have the NXC start applying the configuration file or click Cancel to close the
screen
#
This column displays the number for each configuration file entry. This field is a sequential
value, and it is not associated with a specific address. The total number of configuration
files that you can save depends on the sizes of the configuration files and the available
flash storage space.
File Name
This column displays the label that identifies a configuration file.
You cannot delete the following configuration files or change their file names.
The system-default.conf file contains the NXC’s default settings. Select this file and click
Apply to reset all of the NXC settings to the factory defaults. This configuration file is
included when you upload a firmware package.
The startup-config.conf file is the configuration file that the NXC is currently using. If
you make and save changes during your management session, the changes are applied to
this configuration file. The NXC applies configuration changes made in the Web
Configurator to the configuration file when you click Apply or OK. It applies configuration
changes made via commands when you use the write command.
The lastgood.conf is the most recently used (valid) configuration file that was saved
when the device last restarted. If you upload and apply a configuration file with an error,
you can apply lastgood.conf to return to a valid configuration.
346
NXC Series User’s Guide
Chapter 30 File Manager
Table 180 Maintenance > File Manager > Configuration File (continued)
LABEL
DESCRIPTION
Size
This column displays the size (in KB) of a configuration file.
Last Modified
This column displays the date and time that the individual configuration files were last
changed or saved.
Upload
Configuration
File
The bottom part of the screen allows you to upload a new or previously saved
configuration file from your computer to your NXC
You cannot upload a configuration file named system-default.conf or lastgood.conf.
If you upload startup-config.conf, it will replace the current configuration and
immediately apply the new settings.
File Path
Type in the location of the file you want to upload in this field or click Browse ... to find it.
Browse...
Click Browse... to find the .conf file you want to upload. The configuration file must use a
“.conf” filename extension. You will receive an error message if you try to upload a fie of a
different format. Remember that you must decompress compressed (.zip) files before you
can upload them.
Upload
Click Upload to begin the upload process. This process may take up to two minutes.
30.3 Firmware Package
Click Maintenance > File Manager > Firmware Package to open this screen. Use the
Firmware Package screen to check your current firmware version and upload firmware to the
NXC.
Note: The Web Configurator is the recommended method for uploading firmware. You
only need to use the command line interface if you need to recover the firmware.
See the CLI Reference Guide for how to determine if you need to recover the
firmware and how to recover it.
Find the firmware package at www.zyxel.com in a file that (usually) uses the system model name
with a .bin extension, for example, “nxc.bin”.
NXC Series User’s Guide
347
Chapter 30 File Manager
The firmware update can take up to five minutes. Do not turn off or reset
the NXC while the firmware update is in progress!
Figure 207 Maintenance > File Manager > Firmware Package
The following table describes the labels in this screen.
Table 181 Maintenance > File Manager > Firmware Package
LABEL
DESCRIPTION
Version
Boot Module
This is the version of the boot module that is currently on the NXC.
Current Version
This is the version of the firmware that is currently installed on the NXC.
The firmware version conists of the trunk version number, model code, and release
number. For example, V4.10(AAOS.1) means V4.10 is the trunk number, AAOS
represents NXC5500, and 1 means the first release.
Released Date
This is the date that the firmware was created.
Upload File
File Path
Type in the location of the file you want to upload in this field or click Browse ... to find
it.
Browse...
Click Browse... to find the .bin file you want to upload. Remember that you must
decompress compressed (.zip) files before you can upload them.
Upload
Click Upload to begin the upload process. This process may take up to two minutes.
Upload Firmware
Status
Version
348
This is the version of the firmware that you uploaded.
NXC Series User’s Guide
Chapter 30 File Manager
Table 181 Maintenance > File Manager > Firmware Package (continued)
LABEL
DESCRIPTION
Released Date
This is the date that the firmware was created.
Firmware Update
Schedule
The NXC can be scheduled to install the firmware you uploaded at the specified date and
time.
Schedule
Select this option to turn on the firmware update scheduling feature.
Note: To enable scheduling, you have to select this option and click Apply before you
upload a firmware package. Otherwise, the NXC installs the uploaded firmware
package immediately.
Time (hh:mm)
Enter the time of the day in 24-hour format (for example 23:00 equals 11:00 pm) to
install the firmware.
Date (yyyy-mmdd)
Select or specify the day in year-month-date format to install the firmware.
Apply
Click Apply to save your changes back to the NXC.
Reset
Click Reset to return the screen to its last-saved settings.
After you see the Firmware Upload in Process screen, wait two minutes before logging into the
NXC again.
Figure 208 Firmware Upload In Process
Note: The NXC automatically reboots after a successful firmware update.
The NXC automatically restarts causing a temporary network disconnect. In some operating
systems, you may see the following icon on your desktop.
Figure 209 Network Temporarily Disconnected
After five minutes, log in again and check your new firmware version in the Dashboard screen.
If the firmware update was not successful, the following message appears in the screen.
Figure 210 Firmware Upload Error
NXC Series User’s Guide
349
Chapter 30 File Manager
30.4 Shell Script
Use shell script files to have the NXC use commands that you specify. Use a text editor to create the
shell script files. They must use a “.zysh” filename extension.
Click Maintenance > File Manager > Shell Script to open this screen. Use the Shell Script
screen to store, name, download, upload and run shell script files. You can store multiple shell
script files on the NXC at the same time.
Note: You should include write commands in your scripts. If you do not use the write
command, the changes will be lost when the NXC restarts. You could use multiple
write commands in a long script.
Figure 211 Maintenance > File Manager > Shell Script
Each field is described in the following table.
Table 182 Maintenance > File Manager > Shell Script
LABEL
DESCRIPTION
Rename
Use this button to change the label of a shell script file on the NXC.
You cannot rename a shell script to the name of another shell script in the NXC.
Click a shell script’s row to select it and click Rename to open the Rename File screen.
Specify the new name for the shell script file. Use up to 25 characters (including a-zA-Z09;‘~!@#$%^&()_+[]{}’,.=-).
Click OK to save the duplicate or click Cancel to close the screen without saving a duplicate of
the configuration file.
Remove
Click a shell script file’s row to select it and click Delete to delete the shell script file from the
NXC.
A pop-up window asks you to confirm that you want to delete the shell script file. Click OK to
delete the shell script file or click Cancel to close the screen without deleting the shell script file.
Download
350
Click a shell script file’s row to select it and click Download to save the configuration to your
computer.
NXC Series User’s Guide
Chapter 30 File Manager
Table 182 Maintenance > File Manager > Shell Script (continued)
LABEL
DESCRIPTION
Copy
Use this button to save a duplicate of a shell script file on the NXC.
Click a shell script file’s row to select it and click Copy to open the Copy File screen.
Specify a name for the duplicate file. Use up to 25 characters (including a-zA-Z09;‘~!@#$%^&()_+[]{}’,.=-).
Click OK to save the duplicate or click Cancel to close the screen without saving a duplicate of
the configuration file.
Apply
Use this button to have the NXC use a specific shell script file.
Click a shell script file’s row to select it and click Apply to have the NXC use that shell script file.
You may need to wait awhile for the NXC to finish applying the commands.
#
This column displays the number for each shell script file entry.
File Name
This column displays the label that identifies a shell script file.
Size
This column displays the size (in KB) of a shell script file.
Last
Modified
This column displays the date and time that the individual shell script files were last changed or
saved.
Upload
The bottom part of the screen allows you to upload a new or previously saved shell script file
Shell Script from your computer to your NXC.
File Path
Type in the location of the file you want to upload in this field or click Browse ... to find it.
Browse...
Click Browse... to find the .zysh file you want to upload.
Upload
Click Upload to begin the upload process. This process may take up to several minutes.
NXC Series User’s Guide
351
C HAPTER
31
Diagnostics
31.1 Overview
Use the diagnostics screens for troubleshooting.
31.1.1 What You Can Do in this Chapter
• The Diagnostics screen (Section 31.2 on page 352) generates a file containing the NXC’s
configuration and diagnostic information if you need to provide it to customer support during
troubleshooting.
• The Packet Capture screen (Section 31.3 on page 354) captures data packets going through
the NXC.
• The Core Dump screens (Section 31.4 on page 357) save a process’s core dump to an attached
USB storage device if the process terminates abnormally (crashes) so you can send the file to
customer support for troubleshooting.
• The System Log screens (Section 31.5 on page 359) download files of system logs from a
connected USB storage device to your computer.
• The Wireless Frame Capture screens (Section 31.6 on page 360) capture network traffic going
through the AP interfaces connected to your NXC.
31.2 Diagnostics
This screen provides an easy way for you to generate a file containing the NXC’s configuration and
diagnostic information. You may need to generate this file and send it to customer support during
troubleshooting.
Click Maintenance > Diagnostics to open the Diagnostic screen.
Figure 212 Maintenance > Diagnostics
NXC Series User’s Guide
352
Chapter 31 Diagnostics
The following table describes the labels in this screen.
Table 183 Maintenance > Diagnostics
LABEL
DESCRIPTION
Filename
This is the name of the most recently created diagnostic file.
Last modified
This is the date and time that the last diagnostic file was created. The format is yyyy-mm-dd
hh:mm:ss.
Size
This is the size of the most recently created diagnostic file.
Copy the
diagnostic file
to USB storage
(if ready)
Select this to have the NXC create an extra copy of the diagnostic file to a connected USB
storage device.
Apply
Click Apply to save your changes.
Collect Now
Click this to have the NXC create a new diagnostic file.
Download
Click this to save the most recent diagnostic file to a computer.
31.2.1 Diagnostics Files
Click Maintenance > Diagnostics > Files to open the diagnostic files screen. This screen lists the
files of diagnostic information the NXC has collected and stored in a connected USB storage device.
You may need to send these files to customer support for troubleshooting.
Figure 213 Maintenance > Diagnostics > Files
The following table describes the labels in this screen.
Table 184 Maintenance > Diagnostics > Files
LABEL
DESCRIPTION
Remove
Select files and click Remove to delete them from the NXC. Use the [Shift] and/or [Ctrl] key
to select multiple files. A pop-up window asks you to confirm that you want to delete.
Download
Click a file to select it and click Download to save it to your computer.
#
This column displays the number for each file entry. The total number of files that you can
save depends on the file sizes and the available storage space.
File Name
This column displays the label that identifies the file.
Size
This column displays the size (in bytes) of a file.
Last Modified
This column displays the date and time that the individual files were saved.
NXC Series User’s Guide
353
Chapter 31 Diagnostics
31.3 Packet Capture
Use this screen to capture network traffic going through the NXC’s interfaces. Studying these
packet captures may help you identify network problems.
Click Maintenance > Diagnostics > Packet Capture to open the packet capture screen.
Note: New capture files overwrite existing files of the same name. Change the File Suffix
field’s setting to avoid this.
Figure 214 Maintenance > Diagnostics > Packet Capture > Capture
The following table describes the labels in this screen.
Table 185 Maintenance > Diagnostics > Packet Capture
354
LABEL
DESCRIPTION
Interfaces
Enabled interfaces appear under Available Interfaces. Select interfaces for which
to capture packets and click the right arrow button to move them to the Capture
Interfaces list. Use the [Shift] and/or [Ctrl] key to select multiple objects.
IP Version
Select the version of the Internet Protocol (IP) by which traffic is routed across the
networks and Internet. Select any to capture packets for traffic sent by either IP
version.
Protocol Type
Select the protocol type of traffic for which to capture packets. Select any to capture
packets for all types of traffic.
NXC Series User’s Guide
Chapter 31 Diagnostics
Table 185 Maintenance > Diagnostics > Packet Capture (continued)
LABEL
DESCRIPTION
Host IP
Select a host IP address object for which to capture packets. Select any to capture
packets for all hosts. Select User Defined to be able to enter an IP address.
Host Port
This field is configurable when you set the Protocol Type to any, tcp, or udp.
Specify the port number of traffic to capture.
Continuously capture
and overwrite old ones
Select this to have the NXC keep capturing traffic and overwriting old packet capture
entries when the available storage space runs out.
Save data to onboard
storage only
Select this to have the NXC only store packet capture entries on the NXC. The
available storage size is displayed as well.
Note: The NXCL reserves some onboard storage space as a buffer.
Save data to USB
storage
Select this to have the NXC store packet capture entries only on a USB storage
device connected to the NXC.
Status:
Unused - the connected USB storage device was manually unmounted by using the
Remove Now button or for some reason the NXC cannot mount it.
none - no USB storage device is connected.
available - you can have the NXC use the USB storage device. The available storage
capacity also displays.
service deactivated - the USB storage feature is disabled and the NXC cannot use
a connected USB device to store the system log and other diagnostic information.
Note: The NXC reserves some USB storage space as a buffer.
Captured Packet Files
When saving packet captures only to the NXC’s onboard storage, specify a maximum
limit in megabytes for the total combined size of all the capture files on the NXC.
When saving packet captures to a connected USB storage device, specify a
maximum limit in megabytes for each capture file.
Note: If you have existing capture files and have not selected the Continuously
capture and overwrite old ones option, you may need to set this size larger or
delete existing capture files.
The valid range depends on the available onboard/USB storage size. The NXC stops
the capture and generates the capture file when either the file reaches this size or
the time period specified in the Duration field expires.
Split threshold
Specify a maximum size limit in megabytes for individual packet capture files. After
a packet capture file reaches this size, the NXC starts another packet capture file.
Duration
Set a time limit in seconds for the capture. The NXC stops the capture and generates
the capture file when either this period of time has passed or the file reaches the
size specified in the Captured Packet Files field. 0 means there is no time limit.
File Suffix
Specify text to add to the end of the file name (before the dot and filename
extension) to help you identify the packet capture files. Modifying the file suffix also
avoids making new capture files that overwrite existing files of the same name.
The file name format is “interface name-file suffix.cap”, for example “vlan2-packetcapture.cap”.
Number Of Bytes To
Capture (Per Packet)
NXC Series User’s Guide
Specify the maximum number of bytes to capture per packet. The NXC automatically
truncates packets that exceed this size. As a result, when you view the packet
capture files in a packet analyzer, the actual size of the packets may be larger than
the size of captured packets.
355
Chapter 31 Diagnostics
Table 185 Maintenance > Diagnostics > Packet Capture (continued)
LABEL
DESCRIPTION
Capture
Click this button to have the NXC capture packets according to the settings
configured in this screen.
You can configure the NXC while a packet capture is in progress although you cannot
modify the packet capture settings.
The NXC’s throughput or performance may be affected while a packet capture is in
progress.
After the NXC finishes the capture it saves a separate capture file for each selected
interface. The total number of packet capture files that you can save depends on the
file sizes and the available flash storage space. Once the flash storage space is full,
adding more packet captures will fail.
Stop
Click this button to stop a currently running packet capture and generate a separate
capture file for each selected interface.
Reset
Click this button to return the screen to its last-saved settings.
31.3.1 Packet Capture Files
Click Maintenance > Diagnostics > Packet Capture > Files to open the packet capture files
screen. This screen lists the files of packet captures stored on the NXC or a connected USB storage
device. You can download the files to your computer where you can study them using a packet
analyzer (also known as a network or protocol analyzer) such as Wireshark.
Figure 215 Maintenance > Diagnostics > Packet Capture > Files
The following table describes the labels in this screen.
Table 186 Maintenance > Diagnostics > Packet Capture > Files
356
LABEL
DESCRIPTION
Remove
Select files and click Remove to delete them from the NXC. Use the [Shift] and/or [Ctrl] key
to select multiple files. A pop-up window asks you to confirm that you want to delete.
Download
Click a file to select it and click Download to save it to your computer.
#
This column displays the number for each packet capture file entry. The total number of packet
capture files that you can save depends on the file sizes and the available flash storage space.
NXC Series User’s Guide
Chapter 31 Diagnostics
Table 186 Maintenance > Diagnostics > Packet Capture > Files (continued)
LABEL
DESCRIPTION
File Name
This column displays the label that identifies the file. The file name format is interface namefile suffix.cap.
Size
This column displays the size (in bytes) of a configuration file.
Last Modified
This column displays the date and time that the individual files were saved.
31.3.2 Example of Viewing a Packet Capture File
Here is an example of a packet capture file viewed in the Wireshark packet analyzer. Notice that the
size of frame 15 on the wire is 1514 bytes while the captured size is only 1500 bytes. The NXC
truncated the frame because the capture screen’s Number Of Bytes To Capture (Per Packet)
field was set to 1500 bytes.
Figure 216 Packet Capture File Example
31.4 Core Dump
Use the Core Dump screen to have the NXC save a process’s core dump to an attached USB
storage device if the process terminates abnormally (crashes). You may need to send this file to
customer support for troubleshooting.
NXC Series User’s Guide
357
Chapter 31 Diagnostics
Click Maintenance > Diagnostics > Core Dump to open the following screen.
Figure 217 Maintenance > Diagnostics > Core Dump
The following table describes the labels in this screen.
Table 187 Maintenance > Diagnostics > Core Dump
LABEL
DESCRIPTION
Save core dump to USB
storage (if ready)
Select this to have the NXC save a process’s core dump to an attached USB storage
device if the process terminates abnormally (crashes). If you clear this option the
NXC only saves
Apply
Click Apply to save the changes.
Reset
Click Reset to return the screen to its last-saved settings.
31.4.1 Core Dump Files
Click Maintenance > Diagnostics > Core Dump > Files to open the core dump files screen. This
screen lists the core dump files stored on the NXC or a connected USB storage device. You may
need to send these files to customer support for troubleshooting.
Figure 218 Maintenance > Diagnostics > Core Dump > Files
358
NXC Series User’s Guide
Chapter 31 Diagnostics
The following table describes the labels in this screen.
Table 188 Maintenance > Diagnostics > Core Dump > Files
LABEL
DESCRIPTION
Remove
Select files and click Remove to delete them from the NXC. Use the [Shift] and/or [Ctrl] key
to select multiple files. A pop-up window asks you to confirm that you want to delete.
Download
Click a file to select it and click Download to save it to your computer.
#
This column displays the number for each core dump file entry. The total number of core
dump files that you can save depends on the file sizes and the available flash storage space.
File Name
This column displays the label that identifies the file.
Size
This column displays the size (in bytes) of a file.
Last Modified
This column displays the date and time that the individual files were saved.
31.5 System Log
Click Maintenance > Diagnostics > System Log to open the system log files screen. This screen
lists the files of system logs stored on a connected USB storage device. The files are in comma
separated value (csv) format. You can download them to your computer and open them in a tool
like Microsoft’s Excel.
Figure 219 Maintenance > Diagnostics > System Log
The following table describes the labels in this screen.
Table 189 Maintenance > Diagnostics > System Log
LABEL
DESCRIPTION
Remove
Select files and click Remove to delete them from the NXC. Use the [Shift] and/or [Ctrl] key
to select multiple files. A pop-up window asks you to confirm that you want to delete.
Download
Click a file to select it and click Download to save it to your computer.
#
This column displays the number for each file entry. The total number of files that you can
save depends on the file sizes and the available storage space.
File Name
This column displays the label that identifies the file.
Size
This column displays the size (in bytes) of a file.
Last Modified
This column displays the date and time that the individual files were saved.
NXC Series User’s Guide
359
Chapter 31 Diagnostics
31.6 Wireless Frame Capture
Use this screen to capture wireless network traffic going through the AP interfaces connected to
your NXC. Studying these frame captures may help you identify network problems.
Click Maintenance > Diagnostics > Wireless Frame Capture to display this screen.
Note: New capture files overwrite existing files of the same name. Change the File Prefix
field’s setting to avoid this.
Figure 220 Maintenance > Diagnostics > Wireless Frame Capture > Capture
The following table describes the labels in this screen.
Table 190 Maintenance > Diagnostics > Wireless Frame Capture > Capture
LABEL
DESCRIPTION
MON Mode APs
Configure AP to
MON Mode
Click this to go the Configuration > Wireless > AP Management screen, where
you can set one or more APs to monitor mode.
Available MON
Mode APs
This column displays which APs on your wireless network are currently configured
for monitor mode.
Use the arrow buttons to move APs off this list and onto the Captured MON Mode
APs list.
Capture MON Mode
APs
This column displays the monitor-mode configured APs selected to for wireless
frame capture.
Misc Setting
360
NXC Series User’s Guide
Chapter 31 Diagnostics
Table 190 Maintenance > Diagnostics > Wireless Frame Capture > Capture (continued)
LABEL
File Size
DESCRIPTION
Specify a maximum size limit in kilobytes for the total combined size of all the
capture files on the NXC, including any existing capture files and any new capture
files you generate.
Note: If you have existing capture files you may need to set this size larger or delete
existing capture files.
The valid range is 1 to 50000. The NXC stops the capture and generates the capture
file when either the file reaches this size or the time period specified in the Duration
field expires.
File Prefix
Specify text to add to the front of the file name in order to help you identify frame
capture files.
You can modify the prefix to also create new frame capture files each time you
perform a frame capture operation. Doing this does no overwrite existing frame
capture files.
The file format is: [file prefix].cap. For example, “monitor.cap”.
Capture
Click this button to have the NXC capture frames according to the settings
configured in this screen.
You can configure the NXC while a frame capture is in progress although you cannot
modify the frame capture settings.
The NXC’s throughput or performance may be affected while a frame capture is in
progress.
After the NXC finishes the capture it saves a combined capture file for all APs. The
total number of frame capture files that you can save depends on the file sizes and
the available flash storage space. Once the flash storage space is full, adding more
frame captures will fail.
Stop
Click this button to stop a currently running frame capture and generate a combined
capture file for all APs.
Reset
Click this button to return the screen to its last-saved settings.
31.6.1 Wireless Frame Capture Files
Click Maintenance > Diagnostics > Wireless Frame Capture > Files to open this screen. This
screen lists the files of wireless frame captures the NXC has performed. You can download the files
to your computer where you can study them using a packet analyzer (also known as a network or
protocol analyzer) such as Wireshark.
Figure 221 Maintenance > Diagnostics > Wireless Frame Capture > Files
NXC Series User’s Guide
361
Chapter 31 Diagnostics
The following table describes the labels in this screen.
Table 191 Maintenance > Diagnostics > Wireless Frame Capture > Files
362
LABEL
DESCRIPTION
Remove
Select files and click Remove to delete them from the NXC. Use the [Shift] and/or [Ctrl] key
to select multiple files. A pop-up window asks you to confirm that you want to delete.
Download
Click a file to select it and click Download to save it to your computer.
#
This column displays the number for each packet capture file entry. The total number of packet
capture files that you can save depends on the file sizes and the available flash storage space.
File Name
This column displays the label that identifies the file. The file name format is interface namefile suffix.cap.
Size
This column displays the size (in bytes) of a configuration file.
Last Modified
This column displays the date and time that the individual files were saved.
NXC Series User’s Guide
C HAPTER
32
Packet Flow Explore
32.1 Overview
Use this to get a clear picture on how the NXC determines where to forward a packet and how to
change the source IP address of the packet according to your current settings. This function
provides you a summary of all your routing and SNAT settings and helps troubleshoot any related
problems.
32.1.1 What You Can Do in this Chapter
• The Routing Status screen (Section 32.2 on page 363) displays the overall routing flow and
each routing function’s settings.
• The SNAT Status screen (Section 32.3 on page 366) displays the overall source IP address
conversion (SNAT) flow and each SNAT function’s settings.
32.2 The Routing Status Screen
The Routing Status screen allows you to view the current routing flow and quickly link to specific
routing settings. Click a function box in the Routing Flow section, the related routes (activated)
will display in the Routing Table section. To access this screen, click Maintenance > Packet
Flow Explore.
The order of the routing flow may vary depending on whether you:
• select use policy route to override direct route in the CONFIGURATION > Network >
Routing > Policy Route screen.
• use policy routes to control 1-1 NAT by using the policy control-virtual-server-rules
activate command.
NXC Series User’s Guide
363
Chapter 32 Packet Flow Explore
Note: Once a packet matches the criteria of a routing rule, the NXC takes the
corresponding action and does not perform any further flow checking.
Figure 222 Maintenance > Packet Flow Explore > Routing Status (Direct Route)
Figure 223 Maintenance > Packet Flow Explore > Routing Status (Policy Route)
Figure 224 Maintenance > Packet Flow Explore > Routing Status (1-1 SNAT)
364
NXC Series User’s Guide
Chapter 32 Packet Flow Explore
Figure 225 Maintenance > Packet Flow Explore > Routing Status (Main Route)
The following table describes the labels in this screen.
Table 192 Maintenance > Packet Flow Explore > Routing Status
LABEL
DESCRIPTION
Routing Flow
This section shows you the flow of how the NXC determines where to route a packet. Click a
function box to display the related settings in the Routing Table section.
Routing Table
This section shows the corresponding settings according to the function box you click in the
Routing Flow section.
The following fields are available if you click Direct Route or Main Route in the Routing Flow section.
#
This field is a sequential value, and it is not associated with any entry.
Destination
This is the destination IP address of a route.
Gateway
This is the IP address of the next-hop gateway or the interface through which the traffic is
routed.
Interface
This is the name of an interface associated with the route.
Metric
This is the route’s priority among the displayed routes.
Flags
This indicates additional information for the route. The possible flags are:
•
•
•
•
•
•
•
•
•
Persist
A - this route is currently activated.
S - this is a static route.
C - this is a direct connected route.
O - this is a dynamic route learned through OSPF.
R - this is a dynamic route learned through RIP.
G - the route is to a gateway (router) in the same network.
! - this is a route which forces a route lookup to fail.
B - this is a route which discards packets.
L - this is a recursive route.
This is the remaining time of a dynamically learned route. The NXC removes the route after
this time period is counted down to zero.
The following fields are available if you click Policy Route in the Routing Flow section.
#
This field is a sequential value, and it is not associated with any entry.
PR #
This is the number of an activated policy route. If you have configured a schedule for the
route, this screen only displays the route at the scheduled time.
Incoming
This is the interface on which the packets are received.
NXC Series User’s Guide
365
Chapter 32 Packet Flow Explore
Table 192 Maintenance > Packet Flow Explore > Routing Status (continued)
LABEL
DESCRIPTION
Source
This is the source IP address(es) from which the packets are sent.
Destination
This is the destination IP address(es) to which the packets are transmitted.
Service
This is the name of the service object. any means all services.
Source Port
This is the name of a service object. The NXC applies the policy route to the packets sent
from the corresponding service port. any means all service ports.
DSCP Code
This is the DSCP value of incoming packets to which this policy route applies.
Next Hop Type
This is the type of the next hop to which packets are directed.
Next Hop Info
•
•
This is the main route if the next hop type is Auto.
This is the interface name and gateway IP address if the next hop type is Interface /
GW.
The following fields are available if you click 1-1 SNAT in the Routing Flow section.
#
This field is a sequential value, and it is not associated with any entry.
NAT Rule
This is the name of an activated 1:1 or Many 1:1 NAT rule in the NAT table.
Source
This is the original source IP address(es). any means any IP address.
Destination
This is the original destination IP address(es). any means any IP address.
Outgoing
This is the name of an interface which transmits packets out of the NXC.
Gateway
This is the IP address of the gateway in the same network of the outgoing interface.
32.3 The SNAT Status Screen
The SNAT Status screen allows you to view and quickly link to specific source NAT (SNAT) settings.
Click a function box in the SNAT Flow section, the related SNAT rules (activated) will display in the
SNAT Table section. To access this screen, click Maintenance > Packet Flow Explore > SNAT
Status.
The order of the SNAT flow may vary depending on whether you:
• use policy routes to control 1-1 NAT by using the policy control-virtual-server-rules
activate command.
366
NXC Series User’s Guide
Chapter 32 Packet Flow Explore
Note: Once a packet matches the criteria of an SNAT rule, the NXC takes the
corresponding action and does not perform any further flow checking.
Figure 226 Maintenance > Packet Flow Explore > SNAT Status (Policy Route SNAT)
Figure 227 Maintenance > Packet Flow Explore > SNAT Status (1-1 SNAT)
Figure 228 Maintenance > Packet Flow Explore > SNAT Status (Loopback SNAT)
NXC Series User’s Guide
367
Chapter 32 Packet Flow Explore
Figure 229 Maintenance > Packet Flow Explore > SNAT Status (Default SNAT)
The following table describes the labels in this screen.
Table 193 Maintenance > Packet Flow Explore > SNAT Status
LABEL
DESCRIPTION
SNAT Flow
This section shows you the flow of how the NXC changes the source IP address for a packet
according to the rules you have configured in the NXC. Click a function box to display the
related settings in the SNAT Table section.
SNAT Table
The table fields in this section vary depending on the function box you select in the SNAT
Flow section.
The following fields are available if you click Policy Route SNAT in the SNAT Flow section.
#
This field is a sequential value, and it is not associated with any entry.
PR #
This is the number of an activated policy route which uses SNAT.
Outgoing
This is the outgoing interface that the route uses to transmit packets.
SNAT
This is the source IP address(es) that the SNAT rule uses finally.
The following fields are available if you click 1-1 SNAT in the SNAT Flow section.
#
This field is a sequential value, and it is not associated with any entry.
NAT Rule
This is the name of an activated NAT rule which uses SNAT.
Source
This is the original source IP address(es).
Destination
This is the original destination IP address(es).
Outgoing
This is the outgoing interface that the SNAT rule uses to transmit packets.
SNAT
This is the source IP address(es) that the SNAT rule uses finally.
The following fields are available if you click Loopback SNAT in the SNAT Flow section.
#
This field is a sequential value, and it is not associated with any entry.
NAT Rule
This is the name of an activated NAT rule which uses SNAT and enables NAT loopback.
Source
This is the original source IP address(es). any means any IP address.
Destination
This is the original destination IP address(es). any means any IP address.
SNAT
This indicates which source IP address the SNAT rule uses finally. For example, Outgoing
Interface IP means that the NXC uses the IP address of the outgoing interface as the source
IP address for the matched packets it sends out through this rule.
The following fields are available if you click Default SNAT in the SNAT Flow section.
368
#
This field is a sequential value, and it is not associated with any entry.
Incoming
This indicates internal interface(s) on which the packets are received.
NXC Series User’s Guide
Chapter 32 Packet Flow Explore
Table 193 Maintenance > Packet Flow Explore > SNAT Status (continued)
LABEL
DESCRIPTION
Outgoing
This indicates external interface(s) from which the packets are transmitted.
SNAT
This indicates which source IP address the SNAT rule uses finally. For example, Outgoing
Interface IP means that the NXC uses the IP address of the outgoing interface as the source
IP address for the matched packets it sends out through this rule.
NXC Series User’s Guide
369
C HAPTER
33
Reboot
33.1 Overview
Use this to restart the device.
33.1.1 What You Need To Know
If you applied changes in the Web configurator, these were saved automatically and do not change
when you reboot. If you made changes in the CLI, however, you have to use the write command to
save the configuration before you reboot. Otherwise, the changes are lost when you reboot.
Reboot is different to reset; reset returns the device to its default configuration.
33.2 Reboot
This screen allows remote users can restart the device. To access this screen, click Maintenance >
Reboot.
Figure 230 Maintenance > Reboot
Click the Reboot button to restart the NXC. Wait a few minutes until the login screen appears. If
the login screen does not appear, type the IP address of the device in your Web browser.
You can also use the CLI command reboot to restart the NXC.
NXC Series User’s Guide
370
C HAPTER
34
Shutdown
34.1 Overview
Use this screen to shutdown the device.
Always use Maintenance > Shutdown > Shutdown or the shutdown
command before you turn off the NXC or remove the power. Not doing so
can cause the firmware to become corrupt.
34.1.1 What You Need To Know
Shutdown writes all cached data to the local storage and stops the system processes. Shutdown is
different to reset; reset returns the device to its default configuration.
34.2 Shutdown
To access this screen, click Maintenance > Shutdown.
Figure 231 Maintenance > Shutdown
Click the Shutdown button to shut down the NXC. Wait for the device to shut down before you
manually turn off or remove the power. It does not turn off the power.
You can also use the CLI command shutdown to shutdown the NXC.
NXC Series User’s Guide
371
C HAPTER
35
Troubleshooting
35.1 Overview
This chapter offers some suggestions to solve problems you might encounter.
35.1.1 General
This section provides a broad range of troubleshooting tips for your device.
None of the LEDs turn on.
Make sure that you have the power cord connected to the NXC and plugged in to an appropriate
power source. Make sure that you have both power cords connected to the NXC and plugged into
appropriate power sources. Make sure you have both of the NXC’s power switches turned on. Make
sure you have the NXC turned on. Check all cable connections.
If the LEDs still do not turn on, you may have a hardware problem. In this case, you should contact
your local vendor.
Cannot access the NXC from the LAN.
• Check the cable connection between the NXC and your computer or switch.
• Ping the NXC from a LAN computer. Make sure your computer’s Ethernet card is installed and
functioning properly. Also make sure that its IP address is in the same subnet as the NXC’s.
• In the computer, click Start > Programs > Accessories and then Command Prompt. In the
Command Prompt window, type "ping" followed by the NXC’s LAN IP address (192.168.1.1 is
the default) and then press [ENTER]. The NXC should reply.
• If you’ve forgotten the NXC’s password, use the RESET button. Press the button in for about 5
seconds (or until the PWR LED starts to blink), then release it. It returns the NXC to the factory
defaults (password is 1234, LAN IP address 192.168.1.1 etc.; see your User’s Guide for details).
• If you’ve forgotten the NXC’s IP address, you can use the commands through the console port to
check it. Connect your computer to the CONSOLE port using a console cable. Your computer
should have a terminal emulation communications program (such as HyperTerminal) set to
VT100 terminal emulation, no parity, 8 data bits, 1 stop bit, no flow control and 115200 bps port
speed.
NXC Series User’s Guide
372
Chapter 35 Troubleshooting
I cannot access the Internet.
• Check the NXC’s connection to the Ethernet jack with Internet access. Make sure the Internet
gateway device (such as a DSL modem) is working properly.
• If the NXC is operating in its default bridge mode, ensure that the DHCP server to which the NXC
is connected is properly configured to assign IP addresses.
• Check the NXC’s security settings and/or interface and VLAN settings to ensure you have not
inadvertently excluded your client device from accessing the network or the Internet.
The NXC is not applying the custom policy route I configured.
The NXC checks the policy routes in the order that they are listed. So make sure that your custom
policy route comes before any other routes that the traffic would also match.
I can’t enter the interface name I want.
The format of interface names other than the Ethernet interface names is very strict. Each name
consists of 2-4 letters (interface type), followed by a number (x, limited by the maximum number
of each type of interface). For example, VLAN interfaces are vlan0, vlan1, vlan2, ...; and so on.
My rules and settings that apply to a particular interface no longer work.
The interface’s IP address may have changed. To avoid this create an IP address object based on
the interface. This way the NXC automatically updates every rule or setting that uses the object
whenever the interface’s IP address settings change. For example, if you change ge1’s IP address,
the NXC automatically updates the corresponding interface-based, ge1 subnet address object.
Hackers have accessed my WEP-encrypted wireless LAN.
WEP is extremely insecure. Its encryption can be broken by an attacker, using widely-available
software. It is strongly recommended that you use a more effective security mechanism. Use the
strongest security mechanism that all the wireless devices in your network support. WPA2 or WPA2PSK is recommended.
The wireless security is not following the re-authentication timer setting I specified.
NXC Series User’s Guide
373
Chapter 35 Troubleshooting
If a RADIUS server authenticates wireless stations, the re-authentication timer on the RADIUS
server has priority. Change the RADIUS server’s configuration if you need to use a different reauthentication timer setting.
The NXC is not applying an interface’s configured ingress bandwidth limit.
At the time of writing, the NXC does not support ingress bandwidth management.
The NXC routes and applies SNAT for traffic from some interfaces but not from others.
The NXC automatically uses SNAT for traffic it routes from internal interfaces to external interfaces.
For example LAN to WAN traffic. You must manually configure a policy route to add routing and
SNAT settings for an interface with the Interface Type set to General. You can also configure a
policy route to override the default routing and SNAT behavior for an interface with the Interface
Type set to Internal or External.
The NXC keeps resetting the connection.
If an alternate gateway on the LAN has an IP address in the same subnet as the NXC’s LAN IP
address, return traffic may not go through the NXC. This is called an asymmetrical or “triangle”
route. This causes the NXC to reset the connection, as the connection has not been acknowledged.
I changed the LAN IP address and can no longer access the Internet.
The NXC automatically updates address objects based on an interface’s IP address, subnet, or
gateway if the interface’s IP address settings change. However, you need to manually edit any
address objects for your LAN that are not based on the interface.
I cannot get the RADIUS server to authenticate the NXC‘s default admin account.
The default admin account is always authenticated locally, regardless of the authentication method
setting.
The NXC fails to authenticate the ext-user user accounts I configured.
374
NXC Series User’s Guide
Chapter 35 Troubleshooting
An external server such as AD, LDAP or RADIUS must authenticate the ext-user accounts. If the
NXC tries to use the local database to authenticate an ext-user, the authentication attempt will
always fail.
I cannot add the admin users to a user group with access users.
You cannot put access users and admin users in the same user group.
I cannot add the default admin account to a user group.
You cannot put the default admin account into any user group.
The schedule I configured is not being applied at the configured times.
Make sure the NXC’s current date and time are correct.
I cannot get a certificate to import into the NXC.
1
For My Certificates, you can import a certificate that matches a corresponding certification
request that was generated by the NXC. You can also import a certificate in PKCS#12 format,
including the certificate’s public and private keys.
2
You must remove any spaces from the certificate’s filename before you can import the certificate.
3
Any certificate that you want to import has to be in one of these file formats:
• Binary X.509: This is an ITU-T recommendation that defines the formats for X.509 certificates.
• PEM (Base-64) encoded X.509: This Privacy Enhanced Mail format uses lowercase letters,
uppercase letters and numerals to convert a binary X.509 certificate into a printable form.
• Binary PKCS#7: This is a standard that defines the general syntax for data (including digital
signatures) that may be encrypted. A PKCS #7 file is used to transfer a public key certificate. The
private key is not included. The NXC currently allows the importation of a PKS#7 file that
contains a single certificate.
• PEM (Base-64) encoded PKCS#7: This Privacy Enhanced Mail (PEM) format uses lowercase
letters, uppercase letters and numerals to convert a binary PKCS#7 certificate into a printable
form.
• Binary PKCS#12: This is a format for transferring public key and private key certificates.The
private key in a PKCS #12 file is within a password-encrypted envelope. The file’s password is not
connected to your certificate’s public or private passwords. Exporting a PKCS #12 file creates this
and you must provide it to decrypt the contents when you import the file into the NXC.
NXC Series User’s Guide
375
Chapter 35 Troubleshooting
Note: Be careful not to convert a binary file to text during the transfer process. It is easy
for this to occur since many programs use text files by default.
I cannot access the NXC from a computer connected to the Internet.
Check the service control rules.
I uploaded a logo to display on the upper left corner of the Web Configurator login screen and
access page but it does not display properly.
Make sure the logo file is a GIF, JPG, or PNG of 100 kilobytes or less.
I uploaded a logo to use as the screen or window background but it does not display properly.
Make sure the logo file is a GIF, JPG, or PNG of 100 kilobytes or less.
The NXC’s traffic throughput rate decreased after I started collecting traffic statistics.
Data collection may decrease the NXC’s traffic throughput rate.
I can only see newer logs. Older logs are missing.
When a log reaches the maximum number of log messages, new log messages automatically
overwrite existing log messages, starting with the oldest existing log message first.
The commands in my configuration file or shell script are not working properly.
• In a configuration file or shell script, use “#” or “!” as the first character of a command line to
have the NXC treat the line as a comment.
• Your configuration files or shell scripts can use “exit” or a command line consisting of a single “!”
to have the NXC exit sub command mode.
• Include write commands in your scripts. Otherwise the changes will be lost when the NXC
restarts. You could use multiple write commands in a long script.
Note: “exit” or “!'” must follow sub commands if it is to make the NXC exit sub command
mode.
376
NXC Series User’s Guide
Chapter 35 Troubleshooting
I cannot get the firmware uploaded using the commands.
The Web Configurator is the recommended method for uploading firmware. You only need to use
the command line interface if you need to recover the firmware. See the CLI Reference Guide for
how to determine if you need to recover the firmware and how to recover it.
My packet capture captured less than I wanted or failed.
The packet capture screen’s File Size sets a maximum size limit for the total combined size of all
the capture files on the NXC, including any existing capture files and any new capture files you
generate. If you have existing capture files you may need to set this size larger or delete existing
capture files.
The NXC stops the capture and generates the capture file when either the capture files reach the
File Size or the time period specified in the Duration field expires.
My earlier packet capture files are missing.
New capture files overwrite existing files of the same name. Change the File Suffix field’s setting
to avoid this.
35.1.2 Wireless
This section provides troubleshooting for wireless devices connected the NXC.
Wireless clients cannot connect to an AP.
• There may be a configuration mismatch between the AP and the NXC. This could be the result of
a number of things, such as incorrect VLAN topology, incorrect AP profiles, incorrect security
settings between the AP and the NXC, and so on.
See Section 5.11 on page 71 for how to check if the AP’s runtime management VLAN ID setting
matches the NXC’s management VLAN ID setting for the AP.
See Section 5.11.1 on page 73 for how to check if the AP’s configuration is in conflict with the
NXC’s settings for the AP.
• The wireless client’s MAC address may be on the MAC filtering list. See Section 18.3.3 on page
223 for details on managing the NXC MAC Filter.
NXC Series User’s Guide
377
Chapter 35 Troubleshooting
• The wireless client may not be able to get an IP:
If the NXC is operating in bridge mode, check the settings on the DHCP server associated with
the network.
Check the wireless client’s own network configuration settings to ensure that it is set up to
receive its IP address automatically.
If the NXC or a connected Internet access device are managing the network with static IPs, make
sure that the server settings for issuing those IPs are properly configured.
Check the wireless client’s own network settings to ensure it is already set up with its static IP
address.
• Authentication of the wireless client with the authentication server may have failed. Ensure the
AP profile assigned to the AP uses a security profile that is properly configured and which
matches the security settings in use by the NXC. For example, if the security mode on the AP is
set to WPA/WPA2 then make sure the authentication server is running and able to complete the
802.1x authentication sequence. See Chapter 18 on page 208 and Chapter 7 on page 92 for
more.
If the AP profile uses an SSID security profile that has the AP use an external server to
authenticate wireless clients by MAC address, check the SSID security profile’s MAC
authentication settings (see Section 18.3.2.1 on page 220).
• Enable the AP Wireless LAN logs (see Section 29.3.2 on page 331).
• Check the AP log Wireless LAN logs (Section 5.17 on page 84) for WTP logs. WTP stands for
Wireless Wireless Terminal Point and is equivalent to an AP.
• If you cannot solve the problem on your own, before contacting Customer Support use the builtin wireless frame capture tools (Chapter 31 on page 352) to capture data that can be used for
more granular troubleshooting procedures. To use the built-in wireless frame capture tool, first
set up a second AP nearby to act as a Monitor AP (Chapter 7 on page 92).
The AP status is registered as offline even though it is on.
• Check the network connections between the NXC and the AP to ensure they are still intact.
• The AP may be suffering from instability. Disconnect it to turn its power off, wait some time, then
reconnect it and see if that resolves the issue.
• The CAPWAP daemon may be down. You can use the NXC’s built-in diagnostic tools and CLI
console to get CAPWAP debug messages which can later be sent to customer service for analysis.
See Chapter 3 on page 28 for more information.
A wireless client cannot be authenticated through the Captive Portal.
If the Captive Portal redirects a wireless client to a failed login page or an internal server error
page, then the authentication server may not be reachable. Make sure that the NXC can reach it if
is external to the LAN by opening the Console Window and pinging the server’s IP address.
If Captive Portal is using the external web portal:
• Make sure the Captive Portal configuration pointing to it is correct. You must configure the Login
URL field.
• Check that the external Web server is configured properly.
378
NXC Series User’s Guide
Chapter 35 Troubleshooting
• It is recommended to have the external web server on the same subnet as the login users.
The NXC sends wireless clients the default logout page instead of a login page.
Make sure you have configured the Captive Portal external web portal’s Login URL field correctly.
Wireless clients are not being load balanced among my APs.
• Make sure that all the APs used by the wireless clients in question share the same SSID, security,
and radio settings.
• Make sure that all the APs are in the same broadcast domain.
• Make sure that the wireless clients are in range of the other APs; if they are only in range of a
single AP, then load balancing may not be as effective.
In the Monitor > Wireless > AP Info > AP List screen, there is no load balancing indicator
associated with any APs assigned to the load balancing task.
• Check to be sure that the AP profile which contains the load balancing settings is correctly
assigned to the APs in question.
• The load balancing task may have been terminated because further load balancing on the APs in
question is no longer required.
35.2 Resetting the NXC
If you cannot access the NXC by any method, try restarting it by turning the power off and then on
again. If you still cannot access the NXC by any method or you forget the administrator
password(s), you can reset the NXC to its factory-default settings. Any configuration files or shell
scripts that you saved on the NXC should still be available afterwards.
Use the following procedure to reset the NXC to its factory-default settings. This overwrites the
settings in the startup-config.conf file with the settings in the system-default.conf file.
Note: This procedure removes the current configuration.
1
Make sure the SYS LED is on and not blinking.
2
Press the RESET button and hold it until the SYS LED begins to blink. (This usually takes about five
seconds.)
3
Release the RESET button, and wait for the NXC to restart.
You should be able to access the NXC using the default settings.
NXC Series User’s Guide
379
Chapter 35 Troubleshooting
35.3 Getting More Troubleshooting Help
Search for support information for your model at www.zyxel.com for more troubleshooting
suggestions.
380
NXC Series User’s Guide
A PPENDIX
A
Log Descriptions
This appendix provides descriptions of example log messages.
The ZySH logs deal with internal system errors.
Table 194 ZySH Logs
LOG MESSAGE
DESCRIPTION
Invalid message queue.
Maybe someone starts
another zysh daemon.
ZySH daemon is
instructed to reset by
%d
1st:pid num
System integrity error!
Group OPS
cannot close property
group
cannot close group
%s: cannot get size of
group
1st:zysh group name
1st:zysh group name, 2st:zysh entry name
%s: cannot specify
properties for entry %s
%s: cannot join group
%s, loop detected
1st:zysh group name, 2st:zysh group name
cannot create, too many
groups (>%d)
1st:max group num
%s: cannot find entry
%s
1st:zysh group name, 2st:zysh entry name
%s: cannot remove entry
%s
1st:zysh group name, 2st:zysh entry name
List OPS
can't alloc entry: %s!
1st:zysh entry name
can't retrieve entry:
%s!
1st:zysh entry name
can't get entry: %s!
1st:zysh entry name
can't print entry: %s!
1st:zysh entry name
%s: cannot retrieve
entries from list!
1st:zysh list name
can't get name for
entry %d!
1st:zysh entry index
NXC Series User’s Guide
381
Appendix A Log Descriptions
Table 194 ZySH Logs (continued)
LOG MESSAGE
DESCRIPTION
can't get reference
count: %s!
1st:zysh list name
can't print entry name:
%s!
1st:zysh entry name
Can't append entry: %s! 1st:zysh entry name
Can't set entry: %s!
1st:zysh entry name
Can't define entry: %s! 1st:zysh entry name
%s: list is full!
1st:zysh list name
Can't undefine %s
1st:zysh list name
Can't remove %s
1st:zysh list name
Table OPS
382
%s: cannot retrieve
entries from table!
1st:zysh table name
%s: index is out of
range!
1st:zysh table name
%s: cannot set entry
#%d
1st:zysh table name,2st: zysh entry num
%s: table is full!
1st:zysh table name
%s: invalid old/new
index!
1st:zysh table name
Unable to move entry
#%d!
1st:zysh entry num
%s: invalid index!
1st:zysh table name
Unable to delete entry
#%d!
1st:zysh entry num
Unable to change entry
#%d!
1st:zysh entry num
%s: cannot retrieve
entries from table!
1st:zysh table name
%s: invalid old/new
index!
1st:zysh table name
Unable to move entry
#%d!
1st:zysh entry num
%s: apply failed at
initial stage!
1st:zysh table name
%s: apply failed at
main stage!
1st:zysh table name
%s: apply failed at
closing stage!
1st:zysh table name
NXC Series User’s Guide
Appendix A Log Descriptions
Table 195 User Logs
LOG MESSAGE
DESCRIPTION
%s %s from %s has
logged in
EnterpriseWLAN
A user logged into the NXC.
1st %s: The type of user account.
2nd %s: The user’s user name.
3rd %s: The name of the service the user is using (HTTP, HTTPS, FTP, Telnet,
SSH, or console).
%s %s from %s has
logged out
EnterpriseWLAN
A user logged out of the NXC.
1st %s: The type of user account.
2nd %s: The user’s user name.
3rd %s: The name of the service the user is using (HTTP, HTTPS, FTP, Telnet,
SSH, or console).
%s %s from %s has been
logged out
EnterpriseWLAN (re-auth
timeout)
The NXC is signing the specified user out due to a re-authentication timeout.
1st %s: The type of user account.
2nd %s: The user’s user name.
3rd %s: The name of the service the user is using (HTTP, HTTPS, FTP, Telnet,
SSH, or console).
%s %s from %s has been
logged out
EnterpriseWLAN (lease
timeout)
The NXC is signing the specified user out due to a lease timeout.
1st %s: The type of user account.
2nd %s: The user’s user name.
3rd %s: The name of the service the user is using (HTTP, HTTPS, FTP, Telnet,
SSH, or console).
%s %s from %s has been
logged out
EnterpriseWLAN (idle
timeout)
The NXC is signing the specified user out due to an idle timeout.
1st %s: The type of user account.
2nd %s: The user’s user name.
3rd %s: The name of the service the user is using (HTTP, HTTPS, FTP, Telnet,
SSH, or console).
Console has been put
into lockout state
Too many failed login attempts were made on the console port so the NXC is
blocking login attempts on the console port.
Address %u.%u.%u.%u has
been put into lockout
state
Too many failed login attempts were made from an IP address so the NXC is
blocking login attempts from that IP address.
Failed login attempt to
EnterpriseWLAN from %s
(login on a lockout
address)
A login attempt came from an IP address that the NXC has locked out.
Failed login attempt to
EnterpriseWLAN from %s
(reach the max. number
of user)
The NXC blocked a login because the maximum login capacity for the
particular service has already been reached.
Failed login attempt to
EnterpriseWLAN from %s
(reach the max. number
of simultaneous logon)
The NXC blocked a login because the maximum simultaneous login capacity
for the administrator or access account has already been reached.
NXC Series User’s Guide
%u.%u.%u.%u: the source address of the user’s login attempt
%u.%u.%u.%u: the source address of the user’s login attempt
%s: service name
%s: service name
383
Appendix A Log Descriptions
Table 195 User Logs (continued)
LOG MESSAGE
DESCRIPTION
User %s has been denied
access from %s
The NXC blocked a login according to the access control configuration.
User %s has been denied
access from %s
The NXC blocked a login attempt by the specified user name because of an
invalid user name or password.
%s: service name
2nd %s: service name
LDAP/AD: Wrong IP or
Port. IP:%s, Port: %d
LDAP/AD: Wrong IP or Port.Please check the AAA server setting.
Domain-auth fail
Domain-auth fail. Please check the domain-auth related setting.
Failed to join domain:
Access denied
Failed to join domain: Access denied. Please check the AD server.
Table 196 Registration Logs
LOG MESSAGE
DESCRIPTION
Send registration
message to MyZyXEL.com
server has failed.
The device was not able to send a registration message to MyZyXEL.com.
Get server response
has failed.
The device sent packets to the MyZyXEL.com server, but did not receive a
response. The root cause may be that the connection is abnormal.
Timeout for get server
response.
zysh need to catch MyZyXEL.com agent's return code, this log will be shown
when timeout.
User has existed.
The user name already exists in MyZyXEL.com's database. So the user can't
use it for device registration and needs to specify another one.
User does not exist.
The user name does not yet exist in MyZyXEL.com's database. So the user can
use it for device registration.
Internal server error. MyZyXEL.com's database had an error when checking the user name.
Device registration
has failed:%s.
Device registration failed, an error message returned by the MyZyXEL.com
server will be appended to this log.
%s: error message returned by the myZyXEL.com server
Device registration
has succeeded.
The device registered successfully with the myZyXEL.com server.
Registration has
failed. Because of
lack must fields.
The device received an incomplete response from the myZyXEL.com server
and it caused a parsing error for the device.
%s:Trial service
activation has
failed:%s.
Trail service activation failed for the specified service, an error message
returned by the MyZyXEL.com server will be appended to this log.
1st %s: service name
2nd %s: error message returned by the myZyXEL.com server
384
%s:Trial service
activation has
succeeded.
Trail service was activated successfully for the specified service.
Trial service
activation has failed.
Because of lack must
fields.
The device received an incomplete response from the myZyXEL.com server
and it caused a parsing error for the device.
%s: service name
NXC Series User’s Guide
Appendix A Log Descriptions
Table 196 Registration Logs (continued)
LOG MESSAGE
DESCRIPTION
Standard service
activation has
failed:%s.
Standard service activation failed, this log will append an error message
returned by the MyZyXEL.com server.
Standard service
activation has
succeeded.
Standard service activation has succeeded.
Standard service
activation has failed.
Because of lack must
fields.
The device received an incomplete response from the myZyXEL.com server
and it caused a parsing error for the device.
Service expiration
check has failed:%s.
The service expiration day check failed, this log will append an error message
returned by the MyZyXEL.com server.
%s: error message returned by the myZyXEL.com server
%s: error message returned by myZyXEL.com server
Service expiration
check has succeeded.
The service expiration day check was successful.
Service expiration
check has failed.
Because of lack must
fields.
The device received an incomplete response from the myZyXEL.com server
and it caused a parsing error for the device.
Server setting error.
The device could not retrieve the myZyXEL.com server's IP address or FQDN
from local.
Resolve server IP has
failed.
The device could not resolve the myZyXEL.com server's FQDN to an IP address
through gethostbyname().
Verify server's
certificate has
failed.
The device could not process an HTTPS connection because it could not verify
the myZyXEL.com server's certificate.
Connect to MyZyXEL.com
server has failed.
The device could not connect to the MyZyXEL.com server.
Do account check.
The device started to check whether or not the user name in MyZyXEL.com's
database.
Do device register.
The device started device registration.
Do trial service
activation.
The device started trail service activation.
Do standard service
activation.
The device started standard service activation.
Do expiration check.
The device started the service expiration day check.
Build query message
has failed.
Some information was missing in the packets that the device sent to the
MyZyXEL.com server.
Parse receive message
has failed.
The device cannot parse the response returned by the MyZyXEL.com server.
Maybe some required fields are missing.
Resolve server IP has
failed. Update stop.
The update has stopped because the device couldn’t resolve the myZyXEL.com
server's FQDN to an IP address through gethostbyname().
Verify server's
certificate has
failed. Update stop.
The device could not process an HTTPS connection because it could not verify
the myZyXEL.com server's certificate. The update has stopped.
NXC Series User’s Guide
385
Appendix A Log Descriptions
Table 196 Registration Logs (continued)
386
LOG MESSAGE
DESCRIPTION
Send download request
to update server has
failed.
The device’s attempt to send a download message to the update server failed.
Get server response
has failed.
The device sent packets to the MyZyXEL.com server, but did not receive a
response. The root cause may be that the connection is abnormal.
Timeout for get server
response.
zysh need to catch MyZyXEL.com agent's return code, this log will be shown
when timeout.
Send update request to
update server has
failed.
The device could not send an update message to the update server.
Update has failed.
Because of lack must
fields.
The device received an incomplete response from the update server and it
caused a parsing error for the device.
Update server is busy
now. File download
after %d seconds.
The update server was busy so the device will wait for the specified number of
seconds and send the download request to the update server again.
Device has latest
file. No need to
update.
The device already has the latest version of the file so no update is needed.
Device has latest
signature file; no
need to update
The device already has the latest version of the signature file so no update is
needed.
Connect to update
server has failed.
The device cannot connect to the update server.
Wrong format for
packets received.
The device cannot parse the response returned by the server. Maybe some
required fields are missing.
Server setting error.
Update stop.
The device could not resolve the update server's FQDN to an IP address
through gethostbyname(). The update process stopped.
Build query message
failed.
Some information was missing in the packets that the device sent to the
server.
System protect
signature download has
succeeded.
The device successfully downloaded the system protect signature file.
System protect
signature update has
succeeded.
The device successfully downloaded and applied a system protect signature
file.
System protect
signature download has
failed.
The device still cannot download the system protect signature file after 3
retries.
Resolve server IP has
failed.
The device could not resolve the myZyXEL.com server's FQDN to an IP address
through gethostbyname().
Connect to MyZyXEL.com
server has failed.
The device could not connect to the MyZyXEL.com server.
Build query message
has failed.
Some information was missing in the packets that the device sent to the
server.
NXC Series User’s Guide
Appendix A Log Descriptions
Table 196 Registration Logs (continued)
LOG MESSAGE
DESCRIPTION
Verify server's
certificate has
failed.
The device could not process an HTTPS connection because it could not verify
the server's certificate.
Get server response
has failed.
The device sent packets to the server, but did not receive a response. The root
cause may be that the connection is abnormal.
Expiration dailycheck has failed:%s.
The daily check for service expiration failed, an error message returned by the
MyZyXEL.com server will be appended to this log.
%s: error message returned by myZyXEL.com server
Do expiration dailycheck has failed.
Because of lack must
fields.
The device received an incomplete response to the daily service expiration
check and the packets caused a parsing error for the device.
Server setting error.
The device could not retrieve the server's IP address or FQDN from local.
Do expiration dailycheck has failed.
The daily check for service expiration failed.
Do expiration dailycheck has succeeded.
The daily check for service expiration was successful.
System bootup. Do
expiration dailycheck.
The device processes a service expiration day check immediately after it starts
up.
After register. Do
expiration dailycheck immediately.
The device processes a service expiration day check immediately after device
registration.
Time is up. Do
expiration dailycheck.
The processes a service expiration day check every 24 hrs.
Read MyZyXEL.com
storage has failed.
Read data from EEPROM has failed.
Open /proc/MRD has
failed.
This error message is shown when getting MAC address.
Unknown TLS/SSL
version: %d.
The device only supports SSLv3 protocol. %d: SSL version assigned by client.
Load trusted root
certificates has
failed.
The device needs to load the trusted root certificate before the device can
verify a server's certificate. This log displays if the device failed to load it.
Certificate has
expired.
Verification of a server’s certificate failed because it has expired.
Self signed
certificate.
Verification of a server’s certificate failed because it is self-signed.
Self signed
certificate in
certificate chain.
Verification of a server’s certificate failed because there is a self-signed
certificate in the server’s certificate chain.
Verify peer
certificates has
succeeded.
The device verified a server’s certificate while processing an HTTPS
connection.
NXC Series User’s Guide
387
Appendix A Log Descriptions
Table 196 Registration Logs (continued)
LOG MESSAGE
DESCRIPTION
Certification
verification failed:
Depth: %d, Error
Number(%d):%s.
Verification of a server’s certificate failed while processing an HTTPS
connection. This log identifies the reason for the failure.
1st %d: certificate chain level
2nd %d: error number
%s: error message
Certificate issuer
name:%s.
Verification of the specified certificate failed because the device could not get
the certificate’s issuer name. %s is the certificate name.
The wrong format for
HTTP header.
The header format of a packet returned by a server is wrong.
Timeout for get server
response.
After the device sent packets to a server, the device did not receive any
response from the server. The root cause may be a network delay issue.
Download file size is
wrong.
The file size downloaded for AS is not identical with content-length
Parse HTTP header has
failed.
Device can't parse the HTTP header in a response returned by a server. Maybe
some HTTP headers are missing.
Table 197 Sessions Limit Logs
LOG MESSAGE
DESCRIPTION
Maximum sessions per
host (%d) was
exceeded.
%d is maximum sessions per host.
Table 198 Policy Route Logs
LOG MESSAGE
DESCRIPTION
Can't open bwm_entries Policy routing can't activate BWM feature.
Can't open link_down
Policy routing can't detect link up/down status.
Cannot get handle from
UAM, user-aware PR is
disabled
User-aware policy routing is disabled due to some reason.
mblock: allocate
memory failed!
Allocating policy routing rule fails: insufficient memory.
pt: allocate memory
failed!
Allocating policy routing rule fails: insufficient memory.
To send message to
policy route daemon
failed!
Failed to send control message to policy routing manager.
Allocating policy routing rule fails: insufficient memory.
The policy route %d
allocates memory fail!
%d: the policy route rule number
Use an empty object group.
The policy route %d
uses empty user group!
%d: the policy route rule number
388
NXC Series User’s Guide
Appendix A Log Descriptions
Table 198 Policy Route Logs (continued)
LOG MESSAGE
DESCRIPTION
The policy route %d
uses empty source
address group!
Use an empty object group.
The policy route %d
uses empty destination
address group!
Use an empty object group.
The policy route %d
uses empty service
group
Use an empty object group.
Policy-route rule %d
was inserted.
Rules is inserted into system.
Policy-route rule %d
was appended.
Rules is appended into system.
Policy-route rule %d
was modified.
Rule is modified.
Policy-route rule %d
was moved to %d.
Rule is moved.
%d: the policy route rule number
%d: the policy route rule number
%d: the policy route rule number
%d: the policy route rule number
%d: the policy route rule number
%d: the policy route rule number
1st %d: the original policy route rule number
2nd %d: the new policy route rule number
Policy-route rule %d
was deleted.
Rule is deleted.
Policy-route rules
were flushed.
Policy routing rules are cleared.
BWM has been
activated.
The global setting for bandwidth management on the NXC has been turned on.
BWM has been
deactivated.
The global setting for bandwidth management on the NXC has been turned off.
%d: the policy route rule number
Table 199 Built-in Services Logs
LOG MESSAGE
DESCRIPTION
User on %u.%u.%u.%u
has been denied access
from %s
HTTP/HTTPS/TELNET/SSH/FTP/SNMP access to the device was denied.
%u.%u.%u.%u is IP address
%s is HTTP/HTTPS/SSH/SNMP/FTP/TELNET
An administrator assigned a nonexistent certificate to HTTPS.
HTTPS certificate:%s
does not exist. HTTPS
%s is certificate name assigned by user
service will not work.
HTTPS port has been
changed to port %s.
An administrator changed the port number for HTTPS.
HTTPS port has been
changed to default
port.
An administrator changed the port number for HTTPS back to the default
(443).
HTTP port has changed
to port %s.
An administrator changed the port number for HTTP.
NXC Series User’s Guide
%s is port number
%s is port number assigned by user
389
Appendix A Log Descriptions
Table 199 Built-in Services Logs (continued)
LOG MESSAGE
DESCRIPTION
HTTP port has changed
to default port.
An administrator changed the port number for HTTP back to the default (80).
SSH port has been
changed to port %s.
An administrator changed the port number for SSH.
SSH port has been
changed to default
port.
An administrator changed the port number for SSH back to the default (22).
%s is port number assigned by user
An administrator assigned a nonexistent certificate to SSH.
SSH certificate:%s
does not exist. SSH
%s is certificate name assigned by user
service will not work.
After an administrator assigns a certificate for SSH, the device needs to
SSH certificate:%s
convert it to a key used for SSH.
format is wrong. SSH
service will not work. %s is certificate name assigned by user
TELNET port has been
changed to port %s.
An administrator changed the port number for TELNET.
TELNET port has been
changed to default
port.
An administrator changed the port number for TELNET back to the default
(23).
FTP certificate:%s
does not exist.
An administrator assigned a nonexistent certificate to FTP.
FTP port has been
changed to port %s.
An administrator changed the port number for FTP.
FTP port has been
changed to default
port.
An administrator changed the port number for FTP back to the default (21).
SNMP port has been
changed to port %s.
An administrator changed the port number for SNMP.
SNMP port has been
changed to default
port.
An administrator changed the port number for SNMP back to the default (161).
Console baud has been
changed to %s.
An administrator changed the console port baud rate.
Console baud has been
reset to %d.
An administrator changed the console port baud rate back to the default
(115200).
%s is port number assigned by user
%s is certificate name assigned by user
%s is port number assigned by user
%s is port number assigned by user
%s is baud rate assigned by user
%d is default baud rate
390
DHCP Server on
Interface %s will not
work due to Device HA
status is Stand-By
If interface is stand-by mode for device HA, DHCP server can't be run.
Otherwise it has conflict with the interface in master mode.
DHCP Server on
Interface %s will be
reapplied due to
Device HA status is
Active
When an interface has become the HA master, the DHCP server needs to start
operating.
%s is interface name
%s is interface name
NXC Series User’s Guide
Appendix A Log Descriptions
Table 199 Built-in Services Logs (continued)
LOG MESSAGE
DESCRIPTION
DHCP's DNS option:%s
has changed.
DHCP pool's DNS option support from WAN interface. If this interface is unlink/
disconnect or link/connect, this log will be shown.
%s is interface name. The DNS option of DHCP pool has retrieved from it
Set timezone to %s.
An administrator changed the time zone.
%s is time zone value
Set timezone to
default.
An administrator changed the time zone back to the default (0).
Enable daylight
saving.
An administrator turned on daylight saving.
Disable daylight
saving.
An administrator turned off daylight saving.
DNS access control
rules have been
reached the maximum
number.
An administrator tried to add more than the maximum number of DNS access
control rules (64).
DNS access control
rule %u of DNS has
been appended.
An administrator added a new rule.
DNS access control
rule %u has been
inserted.
An administrator inserted a new rule.
DNS access control
rule %u has been
appended
An administrator appended a new rule.
DNS access control
rule %u has been
modified
An administrator modified the rule %u.
DNS access control
rule %u has been
deleted.
An administrator removed the rule %u.
DNS access control
rule %u has been moved
to %d.
An administrator moved the rule %u to index %d.
%u is rule number
%u is rule number
%u is rule number
%u is rule number
%u is rule number
%u is previous index
%d variable is current index
The default record of
Zone Forwarder have
reached the maximum
number of 128 DNS
servers.
The default record DNS servers is more than 128.
Interface %s ping
check is successful.
Zone Forwarder adds
DNS servers in
records.
Ping check ok, add DNS servers in bind.
Interface %s ping
check is failed. Zone
Forwarder removes DNS
servers in records.
Ping check failed, remove DNS servers from bind.
NXC Series User’s Guide
%s is interface name
%s is interface name
391
Appendix A Log Descriptions
Table 199 Built-in Services Logs (continued)
LOG MESSAGE
DESCRIPTION
Interface %s ping
check is disabled.
Zone Forwarder adds
DNS servers in
records.
Ping check disabled, add DNS servers in bind.
Wizard apply DNS
server failed.
Wizard apply DNS server failed.
Wizard adds DNS server
%s failed because DNS
zone setting has
conflictd.
Wizard apply DNS server failed because DNS zone conflicted.
Wizard adds DNS server
%s failed because Zone
Forwarder numbers have
reached the maximum
number of 32.
Wizard apply DNS server fail because the device already has the maximum
number of DNS records configured.
Access control rules
of %s have reached the
maximum number of %u
The maximum number of allowable rules has been reached.
%s is interface name
%s is the IP address of the DNS server
%s is IP address of the DNS server.
%s is HTTP/HTTPS/SSH/SNMP/FTP/TELNET.
%u is the maximum number of access control rules.
Access control rule %u
of %s was appended.
A new built-in service access control rule was appended.
%u is the index of the access control rule.
%s is HTTP/HTTPS/SSH/SNMP/FTP/TELNET.
Access control rule %u
of %s was inserted.
An access control rule was inserted successfully.
%u is the index of the access control rule.
%s is HTTP/HTTPS/SSH/SNMP/FTP/TELNET.
Access control rule %u
of %s was modified.
An access control rule was modified successfully.
%u is the index of the access control rule.
%s is HTTP/HTTPS/SSH/SNMP/FTP/TELNET.
Access control rule %u
of %s was deleted.
An access control rule was removed successfully.
%u is the index of the access control rule.
%s is HTTP/HTTPS/SSH/SNMP/FTP/TELNET.
Access control rule %d An access control rule was moved successfully.
of %s was moved to %d.
1st %d is the previous index .
%s is HTTP/HTTPS/SSH/SNMP/FTP/TELNET.
2nd %d is current previous index.
SNMP trap can not be
sent successfully
392
Cannot send a SNMP trap to a remote host due to network error
NXC Series User’s Guide
Appendix A Log Descriptions
Table 200 System Logs
LOG MESSAGE
DESCRIPTION
Port %d is up!!
When LINK is up, %d is the port number.
Port %d is down!!
When LINK is down, %d is the port number.
%s is dead at %s
A daemon (process) is gone (was killed by the operating system).
1st %s: Daemon Name, 2nd %s: date and time
%s process count is
incorrect at %s
The count of the listed process is incorrect.
%s becomes Zombie at
%s
A process is present but not functioning.
1st %s: Daemon Name, 2nd %s: date and time
1st %s: Daemon Name, 2nd %s: date and time
When memory usage exceed threshold-max, memory usage reaches %d%%
:mem-threshold-max.
When local storage usage exceeds threshold-max, %s: Partition name file
system usage reaches %d%%: disk-threshold-max.
When memory usage drops below threshold-min, System Memory usage drops
below the threshold of %d%%: mem-threshold-min.
When local storage usage drops below threshold-min, %s: partition_name file
system drops below the threshold of %d%%: disk-threshold-min.
DHCP Server executed
with cautious mode
enabled
DHCP Server executed with cautious mode enabled.
DHCP Server executed
with cautious mode
disabled
DHCP Server executed with cautious mode disabled.
Received packet is not A packet was received but it is not an ARP response packet.
an ARP response packet
Receive an ARP
response
The device received an ARP response.
Receive ARP response
from %s (%s)
The device received an ARP response from the listed source.
The request IP is: %s,
sent from %s
The device accepted a request.
Received ARP response
NOT for the request IP
address
The device received an ARP response that is NOT for the requested IP address.
Receive an ARP
response from the
client issuing the
DHCP request
The device received an ARP response from the client issuing the DHCP request.
Receive an ARP
response from an
unknown client
The device received an ARP response from an unknown client.
In total, received %d
arp response packets
for the requested IP
address
The device received the specified total number of ARP response packets for the
requested IP address.
NXC Series User’s Guide
393
Appendix A Log Descriptions
Table 200 System Logs (continued)
394
LOG MESSAGE
DESCRIPTION
Clear arp cache
successfully.
The ARP cache was cleared successfully.
Client MAC address is
not an Ethernet
address
A client MAC address is not an Ethernet address.
DHCP request received
via interface
%s (%s:%s), src_mac:
%s with requested IP:
%s
The device received a DHCP request through the specified interface.
IP confliction is
detected. Send back
DHCP-NAK.
IP conflict was detected. Send back DHCP-NAK.
Clear ARP cache done
Clear ARP cache done.
Set manual time has
succeeded. Current
time is %s
The device date and time was changed manually.
NTP update successful,
current time is %s
The device successfully synchronized with a NTP time server .
NTP update failed
The device was not able to synchronize with the NTP time server successfully.
Device is rebooted by
administrator!
An administrator restarted the device.
Insufficient memory.
Cannot allocate system memory.
Update the profile %s
has failed because of
strange server
response.
Update profile failed because the response was strange, %s is the profile
name.
Update the profile %s
has succeeded because
the IP address of FQDN
%s was not changed.
Update profile succeeded, because the IP address of profile is unchanged, %s
is the profile name.
Update the profile %s
has succeeded.
Update profile succeeded, %s is the profile name.
Collect Diagnostic
Information has failed
- Server did not
respond.
There was an error and the diagnostics were not completed.
Collect Diagnostic
Infomation has
succeeded.
The diagnostics scripts were executed successfully.
Port %d is up!!
The specified port has it’s link up.
Port %d is down!!
The specified port has it’s link down.
%s is the date and time.
%s is the date and time.
NXC Series User’s Guide
Appendix A Log Descriptions
Table 201 Connectivity Check Logs
LOG MESSAGE
DESCRIPTION
Can't open link_up2
Cannot recover routing status which is link-down.
Can not open %s.pid
Cannot open connectivity check process ID file.
%s: interface name
Can not open %s.arg
Cannot open configuration file for connectivity check process.
%s: interface name
The connectivitycheck is activate for
%s interface
The link status of interface is still activate after check of connectivity check
process.
The connectivitycheck is fail for %s
interface
The link status of interface is fail after check of connectivity check process.
Can't get gateway IP
of %s interface
The connectivity check process can't get the gateway IP address for the
specified interface.
%s: interface name
%s: interface name
%s: interface name
Can't alloc memory
The connectivity check process can't get memory from OS.
Can't load %s module
The connectivity check process can't load module for check link-status.
%s: the connectivity module, currently only ICMP available.
Can't handle 'isalive'
function of %s module
The connectivity check process can't execute 'isalive' function from module for
check link-status.
%s: the connectivity module, currently only ICMP available.
Create socket error
The connectivity check process can't get socket to send packet.
Can't get IP address
of %s interface
The connectivity check process can't get IP address of interface.
Can't get flags of %s
interface
The connectivity check process can't get interface configuration.
Can't get NETMASK
address of %s
interface
The connectivity check process can't get netmask address of interface.
Can't get BROADCAST
address of %s
interface
The connectivity check process can't get broadcast address of interface
Can't use MULTICAST IP
for destination
The connectivity check process can't use multicast address to check linkstatus.
The destination is
invalid, because
destination IP is
broadcast IP
The connectivity check process can't use broadcast address to check linkstatus.
Can't get MAC address
of %s interface!
The connectivity check process can't get MAC address of interface.
To send ARP REQUEST
error!
The connectivity check process can't send ARP request packet.
NXC Series User’s Guide
%s: interface name.
%s: interface name
%s: interface name
%s: interface name
%s: interface name
395
Appendix A Log Descriptions
Table 201 Connectivity Check Logs (continued)
LOG MESSAGE
DESCRIPTION
The %s routing status
seted to DEAD by
connectivity-check
The interface routing can't forward packet.
The %s routing status
seted ACTIVATE by
connectivity-check
The interface routing can forward packet.
The link status of %s
interface is inactive
The specified interface failed a connectivity check.
%s: interface name
%s: interface name
Table 202 NAT Logs
LOG MESSAGE
DESCRIPTION
The NAT range is full
The NAT mapping table is full.
%s FTP ALG has
succeeded.
The FTP Application Layer Gateway (ALG) has been turned on or off.
Extra signal port of
FTP ALG has been
modified.
Extra FTP ALG port has been changed.
Signal port of FTP ALG
has been modified.
Default FTP ALG port has been changed.
%s H.323 ALG has
succeeded.
The H.323 ALG has been turned on or off. %s: Enable or Disable
Extra signal port of
H.323 ALG has been
modified.
Extra H.323 ALG port has been changed.
%s: Enable or Disable
Default H.323 ALG port has been changed.
Signal port of H.323
ALG has been modified.
%s SIP ALG has
succeeded.
The SIP ALG has been turned on or off. %s: Enable or Disable
Extra signal port of
SIP ALG has been
modified.
Extra SIP ALG port has been changed.
Signal port of SIP ALG
has been modified.
Default SIP ALG port has been changed.
Register SIP ALG extra
port=%d failed.
SIP ALG apply additional signal port failed.
%d: Port number
SIP ALG apply signal port failed.
Register SIP ALG
signal port=%d failed.
%d: Port number
Register H.323 ALG
extra port=%d failed.
H323 ALG apply additional signal port failed.
%d: Port number
H323 ALG apply signal port failed.
Register H.323 ALG
signal port=%d failed.
%d: Port number
396
NXC Series User’s Guide
Appendix A Log Descriptions
Table 202 NAT Logs (continued)
LOG MESSAGE
DESCRIPTION
Register FTP ALG extra
port=%d failed.
FTP ALG apply additional signal port failed.
%d: Port number
FTP ALG apply signal port failed.
Register FTP ALG
signal port=%d failed.
%d: Port number
Table 203 Certificate Path Verification Failure Reason Codes
CODE
DESCRIPTION
1
Algorithm mismatch between the certificate and the search constraints.
2
Key usage mismatch between the certificate and the search constraints.
3
Certificate was not valid in the time interval.
4
(Not used)
5
Certificate is not valid.
6
Certificate signature was not verified correctly.
7
Certificate was revoked by a CRL.
8
Certificate was not added to the cache.
9
Certificate decoding failed.
10
Certificate was not found (anywhere).
11
Certificate chain looped (did not find trusted root).
12
Certificate contains critical extension that was not handled.
13
Certificate issuer was not valid (CA specific information missing).
14
(Not used)
15
CRL is too old.
16
CRL is not valid.
17
CRL signature was not verified correctly.
18
CRL was not found (anywhere).
19
CRL was not added to the cache.
20
CRL decoding failed.
21
CRL is not currently valid, but in the future.
22
CRL contains duplicate serial numbers.
23
Time interval is not continuous.
24
Time information not available.
25
Database method failed due to timeout.
26
Database method failed.
27
Path was not verified.
28
Maximum path length reached.
NXC Series User’s Guide
397
Appendix A Log Descriptions
Table 204 Interface Logs
LOG MESSAGE
DESCRIPTION
Interface %s has been
deleted.
An administrator deleted an interface. %s is the interface name.
Interface %s has been
changed.
An administrator changed an interface’s configuration. %s: interface name.
Interface %s has been
added.
An administrator added a new interface. %s: interface name.
Interface %s is
enabled.
An administrator enabled an interface. %s: interface name.
Interface %s is
disabled.
An administrator disabled an interface. %s: interface name.
An administrator set a static gateway in interface but this interface is link
Interface %s links
down. At this time the configuration will be saved but route will not take effect
down. Default route
until the link becomes up.1st %s: interface name, 2nd %s: interface name.
will not apply until
interface %s links up.
398
name=%s,status=%s,TxP
kts=%u,
RxPkts=%u,Colli.=%u,T
xB/s=%u,
RxB/s=%u,UpTime=%s
Port statistics log. This log will be sent to the VRPT server.
name=%s,status=%s,TxP
kts=%u,
RxPkts=%u,Colli.=%u,T
xB/s=%u,
RxB/s=%u
Interface statistics log. This log will be sent to the VRPT server.
Interface %s connect
failed: MS-CHAPv2
mutual authentication
failed.
MS-CHAPv2 authentication failed (the server must support mS-CHAPv2 and
verify that the authentication failed, this does not include cases where the
servers does not support MS-CHAPv2). %s: interface name.
Interface %s connect
failed: MS-CHAP
authentication
failed.
MS-CHAP authentication failed (the server must support MS-CHAP and verify
that the authentication failed, this does not include cases where the server
does not support MS-CHAP). %s: interface name.
Interface %s connect
failed: CHAP
authentication
failed.
CHAP authentication failed (the server must support CHAP and verify that the
authentication failed, this does not include cases where the server does not
support CHAP). CHAP: interface name.
Interface %s connect
failed: Peer not
responding.
The interface’s connection will be terminated because the server did not send
any LCP packets. %s: interface name.
Interface %s connect
failed: PAP
authentication
failed.
PAP authentication failed (the server must support PAP and verify verify that
the authentication failed, this does not include cases where the server does not
support PAP).
Interface %s create
failed because has no
member.
A bridge interface has no member. %s: bridge interface name.
1st %s: physical port name, 2nd %s: physical port status, 1st %u: physical
port Tx packets, 2nd %u: physical port Rx packets, 3rd %u: physical port
packets collisions, 4th %u: physical port Tx Bytes/s, 5th %u: physical port Rx
Bytes/s, 3rd %s: physical port up time.
1st %s: interface name, 2nd %s: interface status, 1st %u variable: interface
Tx packets, 2nd %u variable: interface Rx packets, 3rd %u: interface packets
collisions, 4th %u: interface Tx Bytes/s, 5th %u: interface Rx Bytes/s.
NXC Series User’s Guide
Appendix A Log Descriptions
Table 205 WLAN Logs
LOG MESSAGE
DESCRIPTION
Wlan %s is enabled.
The WLAN (IEEE 802.11 b and or g) feature has been turned on. %s is the
slot number where the WLAN card is or can be installed.
Wlan %s is disabled.
The WLAN (IEEE 802.11 b and or g) feature has been turned off. %s is the
slot number where the WLAN card is or can be installed.
Wlan %s has been
configured.
The WLAN (IEEE 802.11 b and or g) feature’s configuration has been
changed. %s is the slot number where the WLAN card is or can be installed.
Interface %s has been
configured.
The configuration of the specified WLAN interface (%s) has been changed.
Interface %s has been
deleted.
The specified WLAN interface (%s) has been removed.
Create interface %s
has failed. Wlan
device does not exist.
The wireless device failed to create the specified WLAN interface (%s).
Remove the wireless device and reinstall it.
System internal error.
No 802.1X or WPA
enabled!
IEEE 802.1x or WPA is not enabled.
System internal error.
Error configuring WPA
state!
The NXC was not able to configure the wireless device to use WPA. Remove
the wireless device and reinstall it.
System internal error.
Error enabling WPA/
802.1X!
The NXC was not able to enable WPA/IEEE 802.1X.
Station has
associated. Interface:
%s, MAC: %s.
A wireless client with the specified MAC address (second %s) associated with
the specified WLAN interface (first %s).
WPA or WPA2 enterprise
EAP timeout.
Interface: %s, MAC:
%s.
There was an EAP timeout for a wireless client connected to the specified
WLAN interface (first %s). The MAC address of the wireless client is listed
(second %s).
Station association
has failed. Maximum
associations have
reached the maximum
number. Interface: %s,
MAC: %s.
A wireless client with the specified MAC address (second %s) failed to connect
to the specified WLAN interface (first %s) because the WLAN interface already
has its maximum number of wireless clients.
WPA authentication has
failed. Interface: %s,
MAC: %s.
A wireless client used an incorrect WPA key and thus failed to connect to the
specified WLAN interface (first %s). The MAC address of the wireless client is
listed (second %s).
Incorrect password for
WPA or WPA2 enterprise
internal
authentication.
Interface: %s, MAC:
%s.
A wireless client used an incorrect WPA or WPA2 user password and failed
authentication by the NXC’s local user database while trying to connect to the
specified WLAN interface (first %s). The MAC address of the wireless client is
listed (second %s).
NXC Series User’s Guide
399
Appendix A Log Descriptions
Table 205 WLAN Logs (continued)
LOG MESSAGE
DESCRIPTION
Incorrect username or
password for WPA or
WPA2 enterprise
internal
authentication.
Interface: %s, MAC:
%s.
A wireless client used an incorrect WPA or WPA2 user name or user password
and failed authentication by the NXC’s local user database while trying to
connect to the specified WLAN interface (first %s). The MAC address of the
wireless client is listed (second %s).
System internal error.
%s: STA %s could not
extract EAP-Message
from RADIUS message
There was an error when attempting to extract the EAP-Message from a
RADIUS message. The first %s is the WLAN interface. The second %s is the
MAC address of the wireless client.
Table 206 Account Logs
LOG MESSAGE
DESCRIPTION
Account %s %s has been
deleted.
A user deleted an ISP account profile.
Account %s %s has been
changed.
A user changed an ISP account profile’s options.
Account %s %s has been
added.
A user added a new ISP account profile.
1st %s: profile type, 2nd %se: profile name.
1st %s: profile type, 2nd %s: profile name.
1st %s: profile type, 2nd %s: profile name.
Table 207 Force Authentication Logs
LOG MESSAGE
DESCRIPTION
Force User
Authentication will be
enabled due to http
server is enabled.
Force user authentication will be turned on because HTTP server was turned
on.
Force User
Authentication will be
disabled due to http
server is disabled.
Force user authentication will be turned off because HTTP server was turned
off.
Force User
Authentication may not
work properly!
400
NXC Series User’s Guide
Appendix A Log Descriptions
Table 208 File Manager Logs
LOG MESSAGE
DESCRIPTION
ERROR:#%s, %s
Apply configuration failed, this log will be what CLI command is and what error
message is.
1st %s is CLI command.
2nd %s is error message when apply CLI command.
WARNING:#%s, %s
Apply configuration failed, this log will be what CLI command is and what
warning message is.
1st %s is CLI command.
2nd %s is warning message when apply CLI command.
ERROR:#%s, %s
Run script failed, this log will be what wrong CLI command is and what error
message is.
1st %s is CLI command.
2nd %s is error message when apply CLI command.
WARNING:#%s, %s
Run script failed, this log will be what wrong CLI command is and what
warning message is.
1st %s is CLI command.
2nd %s is warning message when apply CLI command.
Resetting system...
Before apply configuration file.
System resetted. Now
apply %s..
After the system reset, it started to apply the configuration file.
Running %s...
An administrator ran the listed shell script.
%s is configuration file name.
%s is script file name.
Table 209 DHCP Logs
LOG MESSAGE
DESCRIPTION
Can't find any lease
for this client - %s,
DHCP pool full!
All of the IP addresses in the DHCP pool are already assigned to DHCP clients,
so there is no IP address to give to the listed DHCP client.
DHCP server offered %s
to %s(%s)
The DHCP server feature gave the listed IP address to the computer with the
listed hostname and MAC address.
Requested %s from
%s(%s)
The NXC received a DHCP request for the specified IP address from the
computer with the listed hostname and MAC address.
No applicable lease
found for DHCP request
- %s !
There is no matching DHCP lease for a DHCP client’s request for the specified
IP address.
DHCP released %s with
%s(%s)
A DHCP client released the specified IP address. The DHCP client’s hostname
and MAC address are listed.
Sending ACK to %s
The DHCP server feature received a DHCP client’s inform packet and is
sending an ACK to the client.
DHCP server assigned
%s to %s(%s)
The DHCP server feature assigned a client the IP address that it requested.
The DHCP client’s hostname and MAC address are listed.
NXC Series User’s Guide
401
Appendix A Log Descriptions
Table 210 E-mail Daily Report Logs
LOG MESSAGE
DESCRIPTION
Email Daily Report has
been activated.
The daily e-mail report function has been turned on. The NXC will e-mail a
daily report about the selected items at the scheduled time if the required
settings are configured correctly.
Email Daily Report has
been deactivated.
The daily e-mail report function has been turned off. The NXC will not e-mail
daily reports.
Email daily report has
been sent
successfully.
The NXC sent a daily e-mail report mail successfully.
Cannot resolve mail
server address %s.
The (listed) SMTP address configured for the daily e-mail report function is
incorrect.
Mail server
authentication failed.
The user name or password configured for authenticating with the e-mail
server is incorrect.
Failed to send report.
Mail From address %s1
is inconsistent with
SMTP account %s2.
The user name and password configured for authenticating with the e-mail
server are correct, but the (listed) sender e-mail address does not match the
(listed) SMTP e-mail account.
Failed to connect to
mail server %s.
The NXC could not connect to the SMTP e-mail server (%s). The address
configured for the server may be incorrect or there may be a problem with the
NXC’s or the server’s network connection.
Table 211 IP-MAC Binding Logs
LOG MESSAGE
DESCRIPTION
The IP-MAC binding feature dropped an Ethernet packet. The interface the
Drop packet %spacket came in through and the sender’s IP address and MAC address are also
%u.%u.%u.%u%02X:%02X:%02X:%02X:%0 shown.
2X:%02X
402
Cannot bind ip-mac
from dhcpd:
%s#%u.%u.%u.%u#%02X:%0
2X:%02X:%02X:%02X:%02X
.
The IP-MAC binding feature could not create an IP-MAC binding hash table
entry. The interface the packet came in through, the sender’s IP address and
MAC address, are also shown along with the binding type (“s” for static or “d”
for dynamic).
Cannot remove ip-mac
binding from dhcpd:
%s#%u.%u.%u.%u#%02X:%0
2X:%02X:%02X:%02X:%02X
.
The IP-MAC binding feature could not delete an IP-MAC binding hash table
entry. The interface the packet came in through, the sender’s IP address and
MAC address, are also shown along with the binding type (“s” for static or “d”
for dynamic).
NXC Series User’s Guide
Appendix A Log Descriptions
Table 212 CAPWAP Server Logs
LOG MESSAGE
DESCRIPTION
WLAN Controller Start.
Registration Type:%s
Start the AP management service.
1st %s: Registration Type.
{Always Accept | Manual}
WLAN Controller Reset.
Registration Type:%s
Reset the AP management service.
1st %s: Registration Type.
{Always Accept | Manual}
WLAN Controller End.
Stop/End the AP management service.
AP Connect.
MAC:%02x%02x%02x%02x%02x%02x,
Name:%s,Model:%s
A Managed AP connected to the CAPWAP Server.
1st %02x ~ 6th %02x: Managed AP MAC Address.
7th %s: Managed AP Description.
8th %s: Managed AP Model Name.
Model of AP is fake.
MAC:%02x%02x%02x%02x%02x%02x,
Model ID:%x
A Managed AP's model is not support by CAPWAP Server.
1st %02x ~ 6th %02x: Managed AP MAC Address.
7th %x: Managed AP's Model ID.
AP Disconnect.
MAC:%02x%02x%02x%02x%02x%02x,
Name:%s, Reason:%s in %s
State,Model:%s
A Managed AP disconnected from the CAPWAP Server.
1st %02x ~ 6th %02x: Managed AP MAC Address.
7th %s: Managed AP Description.
8th %s: Managed AP Disconnect Reason.
9th %s: Managed AP Model Name.
AP Add.
MAC:%02x%02x%02x%02x%02x%02x,
Model:%s
Add an AP from un-managed list to managed list.
1st %02x ~ 6th %02x: Managed AP MAC Address.
7th %s: Managed AP Model Name.
AP Delete.
MAC:%02x%02x%02x%02x%02x%02x,
Model:%s
Delete an AP from managed list.
1st %02x ~ 6th %02x: Managed AP MAC Address.
7th %s: Managed AP Model Name.
Update AP Configure.
MAC:%02x%02x%02x%02x%02x%02x,
Model:%s
Send configuration to an AP in the managed list.
1st %02x ~ 6th %02x: Managed AP MAC Address.
7th %s: Managed AP Model Name.
Update AP Configure Fail. Wrong Send configuration to an AP in the managed list, but AP sent back
an apply fail response.
Configure
Apply,MAC:%02x%02x%02x%02x%02x% 1st %02x ~ 6th %02x: Managed AP MAC Address.
02x, Model:%s
7th %s: Managed AP Model Name.
NXC Series User’s Guide
403
Appendix A Log Descriptions
Table 212 CAPWAP Server Logs
LOG MESSAGE
DESCRIPTION
AP Reboot.
MAC:%02x%02x%02x%02x%02x%02x,
Name:%s,Model:%s
Reboot the specified AP in the managed list.
1st %02x ~ 6th %02x: Managed AP MAC Address.
7th %s: Managed AP Description.
8th %s: Managed AP Model Name.
Upgrade AP Firmware.
MAC:%02x%02x%02x%02x%02x%02x,
Name:%s,Model:%s
Update AP Firmware in the managed list.
1st %02x ~ 6th %02x: Managed AP MAC Address.
7th %s: Managed AP Description.
8th %s: Managed AP Model Name.
Start Send Configuration to AP.
MAC:%02x%02x%02x%02x%02x%02x,
Name:%s,Model:%s
Start Send Configuration to an AP in the Managed List.
1st %02x ~ 6th %02x: Managed AP MAC Address.
7th %s: Managed AP Description.
8th %s: Managed AP Model Name.
Sucess Send Configuration to
AP.
MAC:%02x%02x%02x%02x%02x%02x,
Name:%s,Model:%s
Receiving Send Configuration Respons from an AP in the Managed
List.
1st %02x ~ 6th %02x: Managed AP MAC Address.
7th %s: Managed AP Description.
8th %s: Managed AP Model Name.
Start Send Updating
Configuration to AP.
MAC:%02x%02x%02x%02x%02x%02x,
Name:%s,Model:%s
Start Send Updating Configuration to an AP in the Managed List.
1st %02x ~ 6th %02x: Managed AP MAC Address.
7th %s: Managed AP Description.
8th %s: Managed AP Model Name.
Sucess Send Updating
Configuration to AP.
MAC:%02x%02x%02x%02x%02x%02x,
Name:%s,Model:%s
Receiving Send Updating Configuration Response from an AP in
the Managed List.
1st %02x ~ 6th %02x: Managed AP MAC Address.
7th %s: Managed AP Model Name.
8th %s: Managed AP Description.
Send Retransmit Configuration
to AP.
MAC:%02x%02x%02x%02x%02x%02x,
Name:%s, Retry
Count=%d,Model:%s,
Retransmit Configuration to an AP in the Managed List.
1st %02x ~ 6th %02x: Managed AP MAC Address.
7th %s: Managed AP Description.
8th %s: Managed AP Model Name.
9th %d: Retry count.
AP SSID Stop.
MAC:%02x%02x%02x%02x%02x%02x,
Radio:%d, SSID:%s Stop.
A Managed AP's stops broadcasting the SSID due to DTLS
(Datagram Transport Layer Security) is disabled.
1st %02x ~ 6th %02x: Managed AP MAC Address.
7th: %d: Managed AP's Radio Number.
8th: %s: Managed AP Stop SSID Name.
404
NXC Series User’s Guide
Appendix A Log Descriptions
Table 212 CAPWAP Server Logs
LOG MESSAGE
DESCRIPTION
The VLAN ID of the AC is not the same as the VLAN ID of the AP.
VLAN setting is
conflict.MAC:%02x:%02x:%02x:%02
1st %02x~6th%02x: Managed AP MAC Address.
x:%02x:%02x,Model:%s,
Mgnt. VID(AC):%d, %s, Mgnt.
7th %s: Managed AP Description.
VID(AP):%d,%s
8th %d: VID , 9th %s: tag or untag
10th %d: VID , 11th %s: tag or untag
An AP doesn't support a feature.
AP doesn't support %s feature.
MAC:%02x:%02x:%02x:%02x:%02x:%0
1st %s: feature name
2x,AP:%s
2st %02x~7th%02x: Managed AP MAC Address.
8th %s: Managed AP Description.
Table 213 CAPWAP Client Logs
LOG MESSAGE
DESCRIPTION
AP Start. Discovery Type:%s
Start the CAPWAP Client service.
1st %s: Discovery type {Static | DHCP | DNS | Broadcast}
AP Reset. Discovery Type:%s
Reset the CAPWAP Client service.
1st %s: Discovery type {Static | DHCP | DNS | Broadcast}
Connect to WLAN Controller. IP:%s
CAPWAP Client connected to the WLAN Controller.
1st %s: WLAN Controller IP Address.
Disconnect from WLAN Controller.
IP:%s
CAPWAP Client disconnected from to the WLAN Controller.
Updated Configuration by a WLAN
Controller Success. Partial
Update
Configuration upgraded success by WLAN Controller.
Updated Configuration by a WLAN
Controller Fail.
Configuration upgraded fail by WLAN Controller.
ReBoot by a WLAN Controller.
IP:%s
Reboot the WTP by WLAN Controller.
Firmware Upgraded by WLAN
Controller. IP:%s
Firmware upgraded by WLAN Controller.
Apply Configuration by a WLAN
Controller Success.%s
Configuration apply success by WLAN Controller.
WLAN Controller IP Changed. New
Discovery Type:%s, WLAN
Controller IP: %s
Changed WTP's AC IP.
1st %s: WLAN Controller IP Address.
1st %s: WLAN Controller IP Address.
1st %s: WLAN Controller IP Address.
1st %s: Complete Update
1st %s: Discovery type {Static | DHCP | DNS | Broadcast}
2nd %s: WLAN Controller IP Address
AP Receiving Complete ZySH
Configuration from WLAN
Controller.
NXC Series User’s Guide
WTP receiving total configuration from WLAN Controller during
CAPWAP protocol handshaking. (Configuration Change State)
405
Appendix A Log Descriptions
Table 213 CAPWAP Client Logs
LOG MESSAGE
DESCRIPTION
AP Receiving Updating ZySH
Configuration from WLAN
Controller.
WTP receiving total configuration from WLAN Controller When
AC changed configuration. (RUN State)
STA List Full. STA List of AP [%s]
is Full
Number of stations connecting to the specified AP has reached
its upper limit.
1st %s: WTP's description.
DNS Query result is NULL.
A DNS query failed.
Table 214 AP Load Balancing Logs
LOG MESSAGE
DESCRIPTION
Indicates that the specified station was removed from an AP’s wireless
kick station
%02x:%02x:%02x:%02x:%0 network because the AP became overloaded.
2x:%02x
Table 215 Rogue AP Logs
LOG MESSAGE
DESCRIPTION
rogue ap detection is
enabled.
Indicates that rogue AP detection is enabled.
Table 216 Wireless Frame Capture Logs
LOG MESSAGE
DESCRIPTION
Capture done!
check_size:%d,
max_file_size:%d\n
This message displays check_size %d and max_file_size %d when the wireless
frame capture has been completed.
1st %d: total files size of directory.
2nd %d: max files size.
Can not initial
monitor mode signal
handler.\n
While an AP is in Monitor mode, the handler functions as a daemon; if it fails to
initialize the handler, then this message is returned.
Table 217 DCS Logs
406
LOG MESSAGE
DESCRIPTION
dcs init failed!\n
Indicates that the NXC failed to initialize the dcs daemon.
init zylog fail\n
Indicates that the NXC failed to initialize zylog.
NXC Series User’s Guide
Appendix A Log Descriptions
Table 217 DCS Logs
LOG MESSAGE
DESCRIPTION
channel changed: %s %d
-> %d\n
DCS has changed the wireless interface %s channel from %d to channel %d.
1st %s: interface name
1st %d: current channel
2nd %d: new channel
dcs is terminated!
DCS was terminated for an unknown reason.
Table 218 WLAN Station Info
LOG MESSAGE
DESCRIPTION
A wireless client is connected to the AP.
STA Association.
Addr:%02x%02x%02x%02x%
1st %02x ~ 6th %02x: Managed AP MAC Address.
02x%02x, AP:%s
7th %s: Managed AP's description.
A wireless client is disconnected from the AP.
STA Disassociation.
Addr:%02x%02x%02x%02x%
1st %02x ~ 6th %02x: Managed AP MAC Address.
02x%02x, AP:%s
7th %s: Managed AP's description.
A wireless client roams from one AP to another.
STA Roaming.
MAC:%02x:%02x:%02x:%02
1st %02x~6th%02x: Station MAC Address.
x:%02x:%02x, From:%s,
To:%s
7th %s: Source WTP's description.
8th %s: Destination WTP's description.
STA List Full. STA
List of AP [%s] is
Full
The number of wireless clients connected to the AP has reached the
maximium limit.
1st %s: Managed AP's description.
Indicates the reason why a wireless client is disassociated from an AP.
STA
Disassociation(%s).MAC
1st %s: Disassociation reason.
:%02x:%02x:%02x:%02x:%
02x:%02x,AP:%s
2nd %02x~7th%02x: Wireless client’s MAC Address.
8th %s: Managed AP Description.
AP Radio
MAC=%02x:%02x:%02x:%02
x:%02x:%02x, Reject
Station
MAC%02x:%02x:%02x:%02x
:%02x:%02x, RSSI=%d
dBm
NXC Series User’s Guide
An AP rejected a wireless client’s association request.
1st %02x~6th%02x: AP’s MAC Address.
7th %02x~12th%02x: Wireless client’s MAC Address.
13th %d: RSSI value
407
A PPENDIX
B
Common Services
The following table lists some commonly-used services and their associated protocols and port
numbers. For a comprehensive list of port numbers, ICMP type/code numbers and services, visit
the IANA (Internet Assigned Number Authority) web site.
• Name: This is a short, descriptive name for the service. You can use this one or create a
different one, if you like.
• Protocol: This is the type of IP protocol used by the service. If this is TCP/UDP, then the service
uses the same port number with TCP and UDP. If this is USER-DEFINED, the Port(s) is the IP
protocol number, not the port number.
• Port(s): This value depends on the Protocol. Please refer to RFC 1700 for further information
about port numbers.
• If the Protocol is TCP, UDP, or TCP/UDP, this is the IP port number.
• If the Protocol is USER, this is the IP protocol number.
• Description: This is a brief explanation of the applications that use this service or the situations
in which this service is used.
Table 219 Commonly Used Services
NAME
PROTOCOL
PORT(S)
DESCRIPTION
AH
(IPSEC_TUNNEL)
User-Defined
51
The IPSEC AH (Authentication Header) tunneling
protocol uses this service.
AIM/New-ICQ
TCP
5190
AOL’s Internet Messenger service. It is also used as
a listening port by ICQ.
AUTH
TCP
113
Authentication protocol used by some servers.
BGP
TCP
179
Border Gateway Protocol.
BOOTP_CLIENT
UDP
68
DHCP Client.
BOOTP_SERVER
UDP
67
DHCP Server.
CU-SEEME
TCP
7648
UDP
24032
A popular videoconferencing solution from White
Pines Software.
DNS
TCP/UDP
53
Domain Name Server, a service that matches web
names (for example www.zyxel.com) to IP
numbers.
ESP
(IPSEC_TUNNEL)
User-Defined
50
The IPSEC ESP (Encapsulation Security Protocol)
tunneling protocol uses this service.
FINGER
TCP
79
Finger is a UNIX or Internet related command that
can be used to find out if a user is logged on.
FTP
TCP
20
TCP
21
File Transfer Program, a program to enable fast
transfer of files, including large files that may not
be possible by e-mail.
H.323
TCP
1720
NetMeeting uses this protocol.
HTTP
TCP
80
Hyper Text Transfer Protocol - a client/server
protocol for the world wide web.
NXC Series User’s Guide
408
Appendix B Common Services
Table 219 Commonly Used Services (continued)
NAME
PROTOCOL
PORT(S)
DESCRIPTION
HTTPS
TCP
443
HTTPS is a secured http session often used in ecommerce.
ICMP
User-Defined
1
Internet Control Message Protocol is often used for
diagnostic or routing purposes.
ICQ
UDP
4000
This is a popular Internet chat program.
IGMP (MULTICAST)
User-Defined
2
Internet Group Management Protocol is used when
sending packets to a specific group of hosts.
IKE
UDP
500
The Internet Key Exchange algorithm is used for
key distribution and management.
IRC
TCP/UDP
6667
This is another popular Internet chat program.
MSN Messenger
TCP
1863
Microsoft Networks’ messenger service uses this
protocol.
NEW-ICQ
TCP
5190
An Internet chat program.
NEWS
TCP
144
A protocol for news groups.
NFS
UDP
2049
Network File System - NFS is a client/server
distributed file service that provides transparent file
sharing for network environments.
NNTP
TCP
119
Network News Transport Protocol is the delivery
mechanism for the USENET newsgroup service.
PING
User-Defined
1
Packet INternet Groper is a protocol that sends out
ICMP echo requests to test whether or not a remote
host is reachable.
POP3
TCP
110
Post Office Protocol version 3 lets a client computer
get e-mail from a POP3 server through a temporary
connection (TCP/IP or other).
PPTP
TCP
1723
Point-to-Point Tunneling Protocol enables secure
transfer of data over public networks. This is the
control channel.
PPTP_TUNNEL
(GRE)
User-Defined
47
PPTP (Point-to-Point Tunneling Protocol) enables
secure transfer of data over public networks. This is
the data channel.
RCMD
TCP
512
Remote Command Service.
REAL_AUDIO
TCP
7070
A streaming audio service that enables real time
sound over the web.
REXEC
TCP
514
Remote Execution Daemon.
RLOGIN
TCP
513
Remote Login.
RTELNET
TCP
107
Remote Telnet.
RTSP
TCP/UDP
554
The Real Time Streaming (media control) Protocol
(RTSP) is a remote control for multimedia on the
Internet.
SFTP
TCP
115
Simple File Transfer Protocol.
SMTP
TCP
25
Simple Mail Transfer Protocol is the messageexchange standard for the Internet. SMTP enables
you to move messages from one e-mail server to
another.
SNMP
TCP/UDP
161
Simple Network Management Program.
SNMP-TRAPS
TCP/UDP
162
Traps for use with the SNMP (RFC:1215).
NXC Series User’s Guide
409
Appendix B Common Services
Table 219 Commonly Used Services (continued)
410
NAME
PROTOCOL
PORT(S)
DESCRIPTION
SQL-NET
TCP
1521
Structured Query Language is an interface to
access data on many different types of database
systems, including mainframes, midrange systems,
UNIX systems and network servers.
SSH
TCP/UDP
22
Secure Shell Remote Login Program.
STRM WORKS
UDP
1558
Stream Works Protocol.
SYSLOG
UDP
514
Syslog allows you to send system logs to a UNIX
server.
TACACS
UDP
49
Login Host Protocol used for (Terminal Access
Controller Access Control System).
TELNET
TCP
23
Telnet is the login and terminal emulation protocol
common on the Internet and in UNIX environments.
It operates over TCP/IP networks. Its primary
function is to allow users to log into remote host
systems.
TFTP
UDP
69
Trivial File Transfer Protocol is an Internet file
transfer protocol similar to FTP, but uses the UDP
(User Datagram Protocol) rather than TCP
(Transmission Control Protocol).
VDOLIVE
TCP
7000
Another videoconferencing solution.
NXC Series User’s Guide
A PPENDIX
C
Importing Certificates
This appendix shows you how to import public key certificates into your web browser.
Public key certificates are used by web browsers to ensure that a secure web site is legitimate.
When a certificate authority such as VeriSign, Comodo, or Network Solutions, to name a few,
receives a certificate request from a website operator, they confirm that the web domain and
contact information in the request match those on public record with a domain name registrar. If
they match, then the certificate is issued to the website operator, who then places it on the site to
be issued to all visiting web browsers to let them know that the site is legitimate.
Many ZyXEL products, such as the NXC, issue their own public key certificates. These can be used
by web browsers on a LAN or WAN to verify that they are in fact connecting to the legitimate device
and not one masquerading as it. However, because the certificates were not issued by one of the
several organizations officially recognized by the most common web browsers, you will need to
import the ZyXEL-created certificate into your web browser and flag that certificate as a trusted
authority.
Note: You can see if you are browsing on a secure website if the URL in your web
browser’s address bar begins with https:// or there is a sealed padlock icon
(
) somewhere in the main browser window (not all browsers show the padlock
in the same location.)
NXC Series User’s Guide
411
Appendix C Importing Certificates
Internet Explorer
The following example uses Microsoft Internet Explorer 7 on Windows XP Professional; however,
they can also apply to Internet Explorer on Windows Vista.
412
1
If your device’s Web Configurator is set to use SSL certification, then the first time you browse to it
you are presented with a certification error.
2
Click Continue to this website (not recommended).
3
In the Address Bar, click Certificate Error > View certificates.
NXC Series User’s Guide
Appendix C Importing Certificates
4
In the Certificate dialog box, click Install Certificate.
5
In the Certificate Import Wizard, click Next.
NXC Series User’s Guide
413
Appendix C Importing Certificates
414
6
If you want Internet Explorer to Automatically select certificate store based on the type of
certificate, click Next again and then go to step 9.
7
Otherwise, select Place all certificates in the following store and then click Browse.
8
In the Select Certificate Store dialog box, choose a location in which to save the certificate and
then click OK.
NXC Series User’s Guide
Appendix C Importing Certificates
9
In the Completing the Certificate Import Wizard screen, click Finish.
10 If you are presented with another Security Warning, click Yes.
11 Finally, click OK when presented with the successful certificate installation message.
NXC Series User’s Guide
415
Appendix C Importing Certificates
12 The next time you start Internet Explorer and go to a ZyXEL Web Configurator page, a sealed
padlock icon appears in the address bar. Click it to view the page’s Website Identification
information.
Installing a Stand-Alone Certificate File in Internet Explorer
Rather than browsing to a ZyXEL Web Configurator and installing a public key certificate when
prompted, you can install a stand-alone certificate file if one has been issued to you.
416
1
Double-click the public key certificate file.
2
In the security warning dialog box, click Open.
3
Refer to steps 4-12 in the Internet Explorer procedure beginning on page 412 to complete the
installation process.
NXC Series User’s Guide
Appendix C Importing Certificates
Removing a Certificate in Internet Explorer
This section shows you how to remove a public key certificate in Internet Explorer 7 on Windows XP.
1
Open Internet Explorer and click Tools > Internet Options.
2
In the Internet Options dialog box, click Content > Certificates.
NXC Series User’s Guide
417
Appendix C Importing Certificates
418
3
In the Certificates dialog box, click the Trusted Root Certificates Authorities tab, select the
certificate that you want to delete, and then click Remove.
4
In the Certificates confirmation, click Yes.
5
In the Root Certificate Store dialog box, click Yes.
6
The next time you go to the web site that issued the public key certificate you just removed, a
certification error appears.
NXC Series User’s Guide
Appendix C Importing Certificates
Firefox
The following example uses Mozilla Firefox 2 on Windows XP Professional; however, the screens can
also apply to Firefox 2 on all platforms.
1
If your device’s Web Configurator is set to use SSL certification, then the first time you browse to it
you are presented with a certification error.
2
Select Accept this certificate permanently and click OK.
3
The certificate is stored and you can now connect securely to the Web Configurator. A sealed
padlock appears in the address bar, which you can click to open the Page Info > Security window
to view the web page’s security information.
NXC Series User’s Guide
419
Appendix C Importing Certificates
Installing a Stand-Alone Certificate File in Firefox
Rather than browsing to a ZyXEL Web Configurator and installing a public key certificate when
prompted, you can install a stand-alone certificate file if one has been issued to you.
420
1
Open Firefox and click Tools > Options.
2
In the Options dialog box, click Advanced > Encryption > View Certificates.
NXC Series User’s Guide
Appendix C Importing Certificates
3
In the Certificate Manager dialog box, click Web Sites > Import.
4
Use the Select File dialog box to locate the certificate and then click Open.
5
The next time you visit the web site, click the padlock in the address bar to open the Page Info >
Security window to see the web page’s security information.
NXC Series User’s Guide
421
Appendix C Importing Certificates
Removing a Certificate in Firefox
This section shows you how to remove a public key certificate in Firefox 2.
422
1
Open Firefox and click Tools > Options.
2
In the Options dialog box, click Advanced > Encryption > View Certificates.
NXC Series User’s Guide
Appendix C Importing Certificates
3
In the Certificate Manager dialog box, select the Web Sites tab, select the certificate that you
want to remove, and then click Delete.
4
In the Delete Web Site Certificates dialog box, click OK.
5
The next time you go to the web site that issued the public key certificate you just removed, a
certification error appears.
NXC Series User’s Guide
423
A PPENDIX
D
Wireless LANs
Wireless LAN Topologies
This section discusses ad-hoc and infrastructure wireless LAN topologies.
Ad-hoc Wireless LAN Configuration
The simplest WLAN configuration is an independent (Ad-hoc) WLAN that connects a set of
computers with wireless adapters (A, B, C). Any time two or more wireless adapters are within
range of each other, they can set up an independent network, which is commonly referred to as an
ad-hoc network or Independent Basic Service Set (IBSS). The following diagram shows an example
of notebook computers using wireless adapters to form an ad-hoc wireless LAN.
Figure 232 Peer-to-Peer Communication in an Ad-hoc Network
BSS
A Basic Service Set (BSS) exists when all communications between wireless clients or between a
wireless client and a wired network client go through one access point (AP).
Intra-BSS traffic is traffic between wireless clients in the BSS. When Intra-BSS is enabled, wireless
client A and B can access the wired network and communicate with each other. When Intra-BSS is
NXC Series User’s Guide
424
Appendix D Wireless LANs
disabled, wireless client A and B can still access the wired network but cannot communicate with
each other.
Figure 233 Basic Service Set
ESS
An Extended Service Set (ESS) consists of a series of overlapping BSSs, each containing an access
point, with each access point connected together by a wired network. This wired connection
between APs is called a Distribution System (DS).
This type of wireless LAN topology is called an Infrastructure WLAN. The Access Points not only
provide communication with the wired network but also mediate wireless network traffic in the
immediate neighborhood.
NXC Series User’s Guide
425
Appendix D Wireless LANs
An ESSID (ESS IDentification) uniquely identifies each ESS. All access points and their associated
wireless clients within the same ESS must have the same ESSID in order to communicate.
Figure 234 Infrastructure WLAN
Channel
A channel is the radio frequency(ies) used by wireless devices to transmit and receive data.
Channels available depend on your geographical area. You may have a choice of channels (for your
region) so you should use a channel different from an adjacent AP (access point) to reduce
interference. Interference occurs when radio signals from different access points overlap causing
interference and degrading performance.
Adjacent channels partially overlap however. To avoid interference due to overlap, your AP should
be on a channel at least five channels away from a channel that an adjacent AP is using. For
example, if your region has 11 channels and an adjacent AP is using channel 1, then you need to
select a channel between 6 or 11.
426
NXC Series User’s Guide
Appendix D Wireless LANs
RTS/CTS
A hidden node occurs when two stations are within range of the same access point, but are not
within range of each other. The following figure illustrates a hidden node. Both stations (STA) are
within range of the access point (AP) or wireless gateway, but out-of-range of each other, so they
cannot "hear" each other, that is they do not know if the channel is currently being used. Therefore,
they are considered hidden from each other.
Figure 235
RTS/CTS
When station A sends data to the AP, it might not know that the station B is already using the
channel. If these two stations send data at the same time, collisions may occur when both sets of
data arrive at the AP at the same time, resulting in a loss of messages for both stations.
RTS/CTS is designed to prevent collisions due to hidden nodes. An RTS/CTS defines the biggest
size data frame you can send before an RTS (Request To Send)/CTS (Clear to Send) handshake is
invoked.
When a data frame exceeds the RTS/CTS value you set (between 0 to 2432 bytes), the station
that wants to transmit this frame must first send an RTS (Request To Send) message to the AP for
permission to send it. The AP then responds with a CTS (Clear to Send) message to all other
stations within its range to notify them to defer their transmission. It also reserves and confirms
with the requesting station the time frame for the requested transmission.
Stations can send frames smaller than the specified RTS/CTS directly to the AP without the RTS
(Request To Send)/CTS (Clear to Send) handshake.
You should only configure RTS/CTS if the possibility of hidden nodes exists on your network and
the "cost" of resending large frames is more than the extra network overhead involved in the RTS
(Request To Send)/CTS (Clear to Send) handshake.
If the RTS/CTS value is greater than the Fragmentation Threshold value (see next), then the
RTS (Request To Send)/CTS (Clear to Send) handshake will never occur as data frames will be
fragmented before they reach RTS/CTS size.
Note: Enabling the RTS Threshold causes redundant network overhead that could
negatively affect the throughput performance instead of providing a remedy.
NXC Series User’s Guide
427
Appendix D Wireless LANs
Fragmentation Threshold
A Fragmentation Threshold is the maximum data fragment size (between 256 and 2432 bytes)
that can be sent in the wireless network before the AP will fragment the packet into smaller data
frames.
A large Fragmentation Threshold is recommended for networks not prone to interference while
you should set a smaller threshold for busy networks or networks that are prone to interference.
If the Fragmentation Threshold value is smaller than the RTS/CTS value (see previously) you
set then the RTS (Request To Send)/CTS (Clear to Send) handshake will never occur as data frames
will be fragmented before they reach RTS/CTS size.
Preamble Type
Preamble is used to signal that data is coming to the receiver. Short and long refer to the length of
the synchronization field in a packet.
Short preamble increases performance as less time sending preamble means more time for sending
data. All IEEE 802.11 compliant wireless adapters support long preamble, but not all support short
preamble.
Use long preamble if you are unsure what preamble mode other wireless devices on the network
support, and to provide more reliable communications in busy wireless networks.
Use short preamble if you are sure all wireless devices on the network support it, and to provide
more efficient communications.
Use the dynamic setting to automatically use short preamble when all wireless devices on the
network support it, otherwise the NXC uses short preamble.
Note: The wireless devices MUST use the same preamble mode in order to communicate.
IEEE 802.11g Wireless LAN
IEEE 802.11g is fully compatible with the IEEE 802.11b standard. This means an IEEE 802.11b
adapter can interface directly with an IEEE 802.11g access point (and vice versa) at 11 Mbps or
lower depending on range. IEEE 802.11g has several intermediate rate steps between the
maximum and minimum data rates. The IEEE 802.11g data rate and modulation are as follows:
Table 220 IEEE 802.11g
DATA RATE (MBPS)
MODULATION
1
DBPSK (Differential Binary Phase Shift Keyed)
2
DQPSK (Differential Quadrature Phase Shift Keying)
5.5 / 11
CCK (Complementary Code Keying)
6/9/12/18/24/36/48/54
OFDM (Orthogonal Frequency Division Multiplexing)
Wireless Security Overview
Wireless security is vital to your network to protect wireless communication between wireless
clients, access points and the wired network.
428
NXC Series User’s Guide
Appendix D Wireless LANs
Wireless security methods available on the NXC are data encryption, wireless client authentication,
restricting access by device MAC address and hiding the NXC identity.
The following figure shows the relative effectiveness of these wireless security methods available on
your NXC.
Table 221 Wireless Security Levels
SECURITY
LEVEL
Least
Secure
SECURITY TYPE
Unique SSID (Default)
Unique SSID with Hide SSID Enabled
MAC Address Filtering
WEP Encryption
IEEE802.1x EAP with RADIUS Server Authentication
Wi-Fi Protected Access (WPA)
Most Secure
WPA2
Note: You must enable the same wireless security settings on the NXC and on all wireless
clients that you want to associate with it.
IEEE 802.1x
In June 2001, the IEEE 802.1x standard was designed to extend the features of IEEE 802.11 to
support extended authentication as well as providing additional accounting and control features. It
is supported by Windows XP and a number of network devices. Some advantages of IEEE 802.1x
are:
• User based identification that allows for roaming.
• Support for RADIUS (Remote Authentication Dial In User Service, RFC 2138, 2139) for
centralized user profile and accounting management on a network RADIUS server.
• Support for EAP (Extensible Authentication Protocol, RFC 2486) that allows additional
authentication methods to be deployed with no changes to the access point or the wireless
clients.
RADIUS
RADIUS is based on a client-server model that supports authentication, authorization and
accounting. The access point is the client and the server is the RADIUS server. The RADIUS server
handles the following tasks:
• Authentication
Determines the identity of the users.
• Authorization
Determines the network services available to authenticated users once they are connected to the
network.
• Accounting
Keeps track of the client’s network activity.
NXC Series User’s Guide
429
Appendix D Wireless LANs
RADIUS is a simple package exchange in which your AP acts as a message relay between the
wireless client and the network RADIUS server.
Types of RADIUS Messages
The following types of RADIUS messages are exchanged between the access point and the RADIUS
server for user authentication:
• Access-Request
Sent by an access point requesting authentication.
• Access-Reject
Sent by a RADIUS server rejecting access.
• Access-Accept
Sent by a RADIUS server allowing access.
• Access-Challenge
Sent by a RADIUS server requesting more information in order to allow access. The access point
sends a proper response from the user and then sends another Access-Request message.
The following types of RADIUS messages are exchanged between the access point and the RADIUS
server for user accounting:
• Accounting-Request
Sent by the access point requesting accounting.
• Accounting-Response
Sent by the RADIUS server to indicate that it has started or stopped accounting.
In order to ensure network security, the access point and the RADIUS server use a shared secret
key, which is a password, they both know. The key is not sent over the network. In addition to the
shared key, password information exchanged is also encrypted to protect the network from
unauthorized access.
Types of EAP Authentication
This section discusses some popular authentication types: EAP-MD5, EAP-TLS, EAP-TTLS, PEAP and
LEAP. Your wireless LAN device may not support all authentication types.
EAP (Extensible Authentication Protocol) is an authentication protocol that runs on top of the IEEE
802.1x transport mechanism in order to support multiple types of user authentication. By using EAP
to interact with an EAP-compatible RADIUS server, an access point helps a wireless station and a
RADIUS server perform authentication.
The type of authentication you use depends on the RADIUS server and an intermediary AP(s) that
supports IEEE 802.1x. .
For EAP-TLS authentication type, you must first have a wired connection to the network and obtain
the certificate(s) from a certificate authority (CA). A certificate (also called digital IDs) can be used
to authenticate users and a CA issues certificates and guarantees the identity of each certificate
owner.
430
NXC Series User’s Guide
Appendix D Wireless LANs
EAP-MD5 (Message-Digest Algorithm 5)
MD5 authentication is the simplest one-way authentication method. The authentication server
sends a challenge to the wireless client. The wireless client ‘proves’ that it knows the password by
encrypting the password with the challenge and sends back the information. Password is not sent in
plain text.
However, MD5 authentication has some weaknesses. Since the authentication server needs to get
the plaintext passwords, the passwords must be stored. Thus someone other than the
authentication server may access the password file. In addition, it is possible to impersonate an
authentication server as MD5 authentication method does not perform mutual authentication.
Finally, MD5 authentication method does not support data encryption with dynamic session key. You
must configure WEP encryption keys for data encryption.
EAP-TLS (Transport Layer Security)
With EAP-TLS, digital certifications are needed by both the server and the wireless clients for
mutual authentication. The server presents a certificate to the client. After validating the identity of
the server, the client sends a different certificate to the server. The exchange of certificates is done
in the open before a secured tunnel is created. This makes user identity vulnerable to passive
attacks. A digital certificate is an electronic ID card that authenticates the sender’s identity.
However, to implement EAP-TLS, you need a Certificate Authority (CA) to handle certificates, which
imposes a management overhead.
EAP-TTLS (Tunneled Transport Layer Service)
EAP-TTLS is an extension of the EAP-TLS authentication that uses certificates for only the serverside authentications to establish a secure connection. Client authentication is then done by sending
username and password through the secure connection, thus client identity is protected. For client
authentication, EAP-TTLS supports EAP methods and legacy authentication methods such as PAP,
CHAP, MS-CHAP and MS-CHAP v2.
PEAP (Protected EAP)
Like EAP-TTLS, server-side certificate authentication is used to establish a secure connection, then
use simple username and password methods through the secured connection to authenticate the
clients, thus hiding client identity. However, PEAP only supports EAP methods, such as EAP-MD5,
EAP-MSCHAPv2 and EAP-GTC (EAP-Generic Token Card), for client authentication. EAP-GTC is
implemented only by Cisco.
LEAP
LEAP (Lightweight Extensible Authentication Protocol) is a Cisco implementation of IEEE 802.1x.
Dynamic WEP Key Exchange
The AP maps a unique key that is generated with the RADIUS server. This key expires when the
wireless connection times out, disconnects or reauthentication times out. A new WEP key is
generated each time reauthentication is performed.
NXC Series User’s Guide
431
Appendix D Wireless LANs
If this feature is enabled, it is not necessary to configure a default encryption key in the wireless
security configuration screen. You may still configure and store keys, but they will not be used while
dynamic WEP is enabled.
Note: EAP-MD5 cannot be used with Dynamic WEP Key Exchange
For added security, certificate-based authentications (EAP-TLS, EAP-TTLS and PEAP) use dynamic
keys for data encryption. They are often deployed in corporate environments, but for public
deployment, a simple user name and password pair is more practical. The following table is a
comparison of the features of authentication types.
Table 222 Comparison of EAP Authentication Types
EAP-MD5
EAP-TLS
EAP-TTLS
PEAP
LEAP
Mutual Authentication
No
Yes
Yes
Yes
Yes
Certificate – Client
No
Yes
Optional
Optional
No
Certificate – Server
No
Yes
Yes
Yes
No
Dynamic Key Exchange
No
Yes
Yes
Yes
Yes
Credential Integrity
None
Strong
Strong
Strong
Moderate
Deployment Difficulty
Easy
Hard
Moderate
Moderate
Moderate
Client Identity Protection
No
No
Yes
Yes
No
WPA and WPA2
Wi-Fi Protected Access (WPA) is a subset of the IEEE 802.11i standard. WPA2 (IEEE 802.11i) is a
wireless security standard that defines stronger encryption, authentication and key management
than WPA.
Key differences between WPA or WPA2 and WEP are improved data encryption and user
authentication.
If both an AP and the wireless clients support WPA2 and you have an external RADIUS server, use
WPA2 for stronger data encryption. If you don't have an external RADIUS server, you should use
WPA2-PSK (WPA2-Pre-Shared Key) that only requires a single (identical) password entered into
each access point, wireless gateway and wireless client. As long as the passwords match, a wireless
client will be granted access to a WLAN.
If the AP or the wireless clients do not support WPA2, just use WPA or WPA-PSK depending on
whether you have an external RADIUS server or not.
Select WEP only when the AP and/or wireless clients do not support WPA or WPA2. WEP is less
secure than WPA or WPA2.
Encryption
Both WPA and WPA2 improve data encryption by using Temporal Key Integrity Protocol (TKIP),
Message Integrity Check (MIC) and IEEE 802.1x. WPA and WPA2 use Advanced Encryption
Standard (AES) in the Counter mode with Cipher block chaining Message authentication code
Protocol (CCMP) to offer stronger encryption than TKIP.
TKIP uses 128-bit keys that are dynamically generated and distributed by the authentication server.
AES (Advanced Encryption Standard) is a block cipher that uses a 256-bit mathematical algorithm
432
NXC Series User’s Guide
Appendix D Wireless LANs
called Rijndael. They both include a per-packet key mixing function, a Message Integrity Check
(MIC) named Michael, an extended initialization vector (IV) with sequencing rules, and a re-keying
mechanism.
WPA and WPA2 regularly change and rotate the encryption keys so that the same encryption key is
never used twice.
The RADIUS server distributes a Pairwise Master Key (PMK) key to the AP that then sets up a key
hierarchy and management system, using the PMK to dynamically generate unique data encryption
keys to encrypt every data packet that is wirelessly communicated between the AP and the wireless
clients. This all happens in the background automatically.
The Message Integrity Check (MIC) is designed to prevent an attacker from capturing data packets,
altering them and resending them. The MIC provides a strong mathematical function in which the
receiver and the transmitter each compute and then compare the MIC. If they do not match, it is
assumed that the data has been tampered with and the packet is dropped.
By generating unique data encryption keys for every data packet and by creating an integrity
checking mechanism (MIC), with TKIP and AES it is more difficult to decrypt data on a Wi-Fi
network than WEP and difficult for an intruder to break into the network.
The encryption mechanisms used for WPA(2) and WPA(2)-PSK are the same. The only difference
between the two is that WPA(2)-PSK uses a simple common password, instead of user-specific
credentials. The common-password approach makes WPA(2)-PSK susceptible to brute-force
password-guessing attacks but it’s still an improvement over WEP as it employs a consistent,
single, alphanumeric password to derive a PMK which is used to generate unique temporal
encryption keys. This prevent all wireless devices sharing the same encryption keys. (a weakness of
WEP)
User Authentication
WPA and WPA2 apply IEEE 802.1x and Extensible Authentication Protocol (EAP) to authenticate
wireless clients using an external RADIUS database. WPA2 reduces the number of key exchange
messages from six to four (CCMP 4-way handshake) and shortens the time required to connect to a
network. Other WPA2 authentication features that are different from WPA include key caching and
pre-authentication. These two features are optional and may not be supported in all wireless
devices.
Key caching allows a wireless client to store the PMK it derived through a successful authentication
with an AP. The wireless client uses the PMK when it tries to connect to the same AP and does not
need to go with the authentication process again.
Pre-authentication enables fast roaming by allowing the wireless client (already connecting to an
AP) to perform IEEE 802.1x authentication with another AP before connecting to it.
Wireless Client WPA Supplicants
A wireless client supplicant is the software that runs on an operating system instructing the wireless
client how to use WPA. At the time of writing, the most widely available supplicant is the WPA patch
for Windows XP, Funk Software's Odyssey client.
The Windows XP patch is a free download that adds WPA capability to Windows XP's built-in "Zero
Configuration" wireless client. However, you must run Windows XP to use it.
NXC Series User’s Guide
433
Appendix D Wireless LANs
WPA(2) with RADIUS Application Example
To set up WPA(2), you need the IP address of the RADIUS server, its port number (default is 1812),
and the RADIUS shared secret. A WPA(2) application example with an external RADIUS server
looks as follows. "A" is the RADIUS server. "DS" is the distribution system.
1
The AP passes the wireless client's authentication request to the RADIUS server.
2
The RADIUS server then checks the user's identification against its database and grants or denies
network access accordingly.
3
A 256-bit Pairwise Master Key (PMK) is derived from the authentication process by the RADIUS
server and the client.
4
The RADIUS server distributes the PMK to the AP. The AP then sets up a key hierarchy and
management system, using the PMK to dynamically generate unique data encryption keys. The
keys are used to encrypt every data packet that is wirelessly communicated between the AP and
the wireless clients.
Figure 236 WPA(2) with RADIUS Application Example
WPA(2)-PSK Application Example
A WPA(2)-PSK application looks as follows.
434
1
First enter identical passwords into the AP and all wireless clients. The Pre-Shared Key (PSK) must
consist of between 8 and 63 ASCII characters or 64 hexadecimal characters (including spaces and
symbols).
2
The AP checks each wireless client's password and allows it to join the network only if the password
matches.
3
The AP and wireless clients generate a common PMK (Pairwise Master Key). The key itself is not
sent over the network, but is derived from the PSK and the SSID.
NXC Series User’s Guide
Appendix D Wireless LANs
4
The AP and wireless clients use the TKIP or AES encryption process, the PMK and information
exchanged in a handshake to create temporal encryption keys. They use these keys to encrypt data
exchanged between them.
Figure 237 WPA(2)-PSK Authentication
Security Parameters Summary
Refer to this table to see what other security parameters you should configure for each
authentication method or key management protocol type. MAC address filters are not dependent on
how you configure these security features.
Table 223 Wireless Security Relational Matrix
AUTHENTICATION
METHOD/ KEY
MANAGEMENT
PROTOCOL
ENCRYPTION
METHOD
ENTER
MANUAL KEY
IEEE 802.1X
Open
None
No
Disable
Enable without Dynamic WEP Key
Open
Shared
WEP
WEP
No
Enable with Dynamic WEP Key
Yes
Enable without Dynamic WEP Key
Yes
Disable
No
Enable with Dynamic WEP Key
Yes
Enable without Dynamic WEP Key
Yes
Disable
WPA
TKIP/AES
No
Enable
WPA-PSK
TKIP/AES
Yes
Disable
WPA2
TKIP/AES
No
Enable
WPA2-PSK
TKIP/AES
Yes
Disable
NXC Series User’s Guide
435
A PPENDIX
E
IPv6
Overview
IPv6 (Internet Protocol version 6), is designed to enhance IP address size and features. The
increase in IPv6 address size to 128 bits (from the 32-bit IPv4 address) allows up to 3.4 x 1038 IP
addresses.
IPv6 Addressing
The 128-bit IPv6 address is written as eight 16-bit hexadecimal blocks separated by colons (:). This
is an example IPv6 address 2001:0db8:1a2b:0015:0000:0000:1a2f:0000.
IPv6 addresses can be abbreviated in two ways:
• Leading zeros in a block can be omitted. So 2001:0db8:1a2b:0015:0000:0000:1a2f:0000 can
be written as 2001:db8:1a2b:15:0:0:1a2f:0.
• Any number of consecutive blocks of zeros can be replaced by a double colon. A double colon can
only appear once in an IPv6 address. So 2001:0db8:0000:0000:1a2f:0000:0000:0015 can be
written as 2001:0db8::1a2f:0000:0000:0015, 2001:0db8:0000:0000:1a2f::0015,
2001:db8::1a2f:0:0:15 or 2001:db8:0:0:1a2f::15.
Prefix and Prefix Length
Similar to an IPv4 subnet mask, IPv6 uses an address prefix to represent the network address. An
IPv6 prefix length specifies how many most significant bits (start from the left) in the address
compose the network address. The prefix length is written as “/x” where x is a number. For
example,
2001:db8:1a2b:15::1a2f:0/32
means that the first 32 bits (2001:db8) is the subnet prefix.
Link-local Address
A link-local address uniquely identifies a device on the local network (the LAN). It is similar to a
“private IP address” in IPv4. You can have the same link-local address on multiple interfaces on a
device. A link-local unicast address has a predefined prefix of fe80::/10. The link-local unicast
address format is as follows.
Table 224 Link-local Unicast Address Format
1111 1110 10
0
Interface ID
10 bits
54 bits
64 bits
NXC Series User’s Guide
436
Appendix E IPv6
Global Address
A global address uniquely identifies a device on the Internet. It is similar to a “public IP address” in
IPv4. A global unicast address starts with a 2 or 3.
Unspecified Address
An unspecified address (0:0:0:0:0:0:0:0 or ::) is used as the source address when a device does
not have its own address. It is similar to “0.0.0.0” in IPv4.
Loopback Address
A loopback address (0:0:0:0:0:0:0:1 or ::1) allows a host to send packets to itself. It is similar to
“127.0.0.1” in IPv4.
Multicast Address
In IPv6, multicast addresses provide the same functionality as IPv4 broadcast addresses.
Broadcasting is not supported in IPv6. A multicast address allows a host to send packets to all hosts
in a multicast group.
Multicast scope allows you to determine the size of the multicast group. A multicast address has a
predefined prefix of ff00::/8. The following table describes some of the predefined multicast
addresses.
Table 225 Predefined Multicast Address
MULTICAST ADDRESS
DESCRIPTION
FF01:0:0:0:0:0:0:1
All hosts on a local node.
FF01:0:0:0:0:0:0:2
All routers on a local node.
FF02:0:0:0:0:0:0:1
All hosts on a local connected link.
FF02:0:0:0:0:0:0:2
All routers on a local connected link.
FF05:0:0:0:0:0:0:2
All routers on a local site.
FF05:0:0:0:0:0:1:3
All DHCP severs on a local site.
The following table describes the multicast addresses which are reserved and can not be assigned
to a multicast group.
Table 226 Reserved Multicast Address
MULTICAST ADDRESS
FF00:0:0:0:0:0:0:0
FF01:0:0:0:0:0:0:0
FF02:0:0:0:0:0:0:0
FF03:0:0:0:0:0:0:0
FF04:0:0:0:0:0:0:0
FF05:0:0:0:0:0:0:0
FF06:0:0:0:0:0:0:0
FF07:0:0:0:0:0:0:0
FF08:0:0:0:0:0:0:0
FF09:0:0:0:0:0:0:0
NXC Series User’s Guide
437
Appendix E IPv6
Table 226 Reserved Multicast Address (continued)
MULTICAST ADDRESS
FF0A:0:0:0:0:0:0:0
FF0B:0:0:0:0:0:0:0
FF0C:0:0:0:0:0:0:0
FF0D:0:0:0:0:0:0:0
FF0E:0:0:0:0:0:0:0
FF0F:0:0:0:0:0:0:0
Subnet Masking
Both an IPv6 address and IPv6 subnet mask compose of 128-bit binary digits, which are divided
into eight 16-bit blocks and written in hexadecimal notation. Hexadecimal uses four bits for each
character (1 ~ 10, A ~ F). Each block’s 16 bits are then represented by four hexadecimal
characters. For example, FFFF:FFFF:FFFF:FFFF:FC00:0000:0000:0000.
Interface ID
In IPv6, an interface ID is a 64-bit identifier. It identifies a physical interface (for example, an
Ethernet port) or a virtual interface (for example, the management IP address for a VLAN). One
interface should have a unique interface ID.
EUI-64
The EUI-64 (Extended Unique Identifier) defined by the IEEE (Institute of Electrical and Electronics
Engineers) is an interface ID format designed to adapt with IPv6. It is derived from the 48-bit (6byte) Ethernet MAC address as shown next. EUI-64 inserts the hex digits fffe between the third and
fourth bytes of the MAC address and complements the seventh bit of the first byte of the MAC
address. See the following example.
Table 227
MAC
00
: 13
: 49
: 12
: 34
: 56
: 13
: 49
: FF
: FE
: 12
: 34
Table 228
EUI-64
02
: 56
Stateless Autoconfiguration
With stateless autoconfiguration in IPv6, addresses can be uniquely and automatically generated.
Unlike DHCPv6 (Dynamic Host Configuration Protocol version six) which is used in IPv6 stateful
autoconfiguration, the owner and status of addresses don’t need to be maintained by a DHCP
server. Every IPv6 device is able to generate its own and unique IP address automatically when
IPv6 is initiated on its interface. It combines the prefix and the interface ID (generated from its own
Ethernet MAC address, see Interface ID and EUI-64) to form a complete IPv6 address.
When IPv6 is enabled on a device, its interface automatically generates a link-local address
(beginning with fe80).
When the interface is connected to a network with a router and the NXC is set to automatically
obtain an IPv6 network prefix from the router for the interface, it generates 2another address which
438
NXC Series User’s Guide
Appendix E IPv6
combines its interface ID and global and subnet information advertised from the router. This is a
routable global IP address.
DHCPv6
The Dynamic Host Configuration Protocol for IPv6 (DHCPv6, RFC 3315) is a server-client protocol
that allows a DHCP server to assign and pass IPv6 network addresses, prefixes and other
configuration information to DHCP clients. DHCPv6 servers and clients exchange DHCP messages
using UDP.
Each DHCP client and server has a unique DHCP Unique IDentifier (DUID), which is used for
identification when they are exchanging DHCPv6 messages. The DUID is generated from the MAC
address, time, vendor assigned ID and/or the vendor's private enterprise number registered with
the IANA. It should not change over time even after you reboot the device.
Identity Association
An Identity Association (IA) is a collection of addresses assigned to a DHCP client, through which
the server and client can manage a set of related IP addresses. Each IA must be associated with
exactly one interface. The DHCP client uses the IA assigned to an interface to obtain configuration
from a DHCP server for that interface. Each IA consists of a unique IAID and associated IP
information.
The IA type is the type of address in the IA. Each IA holds one type of address. IA_NA means an
identity association for non-temporary addresses and IA_TA is an identity association for temporary
addresses. An IA_NA option contains the T1 and T2 fields, but an IA_TA option does not. The
DHCPv6 server uses T1 and T2 to control the time at which the client contacts with the server to
extend the lifetimes on any addresses in the IA_NA before the lifetimes expire. After T1, the client
sends the server (S1) (from which the addresses in the IA_NA were obtained) a Renew message. If
the time T2 is reached and the server does not respond, the client sends a Rebind message to any
available server (S2). For an IA_TA, the client may send a Renew or Rebind message at the client's
discretion.
T2
T1
Renew Renew
to S1
to S1
Renew Renew
to S1
to S1
Renew
to S1
Renew
to S1
Rebind
to S2
Rebind
to S2
DHCP Relay Agent
A DHCP relay agent is on the same network as the DHCP clients and helps forward messages
between the DHCP server and clients. When a client cannot use its link-local address and a wellknown multicast address to locate a DHCP server on its network, it then needs a DHCP relay agent
to send a message to a DHCP server that is not attached to the same network.
The DHCP relay agent can add the remote identification (remote-ID) option and the interface-ID
option to the Relay-Forward DHCPv6 messages. The remote-ID option carries a user-defined string,
2.
In IPv6, all network interfaces can be associated with several addresses.
NXC Series User’s Guide
439
Appendix E IPv6
such as the system name. The interface-ID option provides slot number, port information and the
VLAN ID to the DHCPv6 server. The remote-ID option (if any) is stripped from the Relay-Reply
messages before the relay agent sends the packets to the clients. The DHCP server copies the
interface-ID option from the Relay-Forward message into the Relay-Reply message and sends it to
the relay agent. The interface-ID should not change even after the relay agent restarts.
Prefix Delegation
Prefix delegation enables an IPv6 router to use the IPv6 prefix (network address) received from the
ISP (or a connected uplink router) for its LAN. The NXC uses the received IPv6 prefix (for example,
2001:db2::/48) to generate its LAN IP address. Through sending Router Advertisements (RAs)
regularly by multicast, the NXC passes the IPv6 prefix information to its LAN hosts. The hosts then
can use the prefix to generate their IPv6 addresses.
ICMPv6
Internet Control Message Protocol for IPv6 (ICMPv6 or ICMP for IPv6) is defined in RFC 4443.
ICMPv6 has a preceding Next Header value of 58, which is different from the value used to identify
ICMP for IPv4. ICMPv6 is an integral part of IPv6. IPv6 nodes use ICMPv6 to report errors
encountered in packet processing and perform other diagnostic functions, such as "ping".
Neighbor Discovery Protocol (NDP)
The Neighbor Discovery Protocol (NDP) is a protocol used to discover other IPv6 devices and track
neighbor’s reachability in a network. An IPv6 device uses the following ICMPv6 messages types:
• Neighbor solicitation: A request from a host to determine a neighbor’s link-layer address (MAC
address) and detect if the neighbor is still reachable. A neighbor being “reachable” means it
responds to a neighbor solicitation message (from the host) with a neighbor advertisement
message.
• Neighbor advertisement: A response from a node to announce its link-layer address.
• Router solicitation: A request from a host to locate a router that can act as the default router and
forward packets.
• Router advertisement: A response to a router solicitation or a periodical multicast advertisement
from a router to advertise its presence and other parameters.
IPv6 Cache
An IPv6 host is required to have a neighbor cache, destination cache, prefix list and default router
list. The NXC maintains and updates its IPv6 caches constantly using the information from response
messages. In IPv6, the NXC configures a link-local address automatically, and then sends a
neighbor solicitation message to check if the address is unique. If there is an address to be resolved
or verified, the NXC also sends out a neighbor solicitation message. When the NXC receives a
neighbor advertisement in response, it stores the neighbor’s link-layer address in the neighbor
cache. When the NXC uses a router solicitation message to query for a router and receives a router
advertisement message, it adds the router’s information to the neighbor cache, prefix list and
destination cache. The NXC creates an entry in the default router list cache if the router can be
used as a default router.
When the NXC needs to send a packet, it first consults the destination cache to determine the next
hop. If there is no matching entry in the destination cache, the NXC uses the prefix list to determine
440
NXC Series User’s Guide
Appendix E IPv6
whether the destination address is on-link and can be reached directly without passing through a
router. If the address is onlink, the address is considered as the next hop. Otherwise, the NXC
determines the next-hop from the default router list or routing table. Once the next hop IP address
is known, the NXC looks into the neighbor cache to get the link-layer address and sends the packet
when the neighbor is reachable. If the NXC cannot find an entry in the neighbor cache or the state
for the neighbor is not reachable, it starts the address resolution process. This helps reduce the
number of IPv6 solicitation and advertisement messages.
Multicast Listener Discovery
The Multicast Listener Discovery (MLD) protocol (defined in RFC 2710) is derived from IPv4's
Internet Group Management Protocol version 2 (IGMPv2). MLD uses ICMPv6 message types, rather
than IGMP message types. MLDv1 is equivalent to IGMPv2 and MLDv2 is equivalent to IGMPv3.
MLD allows an IPv6 switch or router to discover the presence of MLD listeners who wish to receive
multicast packets and the IP addresses of multicast groups the hosts want to join on its network.
MLD snooping and MLD proxy are analogous to IGMP snooping and IGMP proxy in IPv4.
MLD filtering controls which multicast groups a port can join.
MLD Messages
A multicast router or switch periodically sends general queries to MLD hosts to update the multicast
forwarding table. When an MLD host wants to join a multicast group, it sends an MLD Report
message for that address.
An MLD Done message is equivalent to an IGMP Leave message. When an MLD host wants to leave
a multicast group, it can send a Done message to the router or switch. The router or switch then
sends a group-specific query to the port on which the Done message is received to determine if
other devices connected to this port should remain in the group.
NXC Series User’s Guide
441
Appendix E IPv6
Example - Enabling IPv6 on Windows XP/2003/Vista
By default, Windows XP and Windows 2003 support IPv6. This example shows you how to use the
ipv6 install command on Windows XP/2003 to enable IPv6. This also displays how to use the
ipconfig command to see auto-generated IP addresses.
C:\>ipv6 install
Installing...
Succeeded.
C:\>ipconfig
Windows IP Configuration
Ethernet adapter Local Area Connection:
Connection-specific
IP Address. . . . .
Subnet Mask . . . .
IP Address. . . . .
Default Gateway . .
DNS
. .
. .
. .
. .
Suffix
. . . .
. . . .
. . . .
. . . .
.
.
.
.
.
:
:
:
:
:
10.1.1.46
255.255.255.0
fe80::2d0:59ff:feb8:103c%4
10.1.1.254
IPv6 is installed and enabled by default in Windows Vista. Use the ipconfig command to check
your automatic configured IPv6 address as well. You should see at least one IPv6 address available
for the interface on your computer.
Example - Enabling DHCPv6 on Windows XP
Windows XP does not support DHCPv6. If your network uses DHCPv6 for IP address assignment,
you have to additionally install a DHCPv6 client software on your Windows XP. (Note: If you use
static IP addresses or Router Advertisement for IPv6 address assignment in your network, ignore
this section.)
This example uses Dibbler as the DHCPv6 client. To enable DHCPv6 client on your computer:
442
1
Install Dibbler and select the DHCPv6 client option on your computer.
2
After the installation is complete, select Start > All Programs > Dibbler-DHCPv6 > Client
Install as service.
3
Select Start > Control Panel > Administrative Tools > Services.
4
Double click Dibbler - a DHCPv6 client.
NXC Series User’s Guide
Appendix E IPv6
5
Click Start and then OK.
6
Now your computer can obtain an IPv6 address from a DHCPv6 server.
Example - Enabling IPv6 on Windows 7
Windows 7 supports IPv6 by default. DHCPv6 is also enabled when you enable IPv6 on a Windows 7
computer.
To enable IPv6 in Windows 7:
1
Select Control Panel > Network and Sharing Center > Local Area Connection.
2
Select the Internet Protocol Version 6 (TCP/IPv6) checkbox to enable it.
3
Click OK to save the change.
NXC Series User’s Guide
443
Appendix E IPv6
4
Click Close to exit the Local Area Connection Status screen.
5
Select Start > All Programs > Accessories > Command Prompt.
6
Use the ipconfig command to check your dynamic IPv6 address. This example shows a global
address (2001:b021:2d::1000) obtained from a DHCP server.
C:\>ipconfig
Windows IP Configuration
Ethernet adapter Local Area Connection:
Connection-specific DNS
IPv6 Address. . . . . .
Link-local IPv6 Address
IPv4 Address. . . . . .
Subnet Mask . . . . . .
Default Gateway . . . .
444
Suffix
. . . .
. . . .
. . . .
. . . .
. . . .
.
.
.
.
.
.
:
:
:
:
:
:
2001:b021:2d::1000
fe80::25d8:dcab:c80a:5189%11
172.16.100.61
255.255.255.0
fe80::213:49ff:feaa:7125%11
172.16.100.254
NXC Series User’s Guide
A PPENDIX
F
Customer Support
In the event of problems that cannot be solved by using this manual, you should contact your
vendor. If you cannot contact your vendor, then contact a ZyXEL office for the region in which you
bought the device. Regional websites are listed below (see also http://www.zyxel.com/
about_zyxel/zyxel_worldwide.shtml). Please have the following information ready when you
contact an office.
Required Information
• Product model and serial number.
• Warranty Information.
• Date that you received your device.
• Brief description of the problem and the steps you took to solve it.
Corporate Headquarters (Worldwide)
Taiwan
• ZyXEL Communications Corporation
• http://www.zyxel.com
Asia
China
• ZyXEL Communications (Shanghai) Corp.
ZyXEL Communications (Beijing) Corp.
ZyXEL Communications (Tianjin) Corp.
• http://www.zyxel.cn
India
• ZyXEL Technology India Pvt Ltd
• http://www.zyxel.in
Kazakhstan
• ZyXEL Kazakhstan
• http://www.zyxel.kz
NXC Series User’s Guide
445
Appendix F Customer Support
Korea
• ZyXEL Korea Corp.
• http://www.zyxel.kr
Malaysia
• ZyXEL Malaysia Sdn Bhd.
• http://www.zyxel.com.my
Pakistan
• ZyXEL Pakistan (Pvt.) Ltd.
• http://www.zyxel.com.pk
Philipines
• ZyXEL Philippines
• http://www.zyxel.com.ph
Singapore
• ZyXEL Singapore Pte Ltd.
• http://www.zyxel.com.sg
Taiwan
• ZyXEL Communications Corporation
• http://www.zyxel.com
Thailand
• ZyXEL Thailand Co., Ltd
• http://www.zyxel.co.th
Vietnam
• ZyXEL Communications Corporation-Vietnam Office
• http://www.zyxel.com/vn/vi
Europe
Austria
• ZyXEL Deutschland GmbH
• http://www.zyxel.de
Belarus
• ZyXEL BY
• http://www.zyxel.by
446
NXC Series User’s Guide
Appendix F Customer Support
Belgium
• ZyXEL Communications B.V.
• http://www.zyxel.com/be/nl/
Bulgaria
• ZyXEL България
• http://www.zyxel.com/bg/bg/
Czech
• ZyXEL Communications Czech s.r.o
• http://www.zyxel.cz
Denmark
• ZyXEL Communications A/S
• http://www.zyxel.dk
Estonia
• ZyXEL Estonia
• http://www.zyxel.com/ee/et/
Finland
• ZyXEL Communications
• http://www.zyxel.fi
France
• ZyXEL France
• http://www.zyxel.fr
Germany
• ZyXEL Deutschland GmbH
• http://www.zyxel.de
Hungary
• ZyXEL Hungary & SEE
• http://www.zyxel.hu
Latvia
• ZyXEL Latvia
• http://www.zyxel.com/lv/lv/homepage.shtml
NXC Series User’s Guide
447
Appendix F Customer Support
Lithuania
• ZyXEL Lithuania
• http://www.zyxel.com/lt/lt/homepage.shtml
Netherlands
• ZyXEL Benelux
• http://www.zyxel.nl
Norway
• ZyXEL Communications
• http://www.zyxel.no
Poland
• ZyXEL Communications Poland
• http://www.zyxel.pl
Romania
• ZyXEL Romania
• http://www.zyxel.com/ro/ro
Russia
• ZyXEL Russia
• http://www.zyxel.ru
Slovakia
• ZyXEL Communications Czech s.r.o. organizacna zlozka
• http://www.zyxel.sk
Spain
• ZyXEL Spain
• http://www.zyxel.es
Sweden
• ZyXEL Communications
• http://www.zyxel.se
Switzerland
• Studerus AG
• http://www.zyxel.ch/
448
NXC Series User’s Guide
Appendix F Customer Support
Turkey
• ZyXEL Turkey A.S.
• http://www.zyxel.com.tr
UK
• ZyXEL Communications UK Ltd.
• http://www.zyxel.co.uk
Ukraine
• ZyXEL Ukraine
• http://www.ua.zyxel.com
Latin America
Argentina
• ZyXEL Communication Corporation
• http://www.zyxel.com/ec/es/
Ecuador
• ZyXEL Communication Corporation
• http://www.zyxel.com/ec/es/
Middle East
Egypt
• ZyXEL Communication Corporation
• http://www.zyxel.com/homepage.shtml
Middle East
• ZyXEL Communication Corporation
• http://www.zyxel.com/homepage.shtml
North America
USA
• ZyXEL Communications, Inc. - North America Headquarters
• http://www.us.zyxel.com/
NXC Series User’s Guide
449
Appendix F Customer Support
Oceania
Australia
• ZyXEL Communications Corporation
• http://www.zyxel.com/au/en/
Africa
South Africa
• Nology (Pty) Ltd.
• http://www.zyxel.co.za
450
NXC Series User’s Guide
A PPENDIX
G
Legal Information
Copyright
Copyright © 2014 by ZyXEL Communications Corporation.
The contents of this publication may not be reproduced in any part or as a whole, transcribed, stored in a retrieval system, translated into
any language, or transmitted in any form or by any means, electronic, mechanical, magnetic, optical, chemical, photocopying, manual, or
otherwise, without the prior written permission of ZyXEL Communications Corporation.
Published by ZyXEL Communications Corporation. All rights reserved.
Disclaimer
ZyXEL does not assume any liability arising out of the application or use of any products, or software described herein. Neither does it
convey any license under its patent rights nor the patent rights of others. ZyXEL further reserves the right to make changes in any
products described herein without notice. This publication is subject to change without notice.
Your use of the NXC is subject to the terms and conditions of any related service providers.
Trademarks
ZyNOS (ZyXEL Network Operating System) is a registered trademark of ZyXEL Communications, Inc. Other trademarks mentioned in this
publication are used for identification purposes only and may be properties of their respective owners.
Certifications
Federal Communications Commission (FCC) Interference Statement
The device complies with Part 15 of FCC rules. Operation is subject to the following two conditions:
• This device may not cause harmful interference.
• This device must accept any interference received, including interference that may cause undesired operations.
This device has been tested and found to comply with the limits for a Class B digital device pursuant to Part 15 of the FCC Rules. These
limits are designed to provide reasonable protection against harmful interference in a residential installation. This device generates, uses,
and can radiate radio frequency energy, and if not installed and used in accordance with the instructions, may cause harmful interference
to radio communications. However, there is no guarantee that interference will not occur in a particular installation.
If this device does cause harmful interference to radio/television reception, which can be determined by turning the device off and on, the
user is encouraged to try to correct the interference by one or more of the following measures:
1
2
3
4
Reorient or relocate the receiving antenna.
Increase the separation between the equipment and the receiver.
Connect the equipment into an outlet on a circuit different from that to which the receiver is connected.
Consult the dealer or an experienced radio/TV technician for help.
Notices
Changes or modifications not expressly approved by the party responsible for compliance could void the user's authority to operate the
equipment.
This Class B digital apparatus complies with Canadian ICES-003.
Cet appareil numérique de la classe B est conforme à la norme NMB-003 du Canada.
Viewing Certifications
Go to http://www.zyxel.com to view this product’s documentation and certifications.
ZyXEL Limited Warranty
ZyXEL warrants to the original end user (purchaser) that this product is free from any defects in material or workmanship for a specific
period (the Warranty Period) from the date of purchase. The Warranty Period varies by region. Check with your vendor and/or the
authorized ZyXEL local distributor for details about the Warranty Period of this product. During the warranty period, and upon proof of
purchase, should the product have indications of failure due to faulty workmanship and/or materials, ZyXEL will, at its discretion, repair or
replace the defective products or components without charge for either parts or labor, and to whatever extent it shall deem necessary to
restore the product or components to proper operating condition. Any replacement will consist of a new or re-manufactured functionally
equivalent product of equal or higher value, and will be solely at the discretion of ZyXEL. This warranty shall not apply if the product has
been modified, misused, tampered with, damaged by an act of God, or subjected to abnormal working conditions.
Note
Repair or replacement, as provided under this warranty, is the exclusive remedy of the purchaser. This warranty is in lieu of all other
warranties, express or implied, including any implied warranty of merchantability or fitness for a particular use or purpose. ZyXEL shall in
no event be held liable for indirect or consequential damages of any kind to the purchaser.
To obtain the services of this warranty, contact your vendor. You may also refer to the warranty policy for the region in which you bought
the device at http://www.zyxel.com/web/support_warranty_info.php.
NXC Series User’s Guide
451
Appendix G Legal Information
Registration
Register your product online to receive e-mail notices of firmware upgrades and information at www.zyxel.com for global products, or at
www.us.zyxel.com for North American products.
Open Source Licenses
This product contains in part some free software distributed under GPL license terms and/or GPL like licenses. Open source licenses are
provided with the firmware package. You can download the latest firmware at www.zyxel.com. If you cannot find it there, contact your
vendor or ZyXEL Technical Support at [email protected].
To obtain the source code covered under those Licenses, please contact your vendor or ZyXEL Technical Support at
[email protected].
Safety Warnings
•
•
•
•
•
•
•
•
•
•
•
•
•
•
•
•
•
Do NOT use this product near water, for example, in a wet basement or near a swimming pool.
Do NOT expose your device to dampness, dust or corrosive liquids.
Do NOT store things on the device.
Do NOT install, use, or service this device during a thunderstorm. There is a remote risk of electric shock from lightning.
Connect ONLY suitable accessories to the device.
Do NOT open the device or unit. Opening or removing covers can expose you to dangerous high voltage points or other risks. ONLY
qualified service personnel should service or disassemble this device. Please contact your vendor for further information.
Make sure to connect the cables to the correct ports.
Place connecting cables carefully so that no one will step on them or stumble over them.
Always disconnect all cables from this device before servicing or disassembling.
Use ONLY an appropriate power adaptor or cord for your device. Connect it to the right supply voltage (for example, 110V AC in North
America or 230V AC in Europe).
Do NOT allow anything to rest on the power adaptor or cord and do NOT place the product where anyone can walk on the power
adaptor or cord.
Do NOT use the device if the power adaptor or cord is damaged as it might cause electrocution.
If the power adaptor or cord is damaged, remove it from the device and the power source.
Do NOT attempt to repair the power adaptor or cord. Contact your local vendor to order a new one.
Do not use the device outside, and make sure all the connections are indoors. There is a remote risk of electric shock from lightning.
The PoE (Power over Ethernet) devices that supply or receive power and their connected Ethernet cables must all be completely
indoors.
This product is for indoor use only (utilisation intérieure exclusivement).
Your product is marked with this symbol, which is known as the WEEE mark. WEEE stands for Waste Electronics and
Electrical Equipment. It means that used electrical and electronic products should not be mixed with general waste. Used
electrical and electronic equipment should be treated separately.
"INFORMAZIONI AGLI UTENTI"
Ai sensi dell'art. 13 del Decreto Legislativo 25 luglio 2005, n.151"Attuazione delle Direttive 2002/95/CE, 2002/96/CE e 2003/108/CE,
relative alla riduzione dell’uso di sostanze pericolose nelle apparecchiature elettriche ed elettroniche, nonche allo smaltimento dei rifiuti"
Il simbolo del cassonetto barrato riportato sull’apparecchiatura o sulla sua confezione indica che il prodotto alla fine della propria vita utile
deve essere raccolto separatamente dagli altri rifiuti.
La raccolta differenziata della presente apparecchiatura giunta a fine vita e organizzata e gestita dal produttore. L’utente che vorra disfarsi
della presente apparecchiatura dovra quindi contattare il produttore e seguire il sistema che questo ha adottato per consentire la raccolta
separata dell’apparecchiatura giunta a fine vita.
L’adeguata raccolta differenziata per l’avvio successivo dell’apparecchiatura dismessa al riciclaggio, al trattamento e allo smaltimento
ambientalmente compatibile contribuisce ad evitare possibili effetti negativi sull’ambiente e sulla salute e favorisce il reimpiego e/o riciclo
dei materiali di cui e composta l’apparecchiatura.
Lo smaltimento abusivo del prodotto da parte del detentore comporta l’applicazione delle sanzioni amministrative previste dalla normativa
vigente."
452
NXC Series User’s Guide
Appendix G Legal Information
Environmental Product Declaration
NXC Series User’s Guide
453
Index
Index
A
AAA
Base DN 254
Bind DN 254, 258
directory structure 253
Distinguished Name, see DN
DN 253, 255, 257
password 258
port 257, 261
search time limit 258
SSL 257
AAA server 251
AD 253
and users 191
directory service 251
LDAP 251, 253
local user database 252
RADIUS 252, 253
RADIUS default 259
RADIUS group 260
see also RADIUS
access 28
access users 190, 192
idle timeout 199
multiple logins 200
see also users 190
Web Configurator 203
account
myZyXEL.com 88
user 190
accounting server 251
Active Directory, see AD
active sessions 50, 53, 65
AD 251, 253, 254, 255, 257, 258
directory structure 253
Distinguished Name, see DN
password 258
port 257, 261
search time limit 258
SSL 257
address groups 236
454
and
and
and
and
and
and
firewall 186
FTP 316
SNMP 320
SSH 312
Telnet 314
WWW 303
address objects 236
and firewall 186
and FTP 316
and NAT 140, 150
and policy routes 139
and SNMP 320
and SSH 312
and Telnet 314
and WWW 303
HOST 236
RANGE 236
SUBNET 236
types of 236
address record 294
admin users 190
multiple logins 200
see also users 190
Advanced Encryption Standard, see AES
AES 432
alerts 328, 332, 333, 334, 337, 338, 339
ALG 154
and NAT 154
FTP 154
AP (Access Point) 426
Application Layer Gateway, see ALG
applications 18
asymmetrical routes 182
allowing through the firewall 184
authentication
LDAP/AD 253
server 251
authentication method objects 263
and users 191
and WWW 302
create 264
Authentication server
NXC Series User’s Guide
Index
RADIUS client 323
authentication server 321
Authentication, Authorization, Accounting servers,
see AAA server
authorization server 251
B
backing up configuration files 343
fingerprints 276, 281
importing 270
not used for encryption 267
revoked 267
self-signed 267, 272
serial number 275, 280
storage space 269, 278
thumbprint algorithms 268
thumbprints 268
used for authentication 267
verifying fingerprints 268
Base DN 254
certification requests 272, 273
Basic Service Set, See BSS 424
certifications 451
notices 451
viewing 451
Bind DN 254, 258
boot module 348
BSS 424
channel 426
interference 426
C
CLI 20, 36
button 36
messages 36
popup window 36
Reference Guide 2
CA 431
and certificates 267
CA (Certificate Authority), see certificates
Calling Station ID 221
cold start 21
commands 20
sent by Web Configurator 36
captive portal 161
authentication 161
page 161
type 162
Common Event Format (CEF) 329, 337
CEF (Common Event Format) 329, 337
configuration
information 352, 357
object-based 20
cellular
status 70
Certificate Authority (CA) 431
see certificates
Certificate Management Protocol (CMP) 273
Certificate Revocation List (CRL) 267
vs OCSP 282
certificates 266
advantages of 267
and CA 267
and FTP 315
and HTTPS 299
and SSH 312
and WWW 301
certification path 267, 275, 280
expired 267
factory-default 267
file formats 267
NXC Series User’s Guide
common services 408
comparison table 16
computer names 117, 129, 133
configuration files 341
at restart 344
backing up 343
downloading 345, 356, 362
downloading with FTP 315
editing 341
how applied 342
lastgood.conf 344, 346
managing 343
startup-config.conf 346
startup-config-bad.conf 344
syntax 342
system-default.conf 346
uploading 347
uploading with FTP 315
use without restart 341
455
Index
connectivity check 116, 130
pointer (PTR) records 294
console port
speed 291
DNS servers 292, 296
and interfaces 133
contact information 445
cookies 28
documentation
related 2
copyright 451
domain name 286
CPU usage 49, 51
Domain Name System, see DNS
CTS (Clear to Send) 427
DSA 272
current date/time 48, 287
and schedules 246
daylight savings 289
setting manually 290
time server 291
DSCP 366
customer support 445
D
date 287
daylight savings 289
default
interfaces and zones 17
port mapping 16
device introduction 16
DHCP 132, 286
and DNS servers 133
and domain name 286
and interfaces 132
client list 54
pool 132
static DHCP 132
dynamic guest 69
dynamic guest account 69, 191
Dynamic Host Configuration Protocol, see DHCP.
dynamic WEP key exchange 431
E
EAP Authentication 430
Ekahau RTLS 178
e-mail
daily statistics report 327
encryption 432
RSA 275
ESS 425
Ethernet interfaces 110
and routing protocols 111
Ethernet ports 16
default settings 24
Extended Service Set IDentification 209
Extended Service Set, See ESS 425
diagnostics 352, 357
Digital Signature Algorithm public-key algorithm,
see DSA
directory 251
directory service 251
file structure 253
F
FCC interference statement 451
Distinguished Name (DN) 253, 255, 257
file extensions
configuration files 341
shell scripts 341
DN 253, 255, 257
file manager 341
DNS 291
address records 294
domain name forwarders 296
domain name to IP address 294
IP address to domain name 294
Mail eXchange (MX) records 297
Firefox 28
disclaimer 451
456
firewall 181
actions 186
and address groups 186
and address objects 186
and NAT 183
NXC Series User’s Guide
Index
and schedules 185
and service groups 186
and services 186
and user groups 186, 189
and users 186, 189
and zones 181, 184
asymmetrical routes 182, 184
global rules 182
priority 184
rule criteria 182
session limits 182, 187
stateful inspection 181
triangle routes 182, 184
firmware
and restart 347
boot module, see boot module
current version 48, 348
getting updated 347
uploading 347, 348
uploading with FTP 315
flash usage 50
H
hidden node 427
HTTP
over SSL, see HTTPS
redirect to HTTPS 301
vs HTTPS 299
HTTPS 299
and certificates 299
authenticating clients 299
avoiding warning messages 304
example 303
vs HTTP 299
with Internet Explorer 303
HyperText Transfer Protocol over Secure Socket
Layer, see HTTPS
I
FQDN 294
IBSS 424
fragmentation threshold 428
ICMP 241
front panel ports 16
IEEE 802.11g 428
FTP 315
additional signaling port 155
ALG 154
and address groups 316
and address objects 316
and certificates 315
and zones 316
signaling port 155
with Transport Layer Security (TLS) 315
IEEE 802.1q VLAN
Fully-Qualified Domain Name, see FQDN
G
ge 16
Gigabit Ethernet 16
ports 16
Guide
CLI Reference 2
Quick Start 2
NXC Series User’s Guide
IEEE 802.1x 209
Independent Basic Service Set
See IBSS 424
initialization vector (IV) 433
interface
mapping 16
status 50, 60
types 17
interfaces 16, 110
and DNS servers 133
and NAT 150
and physical ports 16, 110
and policy routes 139
and static routes 141
and zones 16, 110
as DHCP relays 132
as DHCP servers 132, 286
bandwidth management 131
default configuration 17
DHCP clients 131
Ethernet, see also Ethernet interfaces.
gateway 131
general characteristics 110
457
Index
IP address 131
metric 131
MTU 132
overlapping IP address and subnet mask 131
static DHCP 132
subnet mask 131
types 110
VLAN, see also VLAN interfaces.
Internet Control Message Protocol, see ICMP
Internet Explorer 28
Internet Protocol version 6, see IPv6
IP policy routing, see policy routes
IP protocols 241
ICMP, see ICMP
TCP, see TCP
UDP, see UDP
IP static routes, see static routes
IP/MAC binding 156
exempt list 160
monitor 67
static DHCP 159
IPv6 436
addressing 436
EUI-64 438
global address 437
interface ID 438
link-local address 436
Neighbor Discovery Protocol 436
ping 436
prefix 436
prefix length 436
stateless autoconfiguration 438
unspecified address 437
J
Java
permissions 28
JavaScripts 28
K
key pairs 266
L
lastgood.conf 344, 346
LDAP 251
and users 191
Base DN 254
Bind DN 254, 258
directory 251
directory structure 253
Distinguished Name, see DN
DN 253, 255, 257
password 258
port 257, 261
search time limit 258
SSL 257
license
key 90
licensing 86
Lightweight Directory Access Protocol, see LDAP
local user database 252
log messages
categories 333, 334, 337, 338, 339
debugging 81
regular 81
types of 81
logged in users 55
logout
Web Configurator 31
logs
descriptions 381
e-mail profiles 328
e-mailing log messages 83, 332
formats 329
log consolidation 333
settings 328
syslog servers 328
system 328
types of 328
M
MAC address 206
and VLAN 123
Ethernet interface 114
range 48
MAC authentication 221
458
NXC Series User’s Guide
Index
AAA server 251
addresses and address groups 236
authentication method 263
certificates 266
for configuration 20
introduction to 20
schedules 246
services and service groups 241
users, user groups 190
Calling Station ID 221
case 221
delimiter 221
mac role 206
Management Information Base (MIB) 317, 318
mapping ports 16
memory usage 50, 52
message bar 40
Message Integrity Check (MIC) 432
messages
CLI 36
warning 40
metrics, see reports
Online Certificate Status Protocol (OCSP) 282
vs CRL 282
other documentation 2
OUI 207
model name 48
multicast 214
multicast rate 214
My Certificates, see also certificates 269
myZyXEL.com 86
accounts, creating 86
N
NAT 142, 147
ALG, see ALG
and address objects 140
and address objects (HOST) 150
and ALG 154
and firewall 183
and interfaces 150
and policy routes 140
NAT example 147
NBNS 117, 129, 133
NetBIOS
Name Server, see NBNS.
NetBIOS name 258
Netscape Navigator 28
P
P1 16
packet
statistics 57, 59
packet capture
files 353, 358
packet captures
downloading files 353, 359
Pairwise Master Key (PMK) 433, 434
physical ports 16
and interfaces 16
packet statistics 57, 59
pointer record 294
policy routes 134
actions 135
and address objects 139
and interfaces 139
and schedules 139
and user groups 138, 139
and users 138, 139
benefits 134
criteria 135
Network Address Translation, see NAT
pop-up windows 28
Network Time Protocol (NTP) 290
port mapping 16
ports 16
power off 21
O
object-based configuration 20
objects 20
NXC Series User’s Guide
power on 21
PPP interfaces
subnet mask 131
preamble mode 428
459
Index
product
overview 16
product registration 452
PSK 433
PTR record 294
Public-Key Infrastructure (PKI) 267
public-private key pairs 266
RFC
1631 (NAT) 142
2131 (DHCP) 132
2132 (DHCP) 132
2510 (Certificate Management Protocol or
CMP) 273
Rivest, Shamir and Adleman public-key algorithm
(RSA) 272
routing protocols
and Ethernet interfaces 111
Q
RSA 272, 275, 281
QoS 135
RTLS 178
Quick Start Guide 2
RTS (Request To Send) 427
threshold 427
R
RADIUS 252, 253, 429
advantages 252
and users 191
message types 430
messages 430
shared secret key 430
RADIUS server 321
reboot 21, 370
vs reset 370
RSSI threshold 213
S
SCEP (Simple Certificate Enrollment Protocol) 273
schedules 246
and current date/time 246
and firewall 185
and policy routes 139
one-time 246
recurring 246
types of 246
Reference Guide, CLI 2
screen resolution 28
registration 86
product 452
Secure Socket Layer, see SSL
serial number 48
related documentation 2
service control
and users 299
limitations 298
timeouts 299
Relative Distinguished Name (RDN) 253, 255, 257
Remote Authentication Dial-In User Service, see
RADIUS
remote management
FTP, see FTP
Telnet 314
WWW, see WWW
service groups 242
and firewall 186
reports
collecting data 63
daily 327
daily e-mail 327
specifications 64
traffic statistics 62
service subscription status 90, 91
reset 379
vs reboot 370
RESET button 21, 379
460
service objects 241
Service Set 209
services 241, 242, 408
and firewall 186
and policy routes 242
session control 187
session limits 182, 187
sessions 65
sessions usage 50, 53
NXC Series User’s Guide
Index
shell scripts 341
downloading 350
editing 350
how applied 342
managing 350
syntax 342
uploading 351
shutdown 21, 371
Simple Certificate Enrollment Protocol (SCEP) 273
Simple Network Management Protocol, see SNMP
SNAT 142
SNMP 317
agents 317
and address groups 320
and address objects 320
and zones 320
Get 317
GetNext 317
Manager 317
managers 317
MIB 317, 318
network components 317
Set 317
Trap 318
traps 318
versions 317
Source Network Address Translation, see SNAT
SSH 309
and address groups 312
and address objects 312
and certificates 312
and zones 312
client requirements 311
encryption methods 311
for secure Telnet 312
how connection is established 310
versions 311
with Linux 313
with Microsoft Windows 312
SSL 299
and AAA 257
and AD 257
and LDAP 257
starting the device 21
startup-config.conf 346
if errors 344
missing at restart 344
present at restart 344
NXC Series User’s Guide
startup-config-bad.conf 344
static DHCP 159
static routes 134
and interfaces 141
metric 141
statistics
daily e-mail report 327
traffic 62
status 47
status bar 40
warning message popup 40
stopping the device 21
subscription services
status 90, 91
upgrading 90
supported browsers 28
syslog 329, 337
syslog servers, see also logs
system log 359
downloading files 359
system log, see logs
system name 48, 286
system reports, see reports
system uptime 48
system-default.conf 346
T
target market 16
TCP 241
connections 241
port numbers 241
Telnet 314
and address groups 314
and address objects 314
and zones 314
with SSH 312
Temporal Key Integrity Protocol (TKIP) 432
time 287
time servers (default) 290
trademarks 451
traffic statistics 62
Transmission Control Protocol, see TCP
Transport Layer Security (TLS) 315
461
Index
triangle routes 182
allowing through the firewall 184
attributes for Ext-User 191
currently logged in 48, 55
default lease time 199, 201
default reauthentication time 199, 202
default type for Ext-User 191
ext-group-user (type) 191
Ext-User (type) 191
ext-user (type) 191
groups, see user groups
guest (type) 191
guest-manager (type) 191
lease time 195
limited-admin (type) 190
lockout 200
mac-address (type) 191, 192
reauthentication time 195
types of 190
user (type) 191
user names 194
troubleshooting 352, 357, 372
Trusted Certificates, see also certificates 277
U
UDP 241
messages 241
port numbers 241
upgrading
firmware 347
uploading
configuration files 347
firmware 347
shell scripts 350
usage
CPU 49, 51
flash 50
memory 50, 52
onboard flash 50
sessions 50, 53
user authentication 190
external 191
local user database 252
user awareness 192
User Datagram Protocol, see UDP
user group objects 190
user groups 190, 192
and firewall 186, 189
and policy routes 138, 139
user name
rules 194
user objects 190
user sessions, see sessions
users 190
access, see also access users
admin (type) 190
admin, see also admin users
and AAA servers 191
and authentication method objects 191
and firewall 186, 189
and LDAP 191
and policy routes 138, 139
and RADIUS 191
and service control 299
462
V
Vantage Report (VRPT) 329, 337
virtual interfaces
not DHCP clients 131
Virtual Local Area Network, see VLAN.
VLAN 122
advantages 123
and MAC address 123
ID 123
VLAN interfaces 110
VRPT (Vantage Report) 329, 337
W
warm start 21
warning message popup 40
warranty 451
note 451
Web Configurator 20, 28
access 28
access users 203
requirements 28
supported browsers 28
WEP (Wired Equivalent Privacy) 209
NXC Series User’s Guide
Index
Wi-Fi Protected Access 209, 432
Windows Internet Naming Service, see WINS
Windows Internet Naming Service, see WINS.
WINS 117, 129, 133
WINS server 117
wireless client WPA supplicants 433
wireless security 428
WLAN
interference 426
security parameters 435
WPA 209, 432
key caching 433
pre-authentication 433
user authentication 433
vs WPA-PSK 433
wireless client supplicant 433
with RADIUS application example 434
block intra-zone traffic 146, 183
default 17
extra-zone traffic 144
inter-zone traffic 144
intra-zone traffic 144
types of traffic 144
ZyMesh 232
auto provision 232
profile 234
repeater 232
root AP 232
security 235
SSID 235
WDS 232
WPA2 209, 432
user authentication 433
vs WPA2-PSK 433
wireless client supplicant 433
with RADIUS application example 434
WPA2-Pre-Shared Key (WPA2-PSK) 432
WPA2-PSK 432, 433
application example 434
WPA-PSK 432, 433
application example 434
WWW 300
and address groups 303
and address objects 303
and authentication method objects 302
and certificates 301
and zones 303
see also HTTP, HTTPS 300
Z
zones
and
and
and
and
and
and
and
and
16, 144
firewall 181, 184
FTP 316
interfaces 16, 144
SNMP 320
SSH 312
Telnet 314
VPN 16
WWW 303
NXC Series User’s Guide
463