1
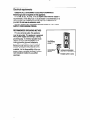
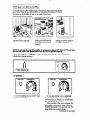
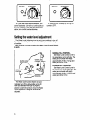
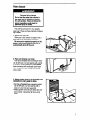
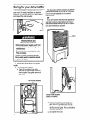
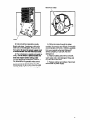
Contents
Parts and features . .. .. . .. .. .. . .. .. .. . .. . .. .. .. ..
Before using your dehumidifier
.. .. .. .. .
Install properly .. .. . ... . .. . .. .. .. .. . .. .. . .. .. .. . ..
Electrical requirements . .. .. .. .. .. . .. .. . .. .. .
Using your dehumidifier
.. .. .. .. .. . .. .. .. . .. .
To operate .. . .. .. .. . .. .. .. . .. .. . .. .. .. . .. .. .. . .. .. .
Page
2
3
3
4
5
5
Page
Setting the water level
.. . .. .. .. . .. .. .. . .. .. . .. . .. .. .. . .. .. .. .. .. .
adjustment
Water disposal . . .. .. .. .. . .. .. . .. .. . .. .. .. . .. .. .. .
Caring for your dehumidifier
. . ... . .. .. .. ..
If you need service or assistance
.. .. ..
Coolerator dehumidifier
warranty .. .. ..
0 1992 Whirlpool Corporation
Parts and features
FULL LIGHT
HUMIDISTAT
CONDENSER COILS
(NOT SHOWN)
REAR GRILLE
I
,NEL
FRONT GRILLE
MODEL AND
SERIAL NUMBER
LABEL (ON
CABINET UNDER
WATER PAN)
WATER PAN
6
7
8
10
12
Before using your dehumidifier
This booklet tells you how to install your dehumidifier, use it and
clean it. Treat your new dehumidifier with care. Use it only to do what
home dehumidifiers are designed to do.
Copy your model and serial number
here . . .
If you need service or call with a question,
have this information ready:
1. Complete model and serial numbers
(from the label under the water pan on the
base of the unit).
2. Purchase date from sales slip.
Copy this information
in these spaces.
Keep this book and your sales slip together
in a handy place.
Thank you for purchasing
a Coolerator
product. Please complete and mail the
Owner’s Registration
Card furnished with
this product.
It is your responsibility
dehumidifier:
l
l
l
l
Serial Number
Purchase Date
Service company Name and telephone
Number
to make sure your
Has been properly installed on a floor that is
reasonably level.
Is the correct size for the area you want to
dehumidify.
Is connected to the proper kind of outlet with
the correct electrical supply and grounding.
(Refer to your “Electrical Requirements.“)
Is used only for jobs expected of home
dehumidifiers.
Install properly
Model Number
l
l
l
l
Is not used by children or anyone not able to
operate it properly.
Is properly maintained.
Is used in an area where the room temperature will not fall below 65°F (18.3%).
Do not remove Tech Sheet which is inside
the cabinet. Your service technician needs
this information.
...
1. There are two rollers under your
dehumidifier to help you move it more easily.
To move: Remove the water pan, tilt unit forward
and roll to another position.
2. Allow at least 12 inches (30.5 cm)
of space around the unit for good air
circulation.
3. Keep all outside doors, windows and other
openings closed when dehumidifier is operating.
Humid outdoor air will add to the dehumidifier’s
operating load.
4. Water pan must be properly positioned,
on the hangers inside the cabinet, when
dehumidifier
is operating in order for the
automatic shut-off to operate correctly.
3
Electrical
requirements
OBSERVE ALL GOVERNING CODES AND ORDINANCES.
Electrical ground is required on this appliance.
A 115 volt, 60 Hz., AC only, 15 or 20 ampere fused electrical supply is
recommended. (Time delay fuse or circuit breaker is recommended.) It is
recommended that a separate circuit serving only this appliance be
provided. Do not use an extension cord.
DO NOT, UNDER ANY CIRCUMSTANCES,
REMOVE THE POWER
SUPPLY CORD GROUND PRONG.
RECOMMENDED
GROUNDING
METHOD
For your personal safety, this appliance
must be grounded. This appliance is equipped
with a power supply cord having a 3-prong
grounding plug. To minimize possible shock
hazard, the cord must be plugged into a
mating grounding type wall receptacle,
grounded in accordance with the National
Electrical Code and local codes and ordinances. If a mating wall receptacle is not
available, it is the responsibility of the customer to have a properly grounded, 3-prong
wall receptacle installed by a qualified
electrician.
3-PRONG
GROUNDING
PLUG
\
GROUNDING
/
K
3-PRONG GROUNDING
TYPE WALL RECEPTACLE
POWER SUPPLY CORD
Using your dehumidifier
You will use your dehumidifier more during months when you’re not heating
your home. However, your dehumidifier can help prevent excessive moisture
and keep you comfortable all year in any area of your home.
Use to prevent moisture
damage anywhere books or
valuables are stored.
Use in cooking, laundry,
bathing and dishwashing
areas which have excess
moisture.
Use in a basement to help
prevent moisture damage
NOTE: Do not operate your dehumidifier
in temperatures
below 65°F (18.3”C). The coil may
become iced over at low temperatures
and unit will not operate properly.
Your dehumidifier has a PAN FULL Light. The light glows when the pan is full of water to
indicate that it needs emptying.
PAN FULL LIGHT
To operate:
PAN FULL
HUMIDISTAT
0
PAN FULL
HUMIDISTAT
HUMIDISTAT
0
OFF
DRYEST
: 1
1. Turn Humidistat Control to OFF, then
plug in the dehumidifier.
Off
DRYEST
2. Your dehumidifier has an automatic
humidistat. Turn the Humidistat Control
clockwise toward DRYEST for normal operation. Adjust later, if necessary.
When humidity in the room increases, the
dehumidifier automatically starts. When the
humidity decreases to the selected level, the
dehumidifier automatically stops.
Continued on next page
5
/
PAN FULL
\
HUMIDISTAT
-.
/
PAN FULL
HUMIDISTAT
\
0
OFF
OFF
DRYEST
J
\
3. If you need more dehumidification, turn
control clockwise. Unit will run continuously at
DRYEST setting. If you need less dehumidification, turn control counterclockwise.
DRYEST
/
\
4. Stop the unit manually by turning the
control to OFF.
Setting the water level adjustment
The Water Level Adjustment can be set in two positions to turn off
the unit automatically when the pan is full. This prevents the danger
of overflow.
Pan must be in proper position for Water Level Control Switch
to work.
WATER LEVEL
ADJUSTMENT
NOR MttL FILL -&‘j
POslTIp//;Ew
/
WATER LEVEL
CoNTIRoL . SWITC
_
A
\
The Water Level Control Switch will automatically turn off the dehumidifier at the fill
level you selected when pan is properly
placed. Loosen the screw to move the Water
Level Adjustment. Retighten screw when
adjusted.
NORMAL FILL POSITIONSet Water Level Control Lever to
the indentation on the left side. The
water pan and water will weigh
approximately 16 Ibs. (7.2 kg) and
water pan will be % full.
MAXIMUM FILL POSITIONSet Water Level Control Lever to
the raised area on the right side. The
water pan and water will weigh
approximately 24 Ibs. (10.8 kg) and
water pan will be VI full.
Water disposal
Personal Injury Hazard
Do not use the water that collects in
the water pan for drinking purposes.
It is not sanitary. Failure to follow the
above precaution could result in
personal injury or illness.
This unit has a 24 pint (11.3 L) capacity
water pan. There are three methods of disposing of water.
1. Empty pan manually.
When pan is full, remove it, empty it into a
large sink or tub and replace it properly.
Be sure pan is replaced properly so the
Water Level Control Switch will work to
automatically
shut off the unit.
2. Place unit directly over drain.
Pan has a threaded hose connection which
can be left open. Cut out opening with a knife
or S-inch (19 mm) wood drill. Once opened,
hose connection will continually drain water
from the pan. Be sure to keep unit directly
over a drain.
3. Attach garden hose to the threaded hose
connection to carry water to drain.
l Pan has a threaded
hose connection which
can be left open. Cut out opening with a
knife or S-inch (19 mm) wood drill.
l Attach garden
hose. Be sure hose does not
kink or bend. It should lie flat from unit to
drain.
7
Caring for your dehumidifier
Your dehumidifier is designed to serve you
year-round. It needs practically no attention.
However, you should check your dehumidifier
and inspect the coils annually.
You may call a service company to perform
this annual checkup or you can do it yourself.
Cost of annual inspection is the owner’s
responsibility.
OR
If you are familiar with electrical appliances
and their functions, listed below are instructions which would allow you to do the inspection and maintenance yourself.
COILS
Electrical Shock and
Personal Injury Hazard
. Disconnect power supply cord from
receptacle before performing any
maintenance.
l Be careful
when cleaning the coils.
Fins are sharp.
Failure to follow the above precautions could result in electrical shock
or personal injury.
1. Disconnect dehumidifier from power
supply.
2. To remove outer cabinet:
a. Take off the plastic front grille.
Remove the two screws at bottomfront of grille. Drop grille down and
pull it out.
TOP FLANGE SCREWS
SOCKET-HEAD
SCREWS
(SIDES OF CABINET)
b. Remove the socket-head screws on
each side of the cabinet and the top
flange screws (See illustrations). Also,
remove the rear grille. Pull out at bottom
and drop grille down.
c. Lift cabinet from unit.
-.
MOTOR OIL TUBES
3. Coils should be inspected annually.
Brush coils clean, if necessary, with warm
water and a mild detergent. Rinse and dry
thoroughly. Be sure the power supply cord
is disconnected
from the electrical outlet.
4. The compressor is sealed and needs no
oiling. The fan motor is prelubricated
and
does not require further oiling under
normal operating conditions.
However, if
the dehumidifier is operated under severe
environmental conditions (dust, dirt, high
temperatures) the fan motor should be oiled
annually. Follow the instructions in step 5.
5. Oil the fan motor through the tubes
provided. An easy-to-use capsule of especially
recommended oil (Part No. 10943) is available
from your nearest authorized WhirlpoolSM
service company, or use SAE #20 nondetergent oil.
6. Wash all plastic parts with a soft cloth,
warm water and a mild detergent. Rinse and
dry them with a soft cloth.
7. Replace cabinet and grille(s). Reconnect
dehumidifier to power supply.
If you need service or assistance,
we suggest you follow these five steps:
1. Before calling for assistance
...
Performance problems often result from little
things you can find and fix yourself without
tools of any kind.
If unit won’t operate:
Is the dehumidifier properly plugged into a
live circuit with the proper voltage?
Is the Humidistat Control set to a position
other than OFF? Try a dryer setting.
Have you checked your home’s main fuse or
circuit breaker box?
If unit blows fuses or trips circuit breakers:
Are the correct time-delay fuses being used
in your home’s main fuse box?
Is an extension cord being used? Do not
use an extension cord.
Are the coils iced or clogged with lint?
If unit ices up:
Is humidity too low?
Is room temperature below 65°F (18.3X)?
Coil will become iced over at low temperatures.
If water collects on the floor:
Is unit reasonably level?
9 Is hose kinked or drain clogged?
. Is the water pan overflowing? Pan must be
properly positioned.
Special dehumidifier
needs:
. Annual inspection: Clean coils, inspect drain
and hoses. If necessary, oil the fan motor.
Moving: When moving, keep the unit in an
upright position.
Remember . . . Please include the model and
serial number of your appliance when requesting service. Also, retain your sales slip and
warranty to verify your warranty status. Learn
the benefits of using WhirlpoolSM authorized
service for maintaining the quality originally
built into your WHIRLPOOL appliance.
l
l
l
3. If you need service*
Whirlpool has a nation&
wide network of author;
7fik
SERv,CErzed WhrrlpoolSM service
companies. Whirlpool
service technicians are trained to fulfill the
product warranty and provide after-warranty
service, anywhere in the United States. To
locate the authorized Whirlpool service company in your area, call our Consumer Assistance Center telephone number (see Step 2)
or look in your telephone directory Yellow
Pages under:
l9
OR
WASHING MACHINES, DRYERS
A IRONERS - SERVICING
l
WHIRLPOOL APPLIANCES
AUTHORIZED WHIRLPOOL
l
SERVICE
SERVICE COMPANIES
XYZ SERVICE CO
123 Maple
.,..,... 999-9999
l
l
ELECTRICAL APPUANCES MAJOR-REPAIRING
A PARTS
APPLIANCES - HOUSEHOLD MAJOR SERVICE h REPAIR
l
l
...
4. If you have a problem*
..,
Call our Consumer Asssistance Center telephone number (see Step 2) and talk with one
of our consultants, or if you prefer, write to:
Mr. William Clark
Consumer Assistance Representative
Whirlpool Corporation
2000 M-63
Benton Harbor, Ml 49022
Please include a daytime phone number in
your correspondence.
l
2. If you need assistance*
..,
Call Whirlpool Consumer Assistance
Center telephone number. Dial free from
anywhere in the U.S.:
1-800-253-l 301
and talk with one of our trained consultants.
The consultant can instruct you in how to
obtain satisfactory operation from your appliance or, if serviced is necessary, recommend
a qualified service company in your area.
10
5. If you need FSP@ replacement
parts* . . .
FSP is a registered trademark of Whirlpool
Corporation for quality parts. Look for this
symbol of quality whenever you need a replacement part for your Whirlpool appliance.
FSP replacement parts will fit right and work
right, because they are mode to the same
exacting specifications used to build every new
Whirlpool appliance.
To locate FSP replacement parts in your
area, refer to Step 3 above or call the Whirlpool
Consumer Assistance Center telephone
number in Step 2.
If you must call or write, please provide:
model number, serial number, date of
purchase, and a complete description
of
the problem. This information is needed to
respond properly to your request for assistance.
l
Notes
11
Coolerator@ Dehumidifier
WARRANTY
DH003
LENGTH OF WARRANTY
WHIRLPOOL
FULL ONE-YEAR
WARRANTY
From Date of Purchase
FSP@ replacement parts and repair labor to correct
defects in materials or workmanship.
FULL FIVE-YEAR
WARRANTY
From Date of Purchase
FSP replacement parts and repair labor to correct
defects in materials or workmanship in the sealed
refrigeration system. These parts are:
4. Drier-Strainer
1. Compressor
2. Evaporator
5. Connecting Tubing
3. Condenser
WHIRLPOOL
WILL PAY FOR
WILL NOT PAY FOR
A. Service calls to:
1. Correct the installation of the dehumidifier.
2. Instruct you how to use the dehumidifier.
3. Replace house fuses or correct house wiring.
B. Pickup and delivery. This product is designed to be repaired
in the home.
C. Damage to the dehumidifier caused by accident, misuse,
fire, flood, acts of God or use of products not approved by
Whirlpool.
D. Repairs to parts or systems caused by the unauthorized
modifications made to the appliance.
Service under the full warranties
company.
must be provided by an authorized
Whirlpools’“’ service
WHIRLPOOL CORPORATION SHALL NOT BE LIABLE FOR INCIDENTAL OR
CONSEQUENTIAL
DAMAGES. Some states do not allow the exclusion or limitation of
incidental or consequential damages so this limitation or exclusion may not apply to you.
This warranty gives you specific legal rights, and you may also have other rights which
vary from state to state.
Outside the United States, a different warranty may apply. For details, please contact
your authorized Whirlpool distributor or military exchange.
DEHUMIDIFIERS
Manufactured by Whirlpool Corporation
Pan No. 1162739
0 1992 Whirlpool Corporation
Printed in U.S.A.