1
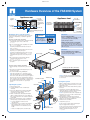
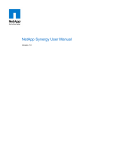
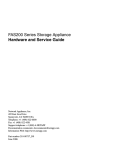
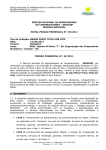
Trim-17” x 22”
FAS2050 System Installation and Setup
1
Before you begin
2
Your system comes with an accessory kit that includes the following components:
If you have not already done so, gather the required information and confirm your site
requirements, as described in the Site Requirements Guide at http://now.netapp.com/.
3
Install in rack
Unpack and verify contents
- This installation poster
- Software license flyer
- System Manager CD-ROM
- Grounding kit
- Power cables
- DB-9 to RJ-45 console adapters
- Rail kit (for two-post and four-post racks)
Caution: Only use the NetApp® rail kit to install your system. Using a different rail kit can cause injury to you or damage to your system.
Four-post rack
(2x)
(2x)
Clip nut
tool
(4x)
Note: Remove handles after the
system is supported by the shelf.
Setting the Disk Shelf IDs
Front rail
1
(2x)
Clip nut (4x)
0
FRONT
Shelf ID
switch
Note: The disk shelf IDs for the
disk shelves should be set in the
range 1 to 6. Leave the FAS2050
disk shelf ID at the preset value of 00.
4
4U
SIDE
3U
3U
1
1
Note: Refer to the rail kit installation flyer included with the rail kit for the two-post procedure.
Cable the system
Cable controllers
Cable disk shelves
1 RJ-45 to DB-9 adapter to console port (required)
0a
0b
e0a
e0b
8
Port labels
Remote
Management
Port
These are a few common configurations. For additional options, see Supported Configurations for
FAS2000-series Systems at http://now.netapp.com.
Active/Active NAS or ISCSI:
1 Fibre Channel Disk Shelf Stack (Multipath)
FAS2050
1b
0a 0b
10101
PSU CM-B
0a
0b
e0a
e0b
Fibre
Channel
1 Controller to switches
1a
e0a e0b
1b
PSU
1a
e0a e0b
10101
DS14
OUT
IN
PSU
PSU
IN
or
FAS2050
1b
0a 0b
10101
PSU CM-B
0a 0b
Ethernet
DS14
Console
3 Network cables to e0a and e0b ports
0b
e0a
FAS2050
1b
0a 0b
10101
PSU
e0a e 0b
OUT
IN
PSU
6
e0a
FAS2050
1b
0a 0b
10101
OUT
OUT
FAS2050
1b
0a 0b
10101
1b
10101
DS14
PSU
OUT
e0a e0b
PSU
1a
e 0a e 0 b
FAS2050
1b
0a 0b
10101
0a 0b
OUT
5 Connect the installed PCI card, as needed.
5
OUT
DS14
P SU
e0a e0b
OUT
IN
P SU
OUT
DS14
IN
PSU
OUT
10101
e0a e0b
1a
PSU
IN
IN
1b
1a
IN
PSU
DS14
IN
1a
OUT
PSU
OUT
PSU
3 Shelf to controller
PSU
IN
IN
PSU
IN
3 Shelf to controller
8
OUT
OUT
PSU CM-B
8
P SU
e0a e0b
10101
DS14
IN
PS U
0a 0b
e0a e0b
1a
PSU
IN
e0b
1a
1b
DS14
P SU
OUT
DS14
0b
PSU
OUT
0a 0b
PSU
0a
IN
e0a e0b
1a
10101
PSU CM-B
OUT
PSU
1a
1b
DS14
4 Network cable to Remote Management port
IN
OUT
PSU CM-B
IN
OUT
2 Controller to shelves
e0b
8
e0a e0b
PSU
IN
2 Shelf to shelf
IN
P SU
1a
10101
DS14
OUT
PSU CM-B
e0a e0b
1b
DS14
IN
PSU
0a 0b
0a
OUT
PSU
IN
1a
PS U
OUT
IN
8
Note: You do not need to
ground your system.
Active/Active SAN: 4 FCP
Connections 1 Fibre Channel Disk Shelf Stack (Multipath)
1 Controller to shelf
0a 0b
2 Console cable to adapter
Connect power
PSU
210-03951+C0
OUT
IN
PSU
IN
OUT
Boot the system and proceed with setup
- Turn on the power to your system. It takes the LEDs on your system power supplies a few seconds to illuminate.
- Windows® environments with DHCP: Install System Manager from the CD-ROM and run it on a Windows client system to discover, configure, and manage your system. Connect your
Windows client system through the management LAN.
- All other configurations: Use the console interface and proceed through the setup questions. See the Data ONTAP Software Setup Guide at http://now.netapp.com/.
Copyright © 2009 NetApp, Inc. All rights reserved.
Trim-17” x 22”
Hardware Overview of the FAS2050 System
2 power
supplies
Appliance rear
Controller
module
2 Fibre Channel ports
Appliance front
Second
controller
module (for
active/active
configurations
only)
Disk drive,
power, and
fault LEDs
Drive 0
System LEDs
Power
Fault
Drive 19
PCI slot
2 network ports
RM (Remote Management) port
Console port
Shutting down a controller module
x4 Filler panel
For hot-swappable FRUs:
Always consult http://now.netapp.com for
current field-replaceable unit (FRU)
replacement procedures.
Use assistance
when moving or
lifting the equipment.
If you have an active/active configuration:
1. Check the status of the target node by entering the following
command at the system console of either node:
cf status
Controller
A Activity
Controller
B Activity
Attention:
LIFTING HAZARD
CAUTION
Shut down the target controller module (called a “node” in an
active/active configuration) by completing the applicable
procedure:
0 to 20
disk drives
Adding external storage or using FCP:
You must order and use SFP modules on
your system, if you are connecting external
Fibre Channel storage devices or using FCP
with the system.
2. Take one of the following actions, depending on the result of
the cf status command:
IF clustering is enabled and neither node is in takeover
mode, go to step 3.
IF clustering is enabled and the partner node took over the
target node, go to “Opening the System.”
Attention:
Disk drive
IF clustering is enabled and the target node took over the
partner node, correct the problem, run the cf giveback
command from the target node console, and go back to
step 1.
For hot-swappable power supplies:
The system shuts down two minutes after
you remove a power supply.
Power supply
3. Take over the target node by entering the following
command from the partner node’s console:
partner> cf takeover
4. Go to “Opening the System” when the takeover
is complete.
If you have a single-controller configuration:
1. Enter the following command from the system console:
halt
Releasing a disk drive cam handle
2. Turn off the power supplies and unplug both power cords
from the power source.
Controller module
3. Check the nonvolatile memory (NVMEM) LED.
Cam handle
IF the LED is not flashing, go to “Opening the System.”
IF the LED is flashing, there is content in the NVMEM that
has not been saved to disk. Reconnect the power supplies to
the power source, reboot the controller module, and repeat
Steps 1 through 3. If repeated attempts to cleanly shut down
the controller module fail, be aware that you might lose any
data that was not saved to disk. Go to “Opening the
System.”
Opening the system
Controller module
cover
Attention: Disk drives are fragile. Do not handle them
except when replacing failed disk drives or moving them
to a new chassis.
Thumbscrew
Closing the system
Battery
1. Align the controller module cover with the notches on the
sides of the controller module, then slide the cover down
and forward to seat it.
Indentation
1. Properly ground yourself.
2. Align the end of the controller module with the opening in
the chassis.
2. Loosen the thumbscrew on the controller module
cam handle.
3. Remove any cabling from the controller module. Make
sure that you keep track of where the cables were
connected to the controller module.
3. Gently push the controller module halfway into the
chassis and recable the controller module, then push the
controller module all the way into the chassis.
DIMMs
Battery
cover
Result: For systems in an active/active configuration, the
node reboots as soon as you seat the controller module
completely into the chassis.
4. Pull the controller module cam handle downward and
slide the controller module out of the system. Make sure
that you support the bottom of the controller module with
your free hand.
5. Remove the controller module cover by completing the
following substeps, using the illustration for reference:
a. Loosen the thumbscrew on the back of the
controller module.
b. Gently press the heel of your hand on the indentation
in the controller module cover closest to the cam
handle, then slide the cover toward the back of the
module.
c. Lift the cover straight up off the controller module.
Thumbscrew
Locking
Nut
PCI access
panel
PCI card
CompactFlash® card
4. Firmly push up the cam handle to finish seating the
controller module in the system, and then push the cam
handle to the closed position and tighten the
thumbscrew on the cam handle.
5. Complete the boot process.
IF your system has a single controller module, plug in
the power supply and turn on the power.
IF your system is in an active/active configuration, wait a
few seconds for the node to boot, then enter the
following command from the partner console:
cf giveback