1
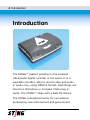
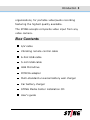
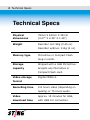
Users_guide_cover.fh8 8/13/04 12:48 PM Page 2
C
Composite
M
Y
CM
MY
CY CMY
K
TM
Miniature Digital Recorder
Table of Contents i
Table of Contents
INTRODUCTION................................................ 4
Box Contents ...................................................... 5
TECHNICAL SPECS ............................................ 6
STING COMPONENTS ........................................ 8
Top View ............................................................ 8
Left- and Right-Side View ..................................... 9
Accessories......................................................... 9
GETTING STARTED.......................................... 10
1. First-Time Charging ....................................... 11
2. Installing STING Media Center......................... 12
3. Setting Current Time...................................... 14
4. Formatting Microdrive .................................... 15
5. Connecting the A/V Cable ............................... 16
6. Connecting Camera / Microphone .................... 18
RECORDING WITH STING BUTTONS & LIGHTS....... 20
Recording Readiness Indication ........................... 21
Setting Recording Mode & Quality........................ 22
ii Table of Contents
Starting and Stopping a Recording....................... 26
Memory Status Indication................................... 28
RECORDING WITH REMOTE CONTROL ............ 30
Starting and Stopping a Recording....................... 31
Low Battery & Low Memory Indication........................ 33
Alarm Indication................................................ 33
ALARM TRIGGER SWITCH ............................... 35
VIEWING AND MANAGING RECORDINGS........ 37
To Connect STING or Microdrive to PC........................ 37
Accessing STING Files Directly ............................ 39
Starting the STING Media Center......................... 40
MAINTENANCE AND TROUBLESHOOTING ....... 41
Caring for the STING ......................................... 41
Troubleshooting ................................................ 41
OPTIONAL ACCESSORIES ............................... 44
About this Document iii
About this Document
This user‘s guide explains how to install, connect,
and use the STING, a portable digital recorder. It is
intended for users of the device, and does not
require special technical knowledge.
The STING ships with a Windows software program,
STING Media Center, used for playing and
managing recordings. For more details on using this
program, press Help in its main screen.
4 Introduction
Introduction
The STING™ (patent pending) is the smallest
video/audio digital recorder in the world. It is a
wearable recorder, able to record video and audio,
or audio only, using MPEG-2 format. Recordings are
stored on Microdrive or Compact Flash plug-in
cards. The STING™ ships with a 4GB Microdrive.
The STING is designed mainly for surveillance
purposes by law-enforcement and government
Introduction 5
organizations, for portable video/audio recording
featuring the highest quality available.
The STING accepts composite video input from any
video camera.
Box Contents
A/V cable
Vibrating remote control cable
6-foot USB cable
5-inch USB cable
4GB Microdrive
PCMCIA adapter
Multi-standard universal battery wall charger
Car battery charger
STING Media Center installation CD
User‘s guide
6 Technical Specs
Technical Specs
Physical
78mm X 60mm X 32mm
dimensions
(3.07" X 2.36" X 1.26")
Weight
Recorder net: 98g (3.45 oz)
Recorder w/drive: 114g (4 oz)
Memory type
Microdrive or Compact Flash
plug-in cards.
Storage
Shipped with a 4GB Microdrive.
capacity
Accepts any Microdrive or
Compact Flash card.
Video storage
Digital MPEG-2.
format
Recording time
2-8 hours video (depending on
quality) or 75 hours audio.
Video
Approx. 15 minutes for 4GB,
download time
with USB 2.0 connection.
Technical Specs 7
Memory erase
10 seconds.
time
Internal
Lithium-iron. Provides approx.
battery
3 hours of operation.
External
Accepts 90-240 VAC.
charger
Connectors for Europe, US, UK.
Camera power
5V, 500mA output for a 5-V
source
camera (2 hours recording
time). 1.3 mm connector.
External power
7-12V (min. 800mA), 1.7 mm
input
connector (center +).
Video input
PAL / NTSC std. composite
video. RCA / 3.5mm connector.
Audio Input
Line-level audio. RCA connector.
PC interface
USB 1.1 or USB 2.0 (USB 2.0
recommended).
Video/audio
MPEG-2 compatible players
playback
(e.g. Windows Media Player).
8 STING Components
STING Components
Top View
STING Components 9
Left- and Right-Side View
Accessories
Battery
Charger
R/C with
vibrating
cable
PCMCIA
Adapter
Micro- V/A USB
drive Cable Cable
10 Getting Started
Getting Started
When you receive your STING, remove it from the
packaging, check that you have all the accessories
(see page 5), and then follow the instructions
below. Each step is explained in more detail in a
following section.
To get your STING up and running:
1.
C harge the unit.
2.
I nstall STING Media Center.
3.
S et the current time.
4.
I nsert and format the memory card.
5.
C onnect the A/V cable to the STING.
6.
C onnect a camera or microphone to the A/V
cable.
Getting Started 11
1. First-Time Charging
The STING ships with its battery uncharged. The
first time you charge the unit, a 6-hour charging
period is required. Afterwards, the unit charges fully
in 4 hours.
To charge the battery for the first time:
1.
I nsert the charger plug into the unit, as shown in
the image below. The green light comes on,
indicating that the battery is being charged.
2.
C harge the battery for 6 hours.
12 Getting Started
2. Installing STING Media Center
STING Media Center is a software program that
communicates with your STING, and allows you to
preview, upload and delete recordings. The program
also allows you to set the current time (see page
8).
For more details on using STING Media Center,
refer to the help file, accessed by pressing Help in
the program‘s main screen.
To install the STING Media Center:
1.
Insert the STING™ mini-disk into the CD drive in
your computer. The Visual Introduction screen
appears.
Getting Started 13
Note:
The options at the bottom-left of the startup
screen (Charging, Microdrive, etc.) show images
and instructions on how to operate the STING.
2.
Press the button labeled Install STING Media
Center, located at the top-right of the screen.
The installation wizard starts.
3.
C lick Next, accept the license agreement and
press Next again.
4.
Press Install. A progress bar is shown.
5.
When installation ends, press Finish.
14 Getting Started
3. Setting Current Time
The memory chip in the STING contains a real-time
clock, used to attach a timestamp to each
recording. You must set the current time after
receiving the unit, using the instructions below. The
time is saved to persistent memory, so there is no
need to set it again, unless you move to another
time zone.
To set the current time on the STING:
1.
Turn on your PC and wait for Windows to start.
2.
C onnect the USB cable (supplied) to the Sting
device.
3.
Turn on the STING using the On/Off Button (see
page 8).
4.
C onnect the other end of the USB cable to a
vacant USB port on your PC.
5.
Wait for the device to be recognized by Windows.
Usually, this is indicated by a bell sound and a
message box.
Getting Started 15
6.
S tart the Sting Media Center by clicking its
desktop icon, or by clicking the Start button and
selecting Programs > STING > STING Media
Center.
7.
Make sure your Windows clock is accurate. To
change it, double-click the clock at the bottomright of the screen.
8.
I n the Sting Media Center, in the Time
Management area, press the Current Time
button. The Windows clock time appears in the
time/date box above the button.
9.
Press Set Time to set the current time on the
STING device.
10. Restart the STING.
4. Formatting Microdrive
The STING ships with a 4GB Microdrive card. Before
you can record, you must format the card, as
explained below.
If you switch to another card in the future, repeat
this procedure to erase the new card.
16 Getting Started
To format the Microdrive card:
1.
I nsert the Microdrive card, with the printed side
facing down, as shown in the image below. Push
it in until it latches.
2.
With the tip of a pen or pencil, gently press the
ERASE Card until the green light, located on the right of the
REC button, flashes for 10 seconds as the disk is erased.
Wait for the light to turn off.
5. Connecting the A/V Cable
The A/V cable has two RCA-type sockets on one
end, and a 3.5mm plug on the other end, which
connects to the STING.
Getting Started 17
To connect the V/A cable to the STING:
Plug the 3.5mm plug into the socket on the
STING, as illustrated below. Make sure it is
plugged all the way into the center hole.
18 Getting Started
6. Connecting Camera / Microphone
You can connect any video camera to the STING. If
the camera operates on 5VDC, it can draw its power
from the Camera Power Out socket (see page 8, leftside view), as long as the current consumption does
not exceed 500mA. If the camera does not comply
with these requirements, it should be powered by
its own battery.
Alternatively, you can connect an amplified
microphone, or any other device that sends out a
line-level signal. An amplified button microphone is
sold separately.
The STING A/V cable has two RCA-type sockets:
Video socket (yellow) - accepts composite
video, PAL or NTSC from a video camera.
Audio socket (red) - accepts line-level signal
from an amplified microphone.
Getting Started 19
To connect a camera or microphone:
1.
Plug the RCA plug from your camera or
microphone into the A/V cable:
If you are plugging in a camera, and it
has only one RCA connector, plug it into
the yellow socket. If the camera has two
connectors, plug the yellow one (video)
into the yellow socket and the red one
(audio) into the red socket.
If you are plugging in a microphone,
plug its RCA connector into the red
socket of the A/V cable.
Audio
Video
2.
If your camera operates on 5V, and its power
consumption does not exceed 500mA, plug its
power cable into the Camera Power Out socket
(see page 8).
20 Recording With STING Buttons & Lights
Recording With STING
Buttons & Lights
This chapter explains how to start and stop a
recording, and receive status indications, using the
buttons and lights on the STING device.
To learn how to record and receive status
indications with the STING's remote control, see
page 30.
Note:
The STING's lights may show through thin
fabrics. When wearing the STING under your
clothing, it is advisable to have the lights facing
the body, or to cover them with masking-tape.
Recording With STING Buttons & Lights 21
Recording Readiness Indication
When the STING turns on, there is a 25-second
warm-up period. You cannot record until the warmup is finished. The light on the right of the REC
button (shown below) indicates whether the device
is ready to record or not.
22 Recording With STING Buttons & Lights
The light may be either red or green (as shown on
the previous page):
Red indicates the STING is still warming up,
and is not ready for recording. The light is also
red if the device is currently recording (see
page 26 to learn how to start and stop a
recording).
Green indicates the STING is ready for
recording.
Setting Recording Mode & Quality
The light on the left of the REC button (shown on
the following page), indicates two things:
Recording mode - video and audio; audio only.
Video quality - determines the total number of
hours that can be recorded on the STING‘s
Microdrive card. The higher the quality, the
shorter the recording period.
Recording With STING Buttons & Lights 23
The light indicated in the image above (it may be
green, yellow, white, red or blue) turns on 15
seconds after the STING is switched on.
For the next 10 seconds, it is possible to change the
recording mode and quality. During this period the
recording readiness light, on the right of the REC
button, remains red.
To set recording mode and quality:
1.
Turn on the STING, or restart it if it is already
on. The recording readiness light becomes red.
24 Recording With STING Buttons & Lights
2.
Wait 15 seconds. The light on the left of the REC
button, indicated in the image below, illuminates
(the light will not necessarily be yellow).
3.
F or the next 10 seconds, the color of the lefthand light indicates the recording mode and
quality:
720 x 480
Green
broadcast quality video. Allows
2 hours of recording.
704 x 480
Yellow
high quality video. Allows 4
hours of recording.
352 x 240
White
medium-quality video. Allows 6
hours of recording.
352 x 240
Red
low-quality video. Suitable for
static operation (when the device is not
worn on the user‘s body), or for
recordings triggered by an alarm motion
detector. Allows 8 hours of recording.
Recording With STING Buttons & Lights 25
Blue
audio only. Allows 75 hours of
high-quality audio recording.
As long as the left-hand light is on, you can use
the REC button to change recording mode and
quality. Press REC to cycle through the five
colors, in the order listed above.
4.
Keep pressing REC until you reach the color that
corresponds to the desired mode and quality.
5.
10 seconds after it first illuminates, the left-hand
light turns off, and the recording readiness light
on the right turns green.
6.
The recording quality you set earlier is saved to
persistent memory. If you are unsure which
recording mode and quality was set, go back to
step 1.
26 Recording With STING Buttons & Lights
Note:
If the STING is set to record both video and
audio, recording will only work if a camera is
plugged to the A/V Cable‘s RCA sockets (see
page 18).
Starting and Stopping a Recording
To start a recording:
1.
C heck that the recording readiness light is green,
as shown below.
2.
Press the REC button three times, fast. The light
on the right of the REC button turns red and
stays red during the recording.
Recording With STING Buttons & Lights 27
Note:
If the recording readiness light changes to green
on its own, 10 seconds after the start of the
recording, this indicates a problem with the
recording: Either there is no video signal; the
Microdrive has been pulled out; or the memory
is full. The recording stops and the preceding 10
seconds are not stored in memory.
To stop or pause a recording:
Press the REC button three times, fast. The
recording stops and the recording readiness
light, on the right of the REC button, turns
green.
To resume a recording:
Press the REC button three times, fast. The
light on the right of the REC button turns red
and stays red during the recording.
If you do this within 10 minutes of
stopping a previous recording, the
recording resumes from the point it
stopped, without starting a new file.
28 Recording With STING Buttons & Lights
If you do this after 10 minutes have
passed, the STING starts a new file.
Note:
If you pause a recording and resume it, the
video timestamp may not be exactly accurate.
For example, if you pause the recording at 9:35
and resume it at 9:40, the timestamp will
resume from 9:35, and there will be a fiveminute “gap“. So an event that takes place at
9:45 will have a timestamp for 9:40.
Note:
If you make a sudden move during a recording,
the frame may blur or darken temporarily as the
camera re-focuses and adjusts the iris.
Memory Status Indication
You should occasionally check the Microdrive‘s
available memory, to avoid running out of storage
space during a recording. The same procedure
cheks if the Microdrive is present and functioning.
You can only check the memory status if the STING
is set to record video and audio (not audio only),
and if it is not currently recording.
Recording With STING Buttons & Lights 29
To check Microdrive and available space:
When the STING is not recording, press the
Memory Status button (see page 8). The light
on the left of the REC button displays, using a
color code, how much memory is available:
Green - between 0% and 25% of
memory is used up.
Yellow - between 26% and 50% of
memory is used up.
White - between 51% and 75% of
memory is used up.
Red - low memory. Between 76% and
100% of memory is used up.
Blue - Microdrive is absent or faulty, or
the recording mode is set to audio only.
Not
currently
recording
30 Recording With Remote Control
Recording With
Remote Control
The remote control is composed of a push-button
and a cable connected to a vibrating motor. It can
be used for:
Starting and stopping the recording.
Getting indications, by vibration, for low
battery, low memory, a disconnected video
cable and any other malfunction.
Recording With Remote Control 31
Starting and Stopping a Recording
To start a recording:
Press the remote control button once, and keep
it pressed for about 2 seconds.
The motor vibrates for 3 seconds to indicate
that recording has started.
Note:
If you make a sudden move during a recording,
the frame may blur or darken temporarily as the
camera re-focuses and adjusts the iris.
To stop or pause a recording:
Press the remote control button once, and keep
it pressed for about 2 seconds.
The motor vibrates in three short pulses,
indicating that the recording is off. If the
recoding session is over, turn off the main
switch of the STING.
32 Recording With Remote Control
To resume a recording:
Press the remote control button once, and keep
it pressed for about 2 seconds.
If you do this within 10 minutes of
stopping a previous recording, the
recording resumes from the point it
stopped, without starting a new file.
If you do this after 10 minutes have
passed, the STING starts a new file.
Note:
If you pause a recording and resume it, the
video timestamp may not be exactly accurate.
For example, if you pause the recording at 9:35
and resume it at 9:40, the timestamp will
resume from 9:35, and there will be a fiveminute “gap“. So an event that takes place at
9:45 will have a timestamp for 9:40.
Recording With Remote Control 33
Low Battery & Low Memory Indication
About ten minutes before the battery reaches a low
level, the remote control motor will vibrate in ten
short pulses. The same warning is given if
remaining space on the Microdrive becomes too
low.
When you receive this signal, you should prepare to
leave the recording location, to recharge and/or
replace Microdrive.
Alarm Indication
When the remote control cable vibrates
continuously, this is an alarm. Press the remote
control button to stop the vibration.
An alarm indicates one of the following:
The camera cable has been disconnected (lost
video-sync).
The Microdrive card has been removed or
dislodged.
34 Recording With Remote Control
The STING has suffered a severe malfunction
and cannot continue recording.
Note:
If the video camera cable has been pulled out,
and then plugged in again, the STING cannot
record. You must restart the STING to recapture
a video sync and record again.
To resume recording after an alarm
indication:
1.
R econnect the camera cable and/or push the
Microdrive card back in.
2.
Turn the STING off and on again using the On/Off
button (see page 8).
3.
Press the remote control button once, and keep
it pressed for about two seconds, to start
recording again.
Alarm Trigger Switch 35
Alarm Trigger Switch
The STING is equipped with an analog input that
triggers a 30-second recording session. This input is
mainly used to connect the STING to security
systems and other surveillance devices - these can
send a signal to automatically start a recording.
The alarm trigger switch is normally open. When
the switch is closed, the STING immediately starts
recording and stops after 30 seconds. If an
additional signal is received during a recording, it
adds 30 seconds more to the recording time.
36 Alarm Trigger Switch
To connect the alarm trigger switch:
1.
Mount the STING in a stable position and
connect it to a camera or microphone (see page
18).
2.
R un a two-wire cable from an external device
(usually an alarm system) to the STING. The
wire should be fitted with a 0.7mm DC power
plug (Mouser part #171-3218).
3.
C onnect the 0.7mm plug into the Trigger Switch
In socket (see page 8).
The connected device can now close the circuit
to start a 30-second recording.
To stop an automatic recording:
Press the REC button three times, fast. The
recording stops immediately, even if 30
seconds have not yet elapsed.
Viewing and Managing Recordings 37
Viewing and Managing
Recordings
There are two ways to view and manage recordings
stored on the STING:
Using Windows Explorer and a generic video
player that supports MPEG-2.
Using the STING Media Center (see page 12) to
learn how to install this program.
Before you can use either of these messages, you
must connect the STING, or its Microdrive card, to
the PC.
To Connect STING or Microdrive to PC
To connect the STING to the PC directly:
1.
Turn on the PC and the STING.
2.
C onnect the USB cable (supplied) to the STING,
and then to a USB port on the PC.
38 Viewing and Managing Recordings
3.
Wait for the device to be recognized by Windows.
Usually, this is indicated by a bell sound and a
message box.
To connect the Microdrive to the PC
using the PCMCIA adapter:
1.
Ensure the STING is turned off.
2.
Pull out the Microdrive.
3.
I nsert the Microdrive into the PCMCIA adapter
(supplied).
4.
Turn on the PC and wait for Windows to start.
5.
I nsert the PCMCIA card.
Viewing and Managing Recordings 39
6.
Wait for the card to be recognized by Windows.
Usually, this is indicated by a bell sound and a
message box.
Accessing STING Files Directly
To access STING files directly:
1.
O pen Windows Explorer or My Computer.
2.
Navigate to the STING‘s removable drive.
3.
You can now do any of the following:
Copy files from the STING to folders on
your PC.
Delete files on the STING.
Open a file in a generic player. The
player must support MPEG-2.
40 Viewing and Managing Recordings
Starting the STING Media Center
To start the STING Media Center:
1.
C lick the program‘s desktop icon, or click the
Start button and select Programs > STING >
STING Media Center.
2.
You can now do any of the following:
Show files on the STING Microdrive.
Play recordings and capture frames.
Copy files to the PC.
To learn how to perform these and other
operations, click Help in the STING Media
Center‘s main screen.
Maintenance and Troubleshooting 41
Maintenance and
Troubleshooting
Caring for the STING
The STING does not require special maintenance.
Keep the unit away from moisture, dirt or excessive
heat. Clean with a damp cloth and wipe dry.
Do not use Acetone, Benzene or any other alcoholic
agents when cleaning the unit.
Troubleshooting
Unit Does Not Turn On
Probable cause: Dead or uncharged battery
Corrective Action: Charge the battery (see page
11). If the problem persists, send in for service.
42 Maintenance and Troubleshooting
Troubleshooting (cont.)
Cannot Start Recording
Probable causes:
A/V cable disconnected
No sync signal detected
No Microdrive
Corrective Action: Check connection to the A/V
cable RCA sockets and to the camera, and check
that a Microdrive is plugged. If this doesn‘t solve
the problem, replace the camera.
R/C cable vibrates 10 consecutive
times
Probable Cause: Low memory or low battery
Corrective Action: Charge battery and/or replace
Microdrive.
Maintenance and Troubleshooting 43
Troubleshooting (cont.)
R/C Cable Vibrates Continuously
Probable Causes:
Disconnected video cable
Microdrive card came out
Corrective Action: Turn the STING off. Ensure the
video cable is plugged in and the Microdrive is
pushed in fully. Turn on again.
44 Optional Accessories
Optional Accessories
Several optional add-ons, specially designed for the
STING, are sold separately:
STING Xtreme - high impact casing
Button camera
Body-wear pouch
Miniature microphone
External battery with charger
Contact your distributor for more details about
these items.
Legal Notice 45
Legal Notice
This manual contains information that is proprietary to ESP Inc. No part of this publication
may be reproduced in any form whatsoever without prior written approval by ESP.
Right, title and interest, all information, copyrights, patents, know-how, trade secrets
and other intellectual property or other proprietary rights relating to this manual and to the
STING™ (“the Product“), and any software components contained therein, are proprietary
products of ESP protected under international copyright law and shall be and remain solely
with ESP.
STING™ is a registered trademark of ESP. No right, license, or interest to such trademark is
granted hereunder, and you agree that no such right, license, or interest shall be asserted
by you with respect to such trademark.
You shall not copy, reverse compile or reverse assemble all or any portion of the Manual or
the Product. You are prohibited from, and shall not, directly or indirectly, develop, market,
distribute, license, or sell any product that supports substantially similar functionality as the
Product, based on or derived in any way from the Product. Your undertaking in this
paragraph shall survive the termination of this Agreement.
This Agreement is effective upon your opening of the packaging of the Product, and shall
continue until terminated. ESP may terminate this Agreement upon the breach by you of any
term hereof. Upon such termination by ESP, you agree to return to ESP the Product and all
copies and portions thereof. For further information contact ESP at the address below or
contact your local distributor.
46 Warranty
Warranty
Electronic Security Products, Inc. (hereinafter "ESP") warrants all instruments it
manufactures to be free from defect in materials and factory workmanship, and agrees to
repair or replace any instrument that fails to perform as specified within one year after date
of shipment.
This warranty shall not apply to any instrument that has been repaired, worked on or altered
by persons unauthorized by ESP in such a manner as to injure, in our sole judgment, the
performance, stability, or reliability of the instrument; subjected to misuse, negligence or
accident; or connected, installed, adjusted, or used otherwise than in accordance with the
instructions furnished by us.
At no charge, we will repair, at our plant, or an authorized repair station, or at our option,
replace any of our products found to be defective under this Warranty.
This Warranty is in lieu of any other warranties, expressed or implied, including any implied
warranties of merchantability or fitness for a particular purpose. There are no warranties which
extend beyond the description on the face hereof, Purchaser acknowledges that no salesman,
agent, employee or other person has made any such presentations or warranties or otherwise
assumed for ESP any liability in connection with the sale of any goods to the purchase. Buyer
hereby waives all rights Buyer may have arising out of any breach of contract or breach of
warranty on the part of ESP, to any incidental or consequential damages, including but not limited
to damages to property, damages for injury to the person, damages for loss of use, loss of time,
loss of profits or income, or loss resulting from personal injury.
The Purchaser agrees that the Purchaser is responsible for notifying any subsequent Buyer
of goods manufactured by ESP of the warranty provisions, limitations, exclusions and
disclaimers stated herein, prior to the time any such goods are purchased by such Buyer,
and the Purchaser hereby agrees to indemnify and hold ESP harmless from any claim
asserted against or liability imposed on ESP occasioned by the failure of the Purchaser to so
notify such buyer. This provision is not intended to afford subsequent Purchasers any
warranties or rights not expressly granted to such subsequent Purchasers under the law.
ESP reserves the right to make any changes in the design or construction of its instruments
at any time, without incurring any obligation to make any change whatever in units
previously delivered. ESP sole liabilities, and Buyerís sole remedies, under this agreement
shall be limited to the purchase price, or at our sole discretion, to the repair or replacement
of any instrument that proves, upon examination, to be defective, when returned to our
factory, transportation prepaid by the Buyer, within the applicable period of time from the
date of original shipment. Return transportation charges of repaired or replacement
instruments under warranty will be prepaid by ESP.
ESP is solely a manufacturer and assumes no responsibility of any form for the accuracy or
adequacy of any test results, data, or conclusions which may result from the use of its
equipment.
The manner in which the equipment is employed and the use to which the data and test
results may be put are completely in the hands of the Purchaser. ESP shall in no way be
liable for damages consequential or incidental to defects in any of its products.
This warranty constitutes the full understanding between the manufacturer and buyer, and
no terms, conditions, understanding or agreement purporting to modify or vary the terms
hereof shall be binding unless hereafter made in writing and signed by an authorized official
of ESP.