1
SERIES[§
LED TV
user manual
j
l
I ,___________________ -
L__________ _ _ __
- - -- "
i
I SUPPORT i
r.·-- -
i
iI
~
:I
.
Thank you for purchasing this Samsung product.
To receive more complete service, please register
your product at
www.samsung.com/register
Model _ _ _ __ Serial No. _ _ _ __
~
If you have any questions, please call us at 1-800-SAMSUNG (1-800-726-7864) for assistance.
A detailed User's Manual is built into your TV. For more Information about how to v1ew this e-Manual see page 28.
Figures and illustrations in this User Manual are provided for reference only and may differ from actual product appearances. Product design and
specifications may be changed without notice.
Important Warranty Information Regarding
Wide screen format LED Displays (with 16:9 aspect ratios, the ratio of the screen width to height) are primarily designed to view wide screen format fullmotion video. The images displayed on them should primarily be in the wide screen, 16:9 ratio format, or expanded to fill the screen, if your model offers
th1s feature, with the images constantly in motion. Displaying stationary graphics and images on the screen, such as the dark sidebars on non-expanded
standard format television video and programming, should be limited to no more than 5% of the total television viewing per week.
Additionally, viewing other stationary images and text such as stock market reports, video game displays, station logos, web sites or computer graphics
and patterns, should be limited as described above for all televisions. Displaying stationary images that exceed the above guidelines can cause uneven
aging of LED Displays that leave subtle, but permanent burned-in ghost images in the LED picture. To avoid this, vary the programm1ng and images, and
primarily display full screen moving images, not stationary patterns or dark bars. On LED models that offer picture sizing features, use these controls to
view different formats as a full screen picture.
Be careful about the television formats you select and the length of time you view them. Uneven LED aging as a result of format selection and use, as
well as burned in images, are not covered by your Samsung limited warranty.
• SAMSUNG ELECTRONICS NORTH AMERICAN LIMITED WARRANTY STATEMENT
Subject to the requirements, conditions, exclusions and limitations of the original Limited Warranty supplied with Samsung Electronics (SAMSUNG)
products, and the requirements, conditions, exclusions and limitations contained herein, SAM SUNG will additionally provide Warranty Repair Service
in the United States on SAMSUNG products purchased in Canada, and in Canada on SAM SUNG products purchased in the United States, for the
warranty period originally specified, and to the Original Purchaser only.
The above described warranty repairs must be performed by a SAMSUNG Authorized Service Center. Along with this Statement, the Original Limited
Warranty Statement and a dated Bill of Sale as Proof of Purchase must be presented to the Service Center. Transportation to and from the Service
Center is the responsibility of the purchaser. Conditions covered are limited only to manufacturing defects in material or workmanship, and only those
encountered in normal use of the product.
Excluded, but not limited to, are any originally specified provisions for, in-home or on·site services, m1nimum or maximum repair t1mes. exchanges or
replacements, accessories, options, upgrades, or consumables.
For the location of a SAMSUNG Authorized Service Center, please call toll-free:
- In the United States : 1-800-SAMSUNG (1-800-726-7864)
- In Canada : 1-800-SAMSUNG
Still image warning
Avoid displaying still images (such as jpeg picture files), still image elements (such as TV channel logos, stock or news bars at the screen bottom etc.),
or programs in panorama or 4:3 image format on the screen. Constantly displaying still pictures can cause image burn-in on the LED screen, which will
affect image quality. To reduce risk of this effect, please follow the recommendations below:
• Avoid displaying the same TV channel for long periods.
• Always try to display any image in full screen. Use the TV set's picture format menu for the best possible match.
• Reduce brightness and contrast to avoid the appearance of after-images.
• Use all TV features designed to reduce image retention and screen burn. Refer to thee-Manual for details.
List of Features
• SMART HUB: Your gateway to all your content, integrated in one place.
-
Provides diverse entertainment choices.
-
Lets you control your entertainment life with an easy-to-use, user friendly user interface.
-
Gives you easy access to diverse apps, with more being added every day.
-
Lets you customize your 1V by grouping and sorting apps to your taste.
• AIIShare Play: Lets you access, view, or play photos, videos, or music located on USB devices,
digital cameras, cell phones, and PCs. PCs and cell phones can be accessed wirelessly, through your
wireless network.
• Anynet+ (HDMI-CEC): Allows you to control all connected Samsung devices that support Anynet+
with your Samsung 1V's remote.
• e-Manual: Provides a detailed, on-screen user's manual that's built into your 1V. (page 28)
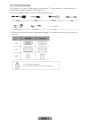
Accessories and Cables
~
Please make sure the following items are included with your TV. If any items are missing, contact your
dealer.
~
The items' colors and shapes may vary depending on the model.
~
Make sure that there are no accessories hidden behind or under packing materials after you open the
box.
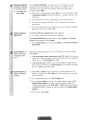
Assembling the Stand Wire Holder
"·
Input Cables (Sold Separately)
You will need one or more of these cables to connect your 1V to your antenna or cable outlet and your
peripheral devices (Biu-ray players, DVD players, etc.)
..
To purchase the RS232 cable, contact www.SamsungParts.com .
· am
~
•
Make sure you have the correct cable before plugging it in. Illustrations of common plugs and jacks
are below.
USB
Optical
Do not plug cables in upside down.
Be sure to check the orientation of the plug before plugging it in.
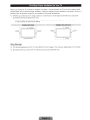
Warning
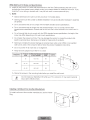
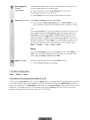
Providing Proper Ventilation for Your TV
When you install your 1V, maintain a distance of at least 4 inches between the 1V and other objects (walls,
cabinet sides, etc.) to ensure proper ventilation. Failing to maintain proper ventilation may result in a fire or a
problem with the product caused by an increase in its internal temperature.
~ Whether you install your TV using a stand or a wall-mount, we strongly recommend you use parts
provided by Samsung Electronics only.
•
If you use parts provided by another manufacturer, it may cause difficulties with the product or result
in injury caused by the product falling.
------ -- -----T -----------:
4 inches
:
0
I
I
I
4inches :
~
'
'
: 4 inches
;--
~
: - - - - - - - - - - - - r - -4inches----:
'
'
4 inches :
~
'
j
'
'
: 4 inches
~
:
4 inches
:------ - ---- - J-- ----- - - ---..J
Other Warnings
~
The actual appearance of the TV may differ from the images in this manual, depending on the model.
~
Be careful when you touch the TV. Some parts can be somewhat hot.
~NOTE
• Make sure to distinguish between the front and back of each component when assembling them.
• Make sure that at least two people lift and move the TV.
• Stand the product up before you tighten the screws. If you tighten the screws with the TV lying
down, it may lean to one side when you stand it up.
&
Do not insert your fingers into the stand base slot of the TV when installing the stand base.
Installing the Wall Mount (Optional)
Wall or Ceiling Mounting
If you mount this product on a wall, it should be mounted only as recommended by the
manufacturer. Unless it is correctly mounted, the product may slide or fall, causing serious
injury to a child or adult, and serious damage to the product.
Installing the Wall Mount Kit
The wall mount kit (sold separately) lets you mount the TV on the wall.
For detailed information about installing the wall mount, see the instructions provided with the wall mount.
We recommend you contact a technician for assistance when installing the wall mount bracket. We do not
advise you to do it yourself. Samsung Electronics is not responsible for any damage to the product or injury
to yourself or others if you choose to install the wall mount on your own.
To order the wall mount kit, contact Samsung Customer Care at 1-800-SAMSUNG (1-800-726-7864).
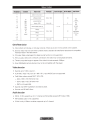
VESA Wall Mount Kit Notes and Specifications
~
Install your wall mount on a solid wall perpendicular to the floor. Before attaching the wall mount to
surfaces other than plaster board, please contact your nearest dealer for additional information. If you
install the TV on a ceiling or slanted wall, it may fall and result in severe personal injury.
~ NOTE
• Standard dimensions for wall mount kits are shown in the table below.
•
Samsung wall mount kits contain a detailed installation manual and all parts necessary for assembly
are provided.
•
Do not use screws that do not comply w ith the VESA standard screw specifications.
•
Do not use screws that are longer than the standard length or do not comply with the VESA
standard screw specifications. Screws that are too long may cause damage to the inside of the TV
set.
•
For wall mounts that do not comply with the VESA standard screw specifications, the length of the
screws may differ depending on the wall mount specifications.
•
Do not fasten the screws too firmly. This may damage the product or cause the product to fall ,
leading to personal injury. Samsung is not liable for these kinds of accidents.
• Samsung is not liable for product damage or personal injury when a non-VESA or non-specified
wall mount is used or the consumer fails to follow the product installation instructions.
•
Do not mount the TV at more than a 15 degree tilt.
• Always have two people mount the TV on a wall.
LED-TV
~
26
100X 100
M4
32 - 40
200 X 200
M6
46-60
400 X 400
MS
4
Remove the screws in the mounting holes before you install the wall mount.
Do not install your Wall Mount Kit while your TV is turned on. It may result in personal
injury due to electric shock.
Installing a Wall Mount from Another Manufacturer
To install a wall-mount from another manufacturer, use the HolderRing .
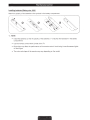
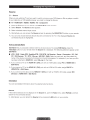
Connecting the Power Cord and the Antenna or Cable Connection
VHF/UHF Antenna
...
-
~ -----:-1
Cable
~
'-- r;;;;;::J='
i =----1:_ (
·
--
I
§]
Power Input
Plug the power cord into a wall outlet only after you have made all other connections.
~ If you are connecting your TV to a cable or satellite box using HDMI, Component, or Composite
connections, you do not need to connect the ANT IN jack to an antenna or a cable connection.
~
Use caution when you move or swivel the TV if the antenna cable is tightly connected. You could
break the antenna jack off the TV.
Connecting to a Network
You can set up your lV so that it can access SMART lV applications through your local area network
(LAN) using a wired or wireless connection.
~
After you have "physically" connected your TV to your network, you must configure the network
connection to complete the process. You can configure the connection during the Initial Setup
process (see page 18) or after the Initial Setup process, through the TV's menu (see page 26).
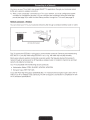
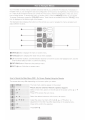
Network Connection - Wireless
You can connect your lV to your local area network (LAN) through a standard wireless router or modem.
The LAN Port on the Wall
Wireless IP Sharer
(router having DHCP Server)
LAN Cable (Not Supplied)
((<
r~~
\-L-:--====-_::::;·"--=:===--=~JJ
------ -c~~=,-~=:~-5
~-----------------------------· --------' ~------------------------------------~
This lV supports the IEEE 802.11 a/b/g and n communication protocols. Samsung recommends using
IEEE 802.11 n. If you play video using IEEE 802.11 a, b, or g, the video may not play smoothly.
Most wireless network systems incorporate a security system that requires devices that access the
network through an access point or AP (typically a wireless router or modem) to transmit an encrypted
security code called an access key.
Your lV is compatible with the following security protocols:
• Authentication Mode: OPEN, SHARED, WPAPSK, WPA2PSK
•
Encryption Type: WEP, TKIP, AES
If you select Pure High-throughput (Greenfield) 802.11 n mode and the Encryption type is set to WEP or
TKIP on your AP or wireless router, Samsung lVs will not support a connection in compliance with new
Wi-Fi certification specifications.
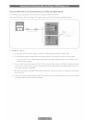
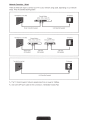
Network Connection - Wired
There are three main ways to connect your TV to your network using cable, depending on your network
setup. They are illustrated starting below:
~--·-
1
I
·------~-·-----'""'"'t
The Modem Port on the Wall
TV Rear Panel
External Modem
(ADSL I VDSL I Cable T\1)
Modem Cable (Not Supplied)
LAN Cable (Not Supplied)
.,.,,_,,, . .____ ' . . . ------------··-----.....Ji
r·-·--·-_. ----·------ - · - ·~--
·-----------·~------·-··-·-------
The Modem Port on the Wall
External Modem
(ADSL I VDSL I Cable TV)
TV Rear Panel
IP Sharer
(having DHCP server)
1
Modem Cable
(Not Supplied)
LAN Cable
(Not Supplied)
.
LAN Cable
(Not Supplied)
---··· .• ....J
...- - -·-··--·-~-~LAN ~ort :::~:~---·-----·---- TV·-R--ea-r-Pa-n-el- - - - ,
l
'
'
LAN Cable (Not Supplied)
· - - - ------------·-·- -------·-··----·
~
The TV does not support network speeds less than or equal to 10M bps.
~
Use Cat 6 (STP Type*) cable for the connection. (*Shielded Twisted Pair)
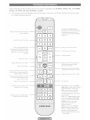
The Remote Control
Installing batteries (Battery size: AAA)
Match the polarity of the batteries to the symbols in the battery compartment.
(
\
"""---'-·-·---··~--·--
~ NOTE
•
Install the batteries so that the polarity of the batteries (+/ -) matches the illustration in the battery
compartment.
•
Use the remote control within 23 feet of the 1V.
•
Bright light may affect the performance of the remote control. Avoid using it near fluorescent lights
or neon signs.
• The color and shape of the remote may vary depending on the model.
Configuring the Basic Settings in Initial Setup
When you turn the TV on for the first time, a sequence of screens and on-screen prompts will assist you in
configuring the TV's basic settings. Plug the power cord into a wall outlet, and then press the (!) button to
turn on the TV.
~
Setup is available only when the input source is set to TV. See "Changing the Input Source" (page 22).
~
To return to the previous step in the Setup sequence, select Previous.
~
If you are not using a cable box or satellite box, make sure you have connected the TV to an antenna
or cable connection before you turn on the TV. See page 9 for instructions.
~
If you want to configure a w ired network connection during Setup, make sure you've connected
a LAN cable to your TV. See pages 15 for instructions. If you want to configure a wireless network
connection during Setup, make sure your wireless modem or router is on and working.
Menu Language:
Select a Language.
After you press the (!) button, the Start screen appears. Select Next
to continue. The Menu Language screen appears. Select the menu
language you want using your remote, and then select Next. The TV will
display on-screen menus using the language you select beginning with
the next step in the Setup process.
Use Mode: Select
the Home Use
Mode.
On the Use Mode screen, select the Home Use using your remote, and
then select Next. The Network Settings screen appears.
Network Settings:
Configure the
network settings
To configuring your network settings, select Start using your remote, and
then go to 3A - Wireless Network or 38 - Wired Network on the next
page.
~
If you do not know your network configuration information or want to
configure the settings later, or do not have a network, select Skip, and
then go to 6 -Auto Program (1) on page 20.
To configure
later, select Skip.
You can set up
the network
connection later
using the onscreen Network
menu.
~
Store Demo is for retail environments only. If you select Store
Demo, some functions will not work, and the TV will reset all
functions to their factory default after a certain period of time. For
more information about Store Demo, go to the end of this section.
To configure network settings later, refer to "Setting up the Wired or
Wireless Network" in the e-Manual or see the Network Connection
sections in this manual (pages 14 and 26).
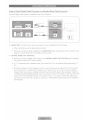
Wireless Network
1. The TV searches for and then displays all the wireless networks
within range. When done, it displays a list of the networks. In the list
of networks, move the Highlight to select a network, and then select
Next. If the selected network requires a Security Key, the Security
Key screen appears.
~
If you have a WPS(PBC) compatible router, select WPS(PBC)
instead, and then follow the directions on the screen. When
done, go to Step 4.
2. Enter your network security key or WPS PIN using your remote.
~
Enter numbers and letters using your remote.
• You can enter numbers by pressing the number buttons on
the remote.
• To enter a letter, move the Highlight to the letter, and then
select it. You can enter numbers in the same way if you
choose.
~
To display capital letters (or redisplay small letters if capital letters
are displayed), select Caps or Shift.
~
To display symbols and punctuation, select*· To redisplay
letters, select * again .
3. When done, select Next if you have entered a security key or WPS
PIN if you have entered a WPS PIN.
4. The TV checks the wireless connection. If the connection is
successful, the You are connected to the Internet. If you have any
problems using online services, please contact your Internet
Service Provider. message appears. Select Next, and then go to 4
Software Upgrade Step.
~
Wired Network
If the connection fails, select Previous, repeat Step 1 and 2,
carefully re-enter your security key or WPS PIN , then repeat
Steps 3 and 4. If it fails again, select Next on the "Connection
Failed" screen, and then go to 6 - Auto Program (1) on the next
page. Configure your network later through Network Settings
in the TV's Menu. For more information, refer to "Setting up the
Wired or Wireless Network" in the e-Manual or see the Network
Connection sections in this manual (pages 14 and 26).
The TV checks the network connection, then displays the You are
connected to the Internet. If you have any problems using online
services, please contact your Internet Service Provider. message
appears. Select Next. The Software Upgrade screen appears.
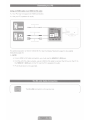
· · Software Upgrade:
Update the software
to the latest version
~
To update later,
select Skip.
Terms of Service
Agreement
When Network Settings is complete, your 1V will check for a new
software version automatically. If new software is available, the 1V
downloads and installs the new software. When the download is
complete, select Next.
~
If you want to upgrade later, select Skip. For more information, refer
to Software Update (Preference Features - Support Menu) in the
e-Manual.
~
This may take some time, depending on your network status.
~
You can only upgrade software if your TV has an active network
connection.
~
If no new update software is available, a no new updates message
appears on the screen. Select OK.
The Terms of Service Agreement screen appears.
~
The screen can take a few seconds to display.
The General Disclaimer screen appears. Select Agree. The Privacy
Policy screen appears. Select Agree .
~ To use Smart Hub, you must select Agree for the Terms of Service
Agreement.
Auto Program (1):
Select where your
1V signal comes
from.
Select the appropriate option for your 1V using your remote, and then
select Next.
• I use an antenna cable connection to the TV.: Select if you have an
antenna or a cable connection without a set-top box. If you select this
option, go to 7- Auto Program (2) Step.
• I use a set-top box.: Select if you have a satellite or cable set-top
box. You do not need to run Auto Program. If you select this opt ion,
go to 9 - Clock on the next page.
Auto Program (2):
Select the search
options.
1. Select Air or Cable using your remote. A check appears on your
selection. When done, select Next. You can check both if you have
both connected.
2. If you selected Air, go to 8 - Auto Program (3).
3. If you selected Cable, you'll go to the cable system screen. Select
Digital Cable System. The option window appears. Select the
correct cable signal format; STD, HRC, or IRC. Most cable systems
use STD (Standard). Repeat the same process with Analog Cable
System.
4. When done, select Next.
Auto Program (3):
Channel
memorization
Channel memorization stars. Channel memorization can take up to 45
minutes, depending on your cable system.
For more information, refer to Auto Program (Channel Menu---->
Memorizing Channels) in the e-Manual.
~
Clock: Set the Clock
Select Stop at any time to halt the memorization process.
Select Auto or Manual, and then select Next.
~
If you selected I have a set-top box. in 6 - Auto Program (1), you
can only set the current time and date manually, using your remote.
Auto
If you selected Auto, the 1V will automatically download the correct time
from a digital channel. The Time Zone screen will appear. Select your
Time Zone, and then select Next. The DST (Daylight Savings Time)
screen will appear. The DST function sets the time ahead one hour to
adjust the clock for Daylight Savings Time. Select On if you want to turn
the DST adjustment on. Select Off to turn off the DST adjustment. You
can also turn the DST function on through the 1V's on screen menu
(Menu ----> System ----> Time ----> Clock ----> DST).
Manual
If you selected Manual, you'll go to the Clock screen. Select Date or
Time. You can set the current date and time using your remote. When
done setting the Date and Time, select Next.
Setup Complete
Review the Setup data, and then select Close to finish .
~
The completed settings are displayed.
If You Want to Rerun Setup ...
Menu
---->
System
---->
Setup
If You Want to Turn the Store Demo Mode On or Off.
To set or unset Store Demo mode outside of Setup, press and release the 1V Controller when the power
is on. The Function menu screen appears. Push the 1V Controller to the left (to MENU (I.III)) and hold for
more than 5 seconds. The Store Demo mode is set. To cancel Store Demo, bring up the Function menu
using the 1V Controller, push the 1V Controller to the right (to Source (-El)) and hold for more than 5
seconds. See page 24 for information about the 1V Controller.
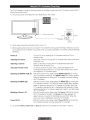
Changing the Input Source
Source
@__.Source
When you are watching TV and you want to watch a movie on your DVD player or Blu-ray player or switch
to your cable box or STB satellite receiver, you need to change the Source .
•
TV I HDMI1/DVI I HDMI2 I HDMI3 I AV I Component
1. Press the
tl button on your remote. The Smart Hub screen appears.
2. Select Source. The Source screen appears.
3. Select a desired external input source.
~
Alternatively, you can access the Source screen by pressing the SOURCE-EJ button on your remote.
~
You can only choose external devices that are connected to the TV. In the displayed Source list,
connected inputs are highlighted.
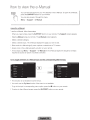
How to Use Edit Name
Edit Name lets you associate a device name to an input source. To access Edit Name, press the
TOOLS,Ll button on your remote when the Source list is displayed. The following selections appear under
Edit Name:
•
VCR I DVD I Cable STB I Satellite STB I PVR STB I AV Receiver I Game I Camcorder I PC I DVI
PC I DVI Devices I TV I IPTV I Blu-ray I HD DVD I DMA: Select an input jack, and then select the
name of the device connected to that jack from the list that appears. For example, if you have your Bluray player attached to HOM I IN 2, select Blu-ray for that input.
~
If you connect a PC to the HOM I IN 1 (DVI) port with an HDMI cable, assign PC to HDMI1/DVI in
Edit Name.
~
If you connect a PC to the HDMIIN 1 (DVI) port with an HDMI to DVI cable, assign DVI PC to
HDMI1/DVI in Edit Name.
~
If you connect an AV device to the HOM I IN 1 (DVI) port with an HOM I to DVI cable, assign DVI
Devices to HDMI1/DVI in Edit Name.
Information
You can see detailed information about the selected external device.
Refresh
If the external devices are not displayed in the Source list, open the Tools menu, select Refresh, and then
search for the connected devices.
~
Alternatively, you can refresh the Source list by pressing the
a button on your remote.
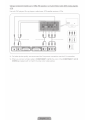
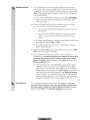
Using the TV•s Controller (Panel Key)
The TV's Controller, a small joy stick like button on the bottom right side of the TV, lets you control the TV
without the remote control.
~
The product color and shape may vary depending on the model.
Function menu
Down (Front)
I
,
.......
:t ..... ._
l'
l ~\
t
:·· ·· ·· · ·· ··· ·· · ·· · ·· · ·· · ·· ·· · ··;;;c,;;.;,i;; · ~ .....!
Remote control sensor
L:======;:=;:=====~d--,
Left ~
Right
Up (Rear)
~
Follow these instructions facing the front of your TV.
~
When selecting the function by moving the TV Controller to the up/down/ left/right directions, be sure
not to press the TV Controller. If you press it first, you cannot operate it to move the up/down/ left/right
directions.
Power on
Adjusting the volume
Selecting a channel
Using the Function menu
Selecting the SMART HUB (@)
Selecting the MENU (liD)
Selecting a Source (-EJ)
Power Off (C))
~
Turn the TV on by pressing the TV Controller when the TV is in
standby mode.
Adjust the volume by moving the TV Controller from side to side when
the power is on.
Select a channel by moving the TV Controller backwards and
forwards when the power is on.
To view and use the Function menu, press and release the TV
Controller when the power is on. To close the Function menu, press
and release the TV Controller again.
With the Function menu visible, select SMART HUB (8) by moving
the TV Controller backwards. The SMART HUB main screen appears.
Select an application by moving the TV Controller, and then pressing
the TV Controller.
With the Function menu visible, select the MENU (liD) by moving the
TV Controller to the left. The OSD (On Screen Display) Menu appears.
Select an option by movrng the TV Controller to the right. Move the
TV Controller to the right or left, or backwards and forwards to make
additional selections. To change a parameter, select it, and then press
the TV Controller.
With the Function menu visible, open the Source (-EJ) list by moving
the TV Controller to the right. The Source list screen appears. To
select a source, move the TV Controller back and forth . When the
source you want is highlighted, press the TV Controller.
With the Function menu visible, select Power Off (C)) by moving the
TV Controller forwards, and then press the TV Controller.
To close the Menu, Smart Hub, or Source, press the TV Controller for more than 1 second.
Standby mode
Your TV enters Standby mode when you turn it off and continues to consume a small amount of electric
power. To be safe and to decrease power consumption, do not leave your TV in standby mode for long
periods of time (when you are away on vacation, for example). It is best to unplug the power cord .
Using Smart Hub
Smart Hub provides easy, on-screen access to five functions that let you manage and access channels,
set favorite channels, access photos, videos, or music on USB devices, cameras, and PCs, select video
sources, and set the TV to turn on automatically when a show you want to watch is on. The five functions
are listed below:
• Channel: Lets you manage channels, select favorite channels, add channels to and delete channels
from the Added Ch. list (the channels that appear when you press the v CH A button.)
• Web Browser: Lets you browse the Internet.
• Schedule Manager: Lets you schedule shows and channels for viewing.
• Source: Lets you select a connected external video source to view.
• AIIShare Play: Lets you access, view, or play photos, videos, or music located on USB devices,
digital cameras, cell phones, and PCs. PCs and cell phones can be accessed wirelessly, through your
wireless network.
Smart Hub also provides an easy-to-use gateway to a host of on-line media and entertainment including
apps from the Samsung Apps store, streaming videos and movies, kids sites, and more.
~ To access Smart Hub, press the
~
8
button on your remote.
For more information about Smart Hub, see the e-Manual.
Configuring Network Connections
After you have run the initial setup, you can configure or reconfigure the network connections through the
1V's menu.
Configuring a Wireless Network Connection
The instructions below are for networks that use the Dynamic Host Configuration Protocol (DHCP) to
configure network connections automatically. Most wireless networks use DHCP. If you have a Static IP
network, see the e-Manual for configuration instructions.
To configure the network connection for a network that uses DHCP, follow these steps:
1. Connect your 1V to your network as shown in the illustration on page 14.
2. Turn on your 1V, and then go to the Network Settings screen. (Menu----> Network----> Network
Settings)
3. Select Start. The Network function searches for available wireless networks. When done, it displays a
list of the available networks.
4. In the list of networks, move the highlight to select a network, and then select Next.
~
If you have a WPS(PBC) compatible router, select WPS(PBC) instead, and then follow the
directions on the screen.
5. Enter your network security key or WPS PIN using your remote.
~
Enter numbers and letters using your remote.
• Enter numbers by pressing the number buttons on your remote.
• To enter a letter, move the Highlight to the letter, and then select it. You can enter numbers in
the same fashion way if you choose.
~
To display capital letters (or redisplay small letters if capital letters are displayed), select Caps or
Shift.
~
To display symbols and punctuation, select
*·
To redisplay letters, select
*
again.
6. When done, select Next if you have entered a security key or WPS PIN if you have entered a WPS PIN .
7. The 1V checks the wireless connection. If the connection is successful , the "You are connected to the
Internet. If you have any problems using online services, please contact your Internet Service
Provider." message appears. Select Next using your remote.
~
For more detailed information, see "Setting up a Wireless Network" in the e-Manual.
~
If you want to configure the connection manually, select IP Settings on the Network Connection
screen. Set IP Mode to Manual, and then enter the IP Address, Subnet Mask, Gateway, and
DNS Server manually.
Configuring a Wired Network Connection
Most home networks use the Dynamic Host Configuration Protocol (DHCP) to configure network
connections. Home networks that support DHCP automatically provide the IP address, subnet mask,
gateway, and DNS values your TV needs to access the Internet so you don't have to enter them manually.
If you have a Static IP network, see your user's manual for configuration instructions.
To configure the network connection for a wired network that uses DHCP, follow these steps:
1. Connect your TV to your network as shown in one of the illustrations on page 15.
2. Turn on your TV, and then go to the Network Settings screen . (Menu---+ Network---+ Network
Settings)
3. Select Start.
4. The Network Connection screen appears, and verifies the network connection . When the connection
has been verified, the "You are connected to the Internet. If you have any problems using online
services, please contact your Internet Service Provider." message appears. Network set up is
completed.
~
If your TV cannot acquire network the connection values automatically or if you want to set the
connection manually, select IP Settings on the network connection screen. Set IP Mode to Manual,
and then enter the IP Address, Subnet Mask, Gateway, and DNS Server manually.
~
For more detailed information, refer to "Setting up a Wired Network" in the e-Manual.
How to view the e-Manual
You can find instructions for your TV's features in thee-Manual. To open thee-Manual ,
press the SUPPORT button on your remote.
You can also access it through the menu:
Menu ----. Support
--->
e-Manual
Access thee-Manual
To use thee-Manual, follow these steps:
1. When you need a help, press the SUPPORT button on your remote. The Support screen appears.
2. Select e-Manual using your remote. The e-Manual screen appears.
3. Select a desired category.
4. Select a desired topic. The e-Manual displays the page you want to see.
~
Blue words in e-Manual signify menu options or selections on TV screen.
~
Green icons in the e-Manual signify a button on your remote.
~
Arrow steps (e.g. Menu ---> Support ---> e-Manual) in the e-Manual signify the sequence of steps
required to access an option or activate a fu nction.
How to toggle between an e-Manual topic and the corresponding OSD menu(s).
~
This function is not enabled in some menus.
~
You can't use the Try Now function if the menu is not available.
1. To go to the topic's corresponding menu option, press the PZ1 button on your remote.
2. To return to thee-Manual screen, press the SUPPORT button on your remote.
Using the colored and function buttons with the e-Manual
• Scroll bar: Scroll thee-Manual screen up or down.
•
~
I
~:
Moves to the previous or next chapter.
• fJ Try Now: Move to the OSD menu that corresponds to the topic. To return to thee-Manual screen,
press the SUPPORT button on your remote.
• mHome: Moves to thee-Manual home screen.
• l!J Position: Each time you select
(!J,
you change the position of thee-Manual screen.
• I1J Index: Displays the Index screen.
•
':::> Return: Return to the previous screen.
How to search for a topic on the index page
1. Select I1J using your remote. The Index screen appears.
2. To search for a topic, select a letter. The Index displays a list of topics and keywords that begin with the
letter you selected.
3. Select a topic or keyword you want.
4. The e-Manual page with the topic appears.
~
To close the Index screen, press the RETURN'::> button.
To Change the screen position of the e-Manual
If the OSD Menus screen is not visible, well because thee-Manual screen, you can change thee-Manual
screen's position.
1. Move the Highlight to thee-Manual screen by pressing the SUPPORT button on your remote.
2. Press the l!J button on your remote. Each time you select (!J, the position of thee-Manual will change.
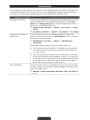
Troubleshooting
If the 1V seems to have a problem, first review this list of possible problems and solution. Also review the
Troubleshooting Section in the e-Manual. If none of the troubleshooting tips apply, visit www.samsung.
com/support or call Samsung Customer Service at 1-800-SAMSUNG (1-800-726-7864).
Flickering and Dimming
Component Connections I
Screen Color
If your Samsung Television is flickering or dimming sporadically, you may
need to disable some of its energy efficient features such as the Eco
Sensor or the Energy Saving feature. Follow the steps below with your
remote to turn these features off or on.
• Energy Saving: User Menu
Saving
--+
• Eco Sensor: User Menu
System
--+
System
--+
--+
Eco Solution
Eco Solution
--+
--+
Energy
Eco Sensor
If you find that the color on your Samsung television's screen is not
correct or black and white, first run a Self Diagnosis on the 1V to make
sure there are no device issues.
• Self Diagnosis: User Menu
Picture Test
--+
Support
--+
Self Diagnosis
--+
If the problem does not appear in the Picture test, make sure:
• Your connections are all consistent. For example, if you've used the
AV In jack on your 1V, make sure you have used the AV Out jack on
your video source.
• You have connected your devices to the correct jacks. For example. if
you use the Component jacks, labeled Pb, Pr, andY, to connect your
1V and video source. make sure you have connected the blue Pb jack
on the video source to the blue Pb jack on the 1V, and the yellow Y
jack on the source to the yellow Y jack on the 1V.
Screen Brightness
If you find that the colors on your Samsung 1V are correct but just a little
too dark or bright, try adjusting the following settings in the Picture menu
option of the Main menu:
• Backlight, Contrast. Brightness, Sharpness. Color, Tint (G/R) and
so on.
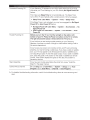
Unwanted Powering Off
If your Samsung TV appears to turn off by itself, there may be an issue
with either your Timer settings or your Eco friendly No Signal Power Off
feature.
First make sure Sleep Timer is not accidentally set. The Sleep Timer
turns off the TV automatically after a certain period of time has passed.
• Sleep Timer: User Menu -+ System -+ Time -+ Sleep Timer
If the Sleep Timer is not activated , you may have engaged the No Signal
Power Off or Auto Power Off feature.
• No Signal Power Off: User Menu -+ System -+ Eco Solution -+ No
Signal Power Off
• Auto Power Off: User Menu -+ System -+ Eco Solution -+ Auto
Power Off
Trouble Powering On
Before you turn the TV on, find the red light on the right or left
bottom of your TV. Press the Power on button on the TV or remote.
The light should blink about 5 times before the TV turns on.
If you find that you are having trouble powering on your Samsung
television, there are a number of things to check before making a call to
the service department.
If you're sure your power cord, remote control, and PC are functioning
properly, you may be having a cable issue. If you have a cable or satellite
box, your TV may appear to be off because the cable or satellite box is
not outputting a signal. To test the signal output of your cable or satellite
box, press the guide or info button on the cable or satellite box remote
control. If the screen displays the guide or info data, the problem is
caused by the box.
Stand Assembly
If you have any trouble assembling the stand first, review "Install the
Stand" in the paper manual.
Cannot Find a Channel
Re-run Setup (Go to User Menu -+ System -+ Setup) or run Auto
Program. (Go to User Menu-+ Channel-+ Auto Program).
~
For detailed troubleshooting information, watch the troubleshooting videos at www.samsung.com/
spsn.
The IV won't turn on.
• Make sure the AC power cord is securely plugged in to the wall outlet
and the IV.
• Make sure the wall outlet is working.
• Try pressing the 6 button on the IV to make sure the problem is not
the remote. If the IV turns on, refer to "Remote control does not work"
below.
There is no picture/video.
• Check the cable connections. Remove and reconnect all cables
connected to the IV and external devices.
• Set the video outputs of your external devices (Cable/Sat Box, DVD,
Blu-ray etc) to match the IV's input connections. For example, if an
external device's output is HDMI, it should be connected to an HDMI
input on the IV.
• Make sure your connected devices are powered on.
• Be sure to select the correct input source
• Reboot the connected device by unplugging it, and then reconnecting
the device's power cable.
The remote control does not
work.
• Replace the remote control batteries. Make sure the batteries are
installed with their poles(+/-) in the correct direction.
• Clean the sensor's transmission window on the remote.
• Try pointing the remote directly at the IV from 5-6 feet away.
The cable/set top box remote
control doesn't turn the IV on
or off, or adjust the volume.
• Program the Cable/Set remote control to operate the IV. Refer to the
Cable/Set-Top-Box user manual for the SAMSUNG IV code.
~
This TFT LED panel uses a panel consisting of sub pixels which require sophisticated technology to
produce. There may be, however, a few bright or dark pixels on the screen. These pixels will have no
impact on the performance of the product.
~
To keep your TV in optimum condition, upgrade to the latest firmware on the Samsung web site by
USB (samsung.com ~ Support ---+ Downloads).
Licenses
[I] DOLBY.
DIGITAL PLUS
PULSE
I
I
~db
2.0+Digital Out
DIVX,.
HD
srs@
TheaterSound HD
Storage and Maintenance
~
If a sticker was attached to the TV screen , some debris can remain after you remove the sticker.
Please clean the debris off before watching TV.
~
The exterior and screen of the product can get scratched during cleaning. Be sure to wipe the exterior
and screen carefully using a soft cloth to prevent scratches.
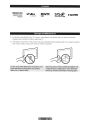
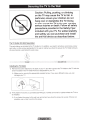
Securing the TV to the Wall
Caution: Pulling, pushing, or climbing
on the TV may cause the TV to fall. In
particular, ensure your children do not
hang over or destabilize the TV. Doing
so may cause the TV to tip over, causing
serious injuries or death. Follow all safety
precautions provided in the Safety Flyer
included with your TV. For added stability
and safety, you can purchase and install
the anti-fall device as described below.
The TV-Holder Kit (Sold Separately):
The parts below are included in the 1V Holder kit. In addition, you need to provide a wood screw, screw
and molly, or other screw appropriate for the wall or cabinet you intend to secure the 1V-Holder string to.
We recommend a size M4xl20 wood screw.
~
~
1Y~H0Ioor
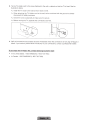
Installing the TV-Holder
1. Remove the screw attached to the back of your 1V, and then connect the 1V-Holder to the 1V with the
screw included in the 1V-Holder Kit that is designated for your 1V.
~
Make sure to use only the appropriate supplied screw. If you use a different screw, you can
damage your TV.
2. Firmly fasten the screw you provided (size M4xl20 or similar) to the wall or cabinet where the 1V is to
be installed.
~
If you fasten the screw to the wall, we recommend you drive the screw into a stud. If that is not
possible, use a molly to anchor the screw.
3. Tie the TV-Holder cord to the screw fastened to the wall or cabinet so that the TV is fixed. See the
illustrations below.
~
Install the TV close to the wall so that it does not fall.
~
When attaching the TV-Holder cord to the wall, tie the cord level with the ground or slanted
downwards for safety purposes.
~
Check the cord occasionally to make sure it is secure.
~
Before moving the TV, separate the connected cord first.
4. Verify all connections are properly secured. Periodically check the connections for any sign of fatigue or
failure. If you have any doubt about the security of your connections, contact a professional installer.
To purchase the TV-Holder Kit, contact Samsung Customer Care
• In the United States: 1-800-SAMSUNG (1-800-726-7864)
• In Canada: 1-800-SAMSUNG (1-800-726-7864)
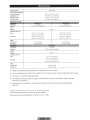
Specifications
Environmental Considerations
Operating Temperature
Operating Humidity
Storage Temperature
Storage Humidity
50°F tO 104°F (1 0°C tO 40°C)
10% to 80%, non-condensing
-4 'F to 113' F (-2ooc to 45'C)
5% to 95%, non-condensing
Sound
(Output)
Dimensions (IN x D x H)
Body
With stand
10 WX2
36.5 x 3.6 x 21 .6 inches
(927.6 x 93.0 x 551.0 mm)
36.5 x 97 x 23.8 inches
(927.6 x 247.8 x 606.5 mm)
29.0 x 3.6 x 17.5 inches
(738.3 x 93.2 x 444.9 mm)
29.0 x 7.5 x 19.6 inches
(738.3 x 191 9 x 498.2 mm)
Weight
Without Stand
46" Ciass
Screen Size
(Diagonal)
10WX 2
Dimensions (IN x 0 x H)
Body
With stand
41.7 x 3.7 x 24.6 inches
(1059.8 x 94.3 x 625.6 mm)
41.7 x 9.7 x 26.7 inches
(1059.8 x 247.8 x 680.7 mm)
Weight
Without Stand
With Stand
27.81bs (12.6 kg)
31.9 lbs (1 4.5 kg)
~
Design and specifications are subject to change without prior notice.
~
The actual appearance of the TV may differ from the images in this manual, depending on the model.
~
This device is a Class B digital apparatus.
~
For information about the power supply, and more about power consumption, refer to the label
attached to the product.
~
Typical power consumption is measured according to Energy Star Program requirements for
Televisions.
Dispose unwanted electronics through an approved recycler.
To find the nearest recycling location, go to our website:
www.samsung.com/recyclingdirect or call , (877) 278 - 0799
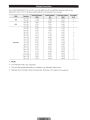
Display Resolution
If you have attached the 1V to your PC, you can select one of the standard resolutions listed in the
Resolution column. The 1V will automatically adjust to the resolution you choose.
·~-AQnzon®Ji'ec!IJ~Y,;;·.
· }~~::~y· {:M<r:-:~t:.~-~~~F't;;:{~~>'..·;: ·~P~f:~-~~·~
-~ · 1
• .- •• -.
.. _,,
:,:~~~~i\~~>.
IBM
640 X 350
720 X 400
31.469
31.469
70.086
70.087
25.175
28.322
MAC
640 X 480
832 X 624
1152 X 870
35.000
49.726
68681
66.667
74.551
75062
30.240
57 284
100.000
VESA DMT
640 X 480
640 X 480
640 X 480
800 X 600
800 X 600
800 X 600
1024 X 768
1024 X 768
1024 X 768
1152 X 864
1280 X 720
1280 X 800
1280 X 1024
1280 X 1024
1366 X 768
1440 X 900
1600 X 900RB
1680x 1050
1920 X 1080
31.469
37.861
37.500
37.879
48.077
46.875
48.363
56.476
60.023
67.500
45.000
49.702
63981
79.976
47.71 2
55.935
60.000
65290
67.500
59.940
72.809
75.000
60.317
72.188
75.000
60.004
70.069
75029
75.000
60.000
59.810
60.020
75.025
59.790
59.887
60.000
59.954
60.000
25. 175
31.500
31 .500
40.000
50.000
49.500
65.000
75.000
78.750
108.000
74.250
83.500
108.000
135.000
85.500
106.500
108.000
146.250
148.500
~ NOTE
• The interlaced mode is not supported .
• The set might operate abnormally if you select a non-standard video format.
• Separate and Composite modes are supported. SOG (Sync On Green) is not supported.
+1-I+
-1-I-1-I-I-I+I+
+I+
t it
-1-It it
+I+
tit
-1+
+I+
t it
t it
-1+
t it
-1+
+I+
Video Codec
·.avi
'.mkv
·.asf
*.wmv
' .mp4
*.3gp
·.vro
*.mpg
' .mpeg
' .ts
' .tp
'.trp
·.m2ts
*.mts
·.webm
' .divx
DIVX 3.11 /4.x/5.x/6.1
MPEG4 SP/ASP
AVI
MKV
ASF
MP4
3GP
VRO
VOB
PS
TS
WebM
1920 X 1080
30
640 X 480
8
H.264 BP/MP/HP
Motion JPEG
6- 30
Window Media Video v9
MPEG2
1920 X 1080
30
640 X 480
4
MPEG1
VPS
VP6
AC3
LPCM
ADMPCM(IMA,
MS)
AAC
HE-AAC
WMA
DD+
MPEG(MP3)
DTS Core
Voris
Other Restriction
~
Video content will not play, or not play correctly, if there is an error in the content or the container.
~
Sound or video may not work if the contents have a standard bit rate/frame rate above the compatible
Frame/sec listed in the table above.
~
If the Index Table is damaged, the Seek (Jump) function is not supported.
~
When you play video over a network connection, the video may not be played smoothly.
~
The menu may take longer to appear if the video's bit rate exceeds 1OM bps.
~
Some USB/digital camera devices may not be compatible with the player.
Video decoder
• Supports up to H.264, Level 4.1.
• H.264 FMO I ASO I RS, VC1 SP I MP I AP L4 and AVCHD are not supported.
• For all Video codecs except MVC, VP8, VP6:
-
Below 1280 x 720: 60 frame max
-
Above 1280 x 720: 30 frame max
-
GMC is not supported.
• Supports only SVAF Top/Bottom and Side by Side.
• Supports only BD MVC Spec.
Audio decoder
• WMA 9, 10 Pro supports up to 5.1 channel and M2 profile (except LBR mode of MO).
• WMA lossless audio is not supported.
• If Vorbis is only in Webm container, supports up to 2 channel.
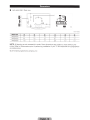
Dimensions
•
Jack panel detail I Rear view
~l
$1@]
.(!) •••
MRQIMI-----vi::::::M
!
(Unit: inches)
;;;;'M<>de'A<~~Jle..· I ··(
m. /
;·'i
@.
00
G)
@
·
...
UN32EH5300
7.4
3.4
4.2
19.0
7.8
7.8
UN40EH5300
9.6
5.8
6.2
24.1
7.8
78
UN46EH5300
11.6
5.2
7.7
29.8
15.7
15.7
NOTE: All drawings are not necessarily to scale. Some dimensions are subject to change without prior
notice. Refer to the dimensions prior to performing installation of your TV. Not responsible for typographical
or printed errors .
© 201 2 Samsung Electronics America, Inc
Contact SAMSUNG WORLDWIDE
If you have any questions or comments about Your Samsung TV, please contact the SAMSUNG customer care center.
r, $~~ ...
.., :
w,.,~.,.,
;
. ..
;
CANADA
1-800-SAMSUNG (726-7864)
U.S.A
1-800-SAMSUNG (726-7864)
•P''l-'l'ii!'• •.i·c'''{jJ;;y:"J:'l!'Yft:' ,.; ·.·if'i,\(?!:i';'·lJ.lli'l,>
. :•'h'J!??i<.
.. Y'•'''"'l'~' 'r
Samsung Electronics Canada Inc., Customer Service 55
www.samsung.com
Standish Court Mississauga, Ontario L5R 482 Canada
Samsung Electronics America, Inc. 85 Challenger Road
www.samsung.com
Ridgefield Park, NJ 07660
© 2012 Samsung Electronics Co., Ltd. All rights reserved.
Ill IIIII 11111111111111111111111111111111 Ill
BN68-04075A-OO
- - - - - - ---·------ -----
~--·----
1
------- -----~
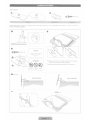
Assemble Stand before removing TV from shipping box
•
L__ _
0
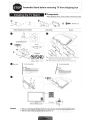
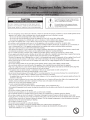
Installing the TV Stand
Components
' When installing the stand, use the provided components and parts.
- ·
- · • · - -~ -.,~,---, ,~-~- -"'~
• •·•··
· ·- ~ -- ~ -- ~ · ·- - •- - ··· · ·--.~
[11
:_§)
______ ___ _ ::
Stand (depending on the model)
•
tA
~
D
-
-:~
-~ :::
'
•
~=--n
...
Guide Stand
~~ - • -·•
•
~-
~
••
• •• ~ -
_, .
,_ , ~
x8(M4XL12)
Screws
'
1
I
'
'
'
'
' -- -- -------~
@~x4
•
Top View
: 1~ 1 :
(M4X L12)
I
I
I
I
I
ATTENTION
1
8
Side View
•
CHEMICALS
GREASE
OIL
(Correct assembly)
(Incorrect assembly)
- - ------- - - - ----- - - -- -·a · -- ....,
f
0
•
f
f
0
Caution
i
_____________]i
_
> Make sure to distinguish between i~efr6r1t and back of:each componet)t~~ft(~s~~~btiqgJheh'l.
> Make sure that at least two per5pn$Aift and move the TV.
.·.· -···· .. . .
• ••
BN68-04027A-02
1111111111111111111111111111111111111111111
BN68-04027A-02
\\''I,\ \\ ':·
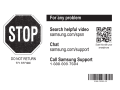
For·any problem
[!]J'L~[!]
Search helpful video
samsung.com/spsn
t.~: ~
-[!]
Chat
samsung.com/support
DO NOT RETURN
TO STORE
Scan this with your
smartphone
Call Samsung Support
1-888-899-7604
111111111 IIIII II
BN68-03608A-08
~
......
....
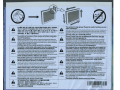
;--------- ~ q~-~- ~ ;fj.i:;_~-;.;;~-~ ~_i -~j~~-~~atG~ ; -------- - This- ;;;c~u_c_t-i; high 9i;s-sy~ Pie~-.;; ~;;;f~l ~i ;~;,~~~ -~;;tc_h_ ;
: J\.
: aA
~ Ai ;J;~ jt~~ 9iAfa H"!l $0i ~Afl.a Ai~ 1HI:fl~ l:f~SJ.I
J;i~~;J;~ ~Ofl !!'tr:7fa o1g~!<)t
~jti 1SiaL"-'
1
: !t~Oi
1o
""~ z:.Ai~-Do.
AtltJfic ll
"-''-'3
1
:
H
"-'6iJ'itA~·. . .·~~.£.£ :
4
a~o~
c:KI~2nii.R7 I7 L
t MW>Afl •
•e.!
r
~A-=~-:
At*ati~At.S. .
Oliiln.....
IAH::rl ......:o161 lr-L
6
1!!!-.o;v ·c"!! 1
'"" '-~'-~·
J\.
aA
1
:
English
1
while Installation.
1
frontcablllet.makesure}QiluseonlylheprOYideddothonwhidltospraywater4tootlmesbe·
!
Onty use water as a cleansing solution.
1
,Mak.esuretobrushofflhedutontheprOVIdeddoltlbeforeclean~r~gthecabtnet For~arung the:
forewipl'lgitoutsoftly•nonedirection.Afterdean.ng.wl~thecabinettoremoveanymoisture. :
·-----------------------------------------------------------·
Ce prodult est recouvert d'une couche de brtllant-----------·
vulnerable : ----------------------------------------------DieMs Produkt hat elne hochglinzende Oberfl i che,
die sehr
J\.
aA
1
:
Franya•s
~ ---------
~
• ltal1ano
!
aux rayures ; II convient, par consequent, de rester vigilant
durant l'lnstallatlon.
Velllez Aen lever Ia salete al'alde du chiffon foornl avant de nettoyer le cMssls. Pour
nettoyer le meuble avant, assurez-vous de n'utiliser que le chiff or foumL Aspergez-le
d'eau 4 ~ 6 fols pu1s nertoyezen frottant dans une seule direction. Apr~ le nenoyage,
essuyez le chassis pour enlever l'humidrre
N'utlllsez que de l'eau comma produit de nettoyage.
Ieicht zerkratzt warden kann, weshalb wihrend dar Montage
besondere Vorslcht geboten i st.
Vergewissern Sle slch, class das mitgelleferte Tuch sauber 1st. bevor Sie es zum Reln1gen
des Gehauses ver.venden.Zum Reinigen der Vordersette verwenden Sie brt te our das
mltgelieferte Tuch. auf das sle 4 bls6 SpntzerWasser auftragen. Wlschen Sle dann 1n e1ne
R1chtur~g vorsictltig Ober die Aache. Wischen Sie das Gehiuse nach dem Retn1gen trocken.
Verwenden Sie nur Wasser als Relnlgungsmlttel.
ir-P',.;,d;it~ ~t-o-1~ici0 ~.1; ;~p;,fl-~~~; ~t;; ~ ~~-;r~eli;.;~~~;
~ ~~~i~t; .;.~ 'briir~~t; ;~ ~;;,fi -ci~ - ;
facilmente; occorre fare atteiW
. ·one durante f'installazione.
: ~
vulnerable a annuos; tenga mucho c11ldado durante Ia lnstalaciOn.
Pnmadieffettuare lapulim deltelaio,assKUrars• che~ pannoapposnamentefomltosia :
Elimine Ia suciedad del pai'lo suministradoantesde timplar Ia caja. Para limpiar ella
pulito. ~rpufnlaJWttanteriotedelcabinet.assicurarsidiutilimresolo il pannofom.to. 1
caja frontal, asegwese de que uo1iza unicamente un pal\oyde que 1o rooa entre 4
chedovrh:sserespruzzatod'acqua4o6volte primadi strofi narlodeliatameme 10
:
~
y6 vecesantesde pasario s~ en una direcci6n. Despuesde limpiarla ca,a
1
un·unicacfllUIOOe.Oopolapulizia,asciugaredte~aioperrimUOYereogrntracciad•umldiU. 1 Espa 0 1 sequelacUtdadosamenteparaeliminarlahumedad.
Come sostanza pulente, utiliuare solo acqua.
!
Umpie unicamente con agua.
:
Este produto possul um acabamento brtlhante na superficle
Ten produkt ma powierzchnitp lakierowan~ o w ysoklm potysku 1
particularmente sujeito a riscos; devem ser tomadas as
ktora jest bardzo podatna na zarysowani a, dlatego naleiy
devi das precau~ O.s durante a i nstala~ao.
J\ uwatac podczas montaiu.
Sacuda o podo pano forn~1do a'ltes ~e mpar a carxa. Para proceder Ahmpeza da
Przed ~i\P1en1em ~ c.zysza~nia obudowy nalezy strzepac brud z ~czone
pane frontal.cert.fi Que-se de cue unltza apenas o pano fornecido.ligeJrameme
szmatlcl. Do ayszczen.a przedn1ej ~ nalezy uzywai ~ie zalaczoneJ szmatKL
humedecido. limpando sua~;emente numa unkadire<:\~-Depoisda hmoeza.passe
Potsk1
kt6r~ nalezyspryskac 4-6 razywod~, a ~pnie przecierac powierzchn~w jednym
urn pano seco sobre a caix.1 do aparelho para remO\Ier a humidade.
kierunku. Po zakoi'Kzeniu czyszczenia wytrzee obud~ na sucho
•
Utiliz:e apenas agua como solu~ao de limpeza.
Jedynym odpowlednim srodkiem czySZ:CZJlCym jest woda.
:
si
-.
1
: J\.
1 aA
:
: Deutsch
1
:
i---------
ti;.;;
1;
·------------------------------ ---------------------------- ·-------------------------------------------------- -- --------4
: J\.
: aA
1
: Ponugu~s
1
:
aA
-;;,;..-.;".~;;,; ~~~.;.:.;~;,;; ;,~;;; 7--------- o;o~o~ ~~~~•.;,;~~,-;.~~-Yiz~'Yi ~iz:ii;;;,~;~ k~;;.-,;;.-.~~t.;;----- ·
~--------- "~~;;;;;~..;:;;o;~ -y~;p;.i~T~~
J\.
aA
p
no~panan.; co6ntOA8MTe ocTopo•Hocn. •o •peMR ycTaHoaKM.
nl!~ 0..~~ t<OpnyCa, COlPI\Te CHeron bUlb COOMOWbiO IIC)IItlaraeMCJM TKaHII. np11 <4Mme
•
YCCKI/11!1
:
:
:
1
nep!AJ1eil CTOpoH~o~KOpnyca MCilOilbl}'ifre ront>«< npMnaraeMyiO n<.aHt>, npe.QSap~TellbHO
yaslilli(HI'I ee 4-6 pa3 pacnblll~lle'4 snar.~ . 3areM6eJ nMwlHIX yot1111ii Bbl~paMTe.QB~<.-«ett~AAM :
1
a OllHOM Hanpal!lleHMII. Ooci1t 'IMCTIU18birp~rre KOOnyc.Qo nOilfiOI"O y~W~eH~R snail~.
Mcnon~o~yine AI' II 114MCTICM TOnltKO ao"y.
:
J\.
aA
T rk
u ~e
dolayestyla kurulum e.snastnda dikkatll olunmahdtr.
Dofab1 temizlemeden 5nce, 0r0nie birlikte saglanan bezin ftr~ lie temiZiendiQinden em10
olun. On kab1ni temizlemek i~in yaln1zca birlikte gelen kuma~• kullantn ve kuma$& 4 ila 6
~z su pOskOrmlkten sonra tek ydniU olarak nazik~e silin. Temizledlkten sonra, nemden
1
annd1rmak l9n dolabiSIIin.
Temizleme ~ozeltisl olarak yalnezca su kullanen.
:
r---------------------------------------------------------·-----------------------------------------------------------·
ili=li!'-1.;'ti=§a, ~~t-t~•@'ilj\ll.•1-~ii~XIH1i¥fiii.
:
I
i~--------~ ~~~iJ}!~~~~~---if!~!i~~~=!~!!~H:s£~~1~**:·~
i
________ --------------- __ ~
7.Mim
Ill IIII IIIUII I IIIII III~II I II ~111 1
BN63-023688-00
This symbol indicates that high voltage is present
inside. It is dangerous to make any kind of contact
with any internal part of this product.
CAUTION: TO REDUCE THE RISK OF ELECTRIC SHOCK, DO NOT
REMOVE COYER (OR BACK). THERE ARE NO USER SERVICEABLE
PARTS INSIDE. REFER ALL SERVICING TO QUALIFIED PERSONNEL.
This symbol alerts you that important literature
concerning operation and maintenance has been
included with this product.
• The slots and openings in the cabinet and in the back or bottom are provided for necessary ventilation. To ensure reliable operation of this
apparatus, and to protect it from overheating, these slots and openings must never be blocked or covered.
- Do not cover the slots and openings with a cloth or other materials.
- Do not block the slots and openings by placing this apparatus on a bed, sofa, rug or other similar surface.
- Do not place this apparatus in a confined space, such as a bookcase, or built-in cabinet, unless proper ventilation is provided.
• Do not place this apparatus near or over a radiator or heat resistor, or where it is exposed to direct sunlight.
• Do not place a water containing vessel( vases etc.) on this apparatus, as this can result in a risk of fire or electric shock.
• Do not expose this apparatus to rain or place it near water(near a bathtub, washbowl, kitchen sink, or laundry tub, in a wet basement, or
near a swimming pool etc.). If this appratus accidentally gets wet, unplug it and contact an authorized dealer immediately.
Make sure to pull out the power cord from the outlet before cleaning.
• This appratus uses batteries. In your community there might be regulations that require you to dispose of these batteries properly under
environmental considerations. Please contact your local authorities for disposal or recycling information.
• Do not overload wall outlets, extension cords or adaptors beyond their capacity, since this can result in fire or electric shock.
• Power-supply cords should be routed so that they are not likely to be walked on or pinched by items placed upon or against them, paying
particular attention to cords at plug end, adaptors and the point where they exit from the appliance.
• To protect this apparatus from a lightning storm, or when it is left unattended and unused for long periods of time, unplug it from the wall
outlet and disconnect the antenna or cable system. This will prevent damage to the set due to lightning and power line surges.
• Before connecting the AC power cord to the DC adaptor outlet, make sure the voltage designation of the DC adaptor corresponds to the
local electrical supply.
• Never insert anything metallic into the open parts of this apparatus. Doing so many create a danger of electric shock.
• To avoid electric shock, never touch the inside of this apparatus. Only a qualified technician should open this apparatus.
• Make sure to plug the power cord in until it is firmly inserted. When removing the power cord, make sure to hold the power plug when
pulling the plug from the outlet. Do not touch the power cord with wet hands.
• If this appratus does not operate normally- in particular, if there are any unusual sounds or smells coming from it
- unplug it immediately and contact an authorized dealer or service center.
• Be sure to pull the power plug out of the outlet if the TV is to remain unused or if you are to leave the house for an extended period of
time (especially when children, elderly or disabled people will be left alone in the house).
- Accumulated dust can cause an electric shock, an electric leakage or a fire by causing the power cord to generate sparks and heat or the
insulation to deteriorate.
• Be sure to contact an authorized service center, when installing your set in a location with heavy dust, high or low temperatures, high
humidity, chemical substances and where it operates for 24 hours such as the airport, the train station etc.
Failure to do so may cause serious damage to your set.
• Use only a properly grounded plug and receptacle.
- An improper ground may cause electric shock or equipment damage. (Class I Equipment only.)
• To disconnect the apparatus from the mains, the plug must be pulled out from the mains socket, therefore the mains plug shall be readily
operable.
• Do not allow children to hang onto the product.
• Store the accessories (battery, etc.) in a location safely out of the reach of children.
• Do not install the product in an unstable location such as a shaky self, a slanted floor or a location exposed to vibration .
• Do not drop or impart any shock to the product. If the product is damaged, disconnect the power cord and contact a service center.
• Unplug the power cord from the power outlet and wipe the product using a soft, dry cloth. Do not use any chemicals such as wax, benzene,
alcohol, thinners, insecticide, air freshener, lubricant or detergent. This may damage the appearance or erase the printing on the product.
• Apparatus shall not be exposed to dripping or splashing.
• Do not dispose of batteries in a fire.
• Do not short circuit, disassemble or overheat the batteries.
• Danger of explosion if battery is incorrectly replaced. Replace only with the same or equivalent type.
• WARNING- TO PREVENT THE SPREAD OF FIRE, KEEP CANDLES OR OTHER OPEN FLAMES AWAY
FROM THIS PRODUCT AT ALL TIMES .
- English-
I 1111111111111111111111111
AA68-03242L-08
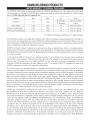
SAMSUNG BRAND PRODUCTS
LIMITED WARRANTY TO ORIGINAL PURCHASER
This SAMSUNG brand product, as supplied and distributed by SAMSUNG and delivered new, in the original carton to the original
consumer purchaser, is warranted by SAMSUNG against manufacturing defects in materials and workmanship for a limited warranty
period of: (90 Days Parts and Labor for Commercial Use)
Categories
Parts
Labor
LCD/LED TV
1 Year
1 Year
Plasma Display
1 Year
1 Year
Projector (Excluding Lamp**)
2 Year
PICO & LED Pocket Projector
1 Year
Size
Service
40" and Larger
Carry-In or In Home
37" and Smaller
Carry-In
All
Carry-In or In Home
2 Year
All
Carry-In or Pick up
1 Year
All
Carry-In or Pick up
** 180 Days after Purchasing and 600 Hours of Use Lamp on Projector
This limited warranty begins on the original date of purchase, and is valid only on products purchased and used in the United States. To
receive warranty service, the purchaser must contact SAMSUNG for problem determination and service procedures. Warranty service can
only be performed by a SAM SUNG authorized service center. The original dated bill of sale must be presented upon request as proof of
purchase to SAMSUNG or SAMSUNG's authorized service center.
SAMSUNG will repair or replace this product, at our option and at no charge as stipulated herein, with new or reconditioned parts or
products if found to be defective during the limited warranty period specified above. All replaced parts and products become the property
of SAM SUNG and must be returned to SAMSUNG. Replacement parts and products assume the remaining original warranty, or ninety (90)
days, whichever is longer.
Certain products are eligible for In-home service at Samsung's discretion. To receive in-home service, the product must be unobstructed
and accessible to service personnel. If during in-home service repair can not be completed, it may be necessary to remove, repair and
return the product. If in-home service is unavailable, SAMSUNG may elect, at our option, to provide for transportation of our choice
to and from a SAMSUNG authorized service center. Otherwise, and for 37" and smaller LCD/LED TV, transportation to and from the
SAMSUNG authorized service center is the responsibility of the purchaser.
This limited warranty covers manufacturing defects in materials and workmanship encountered in normal, and except to the extent
otherwise expressly provided for in this statement, noncommercial use of this product, and shall not apply to the following, including, but
not limited to: damage which occurs in shipment; delivery and installation; applications and uses for which this product was not intended;
altered product or serial numbers; cosmetic damage or exterior finish; accidents, abuse, neglect, fire, water, lightning or other acts of
nature; use of products, equipment, systems, utilities, services, parts, supplies, accessories, applications, installations, repairs, external
wiring or connectors not supplied or authorized by SAMSUNG which damage this product or result in service problems; incorrect
electrical line voltage, fluctuations and surges; customer adjustments and failure to follow operating instructions, cleaning, maintenance
and environmental instructions that are covered and prescribed in the instruction book; reception problems and distortion related to
noise, echo, interference or other signal transmission and delivery problems; brightness related to normal aging, or burned-in images.
SAMSUNG does not warrant uninterrupted or error-free operation of the product.
THERE ARE NO EXPRESS WARRANTIES OTHER THAN THOSE LISTED AND DESCRIBED ABOVE, AND
NO WARRANTIES WHETHER EXPRESS OR IMPLIED, INCLUDING, BUT NOT LIMITED TO, ANY IMPLIED
WARRANTIES OF MERCHANTABILITY OR FITNESS FOR A PARTICULAR PURPOSE, SHALL APPLY AFTER
THE EXPRESS WARRANTY PERIODS STATED ABOVE, AND NO OTHER EXPRESS WARRANTY OR GUARANTY
GIVEN BY ANY PERSON, FIRM OR CORPORATION WITH RESPECT TO THIS PRODUCT SHALL BE BINDING ON
SAMSUNG. SAMSUNG SHALL NOT BE LIABLE FOR LOSS OF REVENUE OR PROFITS, FAILURE TO REALIZE
SAVINGS OR OTHER BENEFITS, OR ANY OTHER SPECIAL, INCIDENTAL OR CONSEQUENTIAL DAMAGES
CAUSED BY THE USE, MISUSE OR INABILITY TO USE THIS PRODUCT, REGARDLESS OF THE LEGAL THEORY
ON WHICH THE CLAIM IS BASED, AND EVEN IF SAMSUNG HAS BEEN ADVISED OF THE POSSIBILITY OF
SUCH DAMAGES. NOR SHALL RECOVERY OF ANY KIND AGAINST SAMSUNG BE GREATER IN AMOUNT
THAN THE PURCHASE PRICE OF THE PRODUCT SOLD BY SAMSUNG AND CAUSING THE ALLEGED DAMAGE.
WITHOUT LIMITING THE FOREGOING, PURCHASER ASSUMES ALL RISK AND LIABILITY FOR LOSS,
DAMAGE OR INJURY TO PURCHASER AND PURCHASER'S PROPERTY AND TO OTHERS AND THEIR PROPERTY
ARISING OUT OF THE USE, MISUSE OR INABILITY TO USE THIS PRODUCT SOLD BY SAMSUNG NOT CAUSED
DIRECTLY BY THE NEGLIGENCE OF SAM SUNG. THIS LIMITED WARRANTY SHALL NOT EXTEND TO ANYONE OTHER
THAN THE ORIGINAL PURCHASER OF THIS PRODUCT, IS NONTRANSFERABLE AND STATES YOUR EXCLUSIVE
REMEDY.
Some states do not allow limitations on how long an implied warranty lasts, or the exclusion or limitation of incidental or consequential
damages, so the above limitations or exclusions may not apply to you. This warranty gives you specific legal rights, and you may also
have other rights which vary from state to state.
To obtain warranty service, please contact SAMSUNG at:
Samsung Electronics America, Inc.
85 Challenger Road
Ridgefield Park, NJ 07660-2112
1-800-SAMSUNG (7267864)- www.samsung.com
1-800-749-0260 : Only Projector
IMPORTANT WARRANTY INFORMATION REGARDING TELEVISION FORMAT VIEWING
Standard screen format televisions (4:3, the aspect ratio of the screen width to height) are primarily designed to view standard format full-motion video.
The images displayed on them should primarily be in the standard 4:3 ratio format and constantly moving. Displaying stationary graphics and images on screen, such
as the dark top and bottom let:terOOx bars (wide screen pictures), should be limited to no more than 15% of the total television viewing per week.
Wtde screen format televisions (16:9, the aspect ratio of the screen width to height) are primarily designed to view wide screen format full-motion video.
The images displayed on them should primarily be in the wide screen 16:9 ratio format, or expanded to fill the screen if your model offers this feature, and constantly
moving. Displaying stationary graphics and images on SCTeen, such as the dark side-bars on non-expanded standard format television video and programming, should
be limited to no more than 15% ofthe total television viewing per week.
Additionally, vie'A-1ng other stationary images and text such as stock marl<et reports, video game displays, station logos, web sites or computer graphics and patterns,
should be limited as described above for all televisions. Displaying any stationary images that exceed the above guidelines can cause uneven aging of Plasma Display
Panels that leave subtle, but permanent burned-in ghost images in the television picture. To avoid this, vary the programming and images, and primarily display full
screen moving images, not stationary patterns or dark bars. On television models that offer picture sizing features, use these controls to view the different formats as a
full screen picture.
Be careful in the selection and duration of television formats used for viewing. Uneven Plasma Display Panels aging as a result of format selection and use,
as well as other burned-in images, is not covered by your Samsung limited warranty.
I 1111111111111111111111111
BP68-00263E-03