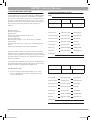
1
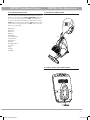
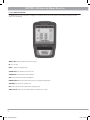
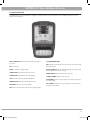
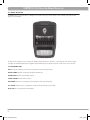
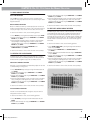
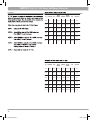
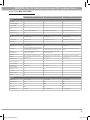
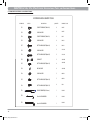
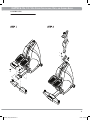
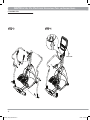
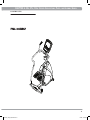
PREMIUM SERIES
STEPPER
Premium_stepper_090723.indd 1
7/23/09 10:18 AM
Premium_stepper_090723.indd 1
7/23/09 10:18 AM
Table
Premium_stepper_090723.indd 2
of
Contents
CHAPTER 1: IMPORTANT SAFETY INSTRUCTIONS
PAGES
1.1
1.2
1.3
1.4
1.5
1.6
Before Getting Started ..............................................................................................
Proper Usage ...........................................................................................................
Read and Save These Instructions .............................................................................
Electrical Requirements ...........................................................................................
Battery Charge (5x, 7x) ...........................................................................................
Grounding Instructions ............................................................................................
CHAPTER 2: PREVENTATIVE MAINTENANCE
2.1
2.2
2.3
2.4 Cleaning Tips ........................................................................................................... 04
Check for Damage Parts ............................................................................................. 04
Care and Maintenance Instructions ............................................................................ 05
Preventative Maintenance Check List ......................................................................... 05
CHAPTER 3: USING MANAGER PREFERENCE
3.1
Using Manager Preference Mode ................................................................................ 06
CHAPTER 4: SERIAL NUMBER LOCATION
4.1
4.2
Stepper Serial Number Location ............................................................................... 06
Universal Console Serial Number Location ................................................................. 06
CHAPTER 5: USING THE STEPPER
5.1
5.2
5.3
5.4
5.5
Console Description .................................................................................................
Manual Workout Operation .......................................................................................
Operating Level Based Programs ...............................................................................
Heart Rate Control Workout Operation .......................................................................
Fit Test ...................................................................................................................
CHAPTER 6: STEPPER SPECIFICATIONS, PARTS AND ASSEMBLY GUIDE
6.1
6.2
6.3
Model Specifications ................................................................................................ 12
Fasteners and Assembly Tools ................................................................................... 13
Assembly Steps ....................................................................................................... 14
03
03
03
04
04
04
07
10
10
10
11
7/23/09 10:18 AM
CHAPTER 1: Important Safety Instructions
1.1 BEFORE GETTING STARTED
1.3
It is the sole responsibility of the purchaser of Matrix Fitness Systems
products to instruct all individuals, whether they are the end user or
supervising personnel, on proper usage of the equipment.
It is recommended that all users of Matrix Fitness Systems exercise
equipment be informed of the following information prior to its use.
READ AND SAVE
THESE INSTRUCTIONS
• This stepper is intended for commercial use
• To insure your safety and protect the equipment, read all instructions before
operating the MATRIX Stepper.
• Unsupervised Children must be kept away from this equipment When using an electrical product, basic precautions should always be followed,
including the following:
1.2 PROPER USAGE
Do not use the equipment in any way other than designed or intended by
the manufacturer. It is imperative that all Matrix Fitness Systems
equipment is used properly to avoid injury.
• Keep hands and feet clear of moving parts at all times to avoid injury.
• Unsupervised children must be kept away from this equipment.
• Do not wear loose clothing while on equipment.
1’ (305 mm)
Stepper
Please leave a 24” (610
mm) behind the stepper. This
zone is to allow easy access
to the stepper and gives the
user an easy exit path from
the machine.
• Always unplug this equipment from the electrical outlet immediately after using
and before cleaning.
WARNING
: To reduce the risk of burns, fire, electrical shock or
injury to persons that may be associated with using this product:
• An appliance should never be left unattended when plugged in. Unplug the
entertainment equipment from outlet when not in use and before putting on or
taking off parts.
• This product must be used for its intended purpose described in this Owner’s
Guide. Do not use other attachments that are not recommended by the
manufacturer. Attachments may cause injury.
• To prevent electrical shock, never drop or insert any object into any opening.
• Do not remove side covers. Service should only be done by an authorized
service technician.
• Never operate the Stepper with the air opening blocked. Keep the air opening
clean, free, of lint, hair and the like.
• Never operate the product if it has a damaged cord or plug, if it is not working
properly, if it has been damaged, or immersed in water. Return the unit to a service center for examination and repair.
2’ (610 mm)
• Do not carry this unit by entertainment equipment power cord or use cord
as handle.
• Keep any of the entertainment equipment power cords away from heated surfaces
• Keep hands and loose clothing away from moving parts.
• Close supervision is necessary when the Stepper is used by or near children or
disabled persons.
• Do not use outdoors.
• Do not operate where aerosol (spray) products are being used or where oxygen is
being administered.
• Connect this Stepper to a properly grounded outlet only.
• To disconnect, turn all entertainment controls to the off position, then remove
plug from outlet.
CAUTION
: If you experience chest pain, nausea, dizziness or
shortness of breath, STOP exercising immediately and consult a
physician before continuing.
3
Premium_stepper_090723.indd 3
7/23/09 10:18 AM
CHAPTER 1: Important Safety Instructions
CHAPTER 2: Preventative Maintenance
1.4 ELECTRICAL REQUIREMENTS
1.6 GROUNDING INSTRUCTIONS
The Matrix Stepper has different electrical requirements depending on the
model chosen. The chart below should assist you with your facility planning:
The stepper must be grounded. If it should malfunction or breakdown, grounding
provides a path of least resistance for electric current to reduce the risk of electric shock. The stepper is equipped with a cord having an equipment-grounding
conductor and a grounding plug. The plug must be plugged into an appropriate
outlet that is properly installed and grounded in accordance with all local codes
and ordinances. If the user does not follow these grounding Instructions, the
user could void the Matrix limited warranty.
5x: These products are designed to be self powered and do not require an
external power supply source to operate. However, these units can be AC
powered if an optional power cord is purchased. This will power the console
at all times and requires no minimum RPM for operation. These units can be
daisy-chained together, up to 4 units per dedicated 15 amp circuit, using a
Matrix daisy-chain cord adapter (sold separately).
7x: These products can operate without power; however, the machine must
boot the software with each new user. This can mean a delay of up to 35
seconds while the machine’s operating system prepares for a workout. It’s
similar to turning your cell phone on for the 1st time of the day. These units
can also be AC powered. This will power the console at all times and requires
no minimum RPM for operation. A powered product lowers the starting
resistance and is easier to use for beginners. These units can be daisychained together, up to 4 units per dedicated 15 amp circuit, using a Matrix
daisy-chain cord adapter (sold separately).
7xe: These products must be AC powered. These units can be daisy-chained
together, up to 4 units per dedicated 15 amp circuit, using a Matrix daisychain cord adapter (sold separately).
For your safety and for the performance of your Matrix product, the ground
on your circuits must be non-looped. Please refer to NEC article 210-21
and 210-23. Any alterations to the standard Matrix power cords will void all
warranties.
DANGER
: Improper connection of the equipment-grounding conductor can result in the risk of electric shock. Check with a qualified electrician or
serviceman if the user is in doubt as to whether the product is properly grounded. Do not modify the plug provided with the product if it will not fit the outlet;
have a proper outlet installed by a qualified technician.
2.1 RECOMMENDED CLEANING TIPS
Preventative maintenance and daily cleaning will prolong the life and look of your
MATRIX Stepper.
Please read and follow these tips.
• P
osition the equipment away from direct sunlight. The intense UV light can
cause discoloration on plastics.
• Locate your equipment in an area with cool temperatures and low humidity.
• Clean with a soft 100% cotton cloth.
1.5 BATTERY CHARGE (5X, 7X)
• Clean with soap and water or other non-ammonia based all purpose cleaners.
The Stepper saves its battery charge by moving into a shutdown mode
whenever STEP FASTER appears on the display. If the user does not
maintain a step rate above 35 steps per minute, then a 30-second
shutdown process begins.
• Wipe foot pads, handles, heart rate grips, and handlebars clean after each use.
When the battery voltage is low, LOW BATTERY appears on the display if
the unit is moving into the shutdown mode. The following situation is the
time to recharge the battery:
• Check pedal motion and stability.
•
If no one has used the unit for an extended period of time, the battery
may need recharging.
The unit continues to function with a low battery, however, user
and program information is lost once the user stops.
•
If the battery must be recharged, use the optional power adapter charging
unit. The charger should be connected to the Stepper for a minimum of
eight hours to ensure a thorough charge. After a completion of charge,
the battery light turns from red into green (see illustration). If LOW
BATTERY still appears on the display in a full of charging, the battery
could be extinct. Please check with an authorized service technician for
replacing the battery.
CAUTION: The battery stored inside the unit contains hazardous
materials to the environment. Proper disposal of the battery is required
by the local law.
• D
o not pour liquids directly onto your equipment. This can cause damage to the
equipment and in some cases electrocution.
• Adjust leveling feet when equipment wobbles or rocks.
• Maintain a clean area around equipment, free from dust and dirt.
2.2 CHECK FOR DAMAGED PARTS
DO NOT use any equipment that is damaged or has worn or broken parts. Use only
replacement parts supplied by Matrix Fitness Systems.
MAINTAIN LABELS AND NAMEPLATES. Do not remove labels for any reason. They
contain important information. If unreadable or missing, contact Matrix Fitness
Systems for a replacement. 1-866-693-4863, www.matrixfitness.com
MAINTAIN ALL EQUIPMENT Preventative maintenance is the key to smooth
operating equipment. Equipment needs to be inspected at regular intervals.
Defective components must be replaced immediately. Improperly working
equipment must be kept out of use until it is repaired. Ensure that any person(s)
making adjustments or performing maintenance or repair of any kind is qualified to
do so. Matrix Fitness Systems will provide service and maintenance training at our
corporate facility upon request or in the field
if proper arrangements are made.
4
Premium_stepper_090723.indd 4
7/23/09 10:18 AM
CHAPTER 2: Preventative Maintenance
2.3 CARE AND MAINTENANCE INSTRUCTIONS
2.4 PREVENTATIVE MAINTENANCE CHECKLIST
In order to maximize life span, and minimize down time, all MATRIX equipment
requires regular cleaning, and maintenance items performed on a scheduled
basis. This section contains detailed instructions on how to perform these items,
the frequency of which they should be done, and a check list to sign off each
time service is completed for a specific machine. Some basic tools and supplies
will be necessary to perform these tasks which include (but may not be
limited to):
Facility:
Metric Allen wrenches
#2 Phillips head screwdriver
Adjustable wrench
Torque wrench (capability to read foot lbs, and inch lbs)
Lint free cleaning cloths
Teflon based spray lubricant
Mild, water soluble, detergent – such as “Simple Green”, or other Matrix
approved product
Teflon based spray lubricant such as “Super Lube”, or other Matrix approved
product
Vacuum cleaner w/extendable hose and crevasse tool attachment
Please find the worksheet sample for our equipment provided in this manual
and make copies as needed, keeping them up to date as the required service/
maintenance items are performed. It is critical that you also log the accumulated
(total) amount of miles or running hours on the equipment each time service or
maintenance is performed.
You may periodically see addendums to this document, as the Matrix Technical
Support Team identifies items that require specific attention, the latest version
will always be available on the Matrix website, matrixfitness.com
MAKE:
MODEL:
LOCATION:
TECHNICIAN:
S/N
DATE:
Inspect power cords
Check resistance system
Clean/lube guide rods
Check E-stop cord/button
Lubricate pivot points
Inspect belt/cable assy.
Vacuum/clean under cover
Check connecting joints
Check locking pins
Check motor drive belt
Remove covers, check belts
Check pulleys
Check running belt
Check pedal & crank
Inspect upholstery
Flip/replace deck
Check/lube seat adjustment
Check/tighten hardware
De-wax rollers
Verify electronics operation
Lubricate Acme screw
Notes/comments
MAKE:
MODEL:
LOCATION:
TECHNICIAN:
S/N
DAILY MAINTENANCE ITEMS
1)
Clean entire machine use water and mild detergent such as “Simple
Green”, or other Matrix approved solution (cleaning agents should be
alcohol and ammonia free).
DATE:
Inspect power cords
Check resistance system
Clean/lube guide rods
Check E-stop cord/button
Lubricate pivot points
Inspect belt/cable assy.
Vacuum/clean under cover
Check connecting joints
Check locking pins
Check motor drive belt
Remove covers, check belts
Check pulleys
Check running belt
Check pedal & crank
Inspect upholstery
Flip/replace deck
Check/lube seat adjustment
Check/tighten hardware
De-wax rollers
Verify electronics operation
Lubricate Acme screw
Notes/comments
5
Premium_stepper_090723.indd 5
7/23/09 10:18 AM
CHAPTER 3: Using Manager Preference
3.1 USING MANAGER PREFERENCE MODE
CHAPTER 4: Serial Number Location
4.1 STEPPER SERIAL NUMBER LOCATION
This section allows a user to manipulate default settings for the machines.
It may be accessed by pressing the LEVEL UP/LEVEL DOWN simultaneously
for 5 seconds. To change a setting, press “ENTER” on the keypad and
use the Level buttons and numeric keypad to change the values. Pressing
“ENTER” again will save the change. Pressing “BACK” will bring you to the
previous menu. To exit manager’s mode, hold “STOP” down for 5 seconds.
Below is a list of the settings.
Maximum Time
Default Time
Default Level
Default Age
Default Weight
Accumulated Distance
Accumulated Time
Software Version
Timer Mode
Speed/Distance Mode
Out of Order
Gender
Language
Sound Mode
SERIAL # PLACEMENT
SERIAL#
PLACEMENT
4.2 UNIVERSAL CONSOLE SERIAL NUMBER LOCATION
6
Premium_stepper_090723.indd 6
7/23/09 10:18 AM
CHAPTER 5: S5x Overlay And Workout Description
5.1 S5x CONSOLE DESCRIPTION
The MATRIX stepper is inspected before it is packaged. It is shipped in two pieces: the base and the console. Carefully unpack the unit and
dispose of the box material.
WORKOUT KEYS: Simple program view and selection buttons.
GO: One touch Start.
ENTER: To confirm each program setting.
UP/DOWN LEVEL: Easy information and level selection.
UP/DOWN TIME: Easy information and time adjustment.
STOP: Ends workout and shows workout summary data.
NUMBER KEYPAD: Workout data input for workout setup. Level adjustment during workout.
COOL DOWN: Puts stepper into Cool Down mode.
FAN: Allows for fan speed selection (fan has three operating speeds.)
TOGGLE DISPLAY: Allows user to select what information is displayed on the console.
7
Premium_stepper_090723.indd 7
7/23/09 10:18 AM
CHAPTER 5: S7x Overlay And Workout Description
S7x CONSOLE DESCRIPTION
The MATRIX stepper is inspected before it is packaged. It is shipped in two pieces: the base and the console. Carefully unpack the unit and
dispose of the box material.
MULTI-PURPOSE KEYS: Keys have different functions depending on
each screen.
GO: One touch Start.
ENTER: To confirm each program setting.
UP/DOWN LEVEL: Easy information and level selection.
UP/DOWN TIME: Easy information and time adjustment.
STOP: Ends workout and shows workout summary data.
NUMBER KEYPAD: Workout data input for workout setup.
COOL DOWN: Puts stepper into Cool Down mode.
S7x ENTERTAINMENT ZONE
iPOD®: Will take the user directly to the iPod screen to allow for iPod control
and playlist selection.
VOLUME UP/DOWN: Adjusts the volume output through the headphone jack
of the integrated console TV or iPod output.
NUMBER KEYPAD: Allows for easy TV channel selections.
CHANNEL UP/DOWN: Allows for channel selection.
DISPLAY MODE: Allows user to cycle through console display options, iPod,
TV or profile display.
LAST CHANNEL: Allows the user to cycle between the current channel and
the previous channel viewed.
FAN: Allows for fan speed selection (fan has three operating speeds.)
8
Premium_stepper_090723.indd 8
7/23/09 10:18 AM
CHAPTER 5: S7xe Overlay And Workout Description
S7xe CONSOLE DESCRIPTION
The MATRIX stepper is inspected before it is packaged. It is shipped in two pieces: the base and the console. Carefully unpack the unit and
dispose of the box material.
The S7xe has a full integrated touch screen display. All information required for workouts is explained on screen. Exploration of the interface is highly
encouraged. The information explaining how to program for various workouts will give an explanation about the contents of each screen on the S7xe.
S7xe ENTERTAINMENT ZONE
iPOD®: Will take the user directly to the iPod screen to allow for iPod control and playlist selection.
VOLUME UP/DOWN: Adjusts the volume output through the headphone jack.
NUMBER KEYPAD: Allows for easy TV channel selections.
CHANNEL UP/DOWN: Allows for channel selection.
DISPLAY MODE: Allows user to cycle through console display options, iPod, TV or profile display.
LAST CHANNEL: Allows the user to cycle between the current channel and the previous channel viewed.
QUICK START: One-touch start. Starts a manual workout.
9
Premium_stepper_090723.indd 9
7/23/09 10:18 AM
CHAPTER 5: S5x, S7x, S7xe Overlay And Workout Description
5.2 MANUAL WORKOUT OPERATION
QUICK START OPERATION
Press the GO button and the stepper will enter into a manual mode of
operation. All energy expenditure values will be calculated using the default
weight measurement.
MANUAL WORKOUT OPERATION
Manual is a workout that allows you to manually adjust the level values at
anytime. The manual workout also contains a setup screen which allows you
to input your weight to help calculate a more accurate caloric burn rate.
To enter into this workout on a S5x, use the following guidelines:
1.Choose MANUAL by selecting the manual workout button and press ENTER.
2.Enter the desired workout length using the ARROW KEYS or the NUMBER
KEYPAD and press ENTER.
3.Enter user weight (user weight is used to calculate the caloric expenditure
value-providing an accurate weight helps to ensure an accurate caloric
expenditure rating for each user) using the ARROW KEYS or the NUMBER
KEYPAD and press ENTER.
4.Enter the desired initial level using the ARROW KEYS or the
NUMBER KEYPAD and press ENTER.
To enter into this workout on a S7x or S7xe, follow the onscreen prompts.
5.3 OPERATING LEVEL BASED PROGRAMS
Your Matrix stepper offers a variety of level-based workouts to challenge
users of all fitness levels. The following information will briefly explain the
workout and how to program the stepper for each workout selection.
ROLLING HILLS WORKOUT OPERATION
Rolling hills is a level-based workout that automatically adjusts the level value
to simulate walking or running up hills.
3.Enter the desired workout length using the ARROW KEYS or the NUMBER
KEYPAD and press ENTER.
4.Enter user weight (user weight is used to calculate the caloric expenditure
value, providing an accurate weight helps to ensure an accurate caloric
expenditure rating for each user) using the ARROW KEYS or the NUMBER
KEYPAD and press ENTER.
To enter into this workout on a S7x or S7xe, follow the onscreen prompts.
5.4 HEART RATE CONTROL WORKOUT OPERATION
Your Matrix stepper offers a heart rate control workout mode. The heart rate
control workout mode allows the user to program their desired heart rate
zone and the stepper will automatically adjust the level based upon the
user’s heart rate. The heart rate zone is calculated using the following equation: (220-Age)*%=target heart rate zone. The user must wear a telemetric
heart rate monitor or continually hold onto the contact heart rate grips for
this workout.
To enter into this workout on a S5x, use the following guidelines:
1.Choose TARGET HEART RATE by selecting the target heart rate workout
button and press ENTER.
2.Enter age using the ARROW KEYS or the NUMBER KEYPAD and
press ENTER.
3.Enter the desired percent of maximum heart rate using the ARROW KEYS
and press ENTER.
4.Enter the desired workout length using the ARROW KEYS or the NUMBER
KEYPAD and press ENTER.
5.Enter user weight (user weight is used to calculate the caloric expenditure
value, providing an accurate weight helps to ensure an accurate caloric
expenditure rating for each user) using the ARROW KEYS or the NUMBER
KEYPAD and press ENTER.
To enter into this workout on a S7x or S7xe, follow the onscreen prompts.
1.Choose ROLLING HILLS by selecting the rolling hills workout button and
press ENTER.
2.Enter the desired intensity using the ARROW KEYS or the NUMBER
KEYPAD and press ENTER.
3.Enter the desired workout length using the ARROW KEYS or the NUMBER
KEYPAD and press ENTER.
4.Enter user weight (user weight is used to calculate the caloric expenditure
value, providing an accurate weight helps to ensure an accurate caloric
expenditure rating for each user) using the ARROW KEYS or the NUMBER
KEYPAD and press ENTER.
To enter into this workout on a S7x or S7xe, follow the onscreen prompts.
FAT BURN WORKOUT OPERATION
Fat burn is a level-based workout that is designed to help user’s burn fat
through various resistance changes.
To enter into this workout on a S5x, use the following guidelines:
1.Choose FAT BURN by selecting the fat burn workout button and press
ENTER.
2.Enter the desired intensity level using the ARROW KEYS or the NUMBER
KEYPAD and press ENTER.
10
Premium_stepper_090723.indd 10
7/23/09 10:18 AM
CHAPTER 5: S5x, S7x, S7xe Overlay And Workout Description
5.5 FIT TEST
Age
EXCELLENT GOOD
ABOVE
AVERAGE
AVERAGE
BELOW
AVERAGE
POOR
VERY POOR
18-25
<79
79-89
90-99
100-105
106-116
117-128
>128
26-35
<81
81-89
90-99
100-107
108-117
118-128
>128
36-45
<83
83-96
97-103
104-112
113-119
120-130
>130
46-55
<87
87-97
98-105
106-116
117-122
123-132
>132
56-65
<86
86-97
98-103
104-112
113-120
121-129
>129
65 +
<88
88-96
97-103
104-113
114-120
121-130
>130
Age
EXCELLENT
GOOD
ABOVE
AVERAGE
AVERAGE
BELOW
AVERAGE
POOR
VERY POOR
18-25
<85
85-98
99-108
109-117
118-126
127-140
>140
26-35
<88
88-99
100-111
112-119
120-126
127-138
>138
36-45
<90
90-102 103-110
111-118
119-128
129-140
>140
46-55
<94
94-104
105-115
116-120
121-129
130-135
>135
56-65
<95
95-104
105-112
113-118
119-128
129-139
>139
65 +
<90
90-102
103-115
116-122
123-128
129-134
>134
11
Premium_stepper_090723.indd 11
7/23/09 10:18 AM
CHAPTER 6: S5x, S7x, S7xe Stepper Specifications, Parts,
and
Assembly Guides
6.1 S5x, S7x, S7xe MODEL SPECIFICATIONS
S7xe
S7x
S5x
Features
Step ranage
12.2”
12.2”
12.2”
Contact & telemetric HR
Yes
Yes
Yes
Ultra non-slip pedals
Yes
Yes
Yes
Q-factor
3.3”
3.3”
3.3”
Handlebar design
Ergonimically designed handrails and horn
Ergonimically designed handrails and horn
Ergonimically designed handrails and horn
Thumb switch controls
Yes
Yes
Yes
Technology
JID brushless generator
JID brushless generator
JID brushless generator
Power requirements
120v/60Hz AC power
Self-powered/optional AC power jack
Self-powered/optional AC power jack
Minimum watts
18
18
18
15” touch screen LCD
7” LCD
Dot-matrix LED
Time, distance (kilometers or miles), calories, calories per
hour, speed, incline, pace, heart rate, METs, Watts, Profile
Time, speed, floors climbed, calories, watts, level, heart
rate, SPM
User defined
multi-language display
Time, distance (kilometers or miles), calories, calories per
hour, speed, SPM, floors climbed, heart rate, METs, watts,
dynamic profile display, static profile display
Yes-English, German, French, Italian, Spanish, Dutch,
Portuguese, Chinese, Japanese
Yes-English, German, French, Italian, Spanish, Dutch,
Portuguese, Chinese, Japanese
No
Resistance levels
25
25
25
Workouts
Manual, rolling, intervals, fat burn, random, target HR,
constant watts, fit test
Manual, rolling, intervals, fat burn, random, target HR,
constant watts, fit test
Manual, rolling, intervals, fat burn, random, target HR,
constant watts, fit test
CSAFE, FitLinxx™ ready
Yes
Yes
Yes
On-the-fly program change
Yes
Yes
Yes
Fit Touch™ Technology
Yes
No
No
Integrated Vista Clear
Digital Ready Television
Yes-15” screen size
Yes-7” screen size
No
Wireless Data transmitter
Yes
Yes
Yes
iPod compatible
Yes
Yes
No
Nike + iPod compatible
Yes
Yes
No
Personal Fan
Yes
Yes
Yes
Overall dimensions
45”L x 31”W x 70.5” H
45”L x 31”W x 70.5” H
45”L x 31”W x 70.5” H
Maximum user weight
400lbs
400lbs
400lbs
Weight
211lbs
209lbs
208llbs
Shipping weight
239lbs
237lbs
236lbs
Electrical Requirements
AC powered
Self-power, power optional
Self-power, power optional
Resistance System
Console
Display type
Display feedback
Tech Specs
12
Premium_stepper_090723.indd 12
7/23/09 10:18 AM
CHAPTER 6: S5x, S7x, S7xe Stepper Specifications, Parts,
and
Assembly Guides
6.2 REQUIRED FASTENERS & ASSEMBLY TOOLS
FASTENERS AND ASSEMBLY TOOLS
REFERENCE
SKETCH
DESCRIPTION
QUANTITY
PAKEAGE COLOR
Z01
SOCKET HEAD BOLT(M8x16L)
8
WHITE
Z02
LOCK WASHER
8
WHITE
Z34
SOCKET HEAD BOLT(M8x25L)
2
BLUE
Z02
LOCK WASHER
4
BLACK
Z07
BUTTON HEAD BOLT(M8x40L)
4
BLACK
Z02
LOCK WASHER
2
YELLOW
Z10
BUTTON HEAD BOLT(M8x45L)
2
YELLOW
Z03
SCREW SET
2
ORANGE
Z05
BUTTON HEAD BOLT(M8x16L)
4
ORANGE
Z06
ARC WASHER
8
ORANGE
Z04
LOCK WASHER
3
GREEN
Z05
BUTTON HEAD BOLT(M8x16L)
3
GREEN
Z09
BUTTON HEAD BOLT(M5x15L)
4
RED
Z50
PHILLIPS DRIVER(4.5x50mm)
1
PURPLE
Z52
5mm ALLEN WRENCH
2
PURPLE
6mm ALLEN WRENCH
1
PURPLE
Z53
13
Premium_stepper_090723.indd 13
7/23/09 10:18 AM
CHAPTER 6: S5x, S7x, S7xe Stepper Specifications, Parts,
and
Assembly Guides
6
6.3 ASSEMBLY STEPS
Z01
Z02
Z02
Z01
Z07
Z09
Z09
Z02
14
Premium_stepper_090723.indd 14
7/23/09 10:18 AM
CHAPTER 6: S5x, S7x, S7xe Stepper Specifications, Parts,
and
Assembly Guides
6.3 ASSEMBLY STEPS
6
6
Z41
CONSOLE SCREW
Z02
Z10
Z04 x 3
Z05 x 3
Z34
Z03
Z06
Z06
Z03
Z05 x 4
Z06
Z06
Z05
15
Premium_stepper_090723.indd 15
7/23/09 10:18 AM
CHAPTER 6: S5x, S7x, S7xe Stepper Specifications, Parts,
and
Assembly Guides
6.3 ASSEMBLY STEPS
16
Premium_stepper_090723.indd 16
7/23/09 10:18 AM
Premium_stepper_090723.indd 17
7/23/09 10:18 AM
M AT R I X F I T N ESS SYST E M S | 1 61 0 L A N D M A R K D R I V E COT TAG E G ROV E W I 53 527 USA
To l l Fre e 8 6 6 . 693.4 8 63 m a t r i x f i t n e ss . co m Fa x 60 8 . 8 3 9. 8 687
PA RT # 0 0 0 0 0 8 8 2 1 0
REV. 1.4
Premium_stepper_090723.indd 18
7/23/09 10:18 AM