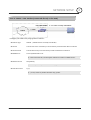
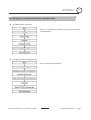
1
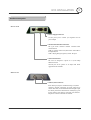
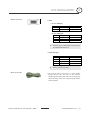
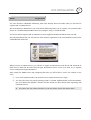
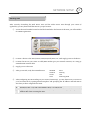
INSTRUCTION MANUAL Ver 1.2
NETWORK VIDEO SERVER / BB01
1
○
Introduction
3
About This Manual
3
Notes Before Starting
3
Modification and Development
4
Installation
4
NVS Installation
5
2
○
Product Description
5
DDNS Registration
8
Quick Start
9
NVS Setup
11
NVS Initial Setup via a Crossover Cable
11
3
○
4
○
Network Setup
13
Guide to Network Setup
13
Case A : Dynamic IP or PPPoE + Personal Router
14
Case B : Static IP + Personal Router
16
Case C : Static IP
18
Case D : Dynamic IP + DSL/Cable Modem
19
Case E : PPPoE + DSL Modem
20
Port Forwarding
21
Starting NVS
22
5
○
Web Viewer
24
6
○
Admin Tool
26
Video Tool
26
Control Tool
27
TCP/IP Tool
28
SMTP Tool
29
Date & Time Tool
30
Users Tool
31
7
○
Appendix
32
A : Determining Current TCP/IP setting
32
B : Changing your computer's IP address and subnet mask
33
C : Port Forwarding
34
8
○
FAQ
36
Specification
10 Internet TCP/IP Basics
○
40
41
9
○
Network Video Server User’s Manual
/BB01
www.bluenetvideo.com
2/2
INTRODUCTION
CONTENTS
1
About This Document
If an administrator has previous knowledge of networking, please follow the Quick Start Guide.
If an administrator is new to networking and has no previous knowledge of the subject, please follow the
step-by-step procedures for configuring, installing, and accessing your Network Video Server (NVS).
Please follow the entire walk-through without skipping any steps. The walk-through was designed to teach
the typical inexperienced home user how to configure their NVS using the simplest techniques and
terminology. Some of these techniques may actually be considered inaccurate, but should suit the needs of
most home users. Consult the FAQ and Appendices for further information when required. There is a basic
Internet and TCP/IP Tutorial at the end of this document
If after following the walk-through and exhausting all literature, please contact our Support Center for
technical support.
Notes Before Starting
•
This product is only compatible with current variants of the Microsoft Windows OS.
•
This product operates with Microsoft’s Internet Explorer only.
•
You must have ActiveX controls enabled on your browser, found in the Options menu.
•
Some pop-up blockers may block legitimate configuration screens, please disable these blockers when
configuring the NVS.
•
Some hardware manufacturers include a cable/DSL modem, router/firewall, and Ethernet switch in
one device.
•
If you have no available ports on your router (with integrated switch) you can purchase a 10/100
Ethernet switch to “expand” your Local Area Network
•
The crossover cable is not wired as a typical straight-through network cable. This cable (or any
crossover) should be used for initial setup of the NVS via a PC/laptop.
•
Please temporarily disconnect any proxy servers associated with Internet Explorer while configuring
the Network Video Server.
Network Video Server User’s Manual
/BB01
www.bluenetvideo.com
3/3
INTRODUCTION
1
Modification and Development
The Linux-based operating system and flash memory file system enable advanced users and application
developers to customize the Network Video Server. An SDK developer kit is available for users to interface
ActiveX controls and other applications.
Attempts to modify the NVS will void all warranties and is not supported by Bluenet Video. Further
development tools and documentation for assistance may be accessible in future releases. We strongly
recommend that inexperienced users DO NOT modify the firmware of NVS.
Bluenet Video will not be held accountable in a user's attempt to modify the NVS that renders the unit
inoperable or otherwise.
Installation
This may be installed as a standalone unit or as a supplement to an existing surveillance system.
Physical connection utilizing 10baseT Ethernet compatible UTP RJ-45 network cable. Installs directly
using NTSC or PAL video cameras using BNC connectors.
Network Video Server User’s Manual
/BB01
www.bluenetvideo.com
4/4
NVS INSTALLATION
2
Product Description
Front Panel
• Power Supply Connector
Use the power jack to connect your regulated 12V DC
power adapter
• Serial Communication Connector
The 9-pin D-sub connector includes 2-channel serial
communication.
COM1 is typically used for Pan/Tilt Camera and COM2 is
for Digital In/Out
COM1 : RS-485/RS-232C (Option), COM2 : RS-232C
• Network Connector
The server is designed to operate on a 10/100 Mbps
Ethernet network.
Currently the server operates at 10 Mbps until future
upgrades become available
Rear Panel
• Video In/Out Connector
Each video input/output is terminated using a coax/BNC
connector. Physical connections are made using RG-59
coaxial video cable; recommended maximum length of 300
feet. These provide the connections for virtually any type of
security camera, CCTV devices, camcorder, VCR, DVR, etc.
Adapters to connect to the BNC are available.
Network Video Server User’s Manual
/BB01
www.bluenetvideo.com
5/5
NVS INSTALLATION
2
Top View
• Power LED
This red light becomes illuminated when 12V DC power is
supplied to the unit. This indicator should always be lit
when in use. If it is not lit or flashes when power is
supplied, the Video Server is not operating properly.
• Active LED
When in use, this orange indicator should always be
flashing or flickering. During reboots or power cycling, it
may take several seconds for the unit to initialize and
illuminate the indicator.
• 100M LED
This indicator may flash during a reboot or power cycling,
but should not be lit during normal operation. 100Mbps is
indicated by this light and is currently unavailable.
• 10M LED
This green indicator should be flashing or glowing during
normal operation. During a reboot or power cycling, it may
take up to 30 seconds to initialize, negotiate your network
speed, and begin operation at 10Mbps. If this light is not lit
after 30 seconds of operation, check then network cable to
ensure a proper connection. When a proper connection is
met, the green indicator should immediately glow
Network Video Server User’s Manual
/BB01
www.bluenetvideo.com
6/6
NVS INSTALLATION
Serial Connector
2
• COM1
> In case of RS-485
Pin
Signal
Remarks
2
D-
Input/Output
3
D+
Input/Output
> In case of RS-232C
Pin
Signal
2
RXD
Remarks
Input
3
TXD
Output
5
GND
Power
L Check the COM 1 communication type located on
the underside label of the NVS.
• COM2 : RS-232C
Pin
Signal
Remarks
6
+12V
Power Output
7
RXD
Input
8
TXD
Output
9
GND
Power
L Sensor I/O module is optional.
Crossover Cable
• The crossover cable is not wired as a typical straightthrough network cable. This cable (or any crossover)
should be used for initial setup of the NVS via a PC/laptop.
After initial setup of NVS, use a straight-through cable for
normal operation.
Network Video Server User’s Manual
/BB01
www.bluenetvideo.com
7/7
NVS INSTALLATION
DDNS
2
Registration
For users that have DYNAMIC addressing from their Internet Service Provider (ISP) you will need to
register with our DDNS service.
We recommend you determine if you use dynamic addressing and if you do, register your Network Video
Server on our DDNS website FIRST, before you configure, setup, or install the NVS.
You do not need to register with our DDNS if you were supplied a STATIC IP address from your ISP.
The only information that you will need off of the NVS for registration is the serial number located on the
underside label of the NVS.
When you join our DDNS service, you will have to supply an ID and Password, the ID and Password do
NOT have to match the ID and Password logon information used to access your NVS. It is a separate
service with separate logon information.
After joining our DDNS service and configuring the NVS, you will be able to access your cameras in two
ways:
① Go to www.mybluenetvideo.com and select your camera from the list or login
②
You may also access it by simply entering a URL of “UserID. mybluenetvideo.com/CameraName”
into your address bar. Replace “UserID” with the UserID you have chosen when registering with
the DDNS service.
L If you have only one camera registered, you do not need to specify the camera name.
Network Video Server User’s Manual
/BB01
www.bluenetvideo.com
8/8
NVS INSTALLATION
2
Quick Start
Please follow the steps below to complete the initial setup of the Network Video Server (NVS)
L Please do not power on the NVS until instructed.
L Temporarily disable any proxy servers configured in Internet Explorer
L If connecting the NVS directly to a modem, power down and reset the modem. Leave the modem
powered down until configurations are finalized with the NVS and the NVS has been correctly
connected to the modem.
① You will need to access a PC/laptop and configure that PC in order to communicate with the NVS.
Record the current TCP/IP properties of that PC (IP address, subnet mask, gateway, DNS, etc)
L If your PC obtains its IP address automatically, then no need to record any information.
②
Change the IP address of that host PC to 192.168.1.11 and subnet mask to 255.255.255.0 (leave all
other entries blank)
③
Connect the NVS to your PC’s Ethernet port via the supplied crossover cable (it does not matter
what end is used for the PC)
④
Power on the NVS using the supplied power adapter.
⑤
After 1 minute of power, verify a solid POWER indicator, a flashing ACTIVE indicator, and a
flashing or solid 10M indicator. After the corresponding indicator lights are proper, open Internet
Explorer.
⑥
Type - http://192.168.1.80 (default IP of the NVS) into your address bar.
⑦
Default ID/Password are both the word: admin
⑧
Familiarize yourself with the Viewer Interface Screen.
⑨
Locate the TCP/IP configuration under Administration Tools. Supply the same ID and Password
to enter Administration Tools (admin:admin)
⑩ Under “Network Type” select STATIC. You will only select Dynamic or PPPoE if you are
connecting the NVS directly to your cable/DSL/Broadband modem and your Internet Service
Provider is supplying you a dynamic or PPPoE address.
L If you have a network with other devices (such as PC/laptop, etc.) or a router, you will NEVER
select Dynamic or PPPoE. (PPPoE function currently unavailable)
Network Video Server User’s Manual
/BB01
www.bluenetvideo.com
9/9
⑪
Configure the NVS’s TCP/IP settings as you would any other PC on your network, providing a
proper IP address, subnet mask, default gateway, and DNS server. Input a DDNS Server address
of : www.mybluenetvideo.com
L If this is standalone unit with a direct connection to a cable/DSL/Broadband modem then
input the addresses you have received from your ISP. If you received no IP address from your
ISP, please select Dynamic or PPPoE and choose the proper settings.
⑫
The NVS utilizes two TCP ports - a Web Server Port for utilizing Internet Explorer and a Video
Server Port to support the streaming video. If this NVS will be directly attached to a
cable/DSL/Broadband modem or has been assigned a static IP from your ISP, then leave the
default port settings. If you are installing the NVS on a network, you must define a Web Server
Port other than 80. The Video Server Port can remain unchanged.
⑬
If the NVS is connected to a network that utilizes a router, you must have Port Forwarding
configured on your personal router to forward both the Web Server Port and Video Server Port to
the IP address you have assigned the NVS.
⑭
After configuring Port Forwarding on your router (if necessary), you may then access your NVS on
your local network by opening Internet Explorer and specifying the IP address and Web Server
Port that you have assigned to the NVS.
L Examples: http://192.168.0.200:8888 or http://24.106.88.123
L If you left your Web Server Port set to 80, then you don’t need to specify the port in the
Address Bar when accessing the NVS
⑮
Access your NVS via the Internet :
If you used a static IP address assigned by your ISP
i) Open Internet Explorer.
ii) Type the IP of the NVS.
iii) If you use a router, type the routers’ static IP and the web port number of the NVS.
If you have a dynamic address provided by your ISP
i) Open Internet Explorer and visit our DDNS website: www.mybluenetvideo.com
ii) Register with our service. (you will need the serial number of the NVS, located on the
bottom of the unit)
iii) Reboot the NVS.
iv) Give the DDNS server 2 minutes to locate your NVS’s IP information.
v) Click the refresh button in Internet Explorer.
vi) After your camera is connected, click on your camera.
vii) You may also access it by simply entering
“UserID. mybluenetvideo.com/CameraName” into your address bar.
Network Video Server User’s Manual
/BB01
www.bluenetvideo.com
10/10
NVS SETUP
3
NVS Initial Setup via a Crossover Cable
This section provides a guide on how to connect the NVS to your PC/laptop for initial setup.
Please follow the instructions in the order they appear, without skipping steps. Do not supply power to the
Network Video Server, until instructed.
In order to access the Network Video Server’s firmware you will need to connect the Video Server directly
to a PC or laptop computer via the supplied crossover cable.
①
Before you begin, you must determine the current network/INTERNET (TCP/IP) settings on the
PC or laptop you plan to setup the Network Video Server. Please ensure that the computer you
wish to use to setup the video server is on your current network and has Internet access. Jot
down your entries below for quick reference.
L For information on how to determine your currents settings, see Appendix A
Current TCP/IP Settings
IP Address
Subnet Mask
Default Gateway
1st DNS Server
2nd DNS Server (Option)
②
In order for the Network Video Server to communicate with your PC, you have to change your
PC’s IP address and subnet mask
L We recommend that you change your IP address to 192.168.1.11 and change the subnet mask
to 255.255.255.0
Leave all other entries (Default Gateway, DNS Servers, etc.) blank.
L For information on how to change your IP address and subnet mask, see Appendix B
③
After you have made the changes to your IP address and subnet mask, you may then attach the
Network Video Server to your PC via the supplied crossover cable. Plug in either end of the
crossover cable into the PC’s network card and the other end into your Network Video Server.
④
After connecting the PC and Network Video Server (NVS) using the crossover cable, power on the
NVS by plugging in the power supply shipped with the NVS.
⑤
No longer than 1 minute after powering on the NVS, verify that the POWER indicator light is solid,
the ACTIVE indicator light is flashing, and the 10M indicator light is flickering or solid. If they are
not, please read the FAQ.
Network Video Server User’s Manual
/BB01
www.bluenetvideo.com
11/11
NVS SETUP
⑥
3
Now you will be able to access the viewer software within the NVS
L Open Internet Explorer and type the IP address of 192.168.1.80 (default IP of the NVS from
the factory) into the Address Bar of the web browser (as seen below). Press Enter.
L If a message appears after pressing “Enter” similar to the image depicted below, choose “Try
Again”. This message will vary depending on the operating system.
⑦
Now you will be able to see the login screen for the Network Video Server.
⑧
The default ID and Password are both the word “admin” (without the “”)
⑨
If at any time you are prompted to download ActiveX controls, you must click ‘Yes’, all content is
safe.
L You will have to click “Yes” twice to two individual prompts. This allows your video to be
displayed in Internet Explorer.
Network Video Server User’s Manual
/BB01
www.bluenetvideo.com
12/12
NETWORK SETUP
4
Guide to Network Setup
Please configure the NVS at the location of its installation. You must determine your network scenario in
order to configure the NVS with the proper TCP/IP settings. This tutorial will guide you through the
process. Before actually configuring the NVS, determine what settings you will apply. Record those settings
that you will use to configure your NVS for reference.
When configuring your NVS, treat the NVS as another PC on your network. You will assign it several
addresses and other TCP/IP properties to match your current network.
This step-by-step tutorial will teach what IP addresses and network configurations you should assign your
NVS based upon your network scenario.
①
Before you begin, you will need to locate any information and settings that you have received from
your Internet Service Provider (ISP). You may need to refer to these IP addresses at a later time
during the configuration.
L If you were not given any IP addresses or the ISP was responsible for the setup and
2
installation of your Internet connection on your PC or network, then please go to step ○
L If you are not using a router on your network, your “Current TCP/IP Settings” (from the
previous section) and “Assigned IP Addresses from My ISP” will be exactly the same
Assigned IP Address
IP Address
Subnet Mask
Default Gateway
Static
1st DNS Server
Dynamic
2nd DNS Server (Option)
PPPoE
②
You must determine whether the IP address that you were assigned from the ISP is STATIC,
DYNAMIC, or using PPPoE. At this moment, you are only concerned about the ISP. Did they
provide you with a STATIC, DYNAMIC, or PPPoE address? If you are unsure, please contact your
ISP.
③
Configure your NVS’s TCP/IP settings for network connectivity by selecting Administration Tools
from the main interface and selecting TCP/IP located on the left of the Administration Tools
screen.
④
If prompted for an ID and Password, use “admin” for both entries.
The default web port number is 80. If your ISP blocks port 80 you must use a value 1025-30000.
Please consult your ISP and determine if they block TCP port 80.
Network Video Server User’s Manual
/BB01
www.bluenetvideo.com
13/13
4
NETWORK SETUP
⑤
Depicted below are several basic network scenarios. Determine which scenario describes your
network. If your network does not match one of the below scenarios and are unsure how to setup
your NVS, please contact your network administrator, then call our Support Center.
L
Dash line box signifies areas of tour network that you can't control.
Only the ISP has access to these devices.
Case A : Dynamic IP or PPPoE + Personal Router [Most SOHO]
Configure your NVS's TCP/IP properties as follows :
Network Type
• STATIC (even though you have Dynamic IP from your ISP, use STATIC on the NVS)
Internet Address
• A private IP address such as 192.168.0.200 [Example]
L You need to assign the NVS an IP address, just as you would assign a PC.
L The IP address you assign must be unique to your network as well as match your
network. For information how to chose a unique IP and match your network
please read the FAQ.
L The IP address you assign the NVS must be a private IP. For information on how
to chose a private IP please read the FAQ
Subnet Mask
• 255.255.255.0 [Example]
L you must use the same subnet mask as the one you noted under “Current TCP/IP
Settings”
Network Video Server User’s Manual
/BB01
www.bluenetvideo.com
14/14
NETWORK SETUP
Default Gateway
4
• 192.168.0.1 [Example]
L This IP address must be the IP address of your router (private or LAN side)
L Use the same Default Gateway you noted under “Current TCP/IP Settings”
Primary DNS Server
• Use the 1st DNS Server from “Assigned IP Address from My ISP”
L if you did not receive any IP addresses from your ISP, please contact them and
acquire the IP address of their DNS server.
DDNS Server
• www.mybluenetvideo.com
L This is the same site you will register with later to accommodate dynamic IP from
your ISP.
Web Server Port
• 8888
L Do NOT use the default port 80, you must change this number.
L You may select any number between 1025-30000.
Video Server Port
• 7777
L you may select any number between 1025-30000.
Network Video Server User’s Manual
/BB01
www.bluenetvideo.com
15/15
NETWORK SETUP
4
Case B : Static(Fixed) IP + Personal Router [Efficient]
L If you have 1 static IP address from your ISP follow the below instructions.
If you have 2 or more available static IP addresses from your ISP follow CASE C.
Configure your NVS's TCP/IP properties as follows :
Network Type
• STATIC
Internet Address
• A private IP address such as 192.168.0.200 [Example]
L You need to assign the NVS an IP address, just as you would assign a PC.
L The IP address you assign must be unique to your network as well as match your
network. For information how to chose a unique IP and match your network
please read the FAQ.
L The IP address you assign the NVS must be a private IP. For information on how
to chose a private IP please read the FAQ
Subnet Mask
• 255.255.255.0 [Example]
L you must use the same subnet mask as the one you noted under “Current TCP/IP
Settings”
Default Gateway
• 192.168.0.1 [Example]
L This IP address must be the IP address of your router (private or LAN side)
L Use the same Default Gateway you noted under “Current TCP/IP Settings”
Primary DNS Server
• Use the 1st DNS Server from “Assigned IP Address from My ISP”
L if you did not receive any IP addresses from your ISP, please contact them and
acquire the IP address of their DNS server.
Network Video Server User’s Manual
/BB01
www.bluenetvideo.com
16/16
NETWORK SETUP
DDNS Server
4
• www.mybluenetvideo.com
L This is the same site you will register with later to accommodate dynamic IP from
your ISP.
Web Server Port
• 8888
L Do NOT use the default port 80, you must change this number.
L You may select any number between 1025-30000.
Video Server Port
• 7777
L you may select any number between 1025-30000.
Network Video Server User’s Manual
/BB01
www.bluenetvideo.com
17/17
NETWORK SETUP
4
Case C : Static(Fixed) IP [Dedicated line directly to the NVS]
Configure your NVS's TCP/IP properties as follows :
Network Type
• STATIC
Internet Address
• A static IP address received from your ISP, such as 24.107.88.125 [Example]
L You need to assign the NVS an IP address, just as you would assign a PC.
L This must be a public IP address.
Subnet Mask
• Subnet mask assigned from your ISP, such as 255.255.255.240 [Example]
Default Gateway
• 24.107.88.113 [Example]
L Use the assigned default gateway from your ISP
Primary DNS Server
• Use the 1st DNS Server from “Assigned IP Addresses from My ISP”
L if you did not receive any IP addresses from your ISP, please contact them and
acquire the IP address of their DNS server.
DDNS Server
• www.mybluenetvideo.com
L This is the same site you will register with later to utilize our DDNS service.
Web Server Port
• 80 [default]
L For most cases, keep this at default, but you may select any number between
1025-30000.
Video Server Port
• 7777
L you may select any number between 1025-30000.
Network Video Server User’s Manual
/BB01
www.bluenetvideo.com
18/18
NETWORK SETUP
4
Case D : Dynamic IP + DSL/Cable Modem [Connected directly to the NVS]
Configure your NVS's TCP/IP properties as follows :
Network Type
• DYNAMIC
DDNS Server
• www.mybluenetvideo.com
L This is the same site you will register with later to accommodate dynamic IP from
your ISP.
Web Server Port
• 80 [default]
L You may select any number between 1025-30000.
Video Server Port
• 7777
L you may select any number between 1025-30000.
L When connecting the NVS directly to a modem, power down and reset the modem. Leave the
modem powered down until configurations are finalized with the NVS and the NVS has been
correctly connected to the modem. Then power on the modem, followed by the NVS.
Network Video Server User’s Manual
/BB01
www.bluenetvideo.com
19/19
4
NETWORK SETUP
Case E : PPPoE + DSL Modem [Connected directly to the NVS]
Configure your NVS's TCP/IP properties as follows :
Network Type
• PPPoE (PPPoE function currently unavailable)
User ID
• Use the User ID or Username you received from your ISP for this direct connection
User Password
• Use the Password you received from your ISP for this direct connection
DDNS Server
• www.mybluenetvideo.com
L This is the same site you will register with later to utilize our DDNS service
Web Server Port
• 80 [default]
L You may select any number between 1025-30000.
Video Server Port
• 7777
L you may select any number between 1025-30000.
Network Video Server User’s Manual
/BB01
www.bluenetvideo.com
20/20
4
NETWORK SETUP
Port Forwarding
After entering the correct TCP/IP settings you will be ready for “Port Forwarding” (Cases A, B).
Please record the TCP/IP settings of your NVS for future reference. You may need this information to
access your NVS and to configure “Port Forwarding”. In Case F, please contact your ISP with regard
to Port Forwarding.
NVS TCP/IP Settings
IP Address
Subnet Mask
Default Gateway
Primary DNS Server
DDNS Server
Web Server Port
Video Server Port
After clicking “Apply” the system will prompt for a reboot. Please allow the system 30
seconds to reboot and accept the changes. After 30 seconds, close the configuration
screen. The view will display “Trying to Reconnect”. If the ACTIVE light on the NVS has
went off and is now back on again flashing, then the NVS has rebooted. After the
system reboots completely, remove the power supply from the unit and close Internet
Explorer.
Return your PC/Laptop TCP/IP properties to their original settings.
Before installing the NVS, you must use “Port Forwarding” on your personal router (Cases A, B).
You will need to forward 2 ports:
• Web Server Port you assigned to the NVS.
• Video Server Port you assigned to the NVS.
Both of these ports will be forwarded to the IP address you assigned to the NVS.
In the Case A & B examples above, you would forward:
• 8888 192.168.0.200
• 7777 192.168.0.200
L For information on how to use “Port Forwarding” please read Appendix C
Network Video Server User’s Manual
/BB01
www.bluenetvideo.com
21/21
NETWORK SETUP
4
Starting NVS
After correctly forwarding the Web Server Port and the Video Server Port through your router (if
applicable), you may then install the NVS in a proper location.
①
Locate the serial number located on the label attached to the bottom of the NVS, you will need this
for DDNS registration.
②
Connect a device to the NVS (camera, DVR, Pan/Tilt/Zoom, etc.) and supply power to the device.
③
Connect the NVS to your router or cable/DSL modem (per your network scenario) via a Cat5/5e
UTP Ethernet network cable.
④
Supply power to the NVS.
⑤
After 30 seconds, verify the NVS indicators:
⑥
• POWER
Solid
• ACTIVE
Flashing
• 100M
OFF
• 10M
Flickering/Solid
After configuring Port Forwarding on your router (if necessary), you may then access your NVS on
your local network by opening Internet Explorer and specifying the IP address and Web Server
Port that you have assigned to the NVS..
L
Examples: http://192.168.0.200:8888 or http://24.106.88.123
L
If you left your Web Server Port set to 80, then you don’t need to specify the port in the
Address Bar when accessing the NVS.
Network Video Server User’s Manual
/BB01
www.bluenetvideo.com
22/22
NETWORK SETUP
⑦
4
Access your NVS via the Internet:
If you use Case B
i) Open Internet Explorer.
ii) Type the static IP received from your ISP followed by the Web Port Number of the
NVS. http://24.106.88.123:8888 (example)
If you use Case C
i) Open Internet Explorer.
ii) Type the IP of the NVS.
If you use Case A, D, E
i) Open Internet Explorer.
ii) Visit our DDNS website: www.mybluenetvideo.com
iii) Register with our service (you will need the serial number of the NVS, located on the
bottom of the unit)
iv) Give the DDNS server 10 minutes (MAX) to locate your NVS’s IP information. You
may reboot the server to send an immediate request to our DDNS server, rather than
waiting the 10 minutes. The reboot command is available under the Admin Tools
interface.
v) After your camera is connected, click on your camera.
vi) You may also access it by simply entering:
“UserID. mybluenetvideo.com/CameraName” into your address bar.
L Replace “UserID” with the UserID you have chosen when registering with the
DDNS service.
L If you have only one camera registered, you do not need to specify the camera
name.
L If you cannot access the NVS please consult the FAQ section.
Network Video Server User’s Manual
/BB01
www.bluenetvideo.com
23/23
5
WEB VIEWER
Viewer Screen
This section is designed to familiarize you with the main interface of the NVS. Displaying the OSD and
Digital Zoom are only taking place on the local machine, not on the video server itself. To make global
changes on the video server and its video, you must login as an administrator.
1
○
Camera Image Display
2
○
OSD - Camera Name / Date / Time
3
○
OSD - This indicator displayed represents the function caption when a specific user logs on.
• P = Operating User
: Pan/Tilt control available
• G = Guest User
: Image monitoring only
4
○
Use these arrows to control a PTZ device.
5
○
If available, click this icon to enable PTZ controls. Only one user may have access to the PTZ controls.
6
○
Speed option for Speed Dome Camera or PTZ devices.
7
○
Zoom, Focus, and Iris functions for PTZ devices that support the listed functions.
8
○
Presets used by some PTZ devices that support preset directions and zoom.
9
○
Digital Inputs status and Digital Outputs control.
10
○
2× Digital Zoom
Network Video Server User’s Manual
/BB01
www.bluenetvideo.com
24/24
WEB VIEWER
11
○
5
Stretch will fit the video to the viewer window regardless of resolution. In essence this provides:
• 160×120 resolution
: 4× digital zoom effect
• 320×240 resolution
: 2× digital zoom effect
• 640×480 resolution
: no change
12
○
OSD (On Screen Display) : Click this icon to display the captions.
13
○
Click this icon to save an image.
14
○
Click this icon to disconnect or connect from the server
15
○
Click this icon to enter Administration Tools
16
○
Click this icon to logout
Network Video Server User’s Manual
/BB01
www.bluenetvideo.com
25/25
ADMIN TOOL
6
This section is provided to familiarize the user with the administration tools. Intuitive options are not
explained in detail.
All the options under Administration Tools take effect in real time the instant the new settings are applied.
These settings will be global, affecting all users currently logged on.
All settings are global and take place immediately except for the ‘Caption’ settings, which require all users
to logout or refresh their browser before noticing a change on the OSD.
Video Tool
Camera Name
Give a name to the device or camera connected to the NVS. Only affects what is
displayed on the OSD. (Maximum 7 characters available)
Caption
Determine what items are displayed on the OSD. Changes will take effect only after
the user logs out.
Color
Select this option to change the color picture to a black/white picture. Changing to
“Gray” may increase FPS rates slightly when viewing remotely
Resolution
Select the resolution (or screen size) of the video stream. Obtain maximum FPS at
the 320x240 resolution. Higher the resolution, lower the FPS remotely.
Frame Rate
Select the frame rate of video stream to control the traffic of network.
CCD Assembly
Select how a CCD or camera is mounted
Camera Mount
Select how the camera is mounted. This option will inverse the picture to
accommodate ceiling-mounted cameras
Quality
Adjusts the quality setting. Higher the quality, lower the FPS remotely.
Brightness
Input a value to adjust the brightness of the video stream.
Contrast
Input a value to adjust the contrast of the video stream.
Network Video Server User’s Manual
/BB01
www.bluenetvideo.com
26/26
6
ADMIN TOOL
Control Tool
Com1
For PTZ devices only. Select the PTZ control protocol.
Com2
For Digital I/O module only. Select the module type.
Com1 Type
Select the type of COM1 port.
Com1 Wait Time
Wait time for the response after data is sent to PTZ device.
It is important value when COM1 is RS-485 type and bi-directional(full-duplex)
protocol is used. In this case, If this time is too short you can lose the data from
device.
Recommended value is 50 msec in case of RS-485, 200 msec in case of RS-232C.
Network Video Server User’s Manual
/BB01
www.bluenetvideo.com
27/27
ADMIN TOOL
6
TCP/IP Tool
Network Type
Select a Static or Dynamic address scheme that is used by the Internet Service
Provider (not the addressing scheme used by a personal router).
Internet Address
Input a value to assign an IP address to the NVS.
Subnet Mask
Input a value to assign a subnet mask to the NVS.
Default Gateway
Input the IP address of the default gateway.
Primary DNS Server Input the IP address of an ISP’s DNS server.
Web Server Port
Input a TCP port number to assign a Web Interface port number to the NVS.
Video Server Port
Input a TCP port number to assign a Video Server port number to the NVS.
DDNS Server
Input Bluenet Video’s DDNS server address of www.mybluenetvideo.com
Network Video Server User’s Manual
/BB01
www.bluenetvideo.com
28/28
ADMIN TOOL
6
SMTP Tool
This function is used to email the specified email recipient and notify that individual of the IP address /
web port number used to access the NVS. This email function is only activates on power-on reset time of
NVS.
SMTP Server
Enter an SMTP server to send email.
Send E-mail box
If this check box is set to on, email function is enabled.
From
Input the email address of sender. The email address should be admitted to the
SMPT sever.
To
Input the email address of receiver.
Network Video Server User’s Manual
/BB01
www.bluenetvideo.com
29/29
ADMIN TOOL
6
Date & Time Tool
Current Date/Time
New Date/Time
It shows the current Date/Time setting of NVS.
Select the method of Date/Time setting. Date/Time can be set by local computer or
timeserver or manual. To prevent the time and date from resetting when the server is
powered down, we recommend choosing the option to sync with a time server.
Network Video Server User’s Manual
/BB01
www.bluenetvideo.com
30/30
ADMIN TOOL
6
Users Tool
System Manager
Specify an ID and Password for the System Administrator of the NVS. The System
Administrator will have all rights and privileges to manage the system.
General Manager
Give access privileges up to 40 separate user accounts.
L Only 20 users may be logged on simultaneously, regardless of what user
identities are logged on.
To add a user
Input an ID and Password, verify Password, select Authority, click ADD.
To edit a user
Select the user from the list of users, make necessary changes, and click EDIT.
To delete a user
Select the user from the list of users, click DELETE.
Operator Authority
This privilege gives the user rights to operate the PTZ controls. Only one user may
have the authority to control the PTZ simultaneously.
Viewer Authority
This privilege gives the user rights to operate only the icons associated with digital 2×
zoom, stretch, OSD, and video capture. These options only affect that current user.
The changes made there will have no effect on the other users logged on.
Auto Login
Only one user/administrator may have Auto Login enabled. When the video server is
accessed, it will bypass the login screen and logon automatically.
Network Video Server User’s Manual
/BB01
www.bluenetvideo.com
31/31
APPENDIX
7
A : Determining Current TCP/IP settings
For Windows 98 / ME Users
• Note the settings under the IP Address, DNS Configuration, and
Gateway tabs. If you do not see any information listed, your
settings have been obtained automatically.
L If your IP settings are obtained automatically, you could use
the MS-DOS prompt (or Command Prompt) to determine your
IP address. For information on how to do this, please read the
FAQ.
For Windows 2000 or Windows XP
• Under the “General” tab of the TCP/IP Properties you will see
your IP address information. If you do not see any information
listed, your settings have been obtained automatically.
L If your IP settings are obtained automatically, you could use
the MS-DOS prompt (or Command Prompt) to determine your
IP address. For information on how to do this, please read the
FAQ.
Network Video Server User’s Manual
/BB01
www.bluenetvideo.com
32/32
APPENDIX
7
B : Changing your computer's IP address and subnet mask
For Windows 98 / ME Users
• Select 'Use the following IP address' and change the IP address
and Subnet Mask.
For Windows 2000 or Windows XP
• Select 'Use the following IP address'
Network Video Server User’s Manual
/BB01
www.bluenetvideo.com
33/33
7
APPENDIX
C : Port Forwarding
After assigning the NVS a web server port and video server port you must use Port Forwarding (for cases A
and B)
Please consult your router’s user guide on how to correctly configure Port Forwarding.
For your convenience, we have provided two example configurations.
For D-Link DI-604 broadband routers:
①
Open a web browser and type http://192.168.0.1 into your Address bar. (the default IP address to access the
router)
②
You will have to supply your User Name and Password to log onto the router. Default from factory. (User
Name: admin Password: [leave blank])
③
Select the advance tab. This should be the Virtual Servers page.
④
Click the “Enabled” option button.
⑤
Give a description to the “Virtual Server”
⑥
Set the Private IP address to the IP address you have assigned the NVS.
⑦
Select TCP as the Protocol Type.
⑧
Set both the Private Port and Public Port the same value that you set the Web Server Port on the NVS.
⑨
Set the schedule for when you will allow access to the NVS.
⑩
Click Apply.
⑪
5 ~○
10 for the Video Server Port that was configured on the NVS.
Repeat steps ○
⑫
After the settings on the router have saved, you can exit the browser. Port Forwarding is complete.
For Linksys BEFSR41 Cable/DSL routers:
①
Open a web browser and type http://192.168.1.1 into your Address bar (the default IP address to access the
router)
②
You will have to supply your User Name and Password to log onto the router. Default from factory (User
Name:[leave blank] Password: admin)
③
Select Applications & Gaming from the menu bar.
④
Enter a description for your NVS Web Port in the Application entry.
Network Video Server User’s Manual
/BB01
www.bluenetvideo.com
34/34
APPENDIX
⑤
Enter the Web Port number you have assigned the NVS into the Start and End fields.
⑥
Select TCP as the Protocol.
⑦
Enter the IP address of the NVS.
⑧
Check the “Enabled” checkbox.
⑨
4 ~○
8 for the Video Server Port that you have assigned the NVS.
Repeat steps ○
⑩
Click “Save Settings”
⑪
After the settings have been saved exit the browser. Port Forwarding is complete.
Network Video Server User’s Manual
/BB01
www.bluenetvideo.com
7
35/35
8
FAQ
I can’t connect!!
In the case of a connection failure.
Modem Reboot > Modem Reboot Finished > Router Reboot > Router Reboot Finished > NVS Reboot
> NVS Reboot Finish > Verify DDNS and NVS communication via www.mybluenetvideo.com, if
applicable.
How do I choose a unique IP address that matches my network?
For your home or small office, ensure that all devices on your network are running. PING an IP
address that you plan to assign to the NVS. If you receive a “Request timed out”, then you may use
that IP address. To ensure the IP address that you will assign the NVS matches your network, review
your “Current TCP/IP Settings” that you had recorded earlier. See some examples below:
•
If your “IP Address” entry in “Current TCP/IP Settings” was 192.168.0.y, and your “Subnet
Mask” was 255.255.255.0 then use 192.168.0.x for your NVS’s IP Address (“x” meaning any
number between 2-254 that you wish, as long as it passes the “PING” test).
•
If your “IP Address” entry is not a 192.168.z.y address with a “Subnet Mask” of 255.255.255.0
then please contact our Support Center.
•
If your “IP Address” entry is not a 192.168.z.y address, please contact our Support Center.
How do I open an MS-DOS or Command Prompt?
•
Windows 98 / ME Users
•
Windows 2000 / XP Users : Start (All) Programs Accessories Command Prompt
: Start Programs Accessories MS-DOS prompt
How do I “PING” an IP address?
① Open an MS-DOS (or Command) prompt
② At the prompt type - “ping xxx.xxx.xxx.xxx” (without the quotes and replace the “x”s with an IP
address)
③ Press Enter
How do I enable or check ActiveX on my browser
Open Internet Explorer Tools on the menu bar Internet Options Security Tab Custom
Level Scroll down and verify that you are prompted or have enabled ActiveX controls and plug-ins
to be downloaded and executed. click OK restart browser
Network Video Server User’s Manual
/BB01
www.bluenetvideo.com
36/36
FAQ
8
How do I find out my IP address information if my settings were
automatically detected?
•
•
Windows 98 / ME Users
①
Open an MS-DOS Prompt
②
At the prompt type: “winipcfg” (without the quotes)
③
Use the drop down list to select your 10/100 Ethernet Adapter (not a PPP adapter)
④
Now you will see your IP Address, Subnet Mask, and Default Gateway information
⑤
For DNS information contact your Internet Service Provider
Windows 2000 / XP Users
①
Open a Command Prompt
②
At the prompt type - “ipconfig /all” (without the quotes)
③
Near the end of the information supplied, should be your current IP address, subnet mask, default
gateway and DNS servers
How do I choose a private IP address:
Assign your NVS a private IP address that matches your current network. Below lists the ranges for
private addresses:
•
Private Class A address space
: 10.0.0.0 - 10.255.255.255
•
Private Class B address space
: 172.16.0.0 - 172.31.255.255
•
Private Class C address space
: 192.168.0.0 - 192.168.255.255
My POWER light is not on?
Power is not being supplied to the unit. Please use the power supply shipped with the unit and verify
that a power source is active from the attached power outlet used to connect the adapter. You can
test this by plugging in any other electrical device and verify its operation. After using the power
supply shipped with the product, checking the power source, and reinserting the power connector
into the NVS, please call our Support Center. The power supply may be defective.
My ACTIVE light is not flashing?
Verify the power supply to the unit. Power off the unit and back on again, wait 1 minute, if the
ACTIVE light still does not begin to flash, you will have to set the unit to its factory default (THIS
WILL DELETE ANY CONFIGURATION AND SET THE UNIT TO THE FACTORY DEFAULTS).
Power on the unit and insert the end of a paper clip into the small recessed opening on the back of
the unit. Use the clip to press the button located within that opening.
Network Video Server User’s Manual
/BB01
www.bluenetvideo.com
37/37
FAQ
8
My 10M light is not flashing or solid?
Verify the cable connection. 99% of the time the cable’s connection to the unit is causing this
problem. Try using a different network cable or crossover cable (for PC connection only). Try
reinserting the cable, if this still doesn’t solve the problem call our Support Center.
I want to prevent users from viewing my camera.
① Go into Administration Tools of the NVS.
② Click on Users
③ Delete the user or all users by deleting the ID and password associated with that user.
Can I record the video?
Yes you can record, but you will need to purchase a separate software program to allow PC-based
recording. This software is available, please contact our Customer Service Center. The software
named “I-PRO” will connect up to 16 separate 1-channel video servers for remote viewing, remote
controlling, and remote recording without the loss of quality or size (up to 640×480 resolution).
I can access the video server on my LAN, but not from the Internet.
Verify that your router (if applicable) has port forwarding properly configured. If accessing from our
DDNS service, verify correct serial number. Firewall issues may prevent user access.
How do I reset the unit to factory defaults?
On the underside of the unit you will find a recessed opening located near the top-left side of the
label. Power ON the unit and use a paper clip to push the reset button within that opening. You
should then see the ACTIVE light turn off and after a few seconds the ACTIVE light will begin to flash,
signifying a successful reboot. If the ACTIVE light does not turn off after depressing the reset button,
please try holding the button in for a second and releasing. YOU WILL LOSE ALL DATA THAT HAD
BEEN ENTERED PREVIOUSLY AND THE NVS WILL BE SET TO ITS FACTORY RESETS.
Does the Network video server support audio?
Not with this current release.
Network Video Server User’s Manual
/BB01
www.bluenetvideo.com
38/38
FAQ
8
Can I use the Network Video Server on my dial-up Internet connection?
It is possible, but we recommend a high-speed broadband connection of at least 128Kb/sec.
I’m accessing my video server remotely over the Internet and the video
stream is choppy, is this normal?
Yes. The frames/second received remotely are determined by your bandwidth capabilities both at
your site where the NVS is installed and your remote location. The lower of the two sites will
determine how fast your video stream is received. It is recommended to have at least a 256Kb/sec
upstream connection from the site where the NVS is installed. Lower speeds will operate properly,
but provide poor remote performance. Faster the Internet connection at both ends, the faster the
video stream.
Can I view multiple cameras at once?
Currently the NVS supports 1 channel of video input. Typically, one camera per network video server.
You can view multiple cameras only if the NVS is connected to another device supporting multiple
cameras (DVR, multiplexer, etc.) or if you purchase the I-PRO software, which will connect up to 16
separate NVS, each connected to their own camera or device.
Network Video Server User’s Manual
/BB01
www.bluenetvideo.com
39/39
9
SPECIFICATION
BB01 Specification
Model
Hardware
BB01
CPU
32Bit RISC Processor
OS
Embedded Linux
Flash Memory
4MB
Viewer
Network
Compression
Video
Web Browser based Monitoring
Protocol
TCP/IP, HTTP, SMTP, PPP, UDP
Interface
10 base-T Ethernet (RJ-45)
Algorithm
M-JPEG
Rate
1/10 ~ 1/200
Input
1CH. NTSC/PAL
Output
1CH. NTSC/PAL
30 frame/sec (320 × 240)
Frame Rate
Communication
RS-485 / RS-232C (Option)
Protocol
Sensor I/O
(option)
Pelco-D etc.
Communication
RS-232
I/O
2 Inputs / 2 Outputs
Power
DC12V / 500mA
Operating Temperature
Dimension
• I-PRO Multi-Viewer
640 × 480, 320 × 240, 160 × 120
Size
Pan/Tilt Control
• Web Browser Viewer
0°C ~ 40°C
98(W) × 27(H) × 100(L) mm including bracket
Weight
Approx. 150g
* Specification & design are subject to change without notice
Typical Connections
Network Video Server User’s Manual
/BB01
www.bluenetvideo.com
40/40
TCP/IP Internet Basics
10
Network
A computer network basically is a group of devices linked together usually using a
communications protocol or language called TCP/IP. Normally these devices consist of PCs
(personal computers), servers, and other devices. Most likely if you have multiple computers at
a site, the chances are they are linked together forming a computer network.
A local network is a private network of computing devices. No one outside that local network
can access without special conditions. So in this tutorial, when referenced to the local network,
just assume the local network is the location where the NVS is installed.
A remote network is a group of computing devices located outside your local network. By
special means it is possible for your local network to communicate with remote networks. For
example, the Internet provider is just a remote network.
Internet
The Internet is basically a network of networks. There are physical links connecting the
networks within the Internet.
Information traveling the Internet usually travels along cables
constructed of fiber optic cables, coaxial cables, telephone lines, and also a variety of wireless
methods. This explains why many Internet service providers (ISP) are based from cable TV and
telephone companies. They already have the physical media in place to transmit data on the
Internet.
Below are two popular types of high-speed Internet.
1. DSL (Digital Subscribers Link) -
This type of service travels along telephone lines. It is a
dedicated line directly from the service provider (usually a telephone company) to your
residence or place of business. So a DSL connection will run through your current phone lines
(ADSL). ADSL provides higher download rates (retrieving data), but slower upload rates (sending
data). The highest upload rate you can achieve with ADSL is typically 640 Kbps. SDSL provides
the same speed on both download and upload, so it’s nice to have when serving data with the
high upload rate, but typically you have to have a dedicated line just for the service and it can’t
Network Video Server User’s Manual
/BB01
www.bluenetvideo.com
41/41
TCP/IP Internet Basics
10
be shared with your current telephone lines.
2. Cable Access – This type of service travels along the same cable as your CATV (Cable TV).
That is why the provider of cable high-speed Internet is usually a cable TV company, since they
can use the existing cable ran to the residence or place of business. It is a shared medium
between you and your neighbors and is not a dedicated line. This in turn means, during peak
hours of the day you may receive slower rates than accessing the unit late at night.
Static vs. Dynamic
The IP address that your Internet service provider supplies generally comes in one of two forms:
static IP addressing or dynamic IP addressing. A static address does not change. They will assign
you an IP address and that IP address is yours to keep until you cancel your service. Whichever
device you assign this static IP, you can ensure that it will not change. Dynamic addresses on the
other hand, may change. A special server located at the ISP automatically assigns these
addresses. With dynamic addressing, the ISP will not give you any IP addresses, rather they will
tell you to configure your equipment to obtain the IP automatically. This is done using DHCP.
Unfortunately, with dynamic addressing the ISP is not guaranteeing that the IP address that was
automatically obtained will stay the same, it may change. Many times the IP address that you are
assigned will not change for a very long time, yet in some situations it may change on a
continuous basis.
High-speed Internet
The term ‘high-speed’ does not really describe your connection too well, other than it’s not dialup. Often it is asked, “How fast is you high-speed connection?”.
This is very important
concerning TCP/IP and your NVS. The speed of your connection is determined by the amount
of ‘bandwidth’ available. When you register for a high-speed Internet service they should tell
you the amount of bandwidth you will be granted. Bandwidth is basically how large or small the
‘pipe’ is that carries your data across the Internet. For an analogy, you can imagine that highspeed bandwidth is the size of residential plumbing for a house’s water supply, while dial-up
bandwidth is the size of a straw. Therefore if you were pushing a large amount of water (or
computer data for this analogy) through a house, you would have faster transfer through the use
Network Video Server User’s Manual
/BB01
www.bluenetvideo.com
42/42
TCP/IP Internet Basics
10
of the plumbing rather than through a straw. The same concept applies with the Internet. For a
large amount of data to travel the Internet then there has to be a large pipe to accommodate that
data. When receiving high-speed Internet, the provider should
give a bandwidth quote telling
you how much bandwidth they will provide you. There are two types of bandwidth that you need
to be aware off and many times the quote on your bandwidth will be displayed like this
1000/128. The first number is downstream bandwidth, the second number is upstream bandwidth.
Downstream Bandwidth – This determines the size of the pipe coming into your location. If you
are retrieving data from other networks, you should have a large amount of downstream bandwidth.
This also is stated in kilobits/sec (Kbps). Take in mind that Kbps is not equivalent to KB/sec.
Upstream Bandwidth – This determines the size of the pipe going away from your location. If you
are providing or sending data to other networks, you need a large amount of upstream bandwidth.
This value is given in kilobits/sec (Kbps). Keep in mind that Kbps is not equivalent to KBps
You may ask, “So do I have two separate lines, one for upstream and one for downstream for my
Internet connection?”. The answer is ‘No’. You still have one physical line, but within that one line
just imagine two separate pipes – one for downstream data transmission and one for upstream
transmission.
The location where you install the NVS must be able to provide data to other remote locations
quickly, thus you need as much UPSTREAM bandwidth as possible. You will be serving a large
amount of data.
When accessing the NVS from a remote location (such as a hotel or home), you want as much
DOWNSTREAM bandwidth as possible. You will be receiving a large amount of data.
You need high-speed Internet access when utilizing the remote viewing features of the NVS.
Converting real-life images into compressed digital images requires a large amount of data. You
simply can’t serve that large amount of data through a dial-up connection, the upstream pipe is way
too small. For another analogy, it would be similar to pushing a tidal wave through a straw. Not
only do you need high-speed Internet, but remember to request the highest amount of UPSTREAM
bandwidth when deciding on a provider for the Internet access, to the location where the DVMR will
be installed. Plus, the location from where you are accessing the data using the remote software
should be at a location with high-speed Internet with a large amount of downstream bandwidth. You
Network Video Server User’s Manual
/BB01
www.bluenetvideo.com
43/43
TCP/IP Internet Basics
10
can still access the DVMR using a dial-up connection, but you might receive a single image every
several seconds. It is highly recommended to access the NVS through a high-speed connection as
well.
You may ask, “So exactly what numbers would be good rates? What can I compare it to?” Below is
a chart describing various bandwidth rates (speeds) that you can compare and determine which
would suit your needs for live video data transfer.
UPLOAD RATES in Kbps
56
128
256
384
512
768
1000
2000+
Dial-up
ISDN
DSL/Cable
DSL/Cable
DSL/Cable
Cable
Cable
Cable
Very Poor
Poor
Bearable
OK
Good
Fast
Speeding
Awesome
DOWNLOAD RATES in Kbps
56
128
256
384
512
768
1000
2000+
Dial-up
ISDN
DSL/Cable
DSL/Cable
DSL/Cable
DSL/Cable
DSL/Cable
Cable
Websites
Websites
Music
Video
Streaming
Fast
Speeding
Awesome
Video
Generally, the higher the values you receive the larger amount the fee, especially if you request a
very large upstream bandwidth rate. Today, most high-speed Internet providers supply sufficient
downstream rates, but often lack sufficient upstream rates to accommodate serving data. In your
case, you are concerned about serving large amounts of data from your NVS site. So, you have to
search for the best provider supplying sufficient upstream rates at a reasonable cost.
Now that you have a better understanding on the importance of how fast your high-speed
connection is, you can appropriately request the type of service needed or upgrade your current
account if desired.
Network Video Server User’s Manual
/BB01
www.bluenetvideo.com
44/44
TCP/IP Internet Basics
10
Network Equipment
Now that you have an idea of high-speed Internet access, you have to determine what type of
equipment you have on the site, so you will better understand how to connect your NVS to your
current network.
Router: A router basically divides networks. Typically a router divides the network from the ISP’s
(Internet Service Provider) network and your local network. You must have a router to separate
these networks. You must have a router to share an Internet connection. If you have a single PC on
site that accesses the Internet and you want to enable another device to transmit over the Internet
(ex. NVS) you must have a router to share the Internet connection. If you already have multiple
PC’s or devices accessing the Internet, then odds are you already have a router installed. A router
essentially needs just two ports. One port links the remote network to the router and another port
from the router to your local network. For most home users, small office/home office routers have
a built-in switch to provide for multiple devices to connect to the router and share that main link to
the remote network.
network.
Let us assume that the remote network we are referring to is the ISP’s
On your router you should be able to identify several ports. There always should be one
port labeled ‘WAN’ or ‘Internet’. That WAN or Internet port is used to connect your ISP’s network
to your router. The other ports are the ‘switched’ ports, which allow you to connect multiple
Ethernet devices to the router to share the Internet connection. The image below shows a typical
home office router.
You notice that there is the one WAN port with 8 other Ethernet ports available for use. All routers
have at least 2 IP addresses, always. One IP address is to connect to your ISP and is assigned to
your WAN or Internet port and the other IP address is logically connected to all of the other
‘switched’ ports. For instance the WAN (public) IP from your provider could be 54.63.2.123 and
the other IP for your LAN (private) may look like 192.168.x.x.
Network Video Server User’s Manual
/BB01
www.bluenetvideo.com
45/45
10
TCP/IP Internet Basics
PORT FORWARDING
Port forwarding is a feature in many routers that allows a device serving data within a local
network to be accessed from outside the network (i.e. Internet). By default routers block
requests from the outside if they haven’t been initiated from within the local network. The
router basis these requests on the application’s TCP and/or UDP port number. The NVS uses
2 TCP ports. Consider the scenario in which a NVS is attached to a router. Without port
forwarding configured on a router, a program outside the local network requests a connection
to port 8888 (web port on our NVS), but is denied access as a security measure by the
router. So therefore, if you are connecting an NVS to a router and that NVS is using a Private
IP address, you MUST configure port forwarding on that router to tell the router to forward
the ports to your NVS rather than block it. More information on port forwarding configuration
is stated in the FAQ section.
Switch: A switch basically connects multiple devices together that are located on the same local
network.
These typically have many more ports than a router, generally anywhere from 5
switched ports to 48 switched ports. You can simply just connect a switch to a router to extend the
amount of ports, thus devices allowed on the network or to share an Internet connection. Unless
you have more than four devices on your local network, then you should be able to use the
available ‘switched’ ports on your router to share an Internet connection. In many enterprise
networks, a patch panel or closet is used to house several switches that connect all the networked
devices on that location. For this tutorial’s sake, switches will not be used. We will implement a
single home office router. Switches are not used to connect networks, this is why you cannot use a
switch alone to share an Internet connection.
Modem: A modem converts the electrical signals from your Internet provider to a signaling type
that your computer or router can understand. Without a modem, the computer or TCP/IP device
would not be able to understand the signaling method used by cable TV and telephone service
providers.
A modem will typically have one RJ-45 Ethernet port and one other port to
accommodate either a cable TV coaxial cable or a DSL telephone line from your Internet service
provider. Overall you will have the line from your ISP entering the modem and from the modem to
your router’s WAN port via a network cable. So that way the signal has been converted by the
modem and also leads to your router, which separates your local network from the ISP’s network.
Ethernet and RJ-45:
Ethernet is a popular communications protocol (language) used for multiple devices to ‘talk’ to each
Network Video Server User’s Manual
/BB01
www.bluenetvideo.com
46/46
TCP/IP Internet Basics
10
other on a local network. RJ-45 is a type of connector similar to a standard telephone jack that is
used in Ethernet cabling. A standard Cat5 network cable has RJ-45 connectors attached that allow
direct connections to routers, switches, and PCs.
You can distinguish between a telephone line
connector and RJ-45 connector by its size. RJ-45 is slightly larger than a telephone line connector
(RJ-11), and RJ-45 houses eight wires as opposed to four.
Note: Some devices contain a router, switch, and modem within the same unit.
Network Video Server User’s Manual
/BB01
www.bluenetvideo.com
47/47
MEMO
Western Regional Office
249 E. Ocean Blvd., #812
Long Beach, CA 90802
Toll Free: 800-504-2850
Fax: 562-436-6641
BlueNet Video Inc.
Headquarters
9786 Windisch Rd.
West Chester, Ohio 45069
Toll Free: 888-616-1514
Fax:513-759-7986
Website: www.bluenetvideo.com
Email: [email protected]
Network Video Server User’s Manual
/BB01
www.bluenetvideo.com
48/48