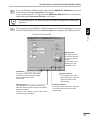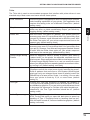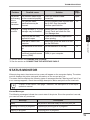
1
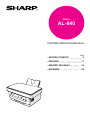
MODEL
AL-840
PRINTER OPERATION MANUAL
Page
• GETTING STARTED
2
• PRINTING
11
• PRINTER TROUBLE?
18
• APPENDIX
24
CONTENTS
1
GETTING STARTED
INTRODUCTION
2
– Making floppy disks from CD-ROM
MAIN FEATURES
3
3
INSTALLING THE PRINTER DRIVER SOFTWARE
– Description of the printer driver
4
– Checking the hardware and software requirements
– Installing the printer driver
4
4
– “AL-800 Series” printer driver group
2
4
10
PRINTING
PRINTING A PAGE
11
– Executing printing
11
– Indicators on the operation panel
12
SETTING PRINT CONDITIONS FROM PRINTER DRIVER
PRINTING FROM AN MS-DOS APPLICATION
– Print setting from the MS-DOS prompt
– Setting on the front panel
– Software printer setting
3
16
17
17
PRINTER TROUBLE?
TROUBLESHOOTING
– Printing problems
STATUS MONITOR
18
18
19
USING OTHER INSTALLED DRIVERS
UNINSTALLING PRINTER DRIVER
4
12
16
21
23
APPENDIX
SPECIFICATIONS
24
PARALLEL INTERFACE
PRINT AREA
25
26
INDEX
1
1
GETTING STARTED
This chapter provides basic information for using the SHARP AL-840 printer and its features.
1
INTRODUCTION
Getting Started
The AL-840 can be used as a copier and a laser printer. This manual describes only the printer
features of the AL-840. To use the AL-840 as a copier and to learn additional information which
relates to both the copier and printer features, see the copier manual. To get full use of all
printer features, familiarize yourself with this manual.
For quick reference during printer use, keep this manual in a handy location.
Conventions used in this manual
In this manual, the following icons are used to provide the user with information pertinent to the
use of the machine.
Warns the user that injury to the user or damage to the machine may result if
the contents of the warning are not properly followed.
Cautions the user that damage to the machine or one of its components may
result if the contents of the caution are not properly followed.
Notes provide information relevant to the machine regarding specifications,
functions, performance, operation and such, that may be useful to the user.
●
When you try to execute printing while copying is being performed, printing
will be executed after copying is finished.
●
When you try to make a copy while printing is being performed, printing will
be interrupted and you can make a copy. Printing will be resumed after copying
is finished.
Trademark acknowledgments
Windows, MS-DOS, Windows NT and Windows Printing System are trademarks of Microsoft
Corporation in the U.S.A. and other countries.
IBM, PC/AT and OS/2 are trademarks of International Business Machines Corporation.
HP, LaserJet and PCL are trademarks of the Hewlett-Packard Company.
All other trademarks and copyrights are the property of their respective owners.
2
INTRODUCTION
Making floppy disks from CD-ROM
The printer driver data in the CD-ROM can be copied to floppy disks.
Windows 95/Windows 98/Windows NT 4.0:
Insert the installation CD-ROM into the CD-ROM drive.
2
Double-click My Computer, Al_800 (CD-ROM), and Makedisk.
3
Double-click Makedisk.exe.
4
Follow the on-screen instructions.
1
Getting Started
1
Windows 3.1x:
1
Insert the installation CD-ROM into the CD-ROM drive.
2
Double-click the File Manager in the Main window of Program Manager and select
CD-ROM and the Makedisk directory.
3
Double-click Makedisk.exe.
4
Follow the on-screen instructions.
MAIN FEATURES
q Printing from Windows 3.1x, Windows 95, Windows 98, and Windows
NT 4.0 applications
●
High-speed and high-quality printing can be performed from Windows 3.1x, Windows
95, Windows 98, and Windows NT 4.0 applications through the SHARP GDI (Graphics
Device Interface) system.
●
Since print data are processed in the computer, waiting time during printing is short.
w Printing from multiple computers through “Smart Sharing” (small-scale
sharing)
●
Since the AL-840 is equipped with two parallel interface connectors, it can be connected
to two computers simultaneously.
●
Automatic interface switching allows easy print operation which can be executed only
from each computer.
e High image quality printing with resolution of 1,800 dpi equivalent x
600 dpi through Super Image Enhancement Technology (SIET)
●
The printer is equipped with the Super Image Enhancement Technology (SIET) which
implements high image quality printing with resolution of 1,800 dpi equivalent x 600 dpi.
Small characters and fine images can be printed clearly.
3
INSTALLING THE PRINTER DRIVER SOFTWARE
Description of the printer driver
The printer driver is the software program which runs the printer. It converts the data in your file
into information that the printer can understand. It also controls communication between the
printer and computer as the data is printed.
1
Getting Started
Checking the hardware and software requirements
You will need the following hardware and software in order to install the printer driver.
Computer type
IBM PC/AT or compatible computer equipped with a bidirectional parallel interface and CD-ROM
Windows type
Windows 3.1x, Windows 95, Windows 98, Windows NT
4.0
CPU
486DX 66MHz or better
Physical RAM
Windows 95, Windows 3.1x: 8 MB (16 MB or more is
recommended.)
Windows NT 4.0: 12MB (16MB or more is recommended.)
Windows 98: 16MB (32MB or more is recommended.)
Virtual storage (swap file)
8 MB or more
Display
640 x 480 dots (VGA) or better
Hard disk free space
10 MB or more
The printer driver included in this product cannot be used under Windows NT
3.5x, OS/2, pure MS-DOS and other operating systems which are not described
above.
If you are using some of your computer’s memory as a RAM drive, the printer
driver may not be allocated the correct amount of memory. In such a case,
reduce the size of your RAM disk, or do not use the RAM disk. Please refer to
your MS Windows documentation for further information.
Installing the printer driver
The software for your printer is provided on CD-ROM which was packed with your laser printer.
Before installing the printer driver, be sure to check the following items.
●
Is the printer connected properly to the computer?
●
Does the printer have paper?
●
Is there another GDI printer driver or Windows Printing System printer driver already
installed? If installed, change the printer port setting. For the change of the printer port
setting, see USING OTHER INSTALLED DRIVERS on page 21.
In this description, the following drive configuration is supposed. Specify proper drives depending
on the configuration of your computer.
Drive R: CD-ROM drive (installation source)
Drive C: Hard disk drive (installation destination)
4
INSTALLING THE PRINTER DRIVER SOFTWARE
Windows 95/Windows NT 4.0:
1
Load paper into the paper tray of the printer. For loading of paper, see the section on
LOADING COPY PAPER in the copier operation manual.
2
Turn on the printer.
3
Turn on your computer and start Windows.
1
Getting Started
Before installing the printer driver, be sure to close all other applications which
may be open.
4
When using Windows 95 on a personal computer with plug & play*, the “Update
Device Driver Wizard” window will appear. Insert the installation CD-ROM into the
CD-ROM drive. Click the Next button and follow the on-screen instructions. Proceed
to step 7. If the “Copying Files” window appears during this operation, enter R:\ (if the
CD-ROM is designated as drive R) and click the OK button.
●
●
●
If you use Windows 95 and the “New Hardware Found” window will appear, click
the Driver from Disk Provided by Hardware Manufacturer button and then click
OK. Proceed to step 6.
If you use Windows 95 and the screen shown above or the “New Hardware Found”
window does not appear, proceed to step 5.
If you use Windows NT 4.0, proceed to step 5.
★ Plug & play
This feature is effective if both the computer and peripheral equipment are equipped
with IEEE 1284 compliant parallel interface.
The screen displayed depends on the version of Windows.
5
INSTALLING THE PRINTER DRIVER SOFTWARE
5
Insert the installation CD-ROM into the CD-ROM drive.
Click the Start button and select Run. When the screen shown below appears, type
R:\SETUP (if the CD-ROM is designated as drive R) and click the OK button. Proceed
to step 7.
6
“Install From Disk” window will appear. Insert the installation CD-ROM into the CDROM drive. Type R:\ (if the CD-ROM is designated as drive R) and click the OK
button. Proceed to step 7.
7
The installation program will start. To install the printer driver to the default folder,
click the Next button. To select a different folder, select Browse and type in the new
path and folder name. Click OK and say YES to create the folder, select the Next
button to continue.
8
On the display, you will see “printer port to be used”. Normally, this is LPT1 and it is
selected automatically.
Ensure that Yes is checked to use the printer as the default printer.
Finally click the Next button.
9
A “Confirm installation” window will be displayed. To continue installation, click the
Yes button.
10
When the installation is complete, you will be asked whether or not to print a test
page. If you wish to do so, click the Yes button. At this time, ensure that paper is
loaded in the paper tray.
11
If the test print completes successfully, click the Finish button. “The installation of the
SHARP AL-800 Series Software is complete.” window will be displayed. Click the OK
button.
1
Getting Started
If you have any problem with the test print, see TROUBLESHOOTING on
page 18 and check the symptoms and solutions. Print the test page again after
removing the problem.
6
INSTALLING THE PRINTER DRIVER SOFTWARE
Windows 98:
1
Load paper into the paper tray of the printer. For loading of paper, see the section on
LOADING COPY PAPER found in the copier operation manual.
2
Turn on the printer.
3
Turn on your computer and start Windows.
1
Getting Started
Before installing the printer driver, be sure to close all other applications which
may be open.
4
When using Windows 98 on a personal computer with plug & play*, the “Add New
Hardware Wizard” window will appear. Click the Next button and follow the on-screen
instructions.
● If the “Add New Hardware Wizard” window does not appear, proceed to step 8.
*Plug &play: For plug & play information, see page 5.
5
Select Search for the best driver for your device and click the Next button.
6
Insert the installation CD-ROM into the CD-ROM drive. Select the CD-ROM drive
and click the Next button.
7
INSTALLING THE PRINTER DRIVER SOFTWARE
7
Windows driver file search will find the device “SHARP AL-800 Series”. Click the
Next button. Proceed to step 9.
8
Insert the installation CD-ROM into the CD-ROM drive. Click the Start button and
select Run. When the window shown below appears, type R:\SETUP (if the CDROM is designated as drive R) and click the OK button. Proceed to step 9.
9
The installation program will start. To select a different folder, select Browse and type
in the path and folder name where the printer driver will be installed. Click OK and
say YES to create the folder, select the Next button to continue. To install the printer
driver to the default folder, click the Next button.
10
On the display, you will see “printer port to be used”. Normally, this is LPT1 and it is
selected automatically. Ensure that Yes is checked to use the printer as the default
printer. Finally click the Next button.
11
A “Confirm installation” window will be displayed. To continue installation, click the
Yes button.
12
When the installation is complete, you will be asked whether or not to print a test
page. If you wish to do so, click the Yes button. At this time, ensure that paper is
loaded in the paper tray.
13
If the test print completes successfully, click the Finish button. “The installation of the
SHARP AL-800 Series Software is complete.” window will be displayed. Click the OK
button.
1
Getting Started
If you have any problem with the test print, see TROUBLESHOOTING on
page 18.
8
INSTALLING THE PRINTER DRIVER SOFTWARE
Windows 3.1x:
1
Load paper into the paper tray of the printer. For loading of paper, see the section on
LOADING COPY PAPER in the copier operation manual.
2
Turn on the printer and then start Windows on your computer.
1
3
Insert the installation CD-ROM into a CD-ROM drive.
4
Choose File from the Menu bar in Program Manager, and then choose the Run…
command.
5
Type R:\SETUP (if the CD-ROM is designated as drive R) in the command line box
and then click the OK button.
6
Select a directory to which the printer driver will be installed and click the Next button.
To install it to the default directory, click the Next button.
7
A “printer port to be used” window will be displayed. Normally, LPT1 is automatically
set.
Then ensure that Yes is checked to use this printer as the default printer.
Click the Next button.
8
A "Confirm installation" window will be displayed. To continue installation, click Yes.
9
When the installation is complete, click the Yes button. Then restart Windows.
Getting Started
Before installing the printer driver, be sure to close all other applications which
may be open.
9
INSTALLING THE PRINTER DRIVER SOFTWARE
“AL-800 Series” printer driver group
When the printer driver is installed, the SHARP AL-800 Series printer driver group will
be created. This group allows the following functions to be executed.
DOS Emulation HELP
1
DOS Emulation Setup
See page 16.
Getting Started
Readme
The latest information on the printer driver is included in this note. Read the Readme
first.
Status Monitor HELP
Status Monitor
The printer state and information on current printing are displayed on the status
monitor window. For details, see STATUS MONITOR on page 19.
Uninstall AL-800 Series
The printer driver can be uninstalled. If the driver is uninstalled, printing cannot be
performed on the printer.
For proper uninstallation, be sure to use uninstallation program of the printer driver
group.
Be sure to read “Readme” found in the printer driver group before starting to
print from application programs.
10
2
PRINTING
PRINTING A PAGE
The printing method is described below. Read the description with the operation manual for
the application to be used.
Before you can use your printer, you must install the printer driver which has
been supplied with the printer. Once this software has been installed, you
can control the printing of your documents from the printer driver which
appears on your computer screen. See INSTALLING THE PRINTER DRIVER
SOFTWARE on page 4.
●
When using multiple printers, you must change the printer setting from the
control panel to change the printer to be used. This printer cannot be used
with other GDI printers and printers that use the Windows Printing System.
For details, see USING OTHER INSTALLED DRIVERS on page 21.
2
Printing
●
Executing printing
1
Ensure that paper of the desired size is loaded in the paper tray. (See the section on
LOADING COPY PAPER in the copier operation manual.)
To print onto special paper, feed it one sheet at a time.
2
Turn on the printer. The ready (
) indicator will light up.
3
Select the settings for printing such as the number of sets and paper type from the
application. See SETTING PRINT CONDITIONS FROM PRINTER DRIVER on page
12.
Before printing, ensure that the AL-800 series has been selected as the printer.
4
Print the file from your software application.
If copying is being performed when printing is initiated, copying will continue.
After copying is complete, printing will be executed when the clear ( ) key
is pressed twice or approximately 60 seconds (auto clear time)* elapse.
* The auto clear time varies with a user program setting. See the copier
operation manual.
● Preheat mode and auto power shut-off mode will be canceled when printing
is started.
●
11
PRINTING A PAGE
2
●
If the paper size specified from the software application is larger than the
paper size in the printer, the image may be printed onto two sheets of paper.
●
If the paper size specified from the software application is larger than the
paper size in the printer, part of the image that is not transferred to the paper
may remain on the surface of the drum. In this case, the other side the paper
may become dirty. If this occurs, change to the correct size paper and print
two or three pages to clean the image.
Indicators on the operation panel
Printing
The ON LINE indicator and the ready (
ON LINE
indicator
Power save
indicator
Ready indicator
) indicator indicate the state of the printer.
Ready indicator
On:
Indicates the printer is ready for printing (on
line), data is being received from a computer
or printing is being performed.
Off:
Indicates copying is being performed or the
printer is in the auto power shut-off mode.
ON LINE indicator
On:
Indicates the printer is ready for printing (on
line) or printing is being performed.
Blinking: Indicates copier setting is being performed
during printing or data is being received from
a computer.
Off:
Copying is being performed.
Power save indicator
On:
Indicates the printer is in a power save mode.
SETTING PRINT CONDITIONS FROM PRINTER
DRIVER
The setting method and setting items of the printer driver are described below.
Before setting the printer driver, check the following items.
●
The AL-800 series printer driver has been installed in the computer to be used. If not, see
INSTALLING THE PRINTER DRIVER SOFTWARE on page 4.
●
The AL-800 series has been selected as the default printer on the computer to be used.
Windows 95/Windows 98/Windows NT 4.0:
1
12
Click the Start button of the computer and then select Printers from Settings.
SETTING PRINT CONDITIONS FROM PRINTER DRIVER
2
If you use Windows 95/Windows 98, right-click the SHARP AL-800 Series icon in the
Printer folder and select Properties in the menu.
If you use Windows NT 4.0, right-click the SHARP AL-800 Series icon in the Printer
folder and select Document defaults in the menu.
For this description, it is assumed that the mouse is configured for right hand
operation.
3
The properties of the SHARP AL-800 Series printer driver will be displayed. If you use
Windows 95/Windows 98, click the Driver Setup tab to display the following screen.
2
* Screen on Windows 95
Printing
Apply button
The settings which
have been selected
by each tab will be
saved.
*This button is not
displayed on the
Windows NT4.0.
OK button
All driver settings which have been
selected by each tab will be saved
and the properties will be
terminated.
Cancel button
The settings which have been selected by
each tab will be canceled and the properties
will be terminated.
However, the settings which have been
saved will not be canceled.
Defaults button
The settings which have
been selected by each tab
will be returned to their
default state.
Default All button
All settings which have been selected
by all tabs will be returned to their
default state.
13
SETTING PRINT CONDITIONS FROM PRINTER DRIVER
Windows 3.1x:
2
1
Double-click the Print Manager icon in the Main window of Program Manager.
2
Select Options in the Print Manager and then select Printer Setup.
3
Select SHARP AL-800 Series in the Installed Printers: and click the Setup button.
4
The properties of the SHARP AL-800 Series will be displayed.
Printing
The following items can be set with the printer driver.
Paper/Output
Copies
Specifies the number of sets to be printed. Any number from 1 to
50 can be selected. (default setting: 1)
Paper Source
Specifies a paper feed station in the printer. (default setting: Paper
Tray)
Paper Size*
Specifies the size of the paper to be printed. The paper sizes that
can be selected are Letter, Legal, Invoice, A4, B5, A5, Folio,
Foolscap, etc. (default setting: Letter or A4 depending on the
countries or regions)
* Custom sizes cannot be set for this printer.
Page orientation
Sets the page orientation. Portrait or Landscape can be selected.
(default setting: Portrait)
Collate
Specifies collated printing or group printing. (default setting:
collated)
Reverse Order
Specifies printing order. If reverse order is specified, printing will
start from the last page. (default setting: selected)
N-Up
Multiple pages can be printed on a single sheet. Two pages or
four pages can be selected. (default setting: 1 page)
Image Quality
14
Lighten/Darken
Any number from 0 to 100% can be set. (default setting: 50%)
Contrast
Any number from 0 to 100% can be set. (default setting: 50%)
Resolution
Specifies 300 dpi or 600 dpi. (default setting: 600 dpi)
Output Type
Specifies output type: Normal, Photograph, Text, Toner Save or
Advanced. (default setting: Normal)
SETTING PRINT CONDITIONS FROM PRINTER DRIVER
Tricks
The Tricks tab is used to accommodate programs that interface with printer drivers in nonstandard ways. Most users need never access these options.
Check this option if the application does not recognize the inherent
color-handling capabilities of your printer. One application that
requires this setting to be on is Microsoft PowerPoint. (default
setting: mark)
Graphics
In general, if performance when rendering complex graphics is
either very slow, or yields unsatisfactory output, you should try
toggling setting. (default setting: mark)
Dither Text
With the Dither Text option on (default), your printer gives you
accurate grays even if it has to dither them. You get exactly what
you ask for. However, small dithered text is difficult to read. With
the Dither Text option off, your printer maps text and lines to the
nearest gray. (default setting: mark)
Dither Line
With the Dither Lines option on (default), your printer gives you
accurate grays even if it has to dither them. You get exactly what
you ask for. However, fine dithered lines appear dashed instead
of solid. With the Dither Lines option off, your printer maps text
and lines to the nearest gray. (default setting: mark)
Accept Larger Bitmap
Pattern
When an application sends a bitmap fill pattern (also called a
“pattern brush”) to the printer, the expected, standard size is 8
pixels square. Some applications are able to send larger patterns.
If Accept Larger Bitmap Pattern is on, and you encounter output
where your bitmap fills have repeating pattern anomalies in them,
try turning it off. (default setting: non-mark)
Scale
Your printer has a process that automatically enlarges the bitmap
fill patterns so that the output more closely matches the screen.
Scale 0: patterns that come from a VGA system (96x96 logical
pixels per inch) are enlarged three times to (almost) match the
300x300 dpi of a laser printer. Scale 1: no scaling. You can also
force your printer to scale by 2,3,4, or more times. (default
setting: 0)
TrueType
Turning the TrueType checkbox on speeds up handling of
TrueType fonts by sending them as text. With this option off, fonts
are handled as graphics. If you are printing with characters found
in language like Japanese or Chinese (also called double-byte
characters), the True Type checkbox should be off. (default
setting: mark)
Adobe Type manager
The Adobe Type Manager checkbox accesses a “back door” to
ATM. Turning this option on uses this back door to speed up
handling of Type 1 PostScript fonts by handling them as text.
With this option turned off, fonts are handled as graphics. (default
setting: non-mark)
2
Printing
Color Document
15
SETTING PRINT CONDITIONS FROM PRINTER DRIVER
DOS Emulation
A PCL4 DOS Emulation setup program can be started by clicking the Setup button. This is an
independent program that configures the PCL4 DOS emulation.
DOS Emulation Setup
2
Printing
DOS Copies
Specifies the number of sets to be printed. Any number from 1 to
50 can be selected. (default setting: 1)
DOS Orientation
Sets the page orientation. Portrait or Landscape can be selected.
(default setting: Portrait)
DOS Paper Source
Specifies a paper feed station in the printer. (default setting: Paper
Tray)
DOS Paper Size
Specifies the size of paper to be printed. (default setting: Letter
or A4 depending on the countries or regions)
DOS A4 Width
Specifies the number of columns in a line in the width direction of
A4 size. (default setting: 77 Columns)
DOS Lines Per Page
Specifies the number of lines per page. (default setting: 60 lines
or 64 lines depending on the countries or regions)
DOS Fonts
Specifies the font to be used for printing. (default setting: Courier
Regular)
DOS Font Size
Specifies the font size. (default setting: 10 CPI)
DOS Symbol Set
Specifies the symbol set to be used for printing. (default setting:
Roman-8)
About
There are no settings on the About tab page. This page displays the installed printer driver
version and copyright statements.
PRINTING FROM AN MS-DOS APPLICATION
You can execute printing from an MS-DOS application which has been executed from the MSDOS prompt in Windows.
This printer can only print from applications run from the MS-DOS prompt in
Windows. It cannot print when running in native MS-DOS mode.
Print setting from the MS-DOS prompt
Windows 95/Windows 98 has the item, “Spool MS-DOS print jobs” in the port settings. If this
setting is not selected, the printer will not operate properly. Use the following procedure to
check the setting.
16
PRINTING FROM AN MS-DOS APPLICATION
1
Click the Start button.
2
Select Settings and then click Printers.
3
Right-click the AL-800 Series icon in the printer dialog box and click Properties.
For this description, it is assumed that the mouse is configured for right hand
operation.
Click the Details tab in the Properties dialog box.
5
Click the Port Settings button.
6
Check that “Spool MS-DOS print jobs” is checked in the port setting dialog box.
Printing
4
2
Settings on the front panel
Paper size, tray selection, and other options are set from the front panel. Use the following
procedure to start the front panel.
Windows 95/Windows 98/Windows NT 4.0:
1
Click Start, Program, SHARP AL-800 Series, and DOS Emulation Setup.
Windows 3.1x:
1
Double-click the DOS Emulation Setup icon in the SHARP AL-800 Series in Program
Manager.
Software printer setting
Set your MS-DOS application to use the following model printer.
HP LaserJet Series II (PCL4)
If this printer is not listed on the application’s printer setup, choose a PCL4 compatible printer.
17
3
PRINTER TROUBLE?
TROUBLESHOOTING
Some problems in the AL-840 are common to both the copier and printer features, so also
check TROUBLESHOOTING of the copier operation manual.
Printing problems
“Copier” in the column “See page:” indicates the description is in the copier
operation manual.
3
Printer trouble?
Problem
Printer
driver
cannot be
installed.
Possible cause
Solution
Hard disk free space is not
sufficient for installation of
the printer driver.
Delete unnecessary files and
application software to increase hard
disk free space. (The driver requires
at least 10 MB free space.)
4
The operating system is not
proper.
Use Windows 3.1x, Windows 95,
Windows 98 or Windows NT 4.0.
4
Insert the paper correctly.
Paper does Paper is not set correctly.
not feed into
Too much paper in the paper Remove excessive paper from the
the printer.
tray.
paper tray. For envelopes,
transparency film, and labels, feed
one sheet at a time.
The printer
does not
print.
18
See
page:
Copier*1
Copier*1
Copier*2
The interface cable might
not be connected properly.
Check the interface connection.
The interface cable is
defective.
Check the cable with a computer and
printer which you know work. If
printing is still not possible, the
interface cable is defective.
–
The port setting is incorrect. Check the printer settings in the
Windows Control panel to make sure
that the print job is being sent to the
correct port (for example, LPT1).
4
The TD cartridge or drum
cartridge is not installed
properly.
Ensure that the TD cartridge and
drum cartridge are installed properly.
–
The printer may be
configured incorrectly.
Check the application to make sure
that all the print settings are correct.
–
The printer driver may be
incorrectly installed.
Reinstall the printer driver software
and try printing a test page.
4
TROUBLESHOOTING
Problem
Possible cause
Solution
See
page:
The printer
prints wrong
data or
incorrect
characters.
The interface cable might
not be connected properly.
Check the interface cable
connection.
The interface cable
specifications may be
incorrect.
Use the interface cable included with
the AL-840. See the parallel
interface specifications.
Printing is
too slow.
If using Windows 3.1x, Print Double-click the Printers icon in
manager may be disabled. Control Panel and check the Use
Print Manager box.
–
There may be too many
applications open.
Close all unnecessary applications
before printing.
–
RAM disk is used in the
computer.
Reduce the RAM disk size or do not
use the RAM disk.
–
The resolution is set to 600
dpi.
Set the resolution to 300 dpi.
14
The computer may have
insufficient random-access
memory (RAM).
Install more random-access memory
(RAM) in your computer.
–
Copier*2
25
3
Printer trouble?
*1 See the section on LOADING COPY PAPER.
*2 See the section on CONNECTING THE INTERFACE CABLE.
STATUS MONITOR
When printing starts, the status monitor screen will appear on the computer display. The status
monitor displays the printer state and information on the current print job.
The status monitor displays the following types of messages,Normal, Warning and Fault. If an
error message appears, check the message description below and perform the listed task.
“Copier” in the column “See page:” indicates the description is in the copier
operation manual.
Normal Messages
The following messages indicate the current state of the printer. Since the operation is normal,
you need not take any measures.
Message
Description
Ready
The printer is idle and ready for the next print job.
Spooling or Printing in progress
A spooling or printing job is in progress.
Copying in progress
A copying job is in progress.
19
STATUS MONITOR
Warning Messages
Message
Solution
TD Cartridge is near Empty.
Reorder a new cartridge and
replace soon.
Running out of toner. While printing can
continue, the print quality will be affected.
Reorder a new TD cartridge and replace it.
Drum Cartridge is near End of
Life. Reorder a new cartridge
and replace soon.
The drum cartridge is nearly spent. While
Copier*1
printing can continue, the print quality will be
affected. Reorder a new cartridge and replace
it soon.
Current job requires manual
Remove the paper from the paper tray. Feed
feeding.
paper one sheet at a time in accordance with
Special papers such as
the message on the computer.
transparency film, envelope, and
labels must be fed one sheet at a
time.
3
See
page:
Copier*1
–
Printer trouble?
*1: See the section on SUPPLY PART NUMBERS AND STORAGE.
Fault Messages
Message
20
Solution
See
page:
Drum Cartridge is at End of Life.
Replace empty Drum Cartridge
with a new cartridge.
The drum cartridge is spent. Printing cannot
continue until you replace the spent drum
cartridge with a new cartridge.
Copier*2
Close Front Cover
The front cover on the printer is open.
Printing cannot continue until you close the
cover.
–
Insert TD Cartridge into the
machine
The TD cartridge is not in the printer. Insert a
TD cartridge into the printer.
Paper Jam
A piece of paper has misfed within the printer. Copier*4
Printing cannot continue until the misfed
paper is removed.
If the printer does not print, check
the power switch and cable
connection.
If a second computer is attached
and printing, close this dialog box
and reprint from your application
after the other job is finished.
Ensure that the power switch is turned on
and the printer cable is securely connected. If
another computer is printing on your printer,
close this dialog box and restart printing from
your application after the current job is
finished.
Copier*3
–
STATUS MONITOR
Message
Solution
See
page:
Check Paper Tray : Out of Paper
or Misfeed
The paper tray is out of paper or the paper did Copier*5
not feed correctly. Printing cannot continue
until you load the paper or clear the misfeed
in the paper tray.
Service Error
Switch Main Power OFF on the
product. Wait approximately 5
seconds. Switch Main Power
ON. If The Product Error
continues, Contact your
authorized SHARP Service
Center.
The product has detected a fatal error
condition and cannot continue. Make a note
of any specific error conditions or codes.
Then turn the product’s main power switch to
OFF. Wait for five seconds. Then turn the
product’s main power switch to ON. If the
product error condition persists, please
contact your authorized SHARP Service
Center.
–
Communication Error
The computer has lost
communications with the
products. Cancel the current
operation, turn the product off,
check the cable connection,
then back on, retry the
operation.
The computer has lost communications with
the product. Cancel the current operation.
Then turn the product’s main power switch to
OFF. Check the cable connections carefully.
Wait five seconds, Then turn the product’s
main power switch to ON. Try the print job
again. If the product communications error
condition persists, please refer to the
Operation manual.
–
3
Printer trouble?
*2: See the section on DRUM CARTRIDGE REPLACEMENT.
*3: See the section on INSTALLING THE TD CARTRIDGE.
*4: See the section on MISFEED REMOVAL.
*5: See the section on LOADING COPY PAPER.
USING OTHER INSTALLED DRIVERS
If you use another GDI printer or a Windows Printing System printer, interference between
printers may occur and printing may not be performed properly.
To use another GDI printer or a Windows Printing System printer, you must change the port
setting of the printer driver using the following procedure.
If another printer does not operate properly when the AL-800 series printer
driver is set to “FILE”, uninstall the AL-800 series printer driver.
To uninstall the driver, see UNINSTALLING PRINTER DRIVER on page 23.
21
USING OTHER INSTALLED DRIVERS
Windows 95/Windows 98/Windows NT 4.0:
1
Click the Start button.
2
Select Settings and then click Printers.
3
Right-click the AL-800 Series icon in the printer dialog box and then click Properties.
For this description, it is assumed that the mouse is configured for right hand
operation.
3
Printer trouble?
4
Click the Details tab (Ports tab – on Windows NT4.0) in the Properties dialog box,
select FILE: in the Print to the following port list box, and click the OK button.
5
Right-click the icon of the printer to be used and click Properties.
6
Click the Details tab (Ports tab – on Windows NT4.0) in the Properties window,
select LPT1 (or the currently used port), and click the OK button.
To use the AL-800 series again, perform the same procedure but select the
port to be used (for example, LPT1) in step 4.
Windows 3.1x:
22
1
Double-click the Control Panel icon in the Main window of Program Manager.
2
Double-click the Printers icon. The Printers window will then open.
3
Select AL-800 Series, and then click the Connect button.
4
Select File from the list of options in the Ports window, and then click the OK button.
5
Select the new printer you would like to use from the list in the Installed Printers
window, and then click the Connect button.
6
Select the printer port to use for the new printer, and then click the OK button.
USING OTHER INSTALLED DRIVERS
7
Click the Set As Default Printer button, and then click the Close button.
To use the AL-800 series again, perform the same procedure but select the
port to be used (for example, LPT1) in step 4.
UNINSTALLING PRINTER DRIVER
If the printer driver is not installed correctly or if you no longer use this printer, uninstall the
printer driver from your computer using the following procedure.
If using Windows 95/Windows 98/Windows NT 4.0, click Start, Program, SHARP
AL-800 Series, and Uninstall AL-800 Series.
If using Windows 3.1x, double-click the SHARP AL-800 Series icon in Program
Manager and double-click the Uninstall AL-800 Series icon.
2
When the “Confirm File Deletion” window appears, click the Yes button.
3
When the “Remove Programs From Your Computer” window appears, click the OK
button.
Printer trouble?
1
3
If you uninstall either the SHARP AL-800 Series or AL-1000 Series printer
driver after you have installed both drivers, the other printer may not function
properly. In this case, install again the printer driver for the printer you will use.
23
4
APPENDIX
SPECIFICATIONS
4
Appendix
Resolution
600 or 300 can be selected.
1,800 dpi equivalent x 600 dpi through Super Image
Enhancement Technology (SIET) is possible.
Page description language
SHARP GDI
Page orientation
Portrait or landscape
First print time
Approx. 20 seconds*
Print speed
Max. 8 pages per minute (letter or A4)
Interface port
Bi-directional parallel interface (IEEE 1284 compliant)
* First print time may differ depending on operating conditions, such as power-supply voltage
and room temperature.
Also the time may differ depending on data quantity to be printed and applications.
As a part of our policy of continuous improvement, SHARP reserves the right
to make design and specification changes for product improvement without
prior notice. The performance specification figures indicated are nominal values
of production units. There may be some deviations from these values in
individual units.
24
PARALLEL INTERFACE
This printer uses a bi-directional parallel interface. Use the interface cable attached to the AL840.
Use the parallel interface cable specified by SHARP for prevention of external
radio wave interference. For details, contact your SHARP service centre.
● For specifications of the parallel interface of your computer, see its operation
manual.
●
Connector
36-pin DDK 57LE-40360-730B (D29)
female connector or equivalent connector
1
36
19
4
Appendix
Cable
Shielded type bi-directional parallel
interface
For best results, use a printer interface
cable which is IEEE 1284 compliant.
18
Pin configuration
The pin numbers and signal names are
listed in the following table.
Pin No.
Signal name
Pin No.
Signal name
1
STB
19
GND (STB RET)
2
DATA1
20
GND (DATA1 RET)
3
DATA2
21
GND (DATA2 RET)
4
DATA3
22
GND (DATA3 RET)
5
DATA4
23
GND (DATA4 RET)
6
DATA5
24
GND (DATA5 RET)
7
DATA6
25
GND (DATA6 RET)
8
DATA7
26
GND (DATA7 RET)
9
DATA8
27
GND (DATA8 RET)
10
ACKNLG
28
GND (ACKNLG RET)
11
BUSY
29
GND (BUSY RET)
12
PE (Paper End)
30
GND (PE RET)
13
SLTC
31
INPRM
14
AUTO LF
32
FAULT
15
(NC)
33
(NC)
16
GND (0 V)
34
(NC)
17
FG
35
+5V
18
+5V
36
SLTC IN
25
PRINT AREA
The print area of this printer is shown below.
Portrait
Landscape
E
E
B A
D C
F
E
G
E
F
D
C
G
4
Paper size
B
Appendix
A
Print area
600 dpi
A
B
C
Dots
D
Letter
5100
4904
6600
6400
100
96
100
Legal
5100
4904
8400
8200
100
96
100
Invoice
3300
3104
5100
4900
100
96
100
A4
4960
4760
7015
6815
100
100
100
A5
3496
3296
4960
4760
100
100
100
B5
4299
4104
6070
5870
100
95
100
Folio
5100
4904
7800
7600
100
96
100
Foolscap
5100
4904
7440
7240
100
96
100
Paper size
E
F
G
300 dpi
Dots
Paper size
26
A
B
C
D
E
F
G
Letter
2550
2456
3300
3200
50
44
50
Legal
2550
2456
4200
4100
50
44
50
Invoice
1650
1552
2550
2450
50
48
50
A4
2480
2384
3507
3407
50
46
50
A5
1748
1648
2480
2380
50
50
50
B5
2149
2056
3035
2935
50
43
50
Folio
2550
2456
3900
3800
50
44
50
Foolscap
2550
2456
3720
3620
50
44
50
INDEX
C
Contrast . . . . . . . . . . . . . . . . . . . . . . . . . . 14
F
Features . . . . . . . . . . . . . . . . . . . . . . . . . . 3
I
Image quality adjustment . . . . . . . . . . . . 14
Installation
- printer driver . . . . . . . . . . . . . . . . . . . . . . 4
Interface . . . . . . . . . . . . . . . . . . . . . . . . . 25
L
Lighten/Darken . . . . . . . . . . . . . . . . . . . . 14
M
Messages . . . . . . . . . . . . . . . . . . . . . . . . 19
MS-DOS application . . . . . . . . . . . . . . . . 16
O
ON LINE indicator . . . . . . . . . . . . . . . . . . 12
Operation panel . . . . . . . . . . . . . . . . . . . . 12
P
Paper size . . . . . . . . . . . . . . . . . . . . . . . . 14
Paper source . . . . . . . . . . . . . . . . . . . . . . 14
Parallel interface connector . . . . . . . . . . . 25
Print
- collate . . . . . . . . . . . . . . . . . . . . . . . . . . 14
- page orientation . . . . . . . . . . . . . . . . . . 14
- print area . . . . . . . . . . . . . . . . . . . . . . . . 26
- setting print conditions . . . . . . . . . . . . . 12
Printer driver
- installing . . . . . . . . . . . . . . . . . . . . . . . . . 4
- setting . . . . . . . . . . . . . . . . . . . . . . . . . . 12
- uninstalling . . . . . . . . . . . . . . . . . . . . . . 23
Printer driver group . . . . . . . . . . . . . . . . . 10
Printer trouble? . . . . . . . . . . . . . . . . . . . . 18
R
Random-access memory . . . . . . . . . . . . . 4
Ready indicator . . . . . . . . . . . . . . . . . . . . 12
Resolution . . . . . . . . . . . . . . . . . . . . . . . . 14
S
Specifications
- computer . . . . . . . . . . . . . . . . . . . . . . . . . 4
- parallel interface . . . . . . . . . . . . . . . . . . 25
- printer . . . . . . . . . . . . . . . . . . . . . . . . . . 24
Status monitor . . . . . . . . . . . . . . . . . . . . . 19
T
Tricks . . . . . . . . . . . . . . . . . . . . . . . . . . . . 15
Troubleshooting . . . . . . . . . . . . . . . . . . . 18
U
Uninstalling printer driver . . . . . . . . . . . . 23
27
AL-840
SHARP CORPORATION
PRINTED IN HONG KONG
99J
KSw
TINSE7300XCZZ