1
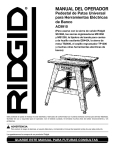
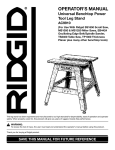
OPERATOR’S MANUAL
Work-n-Haul IT
Two Wheel Work Stand
TM
AC9930
For Use With Ridgid TS2400
Table Saw And
Ridgid Miter Saws
This work stand has been engineered and manufactured to our high standard for dependability, ease of operation and
operator safety. When properly cared for, the work stand will give you years of rugged, trouble-free performance.
WARNING
To reduce the risk of injury, the user must read and understand the operator’s manual before using this product.
Thank you for buying a Ridgid product.
SAVE THIS MANUAL FOR FUTURE REFERENCE
1
TABLE OF CONTENTS
n Introduction ...................................................................................................................................................................... 2
n Rules for Safe Operation .................................................................................................................................................. 3
n Symbols............................................................................................................................................................................ 4
n Unpacking ........................................................................................................................................................................ 5
n Loose Parts ...................................................................................................................................................................... 5
n Tools Needed.................................................................................................................................................................... 5
n Assembly .....................................................................................................................................................................6-10
n Exploded Views/Repair Parts ......................................................................................................................................... 11
n Customer Service Information........................................................................................................................................ 12
INTRODUCTION
Your work stand has many features for making the use of this product more pleasant and enjoyable. Safety, performance,
and dependability have been given top priority in the design of this product making it easy to maintain and operate.
WARNING:
Do not attempt to use this product until you read thoroughly and understand completely the operator’s manual.
Pay close attention to the safety rules, including Dangers, Warnings, and Cautions. If you use your product properly
and only as intended, you will enjoy years of safe, reliable service.
Look for this symbol to point out important safety precautions.
It means attention!!! Your safety is involved.
WARNING:
The operation of any tool can result in foreign objects being thrown into your eyes, which can result
in severe eye damage. Before beginning operation, always wear safety goggles or safety glasses with
side shields and a full face shield when needed. We recommend Wide Vision Safety Mask for use over
eyeglasses or standard safety glasses with side shields. Always wear eye protection which is marked
to comply with ANSI Z87.1.
2
RULES FOR SAFE OPERATION
n NEVER STAND ON WORKSTAND. Serious injury could
occur if the stand tips or you accidentally hit the cutting
tool. Do not store any items above or near the stand
where anyone might climb on the stand to reach them.
n Maximum weight of power tool must not exceed 100
pounds.
n Always mount miter saw so the workpiece is positioned
in-line with the roller assemblies.
n Check to make sure workstand does not rock, slide or
move prior to use.
n Put the workstand on a firm level surface where there
is plenty of room to handle and properly support the
workpiece.
n SAVE THESE INSTRUCTIONS. Refer to them frequently
and use them to instruct other users. If you loan someone
this product, also loan these instructions.
Safe operation of this accessory requires that you read and
understand this operator's manual, the operator’s manual
for the table saw and miter saw as well as all labels affixed
to the tool.
READ ALL INSTRUCTIONS
n KNOW YOUR ACCESSORY. Read the operator's manual
carefully. Learn the product's applications and limitations
as well as the specific potential hazards related to this
product.
n KEEP THE WORK AREA CLEAN. Cluttered work areas
and work benches invite accidents. DO NOT leave tools
or pieces of wood on the saw while operating.
n ALWAYS WEAR SAFETY GLASSES WITH SIDE
SHIELDS. Everyday eyeglasses have only impactresistant lenses; they are NOT safety glasses.
n DO NOT USE THIS PRODUCT WITH OTHER EQUIPMENT or for other purposes.
WARNING:
n ALWAYS DISCONNECT THE SAW FROM THE POWER
SUPPLY BEFORE ASSEMBLING THIS KIT. Make sure
the switch is off when reconnecting the saw to a power
supply.
Some dust created by power sanding, sawing, grinding,
drilling, and other construction activities contains
chemicals known to cause cancer, birth defects or
other reproductive harm. Some examples of these
chemicals are:
n BEFORE MAKING A CUT, BE SURE ALL ADJUSTMENTS ARE SECURE.
• lead from lead-based paints,
n USE THE WORK STAND IN A DRY, INDOOR PLACE
PROTECTED FROM RAIN.
n KEEP WORK AREA WELL LIGHTED.
n PUT THE WORK STAND WHERE NEITHER
OPERATORS NOR BYSTANDERS MUST STAND IN
LINE WITH THE TOOL’S BLADE.
n Always get help if you need to lift the workstand. When
lifting, hold the workstand close to your body. Bend your
knees so you can lift with your legs, not your back.
• crystalline silica from bricks and cement and other
masonry products, and
• arsenic and chromium from chemically-treated lumber.
Your risk from these exposures varies, depending on
how often you do this type of work. To reduce your
exposure to these chemicals: work in a well ventilated
area, and work with approved safety equipment, such
as those dust masks that are specially designed to filter
out microscopic particles.
n When hauling the workstand in a vehicle, securely tie it
down to prevent movement and possible damage.
n NEVER put the workstand where operator's or bystander
are forced to stand with any part of their body inline with
the path of the saw blade.
3
SYMBOLS
The purpose of safety symbols is to attract your attention to possible dangers. The safety symbols, and the
explanations with them, deserve your careful attention and understanding. The safety warnings do not by themselves
eliminate any danger. The instructions or warnings they give are not substitutes for proper accident prevention
measures.
SYMBOL
MEANING
DANGER: Indicates an imminently hazardous situation, which, if not avoided, will result in death or serious
injury.
WARNING: Indicates a potentially hazardous situation, which, if not avoided, could result in death or serious injury.
CAUTION: Indicates a potentially hazardous situation, which, if not avoided, may result in minor or moderate injury. It may also be used to alert against unsafe practices that may cause property damage.
Note:
Advises you of additional information concerning the operation or maintenance of the equipment.
SAFETY AND INTERNATIONAL SYMBOLS
This operator's manual describes safety and international symbols and pictographs that may appear on this product. Read the operator's manual for complete safety, assembly, operating and maintenance, and repair information.
SYMBOL
NAME
MEANING
Wet Condition Alert
• Do not expose to rain or use in damp locations.
No Hands Symbol (Miter Saw)
• Failure to keep your hands away from the blade will result
in serious personal injury.
• Failure to keep your hands away from the blade will result
No Hands Symbol (Table Saw)
in serious personal injury.
Read the Operator’s Manual
• To reduce the risk of injury, the user must read and understand
the operator’s manual before using this product.
Eye Protection
• Always wear safety goggles or safety glasses with side
shields and a full face shield when operating this product.
SAVE THESE INSTRUCTIONS
4
UNPACKING
NOTE: Before beginning assembly, check that all parts
are included. If you are missing any part, do not assemble
this accessory. Call 1-800-4-RIDGID or E-mail us at
[email protected] to get the missing part. Sometimes small
parts can get lost in packaging material. Do not throw away
any packaging until the accessory is completely assembled
and attached to your power tool. Check packaging for
missing parts before contacting RIDGID.
LOOSE PARTS
The following items are included:
n Stand Assembly (1)
n Lower Foot (1)
n Hex Bolt, 6 mm x 41 mm (2)
n Curved Washers, 6 mm (4)
n Lock Nut, 6 mm (2)
n Carriage Bolt, 1/4 in.-20 x 3 in. (4)
n Lockwasher, 1/4 in. (4)
n Wing Nut, 1/4 in. (4)
n Flat Washer, 1/4 in. (4)
n Operator's Manual (1)
STAND ASSEMBLY
CARRIAGE BOLT
HEX HEAD BOLT
LOWER FOOT
FLAT
WASHER
LOCKWASHER
WING
NUT
CURVED WASHER
LOCK NUT
TOOLS NEEDED
3
The following tools (not included) are needed for properly assembling your workstand.
DRILL
DRILL BITS (1/4 in., 3/8 in.
AND 5/8 in. WOOD BORING BIT)
CLAW HAMMER
WRENCHES
10 mm (2)
FLAT SCREWDRIVER
5
ASSEMBLY
ASSEMBLING THE LOWER FOOT
MOVING THE CARRY HANDLE SPRING PIN
See Figure 1.
See Figures 2 and 3.
NOTE: Only ONE spring pin is required at the carry handle
end of the stand. This spring pin locks the legs in the set-up
or tear-down position. Instructions to change the location
of this spring pin are described later in the “Assembly”
section of this manual.
n From carton, and bag of loose parts remove the following:
Hex Bolt, M6 x 41mm (2)
Curved Washers, M6 (4)
Lock Nuts, M6 (2)
Lower Foot (1)
Stand Assembly (1)
NOTE: Only ONE spring pin is required to lock the legs in
the set-up or tear-down position. The spring pin can be
assembled on either side of the carry handle. To change
this location, follow the instructions below:
n Note how the spring and washer are assembled before
relocating them to the other side.
n Hold washer and spring with thumb and forefinger as
shown.
n Using a flat screwdriver pry the e-clip off the groove in
the end of the knob shaft.
n Reassemble the spring pin, washers and spring to the
other side. The knob must be to the inside. Reassemble
the washer, spring and e-clip on the end of the shaft
away from the knob as shown.
NOTE: Additional tools may be required to attach your
power tool to the stand. See “Mounting Power Tools”
section of this manual.
n Slide lower foot into the stand assembly.
NOTE: A dimple has been placed on one side of the
workstand frame to aid in proper assembly alignment of
the foot as shown.
KNOB
NYLON
WASHER
SPRING
n Attach the lower foot on each side with a hex bolt,
curved washers, and a lock nut as shown.
n Firmly tighten the nuts with two 10 mm wrenches.
HEX
BOLT
CURVED
WASHER
LOCK NUT
Fig. 2
KNOB
SPRING
DIMPLE IN
FRAME
E-CLIP
Fig. 1
NYLON
WASHER
6
STEEL
WASHER
Fig. 3
ASSEMBLY
WORK STAND SET-UP
n At the wheel end of the stand firmly grab the lift handle
and with the other hand pull the spring pin knob near the
right front wheel.
See Figures 4, 5, 6 and 7.
Before you start
n Remove any workpieces from the tool.
CAUTION:
n If the tool is already assembled to the stand, make
sure that it is securely attached to the stand per the
instructions in this manual.
Do not lift by any part of the miter saw that is
attached to the workstand. Failure to do so may
result in possible injury and damage the tool.
UPRIGHT POSITION
LIFT HANDLE
SPRING
PIN KNOB
Fig. 4
n Remove or securely store any tool accessories such as
clamps, miter gauge, fence, guard, etc. that may be on
the work stand.
LOCK THE
LEGS
Fig. 6
WARNING:
To avoid serious personal injury when lifting, bend
your knees so you can lift with your legs, not your
back.
n For table saws, lower the blade all the way down into the
cabinet or base.
n For miter saws or other tools, lock the cutter head
or other movable portions of the tool in the stored
position.
n Pull up firmly on the lift handle until sliding leg is vertical.
n Release the pin and lower the handle to latch the leg.
Shake the handle up and down to make sure the sliding
leg locks into position before releasing the handle.
Setting Up
n From the upright position, hold the leg cross bar and pull
the pin.
NOTE: You may need to adjust the speed at which you
bring up the table in order to get the sliding leg to latch.
n Lift legs up until they lock in place.
WARNING:
n Lower unit until the legs rest on the ground.
To reduce the risk of injury, make sure sliding leg is
secured in the notch with the spring pin. Failure to
latch may cause stand to fall in use.
PULL PIN
SPRING
PIN KNOB
LEG
CROSSBAR
SLIDING
LEG
Fig. 5
Fig. 7
7
ASSEMBLY
WORK STAND FOLD DOWN
NOTE: You may need to adjust the speed at which you
bring up the table in order to get them to unlatch.
See Figures 8, 9, 10 and 11.
Before you start
n From the other end of the stand, pull the spring pin knob
and lift stand into the upright position. Push the legs until
they lock into place against the bottom of the table.
n Remove any workpieces from the tool.
n If the tool is already assembled to the stand, make
sure that it is securely attached to the stand per the
instructions in this manual.
n Make sure the stand will remain upright on its own.
CAUTION:
n Remove or securely store any tool accessories such as
clamps, miter gauge, fence, guard, etc. that may be on
the work stand or tool.
If the stand will not remain upright, always store
this tool and stand on the floor in the horizontal
position.
n For table saws, lower the blade down into the cabinet.
n For miter saws or other tools, lock the cutter head
or other movable portions of the tool in the stored
position.
LIFT HANDLE
SPRING
PIN KNOB
PULL THE
SPRING PIN
SLIDING
LEG
Fig. 8
Folding Down
PUSH THE
LEGS
n Pull the spring pin on the wheel end of the stand.
n Fully lift table by the lift handle.
n Slowly lower this end of the table down to the frame.
n You may now roll the stand to the next location.
NOTE: If desired, with the help of a second person, the foot
of the stand may also be used as a carry handle as shown.
WARNING:
To avoid serious personal injury when lifting, bend
your knees so you can lift with your legs, not your
back.
LOWER THE
TABLE
Fig. 10
Fig. 4
Fig. 9
8
ASSEMBLY
SET-UP POSITION
MOUNTING POWER TOOLS
WARNING:
Failure to unplug the tool could result in accidental
starting causing possible serious personal injury.
Before you start
RIDGID TS2400 table saw bolts directly onto this work
stand. Most other tools, including miter saws, will need
additional supports to aid in attaching a tool to work stand.
The hardware and mounting materials shown in this manual
are the minimum size recommended for safe attachment of
a power tool to this work stand. Any deviation from this is
not recommended.
This stand is primarily recommended for use with portable
table saws. Other applications such as miter saws and other
tools weighing less than 100 pounds are described below.
We recommend using wooden mounting blocks as
explained below to attach any tool other than the RIDGID
TS2400 table saw. Any holes drilled in the work stand or
screws attached to the table of the work stand may cause
damage to the product or interfere with the function of the
work stand.
NOTE: In miter saw applications you must build a wood
base between the stand and saw. This will prevent
interference of longer work pieces with the carry handle.
Make sure that you understand how to set-up and
tear-down the work stand safely. Saw and work stand
combination must be stable in order to operate safely.
Fig. 12
Other Portable Power Tools with a Large
Base
See Figures 13, 15 and 15.
(Mounting holes in power tool span 2 x 6 mounting blocks shown)
n Place the stand in the set-up position as shown.
n Using the stand’s table as a pattern, cut two 2 x 6 s to 24
in. length and locate as shown. From the bottom of the
stand mark hole locations.
SET-UP POSITION
WARNING:
To avoid serious personal injury, always assure
saw is fully supported and securely attached to a
level work surface. If not, relocate to a more stable
location.
WARNING:
To reduce the risk of injury from the tool moving
or falling off stand, always check that all mounting
bolts and nuts are securely tightened before
moving stand or using tool.
Fig. 13
RIDGID 10-in. Table Saw Model TS2400
See Figure 12.
n Place the stand in the set-up position as shown.
n Align the four holes supplied in the work stand table with
the four larger holes in the table saw base as shown.
n Starting at the carry handle end of the work stand, insert
the four supplied carriage bolts up through the table of
the work stand and then through the saw base.
n Install the washer, lockwasher and wing nut on top and
tighten securely.
n Drill 1/4 in. or 3/8 in. diameter holes in the two 2 x 6
mounting blocks.
n Temporarily attach the mounting blocks to work stand
with the supplied bolts or 1/4-20 bolts at least 2-1/2 in.
long. Secure with washers, lockwashers and nuts.
n To attach your power tool locate and drill holes in
mounting blocks.
NOTE: A 5/8 in. diameter counterbore 1/4 in. deep is
required for clearance between the bolt head and the
work stand table. Tap carriage bolt with hammer to seat
bolt fully into the hole and counterbore.
9
ASSEMBLY
SEE BOLT VIEW A
SEE BOLT VIEW B
n Temporarily attach the mounting blocks to work stand
with the supplied bolts or 1/4-20 bolts at least 2-1/2 in.
long. Secure with washers, lockwashers and nuts.
n Locate and drill holes in 2 x 6 mounting blocks and 1 x
4 cross pieces, as shown. Plywood 3/4 in. thick, 24 in. x
27 in. may be used in place of the 1 x 4 s.
n Loosen 2 x 6 mounting blocks from work stand table.
Attach two 1 x 4 cross pieces to the mounting blocks
with 1/4-20 carriage bolts at least 2.75 inches long, as
shown. Secure with washers, lockwashers and nuts.
NOTE: A 5/8” diameter counterbore 1/4” deep is
required for clearance between the bolt head and the
Fig. 14
SEE BOLT
VIEW A
n Remove mounting blocks from table. Attach power tool
to mounting blocks with 1/4-20 carriage bolts, washers,
lockwashers and nuts as shown. Reinstall mounting
blocks to work stand table.
NOTE: See views of bolt recommendations, see figure 15.
POWER
2X6
TOOL
WORK
STAND
BOLT VIEW A
(2 X 6s WORK STAND)
SEE BOLT
VIEW B
BOLT VIEW B
(POWER TOOL TO 2 X 6s)
PLYWOOD
SEE BOLT
VIEW C
SEE BOLT
VIEW A-1
Fig. 17
work stand table. Tap carriage bolt with hammer to seat
bolt fully into the hole and counterbore. Resecure 2x6
mounting blocks to work stand table.
If using plywood, the supplied 1/4-20 bolts may be used to
attach the 2 x 6s and plywood to the work stand table.
When mounting table saws to plywood an opening for the
sawdust to fall through is needed. See your tools owner’s
manual for recommended hole size.
See views of bolt recommendations, see figure 18.
n To attach power tool, locate and drill holes in cross
pieces.
n Attach power tool to cross pieces with 1/4-20 carriage
bolts as shown with washers, lockwashers and nuts.
Fig. 15
Portable Power Tools with a Small Base
See Figures 16, 17 and 18.
(Tool mounting holes do not span 2 x 6 mounting blocks
shown.)
n Place the stand in the set-up position as shown.
n Using the stand’s table as a pattern, locate the 2 x 6 s as
shown, and from the bottom mark hole locations.
n Drill 1/4 in. or 3/8 in. diameter holes in the two 2 x 6 x 24
in. long mounting blocks as shown.
BOLT VIEW A
(2 X 6s TO WORK STAND)
SET-UP POSITION
2X6
WORK
STAND
2X6
POWER
TOOL
1X4
2X6
Fig. 16
10
1 X 4 OR
PLYWOOD
2X6
BOLT VIEW C
(POWER TOOL TO
1X4s OR
BOLT VIEW B
(1 X 4s TO 2 X 6s)
BOLT VIEW A-1
(PLYWOOD AND 2 X 6s
TO WORK STAND)
WORK STAND
Fig. 18
EXPLODED VIEW/REPAIR PARTS
34
* Lubricate if
35
1
Necessary
33
36
32
37
20
30
29
22
21
8 10
*
19
20
9
39
23
38
7
12
4
2
17
13
27
3
11
15
41
15
31
26
24
37
5
14
16
24
6
*
18
25
38
36
*
40
28
Work-N-Haul IT Two Wheel Work Stand Model AC9930
RIDGID parts are at www.ridgidparts.com
TM
1
2
3
4
5
6
7
8
9
10
11
12
13
14
15
16
17
18
19
20
21
747-01
747-02
747-03
747-04
747-05
747-06
747-07
747-08
747-09
747-10
747-11
747-12
747-13
747-14
747-15
747-16
747-17
747-18
747-19
747-20
747-21
22
23
24
25
26
27
28
29
30
31
32
33
34
35
36
37
38
39
40
Table
Locking Pin
Metal Sleeve
Spring
Washer (10 ID)
E Clip
Wheel
Washer (13 ID)
Table Support
Nylon Roller
Hex Head Bolt (M6 x 15)
Washer (6 ID)
Axle Shaft
Hex Head Bolt (M6 x 41)
Contoured Washer (6 ID)
Metal Sleeve
Front Foot
Main Frame
E Clip
Washer (8 ID)
Spring
11
747-22
747-23
747-24
747-25
747-26
747-27
747-28
747-29
747-30
747-32
747-33
747-34
747-35
747-36
747-38
747-39
747-40
747-41
828809
983000-412
Locking Pin
Hex Head Bolt (M8 x 62)
Washer (8 ID)
Hex Nut (M8)
Rear Support
Washer (10 ID)
Cap Molded End
Foot
Round Head Bolt (M8 x 20)
Nylock Nut (M6 x 6)
Carriage Bolt (1/4-20 in. x 3 in.)
Washer (1/4 in. ID x 1.5 mm)
Lockwasher (1/4 in. ID)
Wing Nut (1/4 in.)
Phillips Head Bolt (M5)
Rubber-Stop
Hex Nut (M5)
Nylon Washer
Bag Loose Parts
Operator's Manual
OPERATOR’S MANUAL
Work-n-Haul IT
Two Wheel Work Stand
TM
AC9930
For Use With Ridgid TS2400
Table Saw And
Ridgid Miter Saws
Customer Service Information:
For parts or service, contact your nearest RIDGID authorized service center. Be
sure to provide all relevant information when you call or visit. For the location of
the authorized service center nearest you, please call 1-866-539-1710 or visit us
online at www.ridgid.com.
When ordering repair parts, always give the following information:
AC9930
Model No.
Serial No.
983000-412
3-04
12