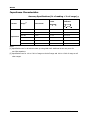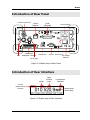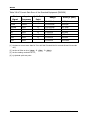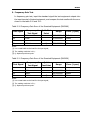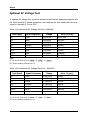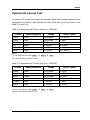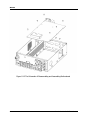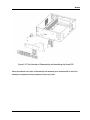
1
Service Guide RIGOL Publication number: SGC01108-1210 Dec. 2008 DM3000 Series Digital Multimeter DM3061/2/4 DM3051/2/4 © 2008 RIGOL Technologies, Inc. All Rights Reserved RIGOL Copyright Information © 2008 RIGOL Technologies, Inc. All Rights Reserved. RIGOL products are protected by patent law in and outside of P.R. China. Information in this publication replaces all previously corresponding material. RIGOL Technologies, Inc. reserves the right to modify or change part of or all the specifications and pricing policies at company’s sole decision. NOTE: RIGOL is registered trademark of RIGOL TECHNOLOGIES, INC. Service Guide for DM3000 Series I RIGOL Safety Notices Review the following safety precautions carefully before operating the instrument to avoid any personal injuries or damages to the instrument and any products connected to it. To avoid potential hazards, it is necessary to use the instrument as specified by this user’s guide only. The instrument should be serviced by qualified personnel only. Avoid Fire or Personal Injury. Use Proper Power Cord. Use the power cord designed for the instrument as authorized in your country only. Connect and Disconnect Correctly. Do not connect or disconnect test leads while they are connected to a voltage source. Ground The Instrument. The instrument is grounded through the grounding conductor of the power cord. To avoid electric shock the instrument grounding conductor(s) must be grounded properly before making connections to the input or output terminals of the instrument. Observe All Terminal Ratings. To avoid fire or shock hazard, observe all ratings and marks on the instrument. Follow the user’s guide for further ratings information before making connections to the instrument. Do Not Operate Without Covers. Do not operate the instrument with covers or panels removed. Use Proper Fuse. Use the fuse of the type, voltage and current ratings as specified for the instrument. Avoid Circuit or Wire Exposure. Do not touch exposed connections and components when power is on. Do Not Operate With Suspected Failures. If you suspect there is damage with this product, you have it inspected by qualified service personnel authorized by RIGOL before further operations. Provide proper ventilation. II Service Guide for DM3000 Series RIGOL Do Not Operate in Wet/Damp Conditions. Do Not Operate in an Explosive atmosphere. Keep Product Surfaces Clean and Dry. The disturbance test of all the models meet the limit values of A in the standard of EN 61326: 1997+A1+A2+A3, but can’t meet the limit values of B. WARNING IEC Measurement Category II. The HI and LO input terminals may be connected to mains in IEC Category II installations for line voltages up to 300 VAC. To avoid the danger of electric shock, do not connect the inputs to mains for line voltages above 300 VAC. Protection Limits: To avoid instrument damage and the risk of electric shock, do not exceed any of the Protection Limits defined in the following section. IEC Measurement Category II Overvoltage Protection To protect against the danger of electric shock, the RIGOL DM3000 series Digital Multimeter provides overvoltage protection for line-voltage mains connections meeting both of the following conditions: the HI and LO input terminals are connected to the mains under Measurement Category II conditions, defined below, and The mains are limited to a maximum line voltage of 300 VAC. IEC Measurement Category II includes electrical devices connected to mains at an outlet on a branch circuit. Such devices include most small appliances, test equipment, and other devices that plug into a branch outlet or socket. The DM3000 series Digital Multimeter may be used to make measurements with the HI and LO inputs connected to mains in such devices, or to the branch outlet itself (up to 300 VAC). However, the DM3000 series Digital Multimeter may not be used with its HI and LO inputs connected to mains in permanently installed electrical devices such as the main circuit-breaker panel, sub-panel disconnect boxes, or permanently wired motors. Such devices and circuits are subject to overvoltage that may exceed the protection limits of the DM3000 series Digital Multimeter. NOTE: Voltages above 300 VAC may be measured only in circuits that are isolated from mains. However, transient overvoltage is also present on circuits that are isolated from mains. The DM3000 series Digital Multimeter is designed to safely Service Guide for DM3000 Series III RIGOL withstand occasional transient overvoltage up to 2500 Vpk. Do not use this equipment to measure circuits where transient overvoltage could exceed this level. IV Service Guide for DM3000 Series RIGOL Safety Terms and Symbols Terms in This Guide. These terms may appear in this guide: ! WARNING: Warning statements identify conditions or practices that could result in injury or loss of life. ! CAUTION: Caution statements identify conditions or practices that could result in damage to this product or other property. ! CAT II (300V): IEC Measurement Category II. Inputs may be connected to mains (up to 300 VAC) under Category II Overvoltage conditions. Terms on the Product: These terms may appear on the product: DANGER indicates an injury hazard may happen immediately. WARNING indicates an injury hazard may not happen immediately. CAUTION indicates that a potential damage to the instrument or other property may occur. Symbols on the Product: These symbols may appear on the Instrument: ! Hazardous Refer to Protective Chassis Earth Voltage Instructions Earth Ground Ground Terminal Service Guide for DM3000 Series V RIGOL General-Purpose Multimeter The document covers the description and introduction of six models of DM3000 Series Digital Multimeter: DM3061, DM3062, DM3064; DM3051, DM3052, DM3054. DM3000 Series Digital Multimeter naming rules: 30 DM 6 1 Prefix of desktop Digital Multimeter Serial Number 6-6½ , 5-5¾ digit No. 1-Basic; 2-LAN/GPIB interface; 4-Multiplexer plate with the model and LAN/GPIB interface. Application examples: DM3061-6½ DM3000 series, Basic type. DM3062-6½ DM3000 series, Basic type, equipped with LAN/GPIB module. DM3064-6½ DM3000 series, Basic type, equipped with LAN/GPIB and multiplexer module. DM3051-5¾ DM3000 series, Basic type. DM3052-5¾ DM3000 series, Basic type, equipped with LAN/GPIB module. DM3054-5¾ DM3000 series, Basic type, equipped with LAN/GPIB and multiplexer module. VI Service Guide for DM3000 Series RIGOL RIGOL DM3000 Series Digital Multimeter is equipment designed for high-precision, multifunction, automation measurements. The series includes 6½ digits multimeter, with high-speed data acquisition, automatic measurements, multiplexer, mathematical operations, and flexible user sensor configurations etc. DM3000 has a high-resolution monochrome LCD display system for simple waveform display and record. The concise and user-friendly layout of the front panel has a keyboard, and back lighted functional buttons, embedded with operating instructions makes the instrument more flexible, and capable. Interface includes RS-232, USB, LAN, and GPIB for disk storage and print. It supports virtual terminal display and control, and remote network access. With the performance and characteristics given below, you will understand how DM3000 can satisfy your measurement requirements. Resolving Resolution: > 6½ digits and 2,400,000 Count; 50kSa/s data sampling rate can be used, such as the rapidly changing high-precision audio waveform data. Meanwhile waveform can be displayed on LCD Screen; 24 measurement functions DC voltage and current, AC voltage and current, two-wire and four-wire resistance, capacitance, continuity test, diode test, frequency, cycle, ratio measurements, sensor measurement, and so on; Math include: maximum, minimum, limit, average, dBm, dB; Data acquisition functions include: data records, inspection, and automatic measurement; True RMS AC voltage and current measurement; 16-Channels multiplexer functional measurement and control software (optional); DC voltage >10GΩ input impedance to achieve the range of 48V (± 24V); 10 groups measuring set-up storage and unlimited setup through PC interface; 256 x 64 pixel monochrome LCD; I/O: RS-232, USB, LAN and GPIB; Built-in USB Host to support USB disk and USB printer; Simple, convenient and flexible control software: Ultralogger and Ultrasensor. Service Guide for DM3000 Series VII RIGOL Structure of This Document Chapter 1 Performance Specifications List the Performance specifications of DM3000 series. Chapter 2 Quick Start Help users to be familiar with the operating skills of DM3000. Chapter 3 Performance Test Introduce how to test the performance so as to know about its current state of DM3000 well. Chapter 4 Calibration Guide you how to calibrate DM3000. Chapter 5 Disassembly and assembly Introduce how to disassemble and assemble DM3000 in order to know about more details about its structure. Chapter 6 Troubleshooting and General Care Provide the methods of troubleshooting and general care. Chapter 7 Service and Support Information about Service and Support and the like. VIII Service Guide for DM3000 Series RIGOL Contents General-Purpose Multimeter ......................................................................... VI Chapter 1 Performance & Specifications .............................................. 1-1 Mechanical Specifications ............................................................................ 1-2 Technical Specifications .............................................................................. 1-3 Specifications of DM306x ..................................................................... 1-3 Specifications of DM305x ................................................................... 1-13 Chapter 2 Quick Start ........................................................................... 2-1 General Inspection ..................................................................................... 2-2 Inspect the Instrument ........................................................................ 2-2 Check the List of Accessories ................................................................ 2-2 Handle Adjustment ..................................................................................... 2-3 Introduction of Front Panel ......................................................................... 2-4 Introduction of Rear Panel .......................................................................... 2-5 Introduction of User Interface ..................................................................... 2-5 Chapter 3 Performance Test ................................................................. 3-1 Equipments for Test ................................................................................... 3-2 Performance Test ....................................................................................... 3-3 Quick Test ........................................................................................... 3-3 Common Test ...................................................................................... 3-3 Optional AC Voltage Test .................................................................... 3-14 Optional AC Current Test .................................................................... 3-15 Capacitance Test................................................................................ 3-16 Software Connection Test ......................................................................... 3-17 Chapter 4 Calibration ............................................................................ 4-1 Calibration Security Code ............................................................................ 4-2 Calibration Notice ....................................................................................... 4-3 DC Voltage, DC Current, Resistance Calibration ............................................ 4-4 AC Voltage and AC Current Calibration ......................................................... 4-6 Frequency Calibration ................................................................................. 4-8 Capacitance Calibration............................................................................... 4-8 Chapter 5 Disassembly & Assembly ...................................................... 5-1 The Disassembly and Assembly Notice ......................................................... 5-2 The 3D View of DM3000 ............................................................................. 5-3 Service Guide for DM3000 Series IX RIGOL To Disassemble and Assemble .................................................................... 5-5 Handle, Rear Panel and Metallic Shell .......................................................... 5-5 To Disassemble and Assemble .................................................................... 5-8 Fuse Socket, BNC Module and GPIB PCB ..................................................... 5-8 To Disassemble and Assemble ...................................................................5-11 Filter Board and Transformer .....................................................................5-11 To Disassemble and Assemble ...................................................................5-12 Front Panel and LCD .................................................................................5-12 To Disassemble and Assemble ...................................................................5-13 Multiplexer Board, Motherboard and Key Board PCB ....................................5-13 Chapter 6 Troubleshooting & Maintenance ...........................................6-1 DM3000 Principle Introduction .................................................................... 6-2 Troubleshooting......................................................................................... 6-4 Common Troubleshooting .................................................................... 6-4 Components Inspection ....................................................................... 6-7 Replaceable Part List ..........................................................................6-10 Maintenance and Cleaning .........................................................................6-12 Chapter 7 Service & Support .................................................................7-1 Warranty ................................................................................................... 7-1 Contact Us ................................................................................................ 7-3 Index ................................................................................................................ 1 X Service Guide for DM3000 Series RIGOL Figure Contents Figure 1-1 Dimension of DM3000................................................................ 1-2 Figure 2-1 The Method of Adjusting Handle ................................................. 2-3 Figure 2-2 Adjustable Positions for Handle................................................... 2-3 Figure 2-3 Sketch map of Front Panel ......................................................... 2-4 Figure 2-4 Sketch map of Rear Panel .......................................................... 2-5 Figure 2-5 Sketch map of User Interface ..................................................... 2-5 Figure 3-1 ................................................................................................. 3-4 Figure 3-2 UltraLogger is successfully connected ....................................... 3-17 Figure 3-3 UltraSensor is successfully connected........................................ 3-18 Figure 4-1 The Input HI-LO and Sense/Ref HI-LO Terminals in Short Circuit... 4-4 Figure 5-1 The Exterior 3D View of DM3000 ................................................ 5-3 Figure 5-2 The Interior 3D View of DM3000 ................................................ 5-4 Figure 5-3 The Schematic of Disassembling and Assembling Handle .............. 5-5 Figure 5-4 The Schematic of Disassembling and Assembling Rear Panel ........ 5-6 Figure 5-5 The Schematic of Disassembling and Assembling Metallic Shell ..... 5-7 Figure 5-6 The Schematic of Disassembling and Assembling Fuse Socket ...... 5-8 Figure 5-7 The Schematic of Disassembling and Assembling BNC Module .... 5-9 Figure 5-8 The Schematic of Disassembling and Assembling GPIB PCB...... 5-10 Figure 5-9 The Schematic of Disassembling and Assembling ....................... 5-11 Figure 5-10 The Schematic of Disassembling and Assembling ..................... 5-12 Figure 5-11 The Schematic of Disassembling and Assembling Multiplexer Board ....................................................................................................... 5-13 Figure 5-12 The Schematic of Disassembling and Assembling Motherborad . 5-14 Figure 5-13 The Schematic of Disassembling and Assembling Key Board PCB ....................................................................................................... 5-15 Figure 6-1 Circuit Diagram of DM3000 series ............................................... 6-2 Figure 6-2 The Sketch Map of Fuse Replacement ......................................... 6-4 Figure 6-3 Transformer Sketch Map ............................................................ 6-7 Service Guide for DM3000 Series XI RIGOL Table Contents Table 3-1 Recommended Equipments ......................................................... 3-2 Table 3-2 Zero Offset of the Standard Equipment (DM306X) ........................ 3-5 Table 3-3 Zero Offset of the Standard Equipment (DM305X) ........................ 3-6 Table 3-4 DC Gain Error of the Standard Equipment (DM306X) ..................... 3-7 Table 3-5 DC Gain Error of the Standard Equipment (DM305X) ..................... 3-8 Table 3-6 AC Voltage Gain Error of the standard equipment (DM306X).......... 3-9 Table 3-7 AC Voltage Gain Error of the Standard Equipment (DM305X) ....... 3-10 Table 3-8 AC Current Gain Error of the Standard Equipment (DM306X) ....... 3-11 Table 3-9 AC Current Gain Error of the Standard Equipment (DM305X) ....... 3-12 Table 3-10 Frequency Gain Error of the Standard Equipment (DM306X) ...... 3-13 Table 3-11 Frequency Gain Error of the Standard Equipment (DM305X) ...... 3-13 Table 3-12 Accessional AC Voltage Test Error (DM306x) ............................. 3-14 Table 3-13 Accessional AC Voltage Test Error(DM305X).......................... 3-14 Table 3-14 Accessional AC Current Test Error(DM306X) ......................... 3-15 Table 3-15 Accessional AC Current Test Error(DM305X) ......................... 3-15 Table 3-16 Capacitance Test Error of the Standard Equipment (DM306X) .... 3-16 Table 3-17 Capacitance Test Error of the Standard Equipment (DM305X) .... 3-16 Table 4-1 DC Zero and DC Gain Calibration Input Value (DM306X) ................ 4-5 Table 4-2 DC Zero and DC Gain Calibration Input Value (DM305X) ................ 4-5 Table 4-3 AC Calibration Input Value .......................................................... 4-7 Table 4-4 Capacitance Calibration input Value ............................................. 4-8 Table 6-1 Check Table of Voltages among Windings of Transformer .............. 6-8 Table 6-2 Replaceable Part List ................................................................ 6-11 XII Service Guide for DM3000 Series RIGOL Chapter 1 Performance & Specifications This chapter covers the following topics: Mechanical Specifications Technical Specifications Specifications of DM306x Specifications of DM305x Service Guide for DM3000 Series 1-1 RIGOL Mechanical Specifications Weight: 2.5 kg Dimension: W× H× D=231.6mm× 107mm× 290.5mm Figure 1-1 Dimension of DM3000 1-2 Service Guide for DM3000 Series RIGOL Technical Specifications Specifications of DM306x DC Characteristics Accuracy Specifications (% of reading + % of range) [1] Temperature Test Current Function Range[3] or Burden Voltage Coefficient 24 Hour[2] 90 Day 1 Year 0 ℃ to Tcal± 1℃ Tcal± 5℃ Tcal± 5℃ (Tcal–5 ℃) (Tcal + 5 ℃) to 55 ℃ DC Voltage 200.0000mV 0.0030+0.00 0.0065+0.00 0.0085+0.00 0.0005+0.0007 2.000000V 30 0.0020+0.00 65 0.0060+0.00 70 0.0078+0.00 0.0005+0.0001 20.00000V 06 0.0020+0.00 07 0.0065+0.00 07 0.0085+0.00 0.0005+0.0001 200.0000V 04 0.0020+0.00 05 0.0082+0.00 05 0.0100+0.00 0.0007+0.0002 06 0.0025+0.00 11 0.0095+0.00 12 0.0110+0.00 0.0010+0.0001 1000.000V [5] 2.000000mA <0.03V 06 0.010+0.014 10 0.060+0.035 10 0.076+0.050 0.0027+0.0070 20.00000mA <0.3V 0.010+0.002 0.058+0.006 0.075+0.006 0.0027+0.0007 200.0000mA <0.3V 0.020+0.002 0.065+0.005 0.081+0.005 0.0027+0.0008 1.000000A <0.3V 0.020+0.016 0.065+0.030 0.073+0.030 0.0027+0.0062 <0.6V 0.300+0.020 0.330+0.020 0.330+0.020 0.0030+0.0025 1mA 0.0106+0.00 0.018+0.011 0.020+0.011 0.0008+0.0007 1mA 97 0.0022+0.00 0.010+0.002 0.015+0.002 0.0008+0.0001 Resistance[4 20.00000kΩ 100uA 11 0.0020+0.00 0.010+0.001 0.015+0.001 0.0008+0.0001 ] 200.0000kΩ 10uA 06 0.0020+0.00 0.010+0.001 0.015+0.001 0.0008+0.0001 1.000000MΩ 2uA 05 0.0020+0.00 0.010+0.001 0.015+0.001 0.0008+0.0002 10.00000MΩ 200nA 10 0.0112+0.00 0.0550+0.00 0.056+0.006 0.0060+0.0004 100.0000MΩ 200nA||10M 5 0.300+0.010 6 0.800+0.011 0.800+0.015 0.1500+0.0002 Ω 1mA 0.005+0.050 0.008+0.050 0.010+0.050 0.0010+0.0020 1mA 0.005+0.050 0.008+0.050 0.010+0.050 0.0010+0.0020 DC Current 10.00000A [7] 200.0000Ω 2.000000kΩ Diode Test Continuity 2.4000V 2000Ω [6] Notes: [1] Specifications are for 60 minute warm–up and set reading resolution as 6½ . [2] Relative to calibration standards. Service Guide for DM3000 Series 1-3 RIGOL [3] 20% over range on all ranges, except DCV 1000V, ACV 750V, DCI and ACI 10A range. [4] Specifications are for 4–wire resistance function, or 2–wire resistance using Math Null. Without Math Null, add 0.2 Ω additional errors in 2–wire resistance function. [5] For each additional volt over ± 500 VDC add 0.02 mV of error. [6] Accuracy specifications are for the voltage measured at the input terminals only. 1mA test current is typical. Variation in the current source will create some variation in the voltage drop across a diode junction. [7] As continuous current higher than 7A DC or AC RMS, 30 seconds needs to be off after connecting 30s. Settling Considerations: Setting time of readings is affected by source impedance, cable dielectric characteristics and input signal changes. Generally, the Settling time of Common readings is about 1.5s when Low source impedance less than 1kΩ. 1-4 Service Guide for DM3000 Series RIGOL AC Characteristics Accuracy Specifications (% of reading + % of range) [1] Temperature Function Range[3] [2] Frequency 24 Hour Range Tcal± 1℃ 90 Day 1 Year Coefficient Tcal± 5℃ Tcal± 5℃ 0℃ to (Tcal–5 ℃) (Tcal + 5 ℃) to 55 ℃ 3Hz-10Hz 5.0+0.05 5.0+0.07 5.1+0.07 0.15+0.006 10Hz-40Hz 0.53+0.05 0.57+0.06 0.60+0.07 0.035+0.004 200.000m 40Hz-20kHz 0.08++0.05 0.14+0.06 0.15+0.07 0.005+0.004 V 20kHz-50kHz 0.10+0.05 0.14+0.06 0.16+0.05 0.011+0.005 True 50kHz-100kHz 0.5+0.10 0.6+0.10 0.60+0.10 0.06+0.008 RMS AC 100kHz-300kHz 4.0+0.80 4.5+0.80 4.50+0.80 0.2+0.02 Voltage 3Hz-10Hz 5.0+0.05 5.0+0.07 5.10+0.07 0.15+0.006 10Hz-40Hz 0.35+0.05 0.37+0.06 0.38+0.07 0.035+0.003 40Hz-20kHz 0.08+0.05 0.10+0.06 0.11+0.07 0.005+0.003 20kHz-50kHz 0.40+0.05 0.40+0.06 0.40+0.07 0.011+0.005 50kHz-100kHz 0.55+0.10 0.60+0.10 0.60+0.10 0.07+0.008 100kHz-300kHz 4.0+0.80 4.0+0.80 4.00+0.80 0.2+0.02 3Hz-10Hz 5.0+0.05 5.1+0.07 5.1+0.07 0.15+0.006 20.0000m 10Hz-40Hz 0.55+0.05 0.61+0.06 0.64+0.07 0.035+0.006 A 40Hz-5kHz 0.13+0.05 0.18+0.06 0.22+0.07 0.015+0.006 5kHz-10kHz 0.20+0.25 0.2+0.25 0.22+0.25 0.03+0.006 3Hz-10Hz 5.0+0.05 5.1+0.07 5.1+0.07 0.15+0.006 200.000m 10Hz-40Hz 0.55+0.05 0.62+0.06 0.64+0.07 0.035+0.006 A 40Hz-5kHz 0.13+0.05 0.20+0.06 0.22+0.07 0.015+0.006 5kHz-10kHz 0.20+0.25 0.20+0.25 0.22+0.25 0.03+0.006 3Hz-10Hz 5.0+0.16 5.1+0.25 5.2+0. 27 0.24+0.047 10Hz-40Hz 0.64+0.16 0.70+0.25 0.71+0.27 0.035+0.047 40Hz-5kHz 0.22+0.16 0.28+0.25 0.29+0.27 0.015+0.047 5kHz-10kHz 0.35+0.2 0.35+0.4 0.35+0.4 0.03+0.047 3Hz-1Hz 5.3+0.05 5.40+0.07 5.4+0.07 0.24+0.006 10.0000A 10Hz-40Hz 0.8+0.05 0.9+0.06 0.9+0.07 0.035+0.006 7] 40Hz-5kHz 0.40+0.06 0.42+0.06 0.43+0.07 0.015+0.006 5kHz-10kHz 0.42+0.1 0.42+0.1 0.43+0.1 0.03+0.006 [4] 2.00000V to 750.00V True RMS AC Current [ 5] 1.00000A [ Notes: [1] Specifications are for 60 minute warm–up and set reading resolution as 5½ . [2] Relative to calibration standards. Service Guide for DM3000 Series 1-5 RIGOL [3] 20% over range on all ranges, except DCV 1000V, ACV 750V, DCI and ACI 10A range. [4] Specifications are for sine wave input >5% of range. For inputs from 1% to 5% of range and <50 kHz, add 0.1% of range additional error. For 50 kHz to 100 kHz, add 0.13% of range. 750 VAC range is limited to 8x10⁷ Volt-Hz. [5] Specifications are for sine wave input >5% of range. Add 0.1% of the range for the sine wave input is 1%~5% of the range. [6] Generally 30% of reading error existing at 100 kHz. [7] As continuous current higher than 7A DC or AC RMS, 30 seconds needs to be off after connecting 30s. Low Frequency Characteristics Following three filter settings are available: Slow: 3Hz~300 kHz Mid: 20Hz~300 kHz Fast: 200Hz~300 kHz Measurement Considerations Frequencies greater than upper settings are considered with no additional errors. Settling Considerations Applying >300VRMS (or >2ARMS) will cause self-heating in signal-conditioning components. These errors are included in the instrument specifications. Internal temperature changes due to self-heating may cause additional error on lower ac voltage ranges. The additional error will be less than 0.02% of reading and will generally dissipate within a few minutes. 1-6 Service Guide for DM3000 Series RIGOL Frequency and Period Characteristics Accuracy Specifications (% of reading) [1] Temperature Function Rang [3 e [2] Frequency 24 Hour Range Tcal± 1℃ 90 Day 1 Year Coefficient Tcal± 5℃ Tcal± 5℃ 0 ℃ to (Tcal–5 ℃) (Tcal + 5 ℃) to 55 ℃ 3Hz-5Hz 0.07 0.07 0.07 0.005 5Hz-10Hz 0.04 0.04 0.04 0.005 10Hz-40Hz 0.02 0.02 0.02 0.001 40Hz-300kHz 0.005 0.006 0.007 0.001 20mA 3Hz-5Hz 0.07 0.07 0.07 0.005 to 10A 5Hz-10Hz 0.04 0.04 0.04 0.005 [4] 10Hz-10kHz 0.005 0.006 0.007 0.001 200mV to Frequency 750V[3] Period Notes: [1] Specifications are for 60 minute warm–up and set reading resolution as 6½ . [2] Relative to calibration standards. [3] For AC input voltages 10% to 120% of range except special mark. 750V range is limited to 750VRMS. 200mV range is specified as full scale or greater inputs. For inputs from 20mV to 200mV, multiply total % of reading error by 10. [4] For the 20mA, 200mA, 10A ranges, the AC input current from 10% to 120% of range except special mark. 1A range is specified as the AC input current from 50% to 120% of range. Measurement Considerations Errors are brought within all the frequency counters when measuring low–voltage, low–frequency signals. Shielding inputs could redound to reduce measuring errors brought from external noise. Settling Considerations Errors will occur when attempting to measure the frequency or period of an input following a dc offset voltage change. The input blocking RC time constant must be allowed to fully settle (up to 1 sec) before the most accurate measurements are possible. Service Guide for DM3000 Series 1-7 RIGOL Capacitance Characteristics Accuracy Specifications (% of reading + % of range) [1] Temperature Function Range[2 Test Current 1 Year Coefficient Tcal± 5℃ 0 ℃ to (Tcal–5 ℃) (Tcal+ 5 ℃) to 55 ℃ Capacitance 2.000nF 200nA 2 + 2.5 0.05+0.05 20.00nF 1uA 1 + 0.5 0.05+0.01 200.0nF 10uA 1 + 0.5 0.01+0.01 2.000uF 100uA 1 + 0.5 0.01+0.01 20.00uF 1mA 1 + 0.5 0.01+0.01 Notes: [1] Specifications are for 60 minute warm–up using Math Null. Additional errors may occur for non–film capacitors. [2] Specifications are for 1% to 120% of range on the 2nF range and 10% to 120% of range on all other ranges. 1-8 Service Guide for DM3000 Series RIGOL Measuring Characteristics DC Voltage Measurement Method: ΣΔ A/D conversion Input Resistance: 200mV, 2V, 20V ranges Selectable 10MΩ ± 2% or >10GΩ 200V, 1000V ranges 10MΩ ± 2% Resistance Measurement Method: 4-wire or 2-wire. Current source referenced to LO input. Open-circuit Voltage: Limit less than 7V. Max. Lead Resistance: 10% of range per lead for 200Ω, 1kΩ range. 1kΩ per lead (4-wire ohms) on all other ranges. Input Protection: 1000V, all ranges. DC Current Shunt Resistor: 0.025Ω for 1A, 10A 1.025Ω for 200mA 11.025Ω for 2mA and 20mA Input Protection: Externally accessible 10A, 250V fuse Internal 12A, 250V fuse Continuity / Diode Test Measurement Method: 1mA ± 0.2% test current, Limit in <7V Response Time: 25 samples / sec Continuity Threshold: Adjustable from 1Ω to 2000Ω Input Protection: 1000V True RMS AC Voltage Measurement Method: AC-coupled True RMS – measures the ac component of input with up to 400Vdc of bias on any range. Input Impedance: 1MΩ ± 2%, in parallel with <100pF Input Protection: 750VRMS all ranges True RMS AC Current Measurement Method: Direct coupled to the fuse and shunt. AC-coupled True RMS measurement (measures the ac component only) Service Guide for DM3000 Series 1-9 RIGOL Max. Input: The DC + AC current peak value <300% of the range. The RMS current including DC current <10A. Shunt Resistor: 0.025Ω for 1A, 10A, 1.025Ω for 200mA, 11.025Ω for 20mA Input Protection: Externally accessible 10A, 250V fuse Internal 12A, 250V fuse Frequency and Period Measurement Method: Reciprocal-counting technique. AC-coupled input using the ac voltage measurement function. Input Impedance (Voltage Signal):1MΩ ± 2%, in parallel with <100pF Shunt Resistor (Current Signal): 0.025Ω for 1A, 10A, 1.025Ω for 200mA, 11.025Ω for 20mA Input Protection: 750VRMS all ranges; Externally accessible 10A, 250V fuse Internal 12A, 250V fuse Capacitance Measurement Method: Current input with measurement of resulting ramp. Connection Type: 2-wire Triggering and Memory Samples per Trigger: 1 to 2,000,000 Trigger Delay: 0 to 3600 sec Input Level: TTL compatible (High level when left trigger input open) Trigger Condition: Selectable Rising, Falling, Low-level, High-level. Input Impendence: >20kΩ, in parallel with 400pF, AC-coupled Delay: <1μs Min Pulsewidth: 1μs VMC Output: Level: TTL compatible (Input to ≥ 1kΩ load) Output Polarity: Selectable Positive, Negative Output Impendence: 200Ω, typical Nonvolatile Memory: 512K readings Volatile Memory: 2M readings 1-10 Service Guide for DM3000 Series RIGOL Rear panel multiplexer function (only for the model equipped with multiplexer module) ! Including the model of multiplexer card, the voltage limit of LO relative to safe ground falls to 200Vpeak (Max). Channel: 12 voltages, 4 current, additional protections. Measurement Type:2-wire resistance, capacitance, DC voltage, DC current, AC voltage, AC current, period, diode and frequency. Work Characteristics:The precision of performance is consistent with the value measured from front panel. The switch time of multiplexer card is 50ms; the switch time of auto measurement is 600ms. (4½ digits) Input Characteristic: Difference input voltage is 150Vpeak(Max); the isolated voltage in interchannel is 150Vpeak(Max),the current terminal is input 1Apeak(Max), channel isolation > 60dB (@10KHz),the voltage of all the terminal relative to safe ground is 150Vpeak(Max). Input Protection: 2A restore the fuse in current channel, 250V limit voltage. 500mA melt the fuse in voltage channel with multiplexer card. Real-time Clock Precision: 1min/month (Environment Temperature >0℃) Clock battery Life: 2 years Sensor Measurement Voltage, current, resistance and frequency random sensor Math Functions Null, Min/Max/Average, dBm, dB, Limit Test (with TTL output) Other Functions Reading Hold, Ratio Measurement High-speed Sampling 50kSa/s (In Datalog function) Reading Resolution 2,400,000 Count, >6½ digits USB I/O Interface USB Host, USB Device interface. It can support U-disk and USB printer. Service Guide for DM3000 Series 1-11 RIGOL Other I/O Interface RS-232, GPIB (Selectable) support for SCPI command, LAN (Selectable) General Specifications Display: 256 x 64 pixels LCD to support multi-display, menu, multilanguage help and waveform display. Data Acquisition and Virtual: Support Microsoft® Windows 98/Me, Windows 2000/XP Power Supply: 100V/ 120V/ 220V/ 240V ± 10% Power Line Frequency: 45Hz to 66Hz Power Consumption: 20VA peak Operating Environment: Full accuracy for 0℃ to 55℃, 95% R.H. at 40℃ non-condensing Storage Temperature: -20℃ to 70℃ Safety: Measurement CAT II 300V, CAT I 1000V. Pollution degree 1. Vibration & Shock: Mil-T-28800E, Type III, Class 5 (Sine Only) Weight: 2.5kg Size (H x W x D): 107.0mm x 231.6mm x 290.5m 1-12 Service Guide for DM3000 Series RIGOL Specifications of DM305x DC Characteristics Accuracy Specifications (% of reading + % of range) [1] Test Current Function Range[2] or Burden Voltage DC Voltage Temperature Input 1 Year Coefficient Impedance 23℃± 5℃ 0 ℃ to 18 ℃ 28 ℃ to 55 ℃ 400.000mV 10MΩ or>10GΩ 0.025 + 0.008 0.0015+0.0005 4.00000V 10MΩ or>10GΩ 0.025 + 0.006 0.0010+0.0005 40.0000V 10MΩ 0.025 + 0.006 0.0020+0.0005 400.000V 10MΩ 0.030 + 0.006 0.0020+0.0005 1000.00V[4] 10MΩ 0.030 + 0.005 0.0015+0.0005 2.00000mA <0.03V 0.050 + 0.070 0.0040+0.0070 20.0000mA <0.3V 0.050 + 0.008 0.0040+0.0007 200.000mA <0.3V 0.050 + 0.009 0.0040+0.0008 1.00000A <0.3V 0.100 + 0.070 0.0100+0.0062 10.0000A <0.6V 0.200 + 0.007 0.0100+0.0007 400.000Ω 1mA 0.050 + 0.010 0.0030+0.0005 4.00000kΩ 100uA 0.015 + 0.006 0.0030+0.0005 40.0000kΩ 10uA 0.015 + 0.006 0.0030+0.0005 400.000kΩ 2uA 0.030 + 0.007 0.0030+0.0005 4.00000MΩ 200nA 0.060 + 0.010 0.0030+0.0005 100.000MΩ 200nA ||10MΩ 2.00 + 0.005 0.1500+0.0005 Diode Test 2.4000V[6] 1mA 0.05 + 0.010 0.0050+0.0005 Continuity 2000Ω 1mA 0.05 + 0.010 0.0050+0.0005 DC Current [5] Resistance[ 3] Notes: [1] Specifications are for 60 minute warm–up and set reading resolution as 5¾ and calibration temperature between 18 ℃ and 28 ℃. [2] 20% over range on all ranges except DCV 1000V, ACV 750V, DCI and ACI 10A range. [3] Specifications are for 4–wire resistance function or 2–wire resistance using Math Null. Without Math Null, add 0.2 Ω additional errors in 2–wire resistance function. [4] For each additional volt over ± 500 VDC add 0.02 mV of error. [5] For current terminal, > 7A DC or ACRMS for 30 seconds ON and 30 seconds OFF. [6] Accuracy specifications are for the voltage measured at the input terminals only. 1 mA test Service Guide for DM3000 Series 1-13 RIGOL current is typical. Variation in the current source will create some variation in the voltage drop across a diode junction. Settling Considerations Reading settling times are affected by source impedance, cable dielectric characteristics, and input signal changes. Typically, settling time is 1.5s when source impedance less than 1kΩ. 1-14 Service Guide for DM3000 Series RIGOL AC Characteristics Accuracy Specifications (% of reading + % of range) [1] Temperature Function Range[2] Frequency Range 1 Year Coefficient 23℃± 5℃ 0 ℃ to 18 ℃ 28 ℃ to 55 ℃ 10Hz-45Hz 1.0 + 0.1 0.02+0.02 45Hz-20kHz 0.2 + 0.1 0.02+0.02 20kHz-50kHz 2.0 + 0.2 0.02+0.02 50kHz-100kHz 4.0 + 0.2 0.02+0.02 10Hz-45Hz 1.0 + 0.1 0.02+0.02 2V to 45Hz-20kHz 0.2 + 0.1 0.02+0.02 750.00V 20kHz-50kHz 1.0 + 0.1 0.02+0.02 50kHz-100kHz 2.0 + 0.2 0.02+0.02 10Hz-45Hz 1.5+0.1 0.02+0.02 45Hz-2kHz 0.5+0.1 0.02+0.02 2kHz-10kHz 2.0+0.2 0.02+0.02 10Hz-45Hz 1.5+0.1 0.02+0.02 45Hz-2kHz 0.5+0.1 0.02+0.02 2kHz-10kHz 2.0+0.2 0.02+0.02 10Hz-45Hz 1.5+0.5 0.02+0.05 45Hz-2kHz 0.5+0.5 0.02+0.05 2kHz-10kHz 2.0+0.5 0.02+0.05 10Hz-45Hz 1.5+0.1 0.02+0.02 45Hz-2kHz 0.5+0.1 0.02+0.02 2kHz-5kHz 2.0+0.2 0.02+0.02 200.000mV True RMS AC Voltage[3] 20.0000mA 200.000mA True RMS AC Current [4, 6] 1.00000A 10.0000A[6] Notes: [1] Specifications are for 60 minute warm–up and set reading resolution as 5½ and calibration temperature between 18 ℃ and 28 ℃. [2] 20% over range on all ranges, except DCV 1000V, ACV 750V, DCI and ACI 10A range. [3] Specifications are for sine wave input >5% of range. For inputs from 1% to 5% of range and <50 kHz, add 0.1% of range additional error. For 50 kHz to 100 kHz, add 0.13% of range. 750Vac range limited to 100 kHz or 8x10⁷ Volt-Hz. [4] Specifications are for sine wave input >5% of range. Add 0.1% of the range for the sine wave input is 1%~5% of the range. [5] For current terminal, > 7A DC or ACRMS for 30 seconds ON and 30 seconds OFF. Service Guide for DM3000 Series 1-15 RIGOL [6] Typically 30% of reading error at 100 kHz. Low Frequency Performance Three filter settings are available: Slow: 3Hz~300kHz Mid: 20Hz~300kHz Fast: 200Hz~300kHz Measurement Considerations Frequencies greater than upper filter settings are considered with no additional errors. Settling Time Considerations Applying >300VRMS (or >1ARMS) will cause self-heating in signal-conditioning components. These errors are included in the instrument specifications. Internal temperature changes due to self-heating may cause additional error on lower ac voltage ranges. The additional error will be less than 0.02% of reading and will generally dissipate within a few minutes. 1-16 Service Guide for DM3000 Series RIGOL Frequency and Period Characteristics Accuracy Specifications (% of reading) [1] Temperature Function Range Frequency 1 Year Coefficient Range 23℃± 5℃ 0 ℃ to 18 ℃ 28 ℃ to 55 ℃ 200mV to 750V [2] Frequency Period [3] 20mA to10A 3Hz-5Hz 0.10 0.005 5Hz-10Hz 0.07 0.005 10Hz-40Hz 0.02 0.005 40Hz-300kHz 0.02 0.005 3Hz-5Hz 0.10 0.005 5Hz-10Hz 0.07 0.005 10Hz-10kHz 0.02 0.005 Notes: [1] Specifications are for 60 minute warm–up. [2] For AC input voltages 10% to 120% of range except where noted. 750V range limited to 750VRMS. 200mV range specifications are for full scale or greater inputs. For inputs from 20mV to 200mV, multiply total % of reading error by 10. [3] For the 20mA, 200mA, 10A ranges, the AC input current from 10% to 120% of range except where noted. For 1A range, the AC input current from 50% to 120% of range except where noted. Measurement Considerations All frequency counters are susceptible to error when measuring low–voltage, low–frequency signals. Shielding inputs from external noise pickup is critical for minimizing measurement errors. Settling Considerations Errors will occur when attempting to measure the frequency or period of an input following a DC offset voltage change. The input blocking RC time constant must be allowed to fully settle (up to 1 sec) before the most accurate measurements are possible. Service Guide for DM3000 Series 1-17 RIGOL Capacitance Characteristics Accuracy Specifications (% of reading + % of range) [1] Temperature Function Range[2] Test Current 1 Year Coefficient 23℃± 5℃ 0 ℃ to 18 ℃ 28 ℃ to 55 ℃ Capacitance 4.000nF 1uA 2 + 2.5 0.05+0.05 40.00nF 10uA 1 + 0.5 0.05+0.01 400.0nF 10uA 1 + 0.5 0.01+0.01 4.000uF 1mA 1 + 0.5 0.01+0.01 40.00uF 1mA 1 + 0.5 0.01+0.01 200.0uF 1mA 1 + 0.5 0.01+0.01 Notes: [1] Specifications are for 60 minute warm–up using Math Null. Additional errors may occur for non–film capacitors. [2] Specifications are for 1% to 120% of range on the 4nF range and 10% to 120% of range on all other ranges. 1-18 Service Guide for DM3000 Series RIGOL Measuring Characteristics DC Voltage Measurement Method: Sigma Delta A-to-D converter. Input Resistance: 400mV, 4V ranges Selectable 10MΩ ± 2% or >10GΩ 40V, 400V, 1000V ranges 10MΩ ± 2% Resistance Measurement Method: Selectable 4-wire or 2-wire. Current source referenced to LO input. Open-circuit Voltage: Limit in <7V. Max. Lead Resistance: 10% of range per lead for 400Ω, 1kΩ per lead (4-wire ohms) on all other ranges. Input Protection: 1000V on all ranges. DC Current Shunt Resistor: 0.025Ω for 1A, 10A 1.025Ω for 200mA 11.025Ω for 2mA, 20mA Input Protection: Externally accessible 10A, 250V fuse Internal 12A, 250V fuse Continuity/Diode Test Measurement Method: 1mA ± 0.2% test current, Limit in <8V Response Time: 25 samples / sec Continuity Threshold: Adjustable from 1Ω to 2000Ω Input Protection: 1000V True RMS AC Voltage Measurement Method: AC coupled true-RMS-measure the ac component of input with up to 400Vdc of bias on any range Input Impedance: 1MΩ ± 2%, in parallel with 100pF Input Protection: 750VRMS all ranges True RMS AC Current Measurement Method: Service Guide for DM3000 Series Direct coupled to the fuse and shunt. AC coupled true RMS 1-19 RIGOL measurement (measures the ac component only) Max. Input: The DC + AC current peak value <300% of the range. The RMS current including DC current <10A Shunt Resistor: 0.025Ω for 1A, 10A, 1.025Ω for 200mA, 11.025Ω for 20mA Input Protection: Externally accessible 10A, 250V fuse Internal 12A, 250V fuse Frequency and Period Measurement Method: Reciprocal-counting technique. AC-coupled input using the ac voltage measurement function. Input Impedance (Voltage Signal):1MΩ ± 2%, in parallel with <150pF Shunt Resistor (Current Signal): 0.025Ω for 1A, 10A, 1.025Ω for 200mA, 11.025Ω for 20mA Input Protection: 750VRMS all ranges; Externally accessible 10A, 250V fuse Internal 12A, 250V fuse Capacitance Measurement Method: Current input with measurement of resulting ramp. Connection Type: 2-wire Triggering and Memory Samples per Trigger: 1 to 2,000,000 Trigger Delay: 0 to 3600 sec Input Level: TTL compatible (High level when left trigger input open) Trigger Condition: Selectable Rising, Falling, Low-level, High-level. Input Impendence: >20kΩ, in parallel with 400pF, AC-coupled Delay: <1μs Min Pulse width: 1μs VMC Output: Level: TTL compatible (Input to ≥ 1kΩ load) Output Polarity: Selectable Positive, Negative Output Impendence: 200Ω, typical Nonvolatile Memory: 512K readings Volatile Memory: 2M readings 1-20 Service Guide for DM3000 Series RIGOL Rear panel multiplexer function (only for the model with multiplexer module) ! Including the model with multiplexer card, the voltage limit of LO relative to safe ground falls to 200Vpeak (Max). Channel: 12 voltage, 4 current, additional protections. Measurement Type:2-Wire resistance; Capacitance; DC Voltage; DC Current; AC Voltage; AC Current; period; Diode and Frequency. Work Characteristics:The precision of performance and front panel measurement is the same. The switch time of multiplexer card is 50ms; the switch time of auto measurement is 600ms (4½ ). Input Characteristic: different input voltage is 150Vpeak(Max); the isolated voltage between the channels is 150Vpeak(Max),the current end is input 1Apeak(Max), channel isolation > 60dB (@10KHz),the voltage of all the ends relative to safe ground is 150Vpeak(Max). Input Protection: 2A restore the fuse in current channel, 250V limit voltage. 500mA melt the fuse in voltage channel with multiplexer card. Real-time Clock Precision: 1min/month (Environment Temperature >0℃) Clock battery Life: 2 years Sensor Measurement Voltage, current, resistance and frequency random sensor Math Functions Null, Min/Max/Average, dBm, dB, Limit Test (with TTL output) Other Functions Reading Hold, Ratio Measurement High-speed Sampling 50kSa/s (In Datalog function) Reading Resolution 480,000 Count, >5¾ digits USB I/O Interface USB Host, USB Device interface. It can support U-disk and USB printer. Service Guide for DM3000 Series 1-21 RIGOL Other I/O Interface RS-232, GPIB (Selectable) support for SCPI command, LAN (Selectable) General Specifications Display: 256 x 64 pixels LCD to support multi-display, menu, multilanguage help and waveform display. Data Acquisition and Virtual: Support Microsoft® Windows 98/Me, Windows 2000/XP Power Supply: 100V/ 120V/ 220V/ 240V ± 10% Power Line Frequency: 45Hz to 66Hz Power Consumption: 20VA peak Operating Environment: Full accuracy for 0℃ to 55℃, 95% R.H. at 40℃ non-condensing Storage Temperature: -20℃ to 70℃ Safety: Measurement CAT II 300V, CAT I 1000V. Pollution Degree 1. Vibration & Shock: Mil-T-28800E, Type III, Class 5 (Sine Only) Weight: 2.5kg Size (H x W x D): 107.0mm x 231.6mm x 290.5m 1-22 Service Guide for DM3000 Series RIGOL Chapter 2 Quick Start The chapter mainly covers the following topics: General Inspection Inspect the Instrument Check the List of Accessories Handle Adjustment Introduction of Front Panel Introduction of Rear Panel Introduction of User Interface Service Guide for DM3000 Series 2-1 RIGOL General Inspection Inspect the Instrument Keep the damaged shipping container or cushioning material until the contents of the shipment have been checked for completeness and the instrument has been checked mechanically and electrically. In case of any damage, or defect, or failure, notify the RIGOL Sales Representative. If the shipping container is damaged, or the protective material shows signs of stress, notify the carrier as well as your RIGOL sales office. Keep the shipping materials for the carrier’s inspection. RIGOL offices will arrange reparation or replacement at RIGOL’s option without waiting for claim settlement. Check the List of Accessories Check your accessories whether accord with the list RIGOL provides. If not, please contact RIGOL Sales Representative or sales office. The list of accessories is given as follows: A USB Data Wire Two Test Lead Kits (red/black) A Power Cord that fits the standard of destination country A User’s Guide Multiplexer Module (DM3064/3054) A Ultralogger Software CD-ROM Data Cables (DM3064/3054) Testing Certification Packing List 2-2 Service Guide for DM3000 Series RIGOL Handle Adjustment To adjust the handle position of DM3000 Digital Multimeter, please grip the handle by the sides and pull it outward. Then, rotate the handle to the desired position as shown in figure 2-1, figure 2-2. Figure 2-1 The Method of Adjusting Handle Figure 2-2 Adjustable Positions for Handle Service Guide for DM3000 Series 2-3 RIGOL Introduction of Front Panel Yellow District: Trigger Control Keys LCD Display On/Off USB Host Switch Gray District: Measurement Function Keys Direction Keys Menu Operation Blue District: Keys Function Selective Current Input Terminal Keys Figure 2-3 Sketch map of Front Panel Gray Function Keys: Measure DC Voltage Measure DC Current Measure Resistance Measure Continuity Measure Frequency Measure Sensor Measure AC Voltage Measure AC Current Measure Capacitance Measure Diode Logging Data Set the Digit of Shown Data 2-4 Blue Function Keys: Set the System parameters Open Math operation Set Trigger and Parameter Save and Recall Set the Utility Functions View the built-in Help System Service Guide for DM3000 Series RIGOL Introduction of Rear Panel Current Input Fuse VMC 10/100 Ethernet Differential Multiplexer Interface GPIB (IEEE-488) USB Device USB Device Ext Trigger Power Socket RS-232 Power Fuse AC Voltage Selector Figure 2-4 Sketch map of Rear Panel Introduction of User Interface Range Digits resolving index Local/Remote Operation Current Measurement Function Measurement Data Display Figure 2-5 Sketch map of User Interface Service Guide for DM3000 Series 2-5 RIGOL Chapter 3 Performance Test The chapter mainly covers the following topics: Equipments for Test Performance Test Quick Test Common Test Optional AC Voltage Test Optional AC Current Test Capacitance Test Software Connection Test Service Guide for DM3000 Series 3-1 RIGOL Equipments for Test The equipments in table 3-1 are recommended for testing DM3000 Series Digital Multimeter (also for calibration). If the exact equipment is not available, use the accuracy requirements shown to select substitute test equipments. Table 3-1 Recommended Equipments Test and Calibration Item Recommended Equipment Accuracy Requirement Zero Calibration None 4-terminals short using only copper interconnections DC Voltage Fluke 5520A <1/5 instrument 24 hour spec Dc Current Fluke 5520A <1/5 instrument 24 hour spec Resistance Fluke 5520A <1/5 instrument 24 hour spec AC Voltage Fluke 5520A <1/5 instrument 24 hour spec AC Current Fluke 5520A <1/5 instrument 24 hour spec Frequency Fluke 5520A <1/5 instrument 24 hour spec Capacitance Fluke 5520A <1/5 instrument 24 hour spec Test Consideration In order to make all the test results more creditable, you are suggested to comply with the following recommendations during testing: 1. Provide proper working voltage for equipments; 2. Ensure a stable test ambient with temperature between 18 °C and 28 °C; 3. Make sure the ambient relative humidity is less than 80%; 4. More than an hour’s warm-up should be done before testing or calibrating; 5. Use copper connector to minimize thermal offset voltage; 6. Use Shielded Twisted Pair with double insulating layer as short as possible to minimize its resistance and noise. Because DM3000 Series Digital Multimeter is a type of high accurate measurement instrument, you must take special care to protect testing procedure against other disturbs being produced. 3-2 Service Guide for DM3000 Series RIGOL Performance Test You can select two different methods when testing by using the equipments listed in table 3-1: Quick test and Common test. The detailed explanations are given below. Quick Test Quick test is an eclectic project which can either speed up test or ensure the test results achieve to high confidence which contains parts of test items within Common test, additional, “Q” is designated for its short (in Common test). NOTE Quick test is not applicable for equipments with some abnormal components. The equipment failing the quick performance check must be used after calibrating or repairing. Common Test Common test is recommend be done once you got the instrument so as to do a complete evaluate for its performance. Generally, the test result is valid in 90-days. If the performance test is performed in 24-hours after calibration, the valid period is 24-hours. NOTE It is necessary to do the test again when exceed valid period since first successful test. The equipment failing test should not be used until have been calibrated or repaired. Service Guide for DM3000 Series 3-3 RIGOL 1. Zero Offset Test When testing Zero Offset, firstly apply a 4-wire short across the Input HI-Lo and Sense HI-Lo terminals (front terminals), then leave the current terminal open as shown in figure 3-1: Figure 3-1 The Input HI-LO and Sense/Ref HI-LO Terminals in Short Circuit Next, perform the test items in table 3-2 or table 3-3 one by one, then compare the test results with the error range in the tables. 3-4 Service Guide for DM3000 Series RIGOL Table 3-2 Zero Offset of the Standard Equipment (DM306X) Input Open Function Quick Test point DC Current Q Range 2.000000mA ± 1μA 20.00000mA ± 1.2μA 200.0000 mA ± 10μA 1.000000A ± 300μA [1] Short DC Voltage Q 10.00000A ± 2mA 200.0000mV ± 14μV 2.000000V ± 14μV 20.00000V ± 100μV 200.0000V ± 2.4mV [2] Short 2-Wire Ohms/ 4-Wire Ohms[3] Q Error (1 year) 1000.000V ± 10mV 200.0000Ω ± 22mΩ 2.000000kΩ ± 40mΩ 20.00000kΩ ± 200mΩ 200.0000kΩ ± 2Ω 1.000000MΩ ± 10Ω 10.00000MΩ ± 600Ω 100.0000MΩ ± 15kΩ Notes: [1] Continuous current more than DC 7A or AC RMS 7A should be 30 seconds Off and 30 seconds On; [2] Each additional volt over ± 500VDC adds 0.02 mV of error; [3] Errors in above table are corresponding to 2-wire resistance function in math Null. Without Math Null, the error is ± 0.2 Ω additional errors in 2–wire resistance function; [4] The reading resolution of multimeter is 6½ ; [5] Q: Optional quick test point. Service Guide for DM3000 Series 3-5 RIGOL Table 3-3 Zero Offset of the Standard Equipment (DM305X) Input Open Function Quick Test Point DC Current Q Range 2.000000mA ± 1.4μA 20.00000mA ± 1.6μA 200.0000 mA ± 18μA 1.000000A ± 700μA [1] Short DC Voltage Q 10.00000A ± 700μA 400.0000mV ± 32μV 4.000000V ± 240μV 40.00000V ± 2.4mV 400.0000V ± 24mV [2] Short 2-Wire Ohms/ 4-Wire Ohms[3] Q Error (1 year) 1000.000V ± 50mV 400.0000Ω ± 40mΩ 4.000000kΩ ± 240mΩ 40.00000 kΩ ± 2.4Ω 400.0000 kΩ ± 28Ω 4.000000MΩ ± 400Ω 100.00000MΩ ± 5kΩ Notes: [1] Continuous current more than DC 7A or AC RMS 7A should be 30 seconds Off after 30 seconds On; [2] Each additional volt over ± 500 VDC adds 0.02 mV of error; [3] Errors in above table are corresponding to 2-wire resistance function in math Null. Without Math Null, the error is ± 0.2 Ω additional errors in 2–wire resistance function; [4] The reading resolution of multimeter is 5½ ; [5] Q: Optional quick test point. 3-6 Service Guide for DM3000 Series RIGOL 2. DC Gain Test In DC gain test, input the standard signal output from test equipment into the input terminal of tested equipment; and compare the test results with error shown in the table 3-4 and 3-5. Table 3-4 DC Gain Error of the Standard Equipment (DM306X) Test Signal 2mA Function Quick Test Point DC Current Range Error (1 year) 2.000000mA ± 2.52μA 20.00000mA ± 16.2μA 200mA 200.0000 mA ± 172μA 1A 1.000000A ± 1.03mA 10.00000A ± 35mA 200.0000mV ± 31μV 2.000000V ± 170μV 20.00000V ± 1.8mV 200.0000V ± 22.4mV 1000.000V ± 120mV 200.0000Ω ± 62mΩ 2.000000kΩ ± 340mΩ Q 20.00000kΩ ± 3.2Ω Q 200.0000kΩ ± 32Ω 1.000000MΩ 1.000000MΩ ± 160Ω 10.00000MΩ 10.00000 MΩ ± 6.2kΩ 100.0000MΩ 100.0000 MΩ ± 815kΩ 20mA 10A Q [1] 200mV DC Voltage Q 2V 20V Q 200V 1000V [2] 200.0000Ω 2.000000kΩ 20.00000kΩ 200.0000kΩ 2-Wire Ohms/ 4-Wire Ohms[3] Notes: [1] Continuous current more than DC 7A or AC RMS 7A should be 30 seconds Off after 30 seconds On; [2] Each additional volt over ± 500 VDC adds 0.02 mV of error; [3] Errors in above table are corresponding to 2-wire resistance function in math Null. Without Math Null, the error is ± 0.2 Ω additional errors in 2–wire resistance function; [4] The reading resolution of multimeter is 6½ ; [5] Q: Optional quick test point. Service Guide for DM3000 Series 3-7 RIGOL Table 3-5 DC Gain Error of the Standard Equipment (DM305X) Test Signal 2mA Function Quick Test Point DC Current Range Error (1 year) 2.000000mA ± 2.4μA 20.00000mA ± 11.6μA 200mA 200.0000 mA ± 118μA 1A 1.000000A ± 1.7mA 10.00000A ± 20.7mA 400.0000mV ± 132μV 20mA Q [1] 10A 400mV DC Voltage 4V Q 4.000000V ± 1.24mV 40V Q 40.00000V ± 12.4mV 400.0000V ± 144mV 1000.000V ± 350mV 400.0000Ω ± 240mΩ 4.000000kΩ ± 840 mΩ Q 40.00000kΩ ± 8.4Ω Q 400.0000kΩ ± 148Ω 4.000000MΩ 4.000000MΩ ± 2.8kΩ 100.00000MΩ 100.00000MΩ ± 2.005MΩ 400V 1000V [2] 400.0000Ω 4.000000kΩ 40.00000kΩ 400.000 kΩ 2-Wire Ohms/ 4-Wire Ohms[3] Notes: [1] Continuous current more than DC 7A or AC RMS 7A should be 30 seconds ON and 30 seconds OFF; [2] Each additional volt over ± 500 VDC adds 0.02 mV of error; [3] Errors in above table are corresponding to 2-wire resistance function in math Null. Without Math Null, the error is ± 0.2 Ω additional errors in 2–wire resistance function; [4] The reading resolution of multimeter is 5½ ; [5] Q: Optional quick test point. 3-8 Service Guide for DM3000 Series RIGOL 3. AC Voltage Gain Test In AC voltage gain test, input the standard signal the test equipment outputs into the input terminal of tested equipment; and compare the test results with the error shown in the table 3-6 and 3-7. Table 3-6 AC Voltage Gain Error of the standard equipment (DM306X) Test Signal Input Frequency 200mV 1kHz 200mV Quick Test Point Q Range Error (1 year) 200.000mV ± 440μV 50kHz 200.000mV ± 460μV 200mV 300kHz 200.000mV ± 10.6mV 2V 1kHz 2.00000V ± 3.6mV 2V 50kHz 2.00000V ± 9.4mV 2V 300kHz 2.00000V ± 96mV 20V 1kHz 20.0000V ± 36mV 20V 50kHz 20.0000V ± 94mV 20V 300kHz 20.0000V ± 960mV 200V 1kHz 200.000V ± 360mV 200V 50kHz 200.000V ± 940mV 200V 100kHz 200.000V ± 1.4V 750V 1kHz 750.00V ± 1.35V 750V 10kHz 750.00V ± 1.35V Q Q Q Q Notes: [1] Set the AC filter as slow ( Meas Filter Slow ); [2] Set the reading resolution as 5½ ; [3] Q: Optional quick test point. Service Guide for DM3000 Series 3-9 RIGOL Table 3-7 AC Voltage Gain Error of the Standard Equipment (DM305X) Test Signal Input Frequency 200mV 1kHz 200mV Quick Test Point Q Range Error (1 year) 200.000mV ± 0.6mV 50kHz 200.000mV ± 4.4mV 200mV 100kHz 200.000mV ± 8.4mV 2V 1kHz 2.00000V ± 6mV 2V 50kHz 2.00000V ± 22mV 2V 100kHz 2.00000V ± 44mV 20V 1kHz 20.0000V ± 60mV 20V 50kHz 20.0000V ± 220mV 20V 100kHz 20.0000V ± 440V 200V 1kHz 200.000V ± 600mV 200V 50kHz 200.000V ± 2.2V 200V 100kHz 200.000V ± 4.4V 750V 1kHz 750.00V ± 2.25V 750V 10kHz 750.00V ± 2.25V Q Q Q Q Notes: [1] Set the AC filter as slow ( Meas Filter Slow ); [2] Set the reading resolution as 5½ ; [3] Q: Optional quick test point. 3-10 Service Guide for DM3000 Series RIGOL 4. AC Current Gain Test In AC current gain test, input the standard signal the test equipment outputs into the input terminal of tested equipment; and compare the test results with the error shown in the table 3-8 and 3-9. Table 3-8 AC Current Gain Error of the Standard Equipment (DM306X) Test Signal Input Frequency 20mA 1kHz 20mA 10kHz 200mA 1kHz 200mA 10kHz 1A 1kHz 1A Quick Test Point Q Q Q 10kHz 10A [1] 1kHz 10A [1] 5kHz Q Range Error (1 year) 20.0000mA ± 58μA 20.0000mA ± 90μA 20.0000mA ± 580μA 200.000mA ± 940μA 1.00000A ± 5.6mA 1.00000A ± 7.5mA 10.0000A ± 96mA 10.0000A ± 96mA Notes: [1] Continuous current more than DC 7A or AC RMS 7A should be 30 seconds ON and 30 seconds OFF; [2] Set the AC filter as slow ( Meas Filter Slow ); [3] Set the reading resolution as 5½ ; [4] Q: Optional quick test point. Service Guide for DM3000 Series 3-11 RIGOL Table 3-9 AC Current Gain Error of the Standard Equipment (DM305X) Test Signal Input Frequency 20mA 1kHz 20mA 10kHz 200mA 1kHz 200mA 10kHz 1A 1kHz 1A Quick Test Point Q Q Q 10kHz [1] 1kHz [1] 5kHz 10A 10A Q Range Error (1 year) 20.0000mA ± 120μA 20.0000mA ± 440μA 200.000mA ± 1.2mA 200.000mA ± 4.4mA 1.00000A ± 10mA 1.00000A ± 25mA 10.0000A ± 60mA 10.0000A ± 220mA Notes: [1] Continuous current more than DC 7A or AC RMS 7A should be 30 seconds ON and 30 seconds OFF; [2] Set the AC filter as slow ( Meas Filter Slow ); [3] Set the reading resolution as 5½ ; [4] Q: Optional quick test point. 3-12 Service Guide for DM3000 Series RIGOL 5. Frequency Gain Test In frequency gain test, input the standard signal the test equipment outputs into the input terminal of tested equipment; and compare the test results with the error shown in the table 3-10 and 3-11. Table 3-10 Frequency Gain Error of the Standard Equipment (DM306X) Test Signal Frequency of Test Signal Quick Test Point Range Error (1 year) 1V 5Hz 200.00000mV 3.5mHz 1V 10Hz 2.0000000V 4mHz 1V 40Hz 20.000000V 8mHz 1V 100kHz 200.00000V 7Hz Q Notes: [1] Use coaxial-cable as the lead for the input signal; [2] The reading resolution is 6½ ; [3] Q: Optional quick test point. Table 3-11 Frequency Gain Error of the Standard Equipment (DM305X) Test Signal Frequency of Test Signal Quick Test Point Range Error (1 year) 1V 5Hz 200.00000mV 5mHz 1V 10Hz 2.0000000V 7mHz 1V 40Hz 20.000000V 8mHz 1V 100kHz 200.00000V 20Hz Q Notes: [1] Use coaxial-cable as the lead for the input signal; [2] The reading resolution is 5½ ; [3] Q: Optional quick test point. Service Guide for DM3000 Series 3-13 RIGOL Optional AC Voltage Test In optional AC voltage test, input the standard signal the test equipment outputs into the input terminal of tested equipment; and compare the test results with the error shown in the table 3-12 and 3-13. Table 3-12 Accessional AC Voltage Test Error (DM306x) Test Signal Input Frequency Range Error (1 year) 2V 10Hz 2.000000V ± 103.4mV 2V 1kHz 2.000000V ± 3.6mV 2V 50kHz 2.000000V ± 9.4mV 2V 100kHz 2.000000V ± 14mV 2V 300kHz 2.000000V ± 96mV 20V 1kHz 20.00000V ± 36mV 200V 1kHz 200.0000V ± 360mV 200mV 1kHz 200.0000mV ± 440μV Notes: [1] Set the AC filter as slow ( Meas Filter Slow ); [2] Set the reading resolution as 5½ . Table 3-13 Accessional AC Voltage Test Error(DM305X) Test Signal Input Frequency Range Error (1 year) 2V 10Hz 2.000000V ± 22mV 2V 1kHz 2.000000V ± 6mV 2V 50kHz 2.000000V ± 22mV 2V 100kHz 2.000000V ± 44mV 20V 1kHz 20.00000V ± 60mV 200V 1kHz 200.0000V ± 600mV 200mV 1kHz 200.0000mV ± 600μV Notes: [1] Set the AC filter as slow ( Meas Filter Slow ); [2] Set the reading resolution as 5½ . 3-14 Service Guide for DM3000 Series RIGOL Optional AC Current Test In optional AC current test, input the standard signal from testing equipment into equipment to be tested; and compare the test results with the errors shown in the table 3-14 and 3-15. Table 3-14 Accessional AC Current Test Error(DM306X) Current Input Frequency Range Error (1 year) 20mA 10Hz 20.0000mA ± 1.034mA 20mA 1kHz 20.0000mA ± 58μA 20mA 10kHz 20.0000mA ± 90mA 1A 1kHz 1.00000A ± 5.6mA 200mA 1kHz 1.00000A ± 3.28mA 20mA 1kHz 1.00000A ± 2.758mA Notes: [1] Set the AC filter as slow ( Meas Filter Slow ); [2] Set the reading resolution as 6½ . Table 3-15 Accessional AC Current Test Error(DM305X) Current Input Frequency Range Error (1 year) 20mA 10Hz 20.0000mA ± 320μA 20mA 1kHz 20.0000mA ± 120μA 20mA 10kHz 20.0000mA ± 440μA 1A 1kHz 1.00000A ± 10mA 200mA 1kHz 1.00000A ± 6mA 20mA 1kHz 1.00000A ± 5.1mA Notes: [1] Set the AC filter as slow ( Meas Filter Slow ); [2] Set the reading resolution as 6½ . Service Guide for DM3000 Series 3-15 RIGOL Capacitance Test In capacitance test, input the standard signal from testing equipment into the equipment to be tested; and compare the test results with the error shown in the table 3-16 and 3-17. Table 3-16 Capacitance Test Error of the Standard Equipment (DM306X) Test Signal Quick Check Range Error (1 year) 2nF 2.000nF ± 90 pF 20nF 20.00nF ± 300pF 200.0nF ± 3nF 2.000μF ± 30nF 20.00μF ± 300nF 200.0μF ± 3μF 200nF Q 2μF 20μF Q 200μF Notes: [1] Specifications are for 60 minutes warm–up using Math Null; [2] Q: Optional quick test point. Table 3-17 Capacitance Test Error of the Standard Equipment (DM305X) Test Signal Quick Check Range Error (1 year) 4nF 4.000nF ± 180pF 40nF 40.00nF ± 600pF 400.0nF ± 6nF 4.000μF ± 60nF 40.00μF ± 600nF 200.0μF ± 3μF 400nF Q 4μF 40μF 200μF Q Notes: [1] Specifications are for 60 minutes warm–up using Math Null; [2] Q: Optional quick test point. 3-16 Service Guide for DM3000 Series RIGOL Software Connection Test UltraLogger Connection Test USB Device Interface of DM3000 can be used to connect the computer software UltraLogger,after successfully installing the software and USB driver and opening the software, you will see the figure 3-2 below. Figure 3-2 UltraLogger is successfully connected UltraSensor Connection Test USB Device Interface of DM3000 can be used to connect the computer software UltraSensor; after successfully installing the software and USB driver and opening the software; press above the software interface, the color of light on the upper right of interface turns red into green, you will see the figure 3-3 below. Service Guide for DM3000 Series 3-17 RIGOL Figure 3-3 UltraSensor is successfully connected NOTE You can download the latest UltraLogger and UltraSensor software from the official website www.rigolna.com. 3-18 Service Guide for DM3000 Series RIGOL Chapter 4 Calibration The chapter mainly covers the following topics: Calibration Security Code Calibration Notice DC Voltage, DC Current, Resistance Calibration AC Voltage and AC Current Calibration Frequency Calibration Capacitance Calibration Service Guide for DM3000 Series 4-1 RIGOL Calibration Security Code Setting calibration security code can ensure that the multimeter could be calibrated only by authorized person. Before calibrating, firstly you must enter calibration security code. The security code of Multimeter could be made of 10 characters at most which is from number “0~9” and letter “A~Z”. Users can set the self-defined password. The factory default of security code is “DMCAL”, and when power is off or reset, security code will not be changed or lost. Set or Reset Security Code Press , select T/C PSW to enter the primary password by the direction buttons on front panel and set SecrOff , then enter a new code and press SecrOff to finish new setting. 4-2 Service Guide for DM3000 Series RIGOL Calibration Notice Calibration Interval The multimeter should be calibrated on a regular interval determined by the measurement accuracy requirement of your application. Generally, a 90 days interval is recommended, also a 1-year interval could be used for calibrating depending on your actual requirement. RIGOL does not recommend extending calibration intervals beyond 1 year for any application. Whatever calibration interval you select, RIGOL suggests that completing re-adjustment should always be performed in conformity to its regulations offered by RIGOL during calibrating. If you actually do this, a good performance will be hold within interval to next calibration or longer. Calibration Explanations During calibrating, the calibration factor is determined by current input value and saved in non-volatile memory and will not be changed until next calibration. Basically two steps should be performed during calibrating: Zero Adjustment and Gain Adjustment (except for AC and frequency measurement). Service Guide for DM3000 Series 4-3 RIGOL DC Voltage, DC Current, Resistance Calibration The calibration procedures of DC voltage, DC current and resistance are similar, so next will take the calibration of 4-wire resistance in the range of 20kΩ as an example to show you procedures. 1. Press to select resistance measurement function, then press Rng+ or Rng- to set the range as 20kΩ and the reading resolution as 6½ ; 2. Press , and select T/C PSW to input the password by the direction buttons on front panel, then set SecrOff , next select Cal Enter ; 3. See figure 4-1, short the terminals of both Input HI-LO and Sense/Ref HI-LO via plugging into the short pin, and the current terminal is opened. Then select Zero to perform Zero Calibration; Figure 4-1 The Input HI-LO and Sense/Ref HI-LO Terminals in Short Circuit 4. Finally, connect the terminals of Input HI-LO and Sense/Ref HI-LO with corresponding terminals from Fluke 5520A, and set Fluke 5520A as 20 kΩ output (full range input), then select Gain to perform gain calibration. After calibrating, press Save to exit and complete calibration. Afterwards, perform other items list in table 4-1 in the same way. NOTE The calibration procedure must be performed carefully to avoid affecting instruments performance by wrong operations. Before calibrating, please pay your attention to “Test Consideration” in chapter 3. 4-4 Service Guide for DM3000 Series RIGOL Table 4-1 DC Zero and DC Gain Calibration Input Value (DM306X) Function Range Zero Resistance 200.0000Ω 2.000000kΩ 20.00000kΩ 200.0000kΩ 10.00000MΩ 100.0000MΩ 200.0000mV 2.000000V 20.00000V 200.0000V 1000.000V 20.00000mA 200.0000mA 1.000000A 10.00000A 0 (input terminal shorted) 0 0 0 0 0 0 (input terminal shorted) 0 0 0 0 0 (input terminal open) 0 0 0 DC Voltage DC Current DC Gain Calibration Input Value 200.0000Ω 2.000000kΩ 20.00000kΩ 200.0000kΩ 10.00000MΩ 100.0000MΩ 200.0000mV 2.000000V 20.00000V 200.0000V 1000.000V 20.00000mA 200.0000mA 1.000000A 10.00000A Table 4-2 DC Zero and DC Gain Calibration Input Value (DM305X) Range Resistance 400.000Ω 0 (input terminal shorted) 4.00000kΩ 0 4.00000kΩ 40.0000kΩ 0 40.0000kΩ 400.000kΩ 0 400.000kΩ 4.00000MΩ 0 4.00000MΩ 100.000MΩ 0 100.0000MΩ 400.000mV 0 (input terminal shorted) 400.000mV DC Voltage DC Current Zero DC Gain Calibration Input Value 400.000Ω Function 4.00000V 0 4.00000V 40.0000V 0 40.0000V 400.000V 0 400.000V 1000.00V 0 1000.00V 20.0000mA 0 (input terminal open) 20.0000mA 200.000mA 0 200.000mA 1.00000A 0 1.00000A 10.0000A 0 10.0000A Service Guide for DM3000 Series 4-5 RIGOL AC Voltage and AC Current Calibration Comparing the calibration procedure with DC, when calibrating AC function Frequency correction and Middle range calibration are appended to be executed but Zero calibration. Take the calibration of AC voltage in the range of 200mV as an example: 1. Press to select AC voltage measurement function, then press Rng+ or Rng- to set the range as 200mV and the reading resolution as 5½ ; 2. Press , and select T/C then select Cal Enter ; PSW to input password and set SecrOff , 3. Select Freq and select 50Hz frequency correction. Then input a sine wave of 100mV, 50Hz into the terminal of Input HI-LO by Fluke 5520A, after that, press Meas and select 200 kHz frequency correction. Next, input a sine wave of 200 kHz into the terminal of Input HI-LO by Fluke 5520A. Then press Meas and select Done to return to last menu. 4. Output a sine wave of 100mV, 1 kHz into the terminal of Input HI-LO by FLuke 5520A. Select Middle to perform middle range calibration, then go on output a sine wave of 200mV, 1kHz into the terminal of Input HI-LO by FLuke 5520A , after that, press Gain to perform full range calibration, finally select Save to exit and complete calibrating AC voltage in the range of 200mV. Afterwards, perform other items list in table 4-2 in the same way. NOTE Frequency correction is not required during calibrating AC current. 4-6 Service Guide for DM3000 Series RIGOL Table 4-3 AC Calibration Input Value Function AC Voltage Range 200mV 2V 20V 200V 750V AC Current Frequency Correction Signal 50Hz/100mV 200kHz/100mV 50Hz/1V 200kHz/1V 50Hz/3V 200kHz/3V 50Hz/10V 200kHz/10V 50Hz/10V 200kHz/10V 2mA 20mA 200mA 1A 10A Service Guide for DM3000 Series Null Middle Calibration Signal Full Range Calibration Signal 1kHZ/100mV 1kHz/200mV 1kHz/1V 1kHz/2V 1kHz/10V 1kHz/20V 1kHz/100V 1kHz/200V 1kHz/375V 1kHz/750V 1kHz/1mA 1kHz/10mA 1kHz/100mA 1kHz/500mA 1kHz/5A 1kHz/2mA 1kHz/20mA 1kHz/200mA 1kHz/1A 1kHz/10A 4-7 RIGOL Frequency Calibration Frequency calibration is easier than others; generally just calibrate 2V range is enough. The frequency calibration procedure is: 1. Press to select AC voltage measurement function, then press Rng- to set the range as 2V; Rng+ or 2. Press , and select menu button T/C PSW , input password, and set SecrOff , then select CAL Enter ; 3. Input a sine wave of 1V, 450 kHz into the terminal of Input HI-LO by FLuke 5520A, and press Gain , finally select Save and exit. Capacitance Calibration The way to calibrating Capacitance is similar with AC but a little difference. It also includes Zero calibration and Gain calibration, but all the input terminals on front panel are opened. Please refer to the section “AC calibration” about the detailed procedure. The capacitance calibration input values are shown in table 4-3. Table 4-4 Capacitance Calibration input Value Function Capacitance 4-8 Range 2nF 20nF 200nF 2μF 20μF 200μF Zero Input Null Gain Input 2nF 20nF 200nF 2μF 20μF 200μF Service Guide for DM3000 Series RIGOL Chapter 5 Disassembly & Assembly The chapter mainly covers the following topics: The Disassembly and Assembly Notice The 3D View of DM3000 To Disassemble and AssembleHandle, Rear Panel and Metallic Shell To Disassemble and Assemble Fuse Socket, BNC Module and GPIB PCB To Disassemble and Assemble Filter Board and Transformer To Disassemble and Assemble Front Panel and LCD To Disassemble and Assemble Multiplexer Board, Motherboard and Key Board PCB Service Guide for DM3000 Series 5-1 RIGOL The Disassembly and Assembly Notice Notice: Please don’t disassemble the instrument except the work need Please don’t disassemble the instrument except the professionals Please cut off the multimeter power when disassembling Please wear the anti-static hand-ring or take other anti-static measures when disassembling Please use the proper tools and disassemble in order Prevent the transfiguration of metallic parts and avoid to be injured when disassembling Tools: Club screwdriver T10, T15 Clamps ! 5-2 WARNING Before disassembling, please make sure the power is cut off. The operation stuff should be trained and have acquired the related qualification. Service Guide for DM3000 Series RIGOL The 3D View of DM3000 The 3D views of DM3000 are shown in the figure 5-1 and figure 5-2. You should have a primary understanding of the main parts of the instrument before disassembling and assembling. In progress of disassembling or assembling, please operate gently and step by step. Note that please not scratch the surface of the device and damage PCB and so on by tools, see the Disassembly and Assembly Notice. The disassembly order suggested is given as followings (for example DM3064): Handle Rear Panel Metallic Shell Fuse Socket BNC & GPIB PCB Filter Board and Transformer Front Panel and LCD Multiplexer Board Motherboard Key Board PCB. The assembly step is reverse. Figure 5-1 The Exterior 3D View of DM3000 Service Guide for DM3000 Series 5-3 RIGOL Figure 5-2 The Interior 3D View of DM3000 5-4 Service Guide for DM3000 Series RIGOL To Disassemble and Assemble Handle, Rear Panel and Metallic Shell Grip both side of handle and pull it outward, then rotate the handle to the desired position in order to take it away. See figure 5-3. The disassembly method of rear panel and metallic shell is shown in the figure 5-4, figure 5-5. Figure 5-3 The Schematic of Disassembling and Assembling Handle Service Guide for DM3000 Series 5-5 RIGOL Figure 5-4 The Schematic of Disassembling and Assembling Rear Panel 5-6 Service Guide for DM3000 Series RIGOL Figure 5-5 The Schematic of Disassembling and Assembling Metallic Shell Service Guide for DM3000 Series 5-7 RIGOL To Disassemble and Assemble Fuse Socket, BNC Module and GPIB PCB Figure 5-6 The Schematic of Disassembling and Assembling Fuse Socket 5-8 Service Guide for DM3000 Series RIGOL Figure 5-7 The Schematic of Disassembling and Assembling BNC Module Service Guide for DM3000 Series 5-9 RIGOL Figure 5-8 The Schematic of Disassembling and Assembling GPIB PCB 5-10 Service Guide for DM3000 Series RIGOL To Disassemble and Assemble Filter Board and Transformer Figure 5-9 The Schematic of Disassembling and Assembling Filter Board and Transformer Service Guide for DM3000 Series 5-11 RIGOL To Disassemble and Assemble Front Panel and LCD Figure 5-10 The Schematic of Disassembling and Assembling Front Panel and LCD 5-12 Service Guide for DM3000 Series RIGOL To Disassemble and Assemble Multiplexer Board, Motherboard and Key Board PCB Figure 5-11 The Schematic of Disassembling and Assembling Multiplexer Board Service Guide for DM3000 Series 5-13 RIGOL Figure 5-12 The Schematic of Disassembling and Assembling Motherborad 5-14 Service Guide for DM3000 Series RIGOL Figure 5-13 The Schematic of Disassembling and Assembling Key Board PCB Above procedures and orders of disassembly and assembly are recommended to avoid the damage to equipment during operating and save your time. Service Guide for DM3000 Series 5-15 RIGOL Chapter 6 Troubleshooting & Maintenance The chapter mainly covers the following topics: DM3000 Principle Introduction Troubleshooting Common Troubleshooting Components Inspection Replaceable Part List Maintenance and Cleaning Even though great care was taken in the design of DM3000 series, problems may occur. So, please read this chapter carefully to get more information about troubleshooting and maintenance. Service Guide for DM3000 Series 6-1 RIGOL DM3000 Principle Introduction The circuit of DM3000 series can be divided into floating circuit, grounding circuits and power input. 1. The floating circuit includes current fuse, front panel signal input end (banana socket) and measurement analog front-end which contains circuits such as the input protection of all the measurement function, function switch, signal transform conditioning, A/D conversion and control interface. The structural schematic diagram of circuit from DM3000 Series is as follows: BNC Board LAN/GPIB Board (Except DM30X1) LC D Key Board USB Board Ground Circuit Filter Board Transformer (CPU) Swiching Board Only for DM30X4 ( Motherboard ) (Front End Circuit) Power Input Circuit Current Input Fuse Banana Socket Floating Circuit Figure 6-1 Circuit Diagram of DM3000 series 6-2 Service Guide for DM3000 Series RIGOL 2. Ground circuit contains keyboard, LCD, USB Host, BNC board, LAN/GPIB board and the host CPU of motherboard. 3. The AC power inpour into the multimeter via power socket and connect with transformer through filter board that divides it into multi low voltage and floating into circuit and ground circuit respectively. The power supply of ground circuit is 9V AC voltage and the floating circuit is a group of 8.5V AC voltage and two groups of 17V AC voltage. The commutate, filter and regulation circuit in floating and grounding circuit transform the low-voltage AC into stable DC voltage and supply power to each circuit. Connect the control circuit of multiplexer board with host CPU and then connect the output terminal of multiplexer board with analog front-end. when measuring,the host CPU will send commands to control the analog front-end to switch function and range. Then the analog front-end return the result from A/D transform and cymometer to host CPU, eventually, the host CPU will calibrate these results and display according to control the LCD. When multiplexer measuring, firstly the host CPU will control the analog front-end to switch to multiplex board, and then send commands to shift to certain channel, eventually, perform same procedures to get final result. Service Guide for DM3000 Series 6-3 RIGOL Troubleshooting Common Troubleshooting 1. After press the power switch, the multimeter is blank screen with nothing display: (1) Check if the power is correctly connected. (2) Check if the main power switch on the Rear panel has been turn on. (3) Check if the power light on Front panel is bright. (4) Check if the safety fuse is blown; replace a new one if necessary. (5) Check if the power selector is in correct position. (6) If the unit still cannot work properly, please contact with your local RIGOL Service center. Instruction of Power Supply Button: Light: ON; Twinkle: STAND BY; Dark: OFF. Tips: How to change the fuse of power supply: The electric power fuse locates within the fuse socket at the Rear panel of Multimeter which has already been equipped when the instrument leaves factory. The replacing sequence for a fuse is: Disconnect the power. Use a tool to press the block down (as the dashed pointed in the picture) and then pull out the fuse socket. After replacing, put the fuse socket back into the slot. Check whether the voltage is in correct level. Figure 6-2 The Sketch Map of Fuse Replacement 6-4 Service Guide for DM3000 Series RIGOL ! CAUTION: Make sure the power is cut off before replacing fuse, and the specifications of fuse should be in accordance with the requirements in this manual. 2. When the reading display is incorrect: (1) Check whether the range is consistent with test items. (2) Check whether the recommended calibration date is exceed. If the testing value exceeds the range in corresponding accuracy index, please contact authorized calibration center of RIGOL to calibrate. (3) If the instrument still can not work in the course of nature, please contact with your local RIGOL Service center. 3. When the back light of the screen is dark: (1) Adjust its brightness and contrast. (2) If the instrument still can not work in the course of nature, please contact with your local RIGOL Service center. 4. When the multiplexer work abnormally: (1) Check whether the module connection cable and test lead is correctly connected. (2) Check whether the multimeter could communicate with PC normally.; (3) Check whether the correct range has been set to multiplexer test (4) If the instrument still can not work in the course of nature, please contact with your local RIGOL Service center. 5. When the multimeter can not access into the test interface: (1) Check whether you turn on the instrument following the requirements in manual (2) Check whether GPIB/LAN extension board is connected with the motherboard normally. (3) If the instrument still can not work in the course of nature, please contact with your local RIGOL Service center. 6. When the multimeter can not communicate with PC by its software: (1) Check whether the USB cable is connected correctly. (2) Take Windows system as example, check device manager to make sure whether PC recognizes the host machine connection. (3) Check whether install the drive, you can download the drive program in the website www.rigol.com (4) Check whether the software version is matching with current firmware version.; (5) If the instrument still can not work in the course of nature, please contact with your Service Guide for DM3000 Series 6-5 RIGOL local RIGOL Service center.. 7. For the other malfunctions, please contact with RIGOL maintain ace centre or refer to “service and support. ! 6-6 WARNING: Only authorized personnel by RIGOL could disassemble the instrument, or else no warranty would be available. Service Guide for DM3000 Series RIGOL Components Inspection From this part, you can get more information about malfunction in order to process hard troubleshooting by yourself. 1. Fuse DM3000 have many fuse designs, the one can be changed by customer themselves is power instrument pipe and current fuse, the parameters are as follows: Power fuse: 250V, 300mA, quick-break Current fuse: 10A, quick-break Inspection method: Test the continuity by DM. If no connection beep, the fuse is supposed brown. 2. Power Frequency Transformer DM3000 adopts power frequency transformer, and the power socket equips with fuse socket and power source switch. The voltage switch function extend the voltage adjust range all over the world. Voltage switch has options of 230V/115V, when the commercial power is 220V, you should select “230”; if the commercial power is 110V, you should select “115”. Inspection method: Check the voltage among windings Red Blue AC 8.5V Blue Brown AC 110V AC 17V Yellow Yellow AC 17V White Black AC 110V AC 9V White Black Figure 6-3 Transformer Sketch Map Service Guide for DM3000 Series 6-7 RIGOL Compare the measured voltages of each winding with table2.1, we can see that: Table 6-1 Check Table of Voltages among Windings of Transformer windings Original White-Yellow side White-Red Black-Black Vice side White-Yellow Yellow-Brown Blue-Blue Max(Vrms) 132 265 10.8 21 21 10.3 Min(Vrms) 90 180 7.3 14 14 6.9 Typical(Vrms) 110 220 9 17 17 8.5 If all the winding voltages among original side are 0, there might be something wrong with filter board or power source socket. If the original voltage is half or double of the typical value, inaccurate location might be selected by AC voltage selectors. If the vice side voltage is less than the minimum value, short circuit might be happened within mainboard. You can pull out the vice side socket of the transformer from the motherboard (please cut off the electricity before operating), then test the voltage in vice side. If the voltage is upturned, short circuit might be happened within mainboard or transformer malfunctions. If you make sure that it was the malfunction of Power frequency transformer, please contact RIGOL. 3. Display DM3000 series utilize homochromatic LCD, support Power-on testing. Inspection method: Press the second menu operation key in the left side, at the same time turn on the multimeter, keep pressing for about 5 seconds until you hear beep. After that, multimeter starts testing display within a tip message on the screen “Press ·Help· Key to Switch, Hold ·Help· Key to Exit”. Press Help button, the screen would switch between Full white (all pixel are bright) and Full black (all pixel are put out). Press Help button for about 2 seconds, the display return to normal measurement state. If you make sure it was the malfunction of the screen, please contact RIGOL. 4. Keyboard DM3000 series utilize LED backlight button design, which is more convenient and accurate. 6-8 Service Guide for DM3000 Series RIGOL Inspection method: Press the first menu operation key in the left side, at the same time turn on the multimeter, keep pressing for about 5 seconds until you hear beep. After that, multimeter starts testing display. In this state, the basic measure keys, parameter keys and trigger control keys would twinkle and the screen displays keyboard testing menu. When you first press a button, the corresponding icon in the test interface would change to reverse video, after this,, the icon would vary with the button you have pressed. If you make sure it was the malfunction of keyboard, please contact RIGOL. Tips: Some difficulties could be solved by recalling factory setup. For example, parts of setup mistakes or Non-fault errors could be eliminated by this way: Press Utility System Setup Factory It will be difficult to read the information on the interface if the display configuration is abnormal; we can recall the factory setup by another way to solve this problems: Keep pressing the second menu operation key and turn on the multimeter. Keep pressing for about 5 seconds until you hear beep. After that, the mulitimeter will load the factory configuration automatically. ! CAUTION: You can contact RIGOL technical support department or RIGOL authorized distributors when there is malfunction. Do not disassembly the instrument by yourself to avoid accident or losing. Service Guide for DM3000 Series 6-9 RIGOL Replaceable Part List RIGOL provides some replaceable parts in order to maintain or update for users. Please see as the following table. 6-10 Service Guide for DM3000 Series RIGOL Table 6-2 Replaceable Part List Part No. 1 2 3 4 5 6 7 8 9 10 11 12 13 14 15 16 17 18 19 20 21 22 23 24 25 26 27 28 29 30 31 Name Front Panel Rubber Keypad Keyboard Banana Socket Metal Body Fan Screw Handle BNC Nut 10A Fuse Outer Housing Rear Panel Non-slip Mat Multiplexer Module RS-232 Interface USB Device Interface Multiplexer Module Interface Motherboard Fuse Base 300mA Fuse Power Outlet Rear BNC Board BNC(Plastic) Power Frequency Transformer Filter Board LAN Interface LAN&GPIB Board GPIB Interface Front USB Board USB Host Interface LCD screen You can contact RIGOL technical support department or RIGOL authorized distributors to change the part, take a reference of chapter “Contact Us” to get the contact information. Service Guide for DM3000 Series 6-11 RIGOL Maintenance and Cleaning System Maintenance In order to ensure the running performance of instrument and extend useful time, please abide by the following advices: 1. Before operating please ensure that all the performance and particular using method. Have been taken into you memory and brain. For any puzzles please refer to Chapter 2. 2. Do operate or storage the instrument under the environment of dustproof, quakeproof, dampproof, antimagnetic, static-free and other relative requests as soon as possible. Meanwhile, do not expose it in the sun for a long time to avoid reducing the measurement precision and useful time. 3. Operating with malfunction is forbidden. If some malfunctions occurred duing running, please solve this problem first. Besides, test and calibrate the instrument within stated term to ensure the creditability of measurement. 4. Do the relevant neatening work after using. 5. Keep corresponding accessories safe for next using. Please refer to “Check the list of accessories” in Chapter 2. General Care Do not store or leave the instrument in where the LCD display will be exposed to direct sunlight for long periods of time. Caution To avoid damage to the instrument and test lead, do not expose them to sprays, liquids, or solvents. Cleaning To clean the exterior surface, perform the following steps: 1. Remove loose dust on the outside of the instrument and test lead with a lint- free cloth. Take care to avoid scratching the clear plastic display filter. 2. Use a soft cloth dampened with water to clean the instrument, disconnect it from all power sources. If this instrument requires cleaning, and clean it with a mild detergent and water.. To avoid damage to the surface of the instrument, do not use any abrasive or chemical cleaning agent. ! 6-12 CAUTION: Make sure the instrument is completely dry before reconnecting it to a power source. Service Guide for DM3000 Series RIGOL Chapter 7 Service & Support Warranty 1. RIGOL Technologies, Inc. warrants its products’ mainframe and accessories in materials and techniques within the warranty period. During the period of warranty, RIGOL guarantees to do free replacement or repair for products which are approved defective. 2. The mainframes of RIGOL’ s products have a three-year warranty and the accessories such as probe and test pen (with the exception of power cord, USB and BNC cable) have a one-year warranty . In above-mentioned periods, any hardware or software error caused by quality flaws will be examined and repaired by RIGOL Maintenance Center or its authorized maintenance branch for free if the customer provides the warranty card and maintenance record card. RIGOL provides paid maintenance for products which exceed warranty period. 3. The warranty period starts from the date on the valid certificate of purchase (receipt or invoice). If the invoice can not be offered, the starting date will adopt the manufacture delivery date. 4. Warranty period extended plan. RIGOL extends warranty deadline to a maximum of three months (to compensation the time of transportation and storage by dealer) which is applied for only the customer who has sent back both the return receipt of warranty card and the copy of certificate invoice to RIGOL Maintenance Center (relative documents should be sent back within 30 days from date of purchase, subjected to local postmark or EMS delivery date). 5. For products with free maintenance, RIGOL promise to maintain the instrument within five working days and send back to you for free. For special transportation requirement, please contact the RIGOL Maintenance Center ahead of schedule. 6. The warranty is avoid when: (1) Accidental damage during transporting (please confer with insurance agency or transportation company about the compensation). (2) Malfunctions or damages caused by the wrong installation or operation in disallowed environment. (3) Surface damage by manmade factors such as burn, distortion by extrusion and the like. (4) Repaired by anyone who is not from RIGOL Maintenance Center or an authorized maintenance branch including disassemble and repair without permission, rebuild exceed authority, replace parts and tear up the warranty seal and so on. (5) Accidental damage by using a power supply or a power adapter not authorized by RIGOL. Service Guide for DM3000 Series 7-1 RIGOL (6) Malfunctions or damages caused by irresistible natural calamities, such as earthquake, lightning strike, etc. 7. About defective products not belongs to warranty bound ( include exceed warranty period or extended warranty period), RIGOL will start to maintain after getting the admission from user, after repairing, we will send back to the owner of instrument within 5 working days as soon as we receive the upkeep and man-hour charge. If the owner refuse to repair, RIGOL Maintenance Center will send defective products back to its owner when receive formal affirm fax and man-hour charge for inspection. Concerning about problems occurred during transporting please refer to User Guide. If there are any doubts or difficulties please contact RIGOL Technical support department or Maintenance Center to avoid unnecessary damages. 8. For any direct or indirect losing caused by incorrect operations by users, RIGOL may take in hand only some maintenance responsibilities with rationality and maneuverability. 9. Malfunction instrument should be send back to RIGOL Maintenance Center for repairing and the carriage should be paid by consignor when repairing for second time in principle. 10. For special requirements for maintenance or service such as door-to-door service please contact with RIGOL Maintenance Center. Warranties shown above are apply to the products sold by RIGOL Technologies, Inc. and its authorized dealers, any other form of warranty should be based on these. RIGOL Maintenance Center has the final power of interpretation with the maintenance affairs. 7-2 Service Guide for DM3000 Series RIGOL Contact Us If you have any problem or requirement occurs when using our products, please contact RIGOL Technologies, Inc. or the local distributors. In China: Please call Tel: (86-10) 8070 6688 Fax:(86-10) 8070 5070 Service & Support Hotline: 800 810 0002 9:00 am–5: 00 pm from Monday to Friday Or by e-mail: [email protected] Or mail to: RIGOL Technologies, Inc. 156# CaiHe Village, ShaHe Town, ChangPing District, Beijing, China Post Code: 102206 Overseas: Contact the local RIGOL distributors or sales office. For the latest product information and service, visit our website: www.rigolna.com . Service Guide for DM3000 Series 7-3 RIGOL Index AC Current Calibration .........................4-6 AC Current Gain Test.........................3-11 AC Voltage Calibration ..................4-1, 4-6 AC Voltage Gain Test...........................3-9 Accessional AC Current Test ..............3-15 Accessional AC Voltage Test ..............3-14 Calibration Explanations.......................4-3 Calibration Interval ..............................4-3 Calibration Notice ................................4-3 Calibration Security Code .....................4-2 Capacitance Calibration .......................4-8 Capacitance Test ...............................3-16 Check the list of accessories ................2-2 Circuit Diagram of DM3000 series........6-2 Cleaning ............................................6-12 Common Test .....................................3-3 Common Troubleshooting ...................6-4 Components Inspection.......................6-7 Contact Us...........................................7-3 DC Current Calibration ..................4-1, 4-4 DC Gain Test .......................................3-7 DC Voltage Calibration ..................4-1, 4-4 Disassembling and Assembling .5-11, 5-12 Disassembling and Assembling BNC Module ................................................5-9 Disassembling and Assembling Fuse Socket .................................................5-8 Disassembling and Assembling GPIB PCB5-10 Disassembling and Assembling Handle 5-5 Disassembling and Assembling Key Board PCB .........................................5-15 Disassembling and Assembling Metallic Shell ....................................................5-7 Disassembling and Assembling Motherborad .....................................5-14 Disassembling and Assembling Service Guide for DM3000 Series Multiplexer Board .............................. 5-13 Disassembling and Assembling Rear Panel .................................................. 5-6 DM305X AC Characteristics ............... 1-15 DM305X Capacitance Characteristics. 1-18 DM305X DC Characteristics............... 1-13 DM305X Frequency Period Characteristics................................... 1-17 DM305X Measuring Characteristics ... 1-19 DM306X AC Characteristics ................. 1-5 DM306X Capacitance Characteristics... 1-8 DM306X DC Characteristics................. 1-3 DM306X Frequency Period Characteristics..................................... 1-7 DM306X Measuring Characteristics ..... 1-9 Equipments for Test............................ 3-2 Frequency Calibration ......................... 4-8 Frequency Gain Test ......................... 3-13 General Care..................................... 6-12 Handle Adjustment ............................. 2-3 Inspect the Instrument ....................... 2-2 Performance Test ............................... 3-3 Product Dimension.............................. 1-2 Quick Test .......................................... 3-3 Replaceable Part List................ 6-10, 6-11 Resistance Calibration ......................... 4-4 Safety Notices........................................ II Safety Terms and Symbols .................... V Software Connection Test ................. 3-17 Specifications for DM305x ................. 1-13 Specifications for DM306x ................... 1-3 System Maintenance......................... 6-12 Test Consideration .............................. 3-2 The Disassembly and Assembly Notice 5-2 The Exterior 3D View of DM3000 ........ 5-3 The Interior 3D View of DM3000 ........ 5-4 1 RIGOL The Introduction of Front Panel .......... 2-4 The Introduction of Rear Panel ........... 2-5 The User Interface.............................. 2-5 2 UltraLogger Connection Test ............. 3-17 UltraSensor Connection Test ............. 3-17 Warranty............................................. 7-1 Service Guide for DM3000 Series