1
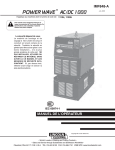
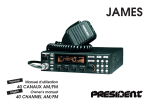
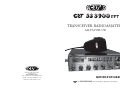
®
®
TRANSCEIVER RADIOAMATEUR
AM/FM/SSB/CW
SUPERSTAR
SARL au capital de 762 500 €
Route de Pagny
21250 SEURRE - France
TEL. 03 80 26 91 91 - FAX 03 80 26 91 00
NOTICE D'UTILISATION
E-mail : [email protected]
Web site : www.crtfrance.com
SUPERSTAR
®
®
et
sont des marques déposées et protégées.
TABLE DES MATIERES
CARACTERISTIQUES
CONSEIL D'UTILISATION
CARACTERISTIQUES : .............................................................................3
CONSEIL DʼUTILISATION ..............................................................3
ACCESSOIRES................................................................................3
GENERALITE ...................................................................................3
EMETTEUR ......................................................................................3
RECEPTEUR....................................................................................3
LANGAGE INTERNATIONAL DES RADIOAMATEURS ...........................4
DESCRIPTION : ..........................................................................................5
FACE AVANT ...................................................................................5
FACE ARRIERE ...............................................................................6
OPERATIONS .............................................................................................7
DECLARATION DE CONFORMITE .........................................................15
INSTALLATION ..........................................................................................8
GARANTIE ................................................................................................14
Important : Pour utiliser votre CRT SS 3900 EFT en émission réception, vous devez
posséder la licence radioamateur groupe D.
A - A lʼinstallation, vérifier bien la polarité du branchement de lʼalimentation fil noir à
la masse, fil rouge au +, connecté directement sur les bornes de la batterie du
véhicule.
B - Faire contrôler le taux dʼondes stationnaire de votre antenne qui doit être voisin
de 1.5. Sinon régler lʼantenne.
ACCESSOIRES
Votre CRT SS 3900 EFT est livré avec un microphone, un berceau de fixation,
un cordon alimentation et un support micro perçage.
GENERALITES
FREQUENCES COUVERTES : 28.245 – 29.655 MHZ
CLASSE DʼEMISSION : USB, LSB (J3E) , CW (A1A), AM (A3E), FM (F3E)
CONTROL DE FREQUENCE : PLL synthétisé
TOLERANCE DE FREQUENCE : 0.005%
STABILITE DE FREQUENCE : 0.001%
TEMPERATURE DE FONCTIONNEMENT : 0° à +40°
HP IMPEDANCE : 8 ohms, 2 Watts
MICRO IMPEDANCE : 600 Ohms, Pastille dynamique
AFFICHAGE : DIGITAL LED
ALIMENTATION : 13.8 volts DC négatif à la masse
EMETTEUR
PUISSANCE DE SORTIE ANTENNE : AM/FM : 10 Watts – USB/LSB/CW : 25 Watts
FREQUENCES PARASITES : -50 Db
SUPPRESSION DE LA PORTEUSE : -50 Db
CONNECTEUR DʼANTENNE : UHF 50 (SO239)
MODES DE TRANSMISSION : USB, LSB, CW, AM, FM
RECEPTEUR
RECEPTION POUR 10 Db SIGNAL/BRUIT : AM : 0.5 MICROVOLTS
USB/LSB/CW : 0.3 MICROVOLTS
FM : 1 MICROVOLTS
REJECTION IMAGE : 65 Db
PUISSANCE BF A 10% DE DISTORTION : 2.5 Watts
3
FACE AVANT
DESCRIPTION
LANGAGE INTERNATIONAL DES RADIOAMATEURS
10
QRA
QRA PRO
QRB
QRD
QRE
QRG
QRK
QRL
QRM
QRN
QRO
:
:
:
:
:
:
:
:
:
:
:
QRP
QRT
:
:
QRU
QRV
QRZ
QSA
:
:
:
:
QSJ
QSO
QSL
QSP
:
:
:
:
QST
QSY
:
:
QTH
QTR
144
144 + 2
166
212
318
813
Mike
600 Ohms
:
:
:
:
:
:
:
:
:
:
4
Domicile de l'opérateur
Lieu de travail
Distance entre deux stations
Direction
Heure d'arrivée prévue
Fréquence
Force des signaux (radio 1…5)
Je suis occupé
Brouillages industriels
Brouillages atmosphériques
Fort, puissant, et par extension
sympathique
Petit, faible
Arrêter la transmission et par
extension s'en aller
Plus rien à dire
Attente en écoute
Indicatif
Force signaux
(Santiago 1…9 + 10 + 30)
Tarif, prix
Liaison radio
Accusé de réception
Relais-intermédiaire
(on dit souvent QSPapa)
Communiqué d'intérêt général
Changement de fréquence
(Dégager - descendre ou monter)
Position géographique de l'opérateur
Heure
Polarisation horizontale, se coucher
Se coucher mais pas seul
73 / 88
73 / 51 / 88
Pipi
Gastro liquide
Microphone
Téléphone
PRO
:
Push pull :
1000 pattes :
TV
:
Visu
:
Gastro solide :
Gastroliquide :
Stand-by :
QRM 22
:
Roger
:
Tonton
:
Mayday
:
AM
:
FM
:
BLU
:
CQ
:
TX
:
RX
:
DX
:
CW
:
BF
:
HF
:
VHF
:
UHF
:
SW
:
SWL
:
OM
:
YL
:
XYL
:
QRP
:
VX
:
H1 3 fois :
33
:
73
:
51
:
88
:
99
:
Travail
Voiture
Camion
Tante Victorine
Se voir
Repas
Pot
Attente
Policier
Compris
Ampli de puissance
Appel de détresse
Modulation d'amplitude
Modulation de fréquence
Bande latérale unique (USB-LSB)
Appel général
Appareil émetteur
Récepteur
Liaison longue distance
Graphie Morse
Basse fréquence
Haute fréquence
Très haute fréquence
Ultra haute fréquence
Ondes courtes
Ecoute en ondes courtes
Opérateur radio
Opératrice
Epouse de l'opérateur
Enfants de l'opérateur (QRPépette)
Vieux copains
Hilarité
Salutations entre YL
Amitiés
Poignées de mains
Grosses bises
Dégager la fréquence, disparaître
11
12
13 14 15 16 17 18 19
20
1
2
3
4
5 5.1 6
7
8
9
1. SQ : SQUELCH CONTROL : Cette fonction permet d’éliminer ou d’amoindrir le bruit de fond
en mode réception en l’absence d’un signal émis. Pour le maximum de sensibilité en mode
réception, il faut ajuster le réglage afin d’éliminer le bruit de fond juste à la coupure et pas
plus. Tourner ce bouton en sens inverse horaire puis tourner lentement en sens horaire jusqu’à
le bruit de fond disparaisse. Tout signal pouvant être reçu, devra être légèrement plus fort que
la moyenne des bruits de fond.
2. ON-OFF / VOLUME CONTROL : Tourner le bouton dans le sens des aiguilles d’une montre
pour la mise en route et ajuster le niveau sonore d’écoute.
3. RF GAIN : Cette fonction permet de réduire le gain d’amplification réception en cas de
signaux très forts.
4. MIC GAIN : Cette fonction ajuste le gain du micro en transmission.
5. EC : ECHO – on/off volume : Tourner le bouton pour allumer et ajuster plus ou moins l’écho
5.1. RF POWER puissance de sortie : Cette fonction permet d’ajuster la puissance de sortie de
1 à 25 watts (AM : 1Wà 10W – SSB : 10W à 25W).
6. BAND : Permet de sélectionner la bande désirée.
7. MODE : Cette fonction permet de sélectionner les modes suivants : FM-AM-USB-LSB-CW
8. FINE-COARSE : Cette fonction permet d’avoir un ajustement fin du signal reçu en mode SSB
ou CW pour le maximum de clarté. Ajuste la fréquence en réception de plus ou moins 1 KHz.
9. SELECTEUR DE FREQUENCE : Ceci permet de sélectionner la fréquence voulue et permet
un réglage continu sur toute la gamme de fréquences.
10. VU-METRE : Ce vu-metre indique le niveau du signal de réception ainsi que le niveau du
signal émis et de la puissance de sortie. Il signale sur l’échelle SWR le taux d’ondes stationnaire
de l’antenne.
5
OPERATIONS
11. INDICATEUR TX/RX : LED bicolore signalant l’état de fonctionnement de l’appareil.
L’appareil fonctionne en émetteur la LED claire rouge. L’appareil fonctionne en récepteur la
LED claire verte.
12. FREQUENCEMETRE : Ce fréquencemètre indique la fréquence numérique du canal sélectionné.
13. TOUCHE MONITOR : Permet une écoute de la modulation dans le HP interne (ex : ajustement de l’écho)
14. TOUCHE HI-LOW : Commute les bandes basses et hautes
15. TOUCHE SWR : Cette fonction permet de contrôler votre taux onde stationnaire.
16. TOUCHE NB/ANL : Sélecteur des filtres noise blanker et ANL
Le Noise Blanker (limitateur de bruit) est très efficace pour enlever les sons répétitifs à
impulsion (les parasites dus à l’allumage des voitures). En position ANL, le limitateur de bruit
est activé.
17. TOUCHE ROGER BEEP : Mise en service ou arrêt du Roger beep en fin d’émission.
18. TOUCHE +10Khz : En position + 10Khz la fréquence d’émission et de réception est
décalée de +10Khz
EMETTRE ET RECEVOIR :
A. MICROPHONE :
La réception et l’émission est contrôlée par la pression de la pédale PTT du microphone.
Appuyé sur la pédale PTT pour activé l’émetteur, relâcher celle-ci pour recevoir. Quand
vous transmettez, tenez votre micro à quelques centimètres de votre bouche et parler
clairement, d’une voix normal.
B. RECEPTION :
Assurez-vous que la prise d'alimentation, le microphone et l'antenne soient bien
connectées avant de passer à l'étape suivante.
Tourner le bouton VOL dans le sens des aiguilles d’une montre pour allumer la radio.
Mettez le bouton VOL à un niveau d’écoute confortable.
19. INDICATEUR DE CANAUX : Permet de visualiser sur quel canal l’appareil fonctionne
Mettez le bouton MODE en fonction du mode désiré.
20. PRISE MICRO : prise micro 4 broches au standard CRT-SUPERSTAR
FACE ARRIERE
4
3
Ecouter les bruits de fonds de votre Haut parleur. Tourner le squelch SQ doucement
dans le sens des aiguilles d’une montre jusqu’à ce que le bruit disparaisse. Le SQ est
maintenant bien ajusté.
Le récepteur reste tranquille jusqu'à ce qu'un signal soit reçu. Ne pas baisser le bouton
trop bas ou certains signaux ne seront pas entendus.
Mettre le sélecteur de canaux sur le canal désiré.
Mettre le bouton RF GAIN à fond dans le sens des aiguilles d’une montre pour un
maximum de RF gain.
Ajuster le bouton FINE/COARSE pour clarifier le signal en SSB/CW ou optimiser le
signal en AM/FM.
1
2
C. EMISSION :
1. ANT : Permet de connecter votre câble coaxial d’antenne 50 Ohms avec une fiche PL259.
2. POWER : Prise permettant de connecter votre câble d’alimentation 13.8 Volts rouge et noir
avec fusible. Fil rouge au positif, fil noir à la masse.
Sélectionner le canal désiré pour émettre.
Mettre le bouton MIC GAIN à fond dans le sens des aiguilles d’une montre.
Si le canal est libre, appuyer sur la pédale PTT du micro et parler d’une voix claire.
3. JACK CW : Ce jack sert en fonctionnement code morse. Pour cela brancher un manipulateur
à ce jack et placer le bouton mode en position CW.
6
4. EXT SP : Haut parleur extérieur.
Ce jack accepte un haut parleur extérieur de 4 à 8 Ohms – 5 Watts.
7
INSTALLATION
F EMPLACEMENT ET MONTAGE DE VOTRE CRT SS 3900 EFT :
Accessoires : votre CRT SS 3900 EFT est livré complet, avec microphone, berceau de
fixation, cordon alimentation, support micro à perçage et visserie.
✦ ALIMENTATION
Votre CRT SS 3900 EFT peut être installé dans n'importe quel véhicule utilisant
12 Volts continus (masse négative -).
Fil rouge + = batterie
Fil noir - = masse
VERIFIER VOTRE INSTALLATION ELECTRIQUE
✦ VERIFIER VOTRE INSTALLATION ELECTRIQUE
Avant le montage et la tension d'alimentation qui ne doit pas être supérieure à 15.6 volts.
Camions : Installés en 24 Volts, il est nécessaire d'utiliser un convertisseur de tension CRT
SUPERSTAR qui réduira la tension 24 volts en 12 volts.
AU MOINDRE DOUTE CONSULTEZ UN SPECIALISTE.
MONTAGE D'UN POSTE CB DANS UNE VOITURE
+
PORTE FUSIBLE
POSTE CB
ROUGE
+
-
Vous choisirez l’emplacement le plus approprié afin de pouvoir utiliser votre
CRT SS 3900 EFT de façon simple et pratique sans gêner le conducteur ni les passagers.
Veuillez à faire vos raccordements électriques de façon à ne pas gêner les commandes de
votre véhicule (freins, accélérateurs, etc…)
+
ROUGE
24 V
8
12 V
NOIR
+
-
REDUCTEUR TENSION
24 / 12 V CRT
* Support Micro
Des trous de fixation sont prévus sur votre CRT SS 3900 EFT. Vous pouvez aussi le monter
sur votre tableau de bord.
* Prise EXT/SP sur face arrière
«EXT» : vous permet le montage d'un haut parleur supplémentaire. Introduire la fiche jack
correspondante (diamètre 3.5 mm).
POSTE CB
MONTAGE D'UN POSTE CB DANS UN CAMION
✦ MONTAGE
* Sur Emetteur-Récepteur
Accrochez le berceau de fixation avec les vis fournies. N'oubliez pas d'insérer les rondelles
caoutchouc entre le poste et son support afin de mieux fixer le poste et protéger la peinture.
-
NOIR
✦ EMPLACEMENT
-
+
9
✦ L'ANTENNE
A/ L'utilisation d'une antenne 28 Mhz est indispensable. CRT SUPERSTAR distribue une
gamme complète d'antennes magnétiques, à perçage, avec support TOP NIVEAU. Consultez
votre revendeur qui vous indiquera le modèle le mieux adapté pour votre émetteur-récepteur.
B/ Emplacement
MONTAGE TOIT
MONTAGE GOUTTIERE
MONTAGE AVANT AILE
MONTAGE COFFRE
MONTAGE PARE-CHOCS
(pour les voitures munies de pare-chocs métalliques)
Positionnez le câble loin des sources de parasites (allumage, jauges).
ATTENTION à ne pas endommager le câble de votre antenne en l'installant, ce qui pourrait
entraîner des dommages à votre émetteur-récepteur à l'utilisation.
Rayonnement
maximal
Lors du montage d'une antenne au
centre du toit d'un véhicule, les lobes de
rayonnement vertical sont renforcés de
façon similaire vers l'avant et l'arrière
étant donné que les surfaces métalliques de chaque côté de l'antenne sont
identiques.
C/ Réglage du TOS
MICRO
CORDON PL/PL 50 CM
Rayonnement
maximal
Rayonnement
minimal
"Image" électrique de l'antenne
S / RF
SWR 2
3 CAL
SWR
NB / ANL
ANL
PWR
HI
RB
FM
RF
1
3
TX
5
7 9 + 30 dB
CAL
VOLUME
SQUELCH
MIC GAIN
OFF
LOW
RF GAIN
OFF
SWR CAL
AM
OFF
POSTE
TOS METRE
RX
MID
LOW
PULL
PA
HI
BAND
FRANCE
ANTENNE
Avant toute utilisation de votre émetteur-récepteur vous devez impérativement régler votre
antenne à l'aide d'un Tosmètre. Ceci vous permettra d'améliorer sa portée.
10
Pour obtenir un rayonnement maximal, il faut déplacer l'antenne vers l'arrière du véhicule, la plus grande surface métallique devant l'antenne étant
l'avant du véhicule.
"Image" électrique de l'antenne
11
ELEMENTS MODIFIANTS LA PORTEE
DE VOTRE TRANSCEIVER
Ce sont principalement les mêmes éléments que ceux qui améliorent ou limitent les
performances des autres postes AM ou FM dans les véhicules en déplacement.
✦ LE TERRAIN :
Très important !
Celui-ci déterminera la qualité de vos liaisons Transceiver. Le meilleur environnement étant
un terrain plat (plaine ou vallée).
✦ LES CONDITIONS ATMOSPHERIQUES :
Déterminent également la portée de votre Transceiver. En cas d'orage, chute de neige et
brouillard, celle-ci peut être diminuée considérablement.
✦ LES OBSTACLES :
(Parkings couverts, pont, garage, tunnel, forêts, etc…)
Déterminants eux aussi ! La qualité de votre émission et de votre réception Transceiver
dépendra de ceux-ci.
✦ LES PARASITES : Causes et suppression
✦
CONDITIONS DE GARANTIE
Les émetteurs-récepteurs CRT SUPERSTAR sont garantis 1 an pièces et main-d'œuvre. Toute
anomalie de fonctionnement devra être signalée à votre revendeur, qui interviendra ou
l'expédiera à notre service technique pour contrôle.
Les pièces détachées de nos appareils ne font l'objet d'aucun envoi sous garantie.
CRT France - Route de Pagny - 21250 SEURRE déclare que
cet équipement CRT SS 3900 EFT
est en conformité avec l’essentiel
des conditions et d’autres provisions en rapport
avec la directive du R. TTE 1999/5/CE.
Sont exclus de la garantie :
— Les dégâts occasionnés par accidents, chocs, éléments naturels (foudre, orage, électricité
statique) etc…
— Les transistors de puissance (PA)
— Les micros (pastille ou dégradation)
— Les fusibles
— Les mauvaises utilisations :
- antenne mal réglée (tos excessif)
- inversion de polarité
- surtension
- mauvaise connexion
- etc…
reconnues par notre Service Technique.
M. CELESTRANO PHILIPPE
GERANT
LE 26/09/2008
— Les interventions ayant modifiées les normes d'agrément de l'appareil.
PROCEDURE DE RETOUR
AU SAV CRT
E-mail : [email protected]
Web.site : www.crtfrance.com
1/ PORT :
Le port "aller" est toujours à la charge de l'expéditeur. CRT SUPERSTAR refusera tout colis
en port dû.
Le port "retour" : - appareil garanti : port à la charge de CRT SUPERSTAR.
- appareil hors garantie : port inclus dans la facture de réparation, en
contre remboursement à la charge du client.
2/ Tout appareil devra être envoyé accompagné d'une photocopie de la facture d'achat ainsi
que d'une note descriptive du défaut constaté.
Si notre SAV évalue la réparation plus coûteuse que la valeur de l'appareil, celui-ci vous fera
parvenir un devis qui devra lui être retourné accepté ou refusé. Si le devis est refusé, l'appareil sera retourné en port dû.
La prise sous garantie de votre appareil ne sera valable que si CRT SUPERSTAR a reçu
votre BON DE GARANTIE (incluse dans la notice d'utilisation) dans les délais.
14
Ce matériel est importé et distribué en Europe par :
C.R.T. FRANCE INTERNATIONAL S.A.R.L.
Route de Pagny - 21250 SEURRE - FRANCE
Capital de 762 500 euros
Tél. 03 80 26 91 91 - Fax : 03 80 26 91 00
E-mail : [email protected]
Web site : www.crtfrance.com
15
Notes
Notes
SUPERSTAR
®
AM/FM/USB/LSB/CW
AMATEUR MOBILE TRANSCEIVER
WITH BUILT-IN FREQUENCY
COUNTER
TABLE OF CONTENTS
CHAPTER 1
Specifications . . . . . . . . . . . . . . . . . . . . . . . . . . . . . . . . . . . . . . . . . . . . . . .
PAGE
2
CHAPTER 2
Installation . . . . . . . . . . . . . . . . . . . . . . . . . . . . . . . . . . . . . . . . . . . . . . . . .
Location . . . . . . . . . . . . . . . . . . . . . . . . . . . . . . . . . . . . . . . . . . . . . . . . . .
Mounting The Radio . . . . . . . . . . . . . . . . . . . . . . . . . . . . . . . . . . . . . . . . .
Ignition Noise Interference . . . . . . . . . . . . . . . . . . . . . . . . . . . . . . . . . . . .
Antenna . . . . . . . . . . . . . . . . . . . . . . . . . . . . . . . . . . . . . . . . . . . . . . . . . . .
Tuning The Antenna for Optimum SWR . . . . . . . . . . . . . . . . . . . . . . . .
External Speaker . . . . . . . . . . . . . . . . . . . . . . . . . . . . . . . . . . . . . . . . . . . .
3
3
3
4
4
5
6
CHAPTER 3
OWNER’S MANUAL
SUPERSTAR
®
®
et
are registered and protected brands.
Operation . . . . . . . . . . . . . . . . . . . . . . . . . . . . . . . . . . . . . . . . . . . . . . . . . .
Front Panel . . . . . . . . . . . . . . . . . . . . . . . . . . . . . . . . . . . . . . . . . . . . . . . .
Rear Panel . . . . . . . . . . . . . . . . . . . . . . . . . . . . . . . . . . . . . . . . . . . . . . . . .
Procedure to Receive And Transmit . . . . . . . . . . . . . . . . . . . . . . . . . . . . .
Receiving SSB Signals . . . . . . . . . . . . . . . . . . . . . . . . . . . . . . . . . . . . . . .
Alternate Microphone And Installation . . . . . . . . . . . . . . . . . . . . . . . . . .
7
7
10
11
12
14
Conformity certificate . . . . . . . . . . . . . . . . . . . . . . . . . . . . . . . . . . . . . .
17
GENERAL
Model
Frequency Range
Frequency Control
Frequency Stability
Temperature Range
Antenna Impedance
Antenna Connectors
Input Voltage
Size
Weight
SS-3900EFT
28.245 ~ 29.655 MHz
Phase-Lock-Loop (PLL) Synthesizer
0.001%
-30qC to +50qC
50 Ohms
Standard SO-239 type
13.8V DC
7 7/8” (W) x 10 3/4” (D) x 2 3/8” (H)
5.0 lbs.
TRANSMITTER
RF Power Output
Carrier Emission
Spurious Emission
Audio Distortion
Frequency Response
Microphone
AM/FM/CW: 10watts; SSB: 25watts PEP
-50 dB
-50 dB
10%
300 to 2500 Hz
Dynamic
RECEIVER
Sensitivity for 10 dB (S+N)/N
Sensitivity for 20 dB (S+N)/N
Squelch Sensitivity
Image Rejection
AGC Figure of Merit
Audio Power Output
Audio Response
CW/AM : < 1.0 ȝV ; SSB : < 0.25 ȝV
FM : < 0.5 ȝV
< 0.5 ȝV
More than 65 dB
100 mV for 10dB Change in Audio Output
2.5W @ 10% Distortion
300 to 2500 Hz
(SPECIFICATIONS SUBJECT TO CHANGE WITHOUT NOTICE)
IGNITION NOISE INTERFERENCE
Use of a mobile receiver at low signal levels is normally limited by the presence of
electrical noise. The primary source of noise in automobile installation is from the
generator and ignition system in the vehicle. Under most operating conditions, when
signal level is adequate, the background noise does not present a serious problem. Also,
when extremely low level signals are being received, the transceiver may be operated
with vehicles engine turned off. The unit requires very little current and therefore will
not significantly discharge the vehicle battery.
Even though the transceiver has ANL and NB controls, in some installation ignition
interference may be high enough to make good communications impossible. The
electrical noise may come from several sources. Many possibilities exist, as variations
between vehicles require different solutions to reduce the noise.
ANTENNA
A vertically polarized, quarter-wavelength whip antenna provides the most reliable
operation and greatest range. Shorter, loaded-type whip antennas are more attractive,
compact and adequate for applications where the maximum possible distance is not
required. Also, loaded whips do not present the problems of high wind resistant
imposed by a full quarter-wavelength whip.
Mobile whip antennas utilize the metal body of the vehicle as a ground plane. When
mounted at a corner of the vehicle they are slightly directional, in the direction of the
body of the vehicle. For all practical purpose, however, the radiation pattern is nondirectional. The slight directional characteristic will be observed only at extreme
distances. A standard antenna connector (type SO-239) is provided on the transceiver
for easy connection to a standard PL-259 cable termination.
If the transceiver is not mounted on a metal surface, it is necessary to run a separate
ground wire from the unit to good metal electrical ground in the vehicle. When installed
in a boat, the transceiver will not operate at maximum efficiency without a ground plate,
unless the vessel has a steel hull.
Before installing the transceiver in a boat, consult your dealer for information
regarding an adequate grounding system and prevention of electrolysis between fittings
in the hull and water.
If you’re having difficulties in adjusting your antenna, check the following:
a.
b.
c.
d.
e.
f.
All doors must be closed when adjusting the antenna
Make sure the antenna base is grounded.
Check your coaxial cable routing (it may be pinched when routed into the car)
Try a different location in your car (keeping in mind the radiation pattern you wish.)
Is the antenna perfectly vertical?
Try a different location in your neighborhood. Stay away from large metal objects
when adjusting (metal telephone polls or light post, fences, etc.)
CHAPTER 3 OPERATION
FRONT PANEL
NOTE
The transceiver will operate into an SWR of 2 to 1
indefinitely and sustain an SWR of 20 : 1 for a maximum
of 5 minutes at rated operating conditions.
EXTERNAL SPEAKER
The external speaker jack (EXT SP.) on the rear panel is used for remote receiver
monitoring. The external speaker should have 8 ohms impedance and be able to handle
at least 4 watts. When the external speaker is plugged in, the internal speaker is
disconnected.
1. ON/OFF VOLUME CONTROL : This knob controls the volume and power to
the radio. To turn radio on, rotate the knob clockwise. Turning the knob further will
increase the volume of the receiver.
2. SQUELCH CONTROL : This switch is used to eliminate background noise being
heard through the receiver which can be disturbing when no transmission are being
heard through the received. To use this feature, turn the switch fully
counterclockwise and then turn clockwise slowly until the background noise is just
eliminated. Further clockwise rotation will increase the threshold level which a
signal must overcome in order to be heard. Only strong signal will be heard at a
maximum clockwise setting.
3. MIC GAIN CONTROL : Adjust the microphone gain in the transmit modes. This
controls the gain to the extent that full talk power is available several inches away
from the microphone.
4. RF GAIN CONTROL : This control is used to reduce the gain of the RF amplifier
under strong signal conditions.
6
7
5. E-TONE CONTROL : This control is used to control the echo effects.
6. RF POWER CONTROL : This control enables adjustment of RF power output
continuously up to the rated output power. 1 to 25 Watts (AM : 1W to 10W - SSB : 10W to 25W)
7. BAND SELECTOR : This band selector allow the user to select the desired band.
8. MODE CONTROL : This control allows you to select one of the following
operating modes : CW/FM/AM/USB/LSB.
9. FINE/COARSE CONTROL : Allows variation of the receive operating
frequency above or below the assigned frequency. Although this control is intended
primarily to tune in SSB/CW signals, it may be used to optimize AM/FM signals as
described in the Operating Procedure paragraphs. Coarse operates both TX/RX but
Fine only in RX.
19. ROGER BEEP : When this switch is placed in the ROGER BEEP position, the
radio automatically transmits an audio tone at the end of your transmission. This
indicates the end of your transmission so that people who are having trouble
hearing you will know that you are done speaking. As a courtesy to others, use the
Roger Beep only when necessary.
20. +10KHz SWITCH : In the +10KHz position, the transmit and receive frequency is
shifted 10 KHz up.
21. CHANNEL DISPLAY : The channel display indicates the current selected
channel.
10. CHANNEL SELECTOR : This control is used to select a desired transmit and
receive channel.
11. MICROPHONE JACK : Used to connect microphone for voice source.
12. FRONT PANEL METER : The Front Panel Meter allows the user to monitor
signal strength, RF output power and SWR level.
13. TX/RX LED : The red LED indicates the unit is in the transmit mode. The green
LED indicates the unit is in the receive mode.
14. FREQUENCY COUNTER : This frequency counter indicates the selected
channel frequency digitally.
15. TALKBACK SWITCH : This switch is used to monitor the sound feedback
effects.
16. HI/LOW SWITCH : This switch select HI or LOW band of operation.
17. NB/ANL/OFF SWITCH : When the switch is place in the NB/ANL position, the
RF Noise Blanker (NB) and the Automatic Noise Limiter (ANL) in the audio
circuits are activated. The Noise Blanker is very effective in eliminating repetitive
impulse noise such as ignition interference.
18. S-RF/SWR/ SWITCH : In the S-RF position, the meter swings proportionally to
the strength of the received signal. When transmitting, the meter indicates relative
RF output power. When in the SWR position, the standing wave ratio is measured.
8
9
REAR PANEL
PROCEDURE TO RECEIVE AND TRANSMIT
A. MICROPHONE
The receiver and transmitter are controlled by the push-to-talk switch on the
microphone. Press the switch and the transmitter is activated, release switch to receive.
When transmitting, hold the microphone two inches from the mouth and speak clearly
in a normal voice. This transceiver comes complete with a low impedance dynamic
microphone.
- DC 13,8V +
B. PROCEDURE TO RECEIVE
1. Be sure that power source, microphone and antenna are connected to the proper
connectors before going to the next step.
2. Turn VOL knob clockwise to apply power to the radio.
3. Set the VOL for a comfortable listening level.
1. ANTENNA : This jack accepts 50 ohms coaxial cable with a PL-259 type plug.
2. DC POWER : This accepts 13.8V DC power cable with built-in fuse. The power
cord provided with the radio has a black and red wire. The black goes to negative
and red goes to positive.
4. Set the MODE switch to the desired mode.
5. Listen to the background noise from the speaker. Turn the SQ knob slowly
clockwise until the noise just disappears. The SQ is now properly adjusted. The
receiver will remain quiet until a signal is actually received. Do not advance the
control too far or some of weaker signals will not be heard.
6. Set the CHANNEL selector switch to the desired channel.
3. EXT. SP : This jack accepts 4 to 8 ohms, 5 watts external speaker. When the
external speaker is connected to this jack, the built-in speaker will be disabled.
7. Set the RF GAIN control fully clockwise for maximum RF gain.
4. CW. KEY : This jack is for Morse Code operation. To operate, connect a CW Key
to this jack and place the Mode Control in the CW position.
8. Adjust the FINE/COARSE control to clarify the SSB/CW signals or to optimize
AM/FM signals.
C. PROCEDURE TO TANSMIT
1. Select the desired channel of transmission
2. Set the MIC GAIN control fully clockwise.
3. If the channel is clear, depress the push-to-talk switch on the microphone and speak
in a normal voice.
10
11
RECEIVING SSB SIGNALS
There are four types of signals presently used for communications in the Citizens
Band : FM, AM, USB and LSB. When the MODE switch on your unit is placed in the
AM position, only standard double-side band and in FM position, only frequency
deviation, full carrier signals will be detected. An SSB signal may be recognized while
in the AM or FM mode by its characteristic "Donald Duck" sound and the inability of
the detector to produce an intelligible output. The USB and LSB modes will detect
upper side band and lower side band respectively, and standard AM signals.
SSB reception differs from standard AM reception in that an SSB receiver does not
require a carrier or opposite side band to produce an intelligible signal. A single-side
band transmitted signal consists only of the upper or the lower side band and no carrier
is transmitted. The elimination of the carrier from the AM signal helps to eliminate the
biggest cause of whistles and tones heard on channels which make even moderately
strong AM signals unreadable. Also, SSB takes only half the space of an AM channel,
therefore two SSB conversations will fit into each channel, expanding the 40 AM
channels to 80 SSB channels. The reduction in channel space required also helps in the
receiver because only half of the noise and interference can be received with 100% of
the SSB signal.
Once the desired SSB mode has been selected, frequency adjustment may be
necessary in order to make the incoming signal intelligible. The FINE/COARSE control
allows the operator to vary frequency above or below the exact frequency of the
channel. If the sound of the incoming signal is high or low pitched, adjust the operation
of the FINE/COARSE.
Consider it as performing the same function as a phonograph speed control. When the
speed is set too high, voices will be high-pitched and if set too low, voice will be lowpitched. Also, there is only one correct speed that will make a particular record produce
the same sound that was recorded. If the record is played on a turntable that is rotated in
the wrong direction (opposite side band) no amount of speed control (FINE/COARSE)
will produce an intelligible sound.
An AM signal received while listening in one of the SSB modes will produce a steady
tone (carrier) in addition to the intelligence, unless the SSB receiver is tuned to exactly
the same frequency by the FINE/COARSE control. For simplicity, it is recommended
that the AM modes be used to listen to AM signals.
An SSB signal may be received only when the listening receiver is functioning in the
same mode. In other words, an upper side band signal (USB) may be made intelligible
only if the receiver is functioning in the USB position.
If a lower side band (LSB) signal is heard when the receiver is in the USB mode, no
amount of tuning will make the signal intelligible. The reason for this may be
understood if you consider that when the modulation is applied to the transmitter's
microphone in the USB mode, the transmitter output frequency is increased whereas in
the LSB mode the transmitter's output frequency is decreased.
The result in listening to the receiver is that when the MODE switch is in the proper
position (either USB or LSB), a true reproduction of a single tone of modulation will
result, and if the tone is increased in frequency (such as a low-pitched whistle or a highpitched whistle) you will hear the increase in the output tone of the receiver. If the
incorrect mode is selected, an increase in tone of a whistle applied to the transmitter
will cause a decrease in the resultant tone from the receiver.
Thus when a voice is used in place of a whistle or tone, in the proper listening mode
the voice will be received correctly whereas in the incorrect mode, the voice will be
translated backwards and cannot be made intelligible by the FINE/COARSE control.
When listening to an AM transmission, a correct side band is heard in either mode since
both upper and lower side bands are received.
12
13
ALTERNATE MICROPHONES AND INSTALLATION
For best results, the user should select a low-impedance dynamic type microphone or
a transistorized microphone. Transistorized type microphones have low output
impedance characteristics. The microphones must be provided with a four-lead cable.
The audio conductor and its shielded lead comprise two of the leads. The third lead is
for transmit control and fourth is for receiving control.
The microphone should provide the functions shown in schematic below.
4 WIRE MIC CABLE
Pin Number
Mic Cable Lead
1
Audio Shield
2
Audio Lead
3
Transmit Control
4
Receive Control
Fig. 1 Your transceiver microphone schematic.
If the microphone to be used is provided with precut leads, they must be revised as
follows.
1. Cut leads so that they extend 7/16" beyond the plastic insulating jacket of the
microphone cable.
2. All leads should be cut to the same length. Strip the ends of each wire 1/8" and tin
the exposed wire.
Before beginning the actual wiring, read carefully the circuit and wiring information
provided with the microphone you select. Use the minimum heat required in soldering
the connections. Keep the exposed wire lengths to a minimum to avoid shorting when
the microphone plug is reassembled.
the back of the plug. Before soldering the wire to the pins, pre-tin the wire
receptacle of each pin of the plug.
CRT FRANCE – Route de Pagny – 21250 SEURRE
declare that this equipment CRT SS 3900 EFT
is in correspondence with the main part of the conditions
and the other provisions in touch with the directive of R.TTE 1999/5/CE.
Fig. 3 Microphone plug pin numbers viewed from rear of pin receptacle.
6. Be sure that the housing and the knurled ring of Figure 2 are pushed back onto the
microphone cable before starting to solder. If the washer is not captive to the pin
receptacle body, make sure that it is placed on the threaded portion of the pin
receptacle body before soldering.
7. If the microphone jack is used to hold the pin receptacle during soldering operation,
best results are obtained when the connections to pin 1 and 3 are made first and
then the connections to pins 2 and 4. Use a minimum amount of soldering and be
careful to prevent excessive solder accumulation on pins, which could cause a short
between the pin and the microphone plug housing.
M. CELESTRANO PHILIPPE
MANAGER
LE 09/26/2008
E-mail : [email protected]
Web.site : www.crtfrance.com
8. When all soldering connections to the pins of the microphone are completed, push
the knurled ring and the housing forward and screw the housing onto the threaded
portion of the pin receptacle body. Note the location of the screw clearance hole in
the plug housing with respect to the threaded hole in the pin receptacle body. When
the housing is completely threaded into the pin receptacle body, a final fraction of a
turn either clockwise or counterclockwise may be required to align the screw hole
with the threaded hole in the pin receptacle body. When these are aligned, the
retaining screw is then screwed into place to secure the housing to the pin
receptacle body.
This material is imported and distributed in Europe by :
9. The two cable clamp retainer screws should now be tightened to secure the housing
to the microphone cord. If the cutting directions have been carefully followed, the
cable clamp should secure to the insulation jacket of the microphone cable.
10. Upon completion of the microphone plug wiring, connect and secure the
microphone plug in the transceiver.
16
C.R.T. FRANCE INTERNATIONAL S.A.R.L.
Route de Pagny - 21250 SEURRE - FRANCE
Capital 762 500 euros
Tél. +33 (0)3 80 26 91 91 - Fax : +33 (0)3 80 26 91 00
E-mail : [email protected]
Web site : www.crtfrance.com
17
Notes
Notes
Notes
FRANCE
SUPERSTAR
Nom :
.............................................................................
Adresse :
Bon de Garantie
à conserver
Prénom :
...................................................
..............................................................................................................................................................
............................................................................................................
Date d'achat :
Type :
Tél. :
...............................................................
...............................................................................................................................................
..........................................................................................................................................................................
Série N°
Sans le Cachet du Distributeur,
la garantie sera nulle.
®
....................................................................................................................................................................
APPAREIL GARANTI 1 AN PIECES ET MAIN D'ŒUVRE
Cachet du Distributeur
✄
POUR LA VALIDITE DE VOTRE GARANTIE
Bon de Garantie
à découper et à retourner sous
enveloppe
dans un délai maximum de 15
jours après la date d'achat
à l'adresse suivante :
Nom :
.............................................................................
Adresse :
...................................................
..............................................................................................................................................................
............................................................................................................
Date d'achat :
Type :
Prénom :
Tél. :
...............................................................
...............................................................................................................................................
..........................................................................................................................................................................
Série N°
....................................................................................................................................................................
APPAREIL GARANTI 1 AN PIECES ET MAIN D'ŒUVRE
C.R.T. SUPERSTAR
DÉPARTEMENT GARANTIE
ROUTE DE PAGNY
21250 SEURRE
FRANCE
Cachet du Distributeur
Sans le Cachet du Distributeur, la garantie sera nulle.