1
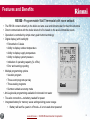
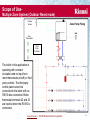
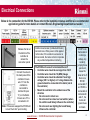
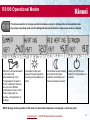
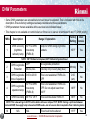
Condensing Boiler
RS100 Controller Training Program
Training Program #501102A –
062311
www.rinnai.us • © 2009 Rinnai America Corporation
Features and Benefits
RS100 –Programmable Wall Thermostat with room setback
•
•
•
•
•
•
•
•
The RS100 connects directly to the boiler and acts as a central thermostat for the entire structure
Direct communication with the boiler allows it to fire based on the area’s immediate needs
Operation is controlled by simple rotary push button technology
Digital display (with backlight):
• Fahrenheit or Celsius
• Ability to display outdoor temperature
• Ability to display supply temperature
• Ability to display system pressure
• Indication of operating capacity (% of Btu)
• Error and warning reporting
Multiple programming options
• Vacation program
• Three event programs per day
• Three weekly programs
• Summer setback economy mode
Anti-Legionella programming available for domestic hot water
Two-wire connection—no battery needed for power
Integrated battery for memory saves settings during power outage
• Battery will last five years in off mode—it is not used when powered
www.rinnai.us • © 2009 Rinnai America Corporation
2
Scope of Use
Applications for the RS100 Room controller
The RS100 is a room controller and not an on/off room thermostat. It is intended to work only
with Rinnai boilers. When used in conjunction with a Rinnai boiler it will sense the room
temperature and use it to influence the supply water temperature. This will allow less cycling of
the boiler and a more efficient installation. The RS100 is designed to control a single circuit of
heating.
There are two basic applications for the RS100:
• In single zone systems, as a remote boiler display with influence from the room or area where the controller
is installed
• This can be done with only room influence and no outdoor reset influence
• Since the RS100 is constantly reporting room conditions to the boiler, the boiler can still modulate
effectively—constant outdoor temperature reporting is not needed for normal operation (it is still beneficial
for freeze protection)
• The RS100 should be installed in the coldest room
• In multiple zone systems, as a remote boiler display only with no room influence from the controller
• This can be done with or without the room temperature displayed
• This would be considered a 100% outdoor reset boiler where the pump runs continuously and the load is
based solely on the outside temperature
• The RS100 can be installed in any room in this application
www.rinnai.us • © 2009 Rinnai America Corporation
3
Scope of UseSingle Zone System (RC mode)
The RS100 can be used to
control a single heating zone
system. A single heating zone
system has only one loop of
heating. The placement of
the RS100 is very important;
it must be placed in the
coldest room within the single
zone system. If the RS100 is
not placed in the coldest room
there is a chance that the
room will not receive enough
heat and therefore not be
comfortable. The RS100
needs no additional installer
level programming to work for
this installation.
www.rinnai.us • © 2009 Rinnai America Corporation
4
Scope of UseMultiple Zone System (Outdoor Reset mode)
If multiple zones are used, it is
likely not beneficial to have a
single zone controlling the
boiler’s demand. The RS100
can be used where its room
information does not influence
the boiler’s demand. Its clock
functions are still active as
well as the ability to adjust a
theoretical temperature for
comfort.
Outdoor
Sensor
Zone Valve Piping
Zone
Thermostats
Third
Party
Controller
In this application, the RS100 will allow
the boiler to switch between day and
night outdoor reset curves. The boiler is
then operating with constant circulation
and no input from room thermostats
(on/off) or third party controls. In this
application, a third party relay panel
should be used to control pumps or
zone valves. The panel cannot be
connected to the boiler with an RS100
also connected. Boiler thermostat
terminals 22 and 23 are inactive when
the RS100 is connected.
www.rinnai.us • © 2009 Rinnai America Corporation
5
Scope of UseMultiple Zone System (Outdoor Reset mode)
Outdoor
Sensor
Zone Pump Piping
Zone
Thermostats
Third
Party
Controller
The boiler in this application is
operating with constant
circulation and no input from
room thermostats (on/off) or third
party controls. The third party
control panel cannot be
connected to the boiler with an
RS100 also connected. Boiler
thermostat terminals 22 and 23
are inactive when the RS100 is
connected.
www.rinnai.us • © 2009 Rinnai America Corporation
6
INSTALLATION
BASICS
THIS IS AN OVERVIEW ONLY—PLEASE REFER TO EACH BOILER OR CONTROLLER
INSTALLATION MANUAL THAT IS SHIPPED WITH THE PRODUCT FOR THE MOST UP TO DATE
INFORMATION. CONTACT RINNAI TECHNICAL SUPPORT IF NEEDED
www.rinnai.us • © 2009 Rinnai America Corporation
7
Electrical Connections
Below is the connection for the RS100. Please refer to the installation manual and Rinnai’s recommended
application guide for more details or contact Rinnai’s Engineering Department as needed
Release the tab at
the bottom of the
controller to
access the
connection points
Connect the wires to
the back panel of the
controller. Ensure
wire ―A‖ from the
controller is
connected to
terminal 20 (wire
―A‖) on the Boiler.
Ensure wire ―B‖ is
connected to 21.
Note: If these are swapped the RS100 will
not exit ―Auto Set‖ upon booting.
Outdoor reset sensor (included with boiler)
connects here. When power is first applied
to the boiler, if the outdoor reset sensor is
not connected, the boiler will not incorporate
any outdoor temperature monitoring
The RS100 will connect to terminals 20 and 21
• Controller wire should be no longer than 164 ft
• Controller wire should be 18 (AWG) Gauge
• Controller wire should be shielded if near high
voltage (120 V or higher) or if a long distance-the
ground should be connected at the boiler (not at
the controller)
• Mount the controller in the coldest area of the
structure
• Do not mount in direct sun
• Do not mount too close to a heat emitter (where
the emitter could falsely influence the controller)
• Do not mount near lighting that could falsely
influence the controller
www.rinnai.us • © 2009 Rinnai America Corporation
On/Off room
thermostat or
control (no
voltage, dry
contact),
jumping these
points will
cause the
boiler to fire if
there is no
RS100
connected. If
an RS100 is
connected at
terminals 20
and 21, the
boiler will
ignore these
terminals.
8
BASIC
OPERATION
THIS IS AN OVERVIEW ONLY—PLEASE REFER TO EACH BOILER OR CONTROLLER
INSTALLATION MANUAL THAT IS SHIPPED WITH THE PRODUCT FOR THE MOST UP TO DATE
INFORMATION. CONTACT RINNAI TECHNICAL SUPPORT IF NEEDED
www.rinnai.us • © 2009 Rinnai America Corporation
9
RS100 Power-on Initialization
RS100 – Display during initialization
The following sequence will occur every time power is reset or the “reset” button on the boiler is pressed
This process takes about 30 seconds
A display test
will occur where
all characters
are illuminated
The selected language will
display.
“GB” = English
The current
software version
will display
(Version 2.3 is
current as of
10/09)
Auto set will display for
a few seconds. NOTE:
If the A and B wires are
reversed from the
controller to the boiler,
the controller will not
exit this page
www.rinnai.us • © 2009 Rinnai America Corporation
10
If factory defaults are restored to
the controller, this should be
changed to ―GB‖
Pressing the dial will exit the
language display quicker
RS100 Navigation Overview
After entering a chapter or display, any
setting available to change will be flashing.
A new setting can then be ―dialed in‖
Pressing the rotary button will save the new
setting
THR 26MAR ’09
8:05
69º
Turning the dial will move to other settings
that can be altered on that page
Pressing the Information button will move
to the previous page
Continually pressing the information
button will ultimately move back to the
operation page
www.rinnai.us • © 2009 Rinnai America Corporation
11
RS100 Display Overview
RS100 – Normal Operation Display
Current heating
mode
24 hour clock with status bar indicating operating times during
current day (currently operating between 6-8 am and 4-10 pm)
=daytime heating
mode
Day, Date, Month,
Year (currently
Monday, 22nd of
August, 2005)
=nighttime
(setback) heating
mode
=summer switch off
activated
III
Room or boiler (T1)
operating temp in
Celsius or Fahrenheit
=frost protection
activated
I =If multiple time
programs are
enabled (P1-P3),
this clock with I, II,
or III will indicate
which program is
currently selected
Time
(24 hour clock)
Status bar indicating current operating mode (currently
indicating boiler is operating in timer mode)
www.rinnai.us • © 2009 Rinnai America Corporation
12
RS100 Operational Modes
This allows selection of unique operational modes-a cursor is displayed above the selected mode.
Any unique operating mode and its settings will be cancelled when a new unique mode is selected.
Vacation mode-Heating will
be inactive until the specified
date (this example is
September 24).At 0:00
(midnight) on this date,
operation will resume. This
can be set 250 days in
advance. DHW operation is
set to freeze protection
(100°F default).
Absent / Economy setbackHeating will be inactive until
specified time (this example is
10:27 am). This can be set
between 0.5-24 hours OR if P1
is selected, heating will resume
at the ON point of the next
heating event.
Party mode-Heating will
remain in operation until
specified time (this example
is 10:27 am). This can be
set between 0.5-24 hours
OR if P1 is selected, heating
will resume at the ON point
of the next heating event.
Operating Times-Heating
and DHW will operate based
on the times and
temperatures set in the
―Timeprograms‖ chapter. If
P1-P3 is selected, there will
be up to three different
schedules to select.
NOTE: While in these modes, a brief press of the dial will allow
immediate temperature adjustment.
NOTE: During normal operation in RC mode, the area/room temperature is displayed—not the set point.
www.rinnai.us • © 2009 Rinnai America Corporation
13
RS100 Operational Modes
This allows selection of unique operational modes-a cursor is displayed above the selected mode.
Any unique operating mode and its settings will be cancelled when a new unique mode is selected.
DHW only will operate based
on the times and
temperatures set in the
―Timeprograms‖ chapter. If
P1-P3 is selected, there will
be up to three different
schedules to choose. In this
mode, heating will not
operate—frost protection is
enabled.
Continuous heating and
reduced hot water operation
according to temperature set
points
Continuous reduced heating
and reduced hot water
operation according to set
back temperature set point
Heating and DHW are in
standby. Frost protection is
enabled.
NOTE: During normal operation in RC mode, the area/room temperature is displayed—not the set point.
www.rinnai.us • © 2009 Rinnai America Corporation
14
RS100 User Buttons
Outdoor reset curve adjustment
(K-Factor)
212
Default setting is 1.50
NOTE: If set to RC mode, adjusting this
value will not have any effect on the
controller or boiler.
Example: If outdoor design temp is 14°F and
max boiler supply is set to 122°F (perhaps
for in-floor heating), a value of 1.00 should
be entered here.
176
Boiler Temperature (F)
This button adjusts the relation of boiler
temperature to outside temperature. Ideally
the slope should create an intersection
between maximum boiler temperature and
outdoor design temperature (climate zone
temperature)
194
If the user wants to adjust this (because the
area does not seem to heat well) it should be
done in increments of 0.10 every 2 days to
allow the boiler time to adjust to the changes.
158
Max boiler
temp is
176°F
140
122
104
86
68
68
61
54
46
39
32
1814 10
Outside Temperature (F)
www.rinnai.us • © 2009 Rinnai America Corporation
25
3
-4
15
RS100 User Buttons
Information
display
Briefly pressing this button displays the following information
(turning the dial clockwise will advance to the next reading):
• Outside—displays current outside temperature reading from the outdoor reset sensor
• Pressing the dial will show the average temperature over the last 24 hour period
• Out. Min/Max—displays the low and high temperatures recorded over the last 24 hour period
• NOTE: Outside information will not display if there is not an outside sensor (T4)
• Heat Gener.—displays the current boiler supply water temperature (T1)
• Pressing the dial will show the average temperature over the last 24 hour period
• Modulation—Shows percentage of modulation when boiler is in operation
• Hydrau. Press—displays current pressure in Bar as detected by the boiler pressure sensor (P1)
• To convert to PSI multiply by 14.7
• DHW—displays temperature of DHW sensor (T3). If no DHW sensor is in use display will indicate ―OFF‖ or if
an ON/OFF type sensor is used for an indirect tank display will indicate that sensor’s current state (ON/OFF)
• Pressing the dial will show the current temperature set point
• Combi models will not display this temperature as it is controlled internally.
• Room temp HC—displays current room temperature
• Pressing the dial will show the average temperature over the last 24 hour period
• Auto-P1 Day DHW; and,
• Auto-P1 Day HC—Both of these will display the following for heating or DHW
• Operational mode: Auto, Holiday, Absence, Party, etc
• P1 indicates the current program. This will not show if P1-P3 is not activated
• Boiler status: ON indicates the pump (and diverter valve) is servicing this side of the system (DHW or HC)
NOTE: Holding the Info button for 3 seconds will allow adjustment of the time these values will display (0.5-10
minutes). OFF will allow the display to follow the System setting (default 2 minutes).
www.rinnai.us • © 2009 Rinnai America Corporation
16
RS100 User Buttons
Daytime room
temperature setting
Briefly pressing this button displays current daytime area (room) set
point. Turning the dial will adjust this value. The dial must then be
pressed to enter the new value
Nighttime room
temperature setting
Briefly pressing this button displays current nighttime area (room)
set point. Turning the dial will adjust this value. The dial must then
be pressed to enter the new value
DHW temperature
setting
After entering the correct
menu, dial in the correct
setting then press the
rotary button to save
Briefly pressing this button displays current DHW set point. Turning
the dial will adjust this value. The dial must then be pressed to
enter the new value
www.rinnai.us • © 2009 Rinnai America Corporation
17
RS100 User Buttons-Shortcuts
Pressing and holding the following buttons for three seconds will immediately display the following.
Operational mode is changed back to Auto.
Programmed timers will take effect
Operational mode is changed to Party. A value will be
displayed and available to change if needed.
Operational mode is changed to Absent/Economy . A
value will be displayed and available to change if needed.
After entering the correct
menu, dial in the correct
setting then press the
rotary button to save
Operational mode is changed to a one-time hot water boost while in
setback. This value can be adjusted from 0.5 to 240 minutes. When the
boost time or day time DHW temperature is reached, DHW is maintained
again at the setback temperature.
www.rinnai.us • © 2009 Rinnai America Corporation
18
USER
AND
INSTALLER SETTINGS
THIS IS AN OVERVIEW ONLY—PLEASE REFER TO EACH BOILER OR CONTROLLER
INSTALLATION MANUAL THAT IS SHIPPED WITH THE PRODUCT FOR THE MOST UP TO DATE
INFORMATION. CONTACT RINNAI TECHNICAL SUPPORT IF NEEDED
www.rinnai.us • © 2009 Rinnai America Corporation
19
Parameter Access
There are two levels of access for making parameter changes:
• The user level allows clock and timer changes and basic system changes
• To access this level, hold the rotary dial for approximately 3 seconds
Hold the rotary dial for 3
seconds for consumer level
parameter access
• The installer level allows access for all pertinent parameters
• To access this level, hold the heating and DHW buttons imultaneously
for approximately 3 seconds
• Code access will then display—using the dial to enter each digit, enter
code ―1234‖
• Installer access is then granted:
• At this point, repeat the user level access
procedure to enter the parameter menus--with
this code, user level and installer level will be
accessible
• After 2 Minutes of inactivity, these menus will be
exited automatically (this value can be changed)
Hold the heating
and DHW buttons
simultaneously for
3 seconds for
installer level
access
www.rinnai.us • © 2009 Rinnai America Corporation
20
Parameter Chapters
Once in the parameter menu, there are eight chapters that allow specific adjustments. Some
parameters (or whole chapters) may only be accessible from the installer level access:
• TIMEPROGRAMS—Allows changes to individual time programs
• This entire section can be accessed by the user
• HYDRAULIC—Allows changes to heating and DHW pump assignments
• This chapter is not available at the consumer level
• SYSTEM—Allows changes to general system parameters
• DHW—Allows changes to DHW parameters (excluding time programs)
• This chapter is not available on combi models or if there is no sensor at terminals 16
and 17 (DHW priority)
• UNMIXED CIRCUIT—Allows changes to the heating only parameters (excluding time
programs)
• ALARM—Allows display of last five errors
• This chapter is not available at the consumer level
• SENSOR ADJUSTMENT—Allows calibration of the RS100 temperature sensor
• This chapter is not available at the consumer level
• TIME / DATE—Allows changes to current time and date
www.rinnai.us • © 2009 Rinnai America Corporation
21
Time Programs
• When entering the Time Program chapter, timers for only heating (HC) or only DHW
(DHW) can be selected
• Up to three events per day can be selected with a unique temperature (in Farhenheit or
Celsius)
• By default HC has one daily event from 6 am-10 pm
• By default DHW has one daily event from 5 am-10 pm
• Outside of these times, the setback temperature will be observed if no other events are
added
• By default HC will observe the nighttime outdoor reset curve or room setback temp
of 61°F depending on which type of application (Outdoor Reset mode or RC)
• By default DHW will maintain 100°F (this is adjustable)
• If a second or third event is added, the day and ―2‖ or ―3‖ will display
• ―3‖ will not display until a second event is entered
• ―2‖ or ―3‖ will not display if the previous event ends at 24:00 (midnight)
www.rinnai.us • © 2009 Rinnai America Corporation
22
Time Programs-Copy Feature
• After setting one day’s time events, they can be copied in several different ways:
• From one day to another
To copy:
• Enter the ―TIMEPROGRAMS‖
• Select ―HC‖ or ―DHW‖
• From one day to Monday through Friday (1-5)
• Dial the rotary button
backwards (CCW) one click
• The copy feature will be visible
• From one day to Saturday and Sunday (6-7)
• From one day to the entire week (1-7)
www.rinnai.us • © 2009 Rinnai America Corporation
23
Hydraulic Parameters
• Hydraulic parameters should very rarely be adjusted
• Hydraulic parameters are only available with the installer code (1234)
PARA
Description
Range / Explanation
OFF
2
DHW assignment
1
5
Disables DHW recognition (Any DHW
features, info, etc will not display). It is not
a requirement to set this to OFF if there is
not DHW
1
Enables DHW recognition
OFF
Disables central heating circuit (never set
this to OFF)
2
Enables central heating circuit recognition
6
Constant control-this forces the boiler to
operate at the max temperature—set at
Para 12 in the Unmixed Circuit Chapter.
This could reduce efficiency and comfort.
(This is not recommended)
Unmixed (heating)
circuit assignment
Factory
Setting
www.rinnai.us • © 2009 Rinnai America Corporation
2
24
System Parameters
• Some System parameters are accessible but should never be adjusted. This is indicated
with N/A at the description. Ensure factory settings are always maintained at these
parameters
• System parameters that are available at the user level are indicated below
PARA
Description
1
Language
2
Number of
enabled time
programs
3
Separate
operational
mode control
of CH/DHW
Range / Explanation
D-German, F-French, I-Italian, GB-English
Rinnai controllers are programmed to English
NOTE: GB = Default at shipment D=Default at System
Reset
P1
Only one time program enabled
P1P3
Three time programs enabled-This would be
applicable for a user that worked rotating shifts, etc
1
2
Common adjustments for CH and DHW
Factory
Setting
User
Access
GB
Yes
P1
Yes
1
Yes
Separate adjustments for CH and DHW-If this is
selected, the operational mode will first ask for CH
or DHW before entering a specific operational
mode. Under normal operation the status bar for
operational mode will not be visible
www.rinnai.us • © 2009 Rinnai America Corporation
25
System Parameters (continued)
PARA
Description
4
Summer
setback
temperature
5
9
10
System frost
protect
Climate
Zone
Building
construction
Range / Explanation
OFF
Factory
Setting
User
Access
68°F
Yes
37°F
No
10°F
No
1
No
No summer setback
System frost
setting (Para
5) to 86°F
When the outdoor sensor detects the
selected temperature, the heating side of
the boiler will not operate
OFF
No function
-4°F to
Summer
setback
(Para 4)
When the outdoor sensor detects the
selected temperature, pump circulation
will begin. This overrides parameter 23 in
the boiler.
-4°F to 68°F
Outdoor design temperature-this is
determined by the geography of the
installation. This overrides parameter 7
inside the boiler. It is not needed when the
RS100 is in RC mode.
1
Light Construction
2
Medium Construction
3
Heavy (Tight) Construction
NOTE: Light Construction = default at shipment, medium = default at system reset; This parameter does not
have an effect if in RC mode
www.rinnai.us • © 2009 Rinnai America Corporation
26
System Parameters (continued)
PARA
Description
11
Time to
return to
normal
display
13
N/A
Range / Explanation
OFF
0.5 to 5
minutes
OFF-ON
Factory
Setting
User
Access
2
minutes
Yes
OFF
No
No automatic return
Time before controller will return to its
normal operating screen (from point of no
activity
This should not be altered
When entering this parameter, ―SET‖ will appear. Holding the dial for
5 seconds will cause the controller to re-initialize. Default settings
will be loaded based on the controller’s current access level.
Example: At the User Level, only parameters accessible by the user
are reset
Reset
Reset to
factory
values
Yes
• Time and date will not be reset
• Language will default to German, GB must be set at initialization
for English
www.rinnai.us • © 2009 Rinnai America Corporation
27
DHW Parameters
• Some DHW parameters are accessible but should never be adjusted. This is indicated with N/A at the
description. Ensure factory settings are always maintained at these parameters
• DHW parameters that are available at the user level are indicated below
• This chapter is not available on combi boilers or if there is no sensor at terminals 16 and 17 (DHW priority)
PARA
Description
1
DHW economy
(nighttime
setback) temp
Range / Explanation
50°F to DHW
max temp
(PARA 6)
Temp for DHW during night time
setback.
Factory
Setting
User
Access
100°F
Yes
Monday
Yes
NOTE: 100°F=Default at shipment, 68°F=Default at System Reset
2
DHW Legionella
Protection
OFF
No Legionella protection
Mo-Su, ALL
One day only or every day (ALL)
3
DHW Legionella
time of operation
0:00 to 23:00
This is not available if PARA 2 is
OFF
2:00
(am)
No
4
DHW Legionella
operation temp
50°F to DHW
max temp
(PARA 6)
This is not available if PARA 2 is
OFF. Do not adjust lower than
140°F
149°F
No
6
DHW max temp
68°F to 176°F
This overrides boiler PARA 31.
149°F
No
NOTE: This value will go to 203°F but the boiler will never eclipse 176°F; NOTE: During a split load between
heat and DHW, the supply temp is based on DHW needs—do not use on direct-coupled in-floor radiant systems
16
N/A
N/A
This should not be altered
www.rinnai.us • © 2009 Rinnai America Corporation
131°F
Yes
28
Unmixed (HC) Circuit Parameters
• Some HC parameters are accessible but should never be adjusted. This is indicated with
N/A at the description. Ensure factory settings are always maintained at these parameters
• HC parameters that are available at the user level are indicated below
PARA
1
Description
Type of reduced
(night time
setback)
operation
Range / Explanation
ECO
RED
2
Do not use
1.00-10.00
Economy-HC is off unless outdoor
freezing temperature is detected. The
heating system therefore will not
operate unless this freezing threshold
temperature is detected
Factory
Setting
User
Access
RED
Yes
1.3
No
Reduced-HC will operate on the night
time heating curve (recommended)
Do not use
www.rinnai.us • © 2009 Rinnai America Corporation
29
Unmixed (HC) Circuit Parameters (continued)
PARA
3
Description
Controller
application
type
(Outdoor
reset or RC
mode)
Range / Explanation
OFF
Outdoor reset mode: The RS100 doesn’t use the
room temp for operation. Boiler supply temp is
displayed (pressing the dial displays room temp).
1
Room Control/RC Mode: Controller fully enabled
(recommended)
3
Outdoor reset mode: The RS100 doesn’t use the
room temp for operation but it will be displayed
Factory
Setting
User
Access
1
Yes
If OFF or 3 is selected the boiler’s pump continuously operates. The boiler will fire based on the outside sensor.
NOTE: 1=Default at shipment, 3=Default at System Reset
4
Controller
effect type
(Parameter 3
must be set
to 1)
OFF
The boiler’s pump continuously operates. The
boiler will fire based on the outside sensor. Boiler
supply temp is displayed.
10500%
Do not use these settings
RC
Yes
OFF
Yes
The boiler will operate based only on the
RS100’s area temperature sensor
RC
NOTE: RC=Default at shipment, OFF=Default at System Reset
5
N/A
OFF
/ON
This should not be altered
www.rinnai.us • © 2009 Rinnai America Corporation
30
Unmixed (HC) Circuit Parameters (continued)
PARA
6
8
Description
Inrush
optimization
Room frost
protection
Range / Explanation
OFF
Not active
1-8
hours
The amount of time the boiler will allow itself to
operate before a heating event begins in order to
be at the desired temperature of that event.
NOTE: This value is the allowed time to
operate—the boiler may not use the entire value
OFF
Not active
4186°F
If in vacation or economy/absent mode, or if
ECO is selected at PARA 1, the boiler will fire if
this temp is detected by the RS100 (in the room).
Factory
Setting
User
Access
OFF
Yes
50°F
No
NOTE: If the RS100 is set for outdoor reset mode (PARA 3=OFF or 1, PARA 4=OFF), a modem-driven
switch can be placed in parallel with the outdoor sensor. When this switch closes, the RS100 will use
this parameter to engage freeze protection. This allows a user to remotely preheat a second home.
9
Exceeding
room temp
control
OFF
Not Active
Off
No
33-41
This setting will turn off the boiler if it senses the preset overshoot. The
boiler will restart at the set point minus -1°F. NOTE: The conversion to
Fahrenheit is incorrect. Use this key: 33=1°F overshoot, 34=2°F
…41=9°F;
NOTE: This parameter is ignored if Para 3=OFF or 3 or Para 4=OFF
www.rinnai.us • © 2009 Rinnai America Corporation
31
Unmixed (HC) Circuit Parameters
(continued)
PARA
Description
12
Min. temp
limit
50°F to max
temp
13
Max. temp
limit
Min. temp
to 176°F
Factory
Setting
User
Access
Minimum boiler temperature limit in heating
mode NOTE: This overrides Boiler Para 27
68°F
No
Maximum boiler temperature limit in
heating mode.
176°F
No
Range / Explanation
NOTE: If parameter 1 in the boiler is lower, it will override this setting; NOTE: This value will go to 203°F but the
boiler will never eclipse 176°F; NOTE: 176°F=Default at shipment, 158°F=Default at System Reset
14
NA
-9 to 36°F
23
NA
1 to 100
24
NA
5–240
25
Daytime
room temp
base value
26
Nighttime
room temp
base value
27
K-Factor
(curve slope)
0°F
No
Do not adjust (temp)
8
No
Do not adjust (minutes)
15
No
41 to 86°F
Daytime base value for room temp (Note:
This setting is not needed as there is a
button on the front for it)
70°F
Yes
41 to 86°F
Nighttime base value for room temp (Note:
This setting is not needed as there is a
button on the front for it)
61°F
Yes
Higher number=steeper the curve.
NOTE: this can be adjusted from
the front panel button. It is not
needed if Para 3=1 and Para 4=RC.
1.50
Yes
0.2 to 3.5
Not for use with the RS100. Do not adjust
www.rinnai.us • © 2009 Rinnai America Corporation
32
Alarm Messages
• The last 5 alarm messages can be viewed in the Alarm chapter.
• The alarm number (1 through 5), the alarm code, date and time will display
• During a live error or blocking code, the display will alternate between the code and
the normal operating display
Time
(24 hour clock)
Date (Oct 19,
2010)
Code Number
(see boiler install
manual for code
explanations)
Error codes 1 through 5;
1 is the most recent
E0=Error code
B0=Blocking code
www.rinnai.us • © 2009 Rinnai America Corporation
33
Sensor Adjustment Chapter
• Sensor adjustment allows an offset or calibration value to be applied to the RS100
• This is only accesible from the installer access level
PARA
Description
1
RS100 internal
temperature
sensor
Range / Explanation
-9 to +9°F
Calibration value of the sensor
www.rinnai.us • © 2009 Rinnai America Corporation
Factory
Setting
User
Access
0°F
No
34
Time Adjustment Chapter
• Time adjustment allows date, day, and time for the RS100
• This is accesible from the user level (except Parameter 4)
PARA
Description
Range / Explanation
Factory
Setting
User
Access
1
Time
0:00 to 23:59
NA
Yes
2
Year
2001 to 2099
NA
Yes
3
Day / Month
01.01 to 31.12 (dd/mm) ; The correct day will
automatically display
NA
Yes
OFF
No
4
Automatic
adjustment for
Daylight Saving
Time
OFF / ON
If set to ON, time will change the last
Sunday in March and October. NOTE:
This is not the North American standard
for time change. It is recommended
NOT to set this to ON
NOTE: OFF=Default at shipment,
ON=Default at System Reset
www.rinnai.us • © 2009 Rinnai America Corporation
35
BOILER
PARAMETER
SETTINGS
THIS IS AN OVERVIEW ONLY—PLEASE REFER TO EACH BOILER’S INSTALLATION MANUAL THAT
IS SHIPPED WITH THE PRODUCT FOR THE MOST UP TO DATE INFORMATION. CONTACT RINNAI
TECHNICAL SUPPORT IF NEEDED
www.rinnai.us • © 2009 Rinnai America Corporation
36
Boiler Parameters (in relation to the RS100)
• When using an RS100, the only adjustment that must be made at the boiler is PARA
73—most others can be made at the RS100
• Boiler parameter 2 or 14 may need to be set to establish an appropriate gradient
control line (the defualt is 10°F/min)
• When connecting an RS100, please observe the following notes at each parameter:
Parameter Chapter
PARA
Default
Range
1
176°
68 to176°F
2
00
5
Description
RS100 Note
Maximum supply temp in
heating mode
This will override the RS100’s setting if
lower (UC PARA 13)
01-04
Curve preset for type of heat
emitters-see reset curve slide
This is not overridden—but should still
be set from the RS100
2.3
0.2-3.5
K Factor of outdoor reset curve
(this depends on PARA 2)
The RS100 heat curve button and/or UC
PARA 27 overrides this setting
6
1.4
1.1-1.4
Outdoor reset curve exponent
RS100 overrides this setting
7
14°F
-4°F to 32°F
Outdoor reset curve coldest
design day setting
RS100 System PARA 9 overrides this
setting
10
0°
-8°F to 10°F
Day temperature calibration
(outdoor reset curve)
11
0°
-8°F to 10°F
Night temperature calibration
(outdoor reset curve)
RS100 will override these settings—no
parameter is available or needed to do
so as it is constantly sampling the room
and adjusts as needed
www.rinnai.us • © 2009 Rinnai America Corporation
37
Boiler Parameters (in relation to the RS100)
• When connecting an RS100, please observe the following notes at each parameter (continued):
Parameter Chapter
PARA
Default
Range
Description
14
10°F/
min
028°F/min
Gradient acceleration—this is set when para 2 is
selected based on application or it can be set here
This is not adjustable
from the RS100
15
00
00 or 01
Booster after night reduction 00=no, 01=yes
RS100 UC PARA 6 will
override this setting
26°
-4°F
to
50°F
Freeze protection activation temperature
RS100 System PARA 5
will override this setting
32°
0°F
to
158°F
Minimum T-set value for heating mode (reset
curve base point)
RS100 UC PARA 12
will override this setting
146°F
(154°F)
104°F
to
176°F
DHW tank temperature adjustment (154°F is
default for the Q175C Combi model and not
available to change. E series Combi models are
set to 132°F and not able to change too)
RS100 DHW PARA 6
will override this setting
0
0
to
100
Vent and Altitude Compensation
RS100 doesn’t effect
(ensure this is set in
every boiler though)
23
27
31
73
www.rinnai.us • © 2009 Rinnai America Corporation
RS100 Note
38
TROUBLESHOOTING
THIS IS AN OVERVIEW ONLY—PLEASE REFER TO EACH BOILER OR CONTROLLER
INSTALLATION MANUAL THAT IS SHIPPED WITH THE PRODUCT FOR THE MOST UP TO DATE
INFORMATION. CONTACT RINNAI TECHNICAL SUPPORT IF NEEDED
www.rinnai.us • © 2009 Rinnai America Corporation
39
Troubleshooting
• When troubleshooting with an RS100, consider the following:
• Jumping the thermostat terminals (22 and 23) to force the boiler to fire will do nothing unless the RS100
is disconnected from 20 and 21
• If the RS100 is not set for RC, the room conditions will not influence the boiler
• If the RS100 is set for RC, outside temperature will not influence the boiler except for freezing or summer
setback conditions
• If max temp at the boiler is lower than the max temp at the RS100, the boiler’s value will have
precedence
• If there is a complaint of lack of heating or too much heat (heating or DHW mode)
• First, ensure the boiler functions correctly without an RS100 and there are no system issues
• If there is a diverter valve on the boiler, ensure it is in the right position and functioning correctly
• Ensure clock settings are correct (including the temp) and heating when needed
• Ensure the RS100 is not physically located in an environment that could cause it to report invalidly (if
in RC mode only)
• Ensure vacation, absent, setback, or standby modes aren’t selected (lack of heating)
• Ensure boiler max and min temps are correct
• Ensure DHW settings are correct
• Ensure UC Para 1 is set to RED (lack of heating)
• Ensure party mode isn’t engaged (too much heat)
• If needed, validate all parameters-reset to factory defaults if needed (make sure system unique
parameters are then reset)
www.rinnai.us • © 2009 Rinnai America Corporation
40
Thank You for being a part of
Rinnai’s Product Expansion –
RS100 Boiler Controller
Training Program #501102A –
062311
www.rinnai.us • © 2009 Rinnai America Corporation
41