1
Use & Care Guide
Manual de Uso-y Cuidado
English/Espafiol
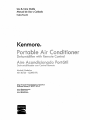
Kenmoreo
Po_°t®b)e Ai_° Conditione_"
De!_umid_@e__w_th Remote Cont_o_
A0__®
Acond_caon®do
_
_
D_um_a_;ador
_
con Cont_o! Remo'_a
Mode_siModebs_
407,83126
o-12_000 BTU
Sears Brands Management
Corporation
Hoffman Estates, IL 60179 U.S.A.
www.kenmore.com
www.sears.com
www.kmart.com
_
Pot
°
2 _
._ @
Before Using Your New Air Conditioner.......2
Important Safeguards.....................................3-5
Kenmore Air Conditioner Warranty .............6
Master Protection Agreement........................7
Unpacking instructions....................................8
Air Conditioner Parts.......................................
8
Accessories.................................................... 9
Installation................................................... 9,10
Safety Plug...........................................
:.11
Control Panel........................... ................11
Remote Control ............................................
I2-14
Operating Instructions
................................15t16
Cleaning & Maintenance .............................
17,18
Technical Specifications..............................19
Troubleshooting..........................................20,21
Error Codes...................................................
22
Sears Service.....................................Back Cover
READTHIS USE & CARE GUIDE CAREFULLYAND THOROUGHLY BEFOREINSTALLING AND OPERATiNG YOUR AIR CONDITIONER.
RETAIN THIS USE & CARE GUIDE FOR FUTUREREFERENCE.
2
To prevent injury to the user or other people and property
the following instructions must be followed.
damage,
Use this appliance only as described in this Use & Care Guide. As with
any electrical appliance, the instructions aim to cover as many eventualities as possible. Caution and common sense should be used when operating and installing this air conditioner.
This appliance has been manufactured
to cool and dehumidify domestic
environments and should not be used for other purposes.
The appliance should not be installed where the atmosphere may contain
combustible gases, oil or sulfur, or near heat sources.
Always install the portable air conditioner properly. Incorrect assembly
or installation may cause failure to operate including injury, fire and
electric shock hazards.
Do not place the power cord near a heater. It may cause fire or electric
shock.
Do not use the power cord near flammable gas or combustibles such as
gasoline, benzene, thinner, etc. It may cause explosion or fire.
Do not operate or stop the unit by inserting or pulling out the power
plug. It may cause fire or electric shock.
Do not damage or use an unspecified power cord. It may cause fire or
electric shock.
Do not modify the length of the power cord. It will cause fire or electric
shock due to heat generation.
Use the air conditioner on a single outlet circuit. Do not share the outlet
with other appliances. It may cause circuit failure.
Changing the outlet without making the appropriate
wiring changes will
create an unsafe condition that could result in fire or electric shock. Refer
all such work to a licensed and qualified electrician.
WARNING:
This appliance must be properly grounded. The power cord
of this appliance is equipped with a three-prong LCD1 (Leakage Current
Detection and Interruption) plug. To minimize the risk of electric shock,
use the plug with a standard three-slot grounding wall power outlet. If
power outlet does not include a grounding siot_ have a qualified electrician replace the outlet before you use your room air conditioner. Do not
cut or remove the grounding prong from the power plug. If you have
doubt whether the air conditioner is properly grounded, have the wall
receptacle and circuit checked by a qualified electrician.
Do not disassemble or modify this appliance. Doing so may cause failure
and electric shock.
°
DO NOT USEEXTENSIONCORDS.Do not usean extensioncord due to
potential safety hazards. Fortemporary situations,useonly CSA and UL
certified 3-prong grounded extensioncords designed and approved specifically for air conditioners.
•
To prevent injury from handling sharp objects, do not touch the metal
parts of the unit when removing the filter.
Do not block the air inlet or air outlet. It may cause failure of the appliance.
•
•
•
°
•
•
•
•
•
•
•
•
•
•
Always store and transport the air conditioner upright to maintain the
compressor in a proper condition. Prior to installation, allow air conditioner to stand upright for 12 hours. This ensures all lubricating oil has
settled to the bottom of the compressor, avoiding damage to internal
parts.
Only operate the unit on an even horizontal surface to ensure no water
leaks.
This appliance is not intended for use by persons (including children) with
reduced physical, sensory or mental capabilities, or lack of experience
and knowledge, unless they have been given supervision or instruction
concerning use of the appliance by a person responsible for their safety.
Children should be supervised to ensure that they do not play with the
appliance.
Do not insert the power plug into a wall outlet if either is loose or damaged. It may cause fire and electric shock.
Unplug the unit if strange sounds, odors or smoke come from it.
Hold the plug by the head when unplugging the unit. Do not pull on the
cord.
Unplug the air conditioner if it will not be used for a long period to prevent accidental startup and the possibility of injury.
Do not place heavy objects on the power cord, and take care so that the
cord will not be damaged.
Clean the air filters regularly. A contaminated air filter reduces capacity.
Use a soft cloth to clean. Do not use wax, thinners or a strong detergent.
The appearance
of the air conditioner may deteriorate,
change color or
develop surface flaws.
Do not use water to clean inside the air conditioner. Exposure to water
can destroy the insulation, leading to possible electric shock.
If water enters the product, unplug the power cord from the wall. Leave
unplugged until dry.
Being exposed to direct airflow for an extended period of time could be
hazardous to your health.
4
Do not use this air conditioner
precision
devices,
food,
Due to the possibility
room
when
mate
refrigeration
pets, plants
of oxygen
used together
The air conditioner
for
(e.g. preserving
and art objects).
deficiency
within
with stoves or other
is a consumer
purposes
comfort
the room,
heating
appliance,
ventilate
the
devices.
not a precision
cli-
control system.
Always insert the filter securely. Never operate without a filter.
Do not drink water drained
from air conditioner.
It contains contaminants
that
may make
you sick.
This air conditioner
has an ambient
operating
35°C),
5
range
of 5]°F
- 95°F (16°C -
Kenmore One Year Limited Warranty
When installed, operated and maintained according to all supplied instructions, if this appliance fails due to a defect in material and workmanship
within one year from the date of purchase, call 1-800-4-MY-HOME®
to arrange for free repair.
If this appliance is ever used for other than private family purposes, this warranty applies for only 90 days from the date of purchase.
This warranty covers ONLY defects in material and workmanship, and will
NOT pay for:
1.
2.
3.
5.
6.
7.
Expendable
items that can wear out from normal
use, including
but not
limited to filters, belts, light bulbs, and bags.
A service technician to instruct the user in correct product installation,
operation or maintenance.
A service technician to clean or maintain this product.
Damage to or failure of this product if it is not installed, operated or
maintained according to the all instructions supplied with the product.
Damage to or failure of this product resulting from accident, abuse, misuse or use for other than its intended purpose.
Damage to or failure of this product caused by the use of detergents,
cleaners, chemicals or utensils other than those recommended in all instructions supplied with the product.
Damage to or failure of parts or systems resulting from unauthorized
modifications made to this product.
Disclaimer of Implied warranties; limitation of remedies
Customer's sole and exclusive remedy under this limited warranty shall
be product repair as provided herein. Implied warranties, including warranties of merchantability
or fitness for a particular purpose, are limited
to one year or the shortest period allowed by law. Sears shall not be liable for incidental or consequential damages. Some states and provinces
do not allow the exclusion or limitation of incidental or consequential
damages, or limitation on the duration of implied warranties of merchantability or fitness, so these exclusions or limitations may not apply to
you.
This warranty
applies
only while
This warranty
gives you specific
this appliance
legal rights,
is used in the United
and you may also have
rights which vary from state to state.
Sears Brands Management
Corporation, Hoffman Estates, IL 60179
6
States.
other
Master Protection Agreements
Congratulations on making a smart purchase. Your new Kenmore ® product is
designed and manufactured for years of dependable operation. But like all
products, it may require preventive maintenance or repair from time to time.
That's when having a Master Protection Agreement can save you money and
aggravation.
The Master Protection Agreement also helps extend the life of your new
product. Here's what the Agreement _ includes:
[]
Parts and labor not just for repairing defects, but to help keep products operat-
[]
[]
[]
[]
ing properly under normal use. Our coverage goes well beyond the product
warranty. No deductibles, no functional failure excluded from coverage-real
protection.
Expert service by a force of more than 10,000 authorized Sears service technicians, which means someone you can trust will be working on your product.
Unlimited service calls and nationwide service, as often as you want us, whenever you want us.
"No-lemon"
guarantee-replacement
of your covered product if four or more
product failures occur within twelve months.
Product replacement if your covered product can't be fixed.
Annual Preventive Maintenance Check at your request-no extra charge.
[] " Fast help by phone-we call it Rapid Resolution-phone support from a Sears representative on all products. Think of us as a "talking owner's manual".
[]
[]
Power surge protection against electrical damage due to power Fluctuations.
$250 Food Loss Protection annually for any food spoilage that is the result of
mechanical failure of any covered refrigerator
or freezer.
[]
Rental reimbursement
ised.
[]
10% discount off: the regular price of any non-covered repair service and relat-
if repair of your covered product takes longer than prom-
ed installed parts.
Once you purchase the Agreement, a simple phone call is all that it takes for you
to schedule service. You may call anytime, day or night, or schedule a service
appointment online.
The Master Protection Agreement is a risk free purchase. If you cancel for any
reason during the product warranty, we will provide a full refund. Or, a prorated
refund anytime after the product warranty period expires. Purchase your Master
Protection Agreement today!
Some limitations and exclusions apply. For prices and additional information in the
U.S.A. call 1-800-827-6655.
Sears Installation Service
For Sears professional installation
of home appliances garage
heaters, and other home items, call 1-800-4-MY-HOME
®.
door openers water
1.
2.
3.
To move the unit, grip the unit by the recessed carry handle on each side of the
unit. Carefully lift unit until it slides free from foam base.
Do not touch louvers when moving the unit.
Place unit in the correct upright position. (We recommend retaining the packaging for off-season or long term storage).
Carry
Carry
Handle
Handle
Remove the air conditioner from the packing carton. It is recommended
carton and packing material for storage or transportation
of the unit.
to keep the
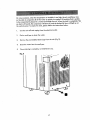
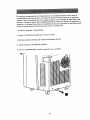
Fia, 1
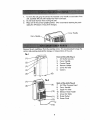
Front of the Unit (Fig. ])
(1)
1.
2.
3.
4.
5.
6.
(2)
(4)
(5)
_, ,i
ii
Air Outlet Louvers
Carry Handle
Control Panel
Remote Holder
Lower Air Inlet
Casters
(6)
(9)
(10)
(11)
(12)
-(13)
8
Back of the Unit(Fiq, 2)
7. Air Filter Compartment
8. Carry Handle
9. Upper Air Inlet
10. Exhaust Hose Holder
11. Lower Air Inlets
12. Drain Outlet
13. Power Cord
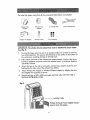
On initial unit setup, check that all the accessories listed below are included:
Exhaust Hose
Adapter
Window
Windo_v
Hose
5' Exhaust Hose
3-Piece
Window
Kit
Adapter
Kit Adapter
IMPORTANT:
tion (Fig. 3)
2 AAA Batteries
Remote Control
The window kit and exhaust hose must be installed for proper opera-
1.
To avoid damage, place the unit in an upright position for at least 12 hours before initial operation. This ensures all lubricating oil has settled to the bottom of
the compressor, avoiding damage to internal parts.
2.
Fully extend both ends of the exhaust hose approximately 6 inches, then screw
both hose adapters onto each end of the exhaust hose in a clockwise direction
until firmly secured.
3.
Attach
the hose to the unit by turning the exhaust hose adapter
clockwise
and
locking into the tabs around the exhaust hose holder.
4.
Attach
Window
Kit Adapter
then slightly turn clockwise
5.
to Window
Exhaust Adapter
by aligning
the tabs
to secure.
Plug the unit into a 120V_60Hz
REGULAR EXTENSION CORD.
grounded electrical
outlet. DO NOT USE A
Locking Tabs
Rotate Exhaust Hose Adapter
wise to lock into place
9
Clock-
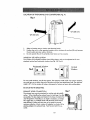
LOCATION
OF THE PORTABLE AIR CONDITIONER
(Fig. 4)
12" (30 cm)
12" (30 cm)
1.
Select a location near a window and electrical outlet.
2.
Position the unit in a fiat, spacious location with a minimum of one foot (30 cm) between
the air outlets and any walls or furniture.
Do not operate the unit in extremely moist areas such as a sauna.
3.
WINDOW
KIT INSTALLATION
The Window Kit (included) contains three sliding pieces, and can be adjusted to fit most
standard vertical and horizontal windows (see Fig. 5 & Fig. 6).
Horizontal
Window
Vertical
Window
i r!_
iii i
For very wide windows, use all three pieces. The maximum width is 58". For narrow windows,
you may have to cut clown the end of the piece with the hose attachment hole. The minimum
width is 10". Cut the window kit using a strong pair of scissorsor heavy duty cutting pliers.
Do not cut into the exhaust hole.
EXHAUST HOSE CONNECTION
The exhaust hose must be attached for cooling and dehumidification. When installing the exhaust hose, try and keep it as fiat
as possible. The tess angles and bends in the hose, the better the
unit will perform. If bending or an angle Is necessary, usesingle
90 ° angles (Fig, 7). Multiple bends wil! decrease performance
and efficiency. Make surethere are no low spots to prevent
moisture collection. Attach window kit adapter to window kit by
placing adapter into exhaust hole. Pushforward until it is secured.
iEL Z
22" Maximum
10
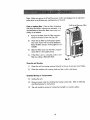
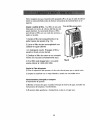
Thisproduct isequipped with an LCDI (Leakage Current Detection and Interruption} safety
plug. If power shutsoff, unplug from the electrical outlet and make sure the cord is undamaged. If the cord is damaged, call 1-800-469-4663 to arrange for repair.
TO TEST THE SAFETY PLUG
t.
Connect the power plug to an electrical outlet.
2. The power plug has two buttons located on the top, One button is marked "TEST" and the
other is marked "RESET' Pressthe "TEST" button; you will hear a click as the "RESET"
button pops out.
3,
Pressthe "RESET"button; you will hear a click as the button engages.
4.
The power supply cord is now energized and supplying electricity to the air conditioner (it
is indicated by a light on the plug head).
• Under no circumstances should the LCDI Safety Plug be used to turn the unit on or off.
• The "RESET"button must always be pushed in (engaged} for correct operation.
° The power supply cord must be replaced if it fails to reset when the "TEST" button is
pushed in,
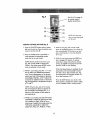
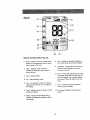
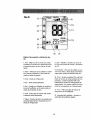
(4) LED DISPLAY
(8) TANK FULL
(2) MODE
(5) COOL
I
(6) DRY
(3) TEMP SELECT
(7) FAN
(1) ON/OFF
1.
ON/OFF - Pressthis button to turn the air conditioner on or off.
2.
MODE - Press ihis button to select between Cooling, Dehumidifying or air circulating
modes. The correspondingindicator will light up when each mode is selected: (5) Cool,
(6) Dry, and (7} Fan.
3.
TEMP SELECT- Pressthe up arrow button while in cooling mode to increasethe desired
set temperature by I°F up to a maximum setting of 86°F. Pressthe down arrow button
while in cooling mode to decrease the desired set temperature by I°F down to a low of
61°F.
=
TANK FULL - During extreme heat and humidity, the backup water tank may fill up.
When the tank full indicator is lit, the backup water tank in the unit is full. The unit will
stop operating. Drain the backup tank. The unit will not cool until the water tank is
drained.
11
See Fig. 10 on page 14
for remote control
display descriptions.
(2)
(1)
(4)
(3)
(5)
(6)
(7)
NOTE: At] white buttons are non-functional
on this unit.
(8)
REMOTE CONTROL BUTTONS (Fig. 9)
1. Press the ON/OFF button once to manually turn the unit on. Press the button once
more to turn the unit off.
2. Press the MODE button repeatedly to
cycle between the operating modes:
cool, dry, fan or auto mode.
.
While
in cool, dry, fan or auto mode,
press the oscillation button _1 to have the
unit automatically
lift the louvers up and
down continuously, to vary the direction
of the air.
6,
NOTE: Remote control must be in cool,
dry, fan or auto mode to control unit.
While in Fan Mode, press MODE button
twice to advance to Auto mode.
While in cool mode, press the SLEEPbutton to engage this feature. It reduces
compressor usage and enhances energy
savings by slightly increasing the set temperature while you are sleeping.
When the sleep feature is enabled, the set
temperature will automatically increase
2°F after 1 hour. After another hour, the
set temperature will increase another 2°F
for a total increaseof 4°F.
3. While in cool mode, press the - or + buttons to select your desired set temperature. The set temperature on the remote
control and unit will increase or decrease
accordingly. Hold the - and + buttons for
2 seconds to rapidly increase or decrease
the set temperature.
Temperature range is
61°F---86°F.
Press the SLEEP button once more or the
Mode button to disable this feature. Sleep
is only available while in cooling mode.
NOTE: When in dry, auto or fan mode,
the set temperature does not appear on
the unit display and pressing the - or +
buttons on the remote will not adjust its
set temperature.
4. While in cool mode, press the FAN button
repeatedly to adjust fan speed from Auto,
Low, Medium or High. While in Fan or
Auto (when it selects Fan) mode, pressthe
FAN button repeatedly to adjust fan
speed from Auto, Low, Medium or High.
12
REMOTE CONTROL LOCK
Pressthe + and - buttonssimultaneouslyto
lock the buttons on the remote control.
When Iockeds the remote control may not
be used to operate the unit. Pressthe + and
- buttons simultaneouslyonce more to unlock
the remote control,
REMOTE CONTROL BUTTONS Cont. (Rg. 9)
7. Auto-on Timer: When the air conditioner
is off_ it can be set to automatically turn
on in 30 minutesto 24 hoursat the previous setting. To set the Auto-on Timer;
while the unit is off_point the remote control toward the air conditioner and press
the TIMER button. Then pressthe + or buttons to adjust the timer setting in 30
minute increments (,5 hours). Once desired settingis reached_ pressTIMER button again. An audio alert will sound, and
the TIMER ON indicator will stop flashing
to indicate the setting has been saved and
the timer has been activated. To cancel
the auto-on timer, press the TIMER button
again.
CHANGE TEMP READING °C & °F
When the unit is powered off, press the
MODE and - buttons simultaneously to
change the temperature reading from °F to
°C. Press the MODE and - buttons simultaneously once more to change the temperature
reading from °C to °F.
INSERTINGBATTERIES - The included remote control uses two AAA batteries.
1)
Remove the back cover of the remote control
Auto-off Timer: When the air conditioner
is on, it can be set to automatically turn
off in 30 minutes to 24 hours. To set the
Auto-off Timer; while the unit is on, point
the remote toward the air conditioner and
pressthe TIMER button. Then press the +
or - buttons to adjust the timer setting in
30 minute increments (.5 hours). Once
desired setting is reached, press TIMER
button again. An audio alert will sound,
and the TIMER OFF indicator will stop
flashing to indicate the setting has been
saved and the timer has been activated.
To cancel the auto-off timer, pressthe
TIMER button again.
2)
Insert two AAA 1.5V batteries, making sure they are in the correct position.
3)
Replace the cover.
DO NOT mix old and new batteries. DO
NOT mix together Alkaline, Standard
(Carbon-Zinc), or Rechargeable (NickelCadmium) batteries. Dispose of batteries
properly. DO NOT leave batteries in the y
remote if it will not be used for longer than
2 months.
8. Pressthe LIGHT button to turn the air
conditioner control panel indicator lights
on and off.
13
Fiq. 10
(1)
2)
(3)
(11)
(4)
(5)
(10)
(6)
(7)
(8) (9)
REMOTE CONTROL DISPLAY(Fig. 10)
1.
Auto - Chooses one of the modes below
based on the temperature
tioner senses in the room
.
Oper - Indicates when a button is
pressed on the remote and a signal is
sent to the unit
.
Dry - Dehumidifying
Mode
Fan - Air circulation mode is the chosen
selection when the fan icon is visible on
,
Oscillation - Makes the louvers move up
and down automatically to vary the
direction of the air.
!t. °F/°C - Indicates which temperature
the display
6.
Light - Enables or disables the lights on
the control panel icons and LED display
10. Timer - When ON is lit the auto-on timer
is enabled. When OFF is lit the auto-off
timer is engaged. The numbers indicate
tl_e amount of time (in hours) to set the
timer
3. Cool - Cooling Mode
4.
.
the air condi-
reading
Lock - Indicates when the remote control
buttons are locked
type is enabled.
12. Fan Speed - Displays the chosen fan
speed
7. Sleep - Energy saving feature that increasesthe temperature slightly while in
Coot Mode
]4
IMPORTANT: After switchingthe unit on, the ventilator fan operates, but the compressorwill
not start for approximately three minutes.Cool air will begin to blow once the compressor
starts, but it may take another 5 minutes to feet the effect in the room. Thisfeature helps prolong the life of the compressor.Furtherinformation is available in the "Troubleshooting" section. Do not touch the louvers as it could result in damage. Thts unit features automatic air
flow adjustment and is activated when the unitis powered on.
COOL
•
MODE
Place the unit {n the room that requires cooling.
We recommend starting your unit early in the morning on warm days for maximum
effect. This unit has a self-evaporation
system to eliminate water that condenses in the
unit during cooling. The exhaust hose must be connected and properly installed to cool
the room properly. See the INSTALLATION instructions on page 9-10 of this USE AND
CARE GUIDE.
Use the MODE button on the unit control panel or remote and set to COOL. Adjust the
set temperature using the up and clown buttons on the unit or - and + buttons on the
remote. The cooling temperature can be set from 61°F to 86°F.
Using the remote
High.
control,
press FAN button to adjust fc_n speed from Auto, Low, Med or
DRY MODE
, Place the unit in the room that requiresdehumidification.
The exhaust hose must be connected and properly installed to dehumidify
the room
properly. See the INSTALLATION instructions on page 9-10 of this USE AND CARE
GUIDE.
Use the MODE
button on the unit control panel or remote and set to DRY.
•
The fan speed is set to low and cannot be adjusted
•
The compressor
•
There is a built-in defrost control that senses frost buildup on the evaporator coils. During
defrosting, the compressor will automatically turn off. The fan will continue running to
defrost the coils. Once the frost has been removed, the compressor will re-start.
will run continuously
in DRY Mode.
when the unit operates in DRY mode.
NOTE: The set temperature will not appear on the unit display. The set temperature and fan
speed cannot be adjusted while operating in this mode.
FAN MODE
• Place the unit in the room that requires fanning or air circulation.
• Use the MODE button on the unit control panel or remote and set to FAN. Using the
remote control, press FAN button to adjust fan speed from Auto, Low, Med or High.
• The fan auto settingwill change the fan speed to either High or Medium, depending on
the last setting of the cooling mode set temperature.
NOTE: The set temperature
operating in this mode.
will not appear
on the unit display and cannot be adjusted while
]S
AUTOMODE
Place the unit in the room the desired room.
The exhaust hose must be connected and properly installed to cool or dehumidify the
room properly. See the INSTALLATION instructionson page 9-10 of this USE AND CARE
GUIDE.
Usethe MODE button on the remote to set the unit function to Auto. The set temperature
does not appear on the display and cannot be adjusted in Auto Mode.
Once in auto mode the unit will automatically select the mode based on current room
temperature.
AUTO MODE SETTINGS
Below 68°F
Fan Mode
68°F.
Dry Mode
78°F
mll,.J i,,,
79°F or Greater
Cool Mode
NOTE: If room temperature is 68°F - 73°F and the mode was previously set to Fan before
changing to Auto, it will default to Fan mode. When room temperature is 74°F - 78°F, it will
default to Dry mode.
SLEEPFUNCTION
• While in cooling reader set desired temperature by pressingthe up and down arrow buttons on the unit control panel or - and + buttons on the remote. Cooling temperature can
be set from 61°F to 86°F.
• Adjust the fan speed from Low, Med, High and Auto by pressingthe FAN button on the
remote control.
•
Press SLEEP button on the remote
in cooling mode.
control to activate
this function.
Sleep will only operate
• When Sleep is activated, the set temperature WTIIautomatically increase 2°F after 1 hour.
After another hour, the set temperature will increase another 2°F for a total increase of
4°F.
• To cancel Sleep, pressthe SLEEPbutton on the remote or MODE button on the unit control panel or remote.
NOTE: The displayed set temperature on unit control panel and remote will remain at its
initial set positionwhile Sleep function is enabled.
]6
On rare occasions, when the temperature
or humidity is too high, the air conditioner may
not be able to evaporate all of the water as quickly as needed. All moisture that is unable
to be evaporated is placed in a water tank inside the unit. When the tank is completely full,
an alarm will sound, the compressor will shut off, and the bucket fult icon will light up on
the control panel. To empty the tank, please follow the instructions below.
1.
Turn the unit off and unplug from the electrical outlet.
Find a small pan to drain the water.
3.
Remove the pre-installed
Drain Cap from the unit (Fig 11).
4.
Drain the water into the small pan.
Once draining is complete, re-install
drain cap.
!
17
"
Note:
Make sure power is off and the power cord is not plugged
outlet prior to performing
any maintenance
into an electrical
on the unit.
Clean or replace filter - If the air filter is blocked
with dust, the airflow volume may decrease. It is
recommended to clean the filter once every two
Pull Up to Remove Filter
weeks, or as needed.
1) _ Remove the filter from the filter compartment on the back of the unit (Fig. t2).
2)
Wash the air filter by immersing it gently
into warm water with a neutral detergent.
Rinse the filter and dry it thoroughly out of
Sunlight.
3)
Slide the filter back into the filter compartment after it is thoroughly dried.
4)
If the filter is torn or unusable, order a new
filter by calling 1-800-252-1968.
Clean the unff Housing
i)
Keep the unit from being exposed directly to the sun to prevent color fading.
2)
Clean the surface with a damp cloth and dry it with a soft towel.
Extended
Storage or Transportation
i)
Unplug the unit.
2)
Remove excess water by draining
and Maintenance for instructions.
3)
The unit should be stored or transported
the backup water tank.
]8
upright
Refer to Cleaning
in a cool dry place.
MODEL
83126
Voltage
115V_60Hz
,,,
,, ,, ,,,,,,,,,,,,,,
,..,..,,.,,,,..
Amperage:
,,
,,,,,
Power Consumption:
Cooling
.....
,,.
11.5Amps
Cooling
, ,,
,
,,
i465 Watts
,,,,,
Cooling Capacity
12,000 BTU/h
Dehumidifying Capacity
82 Pints / Day
(38.8 Liters / Day)
....................
,,,L
,, ,,,,,
,,, ,,,,,,,,,,
Backup Water Tank Capacity
,, ,,,
i
, ,,",,",',L
60.9 our_ces(1.8Uters)
,,,,
55 dB(A)
Noise Level dB(A) (H)
,,,
Air Circulation (CFM)
.......
, .........
,
,
235 Maximum at high fan speed
INCLUDED
Remote Control
17.75" x 33.125" x 17.125"
Dimensions (W x H x D)
(45.09cm
Net Weight
x84.14cm
x 43.50cm)
80 Ibs / 36.3 kg
i
19
If your air conditioner fails to operate, please follow these procedures prior to contacting
customer service.
DO NOT ATTEMPT TO OPEN OR REPAIRTHE AIR CONDITIONER YOURSELF.DOING SO
WILL VOID THE WARRANTY AND CAUSE DAMAGE OR PERSONAL INJURY.
_J
Solutions
Possible Causes
Problem
ill,
Can 1turn the unit on
•
No, The unit must be placed upright for at
least 12 hours after every transport. Otherwise the compressor may be damaged
immediately after
unpacking it?
i, ,
, ,,,,,
,,,,
Unitdoes not start
•
i1,1 i,
Room temperature is
lower than the set tem-
when pressingpower
button
Raise the set temperature
le
perature (cooling mode)
l lll
The air conditioner
!does not come on
•
•
_1
i i
No electricity
It is not plugged into the
outlet
The internal safety device
•
•
has tripped
The safety device on the
plug has tripped
I
•
There are bends or kinks
in the air exhaust hose
•
Something is preventing
the air from being discharged
,,
Check house circuit breaker panel for
tripped switch
• Plug into outlet
• Wait 30 minutes; if problem persists, call
t-800-469-4663
to arrange for product
inspection and repair.
• Reset the safety plug
i,,
The air conditioner
works for only a short
time
,u
•
Ilml
[[[[[
•
Position the air hose correctly, keeping it
as short and free of curves as possible to
avoid bottlenecks.
•
Check and remove any obstacles obstructing air discharge
,i,,,,,,
Room is not coot
•
enough
•
•
•
•
Windows/doors
in room
are open
There are heat sources
nearby
Exhaust hose is not connected or is blocked
Temperature setting is too
high
Air filter blocked by dust
•
:-
Close all windows/doors
Remove heat source if possible
• Connect
•
the exhaust hose and make sure
it can function properly
Decrease the set temperature
• Clean the air filter
i,,11
ii 11111
The air conditioner
•
does not operate for
about three minutes
after restarting it
The compressor control
prevents the unit from
being restarted until three
minutes have elapsed
since it was last turned
• Wait. This delay is part of normal operation
off
Noise or vibrations
i
Gurgling
Sound
• The floor is not level or
the unit is on an incline
•
Place the unit on a flab level surface
•
•
This isnormal
1iiii
nnl
The sound comes from
the flowing of refrigerant
in the air conditioner
20
L," ;;.,
, , ,i-i ,,i¸,,,,,,,,
Problem
Solutions
i Posdble Causes
/ iii
Unit emits odor dur-
First useof unit, or after
storage of unit in dusty
area
ing operation
•
i,i ii,
Compressor does not
immediately
activate
when power button is
pressed ON
i
•
,
•
'
'"
J'_l_lW_" 'l.
After pressing POWER button ON the
compressor will not start for 3 minutes.
Conditioned air will start to blow once the
, • .,LI,,I
i
i i
i
•
Normal
The unit does not cool
to satisfaction
Operation
,,,i,,
,ll
i
i IIII,,,,IL
,IL ,, ,, J,,,L,,,,,,,,,,,,,
Air conditioners operate more effectively
if a cooler room temperature is maintained. To adequately cool the air in a
very warm room requires much more time
and energy.
Room temperature is high
when unit is first turned
ON
i llll
•
• The temperature reading
has been changed using
the remote control
has
from °F to
Make sure the unit is powered OFF. Press
the "MODE" button and "-"button
simultaneously
to change
back to =F
i iii .i.i..ll
i ill. ii.
Temp reading
changed
has
from °C to
II.HHH...Hll
RemOte Control
locked
is
•
lights don't illuminate
when unit is running
The "-" and "+"
i
•
Make sure the unit is powered OFF. Press
the "MODE" button and "-" button simultaneously
to change
back to °C
I
buttons
•
were pressed simultaneously
1ill ill1111111111
i
Indicator
•
The temperature
reading
has been changed using
the remote control
i•
o F
Control
,u
Upon reaching the set temperature,
the
unit switches of? automatically.
Check
temperature setting.
It
i
Temp reading
changed
°C
•
Operation
i ,
compressor starts, but it may take up to
another 5 minutes
,,,i ,llll, i
i
'JLL'J'L"
Normal
,,,,
The unit deactivates
,.ll,
Odor development
can arise upon first
use and after a long period of non-use by
starting in unsuitable areas (e,g. dusty
areas). Run the unit for 1/2 day. The smell
will dissipate after awhile. In the case of
intense odor development, air the room.
i
Press the "-" and "+"
buttons simultane-
ously to unlock the remote control
i'11,n
The control indicator
Press the "+"
lights have been turned
off using the remote control
neously to illuminate the control indicator
lights
21
and "FAN"
buttons simulta-
,
•1,,
.....
Solutions
Error Codes
PossibleCauses
E5
* Low Voltage
H8
• The backup water tank
is futl
Protection
i iiiii
i
• Unplug for ten minutes and then turn
on unit. If "E5" is still displayed call 1800-469-4663
to arrange for product inspection and repair.
i i,,
IH
• If the water tank is full the warning
sign "H8" appears in the display. To
restart operation of the unit, unplug
from the electrical outlet and then
remove the plug of the lower drain
outlet to allow the water to drain. Use
an appropriate collection pan. When
the water has been completely removed, restart the unit. The unit can
now be used as Usual.
,i
,,,
,,,L .......
i, i,i,
• Indoor ambient tem-
F1
perature
function
i•
sensor is mal-
F2
i
,,,,,
Unplug for ten minutes and then restart unit. If "FI" continues to appear
call 1-800-469-4663
to arrange for
product
i,
,
inspection and repair.
l lll
,
• Unplug for ten minutes and then restart unit. If "F2" continues to appear
call 1-800-469-4663
to arrange for
_° indoor evaporator
temperature sensor
malfunction
product inspection and repair.
111111
F4
,ll
i ,
• Condenser temperature sensor malfunction
i
• Unplug for ten minutes and then restart unit. If "F4" continues to appear
call 1-800-469-4663
to arrange for
product inspection and repair.
, i, i i,,,,,,,,,,
22
23
a distancia..............
_................................
12 -14
Antes de usar sunuevo Acondicionador de aire.......2 Mando
15s16
Precaucionesimportantes..........................................3-5 Instruccionesde funcionamlento...........................
Garantia del Acondicionador de aire Kenmore.......6 Limpieza y mantenimlento ...................................
17,18
19
Contrato maestro de protecci6n.................................7 Caractedstlcas t_,cnicas .....................................
Instruccionespara desempaquetar .............................8 iReso|uci6nde problemas ....................................
20,21
Partesdel acondiclonador de aire ..............................8 C6digos de error...........................................
22
Accesorios
......................................................................
9 Servicio Sears........................................
Contraportada
Instalaci6n..............................................................
9,10
Enchufe de seguridad............................................ 11
Panel de mando ....................................................... tl
LEA CON ATENCtON Y POR ENTERO ESTA GU(A DE USO Y MANTENIMIENTO ANTES DE INSTALAR Y
HACER FUNCIONAR SU ACONDICIONADOR DE A!RE.
CONSERVE ESTAGU/A DE USO Y MANTENIMIENTO PARA FUTURA REFERENCIA.
24
Para impedir dafios al usuario u otras personasy cosas_se deben respetar los siguientesinstrucciones.
Utilice este dispositivos61oconforme se explica en esta Guia para el usa y mantenimiento. Corno en todos los dispositivosel_ctricos, los instrucciones tienen par objeto cubrir el
m_ximo posible de circunstancias-A la hora de instalar y hacer funcionar este acondicionador de aire, se debe actuar con precauci6n y sentido com0n-.
Esteaparato ha sido fabricado para refrigerar y deshumidificar ambientes dom_sticos,y
no debe utilizarse con otros fines.
E! dispositivo no debe instalarse en atm6sferas que puedan contener gases combustibles,
aceite o azufre, ni cerca de fuentes de color.
El acondicionador de aire port6til siempre debe instalarsecorrectamente.
Un montaje o
instalaci6n incorrectospueden causar folios de funcionamiento, asi coma heridas, incendios y sacudidas el_ctricas.
Nunca deje el cable de alimentaci6n cerca de estufaso fuentes de calor. Puede causar
incendioso sacudidas el6ctricas.
No uti{ice et cable de altmentaci6n cerca de gases intlamables o combustibles coma
gasolina, benceno, diluyentes, etc. Puede causar explosiones o fuego.
Nunca encienda o apague el aparato enchuf6ndolo o desenchufc_ndolo. Puede
causar incendios o sacudidas el_ctricas.
No da_e el cable de alimentaci6n, ni utilice cables que no se correspondan con las caracteristicas t_cnicas. Puede causar incendios o sacudidas el_ctricas.
t
No modifique la Iongitud det cable de atimentaci6n.
Puede causar incenclios o sacudidas
el_ctricas debido al calor generado.
Utilice el aire acondicionado en un solo circuito de salida. No comparta la salido con
arras dispositivos. Puede causar cortocircuitos.
Cambiar la salida sin hacer los correspondientes cambios en el cableado dar_ lugar a
una situaci6n inseguraque puede dar tugar a incendioso sacudidas el_ctricas. EfectOe
ese trabajo con ayuda de un electricista debidamente experto y calificado.
AVISO: Este aparato debe estar correctamente conectado a tierra. El cable de alimentaci6n de este aparato est6 equlpado con un enchufe de tres puntas LCDI (lnterrupci6n y
detecci6n de fugas de corriente). Para reducir al minima el riesgo de sacudidas el_:tricos, utitice el enchufe con una toma de corriente de pared est_ndar de tres bocas con
torna de tierra. Si la toma de corriente no Ileva boca de toma de tierra, flame a un electricista califlcado para que cambie la toma de corriente antes de utilizar el acondicionador de aire de interiores.- No carte ni quite la punta de tierra del enchufe de alimentaci6n. Si tiene dudas acerca de si la toma de tierra funciona correctamente, haga revisar
el circuito y et cajetin de pared a un electricista calificado.
No desmonte ni modifique el aparato. Hacerlo puede causar fallos y sacudidas el_ctricas.
25
NO UTILICE CABLESALARGADORES. No utilice cables alargadores, por los potenciales
riesgos de seguridad que comportan. Para situaciones temporales, utilice gnicamente
cables alargadores con certificado CSA y UL de 3 puntas con toma de tierra, dise_ados
y aprobados especificamente para acondicionadores de aire.
Para impedir heridas pot uso de objetos cortantes, no toque las partes met_licas del
aparato cuando quite el filtro.
et
No tape la salida ni la entrada del aire. Puede causar la averia del dispositivo.
et
Guarde y transporte siempre el acondicionador de aire en pie para mantener el compresot en buen estado de funcionamiento.
Antes de su instalaci6n, el acondicionacior de
aire debe permanecer en posici6n de pie durante 12 horas. De ese modo se asegura que
todo et aceite lubricante se asiente en el fondo del compresor, evitando dafios alas partes internas.
El aparato debe ponerse en marcha 0nicamente en superficies horizontales y lisas, para
asegurar que no pierda agua.
Esteaparato no ha sido disefiado para su uso por parte de personas (incluidos los nifios}
con capacidades fisicas, sensorias o mentales reducidas, o carentes de experiencia y de
conocimiento_ a no set que sean supervisadas o instruidas en relaci6n con el uso del mismo pot una persona que responda de su secjuridad. Esnecesario supervisar a los nifias
para asegurarse de que no jueguen con el aparato.
Nunca enchufe la clavija de atimentaci6n en una toma de corriente de pared si la cfavija
o la toma de corriente est_n flojas o dafiadas.
tricas.
Puede causar incendios o sacudidas el@c-
Q
Desenchufe el aparato si de _1salen sonidos extrafios, olores o humo.
Q
Sujete el enchufe por la cabeza al desenchufar el aparato.
Nunca tire del cable.
Desenchufe el acondicionador de aire si no va a usarlo en un periodo prolongado, para
asi evitar su puesta en marcha accidental y la posibilidad de heridas.
Nunca ponga objetos pesados sobre el cable de alimentaci6n, y asecj0rese de que el
cable no sufra dafios.
Limpie regularmente los filtros de aire. Un filtro de aire suciodisminuye la capacidad
del aparato.
Para limpiarlo, use un patio suave. No use cera, diluyentes ni detergentes fuertes. Podrian afectar al aspecto det acondicionador de aire, cambiar su cator o hacer que surjan
defectos en ta superficie.
No usar agua para limpiar por dentro el acondicionador
de aire.
La exposici6n al agua puede destruir el aislamiento, dando lugar a posiblessacudidas
el_ctricas.
Encaso de entrada de agua en el producto, desenchufe de la pared el cable de alimentaci6n de la pared. D_jelo desenchufado hasta que se seque.
ka exposicJ6na un flujo de aire directo durante un periodo de tiempo extenso puede ser
peligrosa para la salud.
26
No utilice este acondicionador de aire con para refr|geraci6n (p.ej. preservar dispositivos
de precisi6n0alimentos0mascotas, plantas y objetos art[sticos).
Debido a la posibilidad de falta de oxigeno en la habitaci6n, ventile la habitaci6n s1usa
el aparato junto con estufasu otros elementosde calefacci6n.
El acondicionador de aire no es un climatizad0r de precisi6n,sino un aparato para el
bienestar dom_stico,
Siempre |ntroduzca el filtro en modo seguro. Nunca haga funcionar el aparato sin un
fiitro.
No beba et acjua vaciada del acondicionador de aire, Contiene sustanciascontomJnantes que
podfian
Este acondicionador
hacerJe
enfermar.
de aire
tJeneun
intervaJo
3soc).
2?
de funcionamiento
de
61°F - 95°F (16°C-
Garanffa limitada Kenmore de un afio si se instala, mantiene y hace funcionar conforme a
todas los instrucciones dadas; si este electrodom_stico se aveHa debido a defectos de materiales o de fabricaci6n, en un plazo de un afio a partir de la fecha de compras Ilame al 1-800
-4-MY-HOME_
para concertar una reparaci6n gratuita.
En caso de usar el aparato fuera del 6mbito de uso familiar privado, esta garantia s61otiene
validez durante 90 dfas a parfir de la fecha de compra.
La garant|a SOLAMENTE cubre defectos de materiales y fabr|cacl6nn y NO cubre los siguientes €ostes:
1. Consumiblesque puedan desgastarsecon el usonormal, entre ellos, en lista no exhaustiva,
filtros, correas, bombillas y bolsas.
2. T_cnico de servicio para instruiral usuario sobre la instalaci6n, el funcionamiento y el mantenimiento correctos det producto.
3. T_cnico de servicio para Iimpiar o mantener este producto.
4. Dafios o averias del producto debidos a no haber sido instalado, hecho funcionar o mantenido conforme a todas las instruccionesque se dan con el producto.
5. Dafios o aver[as del producto debidos a accidente, abuso, uso incorrecto o usos distintosde
aquetlos para los que ha sJdo concebido.
6. Dafios o aveHas del producto debidos al uso de detergentes, limp[adores, sustancias qu[micas o herramientas distintos a los recomendados en todas las instrucciones que se dan con el
producto.
7. Dafios o averJas de partes o sistemas debidos a alteraciones no autorizadas del producto.
Renuncia de garanffas implfdtas; limitad6n de recursos
Bajo esta garant[a Iimitada, el Cliente tendr6 derecho 0nlca y exclusivamente a la reparaci6n
del producto, tal y como aqu[ se [ndica. Los garantias impJicitas, coma la garantia de comerciabilidad o de aptitud para una deterrninada
final[dad, est6n limitadas a un a_o o al periodo m6s corto permit[do por la iey. Sears se exime de toda responsabilidad
pot dafios accidenlales o consiguientes. AJgunos estados y provincias no adrniten la exclusi6n o limffaci6n de
dafios incidentales o consiguientes, o la i!mitaci6n de la duraci6n de Jasgarantias impi[citas
de comerciabilidad o aptitud, de modo que estas exclusiones o lirnitaciones podr[an no apticorse en su caso.
Esta garanfia se aplica 0nicamente si el aparato se util[za en los Estados Unidos de Arn_rica.
Esta garant[a le concede derechos legales especificos; usted tambi_n puede tener otros derechos, que vat[an de estado a estado.
Sears Brands Management
Corporation, Hof?man Estates, IL 60179
28
Contrato maestro de protecci6n
Enhorabuena, ha hecho usted una compra inteligente. Su nuevo producto Kenmore® ha sido
disefiado y fabricado para que proporcione afios de funcionamiento y fiabilidad. Pero, como
todos los productos, puede necesitar de mantenimiento preventivo o reparaciones de vez en
cuando.
Es ahi donde un Contrato Maestro de Protecci6n puede ahorrarle dinero y dificultades.
[]
[]
[]
[]
[]
[]
[]
[]
[]
[]
[]
El Contrato Maestro de Protecci6n tambi_n ayuda a extender la vida de su nuevo producto. Et Contrato* incluye:
Piezas y mano de obra, no s61opara reparar defectos, sino tambidn para mantener los
productos en funcionamiento en condiciones normales de uso.La cobertura va mucho
mbs all6 de la cjaranffa del producto. Sin deducibles, sin fallos de funcionamiento excluidos de la cobertura real de protecci6n.
ServJcJoexperto con m6s de 10,000 tdcnicos autorizados Sears, !o cual sicjnifica que su
producto siempre set6 atendido por personas en quien pueda confiar.
Ilimitadas ilamadas de servicio y cobertura en toda la naci6n, con tanta frecuencia como
desee, y siempre que 1odesee.
Garantia contra productos problembticos: sustituci6n del producto cubierto pot la garanfia si el producto tiene cuatro o robs averTas en un plazo de doce meses.
Sustituci6n dei producto si el producto cubierto pot la garanffa no se puede reparar.
Revisi6n de mantenimiento preventivo anual sin costes extra cuando usted Io solicite.
Ayuda telef6nica r6pida: Io Ilamamas tel_fono de Asistencia R6pida por parte de un
representante de Sears en todos los productos. Consid_renos un "manual de usuario parlante".
Protecci6n contra sobretensiones contra dafios el_ctricos debidos a fluctuaciones de potencia,
Protecci6n anual de 2505contra p_rdidas de alimentos por cualquier deterioro de alimentos que sea resuitado de averias mec_n[cas de cualquier refrigerador o fricjorifico
con cobertura.
Reembolso de producto alquilado si la reparaci6n de su producto bajo cobertura Ileva
rods tiempo del previsto.
10% de descuento sobre el precio de cualquier servicio de reparaci6n no cubierto, asi
como sobre tas piezas instaladas en relaci6n con dicha reparaci6n.
Una vez adquirido el Contrato, todo Io que necesita para concertar el servicio es una simple
Itamada. Puede Iiamar en cualquier momento, de dfa o de noche, o concertar una cita de
servicio online.
El Contrato Maestro de Protecci6n es una compra libre de riesgos. Si pot alguna raz6n canceia el contrato durante el periodo de garantfa del producto, le reembolsaremos la totalidad
del pago. O, si el periodo de garantia del producto ha vencido, le reembolsaremos con tarlfa
especial, iCompre hoy mismo su Contrato Maestro de Protecci6n!
Se aplican algunas limitaciones y excepciones. Para precios e informaci6n adicional en EEUU,
Ilame al 1-800-827-6655.
Servicio de Instalaci6n Sears
Para la instalaci6n profesional Sears de aparatos domdsticos, sistemasde apertura de puertas
de cjara)e, calentadores de agua y otros elementos domdsticos,Ilame ai 1-800-4-MY-HOME
®.
29
1. Para mover el aparato, sujete el equipo por et asa recortada en cada lado de la unidad.
Levante con cuidado el aparato hasta que se deslice de la base de espuma.
2. No toque las rejillas cuando mueva el aparato.
3. Ponga el aparato de pie en la posici6ncorrecta. (Aconsejamosconservarel embalaje para
almacenamiento fuera de estaci6n o peHodosde inactividad prolongada}.
Asa para transporte
Asa para transporte ,_.
Saque el acondicionador de aire de la caja de embalaje. Se aconseja cjuardar la caja de
cart6n y el material de embalaje para almacenar o transportar el aparato.
Frente del aparato (Fig. 1)
I. Rejillas de salida del aire
2. Asa para transporte
3. Panel de control
(1)
(2)
4. Soporte para mando a distancia
5. Entrada inferior de aire
6. Ruedas
(6)
(9)
(lO)
(1I)
(12)
-(13)
3O
Trasera del aparato (Fig. 2)
7. Compartimento
del filtro de aire
8. Asa para transporte
9. Entrada superior de aire
10. Soporte para tubo de purgado
11. Entradas inferiores de aire
t2. Salida de desagiJe
13. Cable de alimentaci6n
En la configuraci6n
inicial
del aparato,
compruebe
lct presencia de todos los accesorios de kt siguiente lista:
-...Tji
ldciptador
del tubo de purgado
Adaptaclor
Adaptador del kit de ventana
IMPORTANTE:
del tubo de ventona
Mando
a distancia
El kit de ventana
Tubo de purgado
de 5'
Kit de venfana
de 3-Piezas
2 pilas AAA
y el tubo de purgado debe instalarse
para el co-
rrec¢o funcionam|ento (Fig. 3)
1. Para evitar dafios, slt0e el aparato en posici6n de pie un m/nimo de 12 horas antes
de ta puesta en marcha inicial. De ese rnodo se asegura que todo el aceite tubricante se asiente en el fondo del compresor, evitando da_os alas partes interncis.
2. Exfienda completamente
los dos extremos del tubo de purgado aproximadamente
6 pulgadas; hecho esto, enrosque ambos adaptadores de los tubos a cada uno de
los tubos de purgado en el sentido de las aguas del reloj hasta que queden bien
sujetos.
3. Conecte el tubo al aparato
girando
en el sentido de ias agujas del reloj el apara-
to y sujet6ndolo con las presillas en torno ai soporte dei tubo de purgado.
4. Conecte el Adaptador
del kit de ventana al Adaptador de purgado de la ventana
alineando las presillas y gfrelas ligeramente en el sentido de las agujas del retoj
para fijarlos.
Presillas de cierre
Gire el Adaptador del tubo de purgado en el
sentido de las agujas del reloj para fijarlo en
su sitio
.3I
POSICIO N DEL ACONDICIONADOR_DE
AIRE PORTATIL (Fig. 4)
12" (30 cm)
12" (30 cm)
1. Elija un punto cerca de una ventana y de una toma de corriente,
2. SitOe el aparato en un lugar llano, espacloso, con un m/n_mo de 30 cm (1 foot) entre tas salidas de aire
y cualesquiera paredes o muebles alrededor.
3. No haga funcionar el aparato en lugares extremamente hgmedos, como una sauna.
INSTALACION
DEL KIT DE VENTANA
Et kit de ventana (fncluido) contlene tres piezas deslizantes, y puede acomodarse de modo que se ajuste a
ta mayor parte de las ventanas est6ndar verticales y horizontafes (ver Fig. 5 y Fig. 6).
Ventana
i
Vertical
Irll
ili
Ibi
Ventana
Vertical
Para ventanas muy anchas, utilice las tres piezas. La anchura =============================
m6xima son 58". Para
ventanas estrechas, es posibte que tenga que cortar el extremo de la pieza con el agujero de conexi6n
det tubo. La anchura mfnima son 10". Corte el kit de ventana utilizando unas tijeras fuertes o unas cuchrIlas de usopesado.
No carte el agujero de purgado.
CONEXION DEL TUBO DE PURGADO
El tuba de purgado debe conectarse para refrigeraci6n y deshumidifi. caci6n. Cuancloinstale el tuba de purgado, trate de mantenerlo lo m6s
piano posible.Cuanto menos 6ngulos y dobleces en el tuba, mejor
trabajar6 el aparato. Si es necesaria una doblez o un dngulo, utilice
6ngulas de 90 ° (Fig. 7). Con muchas dobleces, las prestacionesy la
eficacia disminuir6n.AsegOrese de que no hay puntos bajos, para _mpedir la formaci6n de humedad. Conecte el adaptador del kit de ventana
al kit mismo colocando el adaptador en el agujero de purgado. Empuje
hacia adeiante hasta que quede bien sujeto.
32
Este producto Ileva un enchufe de seguridad LCDI (!nterrupci6n y detecci6n de fugas de corriente). Si se
corta la corriente0 ctesenchufar de la t0ma de corriente y asegurarse de que el cable no haya sufrido
cla_os, Si e! cable ha sufriclo cta_os, Ilame al t-800-469-4663 para concertar la reparaci6n.
PARA PROBAR EL ENCHUFE
1. Conecte
el enchufe
DE SEGURIDAD
de alimentaci6n
a una toma de corriente.
2. El enchufe de alimentaci6n
tiene dos botones en su porte superior. Un bot6n Ileva el r6tuto "TEST", ei
otro "RESET'. Pulse el bot6n de "TEST"; escuchar6 un clic, y el bot6n "RESET" sobresaldr6.
3. Pulse et bot6n "RESET"; escuchar6
4. El cable de alimentaci6n
el clic de activaci6n
recibe ahora
indica una luz en la cabeza
corriente
del bot6n.
y l|eva electricidad
al aconcliclonador
de aire (asi Io
del enchufe)..
° E_enchufe de seguridad LCDI no se debe utilizar en ninguna circunstanc{a para encender o apagar el
aparato.
* El bot6n de "RESET"siempre debe estar preslonado (acfivado) para que el funcionamiento sea correcto.
" El cable de alimentaci6n debe sustitulrse sial pulsar el bot6n "TEST" no se activa RESET.
(8)TANQUE
LLENO
(4) DISPLAY
(5) REFRIGERACION
(2) MODO
_
(3) SELECT
DE LED
(7)
VENTILADOR
(6) DESHUMIDIFICADOR
TEMP
(1) ONtOFF
1. ON/OFF - Pulse este bot6n para encencler o apacjar el acondicionador de aire.
2. MODO - Pulseeste bot6n para seleccionar entre los moclos de Refrigeraci6n, Deshumidificaci6n o Circulaci6n de aire. Cuando se seleccione un modo, se iluminar_ el indicador correspondiente: (5) Cool (refricjerar)0 (6) Dry (deshumidificar), y (7) Fan (ventilador).
3. SELECTTEMP Pulseia fecha direccional "arriba" en modo refrigeraci6n para aumentar 1° F
la temperatura que se desea programar, basra un m_ximo de 86 °F. Pulse la flecha "abajo" en
modo refrigeraci6n para bajar 1 °F la temperatura deseada hasta un m_nimo de 61°F.
4. TANQUE LLENO - En condiciones extremas de calory humedad, el tanque de reserva de
agua puede Ilenarse. Cuando se enciende el indicador de tanque Ileno, el tanque de reserva
de agua de aparato est_ Ileno. El aparato dejar6 de funclonar. Vacie el tanque de reserva. El
aparato no se enffiar_ mientras no se vacfe el agua det tanque.
33
En la Fig. 10 de ta p6gina 14 encontrar6 tas
descripciones del display
del mando a distancia.
(2)
(1)
(3)
(4)
(5)
(7)
(8)
NOTA: En este aparato, los botones blancos
no tienen funci6n alguna.
BOTONES DEL MANDO A DISTANCIA (Fig. 9)
I. Pulseel bot6n ON/OFF una vez para
encender el aparato manualmente. Pulseel
bot6n una vez m_s para apagarlo.
2. Pulse repetidas veces el bot6n MODO
para pasar de un modo operativo a otto:
cool (refrigeraci6n), dry (deshumidificador),
fan (ventilador) o auto. NOTA: El mando a
distancia debe estar en uno de esos cuatro
modos para controlar el aparato. En Modo
Fan (ventilador), pulse el bot6n MODO dos
veces para pasar al modo Auto.
3. En modo de refrigeraci6n (cool), pulse los
botones - o + para seleccionar la temperatufa deseada. La temperatura establecida
en el mando a distancia y en el aparato
aumentar6 o disminuir& Mantenga pulsados
los botones - y + durante 2 segundospara
aumentar o disminuirr6pidamente la temperatura programada. El intervalo de temperaturas va de 6t°F a 86°F. NOTA: En los
modos deshumidiflcador (dry), auto o ventilador (fan), la temperatura establecida no
aparece en el display del aparato, y pulsar
los botones - o + en el mando a distancia
no regular6 su temperatura establecida,
4. En modo de refrigeraci6n
(cool), pulse el
bot6n FAN repetidas veces para regular la
velocidad del ventilador; puede escoger
entre Auto, Low, Medium y High (Auto, Baja,
Media y Alta). En modo de ventitaci6n (Fan)
o Auto con ventilador seleccionacto, pulse el
bot6n FAN repetidas veces para regular ta
velocidad clel ventilador;
puede escoger
entre Auto, Low, Medium y High (Auto, Baja,
Media y Alta).
5. En los modos de refrigeraci6n, deshumidificaci6n, ventilaci6n o auto (cool, dry, fan o
auto), pulse el bot6n de oscilaci6n _! para que
el aparato alce y baje autom6ticamente las
rejillas en modo continua, para variar la
direcci6n del aire.
6. En modo refrigeraci6n (cool), pulseel
bot6n SLEEPpara activar esta funci6n.
SLEEPreduce el usa del compresor y aumenta el ahorro de energ[a aumentando levemente la temperatura programada mientras
usted duerme. Con ia funci6n SLEEPhabilitada, la temperatura programada aumentar6 autometicamente 2 °F al cabo de una
hora. Una hora despu_s, la temperatura
aumentar6 otros 2°F, con un aumento total
de 4°F.
Pulse el bot6n SLEEP una vez m6s, o el bot6n Modo para inhabilitar esta funci6n.
funci6n
refrigeraci6n
34
La
SLEEP s61oeste disponible en modo
(cool).
BOTONE$ DEL M_IDO
BLOQUEO DELMANDO A DISTANCIA
Pulsesimult6neamentelos botones de + y
para bloquear los botones del mando a
distancia. Una vez bloqueados, no se puede
uti|izar el mando a distancia para hacer
funcionar et aparato. Putse simutt6neamente los botones de ÷ y - una vez mas para
desbtoquear el mando a distancia.
A DISTANCIA (Fig.
9)
7. Temporizador de encendido autom6tico:
Cuando el acondicionador de aire est_
apacjado, puedeprogramarse para que se
encienda autom6ticamente en un ptazo que
puede variar de 30 minutosa 24 horas,
conservando la 01tima configuraci6n. Para
programar el Temporizador de encendido
automc_tico, con el aparato en off:, diricjir el
mando a distancia hacia el acondicionador
y pulsar el bot6n TIMER. Pulsar entonces los
botones + o - para ajustar el tiempo prograrnado en intervalos de 30 minutos (0.5
horas). Una vez establecido el tiempo
deseado, pulse de nuevo el bot6n TIMER.
Sonar6 una alarma sonora, y el indicador
TIMER ON dejar6 de parpadear, indicando
que se ha cjuardado ta conficjuraci6n y que
el temporizador est6 activado. Para anular
el temporizador de encendido autom6tico,
pulse de nuevo el bot6n TIMER.
CAMBIO DE LECTURADE TEMPERATURASo
CY°F
Con el aparato apagado, pulse los botones
MODO
y - simult_neamente
para
cambiar
[a lecturade la temperatura de °F a °C.
Pulselos botones MODE y - simult_neam_ente una vez m_s para cambiar la lectura de
temperatura de °C a °F.
COLOCACI6N DE LAS PILAS- El mando a
distancia incluido usa dos pilas AAA.
1) Quite la tapa trasera del mando a distancia
Temporizador de apagado autom_tico:
Cuando et acondicionador de aire est6
encendido, puede programarse para que se
apague autorn6ticamente en un plazo que
puede variar de 30 minutosa 24 horas.
Para programar el Temporizador de apagado autom_tico_con el aparata encendido,
dirigir el mando a distancia hacia el acondicionador y pulsar el bot6n TIMER. Pulsar
entonces los botones + o - para a)ustar el
tiempo programado en intervalos de 30
minutos (0,5 horas). Una vez alcanzado el
tiempo deseado, pulse de nuevo el bot6n
TIMER. Sonar_ una alarma sonora, y el
indicador TIMER OFF dejar6 de parpadear I
indicando que se ha guardado la configuraci6n y que el temporizador est_ activado.
Para anular el temporizador de apagado
autom6tico, pulse de nuevo el bot6n TIMER.
2) Coloque dos pilas AAA de 1.5V, asegur_ndose de que la poslci6nes la correcta.
3) Ponga de nuevo la tapa.
NO mezcle pitas usadas con pilas nuevas.
NO mezcle pilas AIcalinas con pilas Est_ndar (Carb6n-Zinc) o Recargables (NiquetCadmio). Elimine tas pitas correctamente.
NO deje las pilas en el mando si no Io va a
usar en un periodo superiora 2 meses.
8. Pulseel bot6n LIGHT (luz) para encender
o apagar los indicadores luminosos del panel de control.
35
_'.
Fiq. 10
(1)
(2)
(12)
(3)
(11)
(4)
10)
(8) (9)
DISPLAY DEL MANDO A DISTANCIA (Fig.
lO)
1. Auto - Elige uno de los modos que aba]o
se indican en funci6n de la temperatura que
el acondicionador de aire mida en la habitaci6n.
2. Oper - Indica que se ha pulsado un bot6n
en el mando a distancia y que se est6 enviando la se_al al aparato.
3. Cool - Modo de refrigeraci6n
4. Dry - Modo deshumidificador
5. Fan - Cuando en el display se visualiza el
icono del ventilador0 se ha seleccionado el
modo de circulaci6n de aire.
6. Lock - Indica que los botones det mando
a distancia est6n bloqueados
8. Light - Habilita o inhabitita los luces de
los iconos del panel de control y del display
de LED
9. Oscitaci6n -Hace que las rejiltas se muevan hac(a arriba y hacia abajo autom6ticamente para cambiar la direcci6n del aire.
10. Timer - Si est6 encendido ON, est6 habilitada la funci6n de autoencendido del temporizador. Si est6 encendido OFF, est6
habilitada la funci6n de autoapagado del
temporizador. Los n0meros indican en horas
el tiempo a programar en el temporizador
11.°Fi°C - ind(ca qu6 tipo de lectura de
temperatura se ha habilitado.
12. Velocldad dei venfilador - Muestra la
velocidad del ventilador elegida
7. Sleep - Funci6n de ahorro de energ(a que
aumenta ligeramente la temperatura en el
Modo de refrigeraci6n
36
IMPORTANTE: Una vez encendido el aparato, el ventilador se pone en marcha, pero el compresor no
comenzar6 a funcionar basra pasados unos ires minutos, aproxlmadamente.
Una vez en marcha el compresorf comenzar6 a soplar oire fresco, pero el efecto en la habitaci6n
puede tardar arras 5 minutos en
notarse. Este comportamiento ayuda o prolongar la riga 0til del compresor. Encontrar6 m6s informaci6n
en ia secci6n "Resoluci6n de problemas'. No toque las rejillas, ya que podr_a causar da_os. Este aparato
ofrece un ajuste autom(_tico del flujo de alre, que se activa al encengerlo.
MODO REFRIGERACION (COOL)
• Coloque el aparato en la habitacibn que requlera refrigeraci6n.
* En digs de color; oconsejamosencender e! aparato par la ma_ana temprano para obtener et rn_ximo
efecto. El aparato cuenta con un sistema de auto.evaporaci6n para eliminar et agua que se congensa en
61durante la refrigeraci6n. El tuba de purgado debe estar conectado y debidamente instafado para que
la habitaci6n se enfd'e debtdamente. Consulte ias instrucciones de INSTALACION en los paginas 9-10 de
•esta GUJA DE usa Y MANTENIMIENTO.
• Utilice el bot6n MODE del panel de control gel aparato o gel mando o dlstancia y establezco COOL
(refrigerar). Regule la temperatura programada utitizando los botones arriba y abajo gel aparato o - y +
er_el mando a distancia. La temperatura de refrigeraci6n puede estar entre 61°F y 86°F.
• Utilizando el mando a distanc_a, pulse el bot6n FAN para regular la velocidad gel ventilador; puede
escoger entre Auto_ Low, Med o High (Auto, Baja, Media o Alto).
MODO DESHUMIDtFICADOR (DRY)
* Coloque el aparato en la habitaci6n que requiera geshumidificaci6n.
El tuba de purgado debe estar conectado y debidamente instalado para que la habltaci6n se enfr[e
debidamente. Consulte las instrucciones de INSTALACKbN en los p_ginas 9-10 de esta GU(A DE USa Y
MANTENIMtENTO.
" Utilice el bat6n MODE de?panel de control del aparato o del mando a dlstancia y estoblezca DRY
{deshumidificagor).
* En Modo DRY, el ventilador est,=en velocidad baja y no admite regulaci6n.
• El compresor funcionar6 continuamente cuando el aparato trabaje en modo DRY
" Un control antiescarcha incorporado es sensiblea la formaci6n de escarcha en los bobinas gel evaporador. Durante la eliminaci6n de |a escarcha, el compresor se apagar6 autom_ticamente. El ventilador
seguir6 funcionado para etimtnar la escarcha de las bobinas. Una vez ellminada la escarcha, el compresor se pondr_ de nuevo en marchao
NOTA: La temperatura establecida no aparecer6 en el display gel aparato. La ternperatura establecida y
la velocidad del ventilador no pueden regu|arse en este modo de funcionamlento.
MODO VENT[LADOR (FAN)
• Coloque el aparato en la habitaci6n que requiera ventiiador o circulaci6n de aire.
* Utilice el bot6n MODE del panel de control gel aparato o del mondo a distancia y estabfezca FAN
(ventilador). ° Utilizando el mando a distanciar pulse el bot6n FAN para regular la velocidad del ventitador; puede escoger entre Auto, Low, Med o High (Auto_ Baja, Media o Atta).
* Si elicje la opci6n Auto_ la ve|ocldad del ventilador cambiar_ a Alto o Media, en funci6n gel Oltimo
ajuste efectuado en la funci6n establecer temperatura del modo de refrigeraci6n.
NOTA: La temperatura programada no aparece en el disp(a¥ y no puede regularse mientras est_ activo
este mogo.
3?
MODO AUTO
a Cotoque el aparato
en la habltaci6n
deseada.
• E! tubo de purgado debe estar conectado y correctamente instalado para refrigerar o deshumidificar la habitaci6n correctamente. Consultelas instrucciones de INSTALACION en las
p6ginas 9-10 de esta OU1A DE USO Y MANTENIMIENTO.
• Util|ce et bot6n MODE det mando a distancia para programar la funci6n det aparato en
Auto. La temperatura programada no aparece en el display y na puede regularseen Modo
Auto.
• Una vez en modo Auto, el aparato seteccionar6 autom6ticamente el modo en funci6n de la
temperatura actual de la habitaci6n.
AJUSTESDEL MODO AUTO
Menos de 68°F
68°F.
Modo Venfilador
78°F
Modo Deshumidificador
79°F o Mas
(DRY)
Mode Refrigeraci6n
NOTA: Si la temperatura de la habitaci6n est6 entre 68°F y 73°F y el modo establecido pre_
viarnente, antes de cambiar a Auto, era VentTlador, pasar6 pot defecto a modo Ventilador..
Cuando ta temperatura de la habitaci6n est6 entre 74°F y 78°F, pasar6 pot defecto a modo
Deshumidificador (Dry).
FUNCI_N
SLEEP
• En modo refrigeraci6n, programar Ja temperatura deseada pulsando los botones arriba y
abajo del panel de control dei aparato o los botones - y -I- del mando a distancia. La temperatura de refrigeraci6n
puede establecer entre 61°F y 86°F.
• Ajuste la velocidad del ventilador de Bajo, Media, Alta y Auto pulsandoel bot6n FAN en el
mando a distancia.
° Pulse el bot6n SLEEPen el mando a distancia para activar esta funci6n. La funci6n Sleep
s61ofuncionar6 en modo refrigeraci6n.
• Cuando la funci6n Sleep est_ activada, la temperatura programada aumentar6 autom6ticarnente 2°F pasada 1 hora. Una hora despu_s, la temperatura aumentar6 otros 2°1:, con un
aurnento total de 4°F.
° Para anular la funci6n Sleep, pulseel bot6n SLEEPen el mando a distancia o el bot6n MODE en el panel de control del aparato o en el mando a distancia.
NOTA: La temperatura establecida que aparece en el display del panel de control de la unidad yen el mando a distancia permanecer6 en la posici6n inicial mientras est_ habilitada la
funci6n Sleep.
38
En ocasiones excepcionales0 si la temperatura o ia humedad del aire son muy altas, el
acondicionador
de aJre podrfa no set capaz de evaporar toda el agua con la necesaria
rapidez. Tada la humectad que no se puede evaporar pasa al tanque de agua dentro del
aparato. Cuando el tanque esf_ completamente
lleno, sonar6 una alarma, el compresor se
apagar6 yen el panel de control se encender6 el icono que representa un cubo Ileno. Para
vaciar el tanque, siga las instrucciones que se clan a continuaci6n.
1. Apague el aparado
y desenchOfelo.
2. Busque un recipiente
3. Quite del aparato
4. Vacie
peque_o para vaciar el agua.
el tap6n
de vaciado
el agua en el recipiente
5. Una vez completamente
preinstalado
(Fig 11).
peque_o.
vaciado,
ponga de nuevo el tap6n.
!1
39
Nota: Aseg0rese de que el aparato est6 apagado (off) y de que el cable de alimentaci6n no est_ enchufado antes de efectuar actuaciones de mantenimiento
en el
aparato.
Limplar o sustituir el flltro - Si el filtro de aire est6
bloqueado con polvo, el volumen del flujo de aire
puede disminuir. Se recomienda limpiar el filtro
para timpiar el filtro una vez cada dos semanas, o
Tirar del filtro para uitarlo
segOn se necesite.
1) Quitar el filtro del compartimento en la
parte trasera det aparato (Fig. 12).
2) Lavar el filtro de aire sumergi_ndolo
cuidado en agua caliente
con
con detergente neutro. Enjuagar el filtro y
secarto a fondo a la luz del sot.
3) Deslizar el filtro de nuevo en su compartimento una vez est6 completamente
seco,
4) Si el fUtro esta desgarrado o no puede
usarse, Iiamar al 1-800-252-1968.
L|mpiar la Caja del aparato
1) Evitar la exposici6n del aparato
2) Limpiar
a la luz solar directa para que no pierda color.
la superficie con un trapo hOmedo y secarlo con una toalla
suave.
Almacenam|ento
prolongado o transporte
1) Desenchufar el aparato.
2) Eliminar el exceso de agua vaciando el tanque de reserva de agua. Consultar ]as
instrucciones de Limpieza y mantenimiento.
3) El aparato
debe guardarse o transportarse
4O
en pie en un lugar seco.
k
MODELO
' "_83126
................
115V-60Hz
Voltaje
III
Intensidad:
RefrigeracJ6n
11.5Arnps
Consumo energ_tico:
Refrigeraci6n
1465 Wats
Poder refricjerante
12,000 BTU/h
Poder deshumidificador
82 Pints / Day....................
(38.8 Litros / Dfa)
Capacidad del tanque de reserva de agua
60.9 ounces (1.8 Litros)
Ni,,elderuidod_(Ai(H)
i1,,i
'
55 dB(A)
.....
235"M6ximo con ventilador a alta
velocidad
Circulaci6n de aire (CFM)
INCLuIDo
iiii i,,,
Mando a distancia
"Medidas (A x H'X P)
17.75" x '33.125" x 17.125" (45.09cm
x84.14crn x 43.50crn)
ii
Peso neto
80 Ibs / 36.3 kg
ii
41
Si su acondicionador de aire no funciona, siga las instrucciones que se dan a continuaci6nantes de contactar al servicio de asistenciaal ctiente°
NO INTENTE ABRIR O REPARAREL ACONDICIONADOR DE AIRE USTED MISMO. EN CASO CONTRARIO, LA GARANTtA QUEDARA ANULADA Y PUEDECAUSAR DANOS A PERSONAS Y COSAS.
Problema
Posibtescausas
Soluciones
8Puedo encender el
aparato nada m6s
sacarlo de la caja?
,ram ,,=.,,,,,,, , ,, ,, ,,,, ,,, ,,,,,
• No; el aparato debe deiarse en posici6n de pies
un mlnimo de 12 horas despu_s de cada transporte. En caso contrar[o,
da_os
e[ compresor
puede sufrir
,
E1aparato no se enciende cuando se pulsa
el bot6n de encendido
° La temperatura del local es
inferior a la temperatura
Et acondicionador de
alre no se enciende
No hay electricidad
• No est6 enchufado
• Ha saltado el secjuro interno
• Ha saltado et seguro del
enchufe
• Comprobar que no ha'ca saltado ei autom_tico
en la casa
• Enchufar correctamente
° Esperar 30 mlnutos; si el problema persiste0
flamar al 1-800-469-4663 para concertar la
inspecci6ny reparaci6n del producto.
"Restabfecer el seguro
El aire acondiclonado
s61ofunciona durante
un breve tiempo
• Hay estrangulamientos o
dobleces en el tuba de purgado del alre
• Alga implde la salida del
aire
• Colocar el tuba de aire correctamente_ monteni4ndolo to m6s corto y libre de curvas posib[e
para evitar estrangutamientos.
" Inspeccionar y eliminar cualquier obst6culo
que obstruya la salida del aire
La habitaci6n no est6
suficientementefria
• Hay ventanas o puertas
abiertas en la habitaci6n
* Hay fuentes de calor cerca-
• Cerrar todas Ias puertasiventanas
• Refirar la fuente de calor, de set posible
• Conectar el tuba de purgado y asegurarse de
que pueda funcionar correctamente
• Baiar la temperatura programada
- Limpiar el filtro de aire
programada
• Subir la temperatura
programada
(modo enfriar)
has
• Ettuba de purgado de aire
no est6 ¢onectado o est6
bloqueado
• Se ha programado una
temperatura demaslado affa
o E| filtro de purgado del aire
est6 atascado con polvo
El acondicionador de
aire no funciona durante unos tres minutos
despu_sde encender|o
de nuevo
° El control del compresor
impide que la unidad se ponga de nueva en marcha mientras no hayan pasado tres
minutos desde ta Oltima vez
que se apag6
- Esperar. Este retraso es parte de| funcionamiento normal
Ruido o vibraciones
* El suelo no est6 nivelado o el
aparato est6 en una superficie
inclinada
• Colocar et aparato en una superficieptana,
nlvelada
Gorgoteo
° El sonidoe$ causado par el
flujo de refrigerante en el
acondicionador de aire
42
• Fs normal
Problema
Poslbles causas
E]aparato desprende
olor durante el funcionamiento
Soluciones
* Primer usa del aparato, o
despu#.sde haber permanectdo
cjuardacloen una zona con
* Pueden producirse olores la primera vez que se
usa y tras un largo peHodo de inactividad s_se
pone en marcha en lugares inadecuados (6reas
po}vo.
con polvo, par e]emplo). Haga funcionar el aparata durante 1/2 dia. Ei olor desaparecer_
tras un
poco de tiempo.
la hobitaci6n.
i i,,,,,,,,,,
En caso de afar intenso, ventilar
i i
• Funcionamiento normal
° Despu_s de pulsar el bot6n de ENCENDIDO
ON, el compresor tardar_ todav_a 3 minutosen
ponerse en marcha. El atre acondicionado comenzard a fiuir una vez que el compresor se ponga en
marcha_ pero puede tardar todav_a arras 5 minutes.
E! aparato se desacfiva
* Euncionamientonormal
• At alcanzar la temperatura establecida, el aparata se desactlva (off) autom6ticamente. Controlar la temperatura pmgramada.
El aparato no enfrfa
satlsfactorlamente
• La temperatura del local es
alta cuando se enciende par
primera vez el aparato (ON}
EJ compresor
no se
activa inmedlatamente
al pulsar el bot6n de
encendido ON
........
_,,,,,,,,,,,,,
ii •
iii
iii
La lectura de temperatura ha cambiado de °F a
°C
i, ,,,,,,,,
i
ii i,I,,JlL
iii.
I.,,L
i iii1,,11,,,,,,,,,,,
* Los acondicionadores de aire son m6s efectivos
si se mantiene una temperatura m6s fresco en el
local. Enfriar el aire en una habltac16n muy
caliente requiem mucho m6s tiempo y energia.
ii
* Se ha cambTado la lectura de
temperatura usando el mando
a dlstancia
i,i
° Aseg6resede que et aparato est6 desactivado
OFF. Pulse losbotones "MODE" y %" simult6neamente para volver a °F
i
iiii
i
* Se ha cambiado la lectura de
temperatura usando el mando
a dlstancla
• AsegOrese de que el aparato est6 desactivado
OFF. Pulse losbotones "MODE" y "-" simult6neamente para volver a °C
El mando a distancia
est6 bloqueado
° Se han pulsado simult6neamente los botones"2' y "+"
• Pulse los botones"-" y "+" simult6neamente
para desbloquear el mando a distancia
Los indicadores tumino_
sos de Control no se
encienden cuando el
aparoto est6 en marcha
• Losindicadores tuminosos de
control se ban apagado usando
el mando a distancia
• Pulsesimult6neamente los botones "+" y "FAN"
para que se enciendan los indicadores luminosos
de Control
La lectura de Temperatura ha ca mbiado de °C
a °F:
1111111111'
.................................
i1.,...i
.........................
43
, .
i
C6digos de Error
C6digos de Error
C6dlgos de Error
iii
, ,
i,,,,,,,,,,u,,,|
,11i
E5
Protecci6n contra bajo voltaje
Desenchufe
durante
diez minutos y vuelva a
encender el aparato. Si sigue apareciendo el
c6dicjo "ES" Ilarne al 1-800-469-4663
para
concertar la inspecc;6n y reparaci6n del producto.
i.i.
H8
El tanque de reserva de
agua est6 Ileno
,,,,,,,.i
Si el tanque de agua est_ Ilenosen et display
aparece la sepal de advertencia "H8". Para
poner el aparato de nuevo en rnarchat desenchOfelo y quite el tap6n det desacjGeinferior
para poder vaclar e! agua. Utilice un recipiente de recogida adecuado. Una vez eliminado
toda el agua, ponga el aparato en marcha
nuevamente. Ahora puede usar el aparato
coma de costumE_re.
,i !
F1
El sensorde temperatura
ambiente interior no funciona correctamente
Desenchufar
durante 10 minutos y poner de
El sensor de temperatura
de
interior del evaporador
no
funciona correctamente
Desenchufar durante 10 minutos y poner de
nuevo en marcha el aparato. Si sigue apareciendo el c6digo "F2" tlame al 1-800-4694663 para concertar ta inspecci6n y reparaci6n del producto.
nuevo en marcha el aparato,
Si slgue apare-
ciendo et cSdicjo "FI" I[ame at 1-800-,469-4663
para concertar la inspecci6n y reparaci6n del
producto.
F2
i
Jil.i
• ..i
Elsensor de temperatura del
condensador no funciona
correctamenfe
44
Desenchufar durante 10 mlnutos y poner de
nuevoen marcha e| aparato. Si sigue aparecTendoel c6digo "F4" Ilame at 1-800-4694663 para concertar la inspecci6ny reparaci6n del producto.
45
Your Homre
For t_oubteshooti_g_=product manuals
and expert a@¢ice:
www.managem¥1tfe.c om
For repair - in your home - of all major brat=_dappliances,
lawn and garden equ_ment, or heating and cooling systems,
no matter who made |t, no matter who sold it!
Fo_ _e replacement parts, accessories and
owner's man,uats that you need to doqt*yourself_
For Sea_s professiona_ installation of home _ppt_nces
and i_ems like g_rage door openers and water heaters.
( 1=800-469-4663)
Call _nytime, day or night
www.se=rs.com
Our Home
For repair of carPi-in _tems |ike vacu urns, _awn equipment,
and electronics, cati an_me for the location of your nearest
Sears Parts & Repair Service Center
1-800-488-1222
WWW,SearS.
To pur_ase
(U.S.A
¢ O_
a protection agreement on a product serviced by Sears:
1.800.827-6655
(us.A)
Para _edir servido de reparacidn
a do_c_l_o: y par8 ordenar piezas:
i-888-SU_4OGAR
e
O-ees.q84-_27,_
www:sears.com
IIII!III
Ii1111
I111
i11111
!!!!1
66129912644