1
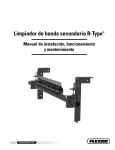
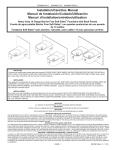
STEP 5
Connecting the Electrical (continued)
Plug the factory supplied, three-prong plug located at the bottom back right corner of the grill into the grounded receptacle.
Also, install the rotisserie motor and spit at this time (Use and Care instruction for proper rotisserie installation) be sure to plug only into a
grounded receptacle.
Three-Prong Plug
Figure 8:
Three-Prong Plug and Receptacle
Three-prong grounded receptacle
and cover plate
STEP 6
Verifying Proper Operation
WARNINGS:
1. If the grill or cooktop fails to operate properly, ensure that the electrical power supply and gas
supply are turned on and that all installation steps have been carefully followed. Call a qualified
service technician if the grill still does not operate properly.
2. The grill or cooktop and shut-off valve must be disconnected from the gas supply piping during
any pressure testing exceeding 1/2 psi (3.5kPA).
3. The grill or cooktop must be isolated from the gas supply piping by closing the shut-off valve
during any pressure testing at or below 1/2 psi (3.5kPA).
4. The top cover (canopy) is to be closed during the outdoor cooking gas appliance pre-heat
period.
5. Visually check the burner flame for carry over and proper operation.
6. Proper flame operation will show a soft blue color and stable flame.
7. Remove side burner cover before operating side burners.
8. Never place the cover over operating side burners.
9. Remove all shipping material from around side burners and side burner cover before operating
side burners.
Lighting Instructions for Grills or Cooktops (Liquid Propane)
Turn ON the main tank valve, then turn all burners ON to the high position for approximately 20 seconds to allow the air in the system to purge
from the grill and cooktop side burners.
Once the gas has filled the lines the automatic electronic ignition system should ignite the burner. If the system burners do not ignite within 20
seconds turn all burner controls to the OFF position and wait five minutes and attempt the ignition process again.
If the second or third attempt to ignite the burner is not successful then turn all
burner controls to the OFF position. Turn off the main gas line control valve or LP
tank control valve and contract your authorized Dacor service agent to schedule a
service call.
Light & high position
Off position
Low position
When installed properly, the flame will be steady and quiet. Flame adjustment
will not be necessary, all grill and side burners are factory adjusted, for proper
performance.
Read and understand the accompanying Use & Care Manual prior to cooking
with this appliance. The Use & Care Manual contains additional important safely,
service and warranty information.
Specifications contained within are subject to change without notice. No liability is
assumed for changes in specifications.
Figure 9:
Gas Control Knob
Burner indicator light
Page 9