1
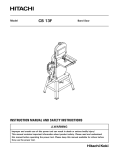
abcdef
UNIVERSITY OF LONDON
HOUSING SERVICES
Electrical Appliance
Manual - 1 Taviton
Street - basement flat
Property Management Unit
44
2
43
Contents Page
General Advise
Boiler
Washing Machine
Oven
Cooker Hobs
Cooker extractor fan
Fridge Freezer
Electric shower
42
3
GENERAL ADVICE
Below is some general safety advice when using electrical equipment:
Please note that the normal voltage and frequency of the electrical supply to
homes in the UK is 230 v 50 Hz. Please do not use any electrical equipment
which exceeds this voltage or frequency.
DO
Check flexible leads on all equipment is in good condition.
Take special care when using electrical appliances in the kitchen
The mixture of water, hot surfaces, flexes and electricity can be
Dangerous
•
•
DON’T
•
•
•
•
•
•
•
•
•
•
4
Use any electrical equipment or switches with wet hands
Wrap flexible leads around equipment that is still warm when storing
Clean any appliance whilst it is still plugged in
Trail flexible leads across sinks or cookers
Try to retrieve toast stuck in a toaster whilst the toaster is still plugged
in, and especially not with a metal instrument
Fill a kettle whilst it is plugged in
Fill a steam iron whilst it is plugged in
Portable appliances such as hairdryers and plugged in radios must
never be brought into a bathroom, even if they are plugged in outside
the room.
Leave electrical appliances on unnecessarily—switch them off before
going out or going to bed—it’ll save you money too!
Overload adaptors by plugging in too many appliances, this is a serious fire hazard
41
BOILER
Vokera 20/80 Flowmatic
The Vokera 20/80 Flowmatic is a central heating boiler supplying central heating and instantaneous domestic hot water. In the winter when both the central
heating and hot water are needed the central heating circulation stops when the
hot water is being drawn off. This will normally not affect the level of heating.
1.
2.
3.
4.
5.
6.
7.
8.
9.
10.
Pilot sight glass
On/off switch
Timed/summer/constant switch
Heating thermostat
DHW thermostat
Gas control knob
Piezo Ignitor button
Pressure gauge
Temperature gauge
Time clock aperture
Lighting the pilot
•
40
5
Switch on the electricity supply at the mains isolating point, but ensure
that the on/off switch is in the off position
•
•
•
•
Select summer position on switch
Ensure that the gas supply to the appliance is on
Press the gas control knob (6) and hold it in whilst pressing the igniter
button (7) until a pilot flame is seen through the viewing window (1).
Continue to press the gas control knob for 15 seconds, then slowly release. The pilot should remain alight. If the does pilot does not remain
alight or goes out on any occasion, wait 3 minutes and repeat the procedure as above.
Switch the on/off switch (2) to on
Hot Water only
•
•
With the on/off switch (2) on, the pilot lit and the selector switch (3) in
the summer position, the main burner will ignite whenever water is drawn
from the tap.
The temperature of water at the tap can be varied by adjusting the water
flow rate at the tap. The hot water thermostat (5) will govern the maximum temperature. Setting 1 approximately 60°C setting 9 approximately
80°C. The temperature gauge (9)indicates the temperature of the central
heating water, not the tap water.
Heating and hot water
•
•
With the boiler on/off switch on and the pilot lit. Turn the appliance
timed/summer/constant switch (3) to constant, the main burner will light
Adjust the thermostat knob (4) to suit the weather; 1 is the lowest setting
and 9 is the highest
Time Clock
When a Vokera time closk is fitted in the boiler fascia it can be used to programme the central heating on and off times.
Timed/summer/constant switch
For the time clock programme to operate the switch (3) must be in the timed
position.
The central heating will operate regardless of the time clock programme if the
switch (3) is in the constant position
6
39
Setting the time clock—24 hour version
The time can be set by grasping the outer edge of the black dial and turning it in
a clockwise direction until the correct time is in line with the white pointer.
Setting switcher times
The on periods are set by sliding the tappets adjacent to the time periods required to the outer edge of the dial.
The tappets will remain at the centre of the dial will be the off periods
Vokera time clock—7 day version
The Vokera digital clock has, besides the normal individual daily setting facility, a group timing feature. Group timing allows for any single time slot of the
12 available to be repeated over one of the following four periods:
Monday to Friday
Monday to Saturday
Monday to Sunday (day display blank)
Saturday and Sunday
Setting the time
•
•
•
•
•
Press and hold the button marked as a clock whilst carrying out steps 2,3
and 4.
Set hour of day using h+ button
Set minute of day using m+ button
Set day of week by repeatedly pressing button marked day
Releasing the button marked as a clock starts time switch running.
Programming of switching on operations
•
•
•
38
7
Press button marked timer once. The time of day –as set—disappears
from the display. Timer on —:— appears
Press button marked day until the day or group of days requiring setting
are displayed
Set the on time of programme required by using h+ and m+ buttons for
hours and minutes.
Again press button marked timer, so that the command will be incorporated in
the programme storage compartment. Symbol timer off—-+— will appear.
Programming of switching off operations
•
•
•
Symbol timer off —+— is visible in the display. Now insert the off time
of the programme required using h+ and m+ buttons for hours and minutes.
Press button marked day until the day or group of days requiring setting
are displayed
In order the insert further switching times on or off operate timer button
once or several times respectively. The display shows a vacant storae
space; for instance timer on.
Input of on/off times as described above may be carried out. 6 on/off programmes can be set.
Press the button marked as a clock on completion of programme settings.
WASHING MACHINE
Electrolux ZWF1211W
8
37
Door Locked Pilot Light
It stays on during the whole programme indicating that the door is locked. When the
light goes out, the door can be opened.
The Control Panel
On/Off Button
On/off button: Press this button to switch the washing machine on. Press the ON/OFF button
again to switch the machine off.
Mains Light –On
Mains light on: The light is connected to the ON/OFF button. It lights up when you press the button, and goes out when you press it again.
36
9
Fabrics Button
Fabrics Button: Press this button repeatedly to select the programme on the basis of the type of
laundry to be washed. The light relevant to the selected programme will light up. The washing
machine will propose a temperature and automatically select the maximum spin value provided
for the programme you have chosen. You can change these values by operating buttons 4 and 5.
Cotton daily—to be used for lightly soiled cotton items in order to obtain a good washing
performance in a short time
Wool/hand wash—When you select this programme, you obtain a particularly delicate wash,
suitable for articles of clothing whose label indicates that the must be hand washed
Temp button
Temperature button: Press this button repeatedly to increase or decrease the temperature, if you want your laundry to be washed at a temperature different from the one proposed by the washing machine. The relevant light will light up. Maximum temperatures
are 90°C for cottons and cotton daily programme, 60° C for synthetic fabrics, 40°C for
delicate fabrics and wool, wool and fabrics to be hand washed.
Spin button
Spin speed button: Press this button repeatedly to change the spin speed, if you want
your laundry to be spun at a speed different from the one proposed by the washing machine. The relevant light will light up.
Rinse Hold Position:
When you choose this option, the machine will not drain the water of the last rinse, so
as not to crease the laundry.
At the end of the cycle, the door is locked, the start/pause button light goes out, the rinse
hold button light remains lit to indicate that the water must be drained and a flashing
zero will appear on the display (the door light is on.)
To complete the cycle, press skip reset button once, so as to cause all the lights to go
off, the display will show three flashing dashes.
The press the fabric button in order to select the desired programme.
10
35
If you wish to drain or spin press skip reset button until the led of the spin or drain position on the programme progress display illuminates.
If you accidentally press the skip reset button more than once, the display will show
three flashing dashes. To drain the water, select any washing programme by means of
the fabrics button, the press skip reset three times in order to select the drain (only the
drain light will remain lit), ten press again the start/pause button.
Wash Choice Button
Press this button to select the following options
•
•
•
Pre-wash: Select this option if you wish your laundry to be pre-washed at 30°C
before the main wash (not available for wool/hand wash programme). The prewash ends with a short spin and for the programme for delicate fabrics the water
is only drained
Intensive: This option can be selected for heavily soiled laundry. If you depress
this button the washing intensity will be increased and the washing time will be
prolonged by a few minutes depending on the selected type of fabric. This option
can be selected with all cottons and synthetic programmes except for cotton daily
programme.
Extra Quick: Select this option for laundry that is only slightly soiled because
this is a very short washing cycle (not available for cottons daily and wool/hand
wash programmes) The washing time will be reduced according to the type of
fabric and the selected temperature.
Options Button
Press this button to select the following options:
•
•
Super rinse: this option can be selected with all programmes except the wool/
hand wash programme. The machine will ad 2 rinses to the cotton programmes
and 1 rinse to the synthetic and delicate programmes. This option is recommended for people who are allergic to detergents and in areas where the water is
very soft.
40° AA: This option can be selected for cottons and synthetics lightly or normally soiled with a temperature of 40°C or higher. The washing temperature will
be reduced and the washing time will be prolonged in order to achieve an AA
class in energy efficiency and washing performance.
Display
Three flashing dashes, when a programme is cancelled by means of the skip reset button
34
11
Duration of washing programme in hours and minutes, after you have selected a
programme.
The washing machine has stopped with water in the tub, at the end of a programme with
the rinse hold option, this is indicated by a flashing zero
The washing machine has completed the programme: this is indicated by a flashing zero
Delay start, a time value indicated in hour and selected by means of the relevant button
(max 23 hours). The delay time is displayed for 3 seconds, then the duration of the selected programme reappears. After you have pressed the start pause button, the countdown begins, and the delay time value decreases by one unit every hour and then, when
2 hours remain, the time decreases in 30 minute intervals
12
33
An incorrect option selection has been made, this is indicated with the message Err
when a function incompatible with the current programme is selected. The incorrect
selection is also indicated by an audible warning signal
An alarm code indicates a fault in the machine operation
Start/Pause Button
Start/pause button: This button has two functions:
Start – after you have selected the desired programme and options, press this button to
start the washing machine. The light above the button will stop flashing and remain lit.
Pause – when you press this button again, the programme in progress is interrupted.
The light above the button will start flashing. To restart the programme, press the button
again
32
13
Skip/reset Button
Skip/reset button: The button performs two functions
•
•
Clears the memory
Selects special programmes
At the end of every programme the reset button must be pressed once or repeatedly to
clear the programme memory. This will be confirmed by three dashes flashing in the
Display. If the previous programme is not cleared, the display will show a 0 flashing
and an audible signal will sound, when you switch the machine on.
Selecting a special programme: A wash programme must be selected in the normal way.
The skip button is then used to cancel or advance the programme to the required phase.
The skip button can only operate during the selection of the programmes or when the
programme is in pause.
A normal ash cycle consists of the following phases wash-rinses-spin and is confirmed
by the illumination of the corresponding LED’s
To select rinses and spin, press the skip button once, the wash LED goes out
14
31
To select spin only, press the skip button twice. The wash and rinses LED’s go out
To select drain only, press the skip button three times, the wash-rinses-spin LED’s go
out. The drain LED only remains alight.
Programme Phase Indicator Lights
When you select a programme, the lights relevant to the phases that form the programme light up.
Operating Sequence
1 . Load the laundry
2 . Measure out the detergent
3. Measure out the fabric softener
4. Switch the machine on
5. Select the desired programme/fabric
6. Select the temperature
7. Select the spin speed or the rinse hold option
8. Select the desired options i.e. quick wash
9. Select the super rinse of 40° AA Option if required
10. Select the delay if required
11. Start the programme
30
15
How to change an option or a programme during its cycle
Before you make any changes, you must pause the machine by pressing the start/pause
button.
It is possible to change the temperature or any option before the programme carried out
Changing a running programme is possible only by cancelling it and selecting a new
Programme. The machine will resume the cycle from the beginning and the washing
water in the tub will not be emptied out.
If it is necessary to drain the water, proceed as follows:
•
•
Pause the machine by pressing the start/pause button
Press the skip/reset button repeatedly, until only the drain light remains lit
•
Press the start/pause button again
When the water has been drained, the display shows a blinking zero. You may now select a new programme and press the start/pause button to start it.
How to cancel a programme during its cycle
To cancel a programme that is being carried out, first pause the washing machine by
pressing the start/pause button, then press the skip/reset button repeatedly, until the display shows three flashing dashes.
How to open the door during the cycle of a programme
You can open the door, after having set the washing machine to pause, provided the
following conditions exist
•
•
•
The washing machine is not in the heating phase beyond 55°C
The level of the water is not high
The drum is not turning
If these requirements are met, when you pause the washing machine, the door locked
light goes off and the door can be opened.
Should it not be possible to open the door, and should it be absolutely necessary to do
so, switch the machine off by pressing the On/Off button. After approximately 3 minutes you will be able to open the door.
PAY ATTENTION TO THE LEVEL AND TEMPERATURE OF THE WATER IN
16
29
THE WASHING MACHINE!
End Of Programme
At the end of the programme, the washing machine stops automatically, gives an audible signal, the start/pause button light goes off, and the display shows a blinking zero.
If you have selected the rinse hold option, the door is locked, the start/pause button light
goes off, the pilot light of rinse hold remains lit to indicate that the water must be
drained. The display shows a flashing zero.
When the programme has been completed, a blinking zero appears on the display and
the audible signal is given. The door locked light goes off.
Press the On/Off button to switch the machine off. The relevant light will go out.
Remove the laundry from the washing machine.
28
17
18
27
Maintenance and Cleaning
After Each Wash
Leave the door open for a while. This helps to prevent mould ad stagnant smells forming inside the appliance. Keeping the door open after a wash will also help to preserve
the door seal.
Maintenance Seal
With the use of low temperature washes it is possible to get a build up of residue inside
the drum. We recommend that a maintenance wash be performed on a regular basis.
To run a maintenance wash:
•
•
•
The drum should be empty of laundry
Select the hottest cotton wash programme
Use a normal measure of detergent which must be a powder
External Cleaning
Clean the exterior cabinet of the appliance with soap and water only, and then dry
thoroughly.
Cleaning the Dispenser Drawer
The washing powder and additive dispenser drawer should be cleaned regularly.
Remove the drawer by pressing the catch downwards and pulling it out.
Flush it out under a tap, to remove any traces of accumulated powder.
To aid cleaning, the top part of the additive compartment should be removed.
26
19
OVEN
Diplomat
Operating the clock programmer
The timer controls the oven heating element only. The current time of day must be set
before the oven will operate.
20
25
The following functions are available on your programmable timer:
•
•
•
Automatic, semi automatic or manual modes
Current time clock display in 24 hour format
Timer alarm that can be used as a minute minder
If the timer has been set to an automatic or semi-automatic programme, the daily time
cannot be re-adjusted, so the semi or auto programme must be cancelled. See ‘How to
cancel automatic programme.’
How to set the current time of day
The clock display uses the 24 hour system
1.
Press and hold
2.
3.
Press + to increase or—to decrease the time.
Adjust using + or—to set the current time. If auto flashes, see ’How to cancel
automatic programme’
Release the buttons, the clock will now start
4.
and
at the same time
Semi-automatic programming
This mode allows a manual start time but an automatic switch off time, which is useful
to prevent the over cooking of food.
24
21
1.
Press
(Auto and
2.
3.
4.
Press + or—to set the cooking time duration in minutes.
will be displayed.)
5.
6.
Set the oven thermostat knob to the required temperature.
The oven will switch on and cooking will start
The programmer will switch the oven off at the end of the preset cooking time.
Auto will flash and the timer alarm will bleep. To turn off the alarm press
The oven will switch on at the required time, cook the food and switch
off at the pre-determined time
At the end of cooking the alarm will bleep and AUTO will flash. To turn
off the alarm press
7.
Press
to cancel AUTO
8.
Set the oven thermostat knob to
the
If the clock does not switch into manual mode or the oven does not start:
5.
6.
Set the oven thermostat knob to the
Press
to cancel AUTO
mark.
Auto-program in the clock memory may be reset. Hold button
Pressed and press + increase the cooking time a little bit and then set
the cooking
time to zero by pressing - . Then, the oven can be started by pressing the manual
key
Manual cooking (or to cancel a programme)
1.
Press
then press—until 0:00 is displayed
2.
Press
3.
The AUTO and
4.
5.
6.
Set the oven
knob to the required temperature,
The oven will switch on. The amber indicator will light.
At the end of cooking, switch off by resetting the oven thermostat knob to the
Mark.
Timer Alarm
The timer alarm can be adjusted to bleep between 0 and 23 hours 59 minutes
symbols will disappear.
Note: The timer will not switch off the oven automatically.
Automatic programming
The programmer will switch the oven on and off at the required times. Ensure the oven
thermostat is in the
position, and the correct time has been set.
1.
2.
Press the
button to cancel any program stored. (AUTO
and
Will not be displayed).
Press
and press + or—to set the stop time required
3.
Press
and press—to set the cooking time required
4.
Set the oven knob to the required time, cook the food and switch off at the predetermined time.
22
23