1
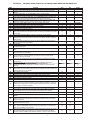
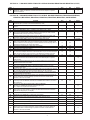
KGBSD0301FMS
ECM MOTOR SIMULATOR
Operating Instructions
INTRODUCTION
NOTE: Read the entire instruction manual before using the
ECM motor simulator.
This instruction covers the use of the ECM motor simulator for
the following variable--speed gas furnaces:
SAFETY CONSIDERATIONS
!
CARRIER
WARNING
BRYANT
PAYNE
90% Furnace Models
FIRE, EXPLOSION, ELECTRICAL SHOCK
HAZARD
Failure to follow this warning could result in personal
injury, death and / or property damage.
The ability to properly perform service on this equipment
requires certain expertise, mechanical skills, tools, and
equipment. If you do not possess these, do not attempt to
perform any service on this equipment other than those
procedures recommended in the User’s Manual.
59MN7A
987MA
PG9UAA
59TN6A
355CAV
--- ---
58MVC
355BAV
--- ---
58UVB
355AAV
--- ---
58MVB
355MAV
--- ---
58MVP
321AAZ*
--- ---
58VUA*
320AAZ*
--- ---
58VCA*
398BAZ*
--- ---
58SXB*
398BAW*
--- ---
80% Furnace Models
Installing and servicing heating equipment can be hazardous due
to gas and electrical components. Only trained and qualified
service personnel should install, repair, or service heating
equipment.
Untrained personnel can perform basic maintenance functions
such as cleaning coils, or cleaning and replacing filters. All other
operations should be performed by trained service personnel.
When working on heating equipment, observe precautions in
literature, on tags, and on labels attached to or shipped with the
unit, and other safety precautions that may apply.
Follow all safety codes. In the United States, follow all safety
codes including the National Fuel Gas Code (NFGC) NFPA
54/ANSI Z223.1. In Canada, refer to the National Standard of
Canada Natural Gas and Propane Installation Codes
(NSCNGPIC), CSA B149.1.
Wear safety glasses and work gloves. Have a fire extinguisher
available during start--up, adjustment procedures, and service
calls.
Recognize safety information. This is the safety--alert symbol
58CVA
315A
PG8MVA
58CVX
315J
PG8JVA
* Requires HK42FZ003 or HK42FZ012 control.
NOTE: The ECM motor simulator can only be used with the
furnace component self--test function. In addition, an adapter
harness is included for installations with ECM 3.0 motors and an
inducer adapter harness is included for conversion to a 12--pin
connector.
Use the procedure outlined below several times before relying on
the condensed instructions printed on the ECM motor simulator
labels. This procedure should be inserted into the main
troubleshooting guide.
DESCRIPTION AND USAGE
The ECM motor simulator is designed to assist the service
technician in troubleshooting the variable speed gas--fired
furnaces. Use the procedure outlined below to troubleshoot with
the ECM motor simulator.
. When you see this symbol on the furnace and in instructions
or manuals, be alert to the potential for personal injury.
Understand the signal words DANGER, WARNING,
CAUTION, and NOTE. The words DANGER, WARNING, and
CAUTION are used with the safety--alert symbol. DANGER
identifies the most serious hazards which will result in severe
personal injury or death. WARNING signifies hazards which
could result in personal injury or death. CAUTION is used to
identify unsafe practices which may result in minor personal
injury, or product and property damage. NOTE is used to
highlight suggestions which will result in enhanced installation,
reliability, or operation.
!
WARNING
ELECTRICAL OPERATION HAZARD
Failure to follow this warning could result in damage to this
equipment, personal injury, or death.
Only trained and qualified personnel should install, repair or
service this equipment.
1
QUICK MOTOR TEST PROCEDURE
(WHEN USING ECM MOTOR
SIMULATOR)
In an effort to provide a method of troubleshooting a variable
speed inducer and/or variable speed blower motor by themselves
the following procedure may save you some time in the event any
of the following status codes are reason for the service call.
S
Status codes 12, 32, 41, 42, or 44 on furnace control
HK42FZ003 or HK42FZ012.
Status codes 15, 32, 41, or 42 on furnace control
HK42FZ022, HK42FZ024, HK42FZ026,
HK42FZ031, HK42FZ035, HK42FZ043,
HK42FZ044, HK42FZ050, HK42FZ051 and
HK42FZ052.
If you get any other status code, you should use the main
troubleshooting guide (not included in this kit) to isolate the
problem. Select the proper section based on the furnace control
board installed in the furnace.
SECTION A -- Variable Speed Furnace Control Boards
HK42FZ003 or HK42FZ012.
SECTION B -- Variable Speed Furnace Control Board
HK42FZ022, HK42FZ024, HK42FZ026,
HK42FZ031,
HK42FZ035, HK42FZ043, HK42FZ044,
HK42FZ050,
HK42FZ051 and HK42FZ052.
S
2
SECTION A - VARIABLE SPEED FURNACE CONTROL BOARDS HK42FZ003 OR HK42FZ012
STEP
1
2
3
4
5
6
7
8
9
10
11
12
13
14
15
16
17
18
19
20
21
22
23
24
25
26
27
28
29
30
ACTION
Turn power off, remove blower access panel, and disconnect R thermostat lead.
Turn the power ON and depress the door switch. Use a piece of tape to hold it
closed.
Put setup switch SW1--- 6 for COMPONENT TEST in the ON position.
After the COMPONENT TEST is completed, does Status Code 11 flash?
Turn power off, put setup switch SW1--- 6 for COMPONENT TEST in the OFF position, and reconnect the R thermostat lead to the furnace control board.
Replace blower access panel and turn power on. Wait a few seconds then reset
thermostat. Observe operation of the furnace through 1 heating cycle.
Go to the “START HERE” section in the main troubleshooting guide.
Does Status Code 42 flash?
Did inducer motor MTR1 turn on and come up to speed?
Does the inducer wheel rub against the inducer housing?
Does the inducer wheel turn freely?
Disconnect PL7 from the inducer motor MTR1 and plug into the ECM motor simulator. Does the LED next to the inducer motor connector on the ECM motor simulator turn ON?
Do you have 120 volts between I1 and I2 on the furnace control board?
You have an open wire or bad terminal on either the BLACK or WHITE wire
between the furnace control board and inducer motor MTR1. Repair it or replace
main harness.
Are all pins and wire leads intact on the connectors between the furnace control
board and the inducer motor MTR1?
Fix problem.
Go to the “CLEANUP AND START--- UP INSTRUCTIONS” section in the main
troubleshooting guide.
Disconnect PL7 from the inducer motor MTR1 and plug into the ECM motor simulator.
Repeat COMPONENT TEST by turning setup switch SW1--- 6 OFF and then back
ON. Does Status Code 42 flash?
Replace the inducer motor or the inducer motor assembly. Inspect electronics portion of failed motor for water damage. If present, find source of water and fix.
Check A--- coil and/or humidifier.
Turn power off and disconnect PL7 from the ECM motor simulator. Do you have
continuity across the BROWN, YELLOW, and ORANGE wires between connectors
PL1 and PL7?
You have an open wire or bad terminal on either the BROWN, YELLOW, or
ORANGE wire between connectors PL1 and PL7. Repair it or replace the main
harness.
Replace the furnace control board. NOTE: If replacing the furnace control board
still results in the same problem reinspect the wire harness terminals checked in the
previous step (step 21, or step 38).
Does Status Code 41 flash?
Did blower motor MTR2 turn on and come up to speed?
Remove tape from door switch and shut power off at main disconnect.
Does the blower wheel rub against the blower housing?
Does the blower wheel turn freely?
Is blower wheel firmly mounted on motor shaft?
Replace the entire blower motor or the blower control module attached to the
blower motor. If you replace the blower control module go to Section B --- Step 40.
Always inspect failed motor for water damage. If present find source of water and
fix it. Check A--- coil and/or humidifier.
YES
NO
GO TO
2
3
4
5
8
6
7
TS GUIDE
9
18
16
12
24
10
11
20
15
13
14
16
16
19
16
17
TS GUIDE
19
21
20
17
23
22
17
17
25
37
7
26
16
29
31
28
30
16
27
17
31
Put setup switch SW1--- 6 for COMPONENT TEST in the OFF position.
32
32
Turn power on and depress the door switch. Use a piece of tape to hold switch
closed. Wait a few seconds for self test before proceeding to the next step.
33
33
Do you have 120 volts between B1 and B2 on the furnace control board?
34
35
36
37
38
Do you have 120 volts between BLACK and WHITE power leads at blower motor
MTR2?
You have an open wire or bad terminal on either the BLACK or WHITE wire
between the furnace control board and blower motor MTR2. Repair it or replace
blower harness(es).
Are all pins and wire leads intact on the connectors between the furnace control
board and the blower motor?
Disconnect PL13 from the blower motor MTR2 and plug into the ECM motor simulator. Repeat COMPONENT TEST by turning setup switch SW1--- 6 OFF and then
back ON. Does Status Code 41 flash?
Remove tape from door switch and turn power off at main disconnect. Disconnect
PL13 from the ECM motor simulator. Do you have continuity across the BLUE,
YELLOW, VIOLET, ORANGE, and RED wires between connectors PL3 and PL13?
3
34
16
36
35
16
37
16
38
30
23
39
SECTION A - VARIABLE SPEED FURNACE CONTROL BOARDS HK42FZ003 OR HK42FZ012 (CON’T)
STEP
39
ACTION
You have an open wire or bad terminal on either the BLUE, YELLOW, VIOLET,
ORANGE, or RED wire between connectors PL3 and PL13. Repair it or replace
blower harness(es).
YES
NO
GO TO
17
SECTION B - VARIABLE SPEED FURNACE CONTROL BOARDS HK42FZ022, HK42FZ024 HK42FZ026,
HK42FZ031, HK42FZ035, HK42FZ043, HK42FZ044, HK42FZ050, HK42FZ051, OR HK42FZ052
STEP
1
2
3
4
5
6
7
8
9
10
11
12
13
14
15
16
17
18
19
20
21
22
23
ACTION
Turn power off, remove blower access panel, and disconnect User Interface ABCD
Connector (PL7) (if used) or the R thermostat lead (if used).
Turn the power on and depress the door switch. Use a piece of tape to hold it
closed.
Put setup switch SW1--- 6 for COMPONENT TEST in the ON position.
After the COMPONENT TEST is completed, does Status Code 11 flash?
Turn power off, put setup switch SW1--- 6 for COMPONENT TEST in the OFF position, and reconnect the User Interface ABCD Connector (PL7) (if used) or the R
thermostat lead (if used) to the furnace control board.
Replace blower access panel and turn power on. Wait a few seconds then reset
thermostat. Observe operation of the furnace through 1 heating cycle.
Go to the “START HERE” section in the main troubleshooting guide.
Does Status Code 42 flash?
Note: If you get this status code on a furnace that does not have a variable speed
inducer motor then the model plug is incorrect. Reference the model plug chart on
the wiring schematic for the correct part number.
Did inducer motor IDM turn on and come up to speed?
Does the inducer wheel rub against the inducer housing?
Does the inducer wheel turn freely?
Disconnect PL11 from the inducer motor IDM and plug into the ECM motor simulator. Use inducer adapter harness for inducers without a 12--- pin connector. Does the
LED next to the inducer motor connector on the ECM motor simulator turn ON?
Do you have 120 volts between PL2--- 4 and L2 on the furnace control board?
You have an open wire or bad terminal on either the BLACK or WHITE wire
between the furnace control board and inducer motor IDM. Repair it or replace
main harness.
Are all pins and wire leads intact on the connectors between the furnace control
board and the inducer motor IDM?
YES
NO
GO TO
2
3
4
5
8
6
7
TS GUIDE
9
24
18
16
12
10
11
20
15
13
14
16
16
19
16
Fix problem.
17
Go to the “CLEANUP AND START--- UP INSTRUCTIONS” section in the main
troubleshooting guide.
Disconnect PL11 from the inducer motor IDM and plug into the ECM motor simulator. Use inducer adapter harness for inducers without a 12--- pin connector.
Repeat COMPONENT TEST by turning setup switch SW1--- 6 OFF and then back
ON. Does Status Code 42 flash?
Replace the inducer motor or the inducer motor assembly. Inspect electronics portion of failed motor for water damage. If present, find source of water and fix.
Check A--- coil and/or humidifier.
Turn power off and disconnect PL11 from the ECM motor simulator. Do you have
continuity across the BROWN, YELLOW, and ORANGE wires between connectors
PL1 and PL11?
You have an open wire or bad terminal on either the BROWN,
YELLOW, or ORANGE wire between connectors PL1 and
PL11. Repair it or replace the main harness.
Replace the furnace control board. NOTE: If replacing the furnace control board
still results in the same problem, reinspect the wire harness terminals checked in
the previous step (step 21, or step 38).
TS GUIDE
19
21
20
17
23
22
17
17
24
Does Status Code 41 flash?
25
7
25
Did blower motor BLWM turn on and come up to speed?
37
26
26
Remove tape from door switch and shut power off at main disconnect.
27
Does the blower wheel rub against the blower housing?
16
28
28
Does the blower wheel turn freely?
29
30
29
Is blower wheel firmly mounted on motor shaft?
31
16
30
Replace the entire blower motor or the blower control module attached to the
blower motor. If you replace the blower control module go to step 40. Always inspect failed motor for water damage. If present find source of water and fix it.
Check A--- coil and/or humidifier.
17
31
Put setup switch SW1--- 6 for COMPONENT TEST in the OFF position.
32
4
27
SECTION B - VARIABLE SPEED FURNACE CONTROL BOARDS HK42FZ022, HK42FZ024 HK42FZ026,
HK42FZ031, HK42FZ035, HK42FZ043, HK42FZ044, HK42FZ050, HK42FZ051, OR HK42FZ052 (CON’T)
STEP
32
ACTION
Turn power on and depress the door switch. Use a piece of tape to hold switch
closed. Put setup switch SW1--- 6 for COMPONENT TEST in the OFF position. Wait
a few seconds for self test before proceeding to the next step.
33
Do you have 120 volts between L1 and L2 on the furnace control board?
34
35
36
37
38
39
Do you have 120 volts between BLACK and WHITE power leads at blower motor
BLWM?
You have an open wire or bad terminal on either the BLACK or WHITE wire
between the furnace control board and blower motor BLWM. Repair it or replace
blower harness(es).
Are all pins and wire leads intact on the connectors between the furnace control
board and the blower motor?
Disconnect PL13 from the blower motor BLWM and plug into the ECM motor simulator. Use the adapter harness for installations with ECM 3.0 blower motors. Repeat
COMPONENT TEST by turning setup switch SW1--- 6 OFF and then back ON. Does
Status Code 41 flash?
Remove tape from door switch and turn power off at main dis--connect. Disconnect PL13 from the ECM motor simulator or adapter harness (if
used). Do you have continuity across the BLUE, YELLOW, GREEN, and RED wires
between connectors PL3 and PL13?
You have an open wire or bad terminal on either the BLUE,
YELLOW, GREEN, or RED wire between connectors PL3 and
PL13. Repair it or replace blower harness.
!
YES
NO
GO TO
33
34
16
36
35
16
37
16
38
30
23
39
17
WARNING
ELECTRICAL OPERATION HAZARD
Failure to follow this warning could result in personal
injury or death.
Wait at least five minutes after disconnecting line voltage
from equipment before opening blower motor to prevent
electric shock.
STEP
ACTION
YES
NO
GO TO
40
Remove tape from door switch and turn power off at main disconnect.
41
41
Disconnect both multi--- pin connectors from blower control module attached to the
blower motor. Be sure to depress release latches on connectors or they may get
damaged.
42
42
Remove control box assembly from blower shelf and position out of the way.
43
43
Remove blower assembly from furnace.
44
47
Remove two ¼--- in. hex head bolts from blower control module attached to blower
motor.
Carefully lift blower control module off blower motor. Depress latch on internal connector to disconnect blower control module from motor portion of blower motor.
DO NOT PULL ON WIRES. GRIP PLUG ONLY.
When blower control module is completely detached from blower motor, verify with
standard ohmmeter that the resistance from each motor lead in motor plug to unpainted motor end plate is greater than 100k ohms. Then verify motor windings are
not shorted or open by measuring resistance between each combination of pins in
motor plug (there are three different combinations, pin 1--- 2, pin 2--- 3, and pin
1--- 3). Resistance should be approximately equal across each combination of pins.
Did the motor pass the resistance check?
48
50
48
Does blower wheel turn freely with blower control module removed?
49
50
44
45
46
49
50
Replace blower control module. Inspect failed blower control module for water
damage. If present, find source of water and fix. Check A--- coil and/or humidifier.
Replace entire blower motor including blower control module. Inspect blower control module for water damage. If present, find source of water and fix. Check A--coil and/or humidifier.
5
45
46
47
17
17
Copyright 2012 CAC / BDP D 7310 W. Morris St. D Indianapolis, IN 46231
Printed in U.S.A.
Edition Date: 04/12
Manufacturer reserves the right to change, at any time, specifications and designs without notice and without obligations.
6
Catalog No: AG ---KGBSD0301FMS---01
Replaces: IIKKGASD0301FMS003