1
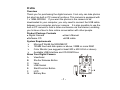
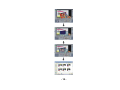
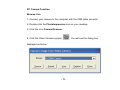
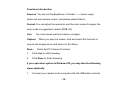
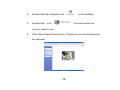
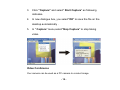
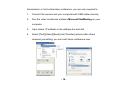
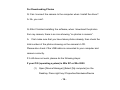
COBRA DC125
Contents
Profile……………………………………………………………………... 1
Overview……………………………………………………………….. 1
Product Package Contents…………………………………………… 1
System Requirements………………………………………………… 1
Know Your Digital Camera……………………………………………. 1
Install Batteries…………………………………………………………. 2
Software Installation…………………………………………………… 3
How to Take Photos......................................................................... 3
Camera Functions Control ………………………………..…………. 4
Instructions for the LCD Diagram …………………………………… 4
Camera Functions Control……………...……………………………. 5
Compression Ratio Selection………………………………………… 7
Download Photos………………………………………………………..8
PC Camera Function .………………………………………………….11
Browse Live……………………………………………………………. 11
Take video……………………………………………………………. 14
Video Conference……………………………………………………... 15
Troubleshooting………………………………………………………… 17
Profile
Overview
Thank you for purchasing the digital camera. It not only can take photos
but also has built-in PC camera functions. This camera is equipped with
1 x 16Mb SDRAM. If you want the photos in the camera to be
downloaded to your computer, you only need to connect the USB cable
between your computer and your camera. It is also possible to use the
built-in PC camera to hold a video conference via the internet, enabling
you to have a face to face online conversation with other people.
Product Package Contents
● Digital Camera
●User’s Manual
●Software CD
●USB cable
System Requirements
¾
Microsoft Win98 Se/2000/ME/XP
¾
125MB free hard disk space or above, 32MB or more RAM
¾
Color Monitor (we suggest at least 800 x 600 24 bit or above)
¾
Available USB Interface and CD-ROM Drive
Know Your Digital Camera
A.
Viewfinder
B.
Shutter Release Button
C.
Lens
D.
USB Socket
E.
Start/Function Button
F.
LCD
G.
Battery Box
-1-
Installing The Batteries
1. Open the battery box.
2. Load the batteries correctly: when you load the batteries, please
place both batteries according to the pole directions inscribed on the
battery box.
3. Close the battery box cover.
Note: When you use the USB cable to connect the camera to a
computer, is unnecessary to use the batteries because the camera uses
the power provided by the computer through the USB interface.
Warning
1. Don’t open the battery box unless necessary. The interruption of
power may cause you to lose the photos in the camera.
2. If you don’t use the camera for a long time, please take out the
batteries to avoid accidental discharging or corrosion of the terminals.
3. Please don’t throw any battery into a fire. It may explode.
4. Please download photos to your computer promptly to make sure
you don’t lose any of them.
The energy saving mode is automatically activated
If the camera is not used for 30 seconds, the camera will automatically
enter the energy saving mode.
-2-
Software Installation
Please insert the CD into the CD-ROM drive, this dialog box will appear:
1. Install PhotoImpression
2. Install Funhouse
3. Install Driver
4. Browse CD
5. Exit
Prompt:
For details regarding PhotoImpression and Funhouse, please refer to
separate instructions included on the CD.
You need to install both the application and the driver. During the
installation process, you will be able to select the language of your choice.
If the auto installation failed, you must install the programs manually.
1. Place the included CD into the CD-ROM drive
2. Enter E:\autorun.exe (If E is the letter for the drive)
3. Follow the directions of the installation wizard
How to Take Photos
1. Press the function button to turn on the camera and “Hi” will show on
the LCD at the back of the camera. The camera will sound out two
“beeps” indicating that it is ready to work.
2. Select the required mode to take your photo. (Please refer to the
instructions under “Camera Functions Control”)
-3-
3. Hold the camera steadily, and press the shutter release button to take
photos.
4. The camera sounds a buzzer, indicating that the photo was taken and
that you can proceed to the next one.
5. When the camera’s memory is fully loaded with photos, “0” will show
on the LCD, if you press the shutter release again, the buzzer will sound
continuously as a warning.
Prompt
1. When taking photos, the weaker sound indicates that you failed to
take the photo.
2. Please hold the camera steadily when you are taking photos.
3. The availability of light will affect the quality of the picture.
Camera Functions Control
Instructions for the LCD Diagram
Press the Function button to select the functions of the digital camera.
The function diagram will show on the LCD display on the back of the
digital camera, as follows:
¾
– Power off the camera.
-4-
– Auto shoot
– Continuous shoot.
– Delete all photos in the memory
– Delete the last photo from memory
– Hi means CIF mode (100k pixels resolution).
-- Lo means QCIF mode (25K pixels resolution).
¾
“50” or “60” – “50” or “60” to select the frequency of light used
indoors. “50” means 50Hz and “60”means 60Hz.
¾
“Hd” or “Ld”– The photo compression ratios. “Hd” Means high
compression and “Ld” means low compression. Higher
compression ratio means you may store more photos.
Camera Functions Control
Power off the camera
1. Press the Function button to select the “ ” icon shown on the LCD
display.
2. Press the Shutter release button within 5 seconds to power off the
camera.
Auto-Shoot Mode
1. Press the Function button to select the “ ” icon shown on the LCD
display.
2. Press the Shutter release button within 5 seconds to activate the 10
second timer. The digital camera will beep once every second.
3. After 10 seconds, the camera will beep twice to indicate that the photo
has been taken.
¾
¾
¾
¾
¾
-5-
Continuous Shoot Mode
1. Press the Function button to select the “ ” icon shown on the LCD
display.
2. Press the Shutter release button within 5 seconds to activate the
continuous shooting mode and do not release the button until you want
to stop shooting. The camera will beep once for each photo taken until
you release the Shutter button or the memory is full.
3. Under the continuous shooting mode, the photos are taken in CIF &
QCIF modes and saved in a video format.
4. Under the continuous photo shooting mode, the shooting may fail due
to poor lighting. If so, the continuous shooting will stop.
Note: The photos taken under the continuous mode will be saved in AVI
format. You may open it directly from the photo downloading software.
Delete All Photos
1. Press the Function button to select the “ ” icon shown on the LCD
display.
2. Press the Shutter release, the photo counter will flash. Press the
Shutter Button again within 5 seconds to delete all the photos stored in
memory.
Delete the Last Photo Taken
1. Press the Function button to select the “ ” icon shown on the LCD
display.
2. Press the Shutter button once within 5 seconds to delete the last
photo taken.
-6-
Photo Resolution Selection
Note: The resolution status will always show on the LCD display in small
characters.
1. Press the Function button to select the “
” icon shown on the LCD
display.
2. “Hi” means CIF mode 352 x 288 Pixels, “Lo” means QCIF mode 176 x
144 pixels
3. When you select the Mode function, press the shutter release once to
switch between the Hi mode and the Lo mode. The Hi mode will allow
you to take 19 photos and the Lo mode will allow you to take 76 photos.
Frequency Selection
1. Generally speaking, 60Hz fluorescent lamp frequency is used in the
United States and Asia. And 50Hz is used in Japan and Europe. If
the wrong frequency is selected, the photos or the video will be
distorted.
2. Press the Function button to select either 50 Hz or 60 Hz as shown
on the LCD display.
Photo Compression Ratio Selection
The compression ratios available are either “Hd” or “Ld” for the photos
stored in memory. The higher the compression, the more photos you
can take without having to download them to your PC. You can take up
to 152 photos in the “Hd” mode when you select the low resolution (Lo)
setting preset on your camera (see the photo resolution section above).
Photo Storage
The number of photos that can be taken will vary depending on the
-7-
resolution and compression ratio. The LCD display will always show the
status of the resolution and the number of photos left that you may take
unless the Function Button is pressed. The highest storage of photos will
be
19 photos --- “Hi” resolution + “Ld” compression
76 photos --- “Lo” resolution + “Ld” compression
38 photos --- “Hi” resolution + “Hd” compression
152 photos --- “Lo” resolution + “Hd” compression
Press the Shutter release to take a photo and the balance of the photos
you have remaining in memory (based on the mode you have set) will be
displayed as a digit on the LCD display. Each consecutive photo taken
will reduce the counter by one digit. Each time you change the resolution,
the number of photos remaining to be taken will change. If some photos
were taken in a low resolution mode, then later you switch to a higher
resolution, the lower resolution photos will remain in low resolution.
Download Photos
Please take the following steps to download the photos.
1.
Connect your camera to computer with USB cable correctly.
2.
Double-click the PhotoImpression icon on your desktop.
-8-
3.
Click the Camera/Scanner button.Select Source" JL2005A
Camera"
4.
Click the icon
5.
Click the icon
6.
Click
to save as (You can select the photos to save
on the blue screen).
7.
Input the file name and select the file type.
your photo.
-9-
Click Save to save
- 10 -
PC Camera Function
Browse Live
1. Connect your camera to the computer with the USB cable correctly.
2. Double-click the PhotoImpression icon on your desktop.
3. Click the icon Camera/Scanner.
4. Click the Video Camera symbol
displayed as below.
- 11 -
. You will see the dialog box
Functions Introduction
Sources: You can set the Brightness, Contrast —— device origin,
device set and camera control; and please select Default.
Format: You can adjust the resolution and the color mode of images; the
color mode is suggested to select [RGB-24].
Live:
You can browse real-time videos or images.
Capture:
When you play live videos, click and select this function to
acquire the single picture and store it in the album.
Done:
Finish the PC Camera Functions
1.
Click Live to start browsing.
2.
Click Done to finish browsing.
If your operation system is Windows XP, you may take the following
steps optionally.
1.
Connect your camera to the computer with the USB cable correctly.
- 12 -
2.
Double-click My Computer icon
3.
Double-click
icon
on the desktop.
. You can browse live
via your camera now.
4.
Click Take a New Picture button. The picture you are browsing will
be captured.
- 13 -
5.
Select the picture you captured, click Copy this file to save your
picture.
6.
Select the place you want to copy this photo, then click Copy.
Take Video
1.
Open DSC File to select the icon
2.
Click the icon
- 14 -
3.
Click "Capture" and select" Start Capture" as following
indicates.
4.
In new dialogue box, you select"OK" to save the file on the
desktop automatically .
5.
In " Capture" menu,select"Stop Capture" to stop taking
video.
Video Conference
Your camera can be used as a PC camera to conduct image
- 15 -
transmission or hold onlinevideo conference, you are only required to:
1.
Connect the camera and your computer with USB cable correctly.
2.
Run the video conference software Microsoft NetMeeting on your
computer.
3.
Input others’ IP address in the address bar and dial.
4.
Select [Tool]\[Video]\[Send] and [Transfer] options after others
received yourcalling, you can hold video conference now.
- 16 -
Note: If you do not install the software NetMeeting, please click
C:\Program Files\NetMeeting\ Conf.exe, and install the software per
the directions.
Troubleshooting
For Taking Photos
Q: Why my camera has no response when I press MODE Button or
Shutter Button.
A: If your camera comes with Lithium Battery, please slide the power
switch to OFF, then turn ON again 10 seconds later. This operation will
make the photos in the camera lost. Please download them to your
computer in time. If your camera uses Alkaline batteries or other
replaceable batteries, please take out the batteries and reload after 10
seconds. This operation will make the photos in the camera lost. Please
download them to your computer in time.
- 17 -
Q:There are color spots or stripes layers and segments on my photos.
A: This is caused by camera’s internal program loop, the factors might
be caused by improper or bad batteries. Please turn off all the power
(including USB cable and batteries), then turn on after 10 seconds.
Q: Why my photo was blurred?
A:
The camera was shaking during shooting. Please hold the camera
steadily.
Q: There is shadow on my photo, what’s the reason?
A:
Maybe the lens of camera was obscured by your hand or strap
during shooting. Please make sure the lens was not obscured while
shooting.
- 18 -
For Downloading Photos
Q: Can I connect the camera to the computer when I install the driver?
A: No, you can’t.
Q: After I finished installing the software, when I download the photos
from my camera, there is an icon showing “no photos in camera”.
A:
First make sure that you have taken photos already, then check the
total number of the photos showing on the camera’s LCD.
Please also check if the USB cable is connected to your computer and
camera correctly.
If it still does not work, please do the following steps:
If your O/S (operating system) is Win XP or Win 2000
(1)
Open [Device Manager] (Select [My computer] on the
Desktop, Press right key/ Properties/Hardware/Device
- 19 -
Manager…)
(2)
Select [Action]
[Scan for hardware changes]
If your O/S is Win 98SE or Win ME
(1)
Open [Device Manager] (Select [My computer] on the
Desktop,
Press right key/ Properties/Device Manager)
(2)
Press right key/[Refresh]
Q: The camera can’t work after connection, there’s a yellow mark “!”
showing at Device Manager/Imaging devices/ JL2005A Camera
A: Due to the collision of the computer’s peripheral, please follow below
steps:
(1)
Select JL2005A Camera
- 20 -
in [Device Manager]
(2)
Press right key/[Uninstall] (If OS is WIN98SE or WIN ME,
Press right key/ [Remove])
(3)
Remove USB cable
(4)
Restart Computer
(5)
Re-plug USB cable
Q: After finished installing software and connect the camera to the
computer, in device manager there’s “unknown USB device”.
A: Please check if your camera was connected to your computer
correctly, if it was, please do the following steps:
(1)
Unload driver
(2)
Re-install driver.
- 21 -