1
Before installing this appliance, we recommend that;
1. Choose which style of Bingham you require and make the
required adjustments to the appliance
2. If the appliance is to be installed in an existing chimney
breast, ensure that the chimney is cleaned by a competent
chimney sweep and block off the chimney flue.
This procedure is important for the efficient operation of
appliance.
Installation.
Ensure that all packing items are removed (read any
warning labels carefully).
Retain all packing for possible future use, in the event of
moving or returning the appliance to your supplier.
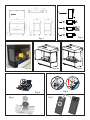
Under the appliance there are four adjustable supports
provided for levelling, where the base of the fireplace opening
is raised above the level of the hearth.
You are now ready to install the electric fire. Make sure the unit
is switched OFF.
Using the correct fixings for your wall fix the wall bracket to
the wall. With two persons hold the fire by the sides and gently
manoeuvre into position. Plug the fire into a 13amp/240 volt
outlet. Ensure that the supply cable exits at the front of the
fire, at the right or left hand corner to suit your supply socket
location and is not trapped under the fire such that it might
become damaged, also that the plug is accessable after
installation.
Note: Should condendsation appear on the glass, simply turn
down the mist and switch the mist extractor motor to high
speed until the condensation has been eliminated.
When the water tank is empty the main lamps will go out. See
instructions under ‘Maintenance’, ‘Filling the water tank’. When
this procedure is complete, the main lamps will illuminate but
it will take approx 30 seconds before the flames return.
Remote Control Operation
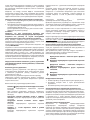
On the control panel, Switch A (see Fig. 2) must be in the ‘ON’ ( I
) position in order for the remote control to operate. There are 3
buttons on the remote control. (See Fig. 7)
To operate correctly the remote must be pointed towards the
front of the fuel effect.
The remote control functions are as follows:
Press once to turn on Flame effect only.
This will be indicated by one beep.
Press once to turn on Heat and Flame effect.
This will be indicated by two beeps.
Standby
This will be indicated by one beep.
Battery Information.
1. Unclip the battery cover on the back of the remote control.
(See Fig. 7)
2. Install AAA batteries into the remote control.
3. Replace the battery cover.
Before using the manual controls firstly fill the water tank
(See ‘Maintenance’, ‘Filling the water tank’).
Manual Controls.
The Opti-myst Manual controls are located behind the drawer
front. Slide out the drawer to access the controls. (See Fig. 2 for
Manual Control lay out)
Switch ‘A’:- Controls the electricity supply to the heater.
Note: This switch must be in the ‘ON’ ( I ) position for the
appliance to operate, with or without heat.
Discard leaky batteries.
Dispose of batteries in the proper manner according to
national and local regulations.
Any battery may leak electrolyte if mixed with a different
battery type, if inserted incorrectly, if all the batteries are
not replaced at the same time, if disposed of in a fire, or if
an attempt is made to charge a battery not intended to be
recharged.
Switch ‘B’:- Controls the functions of the fire.
Press once to turn on flame effect. This will be indicated
by one beep.
Although the main lights operate immediately it will take a
further 30 seconds before the flame effect starts.
Press it again to give flame effect and heat. This will be
indicated by two beeps.
Press it again to return to flame effect only.
This will be indicated by one beep.
Press to put fire in to standby mode.
This will be indicated by one beep.
Thermal safety cut-out
A thermal safety cut-out is incorporated in the fan heater to
prevent damage due to overheating. This can happen if the
heat outlet is restricted in any way or if the chimney flue has
not been blocked off effectively. If the cut-out operates, unplug
the heater from the socket outlet and allow approximately 10
minutes before reconnecting. Before switching the heater
back on remove any obstruction that may be restricting the
heat outlet, then continue normal operation.
Caution: In order to avoid hazard due to inadvertent resetting
of the thermal cutout, this appliance must not be powered
through an external switching device, such as a timer, or
connected to a switch that is regularly switched on and off by
the utility.
This heater is not equipped with a thermostat to control the
room temperature.
Switch ‘C’:- Controls the mist extractor motor.
There are two speeds for the mist extractor motor, low and
high. This function is required to eliminate concensation on
the glass. When the unit is switched on the mist extractor
motor will run at high speed for 1 minute and then will default
to the low setting.
Tips for using your appliance.
1. Only pull out the drawer when its time to refill the water
tank or change a lamp, otherwise it may lead to excess
water in the sump and reduced flame effect. If this happens
empty the water from the sump as instructed under
Thumb Wheel ‘D’:- Controls the mist output.
Turning the wheel upwards will increase the amount of mist
produced and turning the wheel downwards decreaces the
amount of mist produced.
2