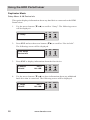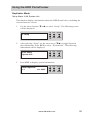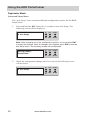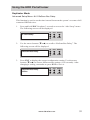
1
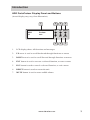
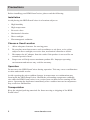
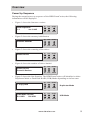
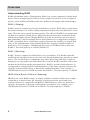
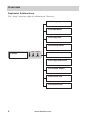
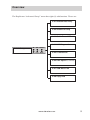
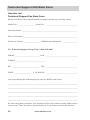
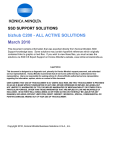
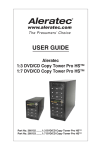
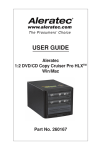
USER GUIDE Aleratec® HDD PortaCruiser™ Part No. 350108 Copyright/Model Identification The content of this manual is for informational purposes only and is subject to change without notice. This manual is copyright with all rights reserved. Under copyright laws, this manual and the software described within may not be copied, except in the normal use of the product(s) described within or to make a backup copy. Copyright© 2009 Aleratec, Inc. 9851 Owensmouth Avenue Chatsworth, CA 91311 U.S.A. www.aleratec.com Aleratec® is a registered trademark, and HDD PortaCruiser™ is a trademark of Aleratec, Inc. Please record the following information to help expedite any warranty claim: Model No. _ _________________________ Serial No.________________________ Date Purchased ________________________________________________________ Place of Purchase ______________________________________________________ www.aleratec.com Radio/TV Interference Statement The equipment described in this guide emits radio frequency energy. If it is not installed in accordance with the manufacturer’s instructions, it may cause interference with radio or television reception. This equipment has been tested and found to comply with the limits for a Class B digital device, pursuant to Part 15 of the FCC Rules. These limits are designed to provide reasonable protection against harmful interference in a residential installation. This equipment generates, uses, and can radiate radio frequency energy. If not installed and used in accordance with the instruction manual, this equipment may cause harmful interference to radio communications. However, there is no guarantee that interference will not occur in a particular installation. If this equipment does cause harmful interference to radio or television reception, which can be verified by turning the equipment off and on, the user is encouraged to try to correct the interference by one or more of the following measures: • Reorient or relocate the receiving antenna. • Increase the separation between the equipment and the receiver. • Connect the equipment to an electrical outlet on a circuit that is different from the circuit to which the receiver is connected. • Consult your dealer or an experienced radio/TV technician for help. This equipment has been certified to comply with the limits for a Class B computing device, pursuant to FCC Rules. In order to maintain compliance with FCC regulations, shielded cables must be used with this equipment. Operation with nonapproved equipment or unshielded cables is likely to result in interference to radio and TV reception. The user is cautioned that changes and/or modifications made to this equipment, without the approval of manufacturer, could void the user’s authority to operate this equipment. www.aleratec.com Safety Regulations WARNING To prevent fire or shock hazard, do not expose the unit to rain or moisture. To avoid electrical shock, do not open the housing. Refer servicing to authorized personnel only. www.aleratec.com Table of Contents Introduction....................................................................................................1 Product Features....................................................................................................1 Key Items..............................................................................................................2 HDD PortaCruiser Display Panel and Buttons.....................................................3 Precautions....................................................................................................4 Installation.............................................................................................................4 Choose a Good Location.......................................................................................4 Operation...............................................................................................................4 Transportation.......................................................................................................4 Overview.........................................................................................................5 Power Up Sequence..............................................................................................5 Understanding RAID............................................................................................6 RAID 0 (Striping).........................................................................................6 RAID 1 (Mirroring)......................................................................................6 JBOD (Just a Bunch of Disks or Spanning)..................................................6 Duplicator Main Menu..........................................................................................7 Duplicator Subfunctions.......................................................................................8 Dual Disk RAID (USB) Mode Main Menu........................................................10 Normal Mode..............................................................................................10 JBOD Mode................................................................................................10 RAID0 Mode..............................................................................................11 RAID1 Mode..............................................................................................11 Using the HDD PortaCruiser .....................................................................12 Loading the Hard Drives.....................................................................................12 IDE Drives .................................................................................................12 SATA Drives ..............................................................................................12 Removing Hard Drives.......................................................................................13 Duplicator Mode ................................................................................................14 Main Menu: Copy HDD.............................................................................14 Main Menu: Compare HDD.......................................................................15 Main Menu: PreScan Source......................................................................16 Main Menu: ReScan Bus............................................................................17 Main Menu: Source HDD Size...................................................................18 Main Menu: USB RAID Mode...................................................................19 Duplicator Mode.................................................................................................20 Setup Menu.................................................................................................20 Setup Menu: 6-01 Language.......................................................................21 Setup Menu: 6-02 DMA Mode...................................................................22 Setup Menu: 6-03 Copy Size......................................................................23 Setup Menu: 6-04 Startup Menu.................................................................24 Setup Menu: 6-05 Auto Compare...............................................................25 Setup Menu: 6-06 Copy with Detect..........................................................26 Setup Menu: 6-07 Button Sound................................................................27 Setup Menu: 6-08 Device Info....................................................................28 Setup Menu: 6-09 System Info...................................................................29 www.aleratec.com Table of Contents Using the HDD PortaCruiser .....................................................................30 Duplicator Mode.................................................................................................30 Advanced Setup Menu................................................................................30 Advanced Setup Menu: 8-01 ReScan Bus Delay.......................................31 Advanced Setup Menu: 8-02 Read Error Skip...........................................32 Advanced Setup Menu: 8-03 Quick Erase HDD........................................33 Advanced Setup Menu: 8-04 H/W Diagnostic...........................................34 Advanced Setup Menu: 8-05 Load Default................................................35 Advanced Setup Menu: 8-06 Link Option..................................................36 Advanced Setup Menu: 8-07 USB Auto-Link............................................37 Advanced Setup Menu: 8-08 Copy HPA....................................................38 Dual Disk RAID Controller (USB) Mode..........................................................39 Main Menu: Duplicator Mode Option .......................................................39 Main Menu: Information Option................................................................40 Main Menu: Change RAID Mode Option..................................................41 Dual Disk RAID Controller (USB) Mode – Normal Only.................................45 Main Menu: D1 Drive Select Mode Option...............................................45 D2 Drive Select Mode Option....................................................................45 Dual Disk RAID Controller (USB) Mode – JBOD Only...................................46 Main Menu: Initial JBOD Option...............................................................46 Dual Disk RAID Controller (USB) Mode – RAID0 Only.................................47 Main Menu: Initial RAID0 Option.............................................................47 Dual Disk RAID Controller (USB) Mode – RAID1 Only.................................48 Main Menu: Initial RAID1 Option.............................................................48 Specifications..............................................................................................49 Troubleshooting..........................................................................................49 Technical Support.......................................................................................50 Service and Support....................................................................................51 Technical Support FAX Back Form............................................................54 www.aleratec.com Introduction Thank you for purchasing the HDD PortaCruiser. Please read this User Guide thoroughly before using this product. Product Features The HDD PortaCruiser is a Hard Disk Drive Duplicator and Dual Disk RAID Controller. • Duplicator Features ▪▪ ▪▪ ▪▪ ▪▪ ▪▪ 1 to 1 SATA/IDE to SATA/IDE HDD duplicator Stand alone, no computer needed Complete cloning of partitions, boot sectors, and unallocated sectors LCD display shows full menu items and progress Supports SATA-to-SATA, SATA-to-IDE, IDE-to-SATA and IDE-to-IDE duplication • Dual Disk RAID Controller Features ▪▪ ▪▪ ▪▪ ▪▪ RAID 0 mode (Striping) RAID 1 mode (Mirroring) JBOD (Spanning mode) – combines two hard disk drives into one virtual drive Normal Mode – access your dual drives separately NOTE: In either mode, you must reset the unit when attaching/removing hard drives so that the system can re-scan the drives. www.aleratec.com 1 Introduction Key Items Drive Status Indicator Lights (4) SATA Source Drive Connector IDE Source Drive Port IDE Source Power Port Controller Buttons USB Connector Power Switch Power Connector IDE Target Power Port Display Panel (see page 3) IDE Target Drive Port SATA Target Drive Connector 2 www.aleratec.com Introduction HDD PortaCruiser Display Panel and Buttons (Actual display may vary from illustration) 1 4 6 HDD 1-1 2 ENT RESET ESC MUTE 3 5 7 Cruiser ver: 1. LCD display shows all functions and messages 2. UP arrow is used to scroll backward through functions or menus 3. DOWN arrow is used to scroll forward through functions or menus 4. ENT button is used to execute a selected function, or enter a menu 5. ESC button is used to cancel a selected function, or exit a menu 6. RESET button is used to restart the unit 7. MUTE button is used to mute audible alarms www.aleratec.com 3 Precautions Before installing your HDD PortaCruiser, please read the following. Installation Avoid placing the HDD PortaCruiser in a location subject to: • High humidity • High temperature • Excessive dust • Mechanical vibration • Direct sunlight • Electromagnetic radiation Choose a Good Location 1. Allow adequate clearance for moving parts. 2. Do not place near heat sources such as radiators or air ducts, or in a place subject to direct sunlight, excessive dust, mechanical vibration or shock. 3. Disconnect the AC adapter from the outlet if the product is not used for an extended period of time. 4. Proper care will help assure maximum product life. Improper operating environment and misuse may void the warranty. Operation Do not move the HDD PortaCruiser during operation. This may cause a malfunction or other undesirable results. Avoid exposing the unit to sudden changes in temperature as condensation may form inside the HDD PortaCruiser. Should the surrounding temperature suddenly rise while the HDD PortaCruiser is on, wait at least one hour before turning off the power. Operating the duplicator immediately after a sudden increase in temperature may result in a malfunction. Transportation Keep the original packing materials for future moving or shipping of the HDD PortaCruiser. 4 www.aleratec.com Overview Power Up Sequence During the normal power-up sequence of the HDD PortaCruiser, the following information will be displayed. • Figure 1 shows the firmware version HDD Duplicator 1-1 ver: 0.92C ENT RESET ESC MUTE • Figure 2 shows the memory initialization Initialize SDRAM ENT RESET ESC MUTE • Figure 3 shows the scanning of the drives Detect Drives ENT RESET ESC MUTE • Figure 4 shows the number of drives loaded. Detect Drives Found 0 Devices ENT RESET ESC MUTE • Figure 5 shows the first function. The HDD PortaCruiser will initialize in either Duplicator Mode or Dual Disk RAID (USB) Mode depending on its last state. ENT RESET Duplicator Mode ESC MUTE USB Mode: Normal D1: HDD D2: HDD 1. Copy HDD ENT RESET ESC MUTE USB Mode www.aleratec.com 5 Overview Understanding RAID RAID (Redundant Array of Independent Disks) is a system composed of many hard drives; that is, multiple physical drives form a single virtual drive to be recognized by the system. Different RAID modes have different advantages and disadvantages. RAID 0 (Striping) RAID 0 must be composed of a pair of hard drives at least. When data is written into the whole hard drive, it will be equally striped and written into each hard drive of the array. Thus the access speed becomes quicker. The effect of RAID 0 is to proportion the data to a number of hard drives. More hard drives mean more read/write heads, and therefore higher speed. Though RAID 0 is quick in read/write speed, it has no data redundancy, and accordingly has no fault tolerance. It is suggested to compose RAID 0 with hard drives of the same capacity. Because the capacity of striped disk array is the multiplication of the smallest hard drive capacity with the number of hard drives. For example, a 100GB hard drive and a 120GB hard drive unite into RAID 0. The total capacity is 200GB (100GB×2). RAID 1 (Mirroring) RAID 1 must be composed of hard drives in even numbers. The RAID controller willdivide the hard drives into a pair, and write data simultaneously into the two hard drives. The two hard drives contain the same data. When one hard drive’s data are damaged, you can replace the failed hard drive, and the RAID controller will restore the data by the backup on the other hard drive. RAID 1 provides fault tolerance. It is suggested to compose RAID 1with hard drives of the same capacity. Because the capacity of mirrored disk array is that of the smallest hard drive. For example, a 100GB hard drive and a 120GB one unite into RAID 1. The total capacity is 100GB. JBOD (Just a Bunch of Disks or Spanning) JBOD is not a real RAID setting. It simply combines a bunch of disks into a single virtual drive. It doesn’t have the functions of quick read/write speed and error tolerance. However, compared with RAID 0, JBOD doesn’t waste any hard drive capacity. Its capacity is the total of all hard drive capacities. For example, set a 100GB hard drive and a 120GB one as JBOD. The total capacity is 220GB. 6 www.aleratec.com Overview Duplicator Main Menu In Duplicator mode, there are eight main menu items that can be seen in the HDD PortaCruiser Copy Controller Display Panel. These are: 8. Adv Setup ESC MUTE ENT RESET ESC MUTE ENT RESET ESC MUTE ENT RESET ESC MUTE ENT RESET ESC MUTE ENT RESET ESC 8. 7. USB RAID Mode 7. 6. Setup ENT RESET 6. 5. Source Size MUTE 5. 4. ReScan Bus ESC 4. 3. PreScan Source 3. 2. Compare HDD ENT RESET 2. 1. Copy HDD 1. ENT RESET ESC MUTE MUTE Note: The Advanced Setup function is a hidden menu. To access this menu, press ESC for 3 seconds. After you have completed any desired adjustments, press ESC to exit Advanced Setup. www.aleratec.com 7 Overview Duplicator Subfunctions The “Setup” menu has eight (8) subfunctions. These are: 6-01 Language 6-02 DMA Mode 6-03 Copy Size 6-04 Startup Menu 6. Setup ENT RESET ESC 6-05 Auto Compare MUTE 6-06 Copy with Detect 6-07 Button Sound 6-08 Device Info 6-09 System Info 8 www.aleratec.com Overview The Duplicator “Advanced Setup” menu has eight (8) subfunctions. These are: 8-01 ReScan Bus Delay 8-02 Read Error Skip 8-03 Quick Erase HDD 8-04 H/W Diagnostic 8. Adv Setup ENT RESET ESC MUTE 8-05 Load Default 8-06 Link Option (for USB Mode) 8-07 USB Auto Link 8-08 Copy HPA www.aleratec.com 9 Overview Dual Disk RAID (USB) Mode Main Menu In USB mode, the options seen in the HDD PortaCruiser Display Panel depend on the RAID mode of the system. These are: Normal Mode 5. D2 Drive Select MUTE ENT RESET ESC MUTE ENT RESET ESC MUTE ENT RESET ESC MUTE 5. 4. D1 Drive Select ESC 4. 3. Change RAID Mode 3. 2. Information ENT RESET 2. 1. Duplicator Mode 1. ENT RESET ESC MUTE JBOD Mode 10 4. Initial JBOD ESC MUTE ENT RESET ESC MUTE ENT RESET ESC 4. 3. Change RAID Mode 3. 2. Information ENT RESET 2. 1. Duplicator Mode 1. ENT RESET ESC MUTE MUTE www.aleratec.com Overview RAID0 Mode 4. Initial RAID0 ESC MUTE ENT RESET ESC MUTE ENT RESET ESC MUTE 4. 3. Change RAID Mode 3. 2. Information ENT RESET 2. 1. Duplicator Mode 1. ENT RESET ESC MUTE RAID1 Mode 4. Initial RAID1 ESC MUTE ENT RESET ESC MUTE ENT RESET ESC 4. 3. Change RAID Mode 3. 2. Information ENT RESET 2. 1. Duplicator Mode 1. ENT RESET ESC MUTE MUTE www.aleratec.com 11 Using the HDD PortaCruiser Loading the Hard Drives IDE Drives 1. 2. Use an IDE cable (not included) to connect the source/target hard drive’s IDE port to the HDD PortaCruiser’s Source/Target IDE port. Use an IDE cable (not included) to connect the source/target hard drive’s power port to the HDD PortaCruiser’s Source/Target port. SATA Drives 1. Position the HDD PortaCruiser on a flat surface with enough area around it to place the source/target hard drive. 2. Align the source/target hard drive’s SATA port with the HDD PortaCruiser’s SATA connector. 3. Slide the source/target hard drive against the HDD PorrtaCruiser so that the SATA connection is made. Note: If you are duplicating, the hard disk drive you are copying goes on the side labeled “Source”, and the hard disk drive you are copying to goes on the side labeled “Target”. Note: When both the IDE and SATA connectors on the Target (or Source) side are connected to hard drives, the HDD PortaCruiser will only recognize the SATA drive. 12 www.aleratec.com Using the HDD PortaCruiser Removing Hard Drives 1. Remove the IDE and power cables (for IDE drives) or slide the hard drive away from the HDD PortaCruiser unit (for SATA drives). Note: Do not attempt to remove the hard drive if the drive activity LED is on or the unit is in the middle of a process. www.aleratec.com 13 Using the HDD PortaCruiser Duplicator Mode Main Menu: Copy HDD The “Copy HDD” function performs an actual copy from the source HDD to the target HDD. The target HDD must be at least as large as the source. The HDD PortaCruiser will copy every block of capacity on the source HDD. Load the source HDD and the target HDD into the HDD PortaCruiser. The system will auto-detect the hard drives. After the drives have been detected, a screen similar to the one below will be displayed. 1. Copy HDD 1. ENT RESET ESC MUTE 149.1GB Note: Before copying be sure that the capacity of the target HDD is equal to or larger than the source hard drive. Press ENT to start copying. The system will auto-detect the hard drives. The following information will be displayed. Detect Drives Please wait... ENT RESET ESC MUTE During the copy process the HDD PortaCruiser will display progress information. Copy - 36MB/s 235.7GB 0% 1:48 3. 2. ENT RESET ESC MUTE The amount of data remaining to be transferred (shown in gigabytes), and time will be displayed in decreasing increments as the percentage of completion increases. Note: The copying speed, capacity and duration may vary from one source hard drive to another. Once duplication is complete, a job status screen will be displayed. 1. HDD OK:1 14 4. ENT RESET ESC MUTE Fail: 0 www.aleratec.com Using the HDD PortaCruiser Duplicator Mode Main Menu: Compare HDD The “Compare HDD” function performs a comparison of data from the source hard drive to the data on the target hard drive. With the source and target HDDs loaded use the arrow buttons (or) to select “Compare HDD”. The following screen will be displayed. 2. Compare HDD ENT RESET ESC MUTE Press ENT to begin the comparison. The system will auto-detect the hard drives. Detect Drives Please wait... 2. 1. ENT RESET ESC MUTE During the compare process, the HDD PortaCruiser will display progress information. ENT RESET ESC MUTE When the comparison is completed, a job status screen will be displayed. Compare Fail:0 OK:1 Diff:0 3. Comp-23MB/s 05% 236.9.9GB 51:12 ENT RESET ESC MUTE www.aleratec.com 15 Using the HDD PortaCruiser Duplicator Mode Main Menu: PreScan Source The “PreScan Source” scans the source hard drive to determine if it can be read correctly. With the source HDD loaded, use the arrow buttons (or) to select “PreScan Source”. The following screen will be displayed. 3. PreScan Source ENT RESET ESC MUTE Press ENT to begin the scan. The system will auto-detect the hard drives. Detect Drives Please wait... 2. 1. ENT RESET ESC MUTE During the PreScan process, the HDD PortaCruiser will display progress information. RESET ESC MUTE When the PreScan is complete, a job status screen will be displayed. PreScan OK! 16 ENT 3. 0% Scan-52MB/s 236.4GB 1:15:04 ENT RESET ESC MUTE www.aleratec.com Using the HDD PortaCruiser Duplicator Mode Main Menu: ReScan Bus The “ReScan Bus” function causes the HDD PortaCruiser to redetect connected hard drives. This can be used when you change drives without restarting the system. Use the arrow buttons (or) to select “ReScan BUS”. The following screen will be displayed. 4. ReScan BUS RESET ESC MUTE Press ENT to select. The system will prompt you to confirm that you wish to proceed. ReScan BUS Now? Yes ENT RESET ESC MUTE Press ENT to begin the rescan, during which the following screen will be displayed. Detect Drives Please wait... 3. ENT 2. 1. ENT RESET ESC MUTE Note: The order of scanning is Source SATA, Source IDE, Target SATA, Target IDE. When the rescan is complete, the following screen will be displayed. Bus re-scan OK! Found 2 Devices 4. ENT RESET ESC MUTE www.aleratec.com 17 Using the HDD PortaCruiser Duplicator Mode Main Menu: Source HDD Size The “Source Size” function is used to display the capacity of the source hard drive. With the source HDD loaded, use the arrow buttons (or) to select “Source size”. The following screen will be displayed. 5. Source size RESET ESC MUTE Press ENT to display the capacity of the source hard drive. Total: 232.5GB 18 ENT 2. 1. ENT RESET ESC MUTE www.aleratec.com Using the HDD PortaCruiser Duplicator Mode Main Menu: USB RAID Mode This function allows you to switch to the Dual Disk RAID Controller mode. Use the arrow buttons (or) to select “USB RAID Mode”. The following screen will be displayed. 7. USB RAID Mode RESET ESC MUTE Press ENT to select. The system will prompt you to confirm that you wish to change modes. Switch USB Mode? No ENT RESET ESC MUTE Use the arrow buttons (or) to select “YES” and press ENT to select. The following screen will be displayed showing your connected drives. USB Mode: Normal D1: - - - D2: - - - 3. ENT 2. 1. ENT RESET ESC MUTE www.aleratec.com 19 Using the HDD PortaCruiser Duplicator Mode Setup Menu The “Setup” menu contains configuration options for the HDD PortaCruiser. It is suggested to use the factory defaults for optimum performance. Use the arrow buttons (or) to select “Setup”. The following screen will be displayed. 6. Setup 1. ENT RESET ESC MUTE Note: After changing any of the configuration options, you must press ENT to accept the change. 20 www.aleratec.com Using the HDD PortaCruiser Duplicator Mode Setup Menu: 6-01 Language This option allows you to select the language that is used for the display. Use the arrow buttons (or) select “Setup”. The following screen will be displayed. 6. Setup ESC MUTE ENT RESET ESC MUTE Press ENT to display the current language selection (the default language is English). Language English 4. RESET Press ENT and use the arrow buttons () to scroll to “Language”. The following screen will be displayed. 6-01. Setup Language 3. ENT 2. 1. ENT RESET ESC MUTE Use the arrow buttons () to toggle through the available options. Once you change a configuration option, remember to press ENT to save it. www.aleratec.com 21 Using the HDD PortaCruiser Duplicator Mode Setup Menu: 6-02 DMA Mode This function is used to specify the Ultra DMA mode. Use the arrow buttons (or) select “Setup”. The following screen will be displayed. 6. Setup ESC MUTE ENT RESET ESC MUTE ENT RESET ESC MUTE Use the arrow buttons () to toggle through the available modes (1-4). Once you change a setting, remember to press ENT to save it. DMA Mode UDMA 1 – UDMA 4 (MB) 22 Press ENT to display the current configuration setting. DMA Mode UDMA 4 (66MB/s) 4. RESET Press ENT and use the arrow buttons () to scroll to “Copy Size”. The following screen will be displayed. 6-02. Setup DMA Mode 3. ENT 2. 1. ENT RESET ESC MUTE www.aleratec.com Using the HDD PortaCruiser Duplicator Mode Setup Menu: 6-03 Copy Size This function is used to specify the amount of source disk data to copy to the target drive. Use the arrow buttons (or) select “Setup”. The following screen will be displayed. 6. Setup ESC MUTE ENT RESET ESC MUTE Press ENT to display the current configuration setting. 6. Setup ALL ENT RESET ESC MUTE Use the arrow buttons () to toggle through the available copy sizes (1%-100%). Once you change a setting, remember to press ENT to save it. Copy Size 1% - 100% (MB) 4. RESET Press ENT and use the arrow buttons () to scroll to “Copy Size”. The following screen will be displayed. 6-03. Setup Copy Size 3. ENT 2. 1. ENT RESET ESC MUTE www.aleratec.com 23 Using the HDD PortaCruiser Duplicator Mode Setup Menu: 6-04 Startup Menu This option lets you select any of the functions (except “Setup”) as the initial function that appears when the HDD PortaCruiser is powered on. Use the arrow buttons (or) select “Setup”. The following screen will be displayed. 6. Setup ESC MUTE ENT RESET ESC MUTE 24 Press ENT to display the current configuration setting. The default setting is “1. Copy HDD”. Startup Menu 1. Copy HDD 4. RESET Press ENT and use the arrow buttons () to scroll to “Startup Menu”. The following screen will be displayed. 6-04. Setup Startup Menu 3. ENT 2. 1. ENT RESET ESC MUTE Use the arrow buttons () to toggle through the available options. Once you change a setting, remember to press ENT to save it. www.aleratec.com Using the HDD PortaCruiser Duplicator Mode Setup Menu: 6-05 Auto Compare This option allows you to choose whether or not to automatically compare the source and target hard drive after every copy operation. Use the arrow buttons (or) select “Setup”. The following screen will be displayed. 6. Setup ESC MUTE ENT RESET ESC MUTE Press ENT to display he current configuration setting. The default setting is “Off”. Auto Compare Off 4. RESET Press ENT and use the arrow buttons () to scroll to “Auto Compare”. The following screen will be displayed. 6-05. Setup Auto Compare 3. ENT 2. 1. ENT RESET ESC MUTE Use the arrow buttons () to modify the setting. After you change a setting, remember to press ENT to save it. www.aleratec.com 25 Using the HDD PortaCruiser Duplicator Mode Setup Menu: 6-06 Copy with Detect This option allows you to choose whether or not to automatically rescan for connected drives immediately before a copy operation. Use the arrow buttons (or) select “Setup”. The following screen will be displayed. 6. Setup ESC MUTE ENT RESET ESC MUTE 26 Press ENT to display he current configuration setting. The default setting is “Off”. 6. Setup Off 4. RESET Press ENT and use the arrow buttons () to scroll to “Copy with Detect”. The following screen will be displayed. 6-06. Setup Copy with Detect 3. ENT 2. 1. ENT RESET ESC MUTE Use the arrow buttons () to modify the setting. After you change a setting, remember to press ENT to save it. www.aleratec.com Using the HDD PortaCruiser Duplicator Mode Setup Menu: 6-07 Button Sound This option allows you to enable or disable the beeping sound heard when you press a button. Use the arrow buttons (or) select “Setup”. The following screen will be displayed. 6. Setup ESC MUTE ENT RESET ESC MUTE Press ENT to display the current configuration setting. The default is “On”. Button Sound On 4. RESET Press ENT and use the arrow buttons () to scroll to “Button Sound”. The following screen will be displayed. 6-07. Setup Button Sound 3. ENT 2. 1. ENT RESET ESC MUTE Use the arrow buttons () to toggle through the available options. Once you change a default, remember to press ENT to save it. www.aleratec.com 27 Using the HDD PortaCruiser Duplicator Mode Setup Menu: 6-08 Device Info This option displays information about any hard drives connected to the HDD PortaCruiser. Use the arrow buttons (or) to scroll to “Setup”. The following screen will be displayed. 6. Setup ESC MUTE ENT RESET ESC MUTE CH: 0 149.1GB ENT RESET ESC MUTE Use the arrow buttons (or) to show information about any additional hard drive that is connected. The following screen will be displayed. CH: 1 149.1GB 1 Target Hitachi 28 Press ENT to display information about the first device. 0 Source Hitachi 4. RESET Press ENT and use the arrow buttons () to scroll to “Device Info”. The following screen will be displayed. 6-08. Setup Device Info 3. ENT 2. 1. ENT RESET ESC MUTE www.aleratec.com Using the HDD PortaCruiser Duplicator Mode Setup Menu: 6-09 System Info This function displays information about the HDD PortaCruiser, including the current firmware version. Use the arrow buttons (or) to select “Setup”. The following screen will be displayed. 6. Setup RESET ESC MUTE After selecting “Setup” use the arrow keys () to toggle between the subfunctions. Press ENT to select. “System Info”. The following information will be displayed. 6-09. Setup System Info ENT RESET ESC MUTE Press ENT to display system information. HDD Duplicator 1-1 ver: 092C 3. ENT 2. 1. ENT RESET ESC MUTE www.aleratec.com 29 Using the HDD PortaCruiser Duplicator Mode Advanced Setup Menu The “Adv Setup” menu contains additional configuration options for the HDD PortaCruiser. Press and hold the ESC button for 3 seconds to enter Adv Setup. The following screen will be displayed. 8. Adv Setup 1. ENT RESET ESC MUTE Note: After changing any of the configuration options, you must press ENT to accept the change. Once all changes are complete, press ESC to exit the Adv Setup menu. The following screen will be displayed. RESET ESC MUTE When the configuration changes have been saved, the following screen will be shown. 8. Adv Setup 30 ENT 2. Saving Config... Please Wait... ENT RESET ESC MUTE www.aleratec.com Using the HDD PortaCruiser Duplicator Mode Advanced Setup Menu: 8-01 ReScan Bus Delay This function is used to set the time interval between the system’s re-scans of all connected HDD devices. Press and hold ESC for about 3 seconds to access the “Adv Setup” menu. The following screen will be displayed. 8. Adv Setup RESET ESC MUTE Use the arrow buttons (or) to scroll to “ReScan Bus Delay”. The following screen will be displayed. ReScan Bus Delay ENT RESET ESC MUTE Press ENT to display the current configuration setting. Use the arrow buttons (or) to choose different time settings (1-60 seconds). After changing a setting, remember to press ENT to save it. ReScan Bus Delay 20Sec 3. ENT 2. 1. ENT RESET ESC MUTE www.aleratec.com 31 Using the HDD PortaCruiser Duplicator Mode Advanced Setup Menu: 8-02 Read Error Skip This function can be enabled to ignore any error that occurs during copying. By default, the HDD PortaCruiser will halt the copy operation when it encounters an unreadable area of the source hard disk and display an error. Enabling this option will ignore any bad sectors on the source hard drive by skipping over them. Warning: Setting this function to “On” may result in corrupt data on copied hard drives. Press and hold ESC for about 3 seconds to access the “Adv Setup” menu. The following screen will be displayed. 8. Adv Setup ESC MUTE ENT RESET ESC MUTE 32 Press ENT to display the current configuration setting. The default setting is “Off”. Read Error Skip Off 4. RESET Use the arrow buttons (or) to scroll to “Read Error Skip”. The following screen will be displayed. 8-02. Adv Setup Read Error Skip 3. ENT 2. 1. ENT RESET ESC MUTE Press the arrow buttons (or) to toggle the option “On” or “Off”. After changing a setting, remember to press ENT to save it. www.aleratec.com Using the HDD PortaCruiser Duplicator Mode Advanced Setup Menu: 8-03 Quick Erase HDD This function is used to erase the data of a hard drive quickly. Warning: Backup any important data before using this function. Press and hold ESC for about three seconds to access the “Adv Setup” menu. The following screen will be displayed. 8. Adv Setup ESC MUTE ENT RESET ESC MUTE Press ENT, and you will be prompted whether you wish to proceed. Use the arrow keys () to select “Yes” or “No”. The following screen will be displayed. All data will be lost, erase? No ENT RESET ESC MUTE Select “Yes” and press ENT. The Quick Erase will begin. Once complete the following information will be displayed. The Selected HDD Erase Finished ENT RESET ESC MUTE Erasing Target Please Wait... 4. RESET Use the arrow buttons (or) to select “Quick Erase HDD”. The following screen will be displayed. 8-03. Adv Setup Quick Erase HDD 3. ENT 2. 1. ENT RESET ESC MUTE www.aleratec.com 33 Using the HDD PortaCruiser Duplicator Mode Advanced Setup Menu: 8-04 H/W Diagnostic This function is used to test various components of the HDD PortaCruiser. Press and hold ESC for about three seconds to access the “Adv Setup” menu. The following screen will be displayed. 8. Adv Setup RESET ESC MUTE Use the arrow buttons (or) to select “H/W Diagnostic”. The following screen will be displayed. 8-04. Adv Setup H/W Diagnostic 3. ENT 2. 1. ENT RESET ESC MUTE Press ENT to begin the diagnostic tests. The following tests will be preformed: Button Test, Self-Test of SDRAM, Hardware Connection Test, and Flash Test. Follow the on screen prompts to complete each test. All test results will be shown in the display panel. LCD Test Start Button Test → SDRAM Test: 8192Kbytes OK Test IDE 0/1 OK Flash Test: OK Test finished Note: The Button Test allows you to push the buttons and confirm that they are working properly. A button press will indicate on the LCD screen. DO NOT press the Reset button during this test as it will reset the unit. Press and hold the ESC button to exit this portion of the test. When all tests are complete the following information will be displayed. Test Finished 34 4. ENT RESET ESC MUTE www.aleratec.com Using the HDD PortaCruiser Duplicator Mode Advanced Setup Menu: 8-05 Load Default This function is used to restore all factory settings of the HDD PortaCruiser back to their original defaults. Press and hold ESC for about three seconds to access the “Adv Setup” menu. The following screen will be displayed. 8. Adv Setup RESET ESC MUTE Use the arrow buttons (or) to select “Load Default”. The following screen will be displayed. 8-05. Adv Setup Load Default ENT RESET ESC MUTE Press ENT to proceed to the following screen: Load Default Config? Yes 3. ENT 2. 1. ENT RESET ESC MUTE Press ENT to confirm loading defaults, or press ESC to cancel. When all settings are restored to their original defaults the following information will be displayed. Load Default OK 4. ENT RESET ESC MUTE www.aleratec.com 35 Using the HDD PortaCruiser Duplicator Mode Advanced Setup Menu: 8-06 Link Option This function is used to decide if “7.USB RAID Mode” will be displayed in the display panel. Press and hold ESC for about three seconds to access the “Adv Setup” menu. The following screen will be displayed. 8. Adv Setup RESET ESC MUTE Use the arrow buttons (or) to select “Link Option”. The following screen will be displayed. 8-06. Adv Setup Link Option ENT RESET ESC MUTE Press ENT to display the available options. The default is “Menu ON” which specifies for “7.USB RAID Mode” to appear in the main menu. Link Option Menu ON 3. ENT 2. 1. ENT RESET ESC MUTE If set to “OFF”, “7.USB RAID Mode” will not appear in the main menu. After changing a setting, remember to press ENT to save it. 36 www.aleratec.com Using the HDD PortaCruiser Duplicator Mode Advanced Setup Menu: 8-07 USB Auto-Link This function sets the HDD PortaCruiser to immediately enter Dual Disk RAID Controller (USB) mode on startup. This allows direct control of the unit from a PC. Press and hold ESC for about three seconds to access the “Adv Setup” menu. The following screen will be displayed. 8. Adv Setup 1. ENT RESET ESC MUTE 2. Use the arrow buttons (or) to select “USB Auto-Link”. The following screen will be displayed. 8-07. Adv Setup USB Auto-Link ENT RESET ESC MUTE 3. Press ENT to display the available options. The default is “OFF”. USB Auto-Link OFF ENT RESET ESC MUTE 4. Use the arrow buttons () to toggle the option “ON” or “OFF”. If set to “ON” the unit will immediately enter USB mode on startup. After changing a setting, remember to press ENT to save it. USB L.H Mode D1:HDD D2:HDD ENT RESET ESC MUTE www.aleratec.com 37 Using the HDD PortaCruiser Duplicator Mode Advanced Setup Menu: 8-08 Copy HPA If the source hard disk contains a Host Protected Area (HPA), this option allows you to choose whether or not to copy data within the HPA. Press and hold ESC for about three seconds to access the “Adv Setup” menu. The following screen will be displayed. 8. Adv Setup ESC MUTE ENT RESET ESC MUTE Press ENT to display the current configuration setting. A screen similar to the following will be displayed. Copy HPA Off 4. RESET Use the arrow buttons (or) to select “Copy HPA”. The following information will be displayed. 8-08. Adv Setup Copy HPA 3. ENT 2. 1. ENT RESET ESC MUTE Use the arrow buttons () to toggle the option “On” or “Off”. After changing a setting, remember to press ENT to save it. Note: The HPA is a hidden data region defined in ATA/ATAPI-4. This area is not usually accessible to the operating system or software applications. The HDD PortaCruiser supports the copying of data from this hidden area. 38 www.aleratec.com Using the HDD PortaCruiser Dual Disk RAID Controller (USB) Mode Main Menu: Duplicator Mode Option This function allows you to switch to the Duplicator mode. Use the arrow buttons (or) to select “Duplicator Mode”. The following screen will be displayed. Duplicator Mode RESET ESC MUTE Press ENT to select. The system will prompt you to confirm that you wish to change modes. Back to Stand Alone Mode? No ENT RESET ESC MUTE Use the arrow buttons () to select “Yes” and press ENT to select. The following screen will be displayed. The unit is now back in Duplicator Mode. 1. Copy HDD Copy Size 3. ENT 2. 1. ENT RESET ESC MUTE www.aleratec.com 39 Using the HDD PortaCruiser Dual Disk RAID Controller (USB) Mode Main Menu: Information Option This function displays information about the HDD PortaCruiser and any attached hard drives. Use the arrow buttons (or) to select “Information”. The following screen will be displayed. Information RESET ESC MUTE Press ENT to select. The system will prompt you to choose the desired device. Information System 3. ENT 2. 1. ENT RESET ESC MUTE Use the arrow buttons (or) to select between System, Drive1 and Drive2 and press ENT to select. For System information, USB Mode and firmware version will be displayed. USB Mode: Normal F/W ver: 092C ENT RESET ESC MUTE For Drive information, drive model information and capacity will be displayed. 40 Hitachi HD572168 Capacity: 76.3GB ENT RESET ESC MUTE www.aleratec.com Using the HDD PortaCruiser Dual Disk RAID Controller (USB) Mode Main Menu: Change RAID Mode Option This function allows you to choose the RAID mode for the Dual Disk RAID Controller. Use the arrow buttons (or) to select “Change RAID Mode”. The following screen will be displayed. Change RAID Mode RESET ESC MUTE Press ENT to select. The system will prompt you to choose the desired mode. Change RAID Mode RAID0 ENT RESET ESC MUTE Use the arrow buttons () to select between Normal, JBOD, RAID0, and RAID1, and press ENT to select. Changing to Normal Mode The system will prompt you to confirm that you wish to change modes. Change to Normal Mode? No 5. ENT RESET ESC MUTE Use the arrow buttons (or) to select “Yes” and press ENT to select. The system will then prompt you to confirm that you understand data may be lost. Data May Be Lost Continue? No 4. 3. ENT 2. 1. ENT RESET ESC MUTE www.aleratec.com 41 Using the HDD PortaCruiser Dual Disk RAID Controller (USB) Mode Main Menu: Change RAID Mode Option Changing to Normal Mode - continued Use the arrow buttons () to select “Yes” and press ENT to select. The new main screen will be shown which displays the new mode and capacity. USB Mode: Normal D1:HDD D2:HDD 6. ENT RESET ESC MUTE Changing to JBOD Mode The system will prompt you to confirm that you wish to change modes. Change to JBOD Mode? No ESC MUTE ENT RESET ESC MUTE Use the arrow buttons () to select “Yes” and press ENT to select. The new main screen will be shown which displays the new mode and capacity. USB Mode: JBOD RAID Cap: 228.9GB 42 RESET Use the arrow buttons (or) to select “Yes” and press ENT to select. The system will then prompt you to confirm that you understand data may be lost. Data May Be Lost Continue? No 6. ENT 5. 4. ENT RESET ESC MUTE www.aleratec.com Using the HDD PortaCruiser Changing to RAID0 Mode The system will prompt you to confirm that you wish to change modes. Change to RAID0 Mode? No RESET ESC MUTE Use the arrow buttons (or) to select “Yes” and press ENT to select. The system will then prompt you to confirm that you understand data may be lost. Data May Be Lost Continue? No ENT RESET ESC MUTE Use the arrow buttons () to select “Yes” and press ENT to select. The new main screen will be shown which displays the new mode and capacity. USB Mode: RAID0 RAID Cap: 152.6GB 6. ENT 5. 4. ENT RESET ESC MUTE Changing to RAID1 Mode The system will prompt you to confirm that you wish to change modes. Change to RAID1 Mode? No ENT RESET ESC MUTE Use the arrow buttons () to select “Yes” and press ENT to select. The system will then prompt you to confirm that you understand data may be lost. Data May Be Lost Continue? No 5. 4. ENT RESET ESC MUTE www.aleratec.com 43 Using the HDD PortaCruiser Dual Disk RAID Controller (USB) Mode Main Menu: Change RAID Mode Option Changing to RAID1 Mode - continued Use the arrow buttons () to select “Yes” and press ENT to select. The system will then ask you whether or not you want to preserve the Source drive’s data. Keep Source Data? No RESET ESC MUTE If you would like to keep the Source drive’s data, use the arrow buttons () to select “Yes” and press ENT to select. The device will copy the source drive’s data to the target drive and a new main screen will be shown which displays the new mode and capacity. USB Mode: RAID1 RAID Cap: 76.3GB 44 ENT 7. 6. ENT RESET ESC MUTE www.aleratec.com Using the HDD PortaCruiser Dual Disk RAID Controller (USB) Mode – Normal Only Main Menu: D1 Drive Select Mode Option This function allows you to enable or disable the Source drive. Use the arrow buttons (or) to select “D1 Drive Select”. The following screen will be displayed. D1 Drive Select RESET ESC MUTE Press ENT to select. The system will prompt you to choose the desired mode. D1 Drive Select HDD 3. ENT 2. 1. ENT RESET ESC MUTE Use the arrow buttons () to select between HDD and Disable and press ENT to select. D2 Drive Select Mode Option This function allows you to enable or disable the Target drive. Use the arrow buttons (or) to select “D2 Drive Select”. The following screen will be displayed. D2 Drive Select RESET ESC MUTE Press ENT to select. The system will prompt you to choose the desired mode. D2 Drive Select HDD 3. ENT 2. 1. ENT RESET ESC MUTE Use the arrow buttons () to select between HDD and Disable and press ENT to select. www.aleratec.com 45 Using the HDD PortaCruiser Dual Disk RAID Controller (USB) Mode – JBOD Only Main Menu: Initial JBOD Option This function allows you to initialize your disks for JBOD. Use the arrow buttons (or) to select “Initial JBOD”. The following screen will be displayed. Initial JBOD ESC MUTE ENT RESET ESC MUTE Use the arrow buttons (or) to select “Yes” and press ENT to select. The new main screen will be shown which displays the new mode and capacity. USB Mode: JBOD RAID Cap: 228.9GB 46 RESET Press ENT to select. The system will then prompt you to confirm that you understand data may be lost. Data May Be Lost Continue? No 3. ENT 2. 1. ENT RESET ESC MUTE www.aleratec.com Using the HDD PortaCruiser Dual Disk RAID Controller (USB) Mode – RAID0 Only Main Menu: Initial RAID0 Option This function allows you to initialize your disks for RAID0. Use the arrow buttons (or) to select “Initial RAID0”. The following screen will be displayed. Initial RAID0 RESET ESC MUTE Press ENT to select. The system will then prompt you to confirm that you understand data may be lost. Data May Be Lost Continue? No ENT RESET ESC MUTE Use the arrow buttons (or) to select “Yes” and press ENT to select. The new main screen will be shown which displays the new mode and capacity. USB Mode: RAID0 RAID Cap: 152.6GB 3. ENT 2. 1. ENT RESET ESC MUTE www.aleratec.com 47 Using the HDD PortaCruiser Dual Disk RAID Controller (USB) Mode – RAID1 Only Main Menu: Initial RAID1 Option This function allows you to initialize your disks for RAID1. Use the arrow buttons (or) to select “Initial RAID1”. The following screen will be displayed. Initial RAID1 ESC MUTE ENT RESET ESC MUTE Use the arrow buttons (or) to select “Yes” and press ENT to select. The new main screen will be shown which displays the new mode and capacity. USB Mode: RAID1 RAID Cap: 228.9GB 48 RESET Press ENT to select. The system will then prompt you to confirm that you understand data may be lost. Data May Be Lost Continue? No 3. ENT 2. 1. ENT RESET ESC MUTE www.aleratec.com Specifications Power Requirements Voltage: 100-240V Current: 50-60Hz Dimensions (depth x width x height) D: 150mm W: 116mm H: 27mm (5.9” x 4.6” x 1.0”) Weight 235g (0.5 Lbs.) Note: Specifications subject to change without notice. Troubleshooting If your HDD PortaCruiser is not performing as expected, refer to the symptoms below, and follow the suggested corrective action. Symptoms Corrective Actions LCD Display If the LCD display does not display any message and the backlight is not lit after powering on the HDD PortaCruiser, check that the power cable is properly connected and that the ON/OFF switch is turned on. Error Messages While the system is performing an operation and the operation is manually terminated, an error message will be shown in the LCD display. This may lead to an failed operation and could cause the HDD PortaCruiser to stop responding. If this happens, power the unit off, wait about ten (10) seconds, and then reapply power. Hard Disk If the HDD PortaCruiser does not detect one of the hard disk drives, verify that the drive is properly connected. Keypad Buttons If pressing the keys on the front panel produces no response from the system, the HDD PortaCruiser may still be busy with the previous operation. If the system idle, power the unit off, wait about ten (10) seconds, and then reapply power. Startup/Shutdown Do not power off the system while it is performing an operation. After a normal shutdown, wait about ten (10) seconds before reapplying power. www.aleratec.com 49 Technical Support After reading this User Guide, if you need additional assistance with this product, please contact Aleratec Technical Support. Our technical staff will be happy to assist you, but they may need your help to better assist you. Contacting support without all the necessary information can be both time consuming and frustrating. Therefore, please try to have the following information ready before calling: 1. Part Number - the part number is located on the bottom of the HDD PortaCruiser. 2. Serial Number - the serial number is located on the back of the HDD PortaCruiser. 3. Troubles/symptoms - please provide enough information about the issue so our technical staff can accurately diagnose it. Technical Support Addresses and Phone Numbers XX By e-mail: [email protected] XX By Telephone: 1-818-678-0484 Technical Support Group can be reached 8:00 AM to 5:00 PM, Pacific Time, Monday through Friday, excluding U.S. holidays. Please try to call from a phone near your Aleratec product. XX Access is available 24 hours a day, 365 days a year, via: The World Wide Web at: www.aleratec.com FAX at: 1-818-678-0483 50 www.aleratec.com Service and Support Aleratec, Inc., Limited Warranty This Limited Warranty covers defects encountered in the course of normal use of this product and does not apply to damage from improper use, abuse, accidents, unauthorized service, or inadequate packaging when shipping the product to Aleratec, Inc. Aleratec, Inc. provides the following limited warranty for this product only if the product was originally purchased for use, not re-sale, from Aleratec, Inc., an Aleratec, Inc. authorized dealer or distributor, or any other Aleratec, Inc. approved reseller for this product. This product is warranted to be free from defects in workmanship and material for a period of one year from the date of your original purchase. If the product fails during normal and proper use within the warranty period, Aleratec, Inc. will, at its option, repair or replace the product at no cost (except shipping and insurance). This limited warranty does not include service to repair damage from improper installation, accident, disaster, misuse, abuse, or modifications to the subsystem, or by any other causes unrelated to defective materials or workmanship. www.aleratec.com 51 Service and Support Please Note: This Warranty is valid only within the United States and Puerto Rico, and applies only to products that are new and unopened on the date of purchase. For areas outside the United States and Puerto Rico, contact the authorized dealer from whom you purchased this product to determine which warranty, if any, applies. THIS LIMITED WARRANTY CONSTITUTES YOUR SOLE AND EXCLUSIVE REMEDY, AND THE SOLE AND EXCLUSIVE LIABILITY OF ALERATEC, INC., AND IS IN LIEU OF ALL OTHER WARRANTIES, EXPRESSED OR IMPLIED, INCLUDING, BUT NOT LIMITED TO ANY IMPLIED WARRANTY OF MERCHANTABILITY OF ITEMS FOR A PARTICULAR PURPOSE. Your sole remedy shall be repair or replacement, with new or refurbished components, as provided in this Limited Warranty. Aleratec, Inc. shall not be liable for any direct, indirect, special incidental products or consequential damages, including, but not limited to, any loss of data or loss of profits or business, regardless of the form of action or theory of liability resulting from any defect in, or use of, this product (even if Aleratec, Inc. has been advised of the possibility of such damages). In any event, the liability of Aleratec, Inc. under this Limited Warranty, for damages to you or any third party, regardless of the form of action or theory of liability, shall not exceed the purchase price you paid for this product. Some states do not allow limitations of the disclaimer of implied warranties, the period an implied warranty lasts, or the exclusion or limitation of incidental or consequential damages, so the exclusions and limitations stipulated in this Limited Warranty may not apply to you. This Limited Warranty gives you specific legal rights, and you may have other rights which vary from state to state. 52 www.aleratec.com Service and Support To Obtain Warranty Service: You must ship your subsystem to the authorized dealer where your subsystem was purchased within the one year warranty period and no later than thirty days after discovery of claimed defect, whichever occurs first. In either case, you must provide proof of original purchase before any warranty service can be performed. Products and parts provided as a result of warranty service may be other than new but will be in good working order and become your property at the time of exchange. At the same time, the exchanged products or parts become the property of Aleratec, Inc. When shipping the subsystem for service, you agree to insure the Duplicator, to prepay shipping charges, and to use the original shipping container or equivalent. Any service outside the scope of this limited warranty shall be at Aleratec, Inc.’s or its Authorized Service Provider’s rates and terms then in effect. This warranty gives you specific legal rights; you may also have other rights which vary from state to state. www.aleratec.com 53 Technical Support FAX Back Form Aleratec, Inc. Technical Support Fax Back Form Please record the following information to help expedite any warranty claim: Model No.:_ _________________ Serial No.: ________________________________ Date Purchased: _______________________________________________________ Place of Purchase:______________________________________________________ Firmware Version:__________________ HDD Brand and Model: _______________ To: Technical Support Group FAX: 1-818-678-0483 FROM:_ ________________________ FAX: ________________________________ E-MAIL _____________________________ RE:_ ___________________________ TEL: ________________________________ DATE:___________________ # OF PAGES: ________________________________ I am experiencing the following issues with my HDD PortaCruiser: ____________________________________________________________________ ____________________________________________________________________ ____________________________________________________________________ ____________________________________________________________________ ____________________________________________________________________ By answering these questions, your problem will be solved more rapidly. Make copies as necessary. You can reach us electronically at: www.aleratec.com on the internet. 54 www.aleratec.com Notes: www.aleratec.com Document Number: 9399065_ENG_Rev. C Specifications subject to change without notice. Copyright © 2009 Aleratec, Inc. 9851 Owensmouth Avenue Chatsworth, CA 91311 U.S.A. www.aleratec.com