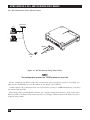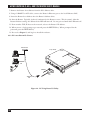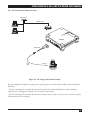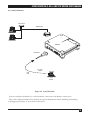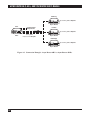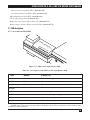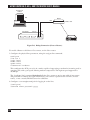
1
MARCH 1996
LRA001A-R2
LRA005A-R2
LRS002A-R2
Async Router AR-P
Async Router AR-5
Sync Router
Async
Router
AR-P
M
MODE
ERR
TX RX
R DCD
NET DT
K
LN
PWR
ET
ETHERN
Sync R
outer
M
MODE
R
RX ER
DCD TX
T DTR
NE
K
PWR LN
ET
ETHERN
r
Route
AsyncAR-5
CUSTOMER
SUPPORT
INFORMATION
1
Modem
3
2
4
/Rx Tx/Rx
T Tx/Rx Tx
ERR NE
5
/Rx
Tx/Rx Tx
D
DC
D DCD
DCD DC
K DCD
PWR LN
Order toll-free in the U.S.: Call 877-877-BBOX (outside U.S. call 724-746-5500)
FREE technical support 24 hours a day, 7 days a week: Call 724-746-5500 or fax 724-746-0746
Mailing address: Black Box Corporation, 1000 Park Drive, Lawrence, PA 15055-1018
Web site: www.blackbox.com • E-mail: [email protected]
FEDERAL COMMUNICATIONS COMMISSION AND
CANADIAN DEPARTMENT OF COMMUNICATIONs RADIO FREQUENCY INTERFERENCE STATEMENTS
This equipment generates, uses, and can radiate radio frequency energy and if not installed and used properly,
that is, in strict accordance with the manufacturer’s instructions, may cause interference to radio communication.
It has been tested and found to comply with the limits for a Class A computing device in accordance with the
specifications in Subpart J of Part 15 of FCC rules, which are designed to provide reasonable protection against
such interference when the equipment is operated in a commercial environment. Operation of this equipment in
a residential area is likely to cause interference, in which case the user at his own expense will be required to take
whatever measures may be necessary to correct the interference.
Changes or modifications not expressly approved by the party responsible for compliance could void the user’s
authority to operate the equipment.
This digital apparatus does not exceed the Class A limits for radio noise emission from digital apparatus set out in the Radio
Interference Regulation of the Canadian Department of Communications.
Le présent appareil numérique n’émet pas de bruits radioélectriques dépassant les limites applicables aux appareils numériques de
classe A prescrites dans le Règlement sur le brouillage radioélectrique publié par le ministère des Communications du Canada.
INSTRUCCIONES DE SEGURIDAD (Normas Oficiales Mexicanas Electrical Safety Statement)
1.Todas las instrucciones de seguridad y operación
deberán ser leídas antes de que el aparato eléctrico
sea operado.
2. Las instrucciones de seguridad y operación
deberán ser guardadas para referencia futura.
3. Todas las advertencias en el aparato eléctrico y en
sus instrucciones de operación deben ser
respetadas.
4. Todas las instrucciones de operación y uso deben
ser seguidas.
5. El aparato eléctrico no deberá ser usado cerca del
agua—por ejemplo, cerca de la tina de baño,
lavabo, sótano mojado o cerca de una alberca, etc..
6. El aparato eléctrico debe ser usado únicamente
con carritos o pedestales que sean recomendados
por el fabricante.
7. El aparato eléctrico debe ser montado a la pared o
al techo sólo como sea recomendado por el
fabricante.
8. Servicio—El usuario no debe intentar dar servicio
al equipo eléctrico más allá a lo descrito en las
instrucciones de operación. Todo otro servicio
deberá ser referido a personal de servicio
calificado.
9. El aparato eléctrico debe ser situado de tal manera
que su posición no interfiera su uso. La colocación
del aparato eléctrico sobre una cama, sofá,
alfombra o superficie similar puede bloquea la
ventilación, no se debe colocar en libreros o
gabinetes que impidan el flujo de aire por los
orificios de ventilación.
10. El equipo eléctrico deber ser situado fuera del
alcance de fuentes de calor como radiadores,
registros de calor, estufas u otros aparatos
(incluyendo amplificadores) que producen calor.
11. El aparato eléctrico deberá ser connectado a una
fuente de poder sólo del tipo descrito en el
instructivo de operación, o como se indique en el
aparato.
12. Precaución debe ser tomada de tal manera que la
tierra fisica y la polarización del equipo no sea
eliminada.
13. Los cables de la fuente de poder deben ser guiados
de tal manera que no sean pisados ni pellizcados
por objetos colocados sobre o contra ellos,
poniendo particular atención a los contactos y
receptáculos donde salen del aparato.
14. El equipo eléctrico debe ser limpiado únicamente
de acuerdo a las recomendaciones del fabricante.
15. En caso de existir, una antena externa deberá ser
localizada lejos de las lineas de energia.
16. El cable de corriente deberá ser desconectado del
cuando el equipo no sea usado por un largo
periodo de tiempo.
17. Cuidado debe ser tomado de tal manera que
objectos liquidos no sean derramados sobre la
cubierta u orificios de ventilación.
18. Servicio por personal calificado deberá ser provisto
cuando:
A: El cable de poder o el contacto ha sido dañado;
u
B: Objectos han caído o líquido ha sido
derramado dentro del aparato; o
C: El aparato ha sido expuesto a la lluvia; o
D: El aparato parece no operar normalmente o
muestra un cambio en su desempeño; o
E: El aparato ha sido tirado o su cubierta ha sido
dañada.
This manual consists of two documents: a User’s Guide and a Reference Guide. The User’s Guide
begins on page 5 and the Reference Guide begins on page 137.
TRADEMARKS
Cheyenne® is a registered trademark of Cheyenne Software, Inc.
Lotus® is a registered trademark of Lotus Development Corporation.
Macintosh® is a registered trademark of Apple Computer, Inc.
Merit® is a registered trademark of Merit Technologies Ltd.
Motorola® is a registered trademark of Motorola.
Novell® and NetWare® are registered trademarks, and IPX is a trademark, of Novell Incorporated.
Stacker™ is a trademark of Stat Electronics.
Telebit® and NetBlazer® are registered trademarks of Telebit Corporation.
UNIX® is a registered trademark of UNIX System Laboratories, Inc.
Wellfleet® is a registered trademark of Wellfleet Communications, Inc.
Windows® is a registered trademark of Microsoft Corporation.
All applied-for and registered trademarks are the property of their respective owners.
MARCH 1996
LRA001A-R2
LRA005A-R2
LRS002A-R2
Async Router AR-P
Async Router AR-5
Sync Router
USER’S GUIDE
ASYNC ROUTER AR-P, AR-5, AND SYNC ROUTER USER’S MANUAL
CONTENTS
1. Specifications...........................................................................................................................9
1.1 General .............................................................................................................................9
1.2 Connector Specifications.................................................................................................9
2. Introduction ............................................................................................................................11
2.1 Applications ......................................................................................................................11
2.1.1 Transparent LAN-to-LAN Routing ........................................................................11
2.1.2 Transparent Remote Client Access........................................................................11
2.1.3 Remote Clients and LANs with Dual-Stack Functionality ....................................11
2.2 Shared Router Features ...................................................................................................12
2.2.1 Easy to Install and Configure.................................................................................12
2.2.2 Reduces Operating Costs .......................................................................................12
2.2.3 Dial Suppression.....................................................................................................12
2.2.4 Prevents Unauthorized Network Access ...............................................................13
2.2.5 Interoperable with RADIUS and SecurID Servers ...............................................13
2.2.6 PPP Link-Level Security .........................................................................................13
2.2.7 IP and IPX Packet Filtering ...................................................................................13
2.2.8 Predefined IP and IPX Packet Filtering................................................................13
2.2.9 Predefined IPX Packet Filters................................................................................13
2.2.10 Passwords for FTP and Telnet Servers..................................................................14
2.2.11 Console Login........................................................................................................14
2.2.12 Passwords for RouterVu Logins (IPX) .................................................................14
2.2.13 Security Callback to Remote Users.......................................................................14
2.2.14 Client Passwords ...................................................................................................14
2.2.15 Compression for Synchronous Interfaces...........................................................14
2.3 Async Router AR-5 (LRA005A-R2) Features...................................................................15
2.4 Sync Router (LRS002A-R2) Features ..............................................................................15
2.4.1 Automatic Fallback.................................................................................................15
2.4.2 Synchronous Router Interface ..............................................................................16
2.5 Async Client Kit ................................................................................................................16
2.6 Operating Requirements .................................................................................................16
3. Connect Cables .......................................................................................................................18
3.1 Inventory...........................................................................................................................18
3.2 Async Router AR-P Connections .....................................................................................19
3.3 Async Router AR-5 Connections .....................................................................................21
3.4 Sync Router Connections ................................................................................................23
4. Connect Host ..........................................................................................................................25
4.1 If you have a previously configured boot diskette..........................................................26
4.2 Select Host Connection Method .....................................................................................27
4.2.1 PC/Workstation Using Telnet Utility ....................................................................28
4.2.2 PC Using RouterVu Utility .....................................................................................30
4.2.3 PC Using Serial Terminal Utility ...........................................................................33
4.2.4 Serial Terminal .......................................................................................................35
5. Install Software ........................................................................................................................37
5.1 Installation Summary .......................................................................................................37
5.2 Installation Procedure .....................................................................................................37
5.3 Installation Examples.......................................................................................................39
5.3.1 Async Router AR-P, Async Router AR-5 Examples................................................39
5.3.2 Sync Router Example .............................................................................................45
6
ASYNC ROUTER AR-P, AR-5, AND SYNC ROUTER USER’S MANUAL
5.4 Parameters ........................................................................................................................47
5.4.1 LAN Parameters .....................................................................................................48
5.4.2 Choose Method of Client Authentication ............................................................49
5.4.3 Modem Parameters ................................................................................................50
5.4.4 Sync Router Parameters .........................................................................................52
5.4.5 IP Firewall Parameters............................................................................................53
5.4.6 Client Parameters ...................................................................................................53
6. Configure and Test..................................................................................................................55
6.1 Configure Hosts on TCP/IP Network.............................................................................55
6.2 Test TCP/IP Networks Using ping ..................................................................................56
6.2.1 Ping from the Local Ethernet................................................................................57
6.2.2 Ping from the Remote Ethernet............................................................................58
6.3 Test IPX Networks Using RouterVu ................................................................................61
Appendix A: Networking Examples...........................................................................................65
A.1 Dialup LAN-to-LAN .........................................................................................................65
A.1.1 Using Names and Passwords .................................................................................65
A.1.2 Home/Branch Office Designation .......................................................................69
A.2 Synchronous LAN-to-LAN...............................................................................................71
Appendix B: Line Use.................................................................................................................73
B.1 How to Monitor Line Use ...............................................................................................73
B.1.1 Determine Sources of Last 5 Dials ........................................................................73
B.1.2 Listen to the Modem’s Speaker.............................................................................73
B.1.3 Turn on Syslog (IP and IPX Networks) ................................................................74
B.1.4 Set Up an Excessive-Use Warning (IP Networks Only) .......................................75
B.2 How to Limit Line Use ....................................................................................................75
B.2.1 Set a Dialup Time Quota for that Interface .........................................................75
B.2.2 How to Temporarily Increase the Time Quota ....................................................76
B.2.3 Use the Router’s Predefined IP Filters .................................................................76
B.2.4 Use the Router’s Predefined IPX Filters ..............................................................79
B.2.5 Write Your Own IP and IPX Filters .......................................................................79
Appendix C: Troubleshooting....................................................................................................82
C.1 LED Descriptions.............................................................................................................83
C.1.1 Async Router AR-P LEDs .......................................................................................83
C.1.2 Async Router AR-5 LEDs .......................................................................................84
C.1.3 Sync Router LEDs ..................................................................................................85
C.2 Router Commands...........................................................................................................86
C.2.1 For Any One Type of Network (TCP/IP and IPX)..............................................86
C.2.2 For IPX (NetWare) Networks Only ......................................................................87
C.2.3 For TCP/IP Networks Only...................................................................................87
C.2.4 RouterVu “Remote Console” for NetWare Networks ..........................................88
C.3 Initial Configuration/Start-up Problems .......................................................................89
C.3.1 Router Cannot Start—LEDs Stay Dark.................................................................89
C.3.2 Router Cannot Start—LEDs Stay Lit ....................................................................91
C.3.3 Prompt Does Not Display ......................................................................................91
C.3.4 Root Password Does Not Work..............................................................................91
C.3.5 IP Hosts on Ethernet Cannot Telnet to the Router.............................................92
C.3.6 Cannot Save Configuration...................................................................................93
C.3.7 Why Don’t the Modems Connect?........................................................................93
C.3.8 Modem Will Not Connect to Remote Modem.....................................................94
7
ASYNC ROUTER AR-P, AR-5, AND SYNC ROUTER USER’S MANUAL
C.4 Operating Problems ........................................................................................................95
C.4.1 Cannot Communicate with Remote Host (IP Only) ...........................................95
C.4.2 Connection Drops After a Few Seconds ...............................................................100
C.4.3 Connection Drops After a Few Hours ..................................................................100
C.4.4 Constant Remote Dialup .......................................................................................100
C.4.5 Unable to Attach to a Remote NetWare Server (Modems Only) .......................101
C.4.6 Remote Server Not Found (IPX)..........................................................................101
C.4.7 No Connection Slots Available (IPX)...................................................................102
C.4.8 Misconfigured Networks (IPX).............................................................................102
C.5 Client Problems ...............................................................................................................103
C.5.1 Router Does Not Answer When Client Calls........................................................103
C.5.2 Router Answers Client Call But Connection Fails ...............................................103
C.5.3 Client Logged In, But Can’t Access Servers on Network ....................................103
C.6 Returning Your Router for Repair..................................................................................104
Appendix D: Interoperability .....................................................................................................105
D.1 RADIUS Servers...............................................................................................................105
D.2 SecurID Servers ...............................................................................................................106
D.3 Cisco Router Interoperability .........................................................................................108
D.3.1 About the Cisco Command Language .................................................................109
D.3.2 Types of Connections Available ............................................................................110
D.4 IPX Synchronous Routers...............................................................................................115
D.5 TCP/IP Synchronous Routers ........................................................................................115
D.5.1 Configure Router to Use PPP ...............................................................................115
D.5.2 Configure Router to Use RIP................................................................................115
D.5.3 Assign Subnet to PPP Connection if Necessary ...................................................115
D.5.4 Telebit NetBlazer and PN......................................................................................116
D.6 Interoperability with CSU/DSUs....................................................................................116
D.6.1 Black Box CSU/DSU MS, EAZY CSU/DSU MS, Adtran DSU III AR ................116
D.6.2 Adtran ISU 128 ......................................................................................................117
D.6.3 CM-1056E, Larse S5600, Racal-Milgo 4556 ..........................................................118
D.6.4 Motorola TA220/TA220k......................................................................................118
D.6.5 Other CSU/DSUs ..................................................................................................119
Appendix E: Glossary..................................................................................................................120
Appendix F: Installation Reference ...........................................................................................127
8
CHAPTER 1: Specifications
1. Specifications
1.1 General
Standards—Ethernet: IEEE 802.3 AUI, 10BASE-T; V.32 bis/V.42 bis
Speed—10-Mbps Ethernet; 28.8-Kbps integrated modem
Protocols—IP, IPX™
Integrated Modem—V.34 bis with V.42 bis
Diagnostics—Via LEDs or management code (supports Telnet login), SNMP
Connectors—All models: (1) DB9 male, (1) DB15 AUI female, (1) RJ-45 female, (1) 5-pin DIN;
LRA001A-R2: (1) RJ-11; LRA005A-R2: (5) RJ-11; LRS002A-R2: (1) RJ-11, (1) DB25 female
Humidity—20-80% (non-condensing)
Operating Temperature—32° F to 122° F (0° C to 50° C)
Power—100-200 VAC, 60/50 Hz, external power supply (autoswitching), 0.6 A max.
Size—All models: 2.3"H x 9.8"W x 8.3"D (5.8 x 25 x 21 cm)
Weight—LRA001A-R2: 3.6 lb. (1.6 kg), LRA005A-R2: 4.3 lb. (1.9 kg), LRS002A-R2: 4.1 lb. (1.8 kg)
1.2 Connector Specifications
Table 1-1. IEEE 802.3 AUI, DB15 Connector.
Pin Number
Signal
Pin 1
Pin 2
Pin 3
Pin 4
Pin 5
Pin 6
Pin 7
Pin 8
Pin 9
Pin 10
Pin 11
Pin 12
Pin 13
Pin 14
Pin 15
Gnd
COL+
TXD+
Gnd
RXD+
Gnd
NC (not connected)
Gnd
COLTXDGnd
RXD+12V
Gnd
NC
9
ASYNC ROUTER AR-P, AR-5, AND SYNC ROUTER USER’S MANUAL
NOTE
The maximum length of the transceiver cable cannot exceed 164 feet
(50 meters).
Table 1-2. 10BASE-T, RJ-45 (8-Pin) Connector.
Pin Number
Signal
Pin 1
Pin 2
Pin 3
Pin 4
Pin 5
Pin 6
Pin 7
Pin 8
TPO+
TPO
TP1+
NC
NC
TP1NC
NC
Table 1-3. DB9 Connector.
Pin Number
Signal
Pin 1
Pin 2
Pin 3
Pin 4
Pin 5
Pin 6
Pin 7
Pin 8
Pin 9
DCD
RXD
TXD
DTR
Gnd
DSR
DTR
CTS
RI
Table 1-4. Power Input Connector.
Pin Number
Signal
Pin 1
Pin 2
Pin 3
Pin 4
Pin 5
COM
Case
+5V
-12V
+12V
Table 1-5. RJ-11 Connector.
10
Pin Number
Signal
Pin 3
Pin 4
Tip
Ring
ASYNC ROUTER AR-P, AR-5, AND SYNC ROUTER USER’S MANUAL
2. Introduction
This chapter introduces Router technology, features, and applications. Installation instructions begin in
Chapter 3.
If you are upgrading a previous version of the Router, make sure you read Appendix C in the Reference
Manual.
The Routers are remote access servers that route TCP/IP and IPX (NetWare®) traffic. Routers connect
remote local area networks (LANs) and clients to Ethernet-based LANs, using standard V.34 modems, or
synchronous lines (leased or switched). Personal computers can access Router servers using the Async
Client software. Macintosh® and other non-PC clients can dial into a Router using the standard point-to
point protocol (PPP).
Three models are available:
Table 2-1. Router Models.
Model
WAN Capabilities
Async Router AR-P (LRA001A-R2)
1 V.34 modem
Async Router AR-5 (LRA005A-R2)
5 V.34 modems
Sync Router (LRS002A-R2)
1 sync interface, 1 V.34 modem
2.1 Applications
All Router models provide autosensing Ethernet interfaces (10BASE-T, AUI), and support multiple
protocols for both LAN-to-LAN and user-to-LAN (remote-client access) routing. All Routers have an
internal V.34 modem (the AR-5 model has five internal modems).
2.1.1 TRANSPARENT LAN-TO-LAN ROUTING
For transparent routing between separate Ethernet-based LANs, pair two Routers together or use
compatible devices. Use any Router model to provide inexpensive networking solutions for remote
of fices. For maximum throughput, use the Sync Router for synchronous connections.
2.1.2 TRANSPARENT REMOTE CLIENT ACCESS
For remote client access, the Router acts as a remote node server, allowing IPX- and TCP/lP-based PCs
and laptop computers to become remote nodes on an Ethernet-based network attached to the Router.
Remote client workstations can then dial into the Router to access services on the LAN as if they were
local nodes. The Router supports transparent access for a maximum of 100 remote clients, and accepts
calls from any client on any dial-up modem line configured for client access.
2.1.3 REMOTE CLIENTS AND LANS WITH DUAL-STACK FUNCTIONALITY
Router supports dual-stack functionality in both remote LAN-to-LAN and remote client operations. IP
and IPX protocols are supported, so that any DOS or Windows® based PC, Macintosh, or UNIX®
workstation can access the Router. The Router uses the standard PPP protocol, which allows third-party
client applications to access the Router.
11
ASYNC ROUTER AR-P, AR-5, AND SYNC ROUTER USER’S MANUAL
2.2 Shared Router Features
All Router models share the following features:
• Included or optional internal 28.8K modems (V.34)
• IP and IPX routing, separately or simultaneously
• PPP, IPCP, IPXCP, PAP, and CHAP protocols
• Remote client access (supports a maximum of 100 clients):
- time filter
- connect quota
- idle timeout
- security callback
• Extensive IP and IPX packet filtering on all interfaces
• Simple configuration for all supported interfaces: Ethernet, modem, and synchronous interfaces
• Superior handling of IP RIP updates
• Extensive dial-up monitoring capabilities
• Automatic recognition of network topology and services
• Support for primary and secondary phone numbers (used for each modem interface)
2.2.1 EASY TO INSTALL AND CONFIGURE
Routers are shipped ready for installation and configuration. Installation is described in Chapters 3, 4,
and 5. You configure the Router with a dialogue that prompts you to enter the desired LAN, WAN and
client parameters. To configure the Router, you can use either a PC with a terminal emulator like
Windows Terminal or a serial terminal connected to the Router’s console port, or use a host computer
with telnet on the local Ethernet (TCP/IP), or use a host PC with RouterVu (included with the Router)
on the local Ethernet (IPX).
2.2.2 REDUCES OPERATING COSTS
The Router supports idle timeouts and time quotas to reduce operating costs. Finally, the Router can
restrict a client’s access to the network, using the concept of a configurable client access shift. A client
account can be restricted to client access during shift hours (IN), after hours (OUT), or 24 hours of the
day.
2.2.3 DIAL SUPPRESSION
Router link optimization (RLO) recognizes and minimizes unnecessary traffic. RLO has IPX and SPX
filters to prevent dialing for and forwarding of, network traffic that doesn’t originate from end-users.
Although it is enabled by default, RLO can be manually enabled and disabled. See Appendix B, Line
use.
Standard IP and IPX filters can also be used to suppress unnecessary dialing activities.
12
ASYNC ROUTER AR-P, AR-5, AND SYNC ROUTER USER’S MANUAL
2.2.4 PREVENTS UNAUTHORIZED NETWORK ACCESS
The Router offers comprehensive security mechanisms to prevent unauthorized network access. The
Router security operates at several levels:
• PPP link-level security (over the WAN link)
• IP, IPX, and SPX packet filtering
• passwords for ftp and telnet servers (IP)
• console login and password
• passwords for RouterVu logins (IPX)
• security callback to remote users (clients)
• client logins and passwords
2.2.5 INTEROPERABLE WITH RADIUS AND SECURID SERVERS
The Router interoperates with RADIUS and SecurID authentication servers. RADIUS allows
administrators to centrally store and manage names and passwords for IP sites with many dial-in routers
and remote clients. SecurID requires remote clients to physically possess a SecurID metal card, in order
to gain network access.
NOTE
SecurID and RADIUS technologies cannot be used at the same time on a Router.
2.2.6 PPP LINK-LEVEL SECURITY
For PPP link-level security, the Router supports the Challenge Handshake Authentication Protocol
(CHAP) and the Password Authentication Protocol (PAP). Both PAP and CHAP require password
and node names for linking to prevent unauthorized users from gaining access through the Router.
We strongly recommend using CHAP to provide security.
Along with PAP and CHAP, a new security CHAP (SCHAP) for Router clients supports security
callback. A modem configured for client access attempts to negotiate CHAP, PAP, then SCHAP
authentication.
2.2.7 IP AND IPX PACKET FILTERING
The Router’s extensive IP and IPX filtering allows specific hosts, networks, and services—mail, terminal,
print, and file services—to be excluded from, or allowed access to, your network.
2.2.8 PREDEFINED IP PACKET FILTERS
If you will be using the Router to provide Internet access to your users, you have the option of installing
a list of IP filters that are commonly used to protect networks from unauthorized access by Internet
users. Refer to Appendix B.
2.2.9 PREDEFINED IPX PACKET FILTERS
You also have the option of installing a list of IPX filters that are commonly used to suppress dialing
caused by unnecessary network traffic such as:
• Pings from NetWare servers
• SPX idle traffic
• NetBIOS name broadcasts between servers
13
ASYNC ROUTER AR-P, AR-5, AND SYNC ROUTER USER’S MANUAL
• Any other IPX broadcasts.
Also refer to Appendix B.
2.2.10 PASSWORDS FOR FTP AND TELNET SERVERS
Passwords must be used to log in and transfer files to prevent unauthorized access.
2.2.11 CONSOLE LOGIN
When a serial terminal (console) is in use, a login and password are required.
2.2.12 PASSWORDS FOR ROUTERVU LOGINS (IPX)
Passwords must be used to log in to a Router with RouterVu.
2.2.13 SECURITY CALLBACK TO REMOTE USERS
A security callback feature can be enabled for any Async Router client. The client must be located at a
specific phone number to access the Router. Security callback only works with Async Router clients.
Once a physical link is established, and before packet routing commences, the calling workstation
presents a user name and password for authenticity. If the password is authentic, Router directs the
client to end the phone session and enter into auto-answer mode, anticipating a response from the
Router. Once the Router responds to the client, the process to determine authenticity ends. If a client
attempts to establish a connection to a modem designated as a LAN-to-LAN line, the connection fails.
2.2.14 CLIENT PASSWORDS
The Router maintains a database supporting a maximum of 100 remote clients. Each record in this
client database is associated with a single client. Each record of the database stores a client’s name,
password, connect quota (length of time each day a client is allowed to access the Router), idle timeout
(length of time network inactivity is allowed to keep up the connection), security callback phone
number, and shift access choice (access based on time of day).
2.2.15 COMPRESSION FOR SYNCHRONOUS INTERFACES
The Router provides compression for synchronous interfaces on the Sync Router, in both TCP/IP and
IPX networks. For the sync0 interface, compression is enabled by default, but can be disabled using the
ppp command. The Router implements compression using Stacker™ algorithms from Stat Electronics.
A synchronous PPP link can have two different compression methods on the same link, one in each
direction. “No compression” counts as a compression method. Although theoretically multiple
compression methods can be active across each direction of a PPP link, the Router supports only one
method of compression per direction on a link.
Example:
For example, suppose your Router is linked to a remote router. There are two connections on the same
links: one from your Router to the remote router, and one from the remote router to your Router.
When the Router establishes a link, it negotiates with the Router at the other end to select what type of
compression will be used. During the negotiation, the Router will indicate a preference for the Stacker
compression method.
14
ASYNC ROUTER AR-P, AR-5, AND SYNC ROUTER USER’S MANUAL
2.3 Async Router AR-5 (LRA005A-R2) Features
The Async Router AR-5 has five internal V.34 modems. It connects LANs and clients at up to 28.Kbps
over normal telephone lines.
2.4 Sync Router (LRS002A-R2) Features
The Sync Router works the same way as the Async Routers, except that it connects LANs over a variety
of synchronous serial line types:
• Leased digital data service at 56 Kbps (North America) or 64 Kbps (Europe), i.e., a fixed line from
one location to another, using an external Channel Service Unit/Data Service Unit (CSU/DSU).
• Switched 56 Kbps service, available in North America from either the local or the long-distance
telephone companies, using an external CSU/DSU with dialing capability.
• ISDN basic rate service at 56 Kbps (referred to as voice, or 56 Kbps data), 64 Kbps (referred to as
transparent data), or 128 Kbps (with bonding), using an external synchronous terminal adapter.
If you want to use ISDN circuits, we recommend using the ISDN models that will be released in
the future.
• Switched circuits, using synchronous V.34 modems (such as ZyXEL U1496+) over normal telephone
lines. This type of circuit is not generally useful, since the standard compressing asynchronous
modems used with the Router generally provide superior performance.
2.4.1 AUTOMATIC FALLBACK
If a leased synchronous line fails, the Router’s built-in modem automatically supports fallback
to the modem, for both IP and IPX routing.
2.4.2 SYNCHRONOUS ROUTER INTERFACE
The Sync Router operates as an interface between synchronous routers from:
• Cisco
• Novell (MPR = Multi-Protocol Router)
• XYPLEX
• Wellfleet
Supported CSU/DSUs include (but are not limited to):
For digital data service:
• Our CSU/DSU MS (part number MT132A-R2)
• LarsE M5600 Multi-rate CSU A CSU/DSU with dual interface mode (V.35/EIA-232).
• Motorola/UDS DSS/MR (the Router works with the V.35 version only, of this CSU/DSU).
• Motorola/UDS DSS/V.32 A CSU/DSU which can use a dial-up V.32 connection as backup
to a leased 56-Kbps line without using the modem port of the Router.
For switched-56 data service:
• Our CSU/DSU MS/DBU (SW56) (part number MT134A-R2): A CSU/DSU for 4-wire switched-56
service with AT-command or V.25 bis dialing support to RS-232 or V.35 DTE. This CSU/DSU can
also be used for digital data service (DDS).
15
ASYNC ROUTER AR-P, AR-5, AND SYNC ROUTER USER’S MANUAL
• Motorola/UDS SW56 II A CSU/DSU that can be used for DTR dialing on a Switched-56 network, or
used for DDS.
For ISDN service:
• Black Box/EAZY part number IS280A.
• Adtran ISU 128: An ISDN/BRT TA (terminal adapter) that can create one 112 Kbps channel out of
the two B channels on an ISDN BRI line.
• Motorola/UDS TA-220 and TA-220K: An ISDN/BRI TA that allows two different terminals to be
active on different calls simultaneously. It also allows the two channels to be “bonded” into one 112
Kbps channel.
The Sync Router performs identically to the Async Router AR-P, unless specifically noted inn this
document.
2.5 Async Client Kit
Each Async Router AR-5 is shipped with Async Client kits (also called RemoteOffice), and SmartRoute™
software that supports up to 100 clients. Each Async Client kit includes:
• Remote Office client software diskette (for PCs with DOS 3.3+ and Windows 3.1+)
• VLM software diskette (used by remote client software)
The remote client software package enables remote PCs, laptop computers and workstations to dial
into a Router and access services on accessible LANs. Unlike LAN-to-LAN connections, which require a
dedicated phone line between them, a remote client calls into any modem line on the Router (if it is
configured for client operation). Remote client services can be offered inexpensively to many users,
using the multiple built-in modem lines offered in the Async Router AR-5.
Remote client access requires a remote user to have an account on the Router. This client account is
created by the system administrator. It has a user name, user password, and an optional security call-back
number.
Refer to the Reference Guide, which begins on page 137, for more detailed information about managing
client databases.
2.6 Operating Requirements
To configure or manage Routers, you need:
• a PC with a serial terminal emulator (such as Windows Terminal), or a serial terminal, or a PC on
Ethernet (IPX), or a workstation with telnet on local Ethernet (IP)
• After initial configuration, remote management of Routers requires a PC with RouterVu (IPX
networks) or a workstation with telnet (IP networks)
At an Async Router AR-P or AR-5 site, you need':
• a local Ethernet-based IP or IPX network
• a maximum of 5 phone lines
• one power outlet 110VAC to 250VAC
16
ASYNC ROUTER AR-P, AR-5, AND SYNC ROUTER USER’S MANUAL
At a Sync Router site, you need:
• a local Ethernet-based IP or IPX network
• a leased line or switched digital line
• a CSU/DSU with a V.35 interface
• two power outlets (110 VAC to 250 VAC: one outlet for the Router and one for the CSU/DSU)
At the opposite end of the synchronous line, you need either:
• a second Router with synchronous interface, or
• another router with synchronous PPP support. Most router vendors offer synchronous PPP options
that are compatible with Router’s synchronous interface, but older models may use proprietary
synchronous protocols that are not compatible.
For each remote client, you need:
• a PC or lap-top with DOS 3.3+ or Windows 3.1+
• a modem (and Async Client software)
• if TCP/IP remote client operation is required, a third-party package, such as Super-TCP, FTP
Software PC/TCP, or others, is also required
• a phone line for the modem
17
ASYNC ROUTER AR-P, AR-5, AND SYNC ROUTER USER’S MANUAL
3. Connect Cables
This chapter is the first of the installation chapters. It describes how to install Router cables.
Cabling varies depending upon your Router model. For cabling instructions, refer to the appropriate
section:
• Async Router AR-P (LRA001A-R2): Section 3.2
• Async Router AR-5 (LRA005A-R2): Section 3.3
• Sync Router (LRS002A-R2): Section 3.4
After connecting cables, proceed to Chapter 4 to install a PC, workstation, or serial terminal for
configuring the Router.
3.1 Inventory
Included in the Router kit are the following:
• Router
• Power supply
• Power-supply cable
• V.35 cable, DB25, for Sync Router (LRS002A-R2) only
• Console cable (9-pin to 9-pin)
• Adapter cable (9-pin to 25-pin)
• Modem cable(s)
• This manual
18
ASYNC ROUTER AR-P, AR-5, AND SYNC ROUTER USER’S MANUAL
3.2 Async Router AR-P Connections
Ethernet Hub
10BASE-T, AUI
LINE
2
1
Async
Router
AR-P
3
Power
Supply
I
O
PO
W
ER
S
C ER
O I
N A
SO L
LE
10
B
as
eT
Power
A
U
I
M
od
em
0
10BASE-T
3
AUI
1
Telephone
2
Figure 3-1. Async Router AR-P Connections.
19
ASYNC ROUTER AR-P, AR-5, AND SYNC ROUTER USER’S MANUAL
Place the Router on a shelf or tabletop and follow these steps. The step numbers coincide with the
cables in the illustration.
1. Using either a 10BASE-T or AUI cable, connect your Ethernet LAN to the appropriate connector.
2. Connect the LINE port (modem0) to the desired telephone line. This telephone line must be
dedicated and cannot be used for any other purpose.
3. Connect the power supply with a power cord. Do not start the Router at this time.
4. Proceed to Chapter 4.
20
ASYNC ROUTER AR-P, AR-5, AND SYNC ROUTER USER’S MANUAL
3.3 Async Router AR-5 Connections
modem4
Ethernet Hub
2
line 5
modem3
line 4
modem2
10BASE-T, AUI
modem1
line 3
line 2
modem0
1
line 1
Async
Router
AR-5
3
Power
Supply
I
O
PO
W
ER
S
C ER
O I
N A
SO L
LE
10
B
as
eT
A
U
I
Power
M
od
em
3
0
10BASE-T
1
AUI
2
Cables to phone lines
1 through 5
Figure 3-2. Async Router AR-5 Connections.
21
ASYNC ROUTER AR-P, AR-5, AND SYNC ROUTER USER’S MANUAL
Place the Async Router AR-5 on a sturdy surface or in a rack, and follow these steps. The steps coincide
with cables in the illustrations:
1. Using either a 10BASE-T or AUI cable, connect your Ethernet LAN to the appropriate
(10BASE-T or AUI) connector.
2. Connect the available modem ports (modem0-modem4) to the desired telephone lines.
These telephone lines must be dedicated and cannot be used for any other purpose
3. Connect the power supply with the power cord. Do not start the Router at this time.
4. Proceed to Chapter 4.
22
ASYNC ROUTER AR-P, AR-5, AND SYNC ROUTER USER’S MANUAL
3.3 Sync Router Connections
Ethernet Hub
2
sync
Synchronous
line
CSU/DSU
10BASE-T, AUI
LINE
line
1
3
Sync
Router
4
Power
Supply
I
O
PO
W
ER
S
C ER
O I
N A
SO L
LE
10
B
as
eT
Power
A
U
I
M
od
em
4
0
10BASE-T
1
AUI
2
Sync
Telephone
3
Figure 3-3. Sync Router Connections.
23
ASYNC ROUTER AR-P, AR-5, AND SYNC ROUTER USER’S MANUAL
Place the Sync Router on a shelf or tabletop and follow the steps. The step numbers coincide with
cables in the illustration.
1. Using either a 10BASE-T or AUI cable, connect your Ethernet LAN to the appropriate ( I 0BASE-T
or AUI) connector.
2. Locate the CSU/DSU you will be using. Use the cable provided (gray, 34-pin to 25-pin) to connect
the Router’s synchronous port to the V.35 port on the CSU/DSU. If you are using a CSU/DSU with a
non-V.35 interface, you must use an adapter (V.35 to non-V.35). Connect the synchronous port of the
CSU/DSU to the synchronous (digital) service line (RJ-45) provided by your telephone company.
3. Connect the modem0 (LINE) port to the desired telephone line. The modem can be used for
fallback, or to connect to a modem at a site that is not at the same site as the synchronous link.
4. Connect the power supply with the power cord. Do not start the Router at this time.
5. Proceed to Chapter 4.
24
ASYNC ROUTER AR-P, AR-5, AND SYNC ROUTER USER’S MANUAL
4. Connect Host
Once you connect Router cables as described in Chapter 3, either:
• connect a host (PC workstation or serial terminal) to install and configure software as described in
Chapters 4, 5, and 6, or
• insert the previously configured boot diskette provided by your system administrator into the
Router’s diskette drive and proceed to Chapter 6.
Ethernet Hub
Host
10BASE-T, AUI
2
IP
Router
telnet
CONSOLE
3
1
IPX
Host
Previously
configured boot
diskette
RouterVu
4
Serial terminal utility
(terminal emulation)
5
Serial terminal
Figure 4-1. Five Methods to Configure the Router Software.
25
ASYNC ROUTER AR-P, AR-5, AND SYNC ROUTER USER’S MANUAL
4.1 If you have a previously configured boot diskette...
Ethernet Hub
10BASE-T, AUI
Router
Previously configured
boot diskette
Figure 4-2. If you have a previously configured boot diskette...
If the Router boot diskette has not been previously configured, proceed to Section 4.2.
If your network administrator has prepared a previously configured boot diskette for you, simply
insert the diskette into the Router’s diskette drive and start the unit. The Router starts and uploads
its configuration parameters from the boot diskette. Your Router is now fully operational. Do not
perform the instructions in Chapters 4 and 5, and proceed directly to Chapter 6 to test your installation.
Store the backup boot diskette for the Router in a secure place. The backup boot diskette also contains
your Router’s configuration, as configured by your network administrator.
NOTE
If you are the network administrator, you can preconfigure boot diskettes for the remote
Router sites in advance, test them, and then mail them to the remote sites. This may be
the easiest method to install and configure Routers. Make sure that you also create a
backup boot diskette.
26
ASYNC ROUTER AR-P, AR-5, AND SYNC ROUTER USER’S MANUAL
4.2 Select Host Connection Method
If you do not have a previously configured boot diskette, select a method to connect the host or serial
terminal before installing the Router software as described in Chapter 5.
Table 4-1. Host Connection Methods.
Host
Required Host
Applications
Required Host Location Required Network Protocols
PC or workstation
(2 of Figure 4-1)
telnet utility1
Must be on the same
Ethernet as Router
IP
PC (3 of Figure 4-1)
RouterVu utility1
Must be on the same
Ethernet as Router
IPX
PC (4 of Figure 4-1)
Serial terminal utility
or terminal emulation
Must be connected to
Router’s console port
Serial terminal
(5 of Figure 4-1)
None
Must be connected to
Router’s console port
After the Router is initially installed, the system administrator can manage it remotely over the dialup
link or from the local Ethernet LAN, using either:
1
• telnet for IP networks, or
• RouterVu for IPX networks.
The telnet utility allows you to access and configure Routers remotely over an IP network.
The RouterVu utility allows you to access and configure Routers remotely over an IPX network.
27
ASYNC ROUTER AR-P, AR-5, AND SYNC ROUTER USER’S MANUAL
4.2.1 PC/WORKSTATION USING TELNET UTILITY
Ethernet Hub
Host
IP
I
O
PO
W
ER
S
C ER
O IA
N
SO L
LE
10
B
as
eT
A
U
I
M
od
em
0
10BASE-T
AUI
10BASE-T,
AUI
Figure 4-3. PC/Workstation Using Telnet Utility.
NOTE
This configuration requires the TCP/IP protocol on your LAN.
Before configuring the Router with a PC or workstation using a third-party vendor’s telnet utility, you
must use the setaddr utility to set an IP address on the Router’s boot diskette.
setaddr requires a PC/workstation that can read and write 3.5-inch, 1.44-MB DOS diskettes; telnet does
not require this capability.
When using telnet to install Router software, the computer using telnet must be a node on the same
Ethernet LAN as the Router. You cannot use telnet to configure a Router until an IP address has been
assigned, using setaddr.
28
ASYNC ROUTER AR-P, AR-5, AND SYNC ROUTER USER’S MANUAL
Procedure
1. Start your DOS-based PC (one that can read and write 3.5-inch, 1.44-MB DOS diskettes).
2. Insert the Router boot diskette into the PC’s diskette drive. We assume you’re using the a: drive.
If you’re using the b: drive, substitute b: for a:.
3. Enter:
a:\stacker a:
a:setaddr <RETURN>
4. The setaddr program asks you whether you will be using IPX or IP addresses for telnet.
The Router must have an IP or IPX address before you can access it.
This program will set up the initial addresses for your Router.
For IPX addresses on a NetWare network enter 1
For IP addresses on a TCP/IP network enter 2
What kind of addresses will you use (1) or (2)?
Enter 2, and press the RETURN key.
5. The setaddr program asks you for the IP address to be assigned to the Router:
The IP address of the Router must be set before you can
telnet in to the box. This program will set up the initial
IP address for your Router.
Use d.d.d.d notation, (0 <= d <= 255 (decimal)).
Enter your IP address:
Enter the Router’s designated IP address, and press the RETURN key. Use dotted quad notation for
your IP address: d.d.d.d where d is a decimal number greater than or equal to zero, and less than or
equal to 255.
6. Now exit the Stacker utility and unmount the a: drive:
Initial configuration for your Router is now complete.
You must now take the boot disk, insert it into your Router
and power on the unit. After the Router boots, you can
complete the configuration of the Router by using Telnet
(IP) or RouterVu (IPX) to access the box.
STACKER doubles your disk capacity!!
(type “EXIT” to unmount drive a:)
Enter
exit <RETURN>
29
ASYNC ROUTER AR-P, AR-5, AND SYNC ROUTER USER’S MANUAL
7. Remove the Router boot diskette from the PC’s diskette drive.
8. Using a 10BASE-T or AUI cable, connect the Router’s Ethernet port to the local Ethernet LAN.
9. Insert the Router boot diskette into the Router’s diskette drive.
10. Start the Router. Typically, it takes 2-3 minutes for the Router to start. This is normal. After the
Router finishes starting, the diskette drive LED will turn off. Do not proceed until this LED turns off.
11. From another TCP/IP host on the network, telnet to the Router’s IP address.
12. When you see a login prompt, type root and press the RETURN key. When prompted for the
password, press the RETURN key.
13. Proceed to Chapter 5, and begin to install the software.
4.2.2 PC USING ROUTERVU UTILITY
Ethernet Hub
Async Router
I
O
PO
W
ER
S
C ER
O IA
N
SO L
LE
IPX
10
B
as
eT
A
U
I
M
od
em
10BASE-T
AUI
10BASE-T,
AUI
Figure 4-4. PC Using RouterVu Utility.
30
0
ASYNC ROUTER AR-P, AR-5, AND SYNC ROUTER USER’S MANUAL
NOTE
This configuration requires NetWare IPX protocol on your LAN.
Before you can configure the Router with an IBM-compatible personal computer using the RouterVu
utility (provided by us), you must use the setaddr utility to set an IPX network number and Ethernet
frame type on the Router’s boot diskette.
To use setaddr or RouterVu, your PC must read and write 3.5-inch, 1.44-MB DOS diskettes. When using
RouterVu to configure the Router, your PC must reside on the same Ethernet LAN as the Router.
The PC operating with RouterVu should only be used by the system administrator when installing,
maintaining or debugging the Router or its network connections.
The PC operating with RouterVu should not be used by users to gain access to local or remote
networks. This method of access is illegal.
Procedure
1. Start your DOS-based PC.
2. Insert the Router boot diskette into the PC’s diskette drive. We assume you’re using the a: drive.
If you’re using the b: drive, substitute b: for a:.
3. Enter, for example:
a:\stacker a:
a:setaddr
<RETURN>
<RETURN>
4. The setaddr utility asks you whether you will be using IPX or IP addresses for telnet.
The Router must have an IP or IPX address before you can access it. This program will set up the
initial addresses for your Router.
For IPX addresses on a NetWare network enter 1
For IP addresses on a TCP/IP network enter 2
What kind of addresses will you use (1) or (2) ?
Enter 1, and press the RETURN key.
5. Setaddr prompts you for the Router IPX network number.
The IPX network number is the number assigned to the Ethernet
segment attached to a NetWare server. This information is
in the AUTOEXEC.NCF file on the NetWare server that will be
on the same Ethernet segment as the Router.
The number is in hexadecimal format.
What is the network number of the ethernet segment to which the Router will
be attached ?
Enter your designated IPX network number in hexadecimal format, and press the RETURN key.
31
ASYNC ROUTER AR-P, AR-5, AND SYNC ROUTER USER’S MANUAL
6. Setaddr next prompts you for the frame type, used on the Ethernet to be connected to the Router.
For
For
For
For
Frame
Frame
Frame
Frame
Type
Type
Type
Type
802.3
Ethernet_II
802.2
SNAP
enter
enter
enter
enter
1
2
3
9
What is the Frame Type you are using ?
Enter the number designated for the desired frame type, and press the RETURN key.
7. Setaddr prompts you for the desired name of the Router.
A unique name is a name that is not used by any
NetWare file servers, print servers or Routers.
Enter a unique name for the Router:
Enter the desired name of the Router, and press the RETURN key.
8. Now exit the Stacker utility and unmount the a: drive:
Initial configuration for your Router is now complete. You
must now take the boot disk, insert it into your Router
and power on the unit. After the Router boots, you can
complete the configuration of the Router by using Telnet
(IP) or RouterVu (IPX) to access the box.
STACKER doubles your disk capacity!!
(type ‘EXIT’ to unmount drive a:)
Enter
exit <RETURN>
9. Remove the Router boot diskette from the PC’s diskette drive.
10. Using a 10BASE-T or AUI cable, connect the Router’s Ethernet port to the local Ethernet LAN.
11. Insert the Router boot diskette into the Router’s diskette drive.
12. Start the Router. Typically it takes 2-3 minutes to load the contents of the boot diskette. This is
normal. After the Router finishes starting, the diskette drive LED will turn off. Do not proceed until
this LED turns off.
13. From a PC on the Ethernet, insert the RouterVu diskette into the PC, and enter:
a: \ routervu name
where the name is associated with the Router that you want to configure, and the floppy drive is the a:
drive. Previously in step 7, you specified name using setaddr.
14. When you see a login prompt, type root and press the RETURN key. When prompted for the
password, press the RETURN key again.
15. Proceed to Chapter 5, and begin installing the software.
32
ASYNC ROUTER AR-P, AR-5, AND SYNC ROUTER USER’S MANUAL
4.2.3 PC USING SERIAL TERMINAL UTILITY
Ethernet Hub
10BASE-T, AUI
Router
I
O
PO
W
CONSOLE
ER
S
C ER
O IA
N
SO L
LE
10
B
as
eT
A
U
I
M
od
em
0
PC/Terminal
Host
serial
cable
serial port
Serial terminal
utility (terminal
emulation)
Figure 4-5. PC Using Serial Terminal Utility.
You can configure the Router by using a PC operating with a serial terminal emulator such as Windows
Terminal.
The PC emulating the terminal should only be used by the system administrator when installing,
maintaining or debugging the Router or its network connections.
The PC emulating the terminal should not be used by users to gain access to local or remote networks.
This method of access is illegal.
33
ASYNC ROUTER AR-P, AR-5, AND SYNC ROUTER USER’S MANUAL
1. Using the serial cable provided, connect a PC’s serial port to the console port of the Router. Set the
serial terminal utility to 9600 bps, no parity, 8 data bits, and 1 stop bit.
2. Insert the Router boot diskette in the Router diskette drive.
3. Start the Router.
Typically it takes 2-3 minutes to load the contents of the boot diskette. This is normal. After the
Router finishes starting, the diskette-drive LED will turn off. Do not proceed until this LED turns off.
4. When you see a login prompt, type root and press the RETURN key. When prompted for the
password. press the RETURN key.
5. Proceed to Chapter 5, and begin the software installation process.
34
ASYNC ROUTER AR-P, AR-5, AND SYNC ROUTER USER’S MANUAL
4.2.4 SERIAL TERMINAL
Ethernet Hub
10BASE-T, AUI
Router
CONSOLE
I
O
PO
W
ER
S
C ER
O IA
N
SO L
LE
10
B
as
eT
A
U
I
PC/Terminal
M
od
em
0
9-to-25 pin
adapter
serial
cable
Serial
terminal
Figure 4-6. Serial Terminal.
You can configure the Router by a serial terminal, connected to the Router console port.
The serial terminal should only be used by the system administrator when installing, maintaining,
or debugging the Router or its network connections.
35
ASYNC ROUTER AR-P, AR-5, AND SYNC ROUTER USER’S MANUAL
The serial terminal should not be used by users to gain access to local or remote networks. This
method of access is illegal.
1. Using the serial cable provided, connect a serial terminal to the console port of the Router. If
necessary, use the adapter provided with the console cable. Set the serial terminal to 9600 bps, no
parity, 8 data bits, and 1 stop bit.
2. Insert the boot diskette into Router’s diskette drive.
3. Start the Router. Typically it takes 2-3 minutes to load the contents of the boot diskette. This is
normal. After the Router finishes starting, the diskette drive LED will turn off. Do not proceed until
this LED turns off.
4. When you see a login prompt, type root and press the RETURN key. When prompted for the
password, press the RETURN key.
5. Proceed to Chapter 5 to install the software.
36
ASYNC ROUTER AR-P, AR-5, AND SYNC ROUTER USER’S MANUAL
5. Install Software
Once you have installed the unit with its cables (Chapter 3) and implemented a means for installing
the software (Chapter 4), your Router is ready to be configured to operate on a TCP/IP and/or IPX
network.
The software installation essentially prompts you to define the LAN, WAN, and client parameters
desired for your Router’s configuration.
• LAN parameters—define the LAN parameters for the Router you are installing (the local Router).
• WAN parameters—define the parameters for the modem/sync interfaces of the local Router.
• Client parameters—define the client parameters for the remote clients.
Before configuring your Router, complete the Installation Reference in Appendix F. You will need
much of this information to successfully install the Router, and after installation, you will have a record
of what you have done. Before installing the Router, we also recommend that you read Appendix A.
5.1 Installation Summary
• Working with your network administrator, complete the Installation Reference in Appendix F.
• Preview one of the software installation examples.
• Start the software installation process.
• As prompted by the Router, enter the LAN, WAN (modem, sync) and client parameters as recorded
in your Installation Reference in Appendix F. Also refer to parameter explanations and examples at
the end of this chapter, organized by parameter type.
• After finishing the installation process and saving the configuration, proceed to Chapter 6.
5.2 Installation Procedure
1. Select and preview the installation example (screen listing) based upon your Router model: Async
Router AR-P or AR-5, or Sync Router. The installation examples include both TCP/IP and IPX
(NetWare) protocols. If your installation requires only one of these protocols, some prompts will
not appear.
2. Start the installation from your serial port terminal, PC emulator program, telnet, or RouterVu
session.
Note that a previously configured Router will not automatically display configuration parameters
for you to select. To change a previously configured Router, issue the config modify command from
the prompt. You will now be prompted through the entire configuration process.
3. Refer to the parameter descriptions at the end of this chapter when you have questions regarding
any of the parameters.
4. Any time during configuration, press the ESC key to stop the process. As a result, the Router
returns to the beginning of the configuration process and will do so until you explicitly save
the configuration.
5. Proceed to Chapter 6 to test your Router installation.
37
ASYNC ROUTER AR-P, AR-5, AND SYNC ROUTER USER’S MANUAL
NOTE
For LAN-to-LAN operation, configure your local and remote NetWare LANs with unique
network numbers before configuring and operating the Router. This includes all
network numbers for all frame types. These numbers are set in the AUTOEXECNCF files
of your NetWare file servers, with the “BIND IPX TO lan_driver NET= net_number”
statements. Before proceeding with your Router software installation, make sure that
your local and remote IPX LANs have unique network numbers.
For User-to-LAN operation, each remote user (client) must also have a unique NetWare
network number. By default, the Router automatically assigns a unique network number
to each client. If you want the client to define the IPX network number used, set the IPX
network number of the Router’s modem to zero using the “ifconfig” command. If the
client and the Router have different assigned IPX network numbers, then the Router will
use the higher network number of the two.
38
ASYNC ROUTER AR-P, AR-5, AND SYNC ROUTER USER’S MANUAL
5.3 Installation Examples
5.3.1 ASYNC ROUTER AR-P, ASYNC ROUTER AR-5
Figure 5-1. Async Router AR-P, Async Router AR-5.
39
ASYNC ROUTER AR-P, AR-5, AND SYNC ROUTER USER’S MANUAL
Define LAN Parameters:
login: root
Password:
Welcome root to the Router (4.0)
The following configuration information must be
supplied before the Router can become operational.
Default values for each parameter are shown in
parentheses.
Press <Esc> at any prompt to cancel this script and
delete the configuration.
This system:
Name (Router): paris
Root password ():
Retype password:
Link password:
Retype password:
Date/time in yymmddhhmm[.ss] format (9408291604.01):
Enable IPX routing (y): y
Enable IP routing (y): y
Define LAN parameters for local Router:
Ethernet:
IPX:
Ethernet_802.3:
Network (): 1
Ethernet_II:
Network (): 2
802.2:
Network (): 3
SNAP:
Network (): 4
IP:
address (): 131.143.19.72
subnet mask (255.255.0.0):
255.255.252.0
Syslog IP address (): 131.143.19.72
Do you have domain name servers? (n): y
Domain name servers:
IP address (): 131.143.16.1
IP address ():
Domain suffix (com): rns.com
40
ASYNC ROUTER AR-P, AR-5, AND SYNC ROUTER USER’S MANUAL
Define Modem Parameters:
Do you want to configure and use modem0 now (y): y
What type of system are you connecting this modem to?
1)
2)
3)
4)
5)
Async Router AR-P, AR-5, or Sync Router
Async Client or other client
Livingston Portmaster
Telebit NetBlazer or PN
Other LAN to LAN
Please enter the number of your choice (1): 1
Define modem0 parameters:
Remote site information:
Phone # ( ): 805-555-1212
Maximum minutes of phone usage per day (1440):
Name (remote0): ventura
Link password ( ):
Retype password:
IP address ( ): 131.143.23.25
IP subnet mask (255.255.0.0): 255.255.252.0
Branch offices usually have a default route pointing to
the home office
You have no default route
Add a default route to modem0 (y): y
Define modem1 (if present)
Do you want to configure and use modem1 now (y): y
What type of system are you connecting this modem to?
1)
2)
3)
4)
5)
Async Router AR-P, AR-5, or Sync Router
Async Client or other client
Livingston Portmaster
Telebit NetBlazer or PN
Other LAN to LAN
Please enter the number of your choice (1):
Remote site information:
Remote Client IP address, optional ( ):
2
143.143.33.33
Do you want to configure and use modem2 now (y):
y
What type of system are you connecting this modem to?
1)
2)
3)
4)
5)
Async Router AR-P, AR-5, or Sync Router
Async Client or other client
Livingston Portmaster
Telebit NetBlazer or PN
Other LAN to LAN
41
ASYNC ROUTER AR-P, AR-5, AND SYNC ROUTER USER’S MANUAL
Please enter the number of your choice (1):
3
Define modem2 (if present)
Remote site information:
Phone # ( ): 213-555-1212
Maximum minutes of phone usage per day (1440):
Name (remote2): LAoffice
Authentication (N)one, (P)AP, or (C)HAP (C): P
Link password ( ):
Retype password:
IP address ( ): 132.222.23.12
IP subnet mask (255.255.0.0):
Branch offices usually have a default route pointing to
the home office
You have no default route
Add a default route to modem0 (y): n
Login name ( ): frank
Login password ( ):
Retype password:
Do you want to configure and use modem3 now (y):
y
What type of system are you connecting this modem to?
1)
2)
3)
4)
5)
Async Router AR-P, AR-5, or Sync Router
Async Client or other client
Livingston Portmaster
Telebit NetBlazer or PN
Other LAN to LAN
Define modem3 (if present)
Please enter the number of your choice (1):
4
Remote site information:
Phone # ( ): 714-555-1212
Maximum minutes of phone usage per day (1440):
Name (remote3): orange
Authentication (N)one, (P)AP, or (C)HAP (C): c
Link password ( ):
Retype password:
IP address ( ): 132.132.12.80
IP subnet mask (255.255.0.0):
Branch offices usually have a default route pointing to
the home office
You have no default route
Add a default route to modem0 (y): n
Login name ( ): linda
Login password ( ):
Retype password:
42
ASYNC ROUTER AR-P, AR-5, AND SYNC ROUTER USER’S MANUAL
Define modem4 (if present)
Do you want to configure and use modem4 now (y):
y
What type of system are you connecting this modem to?
1)
2)
3)
4)
5)
Async Router AR-P, AR-5, or Sync Router
Async Client or other client
Livingston Portmaster
Telebit NetBlazer or PN
Other LAN to LAN
Please enter the number of your choice (1):
5
Remote site information:
Phone # ( ): 213-345-2498
Maximum minutes of phone usage per day (1440):
Name (remote4): marina
Authentication (N)one, (P)AP, or (C)HAP (C): n
IP address ( ): 205.322 200.76.30
IP subnet mask (255.255.255.0):
Branch offices usually have a default route pointing to
the home office
You have no default route
Add a default route to modem0 (y): n
Login name ( ): bobby
Login password ( ):
Retype password:
Script name (\other.dcf): mroutr.dcf
Define client access shift for this Router
Enter the client access shift time in
hhmmhhmmMTWRFSU format (00002400MTWRFSU):
070019002300400mtwrfs
Do you want to save this configuration: y
wait.....
saving.....
Add clients to remote client database? (y): y
Use express setup? Express setup assumes
default values for the time, and quota
and sets the callback number to <none>. (y): n
Client name ( ): jones
Client password ( ):
Reenter password:
Enable client (y): y
Access time (0000 2400 MTWRFSU) - In, Out, Both (B):
Time quota (1440 minutes)L
Idle time (240 seconds):
Callback phone number ( ): 19-1-210-555-2333
43
ASYNC ROUTER AR-P, AR-5, AND SYNC ROUTER USER’S MANUAL
Define clients
Add another client? (y): y
Client name ( ): johnson
Client password ( ):
Reenter password:
Enable client (y): n
Access time (0000 2400 MTWRFSU) - In, Out, Both (B):
Time quota (1440 minutes):
Idle time (240 seconds):
Callback phone number ( ): 19-1-210-555-1333
Add another client? (y):
saving...
(tcp/ip)paris>
44
n
ASYNC ROUTER AR-P, AR-5, AND SYNC ROUTER USER’S MANUAL
5.3.2 SYNC ROUTER
Figure 5-2. Sync Router.
Define LAN parameters
login: root
Password:
Welcome root to the Router (4.0)
The following configuration information must be
supplied before the Router can become operational.
Default values for each parameter are shown in
parentheses.
Press <ESC> at any prompt to cancel this script and
delete the configuration.
This system:
Name (Router): kansas
Root password ( ):
Retype password:
Link password ( ):
Date/time in yymmddhhmm[.ss] format (940910942.36):
45
ASYNC ROUTER AR-P, AR-5, AND SYNC ROUTER USER’S MANUAL
Enable IPX routing (y): y
Enable IP routing (y): y
Define LAN parameters for local Router:
Ethernet:
IPX:
Ethernet_802.3:
Network ( ): 1
Ethernet_II:
Network ( ): 2
802.2:
Network ( ): 3
SNAP:
Network ( ): 4
IP:
address ( ): 128.129.100.1
subnet mask (255.255.0.0): 255.255.255.0
Syslog IP address ( ):
Do you have domain name servers? (n):
Domain name servers:
IP address ( ): 128.129.100.50
IP address ( ):
Domain suffix (com): widgets.com
y
Define Sync/Modem Parameters:
Do you want to configure and use sync0 now (y):
Is this a leased line (y): y
y
Remote site information:
Name (sremote0): malibu
Authentication (N)one, (P)AP, or (C)HAP (N): P
Link password ( ):
Retype password:
IP address ( ): 128.129.90.90
IP subnet mask (255.255.0.0)
Branch offices usually have a default route pointing to
the home office
You have no default route
Add a default route to sync0 (y): y
Do you want to configure and use modem0 now (y):
Is modem0 a fallback line for sync0 (y): n
y
What type of system are you connecting this modem to?
1)
2)
3)
4)
5)
Sync Router
Async Client or other client
Livingston Portmaster
Telebit NetBlazer or PN
Other LAN to LAN
Please enter the number of your choice (1):
46
1
ASYNC ROUTER AR-P, AR-5, AND SYNC ROUTER USER’S MANUAL
Remote site information:
Phone # ( ): 1-210-555-1212
Name (remote0): georgia
Link password ( ):
Retype password:
IP address ( ): 128.129.13.1
IP subnet mask (255.255.0.0):
Branch offices usually have a default route pointing to
the home office
You have no default route
Add a default route to modem0 (y): n
Do you want to save this configuration:
wait...
saving...
y
Add clients to remote client database? (y): y
Use express setup? Express setup assumes
default values for the time, and quota
and sets the callback number to <none>. (y): y
Client name ( ): jones
Client password ( ):
Reenter password:
Enable client (y): n
Add another client? (y):
n
saving...
(tcp/ip)kansas>
5.4 Parameters
Name and Password Syntaxes
All types of names
• have 1 to 31 alphanumeric characters
• do not contain periods “.”
• start with a letter
• are case-sensitive
All types of passwords are 6 to 15 alphanumeric characters, and are case-sensitive.
During initial configuration, current values of parameters are shown in parentheses ( ) on the console
display.
47
ASYNC ROUTER AR-P, AR-5, AND SYNC ROUTER USER’S MANUAL
5.4.1 LAN PARAMETERS
Record all parameters in the Installation Reference (see Appendix F), and store the it in a secure place.
• Name—Enter the system name of the Router you are configuring. The system name may contain a 1
to 31 characters, but must not contain periods. Do not use the default name of “Router.” Each
Router must have a unique system name. When referencing this Router on other systems, use the
system name exactly as entered on your Router, for their remote system name.
Commonly the system name is a location or description that distinguishes the Router from other
nodes in your network.The Router uses its system name when establishing a WAN connection. The
system name is used by all other systems that are connected to this Router.
• Root password—Enter the password required to log in to the Router as a root user. A unique password
is required. Null passwords are not secure, and are not accepted. The root password must have 6 to
15 alphanumeric characters, and is case-sensitive.
The system administrator uses the root password to log into this Router through a telnet or RouterVu
session, or by pp, or from a serial terminal.
• Link password—Enter the password that remote Routers (or other systems) must use to access this
Router. The link password must be entered twice and will not be displayed on the screen. The link
password must be identical to the remote system’s link password on all other Routers (or other
systems).
• Date/time—Enter the date and time in the format yymmddhhmm[.ss], where yy is the last two digits of
the year, mm is the month number, dd is the day (with leading zero), hh is the hour (24 hour format),
and mm is the minute. The seconds parameter .ss is optional. The default shown is the system clock,
which is preset at the factory.
• Enable IPX routing?—Enter yes, if you are using Novell® NetWare on your LANs.
• Enable IP routing?—Enter yes, if you are using TCP/IP on your LANs.
• IPX: network numbers ()—(If IPX protocol is used) Enter the IPX (NetWare) network numbers (in
hexadecimal) for each Ethernet frame type activated on the local Ethernet. You must enter an IPX
network number for at least one frame type, although it is not necessary to enter an IPX network
number for each frame type. Only enter network numbers for the frame types that you are using on
your local Ethernet. If you are not using a frame type, enter a “0” for the network number for that
frame type.
These IPX network numbers are the same as the network numbers configured on your NetWare
servers.
Before configuring and operating the Router, configure your local and remote NetWare LANs with
unique (different) IPX network numbers. This includes all IPX network numbers for all frame types.
These numbers are set in the AUTOEXEC.NCF files of your NetWare file servers, with the “BIND
IPX TO lan_driver NET= net number” statements.
• IP address (If TCP/IP protocol is used...)—Enter the IP address for the local Router. Use dotted-quad
notation for your IP address: d.d.d.d, where d is a decimal number. A 32-bit IP address consists of four
8-bit decimal numbers separated by periods, for example, 128.66.16.100. Do not use any other
format for your IP address.
48
ASYNC ROUTER AR-P, AR-5, AND SYNC ROUTER USER’S MANUAL
• IP subnet mask—Enter the subnet mask desired, in decimal dotted-quad notation. The subnet mask
defaults to all ones for the network portion and all zeroes for the host portion, which corresponds to
the class of IP address entered. Typical subnet masks are specified in Table 5-1, in decimal dottedquad notation and bits notation.
Bits notation represents the number of contiguous high-order bits with a value of one that define the
subnet portion of an IP address.
Table 5-1. IP Subnet Mask Default Values by Class.
IP Address
Class
Subnet Mask
Bits
10.0.0.1
A
255.0.0.0
8
128.66.2.1
B
255.255.0.0
16
192.0.2.1
C
255.255.255.0
24
• Syslog IP address—Enter the IP address of a remote host capable of logging syslog messages. The Syslog
IP address is optional. For more information, refer to the syslog command in the Reference Guide,
which starts on page 137, and the system administration manual for your syslog host.
• Domain name server (DNS) IP addresses—Enter the IP addresses of the preferred domain name servers
on your network. Use dotted-quad notation: d.d.d.d, where d is a decimal number.
Domain name servers allow users to specify network nodes by name, instead of by IP address. If you
configure the Router to use a domain name server on your network, you can use a host name instead
of the IP address in many of the Router commands.
Do not specify the address of a domain name server that can only be reached using a WAN interface
(modem or sync). If you do, it will cause the Router to dial the phone on all name lookups, and will
increase your phone costs unnecessarily.
• Domain suffix—Enter the domain name suffix desired. The domain name suffix is the last group of
letters separated by a period (for example, ms.com). Do not include a leading period in the domain
suffix you enter. This domain suffix is automatically appended to a hostname entered with a Router
command.
To terminate the list of servers press RETURN at the IP address (): prompt. If you do not use a
domain suffix, just press RETURN.
Domain names of similar types of organizations on the Internet usually use a common suffix. Typical
suffices and organization types are shown in Table 5-2.
5.4.2 CHOOSE METHOD OF CLIENT AUTHENTICATION
How do you want to authenticate users connecting to a Router?
Enter the client authentication method desired. The client authentication method only applies to dialin clients (client to router), and does not apply to LAN-to-LAN services (router to router). If you already
have a configured SecurID or RADIUS server on your network, you can choose either to use it (choose 2
or 3), or to use the Router (to store names and passwords; choose 1).
49
ASYNC ROUTER AR-P, AR-5, AND SYNC ROUTER USER’S MANUAL
NOTE
To use a SecurID or RADIUS server, your network must use the TCP/IP protocols.
Table 5-2. Domain Name Suffix Types.
Suffix
Organization Type
com
Commercial organizations
edu
Educational institutions
gov
Government facilities
mil
Military groups
net
Major network support centers
org
Other organizations
(country code)
Country other than USA
If you want to use a SecurID server...
You must have a SecurID card that is configured with a username on the SecurID server. At the end of
the Router’s configuration script, you will be prompted through a process where you will be validated by
the SecurID server for the first time. You will need your SecurID card and its associated username at that
time. During normal operations, a SecurID user must provide a valid username (defined on the SecurID
server), a numeric code shown on the card’s LCD display, and an optional PIN number defined by the
user.
If you want to use a RADIUS server...
You must have the username(s) and IP address(es) of the RADIUS server(s) that you wish to use.
The Router will prompt you to provide the name(s) and password(s) configured on those server(s).
5.4.3 MODEM PARAMETERS
• modem0—The first modem interface.
• modem1—The second modem interface (Async Router AR-5 only).
• modem2—The third modem interface (Async Router AR-5 only).
• modem3—The fourth modem interface (Async Router AR-5 only).
• modem4—The fifth modem interface (Async Router AR-5 only).
• type of system—Select the type of remote system to be connected to the Router via the modem port.
Typically, this remote system is a Router or a remote client, but can also be a Livingston Portmaster,
Telebit® NetBlazer®, or other similar system.
• Phone #—Enter the telephone number of the remote system. The telephone number must begin
with a numeral and may contain special characters, such as commas, to indicate a pause. For more
information, refer to the Reference Guide.
50
ASYNC ROUTER AR-P, AR-5, AND SYNC ROUTER USER’S MANUAL
• Maximum number of minutes—For dialup interfaces only, this parameter limits the time allowed
per day for a dialup interface. Also known as the dialup quota.
• Name—Enter name of the remote system. This name must be identical to the system name
configured on the remote system.
• Authentication—Specify either PAP, CHAP, or none, whichever is appropriate for the remote site.
If the remote system does not support CHAP, then disable this encryption function by entering N,
or by using the ppp command later. The Router supports PAP and CHAP, and defaults to CHAP.
• Link password—For PAP and CHAP Only. Enter the password required to access the remote system.
A link password is required for PAP or CHAP authentication on the WAN interface. The link
password is used by a remote Router (or other remote system) to access the local Router using
the WAN port. This link password must be identical to the link password configured on the remote
Router (or system).
• IP address—Enter the IP address for the remote system, using dotted-quad notation: d d.d.d,
where d is a decimal number, and 0<d<255.
• IP subnet mask—Enter the subnet mask for the remote system, in decimal dotted-quad notation.
The subnet mask defaults to all ones for the network portion and all zeroes for the host portion,
which corresponds to the class of the IP address entered. Refer to Table 5-1.
• Login name—Enter the name required to log into the remote system. The login name for the
remote system is not necessarily the name used during PAP/CHAP authentication. The Livingston
Portmaster and the Telebit NetBlazer can be configured to present a login and password prompt to
systems attempting to connect. The Router sends the login name in response to the “login:” prompt
from the remote system.
• Login password—Enter the password required to log into the remote system. The login password is
not necessarily the link password used during PAP/CHAP authentication. The Router sends the
login password in response to the “password:” prompt from the remote system.
• Script name—The name of the file that contains the dialer script used when the Router connects to
the remote system. If you choose a Livingston Portmaster or Telebit NetBlazer as the remote system,
a dialer script is provided on the Router diskette. If you specify “Other,” you must provide a dialerscript filename.
• Default route—To ensure that traffic with unknown addresses is handled properly (typically passed
to the Internet), you can choose to set a default route through any interface. The interface for the
default route must be selected by your network administrator, because the entire network must be
considered.
When configuring a Router link between two sites, one site is designated as the home office and the
other site designated as a branch office. If the system at the other end of the line on this interface is
the home office, then the default route will be set through that interface so that all traffic to
destinations not on your local network is sent to the home office.
If you are configuring a Router with more than one WAN interface, this question is asked for each
WAN interface until a default route is chosen. Indicate the default route through the interface that
connects to the home office by answering yes for that interface. Once you have set the default route,
the question is not asked again. If neither site is the home office, answer no to the question each
time.
NOTE
It is possible to set the default route to point to a node on the Router’s Ethernet.
51
ASYNC ROUTER AR-P, AR-5, AND SYNC ROUTER USER’S MANUAL
• Remote Client IP address—Enter an optional IP address a remote client uses to access the Router using
that modem port. You or your network administrator must decide whether to assign an IP address to
a remote client modem. The default is no IP address assigned to a remote client when they dial in.
If you assign an IP address to a modem line that is configured for client access (on the Router), then
that IP address is automatically assigned to the remote client, during the remote-client login process.
Any remote client application (operating on the remote user’s PC) must be configured with the same
IP address (assigned to the line used for the client to dial in). The IP address assigned by the Router
(to the Router modem) always overrides any IP address set by the remote client application.
If you choose not to assign an IP address to a modem, then the remote client application must supply
the IP address to be assigned to the remote client at login time. To configure a client’s IP address in
the Remote Office software, click on the More button for your phonebook record, and then click on
the Protocol button.
NOTE
The IP address assigned to the remote client must always be a valid IP address on the
subnet to which the Router is attached.
Client access is not supported over the sync0 interface (Sync Router).
• client access shift—Enter the client access shift, which is valid for all modems configured for client
access. The Router uses the client access shift to restrict remote client access to a specific time
period: either inside of (during) the client access shift, outside of (not during) the client access shift,
or both insid e and outside of the client access shift.
The client access shift is designated by a starting time and an ending time, in standard 24-hour
format (0800 corresponds to 8:00 AM, 1700 corresponds to 5:00 PM, etc.). A sequence of letters
corresponds to the days of the week for which the client access shift applies:
• M for Monday,
• T for Tuesday
• W for Wednesday
• R for Thursday
• F for Friday
• S for Saturday
• U for Sunday
Enter the starting time, the ending time, and the days of the week, on the same line, separated by
single spaces. For example, “0800 1700 MTWRF” defines a typical 8-a.m. to 5-p.m. workweek.
5.4.4 SYNC ROUTER PARAMETERS
Parameters specific to the Sync Router are listed here. Refer to the Modem parameters section for
parameters not listed here.
• sync0—The synchronous interface (Sync Router only).
• Is this a leased line?—Enter yes or no. You can use the sync0 port to connect to another Sync Router
(or other similar system) either via a leased line (dedicated) or via a non-leased line (switched
circuit).
52
ASYNC ROUTER AR-P, AR-5, AND SYNC ROUTER USER’S MANUAL
A leased line is a type of phone service that offers a continuous connection between two sites,
typically at data rates of 56 Kbps (USA) or 64 Kbps (Europe). Leased lines are often referred
to as DDS lines (digital data service).
A non-leased line (switched), such as Switched-56, offers a high-speed dialup connection (typically 56
Kbps).
• Use as a backup?—For leased lines only, the analog modem (modem0) on the Sync Router can be
used to establish a second dialup connection to the same remote site. This second line would not
be used unless the sync0 port ceased to work correctly.
The analog modem can be used as a backup connection for leased lines, but not for non-leased
(switched) lines.
5.4.5 IP FIREWALL PARAMETERS
Parameters specific to the IP firewall feature on Routers are listed here.
Do you want the firewall described in the documentation?
Answer yes if you want to install a list of IP filters designed to protect your network when the Router
is used to provide Internet access.
Public server IP address
Enter the IP address of the public server on the LAN connected to the Router.
Do you allow TELNET to the server (n):
If you want to allow telnet activities to your public server from outside of your network, enter “y” to this
question.
5.4.6 CLIENT PARAMETERS
NOTE
If you have chosen to use a SecurID or RADIUS server, you do not have to configure
clients on the Router.
Client parameters are configured for each remote client. The Router gives you the option of using
Express Setup, to choose the following default values for access time, time quota, idle time, and no
callback:
• access time both inside and outside of the client access shift
• 1440 minutes time quota
• 240 seconds idle time
• no callback phone number (disabled)
To add many remote clients easily, with the default values above, use this faster method.
Express Setup assumes default values, so you enter only for each client: client name, client password,
and if the client is enabled. After you completely enter the data for one client, the Router prompts you
for another client. If you do not want to add more clients, enter n, and press RETURN. The Router
saves all remote client information on the diskette.
53
ASYNC ROUTER AR-P, AR-5, AND SYNC ROUTER USER’S MANUAL
• client access shift—Refer to Section 5.4.3.
• client name—Enter the name of the remote client. The client name must be 8 characters or less and
is not case-sensitive. The remote client application for the client must be configured with the same
client name.
• client password—Enter the password for the remote client. The client password must be 8 characters or
less and is not case-sensitive. The remote client software for the client must be configured with the
same client password.
• enable client—Enter y to enable the client, or n to disable the client. If a remote client is enabled, then
the client can access the network via the Router, during the time interval determined by the client’s
access time and the client access shift of the Router. If a remote client is disabled, then the client
cannot access the network via the Router at any time.
• access time—Enter the access time code for the client. Enter 1 for access during the client access shift,
0 for access at any time not during the client access shift, or B for access at all times. The access time
for a remote client is defined in terms of the client access shift for the Router. Access time is either
inside of (during) the client access shift, outside of (not during) the client access shift, or both inside
and outside of the client access shift (24 hour access).
• time quota—Enter the time quota for the client, in minutes per day, from 0 to 1440. The default time
quota is 1440 minutes (24 hours). The time quota limits the amount of Router connection time
allowed each day, for each remote client (with callback enabled). Time accrues against the time
quota only when the Router initiates a callback during the authentication process. When a remote
client (without callback enabled) initiates a call, that time is not accrued against the time quota.
• idle time—Enter the idle time desired, in seconds (0 to 86400). The idle time default is 240 seconds (4
minutes). The idle time is the time allowed before the Router drops the telephone line, when there
is no network traffic over that line. After the telephone line is dropped, the remote client must reinitiate the login and authentication process, in order to connect. To log back into the Router after
the idle timer has expired, choose “Login to a Router” from the Connection menu of the DOS or
Windows interface. Note that the Router and remote client must go through authentication each
time that a client dials in.
• callback phone number—Enter the telephone number where the client can be reached. The telephone
number must begin with a numeral, and may contain special characters. The default for each client
is no callback number.
If callback is enabled, after normal client authentication, the Router puts the client into auto-answer
mode, disconnects the telephone line, and calls the client back at the callback number. This ensures
that the remote client is accessing the network from a predetermined location and telephone
number. Note that there is no method for changing the callback number from the remote client
side, which is what makes it secure.
The callback number is a security feature that is only available if the remote client is using the Async
Client remote access software (called Remote Office).
54
ASYNC ROUTER AR-P, AR-5, AND SYNC ROUTER USER’S MANUAL
6. Configure and Test
This chapter illustrates how to:
• Configure hosts on your TCP/IP network to interoperate with the Router
• Test Router TCP/IP installations using ping
• Test Router IPX installations using ping
If you are not running TCP/IP on your network, proceed to Section 6.3 and test your network.
If you are running TCP on your network, configure your hosts and then proceed to Section 6.2.
6.1 Configure Hosts on TCP/IP Network
You might need to reconfigure some of the hosts on a TCP/IP network (LAN) to interoperate with a
Router.
1. Add the name and IP address of your Router to each host that accesses it.
For Sun 4.x/BSD UNIX systems, add this line to the /etclhosts or domain name data file (if you are
using DNS) for each host you want to identify:
Router_lP_address Router_name
For example:
192.1.1.1 salesoffcel
2. For BSD-based UNIX systems, reconfigure applications (that can time out) to allow 30 to 60 seconds
for the worst-case dialup connection time.
Note that the Router can take up to 30 seconds (or much less for sync) to establish the connection.
To reconfigure the sendmail daemon for connection time, use one of the following two methods:
Method 1
Disable the periodic queue rescan from the sendmail daemon, and write a custom mini-daemon to
execute from a root crontab entry to take two back-to-back passes at the sendmail queue each hour.
Add these lines to cron fi1e:
/usr/lib/sendmail -q #once to bring up the link
/usr/lib/sendmail -q #once to deliver the mail
Method 2
Implement a set-UID root script to rescan the queue and invoke sendmail when the connection is
brought up. Several IP service providers use this method for incoming-only lines. The sendmail -R
string works.
3. If you are not using RIP on your network, add a route to the Router for each host on your network
that accesses nodes on the remote network.
On a Sun 4.x/BSD UNIX system, either add a default route to the Router by adding a /etc/
defaultrouter file containing the entry:
55
ASYNC ROUTER AR-P, AR-5, AND SYNC ROUTER USER’S MANUAL
Router_name or IP_address
or add the following route command to the /etc/rc.local file:
route add remote_lP_addresslocal_Router_IP addressl
4. Proceed to the next section, and test your network using ping.
6.2 Test TCP/lP Networks Using Ping
To systematically verify connectivity, power up the Router and observe the messages on the console.
Establish a PPP connection on your WAN interface, using the update now command. If CHAP or PAP
hasn’t failed, then perform the “ping” tests. The ping tests provide a minimal set of results that can be
used to help verify network connectivity and resolve problems.
To perform all of the ping tests, you will require the help of an associate at the remote site. If an
associate is not available, then you can perform the first four ping tests.
On the diagram, circle the test numbers if the ping is successful, and record the IP addresses and
subnet masks used. If desired, fax these two completed diagrams to your technical-support person.
For more information, refer to ping in Section 4.10 of the Reference Guide, which begins on page 137.
If you perform all of the steps here and still have problems, refer to Appendix C of this manual.
You
Your associate
4
3
ping
system name
system name
subnet (IP)
subnet (IP)
IP address
IP address
You
1
2
ping
system name
Async
Router
Async
Router
system name
subnet (IP)
subnet (IP)
IP address
IP address
Figure 6-1. Ping from the Local Ethernet.
56
ASYNC ROUTER AR-P, AR-5, AND SYNC ROUTER USER’S MANUAL
6.2.1 PING FROM THE LOCAL ETHERNET
Refer to Figure 6- l.
1. From the local Router, ping a workstation on the local Ethernet.
Enter ping IP_address (of local workstation) and wait for the result. This test passes if you
see a round-trip time displayed in milliseconds. This test fails if you see a response similar
to “Target does not respond.”
If this test fails, then
• Make sure that the local workstation and local Router are physically attached to the same Ethernet,
by checking the cables.
• Verify that the local host and local Router are configured with the same network number and subnet
mask. Display the IP address and subnet mask for the Ethernet interface eth0 on the Router using
the if config command. Consult the system administration manual for the local host to determine
how to display the IP address and subnet mask for its Ethernet interface.
2. From the local Router, ping the remote Router.
• Establish a dialup connection from your Router to the remote Router. Use the -s option to
continuously transmit the ping.
On the local Router, enter:
ping -s IP_address_of_remote_Router
You should hear the modem dial, the remote system answer, and a series of tones. A Sync Router
will not emit any sounds. When the speaker turns off the connection is made. This process can take
up to 30 seconds (or much shorter, when using the sync0 interface). During this time the displayed
response from the ping command is:
Target did not respond
Once the speaker turns off, the test is successful if a round-trip time to the remote system is
displayed, similar to:
Round trip time:
180
3. From a workstation on the local Ethernet, ping the remote Router. You should only do this test if
you want the ability to configure the remote Router from this workstation on the local Ethernet.
Enter syslog on. Next enter ping -s [IP_address] (of remote Router) and wait for the result. This test
passes if you see a round-trip time displayed in milliseconds. This test fails if you see a response
similar to “Target does not respond.”
If this test fails, then:
• Determine if a WAN connection has been established between two Routers. Use the dialup interface
status command for dialup connections (look for called out or serving call), or use the ppp sync0
command for leased lines (look for IPCP opened).
• If the WAN link does not come up, try using trace [interface] to see what kind of traffic is traveling
the link.
4. From a workstation on the local Ethernet, ping a workstation on the remote Ethernet.
Wait up to 60 seconds for the result.
57
ASYNC ROUTER AR-P, AR-5, AND SYNC ROUTER USER’S MANUAL
Enter ping -s [IP_address] (of remote workstation) and wait for the result. This test passes if you see a
round trip time displayed in milliseconds. This test fails if you see a response similar to “Target does
not respond.”
If this test fails, then
• Have an associate perform tests 5-8 on the following pages.
• From a workstation on the local Ethernet, telnet to the remote Router, log in as root, and issue the
route command.
6.2.2 PING FROM THE REMOTE ETHERNET
Now have an associate at the remote site perform similar tests. Refer to Figure 6-2.
5. From the remote Router, ping a workstation on the remote Ethernet.
On a remote Router, have an associate enter syslog on. Next have him enter ping -s [IP_address] (of
remote workstation) and wait for the result. This test passes if you see a round trip time displayed in
milliseconds. This test fails if you see a response similar to “Target does not respond.”
If this test fails, then
• Make sure that the remote workstation and remote Router are physically attached to the same
Ethernet, by checking the cables.
• Issue a ping to another host on the remote network. From the Router enter:
ping IP_address_of_a_remote_node
If the ping command displays the message:
Target did not respond
refer to Appendix C.
6. From the remote Router, ping the local Router. Wait up to 60 seconds, or less (for sync transmission)
for the result.
On a remote Router, have an associate enter syslog on. Next have your associate enter ping -s
[IP_address] (of local Router) and wait for the result. This test passes if you see a round-trip time
displayed in milliseconds. This test fails if you see a response similar to “Target does not respond.”
If this test fails, then
• Enter syslog on.
• Establish a dialup connection from the remote Router to the local Router. Use the -s option to
continuously transmit the ping.
On the remote Router, have your associate enter:
ping -s IP address of local_Router
Your associate should hear the modem dial, the local system answer, and a series of tones. When the
speaker turns off the connection is made. This process can take up to 30 seconds (or much shorter,
when using the sync0 interface). During this time the displayed response from the ping command is:
Target did not respond
58
aASYNC ROUTER AR-P, AR-5, AND SYNC ROUTER USER’S MANUALCHAPTER
Once the speaker turns off, the test is successful if a round-trip time to the local system is displayed,
similar to:
Round trip time:
180
59
aASYNC ROUTER AR-P, AR-5, AND SYNC ROUTER USER’S MANUAL
You
Your associate
8
7
ping
system name
system name
subnet (IP)
subnet (IP)
IP address
IP address
6
Your associate
5
ping
system name
Async
Router
Async
Router
system name
subnet (IP)
subnet (IP)
IP address
IP address
Figure 6-2. Ping from the Remote Ethernet.
7. From a workstation on the remote Ethernet, ping the local Router. You should only do this test if you
want the ability to configure the local Router from this workstation on the remote Ethernet.
On a remote workstation, have an associate enter syslog on. Next have your associate enter ping -s
IP_address (of local Router) and wait for the result. This test passes if you see a round-trip time
displayed in milliseconds. This test fails if you see a response similar to “Target does not respond.”
If this test fails, then
• Determine if a WAN connection has been established between the two Routers. Use the dialup
interface status command for dialup connections (look for called out or serving call), or use the ppp
sync0 command for leased lines (look for IPCP opened).
• If the WAN link does not come up, try using trace [interface] to see what kind of traffic is traveling the
link.
8. From a workstation on the remote Ethernet, ping a workstation on the local Ethernet.
Have your associate enter ping -s IP address (of local workstation) and wait for the result. This test
passes if your associate sees a round-trip time displayed in milliseconds. This test fails if he sees a
response similar to “Target does not respond.”
If this test fails, then
• From a workstation on the remote Ethernet, telnet to the local Router, log in as root, and issue the
route command.
60
ASYNC ROUTER AR-P, AR-5, AND SYNC ROUTER USER’S MANUAL
6.3 Test IPX Networks Using RouterVu
To systematically verify connectivity, power up the Router and observe the messages on the console.
Establish a PPP connection on your WAN interface using the update now command.
If CHAP or PAP hasn’t failed, then perform the “ping” tests. The ping tests provide a minimal set of
results that can be used to help verify network connectivity and resolve problems.
On the diagram, circle the test numbers if the ping is successful, and record the node names and
network addresses used. If desired, fax these two completed diagrams to your technical-support person.
For more information, refer to “ping” in Section 3.10 of the Reference Manual.
IPX RouterVu tests:
You must use a PC with RouterVu to run the following tests. You must have a NetWare File Server on
your remote Ethernet, that is reachable through the Routers.
NOTE
For the ping tests to work, in your local SAP table you must be able to see the host that
you want to ping. Otherwise the ping will not work.
1. Determine the IPX network numbers of the local and remote Ethernets.
2. Run RouterVu on your local PC and issue the following
routervu - a
The display should look similar to:
anole 00000020.02CFlF80060A (Router)
archer 00000040.02CFlF80060B (Router)
DAFFY 00DAFF11.00801B027521 (IPX File Server)
DAFFYII 00000043.00801B027520 (IPX File Server)
61
ASYNC ROUTER AR-P, AR-5, AND SYNC ROUTER USER’S MANUAL
3
You
Your associate
2
NetWare server
hoppervu
1
system name
system name
network.node_address (IPX)
network.node_address (IPX)
Async
Router
system name
network.node_address (IPX)
Async
Router
system name
network.node_address (IPX)
Figure 6-3. Ping from the Local Ethernet.
3. Find the local Router in the output from step 2 above. If the local Router is named anole, then it
should look similar to:
anole
00000020.02CFlF80060A (Router)
This entry shows that anole is on IPX network number 20 (in hexadecimal) and has an Ethernet
address of 02CFIF80060A.
4. From the local PC running RouterVu, ping the local Router using the following command:
routervu -p local_Router_name
If you don’t see a response, check your cabling.
5. Find the remote Router in the output from step 2 above. If the remote Router is named archer, it
should look similar to:
archer
00000040.02CFlF800608 (Router)
This entry shows that archer is on IPX network number 40 (in hexadecimal) and has an Ethernet
address of 02CFlF80060B.
62
ASYNC ROUTER AR-P, AR-5, AND SYNC ROUTER USER’S MANUAL
6. From the local PC running RouterVu, ping the remote Router using the following command:
routervu -p remote_Router_name
If the ping is not successful, wait approximately 45 seconds (if you’re using modems) for the call
between the local and remote Routers and try the ping again. If the ping is successful, continue to
step 7.
If a ping response is not displayed, then log in to the local Router and do the following:
routervu local_Router_name
Log in as root. Check the status of the WAN connection:
For dialup interfaces (modems, sw56), enter:
dialup interface status
look for called out or serving call.
For leased-line interfaces (sync0), enter:
ppp sync 0
Look for IPXCP Opened.
7. Find the remote NetWare fileserver in the output from step 2 above. If the remote fileserver is
named DAFFYII, the it should look similar to:
DAFFYII
00000043.00801B027520 (IPX File Server)
This entry shows that “server_name” has an internal IPX network number of 43 (in hexadecimal)
and has an Ethernet address of 000000000001.
If you find an entry for the remote NetWare file server, continue with step 8.
If you do not see an entry for the remote NetWare fileserver, ask your associate at the other end of
the link to see if a SAP entry is present for it on the remote Router.
63
ASYNC ROUTER AR-P, AR-5, AND SYNC ROUTER USER’S MANUAL
8. From the local PC running RouterVu, ping the remote NetWare fileserver using the following
command:
routervu -p server_name
If the ping is successful, you have successfully completed initial IPX connectivity testing.
If the ping is not successful, wait approximately 45 seconds (if using modems) for the call between
the local and remote Routers, and try the ping again.
If the ping is not successful, ask your associate to run ping from the remote Router to the remote
NetWare fileserver.
64
ASYNC ROUTER AR-P, AR-5, AND SYNC ROUTER USER’S MANUAL
Appendix A: Networking Examples
This appendix describes two typical Router installations:
• dialup LAN-to-LAN,
• synchronous LAN-to-LAN.
A.1 Dialup LAN-to-LAN
A.1.1 USING NAMES AND PASSWORDS
To provide basic security for your network, each Router is configured with a name, a root password and a
link password. The Router name and link password are required when connecting to or from a remote
router. The root password is additionally required to establish a telnet or ftp session (TCP/IP only) to
the Router, or to establish a RouterVu session (IPX only) to the Router, or when logging in on the system
console.
For security on the WAN interface, the Router can use either the Password Authentication Protocol
(PAP) or Challenge Handshake Authentication Protocol (CHAP). The Router is configured to enable
CHAP by default. The CHAP and PAP “handshake” requires a name and link password pair from each
router. For example, when router A connects with router B, router A must present router A’s name and
link password to router B. Conversely, when router B connects with router A, router B must present
router B’s name and link password to router A. The name and link password for both ends of the link
are maintained in the password file on the Router diskette. If the PAP or CHAP handshake does not
complete successfully, the two devices are not allowed to communicate.
Name and password security is further illustrated by the following example. Consider the network
connections made by Routers with the following system names, link passwords, and password file entries:
Table A-1. Connection Example: Async Router AR-5 to Async Router AR-Ps.
System
Name
Link Password
password file entries
name/password
Async Router AR-5
paris
all2paris
hamburg/ham2paris
london/lon2paris
northridge/nor2paris
Async Router AR-P
hamburg
ham2paris
paris/all2paris
Async Router AR-P
london
lon2paris
paris/all2paris
Async Router AR-P
northridge
nor2paris
paris/all2paris
65
ASYNC ROUTER AR-P, AR-5, AND SYNC ROUTER USER’S MANUAL
Hamburg
passwd file: paris / all2paris
Async Router
Paris
Configured for
dialup clients
London
passwd file: paris / all2paris
Async Router
AR-5
name: paris
link password: all2paris
Async Router
Northridge
passwd file: paris / all2paris
Async Router
Figure A-1. Connection Example: Async Router AR-5 to Async Router AR-Ps.
66
ASYNC ROUTER AR-P, AR-5, AND SYNC ROUTER USER’S MANUAL
When the Async Router AR-5 calls any of the Async Router AR-Ps, the name (paris) and password
(all2paris) are sent on the modem links in figure A- 1. Each Async Router AR-P’s password file contains
an entry for the host paris with the link password all2paris. Figure A-2 illustrates the handshake when any
of the Async Router AR-Ps call the Async Router AR-5.
Hamburg
name: hamburg
link password: ham2paris
Async Router
Paris
London
hamburg / ham2paris
london / lon2paris
northridge / nor2paris
Async Router
AR-5
name: london
link password: lon2paris
Async Router
Northridge
name: northridge
link password: nor2paris
Async Router
Figure A-2. Connection Example: Async Router AR-5 to Async Router AR-P.
67
ASYNC ROUTER AR-P, AR-5, AND SYNC ROUTER USER’S MANUAL
NOTE
If the name or link password of a Router (or other router) changes, all remote system
password files that it logs into must be changed, or the authentication handshake will
fail.
Names and link passwords are specified during the initial configuration of the Router. To change the
name or link password later, use the config modify or the password commands . The names and link
passwords at local and remote sites must correspond exactly, in order to successfully connect the two
sites.
Figure A-3 shows the name and link password relationships between local and remote sites, as they
would be specified during the initial configuration of those sites.
Paris
Hamburg
This system:
Name ( Async Router ) : paris
Link Password ( ) : all2paris
This system:
Name ( Async Router ) : hamburg
Link Password ( ) : ham2paris
Remote site information:
Name ( Async Router ) : hamburg
Link password ( ) : ham2paris
Remote site information:
Name ( Async Router) : paris
Link password ( ) : all2parts
Figure A-3. Entering Names and Passwords During Initial Configuration.
68
ASYNC ROUTER AR-P, AR-5, AND SYNC ROUTER USER’S MANUAL
A.1.2 HOME/BRANCH OFFICE DESIGNATION
For each Router WAN link, one site is designated the home office and the other site is designated the
branch office. The home office is usually a central site that may be attached to the Internet, and to
connecting branch offices.
When a remote site is designated as a branch of fice (with IP routing enabled), a default route for the
modem interface is added. When the remote router doesn’t know how to reach an address, it sends the
traffic for that address to the home office, using the default route.
69
ASYNC ROUTER AR-P, AR-5, AND SYNC ROUTER USER’S MANUAL
home
branch
LAN-to-LAN
Async Router
AR-P
Async Router
AR-P
branch
home
Async Router
AR-P
home
branch
LAN-to-LAN
Async Router
AR-P
Async Router
AR-5
home
Async Router
AR-P
home
home
branch
branch
Async Router
AR-5
Async Router
AR-5
Async Router
AR-P
Async Client
Async Client
Other Client
LAN-to-LAN
(cascaded)
Other Client
Async Router
AR-5
home
branch
Async Router
AR-5
Async Router
AR-P
Async Router
AR-5
Async Client
home
Async Client
Async Router
AR-5
home
Other Client
Other Client
Rotary
Other Client
Figure A-4. Typical Configurations with Home and Branch Offices.
70
ASYNC ROUTER AR-P, AR-5, AND SYNC ROUTER USER’S MANUAL
A.2 Synchronous LAN-to-LAN
This example illustrates how the Sync Router uses its integrated modem as a backup for a synchronous
connection. Consider the network and the routing tables given for the systems in Figure A-5.
host1
host2
128.66.1.1
Sync Router A
10.4.0.106
Internet
sync0
home office
Sync Router B
128.66.1.2
sync0
modem0
Public Switched
Telephone
Network
modem0
Sync Router C
128.66.14.1
sync0
branch office
host3
host4
Figure A-5. Modem as a Backup for a Synchronous Connection.
71
ASYNC ROUTER AR-P, AR-5, AND SYNC ROUTER USER’S MANUAL
The routing table entries are:
• Sync Router A
Destination
/Bits
Interface Router/Next
Hop Metric
128.66.0.0
128.66.14.0
default
/16
/24
/0
eth0
eth0
sync0
0
2
1
Destination
/Bits
Interface Router/Next
Hop Metric
128.66.14.0
128.66.14.0
128.66.0.0
default
/24
/24
/16
/0
sync0
modem0
eth0
eth0
1
3 redundant
0
1
Destination
/Bits
Interface Router/Next
Hop Metric
128.66.14.0
default
default
/24
/0
/0
eth0
sync0
modem0
0
1
3 redundant
128.66.1.2
10.4.0.106
• Sync Router B
128.66.14.1
128.66.14.1
128.66.1.1
• Sync Router C
128.66.1.2
128.66.1.2
Router B has redundant routes to the 128.66.14.0 subnetwork. Similarly, Router C has redundant
default routes. As long as the synchronous link is operational, Router B will use it to reach subnetwork
128.66.14.0, because the route through the sync0 interface has a lower hop count (metric=l) than the
route through modem0 (metric=3):
Similarly, Router C uses the synchronous link to reach any other location, because the route through
the sync0 interface has a lower hop count (metric=l) than the route through modem0 (metric=3).
If the synchronous link fails, Router B and Router C maintain connections by automatically
transferring traffic to their integrated modems.
72
ASYNC ROUTER AR-P, AR-5, AND SYNC ROUTER USER’S MANUAL
Appendix B: Line Use
Use the procedures in this appendix to minimize telephone costs associated with dialup connections:
over modem interfaces or switched synchronous (SW-56) lines.
This appendix describes:
• How to monitor line use
• How to limit line use
B.1 How to Monitor Line Use
While the Router is operating, monitor it for excessive line usage. Because of unforeseen sources of
traffic, an incompletely configured network with a properly configured Router, can still produce
excessive phone usage and costs.
Generally, the Router dialup line is most efficient when it is connected for less than 4-5 hours a day
over a long distance carrier. To monitor the Router’s telephone line usage:
• Determine sources of last 5 dials
• Listen to the modem’s speaker (if the Router has a modem)
• Review syslog connection reports (IP networks only)
• Install usage warning process
NOTE
The Router never dials a client unless the client has dialed in, is acknowledged, is
verified using a login name and associated password, and has security callback
enabled.
B.1.1 DETERMINE SOURCES OF LAST 5 DIALS
Use the dialup modemX dial_log command to view the type of packets that caused the last five dials, for any
of the WAN interfaces (modem, sync). For example, to examine what is going on with modem0, from
tcp/ip mode enter
dialup modem0 dial_log
From ipx mode, enter
tcp dialup modem0 dial_log
B.1.2 LISTEN TO THE MODEM’S SPEAKER
If the modem speaker is enabled, it is activated whenever the Router places an outgoing call or answers
an incoming call. During the first few days of operation, listen for frequent incoming or outgoing calls.
Verify that any frequent calling is justified, by correlating it to the actual activities of your network users.
During an outgoing call, you will first hear the dial tone, then the modem dialing the number (using
standard telephone touch tones), and then a series of tones while the modems make the connection.
During an incoming call, you will not hear the dial tone or the dialing touch tones; you will only hear
the modem-connection tones.
73
ASYNC ROUTER AR-P, AR-5, AND SYNC ROUTER USER’S MANUAL
The Router modem should only operate when someone is attempting to communicate with a remote
host, as when logging in or sending mail to a remote host. If the Router modem dials for no apparent
reason, restrict use of the phone line until the source of the traffic is determined.
Use the dialup volume command to control the Router’s internal modem speaker.
dialup modemX volume [off | low | medium | high]
B.1.3 TURN ON SYSLOG (IP AND IPX NETWORKS)
To determine which host is initiating the majority of calls in an IPX network, turn syslog on. From ipx
mode, enter the command:
tcp syslog on
Syslog messages will be displayed on the Router console, but are not saved (in a file).
To determine which host is initiating the majority of calls in an IP network, check your syslog host’s
syslog file. Each night at approximately midnight, the Router sends a connection report to the syslog
host, if both the Router and host are configured correctly. Refer to the system administrator manual for
your syslog host and the syslog command in the Reference Manual.
To create a useful syslog file, configure the Router with your syslog host IP address, and configure your
syslog host to save Router syslog messages to a file. The syslog host address may be configured at any time
using:
syslog address host_address
Whenever an outgoing call is made, a syslog message similar to the following will be sent to your syslog
host (and/or the console):
routerl modem0 Dialing for 128.66.32.120:4466->10.0.0.1:25
In this example, the host with IP address 128.66.32.120 is attempting to contact the host with IP
address 10.0.0.1. The Router senses that the modem connection is down and begins dialing this host.
The numbers following the colon (:) are the TCP or UDP port numbers. Host 128.66.32.120 is sending a
mail datagram to the mail daemon on port 25 of host 10.0.0.1. The port number of the destination host
usually indicates the type of data being sent. Use all of this information to investigate the reason for the
numerous calls.
The syslog details the amount of time spent on the phone for the current day. For example:
Jan 1 00:00:00 routerl modem0 Connections: in 2 (0:00:04:11)
out S (0:03:58:50)
This report shows that the Router named “router1” made 5 outgoing calls, for a billable total of 3
hours, 58 minutes, and 50 seconds and accepted 2 incoming calls. If there are many outgoing calls, you
may want to restrict the Router’s use of the telephone line. If there are many incoming calls from a
system on a remote network belonging to your company, you may want to restrict the remote Router’s
phone use.
74
ASYNC ROUTER AR-P, AR-5, AND SYNC ROUTER USER’S MANUAL
B.1.4 SET UP AN EXCESSIVE-USE WARNING (IP NETWORKS ONLY)
You can configure the Router to send warnings during the day when more than a specified amount of
time is used for outgoing calls on a given interface. First turn syslog on. From tcp/ip mode, enter
syslog on
Next enter the dialup warning command:
dialup interface warning mins
Whenever you have used more than mins minutes of time for outgoing calls in one day, a syslog
message like this is sent to the syslog host and to the console:
router1 modem0 High usage, more than 240 minutes used today
In the example, the display indicates that the Router named router1 has placed more than 4 hours (240
minutes) of calls using the modem0 interface.
You can display the current warning setting by entering:
dialup interface warning
The default dialup quota for a WAN interface (modem, sync) is 24 hours per day, or 1140 minutes.
Refer to the dialup command in Section 2.9 of the Reference Manual, which starts on page 137.
B.2 How to Limit Line Use
If the Router’s line use is excessive for an interface, you may want to limit it until you can determine the
cause. Three methods are available:
• Set a dialup-time quota for that interface
• Use IP and IPX dial filters on that interface
• Use the Router link optimization suite of filters (NLO)
B.2.1 SET A DIALUP TIME QUOTA FOR THAT INTERFACE
To restrict the outgoing dialup-line use by all hosts to a time quota limit, use the dialup quota command.
This command limits the amount of outgoing calls to mins minutes per day. Enter:
dialup interface quota mins
Because incoming calls are not listed on your phone bill, they are not monitored. At midnight each
night the quota is reset back to mins minutes for another 24-hour period. By default, the quota is set to
1440 minutes (24 hours)—in other words, no quota at all. If you desire a smaller dialup quota, create
one using the dialup quota command.
When the quota on an interface interface is reached, any current connection is dropped and cannot be
renewed until the quota is reset, either automatically at midnight or by issuing another dialup quota
command. In addition, the following syslog message is sent to the syslog host and to the console:
router1 modem0 Dropping link, time quota of 480 minutes exceeded
After this time, data packets received at this interface are discarded, and the following syslog message is
sent to the syslog host and to the Router’s console:
router1 modem0 Can’t dial, time quota of 480 minutes exceeded
75
ASYNC ROUTER AR-P, AR-5, AND SYNC ROUTER USER’S MANUAL
You can display the current-time quota setting and the balance of outgoing connect time by entering
either:
dialup interface status
or
dialup interface quota
A typical status display is:
(tcp/ip)croy> dialup modem0 status
modem0: (14400/V1.500-CP39F)
DTR On RTS On CTS On DSR On RI Off DCD Off
demand
listening
Timeout: 65535
Idle: 0:02:29:16
Remote phone: 14
Total time con: 0:01:36:13 Time since last boot: 5:03:59:32
Average daily connected time: 0:00:18:37
Daily quota: 1:00:00:00 Used: 0:00:14:09 Left: 0:23:45:51
Usage warning currently set at: 0:04:00:00
(tcp/ip)croy>
For more information, refer to the dialup command in Section 2.9 of the Reference Manual.
Use dialup status to determine the amount of dialup quota available on a particular interface.
Typically, if you are averaging 1 hour of outgoing connect time per day, set your quota to 2 or 3 hours.
NOTE
Set your quota time slightly higher than the amount of time you expect to use, to
ensure that legitimate connections are not disrupted.
B.2.2 HOW TO TEMPORARILY INCREASE THE TIME QUOTA
You want to set the dialup-time quota higher than normal for a day, issue the dialup quota command to
reset the time quota for the current day only. For example, if you have reached your normal limit of four
hours (240 minutes), and want a few more hours to complete your work, then enter the command:
dialup modem0 quota 120
This command will reset the time quota to two more hours for today, for the modem0 interface. This
command also sets the limit to a total of two hours on subsequent days. After using the increased time,
remember to reset the time quota back to your normal limit tomorrow.
B.2.3 USE THE ROUTER’S PREDEFINED IP FILTERS
Typically, the Router can be configured to be the Internet entry point to the corporate network. All
services that are defined to be reachable from the Internet are running on one public server. Other
hosts (internal servers) cannot be reached from the Internet, but all local users are allowed to access
servers on the Internet. When a Router is being used to provide Internet access for a corporate network,
consider using the predefined IP filters to limit activities by Internet users who are ouside of your
network. This list of IP filters is sometimes called an IP firewall.
There are two ways to install the predefined IP filters: during initial configuration or when executing
config modify.
76
ASYNC ROUTER AR-P, AR-5, AND SYNC ROUTER USER’S MANUAL
At the end of initial configuration, if the default route for an interface points to a serial point-to-point
interface (synchronous or modem), you will be offered a standard firewall configuration. For the
question “Install standard Internet access firewall on iface?” answer Y to install the suite of predefined IP
filters.
When executing config modify, answer Y to the same question in the previous paragraph, to install the
IP filters. If there are filters already present with reserved names, and you request the standard firewall,
all filters with names that begin with “$” are deleted, before the standard firewall is generated.
List of predefined IP filters
The predefined IP filter statements are:
1
filter add $OUTOK -f outbound -t allow
2
filter add $TCPOK -p tcpestab -t allow
3
filter add $FAKE25 -i iface -p tcpnew -s 25 -t deny
4
filter add $NOLOOP -s 127.0.0.0/8 -t deny
5
filter add $NORCMD -p tcp -d 512-515 -t deny
5a
filter add $NOTN -p tcp -d 23 -t deny
6
filter add $SRVOK -p tcp -d server/32 -t allow
7
filter add $MAIL1 -i iface -p tcp -d 25 -t allow
8
filter add $MAIL2 -i iface -p tcp -s 25 -t allow
9
filter add $FTP1 -i iface -f inbound -p tcp -s 20 -t allow
10
filter add $DNS1 -i iface -p tcp -s 53 -t allow
11
filter add $DNS2 -i iface -p tcp -d 53 -t allow
12
filter add $DNS3 -i iface -p udp -s 53 -t allow
13
filter add $DNS4 -i iface -p udp -d 53 -t allow
14
filter add $RIP1 -i iface -p udp -s 520 -t allow
15
filter add $RIP2 -i iface -p udp -d 520 -t allow
Your customized filters are inserted here.
16
filter add $NOUDP -i iface -p udp -t deny
17
filter add $NOSRV -i iface -p tcpnew -f inbound -t deny
18
filter enable
Filter statements 1–15 are placed before any user-defined filter statements. Items 16–17 are placed
after any user-defined filter statements.
77
ASYNC ROUTER AR-P, AR-5, AND SYNC ROUTER USER’S MANUAL
Individual entries in the filter list accomplish the following:
1
filter add $OUTOK -f outbound -t allow
No outgoing packets need to be filtered. (Saves processing time).
2
filter add $TCPOK -p tcpestab -t allow
Packets on established TCP connections do not need to be filtered. (So any mention of TCP
beyond this point in the list pertains only to NEW connections.)
3
filter add $FAKE25 -i iface -p tcpnew -s 25 -t deny
Prevents people from sneaking in with a remote client, that is pretending to be a remote mail
server.
4
filter add $NOLOOP -s 127.0.0.0/8 -t deny
Block packets resulting from misconfigured DNS resolver.
5
filter add $NORCMD -p tcp -d 512-515 -t deny
Do not allow R-series commands across the link.
5a
filter add $NOTN -p tcp -d 23 -t deny
If telnet is not allowed, block it.
6
filter add $SRVOK -p tcp -d server/32 -t allow
Allow connections to the local server host.
7
filter add $MAIL1 -i iface -p tcp -d 25 -t allow
8
filter add $MAIL2 -i iface -p tcp -s 25 -t allow
Allow all of your users to send and receive email.
9
filter add $FTP1 -i iface -f inbound -p tcp -s 20 -t allow
Allow inbound connections to the local FTP client data port.
10
filter add $DNS1 -i iface -p tcp -s 53 -t allow
11
filter add $DNS2 -i iface -p tcp -d 53 -t allow
12
filter add $DNS3 -i iface -p udp -s 53 -t allow
13
filter add $DNS4 -i iface -p udp -d 53 -t allow
Allow local machines full use of DNS.
14
filter add $RIP1 -i iface -p udp -s 520 -t allow
15
filter add $RIP2 -i iface -p udp -d 520 -t allow
Allow RIP packets across the link.
Your customized filters are inserted here.
16
filter add $NOUDP -i iface -p udp -t deny
17
filter add $NOSRV -i iface -p tcpnew -f inbound -t deny
Deny all services not mentioned above, for UDP and TCP.
18
filter enable
Enable all filter statements.
78
ASYNC ROUTER AR-P, AR-5, AND SYNC ROUTER USER’S MANUAL
B.2.4 USE THE ROUTER’S PREDEFINED IPX/SPX FILTERS
Idle and unnecessary IPX and SPX packet transmission can be selectively restricted by Router’s dial
suppression feature (called RLO). RLO is essentially a predefined group of IPX and SPX filters, that
filter unnecessary calling (calling not initiated by the user).
Using NLO, you can separately enable the Router to suppress dialing due to:
• Pings from NetWare servers
• SPX idle traffic
• NetBIOS name broadcasts between servers
• Any other IPX broadcasts
RLO reduces line use due to applications like Lotus® Notes, Windows® for Workgroups, Novell
NetWare Management System, and Cheyenne® ArcServe.
How to enable all RLO filters
Enter the following command to start the RLO filters:
ipx optimization on
enable all NLO filters
When NLO is enabled, the Router is automatically configured to minimize unnecessary dialing.
How to disable the NLO filters
Enter the following command to disable the NLO filters:
ipx optimization off
disable all NLO filters
B.2.5 WRITE YOUR OWN IP AND IPX FILTERS
To prevent certain hosts or networks from making connections with your Router, employ an IP or IPX
dial filter. Using dial filters does not restrict all hosts on your own network, as the dialup-quota method
does.
Dial filters are best used to restrict the access of specified hosts, networks and applications.
Use the -t nodial parameter of the filter command to create IP dial filters.
Use the filter, ripfilter, or sapfilter command to create IPX dial filters.
Simple IP filter example
A branch-office LAN is connected to its home office through a Router, and the home office is connected
to the Internet. To prevent hosts on the Internet from routing through your home office over the dialup
connection to your remote office, install an IP dial filter. For example, domain-name packets entering
the system with a destination port number 53 cannot be sent to the remote office on the modem0 port
when the following command is entered to the home-office Router:
filter add dnsfilter -d any 53 -t nodial -i modem0 -f outbound
filter enable
Also refer to the filter command in Section 3.6 of the Reference Manual, which begins on page 137.
79
ASYNC ROUTER AR-P, AR-5, AND SYNC ROUTER USER’S MANUAL
NOTE
If a dialup connection has already been established between offices, the filter does not
prevent the packets from transitioning the link. The filter only prevents packets from
causing the Router to initiate the connection by dialing out.
Long IP filter example
These filters can be entered from the Router command prompt. Do not use the IP addresses below.
They are for EXAMPLE ONLY! Comments are preceded by “#”. The filters are executed in order, and
the overall filtering depends upon the interplay of all of the filters.
#These filters will allow your network users to ping to hosts in the
outside world.
filter
filter
filter
filter
add
add
add
add
f0 -s 199.98.122.1/32 -p 1 -t allow
f00 -d 199.98.122.1/32 -p 1 -t allow
f1 -s 199.98.122.3/32 -p 1 -t allow
f2 -d 199.98.122.3/32 -p 1 -t allow
#These filters will allow FTP activities to and from the host
with IP address 199.98.122.3.
filter
filter
filter
filter
filter
filter
filter
filter
add
add
add
add
add
add
add
add
f3 -s 199.98.122.3/32 -d any 20 -p 6 -t
f4 -s any 20 -d 199.98.122.3/32 -p 6 -t
f5 -s 199.98.122.3/32 20 -p 6 -t allow
f6 -d 199.98.122.3/32 20 -p 6 -t allow
f7 -s 199.98.122.3/32 -d any 21 -p 6 -t
f8 -s any 21 -d 199.98.122.3/32 -p 6 -t
f9 -s 199.98.122.3/32 -p 6 -t allow
f10 -d 199.98.122.3/32 21 -p 6 -t allow
allow
allow
allow
allow
#These filters will block telnet activities originating from the
outside world, but will allow your network users to telnet to the
outside world.
filter add f11 -d any 23 -p 6 -t deny -i modem0 -f inbound
filter add f12 -s 199.98.122.3/32 -d any 23 -p 6 -t allow
filter add f13 -s any 23 -d 199.98.122.3/32 -p 6 -t allow
#These filters will allow mail to and from the host 199.98.122.3.
filter
filter
filter
filter
add
add
add
add
f14
f15
f16
f17
-s
-s
-s
-d
199.98.122.3/32 -d any 25 -p 6 -t allow
any 25 -d 199.98.122.3/32 -p 6 -t allow
199.98.122.3/32 25 -p 6 -t allow
199.98.122.3/32 25 -p 6 -t allow
#These filters will allow udp and tcp transfers.
filter
filter
filter
filter
filter
filter
80
add
add
add
add
add
add
f18
f19
f20
f21
f22
f23
-s
-s
-s
-d
-s
-s
199.98.122.3/32 -d any 53 -p 6 -t allow
any 53 -d 199.98.122.3/32 -p 6 -t allow
199.98.122.3/32 53 -p 6 -t allow
199.98.122.3/32 53 -p 6 -t allow
199.98.122.3/32 -d any 53 -p 17 -t allow
any 53 -d 199.98.122.3/32 -p 17 -t allow
ASYNC ROUTER AR-P, AR-5, AND SYNC ROUTER USER’S MANUAL
filter add f24 -s 199.98.122.3/32 53 -p 17 -t allow
filter add f25 -d 199.98.122.3/32 53 -p 17 -t allow
#This filter will deny all inbound traffic EXCEPT for the traffic
allowed by previous filters.
filter add modemok -s any -d any -t deny -i modem0 -f inbound
#This command will enable all the filters listed previously.
filter enable
After filtering, reestablish dialup time quotas
Once sources of excessive dialing activities have been identified and filtered, you may want to increase
the dialup time quota to allow for normal demand. Enter the following command for the new dialup
quota:
dialup interface quota mins
This will set the quota to mins for the rest of the current day and for subsequent days.
NOTE
When the time quota is reached, phone connections are immediately dropped.
For uninterrupted service, issue the above command before the quota limit is reached.
81
ASYNC ROUTER AR-P, AR-5, AND SYNC ROUTER USER’S MANUAL
Appendix C: Troubleshooting
Use this appendix to resolve network problems during Router installation or operation.
We strongly recommend that you perform the ping tests described in Chapter 6.
There are several ways to use the information in this appendix:
• Use the LED descriptions to quickly determine which interface that the problem is occurring on.
• Use Router commands to discover more about your particular problem. Review the brief list of
Router commands that are generally useful for solving network problems. Also refer to the
complete descriptions in Chapters 2, 3, and 4 of the Reference Manual, which starts on page 137.
• Using a description of your problem or an error message, look for a match in this appendix:
- Initial configuration/start-up problems
- Operating problems
- Client problems
If you determine that the Router requires repair, refer to Section C.6.
Here is a list of common problems with the section numbers to look up for solutions:
• Initial configuration/start-up problems (Section C.3)
- Router cannot start—LEDs stay dark (Section C.3.1)
- Router cannot start—LEDs stay lit (Section C.3.2)
- Prompt is not displayed (Section C.3.3)
- Root password does not work (Section C.3.3)
- IP hosts on Ethernet cannot telnet to the Router (Section C.3.5)
- Cannot save configuration (Section C.3.6)
- Modem will not connect to remote modem (Section C.3.8)
• Operating problems (Section C.4)
- Cannot communicate with remote host (IP only) (Section C.4.1)
- Connection drops after a few seconds (Section C.4.2)
- Connection drops after a few hours (Section C.4.3)
- Constant remote dialup (Section C.4.4)
- NetWare servers are not displayed on remote host
- Unable to attach to a remote NetWare server (Section C.4.5)
82
ASYNC ROUTER AR-P, AR-5, AND SYNC ROUTER USER’S MANUAL
- Remote server not found (IPX) (Section C.4.6)
- No connection slots available (IPX) (Section C.4.7)
- Misconfigured networks (IPX) (Section C.4.8)
• Client operating problems (Section C.5)
- Router does not answer when client calls (Section C.5.1)
- Router answers client call but connection fails (Section C.5.2)
C.1 LED descriptions
C.1.1 ASYNC ROUTER AR-P LEDS
ASY
PWR
LNK
NC
NET
ROU
DTR
DCD
Tx
TER
AR-
P
Rx E
RR
Figure C-1. LEDs on the Async Router AR-P.
Table C-1. Descriptions of the LEDs on the Async Router AR-P.
Label
Indicates
If the LED is on
PWR
Power
Router is receiving power
ERR
Error
System error is detected
LNK
Link status
Ethernet connection is functional
Network activity
Router is receiving or transmitting data over Ethernet
DTR
Data terminal ready
Modem0 is ready to transmit
DCD
Data carrier detect
Modem0 is receiving carrier signal from remote modem
TX
Transmit
Modem0 is transmitting
RX
Receive
Modem0 is receiving
NWK or NET
connection
All LED lamps light as they are tested when the Router starts. They remain lit for 10 seconds before
resuming normal operation.
83
ASYNC ROUTER AR-P, AR-5, AND SYNC ROUTER USER’S MANUAL
C.1.2 ASYNC ROUTER AR-5 LEDS
ASY
PWR
ERR
LNK
NC
NET
DCD
ROU
0
DCD
x Tx
DCD
2
/Rx T
DCD
AR-
Mod
1
Tx/R
x Tx/R
TER
x/Rx
DCD
ems
3
5
4
Tx/R
x
Figure C-2. Descriptions of the LEDs on the Async Router AR-5.
Table C-2. Descriptions of the LEDs on the Async Router AR-5.
Label
Indicates
If the LED is on
PWR
Power
Router is receiving power
ERR
Error
System error is detected
LNK
Link status
Ethernet connection is functional
Network activity
Router is receiving or transmitting data over Ethernet
0-4 DCD
Data carrier detect
Modem (0-4) is receiving carrier signal from remote modem
0-4 TX/RX
Transmit/receive
Modem (0-4) is transmitting or receiving
NWK or NET
connection
All LED lamps light as they are tested when the Router starts. They remain lit for 10 seconds before
resuming normal operations.
84
ASYNC ROUTER AR-P, AR-5, AND SYNC ROUTER USER’S MANUAL
C.1.3 SYNC ROUTER LEDS
SYN
PWR
LNK
Ethe
NET
rnet
DTR
CR
OUT
ER
DCD
Mode
m
Tx
Rx E
RR
Figure C-3. LEDs on the Sync Router.
Table C-3. Descriptions of the LEDs on the Sync Router.
Label
Indicates
If the LED is on
PWR
Power
Router is receiving power
ERR
Error
System error is detected
LNK
Link status
Ethernet connection is functional
NET
Network activity
Router is receiving or transmitting data over Ethernet connection
DCD
Data carrier detect
Modem0 is receiving carrier signal from remote modem
DTR
Data terminal ready
Modem0 is ready to transmit
TX
Transmit
Modem0 is transmitting
RX
Receive
Modem0 is receiving
All LED lamps light as they are tested when the Router starts. They remain lit for 10 seconds before
resuming normal operation.
85
ASYNC ROUTER AR-P, AR-5, AND SYNC ROUTER USER’S MANUAL
C.2 Router Commands
Use the following commands to investigate problems with your Router. Use the prompt of the Router
(tcp/ip> or ipx>) to remind you of which mode you are in (TCP/IP mode or IPX mode). Be aware that
some commands can be used across modes, and others can only be used while in one of the modes. Note
that some commands have the same name (ifconfig), but are mode-specific in their use.
C.2.1 FOR ANY TYPE OF NETWORK (TCP/IP AND IPX)
• access—display or change primary shift time for clients
• asystat—display interface statistics for Router
• client—display or change remote client data on Router
• config—display or change Router system configuration
• date—display or change date
• default_mode—display or set default protocol mode (ipx or tcp/ip)
• dialup—display or change dialup parameters
• help—display commands available
• history—display last 25 Router commands issued
• hostname—display or change name of Router
• logout—terminate session with Router
• password—change user or link password for Router
• reboot—drop all connections and restart Router
• performance—display network performance statistics
• ppp—display or configure PPP protocol parameters
• ps—display status of active Router processes
• reboot—drop all connections and restart Router
• start—start a server (ftp, rip, snmp, telnet)
• stop—stop a server (ftp, rip, snmp, telnet)
• tip—send modem commands to a remote modem
• trace—display packet types sent or received on a interface
• tux—display status of TUX protocol connections
• update—update routing tables using RIP and SAP
• version—display software release level of Router
• who—display who is logged in to Router
86
ASYNC ROUTER AR-P, AR-5, AND SYNC ROUTER USER’S MANUAL
C.2.2 FOR IPX (NETWARE) NETWORKS ONLY
• filter—display or change IPX filters
• if config—display or change IPX network parameters
• ipx—display or change IPX protocol parameters
• netstat—display IPX network statistics
• ping—send an ICMP packet to remote host
• ripfilter—display or change RIP protocol filters
• route—display and change IPX routing tables
• sap—display and change SAP routing tables
• sapfilter—display or change SAP protocol filters
• spoof—enable or disable protocol spoofing
• tcp/ip—change to TCP/IP mode
C.2.3 FOR TCP/IP NETWORKS ONLY
• arp—display or change ARP protocol parameters
• domain—configure for Internet domain name service (DNS)
• filter—display or change TCP/IP filters
• icmp—display ICMP protocol status
• ifconfig—display or change TCP/IP network parameters
• ip—display or change TCP/IP protocol parameters
• ipx—change to IPX mode
• netstat—display TCP/IP network statistics
• ping—send an ICMP packet to remote host
• rip—display or change RIP protocol parameters
• route—display or change IP routing table
• snmp—display or change SNMP protocol parameters
• syslog—display or configure system log
• tcp—display or configure TCP protocol parameters
• traceroute—trace the route to a host
• udp—display UDP protocol status
For detailed information about the use of these commands, refer to Chapters 2, 3, and 4 in the Reference
Manual, which begins on page 137.
87
ASYNC ROUTER AR-P, AR-5, AND SYNC ROUTER USER’S MANUAL
C.2.4 ROUTERVU “REMOTE CONSOLE” FOR NETWARE NETWORKS
In IPX-only networks, use RouterVu on a PC to
• configure local Routers using a PC on the local Ethernet
• configure remote Routers
• troubleshoot network problems from both ends (Routers)
You can select a specific Router by name or IPX address (network number)
RouterVu enables users on IPX-only networks to log into and configure the Router remotely. RouterVu
is a client/server application, with the client code running in DOS on a PC, and the server code running
on the Router.
Syntax
routervu
[option]
[argument]
routervu—display RouterVu command syntax
routervu target—connect to the Router called target, or at the IPX network number target, and establish
an interactive session
routervu -n—show names of all connected Routers
routervu -a—show names of all connected Routers and NetWare file servers
routervu -p—ping once to the remote Router
routervu -s—ping continuously to the remote Router
routervu -i filename—use the input file filename to generate commands for the Router
routervu -o filename—copy all output to the file filename
Examples
• Display command syntax of routervu command.
routervu
• Connect to a remote Router named Kansas.
routervu kansas
• List to screen all connected Routers.
routervu -n
88
ASYNC ROUTER AR-P, AR-5, AND SYNC ROUTER USER’S MANUAL
ROUTERVU (c) 1995 Rockwell Network Systems
Building list...
anole 00001111.02CFlF80060A (Router)
archer 00001111.02CFlF800197 (Router)
arnie 00001111.02CFlF8006C8 (Router)
dinosaur 99990001.02CFlF80010F (Router)
dragon 12340001.02CFlF8001FC (Router)
hqs 00001111.02CFlF8004E7 (Router)
kato 12340001.02CFlF8005D7 (Router)
NDNLLl 00000011.02CFlF8001B7 (Router)
• List to screen all connected Routers and servers.
routervu -a
ROUTERVU (c) 1995 Rockwell Network Systems
Building list...
anole 00001111.02CFlF80060A (Router)
archer 00001111.02CFlF800197 (Router)
arnie 00001111.02CFlF8006C8 (Router)
DAFFY 00DAFF00.000000000001 (IPX File Server)
DAFFYII 00004321.000000000001 (IPX File Server)
dinosaur 99990001.02CFlF80010F (Router)
dragon 12340001.02CFlF8001FC (Router)
hqs 00001111.02CFlF8004E7 (Router)
• Copy all screen output to the file named session.now. This is useful to when trying to document the
configuration of a remote Router.
routervu -o session.now
• Connect to a Router (iowa) and use the input file (fix_iowa) to generate Router commands (that are
subsequently executed on that Router)
routervu iowa -i fix_iowa
• Connect to a Router (boston), capture all screen displays and put them into a file (bstscms). routervu
boston -o bstscrns
routervu boston -o bstscrns
• Connect to a Router (paris), execute the commands in the input file (forparis), and capture the
resulting output to another file (parisxx).
routervu paris -i forparis -o parisxx
C.3 Initial Configuration/Start-up Problems
C.3.1 ROUTER CANNOT START—LEDS STAY DARK
• Power source problem
• Cannot read the boot diskette
• Unable to resolve an IP address
89
ASYNC ROUTER AR-P, AR-5, AND SYNC ROUTER USER’S MANUAL
Possible cause #1—Power-source problem. LEDs on front panel are not illuminated.
Suggestion—Verify that the power cable is connected and well seated. Plug something else into the power
source to verify that the wall outlet or power strip is active.
Possible cause #2—The Router cannot read the boot diskette or the boot diskette may be damaged.
Suggestion—Verify that the Router boot diskette is properly loaded into the floppy drive. As the Router
attempts to start, check the LED on the front of the floppy-disk drive to see if the disk is being accessed.
During the normal boot procedure, the disk access LED illuminates briefly during the system power-on
self-test and again for 45 to 60 seconds while the Router system loads.
Upon successful start-up, the Router login prompt displays on the console, and a telnet or RouterVu
session may be established.
NOTE
To telnet (IP only) or routervu (IPX only) to a Router, first run the setaddr program or
complete a successful configuration from the Router console.
If the boot diskette appears to be accessed for the period described above, yet no login prompt displays
on a configured console, or if you are unable to connect with telnet or RouterVu to the Router, try
inserting the backup boot diskette and following the same start-up procedure.
If the disk does not appear to be accessed correctly or the problem is not resolved when using the
backup diskette, call Technical Support.
If the problem is resolved by using the backup boot diskette, your boot diskette is probably damaged.
If the backup boot diskette appears to be accessed for the period described above, and you do not see
a login prompt on an attached console, verify that the console terminal is connected correctly and is
functional.
Possible cause #3 (IP only)—The Router is unable to resolve an IP address or the configured domain name
server is unavailable.
Suggestion—While starting, check the disk access LED to see if the boot diskette is being accessed. During
the normal start-up procedure, the disk access LED illuminates briefly during the system power-on selftest and again for 45 to 60 seconds while the Router system loads.
If the LED stays lit and you are using the domain name service to resolve hostnames to IP addresses,
there may be a hostname in one of your start-up files that cannot be resolved, and is causing the start-up
script to hang.
Router software stores IP addresses in dotted-quad notation in start-up scripts stored on the boot
diskette. The only way a hostname can be found in a start-up script is if someone edits the Router boot
diskette by hand. If your boot diskette has been modified this way, use a machine that can read and write
DOS-formatted disks to edit the confg.net file on the boot diskette and change any hostnames to dottedquad notation.
90
ASYNC ROUTER AR-P, AR-5, AND SYNC ROUTER USER’S MANUAL
C.3.2 ROUTER CANNOT START—LEDS STAY LIT
Although the boot diskette seems to boot properly and the Router LEDs stay lit, it will not start and will
not give a prompt.
Possible cause—You may have infected the boot diskette with a virus.
If you have inserted the Router boot diskette into a PC on your network, it is possible that a computer
virus was transferred to it.
Suggestion—Try using the backup boot diskette. Make sure you boot the diskette directly from the
RouterVu or the Router. If you’ve corrupted your backup boot diskette, then call for technical support
and order a new diskette. If you have virus-detection software, run it on the boot diskettes.
C.3.3 PROMPT IS NOT DISPLAYED
No prompt is displayed on the console after the boot diskette appears to have been successfully read at
system start.
Possible cause—The console terminal may not be connected or configured correctly.
Suggestion—See if the console works by connecting the console terminal to another machine. Verify that
the null-modem cable is connected from the Router’s console port to a terminal configured with a 9600
baud rate, no parity, 8 data bits, and 1 stop bit.
C.3.4 ROOT PASSWORD DOES NOT WORK
Possible cause—The root password may have been changed, or you may have forgotten the password.
Follow the instructions below to recover the password.
You can recover the system using the following procedure. These steps must be completed using a
serial-port console. This procedure will not work from a remote telnet or RouterVu session.
1. Eject the boot diskette.
2. Write-protect the boot diskette, as shown in Figure C-4.
Figure C-4. To write-protect the disk, turn it over and open the window at the top left-hand corner.
91
ASYNC ROUTER AR-P, AR-5, AND SYNC ROUTER USER’S MANUAL
3. Re-insert the boot diskette into the diskette drive.
4. Restart the Router.
5. Once the “Login:” prompt appears on the front panel, enter the user name root. Do not enter a
password; just press RETURN.
NOTE
Step 5 can only works on the first login attempt after a reboot. If you make a mistake,
reboot the Router as in step 4.
6. Eject the boot diskette and write-enable it (close the window).
7. Re-insert the diskette into the diskette drive.
8. Set the root password using the password command. The -p option of the password command allows
the root password to be set without having to provide the previous password. The new password will
be saved onto the diskette. Enter:
password -pnew_password
Make sure that there is no space between the -p and the new_password.
C.3.5 IP HOSTS ON ETHERNET CANNOT TELNET TO THE ROUTER
There are 2 possible causes:
• The Ethernet cable is not fully functional.
• The Router may be configured with the wrong IP address.
Possible cause #1—The Ethernet cable is not fully functional. The cable may not be connected correctly or
it may be damaged.
Suggestions—Check the appropriate Ethernet cable to ensure that it is seated correctly.
Issue the trace eth0 command on the Router to determine if the Router is receiving the telnet traffic.
The trace command is used to display incoming and outgoing traffic on a given interface.
Watch the network activity LEDs while trying to access the Router over the Ethernet.
If possible, try attaching the Ethernet cable to another node on the same network that supports
TCP/IP and telnet into it, to verify whether the cable is good.
If possible, use a network analyzer to determine if packets are being sent to the Router.
Possible cause #2—The Router may be configured with the wrong IP address.
Suggestions—If you have a machine available that supports DOS formatted disks, use an editor to read the
config.net file on the boot diskette (or use the ifconfig command to display the IP address) and verify that
the correct IP address is found in the file.
Before editing the boot diskette, uncompress it by entering:
a: \stacker a:
92
< RETURN>
ASYNC ROUTER AR-P, AR-5, AND SYNC ROUTER USER’S MANUAL
After making your changes, enter
exit <RETURN>
A line of the format “ip address xxx.xxx.xxx.xxx” will be found near the top of the file. If the address is
incorrect, run setaddr again or edit the file directly to set the desired IP address for the Router. For more
information about the setaddr utility, refer to Chapter 3.
Also—If the remote hosts support ping, use the ping command to verify connectivity. Issue the ping
command on the machine from which you are trying to telnet. The destination address used when
issuing the ping command should be the Router IP address. If you are able to successfully receive a
response from the Router when using the ping command and are unable to telnet to the Router, call for
technical support.
If possible, display the contents of the ARP table on the machine from which you issued the telnet
command. See if there is a complete entry for the Router Ethernet/IP address mapping.
C.3.6 CANNOT SAVE CONFIGURATION
The following message displays during configuration:
Cannot create configuration file config.tmp
Make sure the floppy disk is write enabled
Possible cause—The Router boot diskette is write-protected.
Suggestions—Remove the Router boot diskette and make sure that it is not write-protected (hole is not
open). Complete the configuration procedure again and save it.
C.3.7 WHY DON’T THE MODEMS CONNECT?
If you are having problems connecting over the WAN interface, you can enable additional error
messages by using the command:
tcp syslog on
This will send all of the syslog messages to the console. When a dialup connection is made, you shoudl
see messages such as:
iface dialup link appears to be up
or
iface CHAP peer says:
Welcome
If you see a message like:
iface call failed:
NO DIALTONE
then you may have a problem with your phone line. If you see a message like:
iface CHAP failed to verify:
remote name
then the names and link passwords between the two systems may not be set up correctly. Refer to the
password example and worksheet in the Installation Reference, which begins on page 137.
When you are done, disable the syslog messages by issuing the command:
tcp syslog off
93
ASYNC ROUTER AR-P, AR-5, AND SYNC ROUTER USER’S MANUAL
C.3.8 MODEM WILL NOT CONNECT TO REMOTE MODEM
Possible causes—There are a variety of possible causes. Use this procedure to determine the most likely
cause:
• the telephone circuit is overloaded
• the remote telephone number is not correct
• the local telephone circuit is faulty
• the remote modem is not compatible with Router’s modem
Suggestions—Sometimes it is useful to go through the connection procedure manually and study the
modem’s output.
We strongly suggest that the Router always be used on a dedicated telephone line. If you are using the
Router to make only outgoing calls to a network service provider (who will never call you), we
recommend not sharing the line with other equipment, such as a fax-modem or a telephone. In order to
reliably maintain the high data rates of the Router’s built-in modem, other such equipment should only
put a minimal electrical load on the telephone circuit. When having a problem with the modem
connection, remove all other equipment from the line and make all telephone cords as short as possible.
Sometimes a long telephone cord can act like an antenna and pick up noise.
To make sure that the remote number is being called correctly, turn the modem’s speaker on with the
command:
dialup modemX volume high
and listen as you type the command:
update modemX now
which should force the Router to make a call. If the remote number is good, you will hear the remote
end ring, get answered, a whistle, and finally the rushing noise of the modem training sequence. If you
don’t hear these sounds, contact the remote site to make sure that you have the right telephone number,
and that their equipment is ready to accept calls.
If all of these preliminary checks pass, but the modem still will not connect, try operating the modem
manually.
1. Stop the dialer process. Enter:
dialup modem0 inactive
2. Connect to the modem. Enter:
tip modem0 <RETURN>
3. Make sure that the modem responds to commands. Enter:
AT <RETURN>
This should generate the “OK” response.
4. Turn the modem speaker on. Enter:
ATM1L3 <RETURN>
94
ASYNC ROUTER AR-P, AR-5, AND SYNC ROUTER USER’S MANUAL
5. Request detailed connection status messages. Enter:
ATW1 <RETURN>
6. Dial the destination telephone number xxx-xxxx. Enter:
ATDTxxx-xxxx <RETURN>
You should see the responses:
CARRIER 28800
PROTOCOL: LAP-M
CONNECT 57600
7. While holding the connection, get back into command mode with
(pause) + + + (pause)
8. This should generate an “OK.”
9. Enter:
AT%L
10. This should return a number between 15 and 30. If the number returned is higher than 30, the
telephone line is a poor connection. To determine which end has the problem, contact Technical
Support. We can arrange for a test against our dial-in ports.
If the dialing command gives one of the following responses at inappropriate times, contact
Technical Support:
NO DIALTONE (if there IS a dialtone)
BUSY (when you hear ringing at the other end)
C.4 Operating Problems
C.4.1 CANNOT COMMUNICATE WITH REMOTE HOST (IP ONLY)
Possible cause—This problem could be caused for a variety of reasons.
Suggestions—The suggestions offered next refer to particular nodes as:
• local node—the network node from which you are originating communication.
• local Router—the Router on the same Ethernet as the local node.
• remote Router—the Router located on the other side of the dialup link, usually at a remote site.
• remote node—the network node to which you are attempting to establish communication.
95
ASYNC ROUTER AR-P, AR-5, AND SYNC ROUTER USER’S MANUAL
Ethernet Testing
Verify that the local node can communicate with the local Router using the ping command.
On the local Router, issue the ping command by entering:
ping ip_address_of_local_node
If the ping command completes and displays a round-trip time, proceed to the Dial Test section.
If the ping command displays the message
Target did not respond
perform the following steps:
1. Verify that the Ethernet cables on both the local node and the local Router are securely connected.
2. Make sure that the subnet masks on the local node and the local Router match. Also verify that the
(sub)network number of the local node and the local Router match. Display this information using
the ifconfig command.
3. Issue the icmp status command. Note the count of icmplnEchoReps and icmpOutEchos packets
displayed.
4. Try the ping command again using the -s option:
ping -s ip_address_of local_node
5. This ping command continuously sends inquiries to reach the local_node. While the ping command is
executing, watch the network activity LEDs to verify that the Router is sending datagrams out the
Ethernet interface. Stop the ping -s command by entering <Ctrl-c> or by pressing <RETURN>.
6. Issue the icmp status command again. Determine if the count for icmplnEchoReps and icmpOutEchos
increased. If the count for icmpOutEchos increased, and the icmplnEchoReps count did not increase, it
implies that the Router is sending the reachability messages to the local node and not receiving a
response from the local node.
7. Issue the arp command to display the contents of the Router Address Resolution Protocol table. This
table contains IP to Ethernet Address mappings. Determine if a mapping exists for the local node.
The mapping should contain the IP address of the local node and the Ethernet address of the local
node.
8. If there is not a valid ARP entry for local node, try issuing the ping command to another host on the
(sub)network that supports TCP/IP. If this works, try issuing the ping command between the other
host and the local node, if ping is available. Enter the ping command from the other host to the local
node. If this works, it indicates that the local node is capable of responding to ICMP Echo Requests,
but for some reason will not do so for the local Router. If possible, use a network analyzer to trace
datagrams traveling between the local node and the local Router. If you continue to experience the
problem, Call Technical Support for additional help.
Dialup Communication Testing
Approach 1
Once you have verified that the local node can communicate with the local Router, try establishing a
dialup connection from the local Router to the remote Router.
96
ASYNC ROUTER AR-P, AR-5, AND SYNC ROUTER USER’S MANUAL
Issue the following command from the local Router:
ping ip_address of remote_Router
The response is:
Target did not respond
This occurs because the amount of time to required to establish the connection is longer than the
timeout of the ping command. After issuing the ping command, you should hear the modem dial and
connect with the modem at the remote site. If you hear the modem dial, skip to Approach 2, otherwise
continue immediately below.
1. Verify that the phone cable is attached to the appropriate modem interface on the local Router.
2. Check the routing table on the local Router using the route command. The routing table should
contain an entry with the Destination field specified as the (sub)network on which the remote
Router resides. Make sure that the Bits field in the routing table entry matches the number of
significant contiguous bits to be used as a subnet mask for the remote site.
Make sure that the Interface field in the routing table is specified as modemX, where X is the
appropriate modem designation number. Make sure that the phone cable is connected to the
modem port, shown in the Interface field of the route entry.
3. Issue the dialup status command. Verify that the correct phone number for the remote site is
displayed. To determine if the dialer is configured as required, refer to Section 2.9, dialup, in the
Reference Manual, which begins on page 137, for a description of possible dialer modes: demand,
demand backoff, inactive, incoming, once, or keepup.
Determine the connection status: idle, dialing, listening, serving call, called out. For possible modem
states, refer also to Section B.5 in the Reference Manual, which begins on page 137.
4. To display PPP information, issue the ppp modemX command, where X is the appropriate modem
designation number. Determine if any PPP packets have been sent on the link.
5. Issue the asystat command to see transmit and receive statistics for the appropriate modem
interface. Also, refer to Section 2.3, asystat, in the Reference Manual, which begins on page 137.
6. Issue the tip command to use the appropriate modem interface manually. Refer to Section B.4.1 in
the Reference Manual.
7. If you have taken the steps above and are still unable to determine why the modem is not dialing,
call Technical Support.
Approach 2
If in Approach 1 above, you heard the modem dial, wait approximately 45 to 60 seconds and try the ping
command again.
If the ping command displays a round-trip time, this implies that you are able to make a dialup
connection between the local and remote Routers but the communication between the local and remote
nodes is failing. To determine the reason for the failure, skip to Approach 3.
If you are unable to establish a dialup connection between the local and remote Routers, continue
with the procedures immediately below.
1. Try the ping command again, listening carefully to the modem as it dials. If you hear a busy signal
when the other end connects, try dialing the phone number of the remote site by hand using a
standard telephone. If you receive a busy signal, there is a problem at the remote site that must be
addressed.
97
ASYNC ROUTER AR-P, AR-5, AND SYNC ROUTER USER’S MANUAL
2. Issue the dialup status command. Verify that the correct phone number for the other site is
displayed. To determine if the dialer is configured as required, refer to Section 2.9, dialup, in the
Reference Manual, which begins on page 137, for a description of possible dialer modes: demand,
demand backoff, inactive, incoming, once, or keepup.
Determine the connection status: idle, dialing, listening, serving call, or called out. For possible
modem states, also refer to the Modem Control Signals discussion in the Modem Dialing chapter of the
Reference Manual, which begins on page 137.
3. If you don’t hear a busy signal, it may be necessary to check the configuration of the remote Router.
If possible, log in to the remote Router over the Ethernet or on the console and enter the route
command to check the routing table. The routing table on the remote Router should contain an
entry with the Destination field specified as the (sub)network on which the local Router resides.
Verify that the Bits field in the routing table entry matches the number of significant contiguous bits
to be used as a subnet mask for the local site. Make sure that the Interface field in the routing table is
specified as modemX, where X is the appropriate modem designation number. Make sure that the
phone cable is connected to the modem shown in the Interface field of the route entry.
4. If possible, execute the procedures described in Approach 1 above on both the local and remote
Router.
5. To display PPP information, issue the ppp modemX command, where X is the appropriate modem
designation number. Make sure that the first line displayed after this command is:
Network Protocol Phase (open for XX:XX:XX:XX)
This means that the system names and link passwords are correct on both systems. If you see
anything else, make sure that both systems are configured in each other’s name and password (using
the config modify command).
Determine if any PPP packets have been sent on the link. For more information, refer to Section 2.18,
ppp, in the Reference Manual, which begins on page 137.
6. Issue the asystat command to see transmit and receive statistics for the appropriate modem
interface. Refer to Section 2.3, asystat, in the Reference Manual.
7. Issue the tip command to manually use the appropriate modem interface. Refer to Section B.4.1 in
the Reference Manual.
8. If you have taken the steps above and are still unable to determine why the connection is not being
established, call Technical Support.
Approach 3
If in Approach 2 you were able to establish a dialup connection between the local and remote Routers,
but are unable to send data between the local node and the remote node, continue immediately with
the following steps:
1. Make sure that the subnetmask and the (sub)network number on the local node and the local
Router match. Also verify that the subnetmask and the (sub)network number on the remote node
and the remote Router match. Display this information using the ifconfig command.
2. Verify that both the local node and remote node contain appropriate routing information. The local
node must contain a route that is used to determine how to reach the remote node. Similarly, the
remote node must contain a route that is used to determine how to reach the local node. Different
TCP/IP implementations have differing methods for managing routes. Most UNIX machines
implement the route command to add routes and the netstat command to display routes. Check in
the system administration guide for your TCMP implementation to determine how to manage routes.
98
ASYNC ROUTER AR-P, AR-5, AND SYNC ROUTER USER’S MANUAL
3. Determine if you are running RIP on the local and remote Routers. Use the config show command
on each Router to see if the start rip and ifconfig iface rip active commands are present in the
configuration, or issue the rip status command to determine if any RIP packets have been
transmitted or received by the Routers. If RIP is enabled in either or both Routers, temporarily
disable RIP by entering the stop rip and ifconfig iface rip off commands.
Enter the route -f command to flush the routing table of all routes learned by RIP. Do this on both
Routers if necessary. If you changed any RIP configuration try issuing the ping command again. Wait
approximately 45 to 60 seconds and try it a second time. If the remote and local nodes are now able
to communicate, there is a routing problem caused by RIP. If you are unsure of how RIP should be
configured, call Technical Support. If the local and remote nodes are still unable to communicate,
continue below.
4. Determine if RIP is running on the local and remote nodes. If so, try disabling it and flushing the
routing tables on the local and remote nodes of all routing table entries learned by RIP. See the
system administration manual for your system to determine how this should be done. After disabling
RIP and flushing the routing tables, try issuing the ping command again. Wait approximately 45 to 60
seconds and try it a second time. lf the remote and local nodes are now able to communicate, there is
a routing problem caused by RIP. lf you are unsure of how RIP should be configured, call Technical
Support.
To configure routing on the local node, add one of these three types of routes to the local node’s
routing table:
• host route to the remote node
• subnetwork route to the remote (sub)network to which the remote node belongs
• default route
For a host route, the destination address should be designated as the IP address of the remote node.
The next hop or gateway should be specified as the IP address of the local Router. The subnet mask, if
supported, should be specified as 255.255.255.255 or 32 bits.
For a (sub)network route, the destination address should be specified as the (sub)network number of
the remote node. The next hop or gateway should be specified as the IP address of the local Router. The
subnet mask, if supported, should be specified as the subnet mask or corresponding number of
significant contiguous bits of the remote (sub)network.
For a default route, the next hop or gateway should be specified as the IP address of the local Router.
To configure routing on the remote node, add one of the following three types of routes to the remote
node’s routing table:
• host route to the local node
• subnetwork route to the remote (sub)network to which the local node belongs
• default route
For a host route, the destination address should be designated as the IP address of the local node. The
next hop or gateway should be specified as the IP address of the remote Router. The subnet mask, if
supported, should be specified as 255.255.255.255 or 32 bits.
For a (sub)network route, the destination address should be specified as the (sub)network number of
the local node. The next hop or gateway should be specified as the IP address of the remote Router. The
subnet mask, if supported, should be specified as the mask or corresponding number of significant
contiguous bits of the local (sub)network.
99
ASYNC ROUTER AR-P, AR-5, AND SYNC ROUTER USER’S MANUAL
For a default route, the next hop or gateway should be specified as the IP address of the remote Router.
5. After all of the routing information has been configured, try pinging the remote node again. lf you
hear the modem dial, wait approximately 45 to 60 seconds and try the ping command one more
time. If you are still unable to establish communications between the local and remote nodes,
contact Technical Support.
C.4.2 CONNECTION DROPS AFTER A FEW SECONDS
The Router connects properly then drops the line after a few seconds.
Possible cause—CHAP failure
Suggestion—Turn syslog on and try to connect. Normally the syslog messages will give a good indication
of the problem.
For example, the names of Routers (Router1 and Router2) are just as important as the passwords.
Look at the password files from both Routers to determine if the names or passwords are correct. Refer
to the examples in Section A.1.1.
C.4.3 CONNECTION DROPS AFTER A FEW HOURS
The Router continually drops the modem link after a few hours of operating properly.
Possible causes—The quota is set too low and forces the line down, or the Router is not in keepup mode.
Suggestion—Check the settings by entering the command:
dialup modem0 status
For example,
(tcp/ip) Router> dialup modem0 status
modem0: (28800/Vl.lOOA-V34_DP)
DTR On RTS On CTS On DSR On RI Off DCD Off
keepup Called out
Timeout: 240
Idle: 0:00:00:08
Remote phone: 1918055623180
Dailyquota:l:00:00:00 Used:00:00:00:00 Left:1:00:00:00
Usage warning currently set at: 0:02:00:00
Also refer to dialup in Appendix A of the Reference Manual.
C.4.4 CONSTANT REMOTE DIALUP
The modem link dials up a remote location all the time.
Possible causes—Some network process is causing the Router to dial remotely.
Suggestion—Check the dialup modem0 dial_log to see which address on the network is causing the
dialing.
time: interfaceDialing
from: address to: address (protocol)
This indicates the source of the traffic that is causing the dial. Also refer to Appendix B.
C.4.5 UNABLE TO ATTACH TO A REMOTE NETWARE SERVER (MODEMS ONLY)
Possible cause #1—The network cabling is not configured correctly.
Suggestions—Verify that the phone line is connected correctly in the Router. Make sure that the phone
line on each of the Routers is connected to the jack labeled LINE.
100
ASYNC ROUTER AR-P, AR-5, AND SYNC ROUTER USER’S MANUAL
Issue the IPX mode command update now. This should cause the modem to dial.
If you hear the local Router modem dial but the modems do not connect (use the dialup modemX
status command to see if the connection is established), try disconnecting the phone line from the
Router, connecting it to a normal phone, and placing the call.
Determine if the modem at the other end of the connection answers. If it answers, verify that the
number that you called is the same as the configured phone number using the dialup modemX status
command on the local Router. If it does not answer, verify that you’re using the correct phone number
and check the Router at the other end to ensure that it is cabled and configured correctly.
Verify that the Ethernet cable is connected to the appropriate Router network connector.
Possible cause #2—The Router is not dialing the phone when a connection is requested, because it has not
learned about the services available on the network attached through its modem connection.
Suggestions—Issue the IPX mode command, update now. If a modem connection is not already
established, this command should cause the Router to dial. Use the IPX mode sap command to
determine if the service and server name that you require is listed in the display. If it is not, the Router is
not learning about the services on the remote network. This could be caused by a misconfigured
network. Refer to the section about misconfigured networks.
If the service that you require is listed in the SAP display, ensure that the appropriate route to the
service exists using the IPX mode route command. For example, if the SAP table displays the service
and server you require as:
Name
Type
Interface
JUSTIN
FILE SERVER modem0
Address
Hops Flg
10.000000000001.451
2
P
The IPX modem route command must have a route to network 10 in order to reach the ENG File
Server. It should look something like:
JUSTIN
Network
Interface
Router/Next
Hops Ticks Timer
Flags
00000010
modem0
74011fl59a4b
3
P
13
20
If you do not have such a route, the problem may be caused by a misconfigured network. Refer to the
Section C.4.8.
C.4.6 REMOTE SERVER NOT FOUND (IPX)
The NetWare client displays the following message when trying to connect to a remote server through
the Router:
SHELL-XXX-XX:
a network server could not be found
Possible cause—The local Router has not learned about the services available on the remote network. See
the Possible cause #2 described in the previous problem titled Unable to attach to a remote NetWare
server giving you suggestions about what to do when you attach to a remote NetWare server.
C.4.7 NO CONNECTION SLOTS AVAILABLE (IPX)
The NetWare client displays a message similar to the following message when trying to connect to a
remote server through the Router:
SHELL-XXX-XX:
no connection slots available
101
ASYNC ROUTER AR-P, AR-5, AND SYNC ROUTER USER’S MANUAL
Possible cause #1—The limit on the amount of connection slots available on the NetWare server has been
reached. Check the server to see if the maximum number of users is currently logged in. lf the limit has
been reached, then there are no available slots. In this case, the problem is not caused by the Router.
Possible cause #2—This could be caused by a misconfigured network. Refer to the section below on
misconfigured network.
C.4.8 MISCONFIGURED NETWORKS (IPX)
Suggestion—Check your network configuration to be sure the following items are configured correctly:
NetWare Serverl
ipx internal net 1234
bind ipx to ether_board net=00001111
Router 1
(ipx)Routerl> ifconfig eth0
eth0/802.3 Lan mode Network number 00001111 (up,connected)
Node number 02CFlF800219
flags 000722 trace 0x0000
sent: ipx 20471 tot 80500 idle 0:00:00:00 qlen 0
recv: ipx 151265 tot 570065 idle 0:00:00:00
discarded input 3396 discarded output 0
input q len 10 output q len 10
NetWare Server2
ipx internal net 5678
bind ipx to ether_board net=00002222
Router 2
(ipx)Router2> ifconfig eth0
eth0/802.3 Lan mode
Network number 00002222 (up,connected)
Node number 02CFlF800436
flags 000722 trace 0x0000
sent: ipx 20231 tot 80760 idle 0:00:00:00 qlen 0
recv: ipx 151265 tot 570065 idle 0:00:00:00
discarded input 3396 discarded output 0
input q len 10 output q len 10
Ethernet frame types—Make sure the frame type(s) configured on each Router match the frame type(s) in
use on the NetWare clients and servers on the LAN.
IPX network numbers—Make sure that a unique IPX network number is configured on the Router for each
Ethernet frame type in use on the LAN. Make sure that the IPX Network Numbers configured on each
Router match those configured on each NetWare server. Note: IPX Network Numbers do not have to be
configured on NetWare clients.
Internal network numbers—Make sure that unique Internal Network Numbers are assigned on each
NetWare server throughout your network.
Console messages—Check your NetWare Server console for messages indicating that the IPX Network
Numbers are set incorrectly. The messages on the server console give the Ethernet address of
misconfigured network nodes.
102
ASYNC ROUTER AR-P, AR-5, AND SYNC ROUTER USER’S MANUAL
C.5 Client Problems
For more troubleshooting tips concerning client connectivity problems, refer also to the Reference
Manual.
C.5.1 ROUTER DOES NOT ANSWER WHEN CLIENT CALLS
Possible cause—Client is dialing the wrong number or not using the correct modem.
Suggestions—Bring up the ro utility (Remote Office). Pull down the Connection menu and select “Login
to Router.” Look at the Phone Number line and verify the phone number. lf possible, dial that number
and make sure that a modem (on the Router) answers the phone.
Try to dial in again, and make sure that your client machine dials the Router. Look at the top half of
the Login Status screen to see modem status information. Make sure that the modem string is
transmitted to the modem. You should see a string of the form “ATDT” followed by the phone number
that you entered for the client. lf the modem is unable to dial, make sure that the correct com port has
been selected for dialing, by looking at the “Login to Router Port” line.
C.5.2 ROUTER ANSWERS CLIENT CALL BUT CONNECTION FAILS
Possible cause #1—Bad login name or password. Account is disabled.
Suggestion—Look at the bottom half of the Login Status Window on your Async Client software. lf the
login name is incorrect, you will see the message:
Login Failed: Invalid user name
If your password is incorrect, you will see the message:
Login Failed: Bad Password
In either case, reenter the user name and password on your Login phonebook record and try again. If
either of these messages occur, correct the account entry on the Router. Log in to your Router, and enter
the client list command. Now verify the name of your client account and that the client account is
enabled.
C.5.3 CLIENT LOGGED IN, BUT CAN’T ACCESS SERVERS ON NETWORK
Possible cause—Not configured for the correct protocol. IP address not configured.
Suggestion—If you have access to your Router console, enter the who command. Verify that you are
logged in and have a nonzero address for the protocols that you wish to use.
Bring up the ro utility (Remote Office), pull down the connection menu and select the “port status”
line. The next screen that appears will show all of the protocol information for your connection. On the
lower half of the screen, your IPX and IP addresses should appear.
If you are using IPX, your Remote IPX Network Number should be nonzero. lf you are using IP, your
local and remote IP addresses should also be nonzero.
If your IP or IPX addresses are missing from the window, you may have failed to configure your client
for the correct protocol. Edit your phonebook record; choose the MORE button at the bottom of the
screen and verify that you have selected the correct combination of protocols. If you are also using IP,
and your IP address was 0.0.0.0, select the PROTOCOL button and verify that you have a nonzero IP
address.
103
ASYNC ROUTER AR-P, AR-5, AND SYNC ROUTER USER’S MANUAL
C.6 Returning Your Router for Repair
There are no user-serviceable parts inside the Router.
If your Router fails to boot, contact technical support. If factory service is required, we will give you a
Return Merchandise Authorization (RMA) number. Include this number when returning the item for
service, and please reference it on any correspondence.
If possible, use the original packing materials to ship the Router. If the original packing carton and
packing materials are not available, package the unit securely in a container equivalent to the original
and insure the package to protect it against loss or damage.
WARNING
Your Router contains a lithium battery that is not in an accessible area. Do not attempt
to replace it yourself. The battery could explode if you replace it incorrectly. It must be
replaced only by qualified service personnel, and only with the same or equivalent type
recommended by the manufacturer. Dispose of used batteries according to the
manufacturer’s instructions.
104
ASYNC ROUTER AR-P, AR-5, AND SYNC ROUTER USER’S MANUAL
Appendix D: Interoperability
Routers can interoperate with multiple routers from multiple vendors in a coordinated manner. Use the
instructions in this appendix to provide interoperability with:
• RADIUS servers
• SecurID servers
• Cisco routers
• IPX synchronous routers (Sync Router only)
• TCP/IP synchronous routers
• CSUs/DSUs (Sync Router only)
D.1 RADIUS Servers
RADIUS is a protocol that allows multiple devices (like the Router) to access a single server for
authentication, authorization, and configuration information. This allows all names and passwords to be
administered from a single point, greatly simplifying the task in environments where many devices are
on the network.
RADIUS server software that executes on a UNIX host is available without charge. Source code is
available from:
Livingston Enterprises at
ftp://ftp.livingston.com/pub/livingston/radius-1.16.tar.Z
or Merit® at:
ftp://merit.edu/pub/michnet/radius.1.17.tar.Z
The Router has been tested with both of these types of RADIUS servers. If you have not previously run
RADIUS, you should obtain a new copy of the software and compile it for your system, and follow its
provided instructions.
The RADIUS documentation from Merit and Livingston refers to a Network Access Server (NAS). NAS
is a generic term for a dial-in router.
Configuration
To use RADIUS to authenticate clients connecting to the Router, perform the following configuration
steps:
1. Configure the RADIUS server to accept queries from the Router. To do this, add the Router’s name
(or IP address) and password to the clients file on the RADIUS server.
For the Livingston RADIUS server, the default location of this file is /etc/raddb/clients. For the Merit
RADIUS server, the default location of this file is /usr/private/etc/raddb.
2. Set the authentication method on the Router to RADIUS, and provide the name of the RADIUS
server to the Router. To do this use config, or use the following commands.
105
ASYNC ROUTER AR-P, AR-5, AND SYNC ROUTER USER’S MANUAL
authent method radius
authent add server hostname_RADIUS_server
<a password will be requested here>
config save
3. Verify that the desired Router modem port(s) on the Router is in client mode:
Enter the command dialup iface status. For example
dialup modem0 status
On the resulting display, verify that the first word of the third line is “client.” Other values that might
appear are “inactive,” “demand” and “demand_backoff.” If it does not say “client,” run config to set
this interface to a client, or enter the following command:
dialup iface client
4. Turn on authentication within PPP using one set of the following commands.
ppp iface lcp local auth pap
config save
or
ppp iface lcp local auth chap
config save
5. If necessary, add clients to the RADIUS database. On your RADIUS server, verify that the file
/etc/raddb/clients (or /usr/private/etc/raddb/clients) has an entry for each client.
6. Test the configuration for a specific client. Use the authenticate test subcommand to verify that a
client and its password are valid in the current Router configuration. On the Router, enter
authenticate test clientname
Provide the password when prompted.
D.2 SecurID Servers
SecurID is a security and authentication system that has two elements. Each user carries a card and also
memorizes a password or Personal Identification Number (PIN). To log on, the user must type his or her
name, and then enter a passcode consisting of the PIN followed by the number currently displayed on
the card. The displayed number changes randomly once every minute. The SecurID server software is
called the ACE (Access Control/Encryption) server.
The Router will interoperate with the SecurID authentication scheme over the modem interface only (at
this time).
ACE server software and user cards must be purchased from Security Dynamics. For detailed
information about how to install and configure the ACE server, contact Security Dynamics.
After the ACE software is installed, follow the next set of instructions to configure the ACE server and
the Router to support the SecurID scheme.
106
ASYNC ROUTER AR-P, AR-5, AND SYNC ROUTER USER’S MANUAL
Configuration
As part of setting the authentication method to SecurID, a successful authentication of a client must take
place between the Router and the ACE server. Therefore, a fully operable ACE server must be available
and correctly configured for use with the Router before configuring the Router to use SecurID. To
accomplish this refer to the following instructions below. Note that the most current information will be
with your ACE server software package.
1. Set up the ACE server following the instructions supplied by Security Dynamics. If you are already
running the ACE server, add the Router to the list of clients by running sdadmin and choosing item
Clients, and then item Create Client. Type the name of the Router and specify its type as Comm
Server.
2. At the ACE server, either activate users who will log onto the Router as direct users, or activate a
group of users. To activate a user, from the main menu choose item Clients, and then choose item
Activate Direct Users. Now type the name of the Router, and then enter the Serial Number or User
Name information as requested. Refer to the ACE server documentation for more information about
using groups.
3. Using ftp, copy the file /var/ace/sdconf.rec from the ACE server to the Router.
From the ACE server, log into the Router as root. Be sure to use binary mode for the transfer.
% cd /var/ace
% ftp Router
Name: root
Password: root_password
> bin
> put sdconf.rec
> quit
On the Router, verify that the file sdconf.rec resides at the top level of the directory hierarchy.
4. Have your SecurID card available, with it already configured for use with this Router at the ACE
server.
5. To verify that the Router can communicate with the ACE server. On the Router, enter:
ping hostname
where hostname is the name of the ACE server.
6. On the Router, enter:
config modify
Eventually you will be asked to select an authentication method. Select SecurID. At the end of the
config session (after you have been asked whether you want to save this configuration), you will be
prompted to enter your username and passcode.
If the ACE server authenticates you, the authentication method is now set to SecurID. If the ACE
server fails to authenticate you, you will be given the option to try again or give up (authentication
method stays unchanged).
107
ASYNC ROUTER AR-P, AR-5, AND SYNC ROUTER USER’S MANUAL
If authentication fails unexpectedly, go to the ACE server and run sdadmin. Choose the menu item
Activity Report and look at the last two pages of the report for reasons why the login attempt has failed.
This report can give you clues as to what corrections need to be made to allow the authentication
method to be set to SecurID.
7. Verify that the desired modem port(s) on the Router are in client mode. From the Router, enter
dialup iface status
For example, dialup modem0 status.
On the resulting display, verify that the first word of the third line is “client.” Other values that might
appear are “inactive,” “demand,” and “demand_backoff.” If it does not say “client,” run config to set
this interface to a client, or enter the following command from the Router:
dialup iface client
config save
8. Make sure that the login prompt is enabled for dial-in users. From the Router, enter:
dialup iface logprompt on
config save
9. Test the configuration. From the Router, enter:
authent test clientname
Starting from the beginning
If something goes wrong in the SecurID configuration, it may be necessary to start from the beginning:
1. Remove the sdconf.rec and sdstatus.net files from the Router boot diskette.
This can be done either by taking the Router boot diskette to a DOS machine, running Stacker, and
then deleting the files in DOS, or by using ftp from a networked machine (using the “delete”
command to remove these files).
2. Use ftp in binary mode (bin) to copy a new version of /var/ace/sdconf.rec from the ACE server to
the Router’s \sdconf.rec.
3. On the ACE server, run sdadmin. Choose the item clients and then choose the item Re-initialize
client. Enter the name of the Router when prompted.
4. On the Router, enter the command
authent method local
5. On the Router, now run config modify, and redo the SecurID configuration.
D.3 Cisco Router Interoperability
For Cisco routers to successfully interoperate with our Routers, configure the Cisco routers depending
upon the method of connection (Ethernet, synchronous line, or dialup connection), and possibly use a
customized dialer script for the Router. You should possess a general familiarity with Cisco routers and
their command language.
Because of the complexity involved with Cisco routers, step-by-step instructions are not provided, so
use this information as a guideline.
This section describes interoperability considerations for:
• Ethernet connections between Cisco routers and our Routers
• Synchronous lines between Cisco routers and our Routers
• Dialup connections between Cisco router and our Routers
108
ASYNC ROUTER AR-P, AR-5, AND SYNC ROUTER USER’S MANUAL
D.3.1 ABOUT THE CISCO COMMAND LANGUAGE
The Cisco command language has several different modes:
• non-privileged user mode
• privilegedusermode
• global configure mode
• configure interface mode
• configure line mode
Table D-1. Cisco Command Language Modes and Their Uses.
mode
prompt*
how to enter mode
Notes
non-privileged
user
bing>
default mode
Very few commands are legal—
most are variations of the show
command. Type ? for a list of valid
commands.
privileged user
bing#
From non-privileged
user mode, enter the
enable command.
Type ? for a list of valid commands.
global configure
bing(config)#
From privileged user
mode, enter the
configure command,
then select terminal
as the source of
configuration
commands.
There is no help available.
Configuration statements
entered will be checked for
syntax and held until you are
finished with configuration mode
(by entering CTRL+Z).
configure interface bing(config-if)#
From global
configure mode, enter
interface type
number
There is no help available.
Configuration statements entered
will be checked for syntax and held until
you are finished with configuration mode
(by entering CTRL+Z).
configure line
From any configure
mode, enter line
number
There is no help available.
Configuration statements entered
will be checked for syntax and held until
you are finished with configuration mode
(by entering CTRL+Z).
bing(config-line)#
*bing is the name assigned to the Cisco router.
Also refer to Cisco’s technical documentation.
109
ASYNC ROUTER AR-P, AR-5, AND SYNC ROUTER USER’S MANUAL
D.3.2 TYPES OF CONNECTIONS AVAILABLE
Synchronous Line
CISCO
Sync Router
Ethernet
Async Router AR-P
Figure D-1. Cisco and Router Connection Methods.
Routers may be connected to Cisco routers using:
• an Ethernet connection
• a synchronous line
• a dialup connection
Ethernet Connection (Cisco to Router)
Routers and Cisco routers can easily share an Ethernet connection. Cisco routers use the IGRP protocol
to exchange routing information with other routers. In order for a Cisco router to learn routes from the
Router, both the Cisco router and the Router must have RIP enabled.
To enable RIP on the Cisco router, log into the Cisco router and issue the following commands to
change from Cisco’s global configure mode:
[configure]
router rip
network x.x.x.x
neighbor y.y.y.y
passive-interface ethernet 0
Specify the Router’s Ethernet address in a neighbor statement in the router rip section.
In IP and IPX networks, the Router enables RIP by default.
110
ASYNC ROUTER AR-P, AR-5, AND SYNC ROUTER USER’S MANUAL
Synchronous line (Cisco to Router)
This information only applies to the Sync Router.
The default encapsulation protocol for a synchronous Cisco port is not the PPP protocol. For the
synchronous Cisco port, set the encapsulation protocol to PPP. On the Cisco router, configure the port
as follows:
configure
interface serial 0
ip address w.w.w.w m.m.m.m
encapsulation ppp
Where w.w.w.w is the IP address number and m.m.m.m is the mask number.
Our Routers usually use the IP address of their Ethernet port for all interfaces (modem, sync), while
Cisco routers are usually configured with distinct IP addresses for each interface port.
If you prefer not to use distinct IP addresses for each interface port on a Cisco router, replace the IP
address statement above (“ip address w.w.w.w m.m.m.m”) with:
ip unnumbered ethernet 0
Many network managers don’t like to do this, because on a Cisco router, an unnumbered link becomes
unusable, if the interface from which it obtained its IP address experiences a failure.
Dialup connection (Cisco to Router)
Cisco routers generally have two asynchronous ports labeled “CONSOLE” and “AUX.” The CONSOLE
port (DCE) is intended to connect to an asynchronous terminal. The AUX connector (DTE) can be
connected to a V.35 bis or V.34 modem.
With Cisco routing software release 10, the AUX port can be used for dial-in or dial-out (DDR =
Demand Dialed Routing) access, which is compatible with our Router.
111
ASYNC ROUTER AR-P, AR-5, AND SYNC ROUTER USER’S MANUAL
Asynchronous
terminal
DCE
Modem
DTE
V.32bis or V.34
Cisco Router
Console
AUX
Async Router AR-P
Figure D-2. Dialup Connection (Cicso to Router).
To enable a Router to dial into a Cisco router, on the Cisco router:
1. Configure the physical line parameters, using the configure line command.
configure
line aux 0
login local
modem inout
speed 38400
flowcontrol hardware
This configures the AUX port to be in a mode capable of supporting a modem for incoming and/or
outgoing calls, with a port speed allowing modem compression. The highest speed supported is
38,400 bps.
The [configure line] command login local tells the Cisco router to use its own table of user names
and passwords to validate the login. Alternatively, you can have a password for each line (no user
name), or use a nearby TACACS server for validation.
2. Configure a username/password pair for logging in on the line:
[configure]
username xxxxx password yyyyy
112
ASYNC ROUTER AR-P, AR-5, AND SYNC ROUTER USER’S MANUAL
3. Define the interface (logical port):
[configure]
interface async 1
ip address w.w.w.w m.m.m.m
encapsulation ppp
async default ip address b.b.b.b
async mode interactive
ppp authentication chap
Where w.w.w.w is the IP address (Cisco), m.m.m.m is the mask number (Cisco), and b.b.b.b is the IP
address (Router).
You can use the same username/password for CHAP validation, that you used to log in.
4. Choose between show and other non-privileged troubleshooting commands displayed when you
enter “?,” or enter PPP using the command:
ppp default /routing /compress.
This combination of options is comfortable for most network managers. When you dial into the port,
you are prompted with:
User Access Verification
Username: xxxxx
Password:
Router>
Alternatively, you can block access to the command prompt by selecting async mode dedicated. You can
even drop straight into PPP when the modem answers.We have found that access to the command
prompt is valuable for debugging after the initial configuration, and that it is easy to write a login script
to issue the “ppp” command. Refer to the sample login script provided after the next section.
Dialing Out (Cisco to Modem to Router)
Dialup PPP support for Cisco’s asynchronous AUX port is a fairly new feature, and most Cisco owners
aren’t familiar with it.
The following configuration statements were taken from a working configuration. To fully understand
each statement, we recommend familiarizing yourself with the Cisco commands, using the Cisco
technical documentation.
Dialing out is more difficult than dialing in, because first you must enable IP packet filtering. To
enable IP packet filtering, on the Cisco router:
1. Define a dummy filter that allows everything:
configure
access-list 101 permit any
dialer-list 1 protocol ip permit
113
ASYNC ROUTER AR-P, AR-5, AND SYNC ROUTER USER’S MANUAL
2. Define a dialer chat script to place calls to the Router. The following command will work with almost
any V.34 modem, and must be entered on a single line:
[configure]
chat-script dial-v34 ABORT ERROR ABORT BUSY "" ATZ
OK "ATDT \T” TIMEOUT 60 CONNECT \c
The first two argument pairs indicate that if ERROR or BUSY messages are posted from the modem
side, dialing must be abandoned and restarted on the next triggering event. More such keywords can
be added.
The following are pairs of expect this and then send this:
\T—means insert the telephone number here.
\c—an end-of-script marker which means don’t send anything at this point.
" " sends a carriage return.
3. The line and interface definitions are similar to dial-in, but with the triggers for dialing out added:
[configure]
username xxxxx password yyyyy
line aux 0
login local
modem inout speed
38400 flowcontrol hardware
access-class 101 out
script dialer dial-v34
interface async 1
ip address a.a.a.a m.m.m.m
encapsulation ppp
async default ip address b.b.b.b
async mode interactive
ppp authentication chap
dialer in-band
dialer string 555-1234
dialer group 1
where a.a.a.a is the IP address number (Cisco), m.m.m.m is the mask number (Cisco), b.b.b.b is the IP
address (Router), and 555-l234 is the phone number (Router).
Cisco dialer script for Router
Because almost everything can be customized, the following Router dialer script is not guaranteed to
work for everyone. However, the following Router dialer script has been tested for dialing into a Cisco
system with the previous configuration (Step 3).
114
ASYNC ROUTER AR-P, AR-5, AND SYNC ROUTER USER’S MANUAL
Create this dialer script in an ASCII file and copy it to the Router boot diskette. Use the dialup script
command to configure your Router to use this dialing script.
# CISCO.DCF
send “AT\r”
wait 1000 “OK”
send $PHONE
connect
send “\r\r” 100
wait l0000 “Username:”
send $LOGIN_NAME
wait 1000 “Password:”
send $LOGIN_PWD
send “ppp\r”
wait 2000 “MTU is 1500 bytes”
status up
D.4 IPX Synchronous Routers
This information only applies to the Sync Router.
When connecting a Router to multiprotocol routers from other vendors, we recommend running the
synchronous links in standard PPP mode (called IPXCP).
D.5 TCP/lP Synchronous Routers
D.5.1 CONFIGURE ROUTER TO USE PPP
Although each type of router may have a preferred, proprietary link encapsulation method, they all
allow PPP as an alternative, so consider using PPP. Refer to your router’s documentation to find the
exact command to select PPP encapsulation.
D.5.2 CONFIGURE ROUTER TO USE RIP
Each type of router also has a preferred internal routing protocol, such as IGRP or OSPF, but they all
allow using RIP as an alternative on a specific network. Again, refer to your vendor’s documentation to
find the exact command to configure the router for RIP.
D.5.3 ASSIGN SUBNET TO PPP CONNECTION IF NECESSARY
The Router doesn’t require you to assign a subnet number to the PPP connection between two routers
(via modem or leased line), although some routers do. If you want to connect to a router that requires
you to assign a subnet number to the PPP connection, then on the Router:
1. Assign a subnet number for the link between the two routers. On the Router, use the ifconfig sync0
address/bits up command.
2. Configure the Router to use the other router’s address (on that link) as the remote IP address.
3. Complete the Router configuration process.
4. Save the Router’s configuration.
Some routers (such as Wellfleet®) may require you to explicitly insert the remote node’s IP address in
an “adjacent host” table.
115
ASYNC ROUTER AR-P, AR-5, AND SYNC ROUTER USER’S MANUAL
D.5.4 TELEBIT NETBLAZER AND PN
If you are connecting a Router to a Telebit NetBlazer or PN (Personal Node) router, and have enabled
IPX routing in both systems, you must disable PPP IPXCP compression, because the Router currently
doesn’t interoperate with the NetBlazer’s IPXCP compression.
To disable PPP IPXCP compression, issue the following command to the Telebit Netblazer or PN:
ppp
options interface ipxcp compress off
and then save the configuration by entering:
save
D.6 Interoperability with CSU/DSUs
This information only applies to the Sync Router.
This section shows how to configure CSUs (channel service units) and DSUs (digital service units) for
use with the Sync Router. Recommended switch settings are intended only for interoperation with the
Sync Router. The CSU/DSUs are listed alphabetically.
D.6.1 BLACK BOX® CSU/DSU MS, EAZY® CSU/DSU MS, ADTRAN DSU III AR
These three CSU/DSUs provide synchronous service over DDS (digital data service), DDSII (DDS
secondary channel services), or SW56 (switched-56) lines.
Connect the Sync Router to the Primary V.35 DTE connector. Use the following configuration
information when using the front-panel keypad:
Local network options:
LOOP RATE: 56K, no secondary channel
NETWORK TYPE: DDS or SW56
CLOCK SOURCE:
if on a DDS, FROM NETWORK;
or
if on a point-to-point private network,
set one to MASTER, and the other to FROM NETWORK.
Local DTE options:
DTE rate:
Connector Type:
Data Format:
DTE CMD:
Transmit clock:
CS options:
Anti-Stream:
CD options:
TR options:
SR options:
116
DTE 56K/57.6K
V.35
SYNCHRONOUS
V.25 SYNC
NORMAL
follow RS
timer OFF
normal
idle when OFF
forced ON
ASYNC ROUTER AR-P, AR-5, AND SYNC ROUTER USER’S MANUAL
You can configure the dialer and test options if you wish. However, if you are using SW56, the Router
will act as a dialer.
D.6.2 ADTRAN ISU 128
The Adtran ISU 128 provides service over a leased digital network. ISDN network termination is built
into the ISU 128, eliminating the need for an NT1.
Connect the Sync Router to the V.35 interface, and set the DIP switches to V.35 (both should be UP).
Before setting up the equipment, verify your operating mode. The Router Sync+ supports the following:
• for a 64K line: CLEAR CHANNEL SYNC or BONDING SYNC
• for a 56K line: CLEAR CHANNEL SYNC or BONDING SYNC
• for a LEASED 56K: CLEAR CHANNEL SYNC
• for a LEASED 64K: CLEAR CHANNEL SYNC
• BONDING: Bandwidth ON Demand.
• CLEAR CHANNEL: The entire channel (line) is provided to the Sync Router without regard to data
format or protocol.
Use the front-panel keypad to configure the ISU 128 as follows:
Network options:
The network options depend upon whether or not you are using a leased line or a SW56. Configure the
leased line as a leased line, and configure SW56 as a dial line. If you are using a dial line, contact your
service provider to find out the switch type.
• Call Type: Data 56Kbps for SW56
• Dial Options: set to V.25 HDLC
• Auto Answer: ON
DTE options:
• Set to Synchronous
• DTE bit rate: Set to same as NETWORK CALL TYPE (56000 or 64000)
• RTS options: force RTS
• CTS: 1Ms delay
• CD: CD if call up
• DSR: forceDSR
• Transit clock: normal
Protocol options:
• If using a leased line, set to clear channel.
117
ASYNC ROUTER AR-P, AR-5, AND SYNC ROUTER USER’S MANUAL
D.6.3 CM-1056E, LARSE S5600, RACAL-MILGO 4556
The CM-1056E, Larse S5600, and Racal-Milgo 4556 are all nearly identical CSU/DSU’s, and are used
exclusively for leased-line operation. Set the switch settings as follows (the numbers are not given,
because they vary from model to model):
Switch Function
Setting
CTS
OFF (follows RTS from DTE)
DTE
OFF
Remote digital loopback
ENABLED
Stream
OFF
RTS
OFF (gets RTS from DTE)
DSR loopback
ON, data during loopback
Circuit assurance
ENABLED
Clocking
internal on one side of the line, external on the other
Before performing any back-to-back testing, obtain a 2-pair (4 wire) RJ-45 cross-over cable, with pin 1
connected to pin 8, and pin 2 connected to pin 7.
If these CSU/DSUs will be used on a public data network (instead of a leased line), set the clocking
function to OFF, because the CSU/DSUs will receive their timing from the DDS network.
D.6.4 MOTOROLA TA220/TA220K
The Motorola® TA220s provide service over ISDN lines, but do not provide internal termination, and so
require a NT1 connection. The TA220/220k’s can be used simultaneously with other ISDN equipment
over the same digital line.
Using the V.35 adapter provided with the TA220, connect the Router Sync+ to the RS-232 port #1 on
the TA220. Configure the TA220 for V.35 operation.
Using the TA220’s front keypad, load the factory-default setting 0. Set the SWITCH CONFIG options,
according to the type of service available. Contact your service provider for more information about the
switch type.
After loading the factory default, change the PORT CONFIG OPTIONS as specified:
DTE options:
• port 1:
SYNCHRONOUS 1
• speed:
56K or 64K
• DTE CMD and MESSAGE OPTIONS:
set to V.25 HDLC
• DTE PIN OPTIONS:
set DCD to NORMAL PROTOCOL
• OPTIONS:
118
set to NONE or BOND
ASYNC ROUTER AR-P, AR-5, AND SYNC ROUTER USER’S MANUAL
D.6.5 OTHER CSU/DSUS
If your DSU/CSU is not any of the models previously listed, use the following generic settings:
• Timing: the line speed being used (56 Kbps, 64 Kbps)
• Synchronous/Asynchronous: Synchronous
• RTS: normal
• DSR: on or forced on
119
ASYNC ROUTER AR-P, AR-5, AND SYNC ROUTER USER’S MANUAL
Appendix E: Glossary
ARP—address resolution protocol. Provides IP-to-Ethernet address mapping. ARP dynamically binds a highlevel IP address to a low-level physical hardware address. ARP is used only across a single physical
network and is limited to networks that support broadcasts.
asynchronous—Method of data communication in which transmission is not synchronized by a clocking
signal.
asynchronous transfer mode (ATM)—The SONET standard for a packet-switching transfer-mode
technique which uses packets (cells) of fixed lengths. Also referred to as “BISDN” and “cell ray.”
auto-answer mode—After successful verification of a calling workstation’s password, client enters autoanswer mode anticipating a response from the Router.
backbone—The primary connectivity mechanism of a hierarchically distributed system. All systems
connected to an intermediate system on the backbone are connected to each other. This does not
prevent systems from setting up private arrangements with each other to bypass the backbone for
reasons of cost, performance, or security.
back-end—A system that provides services for another system is often referred to as a back-end. In many
cases, the term is synonymous with the term “server.”
baud—The number of times per second the signal can change on a transmission line. Typically,
transmission lines use only two signal states, effectively making the baud rate equal to the number of bits
per second that can be transferred.
B channel—A 64-Kbps information-carrying channel that comprises one element of the ISDN
technology definition.
BOOTP—BOOTstrap protocol. Allows a workstation to obtain its IP address dynamically from a host or file
server instead of statically.
boot, boot up—To start a computer. Often used to indicate starting the Router.
bps—Bits per second. Modem signal transmissions are measured in bps.
bridge—A device that connects two or more networks and passes packets between them. Bridges
normally operate at the physical network level. For example, an Ethernet bridge connects two physical
Ethernet cables and forwards packets that are not locally addresses from one cable to the other.
broadcast—Transmitting a packet to all connected nodes on a network.
byte—A binary representation of a data character, usually consisting of 8 bits.
CHAP—Challenge-handshake authentication protocol is used to verify the identity of the peer using a 3-way
handshake. This is done upon initial link establishment.
CO—Central office. The phone-company entity that a WAN interface (modem or sync) connects to.
client—A user who dials into the Router to get access to the network. The client software is the
application that facilitates this process.
120
ASYNC ROUTER AR-P, AR-5, AND SYNC ROUTER USER’S MANUAL
client access shift—The interval of time a Router allows remote clients to access the LAN attached to the
Router. Client access to the Router (and the LAN) is configured relative to the client access shift: access
IN (during) the client access shift, access OUT (not during) of the client access shift, and access BOTH
in and out (all day) of the client access shift.
client database—The Router client database can store information for a maximum of 100 clients. The
client database is manipulated by the client command. The database includes: client name, client
password, callback phone number, time filter, connect quota, and idle timeout.
connect quota—Each client may have a per-day time quota placed on its access to the network. The perday usage is not stored in the user database; thus any accumulated usage will be reset to zero if the
Router is rebooted. The current dial-out quota is accumulated only on clients configured for security
callback. Once a quota has been reached, a syslog message is generated to provide an audit trail of user
activity.
CSLIP—Compressed SLIP. A variation of SLIP where the IP header information is compressed.
CSU/DSU—Channel service unit/data service unit, also known as a digital modem. CSU/DSUs are used to
connect the Router (and similar devices) to leased lines such as Digital Data Service (DDS) or Switched56 service.
cycle power—To turn the Router (or other device) off, and then on.
daemon—A UNIX service process analogous to a NetWare NLM or a DOS TSR.
domain—A part of the naming hierarchy of the Internet. A domain consists of a sequence of names or
labels separated by periods, referred to as “dots.”
DNS—Domain naming system. Provides a mechanism for naming resources in such a way that the names
are usable in different hosts, networks, protocol families, internets and administrative organizations.
DOS—Disk operating system. The operating system used on IBM PCs and clones.
dotted-quad notation—Format for representing a 32-bit IP address consisting of four 8-bit decimal
numbers separated by periods.
DTE—Data terminal equipment. Normally refers to a console.
dual-stack functionality—Multiple protocols operating on the same client.
dynamic routing—When a client connects or disconnects, the Router adds or deletes a route to the
appropriate routing table. For IPX, this allows the route to propagate to other connected networks,
when RIP and SAP updates are transmitted. For IP, this will allow clients to communicate to networks
through other interfaces.
email—Electronic messages sent between two computers on a LAN or Internet-connected network.
Ethernet—A LAN protocol and physical connection. Connection media may be coaxial or twisted-pair
cable.
FTP—File-transfer protocol, used for transferring files between TCP/IP machines. Also known as “ftp.”
gopher—A first-generation service designed to hyperlink various Internet service offerings, regardless of
their physical location.
hop count—A unit of measure typically equal to traversing a router. Hops are the number of routers
between transmitting and receiving host.
121
ASYNC ROUTER AR-P, AR-5, AND SYNC ROUTER USER’S MANUAL
routervu—A command enabling the RouterVu feature available on IPX networks that allows you to
remotely log into the Router over the LAN without having a console directly attached to the Router.
ICMP—Internet control message protocol. (1) A sub-protocol of IP at the network layer, allowing IP to
exchange control information with other IP machines. It automatically reports unusual network
conditions such as routing errors and network congestion. (2) Automatically reports unusual network
conditions such as routing errors and network congestion. ICMP is an adjunct to the internet protocol
(IP) and is often used to help diagnose and solve network problems.
idle timeout—Each client may specify the amount of time allowed to elapse without data transmission,
before the Router disconnects the line. Once the line is disconnected, the client must re-establish its
connection to a server or host computer. The reconnection policy is determined solely by client
software.
internet—(1) Physically, a collection of packet switching networks connected by routers along with
protocols allowing them to function logically as a single, large, virtual network. (2) The collection of
networks and routers, including the ARPANET, MILNET, and NSFnet that uses TCP/IP protocol suite
and function as a single, cooperative virtual network. The Internet provides universal connectivity and
three levels of network services: unreliable, connectionless packet delivery; reliable full duplex stream
delivery; and application-level services like e-mail that build on the first two. The Internet reaches many
universities, government research labs, military installations, and commercial enterprises.
internet address—The 32-bit address assigned to hosts participating in the Internet using TCP/IP.
interoperability—The ability of software and hardware to operate on multiple machines from multiple
vendors, to communicate meaningfully and in a coordinated manner without the implications of a
master-slave relationship.
IP address—A decimal representation of a four-part hexadecimal number. The four parts are separated
by dots. Each part has a value between 0 and 255, and the whole defines both a network and a particular
IP machine on that network.
IP—Internet protocol. Provides routing and communication services that allow messages to be transmitted
between nodes on networks. IP also defines the Internet datagram as the unit of information passed
across the Internet. Provides the basis for Internet connectionless, best-effort packet delivery service.
IPX—Internet packet exchange protocol. The network-layer protocol defined by Novell for use with NetWare.
IPXWAN—internet packet exchange protocol for WANs.
LAN—Local area network. Consists of interconnected computers in close proximity of one another, not
requiring long distance carriers or telephone connections to communicate. The physical-site area is
limited by the degradation of signals through the connection media.
login—A process whereas a user or device provides a name and password to gain access to another
device. In order to configure a Router, you have to log into it as root, and provide a root password. Once
logged on, you have system-administration privileges.
122
ASYNC ROUTER AR-P, AR-5, AND SYNC ROUTER USER’S MANUAL
MIB—Management information base, used to manage networks as part of SNMP. Specified in RFC-1098.
modem—A receiving and transmitting device used in pairs to transmit data over telephone lines. The
modem in the computer transmitting data modulates the digital computer signal to an analog form.
When receiving the analog signal, the paired modem in the remote computer demodulates the digital
signal out of the received signal and passes it to its computer.
modem port—Characterized by an RJ-11 standard telephone jack outlet and the identification word
LINE on the back of the Router.
Mosaic—A WWW browser originally developed by the National Center for Supercomputing Applications
(NCSA). Mosaic natively supports group and private annotation for WWW site entries, inline graphics
display, and context-dependent fonts. It can be configured to make use of external viewers for everything
from GIF images to MPEG movies, including digital stereo sound. Mosaic is an ideal application to access
the global Internet. It is distributed as freeware through FTP on the Internet and is available in a
commercial package from Spyglass Systems. Many IP applications vendors plan to or already have
licensed Mosaic.
NetWare—LAN networking software from Novell.
network—A group of computers physically linked together that can communicate with one another.
NIS—Network information service. Sun Microsystems’ second generation IP-to-host name mapping scheme.
It is similar to DNS.
network number—An identification used to group network nodes. All host on the same LAN share the
same network number.
node—A hardware device on a network. PCs, printers, and routers are examples of nodes.
NT-1—An NT-I is a hardware entity that provides an electrical interface between the user equipment and
the digital subscriber line.
packet—Term used for a unit of a data transmission envelope. The envelope contains to and from
addresses and control codes for handling the data contents.
PAP—Password authentication protocol. Provides a simple method for a peer to establish its identity using a
2-way handshake during initial link establishment. PAP is not a robust authentication method. Passwords
are sent over the circuit “in the clear”—that is, in text format—and there is no protection from playback.
ping—Packet internet gopher. A command that sends ICMP messages to test the existence of another IP
machine. Superior implementations return additional diagnostic information, such as round trip time.
protocol—Rule structure describing communication procedures on a network. Protocols pertain to
physical connections and transport level connections.
PPP—Point-to-point protocol, as specified in RFC 1661, was derived from the earlier work on serial-line IP
(SLIP). PPP is an efficient serial IP connectivity protocol that offers significant advantages over SLIP,
such as dynamic option negotiation and the ability tn carry multiple protocols.
PSTN—Public switched telephone network: the telecommunications service provider in your area.
rate adaption—The process of adjusting for different ISDN B-channel speeds. Even though ISDN
operates at a 64K line speed, many North American long-distance ISDN connections use leased lines that
operate at 56K, and the ISDN software must adjust for the different speeds.
123
ASYNC ROUTER AR-P, AR-5, AND SYNC ROUTER USER’S MANUAL
RARP—Reverse address-resolution protocol. Permits a workstation’s logical IP address to be determined by its
physical MAC-layer Ethernet or token-ring address. Also known as “reverse address-resolution service.”
remote access—Software allowing a remote PC user to attach any file server on the network as though it
were a local node. The servers reside on the host side.
remote client—A software package that enables remote personal computers, laptops, and workstations to
dial into a Router and access services on the LAN (attached to that Router).
Remote Office—The current remote client package provided with the Async Router AR-5. Remote office
enables your PC to become a remote node on a LAN and access services on that LAN (through the
Router).
RFC—Request for comment. A TCP/IP document available from the Network Information Center.
RIP—Routing information protocol. The protocol used by Berkeley 4.3 BSD UNIX systems to exchange
routing information among a network of computers. IPX uses a similar protocol of the same name (RIP)
to relay routing information. IPX RIP is not compatible with IP RIP.
rlogin—remote login. An alternative to Telnet which provides for direct execution of UNIX commands on
a host from the client machine’s command line.
router—An intelligent device linking two networks together using the same network layer protocol. The
router reads destination addresses of packets routed to it, and sends packets to local hosts or other
routers.
routing table—A table maintained by the router of destinations and other router addresses quantified by
metrics.
SAP—Service advertising protocol. Used with IPX, SAP allows nodes that provide services (print and file
servers) to advertise to other nodes.
S-Bus—In ISDN basic-rate applications, the S-bus is the 4-wire bus on the user side of the digital
subscriber loop, where the user equipment (TEs) is terminated.
SCHAP—Security CHAP for the Async Client is used to support security callback. A modem configured
for client access attempts to negotiate CHAP, PAP, then SCHAP verification.
security callback—Only available for use with Async clients, the security callback feature requires a client
to be located at a specific phone number, in order to gain access to the Router. First the client dials into
the Router and is verified. Next, the Router hangs up the line and calls the client back, at the
preconfigured callback phone number. Security callback effectively enables the client to shift the cost of
the call, from the client to the Router. It also enhances network security by requiring a client to be
located at a specific phone number, in order to gain access to the network.
serial terminal—Input device connected to the console port on the Router interface card used for
system administration.
SLIP—Serial-line internet protocol. Allows IP to operate over serial (dial-up) lines. Requires a relatively highspeed (9.6 Kbps or faster) connection.
SMTP—Simple mail-transfer protocol. The Internet standard protocol for transferring electronic-mail
messages from one machine to another. SMTP specifies the way in which two mail systems interact and
the format of control messages they exchange to transfer mail.
SNMP—Simple network management protocol. A protocol used to manage internetworks.
124
ASYNC ROUTER AR-P, AR-5, AND SYNC ROUTER USER’S MANUAL
socket—An IP socket is created when an IP port on a host machine makes a connection to an IP port on
a client machine. IP sockets are ephemeral by nature. When a standard request port has formed a socket
connection to a standard services port, additional requests for access to that port may be denied,
retiming the “Socket request denied” error message, which is often seen when attempting connections
to popular Internet WWW host sites.
SPID—Service profile identification. An additional identification number used along with the local
directory number on some North American ISDN lines. This number and its local directory number
must be programmed into the ISDN equipment so the equipment can register the numbers with the
Central Office ISDN switch whenever they are running.
SPX—Sequenced packet exchange. The guaranteed-delivery version of IPX from Novell.
subnet—For routing purposes, IP networks can be divided into logical subnets by using a subnet mask.
Values below those of the mask are valid addresses on the subnet.
switched service—Also known as switched-56 service. This is a type of nonleased line.
synchronous—As in synchronous serial lines, refers to a mode of data transmission in which a clock
signal (or embedded clock) is used to coordinate sender and receiver.
TA—terminal adapter. An end-user device on the ISDN. Used to interface the Router (and similar
devices) to an ISDN line. The terminal adapter can be a conversion device to connect a non-lSDN device
(analog telephone) to the ISDN.
TCP—transmission control protocol. Responsible for packet reception verification, data integrity, packet
sequencing and maintaining connections. Provides sequenced and verified transmission of messages
between systems. TCP is part of the TCP/IP protocol suite, and often is used to link UNIX-based LANs.
TCP/IP—transmission control protocol/internet protocol. A standard for communicating among different
computer systems. The computer systems may have different operating systems and hardware.
telnet—A utility that emulates a terminal on a network as though it were a console directly connected to
the Router. It enables users to log into a remote system directly from a local terminal and local login
session. With telnet, the user can conduct a session and run application programs as if the user’s
terminal were directly connected to the host. Telnet requires the use of TCP/IP.
transparent access—When a remote device or network appears to be a local node on the LAN.
UDP—User datagram protocol, provides for user access to low overhead connectionless datagram
communications. UDP is part of the TCP/IP protocol suite.
U Interface—In North America, the U Interface is a reference point between an NT1 and a digital
subscriber line.
uudecode—UNIX-to-UNIX decode allows binary files that have been uuencoded into ASCII text files to
be translated back into binary files.
uuencode—UNIX-to-UNIX encode allows binary files to be translated into pure ASCII text files,
permitting them to be transmitted as email through SMTP. It is widely used in the Internet’s USENET
email-based interest-group conferences.
V.32—Full-duplex 9600 bps over dial-up telephone lines with fallback to 4800 bps when line quality does
not allow 9600-bps operation.
V.32bis—Communication specification for data transfer speeds at full duplex to 14400-bps over dial-up
telephone lines with fallback to 12,200/9600/7200/4800 and full compatibility with V.32.
125
ASYNC ROUTER AR-P, AR-5, AND SYNC ROUTER USER’S MANUAL
V.42—Communication specification for error control. Error control is automatic, and retransmission
after link errors is transparent to the user.
V.42bis—Communication specification for data compression. Allows compression of data streams with
repetitive data by a factor of a maximum of four.
WinSock—Microsoft Windows Sockets. Application programming interface (API) that defines a means by
which IP sockets are mapped to the Windows environment. Exploiting it requires a vendor-specific
WinSock driver, which is always implemented as Windows dynamic link library (DLL). Multiple
conflicting WINSOCK.DLL files in a search path can cause IP driver and application errors or failure.
WinSock is an evolving standard.
WAN—Wide-area network. A computer network involving one or more remote networks connected over
long-distance telephone lines.
WWW—World-wide web. The Web, or W3, a service providing multimedia-capable hyperlinks between
Internet resources, regardless of their physical location.
10BASE2—Thin Ethernet. Uses RG-58 coaxial cable.
10BASE-T—Twisted-pair Ethernet. Uses UTP (unshielded twisted-pair) data cable with RJ-45 connectors.
126
ASYNC ROUTER AR-P, AR-5, AND SYNC ROUTER USER’S MANUAL
Appendix F: Installation Reference
This Router
Purchased from______________________________
Date______________
Technical Support phone number___________________________
Root and root passwords
On a Router, the login name for the administrator is root, and the associated password is the root
password, which is factory-set to nothing (press <RETURN>). After configuring your Router, remember
to set up a root password.
Name and password syntaxes
All types of names
• have 1 to 31 alphanumeric characters
• do not contain periods “.”
• start with a letter
• are case-sensitive
All types of passwords are 6 to 15 alphanumeric characters, and are case-sensitive.
Router Parameters
For any Router, record all Router parameters in this section.
Table F-1. Parameters Required for Each Type of Router.
Model
Interfaces Supported
Sync Router
eth0, modem0, sync0
Async Router AR-P
eth0, modem0
Async Router AR-5
eth0, modem0, modem1, modem2, modem3, modem4
Plan how many modems will be used for LAN-LAN access and how many modems will be used for
User-LAN (client) access. In the table below, record how each modem will be used. (Remember that
only the AR-5 model has five modems, the others have only modem0.)
127
ASYNC ROUTER AR-P, AR-5, AND SYNC ROUTER USER’S MANUAL
How will modem be used?
modem0
modem1
modem2
modem3
modem4
for LAN-to-LAN link, or for
client access or for fallback
on Sync Router (record
one use only)
Router
Serial Number____________________(required for Technical Support)
Name___________________________
Your root password_________________
Your link password________________
Date and time (yymmddhhmm[.ss] format)
IPX routing enabled? ___yes ___no
IP routing enabled? ___yes ___no
Home or Branch Office Designation (pick one only)
(Default route through):
___eth0 ___sync0 ___modem0
NOTE
When you are configuring a Router with multiple WAN interfaces, you will be asked
during the configuration of each WAN interface, whether that interface is to be the
default route, until you choose one. Indicate the default route through the WAN
interface that connects to the home office, by answering “yes” when configuring that
interface. After you have set the default route through a WAN interface, the question is
not asked again during the remainder of the configuration process.
128
ASYNC ROUTER AR-P, AR-5, AND SYNC ROUTER USER’S MANUAL
Ethernet Parameters
NOTE
* Starred items are only required in networks that use TCP/IP.
Ethernet (eth0) port
IPX parameters are only required for IPX (NetWare) networks;
IP parameters are only required for IP networks.
IPX Network Number (Ethernet 802.3)____
IPX Network Number (Ethernet II)____
IPX Network Number (Ethernet 802.2)____
IPX Network Number (SNAP)____
*IP address_______________________________________(d.d.d.d)
*IP subnet mask___________________________________(d.d.d.d)
*Syslog IP address_________________________________(d.d.d.d)
Optional information for Domain Name Servers:
*IP addresses:
1)___________________________________(d.d.d.d)
2)___________________________________(d.d.d.d)
*Domain suffix___________(e.g., for rns.com, enter rns.com)
Client Authentication Method (choose one method only)
1
__Names and passwords on Router
or
2
__SecurID server (TCP/IP is required)
Obtain a valid username and SecurID card from your SecurID administrator.
or
3
__RADIUS server
(TCP/IP is required. You can use more than one RADIUS server)
IP address____________________________(d.d.d.d)
Obtain a valid username and password from your RADIUS administrator.
129
ASYNC ROUTER AR-P, AR-5, AND SYNC ROUTER USER’S MANUAL
Sync Parameters
NOTE
* Starred items are only required in networks that use TCP/IP.
sync0 port
For Sync Router only
Type of synchronous line: _______________________
[leased (DDS) or non-leased (SW-56)]
Leased-line carrier___________________________(for example, Sprint, MCI, AT&T)
• Remote Site via a leased line:
Name___________________________
Authentication____________(None or PAP or CHAP)
Link password (PAP or CHAP only)_______________
*IP address__________________________(d.d.d.d)
*IP subnet mask_______________________(d.d.d.d)
OR
• Remote Site via a non-leased line:
Phone number____________________
Maximum phone usage =__________minutes (default is 1440 minutes)
Name___________________________
Authentication____________(None or PAP or CHAP)
Link password (PAP or CHAP only)_______________
*IP address__________________________(d.d.d.d)
*IP subnet mask_______________________(d.d.d.d)
130
ASYNC ROUTER AR-P, AR-5, AND SYNC ROUTER USER’S MANUAL
Modem Parameters
NOTE
* Starred items are only required in networks that use TCP/IP.
modem0 port Type_______________(Router, remote client, Portmaster, NetBlazer, Other)
Remote phone number______________________
Maximum phone usage =__________minutes (default is 1440 minutes)
• If the Remote System is a Router:
Name___________________________
Their link password (PAP or CHAP only)___________
*IP address______________________________________(d.d.d.d)
*IP subnet mask______________________________________(d.d.d.d)
• If the Remote System is NOT a Router or remote client, you also need:
Authentication______________(None or PAP or CHAP)
Login name____________________
Login password_________________
Dialer script filename (if Remote System is “Other”)______________
OR
• If this modem is to be used for remote client access
*Optional IP address______________________________________(d.d.d.d)
modem1 port For Async Router AR-5 only
Type_______________(Router, remote client, Portmaster, NetBlazer, Other)
Remote phone number______________________
Maximum phone usage =__________minutes (default is 1440 minutes)
• If the Remote System is a Router:
Name___________________________
Remote’s link password (PAP or CHAP only)___________
*IP address______________________________________(d.d.d.d)
*IP subnet mask______________________________________(d.d.d.d)
• If the Remote System is NOT a Router or remote client, you also need:
Authentication______________(None or PAP or CHAP)
131
ASYNC ROUTER AR-P, AR-5, AND SYNC ROUTER USER’S MANUAL
Login name____________________
Login password_________________
Dialer script filename (if Remote System is “Other”)______________
OR
• If this modem is to be used for remote client access
*Optional IP address______________________________________(d.d.d.d)
modem2 port
For Async Router AR-5 only
Type_______________(Router, remote client, Portmaster, NetBlazer, Other)
Remote phone number______________________
Maximum phone usage =__________minutes (default is 1440 minutes)
• If the Remote System is a Router:
Name___________________________
Their link password (PAP or CHAP only)___________
*IP address______________________________________(d.d.d.d)
*IP subnet mask______________________________________(d.d.d.d)
• If the Remote System is NOT a Router or remote client, you also need:
Authentication______________(None or PAP or CHAP)
Login name____________________
Login password_________________
Dialer script filename (if Remote System is “Other”)______________
OR
• If this modem is to be used for remote client access
*Optional IP address______________________________________(d.d.d.d)
modem3 port
For Async Router AR-5 only
Type_______________(Router, remote client, Portmaster, NetBlazer, Other)
Remote phone number______________________
Maximum phone usage =__________minutes (default is 1440 minutes)
• If the Remote System is a Router:
Name___________________________
Their link password (PAP or CHAP only)___________
*IP address______________________________________(d.d.d.d)
132
ASYNC ROUTER AR-P, AR-5, AND SYNC ROUTER USER’S MANUAL
*IP subnet mask______________________________________(d.d.d.d)
• If the Remote System is NOT a Router or remote client, you also need:
Authentication______________(None or PAP or CHAP)
Login name____________________
Login password_________________
Dialer script filename (if Remote System is “Other”)______________
OR
• If this modem is to be used for remote client access
*Optional IP address______________________________________(d.d.d.d)
modem4 port
For Async Router AR-5 only
Type_______________(Router, remote client, Portmaster, NetBlazer, Other)
Remote phone number______________________
Maximum phone usage =__________minutes (default is 1440 minutes)
• If the Remote System is a Router:
Name___________________________
Their link password (PAP or CHAP only)___________
*IP address______________________________________(d.d.d.d)
*IP subnet mask______________________________________(d.d.d.d)
• If the Remote System is NOT a Router or remote client, you also need:
Authentication______________(None or PAP or CHAP)
Login name____________________
Login password_________________
Dialer script filename (if Remote System is “Other”)______________
OR
• If this modem is to be used for remote client access
*Optional IP address______________________________________(d.d.d.d)
133
ASYNC ROUTER AR-P, AR-5, AND SYNC ROUTER USER’S MANUAL
Client Parameters Planner
Use this sectionn to plan your client accounts in the client database on the Router.
For the Router
Client Access shift ______________________________
(0000 - 2400 MTWRFSU)
For each Client
Client name:_____________________________ (<8 characters)
Client password:__________________________ (<8 characters)
Account enabled:
Yes____ No____
Access time: ____In ____Out ____Both
Time quota (1440 min max):_____________________
Idle time (240 sec default, 86400 sec max):________________________
Callback phone number: ______________________
Assigned from within the client software
*IP address:_________________________________
IPX network number:____________________________
Client name:_____________________________ (<8 characters)
Client password:__________________________ (<8 characters)
Account enabled:
Yes____ No____
Access time: ____In ____Out ____Both
134
ASYNC ROUTER AR-P, AR-5, AND SYNC ROUTER USER’S MANUAL
Time quota (1440 min max):_____________________
Idle time (240 sec default, 86400 sec max):________________________
Callback phone number: ______________________
Assigned from within the client software
*IP address:_________________________________
IPX network number:____________________________
NOTE
* Starred items are only required in networks that use TCP/IP.
Router Link Passwords Example/Worksheet
Look over the link password configuration example below, and use the worksheet on the next page. Use
this worksheet to plan and coordinate the dialup router names and link passwords for up to five LAN-toLAN remote sites. After installation is complete, store this worksheet in a safe place, and have it on hand
when calling Technical Support.
Link Password Example
newyork
boston
This system:
Name (Async Router) : newyorksitename
•
•
•
Link Password ( ) : newyorklinkpassword
Remote site information:
Name (Async Router) : bostonsitename
•
•
•
Link password ( ) : bostonlinkpassword
This system:
Name (Async Router) : bostonsitename
•
•
•
Link Password ( ) : bostonlinkpassword
Remote site information:
Name (Async Router) : newyorksitename
•
•
•
Link password ( ) : newyorklinkpassword
Figure F-1. Link Password Example.
135
ASYNC ROUTER AR-P, AR-5, AND SYNC ROUTER USER’S MANUAL
Link Passwords Worksheet
Your Site
Site A
Remote Sites
On Router
Site A Name______________________________
Site A Password ___________________________
Remote Site via modem0
Site0 Name ______________________________
Site0 Link Password _______________________
Site0
For this system:
Site0 Name ______________________________
Site0 Link Password _______________________
Remote Site
SiteA Name ______________________________
SiteA Link Password _______________________
Remote Site via modem1
Site1 Name ______________________________
Site1 Password____________________________
Site 1 Router
For this system:
Site1 Name ______________________________
Site1 Link Password _______________________
Remote Site
SiteA Name ______________________________
SiteA Link Password _______________________
Remote Site via modem2
Site2 Name ______________________________
Site2 Link Password _______________________
Site2 Router
For this system:
Site2 Name ______________________________
Site2 Link Password _______________________
Remote Site
SiteA Name ______________________________
SiteA Link Password _______________________
Remote Site via modem3
Site3 Name ______________________________
Site 3 Link Password_______________________
Site3Router
For this system:
Site3 Name ______________________________
Site3 Link Password _______________________
Remote Site
SiteA Name ______________________________
SiteA Link Password _______________________
Remote Site via modem4
Site4 Name ______________________________
Site4 Link Password _______________________
Site4 Router
For this system:
Site4 Name ______________________________
Site4 Remote Password ____________________
Remote Site
Site4 Name ______________________________
Site4 Link Password _______________________
Site A _____________________________________
Site1 ______________________________________
Site2 ______________________________________
Site4
NOTE
If PAP or CHAP is used, names and
link passwords are required.
136
MARCH 1996
LRA001A-R2
LRA005A-R2
LRS002A-R2
Async Router AR-P
Async Router AR-5
Sync Router
REFERENCE GUIDE
137
ASYNC ROUTER AR-P, AR-5, AND SYNC ROUTER USER’S MANUAL
CONTENTS
1. Quick Reference .....................................................................................................................141
1.1 Command Syntax .............................................................................................................141
1.2 Interface Addresses ..........................................................................................................141
1.3 Generic Commands .........................................................................................................142
1.4 IPX-only Commands ........................................................................................................145
1.5 TCP/IP-only Commands .................................................................................................146
1.6 RouterVu Commands.......................................................................................................149
1.6.1 Synopsis ...................................................................................................................149
1.6.2 Subcommands ........................................................................................................149
1.6.3 Examples .................................................................................................................150
1.7 General Info .....................................................................................................................151
1.7.1 Router Modes and Prompts ...................................................................................151
1.7.2 Frequently-used Commands ..................................................................................151
1.7.3 CONFIG.NET Example .........................................................................................152
1.7.4 About IP Addresses.................................................................................................153
1.7.5 IPX Filter Examples................................................................................................154
2. Generic Commands ................................................................................................................155
2.1 Interface addresses...........................................................................................................156
2.2 access shift.........................................................................................................................156
2.3 asystat ................................................................................................................................157
2.4 authenticate ......................................................................................................................159
2.5 client..................................................................................................................................160
2.6 config ................................................................................................................................162
2.7 date....................................................................................................................................162
2.8 default_mode....................................................................................................................163
2.9 dialup ................................................................................................................................164
2.10 help ..................................................................................................................................170
2.11 history...............................................................................................................................170
2.12 hostname .........................................................................................................................171
2.13 logout ...............................................................................................................................171
2.14 memory ............................................................................................................................172
2.15 monitor ............................................................................................................................172
2.16 passwd ..............................................................................................................................172
2.17 performance ....................................................................................................................173
2.18 ppp ...................................................................................................................................174
2.18.1 Interface Status.....................................................................................................177
2.18.2 Compression Method Selection ..........................................................................177
2.18.3 LCP Negotiation ...................................................................................................177
2.18.4 IPCP Negotiation Subcommands ........................................................................179
2.18.5 IPXCP Negotiation...............................................................................................180
2.18.6 Authentication of Users .......................................................................................180
2.19 ps ......................................................................................................................................181
2.20 reboot...............................................................................................................................182
2.21 start/stop .........................................................................................................................182
2.22 tip .....................................................................................................................................183
2.23 trace..................................................................................................................................183
2.24 tux ....................................................................................................................................184
2.25 update ..............................................................................................................................185
2.26 version ..............................................................................................................................186
2.27 who ...................................................................................................................................186
138
CONTENTS
3. IPX-only Commands ...............................................................................................................188
3.1 Interface Addresses ..........................................................................................................188
3.2 IPX Addresses ...................................................................................................................189
3.3 Reserved Destination Socket Numbers...........................................................................189
3.4 IPX Server Types ..............................................................................................................190
3.5 IPX Packet Types ..............................................................................................................191
3.6 filter...................................................................................................................................191
3.7 ifconfig ..............................................................................................................................194
3.8 ipx......................................................................................................................................195
3.9 netstat.................................................................................................................................196
3.10 ping ..................................................................................................................................197
3.11 ripfilter .............................................................................................................................198
3.12 route.................................................................................................................................201
3.13 sap ....................................................................................................................................205
3.14 sapfilter ............................................................................................................................208
3.15 spoof.................................................................................................................................211
3.16 tcp/ip ...............................................................................................................................212
4. TCP/IP-only Commands .........................................................................................................213
4.1 Interface Addresses ..........................................................................................................214
4.2 arp .....................................................................................................................................214
4.3 domain ..............................................................................................................................216
4.4 filter...................................................................................................................................217
4.5 icmp...................................................................................................................................220
4.6 ifconfig ..............................................................................................................................221
4.7 ip........................................................................................................................................223
4.8 ipx......................................................................................................................................224
4.9 netstat................................................................................................................................224
4.10 ping ..................................................................................................................................225
4.11 rip .....................................................................................................................................226
4.12 route.................................................................................................................................228
4.13 snmp.................................................................................................................................230
4.14 syslog ................................................................................................................................232
4.15 tcp.....................................................................................................................................234
4.16 traceroute.........................................................................................................................235
4.17 udp ...................................................................................................................................236
Appendix A: System Messages ....................................................................................................237
A.1 Syslog Messages ................................................................................................................238
A.1.1 CHAP Group ..........................................................................................................238
A.1.2 Dialer Group ..........................................................................................................238
A.1.3 Filter Group............................................................................................................242
A.1.4 IPX Group ..............................................................................................................243
A.1.5 PAP Group..............................................................................................................243
A.1.6 RIP Group ..............................................................................................................243
A.1.7 Security Callback Group (SCHAP).......................................................................243
A.1.8 SNMP Group ..........................................................................................................244
A.1.9 System Group ..........................................................................................................244
A.2 Console Messages.............................................................................................................244
A.2.1 ARP Group .............................................................................................................244
A.2.2 DIALER Group ......................................................................................................244
A.2.3 FILTER Group........................................................................................................245
A.2.4 IFCONFIG Group ..................................................................................................246
A.2.5 IPFILTER Group ....................................................................................................246
139
ASYNC ROUTER AR-P, AR-5, AND SYNC ROUTER USER’S MANUAL
A.2.6 IPROUTE Group ...................................................................................................246
A.2.7 IPX Group ..............................................................................................................247
A.2.8 PING Group ...........................................................................................................248
A.2.9 PPP Group ..............................................................................................................248
A.2.10 RIP Group ............................................................................................................248
A.2.11 SNMP Group ........................................................................................................248
A.2.12 SYSTEM Group .....................................................................................................249
A.2.13 TCP Group ............................................................................................................250
A.2.14 TIP Group .............................................................................................................250
A.2.15 TRACE Group .......................................................................................................251
A.2.16 TRACEROUTE Group .........................................................................................251
Appendix B: Dialing Scripts .......................................................................................................252
B.1 Standard Dialing Procedure ...........................................................................................252
B.2 Dialer Script Procedure...................................................................................................253
B.3 Sample Dialer Script ........................................................................................................254
B.4 Logging into Remote Systems Using Dialer Scripts.......................................................255
B.4.1 Use tip to Test Dialing ...........................................................................................256
B.4.2 Sample Remote Login Dialer Script .....................................................................256
B.4.3 Sample Remote Login Dialer Script Using Macro Strings ..................................257
B.5 Modem Control Signals...................................................................................................258
Appendix C: Release Notes ........................................................................................................260
140
ASYNC ROUTER AR-P, AR-5, AND SYNC ROUTER REFERENCE MANUAL
1. Quick Reference
This chapter provides a quick reference guide for the commands, describing syntax, Router modes and
prompts, and frequently used commands.
The chapters that follow describe each command and its parameters in detail.
• Generic commands
• IPX-only commands
• TCP/IP-only commands
• RouterVu commands
• General info
1.1 Conventions Used in This Chapter
Bold typeface—Commands and keywords. Enter the syntax exactly as shown.
Italics—Mandatory parameters that have values. Enter text or numbers in place of the italicized
parameter name.
[ ]—Brackets enclose optional parameters.
|—Vertical bars separate mutually exclusive keywords. Enter only one keyword.
[ x | y | z ]—Choose one and only one of the options (X, Y, Z), or choose none.
{ }—Curly brackets enclose a list of mandatory, mutually exclusive parameters. You must choose one.
[x] [y] [z]—You must choose at least one item (X, Y or Z), and you may choose more than one at the
same time, e.g, x y.
< >—Chevrons enclose a list of mandatory parameters. Choose at least one, although you can include
more than one.
<RETURN>—At the end of each command press <RETURN> to execute it. For clarity, some
commands are shown on more than one line; do not press <RETURN> until the end of the
command.
1.2 Interface Addresses
The iface[/frame_type] parameters indicate the interface and frame type. iface is specified as one of the
following, depending on your Router model: eth0, sync0, modem0, modem1, modem2, modem3, or
modem4. If eth0 is selected, the frame_type can be specified as part of the interface, and can be either
802.3, 802.2, SNAP or II (for Ethernet Type 2). Use a slash to separate the iface from the frame_type, e.g.,
eth0/802.2. If left unspecified, the default frame_type is 802.3.
For the Ethernet interface, the iface parameter is a string of the form eth0/frame_type. For all other
interfaces, iface is of the form modemX. Examples are:
ethN
Ethernet N interface, raw 802.3 frame type
ethN/802.3
Ethernet N interface, raw 802.3 frame type
141
ASYNC ROUTER AR-P, AR-5, AND SYNC ROUTER REFERENCE MANUAL
ethN/II
Ethernet N interface, Ethernet Type II frame type
ethN/SNAP
Ethernet N interface, 802.3 SNAP frame type
ethN/802.2
Ethernet N interface, 802.3 LLC frame type
modem N
Modem N interface; modems are numbered from 0 to 4, depending on your
Router model. See the User’s guide for details.
sync0
Synchronous interface (Sync Router only)
1.3 Generic Commands
?
Display mode (TCP/IP or IPX) command summary
access shift shiftstart shiftstop [MTWRFSU]
access shift 0
access shift
Time is in hhmm format
asystat [iface [iface] ...]
Display interface statistics
authenticate add server host[:port]
authenticate delete server host
authenticate method {radius | securid | local}
authenticate retry count
authenticate show [securid]
authenticate test user-id
authenticate timeout value_in_seconds
Display or change authentication
method for clients
client add [-e] [clientname]
client delete [all | clientname]
client list [clientname]
client modify [clientname]
Display/edit client information
config firewall iface
config modify
config reset
config save
config show
Modify/display Router configuration
date [yymmddhhmm[.ss]]
Display/set date
default_mode [{ ipx | tcp/ip}]
Display/set default protocol mode for
commands at login
Line mode dialer commands
dialup iface client [dummy secs]
dialup iface demand phone# [secs]
dialup iface demand_backoff phone# [secs]
dialup iface leased_answer
dialup iface leased_originate
Other dialer commands
dialup iface backup add phone#
dialup iface backup delete phone#
dialup iface backup primary [on | off]
dialup iface dial_log [flush]
142
Sets Router’s primary shift time
ASYNC ROUTER AR-P, AR-5, AND SYNC ROUTER REFERENCE MANUAL
dialup iface dtr_dial [dummy secs]
dialup iface hangup
dialup iface idle_time secs
dialup iface inactive
dialup iface incoming [dummy secs]
dialup iface init init_string
dialup iface keepup phone# [secs]
dialup iface login_name name
dialup iface login_pwd password
dialup iface logprompt [on | off]
dialup iface once phone# [secs]
dialup iface quota mins [-e]
dialup iface reset
dialup iface script file
dialup [iface] status
dialup iface volume [{off | low | medium | high}]
dialup iface warning mins
group g_iface addslave iface
group g_iface rmslave iface
group g_iface fragment [{on | off | threshold}]
group g_iface hangup
group g_iface status
Configure/display dial-up parameters
Configure/display multilink parameters
help [command]
Display mode (TCP/IP or IPX)
command summary
history
Display numbered list of previous
commands
!n
!str
!!
Execute command n
Execute last command beginning with
“str”
Execute previous command
hostname [name]
Set or display Router’s name
logout
^D
Terminate Router session
Terminate current Router session
memory freelist
memory sizes
memory status
memory threshold
Display memory usage statistics
monitor errors
monitor isdnerrors
monitor performance
Display interface statistics
passwd [-n newname] [user]
passwd -r hostname
Change either user or link password
Change password for RADIUS server
performance
Display performance statistics every
10 sec
143
ASYNC ROUTER AR-P, AR-5, AND SYNC ROUTER REFERENCE MANUAL
Interface status
ppp i&g_iface
i&g_iface: for single or group ifaces
Compression method selections
ppp i&g_iface ccp {local | remote} method [stacker | history num | none | allow [on | off] ]
LCP negotiation
ppp iface lcp {local | remote} accm [ bitmap | allow [on | off] ]
iface: single ifaces only
ppp iface lcp {local | remote} authentication [ chap | pap | none | allow [on | off] ]
ppp iface lcp {local | remote} acfc [ on | off | allow [on | off] ]
ppp iface lcp {local | remote} pfc [ on | off | allow [on | off] ]|
ppp iface lcp {local | remote} magic [ on | off | value | allow [on | off] ]
ppp iface lcp {local | remote} mru [ size | allow [on | off] ]
ppp iface lcp {local | remote} default
ppp iface lcp timeout [seconds]
LCP negotiation for Multilink
ppp g_iface lcp {local | remote} mrru [ {on | off | size | allow [{on | off}] }] g_iface: group ifaces only
IPCP negotiation
ppp i&g_iface ipcp {local | remote} address [ on | off | allow [on | off] ]
ppp i&g_iface ipcp {local | remote} compress [ tcp slots [flag] | none | allow [on | off] ]
IPXCP negotiation
ppp i&g_iface ipxcp {local | remote} compress [ cipx [slots [flag]] | none | allow [on | off] ]
ppp i&g_iface ipxcp {local | remote} network [ on | off | allow [on | off] ]
ppp i&g_iface ipxcp {local | remote} node [ on | off | allow [on | off] ]
ppp i&g_iface ipxcp {local | remote} default
Authentication of users
ppp i&g_iface chap user username [password]
ppp i&g_iface pap user username [password] Display/configure point-to-point protocol
ps
Display status of running processes
reboot
Drop all connections & restarts Router
start {discard | echo | ftp | rip | snmp | telnet}
stop {discard | echo | ftp | rip | snmp | telnet}
Start or stop a server
tip iface
Make a connection to a modem interface
trace iface [ in | out | hex | ppp | packet | up | > filename]
tux status
Trace data on an interface
Display status of all TCP under IPX connections
update [iface] now
update [iface] init [{on | off}]
update [iface] periodic [[+] time1 [time2 [time3 [time4]]]]
update [iface] timeout [mins]
Update/synchronize networks
144
ASYNC ROUTER AR-P, AR-5, AND SYNC ROUTER REFERENCE MANUAL
version
Display Router’s software version number
who
Display information about logged-in users
1.4 IPX-only Commands
filter add name
{ [-i iface[/frame_type]]
[-s src_addr ]
[-d dest_addr]
[-p pkt_type]
}
-t {allow | deny | nodial}
[-f {inbound | outbound}]
[-o {before | after} existing_name]
filter delete name
filter {enable | disable}
filter flush
filter move name [{before | after} existing_name]
filter status
Configure/display IPX filters
ifconfig [iface[/frame_type] [network net_number] [{up | down}] ]
ifconfig iface [speed [bps]]
Configure interface for IPX
ifconfig [iface [linkaddr directory_number [/SPID] ]
]
Configure interface to assign isdn
address and distinguishes between
multipoint and point-to-point
connection via SPID assignment
ipx broadcast
ipx internal_net [internal_net_number]
ipx optimize [on | off]
ipx priority
ipx routing [{enable | disable}]
ipx spx
ipx trace
Display/configure IPX protocol parameters
netstat [-m] [-p {ipx | rip | sap | pburst}] [-s]
Display IPX network statistics
ping server_name
Send diagnostic packets to test operation
ping router_name
of remote Routers, clients or servers
ping network.node_address
ping -s {server_name | router_name | network.node_address} [count ]
ripfilter add name
{ [-i iface [/frame_type] ]
[-q query_type]
[-n network]
}
-t {allow | deny | nodial}
[-f {inbound | outbound}]
[-o {before | after} existing_name]
[-h {hopcount}]
ripfilter delete name
ripfilter {enable | disable}
ripfilter flush
ripfilter move name [{before | after} existing_name]
ripfilter status
Configure/display RIP filters
145
ASYNC ROUTER AR-P, AR-5, AND SYNC ROUTER REFERENCE MANUAL
For Modem Interfaces Only
route add dest_net iface [metric] [ticks]
For Ethernet Interface Only
route add dest_net iface [/frame_type] router_addr [metric] [ticks]
For any Interface
route
route broadcast iface [/frame_type] [{enable | disable}]
route -f
route delete dest_net
route update iface [/frame_type] [{enable | disable}]
Configure/display IPX routing tables
sap
sap add name iface [/frame_type] server_type server_addr [hops]
sap broadcast iface [/frame_type] [{enable | disable}]
sap delete name
sap -f
sap roundrobin [{on | off}]
sap update iface [/frame_type] [{enable | disable}] Configure/display IPX static SAP entries
sapfilter add name
{ [-i iface[/frame_type]]
[-q query_type]
[-s server_type]
[-n server_name]
}
-t {allow | deny | nodial}
[-f {inbound | outbound}]
[ -o {before | after} existing_name]
[-h {hopcount}]
sapfilter delete name
sapfilter {enable | disable}
sapfilter flush
sapfilter move name [{before | after} existing_name]
sapfilter status
Configure/display SAP filters
spoof iface watchdog [{on | off}]
Enable/disable protocol spoofing
tcp/ip [tcp/ip_command param ...]
Change to internet mode (TCP/IP)
1.5 TCP/IP-only Commands
arp [host_addr]
arp -a
arp -d host_addr
arp -f
arp -p [{on | off}]
arp -s host_addr ether_address [pub]
domain addserver host_addr [host_addr...]
domain dropserver host_addr [host_addr...]
domain cache list
domain cache size [count]
146
Configure/display ARP table
ASYNC ROUTER AR-P, AR-5, AND SYNC ROUTER REFERENCE MANUAL
domain listservers
domain query host_addr
domain retry [count]
domain suffix [domain_suffix]
domain cache list
domain cache size [count]
Configure/display the Internet Domain Name
Service
{ [-s {[src_addr/bits] [src_port]} ]
[-d {[dest_addr/bits] [dest_port]} ]
[-p proto ]
[-l [{syslog | trap | both}] ]
[-i iface]
[-f {inbound | outbound}]
}
-t {allow | deny | nodial | unreach}
[-o {before | after} existing_name]
filter add name
filter delete name
filter {enable | disable}
filter flush
filter move name [{before | after} existing_name]
filter spoof iface [{enable | disable}] [syslog] [trap]
filter status
filter try src_addr [-s port] dest_addr [-d port ] [-p proto]
Configure/display IP filter information
icmp status
Display ICMP protocol status
ifconfig [iface
[address addr [/bits] ]
[broadcast addr]
[metric [hops]]
[mtu size]
]
[netmask mask]
[peer addr[/bits]]
[ rip [{active | passive | off}] ]
[ speed [bps] ]
[{up | down}]
ifconfig [iface [linkaddr directory_number [/SPID
Configure network interface parameters
]]
]
Configure interface to assign ISDN
address and distinguish between
multipoint and point-to-point
connection via SPID assignment
ip address [host_addr]
ip routing [{enable | disable}]
ip rtimer [seconds]
ip status
ip ttl [hops]
Configure/display IP protocol information
ipx [ipx_command param ...]
Change to IPX mode
netstat [-a] [-s] [-r] [-m]
Show protocol and memory statistics
ping dest_addr
ping dest_addr [packet_size]
ping -s dest_addr [packet_size] [count]
Send ICMP ECHO_REQUEST packets to network nodes (to
see if the remote node is up and running)
rip accept router_addr
147
ASYNC ROUTER AR-P, AR-5, AND SYNC ROUTER REFERENCE MANUAL
rip add host_addr seconds [flags]
rip delete host_addr
rip duplicate [{on | off}]
rip merge [{on | off}]
rip netmask add net_addr/net_bits/subnet_bits
rip netmask delete net_addr/net_bits
rip netmask list
rip refuse router_addr
rip request router_addr
rip status
Configure/display RIP Protocol
route
route add dest_addr[/bits] iface router_addr [metric]
route addprivate dest_addr[/bits] iface router_addr [metric]
route add default iface router_addr [metric]
route delete dest_addr[/bits] [iface]
route [-f]
route lookup dest_addr
Configure the routing tables
snmp set community community_name [-p {ro | rw}] [-t {on | off}]
snmp delete community community_name
snmp set acl community_name host_addr [host_addr ...]
snmp delete acl community_name host_addr [host_addr ...]
snmp set authtrap {on | off}
snmp set contact contact_string
snmp set location location_string
snmp status [-c [ community_name ] ]
Configure/display the Simple Network Management Protocol
syslog {on | off}
syslog address host_addr
syslog class class_value
syslog message message_string
syslog priority priority_value
syslog status
tcp irtt [milliseconds]
tcp mss [size]
tcp reset tcb_addr
tcp rtt tcb_addr rtt
tcp status [tcb_addr]
tcp window [size]
Configure/display system logging utility
Configure/display Transmission Control Protocol information
traceroute [-w wait] [-m max_ttl]
Trace the route to a host
[-q nqueries ] host_addr
udp status
1.6 RouterVu Commands
148
Display User Datagram Protocol status
ASYNC ROUTER AR-P, AR-5, AND SYNC ROUTER REFERENCE MANUAL
RouterVu enables users on IPX networks to log into and configure the Router remotely. RouterVu is a
client/server application, with the client code running in DOS on a PC, and the server code running on
the Router.
RouterVu commands can only be used on a PC-DOS or compatible computer. Do not enter RouterVu
commands on the Router console.
The RouterVu utility works over IPX networks. Using RouterVu from a PC, you can:
• configure local Routers using a PC on the local Ethernet
• configure remote Routers
• troubleshoot network problems from both ends (Routers)
You can select a specific Router by name or by IPX address (network number).
1.6.1 SYNOPSIS
routervu name | address
Establishes interactive session with specified
routervu -n
Displays all Routers on network
routervu -a
Displays all Routers and servers on network
routervu -p {name | address} Pings once to Router specified
routervu -o filename
Saves keystrokes to script file specified
routervu
Displays routervu command syntax
1.6.2 SUBCOMMANDS
routervu
Displays routervu command syntax.
routervu name
Establishes an interactive session with a Router called name.
routervu -n
Displays the names of all connected Routers.
routervu -a
Displays the names of all connected Routers and servers.
routervu -p {name | address}
Pings once to the Router specified. Ping sends echo packets over the network to solicit a response from
a Router or Netware server, thereby determining connectivity.
routervu -o filename
Saves the keystrokes to the script file filename.
1.6.3 EXAMPLES
• Display routervu command syntax.
149
ASYNC ROUTER AR-P, AR-5, AND SYNC ROUTER REFERENCE MANUAL
routervu
HOPPERVU Version 1.2 May 1, 1995
RNS (c) 1995 All Rights Reserved.
Usage HOPPERVU
HOPPERVU
HOPPERVU
HOPPERVU
HOPPERVU
target
-n
-a
-p
-o
Establish interactive session
Show Router names
Show Router and Server names
ping
script_file Keep script file
• Connect to a remote Router named Kansas.
routervu kansas
• List to screen all available Routers.
routervu -n
HOPPERVU (c) 1995 RNS
Building list...
anole
00001111.02CF1F80060A (Router)
archer
00001111.02CF1F800197 (Router)
arnie
00001111.02CF1F8006C8 (Router)
dinosaur 99990001.02CF1F80010F (Router)
dragon
12340001.02CF1F8001FC (Router)
hqs 00001111.02CF1F8004E7 (Router)
NDNLL1
00000011.02CF1F8001B7 (Router)
• List to screen all available Routers and servers.
routervu -a
HOPPERVU (c) 1995 RNS
Building list...
anole
archer
arnie
DAFFY
DAFFYII
dinosaur
dragon
hqs
00001111.02CF1F80060A
00001111.02CF1F800197
00001111.02CF1F8006C8
00DAFF00.000000000001
00004321.000000000001
99990001.02CF1F80010F
12340001.02CF1F8001FC
00001111.02CF1F8004E7
(Router)
(Router)
(Router)
(IPX File Server)
(IPX File Server)
(Router)
(Router)
(Router)
• Copy all screen output to the file named session.now. This is useful to when trying to document the
configuration of a remote Router.
routervu -o session.now
• Connect to a Router (boston), capture all screen displays and put them into a file (bstscrns).
routervu boston -o bstscrns
150
ASYNC ROUTER AR-P, AR-5, AND SYNC ROUTER REFERENCE MANUAL
1.7 General Info
1.7.1 ROUTER MODES & PROMPTS
The Router is always in either TCP/IP mode or IPX mode. The prompt on your terminal indicates the
current mode of the Router (indicated by (tcp/ip)router_name> or (ipx)router_name>).
TCP/IP commands are only valid in TCP/IP mode (indicated by the prompt (tcp/ip)router_name>).
IPX commands are only valid in IPX mode (indicated by the prompt (ipx)router_name>). Generic
commands can be entered in either TCP/IP or IPX mode.
1.7.2 FREQUENTLY-USED COMMANDS
About TCP/IP and IPX modes
Your Router has two modes: tcp/ip for TCP/IP networks and ipx for IPX networks. An interface (isdn1,
eth0, modem0, modem1, etc.) can fail in tcp/ip mode, and still be operating in ipx mode
simultaneously, up in both modes, or vice versa. When running both TCP/IP and IPX protocols
simultaneously, as you bring an interface up or down, take note of whether your Router is in tcp/ip or
ipx mode when you issue the command. If you want the interface up or down in the other mode as well,
change to the other mode and issue the command again. To change modes, enter tcp/ip or ipx alone or
as a prefix to the command.
These commands are often used to collect status information:
• asystat—Displays interface statistics. Use asystat to check current interface status (modem LEDs) and
settings.
• config show—Displays the current configuration as a list of individual commands that execute when
the Router starts. When you contact customer support, have a printed output of config show
available to answer questions regarding your Router’s current configuration.
• dialup iface status—Displays the current dialup settings for a given interface. Dialup tells you how the
line is configured (“client” for CLIENT-to-LAN operation and either “demand,” “demand_backoff,”
etc., for LAN-to-LAN operation), total connection time, and quota information.
• ifconfig iface—Display and configure IPX and TCP/IP network interface parameters. Note that the
output of ifconfig depends on the current mode of operation of the Router (either tcp/ip or ipx).
Use ifconfig to determine Ethernet frame types, assigned IP addresses on interfaces (tcp/ip mode
only), or IPX network numbers (ipx mode only), and the number of packets sent and received.
• netstat -m—Displays the amount of free memory, number of failed memory allocations, number of
memory errors, and network usage statistics. This information may be useful when contacting
Technical Support.
• netstat -s—Displays TCP/IP or IPX network statistics, depending upon the current mode (tcp/ip or
ipx) of the Router. The netstat output is more detailed than the ifconfig network statistics output,
and may also be useful when contacting Technical Support.
• version—Displays the current release level of the Router software.
Commands often used to troubleshoot problems include:
• config modify—Use config modify to check and verify your Router’s current configuration. Config
modify prompts you through the configuration process and supplies defaults based on the current
configuration.
151
ASYNC ROUTER AR-P, AR-5, AND SYNC ROUTER REFERENCE MANUAL
• dialup modemX dial_log—Use to view the types of packets that caused the last 5 dials.
• history—Use history to check and verify all commands entered since you logged on.
• ifconfig iface—Use ifconfig to view the status of the interfaces.
• performance—Displays performance statistics, dynamically updated every ten seconds.
• ping IP_address—For TCP/IP sites only. When trying to determine if an IP routing problem exists, use
ping first. Use ping to verify that you can connect out (of your network). For example, try “ping
rns.com.” Ping sends an ICMP echo-request packet to a remote host. A successful ping means that
the packet was able to get to the remote host, and the remote host knew how to send the packet back
to the Router.
• ppp iface—Use ppp to display and configure Point-To-Point Protocol (PPP) statistics. The Router uses
PPP to establish communication with remote devices. When used without optional parameters, ppp
iface displays information about the current state of authentication, and the status of the PPP
connection. Also use ppp to provide local and remote IP addresses, and to show if the line is
connected or not.
• tip iface—For TCP/IP sites only. Use tip to enter modem commands directly, i.e., to send modem
commands directly to the modem interfaces. Use tip when trying to determine if a particular modem
is functioning properly and responding to Router commands. Tip is similar to a “Terminal Mode”
session on a communications program, and can only can be used on an inactive modem interface. To
make an interface inactive, type “dialup modemX inactive,” where modemX is the interface desired.
After your tip session, bring the modem interface back up by issuing either a “dialup modemX
demand” or “dialup modemX demand_backoff” if the line is configured for LAN-to-LAN, or “dialup
modemX client” if the line is configured for User-to-LAN.
• trace iface—Use trace to view packet traffic across the Router, as it happens. Trace also displays the
headers of all packets seen on that interface, which is useful when determining which types of
packets are moving across a specific interface. Packets are shown with their origin and destination
addresses.
• traceroute IP_address—For TCP/IP sites only. Use traceroute to show you the route taken to reach an
IP address. Try “traceroute rns.com.” Traceroute displays each individual device that the Router is
sending packets through, to get to the remote ip_address. Use traceroute to determine if packets are
being routed correctly by the Router and the other routers on your network.
• update [iface] now—Use update to dial the modem or ISDN line and connect to the remote system
on a particular dialup interface. Use update to test the Router’s dialer script. Using update now with
no interface specified will dial all modem and ISDN lines.
1.7.3 CONFIG.NET EXAMPLE
At boot time, the Router executes the CONFIG.NET file on the Router boot diskette (much like a DOS
batch file). Each line in the CONFIG.NET file is a command that you can execute manually from the
system console (or telnet session, or terminal emulator).
The following CONFIG.NET file represents a simple Router configuration. If you decide to use parts
of it, make sure you use your own IP addresses and IPX network numbers.
CONFIG.NET file (supporting TCP/IP and IPX routing)
hostname Router
ip address 0.0.0.0
ifconfig console mtu 1500
ifconfig eth0 netmask 255.255.255.0 broadcast 0.0.0.255 mtu 1500
152
ASYNC ROUTER AR-P, AR-5, AND SYNC ROUTER REFERENCE MANUAL
ifconfig modem0 netmask 255.255.255.0 peer 0.0.0.0 mtu 1500
dialup modem0 demand 555-5555 240
dialup modem0 volume low
domain suffix rns.com
domain addserver 0.0.0.0
ppp modem0 lcp local auth chap
route add 0.0.0.0/0 modem0 0.0.0.0
route add default eth0
snmp set location “Computer Room”
snmp set contact “BBC Technical Support”
snmp set community public
start discard
start echo
start ftp
start telnet
start snmp
ifconfig console up
ifconfig eth0 up
ifconfig modem0 up
ipx
ipx routing enable
ifconfig eth0/802.3 network 00000001 up
ifconfig eth0/II network 00000002 up
ifconfig eth0/802.2 network 00000003 up
ifconfig eth0/SNAP network 00000004 up
ifconfig modem0 up
tcp/ip
The following table is generated by the previous CONFIG.NET file:
(tcp/ip)Router> route
Destination
Flags
Bits
Interface
Router/Next Hop
Metric Timer
Use
0.0.0.0
0.0.0.0
default
/0
/0
/0
modem0
eth0
eth0
0.0.0.0
1
0
1
0
0
0
0
0
0
3 Route entries
1.7.4 ABOUT IP ADDRESSES
Throughout many of the Router’s command descriptions, both Internet and Ethernet addresses are
specified as command parameters. IP addresses are specified in 4-byte Internet dotted-quad notation
(xxx.xxx.xxx.xxx), such as 128.66.16.100. When specifying subnet bits for an IP address, a /bits
parameter may be appended to the IP address. Only contiguous bits are supported for a Router subnet
mask. If no bit number is specified, 32 bits are assumed as default. Ethernet addresses are specified in
standard 6-byte Ethernet notation (xx:xx:xx:xx:xx:xx), such as 02:CF:1F:80:02:AB.
153
ASYNC ROUTER AR-P, AR-5, AND SYNC ROUTER REFERENCE MANUAL
1.7.5 IPX FILTER EXAMPLES
NetBios packets are broadcasted constantly from NetBios hosts, often raising the link on a Router
enough to incur unnecessary phone charges. The following filter blocks NetBios packets (destination
any.any.455) on all interfaces.
(ipx)kansas> filter add -d 0.0.455 -t deny
To block these packets on a single interface, like modem0, enter:
(ipx)kansas> filter add -i modem0 -d 0.0.455 -t deny
154
ASYNC ROUTER AR-P, AR-5, AND SYNC ROUTER REFERENCE MANUAL
2. Generic Commands
Generic Router commands function the same way in both network environments supported by the
Router: IPX and TCP/IP. If a command operates differently depending upon its network environment,
it is listed in a separate chapter. See Chapter 3, IPX-only Commands, and Chapter 4, TCP/IP-only
Commands.
The Router has a mode for each network type. The prompt on the screen reflects its current mode:
tcp/ip or ipx. Change modes by entering tcp/ip or ipx alone or as a prefix to the command.
• access shift
-display or change primary shift time for clients
• asystat
-display interface statistics for Router
• authenticate
-display or change authentication method for clients
• client
-display or change remote client data on Router
• config
-display or change Router configuration
• date
-display or change date
• default_mode
-display or set default protocol mode (ipx or tcp/ip)
• dialup
-display or change dialup parameters
• group
-display or change multilink parameters
• help
-display commands available
• history
-display last 25 Router commands issued
• hostname
-display or change name of Router
• isdn
-display or change ISDN protocol parameters
• logout
-terminate session with Router
• memory
-display memory usage statistics
• monitor
-display interface statistics
• passwd
-change user or link password for Router
• performance
-display real-time performance statistics
• ppp
-display or configure PPP protocol parameters
• ps
-display the status of running processes
• reboot
-drop all connections and restart Router
• start/stop
-start/stop a server (ftp, rip, snmp, telnet)
• trace
-display packet types sent or received on a interface
• tux
-display status of all TCP under IPX connections
• update
-update routing tables using RIP and SAP
• version
-display software release level of Router
• who
-display who is logged onto the Router
155
ASYNC ROUTER AR-P, AR-5, AND SYNC ROUTER REFERENCE MANUAL
2.1 Interface Addresses
The iface[/frame_type] parameters indicate the interface and frame type. iface is specified as one of the
following, depending on your Router model: eth0, sync0, modem0, modem1, modem2, modem3, or
modem4. If eth0 is selected, the frame_type can be specified as part of the interface, and can be either
802.3, 802.2, SNAP, or II (for Ethernet Type 2). Use a slash to separate the iface from the frame_type, e.g.,
eth0/802.2. If left unspecified, the default frame_type is 802.3.
For the Ethernet interface, the iface parameter is a string of the form eth0/frame_type. For all other
interfaces, iface is of the form modemX. Examples are:
ethN
Ethernet N interface, raw 802.3 frame type
ethN/802.3
Ethernet N interface, raw 802.3 frame type
ethN/II
Ethernet N interface, Ethernet Type II frame type
ethN/SNAP
Ethernet N interface, 802.3 SNAP frame type
ethN/802.2
Ethernet N interface, 802.3 LLC frame type
modem N
Modem N interface; modems are numbered from 0 to 4, depending on your
Router model. See the User’s guide for details.
sync0
Synchronous interface (Sync Router only)
2.2 access shift
Displays or changes the primary time clients can access a LAN through the Router
Syntax
access shift shiftstart shiftstop [MTWRFSU]
access shift 0
access shift
Description
The access shift command configures the hours and days of the week clients are allowed to access the
LAN through the Router. The access shift command does not affect LAN-to-LAN operations.
Clients can have individual access times assigned using the client add or client modify commands.
Access to the Router by a client depends upon the access shift assigned, and the access time value (in,
out or both) assigned to the client. A client assigned a value of access time - in will be able to access the
Router during the primary shift. A client assigned a value of access time - out will be able to access the
Router at any time outside the primary shift. A client assigned a value of access time - both will be able to
access the Router at any time (24-hour access).
Subcommands and parameters
access shift shiftstart shiftstop [MTWRFSU]
shiftstart—The time of day the primary shift starts specified in hhmm format using the 24-hour clock.
The default is 0800 or 8:00 a.m.
shiftstop—The time of day the primary shift stops specified in hhmm format using the 24-hour clock.
The default is 1700 or 5:00 p.m. The primary shift hours are the access time for a client with an
156
ASYNC ROUTER AR-P, AR-5, AND SYNC ROUTER REFERENCE MANUAL
access time equal to in. See the client access command.
[MTWRFSU]—The days of the week desired for primary shift.
• M - Monday
• T - Tuesday
• W - Wednesday
• R - Thursday
• F - Friday
• S - Saturday
access shift 0
Resets the primary access shift to the default 8 a.m. to 5 p.m., Monday through Friday.
access shift
Displays the currently defined primary shift.
Example
To set the primary shift hours from 8 a.m. to 9 p.m., Monday through Friday, enter:
access shift 800 2100 MTWRF
As a result of executing the above command, the OUT of shift hours become 9 p.m. to 8 a.m. Monday
through Friday, and, on the weekend, 24 hours per day.
See also
client access
client add
client modify
2.3 asystat
Displays Router interface statistics
Syntax
asystat [iface [iface]...]
asystat
Description
The asystat command displays various statistics compiled for the asynchronous interface (iface) specified.
Subcommands and parameters
asystat [iface [iface] ...]
Enter specific interface names for a display of their statistics only. Leave a space between interface names.
157
ASYNC ROUTER AR-P, AR-5, AND SYNC ROUTER REFERENCE MANUAL
iface
eth0, modem0-4, console
asystat
Enter asystat alone for a display of all modem interface statistics.
Example
A typical display of modem0 statistics is:
asystat modem0
(tcp/ip)pelican> asystat modem0
modem0: [NS16550A] [trigger 0x7e] [cts flow ctrl] [rlsd line ctrl] 115200 bps
MC: int 110
Port: 2f8
DTR On
RTS On
IRQ 3 (ENA)
CTS On
DSR On
RI Off
DCD Off
iir=c1 ier=0b MCR=0b LSR=60 MSR=30
RX: int 403487 chars 1364679 hw over 0 hw hi 0 fifo TO 169269 sw over0sw hi 0
TX: int 351054 chars 5057509 THRE TO 0
asyp->msr 38 count 0
MC: physical line status:
• int 0 – Number of modem control interrupts
• DTR Off – Data Terminal Ready signal status
• RTS Off – Request To Send signal status
• CTS Off – Clear To Send signal status
• DSR Off – Data Set Ready signal status
• RI Off – Ring Indicator signal status
• CD Off – Carrier Detect signal status
RX: interface receive statistics:
• chars 48 – number of bytes received
• hw over 0 – number of hardware receive overruns
• sw over 0 – number of software receive overruns
TX: interface transmit statistics:
• int 0 – number of transmit interrupts
• chars 101 – number of bytes transmitted
158
ASYNC ROUTER AR-P, AR-5, AND SYNC ROUTER REFERENCE MANUAL
2.4 authenticate
Select and configure authentication methods for dial-in clients
Syntax
authenticate add server host[:port]
authenticate delete server host
authenticate method {radius | securid | local}
authenticate retry count
authenticate show [securid]
authenticate test user-id
authenticate timeout value_in_seconds
Description
The authenticate command allows you to specify which authentication method to use for dialin clients,
and to manipulate the server database for non-local authentication methods. Modem ports can be
selected to support dial-in clients or to provide LAN-to-LAN services, but not both. Modem ports
selected to provide LAN-to-LAN service use the authentication method specified using the PPP
command (PAP, CHAP, SCHAP or none).
Subcommands and parameters
authenticate add server host[:port]
Authenticate add server is only available when the authentication method selected is RADIUS. Use
authenticate add server to add a server to the list of RADIUS servers who are consulted when the Router
verifies a dialin client’s name and password. If a port is not specified, the default RADIUS port of 1645 is
used. The host can be specified as a hostname (e.g. [email protected]) or as an IP address in dotted-quad
notation (e.g. 131.143.16.45).
authenticate delete server host
Authenticate delete server is only available when the authentication method selected is RADIUS. Use
authenticate delete server to delete a server from the list of RADIUS servers who are consulted when the
Router verifies a dialin client’s name and password. The host can be specified as a hostname (e.g.
[email protected]) or as an IP address in dotted-quad notation (e.g. 131.143.16.45).
authenticate method {radius | securid | local}
Use authenticate method to select or change the authentication method used when the Router verifies a
dialin client’s name and password. The local option enables the Router to use the Router’s client
database when authenticating dialin clients.
authenticate retry count
Use authenticate retry to specify the number of times that a client can attempt to log in, using a name and
password. The default number of attempts allowed is 3. This retry number only affects login attempts
prior to the start of the PPP protocol, and does not have any effect on the number of attempts allowed
during PAP and CHAP authentication. If you are using RADIUS or the local password file (Router), you
must also specify which PPP authentication protocol will be used. Use the ppp command:
ppp iface lcp local authentication [ chap | pap | none | allow [on | off] ]
authenticate show [securid]
159
ASYNC ROUTER AR-P, AR-5, AND SYNC ROUTER REFERENCE MANUAL
Use authenticate show to display the current authentication method selected, servers in use if any, and the
number of successful and unsuccessful login attempts by dial-in clients. If SecurID is being used,
additional configuration status is displayed.
authenticate test user-id
Use authenticate test to test the authentication method (RADIUS, SecurID or local) of a client.
authenticate timeout value_in_seconds
Use authenticate timeout to specify the timeout value used when the Router contacts a RADIUS or SecurID
server. The timeout value is the time that the client will wait, in the event that no servers reply, per
available server. The total timeout is the timeout value times the number of servers available. The
default timeout value per RADIUS server is 10 seconds. The default timeout value per SecurID server
depends on the each server’s configuration, but is typically 3 seconds.
2.5 client
Manipulate the Router client database
Syntax
client add [-e] [clientname]
client delete [all | clientname]
client list [clientname]
client modify [clientname]
Description
The client command allows the administrator to manipulate client account database records. Each client
record you manipulate has the following characteristics:
• client name
• client password
• account enabled
• access time
• time quota
• idle timeout
• callback phone#
The client database supports up to 100 clients. To permanently save modifications to the client
database, execute the config save command after you make changes with the client command. If no
name is supplied on the command network, you will be prompted for a client name.
Subcommands and parameters
client add [-e] [clientname]
Add a new client record to the database and specify its characteristics.
[-e] The express option adds clients automatically entering default values to access time (24 hours),
idle timeout (240 seconds or 4 minutes) and time quota (1440 minutes or 24 hours) so you do not need
to provide these values individually. This is the fastest way to add clients to the database.
160
ASYNC ROUTER AR-P, AR-5, AND SYNC ROUTER REFERENCE MANUAL
clientname—If you enter a clientname a new record is added to the database and you are prompted to
enter each of the client’s characteristics, i.e., password, etc. If you do not enter a client name, then you
will be prompted for the name and then the client characteristics. For convenience, once you are done,
you are prompted to add another client to the database. Do not use root, modem0, eth0 (interface names),
etc. as client names. Additional client characteristics are:
Client password—When you enter the password, keep in mind that it is case-sensitive in Router
applications and not case-sensitive in Async Client applications.
Account enabled—Allows the client to log on. Disabling the account allows the administrator to keep the
database entry for a specific client while temporarily preventing that client’s access. For example, this is
useful when a person is out of town or on vacation.
Access time—Confines a client’s Router access to certain times of the day. Specifies when a client is
allowed access to the Router, depending on what is defined by the Router’s client access shift command.
Access allowed during the client access shift is called “in”; access allowed outside of the client access shift
is called “out”; access at any time is called “both”. For each client, specify only one of the three values: in,
out, or both. The Router has only one client access shift used for every account in the database. The
default access time is 24 hours, meaning that access is allowed all day.
Time quota—Each client may have a daily time quota for access to the network. The time quota is only
activated for accounts with specified security callback number. The daily usage is stored for each client in
memory and can be examined using the client list command. The time quota is specified in minutes. The
default time quota is 1440 minutes or 24 hours.
Idle timeout—Disconnects a client after a certain amount of time has elapsed without data transmission.
The idle timeout is specified in seconds, with default set to 240 seconds or 4 minutes.
Callback phone #—Adds another level of access security. When a client calls, once the client is validated
and allowed access during the current shift, the Router examines the security callback number of that
client. If the client is an Async Client, the router:
• tells the client to disconnect
• calls back the client at the security callback number
Callback phone # is only available for Async Clients.
client delete [all | clientname]
Delete a specific client’s record or all clients’ records.
all—Enter all to delete all existing records.
clientname—Enter the specific client name whose record you wish to delete.
client list [clientname]
List a specific client’s record or, if you do not enter a name, list all clients’ records.
clientname—Enter the specific client name whose record you wish to display.
client modify [clientname]
Change an existing client record’s characteristics.
clientname—Enter the client name associated with the record you wish to change, and you are
prompted with the client characteristics. For convenience, after you modify one client record, you are
prompted for additional records to modify.
161
ASYNC ROUTER AR-P, AR-5, AND SYNC ROUTER REFERENCE MANUAL
2.6 config
Configures the parameters required for the Router to operate properly. More sophisticated
configurations must be accomplished with individual commands.
Syntax
config firewall iface
config modify
config reset
config save
config show
Description
config firewall iface
Configure an IP firewall on the iface interface. Refer to the User’s Manual for the list of IP filters used in
the firewall.
config modify
Modifies the current configuration. Displays the current setting for each configuration item as it is
entered and allows the user to change the value.
config reset
Resets the Router to its default state. This is useful if the administrator wants to completely clear out a
previous configuration. When this configuration is done, the Router is rebooted.
config save
Saves the current configuration including all items set by individual commands, so that the Router will
be properly configured at the next system start.
config show
Displays the current configuration as a list of individual commands executed when the Router is started.
2.7 date
Display or set the date
Syntax
date [yymmddhhmm [.ss]]
Description
Sets the Router clock’s current date and time to what you enter. Displays the clock’s current date and
time if you do not enter anything.
Subcommands and parameters
date [yymmddhhmm [.ss]]
162
ASYNC ROUTER AR-P, AR-5, AND SYNC ROUTER REFERENCE MANUAL
Enter values for the year, month, day, hour, minutes and seconds:
yy
final two digits of the year, for example, 1996 is 96
mm
the month number (1-12), for example, October is 10
dd
the day number in the month, 1-31
hh
is the hour number in a 24-hour system
mm (second) the second mm is the minute number
.ss
specifies seconds and is optional
The year, month, and day may be omitted. The current values are derived from the host clock and
supplied as defaults.
Examples
date 10080045
Sets the date to Oct 8, 12:45 AM.
2.8 default_mode
Sets or displays the default login command protocol mode
Syntax
default_mode [{ipx | tcp/ip}]
Description
Sets or displays the mode Router users access by default when they log in. Entered with no argument,
this command displays the current setting. The mode can be changed with the tcpip command.
Subcommands and parameters
default_mode [{ipx | tcp/ip}]
ipx
For an IPX network. This is the default.
tcp/ip
For a TCP/IP network
NOTE
config [reset | modify] sets the default start-up mode using the default_mode
command. The algorithm used specifies that if IP routing is enabled, the default mode
is “tcp/ip” otherwise, the default mode is ipx.
See also
config [reset | modify]
ipx
tcpip
163
ASYNC ROUTER AR-P, AR-5, AND SYNC ROUTER REFERENCE MANUAL
2.9 dialup
Configure/display the dialup parameters
Syntax
Line mode dialer commands
dialup iface client [dummy secs]
dialup iface demand phone# [secs]
dialup iface demand_backoff phone# [secs]
dialup iface leased_answer
dialup iface leased_originate
Other dialer commands
dialup iface backup add phone#
dialup iface backup delete phone#
dialup iface backup primary [on | off]
dialup iface dial_log [flush]
dialup iface dtr_dial [dummy secs]
dialup iface hangup
dialup iface idle_time secs
dialup iface inactive
dialup iface incoming [dummy secs]
dialup iface init init_string
dialup iface keepup phone# [secs]
dialup iface login_name name
dialup iface login_pwd password
dialup iface logprompt [on | off]
dialup iface once phone# [secs]
dialup iface quota mins [-e]
dialup iface reset
dialup iface script file
dialup [iface] status
dialup iface volume [{off | low | medium | high}]
dialup iface warning mins
164
ASYNC ROUTER AR-P, AR-5, AND SYNC ROUTER REFERENCE MANUAL
Description
The dialup command configures the dialup parameters for interface iface.
Subcommands and parameters
dialup iface client [dummy secs]
Sets the modem network to client mode. A network configured for client mode must have the dialup client
command present in the network configuration. After setting a network to client mode, the phone number,
idle, and quota fields are set to zero. When a client logs on, these fields are set to the values specified by
the client account.
iface modem0-4, sync0
[dummy secs]—Dummy is a nonfunctioning argument. Sets the time in seconds before the Router
hangs
up on the interface iface, when there is no traffic on that interface.
dialup iface demand phone# [secs]
Dials the phone number and then monitors the connection. If the remote device is down, and there is
output queued, Router dials again. If no output has been queued in secs seconds, Router disconnects
and resets the modem to ensure it is down. If a backup phone number is specified with dialup backup it
is attempted if the primary phone number is busy or does not answer.
iface modem0-4, sync0
phone#—The primary phone number of the remote device you want to monitor. A backup phone
number can be defined using the dialup backup subcommand.
secs The amount of time the Router waits for the remote device you are monitoring to connect and
queue responses before switching back to the primary number.
dialup iface demand_backoff phone# [secs]
Operates similarly to the demand subcommand except that no connections are attempted for two
minutes after a failed call attempt. One end should be configured demand and the other end should be
configured demand_backoff. This prevents a deadlock if both sides are trying to prepare for a call at the
same time. The configuration procedure automatically designates one side of a connection as demand
and one side as demand_backoff.
iface
modem0-4, sync0
phone#
The phone number of the remote device.
secs
The amount of time the Router waits for the remote device you are monitoring to
connect and queue responses before switching back to the primary number.
dialup iface leased_answer
When a link is established some types of leased lines require one end to be designated as the answering
end. Contact your phone company for more information about your leased line.
iface
modem0-4, sync0
dialup iface leased_originate
When a link is established some types of leased lines require one end to be designated as originate.
165
ASYNC ROUTER AR-P, AR-5, AND SYNC ROUTER REFERENCE MANUAL
iface
modem0-4, sync0
dialup iface backup add phone#
Adds a backup phone number for a dialup interface. The Router uses the backup phone number only
when the primary phone number fails to answer or is busy.
iface
modem0-4, sync0
phone#
Enter a backup phone number for times the remote device is busy or fails to answer.
dialup iface backup delete phone#
Removes the backup phone number for the remote device you specify and disables the backup function.
The Router uses the backup phone number when the primary phone number fails to answer or is busy.
iface
modem0-4, sync0
phone#
Enter the phone number of the remote device where you want to disable the backup
function.
dialup iface backup primary [on | off]
Configures the dialer to continue trying to reach the remote device by switching back to the primary
phone number if the backup does not answer, or by simply continuing to ring the backup number.
Several other configurations exist:
• dialup once—Configures the dialer to dial once
• dialup keepup—Attempts to keep the line up
• dialup demand—Dials only when a packet arrives destined for a host on the other side of the phone
network
• dialup incoming—Only allows incoming calls
• dialup demand_backoff—Disconnects and waits to see if the line is not idle when dialing is attempted
iface
modem0-4, sync0
on
Default. Select on for the Router to revert back to the primary phone number after
disconnecting the backup number on the next dialup.
off
Select off for the Router to continue using the backup phone number indefinitely.
dialup iface dial_log [flush]
Allows you to view the type of packets that caused the last five dials on the specified dialup interface. The
following fields from the packets are displayed: source address, destination address, source and destination port
or socket number, and protocol number (if applicable).
iface
modem0-4, sync0
flush
Erase entries in the dial log.
dialup iface dtr_dial [dummy secs]
166
CHAPTER
Used with synchronous ISDN TAs that do not support V.25bis dialing. We recommend you do not use
these types of ISDN TAs. This command is only valid for Sync Routers.
iface
sync0
[dummy secs]
Dummy is a nonfunctioning argument. Sets the time in seconds before the Router
hangs up on the interface iface, when there is no traffic on that interface.
dialup iface hangup
Immediately hangs up (breaks connection of) the interface iface.
dialup iface idle_time secs
Sets the time in seconds before the Router hangs up on the interface iface, when there is no traffic on
that interface.
dialup iface inactive
Terminates a dialer process, leaving the line in the DTR OFF state. In this case, no incoming or outgoing
calls may be made on the network. A new dialup command is required to re-activate the line. In some
installations the network should be reverted to a backup line using dialup demand.
iface
modem0-4, sync0
dialup iface incoming [dummy secs]
Allows only incoming calls on the line you specify. No attempt is made to dial out on this network.
iface
modem0-4, sync0
[dummy secs]
Dummy is a nonfunctioning argument. Sets the time in seconds before the Router
hangs up on the interface iface, when there is no traffic on that interface.
dialup iface init [init_string]
Shows or sets the modem initialization string executed each time the unit or modem restarts.
iface
modem0-4 (the interface for which you wish to set the modem initialization string)
init_string
AT modem commands.
dialup iface keepup phone# [secs]
Dials the phone number, then monitors the network and repeats the dialing process if no input was
received in secs seconds even after sending echo requests to peers or in the event the modem is down.
iface
modem0-4, sync0
phone#
The phone number of the remote device you want to keep up.
secs
Monitors the network and dials again if no input was received in secs seconds even after
sending echo requests to peers or in the event the modem is down.
dialup iface login_name name
Establishes a user name for authentication operating between dialup routers.
iface
modem0-4, sync0 (the interface for which you wish to establish a user for
authentication)
167
ASYNC ROUTER AR-P, AR-5, AND SYNC ROUTER REFERENCE MANUAL
name
The user name to be established.
dialup iface login_pwd password
Establishes a password to coincide with the user’s name for authentication when operating between
other dialup routers.
Many routers present a standard login prompt:
login: name
Password: password
iface
modem0-4, sync0 (the interface for which you wish to establish a password)
password
The password is typically seven characters in length.
dialup iface logprompt [on | off]
Turns on or off the generation of a “login:” prompt on asynchronous interfaces (modem0, modem1,
etc.). The “login:” prompt enables clients to enter a name and password prior to the start of the PPP
protocol. The prompt is on by default.
iface
modem0-4 (the interface for which you wish to establish a password)
dialup iface once phone# [secs]
Executes the redial procedure once. This is useful for testing the dialup parameters. The secs parameter
is ignored.
iface
modem0-4, sync0 (the interface for which you wish to test parameters)
phone#
The phone number of the remote device you want redialed.
secs
ignored
dialup iface quota mins [-e]
Specifies the daily maximum number of minutes your Router may stay connected on outgoing calls. This
is very useful if you have a misconfigured network that continuously attempts to send packets through a
modem interface. The quota is reset every night at midnight or when a new quota command is given.
The amount of quota left for the day is displayed in the dialup status command.
Monitor phone line usage closely after installation. Use the quota mechanism to limit phone costs.
iface
mins
minutes,
modem0-4, sync0 (the interface for which you wish to set a quota)
Enter the number of minutes you want allotted for the quota. The default is 1440
or 24 hours.
-e
Returns an ICMP destination-unreachable packet to the sender when the quota is reached
in addition to delivering the packet. This gives the user an indication that sending data to
the destination is currently not allowed.
dialup iface reset
Stops the current dialer process and restarts it. This is a way to force a redial on a keepup or demand
line where the idle timer has not yet expired. The configuration of the line is not changed.
168
ASYNC ROUTER AR-P, AR-5, AND SYNC ROUTER REFERENCE MANUAL
modem0-4, sync0
iface
dialup iface script file
Specifies the name of the dialer script for this interface. Instead of using the built-in modem commands,
the dialer executes the commands from the dialer script. This is useful for complex dialing sequences or
for operating between other vendor’s dialup devices. See Appendix B, Dialing Scripts, for more
information.
iface modem0-4, sync0 (the interface for which you want to assign a dialer script)
file
The name of the dialer script file.
dialup [iface] status
Displays the current dialup settings for a given interface or for all interfaces if iface is not specified. The
modem line speed only appears when the modem is connected. The modem line speed is also
sometimes missing from the dialup status display.
iface
modem0-4, sync0
dialup iface volume [{off | low | medium | high}]
Controls the volume of the Router’s modem speaker. When the speaker is disabled (using the off
keyword), you will not hear incoming or outgoing calls. Use the low, medium and high keywords to
adjust the volume to a more audible settings.
NOTE
We recommend leaving the speaker enabled when you initially install the Router. When
the modem speaker is disabled, you will not know when the Router is placing calls.
iface
modem0-4
off
Disables the speaker.
low
Sets the speaker volume to low.
medium
Sets the speaker volume to medium.
high
Sets the speaker volume to high.
dialup iface warning mins
Specifies the number of minutes a day your Router may use for outgoing calls before you receive a
warning (a syslog message) calling attention to the high usage. The default warning is 240 minutes, or 4
hours. The warning time is reset every night at midnight or when a new warning command is given. The
amount of time left for the day before a warning is displayed is shown in the dialup status command.
iface
modem0-4, sync0
mins
The number of minutes your Router may be connected to an outgoing call before
receiving a warning. The default is 240 minutes or 4 hours.
169
ASYNC ROUTER AR-P, AR-5, AND SYNC ROUTER REFERENCE MANUAL
2.10 help
Display command summaries
Syntax
help [cmd]
?
Description
The help command displays the list of commands available.
Subcommands and parameters
help
Alphabetically lists the commands available in your Router’s current mode, as indicated by the prompt:
IPX or TCP/IP. A one-line description of each command is provided.
help [cmd]
If you enter the command name, then help displays a textual description of the command and a usage
line.
?
Displays the command names.
2.11 history
Displays a list of previous commands.
Syntax
history
!n
!str
!!
Description
Displays the previous 25 commands entered by the user in a number of ways. Executes the previous
command.
Subcommands and parameters
history
Displays a numbered list of previous commands
!n
Re-executes command number n.
!str
170
ASYNC ROUTER AR-P, AR-5, AND SYNC ROUTER REFERENCE MANUAL
Re-executes last command beginning with str.
!!
Re-executes the previous command.
2.12 hostname
Set or display host name
Syntax
hostname [name]
Description
Displays or defines the name of the Router.
Subcommands and parameters
hostname
Prints the name currently assigned to the router.
hostname [name]
Assigns a name to the router.
name—Enter a name for the router.
2.13 logout
Terminate a Router session.
Syntax
logout
^D
Description
Terminate the current Router session: either a remote telnet session or a login session using the console.
Subcommands and parameters
logout
Terminates Router session.
^D
The short code to terminate a Router session.
171
ASYNC ROUTER AR-P, AR-5, AND SYNC ROUTER REFERENCE MANUAL
2.14 memory
Display memory statistics
Syntax
memory freelist
memory sizes
memory status
memory threshold
Description
The memory commands display memory-use statistics for the Router.
2.15 monitor
Display interface statistics
Syntax
monitor errors
monitor isdnerrors
monitor performance
Description
The monitor commands display statistics collected on the active interfaces of the Router.
2.16 passwd
Changes either user or link password
Syntax
passwd [-n newname] [user]
passwd -r hostname
Description
Use the passwd command to change a user name, a connection password, or the password shared with a
RADIUS server. Only one user name, root, is pre-defined. You can define one local link password for the
local router, up to five passwords for remote connections, one password for each of the Router’s
modems, and one password for each RADIUS server in use. The password stays the same for each login
until the administrator changes it. No aging of passwords is performed.
When changing a password the user is prompted for the old and then the new. Both are required. The
new password must be typed the same way twice to ensure accuracy. If no previous password exists, the
new password must still be typed the same way twice.
New passwords must be at least five characters long if they combine capitalized and un-capitalized
letters, or at least six characters long if in all in the same case. Although longer passwords are accepted,
limit the maximum number of significant characters in a password to eight, because password algorithms
do not work with more than 8 characters. The passwd file contains user and password information.
172
ASYNC ROUTER AR-P, AR-5, AND SYNC ROUTER REFERENCE MANUAL
Subcommands and parameters
passwd [-n newname] [user]
-n
Change the name of the user specified to newname.
newname
Enter the new name of the user. You cannot change the username root.
user
Specify the user to whom the password is assigned. To change a connection password, use
the hostname in the user parameter. To change a remote connection password, use the
remote hostname in the user parameter.
passwd -r hostname
-r
Change the password shared with a RADIUS server.
hostname
Enter the name of the RADIUS server.
2.17 performance
Displays performance statistics every 10 seconds.
Syntax
performance
Description
Displays performance statistics with a dynamic update every ten seconds. The columns in the display are
the defined interface names.
Example
SmartRoute 4.03_r
pelican
Up: 4:18:50:32
Wed Jan 17 10:39:49 1996
131.143.19.66
Idle CPU = 98%
Interface
eth0
ifOutOctets
3002
rawsndcnt
17
ifOutUcastPkts
17
ifOutNUcastPkts
0
ifInOctets
4178
rawrecvcnt
39
ifInUcastPkts
2
ifInNUcastPkts
37
Dialer state
Modem speed 10000000
Line load
modem0
0
0
0
0
0
0
0
0
listening
14400
modem1
modem2
modem3
0
0
0
0
0
0
0
0
0
0
0
0
0
0
0
0
0
0
0
0
0
0
0
0
idle
listening
idle
115200 115200 115200 115200
modem4
0
0
0
0
0
0
0
0
idle
173
ASYNC ROUTER AR-P, AR-5, AND SYNC ROUTER REFERENCE MANUAL
Total in and out: 6 pps Total async load =
Max context switch latency = 1 ticks
0 cps
Where
ifOutOctets
rawsndcnt
ifOutUcastPkts
ifOutNUcastPkts
ifInOctets
rawrecvcnt
ifInUcastPkts
ifInNUcastPkts
Dialer state
Modem speed
Line load
Number of bytes transmitted
Number of packets sent
Number of Unicast (non-broadcast) packets
Number of broadcast packets
Bytes received
Packets received
Unicast packets received
Broadcast packets received
Idle/dialing/called_in/called_out
Should be called port speed
The higher of in or out as a percentage of port speed
2.18 ppp
Displays the current status of the point-to-point protocol (PPP) on a specific interface. Configures an
interface’s various levels of protocol negotiation to support a PPP connection between local and remote
peers as defined by RFC 1661.
Syntax
Interface status
ppp i&g_iface
Compression method selection
ppp i&g_iface ccp {local | remote} method [stacker | history num | none | allow [on | off]]
LCP negotiation
ppp iface lcp {local | remote} accm [bitmap | allow [on | off]]
ppp iface lcp {local | remote} authentication [chap | pap | none | allow [on | off]]
ppp iface lcp {local | remote} acfc [on | off | allow [on | off]]
ppp iface lcp {local | remote} pfc [on | off | allow [on | off]]
ppp iface lcp {local | remote} magic [on | off |value | allow [on | off]]
ppp iface lcp {local | remote} mru [size | allow [on | off]]
ppp iface lcp {local | remote} default
ppp iface lcp timeout [seconds]
IPCP negotiation
ppp i&g_iface ipcp {local | remote} address [on | off | allow [on | off]]
ppp i&g_iface ipcp {local | remote} compress [tcp slots [flag] | none | allow [on | off]]
IPXCP negotiation
174
ASYNC ROUTER AR-P, AR-5, AND SYNC ROUTER REFERENCE MANUAL
ppp i&g_iface ipxcp {local | remote} compress [cipx [slots [flag]] | none | allow [on | off]]
ppp i&g_iface ipxcp {local | remote} network [on | off | allow [on | off]]
ppp i&g_iface ipxcp {local | remote} node [on | off | allow [on | off]]
ppp i&g_iface ipxcp {local | remote} default
Authentication of users
ppp i&g_iface chap user username [password]
ppp i&g_iface pap user username [password]
Description
The Router uses industry-standard PPP as defined by RFC 1661 to transfer data over WAN interfaces, for
example, modemX and syncX.
When a point-to-point connection is established between Router routers and/or other routers, or
peers, several layers of negotiation must occur between local and remote ends. This negotiation process
defines a mutually acceptable configuration for data to transfer between peer_local and peer_remote.
Negotiation layers defined for each interface are:
• Link control protocol (LCP)
• IP control protocol (IPCP) see RFC 1332
• IPX control protocol (IPXCP) see RFC 1552
• Password authentication protocol (PAP) see RFC 1334
• Challenge handshake authentication protocol (CHAP) see RFC 1334
The ppp command configures a specific interface’s layers of negotiation. It also displays the current
configuration of a specific interface.
NOTE
The ppp command is inherently complex because of its wide variety of negotiation
options. Unless you have detailed knowledge of PPP, we recommend you consult with
Technical Support before changing default PPP configurations. Defaults are configured
when you first install the Router.
The most common reason a Router user may issue the ppp command is to disable CHAP
authentication so the Router can communicate with another vendor’s router. Other variations of ppp
require more detailed knowledge of the PPP protocol. Refer to the PPP RFC 1661 for more information.
Before the negotiation process can take place between peer_local and peer_remote, the following events
must occur:
• first a physical connection must be established—a phone call, leased line, or ISDN call
• once the physical connection is established, each end (peer_local and peer_remote) must exchange LCP
packets to configure and test their connection
175
ASYNC ROUTER AR-P, AR-5, AND SYNC ROUTER REFERENCE MANUAL
• once connection tests pass, each end must pass authentication
• once authentication passes, PPP must send packets to select and configure one or more network-layer
protocols, IP and IPX
• once network-layer protocols are selected and configured properly, data can finally be sent over the
connection.
The following section, Syntax, lists the various ppp command syntax configurations. The next section
Subcommands and parameters, organizes the syntax and appropriate parameters according to the
command set in which they belong.
Syntax
Several categories of command syntax are listed next:
• current status of an interface
• commands to configure the layer control protocol (LCP) negotiation
• commands to configure the IP control protocol (IPCP) negotiation
• commands to configure the IPX control protocol (IPXCP) negotiation
• commands to change names and passwords that authenticate the Router to its peers
A PPP peer may refuse to negotiate a parameter altogether by using allow off. In general, we
recommend you do not set allow off with the remote subcommand. There is no requirement that both
ends of a PPP connection be Routers, only that the remote PPP peer support RFC1661 PPP.
Subcommands and parameters
Several subcommands use common parameters. Instead of repeating the global parameters for each
subcommand, the most common parameters and options are listed here.
Global parameters:
iface
Physical interface:
• modem0-4—one of 5 possible modems
• sync0—the synchronous port
i&g_iface
Physical interface:
• modem0-4—one of 5 possible modems
• sync0—the synchronous port
{local | remote}
For each ppp command you must select between local and remote.
local—A peer has absolute control over what it receives by setting its local values.
remote—Set remote values to suggest to a remote peer what it will receive. Remote values suggested
from the other end are taken into consideration during negotiation, but may be refused by the
receiving peer. In general, we recommend you do not send an allow off with the remote
subcommand.
allow [on | off]
176
Activates a feature’s negotiation.
ASYNC ROUTER AR-P, AR-5, AND SYNC ROUTER REFERENCE MANUAL
on—the specified value will be negotiated
off—the specified value will not be negotiated
2.18.1 INTERFACE STATUS
ppp i&g_iface
Current status of an interface - With no other parameters, the ppp iface command issued as shown above
displays the current PPP status of the interface iface you specify.
2.18.2 COMPRESSION METHOD SELECTION
ppp i&g_iface ccp {local | remote} method
[stacker | history num | none | allow [on | off]]
method—Displays or sets the compression method used for outgoing packets on the Router.
stacker—Selects the Stacker™ algorithms to be used to compress outgoing packets.
history num—Compression can be turned on with history, or without history. History 1 turns on
compression; history 0 turns off compression. Compression without history compresses each packet
based upon that packet only. Compression with history compresses packets based upon the packet
itself, and previous types of packets. History allows the box to be more efficient when handling
packets that are identical.
none—Selects no compression to be used on outgoing packets.
2.18.3 LCP NEGOTIATION
ppp iface lcp {local | remote} accm
[bitmap | allow [on | off]]
Displays or sets the desired Asynchronous Control Character Map (ACCM).
bitmap
Specify the bitmap in octets. The default is 0xffffffff.
ppp iface lcp {local | remote} authentication
[chap | pap | none | allow [on | off]]
Displays or sets the authentication protocol. The default is none. Use local when you want the remote
end to authenticate itself using the specified protocol. Use none when the remote end does not have to
authenticate itself.
Use remote to suggest to the remote end that you authenticate yourself to it using the specified protocol
or by suggesting that you not authenticate yourself at all if none was set. The remote end is free to ignore
your suggestion. The acceptable authentication protocols are CHAP and PAP. The challenge handshake
authentication protocol verifies the identity of a peer using a three-way handshake when establishing a link.
The password authentication protocol verifies the identity of a peer using a two-way handshake when
establishing a link. Because passwords are sent over the circuit in a text format (unencrypted), PAP is not
as secure as CHAP.
chap
Selects challenge handshake authentication protocol
pap
Selects password authentication protocol
none
No authentication occurs when the point-to-point connection establishes a link.
This is the default setting.
177
ASYNC ROUTER AR-P, AR-5, AND SYNC ROUTER REFERENCE MANUAL
NOTE
If authentication fails after a config modify has been executed, make sure you verify the
config modify with a config show. If you see more than one ppp modem0 chap user xxx
yyy display for your remote interfaces with the old Router name and password, you
must manually delete them with the following commands:
ppp modem0 chap user none
ppp isdn0 chap user none
config save
ppp iface lcp {local | remote} acfc
[on | off | allow [on | off]]
Address and control field compression (ACFC)—Displays or sets the option to compress the address and
control fields of the PPP header. The default is off.
ppp iface lcp {local | remote} pfc
[on | off | allow [on | off]]
Protocol field compression (PFC)—Displays or sets the option to compress the address and control fields of
the PPP header. By default the setting is off, so that all implementations must transmit packets with twooctet PPP protocol fields. When using low-speed links, it is desirable to conserve bandwidth and avoid
sending redundant data. PFC controls the trade-off between implementation simplicity and bandwidth
redundancy.
ppp iface lcp {local | remote} magic
[on | off |value | allow [on | off]]
Magic number - Displays or sets the initial magic number, to provide a method of detecting links in the
looped-back state and other Data Link Layer anomalies. By default the magic number is off, or not
negotiated, and zero is inserted where a magic number may otherwise be used. Choose the magic
number in the most random manner possible in order to guarantee a very high probability that it is
unique. Good ways to choose a random magic number include using machine serial numbers, network
addresses, etc. Until the magic number is successfully negotiated it must be transmitted as zero.
value
Enter the value you want to be the magic number.
ppp iface lcp {local | remote} mru
[size | allow [on | off]]
Maximum receive unit (MRU)—Displays or sets the maximum receive unit (MRU), the largest packet that a
PPP peer is willing to receive. It is expressed in two octets and sent to inform the peer that the
implementation can receive larger packets.
size—The default value is 1500 octets. If smaller packets are requested, an implementation still must be
able to receive the full 1500 octet information field in case link synchronization is lost.
ppp iface lcp {local | remote} default
Default—Issuing this command verbatim resets the lcp negotiation options to their default values, as
specified by RFC1661. Default values are:
178
ASYNC ROUTER AR-P, AR-5, AND SYNC ROUTER REFERENCE MANUAL
• ACCM - 0xfffffff
• ACFC - off
• authentication - none
• Magic number - off - not negotiated
• MRU - 1500 octets
• PFC - two-octet fields
• timeout - 3 seconds
ppp iface lcp timeout [seconds]
Timeout—Sets the timeout interval.
seconds—Displays or sets the interval to wait between LCP configuration or termination attempts.
The default is 3 seconds.
2.18.4 IPCP NEGOTIATION SUBCOMMANDS
ppp i&g_iface ipcp {local | remote} address
[on | off | allow [on | off]]
local address.enables or disables negotiation of the local address. By default, no addresses are
negotiated. Allows a Router to either request that the remote end set the IP address by putting 0.0.0.0
as the local address or to suggest the remote end allow the Router to set its IP address by configuring
a non-zero remote address.
NOTE
You can specify the local address using the ifconfig command. The default local IP
address is the address set with the “ip address” command.
ppp i&g_iface ipcp {local | remote} compress
[tcp slots [flag] | none | allow [on | off]]
TCP compression—Displays or sets the local or remote TCP compression options. The default is that
compression is on and that the number of slots is 16 and the flags default to 0. In addition, noncompression can be specified for the local or suggested for the remote side.
slots default is 16.
flag default is 0.
2.18.5 IPXCP NEGOTIATION
ppp i&g_iface ipxcp {local | remote} compress
[cipx [slots [flag]] | none | allow [on | off]]
IPX compression—Displays or sets the local or remote IPX compression options. By default compression is
on, the number of slots is 16 and the flags default to 0. In addition, non-compression can be specified for
the local or suggested for the remote side.
slots default is 16.
flag default is 0.
179
ASYNC ROUTER AR-P, AR-5, AND SYNC ROUTER REFERENCE MANUAL
ppp i&g_iface ipxcp {local | remote} node
[on | off | allow [on | off]]
IPX node number—Displays or sets whether the local or remote IPX node number is announced to the
other side or not. Also sets whether to allow a local or remote node number from the remote side.
ppp i&g_iface ipxcp {local | remote} default
ipxcp configuration settings—Change the selected interface’s ipxcp configuration settings back to their
defaults. Defaults are provided for each subcommand.
2.18.6 AUTHENTICATION OF USERS
ppp i&g_iface chap user username [password]
ppp i&g_iface pap user username [password]
Displays or sets username to be sent when the peer requests that your Router to authenticate itself. The
password to be sent may be set, but not displayed. When the username is specified, but no password is
supplied, the passwd file is searched for the password. This command overrides the default name which is
the system name, and the default password, which is the link password set in the config session. The
username and password may be different for the CHAP and PAP authentication protocols.
username
Set the username. Default is the system name.
password
Set the password. Default is the link password set in the config session.
Examples
ppp commands are not required for typical use of the Router. The most common use of the ppp
commands is to turn off the CHAP authentication protocol. Other commands require a more detailed
knowledge of the PPP protocol and are not recommended for use without such knowledge. For
example:
ppp modem0 lcp local auth none
This command sets the authentication type to none. The other choices are pap and chap.
Users often set the authentication type to none to examine the WAN link and then turn authentication
back on (chap or pap) once they are satisfied that the link is functioning properly.
The following commands are often used to connect to an Ascend router’s modem. Check the
parameters set on the Ascend router before using these commands. Note that the commands listed
below must be issued on both sides of the connection for proper configuration:
ppp modem0 lcp local accm 0xa0000
ppp modem0 lcp local acfc off
ppp modem0 lcp local pfc off
ppp modem0 pap user user_acct pwd
180
ASYNC ROUTER AR-P, AR-5, AND SYNC ROUTER REFERENCE MANUAL
2.19 ps
Displays the status of running processes
Syntax
ps
Description
The command ps displays the total time the router has been up and information about all of the
currently running processes. It displays:
PID
process ID
SP
current stack pointer
stksize
amount of stack space used
maxstk
maximum amount of stack space available
event
address of the event a process is waiting for if it is not able to run
fl
the process status and the name of the process that is currently operating.
The status flags are indicated by a sequence of three letters, for example, IWS:
I
Processes that are waiting with interrupts enabled. Usually indicates processes not waiting
for a hardware interrupt.
W
Processes waiting for an event (the event value should be non-blank).
S
Suspended processes.
NOTE
Many commands may cause more than one process to execute. There is not a
one-to-one correspondence between any command/function and processes.
Example
Uptime 10:05:22:22 Stack 6236 max intstk 57
PID
4f630008
50510010
52c00010
52220010
52ba0008
52c70008
57310010
4f5b0010
4f710008
52ab0010
579b0010
515b0010
504b0008
52620010
SP
50270156
50ba01da
56d001ca
522901c2
56f001dc
556e0232
573901bc
507a03dc
4d341f4c
571101ba
575903b2
51620a86
50db07d6
62360f20
stksize
250
256
256
250
256
320
256
512
0
256
512
1536
1024
2048
maxstk event
105
4f770046
46
50510010
151
427ba719
42
427ba108
64
427ba6f8
84
427ba6d8
116
4f7700b2
46
427b9e2e
0
4f770010
117
4f77007c
258
50690036
530
186
322
fl
IW
IW
IW
W
IW
W
IW
IW
IW
IW
IW
I
I
name
display
gcollect
com1monitor
keyboard
com1 tx
com1 receive
FTP listener
killer
cmdintrp
Telnet listener
com1 dialup
network
timer
Telnet Server
181
ASYNC ROUTER AR-P, AR-5, AND SYNC ROUTER REFERENCE MANUAL
2.20 reboot
Drop all connections and restart the Router
Syntax
reboot
Description
reboot is a cold-restart mechanism that gracefully drops all open connections and restarts the router. A
user prompt is displayed on the screen; verification is needed before reboot is initiated. When rebooted,
the router responds as if the power was started and stopped by restarting the Router internal self tests
and reloading the system software.
2.21 start/stop
Start or stop a server
Syntax
start {discard | echo | ftp | rip | snmp | telnet}
stop {discard | echo | ftp | rip | snmp | telnet}
Description
Starts or stops a server. Initiates/ends server processes. The user may use the ps command to determine
which server processes are running.
Subcommands and parameters
start {discard | echo | ftp | rip | snmp | telnet}
stop {discard | echo | ftp | rip | snmp | telnet}
discard—Specifies that any packets sent to the discard port will/will not be discarded. Use start to
discard; stop not to discard.
echo—Specifies that any packets sent to the echo port will/will not be echoed back to the sender.
Use start to echo back; stop not to echo back.
ftp—Starts/stops the ftp server process. The FTP server is used to upload and download files to the
router startup disk.
rip—Starts/stops the rip server process.
snmp—Starts/stops the snmp server process. Used by clients to obtain network statistics and manage
the Router.
telnet—Starts/stops the telnet server process. Allows administrators to log in remotely.
182
ASYNC ROUTER AR-P, AR-5, AND SYNC ROUTER REFERENCE MANUAL
2.22 tip
Establishes a connection with an interface
Syntax
tip iface
Description
Using a terminal program, the tip command establishes a full-duplex terminal connection to a modem
interface. It is a diagnostic tool used to manually send commands to a modem. Normally this command
is only used to test new modem configuration options.
NOTE
The tip command is only used on modem interfaces. Do not use tip on a modem that
has a dialer running.
Before using tip on a modem line, the line dialer must be stopped with the dialup iface inactive
command.
Subcommands and parameters
tip iface
Establish a full duplex connection to a modem interface.
iface modem0-4
2.23 trace
Send packet-type status (for an interface) to the console.
Syntax
trace iface [in | out | hex | ppp | packet | up | > filename]
Description
The trace command enables packet tracing on a given interface (iface) to standard output. The default is
to display input and output packet headers. Packet headers are fully decoded up through the transport
level. Packet data is displayed as ASCII characters and periods representing unprintable characters.
NOTE
If you are logged in on an interface, you are not allowed to trace that interface.
183
ASYNC ROUTER AR-P, AR-5, AND SYNC ROUTER REFERENCE MANUAL
Subcommands and parameters
trace iface [in | out | hex | ppp | packet | up | > filename]
iface
eth0, modem0-4, sync0
in
Limit traces to packets received on the interface.
out
Limit traces to packets sent by the interface.
hex
Add an additional hex dump to the output.
ppp
Include PPP packets in the trace.
packet
Include all packet types in the trace.
up
Displays the packets keeping the WAN link active.
> filename
Sends trace data to the file filename.
2.24 tux
(TCP under IPX) Provides status of all TCP under IPX connections.
Syntax
tux status
Description
This command helps determine the amount of traffic passing through the connection, and shows
the last time data was sent or received. The figures compiled by the report are cumulative.
Subcommands and parameters
tux status
Example
The report issued by the tux command has the following columns:
From
The IPX address sending the packets
Sent-Pkt
Total number of packets sent
Rcvd-Pkt
Total number of packets received
Last Rcvd
Date last packets were received
184
ASYNC ROUTER AR-P, AR-5, AND SYNC ROUTER REFERENCE MANUAL
2.25 update
Synchronize the local and remote networks
Syntax
update [iface] now
update [iface] init [{on | off}]
update [iface] periodic [[+] time1 [time2 [time3 [time4]]]]
update [iface] timeout [mins]
Description
The update command forces a periodic connection to the site at the other end of the specified iface. This
allows IPX protocol tables, like the routing (RIP) and Service (SAP) tables, to be exchanged between the
two sites. After the timeout time mins, the line disconnects. The default is not to periodically connect at all.
For all subcommands, if the iface parameter is not specified, all WAN interfaces are updated. To
configure Router to automatically update all WAN ports when the system starts, use the update iface init
on command. To disable this feature, use the update iface init off command.
Subcommands and parameters
iface Interfaces:
• modem0-4 - one of 5 possible modems
• sync0 - the synchronous port
update [iface] now
To immediately connect the two sites, use update now. This command is normally given after the Router is
first installed, to synchronize the local and remote sites. For example, enter update modem0 now.
update [iface] init [{on | off}]
Each time the Router starts, it attempts to connect the two sites at each end of its defined interfaces by
automatically issuing the update init subcommand. To configure Router to automatically update all WAN
ports when the system starts, use the update iface init on command. To disable this feature, use the update
iface init off command.
on—Configures Router to automatically update all WAN ports when the system starts. This is the
default setting.
off—Disable the update of all WAN ports when the Router starts.
update [iface] periodic [[+] time1 [time2 [time3 [time4]]]]
To periodically connect to a remote site at a fixed time interval, use the update periodic subcommand with
the +time1 parameter defined, indicating the time interval. For example, to connect to the remote site
on modem0 every four hours, enter update modem0 periodic +0400. The Router then connects to the remote
site every four hours after this command is issued. To remove this interval, use a time1 of 0.
To connect to the remote site at specific times during the day, specify the exact times to connect, in 24hour format (hhmm). Up to four times may be specified. For example, to connect to the remote site on
modem0 at 4 a.m., 12 p.m., 4 p.m., and 8 p.m., enter update modem0 periodic 0400 1200 1600 2000.
185
ASYNC ROUTER AR-P, AR-5, AND SYNC ROUTER REFERENCE MANUAL
+—If the first time is preceded by a plus (+) sign, the following three times specified are ignored.
time1—If you specify a value in the time1 parameter preceded by a plus (+) sign, then it becomes the
interval of time at which a connection is attempted. If you do not specify a + before the value, time1
becomes the first time during the day a routine connection is attempted. Use the 24-hour format (hhmm).
time2, time3, time4 If no + is entered before time1, then time2, time3 and time4 are the following three
times when a routine connection is attempted. If a + is specified, then these values are ignored. All
time parameters are cleared when the update command is issued. To change the second, third or
fourth time, the preceeding times must be re-entered.
update [iface] timeout [mins]
To set the amount of time (in minutes) to leave the connection open, use the update timeout
subcommand. This is crucial for timing out remote users on NetWare networks. This time must be
greater than the longest user timeout used in a NetWare server. To compute a NetWare server’s user
timeout, use the following formula:
NetWare Server’s User Timeout =
(Delay Before First Watchdog Packet) + (Number of Watchdog Packets) * (Delay Between Watchdog Packets)
If the update timeout is not long enough, remote users who have restarted or turned their machine power
off may not be cleared from central-site NetWare servers. They may stay logged in forever. The default
timeout is 10 minutes.
mins The timeout value in minutes. The default timeout is 10 minutes.
2.26 version
Display the Router’s software release number
Syntax
version
Description
The version command displays the software release number of the Router.
2.27 who
Displays information about who is logged onto the Router.
Syntax
who
Description
The who command displays the login name, terminal name, login time, and network address for each LAN,
user or client currently logged onto your Router. Who also shows login information for authenticated
remote systems currently logged on. For a remote system (client or LAN), negotiated IP and IPX
interface addresses are also shown.
LANs, users or clients logged onto the Router who are configured to not require authentication, do not
appear in the who report.
Example
who
root net Apr 27 11:11 131.33.12.20) telnet
root net Apr 27 11:25 131.33.12.09) ftp
arrow modem0 Apr 27 11:30 IP Addr: 131.143.16.1 IPX Addr 1222.0.0
guest modem2 Apr 27 13:05 IP Addr: 131.33.12.15 IPX Addr 1333.0.0
186
ASYNC ROUTER AR-P, AR-5, AND SYNC ROUTER REFERENCE MANUAL
3. IPX-only commands
The Router is always in one of two modes. The prompt always indicates the current mode:
• (ipx)Router>
Router is in IPX mode
• (tcp/ip)Router>
Router is in TCP/IP mode
The commands in this chapter are for IPX mode only, supporting IPX network environments.
Commands which operate the same way in both IPX and TCP/IP environments are documented in
Chapter 2, Generic Commands. Commands for TCP/IP mode only are documented in Chapter 4,
TCP/IP-only Commands. Several commands operate in both IPX and TCP/IP modes with parameters
that vary per mode. These commands are documented with their appropriate parameters in both
chapters.
From IPX mode, either use the tcp/ip command to enter TCP/IP mode or prefix the command with
“TCPIP.”
IPX-only commands are organized in this chapter alphabetically:
• filter
-filter ipx packets
• ifconfig
-display or change IPX network parameters
• ipx
-display or change IPX protocol parameters
• netstat
-display IPX network statistics
187
ASYNC ROUTER AR-P, AR-5, AND SYNC ROUTER REFERENCE MANUAL
• ping
-send an ICMP packet to remote host
• ripfilter
-filter RIP packets using the RIP filter list
• route
-display and change IPX routing tables
• sap
-display and change SAP routing tables
• sapfilter
-filter IPX packets using the SAP filter list
• spoof
-configure/display which packets to spoof
• tcp/ip
-change to TCP/IP mode
Before listing the commands alphabetically, the following general information is provided:
• IPX addresses
• Interface addresses
• Reserved destination socket numbers
• IPX server types
• IPX packet types
3.1 Interface Addresses
The iface[/frame_type] parameters indicate the interface and frame type. iface is specified as one of the
following, depending on your Router model: eth0, sync0, modem0, modem1, modem2, modem3, or
modem4. If eth0 is selected, the frame_type can be specified as part of the interface, and can be either
802.3, 802.2, SNAP or II (for Ethernet Type 2). Use a slash to separate the iface from the frame_type—for
example, eth0/802.2. If left unspecified, the default frame_type is 802.3.
For the Ethernet interface, the iface parameter is a string of the form eth0/frame_type. For all other
interfaces, iface is of the form modemX. Examples are:
ethN
Ethernet N interface, raw 802.3 frame type
ethN/802.3
Ethernet N interface, raw 802.3 frame type
ethN/II
Ethernet N interface, Ethernet Type II frame type
ethN/SNAP
Ethernet N interface, 802.3 SNAP frame type
ethN/802.2
Ethernet N interface, 802.3 LLC frame type
modem N
Modem N interface; modems are numbered from 0 to 4, depending on your
Router model. See the User’s Guide (in the front of this manual) for details.
sync0
Synchronous interface (Sync Router only)
188
ASYNC ROUTER AR-P, AR-5, AND SYNC ROUTER REFERENCE MANUAL
3.2 IPX Addresses
IPX addresses uniquely identify a particular node on an IPX network. IPX addresses are represented as:
net.node.socket
net—Uniquely identifies an IPX network with a number. This IPX network number is specified in 8digit hexadecimal format. The range of valid IPX network numbers for Router command-line
parameters is 1 to fffffffe. The IPX network number 0 is reserved for this network and should not be
used in any Router commands. The IPX network number ffffffff is reserved for broadcast and
should not be used in any Router commands.
node—Represents the Media Access Control (MAC) protocol address of an IPX node. For Ethernet, it
is the Ethernet address. The node number is a 12-digit hexadecimal number.
socket—A 4-digit hexadecimal number in the range of 1 to fffe. The socket specifies the process within
a router or NetWare server to which a packet will be sent. Leading zeros are not required. Missing
fields default to zero, which implies a wild-card condition.
Example IPX addresses
3.00801b0271ee.453
Packets with this destination address will be sent to IPX network 3, Ethernet address 00:80:1b:02:71:ee,
RIP process socket 453.
1993.02cf1f800022.452
Packets with this destination address will be sent to IPX network 1993, Ethernet address 02:cf:1f:80:00:22,
SAP process socket 452.
3.3 Reserved Destination Socket Numbers
The destination socket field contains the socket number of the packet’s destination process. Sockets are
used to route packets to different processes within a single node. Table B-1 lists the reserved socket
numbers in NetWare:
Table B-1. Reserved Destination Socket Numbers.
Socket Number
Socket Process
0451h
NetWare Core Protocol process (NCP)
0452h
Service Advertising Protocol process (SAP)
0453h
Routing Information Protocol process (RIP)
0455h
Novell NetBIOS process
0456h
Diagnostics process
4000h-7FFFh
Dynamic Sockets: used by workstations
8000h-FFFFh
Assigned by Novell
189
ASYNC ROUTER AR-P, AR-5, AND SYNC ROUTER REFERENCE MANUAL
To use socket numbers above 8000h, you must contact Novell and obtain assignments. No broadcast
socket numbers are allowed in IPX.
3.4 IPX Server Types
Novell assigns each type of server a unique server type, which is specified by a number. Although IPX
routers use SAP, they do not typically act as servers and do not require assignment of a server type. Table
B-2 lists some typical server types.
Table B-2. Typical IPX Server Types.
190
Server Type Number
Server Type
0000h
unknown
0003h
print queue
0004h
file server
0005h
job server
0007h
print server
0009h
archive server
0024h
remote bridge server
0047h
advertising print server
8000h
reserved up to
FFFFh (-1)
wildcard
ASYNC ROUTER AR-P, AR-5, AND SYNC ROUTER REFERENCE MANUAL
3.5 IPX Packet Types
The packet type indicates the type of service offered or required by the packet. Table B-3 list the packet
types defined in NetWare.
Table B-3. IPX Packet Types.
Field Value
Packet Type
Description
00h
unknown
for all unclassified packets
01h
routing information
for RIP packets
04h
service advertising
for SAP packets
05h
sequenced
for SPX packets
11h
NetWare core protocol
for NCP packets
14h
PP (propagated packet)
for Novell NetBIOS
3.6 filter
Filter IPX packets using the general filter list
Syntax
filter add name{
[-i iface [ /frame_type ]]
[-s src_addr]
[-d dest_addr]
[-p pkt_type]
}
{-t {allow | deny | nodial}
[-f {inbound | outbound}]
[-o {before | after} existing_name]
filter delete name
filter {enable | disable}
filter flush
filter move name [{before | after} existing_name]
filter status
Description
Use packet filtering to make your Router more secure, or to decrease throughput. The filters allow IPX
traffic to be selectively restricted to and through the Router. You can also use filters to keep hosts outside
of your organization from initiating calls on your phone line and increasing your phone bills. There are
three IPX filter lists:
• General (filter command)
• RIP (ripfilter command)
191
ASYNC ROUTER AR-P, AR-5, AND SYNC ROUTER REFERENCE MANUAL
• SAP (sapfilter command)
Packets are checked for filter matches using those three lists in the order: general list, RIP list, SAP list.
The Router software can be configured to specify:
• an include list (packets to forward)
• an exclude list (packets not to forward)
The filter list entries can specify
• IPX source and destination addresses
• IPX packet types
• direction
• Router interface
• RIP and SAP parameters
Use the filter command to configure and modify IPX packet filters. If enabled, all incoming and
outgoing IPX packets can be filtered using IPX filters. Filtering must first be enabled for the list entries
to take effect.
Filtering restrictions apply to packets destined for the Router and those routed through the Router.
The result of passing a packet to the Filtering Module is a decision to allow or deny further processing of
the packet. The next hop is not considered.
The filtering is based on a prioritized list of filter expressions. Filter expressions are added to the
Router through use of the filter, ripfilter and sapfilter commands. The action specified in the first filter
expression found in the filter list that matches the packet in question is applied.
All IPX filtering is disabled by default. Filtering takes effect when the enable command for a filter list
(General, RIP or SAP) is entered by the user. Filter list entries stay in place across reboots only if the
config save command is entered before restarting.
There is no notion of filter modes. The filter list can be a mix of allowed and denied
address/protocol/port/interface/flag/direction specifications.
The default action if no match is found is to allow the packet. You can override this by specifying a
filter expression with wildcard address entries as the lowest-priority filter expression.
Subcommands and parameters
filter add name
The filter add subcommand adds an IPX packet filter of name name.
name—A 1 to 6 character ASCII identifier chosen by the user to easily reference filter expressions. Each
filter expression must have a unique name. This name is generally used so that the position of an
entry in the list can be changed. Names beginning with a dollar sign (“$”) are reserved for use by the
system.
[[+]-i iface [/frame_type]]—Specify a legal interface
iface—eth0, modem0-4, sync0
frame_type—Specified as part of the interface, and can be either 802.3, 802.2, SNAP or II (for
Ethernet Type 2). Use a slash to separate the iface from the frame_type, for example, eth0/802.2. If left
192
ASYNC ROUTER AR-P, AR-5, AND SYNC ROUTER REFERENCE MANUAL
unspecified, the default frame_type is 802.3.
[-s src_addr]—Specify source address
src_addr—Specify the source address field of the IPX header. These include the network, node and
socket numbers. Specify these three numbers as hexadecimal numbers, separated by periods, as
follows: network.node.socket. Leading zeros are not required. Use the keyword any as a wild card for
either node or socket number. Missing fields default to zero, which equates to a wild-card condition
(matches everything).
[-d dest_addr]—Specify destination address.
dest_addr—Specify the destination address field of the IPX header. These include the network, node
and socket numbers. Specify these three numbers as hexadecimal numbers, separated by periods, as
follows: network.node.socket. Leading zeros are not required. Use the keyword any as a wild card for
either node or socket number. Missing fields default to zero, which equates to a wild-card condition
(matches everything).
[-p pkt_type]}—Specify packet type.
pkt_type. Specify the type of packet in the packet field in the IPX header. Specify this parameter as a
hexadecimal number (00-FF), or as one of the following names: unknown, RIP, SAP, SPX, NCP, PPP.
If this argument is not specified, then it is assumed to be 0, which implies all packet types.
{-t {allow | deny | nodial}—
Specify type of filters to be used.
allow—allows any packet that matches the filter specification to pass through.
deny—drops any packet that matches the filter specification.
nodial—only drops packets that cause the destination interface to dial. Otherwise, the packet is
passed on. Use this option to prevent hosts outside the organization from initiating a call on your
phone line and causing unnecessarily expensive phone bills.
[-f {inbound | outbound}]—Specify direction of traffic flowing.
Filter entries may be created to restrict inbound traffic, outbound traffic, or traffic flowing in both
directions. The default value is both.
[-o {before | after} existing_name]—Specify order, and thus priority, of filters in the list.
The default position is at the end. The first entry is highest priority.
filter delete name
The filter delete subcommand deletes the specified IPX filter name.
name Deletes the specified general IPX filter name.
filter {enable | disable}
Enables or disables IPX packet filtering. Filtering is disabled when the unit starts and must be explicitly
enabled.
filter flush
Deletes all general IPX packet filters.
filter move name [{before | after} existing_name]
193
ASYNC ROUTER AR-P, AR-5, AND SYNC ROUTER REFERENCE MANUAL
Enables you to relocate a filter entry name in the filter list, to a place before or after an existing filter entry
existing_name. If no [before | after...] clause is given, then the entry is placed last in the list. To change a
filter’s priority, simply move it in the list.
filter status
Displays the list of general IPX packet filters.
Example
Add a filter to allow only SAP packets (socket 452) to pass through.
filter add fs1 -s any.any.452 -t allow
filter add fs2 -d any.any.452 -t allow -o after fs1
filter add fs3 -s any.any.any -d any.any.any -t deny -o after fs2
See also
ripfilter
sapfilter
3.7 ifconfig
Configure/display IPX network interface parameters
Syntax
ifconfig [iface [/frame_type] [network net_number] [{up | down}]]
ifconfig iface [speed [bps]]
ifconfig [iface [linkaddr directory_number [/SPID]]
Description
The ifconfig command is used to assign an IPX network number to a network interface or to enable or
disable IPX routing on a network interface. ifconfig is used to define the network number of each frame
type on each ethernet interface present on the router. The modem interfaces are each initialized to a
unique net number and do not need to be initialized; however, you can use ifconfig to change the
network address of modem interfaces. Used without options, ifconfig displays the current IPX
configuration of all interfaces.
NOTE
An Ethernet interface can be configured to run multiple frame types simultaneously.
A unique net number must be assigned for each frame type on each interface.
Subcommands and parameters
ifconfig [iface [/frame_type] [network net_number] [{up | down}]]
Assigns network characteristics to the interface specified, including frame type, network, and network
194
ASYNC ROUTER AR-P, AR-5, AND SYNC ROUTER REFERENCE MANUAL
number.
iface
eth0, modem0-4, sync0
/ frame_type The frame type you want to assign to the interface. Legal frame types are:
• 802.3
• 802.2
• SNAP
• II (for Ethernet Type 2)
Use a slash to separate the iface from the frame_type—for example, eth0/802.2. If left unspecified, the
default frame_type is 802.3.
net_number—If net_number is not present, the current net number for the interface is displayed. If
net_number is present, specify net_number as the IPX network number of this interface. You cannot
change the network number unless the interface is marked down.
The net_number is specified as a hexadecimal number with range 0 to FFFFFFFE. Leading zeroes are
optional. A net number between 1 to FFFFFFFE must be entered before the iface interface can be
brought up. A net number of 0 will “unset” the network number on this interface.
up—Enable IPX routing on this interface. When an Ethernet interface is enabled, a route to the
interface is entered in the route table and the router will send out RIP and SAP requests for latest
information. For a modem interface, no route is added and no RIP or SAP requests will be made
until a connection occurs. ifconfig never causes a modem to dial. You cannot bring up an interface
with a “0” network number (unset).
down—Disable IPX routing on this interface. All routing and Service Table entries which point out
through this interface are deleted. IPX packets will not be routed through this interface.
ifconfig iface [speed [bps]]
iface—modem0-4, sync0
speed—The speed subcommand allows you to change the speed of the connection between the Router
and its modem, sync, and ISDN interfaces.
bps—bits per second. Typical choices are 38400 bps for V.34 modem interfaces, 57600 bps for
synchronous interfaces, and 115200 bps for ISDN interfaces.
3.8 ipx
Displays or configures IPX protocol parameters
Syntax
ipx broadcast
ipx internal_net [internal_net_number]
ipx optimize [on | off]
ipx priority
ipx routing [{enable | disable}]
ipx spx
195
aASYNC ROUTER AR-P, AR-5, AND SYNC ROUTER REFERENCE MANUALNAME
ipx trace
Description
The ipx command allows you to display or configure parameters to control the IPX protocol. Entering
any of the commands without options or parameters displays the current state.
Subcommands and parameters
ipx broadcast—Displays the current status (on or off) of ipx broadcast.
ipx internal_net [internal_net_number]
internal_net_number—Displays or sets the current IPX internal network number. If no internal_net_number
is entered, the Router displays the current network number. During start-up, the Router initializes the
IPX internal network number to a unique value based upon the address of the Ethernet interface (range
1 to FFFFFFFE).
ipx optimize [on | off]
on—Enables you to configure the Router to minimize unnecessary dialing on NetWare networks. This
command loads a set of filters that eliminate unnecessary dialing caused by NetBIOS/IPX, NetWare
Time Synchronization, NetWare Directory Services, and SPX applications.
off—Disables this feature.
ipx priority—Displays the current status (on or off) of ipx priority.
ipx spx—Displays the current status (on or off) of ipx spx optimization.
ipx routing [{enable | disable}]
enable—Enables IPX routing on the Router. The default value is enabled.
disable—Disables IPX routing on the Router.When IPX routing is disabled, no IPX packets are
allowed through any interface. If IPX routing is disabled, the Router will still route IP traffic.
ipx trace—Displays the current status (on or off) of ipx trace.
Example
ipx internal_net bf4d021b
This sets the internal net number to bf4d021b.
3.9 netstat
Show IPX network statistics
Syntax
netstat [-m] [-p {ipx | rip | sap | pburst ] [-s]
Description
Use the netstat command to display IPX protocol statistics.
Subcommands and parameters
-m—Display memory statistics: amount of free memory, number of failed memory allocations, number
196
ASYNC ROUTER AR-P, AR-5, AND SYNC ROUTER REFERENCE MANUAL
of memory errors, and network usage statistics. These statistics are useful when troubleshooting
problems.
-p—ipx—Display IPX protocol statistics, including running counter values such as total number
of packets sent and received, number of bad packets received, time-outs, etc.
rip—Display RIP protocol statistics, including running counter values such as total number
of packets sent and received, number of bad packets received, time-outs, etc.
sap—Display SAP protocol statistics, including running counter values such as total number
of packets sent and received, number of bad packets received, time-outs, etc.
pburst—Display NetWare packet burst statistics. Detects and tracks packet burst errors. If any errors
occur, the server name and user address are reported. This helps locate and reconfigure NetWare
clients. Packet burst error messages display on the console four times daily maximally.
Statistics include running counter values such as total number of packets sent and received, number
of bad packets received, timeouts, etc.
-s—Display summary IPX statistics.
3.10 ping
Send an IPX diagnostic packet to see if a remote Router, NetWare server, or NetWare client is operating
properly.
Syntax
ping server_name
ping router_name
ping network.node_address
ping -s {server_name | router_name | network.node_address}
ping -s {server_name | router_name | network.node_address} count
Description
Use ping to send an IPX diagnostic packet to the destination you specify. If the destination responds to
the diagnostic packet, then the round trip time displays in milliseconds. If the destination does not
respond, then the message No response from destination_name displays on the console.
The server_name or router_name must appear in the Router’s SAP table. To see the list of available
Routers and servers:
1. Enter sap from the ipx command prompt.
2. Enter ping destination_name as it appears in the Routers SAP list. The destination_name parameter is
not case-sensitive.
Subcommands and parameters
ping server_name
server_name—The server name to which you wish to verify a connection. This name must appear in
197
ASYNC ROUTER AR-P, AR-5, AND SYNC ROUTER REFERENCE MANUAL
the Router’s SAP table.
ping router_name
router_name—The Router to which you wish to verify a connection. This name must appear in
Router’s SAP table.
ping network.node_address
network.node_address—The node address to which you wish to verify a connection.
ping -s {server_name | router_name | network.node_address}
server_name—The server name to which you wish to verify a connection. This name must appear in
the Router’s SAP table.
router_name—The Router to which you wish to verify a connection. This name must appear in
Router’s SAP table.
network.node_address—The node address to which you wish to verify a connection.
ping -s {server_name | router_name | network.node_address} count
server_name—The server name to which you wish to verify a connection. This name must appear in
the Router’s SAP table.
router_name—The Router to which you wish to verify a connection. This name must appear in
Router’s SAP table.
network.node_address—The node address to which you wish to verify a connection.
-s—sends the IPX diagnostic packet continuously.
count—sends the number of IPX diagnostic packets that you specify in count.
3.11 ripfilter
Filter RIP packets using the RIP filter list
Syntax
ripfilter add name {
[-i iface [/frame_type]]
[-q query_type]
[-n network]
}
-t {allow | deny | nodial}
[-f {inbound | outbound}]
[-o {before | after} existing_name]
[-h {hopcount}]
ripfilter delete name
ripfilter {enable | disable}
ripfilter flush
ripfilter move name [{before | after} existing_name]
ripfilter status
Description
198
ASYNC ROUTER AR-P, AR-5, AND SYNC ROUTER REFERENCE MANUAL
Use the ripfilter command to configure and modify RIP filters. If enabled, all incoming and outgoing RIP
packets are filtered through RIP filters. There are three IPX filter lists:
• General (filter command)
• RIP (ripfilter command)
• SAP (sapfilter command)
Packets are checked for filter matches using these three lists in the order: general list, RIP list, SAP list.
Filtering restrictions apply to packets destined for the Router and those transitioning through the
Router. The result of passing a packet to the filtering module is a decision to allow or deny further
processing of the packet. The next hop is not considered.
Filtering is based on a prioritized list of filter expressions or FEs. Filter expressions are added to the
Router through use of the filter, ripfilter and sapfilter commands. The action specified in the first filter
expression found in the Filter list that matches the packet in question is applied.
All IPX filtering is disabled by default. Filtering takes effect when the enable command for a filter list
(General, RIP, or SAP) is entered by the user. Filter-list entries stay in place across reboots only if the
config save command is entered before restarting.
There is no notion of filter modes. The filter list can be a mix of allowed and denied
address/protocol/port/interface/flag/direction specifications.
The default action if no match is found is to allow the packet. A user can override this by specifying a
filter expression with wildcard address entries as the lowest priority filter expression.
Subcommands and parameters
ripfilter add name
Adds an RIP packet filter of name name.
name—A 1- to 6-character ASCII identifier chosen by the user to easily reference filter expressions.
Each filter expression must have a unique name.
[-i iface [/frame_type]]—Specify a legal interface. See the general description of interfaces at the
beginning of this chapter for more information.
iface—eth0, modem0-4, sync0
frame_type—Specified as part of the interface, and can be either 802.3, 802.2, SNAP or II (for
Ethernet Type 2). Use a slash to separate the iface from the frame_type, for example, eth0/802.2. If
left unspecified, the default frame_type is 802.3.
[-q query_type]—Specify the type of query.
query_type—Enter either request or response. If the query_type is not specified, it is assumed to be
both, for example, request and response.
[-n server_name]}—Specify the server name.
server_name—Name the server using an ASCII string of up to 48 characters. If server_name is not
specified, then it is assumed to be null (any server name).
-t {allow | deny | nodial}
199
ASYNC ROUTER AR-P, AR-5, AND SYNC ROUTER REFERENCE MANUAL
Specify the type of filter to be used.
allow—Allows any packet that matches the filter specification to pass through the router.
deny—Drops packets that matches the filter specification.
nodial—Only drops packets that would make the destination interface dial. Otherwise, the packet is
passed on. Use filters to keep hosts outside of your organization from initiating calls on your phone
line and increasing your phone bills.
[-f {inbound | outbound}]
Specify whether the filter applies to incoming or outgoing packets. If neither parameter is specified,
then the filter applies to both types of packets.
inbound—incoming packets.
outbound—outgoing packets.
[-o {before | after} existing_name]
Change the order of filters in the filter list. If nothing is specified then the filter is inserted at the end of
the list.
before—insert the filter before existing_name.
after—insert the filter after existing_name.
existing_name—Enter a filter name already in the RIP filter list.
[-h {hopcount}]—Specify a hops limit:
Places a limit on the number of IPX router hops visible to the Router. This can be used on large
networks as a security feature to limit access from branch offices to a small area on the your local
network. The sap command shows server names and the number of hops required to get to a
particular server. Note the server name and the number of hops. See the first example.
ripfilter delete name
Deletes the specified filter.
name—A 1 to 6 character ASCII identifier chosen by the user to easily reference filter expressions.
Each filter expression must have a unique name.
ripfilter {enable | disable}
Enables or disables RIP packet filtering. RIP packet filtering is disabled when the unit starts and must be
explicitly enabled.
ripfilter flush
Deletes all RIP packet filters.
ripfilter move name [{before | after} existing_name]
Enables you to change the order of RIP packet filters in the filter list. If no [before | after...] clause is
given, then the entry is placed last in the list.
name—The name whose position you want changed in the filter list.
before—Insert the filter name before existing_name. If before or after are not specified then the
filter is inserted at the end of the list.
200
ASYNC ROUTER AR-P, AR-5, AND SYNC ROUTER REFERENCE MANUAL
after—Insert the filter name after existing_name. If before or after are not specified then the filter is
inserted at the end of the list.
existing_name—Enter a filter name already in the list.
ripfilter status
Displays the list of RIP packet filters.
Example #1
On the headquarters Router enter:
> sap
to display:
Type
FILE SERVER
Name
SALES
Interface
Address
eth0/802.3 1234.000000 1
Hops
2
P
Flg
Next, enter:
ripfilter -h 2 -i eth0/802.3 -t deny -f inbound
With the above configuration, the branch office network will not be able to see more than two router
hops past the Router. This enhances headquarters security and reduce the RIP traffic over the modem
link to improve network performance.
Example #2
Add a filter called rip1 which denies all inbound RIP packets on the Ethernet 802.3 interface. Enter:
ripfilter add rip1 -i eth0 -f inbound -t deny
See also
filter
sapfilter
3.12 route
Manipulate and display the IPX routing tables
Syntax
For modem interfaces only
route add dest_net iface [metric] [ticks]
For Ethernet interfaces only
route add dest_net iface[/frame_type] router_addr [metric] [ticks]
For any interface
route
route broadcast iface[/frame_type] [{enable | disable}]
201
ASYNC ROUTER AR-P, AR-5, AND SYNC ROUTER REFERENCE MANUAL
route -f
route delete dest_net
route update iface[/frame_type] [{enable | disable}]
Description
Adding and deleting IPX routes is unnecessary in all but the most unusual of circumstances. Normally,
the Router software will learn the routes by communicating with other routers and servers on the
network, and the software will maintain valid routing tables without user intervention.
Routes that are added by hand using the route command are called “static” routes, while the “RIP”
routes are those routes that are learned automatically by the Router.
Routes added using the route add subcommands override any existing RIP routes. In those
circumstances the RIP routes become the secondary routes. The system administrator should be sure
that the route being added is correct.
Often there is more than one way to get to a destination. When multiple routes to a destination exist,
the best route is selected as the “primary” route and all other routes are determined to be the
“secondary” routes. Secondary routes are not displayed with the route command. When primary routes
are deleted using the route delete command, a secondary route becomes the primary route.
Subcommands and parameters
For modem interfaces only
route add dest_net iface [metric] [ticks]
Adds routes that send packets out of a modem interface.
dest_net—Network address of the destination machine. Enter it as a hexadecimal number with range
1 to FFFFFFFE.
iface—modem0-4, sync0
metric—The number of hops to the destination. Typically this is the number of additional routers the
packets must pass through to get to the destination. The maximum value is 16, while the default is 1.
ticks—The amount of time that a packet will take to get to the dest_net. Specify ticks in sixtieths of a
second. Default values are Ethernet interface=1, modem interface=5 and synchronous interface=10.
For Ethernet interfaces only
route add dest_net iface[/frame_type] router_addr [metric] [ticks]
Adds routes that send packets out of an Ethernet interface.
dest_net—Network address of the destination machine. Enter it as a hexadecimal number with range
1 to FFFFFFFE.
iface—eth0
/ frame_type—Specified as part of the interface, and can be either 802.3, 802.2, SNAP or II (for
Ethernet Type 2). Use a slash to separate the iface from the frame_type, for example, eth0/802.2. If left
202
ASYNC ROUTER AR-P, AR-5, AND SYNC ROUTER REFERENCE MANUAL
unspecified, the default frame_type is 802.3.
router_addr—The Ethernet address of the next hop router to which packets should be sent. The
router_addr parameter must always be specified for Ethernet interfaces. Enter the router_addr as six
sets of two-digit hexadecimal numbers, separated by colons (“:”).
metric—The number of hops to the destination. Typically this is the number of additional routers the
packets must pass through to get to the destination. The maximum value is 16, while the default is 1.
ticks—The amount of time that a packet will take to get to the dest_net. Specify ticks in sixtieths of a
second. Default values are Ethernet interface=1, modem interface=5, and synchronous interface=10.
For any interface
route
Use route without a subcommand to display all routes listed in the Router’s Route Table. Each route’s
parameters are displayed in seven columns:
Network
Interface
Router/Next Hop
Hops
Ticks
Timer
Flags
• Network—These parameters are the network number,
• Interface—The interface used by the route,
• Router—The node number of the next hop,
• Next Hop—The number of hops to the remote network,
• Ticks—The number of “ticks” to the remote network,
• Timer—The current age in seconds of the route, and
• Flags—One or more flags describing the route. The “ticks” indicate approximately how long it takes
to reach the network. The Route Table flags are:
P—Primary route—All routes will have this flag.
N—New primary route—This route was learned since the last RIP update.
A—Ageless route—The route is currently not being aged.
S—Static route—This route was manually added using the route add subcommand.
route broadcast iface[/frame_type] [{enable | disable}]
Allows the user to enable the sending of periodic RIP broadcasts over the specified interface.
iface—eth0, modem0-4, sync0
/ frame_type—Specified as part of the interface, and can be either 802.3, 802.2, SNAP or II (for
Ethernet Type 2). Use a slash to separate the iface from the frame_type—for example, eth0/802.2. If
left unspecified, the default frame_type is 802.3.
enable—If enabled, broadcasts are sent.
disable—If disabled, broadcasts are not sent.
route -f
Flushes or deletes all RIP routes in the route table. During a flush, static routes are not removed. To
203
ASYNC ROUTER AR-P, AR-5, AND SYNC ROUTER REFERENCE MANUAL
delete a static route, use the route delete command and specify the desired route explicitly. Flushing the
route table does not turn off the Router’s ability to learn new routes. Using RIP, the Router will re-learn
all routes that other routers are advertising on the network, over a period of time.
route delete dest_net
Deletes a route to dest_addr, the network address of the destination network. Enter dest_addr as a
hexadecimal number. If the route being deleted was a static route (added by hand), then any existing
secondary route will become the new primary route to that destination network.
route update iface[/frame_type] [{enable | disable}]
Similar to the route broadcast subcommand, but instead controls the sending of RIP updates (when the
IPX route table changes).
iface—eth0, modem0-4, sync0
/ frame_type—Specified as part of the interface, and can be either 802.3, 802.2, SNAP, or II (for
Ethernet Type 2). Use a slash to separate the iface from the frame_type—for example, eth0/802.2. If
left unspecified, the default frame_type is 802.3.
enable—If enabled, broadcasts are sent.
disable—If disabled, broadcasts are not sent.
Examples
To add a route through the first modem interface to a server on network 12, 5 hops away with the
default number of ticks, enter:
route add 12 modem0 5
To add a route out of the Ethernet interface to a server on network 2F, with the next hop router_addr
having an Ethernet address of 02CF1F302018 and frame type of Ethernet Type 2 (II), also with metric of
6 and ticks equal to 15, enter:
route add 2F eth0/II 02:CF:1F:30:20:18 6 15
To delete the two routes previously added, enter:
route delete 12
route delete 2F
An example of the route command’s output format:
Network
*00002111
BRANCH00000bac
(internal ppp)2204801f
*00001111
JUSTIN2f24f387
MAIN2cc6f6ca
*00002222
*00003333
204
Interface
eth0/802.3
eth0/802.3
modem0
modem0
modem0
modem0
modem0
modem0
Router/Next
02cf1f800013
00001b27ba4b
000000000000 1
740109154a4b
740109154a4b
740109154a4b
740109154a4b
740109154a4b
Hops
1
2
11
2
3
3
3
3
Ticks Timer Flags
2
0
PAS
3
7
P
0
PS
12
46
P
13
46
P
13
46
P
13
46
P
13
46
P
ASYNC ROUTER AR-P, AR-5, AND SYNC ROUTER REFERENCE MANUAL
*00004444
*00000008
*00000009
*0000000a
*0000000b
*00000de2
*00000201
modem0
modem0
modem0
modem0
modem0
modem0
modem0
740109154a4b
740109154a4b
740109154a4b
740109154a4b
740109154a4b
740109154a4b
740109154a4b
3
3
3
3
3
4
4
13
13
13
13
13
23
23
46
46
46
46
46
46
46
P
P
P
P
P
P
P
(* = LAN Network Number)
3.13 sap
Manipulate and display the IPX service table
Syntax
sap
sap add name iface [/frame_type] server_type server_addr [hops]
sap broadcast iface [/frame_type] [{enable | disable}]
sap delete name
sap -f
sap roundrobin [{on | off}]
sap update iface [/frame_type] [{enable | disable}]
Description
Use the sap command to manage the IPX service entries, which the Router software maintains and keeps
in the IPX service table, also called the service table. The IPX service table is used by clients to
determine what services, such as file servers or print servers, are available on the remote network. The
Router supports all service types defined by Novell.
Adding and deleting IPX service-table entries is usually unnecessary. Normally the software running in
the Router will learn about service-table entries by communicating with servers and other routers on the
network, and will maintain valid service tables without user intervention.
Service -table entries that are added by hand using the sap command are called “static” entries to
distinguish them from “dynamic” entries, which are learned automatically by the Service Advertising
Protocol (SAP) software that runs in the Router. Service-table entries added using the sap command can
replace previously learned SAP entries. The system administrator should be sure that a service-table
entry added manually is correct.
There are sometimes cases where there is more than one way to use a service. An example of such a
case is when a file server supports more than one frame type. When multiple ways to use a service exist,
the concept of “secondary” Service table entries is used. In certain circumstances, secondary Service
table entries are used when primary entries are deleted using the sap delete command.
Subcommands and parameters
sap
Issue the sap command without parameters to display the contents of the Router’s service table. The
routes are displayed in six columns:
205
ASYNC ROUTER AR-P, AR-5, AND SYNC ROUTER REFERENCE MANUAL
Name
Type Interface
Address
Hops Flg
• Name—SAP name,
• Type—SAP type,
• Interface—Router interface,
• Address—IPX address,
• Hops—The number of hops to the SAP,
• Flg—Some flags describing the SAP. The flags are:
P—Primary SAP. All routes will have this flag.
N—New primary SAP. This route was learned since the last SAP update.
A—Ageless SAP. This route is currently not being aged.
S—Static SAP. This route was manually added using the sap add subcommand.
sap add name iface [/frame_type] server_type server_addr [hops]
Use the sap add command with parameters to add static entries to the IPX service table.
name—The name assigned to the server. Specify name as an ASCII string up to 48 characters long.
iface—eth0, modem0-4, sync0
/frame_type—Specified as part of the interface, and can be either 802.3, 802.2, SNAP or II (for Ethernet
Type 2). Use a slash to separate the iface from the frame_type—for example, eth0/802.2. If left
unspecified, the default frame_type is 802.3.
server_type—Type of server to be added, and is entered as either a valid text string or a hexadecimal
number in the range 0-FFFF. Valid text strings include:
Unknown, Print_queue, File_server, Job_server, Print_server, Archive_server, Remote_bridge_server,
Advertising_print_server
server_addr—The IPX address of the server. This address is specified as net.node.socket.
hops—The number of additional routers packets must traverse to get to the specified server. The hops
maximum value is 16, with its default value set to 1.
sap broadcast iface [/frame_type] [{enable | disable}]
The sap broadcast subcommand allows the user to enable sending periodic SAP broadcasts over the
specified interface. If enabled, the broadcasts are sent. If not enabled, the broadcasts are not sent.
iface—eth0, modem0-4, sync0
frame_type—Specified as part of the interface, and can be either 802.3, 802.2, SNAP or II (for Ethernet
Type 2). Use a slash to separate the iface from the frame_type, for example, eth0/802.2. If left
unspecified, the default frame_type is 802.3.
enable—If enabled, broadcasts are sent.
disable—If disabled, broadcasts are not sent.
sap delete name
206
ASYNC ROUTER AR-P, AR-5, AND SYNC ROUTER REFERENCE MANUAL
The sap delete subcommand deletes a Service Table entry.
name—The name of the service to be deleted. If the entry being deleted was added by hand (i.e. is a
static entry), then any existing secondary entry will become the new primary entry to the service.
Specify name as an ASCII string up to 48 characters long.
sap -f
Flushes the Service Table. All dynamic SAP entries will be removed from the Service Table. Static entries
must be deleted explicitly by using sap delete. Note that flushing the Service Table does not turn off the
Router’s ability to learn about services. Over time the Router may re-learn all services that other routers
are advertising on the network, through the use of SAP.
sap roundrobin [{on | off}]
Without any arguments displays the status of the roundrobin feature, that is, on or off.
{on | off}—Controls Get Nearest Server responses generated from the Router.
on—Roundrobin on is useful when the client machine doesn’t care which available server is used, or
when it is desirable to distribute the workload over multiple servers.
off—Roundrobin off is useful when you want to limit which server is used.
You cannot assume that a particular server will be used when there are multiple servers in use,
regardless of the state of the roundrobin parameter. When a client desires to use one specific server, use
the NetWare preferred server option on your client to explicitly specify the server.
In NetWare, a client machine broadcasts a “Get Nearest Server” request, asking for the location of the
closest server of a particular type. Typically this is a file server, although any type of server supported by
Netware is possible. In the case that several servers are equally close (same number of hops and transport
time), the router may return any of the equally-close servers. The Router actually returns the server it
learned about first when there are multiple equally-close servers. Turning roundrobin on changes this,
so that the Router will return a different nearest server each time it is queried for nearest server and
there are equally-close servers. When there is one or more servers on the local net, the Router will not
return any information about the nearest server. The local servers themselves will respond.
sap update iface [/frame_type] [{enable | disable}]
sap update is similar to sap broadcast, with the exception that it controls sending SAP updates (when the
IPX SAP table changes).
iface—eth0, modem0-4, sync0
frame_type—Specified as part of the interface, and can be either 802.3, 802.2, SNAP, or II (for
Ethernet Type 2). Use a slash to separate the iface from the frame_type—for example, eth0/802.2. If
left unspecified, the default frame_type is 802.3.
enable—If enabled, broadcasts are sent.
disable—If disabled, broadcasts are not sent.
Examples
The sap output format follows:
Name
Type
Interface
Address
Hops
Flags
207
ASYNC ROUTER AR-P, AR-5, AND SYNC ROUTER REFERENCE MANUAL
remote
RNS
BRANCH
BRANCH
hq
JUSTIN
RNS
RNS
MAIN
MAIN
rolo
Hollis
nmstest
Router
eth0/802.3
NDS
eth0/802.3
NW 386
eth0/802.3
FILE SERVER eth0/802.3
Router
modem0
FILE SERVER modem0
NDS
modem0
NTS
modem0
NW 386
modem0
FILE SERVER modem0
Router
modem0
Router
modem0
Router
modem0
00002111.02CF1F800013.87BE
00000BAC.000000000001.4006
00000BAC.000000000001.8104
00000BAC.000000000001.0451
00001111.02CF1F800022.87BE
2F24F387.000000000001.04513
2CC6F6CA.000000000001.4006
2CC6F6CA.000000000001.0005
2CC6F6CA.000000000001.8104
2CC6F6CA.000000000001.0451
00001111.00801B027488.87BE
00001111.00801B02742B.87BE
00001111.00801B024DD7.87BE
1
2
2
2
3
PA
P
P
P
P
P
3
3
3
3
3
3
3
P
P
P
P
P
P
P
3.14 sapfilter
Filter SAP (service advertising protocol) packets using the SAP filter list
Syntax
sapfilter add name {
[-i iface[/frame_type]]
[-q query_type]
[-s server_type]
[-n server_name]
}
-t {allow | deny | nodial}
[-f {inbound | outbound}]
[-o {before | after} existing_name]
[-h {hopcount}]
sapfilter delete name
sapfilter {enable | disable}
sapfilter flush
sapfilter move name [{before | after} existing_name]
sapfilter status
Description
The Service Advertising Protocol (SAP) exchanges services information between IPX routers and Novell
servers. Use the sapfilter command to configure and modify filters for SAP packets. If enabled, all
incoming and outgoing SAP packets can be filtered through SAP filters.
There are three IPX filter lists:
• General (filter command)
• RIP (ripfilter command)
• SAP (sapfilter command)
Packets are checked for filter matches using those three lists in that order. Filtering restrictions apply
to packets destined for the Router and those transitioning through the Router. The result of passing a
packet to the filtering module is a decision to allow or deny further processing of the packet. The next
208
ASYNC ROUTER AR-P, AR-5, AND SYNC ROUTER REFERENCE MANUAL
hop is not considered.
The filtering is based on a prioritized list of filter expressions. Filter expressions are added to the
Router through use of the filter, ripfilter, and sapfilter commands. The action specified in the first filter
expression found in the Filter list that matches the packet in question is applied.
All IPX filtering is disabled by default. Filtering takes effect when the enable command for a filter list
(General, RIP or SAP) is entered by the user. Filter list entries stay in place across restarts only if the
config save command is entered before restarting.
There is no notion of filter modes. The Filter list can be a mix of allowed and denied
address/protocol/port/interface/flag/direction specifications.
The default action if no match is found is to allow the packet. You can override this by specifying a
filter expression with wildcard address entries as the lowest-priority filter expression.
Subcommands and parameters
sapfilter add name
Adds a SAP packet filter you name and assigns it the options and parameters specified below:
name—A 1- to 6-character ASCII identifier chosen by the user to easily reference filter expressions.
Each filter expression must have a unique name.
{[-i iface [/frame_type]]—Specify a legal interface.
iface—eth0, modem0-4, sync0
/frame_type—Specified as part of the interface, and can be either 802.3, 802.2, SNAP, or II (for
Ethernet Type 2). Use a slash to separate the iface from the frame_type—for example, eth0/802.2. If
left unspecified, the default frame_type is 802.3.
[-q query_type]—Specify the type of query.
query_type—Enter either request or response. If the query_type is not specified, it is assumed to be
both, request and response.
[-s server_type]—Specify the type of server.
server_type—indicates the type of server in the SAP packet on which to filter. Specify the server_type as a
hexadecimal number (1 to FFFF). The server_type can also be specified as one of the following
keywords: Wild, Unknown, Print Queue, File_server, Job_server, Print_server, Archive_server,
Remote_bridge_server, or Advertising_print_server. If no server_type is specified, then all server types
are used.
[-n server_name]}—Specify the server name.
server_name—Name the server using an ASCII string of up to 48 characters. If server_name is not
specified, then it is assumed to be null (any server name).
[-f {inbound | outbound}]
Specify whether the filter applies to incoming or outgoing packets. If neither parameter is specified,
then the filter applies to both types of packets.
inbound—incoming packets.
outbound—outgoing packets.
-t {allow | deny | nodial}—Specify the type of filter to be used.
209
ASYNC ROUTER AR-P, AR-5, AND SYNC ROUTER REFERENCE MANUAL
allow—Allows any packet that matches the filter specification to pass through the router.
deny—Drops packets that matches the filter specification.
nodial—Only drops packets that would make the destination interface dial. Otherwise, the packet is
passed on. Use filters to keep hosts outside of your organization from initiating calls on your phone
line and increasing your phone bills.
[-o {before | after} existing_name]
Change the order of filters in the filter list. If before or after is not specified, then the filter is inserted at
the end of the list.
before—insert the filter before existing_name.
after—insert the filter after existing_name.
existing_name—Enter a filter name already in the list.
[-h {hopcount}]—Specify a hops limit
Places a limit on the number of IPX router hops visible to the Router. This can be used on large
networks as a security feature to limit access from branch offices to a small area on the your local
network. Use ripfilter -h, if possible.
sapfilter delete name
Deletes the specified filter.
name—A 1- to 6-character ASCII identifier to reference a SAP filter entry you wish to delete.
sapfilter {enable | disable}
Enables or disables SAP packet filtering. SAP packet filtering is disabled on startup and must be explicitly
enabled.
enable—Enable SAP packet filtering.
disable—Disable SAP packet filtering. This is the default condition.
sapfilter flush
Deletes all SAP packet filters.
sapfilter move name [{before | after} existing_name]
Enables you to change the order of packet filters in the SAP filter list. If you do not specify before or after,
then the entry is placed last in the list.
name—The name of the filter you want to move.
before—Optional. Move name to the position in the list before existing_name. If you do not specify,
name is moved to the end of the list.
after—Optional. Move name to the position in the list after existing_name. If you do not specify, name
is moved to the end of the list.
existing_name—Optional. The name of the filter in the filter list before or after which you want to
position name, the filter you want to move. If you do not specify, name is moved to the end of the list.
210
ASYNC ROUTER AR-P, AR-5, AND SYNC ROUTER REFERENCE MANUAL
sapfilter status
Displays the list of SAP packet filters.
Example
Add a filter called “sap1” to allow only file server services (service type 4) received from eth0 to be
routed. Create a second filter called “sap2” which denies all other inbound packets. Enter:
sapfilter add sap1 -s 4 -f inbound -i eth0 -t allow
sapfilter add sap2 -i eth0 -f inbound -t deny -o after sap1
See also
filter
ripfilter
3.15 spoof
Configure/display which packets to spoof
Syntax
spoof iface watchdog [{on | off}]
Description
The spoof command configures which packets to spoof. Spoofing is the act of responding to periodic
packets received on the Ethernet interface while a corresponding modem interface is disconnected. If
the Router allowed the packets through, the modem interface would never disconnect. Spoofing is
usually performed for packets that are periodically sent between the local and remote networks. The
Router default is to enable spoofing for all modem interfaces. Any interface (line) configured for client
operation will automatically have the spoof watchdog off for that interface.
Subcommands and parameters
Only “non-Ethernet” interfaces are allowed for iface.
iface—modem0-4, sync0
on—Specifies that spoofing is enabled for a given interface. Enabling watchdog spoofing allows
remote users to not lose their NetWare server connection at the other end of the modem link, when
the modem line disconnects. If the modem disconnects, the user can simply access the server volume
again, the modem will redial, and the session will continue, after a 30- to 60-second delay to make the
modem connection.
off—Specifies that spoofing is disabled for a given interface. If neither on nor off is specified, then
the current state of spoofing is returned. If watchdog spoofing is disabled, then each time the
modem disconnects (usually due to an idle modem line), the user’s connection will time out at the
server. NetWare servers generally time out lost user connections after 10 minutes, although this time
is configurable. After the timeout, the server closes the user’s files and logs the user out. If the user
accesses the NetWare server again, the user’s machine will hang, an error message will be displayed,
the application may abort, and the user will have to log back onto the server.
211
ASYNC ROUTER AR-P, AR-5, AND SYNC ROUTER REFERENCE MANUAL
3.16 tcp/ip
Change the Router mode to TCP/IP
Syntax
tcp/ip [tcp/ip_command [param]...]
Description
When in IPX mode, use the tcp/ip command to enter the TCP/IP mode. The Router is always in one of
two modes, and the prompt always indicates the mode:
(tcp/ip)Router>
(ipx)Router>
Router is in TCP/IP mode
Router is in IPX mode
The protocol mode is set on a per-session basis. Individually logged in users can have different modes
set. Depending upon what mode it is in, the Router software selects the command set and help/usage
strings available to the user for the current mode (protocol).
You can also execute a command from a different mode by prefixing the command with the mode. For
example, to dump the TCP/IP routing table while in IPX mode, at the prompt enter
(ipx)Router> tcp/ip route
This command will switch to the TCP/IP mode, execute the route command, and then return to the
IPX mode.
212
ASYNC ROUTER AR-P, AR-5, AND SYNC ROUTER REFERENCE MANUAL
4. TCP/IP-only Commands
The Router is always in one of two modes. The prompt always indicates the current mode:
• (ipx)Router>
Router is in IPX mode
• (tcp/ip)Router>
Router is in TCP/IP mode
The commands in this chapter are for TCP/IP mode only for TCP/IP network environments.
Commands which work the same way in both IPX and TCP/IP environments are documented in
Chapter 2. Commands for IPX mode only are documented in Chapter 3. Several commands operate in
both IPX and TCP/IP modes with parameters that vary per mode. These commands are documented
with their appropriate parameters in both chapters.
From TCP/IP mode, either use the ipx command to enter IPX mode or use the prefix “ipx” with the
command.
TCP/IP-only commands are organized in this chapter alphabetically:
• arp—display or change ARP protocol parameters
• domain—configure for Internet domain name service (DNS)
• filter—configure/display TCP/IP filter information
• icmp—display ICMP protocol status
• ifconfig—display or change TCP/IP network parameters
• ip—display or change TCP/IP protocol parameters
• ipx—change to IPX mode
• netstat—display TCP/IP network statistics
• ping—send an ICMP packet to remote host
• rip—display or change RIP protocol parameters
• route—display or change TCP/IP routing table
• snmp—display or change SNMP protocol parameters
• syslog—display or configure system log
• tcp—display or configure TCP protocol parameters
• traceroute—trace the route to a host
• udp—display UDP protocol status
213
ASYNC ROUTER AR-P, AR-5, AND SYNC ROUTER REFERENCE MANUAL
4.1 Interface Addresses
The iface[/frame_type] parameters indicate the interface and frame type. iface is specified as one of the
following, depending on your Router model: eth0, sync0, modem0, modem1, modem2, modem3, or
modem4. If eth0 is selected, the frame_type can be specified as part of the interface, and can be either
802.3, 802.2, SNAP, or II (for Ethernet Type 2). Use a slash to separate the iface from the frame_type—for
example, eth0/802.2. If left unspecified, the default frame_type is 802.3.
For the Ethernet interface, the iface parameter is a string of the form eth0/frame_type. For all other
interfaces, iface is of the form modemX. Examples are:
ethN—Ethernet N interface, raw 802.3 frame type
ethN/802.3—Ethernet N interface, raw 802.3 frame type
ethN/II—Ethernet N interface, Ethernet Type II frame type
ethN/SNAP—Ethernet N interface, 802.3 SNAP frame type
ethN/802.2—Ethernet N interface, 802.3 LLC frame type
modem N—Modem N interface; modems are numbered from 0 to 4, depending on your Router
model. See the User’s Guide (at the front of this manual) for details.
sync0—Synchronous interface (Sync Router only)
4.2 arp
Configure/display address-resolution-protocol information
Syntax
arp
arp [host_addr]
arp -a
arp -d host_addr
arp -f
arp -p [{on | off}]
arp -s host_addr ether_address [pub]
214
ASYNC ROUTER AR-P, AR-5, AND SYNC ROUTER REFERENCE MANUAL
Description
The arp command displays and modifies the Internet-to-Ethernet address translation tables used by the
address resolution protocol (ARP).
If an illegal option is entered, the usage line is displayed.
Subcommands and parameters
arp—Display the entire ARP table.
arp [host_addr]—Display the current ARP entry of a host.
host_addr—The address of the host whose ARP table you want displayed.
arp -a—Display all current ARP entries.
arp -d host_addr—Delete an entry for a host.
host_addr—The address of the host whose ARP table entry you want deleted.
arp -f
Flush the temporary entries in the ARP table. Permanent entries are not affected. Temporary entries are
entries learned dynamically. Permanent entries are entered through the User Interface or SNMP.
arp -p—Display the status of proxy ARP.
arp -p [{on | off}]
Change the status of proxy ARP.
on—Enable proxy ARP.
off—Disable proxy ARP. This is the default.
arp -s host_addr ether_address [pub]
Create an ARP entry for the host specified by its host and Ethernet addresses.
host_addr—The address of the host for which you will create an ARP entry.
ether_address—The Ethernet address of the host. The Ethernet address has six hexadecimal digits
separated by colons.
pub—Optional. If specified, the ARP entry is published. The system will respond to ARP requests for
host_addr even though the host address is not its own.
215
ASYNC ROUTER AR-P, AR-5, AND SYNC ROUTER REFERENCE MANUAL
4.3 domain
Configure the Internet Domain Name Service (DNS)
Syntax
domain addserver host_addr [host_addr...]
domain dropserver host_addr [host_addr...]
domain listservers
domain query host_addr
domain retry [count]
domain suffix [domain_suffix]
domain cache list
domain cache size [count]
Description
The domain command configures the Internet Domain Name Service. This is used to map Internet
addresses to a more familiar textual name.
Subcommands and parameters
domain addserver host_addr [host_addr...]
Adds the Internet address to the router list of domain name servers.
host_addr—The Internet address of the device being added to the list.
domain dropserver host_addr [host_addr...]
Removes one or several devices from the router list of domain name servers.
host_addr—The Internet address(es) of the device(s) being removed.
domain listservers
Displays the router list of domain name servers.
domain query host_addr
Displays all resource records associated with the host.
host_addr—The Internet address of the host whose resource records you wish to view.
domain retry [count]
Set or display the number of times a hostname lookup is attempted before giving up.
count—Maximum number of lookups allowed.
domain suffix [domain_suffix]
Set or display the default suffix to add to a domain name when the name contains no suffix.
domain_suffix—The default suffix to add to domain. If this parameter is omitted, the current suffix is
displayed.
domain cache list
Display the current cache of domain names that have been found.
216
ASYNC ROUTER AR-P, AR-5, AND SYNC ROUTER REFERENCE MANUAL
domain cache size [count]
Set or display the current number of domain names that the cache can hold.
count—Enter the maximum number of domain names. If this parameter is omitted, the current setting
is displayed.
4.4 filter
Configure/display IP filter information
Syntax
filter add name {
[-s {[src_addr/bits] [src_port]}]
[-d {[dest_addr/bits] [dest_port]}]
[-p proto]
[-l [{syslog | trap | both}]]
[-i iface]
[-f {inbound | outbound}]}
-t {allow | deny | nodial | unreach}
[-o {before | after} existing_name]
filter delete name
filter {enable | disable}
filter flush
filter move name [{before | after} existing_name]
filter spoof iface [{allow | deny}] [syslog] [trap]
filter status
filter try src_addr [-s port] dest_addr [-d port] [-p proto]
Description
The filter command configures or displays the Internet Protocol (IP) filters.
Subcommands and parameters
filter add name
The filter add subcommand adds filter expressions (FEs) to a list that is stored in prioritized order, with
the first position assigned the highest-priority filter expression. Incoming and outgoing datagrams are
checked against the entry in the highest-priority position first.
Several options to the filter add subcommand exist. Options, variables, and parameters are described
next. It is important to note that one of the following options is required:
-s, -d, -p, -l, -i, or -f
If an option has no default, and is not specified in the filter entry, no match is attempted for that field.
filter add name
name—A 1 to 6 character ASCII identifier chosen by the user to easily reference filter expressions. Each
filter expression must have a unique name. Names beginning with a “$” are reserved for system use
(as IP “firewall” filter names).
[-s {[src_addr/bits] [src_port]}]
217
ASYNC ROUTER AR-P, AR-5, AND SYNC ROUTER REFERENCE MANUAL
Set the source address and length of the subnet mask:
src_addr/bits—Specify the source address and the significant number of high-order contiguous bits
used as a subnet mask to attempt matches. If no bits are specified, a default mask of 32 bits is
assumed.
src_port—Specify the source port. The keyword any may be entered for src_addr or src_port. When
src_addr is any, a mask should not be specified, so that a wildcard condition may be applied to source
and destination addresses.
The src_port can be omitted (i.e. any port will match), a single 16-bit unsigned (decimal) number, a
number followed immediately by “+” (meaning nnn-65535), or two numbers joined by a dash (for
example, 6000-6063) meaning that range, with 6000 and 6063 also included.
[-d {[dest_addr/bits] [dest_port]}]
Set the destination address and/or destination port.
dest_addr/bits—Specify the destination address and the significant number of high-order contiguous
bits used as a subnet mask to attempt matches. If no bits are specified, a default mask of 32 bits is
assumed.
dest_port—Specify the destination port. The keyword any may be entered for destination address or
destination port. When the destination address is any, a mask should not be specified, so that a
wildcard condition may be applied to source and destination addresses.
The dest_port can be omitted (i.e. any port will match), a single 16-bit unsigned (decimal) number, a
number followed immediately by “+” (meaning nnn-65535), or two numbers joined by a dash (for
example, 6000-6063) for a range, with 6000 and 6063 also included.
[-p proto]—Set the protocol type.
proto—Specify an integer greater than 0 and less than 65536. In addition to numbers, keywords can
also be used:
ICMPRED—The protocol field contains 1 and the ICMP subtype field is “redirect.”
TCPNEW—The protocol field contains 6 and the TCP flags field contains the SYN bit but not the
ACK bit; this packet requests the opening of a new connection.
TCPESTAB—The protocol field contains 6 and the TCP flags field either contains the ACK bit or
does not contain the SYN bit; i.e., this packet is not establishing a new connection.
SRCROUTE—The packet contains a source-routing option. (It matches with any protocol-field
value.)
[-l [{syslog | trap | both}]]
Select logging to occur.
syslog—send warnings to syslog
trap—send SNMP traps
both—send warnings to syslog and SNMP traps
[-i iface]—Specify a single interface to which the filter applies.
The default for the iface is all interfaces.
218
ASYNC ROUTER AR-P, AR-5, AND SYNC ROUTER REFERENCE MANUAL
iface—eth0, modem0-4, sync0
[-f {inbound | outbound}]
Specify the flow direction to which an entry applies.
Filter entries may be created to restrict inbound, outbound, or traffic flowing in both directions. The
default value is both.
-t {allow | deny | nodial | unreach}
Specify the type of filter.
allow—allows any packet that matches the filter specification to pass through.
deny—drops any packet that matches the filter specification.
nodial—only drops packets that cause the destination interface to dial. Otherwise, the packet is
passed on. Use this option to prevent hosts outside the organization from initiating a call on your
phone line and causing unnecessarily expensive phone bills.
unreach—drops the packet and returns a “Destination Unreachable” packet to the sender.
[-o {before | after} existing_name]
Specifies order, and thus priority, of filters in the list.
The default position is at the end. The first entry is highest priority.
before—Position the filter expression name before the filter expression existing_name in the FE list.
after—Position the filter expression name after the filter expression existing_name in the FE list.
existing_name—The name of a filter expression currently residing in the FE priority list which you
want to use to orient the placement of a new FE in the list of filter priorities.
filter delete name
The filter delete subcommand deletes the specified filter.
name—A 1- to 6-character ASCII identifier defining the unique filter entry (FE) name you wish to
delete.
filter {enable | disable}
The filter {enable | disable} subcommand enables or disables IP packet filtering. TCP/IP packet filtering
is disabled by default and must be explicitly enabled.
filter flush
The filter flush subcommand deletes all TCP/IP packet filters.
filter move name [{before | after} existing_name]
The filter move subcommand enables you to change the order of IP packet filters in the filter list. If no
before | after clause is specified, the filter entry is placed last in the filter list (lowest priority).
name—A 1 to 6 character ASCII identifier to reference a filter entry (FE) you wish to move. Each FE
has a unique name. A list of FEs is recorded in order of priority, with the first position assigned the
highest priority. Incoming and outgoing packets are checked against the entry in the highest priority
position first.
219
ASYNC ROUTER AR-P, AR-5, AND SYNC ROUTER REFERENCE MANUAL
before—Position the filter expression name before the filter expression existing_name in the FE list.
after—Position the filter expression name after the filter expression existing_name in the FE list.
existing_name—The name of a filter expression currently residing in the FE priority list which you
want to use to orient the placement of a new FE in the list of filter priorities.
filter spoof iface [{allow | deny}] [syslog] [trap]
Enable detection of packets trying to perform “IP address spoofing,” which is a method of getting
data forwarded out of a network, from an external location.
A packet is “IP address spoofing” if it arrives on a Router interface with a source address, that is
inappropriate for that interface. For example, if a packet arrives at an external Router interface
(modem0, etc.) with a source address that is always internal to your network (i.e., it should always be
via eth0), then the packet is “IP address spoofing.”
The filter spoof command enables the Router to ensure that an incoming packet arrives on the
interface that the Router would use to send packets to the source address of that packet. Essentially,
the filter spoof command discards packets that imply that they are sourced from one interface, but
actually arrived on a different interface.
[{allow | deny}]—The deny option causes “IP address spoofing” packets to be discarded, and the
allow option allows these packets to be forwarded. By default, spoof filters are disabled (allow).
[syslog]—The syslog option enables a syslog message to be generated when an “IP address spoofing”
packet is detected.
[trap]—The trap option enables an SNMP trap to be generated when an “IP address spoofing”
packet is detected.
filter status—Displays the list of IP packet filters
filter try src_addr [-s port] dest_addr [-d port] [-p proto]
Use the filter try command to test your filters. The filter try command specifies test packets that are
submitted to your current filter list, and returns the result. For explanations of the parameters, refer
to previous filter command descriptions.
4.5 icmp
Display ICMP protocol information
Syntax
icmp status
Description
The icmp status command displays the status of the Internet Control Message Protocol (ICMP), which
consists of ICMP statistics such as the number of ICMP messages received of each type, the number sent,
etc.
220
ASYNC ROUTER AR-P, AR-5, AND SYNC ROUTER REFERENCE MANUAL
4.6 ifconfig
Name
Configure an interface
Syntax
ifconfig iface [address addr[/bits]]
[broadcast addr]
[linkaddr directory_number [/SPID]]
[metric [hops]]
[mtu size]
[netmask mask]
[peer addr [/bits]]
[rip [{active | passive | off}]]
[speed [bps]]
[{up | down}]
Description
The ifconfig command is used to assign an IP address to a network interface and/or to configure network
interface parameters. ifconfig commands are generated from the Router’s config dialogue to define the
network address of each interface present on the router. It may also be used at a later time to redefine
other operating parameters. Used without options, ifconfig displays the current configuration of all
interfaces.
For the Ethernet interface, the iface parameter is eth0. For the modem interfaces, the iface parameter is
modem0, modem1,...modem4, depending on the model of your Router.
Addresses are expressed in the standard Internet dotted-quad notation. If the /bits parameter is
appended to the address, then this is the number of contiguous bits that are used as a subnet netmask. If
the number of bits is not specified, 32 bits are assumed as a default.
If the iface is currently up, you may only specify the down option.
Subcommands and parameters
ifconfig iface
iface—eth0, modem0-4, sync0
address addr [/bits]]
Specify the address to use for this interface. This will also add a route to the routing table for this
interface.
addr—Specify address for interface
/bits—Specify the number of contiguous bits to use as a subnet mask. If the number of bits is not
specified, 32 bits are assumed as a default.
[broadcast addr]
addr—Specify the address to use to represent broadcasts on the network. The default broadcast
address is the address with a host part of all 1’s. The address can be specified as a single hexadecimal
number with a leading 0x or with a dot-notation address.
221
ASYNC ROUTER AR-P, AR-5, AND SYNC ROUTER REFERENCE MANUAL
[metric [hops]]
Sets the hopcount that RIP will use for a link on the specified interface. No matter what the true
hopcount is for a route, administrators typically set larger hopcount values on slower interfaces than
on faster interfaces, to establish a preference for the faster interface. By default, the Router sets the
hopcount on modems to 2, and to 1 for all other interfaces.
[mtu size]
Specify the maximum packet size of the interface in bytes. Packets exceeding this length will be
fragmented, before forwarding them through the specified interface.
[netmask mask]
Specify how much of the address to reserve for subdividing networks into subnetworks. The mask
includes the network part of the local address and the subnet part, which is taken from the host field
of the address.
mask—Can be specified as a single hexadecimal number with a leading 0x or with a dot-notation
address. The mask contains 1’s for the bit positions in the 32-bit address which are to be used for the
network and subnet parts, and 0’s for the host part. The mask should contain at least the standard
network portion, and the subnet field should be contiguous with the network portion. This value
overrides any /bits parameter specified in the address subcommand.
[peer addr [/bits]]
Specify the IP address and subnet mask bits of the PPP device at the other end of the WAN interface.
This command causes a route to be added to the specified sub-network.
addr—Specify the address to use. The address can be specified as a single hexadecimal number with a
leading 0x or with a dot-notation address.
/bits—Specify the number of bits reserved for the subnet mask. The default is 32.
[rip [{active | passive | off}]]
If specified for the Ethernet interface, the active keyword enables routing information protocol
(RIP) broadcasts on the Ethernet every 30 seconds with split horizon processing, when the interface
is marked “up.”
active—For an Ethernet interface, enables RIP broadcasts on the Ethernet every 30 seconds with split
horizon processing, when the interface is marked “up.”
For a WAN interface, Sends RIP updates every 60 seconds to the WAN peer once a connection is
established if specified on a WAN interface. Updates are sent with split horizon processing enabled.
RIP updates will not keep a dial-up link active, and will only be sent if the other traffic is keeping the
link up.
passive—Causes the Router to listen for RIP updates on the interface specified, in order to learn
routes available through that interface.
off—Prevents the Router from sending any RIP updates, and causes the Router to ignore RIP
updates that are received.
[speed [bps]]
speed—The speed subcommand allows you to change the speed of the connection between the
222
ASYNC ROUTER AR-P, AR-5, AND SYNC ROUTER REFERENCE MANUAL
Router and its modem, sync and ISDN interfaces.
bps—bits per second. Typical choices are 38400 bps for V.34 modem interfaces, 57600 bps for
synchronous interfaces, and 115200 bps for ISDN interfaces.
[{up | down}]
up—Mark an interface “up.” The PPP state of point-to-point interfaces is set to “starting.”
down—Mark an interface “down.” When an interface is marked “down,” the system will not attempt
to transmit messages through that interface. If possible, the interface will be reset to disable
reception as well. This action does not automatically disable routes using the interface. The PPP state
of point-to-point interfaces is reset to “initialized.”
4.7 ip
Configure/display IP protocol information
Syntax
ip address [host_addr]
ip routing [{enable | disable}]
ip rtimer [seconds]
ip status
ip ttl [hops]
Description
Use the ip command to configure the Internet Protocol (IP) or display its status.
Subcommands
ip address [host_addr]
Sets the IP address of the router. This is the address that the administrator uses when connecting to the
router or determining reachability to the router.
host_addr—IP address of the router.
ip routing [{enable | disable}]
Enables or disables IP routing on the Router. If neither enable or disable is entered, the Router displays
the current state of IP routing (enabled or disabled). The default value is enabled.
enable—Enables IP routing on the Router
disable—Disables IP routing on the Router
ip rtimer [seconds]
Sets or displays the IP re-assembly timeout.
seconds—The default is 30 seconds.
223
ASYNC ROUTER AR-P, AR-5, AND SYNC ROUTER REFERENCE MANUAL
ip status
Displays the IP statistics such as total packets, number of bad packets, etc.
ip ttl [hops]
Sets or displays the IP time-to-live value placed in each outgoing IP packet.
hops—The default value for hops is 255.
4.8 ipx
Change to IPX mode
Syntax
ipx [ipx_command param...]
Description
When in TCP/IP mode, use the ipx command to enter IPX mode. The Router is always in one of two
modes, and the prompt always indicates the current mode:
• (ipx)Router>
Router is in IPX mode
• (tcp/ip)Router>
Router is in TCP/IP mode
The protocol mode is set per-session. Individually logged-in users can have different modes set.
Depending upon what mode it is in, the Router software selects the command set and help/usage strings
available to the user for the current mode (protocol).
The user can also execute a command from a different mode by prefixing the command with the mode.
Example
For example, to display the IPX routing table while in TCP/IP mode, at the prompt enter
(tcp/ip)Router> ipx route
This command will switch to the IPX mode, execute the route command, and then return to the
TCP/IP mode.
4.9 netstat
Display network statistics
Syntax
netstat [-a] [-s] [-r] [-m]
Description
Use the netstat command to display the contents of various network-related data structures in various
formats, depending upon the options you select.
Subcommands and parameters
-a—Show the state of all active sockets. The display for each active socket shows the local and remote
address, the send and receive queue sizes in bytes, the protocol, and the internal state of the
protocol.
224
ASYNC ROUTER AR-P, AR-5, AND SYNC ROUTER REFERENCE MANUAL
The possible state values for TCP sockets are as follows:
• CLOSED: the socket is not being used.
• LISTEN: Listening for incoming connections.
• SYN_SENT: Actively trying to establish connection.
• SYN_RECEIVED: Initial synchronization of the connection under way.
• ESTABLISHED: Connection has been established.
• CLOSE_WAIT: Remote shut down: waiting for the socket to close.
• FIN_WAIT_1: Socket closed, shutting down connection.
• CLOSING: Closed, then remote shutdown: awaiting ack.
• LAST_ACK: Remote shut down, then closed: awaiting ack.
• FIN_WAIT_2: Socket closed, waiting for shutdown from remote.
• TIME_WAIT: Wait after close for remote shutdown retransmission.
-s—Show per-protocol statistics. For each protocol type, a complete set of statistic counters is displayed.
This includes such counters as total number of packets sent and received, number of bad packets
received, time-outs, etc.
-r—Show the routing table. Using this option is equivalent to the route command. Refer to route in
Section 4.12, for a description of routing information and format.
-m—Show the memory statistics recorded for the network buffer pool. These statistics include amount
of free memory, number of failed memory allocations, number of memory errors, and the network
mbuf usage statistics.
4.10 ping
Send an ICMP packet to see if a remote host is alive
Syntax
ping dest_addr
ping dest_addr [packet_size]
ping -s dest_addr [packet_size] [count]
Description
The ping command uses the ICMP protocol’s mandatory ECHO_REQUEST packet to solicit an ICMP
ECHO_RESPONSE from the specified destination address. ECHO_REQUEST packets (pings) consist of
an IP and ICMP header, time stamp space, and an arbitrary number of bytes to pad out the packet. If the
dest_addr responds, ping displays a round-trip time in milliseconds for the exchange and exits. If there is
no response, ping displays the message Target did not respond.
Subcommands and protocols
ping dest_addr
dest_addr—Enter the IP address of the device where packets will be sent. Use standard dotted-quad
notation or the host name if DNS service is available.
225
ASYNC ROUTER AR-P, AR-5, AND SYNC ROUTER REFERENCE MANUAL
ping dest_addr [packet_size]
dest_addr—Enter the IP address of the device where packets will be sent. Use standard dotted-quad
notation or the host name if DNS service is available.
packet_size—Modify the default packet size ping sends, which is 4 octets.
ping -s dest_addr [packet_size] [count]
dest_addr—Enter the IP address of the device where packets will be sent. Use standard dotted-quad
notation or the host name if DNS service is available.
packet_size—Modify the default packet size ping sends, which is 4 octets
count—Enter a count of the number of packets generated. With -s set, ping sends one packet per
second by default, and prints one line of output with round trip time for every ECHO_RESPONSE
received.
4.11 rip
Configure/display Routing Information Protocol information
Syntax
rip accept router_addr
rip add host_addr seconds [flags]
rip delete host_addr
rip duplicate [{on | off}]
rip merge [{on | off]]
rip netmask add net_addr /net_bits /subnet_bits
rip netmask delete net_addr/net_bits
rip netmask list
rip refuse router_addr
rip request router_addr
rip status
Description
The rip command is used to display information about or configure the Routing Information Protocol
(RIP). The RIP protocol is used to automatically transfer routing table information between routers. The
table information is sent at specified intervals and also sent whenever a previously reachable destination
becomes unreachable.
Subcommands and parameters
rip accept router_addr
Remove the router with address router_addr from the RIP filter table, allowing future RIP packets to be
accepted from that router. This is the opposite of the rip refuse subcommand.
router_addr—Enter the address of the router to be removed from the RIP filter table, allowing future
packets to be accepted from it.
rip add host_addr seconds [flags]
Adds an entry to the RIP table. The host with address host_addr is sent the entire IP routing table every
seconds seconds.
226
ASYNC ROUTER AR-P, AR-5, AND SYNC ROUTER REFERENCE MANUAL
host_addr—Enter the address of the host to add to the RIP table.
seconds—Enter the number of seconds of the intervals when the RIP table is updated with this
address.
flags—If set to 1, then split horizon processing is performed for the destination. That is, any IP
routing table entries pointing to the interface to be used to send this update will be removed from
the update. If split horizon processing is not specified, then all routing table entries except those
marked private will be sent at each update.
rip delete host_addr
Remove an entry from the RIP table for the host with address host_addr. This is the opposite of the rip
add subcommand.
host_addr—Enter the address of the host to delete from the RIP table.
rip duplicate [{on | off}]
Allow multiple routes to the same destination to co-exist in the IP routing table.
off—Only one route will be retained for any remote destination. This is the normal IP RIP behavior,
and the default in the Router.
on—Multiple routes to the same destination may be retained in the IP routing table. This is required
for automatic fallback (from a leased sync line to a dialup async modem connection), and will be
automatically set up when such a configuration is created with the config command. The rip
duplicate on command also automatically sets rip merge off.
rip merge [{on | off}]
Enable or disable merging of RIP table entries.
on—Enable merging RIP table entries. When enabled, the table is scanned after processing each RIP
update packet. If an entry is redundant, it is deleted from the table. An entry is considered
redundant if the target(s) it pertains to is routed identically by a less specific entry already in the
table. The target address(es) specified by the entry in question must also match the target addresses
of the less specific entry, and the two entries must have the same interface and router fields.
off—Disable merging RIP table entries.
rip netmask add net_addr /net_bits /subnet_bits
Inform RIP of the netmask to be applied to addresses in incoming routing information packets, to create
the correct routing table entries for networks that do not have 16 bit or 24 bit netmasks. For instance,
the command
rip netmask add 128.66.0.0/16/20
informs RIP that within the class B network 128.66.0.0, 20-bit subnets are used (i.e. the netmask is
255.255.240.0). In order to describe an area with smaller subnets within this network, you could add the
command
rip netmask add 128.66.192.0/20/24
If you create networks where different subnets use different masks, be aware that different RIP
implementations may not be compatible with your network after this is done.
227
ASYNC ROUTER AR-P, AR-5, AND SYNC ROUTER REFERENCE MANUAL
rip netmask delete net_addr/net_bits
Delete netmasks from the list.
net_addr—The network address of the network with the netmasks to be deleted.
net_bits—The bits that comprise the netmask.
rip netmask list
Display a list of the netmasks.
rip refuse router_addr
Cause the Router to refuse RIP packets from the router with address router_addr. This is the opposite of
the accept subcommand.
router_addr—The address of the router from which packets must be refused.
rip request router_addr
Cause the Router to send a RIP Request packet to the router with address router_addr, causing it to reply
with a RIP Response packet containing its routing table.
router_addr—The address of the router to send a RIP Request packet.
rip status
Display the current RIP statistics such as the number of RIP packets sent/received, etc.
4.12 route
Configure/display the IP routing table
Syntax
route
route add dest_addr[/bits] iface router_addr [metric]
route addprivate dest_addr[/bits] iface router_addr [metric]
route add default iface router_addr [metric]
route delete dest_addr[/bits] [iface]
route [-f]
route lookup dest_addr
Description
Use the route command to manually manipulate and display the IP routing table.
Subcommands and parameters
route
Use route without arguments to display all the routes currently in the routing tables. The header display
format is:
Destination Bits Interface Router/Next Hop Metric Timer Use Flags
• Destination—the destination address dest_addr.
228
ASYNC ROUTER AR-P, AR-5, AND SYNC ROUTER REFERENCE MANUAL
• Bits—subnet mask /bits.
• Interface—interface iface on which matching packets are routed.
• Route/NextHop—IP address of the next hop.
• Metric—the number of hops to the destination.
• Timer—seconds left until the route expires. A value of 0 indicates a permanent route.
• Use—the number of times this route has been used.
• Flags—provide information about the route. Possible values for this field are:
T—temporary route that will be deleted when timer value reaches zero. The timer is set at 240
seconds by RIP.
P—private route that RIP will not advertise.
U—trigger route, recently changed but not yet advertised by RIP.
D—the interface associated with this route is currently down.
route add dest_addr[/bits] iface router_addr [metric]
Adds a route to the network indicated by the destination network you specify with:
dest_addr—The address of the network towards which you are defining a route.
/bits—The number of significant contiguous bits in the destination address dest_addr to be used as a
subnet mask for matching. If the number of subnet mask bits is not specified, 32 bits are assumed as
a default.
iface—eth0, modem0-4, sync0
router_addr—The address of the closest router to your Router where packets should be sent first,
called the next hop.
metric—The number of hops to the destination.
route addprivate dest_addr[/bits] iface router_addr [metric]
Add a private route to dest_addr, which will not be advertised by RIP.
dest_addr—The address of the network towards which you are defining a route.
/bits—The number of significant contiguous bits in the address dest_addr to be used as a subnet mask
for matching. If the number of subnet mask bits is not specified, 32 bits are assumed as a default.
router_addr—The address of the closest router to your Router where packets should be sent first,
called the next hop.
metric—The number of hops to the destination.
route add default iface router_addr [metric]
Specifies the next hop router to which packets with no corresponding entry in the routing table will be
sent.
iface—The desired default interface.
229
ASYNC ROUTER AR-P, AR-5, AND SYNC ROUTER REFERENCE MANUAL
router_addr—The address of the closest router to your Router where packets should be sent first,
called the next hop.
metric—The number of hops to the destination.
route delete dest_addr[/bits] [iface]
Deletes a route to dest_addr.
dest_addr—The address of the network towards which you are defining a route.
/bits—The number of significant contiguous bits in the address dest_addr to be used as a subnet mask
for matching. If the number of subnet mask bits is not specified, 32 bits are assumed as a default.
route [-f]
Flushes the dynamically-learned RIP entries from the routing tables.
route lookup dest_addr
Displays the route in the route table for that address (dest_addr).
4.13 snmp
Configure/display Simple Network Management Protocol (SNMP) information
Syntax
snmp set community community_name [-p {ro | rw}] [-t {on | off}]
snmp delete community community_name
snmp set acl community_name host_addr [host_addr...]
snmp delete acl community_name host_addr [host_addr...]
snmp set authtrap {on | off}
snmp set contact contact_string
snmp set location location_string
snmp status [-c [community_name]]
Description
The snmp command is used to configure and to display information about the Simple Network
Management Protocol (SNMP) agent.
NOTE
The Router’s SNMP agent contains support for the Novell IPX MIB, but it does not
support SNMP over IPX. Your SNMP management application must be run over IP.
Subcommands
snmp set community community_name [-p {ro | rw}] [-t {on | off}]
Add a community by specifying its community_name.
-p—access privilege for the community. If the -p option is not specified, the default is ro (read-only).
Read and write access is granted using rw.
-t on—specifies that the Router send SNMP Trap PDUs to hosts in the Access Control List (ACL) of
the community. If the -t option is not specified, the default is off, and SNMP Traps are not generated
230
ASYNC ROUTER AR-P, AR-5, AND SYNC ROUTER REFERENCE MANUAL
to IP hosts in the community ACL.
snmp delete community community_name
Delete the community from the access control database. When a community is removed, its
community_name is invalidated as well as its access control list and access privileges.
community_name
Enter the name of the community.
snmp set acl community_name host_addr [host_addr...]
Use this subcommand to add IP addresses to the community ACL. The community must exist before
issuing this command. Before host names have been added to the empty ACL any host is allowed access
to Router SNMP MIB objects. Once a host is assigned to an ACL, only that host may gain access. IP
addresses are specified in dotted-quad notation, or by name if a Domain Name Service is in use.
snmp delete acl community_name host_addr [host_addr...]
Remove host(s) from the Access Control List of a community.
community_name host_addr
Enter the address(es) of the host to remove.
host_addr
Enter additional addresses if necessary.
snmp set authtrap {on | off}
Enable and disable transmission of SNMP authenticationFailure traps.
on—Enables transmission. When enabled, if an incoming SNMP PDU has insufficient access control
privileges based on community name and source address, then authenticationFailure traps are sent to
all IP addresses in the ACLs of communities configured to receive traps.
off—Disables transmission.
snmp set contact contact_string
Set the name of the person responsible for the node.
contact_string.
Enter the name. The default is “Technical Support.”
snmp set location location_string
Set the system location.
location_string.
The default location is “Computer Room.”
snmp status [-c [community_name]]
Use this subcommand to display the current status of SNMP. The default display with no command-line
parameters includes:
• indication that SNMP is enabled or disabled
• indication that SNMP Authentication Trap transmission is enabled or disabled
• SNMP system variables including sysDescr, sysLocation, sysContact, sysName, and sysUptime
-c—parameter is used to display the contents of the access control database. The community data for
all communities is displayed unless the community_name is specified on the command line. In this
case, the information for the specified community is displayed.
231
ASYNC ROUTER AR-P, AR-5, AND SYNC ROUTER REFERENCE MANUAL
4.14 syslog
Configure/display system logging information
Syntax
syslog {on | off}
syslog address host_addr
syslog class class_value
syslog message message_string
syslog priority priority_value
syslog status
Description
The syslog command sets the configuration of how significant events are recorded to a log that displays
on the system console. The following events cause syslog messages to be generated:
• a remote site dials up
• a remote site dials in
• a critical error occurs
• the router reboots
• informational/debug messages are generated
Once you enter syslog on, the messages are displayed on the Router’s system console, even when the
administrator is not logged onto the console. System log messages with priority LOG_WARNING or
higher (4 through 0) are always sent to the console.
If a host is specified with the address subcommand, messages are also sent to the host with the address
host_addr.
NOTE
The Router uses syslog to log significant events due to IPX and IP traffic. Sent over an
IP network, messages related to significant IPX events are always displayed at the
console, because the Router may be operating in an IPX-only environment, in which a
syslog host does not exist.
Subcommands
syslog {on | off}
on—Disables the local display of system log information. and moves the display to the command
terminal from which it was entered. For example, if the Router is currently displaying syslog messages
on the serial console, entering syslog on from a telnet session moves the syslog messages to the telnet
session.
off—disables local display of the system log information. The syslog on subcommand moves the
display to the command terminal from which it was entered. For example, if the Router is currently
displaying syslog messages on the serial console, entering syslog on from a telnet session will move
the syslog messages to the telnet session.
232
ASYNC ROUTER AR-P, AR-5, AND SYNC ROUTER REFERENCE MANUAL
syslog address host_addr
With no parameters specified this command displays the IP address of the syslog daemon.
host_addr—Enter the address of the host which will receive all syslog messages from the router.
syslog class class_value
Set the class of syslog message to be sent.
class_value—Enter a decimal number from 0 to 31. The default value is 16 (class local0). When
editing /etc/syslog.conf on your UNIX system to enable recording or display of the log, use the
following message class names:
• 16 - local0
• 17 - local1
• 18 - local2
• 19 - local3
• 20 - local4
• 21 - local5
• 22 - local6
• 23 - local7
syslog message message_string
Record a system log message. This is useful for marking events manually or for testing.
message_string—Enter the message you want to record.
syslog priority priority_value
Set the priority of syslog message to send.
priority_value—Enter a number from 0-7. The default is 7, indicating that all messages be sent. When
editing /etc/syslog.conf, use the following priority names:
• 7 - debug
• 6 - info
• 5 - notice
• 4 - warning
• 3 - err
• 2 - crit
• 1 - alert
• 0 - emerg
233
ASYNC ROUTER AR-P, AR-5, AND SYNC ROUTER REFERENCE MANUAL
The priority value indicated is:
• used to filter the local display of syslog messages. All syslog messages are sent to the logging host,
which may do its own filtering.
• used as the priority for the “syslog message” command.
syslog status
Display the current system log configuration.
4.15 tcp
Configure/display the Transmission Control Protocol information
Syntax
tcp irtt [milliseconds]
tcp mss [size]
tcp reset tcb_addr
tcp rtt tcb_addr rtt
tcp status [tcb_addr]
tcp window [size]
Description
The tcp command configures and displays information regarding the Transmission Control Protocol
(TCP). TCP is only used in FTP and telnet servers resident in the Router.
Subcommands and parameters
tcp irtt [milliseconds]
Set the initial round-trip time estimate to milliseconds for new TCP connections. Once the TCP
connection is open, it measures and adapts to the actual round trip time. With no parameters, this
subcommand displays the current initial round-trip time and the round-trip times of past connections.
milliseconds—Enter the estimated number of milliseconds. The default is 5000 milliseconds.
tcp mss [size]
Set the maximum segment size for new TCP connections. With no parameters, this subcommand
displays the current maximum segment size.
size—Enter the maximum segment size in packets.
tcp reset tcb_addr
Reset and deletes a TCP connection specified by the TCB address. Display TCB addresses with the tcp
status subcommand.
tcb_addr—Enter the TCB address of the TCP connection you want to delete.
234
ASYNC ROUTER AR-P, AR-5, AND SYNC ROUTER REFERENCE MANUAL
tcp rtt tcb_addr rtt
Replace the automatically computed round-trip time rtt parameter value in the TCP connection
specified by tcb_addr.
tcb_addr—Enter the TCB address of the TCP connection for which you wish to redefine the round
trip time.
rtt—Enter the new round trip time. The value is expressed in milliseconds.
tcp status [tcb_addr]
Display TCP-level information for TCP connections. Without arguments, all TCP connections are
displayed with their TCB addresses.
tcb_addr—Enter the TCB address of a specific TCP connection to display a detailed report of its TCP
status.
tcp window [size]
Display or set the default receive window size for new TCP connections. With no argument, the current
receive window size is displayed.
size.—Set a default receive window size. This value is expressed in octets.
4.16 traceroute
Trace the route to a host
Syntax
traceroute [-w wait] [-m max_ttl] [-q nqueries] host_addr
Description
This command displays the route that a packet takes to reach a specified host at address host_addr. The
trace starts at the router and uses a series of UDP probe packets with increasing IP Time-To-Live (TTL)
fields to determine the sequence of routers that must be traversed in order to reach the host.
Subcommands and parameters
-w—Set the maximum interval in seconds that traceroute waits for a response at each stage of the trace.
wait—The wait value in seconds. The default is 5 seconds.
-m—Set the maximum IP time-to-live (TTL) value that traceroute uses at each stage of the trace.
max_ttl.—The TTL value in seconds. The default is 30 seconds.
-q—Set the number of UDP probes to send at each stage of the trace.
nqueries—The default is 3 queries.
host_addr—The IP address of the host packets are attempting to reach. Use dotted-quad notation or
the host name where DNS is available.
235
ASYNC ROUTER AR-P, AR-5, AND SYNC ROUTER REFERENCE MANUAL
Example
traceroute to today.earth.cmc.com(222.99.32.116), 30 hops max, 38 byte packets
1 Arrow.Today.CMC.COM (222.99.12.208) 800 ms 640 ms 760 ms
2 Target.Today.CMC.COM (222.99.12.116) 640 ms 620 ms 640 ms
traceroute done:normal (Unreachable Port)
4.17 udp
Display the User Datagram Protocol information
Syntax
udp status
Description
Displays information about the User Datagram Protocol (UDP), such as the UDP statistics and the status
of all UDP receive queues.
236
ASYNC ROUTER AR-P, AR-5, AND SYNC ROUTER REFERENCE MANUAL
Appendix A: System Messages
This appendix contains an alphabetical listing of error and information messages that can appear on
your Router’s serial port console. There are two types of messages: syslog and console. Syslog messages
are generated by the UNIX-style logging system syslog; console messages are generated by the system and
are only generated when there is a console or telnet session active. If your network does not support IP,
syslog messages (sent from the Router) cannot be logged on remote hosts. The messages can be
displayed on the console by using the syslog on command.
NOTE
Important! Because the values of the variables will depend upon your specific network
configuration, host names, parameters selected, etc., all variables contained in
message strings will be shown in italics. Many of the variables also have under_scores
in them.
Syslog messages by group:
• CHAP
• Dialer
• Filter
• Multilink
• IPX
• PAP
• RIP
• SCHAP
• SNMP
• System
Console messages by group:
• ARP
• DIALER
• Filter
• IFCONFIG
• IPFILTER
• IPROUTE
• IPX
• PING
• PPP
237
ASYNC ROUTER AR-P, AR-5, AND SYNC ROUTER REFERENCE MANUAL
• RIP
• SNMP
• SYSTEM
• TCP
• TIP
• TRACE
• TRACEROUTE
A.1 Syslog Messages
This section contains a listing of error messages that the Router collects for the UNIX system logging
system (syslog).
syslog can be configured to send messages to a specified remote IP host (where they are displayed or
logged remotely, according to how the remote syslog daemon is configured), or to the Router’s serial
port console (after the syslog on command has been entered at the console).
The system messages are listed in alphabetical order within defined categories (groups), as they are
displayed on the screen. The groups identify the source module from which the error message
originated. The priority entries (assigned by syslog) indicate which log in syslog that the message is stored
in. Also refer to the syslog command.
A.1.1 CHAP GROUP
iface CHAP failed to verify user_name
The system at the other end of the PPP link presented an invalid username; the Router will disconnect
the line. Reconfigure CHAP with the correct user and password information. Priority: LOG_ERR
iface CHAP Unexpected remote challenge
The remote system has requested CHAP password validation, but this end does not have a userid or
password configured. Use the config modify command to add the CHAP user name. Reboot the local
Router to effect the configuration. When this error occurs, link validation is declared failed and the link
is disconnected. Priority LOG_ERR.
iface CHAP peer says: salutation_string
The information string returned by a peer CHAP authenticator. This string could say Welcome on a
successful connection, or Invalid response on an unsuccessful connection attempt. This message can help
you determine if the link was established successfully. Priority: LOG_INFO.
A.1.2 DIALER GROUP
Account disabled at this time
The client (who is logged in) is being disconnected because their access shift has just expired. Priority:
LOG_WARNING.
iface call failed: reason
The Router has attempted to place a call and failed to connect. Any of the following reasons for failure
may be displayed: NO CARRIER, BUSY, NO DIALTONE, NO ANSWER. Priority: LOG_ERR.
238
ASYNC ROUTER AR-P, AR-5, AND SYNC ROUTER REFERENCE MANUAL
iface canned dialer failed: reason
The Router failed to establish a modem link at the destination, using the factory-configured (canned)
dialup commands; the reason for failure is displayed: NO CARRIER, BUSY, NO DIALTONE, NO
ANSWER. Priority: LOG_ERR.
iface can’t dial: exceeded today’s quota of xxx minutes
The dialup command includes an option to set time quotas to limit the expense during set time
periods, for the cost of long distance telephone lines. Wait until the next day to establish a modem
connection (when the daily quota is reinstated), or explore the option with your network administrator
for extending the quota limit. Priority: LOG_ERR.
iface can’t dial: DCD is high
An attempt to dial out found Data Carrier Detect (DCD) signal already on. DCD must be off to dial
out. Check the telephone line to determine if the remote end is off hook. Check the modem
initialization string with the config show command to verify that the &C1 command is included, and use
the dialup status command to monitor the status of DCD. Priority: LOG_ERR.
iface can’t read dialer script file_name.
The Router was unable to find the specified dialer script, file_name. Be sure the file_name specified in
the dialup command is not misspelled, and verify that the file is on the boot disk. Priority: LOG_ERR.
iface current speed(bps): num
A syntax error was detected while attempting to set the modem speed. This error will cause any dialer
script to terminate prematurely and leave the modem speed unchanged. Correct the syntax error in your
dialup script file and run the script again. Priority: LOG_ERR.
iface dialer script failed failure_message
The dialer script has failed. Since the script file was most likely validated during its setup, check to see
if any of the destination parameters have changed. Continue debugging the dialer script until it is again
validated for use. Priority: LOG_ERR.
iface Dialing for destination_addr
An informational message that appears when dialing is initiated for a remote connection. This message
can help you determine what type of traffic is causing the Router to dial. Priority: LOG_DEBUG.
iface dialup link appears to be up
The Router has dialed a phone number and has established a connection over the interface. Priority:
LOG_INFO.
iface dropping link, exceeded today’s quota of num minutes
The dialup command includes an option to set daily time quotas, to limit the expense for the cost of
long distance telephone lines. Wait until the next day to establish a modem connection, or explore the
option with your network administrator for extending the daily quota limit. Priority: LOG_WARNING.
iface hanging up, status returned: modem_result_code
239
ASYNC ROUTER AR-P, AR-5, AND SYNC ROUTER REFERENCE MANUAL
An abnormal condition has caused the modem to hang up. The modem result code is displayed at the
end of the message. Priority: LOG_ERR.
iface hangup failed
The Router attempted to hang up the phone but the modem did not respond as expected. As a result,
the Router will attempt to re-initialize the modem. Wait to see if re-initialization is successful before
taking any action. If not successful, reboot the Router. Priority: LOG_ERR.
iface hangup re-initialization failed
The Router has unsuccessfully attempted to re-initialize the interface. Try cycling power off then on
again, to reboot the Router. This could be a modem failure. Priority: LOG_ERR
iface hangup took: xxx milliseconds
If the modem hangup took an unusually long time, this message is displayed along with the hangup
time. Priority: LOG_NOTICE.
iface high usage, exceeded today’s quota of num minutes
You can set a quota limit for the amount of telephone online time allowed each day. (See Appendix B
in the User’s Guide at the front of this manual.) This message means that line use has exceeded the
established daily limit. You can wait until the next day when the daily quota is reinstated to make calls, or
request an increase in the daily quota from your network administrator. Priority: LOG_WARNING.
iface incoming call
The Router has sensed an incoming call and has answered the phone. Priority: LOG_NOTICE
iface is busy
The modem was already busy when an attempt was made to dial up a connection. Investigate and
correct the cause of the modem being already busy; then retry. If necessary, cycle the Router power off
then on again. Priority: LOG_ERR.
iface line speed: modem_line_speed
Reports the actual line speed that the two modems have negotiated between themselves. The modem
line speed is different than the serial port speed, as set by the ifconfig modemX speed command. Certain
uncontrollable telephone conditions can cause the modem_line_speed to be lower than expected, and may
also cause the modem line speed message to be absent. The modem line speed message will reappear with
normal telephone line conditions. Priority: LOG_INFO.
iface link idle, hanging up
No data has been transmitted over the modem link for the specified idle timeout and the Router is
dropping the telephone line, as the normal response. Priority: LOG_INFO.
iface link lost, going idle
The Router has sensed a lost carrier signal for reasons unrelated to the local modem. This usually
240
ASYNC ROUTER AR-P, AR-5, AND SYNC ROUTER REFERENCE MANUAL
means that the period of network inactivity has exceeded the idle timer setting in the dialup command.
Priority: LOG_INFO.
iface link stalled, hanging up
A modem link in keepup mode is idle and an attempted connection did not get a response. Try again
later. If problem persists, recycle the power. Priority: LOG_INFO.
iface misconfigured speed, actual_speed speed_tried
An attempt was made to set the serial port to an illegal speed. Correct the error in the dialup command
line and reissue the dialup command to the modem. Priority: LOG_ERR.
iface not initialized, dialer exiting
The modem was not initialized. If using a dialer script, verify that the initialization string is correct and
the command line is in the correct order. Otherwise, cycle the Router power off then on again to try
another modem initialization. If the modem still does not initialize, contact Technical Support. Priority:
LOG_ERR.
iface not ready
The Router has not received the DTR signal and the modem is not functional for unknown reasons.
Cycle the power off and on again. If the problem persists, call Technical Support for assistance. Priority
LOG_WARNING.
iface outdial not allowed
An attempt has been made to dial out from the Router while the interface has been configured for
incoming calls only. Priority: LOG_ERR.
iface redial failed m_response This should say OK
An attempt to redial and establish a modem connection failed with an unexpected modem response
message. The response that is displayed should have been the normal modem OK response. This error
will stop the Router from completing its current function, whether it is dialing from a script, or just reinitializing the modem. Look for a dialer script error, then cycle the Router power from off to on to
restart the Router. Priority: LOG_ERR.
iface time connected: time Pkts sent: num Bytes sent: num Pkts recvd: num Bytes rcvd:
num
Normal usage statistics that are displayed at the end of every session. Priority: LOG_INFO.
iface tip or dialer already active
The interface is currently being used by tip or another dialer. Wait until the interface is not busy or
correct the busy condition. Priority: LOG_ERR.
iface total connections: xxx in: xxx out: xxx
At midnight each day the Router prints a connection report containing status information for total
connections, connections in, and connections out. Priority: LOG_INFO.
iface V.25bis call failed - reason_returned
A dialup connection using the V.25 bis protocol failed. The reason for failure is displayed with this
241
aASYNC ROUTER AR-P, AR-5, AND SYNC ROUTER REFERENCE MANUALNAME
message. This message will almost never be seen because the Router will fall back to V.25 bis only if
limited capabilities of the remote modem force it.
iface V.25bis call timed out
This is a routine notification that a dialup connection (using the V.25 bis protocol) timed out from
inactivity. This message will almost never be seen as the Router will fall back to V.25 bis only if limited
capabilities of the remote modem force it.
modemx timeout was set to 86400 seconds (24 hours), the maximum setting
An attempt was made with the dialup command to set the timeout value higher than permitted. In that
event, the system automatically sets timeout at the maximum allowed setting, and displays the above
message.
Updating modemx (init)
This message is sent after the IPX update command has been issued with the init parameter. This
updates (synchronizes) the local and remote networks. Priority: LOG_DEBUG.
Updating modemx (now)
This message is sent after the IPX update command has been issued with the now parameter. This
updates (synchronizes) the local and remote networks’ IPX service and routing information. Priority:
LOG_DEBUG.
Updating modemx (periodic)
This message is sent after the IPX update command has been issued with the periodic parameter. This
updates (synchronizes) the local and remote networks’ IPX service and routing information. Priority:
LOG_DEBUG.
A.1.3 FILTER GROUP
possible security violation: iface received
proto addr:port -> addr:port
This message indicates that a packet was received on a different interface from that which we would
have used to send data to the originator (of the packet). This message will be displayed every 5 seconds
or so. One of the following conditions exists:
• your site is being attacked with forged packets pretending to come from inside your network
• your network’s routing plan is misconfigured
If your network includes redundant routing such as dial backup for leased synchronous lines, this
message may merely reflect a temporary routing anomaly. In such network configurations, you may have
to allow the packets to flow through, in order for the RIP protocol to establish the new routing pattern
when the call fallback occurs. Also see the “[ip] filter spoof” command.
242
ASYNC ROUTER AR-P, AR-5, AND SYNC ROUTER REFERENCE MANUAL
A.1.4 IPX GROUP
iface Dialing for: source_ipxaddr:socket dest_ipxaddr:socket
This is a routine notification that an IPX dialup connection is being initiated, with the source and
destination IPX addresses identified.
iface Answered call for: source_ipxaddr:socket dest_ipxaddr:socket
This is a routine notification that an IPX dialup connection was answered, with the source and
destination IPX addresses identified.
A.1.5 PAP GROUP
Callback not allowed
A non-Async-Client has attempted to call into the Router. However, the Router has been configured for
security callback. Security callback only works with Async Client clients. Priority: LOG_ERR.
iface failed to authenticate error_string.
The Router (at the other end of the PAP connection) is configured with an invalid user name. Correct
the remote user name and be sure the remote link password is also configured correctly. Priority:
LOG_ERR.
iface PAP peer says: message
The system at the other end of the PAP link has reported the connection message. The message can be
Welcome, in which case authentication is valid and the connection is good; or Invalid username or
password. If you must make username or password corrections in order to complete a connection.
Priority: LOG_INFO.
Invalid Authentication method
This error message indicates that a LAN-to-LAN dial-in connection has attempted to use PAP
authentication when the line has been configured for another form of authentication. Priority:
LOG_ERR.
Not allowed in at this time
A client has attempted to log in during a non-shift time, or the client account is disabled. Priority:
LOG_ERR.
A.1.6 RIP GROUP
RIP: received own update
Indicates that a network neighbor is misconfigured, so that it is returning the Router’s RIP updates
back onto the same network. No harm is done to the Router, but the errant remote RIP host should be
correctly configured. Priority: LOG_ERR.
A.1.7 SECURITY CALLBACK GROUP (SCHAP)
Not allowed in at this time
A client has attempted to log in during a non-shift time, or the client account is disabled. Priority:
LOG_ERR.
Failed to verify user_name
The user name presented by the client is not in the client account database. Priority: LOG_ERR.
243
ASYNC ROUTER AR-P, AR-5, AND SYNC ROUTER REFERENCE MANUAL
A.1.8 SNMP GROUP
SNMP Trap addr unreachable trap type type_no
An attempt was made to send an SNMP trap with type type_no to an IP destination that is unreachable.
Reconfigure the SNMP access control group to specify a reachable IP address. Priority: LOG_ERR.
A.1.9 SYSTEM GROUP
Restart complete version_string
Informational message that is displayed at the completion of a startup or reboot. Priority:
LOG_NOTICE.
SYSTEM: too many entries in the passwd file (max = 10)
The Router has detected the maximum entries in the passwd file. The current maximum is 10. Delete
any unused password entries, to add another. Priority: LOG_WARNING.
A.2 Console Messages
This section contains a listing of error and information messages, that are displayed either on the serial
port console attached to the Router, or on a remote console (in use during a Telnet session with the
Router).
If no local or remote console is in use, these messages will not appear.
Certain messages are prefixed with a capitalized name and a colon. This prefix is the name of the
Router software module that originated the message. When calling Technical Support about a message,
mention this module’s name. The prefix names are listed in alphabetical order with their associated
messages.
A.2.1 ARP GROUP
ARP: iface Attach device first
While processing an arp command, the Router has determined that the Ethernet interface is not
working, or is not configured. Run the ifconfig command to determine the state of the Ethernet
interface. Re-issue the ifconfig command to mark the interface up, if necessary.
ARP: Unknown host: host_name
An attempt to enter a host name failed because the Router was unable to resolve the host_name to an IP
address. Check for typos on your command line.
A.2.2 DIALER GROUP
DIALER: dialup once: iface already connected
A dialup once command was executed to dial on the modem. However, the dialer detected that the
modem was already connected. Use dialup reset to send a hangup command to the modem; then try
again.
DIALER: dialup once: iface is busy
The dialup once command can be used to verify a dialer script file or to verify a valid telephone line.
This message normally means that the phone on the other end is busy. Try again later or investigate the
reason for a busy phone. Use the dialup reset command if the modem at the other end of the phone line
244
ASYNC ROUTER AR-P, AR-5, AND SYNC ROUTER REFERENCE MANUAL
is not busy. Try restarting the Router, if dialup reset doesn’t work.
DIALER: dialup once: iface not available
A dialup once command line was issued when the dialer is not in a state from which it can dial out. Issue
the dialup reset command or reboot the Router to correct the irregular modem state and reissue the
dialer command line.
DIALER: iface invalid speed num
A modem initialization string from either the dialup command or a script file was given that included
an invalid modem speed. Only modem speeds divisible by 2400 are valid. Re-enter the command.
DIALER: Illegal interface: iface
The interface specified in the dialup command is not a valid modem interface.
DIALER: modemx cannot be dialed
An undefined error condition is preventing the dialer from functioning correctly on modemx. Restart
the Router and try again. If the problem continues, contact Technical Support.
DIALER: modemx no dialer
An undefined problem has caused the dialer to terminate. Try restarting the Router to re-initialize the
modem. If the problem continues, contact Technical Support.
DIALER: invalid telephone number: num_entered
The program has determined that the telephone number you enter or included in a script file is
invalid. Correct the number.
DIALER: Cant read dialer script file, file_name
The dialer script file shown could not be found. Verify that dialer script file is present on the boot disk
and check for typos in the command file. (Dialer script files have the .dcf extension.) Then retry the
command line.
DIALER: Unknown interface: iface
The interface specified in the dialup or dialup status command could not be found. Check your
command line for typos or enter another interface. Re-enter the dialup command line with the correct
modem interface.
A.2.3 FILTER GROUP
Filters cannot be added to slave interface iface
This response to a filter add command indicates that the named iface argument is component of a
multilink group. You can only apply filters to the multilink interface, and not to the individual interfaces
in that group.
245
ASYNC ROUTER AR-P, AR-5, AND SYNC ROUTER REFERENCE MANUAL
A.2.4 IFCONFIG GROUP
IFCONFIG: Must first set the IP address for iface: iface_name
In order to mark your interface up, the ifconfig command requires that you first set the IP address. Set
the IP address and then you will be able to mark the interface up.
IFCONFIG: WARNING: No Ethernet cable attached
The Router has detected that no Ethernet cable is attached. Connect your Ethernet cable and power
down the Router, to ensure that upon startup, it senses the Ethernet cable.
IFCONFIG: iface not allowed to be marked down
The console and loopback interfaces cannot be placed in the down state. This is the normal message
that appears, if the ifconfig command is used in the attempt to mark either of these interfaces as down.
IFCONFIG: iface unknown encapsulation mode
An incorrect encapsulation mode was entered on your command line. Check for typos on the
command line. Re-enter your command line with the correct encapsulation mode.
IFCONFIG: iface unknown interface
The Router was unable to locate the specified interface. Check for typos on the command line. Reenter your command line with the correct interface.
A.2.5 IPFILTER GROUP
IPFILTER: ip_addr bad address format
The Router was unable to resolve the address given in a filter add command. Check your command line
for typos or bad addresses; re-enter the command line with a valid address. The correct dotted-quad
address notation is: nnn.nnn.nnn.nnn
IPFILTER: Unsupported interface: iface
The filter add command did not recognize the specified interface. Check for typos on the command
line. Supported interface names can be displayed by entering the ifconfig command.
A.2.6 IPROUTE GROUP
IPROUTE: no default route
A route delete command attempted to delete the default route, when a default route did not exist.
IPROUTE: No route to host_name
A route delete command has been issued and the Router was unable to delete the route because: (a) no
such route had been created, or (b) the host_name is unknown. Check your command line for typos
and re-enter.
IPROUTE: Unknown interface: iface
An attempt to add a route failed because the Router was unable locate the specified interface. Check
for typos on your command line. Enter the ifconfig command to display the currently available interface
names.
246
ASYNC ROUTER AR-P, AR-5, AND SYNC ROUTER REFERENCE MANUAL
IPROUTE: Bad host_name
The Router was unable to find a route to the specified host_name or IP_addr. Verify that the destination
host is up and networking, and connected to the expected network. Use the ping command to help
isolate the problem.
A.2.7 IPX GROUP
IPX: Cannot change network address while iface is up
You must first mark the interface down before changing its network address.
IPX: Interface modemx already has network address: num_addr
The same network number cannot be assigned to more than one interface. Choose a different network
number and re-enter your command.
IPX: Invalid network number: net_number Network number must be a hexadecimal
number
An incorrect network number was entered. Check your command-line entry for typos, and re-enter the
correct network number.
IPX: IPXWAN is not supported over the specified interface
The Router supports IPXWAN only over its modem interface.
IPX: Invalid frame type for iface: iface_name
An incorrect frame type was entered for the interface selected. Re-enter your command line with the
correct Ethernet frame type.
IPX: iface_name is not a routable interface
The interface selected on your command line is not routable.
IPX: No route to network
The network selected on your command line has no route from the Router.
IPX: Interface must be a dialup interface
The interface type that you have selected requires a dialup interface. Re-enter your command with the
correct interface type.
IPX: Must first set the IPX network address for iface iface_name
An attempt was made to mark an interface up before a network address was assigned to it. Use the
ifconfig command to assign the network address; then you can mark the interface up.
IPX: Unknown interface: iface
An invalid interface name was entered. Check for spelling of the interface name on the command line.
You can display currently valid interface names by entering the ifconfig command. Re-enter the
command line.
IPX: Unsupported interface: iface
An unsupported interface name was entered. Check for the correct interface. You can display
currently valid interface names by entering the ifconfig command. Re-enter the command line.
247
ASYNC ROUTER AR-P, AR-5, AND SYNC ROUTER REFERENCE MANUAL
A.2.8 PING GROUP
PING: Invalid packet size
You have entered a ping command with the packet-size parameter specified to be larger than 512K.
The maximum Router ping packet size is 512K. Try the command again with a smaller packet size
parameter.
PING: No known DNS servers
No domain name server is present in the current Router configuration, or no domain servers are
present. If you are using Domain Name Service, use the config modify command to add one or more
domain name servers to your configuration.
PING: Resolving host_name...
This message is displayed initially after entering your TCP/IP command, while the resolver is attempting
to map host_name to an IP address. If the mapping is unsuccessful, the message is displayed.
PING: Unknown host: host_name
An attempt to ping host_name failed because the Router was an unable to resolve the given host_name to
an IP address. Check routing to the name server and verify that Name Service is running. Try entering
the IP address of the destination host rather than the host_name.
A.2.9 PPP GROUP
PPP: Unknown interface: iface
The interface specified in the ppp command could not be found. Check for typos on the command
line, and re-enter the command line.
PPP: iface not a ppp interface
A ppp command was given with an incorrect interface. Enter the ifconfig command to display the
available interfaces, and re-enter your command line.
A.2.10 RIP GROUP
RIP: router_addr already in RIP filter table
The rip refuse command has already been entered for router_addr.
RIP: host_address not found in the RIP table
The rip delete or rip refuse command was unable to find the specified host_address in its table.
RIP: host_address unreachable
The rip add command was unable to find a route to the given host_address.
A.2.11 SNMP GROUP
SNMP: host_addr host address already in ACL
An attempt was made to add a host to the ACL whose address was already in the ACL table.
SNMP: Community: com_name not entered
A status or set command was entered without a com_name. Re-enter the command line and include the
com_name.
248
ASYNC ROUTER AR-P, AR-5, AND SYNC ROUTER REFERENCE MANUAL
SNMP: bad host address, host_addr
The Router was unable to resolve the host_addr given in the snmp set command. Verify that host_addr is
correct; the name server or host data base has host_addr; and re-enter the command line.
SNMP: maximum host addresses exceeded, cant add: host_addr
An attempt was made to add another host_addr when the maximum of eight addresses per community
are already in the Access Control List (ACL). Delete an unused host_addr.
SNMP: community_name not added, maximum community names exceeded
An attempt was made to add another community_name when the maximum of eight community
definitions are already in the Access Control List. Delete any unused communities to make room.
SNMP: host_addr host address not in ACL
An attempt to delete host_addr from the Access Control List (ACL) failed. Use the snmp status -c
community_name command to display contents of the ACL. Check for typos, verify that host_addr is valid,
and re-enter the command line.
SNMP: Access control list is empty
A command line was issued that initiated display of community information and the Access Control
List was found to be empty.
SNMP: No communities configured
A command line was issued that initiated display of SNMP communities, and it was found that no
communities were configured.
A.2.12 SYSTEM GROUP
SYSTEM: Make sure the floppy disk is write enabled
Verify that the boot disk is write-enabled and fully inserted in the Router’s disk drive. Re-enter the
command line.
SYSTEM: Mismatch - password unchanged
During the process of changing the existing password and after the prompt to re-enter the new
password, a mismatch was found between the two entries. Try again.
SYSTEM: Please use at least one non-numeric character
A valid Router password requires at least one non-numeric character. Try again.
SYSTEM: Please use a longer passwd
A valid Router password requires at least eight characters. Try again.
SYSTEM: Cannot create config temp file: file_name
The Router was unable to open and read file_name. Verify that a valid boot disk is inserted in the
Router’s disk drive and verify that file_name is on the boot disk. Re-enter the command line.
SYSTEM: Unknown interface: iface_name
An incorrect interface name was specified on your command line. Issue the ifconfig command to
obtain a list of currently valid interfaces for your Router. Re-enter your command line.
249
ASYNC ROUTER AR-P, AR-5, AND SYNC ROUTER REFERENCE MANUAL
SYSTEM: Unknown parameter: parameter_name
An incorrect parameter was specified on your command line. Re-enter your command line.
SYSTEM: Unsupported parameter: parameter_name
An unsupported parameter was specified on your command line. Re-enter your command line.
SYSTEM: Insufficient arguments
An insufficient number of arguments were specified on your command line. Re-enter your command
line.
SYSTEM: Unable to configure at this time, we are already being configured from
another terminal.
You should determine from where the Router is currently being configured. The possibilities include a
forgotten telnet (IP only) session into the Router where a configuration process was started. If your
investigation finds the other configuration action to be legitimate, allow it to complete; and then re-start
your current action.
A.2.13 TCP GROUP
TCP: Bad address format address
The Router was unable to resolve the IP address given. Check your command line for typos; re-enter the
command line with a good address. The correct dotted-quad address notation is nnn.nnn.nnn.nnn.
TCP: Unknown host: host_name
An attempt to set the IP address of host_name failed because the Router was unable to resolve the given
host_name to an IP address. Check routing to the name server, and verify that name service is enabled on
the name server. Try entering the IP address of the destination host rather than host_name.
TCP: Host ip_addr unreachable
An attempt was made to establish a TCP/IP connection. The specified remote host was unreachable
for lack of a physical network connection, or no route was established. Verify that a known-workable
Ethernet wire is connected to the Router. Check routing on the Router and the remote host.
A.2.14 TIP GROUP
TIP: iface interface not a serial port
An attempt was made to open a tip session on an interface that is not a serial interface. Check for typos
on your command line, correct the iface name, re-enter the command line. tip can only be used on
modems.
TIP: iface tip session already active
A tip modemx command was issued at a time when another tip session is in progress. If you determine
that a valid tip session was initiated elsewhere, wait until it completes; otherwise, you can issue a dialup
modemx reset command before again attempting to start your tip session.
TIP: Unknown interface: iface
An attempt was made to tip to an invalid interface. Check for spelling of the interface name on the
command line. You can display currently valid interface names by entering the ifconfig command. Reenter the command line.
250
ASYNC ROUTER AR-P, AR-5, AND SYNC ROUTER REFERENCE MANUAL
A.2.15 TRACE GROUP
TRACE: Unknown interface: iface
An attempt was made to traceroute to an invalid interface. Check for spelling of the interface name on
the command line. You can display currently valid interface names by entering the ifconfig command. Reenter the command line.
A.2.16 TRACEROUTE GROUP
TRACEROUTE: Connection failed
The traceroute program failed due to external network conditions. Try again later.
TRACEROUTE: maximum TTL exceeded
A traceroute command terminated after the time-to-live (TTL) for the IP packet has been exceeded,
during the search for a route to the specified host. This message may sometimes appear after manually
aborting the traceroute command.
TRACEROUTE: Resolving host_name...
This message is displayed initially after entering the traceroute command, while the resolver is
attempting to map host_name to an IP address. If the mapping is unsuccessful, the message is displayed.
TRACEROUTE: Unknown host: host_name
An attempt to set the IP address of host_name failed because the Router was an unable to resolve the
given host_name to an IP address. Check routing to the name server, and verify that name service is
enabled on the name server. Try entering the IP address of the destination host rather than host_name.
TRACEROUTE: Aborted
The traceroute program was aborted either by the user or by external network constraints.
251
ASYNC ROUTER AR-P, AR-5, AND SYNC ROUTER REFERENCE MANUAL
Appendix B: Dialing Scripts
When configuring a modem for most applications, the standard dialing sequence procedure is
recommended. It is more robust and has better error recovery than scripts. When special handling is
required, a simple script language is available for writing custom dialer scripts. Both options are
described in this section.
NOTE
These options and commands can be used only on modems, not synch.
B.1 Standard Dialing Procedure
The phone number the modem is to dial is entered on the dialup command line, as in the following
example:
dialup modem0 demand 1-800-555-4141 240
Characters allowed in the sequence are:
• number digits 0, 1, 2, 3, 4, 5, 6, 7, 8, and 9
• # and * keys
• comma (,)—indicates a 2-second pause
• P—indicates pulse dialing, or T—indicates tone dialing
• hyphen (-)—this character is ignored
• W—indicates wait for dial tone
For special dialing requirements beyond the scope of the built-in dialer, you can write a custom dialer
script. Create the custom script on another system and copy it to the Router boot diskette. If IP is
available, use ftp; otherwise use the DOS copy utility to put the custom script on the boot diskette. For
example:
a:stacker a:
copy scriptname a:
exit
The dialer script command specifies use of that custom script with a particular interface. For example,
to specify a mydialer.dcf file as a custom dialer script used on interface modem0, enter:
dialup modem0 script mydialer.dcf
By convention, the suffix .dcf is used for dialer scripts. The following descriptions concern dialer
scripts. For information about standard dialing procedures without scripts, refer to the dialup command
(Section 2.9).
252
ASYNC ROUTER AR-P, AR-5, AND SYNC ROUTER REFERENCE MANUAL
B.2 Dialer Script Procedure
A dialer script file is a DOS formatted text file in which each line contains one of the following
commands:
connect [speed]
Instructs the dialer to wait for the modem to make a connection. From the scriptwriter’s perspective,
it is equivalent to the command:
wait 60000 “CONNECT” [speed]
but it recognizes modem error messages and will log them to the syslog data stream as:
“call failed: BUSY”
rather than:
“script failed to do ‘wait 60000 “CONNECT” ’ ”
For busy lines, this also allows the call to be retried as soon as the modem detects the busy signal
instead of having to wait for a full minute. As for the wait command, the speed keyword instructs the
dialer process to set the DTE port speed to the speed report in the modem’s connect message (as in
CONNECT 38400). This is not normally required or recommended. The Router sets the port speed
when the port is initialized, and this speed stays locked in regardless of connection speed.
control {up | down}
Used to control both DTR and RTS modem signals.
send {string | macro} [msec]
Used to send a text string. Common C-language escape sequences are supported by this command.
Use this command to initialize the modem. For example:
send “AT&F\r”.
Macro strings may also be substituted for the string parameter. The following macro information may
be sent:
$PHONE—phone number from dialup iface
demand phone
$LOGIN_NAME—current dialup iface login_name value
$LOGIN_PWD - current dialup iface login_pwd value
The optional msec argument allows the specified millisecond pause to be inserted between the
characters of the output string.
speed baud
Used to set the port DTE speed. Normally, the modem ports have speed buffering enabled and the
port speed is locked at 38400 bps. The speed command can change the modem-port speed. However,
if speed buffering, error correction, and compression are turned off, you must also lock the DTE
speed to the modem line speed. In this configuration, the maximum usable line speed in “raw”
connect mode becomes 9600 bps for the Router because 14400 bps is not a valid DTE speed.
status {up | down}
253
ASYNC ROUTER AR-P, AR-5, AND SYNC ROUTER REFERENCE MANUAL
Used to signal a connect state transition to the PPP state machine. For example:
send “ATDT 555-6789\r”
wait 45000 “CONNECT” speed
status up
Once the connection is made, the status up command will start PPP.
wait
Used to indicate a waiting period before the next action is taken. The three forms are:
wait msec
wait msec string
wait msec string speed
The first form waits for a specified time period in milliseconds.
The second form waits for a specified string; if not seen within the specified time, the command is
deemed to have failed.
The third form will expect the specified string. It will then pick a decimal number following that
string, and set the port speed to that number.
The same macro strings used in the send command may also be used in the wait command ($PHONE,
$LOGIN_NAME, $LOGIN_PWD) in place of the string parameter.
NOTE
If a command fails, dialing is considered unsuccessful, and the script will be
terminated. The next retry starts the script from the beginning.
B.3 Sample Dialer Script
Consider the sample dialer script:
control down
wait 100
control up
speed 38400
send “AT&FS=1&C1&D2&Q5&W\r”
wait 3000 “OK”
send “ATDT8,555-4141\r”
wait 45000 “CONNECT”
status up
The action initiated by each command is:
• control down—turn off DTR to reset the modem
• wait 100—give the system 100 milliseconds to respond
• control up—turn DTR back on
• speed 38400—set DTE port speed
254
ASYNC ROUTER AR-P, AR-5, AND SYNC ROUTER REFERENCE MANUAL
• send “AT&FS0=1&C1&D2&Q5&W\r”—set up modem parameters as:
&F—reset to factory defaults.
S0=1—answer incoming calls on first ring.
&C1—Data Carrier Detect is high when connected to remote modem.
&D2—disconnect from remote modem when DTR goes low.
&Q5—Lock DTE speed and enable speed adaptation buffering and error control by the modem.
&W—Save these values so that they are restored when the modem is reset.
• wait 3000 “OK”—wait for modem to be ready
• send “ATDT8,555-4141\r”—through PBX: Obtain outside line, place the call
• wait 45000 “CONNECT”—Wait for connection to be ready
• status up—Start PPP on this line
B.4 Logging into Remote Systems Using Dialer Scripts
Some of the routers and access servers to which the Router can connect open the connection with a
login prompt. The Router must respond with a userid and password before the connection can be activated.
This is accomplished using dialer scripts.
When determining the script configuration for connection to a remote site, the following basic
information is needed:
• the phone number, and what special dialing procedures (if any) are needed for connection.
• the exact wording/spelling of the prompt for user-ID.
• the exact wording/spelling of the user-ID to send.
• the exact wording/spelling of the prompt for password.
• the exact wording/spelling of the password to send.
• the string that is received when successfully connected.
Next, try this sequence by hand-dialing before setting up the script. To hand-dial a connection, first set
the dialer to “inactive.” Use the tip command (described below) to enter each string as you would
include it in the script send command. Pay special attention to uppercase/lowercase in the prompt
strings.
Some systems will prompt for additional information, such as the IP address to use. The format of such
items will depend on the system.
There is no substitute for testing the dialog by hand before committing it to software.
255
ASYNC ROUTER AR-P, AR-5, AND SYNC ROUTER REFERENCE MANUAL
B.4.1 USE TIP TO TEST DIALING
To verify modem dialing, use the tip modemX command (where X is the appropriate modem number) to
connect the console terminal or telnet session directly to the modem.
Any dialer on the modem must first be killed. At the prompt, enter:
dialup modemX inactive
tip modemX
(where X is the appropriate modem number 0, 1, 2, 3, or 4)
Then enter:
AT <RETURN>
and expect to see in response:
OK
Enter:
ATDT 1-xxx-yyy-zzzz <RETURN>
where xxx-yyy-zzzz above is the correct dialing sequence for the number being tested. The modem dials
the remote Router number and responds with CONNECT 38400, followed by a sequence similar to “{.{a{”
indicating the other end is trying to start the PPP connect control protocol.
Now set the modem back to command mode by entering:
+++
Wait a few seconds. The response is
OK
indicating that the modem is now in command mode. Use ATH <RETURN> to terminate the
connection. If this works, exit tip by pressing ESC, and restart the dialer using the dialup command.
B.4.2 SAMPLE REMOTE LOGIN DIALER SCRIPT
The following is an example of how the Router can be configured to connect to a Livingston PortMaster:
control down
wait 100
control up
speed 38400
send “AT&FS0=1&C1&D2&Q5&W\r” 100
wait 3000 “OK”
send “ATDT 1-555-426-1888\r”
wait 45000 “CONNECT 38400”
send “\r\r\r” 100
wait 45000 “login:”
send “ppp\r”
wait 10000 “word:”
send “ppp\r”
status up
256
ASYNC ROUTER AR-P, AR-5, AND SYNC ROUTER REFERENCE MANUAL
Action initiated by each command is:
• control down—turn off DTR in order to reset the modem
• wait 100—give the system 100 milliseconds to respond
• control up—turn DTR on
• speed 38400—set DTE port speed
• send “AT&FS=1&C1&D2&Q5&W\r” 100—set up modem parameters
• wait 3000 “OK”—wait for modem to be ready
• send “ATDT 1-555-426-1888\r”—dial the number
• wait 45000 “CONNECT 38400”—Wait for connection to be ready
• send “\r\r\r” 100—send return to autobaud remote modem, if needed
• wait 45000 “login:”—get login prompt
• send “ppp\r”—send userid
• wait 10000 “word:”—get password prompt
• send “ppp\r”—send password
• status up—start PPP on this line
B.4.3 SAMPLE REMOTE LOGIN DIALER SCRIPT USING MACRO STRINGS
Macro strings enable the use of one dialer command file to access many systems with different logins,
phone numbers, and passwords. The initial effort to produce the script is reduced and modification is
easy. The sample script below causes the same result as the script on the previous page, but has the
advantage that it does not need modification if system parameters change.
control down
wait 100
control up
speed 38400
send “AT&FS=1&C1&D2&Q5&W\r” 100
wait 3000 “OK”
send $PHONE
wait 45000 “CONNECT 38400”
send “\r\r\r” 100
wait 45000 “login:”
send $LOGIN_NAME
wait 10000 “word:”
send $LOGIN_PWD
status up
The $PHONE macro sends the phone value previously specified by the command:
dialup iface demand phone
The $LOGIN_NAME macro sends the login_name value previously specified by the command:
dialup iface login_name login_name
257
ASYNC ROUTER AR-P, AR-5, AND SYNC ROUTER REFERENCE MANUAL
The $LOGIN_PWD macro sends the login_pwd value previously specified by the command:
dialup iface login_pwd login_pwd
To change a phone number, login name, or login password, simply reissue the appropriate dialer
command. The dialer command file remains the same.
B.5 Modem Control Signals
The Router contains an internal modem for each external connection through a telephone line. Data
and control signals connect the internal modem and the Router CPU. These signals between the
modem and computer parts of the Router may be useful to monitor when troubleshooting problem
connections. To facilitate monitoring, some of these signal circuits have LED external indicators. The
status of others may be monitored through the software command asystat.
The LEDs labeled Tx, Rx, DTR, and DCD on the modem card at the rear of the Router indicate the
following:
Tx—Transmit Data
Flickers when the Router is sending modem commands or data to the modem.
Rx—Receive Data
Flickers when the Router is receiving data from the modem. Also flickers together with Tx when the
Router is sending commands to the modem. With some experience, you can get an idea of line use
by watching these lights for an active connection.
DTR—Data Terminal Ready
Normally lit if a dialer is active on the modem port. When the dialer is terminated with a dialup
modem inactive command, DTR goes off. When DTR is off the modem will not answer incoming
calls. When a connection goes idle, the Router hangs up the telephone connection by turning DTR
off for a moment until DCD goes off.
DCD—Data Carrier Detect
Sometimes called Received Line Signal Detect, or RLSD. Also referred to as CD. Indicates that the
modem has established a data path to a remote modem. The LED is lit when connected and off
when listening or dialing.
The status of the other modem control signal can be displayed with the asystat command. The signals
are:
RTS—originally Request to Send
In the Router, indicates that the Router is able to receive data from the modem. Usually on, except
briefly during heavy incoming traffic.
CTS—Clear to Send
Indicates that the modem is able to receive data from the Router.
RI—Ring Indicator
Indicates an incoming call is ringing this phone line. This signal comes on briefly. If DTR is on, the
modem will immediately answer.
DSR—Data Set Ready
Generally always on. If asystat does not show DSR ON, the modem is probably defective.
CD—Carrier Detect
See the definition for DCD above.
Control the Modem Speaker’s Volume
258
ASYNC ROUTER AR-P, AR-5, AND SYNC ROUTER REFERENCE MANUAL
The Router’s modem speaker is on by default during call setup. You can control the modem speaker’s
volume using the dialup iface volume {on | low | medium | high} command. After invoking the dialup volume
command, use the config save command to save the modem speaker’s volume setting. Don’t use an
init_string to control the modem speaker’s volume.
259
ASYNC ROUTER AR-P, ASYNC ROUTER AR-5, SYNC ROUTER RELEASE NOTES
Appendix C: Release 4.2 Notes
The 4.2 release operates with the Async Router AR-P (LRA001A-R2), Async Router AR-5 (LRA005A-R2),
and the Sync Router (LRS002A-R2), and supports LAN-to-LAN routing and single-user remote node
access applications. The following features are available for this release:
New Features, Release 4.2
• SecurID supported—SecurID technology is now supported. SecurID is an authentication scheme
where users must enter a password plus the number currently displaying on the LCD screen of a
personal access card.
- Doesn’t use DES—SecurID uses EXPORT and doesn’t use DES, and so can be used internationally.
With SecurID remote clients must physically have the SecurID card to access the network, along with
a valid username and personal information number (PIN). Also refer to Appendix D in the User’s
Manual, and Sections 2.4 and 2.18 in the Reference Manual.
• RADIUS supported—RADIUS authentication (Remote Authentication Dial-In User Service) is now
supported. RADIUS is an internet protocol (IP) for carrying authentication, authorization and
configuration information between an authentication server and a dial-in router such as the Router.
RADIUS allows network administrators to have a centralized database for client names and
passwords. With RADIUS, client names and passwords reside in one place only, simplifying the
administration of clients and increasing the level of security. Also refer to Appendix D in the User’s
Manual, and Sections 2.4 and 2.18 in the Reference Manual.
• tty login for clients supported—Tty login is now supported for remote clients, allowing a much wider
selection of clients to be used with the Router. Clients calling in get a “login:” prompt, allowing a a
user to enter a username/password before entering PPP, as an alternative to using PAP or CHAP for
validation.
• IP firewall added—It is now easier to implement an “IP firewall” for Routers that are used to provide
access to the Internet. Release 4.2 enables you to selectively enable a core group of the most
commonly-used IP filters, either during initial configuration or by using the config modify command.
These IP filters are typically used to prevent Internet users from illegally accessing your network, and
also reduce overhead traffic associated with domain name service. Also refer to the config firewall
command in the Reference Manual.
• Ascend Multilink PPP support added—The Router now supports Multilink PPP between Routers and
Ascend routers.
• new commands added—New commands since the 4.1 (or 4.1.1) release have been added. Refer to
the Reference Manual for more details.
- New generic commands and subcommands: authenticate, config firewall, dialup, group, memory,
monitor, trace
- New IPX-only commands and subcommands: ipx, ripfilter, sapfilter
- New TCP/IP-only commands and subcommands: filter spoof, filter try
Use Routers to...
• Achieve multi-application LAN-to-LAN routing solutions.—Connect separate Local Area Networks
(LANs) using analog phone lines, digital phone lines, or both. Connecting networks this way is
known as LAN-to-LAN routing. The Router can route both TCP/IP and Novell IPX traffic over its
260
ASYNC ROUTER AR-P, ASYNC ROUTER AR-5, SYNC ROUTER RELEASE NOTES
Ethernet, modem, and synchronous interfaces.
• Enable up to 100 remote users (modem) to dial into your network over the asynchronous modem
interfaces.—The Router is available with remote node software that allows PC-based users to dial into
your LAN using IPX, TCP/IP, or both protocols simultaneously. In addition to the remote node
software, PCMCIA and ISA modems are available with the Router, for remote PC and laptop users.
• Simultaneously support LAN-to-LAN routing and remote users.
• Allow simultaneous synchronous and dialup connections. Router synchronous support includes
leased DDS lines and non-leased lines, such as Switched-56.
Sync Router Only
• Synchronous interface supports digital leased lines and Switched-56
• Integrated V.34 modem
• Support for automatic dial backup (fallback) of synchronous lines for IP and IPX—If the NH-Sync+ is
configured to use a leased line synchronous interface, the internal modem can be configured to act
as a backup to the synchronous leased line. If the leased line fails, the dialup connection comes up
automatically and establishes a temporary backup connection.
• The Sync Router is interoperable with synchronous routers manufactured by:
- Cisco
- XYPLEX
- Wellfleet
• Supported CSU/DSUs include (but are not limited to):
For Digital Data Service:
• Black Box/EAZY CSU/DSU MS (part number MT132A-R2)
• LarsE M5600 Multirate CSU
• Motorola/UDS DSS/MR1
• Motorola/UDS DSS/V.32
For Switched-56 Data Service:
• Black Box/EAZY CSU/DSU MS/DBU (SW56) (part number MT134A-R2)
• Motorola/UDS SW56 II
261
ASYNC ROUTER AR-P, ASYNC ROUTER AR-5, SYNC ROUTER RELEASE NOTES
For All Routers
• Provides “canned” filters called Network Link Optimization (NLO). NLO transparently filters
unnecessary WAN traffic and reduces telephone costs for IPX networks.
• Provides a remote configuration utility, similar in function to telnet (over IP networks). The
RouterVu utility enables you to remotely configure Routers across IPX networks. For remote
configuring IP networks, telnet is supported.
• Support for integrated V.34 modems. V.32 bis modems are optionally available.
• IP and IPX routing (separately or simultaneously) using RIP
• PPP, IPCP, IPXCP, PAP, and CHAP protocols
• The Router software contains support for creating and maintaining a database of up to 100 remote
clients. The database is managed using the Router’s simple configuration interface.
• The Async Client kit contains software (that runs under DOS 3.3+ and Windows 3.1+) that allows
remote TCP/IP and Novell IPX nodes to become “remote nodes” on your LAN.
• Simple configuration for all supported interfaces: Ethernet, modem, and synchronous.
• Superior handling of IP RIP updates
• Extensive support for dialup monitoring
• Automatic learning of network topology and services on IP and IPX networks
• Support for primary and secondary phone numbers (used for each modem interface)
• Support for system statistics, using the performance command
Outstanding Issues, Release 4.2
Outstanding software issues and suggested workarounds are described below. The number in brackets is
the bug report number.
Special Outstanding Issues
• No IPXWAN support exists in the Router 4.2 release.
• IPX Fallback only works if TCP/IP is enabled and IP traffic brings up the link the first time. Once a
synchronous interface is disconnected, you need IP traffic to bring the modem back up.
Generic Issues
[20134] - The dialup once command does not work correctly. Using it will produce the following error
message:
dialup once: modem0 is busy
workaround—Don’t use the dialup once command. Use the update command instead.
[20184] - After using config modify to change a LAN-LAN line to a client line, the old IP address of the
remote LAN site gets inserted into the optional IP address assigned to the client line.
262
ASYNC ROUTER AR-P, ASYNC ROUTER AR-5, SYNC ROUTER RELEASE NOTES
[20215] - When modifying your Router configuration (using config modify), if you respond “n” to the
prompt:
Do you want to configure and use modemX now?
the Router will take the interface down. Use ifconfig iface up to bring the interface back up, or answer
“y” to the prompt and accept all of the defaults (if you desire).
[20396] - When no ethernet media is connected to the unit and the command ifconfig eth0 is entered it
indicates that the interface is up and connected.
[20420] - The update periodic +2 command only works the first time; after that, it never calls back.
However, if you specify specific times to call, the update periodic command will work.
[20504] - When entering any phone numbers, do not use parentheses () or spaces to separate digits; use
hyphens instead.
[20521] - When using config modify to reconfigure the Router, sometimes the Router doesn’t prompt
you for the authentication method desired (for an interface). Use the ppp command to select the
authentication method desired for the interface.
[20531] - After you set the syslog address, there is no easy way to set the address back to null. To work
around this, you must manually edit the config.net file. Contact Technical Support for further
instructions.
[20532] - When taking down one type of Ethernet frame, the other Ethernet frame types become “deaf.”
To recover, execute config save and then restart the Router.
[20538] - If you are having problems with a dialer operation on your Router, enable syslog on your
console, and look at the error messages.
[20541] - When starting the Router, ignore the following messages:
spawn dk86965 returned -1, errno=2
Packet driver not loaded at INT125
[20557] - When using telnet or routervu across a link, sometimes telnet and RouterVu appear to have
stopped. Wait at least 5 minutes before re-establishing the connection, because often telnet and
RouterVu will recover in that time.
[20565] - When using the ppp command, use the full name of the subcommand, because ppp doesn’t
always accept partial names for subcommands.
[20595] - The who command displays telnet servers, ftp servers and ppp sessions, but not console logins.
[20660] - Although it is possible to use root as the name of your Router, don’t use it. If you use root as the
name of your Router, your will have problems changing the name in the future.
TCP/IP Mode Issues
[2762] - If a non-existent or downed syslog server is configured for the Router, the Router may
continually try to reach the syslog server over the interface.
[20227] - The Router’s telnet expects a carriage return plus a line feed for each line, and some
emulators (Microsoft TCP/IP Telnet) can’t do this.
workaround—Use another telnet application instead.
263
ASYNC ROUTER AR-P, ASYNC ROUTER AR-5, SYNC ROUTER RELEASE NOTES
[20391] - ftp to Router using PCNFSpro windows ftp client does not show any files when you’ve
successfully logged in and use the dir command.
[20540] - To remove an IP firewall, use config firewall instead of config modify.
[20561] - Sometimes TCP port displays show negative numbers. Numbers above 215 (32768) will be
displayed as negative numbers.
[20682] - When a remote client connects, a syslog message appears to present the client’s password.
What is presented as the password (in the message) is the client‘s username. The password is never sent
to syslog.
PPP Issues
[20584] - The syslog on the Router shows an error message unknown ppp packet error when a Windows95
machine logs onto the Router using SecurID. Login is successful but an error message is displayed once.
[20585] - If the unit is configured with dialup modemX logprompt on and ppp modemX lcp local auth
none then the client will see a login prompt. If using login/password when the prompt fails, the call will
be cleared, but if the client goes directly to PPP, no validation is performed. To perform validation, select
either CHAP or PAP. User must not set auth none. A later release issues a warning if the log prompt is set
to none.
IPX Mode Issues
[20271] - The ripfilter and sapfilter status messages do not display the maximum number of hops
allowed by the filter.
[20272] - When using the -h option of the ripfilter and sapfilter commands, the entries with hops
greater than the specified number are not deleted from the sap and route tables automatically. The
entries are only removed when the sap or route tables are flushed.
[20568] - SPX spoofing doesn’t work correctly with the Router, unless you install a patch on your
NetWare server.
workaround—The NetWare 4.1 Server contains a bug, which can be fixed by a patch named
WATDOGFX.NLM. This patch is available on Novell’s NETWIRE server (http://www.novell.com/) as
part of a larger patch kit named 410PT3.EXE (4.10 patch kit 3).
Remote Client Issues
[20588] - Remote Office Gold client fails to log in if the Router has login prompts enabled and clients
are not using it.
[20619] - If the baud rate on a Router’s analog modem is set too high (28.8K), then Remote Office will
not be able to log in (using tty mode). Lower the baud rate to allow the Remote Office client to log in.
[20682] - See previous write-up in TCP/IP Issues.
SecurID Issues
[20584] - See previous write-up in PPP Issues.
Windows 95 Issues
[20584] - See previous write-up in PPP Issues.
[20593] - Windows 95 clients logging in often miss parts of the prompts in the tty window.
264
ASYNC ROUTER AR-P, ASYNC ROUTER AR-5, SYNC ROUTER RELEASE NOTES
Workaround—Limit the port speed to 57600.
[20646] - The Windows 95 remote client cannot see the foldernames or files on the remote server.
Workaround—On your Windows 95 client machine, go into the control panel, select the Networking icon,
then the Dialup Adapter icon. Click on Properties/Advance/IPX Header Compression. Set the header
compression to “no.” Now reconnect to the remote server.
RouterVu Issues
[20614] - RouterVu (v1.15) doesn’t interoperate with Novell’s Beta Win32 NetWare client (dated
12/12/95). Call Technical Support for the latest developments.
NetWare Dialup Considerations, Release 4.2
When using the Router’s built-in modems, there are two main areas of concern when using NetWare
over a dialup line: possible user confusion and using NetWare Directory Services.
Using NetWare Over Modem Lines
Using NetWare over modem lines on a dialup network may confuse users accustomed to running
NetWare only across Local Area Networks (LANs).
Users will first notice a reduction in performance.
Users may also notice that some applications may time out while the Router is establishing a phone
connection. This can happen when the Router first boots, and can also happen once a dialup
connection has been established but has timed out because of inactivity. In both situations the following
message will be displayed on the client while the Router dials and establishes a new dialup connection:
General Failure Error reading device NETWORK
Abort, Retry, Fail?
This occurs because the Router takes 20 to 45 seconds to establish a modem connection. Netware
clients time out after 20 seconds. To prevent this from happening, modify the net.cfg file on the NetWare
client to set the IPX retry count to 60 by adding the following line under “Link Support”:
IPX retry count = 60
Users may notice that some applications keep the dialup link up by polling or by sending other traffic. It is
IMPORTANT to monitor your phone line whenever setting up the Router for the first time or when using
new applications. For more information about the dialup quota, dialup dial_log, the trace iface up, and other
related commands used for monitoring phone line usage, refer to the Reference Manual.
Reconfigure Your Local VLM-Based Clients
We recommend using the “preferred server” option whenever possible. To do so:
1. In each NetWare 4.x (VLM-based) client, add the following line to their NET.CFG file:
PREFERRED SERVER = local_server_name
where local_server_name is the name of your local server.
2. Reboot the client and reload the NetWare workstation software.
3. Verify that connecting to the local server is immediate and that the Router doesn’t dial.
265
ASYNC ROUTER AR-P, ASYNC ROUTER AR-5, SYNC ROUTER RELEASE NOTES
How to Upgrade to Release 4.2
A software kit for release 4.2 includes:
• Router SmartRoute release 4.2
• This manual
There are two procedures for upgrading a Router, depending upon whether custom dialer scripts are
used or not:
• The Router doesn’t use custom dialer scripts (use method 1)
• The Router does use custom dialer scripts (use method 2)
Follow method 1 or method 2 to upgrade your Router.
Method 1: If you don’t use custom dialer scripts (standard configuration)
If your Router is currently operating without the use of a custom dialer script (i.e., if you chose “Router”
as the modem peer during configuration), follow the steps outlined below to upgrade from your release
to the 4.2 release:
1. Log in to the Router, and enter:
config show
Record the line that looks like:
dialup iface speed bps
2. Remove the current boot diskette from the diskette drive.
3. Verify that the write-protect “window” on the release 4.2 boot diskette is closed, allowing information
to be written to the disk. Insert the release 4.2 boot diskette into the diskette drive and enter:
config save
4. Reboot the system by entering:
reboot
Ignore any dialup error messages that may be displayed on the screen.
5. If in Step 1, you saw lines that looked like
dialup iface speed bps
then enter ifconfig iface speed bps. (Don’t use the dialup iface speed bps command.)
6. Enter:
config save
7. Log off of the Router by entering:
logoff
Method 2: If you do use custom dialer scripts
If your Router uses a custom dialer script to connect to a peer router (i.e., if you chose Livingston,
266
ASYNC ROUTER AR-P, ASYNC ROUTER AR-5, SYNC ROUTER RELEASE NOTES
Telebit, or other as the modem peer during configuration), the script file from your current
configuration must be copied to the 4.2 release boot diskette so that it may continue to be used.
Complete the steps below to upgrade a currently operational Router from your previous release to the
4.2 release.
The filenames for the standard dialer scripts included with the Router are netbl.dcf, portm.dcf and
other.dcf. If your Router has been using custom dialer scripts, contact your network administrator to find
out what the filenames are. Or, you can issue the config show command and look for entries like dialup
iface script file, for example:
dialup modem0 script netbl.dcf
Note the dialer script filenames and record them.
1. Perform this step, depending on whether you have access to the boot diskette and a DOS-based PC,
or are using ftp over a TCP/IP network to transfer the script to another host (for editing).
If you have the boot diskette and prefer to use a DOS host...
Use a separate DOS machine and the DOS copy command to transfer the dialer script files from the old
(3.x) boot diskette to the new (4.2) boot diskette.
Insert the old (3.x) diskette into the DOS machine and issue the following commands:
mkdir \nh
copy a:netbl.dcf \nh
Insert the new (4.2) diskette into the DOS machine and issue the following command:
copy \nh\netbl.dcf a:
Answer yes to overwrite a query.
If you do not have the boot diskette and prefer to use a host over a TCP/IP network...
Copy the dialer script file to a host computer; to do this, ftp (IP required) from a host computer and log
in to the Router as root.
Copy the dialer script file from the boot diskette to a directory on the hard drive of the system upon
which you are running ftp.
As an example, on a Sun UNIX system, issue the following commands:
mkdir /tmp/nh
ftp nh_ipaddr
(Use the Router’s IP address)
Use the get option of ftp as follows:
ftp> bin
ftp> get \netbl.dcf /tmp/nh
ftp> quit
The netbl.dcf file is stored on the Sun machine until step 6.
Close the ftp session.
2. Login to the Router and enter:
config show
267
ASYNC ROUTER AR-P, ASYNC ROUTER AR-5, SYNC ROUTER RELEASE NOTES
Record the line that looks like:
dialup iface speed bps
3. Remove the current boot diskette from the diskette drive.
4. Verify that the write-protect “window” on the release 4.2 boot diskette is closed, allowing information
to be written to the disk. Insert the release 4.2 boot diskette into the diskette drive and enter:
config save
5. Reboot the system by entering:
reboot
Ignore any dialup error messages that may be displayed on the screen.
6. Perform this step, depending on whether you have access to the boot diskette and a DOS-based PC,
or are using ftp over a TCP/IP network to transfer the script to another host (for editing).
If you have the boot diskette and prefer to use a DOS host ...
Put the 4.2 diskette back into the Router and log in to the Router as root. Continue to Step 7.
If you do not have the boot diskette and prefer to use a host over a TCP/IP network...
Restore the dialer script. To do this, ftp (IP required) from the host computer to the Router. Log onto
the Router as root. Transfer the saved dialer script files using the put option of ftp. They will be stored on
the boot diskette.
For example, on a Sun UNIX system, issue the following command:
ftp nh_ipaddr
Use the put option of ftp as follows:
ftp> bin
ftp> put /tmp/netbl.dcf \netbl.dcf
ftp> quit
The script is now restored on the Router.
7. If in Step 2, you saw a line that looked like
dialup iface speed bps
then enter ifconfig iface speed bps. (Don’t use the dialup iface speed bps command.)
8. Save the new configuration by entering:
config save
9. Log off of the Router by entering:
logoff
How to Make Previous Releases Compatible with Release 4.2
To allow one Router running release 4.2 to correctly work with another Router running a pre-4.2 release,
perform the following procedure.
268
ASYNC ROUTER AR-P, ASYNC ROUTER AR-5, SYNC ROUTER RELEASE NOTES
1. On the two Routers connected together (via a phone line) enter:
dialup modemX status
where modemX is
modem0 on an AR-P or Sync Router,
and modem0 – modem4 on an AR-5.
For an AR-5, repeat the procedure for each configured modem interface and its peer. The dialup line
above will output a message like:
(tcp/ip)croy> dialup modem0 status
modem0: (28800/V1.000-V34-DP)
DTR On RTS On CTS On DSR On RI Off DCD Off
demand
listening
Timeout: 240
Idle: 0:00:2:16
Remote phone: 14
Total time con: 0:01:36:13 Time since last boot: 5:03:59:32
Average daily connected time: 0:00:18:37
Daily quota: 1:00:00:00
Used: 0:00:14:09
Left: 0:23:45:51
Usage warning currently set at: 0:04:00:00
(tcp/ip)croy>
2. Look for demand_backoff or demand on the first line of the output. One Router should have
demand_backoff and the other should have demand. If this is the case, you are done.
If both Routers have demand, enter (on one of the Routers):
dialup modemX demand_backoff
If both Routers have demand_backoff, enter (on one of the Routers):
dialup modemX demand
3. Issue the config show command on the pre-4.2 Router.
4. Look for lines that start with ipx wan, or this exact line:
ipx internal_net net_number
5. If you find such lines, enter the following line for the corresponding interface:
ipx ipxwan iface disable
IPXWAN is no longer supported on the Router. IPXCP will be used as the default.
6. On the Router that you changed, enter:
config save
The two Routers are now ready to route.
Using Analog Leased Lines?
If your site requires 2 or more hours per day of continuous connection time, it may be less expensive to
lease a 2-wire voice-grade line and keep the link up all the time, rather than using a dialup connection.
269
ASYNC ROUTER AR-P, ASYNC ROUTER AR-5, SYNC ROUTER RELEASE NOTES
Although telephone companies often offer several types of leased lines, it is important to select a type
of leased line that is supported by the Router modem. The types of lines offered differ from telephone
company to telephone company, as do the names by which they are referenced.
Here is a description of some commonly used types of lines, and whether they can be used with the
Router’s V.32 bis or V.34 modems.
1. Ringdown line
A ringdown line works well with the Router’s V.32 bis and V.34 modems.
This type of leased line is often used in applications like airport hotel hotlines: You take one of the
telephones off the hook, and the other telephone rings. In many places a local ringdown line is
offered for less than the cost of two regular business lines.
A line provisioned with ringdown works as follows:
When one end of the connection picks up the phone, the ringdown circuit automatically generates
ring voltage on the line. At the other end of the line, the phone (or modem) detects ring just like a
normal phone call. The major difference between a line provisioned with ringdown and a normal
PSTN phone line is that the ringdown line is point-to-point, and no dialing is required. Typically,
ringdown is provisioned for only one end of the connection, resulting in one end being assigned as
the originating party, and the other end being assigned the role of the answering party.
To use V.34 modems on a line provisioned with battery and ringdown, use the following dialup
command:
dialup modemX init existing_init_string X3
Adding the X3 modem command to the modem’s init string tells the modem not to look for a
dialtone when going offhook.
For the originating side of the connection, enter
dialup modemX demand Where (-) represents a null phone number.
For the answering side of the connection, enter
dialup modemX incoming
2. Leased line with battery voltage and no signaling
A two-wire leased line with battery (for loop current) and no signaling (no ringdown) will work with
the Router’s V.32 bis modem. It will not work with the Router’s V.34 modem.
Use the Router’s dialup commands to support each end of the connection. Assign one end of the
connection to be the originator of the dialup connection, by using the command:
dialup modemX leased_originate
Assign the other end of the connection to be the answering side of the dialup connection, by using
the command:
dialup modemX leased_answer
3. Leased line with no battery or signaling
270
ASYNC ROUTER AR-P, ASYNC ROUTER AR-5, SYNC ROUTER RELEASE NOTES
A leased line with no battery or signaling will not work with the Router’s V.32 bis or V.34 modems.
Sometimes called a “dry pair,” this type of line is often provisioned for a local connection. If this is
the only type of line offered, you can augment it with a separate “ringdown box,” in order to turn it
into an equivalent of a ringdown line (described previously).
4. 4-wire leased line
A 4-wire leased line will not work with the Router’s V.32 bis or V.34 modems.
Connecting to an Internet Service Provider (ISP)?
Before configuring your Router to connect to an Internet Service Provider (ISP), obtain the following
information from your Internet Service Provider.
Intended IP addresses at your site.
• Your Router’s IP address
• The set of IP addresses available for hosts on your LAN
• Subnet masks used
• The IP addresses of any domain name servers
The system at the ISP that the Router will connect to, using the PPP protocol.
• The type of system to which your Router will connect to
• Custom dialing script, if required
• The IP address of that system
• Username and password
• If PAP or CHAP is used, the name and password required for authentication
At the end is a sample dialer script. The following sections provide more detail.
Intended IP addresses at your site
• Your Router’s IP address
You do not need a separate IP address for the modem interface in your Router. The same IP address
assigned to your Router is the one used by your modem interface.
• The set of IP addresses available for hosts on your LAN
Depending on your LAN requirements, you may be assigned a whole class C address (e.g.
204.125.5.xxx), or a smaller set of IP addresses (e.g. from 204.125.5.17 to 204.125.5.23).
• Subnet masks used
You must specify the subnet mask to be used.
• The IP addresses of any domain name servers
You can have domain name servers at the ISP site or on your LAN.
The system at the ISP that the Router will connect to, using the PPP protocol.
271
ASYNC ROUTER AR-P, ASYNC ROUTER AR-5, SYNC ROUTER RELEASE NOTES
• The type of system to which your Router will connect.
The Router configuration process includes options to configure your Router to connect to some
other popular routers, like the Livingston Portmaster or the Telebit Netblazer or PN. Ask your ISP if
you will be connecting to any of those, and if so, choose the corresponding configuration option for
your Router during initial configuration.
If the ISP system is not a Router, Livingston Portmaster or the Telebit Netblazer or PN, then you must
create a dialing script for the Router. Obtain from your ISP a sample dialer script, or modify the
other.dcf file on the Router diskette.
The Router provides this information by means of a dialer script. The Router will build the script for
systems like the Livingston Portmaster or the Telebit Netblazer or PN.
If your Router is connecting to an Ascend system, at the Router prompt, issue the following
commands:
ppp iface lcp local accm 0xa0000
ppp iface lcp local acfc off
ppp iface lcp local pfc off
config save
• The IP address of that system
This often called the “Router’s peer” IP address.
• Username and password
Most ISPs will give you a username and a password that will be used to authenticate your Router at
the time the connection is established. Your ISP’s system will ask the Router for this information. The
username and password must be in the dialer script used by the Router. If you choose to connect to a
Router, Livingston Portmaster or the Telebit Netblazer or PN, the Router configuration process will
put the username and password into the dialer script for you.
• If PAP or CHAP is used, the name and password
Ask your ISP if they will be authenticating your Router using the PAP or CHAP protocols. If your ISP
will not be using PAP or CHAP, then answer NONE when the initial configuration process asks for
authentication method. No other work is required. If your ISP will be using PAP or CHAP, you must
configure your Router to use PAP (or CHAP).
PAP and CHAP authentication works in either or both of two ways: the ISP’s system can request your
Router to authenticate itself (using PAP/CHAP), and/or your Router can request your ISP’s system
to authenticate itself (using PAP/CHAP). In other words, their system can authenticate your system,
or your system can authenticate their system, or both.
ISPs typically configure their systems to authenticate customers trying to establish connections with
them (such as you with your Router). However, ISPs typically do not configure their systems to
authenticate themselves to customers.
To configure the Router so that it will authenticate itself to the ISP’s system, and not require the ISP’s
system to authenticate itself to the Router, answer NONE when prompted for the authentication
method that you wish to use, during the configuration process.
After finishing the initial configuration process and rebooting, enter the following command at the
Router prompt:
ppp iface pap user [username] [password]
config save
272
(for PAP)
ASYNC ROUTER AR-P, ASYNC ROUTER AR-5, SYNC ROUTER RELEASE NOTES
or
ppp iface chap user [username] [password]
config save
(for CHAP)
where iface is the modem interface that you are using to connect to the ISP (modem0, modem1, etc.)
The [username] and [password] are the PAP/CHAP authentication name and password. The config save
command will save these PPP commands to the Router’s boot diskette, and these commands will be
executed automatically after every reboot.
If your ISP requires your Router to authenticate the ISP’s system, then during the configuration
process, answer PAP or CHAP when asked for authentication, and enter the name and password that you
will use to authenticate your ISP’s system, when asked for the name and link password of the remote
system that you are connecting to.
Sample dialer script
If your ISP is using a different system, choose
5) Other LAN to LAN
from your configuration options. You will later be prompted for the name of a dialer script file. Often
you can obtain from your ISP a sample dialer script that you can modify to create a dialer script file for
the Router. Included on the Router diskette is a sample dialer script file called other.dcf, which you can
modify to create your own dialer script, or use as a template.
Example dialer script:
send “AT\r”
wait 1000 “OK”
send $PHONE
connect
send “\r\r\r” 100
wait 10000 “login:”
send $LOGIN_NAME
wait 10000 “password:”
send $LOGIN_PWD
wait 10000
send “ppp\r”
status up
The scripts will be different in different systems. For example, your ISP’s system may ask for
“username:” instead of “login:”, as in the example. In that case the line
wait 10000 “login:”
in the script above would be substituted by:
wait 10000 “username:”
In the same way, the system may prompt for a password in different ways.
The variables $PHONE, $LOGIN_NAME, $LOGIN_PWD in the script above will contain the values of
the phone number, your username and password that you entered when you configured the Router. You
can use these variables for the phone number, username, and password in your dialer script, or you can
write their values directly. For example, you can substitute the line
273
ASYNC ROUTER AR-P, ASYNC ROUTER AR-5, SYNC ROUTER RELEASE NOTES
send $PHONE
by
send “ATDT 345-6789\r”
In order for the Router to establish a PPP connection with the ISP’s system, the Router has to indicate
to the ISP’s system that it wants to establish this kind of connection. In the dialer script example, the
command send “ppp\r” indicates this desire. For some systems, you may only need to send one p
character to produce the same effect, such as send “p/r”.
For other systems, you may need to login using a special username that starts with capital P, with no
need to send any special commands after the login process is done. In this case, enter a username that
starts with “P” when prompted for your username during the Router configuration process.
Also, some systems can be set to automatically go into PPP after the login process is completed, and for
these systems, you do not need to send any ppp commands or use any special usernames.
274
© Copyright 1996. Black Box Corporation. All rights reserved.
1000 Park Drive
•
Lawrence, PA 15055-1018
•
724-746-5500
•
Fax 724-746-0746