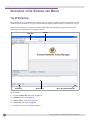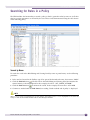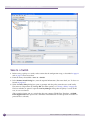
1
Extreme Networks Policy Manager (EPM)
Supervisor Edition - User Guide
Version 1.2
Extreme Networks, Inc.
3585 Monroe Street
Santa Clara, California 95051
(888) 257-3000
(408) 579-2800
http://www.extremenetworks.com
Published: November 2007
Part number: 100260-00 Rev 04
AccessAdapt, Alpine, BlackDiamond, EPICenter, ESRP, Ethernet Everywhere, Extreme Enabled, Extreme Ethernet
Everywhere, Extreme Networks, Extreme Standby Router Protocol, Extreme Turbodrive, Extreme Velocity,
ExtremeWare, ExtremeWorks, ExtremeXOS, the Go Purple Extreme Solution, ScreenPlay, Sentriant, ServiceWatch,
Summit, SummitStack, Unified Access Architecture, Unified Access RF Manager, UniStack, UniStack Stacking, the
Extreme Networks logo, the Alpine logo, the BlackDiamond logo, the Extreme Turbodrive logo, the Summit logos,
the Powered by ExtremeXOS logo, and the Color Purple, among others, are trademarks or registered trademarks of
Extreme Networks, Inc. or its subsidiaries in the United States and/or other countries.
Adobe, Flash, and Macromedia are registered trademarks of Adobe Systems Incorporated in the U.S. and/or other
countries. AutoCell is a trademark of AutoCell. Avaya is a trademark of Avaya, Inc. Merit is a registered trademark
of Merit Network, Inc. Internet Explorer is a registered trademark of Microsoft Corporation. Mozilla Firefox is a
registered trademark of the Mozilla Foundation. sFlow is a registered trademark of sFlow.org. Solaris and Java are
trademarks of Sun Microsystems, Inc. in the U.S. and other countries.
Specifications are subject to change without notice.
All other registered trademarks, trademarks, and service marks are property of their respective owners.
© 2007 Extreme Networks, Inc. All Rights Reserved.
2
Extreme Networks Policy Manager (EPM)
Table of Contents
Preface........................................................................................................................................... 7
Introduction ...............................................................................................................................7
Conventions................................................................................................................................7
Related Publications ...................................................................................................................8
Chapter 1: Overview ........................................................................................................................ 9
Introduction ...............................................................................................................................9
Description of the Extreme Networks Policy Manager ......................................................................9
About This Manual ....................................................................................................................10
Editions of the EPM ..................................................................................................................10
Chapter 2: Installing The Extreme Networks Policy Manager............................................................ 11
Introduction .............................................................................................................................11
Hardware and Software Requirements .........................................................................................11
Switch Requirements ................................................................................................................11
EPM Installation .......................................................................................................................13
Chapter 3: Viewing Policies and Rules ........................................................................................... 15
Introduction .............................................................................................................................15
Opening the EPM ......................................................................................................................15
Configuring the EPM for use on a Switch.....................................................................................18
Description of the Windows and Menus .......................................................................................20
The EPM Desktop................................................................................................................20
Menu Bar .....................................................................................................................21
Toolbar.........................................................................................................................23
Status Panel .................................................................................................................23
Status Bar ....................................................................................................................25
Rule Editor Window .............................................................................................................26
Hide and Show the Panels .............................................................................................26
Tree Structure Panel......................................................................................................27
Rule Editing and Viewing Panel ......................................................................................27
Rule Properties Panel ....................................................................................................28
Rule Parameters Tab ...............................................................................................28
Rule Information Tab ...............................................................................................28
Rule Navigator Window ........................................................................................................29
Opening an Existing Policy.........................................................................................................30
Opening a Policy File Locally................................................................................................30
Opening a Policy File from a Switch ......................................................................................31
Policy Parsing .....................................................................................................................32
Searching for Rules in a Policy ...................................................................................................33
Search by Name............................................................................................................33
Search by Parameter .....................................................................................................34
Working Among the Windows and Panels.....................................................................................36
Extreme Networks Policy Manager (EPM) 1.2 User Guide
3
3
Table of Contents
Chapter 4: Creating Policies and Rules........................................................................................... 37
Introduction .............................................................................................................................37
Creating a New Policy................................................................................................................37
Creating a New Rule for a Policy.................................................................................................37
Saving a Policy .........................................................................................................................39
Validating and Checking a Policy ................................................................................................40
Importing and Exporting Rules into a Policy.................................................................................41
Importing Rules ..................................................................................................................41
Exporting Rules...................................................................................................................42
Chapter 5: Modifying Policies and Rules ........................................................................................ 43
Introduction .............................................................................................................................43
Marking Rules ..........................................................................................................................44
Adding and Deleting Rules in a Policy .........................................................................................44
Adding Rules ......................................................................................................................44
Deleting Rules ....................................................................................................................44
Modifying Rules ........................................................................................................................45
Renaming a Rule ................................................................................................................45
Reclassifying a Rule ............................................................................................................45
Changing Rule Parameters ...................................................................................................46
Applying Changes to an Activated Policy..........................................................................47
Managing Global and Policy Variables .........................................................................................48
Organizing Rules .......................................................................................................................49
Deleting Policies .......................................................................................................................49
Managing Policy Activity ............................................................................................................50
Activating and Deactivating a Policy......................................................................................50
Disabling a Rule..................................................................................................................52
Chapter 6: Running Extreme Networks Policy Manager Examples..................................................... 53
Introduction .............................................................................................................................53
Example 1—Example_TCP_Threshold.pol....................................................................................53
Open and View the Policy.....................................................................................................53
Save to a Switch .................................................................................................................54
Activate the Policy on a Port.................................................................................................55
Modify Rule Parameters .......................................................................................................57
Example 2—Example_TCP_UDP_Balance.pol ..............................................................................58
Open and View the Policy.....................................................................................................58
Search for a Rule ................................................................................................................59
Incorporate into a Policy ......................................................................................................61
Appendix A: Help Messages.......................................................................................................... 63
Introduction .............................................................................................................................63
Predefined CLEAR-Flow System Counters ....................................................................................63
Synonyms used for Rule Constants ............................................................................................65
Type Selection Panel .................................................................................................................68
Match Condition Selection Panel ................................................................................................69
Action Modifier Selection Panel..................................................................................................70
True Action Selection Panel .......................................................................................................75
4
Extreme Networks Policy Manager (EPM) 1.2 User Guide
Table of Contents
Match Condition Selection Panel ................................................................................................75
Appendix B: Troubleshooting ......................................................................................................... 77
Introduction .............................................................................................................................77
Connectivity Problems ...............................................................................................................77
EXOS Compatibility Problems.....................................................................................................77
Local Client Runtime Problems ..................................................................................................78
Rule and Policy Version Problems ...............................................................................................78
SSH Problems ..........................................................................................................................78
Index ............................................................................................................................................ 79
Extreme
Networks
Manager
(EPM)
1.2 User
Extreme
Networks
PolicyPolicy
Manager
(EPM)
1.2 User
GuideGuide
5
5
Table of Contents
6
Extreme Networks Policy Manager (EPM) 1.2 User Guide
Preface
This preface introduces this user guide, describes guide conventions, and lists other useful publications.
Introduction
This guide provides the required information to use the Extreme Networks Policy Manager (EPM) Supervisor Edition software. It is intended for use by network administrators who are responsible for
monitoring and managing Local Area Networks and assumes a basic working knowledge of:
●
Local Area Networks (LANs)
●
Ethernet concepts
●
Ethernet switching and bridging concepts
●
Routing concepts
●
Access Control Lists (ACLs)
●
CLEAR-Flow
NOTE
If the information in a Release Note differs from the information in this User Guide, the Release Note takes
precedence.
Conventions
Table 1 and Table 2 list conventions that are used throughout this guide.
Table 1: Notice Icons
Icon
Notice Type
Alerts you to...
Note
Important features or instructions.
Caution
Risk of unintended consequences or loss of data.
Warning
Risk of permanent loss of data.
Extreme Networks Policy Manager (EPM) 1.2 User Guide
7
Preface
.
Table 2: Text Conventions
Convention
Description
Screen displays
This typeface represents information as it appears on the screen.
Screen displays bold
This typeface indicates how you would type a particular command.
The words “enter”
and “type”
When you see the word “enter” in this guide, you must type something, and then
press the Return or Enter key. Do not press the Return or Enter key when an
instruction simply says “type.”
[Key] names
Key names appear in text in one of two ways. They may be
• referred to by their labels, such as “the Return key” or “the Escape key.”
• written with brackets, such as [Return] or [Esc].
If you must press two or more keys simultaneously, the key names are linked with a
plus sign (+). For example:
Press [Ctrl]+[Alt]+[Del].
Words in bold type
Bold text indicates a button or field name.
Words in italicized type
Italics emphasize a point or denote new terms at the place where they are defined in
the text.
Related Publications
Other manuals that you will find useful are:
●
ExtremeXOS Concepts Guide
●
ExtremeXOS Command Reference Guide
For documentation on Extreme Networks® products, and for general information about Extreme
Networks, see the Extreme Networks home page:
http://www.extremenetworks.com
Customers with a support contract can access the Technical Support pages at:
http://www.extremenetworks.com/services/eSupport.asp
The technical support pages provide the latest information on Extreme Networks software products,
including the latest Release Notes, information on known problems, downloadable updates or
patches as appropriate, and other useful information and resources.
Customers without contracts can access manuals at:
http://www.extremenetworks.com/services/documentation/
8
Extreme Networks Policy Manager (EPM) 1.2 User Guide
1
Overview
Introduction
This chapter describes the following sections:
●
Description of the Extreme Networks Policy Manager on page 9
●
About This Manual on page 10
●
Editions of the EPM on page 10
Description of the Extreme Networks Policy Manager
The Extreme Networks Policy Manager (EPM) is a client application for the configuration and
management of Access Control Lists (ACLs) and Continuous Learning, Examination, Action and
Reporting of Flows (CLEAR-Flow or CF) on EXOS-based Extreme Networks switches. It is a GUI-based
software download designed to simplify the management process.
ACLs are used to perform packet filtering and forwarding decisions on traffic traversing the switch.
Each packet arriving on an ingress port and/or VLAN is compared to the access list applied to that
interface and is either permitted or denied. ACLs are typically applied to traffic that crosses Layer 3
router boundaries, but is possible to use access lists within a Layer 2 virtual LAN (VLAN).
CLEAR-Flow is an extension to ACLs that implements security, monitoring, and anomaly detection in
Extreme XOS software. ACL policy rules are created to count packets of interest. CLEAR-Flow rules are
added to the policy to monitor the ACL counter statistics for situations of interest in the individual
network. Such situations can include: the cumulative value of a counter; the change to a counter over a
sampling interval; the ratio of two counters; or even the ratio of the changes of two counters over an
interval. For example, monitoring the ratio between TCP SYN and TCP packets might show an
abnormally large ratio which may indicate a SYN attack.
The counters used in CLEAR-Flow are either defined by the user in an ACL entry, or can be a
predefined counter. Refer to a list and description of these counters in Appendix A on page 63.
If the rule conditions are met, the CLEAR-Flow actions configured in the rule are executed. The switch
can respond by modifying an ACL that will block, prioritize, or mirror the traffic, executing a set of CLI
commands, or sending a report using a SNMP trap or EMS log message.
For additional information about ACLs or CLEAR-Flow refer to the ExtremeXOS Concepts Guide.
Extreme Networks Policy Manager (EPM) 1.2 User Guide
9
Overview
About This Manual
This manual consists of six chapters, two appendixes and an index, arranged as shown in Table 3.
Table 3: List of Chapters
Chapter
Description
1 - Overview
Describes the Extreme Networks Policy Manager and the User Guide
contents.
2 - Installing EPM
Describes the hardware, software and switch requirements, and explains the
installation process
3 - Viewing Policies and Rules
Describes procedures for viewing policies and rules locally and through a
switch
4 - Creating Policies and Rules
Describes procedures for creating policies and rules
5 - Modifying Policies and Rules
Describes procedures to modify existing policies and rules
6 - Running EPM Examples
Provides two examples to demonstrate capabilities and procedures
Appendix A
Contains help messages and other reference material that appear in the EPM
program
Appendix B
Contains suggestions for dealing with problems that may occur when running
the EPM
Index
Contains a keyword index to the User Guide
Editions of the EPM
Currently, one edition of the EPM is available—the Supervisor Edition. The Supervisor Edition allows
the user the capability to create, modify and save policies either locally or when connected to a switch.
In this User Guide, the terms EPM and Extreme Networks Policy Manager always refer to the
Supervisor Edition.
10
Extreme Networks Policy Manager (EPM) 1.2 User Guide
2
Installing The Extreme Networks Policy
Manager
Introduction
This chapter describes the following sections:
●
Hardware and Software Requirements on page 11
●
Switch Requirements on page 11
●
EPM Installation on page 13
Hardware and Software Requirements
The EPM is a software application that is installed on a customer’s PC. Table 4 displays the minimum
requirements for a single user.
Table 4: Minimum Hardware and Software Requirements
Item
Windows
Linux
Processor
Pentium 4 or AMD Athlon
Pentium 4 or AMD Athlon
Operating System
Windows XP (Home or Professional)
Fedora Core 5
X-windows
Memory
512 MB (1 GB is recommended for
better performance.)
512 MB (1 GB is recommended for
better performance.)
Storage
10 GB
10 GB
CD-ROM Drive
Not required. The EPM is installed
from a network download.
Not required. The EPM is installed
from a network download.
Switch Requirements
The following apply to the switch used with the EPM.
●
The EPM can be run on the following Extreme Networks switches:
■
BlackDiamond® 8800 series
■
Summit® family of switches (Summit X150, X250e, X450, X450a and X450e series)
■
BlackDiamond 10808
■
BlackDiamond 12800 series
NOTE
Although the BlackDiamond 8800 and Summit switches listed above support the EPM, they do not support
CLEAR-Flow rules. Therefore, when the EPM is used with these switches, CLEAR-Flow rules and their raw rule
text are displayed but the rules themselves are disabled
Extreme Networks Policy Manager (EPM) 1.2 User Guide
11
Installing The Extreme Networks Policy Manager
●
The switch must be running ExtremeXOS™ 11.4 or later.
●
The EPM requires a Secure Shell (SSH) module installed and running on the switch to manage policy
file transfer. The default state of SSH is “disabled”, so ensure that this application has been enabled
using the enable ssh2 command.
To load and run the SSH module on a switch, use the following commands:
a Download image <ip> <yy>-xxx-ssh.xmod primary
where “yy” is the switch type and “xxx” is the release number
For example, download image 10.1.1.1 bd10k-11.4.4.7-ssh.xmod primary
b run update
c
enable ssh2
d enable clear-flow (for CLEAR-Flow supported switches)
For additional information, refer to the ExtremeXOS Command Reference Guide and the ExtremeXOS
Concepts Guide.
●
A Trivial File Transfer Protocol (TFTP) server must be installed and running prior to loading or
saving policy files using the EPM. The server is required to transfer policy files to and from switches.
Install an external TFTP server on port 69 and set the EPM’s policy staging directory to the TFTP
server’s root. Set the staging directory after the EPM is installed. (Refer to “Configuring the EPM for
use on a Switch” on page 18 for information on setting the staging directory and other configuration
procedures.)
●
12
Ensure that the EPM user has read/write permission to the installation directory and the TFTP
directory.
Extreme Networks Policy Manager (EPM) 1.2 User Guide
EPM Installation
EPM Installation
The EPM is installed from a network download and utilizes a user interface installation Wizard. Use the
following procedure:
1 Download the EPM program files from Extreme Networks’ Software Downloads web page.
2 On Windows, double click the installation bundle executable icon.
On Linux, run the installation script (.sh file) from an xterm window.
The Setup Wizard window is launched as shown below.
NOTE
Installation on Linux uses the Installation Wizard with similar panels and properties.
and is followed by
3 Continue progressing through the screens that ask you to:
a Accept the license agreement,
b Select the destination directory,
c
Select the start menu folder, and
d Select additional tasks (Create a desktop icon, Create a Quick Launch icon).
Extreme Networks Policy Manager (EPM) 1.2 User Guide
13
Installing The Extreme Networks Policy Manager
The Wizard then extracts and installs the files, and displays
e Notification of the file installation,
f
The following Information window, and
g The following finishing window.
4 Click Finish. The EPM is installed.
14
Extreme Networks Policy Manager (EPM) 1.2 User Guide
3
Viewing Policies and Rules
Introduction
This chapter provides a brief description of the different ways to view policies and rules in the Extreme
Networks Policy Manager (EPM).
The EPM functions in two modes—local and switch. In local mode, the user can work independently
within an offline set of files to create, modify and verify policies and rules. The local files can also be
used as a backup system for files running on a switch. When working locally, certain elements of the
application are hidden and can be seen only when connected to a switch. In switch mode, the user can
utilize all the functions of the EPM.
Each policy is viewed and edited individually and only one policy can be open at a time. If one policy
is open in the program and the user attempts to open or create another, the EPM prompts with a save
command before closing the currently open policy.
This chapter describes the following sections:
●
Opening the EPM on page 15
●
Configuring the EPM for use on a Switch on page 18
●
Description of the Windows and Menus on page 20
●
Opening an Existing Policy on page 30
●
Searching for Rules in a Policy on page 33
●
Working Among the Windows and Panels on page 36
Opening the EPM
1 Launch the EPM through Start > Programs > Extreme Networks Policy Manager > epm_supervisor
or by using a desktop icon if one was selected during the installation process. The EPM opens to the
Rule Editor window as shown below.
NOTE
Only one instance of the EPM can be executed on the desktop at a time.
Extreme Networks Policy Manager (EPM) 1.2 User Guide
15
Viewing Policies and Rules
The first time the EPM program is launched, the following message is displayed
.
16
Extreme Networks Policy Manager (EPM) 1.2 User Guide
Opening the EPM
2 After reading, Close the box. The following IP Address Notice is displayed. This notice is displayed
every time the EPM is opened until an IP address has been set.
3 Click OK. The EPM then notifies the user if it has found a TFTP server. Without one, the EPM can
open and save local policies only.
a If it finds a TFTP server, the following notice is displayed.
Refer to “Configuring the EPM for use on a Switch” on page 18 to set the policy staging directory.
b If it does not find a TFTP server, the following notice is displayed.
If necessary, take the appropriate action to enable a TFTP server.
4 Click OK to close the box. The EPM Rule Editor window remains.
NOTE
A notice regarding TFTP server availability is also displayed in the Status Panel under the Alerts tab. (Refer to
“Status Panel” on page 23.)
Extreme Networks Policy Manager (EPM) 1.2 User Guide
17
Viewing Policies and Rules
Configuring the EPM for use on a Switch
Before attempting to open a policy from a switch or save a policy to a switch, be certain that the
following steps have been completed.
●
The EPM has found a TFTP server. Check that the TFTP server is running on client and is listening
on port 69.
●
The user running the EPM has read/write/create permission to the TFTP server’s root directory.
●
The file staging directory is pointing towards the TFTP server’s root directory. To set the directory:
a Choose Tools > Properties > Set file staging directory from the menu. A file Open box is
displayed.
b Point to the TFTP server’s root directory as shown below.
c
●
Click Open. The box closes and the file staging directory is set.
The local IP address is set. To set the address:
a Choose Tools > Properties > Set Local IP Address from the menu. A Local IP Selection box
opens.
b From the dropdown menu, select an available IP address and click OK. The IP address is set.
NOTE
If the network configuration is changed, the local IP address must be reset.
●
If applicable, set the public side address of NAT. If not applicable, leave blank. To set the address:
a Choose Tools > Properties > Set NAT IP address from the menu. An Input dialog box is
displayed.
b Enter the address and click OK.
NOTE
Network Address Translation (NAT) is a method used by networking equipment such as routers to share an IP
address.
18
Extreme Networks Policy Manager (EPM) 1.2 User Guide
Configuring the EPM for use on a Switch
●
The file search directory is pointing towards the policy files as shown below. This is the default.
Choose Tools > Properties > Set file search directory to check the file name in the file Open box.
Extreme Networks Policy Manager (EPM) 1.2 User Guide
19
Viewing Policies and Rules
Description of the Windows and Menus
The EPM Desktop
The program opens to the Rule Editor window. The two primary working windows are the Rule Editor
window which is described on page 26 and the Rule Navigator window which is described on page 29.
Some window elements are common to both the Rule Editor and the Rule Navigator windows. The
following screen identifies those common elements.
Toolbar
Menu Bar
Status Bar
Status Panel
“Go to the eSupport Website”
These include:
20
●
A standard Menu Bar, discussed on page 21
●
A Toolbar, discussed on page 23
●
A Status Panel, discussed on page 23
●
A Status Bar, discussed on page 25
●
A link icon to access the eSupport Website
Extreme Networks Policy Manager (EPM) 1.2 User Guide
Description of the Windows and Menus
Menu Bar
The Menu Bar consists of six standard menus—File, View, Policy, Rules, Tools and Help. Table 5
describes the elements of these menus.
Table 5: EPM Standard Menus
Menu Components
Description
File
New
Begins the process to create a new policy. Refer to “Creating a New Policy”
on page 37.
Open
Opens an existing policy file.
Switch
Opens an existing policy file from a switch. Refer to “Opening a Policy File
from a Switch” on page 31.
Local
Opens an existing policy file from a local file. Refer to “Opening a Policy File
Locally” on page 30.
Save
Saves changes to an existing policy in the location (switch or local) in which
it was opened.
Save As
Saves a new policy or saves changes to an existing policy to a different
location. Refer to “Creating a New Policy” on page 37.
Switch
Saves to a switch.
Local
Saves locally.
Import From
Imports all rules from one policy into the current policy. Refer to “Importing
Rules” on page 41.
Export To
Exports all rules from the current policy to populate a new policy or to
replace the existing rules in another policy. Refer to “Exporting Rules” on
page 42.
Exit
Closes the EPM.
View
Shows and hides certain panels in the window. When one or more is hidden,
the shown panels expand to fill the window.
Status Panel
Shows and hides the Status Panel.
Rule Properties Panel
Shows and hides the Rule Properties Panel.
Tool Bar
Shows and hides the Tool Bar.
Policy
Includes functions to create, modify and check a policy.
New Policy
Begins the process to create a new policy. Refer to “Creating a New Policy”
on page 37.
Search
Searches the current policy for specific rules. Refer to “Searching for Rules
in a Policy” on page 33.
Validate & Check
Validates and checks a new or modified policy. Refer to “Validating and
Checking a Policy” on page 40.
Refresh
Refreshes the currently loaded policy when it is activated on a switch after it
has been modified. Refer to “Applying Changes to an Activated Policy” on
page 47.
Activity
Activates a policy stored on the switch, allowing control of the active VLANs
and active ports of the current policy. Refer to “Managing Policy Activity” on
page 50.
Recalculate rule ranks
Recalculates the rule ranks when ACL and/or CLEAR-Flow rules have been
added to or deleted from the policy. Refer to “Organizing Rules” on page 49.
Reorder rules by rank
Places rules in order by rule rank when they have been recalculated. Refer to
“Organizing Rules” on page 49.
Extreme Networks Policy Manager (EPM) 1.2 User Guide
21
Viewing Policies and Rules
Table 5: EPM Standard Menus (Continued)
Menu Components
Reorder rules by initial
position
Rules
Description
Places rules in their original position regardless of rank. Refer to “Organizing
Rules” on page 49.
Begins the process to create a new rule.
New Rule
Opens the Rule Wizard to create a new rule. Refer to “Creating a New Rule
for a Policy” on page 37.
Tools
Global Variables...
Opens a dialog box in which global variables can be set. Refer to “Managing
Global and Policy Variables” on page 48.
Policy Variables...
Opens a dialog box in which policy variables can be set. Refer to “Managing
Global and Policy Variables” on page 48.
Synonyms...
Displays a list of synonyms. Refer to “Synonyms used for Rule Constants” on
page 65.
System Counters...
Displays a list of predefined CLEAR-Flow system counters. Refer to
“Predefined CLEAR-Flow System Counters” on page 63.
Properties
Refer to “Configuring the EPM for use on a Switch” on page 18 for the
following properties.
Set local IP address
Opens a box to choose from available IP addresses or enter a new address.
Set NAT IP address
Opens a box to set the public side address of your NAT (Network Address
Translation), if appropriate.
Set files search directory
Sets the default directory for finding policy files when a policy is opened
locally. The Open > File function will set itself to this location.
Set file staging directory
Sets the location of the tftp server’s root directory. Files are 'staged' or
copied to and from the root directory when a policy is opened and saved on a
remote switch. Refer to “Configuring the EPM for use on a Switch” on
page 18.
Message Capture
Captures data to be used to diagnose problems.
Tracing
Turns tracing log on and off.
Debug
Turns debug log on and off. When on, a message is written to a debug text
file and is not displayed in an EPM window.
Set Capture Size
Sets the maximum number of lines of data to be captured. The allowed range
is between 1 and 100,000.
Policy Parsing
Ignore Unknown
Keywords
Turns Ignore Unknown Keywords on and off. When on (the default), a policy
with terms that the EPM does not understand, is loaded but with
qualifications. When off, a policy that the EPM does not understand is not
loaded. Refer to “Policy Parsing” on page 32.
Sentriant Actions
Reset XML to factory
When the Sentriant XML code has been rewritten, replaces it with the
original factory code.
Write XML
Allows you to write specialized code to replace or supplement factory code.
Help
About Extreme Networks
Policy Manager
Lists: Application Name, Edition, Version and Build number.
In the Rule Editing and Viewing Panel and the Rule Navigator window, another menu is displayed
when you right-click any rule in the list. For details about the functions of this menu, refer to the
chapter, “Modifying Policies and Rules” on page 43.
22
Extreme Networks Policy Manager (EPM) 1.2 User Guide
Description of the Windows and Menus
Toolbar
The Toolbar contains icons for the most common menu operations and are shown in Table 6.
Table 6: Toolbar Icons
Icon
Description
Opens a local policy
Saves changes to a local policy
Opens a policy from a switch
Saves changes to a policy on switch
Creates a new rule
Creates a new policy
Validates and checks a policy
Searches a policy for particular rule
elements
Searches for a particular rule
Repeats the search for a particular rule
Status Panel
The Status Panel displays data from different log files—Alert, Actions, Log, Policy Information and
Rule Activity. A log is selected by clicking its panel tab. These logs are described below with examples
of the screens.
●
The Alerts tab
displays the alerts log messages. Alerts are warnings or notices about an
action or error that may or may not have inhibited EPM functions.
Extreme Networks Policy Manager (EPM) 1.2 User Guide
23
Viewing Policies and Rules
●
The Actions tab
displays the actions log messages. All user actions are recorded for audit
purposes. (The replay of actions is planned for a future release.)
●
The Log tab
displays common log messages. The common log contains any trace or error
messages that inhibit or cause failure of EPM functions.
For each of these three logs (Alerts, Actions and Log), there is a “Clear” button that removes the entries
currently appearing on the screen. These entries are then stored in the program’s log files
(\Program Files\epm_supervisor\log). To set the maximum number of status capture lines for a log,
choose Tools > Properties > Message Capture > Set Capture Size from the menu.
●
The Policy Information tab
is displayed when a policy is opened and shows
Information and Notes about that currently open policy. Information shows basic data including
when and by whom the policy was created and last modified as well as the number and type of
rules. Notes might include the purpose of the policy or other user defined identifiers. This is a read/
write text box.
To add to the Notes field:
a In the field, begin typing the desired text. The Apply Notes button is enabled.
b When the text is entered, click the Apply Notes button. The text is added.
To remove notes:
a Highlight the text to be removed then press the keyboard’s Delete or Backspace key. The Apply
Notes button is enabled.
b Click the Apply Notes button. The text is removed.
24
Extreme Networks Policy Manager (EPM) 1.2 User Guide
Description of the Windows and Menus
●
The Rule Activity tab
displays activity data for a policy running on a switch. The EPM
updates the data every 15 to 30 seconds. This log is shown only when the EPM is connected to a
switch.
For the Rule Activity log, there is a Refresh button that manually updates any modified activity.
Status Bar
The Status Bar displays the current activity of the EPM. When it is not executing a function it reads
“Idle.” Otherwise, it shows an explanation of the function that is running. For example:
●
When opening a file locally, the status bar reads “Operation 'OpenLocal' is in progress. (The
operation should complete within '30' seconds.)” or
●
When exiting the EPM, the status bar reads “Operation 'FlushLogsAndExit' is in progress (The
operation should complete within '30' seconds.)”
Extreme Networks Policy Manager (EPM) 1.2 User Guide
25
Viewing Policies and Rules
Rule Editor Window
When a policy is opened from either the local files or from a switch or when a new policy is created, the
Rule Editor Window is displayed.
The following screen shows the Rule Editor Window and the elements unique to this window. They
include:
●
Tree Structure Panel, discussed on page 26
●
Rule Editing and Viewing Panel, discussed on page 27
●
Rule Properties Panel, discussed on page 28
Tree Structure Panel
Rule Editing and Viewing Panel
Rule Properties Panel
Hide and Show the Panels
The different window panels can be hidden or shown by:
●
Clicking the up, down and side “arrow points” adjacent to the Tree Structure, and Status panels
●
Clicking the X in the upper right corner of the Rule Properties and Status panels
●
From the Menu Bar, selecting and deselecting the boxes from the View > Status Panel, Rule
Properties Panel, and Tool Bar submenus
When a panel is hidden using these methods, the remaining panels expand to fill the window.
26
Extreme Networks Policy Manager (EPM) 1.2 User Guide
Description of the Windows and Menus
Tree Structure Panel
The Tree Structure Panel displays the ACL and CLEAR-Flow (or CF) rules that are included within the
selected policy. ACL rules are identified with a silver icon
and CLEAR-Flow rules with a gold
icon .
Within this panel, the rules can be organized and displayed in three different ways. Use the three tabs
that are located below the panel to organize and display the rules according to the following:
Rules by class
Displays the rules by their class.(Refer to “Class” in the next table.)
Rules by action
Displays the rules by each action included in the rule.
• For ACL rules, the actions are: Permit, Deny, Count, CVID, Link Aggregation Hash,
Qos, SCOS, STAG Ethertype, SVID, Traffic Queue, and Uplink Port.
• For CF rules the actions are: Permit, Deny, Qos, Mirror, Cli, Snmp, and Syslog.
Rules by reference
Displays the rules showing the connection between an specific ACL rule and a CLEARFlow rule. An ACL rule that is shown in blue text is one that does not have a
corresponding CLEAR-Flow reference or vice versa.
Information in this panel is displayed using a standard tree structure that allows subcomponents to be
hidden or shown by clicking the "key" icon.
NOTE
Right-click actions are not supported in the tree structure panel.
Rule Editing and Viewing Panel
The Rule Editing and Viewing Panel displays the following information for each rule:
#
A number that shows the position of each rule in the policy. If the rules are reordered, the
position numbers for the rules change accordingly.
Rank
The rank number is used to indicate the order in which the rules are stored in the policy file.
They are stored in descending order. The user can set the order by positioning the rules
manually or rely on the EPM’s algorithm to establish an efficient order based on the
specificity of the rule.
The algorithm is available when creating a rule or later by using the menu command Policy >
Recalculate rule ranks. The menu command is used when creating new rules and for
recalculating rank when rules have been added or deleted from the policy.
Type
The type of rule—ACL or CLEAR-Flow.
Class
The class is a friendly name label that the user defines to customizes the rules according to
individual needs and categories. When a class is not named, the default is “Generic.”
Name
Name of the rule. Clicking on the plus sign expands each rule to display its raw rule text.
TCNT
Trigger Count. TCNT is shown when the policy opened on a switch is activated by the Activity
Manager. It represents the number of times the ACL or CLEAR-Flow rule has been evaluated
and triggered or fired. The TCNT is updated only when a policy is opened on a switch and
when the Refresh button above the Rule Activity tab display on the Status Panel is pressed.
For policies opened locally, nothing is displayed under the TCNT column.
Status
Status displays whether a policy that was saved with the EPM has been modified without the
EPM. When the policy has not been so modified, there is no entry in the column. When the
policy has been so modified the status column entry is “Rule modified externally.”
Extreme Networks Policy Manager (EPM) 1.2 User Guide
27
Viewing Policies and Rules
Another feature of this panel is a dropdown menu that is displayed when you right-click any rule in the
list. The menu displays functions that are used primarily to edit and modify policies and rules. For
details about this menu, refer to the chapter, “Modifying Policies and Rules” on page 43.
Rule Properties Panel
The Rule Properties Panel is made up of three boxes under two tabs. The three boxes display different
elements of the selected rule.
Rule Parameters Tab. Clicking the Rule Parameters tab displays the following information:
●
●
When an ACL is selected from either the Tree Structure or the Rule Editing and Viewing Panel, the
rule parameters displayed are:
Match Conditions
The match conditions contained in the rule—the “if” statement. A list
of available match conditions is included in Appendix A on page 69.
Actions
The action taken when the packet matches the match conditions—the
“then” “permit or deny” statement. If the packet matches all the
match conditions and if there is no action specified in the “then”
statement, “permit” is used by default.
Action Modifiers
Additional modifiers to the actions, such as “count”, cvid, linkaggregation-hash, traffic queue, or redirect.
When a CF is selected, the rule parameters displayed are:
Match Conditions
The conditions that will trigger the rule and how often to evaluate the
rule.
Actions (True Condition)
The list of actions to take when the rule is triggered—the “then”
clause.
Actions (False Condition) The list of actions to take after the rule is triggered and when the
match conditions later become false—the else clause.
Icons are connected to each of the three boxes and are used to edit the parameters. They are:
Delete Selection
Edit Arguments of selected
Add
Rule Information Tab. Clicking the Rule Information tab displays the following information:
28
General
A summary of the basic information about the rule including: Name; Type; Policy
Version; Action information, and so forth.
Access
Details showing when and by whom the rule was created and, if applicable,
modified. In the Supervisor edition, the “by whom” is always the supervisor.
Notes
A read/write text box into which notes such as the purpose of the rule can be
added. To add notes, click inside the text box and begin typing. The Apply Notes
button is enabled. Click the button when the entry in complete. To delete notes,
highlight the text to be removed then strike the keyboard’s Delete or Backspace
key. The Apply Notes button is enabled. Click the button.
Extreme Networks Policy Manager (EPM) 1.2 User Guide
Description of the Windows and Menus
Rule Navigator Window
From the Rule Editor window, clicking the Rule Navigator tab displays the Rule Navigator window.
The screen below shows the Rule Navigator Window and the elements unique to this window. Those
elements include:
●
Access Control List Rules (ACL) and ACL Rule Detail
●
CLEAR-Flow Rules (CF) and CF Rule Detail
The Access Control List (ACL) Rules panel displays the names of the ACL rules that are included in
the policy that is open. ACL Rule Detail displays the raw rule text for the ACL rule that is selected.
The CLEAR-Flow (CF) Rules panel displays the names of the CF rules that are included in the policy
that is open. CF Rule Detail displays the raw rule text for the CF rule that is selected.
Above both the Access Control List Rules panel and the CLEAR-Flow Rules panel are the following two
icons.
Marks the selected rule
Clears all marks
Extreme Networks Policy Manager (EPM) 1.2 User Guide
29
Viewing Policies and Rules
Between the Access Control List rules panel and the CLEAR-Flow Rules panel are two icon arrows
which toggle filters on and off.
A toggle button that when clicked filters the CLEAR-Flow rules to show only those that are
referenced by the selected ACL rule. In the CF Rule Detail panel, the reference is highlighted in
yellow. Click the button a second time to toggle the filter off and again show all CLEAR-Flow
rules.
A toggle button that when clicked filters the ACL rules to show only those that are referenced by
the selected CLEAR-Flow rule. In the ACL Rule Detail panel, the reference is highlighted in
yellow. Click the button a second time to toggle the filter off and again show ACL rules.
Opening an Existing Policy
An existing policy file can be opened from either a local file or a switch.
Opening a Policy File Locally
1 Choose File > Open > Local. The Open dialog box appears.
2 Navigate to a policy and click Open.
When the process is successful, an Operation Progress box is displayed as the policy is opened,
followed by the following Validation Notice screen, that shows the path to the policy.
When the EPM cannot find the required metadata to determine the policy file version, a Policy
Version Notice box is displayed that requests more information.
a Click OK. A Policy Version Selection box is displayed.
b From the Versions: panel, select an appropriate version based on information in the Description
panel and click OK. The Operation Progress box is displayed followed by a Validation Notice.
30
Extreme Networks Policy Manager (EPM) 1.2 User Guide
Opening an Existing Policy
Opening a Policy File from a Switch
1 Ensure that your TFTP server is open.
2 From the EPM menu, choose File > Open > Switch. An Operation Progress box is displayed
followed by a Remote Switch Dialog box as shown below.
3 Enter the following information, completing all four fields. Leaving a field blank does not result in
default behavior.
a The IP Address of the switch to which you want to connect
b The Virtual Router on which the SSH server traffic is routed
c
The Admin Login ID
d The associated Admin Password
Then click OK. An Operation Progress box is displayed showing that the connection to and from
the switch is being checked.
NOTE
The EPM remembers the Remote Switch Dialog settings after they have been entered and the connection is
successful.
4 When there is a problem with the connection, the following box is displayed.
Check the suggested reasons and make the necessary adjustments. For additional information, refer
to “Configuring the EPM for use on a Switch” on page 18.
Extreme Networks Policy Manager (EPM) 1.2 User Guide
31
Viewing Policies and Rules
When there is no problem with the connection, a Policy Selection box opens as shown below.
5 From the dropdown menu, choose the desired policy name and click OK. The Operation Progress
box is displayed and is followed by a Load Notice box stating that the policy was successfully
loaded.
6 Click OK. In the Tree Structure Panel, the IP address of the switch is displayed following the policy
name.
NOTE
The Operation Progress box appears when policies are being loaded from or saved to a switch, indicating that the
switch connection is being checked.
Some EPM functions are active only when the program is connected to a switch and are either not
displayed or not enabled in the local mode. These include the following:
●
The Status Panel’s Rule Activity tab is displayed only when connected to a switch.
●
The Rule Editing and Viewing Panel’s TCNT entries do not show unless connected to a switch.
Policy Parsing
The EPM can be set to respond in one of two ways when an attempt is made to open an invalid policy.
1 From the menu, choose Tools > Properties > Policy Parsing > Ignore Unknown Keywords. The box
is checked by default.
When the box is checked, the EPM attempts to load the policy. When such a policy is encountered, a
Parse Notice box is displayed as shown below.
2 Click OK and the rule display in the rule viewing panels resembles the following:
When the box is unchecked, the EPM responds with an invalid message and does not attempt to load
the policy.
32
Extreme Networks Policy Manager (EPM) 1.2 User Guide
Searching for Rules in a Policy
Searching for Rules in a Policy
The EPM includes the functionality to search a policy to find: 1) particular rules by name or 2) all rules
that have certain parameters as selected by the user. These can be demonstrated using the rules shown
in the following policy.
Search by Name
To search for a rule in the Rule Editing and Viewing Panel by name or partial name, use the following
procedure:
1 In the text box located in the Toolbar, type all or part of the desired rule name, for instance: “ACK.”
2 Click the Find Rule icon
. The first rule in the Rule Editing and Viewing Panel that matches the
entered criteria, is then highlighted. In this example, the rule is “ACL_SMURF_ATTACK.”
3 Click the Find Next icon
to continue the search. In the example, the next rule is ACL-ACK.
4 Continue as needed until the Find Notice box reading "Search reached end of policy" is displayed.
NOTE
When a rule is found and highlighted in the Rule Editing and Viewing Panel, it is also highlighted in the other rule
listings in both the Rule Editor window and the Rule Navigator window.
Extreme Networks Policy Manager (EPM) 1.2 User Guide
33
Viewing Policies and Rules
Search by Parameter
To search for one or more rules that have specified elements, use the following procedure:
1 From the menu choose Policy > Search or click the Search Policy icon
box opens as shown below.
. A Search Policy dialog
2 Click the boxes to indicate Search acl rules and/or Search CLEAR-Flow rules.
3 Click either the Match all of the following or the Match any of the following radio button.
4 Click the More command button. A row of three fields is displayed as shown:
5 From the first (Rule Name) and second (Contains) dropdown menus, select the features on which to
search and in the text field, type specific values. For example: In the first box select “Match condition
args” and in the second box “Contains”. In the text field, type “count.” Then click the Search button.
The rules matching the search criteria are displayed in the bottom left box.
6 Click on any of the listed rules to see the raw rule text and the requested value highlighted in the
bottom right box.
7 To further refine the search, click the More button again to add another criteria row then specify the
search criteria. In this example, select “Rule Name” and “Starts with” and in the text field, type “U”
and click Search. The list of rules is reduced as seen below. Note that in the script, both “count” and
“U” are highlighted.
NOTE
The search function is not case-sensitive, but the highlighting function is.
34
Extreme Networks Policy Manager (EPM) 1.2 User Guide
Searching for Rules in a Policy
8 Continue modifying the search by adding More or Fewer criteria.
9 To remove any specific rules from the policy, select the rule and click the Delete command button.
CAUTION
The Delete command button removes a rule from the policy completely, not only in this action.
10 If desired, mark any rules using the “Mark” buttons. When the Search Policy window is closed,
these marks are displayed in the main windows.
11 To remove the search results, click the Clear command button.
Extreme Networks Policy Manager (EPM) 1.2 User Guide
35
Viewing Policies and Rules
Working Among the Windows and Panels
When a particular policy or rule is selected in any of the windows or panels, it is automatically selected
in all of the windows and panels. For example, in the screens below, the rule ACL_ICMP_REP was
selected by the user from the Tree Structure Panel. The same selection appears automatically in all
other rule viewing panels. This allows the user to make one selection and move throughout the
program without having to make a matching selection. In the figure below, arrows point to the common
rule selection and the raw rule text for the rule is circled.
36
Extreme Networks Policy Manager (EPM) 1.2 User Guide
4
Creating Policies and Rules
Introduction
The Extreme Networks Policy Manager (EPM) is used by first creating a policy and then populating it
with ACL and CLEAR-Flow rules.
Policies and Rules can be created locally, tested and verified, and then pushed to a switch.
This chapter describes the following sections:
●
Creating a New Policy on page 37
●
Creating a New Rule for a Policy on page 37
●
Saving a Policy on page 39
●
Validating and Checking a Policy on page 40
●
Importing and Exporting Rules into a Policy on page 41
Creating a New Policy
To create a new policy, use the following procedure.
1 From the Menu, choose Policy > New Policy or File > New or click the
Selection box opens.
icon. The Policy Version
2 From the Versions: panel, select either 02.00.00 or 03.00.00 and click OK. A new_policy.pol (localfile)
is displayed in the Tree Structure panel.
NOTE
The version 3 policy supports access control list (ACL) and CLEAR-Flow (CF) rules.
The version 2 policy supports access control list (ACL) rules only
3 Add one or more rules to the policy as described in the following sections.
NOTE
Rules must be added to a new policy before the policy can be saved.
Creating a New Rule for a Policy
To create a new rule, use the following procedure.
1 From the Menu, choose Rules > New Rule or click the
icon. The Rule Wizard opens.
2 In the Rule Wizard box, make the following entries:
a In the Rule Name text box, type a name.
Extreme Networks Policy Manager (EPM) 1.2 User Guide
37
Creating Policies and Rules
b From the Class Name dropdown menu, choose an existing class or type a new class name.
NOTE
If the new rule is being added to an existing policy, the dropdown menu contains selections of those class names
that are currently in the policy. If it is being added to a new policy, there are no selections and a name must be
added. Choose a name that will group all related rules.
c
Click the appropriate radio button to designate an ACL or CLEAR-Flow rule. (This button is
displayed only when adding rules to a 03.00.00 version policy.)
d For additional information on rule types and class names, click the Help button. The same
information can be found in Appendix A of this manual under “Type Selection Panel” on page 68.
e Click Next
3 From the Available list box, select one or more "match conditions" and use the "Arrow" icon to move
each of them to the Selected list box.
For addition information on “match conditions”, click the Help button. The same information can be
found in Appendix A of this manual under “Match Condition Selection Panel” on page 69.
4 Click Next. A dialog box opens for the first "match condition."
5 In the text box, enter arguments for the particular “match condition.'”Note that clicking the enabled
icons under the text box provides synonyms and other variable suggestions depending on which
"match condition" was selected. The Description box also displays information consistent with the
selection.
6 Click Next. If applicable, a dialog box opens for the next "match condition." Continue the process
until arguments have been selected for each "match condition."
7 From the Available list box, select the desired true or "then" action (permit or deny) and move it to
the Selected list box.
NOTE
“Permit” is the default, so if no action is specified in a rule entry, the packet is forwarded.
8 Click Next.
9 From the Available list box, select none or one or more "action modifiers" and move them to the
Selected list box.
For addition information on “action modifiers”, click the Help button. The same information can be
found in Appendix A of this manual under “Action Modifier Selection Panel” on page 70.
10 Click Next. If action modifiers were selected, a dialog box opens.
11 From the Available list box, select the desired "arguments" for the first action modifier that was
selected in Step 9, and move them to the Selected list box. Then click Next to continue the process
for each action modifier.
12 Click Next. The text of the new rule is displayed.
13 Under the text box, check or uncheck the box Use algorithm to insert rule in optimized location.
●
When checked (the default), the rule is ranked using an algorithm that calculates its best position
in the policy based on the specifics of the ACL rules. Specific rules trigger before general rules.
●
When unchecked, the rule is inserted according to its position. The user can determine the
position or the rule is added to the end of the list.
14 Click Finish. The new rule is added to the policy and displayed in all of the rule viewing panels.
38
Extreme Networks Policy Manager (EPM) 1.2 User Guide
Saving a Policy
Use the following procedure to add a new rule in a given position in the listing. For example, add a
new # 005 after # 004.
1 In the Rule Editing and Viewing Panel, right-click anywhere in the # 004 row. A menu is displayed.
2 Choose Insert new rule (after). The Rule Wizard opens.
3 Follow Step 2 through Step 14 above.
Saving a Policy
Policies can be saved to a local file or to a switch.
To save to a local file:
1 From the Menu Bar, choose File > Save As > Local. The Save box opens.
2 In the File Name: field, type a new policy name ending in “.pol” and click Save. A Validation
Notice box is displayed that confirms the Policy rules were successfully saved and the new policy
name in displayed in the Tree Structure Panel, followed by "(localfile)."
To save to a switch:
1 From the Menu Bar, choose File > Save As > Switch. The Remote Switch Dialog box opens as
shown below.
2 Enter the required information (described on page 31) and click OK. A Policy Entry box opens as
shown below.
3 In the Name text field, you have three options:
a Use the policy name of the local file you are saving that EPM displays in the text field, or
b TypeS a new policy name in the text field, or
Extreme Networks Policy Manager (EPM) 1.2 User Guide
39
Creating Policies and Rules
c
Select an existing policy name from the dropdown menu. The name is then displayed in the text
field. Use this when replacing an existing policy with an updated one. The EPM displays a
warning when it is overriding an existing policy.
d To save the name you have chosen to display in the Name text field, click OK.
NOTE
The “Launch activity manager after save” box above refers to the Policy Activity Manager dialog box which is
described on page 50.
When the policy is being saved on a switch that supports CLEAR-Flow, a Validation Notice
confirming the save is displayed.
When the policy is being saved on a switch that does not support CLEAR-Flow (see “Switch
Requirements” on page 11), a CLEAR-Flow Support Notice is displayed as shown below. Click Yes
to continue the save process. CLEAR-Flow rules are displayed in the rule viewing panels but are not
supported on the switch.
The saved policy name is displayed in the Tree Structure Panel followed by the IP address of the switch.
NOTE
A policy name must be an alpha-numeric string between 1 and 32 characters in length ending in ‘.pol.’
Validating and Checking a Policy
When a policy is created or when new rules have been added, the policy should be validated.
To validate a policy, use the following procedure.
1 From the Menu choose Policy > Validate & Check or click the
icon. An Operation Progress box
is displayed, followed by either a Validation Notice if the policy has passed validation or a Policy
Validation Exception if it has not. When you are working on a switch, this function indicates that it
validates the policy and checks it on the switch.
2 When the Policy Validation Exception box is shown, click Show Details. An Exception Detail box
opens explaining why the policy did not pass validation. Possible reasons include:
40
■
The Policy contains no rules.
■
Parse Exception ( Last Rule Line = 1, Last Rule = n/a, Last Metadata Line = 0 ) : Unable to
parse policy because policy selection is invalid.
■
Any of the errors you would encounter running the check policy command line directly on
the switch.
Extreme Networks Policy Manager (EPM) 1.2 User Guide
Importing and Exporting Rules into a Policy
Importing and Exporting Rules into a Policy
The same rule can be included in various different policies. The EPM provides the capability to import
rules into the current policy from another policy or export them to another policy from the current
policy. This section explains those procedures.
Use the import function when rules are to be added from one policy to the rules in the current policy.
Use the export function when selected rules in the current policy are to replace the rules in another
existing policy or when a new policy is to be created and populated with selected rules in the current
policy.
Importing Rules
Rules imported from another policy (source) into the currently open policy (target) are merged or added
to the rules already in the existing policy.
To import rules into a policy, use the following procedure.
1 Open the target policy into which rules are to be imported.
2 From the Menu, choose File > Import From... > Policy File. The Open box displays the policies from
which rules can be imported.
3 Select the source policy and click Open. The Rule Merge Assistant box opens as shown below.
When the rule is unique and valid, the EPM proceeds to import the rule.
When the EPM finds a problem importing a specific rule such as finding one that is common to both
policies, it prompts the user as shown in the above figure and suggests appropriate action.
4 Click the Use custom prefix for inserted rules box to add a prefix to the imported rules. Dup_ is the
default prefix but another can be used.
When the rule is of a different policy version, the EPM prompts the user as follows:
Extreme Networks Policy Manager (EPM) 1.2 User Guide
41
Creating Policies and Rules
5 Click Yes or No. The following Merge Results box is displayed.
6 Click OK. The Rule Mark Notice is displayed stating that Updated and inserted rules will be
marked. (Refer to “Marking Rules” on page 44.)
7 Click OK. The new rule is displayed in all the rule viewing panels in rank order.
8 Save the policy.
Exporting Rules
Rules are exported from the currently open policy (the source) in two ways. They can be exported into
an existing policy or into a new policy that is created as part of the export process.
To export rules into an existing policy, use the following procedure.
1 "Mark" one or more or all rules that are to be exported. (Refer to “Marking Rules” on page 44.) A
mark icon
appears next to the rule name.
NOTE
Rules must be marked to be exported.
2 From the Menu Bar, choose File > Export To... > Policy File. The Save box opens.
3 Select the target policy and click Save. The Confirm Export box opens as shown below.
4 Click No to cancel the process, or
Click Yes to overwrite the rules in the target policy. A Validation Notice box is displayed that
confirms the Policy was successfully exported.
To export rules into a new policy, use the following procedure.
1 "Mark" one or more or all rules that are to be exported. (Refer to “Marking Rules” on page 44.) A
mark icon
appears next to the rule name.
2 From the Menu Bar, choose File > Export To... > Policy File. The Save box opens.
3 In the File Name: field, type a new policy name ending in “.pol” and click Save. A Validation
Notice box is displayed that confirms the Policy rules were successfully exported and the new policy
is opened with all of the rules displayed.
4 Open the new policy again to see the final new policy displaying only the marked rules.
42
Extreme Networks Policy Manager (EPM) 1.2 User Guide
5
Modifying Policies and Rules
Introduction
The Extreme Networks Policy Manager (EPM) provides the capability to easily edit and modify existing
policies and rules. This chapter describes the following sections:
●
Marking Rules on page 44
●
Adding and Deleting Rules in a Policy on page 44
●
Modifying Rules on page 45
■
Renaming a Rule
■
Reclassifying a Rule
■
Changing Rule Parameters
●
Managing Global and Policy Variables on page 48
●
Organizing Rules on page 49
●
Deleting Policies on page 49
●
Managing Policy Activity on page 50
■
Activating and Deactivating a Policy
■
Disabling a Rule
Most editing and modifying functions are accomplished using the menu that is displayed by rightclicking a rule row in either the Rule Editing and Viewing Panel or the Rule Navigator Panel. The
complete menu is shown below:
The following sections describe the procedures for these functions.
Extreme Networks Policy Manager (EPM) 1.2 User Guide
43
Modifying Policies and Rules
Marking Rules
The rules in the currently open policy can be marked either for reference purposes or to select specific
rules for export. When a rule is marked, an icon
is displayed in front of the rule name both in the
Rule Editing and Viewing Panel and in the Rule Navigator window. Rules can be marked using either
of the two following methods:
●
In either the Rule Editing and Viewing Panel or the Rule Navigator window, right-click the desired
rule and from the resulting menu, choose Mark for only the selected rule or Mark All for all of the
rules in the policy.
●
In the Rule Navigator window, click to select the desired rule and then click the Mark Selected Rule
icon
.
Marked rules can be unmarked by following the same two procedures and choosing Unmark or
Unmark All from the right-click menu or in the Rule Navigator window, clicking the Clear All Marks
icon
.
Adding and Deleting Rules in a Policy
Once the policy has been created and populated with ACL and CLEAR-Flow rules, the EPM provides
functionality to add, move and delete rules within a policy.
Adding Rules
Rules can be added to an existing policy in the following ways:
●
Create a new rule as described in “Creating a New Rule for a Policy” on page 37. The new rule can
be positioned in a specific location in the rule list by right-clicking an adjacent rule and from the
dropdown menu, choosing either Insert new rule (before) or Insert new rule (after). If the position
is not selected, the rule is positioned according to its rank as determined by the algorithm.
●
Import or export rules as described in “Importing and Exporting Rules into a Policy” on page 41.
●
Copy a rule from one policy to another using the following procedure:
a In either the Rule Editing and Viewing Panel or the Rule Navigator window, right-click the
desired rule and from the resulting menu, choose Copy.
b Open the target policy and right-click an existing rule, then choose one of the Paste functions. The
copied rule is inserted and marked “Copy of...”
Deleting Rules
Rules can be deleted from either the Rule Editing and Viewing Panel listing in the Rule Editor window
or from the Access Control List Rules (ACL) or CLEAR-Flow Rules (CF) panel listing in the Rule
Navigator window.
Use the following procedure to delete a single rule.
1 From either list, right-click the rule that is to be deleted. The rule is highlighted and a menu is
displayed.
44
Extreme Networks Policy Manager (EPM) 1.2 User Guide
Modifying Rules
2 From the menu, choose Cut. The rule is deleted.
Use the following procedure to delete more than one rule.
1 From either list, mark the rules that are to be deleted using the procedures on page 44.
2 Right-click one of the marked rules and choose Cut all marked. All marked rules are deleted.
NOTE
A policy must contain at least one rule. If the user attempts to delete all rules or the last rule from a policy, the
changes will not be saved.
NOTE
The EPM does not support “undo.”
Modifying Rules
The following changes can be made to an existing rule
Renaming a Rule
To change the name of a rule, use the following procedure:
1 In the Rule Editing and Viewing Panel or the Rule Navigator window, right-click a rule and from the
menu displayed, choose Rename. The following dialog box is displayed.
2 Enter a new name and click OK. The new name is displayed in the rule viewing panels.
Reclassifying a Rule
To change the class of a rule, use the following procedure:
1 Right-click a rule and from the menu displayed, choose Reclassify. A submenu displays available
classes from which to choose or offers the choice to <create a new class>.
2 When <create a new class> is chosen, the following Class Entry Dialog box is displayed.
3 Enter a new class name and click OK. The new class is added to the rule viewing panels and the
rule classification is changed.
Extreme Networks Policy Manager (EPM) 1.2 User Guide
45
Modifying Policies and Rules
Changing Rule Parameters
Rule parameters can be changed either during the rule creating process or after the rule is saved.
●
During the rule creating process in the Rule Wizard, use the Back button to back up and make
changes to previous parameters.
●
To add, modify or delete parameters in a saved rule, use the following procedures: (These
procedures modify an ACL rule. Use the same process for a CLEAR-Flow rule which uses the
parameters: "Match Conditions", "Actions [True Condition]" and "Action [False Condition])".
a In the Rule Editing and Viewing Panel, click the rule to be modified. The parameters are shown
in the Rule Properties Panel under the Rule Parameters tab as shown below
Adding parameters to a rule
a To add a new Match Condition, Action or Action Modifier, click the Add icon
under the
appropriate text box. The Add new parameter wizard dialog box opens. Follow the same
procedure as when creating a new rule (discussed on page 38)
Modifying existing parameters in a rule
a To edit a parameter, select a parameter in either the Match Conditions, Actions, or Action
Modifiers text box. The Edit arguments of selected icon
is enabled when that particular
parameter can be edited.
b Click the Edit... icon to display the Edit arguments dialog box that is specific to the match
condition or action being edited. For example, the Enter arguments for ‘count’: box is displayed
below.
46
Extreme Networks Policy Manager (EPM) 1.2 User Guide
Modifying Rules
To assist in the selection of arguments for count, clicking the icon as shown above, displays a list of
“rule packet counters.”
NOTE
The Enter arguments box provides different lists and reference options depending on which “match condition” or
“action” has been selected,
c
Modify the parameters as needed and then click Save and Close. The parameter is changed.
Deleting parameters from a rule.
a To delete a parameter, select a parameter in either the Match Conditions, Actions, or Action
Modifiers text box. The Delete selected icon
is enabled.
b Click the Delete selected icon. A Confirm Delete box is displayed, an example of which is
shown below:
c
Click Yes. The parameter is deleted from the rule.
Should the delete process be inconsistent with rule requirements, a Parameter Notice is displayed
that explains the requirements. For example:
d Continue the procedure as advised in the notice or cancel the process.
Applying Changes to an Activated Policy
When changes are needed in a policy that is currently activated on a switch (described on page 50), it is
not necessary to deactivate the policy. The following steps incorporate changes to rules in an active
policy.
1 Use any of the procedures above to add, modify or delete parameters for a saved rule.
2 From the menu, choose Policy > Refresh. A Refresh Confirmation box is displayed.
3 Click Yes. An Operation Progress box is displayed followed by a Validation Notice stating that the
"Policy has been refreshed."
NOTE
The submenu command, Refresh, is enabled only when the policy being changed is currently activated on a switch.
Extreme Networks Policy Manager (EPM) 1.2 User Guide
47
Modifying Policies and Rules
Managing Global and Policy Variables
Global and policy variables can be added, modified, and deleted. Global variables are stored on the
client that runs the EPM and can be used when creating policies that are stored locally and on a switch.
Policy variables apply to an individual policy. The same procedure is used to manage either of the two
types of variables.
1 From the menu, click either Tools > Global Variables... or Tools > Policy Variables... The following
Global or Policy Variable Manager dialog box is displayed.
2 To add a variable, click the Add button. To edit a variable, select the variable that is to be edited and
click the Edit button. The following Global or Policy Variable Editing box is displayed.
3 When Add is selected, the Name and Value fields are blank. Enter the information and from the
Type dropdown menu, choose a type.
When Edit is selected, The Name and Value fields display the current settings. Make the desired
changes in the fields and in the Type dropdown menu.
4 Click Save. The new entries or modifications are displayed in the Policy or Global Manager
Variable box.
5 Make any additional additions or edits, then click Close.
48
Extreme Networks Policy Manager (EPM) 1.2 User Guide
Organizing Rules
Organizing Rules
Rules can be organized to function within a policy in two ways. As discussed earlier in the rule creation
process (on page 38), the user can either determine the order in which the rules are to be read or call the
EPM algorithm that assigns an efficient order based on the specificity of the rules. The existing rule
order can then be changed in the following ways.
●
Reassign rule ranks using the EPM algorithm by choosing Policy > Recalculate rule ranks from the
menu. Use this command when rules have been added or deleted from an existing policy or when
the original ranks were determined without using the algorithm.
●
Rearrange the rules according to rank. by choosing Policy > Reorder rules by rank. When this
command is chosen, the following box is displayed allowing the user to maintain the existing
ranking or change it.
●
Return all rules to their original order by choosing Policy > Reorder rules by initial position. When
this command is chosen, a Rule Location Notice box is displayed stating that "Any new rules added
since the policy was loaded will appear at the top of the rule list in all views."
Deleting Policies
Policies are deleted from the policy folder in the program files rather than through the EPM application.
Extreme Networks Policy Manager (EPM) 1.2 User Guide
49
Modifying Policies and Rules
Managing Policy Activity
After a policy is saved to the switch. it does not function until it is activated. The current activity status
of the policy is shown in the Status Panel under the Rule Activity tab.
Activating and Deactivating a Policy
To activate the policy on either a port or a VLAN, use the following procedure:
1 From the menu, choose Policy > Activity.... A Policy Activity Manager dialog box is displayed as
shown below.
2 To activate the policy on a port, click the Activate Port command button. The following Policy
Activity - Activate Port(s) dialog box opens.
3 From the Available list of ports, select a port and using the arrow command button transfer it to the
Selected text box. Select additional ports as needed. Click the Ingress or Egress radio buttons and
then Save and Close. The box closes and in the Active Ports panel, the port number, ingress or
egress and the Policy name are displayed.
50
Extreme Networks Policy Manager (EPM) 1.2 User Guide
Managing Policy Activity
4 Continue the process, selecting additional ports (egress or ingress) and VLANs as desired. All are
displayed in the Policy Activity Manager dialog box.
5 When all desired ports and VLANs have been selected, click the now enabled Commit command
button and when the process is completed, Close the box. Under the Rule Activity tab, the port and
VLAN commitments are shown.
To view all the policies that are currently committed to the ports or VLANs, use the following
procedure.
1 Choose Policy > Activity... to open the Policy Activity Manager dialog box.
2 Click the Show All command button to view the following dialog box. The Show All button is a
toggle button that, when selected, shows the VLANs and ports that are activated for policies other
than the policy that is currently loaded in the EPM. All VLANs and ports that are active for the
current policy are shown in black, and all other active VLANs and ports are shown in red.
The Active Vlans field displays the name of each active VLAN, the direction (egress or ingress), and
the name of the policy activated on that VLAN.
The Active Ports field displays the number of each active port, the direction, and the name of the
policy activated on that port.
3 To return to the current policy only, click the Show All button again.
To modify these commitments, use the following procedures:
1 Choose Policy > Activity... to open the Policy Activity Manager dialog box. The commitments for
the current policy are shown.
2 The deactivate command buttons show the available options. Click the desired option (Deactivate
Ingress, Deactivate Egress, Deactivate Selected, or Deactivate All) then click the Commit command
button. The policies are deactivated.
Extreme Networks Policy Manager (EPM) 1.2 User Guide
51
Modifying Policies and Rules
Disabling a Rule
Rules are normally enabled with the policy. However, one or more individual rules within a policy can
be disabled by using the following procedure:
1 In the Rule Editing and Viewing Panel or the Rule Navigator Window, right-click the rule to be
disabled and from the resulting menu, choose Disable. The rule appears in red.
2 To re-enable the rule, repeat the process in Step 1, selecting Enable from the menu.
52
Extreme Networks Policy Manager (EPM) 1.2 User Guide
6
Running Extreme Networks Policy Manager
Examples
Introduction
This chapter describes some of the functionality of the Extreme Networks Policy Manager (EPM) using
two examples. The examples use two sample policies that are included with the EPM application.
NOTE
Each of the following two examples consists of a series of connected procedures. Each procedure begins in the state
where the previous one ended. If a procedure is used out of the order that is displayed here, the results may be
affected.
Example 1—Example_TCP_Threshold.pol
This TCP_Threshold example is a simple policy demonstrating the ability to show CLEAR-Flow rules
that detect TCP traffic that exceeds a minimum threshold.
Open and View the Policy
1 Start by opening the EPM
2 From the menu, choose File > Open > Local. The file Open Box is displayed.
3 Navigate to epm_supervisor\policy_files\examples and Open "Example_TCP_Threshold.pol." The
policy has two rules: "ACL_TCP" and "CF_TCP_THRESHOLD."
4 In the Rule Editor window, set the following views as shown in the screen below.
a In the Tree Structure Panel, click the Rules by Reference tab. This shows that the two rules are
connected.
b In the Rule Editing and View Panel, either click the "+" to the right of the rule name or right-click
the rule and choose Expand All from the resulting dropdown menu. This expands the rules to
view the raw rule text that shows a common rule element—"count TCP_COUNTER." The
CLEAR-Flow rule extends the action of the ACL rule.
5 Check other available information. For example:
a In the Status Panel, under the Policy Information tab, information about the creation,
modification and use of the policy is displayed.
b In the Rule Properties Panel under the Rule Information tab, similar information for the rule(s) is
displayed.
When ACL_TCP is selected, information in the Notes field reads: "This rule creates a counter that
is used by the CLEAR-Flow rule when evaluating the TCP packet threshold."
When CF_TCP_THRESHOLD is selected, the information reads: "This rule evaluates the
TCP_COUNTER setup in the ACL_TCP rule. If the threshold exceeds 100 TCP packets within the
period then the rule is triggered."
Extreme Networks Policy Manager (EPM) 1.2 User Guide
53
Running Extreme Networks Policy Manager Examples
Save to a Switch
1 Before saving a policy to a switch, make certain that the configuration steps, as described on page 11
and on page 18 have been taken.
2 From the menu, choose File > Save As > Switch.
3 In the Remote Switch Dialog box, enter the required information. (For more detail, see "To Save to a
Switch on page 39.")
4 When the Policy Entry dialog box opens, it prompts with the policy name that was used locally.
That name is accepted here by clicking OK. (For other options, see “Saving a Policy” on page 39.)
This box includes an option to open the Activity Manager dialog after the policy is saved. In this
case, it was not selected.
(This example is being run on a switch that does not support CLEAR-Flow. Therefore, a CLEARFlow Support Notice box opens with a reminder of that limitation and the question of whether to
proceed. Yes is selected.)
54
Extreme Networks Policy Manager (EPM) 1.2 User Guide
Example 1—Example_TCP_Threshold.pol
5 When the policy is saved, several changes occur:
●
A notice is displayed confirming the save;
●
The switch’s IP address is displayed in the Tree Structure Panel to the right of the policy name,
replacing "localfile";
●
The Rule Activity tab is displayed in the Status Panel.
The Rule Editor window now appears as follows:
Activate the Policy on a Port
Observe in the screen above, under the Rule Activity tab of the Status Panel, that the policy is not active
on any VLANs or ports. This section describes the procedure to activate the policy.
1 From the menu, choose Policy > Activity.... The Policy Activity Manager dialog box opens.
2 Click the Activate Port command button. The Policy Activity - Activate Port(s) dialog box opens as
shown below.
Extreme Networks Policy Manager (EPM) 1.2 User Guide
55
Running Extreme Networks Policy Manager Examples
3 Transfer port 16 from the Available list to the Selected box using the arrow command buttons. Click
the Ingress radio button and then Save and Close. Port 16 is now displayed in the Active Ports field
as shown below.
4 See the notation in red stating that "Recent changes have not been committed to the switch
configuration!" Click the Commit command button. A Commit Confirmation box opens.
5 Click Yes. The now disabled Commit command button indicates that the changes have been
committed to the switch.
6 See the change also in the Status Panel. It shows that the policy is activated on Port 16 and the
direction is ingress.
7 Click the Show All command button. As shown below, the current policy is shown in black, and all
other ports and/or VLANs with activated policies are shown in red.
56
Extreme Networks Policy Manager (EPM) 1.2 User Guide
Example 1—Example_TCP_Threshold.pol
8 Click the Show All command button again to show only the currently edited policy.
9 Close the dialog box.
Modify Rule Parameters
To modify any of the existing rule parameters, use the following procedure. For this example, in the
CF_TCP_THRESHOLD rule, the argument of 100 packets for the "count" parameter is changed to 200
packets.
1 Open the policy "Example_TCP_Threshold.pol."
2 In the Rule Editing and Viewing Panel, select the rule, "CF_TCP_THRESHOLD." In the Rule
Properties Panel under the Rule Parameters tab, the parameters are displayed.
3 In the Rule Parameters, under "Match Conditions" click "count TCP_COUNTER>100, period 5,
hysteresis 0;" All the icons under the text panel are enabled.
4 Click the "Edit arguments of selected" icon
shown below.
Extreme Networks Policy Manager (EPM) 1.2 User Guide
. The Rule Parameter Editor dialog box is displayed as
57
Running Extreme Networks Policy Manager Examples
5 Replace "100" with "200" then click Save and Close. The change is displayed in the "Match
Conditions" text panel and in the raw rule text of the other rule viewing panels.
6 From the menu, choose Policy > Refresh. The following Refresh Confirmation box is displayed.
7 Click Yes. An Operation Progress box is displayed followed by a Validation Notice stating that the
"Policy has been refreshed."
NOTE
The submenu command, Refresh, is enabled only when the policy being changed is currently activated on a switch.
8 Exit the EPM.
Example 2—Example_TCP_UDP_Balance.pol
This example uses two ACL rules and one CLEAR-Flow rule to track the ratio of TCP to UCP packets.
Open and View the Policy
1 Open the policy, "Example_TCP_UDP_Balance.pol" as a local file.
2 In the Tree Structure Panel under the Rules by reference tab, note the connections among the three
rules.
3 Expand the rules in the Rule Editing and Viewing Panel to view the raw rule text. (You may have to
extend the window downwards and the lower panels to view all three of the expanded rules at
once.)
4 Note from both views that the CLEAR-Flow rule is connected to both ACL rules and is ineffective
without both. The screen below displays these features.
58
Extreme Networks Policy Manager (EPM) 1.2 User Guide
Example 2—Example_TCP_UDP_Balance.pol
5 Click the Rules by class tab to see the relationship between the two classes and the three rules.
Search for a Rule
The EPM provides the ability to search through the rules in a large policy to find one or more that fit
given criteria. Suppose there are one or more particularly useful and workable rules that the user would
like to use again, perhaps with modifications, in a new policy. Rather that recreating the rule(s), the user
can search for the desired rule, and then depending on the need, use the copy, import or export
commands to incorporate the rule(s) into another policy. While the particular policy used here has only
a few rules, the procedure is the same in a larger policy.
Extreme Networks Policy Manager (EPM) 1.2 User Guide
59
Running Extreme Networks Policy Manager Examples
In this example, the user is looking for a ACL rule with a "COUNTER" action to be referenced with a
CLEAR-Flow rule. To find it, use the following procedure:
1 From the tool bar, click the "Search Policy" icon
. The Search Policy dialog box opens.
2 Deselect the Search CLEAR-Flow rules check box and click the More command button. A search
criteria row of three fields is displayed.
3 From the Rule Name dropdown menu, choose Action modifier args; leave the Contains list as is,
and type "COUNTER" in the text field. Then click Search. Two rules matching the criteria
(ACL_UDP and ACL_TCP) are displayed in the lower left text box.
4 Click one of the rules. The raw rule text is displayed in the right box with COUNTER highlighted. It
is also displayed in the other rule viewing panels.
5 When there are many hits, use another criterion to refine the search, in this case, to specify the UDF
protocol. Click More and a new search criteria row is displayed.
6 From the Rule Name menu, choose Match condition args; leave the Contains list as is, and type
UDP in the text field. Then click Search. The following screen is displayed showing both criteria
highlighted.
NOTE
The search function is not case-sensitive, but the highlighting function is.
7 Close the Search Policy box. (The search procedure is not saved.)
60
Extreme Networks Policy Manager (EPM) 1.2 User Guide
Example 2—Example_TCP_UDP_Balance.pol
Incorporate into a Policy
When the single rule that was found is to be added to an existing policy, the copy/paste function is
probably most efficient. Use the following procedure.
1 Right-click the now selected rule and choose Copy from the resulting menu. Close the current (or
source) policy and open the policy into which the rule is to be copied (target). Right-click an existing
rule and choose the desired Paste command from the menu.
NOTE
The Copy/Paste function can be used only with an already populated policy.
When one or more rules that were found are to be the beginning of a new policy, the export function
simplifies the process. Use the following procedure.
1 In this example, mark the rule either from the Search Policy box, before closing, or from the rightclick menu. From the menu, choose File > Export To... > Policy File. In the Save box that opens, type
a new file name (in this case ExportTest.pol) and click Save. When the export is successful, a
Validation Notice is displayed confirming the export. Click OK. From the menu, choose File > Open
> Local and select ExportTest.pol to see the new policy with the rule, ACL_UDP. Additional rules
can be added either by creating new ones, using copy/paste from other policies, importing and/or
exporting.
2 When the new policy is complete, it can be validated. From the menu, choose Policy > Validate &
Check. The EPM checks the policy and validates it or returns notice of problems.
3 Save the new policy to a switch when it is complete.
4 Exit the EPM.
Extreme Networks Policy Manager (EPM) 1.2 User Guide
61
Running Extreme Networks Policy Manager Examples
62
Extreme Networks Policy Manager (EPM) 1.2 User Guide
A
Help Messages
Introduction
This appendix includes Help messages and other reference material that appear in the Extreme
Networks Policy Manager (EPM). These are cross-referenced in this manual from the procedure to
which they apply.
For additional description of this material, refer to the ExtremeXOS Concepts Guide and the ExtremeXOS
Command Reference Guide.
Included are:
●
Predefined CLEAR-Flow System Counters on page 63
●
Synonyms used for Rule Constants on page 65
●
Type Selection Panel on page 68
●
Match Condition Selection Panel on page 69
●
Action Modifier Selection Panel on page 70
●
True Action Selection Panel on page 75
●
Match Condition Selection Panel on page 75
Predefined CLEAR-Flow System Counters
Name
Type
sys_IpInReceives
counterreference
sys_IpInHdrErrors
counterreference
sys_IpInAddrErrors
counterreference
sys_IpForwDatagrams
counterreference
sys_IpInUnknownProtos
counterreference
sys_IpInDiscards
counterreference
sys_IpInDelivers
counterreference
sys_IpOutRequests
counterreference
sys_IpOutDiscards
counterreference
sys_IpOutNoRoutes
counterreference
sys_IpReasmTimeout
counterreference
sys_IpReasmReqds
counterreference
sys_IpReasmFails
counterreference
sys_IpFragOKs
counterreference
sys_IpFragFalls
counterreference
sys_IpFragCreates
counterreference
Extreme Networks Policy Manager (EPM) 1.2 User Guide
63
Help Messages
64
sys_IcmplnErrors
counterreference
sys_IcmplnDestUnreachs
counterreference
sys_IcmplnTimeExcds
counterreference
sys_IcmplnParmProbs
counterreference
sys_IcmplnSrcQuenchs
counterreference
sys_IcmplnRedirects
counterreference
sys_IcmplnEchos
counterreference
sys_IcmplnEchoReps
counterreference
sys_IcmplnTimestamps
counterreference
sys_IcmplnTimestampReps
counterreference
sys_IcmplnAddrMasks
counterreference
sys_IcmplnAddrMaskReps
counterreference
sys_IcmpOutMsgs
counterreference
sys_IcmpOutErrors
counterreference
sys_IcmpOutDestUnreachs
counterreference
sys_IcmpOutTimeExcds
counterreference
sys_IcmpOutParmProbs
counterreference
sys_IcmpOutSrcQuenchs
counterreference
sys_IcmpOutRedirects
counterreference
sys_IcmpOutEchos
counterreference
sys_IcmpOutEchoReps
counterreference
sys_IcmpOutTimestamps
counterreference
sys_IcmpOutTimestampReps
counterreference
sys_IcmpOutAddrMasks
counterreference
sys_IcmpOutAddrMaskReps
counterreference
sys_IcmplnProtoUnreachs
counterreference
sys_IcmplnBadLen
counterreference
sys_IcmplnBadCode
counterreference
sys_IcmplnTooShort
counterreference
SYS_IcmpOutProtoUnreachs
counterreference
sys_IcmpOutRouterAdv
counterreference
sys_IgmplnQueries
counterreference
sys_IgmplnReports
counterreference
sys_IgmplnLeaves
counterreference
sys_IgmplnErrors
counterreference
sys_IgmpOutQueries
counterreference
sys_IgmpOutReports
counterreference
sys_IgmpOutLeaves
counterreference
Extreme Networks Policy Manager (EPM) 1.2 User Guide
Synonyms used for Rule Constants
Synonyms used for Rule Constants
Name
Description
Value
Type
qp1
QOC Profile Names
qp1
qpxname
qp2
QOC Profile Names
qp2
qpxname
qp3
QOC Profile Names
qp3
qpxname
qp4
QOC Profile Names
qp4
qpxname
qp5
QOC Profile Names
qp5
qpxname
qp6
QOC Profile Names
qp6
qpxname
qp7
QOC Profile Names
qp7
qpxname
qp8
QOC Profile Names
qp8
qpxname
add
Mirror modes
add
mirrormode
delete
Mirror modes
delete
mirrormode
DEBU
Syslog Levels
DEBU
level-syslog
INFO
Syslog Levels
INFO
level-syslog
NOTI
Syslog Levels
NOTI
level-syslog
WARN
Syslog Levels
WARN
level-syslog
ERRO
Syslog Levels
ERRO
level-syslog
CRIT
Syslog Levels
CRIT
level-syslog
ACK
TCP Flags
0x10
bitfield-tcpflags
FIN
TCP Flags
0x01
bitfield-tcpflags
PUSH
TCP Flags
0x08
bitfield-tcpflags
RST
TCP Flags
0x04
bitfield-tcpflags
SYN
TCP Flags
0x02
bitfield-tcpflags
URG
TCP Flags
0x20
bitfield-tcpflags
SYN_ACK
TCP Flags
0x12
bitfield-tcpflags
ETHER-P-IP
Ethernet Types
0x0800
number-ethtype
ETHER-P-8021Q
Ethernet Types
0x8100
number-ethtype
ETHER-P-IPV6
Ethernet Types
0x86DD
number-ethtype
egp
Protocols
8
number-protocol
esp
Protocols
5
number-protocol
gre
Protocols
47
number-protocol
icmp
Protocols
1
number-protocol
igmp
Protocols
2
number-protocol
ipip
Protocols
4
number-protocol
ipv6
Protocols
41
number-protocol
ospf
Protocols
89
number-protocol
pim
Protocols
102
number-protocol
rsvp
Protocols
46
number-protocol
tcp
Protocols
6
number-protocol
udp
Protocols
17
number-protocol
afs
Service Ports
1483
numberrange-port
Extreme Networks Policy Manager (EPM) 1.2 User Guide
65
Help Messages
66
bgp
Service Ports
179
numberrange-port
biff
Service Ports
512
numberrange-port
bootpc
Service Ports
68
numberrange-port
bootps
Service Ports
67
numberrange-port
cmd
Service Ports
514
numberrange-port
cvspserver
Service Ports
2401
numberrange-port
DHCP
Service Ports
67
numberrange-port
domain
Service Ports
53
numberrange-port
eklogin
Service Ports
2105
numberrange-port
ekshell
Service Ports
2106
numberrange-port
exec
Service Ports
512
numberrange-port
finger
Service Ports
79
numberrange-port
ftp
Service Ports
21
numberrange-port
ftp-date
Service Ports
20
numberrange-port
http
Service Ports
80
numberrange-port
https
Service Ports
443
numberrange-port
ident
Service Ports
113
numberrange-port
imap
Service Ports
143
numberrange-port
kerberos-sec
Service Ports
88
numberrange-port
klogin
Service Ports
543
numberrange-port
kpasswd
Service Ports
761
numberrange-port
krb-prop
Service Ports
754
numberrange-port
krbupdate
Service Ports
760
numberrange-port
kshell
Service Ports
544
numberrange-port
idap
Service Ports
389
numberrange-port
login
Service Ports
513
numberrange-port
mobileip-agent
Service Ports
434
numberrange-port
mobileip-mn
Service Ports
435
numberrange-port
msdp
Service Ports
639
numberrange-port
netbios-dgm
Service Ports
138
numberrange-port
netbios-ns
Service Ports
137
numberrange-port
netbios-ssn
Service Ports
139
numberrange-port
nfsd
Service Ports
2049
numberrange-port
nntp
Service Ports
119
numberrange-port
ntalk
Service Ports
513
numberrange-port
ntp
Service Ports
123
numberrange-port
pop3
Service Ports
110
numberrange-port
pptp
Service Ports
1723
numberrange-port
printer
Service Ports
515
numberrange-port
radacct
Service Ports
1813
numberrange-port
radius
Service Ports
1812
numberrange-port
rip
Service Ports
520
numberrange-port
rkinit
Service Ports
2108
numberrange-port
Extreme Networks Policy Manager (EPM) 1.2 User Guide
Synonyms used for Rule Constants
smtp
Service Ports
25
numberrange-port
snmp
Service Ports
161
numberrange-port
snmptrap
Service Ports
162
numberrange-port
snpp
Service Ports
444
numberrange-port
socks
Service Ports
1080
numberrange-port
ssh
Service Ports
22
numberrange-port
sunrpc
Service Ports
111
numberrange-port
syslog
Service Ports
514
numberrange-port
facacs-ds
Service Ports
65
numberrange-port
talk
Service Ports
517
numberrange-port
telnet
Service Ports
23
numberrange-port
tftp
Service Ports
69
numberrange-port
timed
Service Ports
525
numberrange-port
who
Service Ports
513
numberrange-port
xdmcp
Service Ports
177
numberrange-port
zephyr-cit
Service Ports
2103
numberrange-port
zephyr-hm
Service Ports
2104
numberrange-port
v1-report
IGMP Message Types
0x12
number-igmptype
v2-report
IGMP Message Types
0x16
number-igmptype
v3-report
IGMP Message Types
0x22
number-igmptype
v2-leave
IGMP Message Types
0x17
number-igmptype
query
IGMP Message Types
0x11
number-igmptype
echo-reply
ICMP Types
0
number-icmptype
echo-request
ICMP Types
8
number-icmptype
info-reply
ICMP Types
18
number-icmptype
info-request
ICMP Types
15
number-icmptype
mask-request
ICMP Types
17
number-icmptype
mask-reply
ICMP Types
18
number-icmptype
parameter-problem
ICMP Types
12
number-icmptype
redirect
ICMP Types
5
number-icmptype
router-advertisement
ICMP Types
9
number-icmptype
router-solicit
ICMP Types
10
number-icmptype
source-quench
ICMP Types
4
number-icmptype
time-exceeded
ICMP Types
11
number-icmptype
timestamp
ICMP Types
13
number-icmptype
timestamp-reply
ICMP Types
14
number-icmptype
unreachable
ICMP Types
3
number-icmptype
ip-header-bad
ICMP Codes
0
number-icmpcode
required-option-missing
ICMP Codes
1
number-icmpcode
redirect-for-host
ICMP Codes
1
number-icmpcode
redirect-for-network
ICMP Codes
2
number-icmpcode
redirect-for-tos-and-host
ICMP Codes
3
number-icmpcode
redirect-for-tos-and-net
ICMP Codes
2
number-icmpcode
Extreme Networks Policy Manager (EPM) 1.2 User Guide
67
Help Messages
ttl-eq-zero-during reassembly
ICMP Codes
1
number-icmpcode
ttl-eq-zero-during-transit
ICMP Codes
0
number-icmpcode
communication-prohibited-by-filtering
ICMP Codes
13
number-icmpcode
destination-host-prohibited
ICMP Codes
10
number-icmpcode
destination-host-unknown
ICMP Codes
7
number-icmpcode
destination-network-prohibited
ICMP Codes
9
number-icmpcode
destination-network-unknown
ICMP Codes
6
number-icmpcode
fragmentation-needed
ICMP Codes
4
number-icmpcode
host-precedence-violation
ICMP Codes
14
number-icmpcode
host-unreachable-for-TOS
ICMP Codes
12
number-icmpcode
network-unreachable
ICMP Codes
0
number-icmpcode
network-unreachable-for-TOS
ICMP Codes
11
number-icmpcode
port-unreachable
ICMP Codes
3
number-icmpcode
precedence-cutoff-in-effect
ICMP Codes
15
number-icmpcode
protocol-unreachable
ICMP Codes
2
number-icmpcode
source-host-isolated
ICMP Codes
8
number-icmpcode
source-route-failed
ICMP Codes
5
number-icmpcode
minimize-delay
IPTOS
16
number-iptos
maximize-reliability
IPTOS
4
number-iptos
minimize-cost
IPTOS
2
number-iptos
normal-service
IPTOS
0
number-iptos
af11
DSCP
10
number_dscp
af12
DSCP
12
number_dscp
af13
DSCP
14
number_dscp
af21
DSCP
18
number_dscp
af22
DSCP
20
number_dscp
af23
DSCP
22
number_dscp
af31
DSCP
26
number_dscp
af32
DSCP
28
number_dscp
af33
DSCP
30
number_dscp
af41
DSCP
34
number_dscp
af42
DSCP
36
number_dscp
af43
DSCP
38
number_dscp
ef
DSCP
46
number_dscp
Type Selection Panel
This panel allows the user to select the rule type. You may choose to create an ACL rule or CLEAR-Flow rule. Some policy
versions do not support CLEAR-Flow rules, so you will NOT see a selection choice for versions the do not support CLEARFlow. You must select or enter a class name for the new rule. Rules are organized by class to make grouping of rules easier.
Give your rule a name that you can use to group all related rules. For example, you can create a set of ACL rules that
increment counters for ICMP echo request and unreachable packets, then create CLEAR-Flow rules to monitor the delta ratios
for these counters. This collection of rules could be grouped under a class name of 'IcmpThreatRules' for instance.
68
Extreme Networks Policy Manager (EPM) 1.2 User Guide
Match Condition Selection Panel
Match Condition Selection Panel
This panel allows you to select from a list of match conditions. A choice of several match conditions is available:
ethernet-type:
Ethernet packet type. In place of the numeric value, you can specify one of the following text
synonyms (the field values are also listed): ETHER-P-IP (0x0800), ETHER-P-8021Q (0x8100),
ETHER-P-IPV6 (0x86DD).
ethernet-source-address
Ethernet source MAC address.
ethernet-destination-address Ethernet destination MAC address and mask. The mask is optional, and is in the same format as
the MAC address. Only those bits of the MAC address whose corresponding bit in the mask is
set to 1 will be used as match criteria. So, the example above will match 00:01:02:03:xx:xx. If
the mask is not supplied then it will be assumed to be ff:ff:ff:ff:ff:ff. In other words, all bits of
the MAC address will be used for matching.
source-address:
IP source address and mask. Egress ACLs do not support IPv6 addresses, only IPv4 addresses.
Use either all IPv4 or all IPv6 addresses in an ACL.
destination-address:
IP destination address and mask. Egress ACLs do not support IPv6 addresses, only IPv4
addresses. Use either all IPv4 or all IPv6 addresses in an ACL.
protocol:
IP protocol field. In place of the numeric value, you can specify one of the following text
synonyms (the field values are also listed): egp(8), esp(5), gre(47), icmp(1), igmp(2), ipip(4),
ipv6(41), ospf(89), pim(102), rsvp(46), tcp(6), or udp(17).
fragments:
BlackDiamond 10K and BlackDiamond 12804 only. Specifies IP fragmented packet. FO > 0
(FO = Fragment Offset in IP header).
first-fragments:
Non-IP fragmented packet or first fragmented packet. FO==0.
source-port:
TCP or UDP source port. In place of the numeric value, you can specify one of the text
synonyms. Normally, you specify this match in conjunction with the protocol match to
determine which protocol is being used on the port. In place of the numeric value, you can
specify one of the following text synonyms (the field values are also listed): afs(1483),
bgp(179), biff(512), bootpc(68), bootps(67), cmd(514), cvspserver(2401), DHCP(67),
domain(53), eklogin(2105), ekshell(2106), exec(512), finger(79), ftp(21), ftp-data(20), http(80),
https(443), ident(113), imap(143), kerberos-sec(88), klogin(543), kpasswd(761), krb-prop(754),
krbupdate(760), kshell(544), idap(389), login(513), mobileip-agent(434), mobileip-mn(435),
msdp(639), netbios-dgm(138), netbiosns( 137), netbios-ssn(139), nfsd(2049), nntp(119),
ntalk(518), ntp(123), pop3(110), pptp(1723), printer(515), radacct(1813), radius(1812), rip(520),
rkinit(2108), smtp(25), snmp(161), snmptrap(162), snpp(444), socks(1080), ssh(22),
sunrpc(111), syslog(514), tacacs-ds(65), talk(517), telnet(23), tftp(69), timed(525), who(513),
xdmcp(177), zephyr-clt(2103), or zephyr-hm(2104).
destination-port:
TCP or UDP destination port. Normally, you specify this match in conjunction with the protocol
match to determine which protocol is being used on the port. In place of the numeric value, you
can specify one of the following text synonyms (the field values are also listed): afs(1483),
bgp(179), biff(512), bootpc(68), bootps(67), cmd(514), cvspserver(2401), DHCP(67),
domain(53), eklogin(2105), ekshell(2106), exec(512), finger(79), ftp(21), ftp-data(20), http(80),
https(443), ident(113), imap(143), kerberos-sec(88), klogin(543), kpasswd(761), krb-prop(754),
krbupdate(760), kshell(544), idap(389), login(513), mobileip-agent(434), mobileip-mn(435),
msdp(639), netbios-dgm(138), netbiosns( 137), netbios-ssn(139), nfsd(2049), nntp(119),
ntalk(518), ntp(123), pop3(110), pptp(1723), printer(515), radacct(1813), radius(1812), rip(520),
rkinit(2108), smtp(25), snmp(161), snmptrap(162), snpp(444), socks(1080), ssh(22),
sunrpc(111), syslog(514), tacacs-ds(65), talk(517), telnet(23), tftp(69), timed(525), who(513),
xdmcp(177), zephyr-clt(2103), or zephyr-hm(2104).
tcp-flags:
TCP flags. Normally, you specify this match in conjunction with the protocol match statement.
In place of the numeric value, you can specify one of the following text synonyms (the field
values are also listed): ACK(0x10), FIN(0x01), PUSH(0x08), RST(0x04), SYN(0x02),
URG(0x20), SYN_ACK(0x12).
igmp-msg-type:
IGMP message type. Possible values and text synonyms: v1- report(0x12), v2-report(0x16), v3report(0x22), V2-leave (0x17), or query(0x11).
Extreme Networks Policy Manager (EPM) 1.2 User Guide
69
Help Messages
icmp-type:
ICMP type field. Normally, you specify this match in conjunction with the protocol match
statement. In place of the numeric value, you can specify one of the following text synonyms
(the field values are also listed): echo-reply(0), echorequest( 8), info-reply(16), info-request(15),
mask-request(17), mask-reply(18), parameter-problem(12), redirect(5), routeradvertisement( 9),
router-solicit(10), source-quench(4), timeexceeded( 11), timestamp(13), timestamp-reply(14), or
unreachable(3).
icmp-code:
ICMP code field. This value or keyword provides more specific information than the icmp-type.
Because the value's meaning depends upon the associated icmp-type, you must specify the
icmp-type along with the icmp-code. In place of the numeric value, you can specify one of the
following text synonyms (the field values also listed); the keywords are grouped by the ICMP
type with which they are associated: Parameter-problem: ip-header-bad(0), required-optionmissing(1) Redirect: redirect-for-host (1), redirect-for-network (2), redirect-for-tosand- host (3),
redirect-for-tos-and-net (2) Time-exceeded: ttl-eq-zero-during-reassembly(1), ttl-eq-zero-duringtransit(0) Unreachable: communication-prohibited-by-filtering(13), destination-hostprohibited(
10), destination-host-unknown(7), destinationnetwork- prohibited(9), destination-networkunknown(6), fragmentation-needed(4), host-precedence-violation(14), hostunreachable( 1), hostunreachable-for-TOS(12), networkunreachable( 0), network-unreachable-for-TOS(11),
portunreachable( 3), precedence-cutoff-in-effect(15), protocolunreachable( 2), source-hostisolated(8), source-route-failed(5)
ip-tos:
IP TOS field. In place of the numeric value, you can specify one of the following text synonyms
(the field values are also listed): minimize-delay 16 (0x10), maximize-reliability 4(0x04),
minimize-cost2 (0x02), and normal-service 0(0x00).
dscp
Differentiated Service Code Point. The DiffServ protocol uses the type of service (TOS) byte in
the IP header, and the most significant six bits of this type form the DSCP. In place of the
numeric value, you can specify one of the following text synonyms (the field values are also
listed): The Expedited Forwarding RFC defines one code point: ef(46) The Assured Forwarding
RFC defines 4 classes, with 3 drop precedences in each class, for a total of 12 code points:
af11(10), af12(12), af13(14), af21(18), af22(20), af23(22), af31(26), af32(28),af33(30), af41(34),
af42(36), af43(38).
Action Modifier Selection Panel
This panel allows you to select from a list of action modifiers. If the match condition is evaluated TRUE
then the action modifiers specified are executed. You have a choice of several action modifiers:
count:
Increments the counter named in the action modifier (ingress only). A number of packet statistics are
gathered by the XOS kernel. To allow you to use these statistics in CLEAR-Flow expressions, these
kernel counters are now available for use with CLEAR-Flow. Most of the counter names are based
directly on well known names from common kernel structures and MIBs. The names are modified from
their familiar form by prepending the characters sys_ to the counter names.
Available Counters:
sys_IpInReceives - The total number of input IP packets received from interfaces, including those
received in error.
sys_IpInHdrErrors - The number of input IP packets discarded due to errors in their IP headers,
including bad checksums, version number mismatch, other format errors, timeto- live exceeded, errors
discovered in processing their IP options, etc.
sys_IpInAddrErrors - The number of input IP packets discarded because the IP address in their IP
header's destination field was not a valid address to be received at this entity. This count includes
invalid addresses (for example, 0.0.0.0) and addresses of unsupported Classes (for example, Class E).
70
Extreme Networks Policy Manager (EPM) 1.2 User Guide
Action Modifier Selection Panel
sys_IpForwDatagrams - The number of input IP packets for which this entity was not their final IP
destination, as a result of which an attempt was made to find a route to forward them to that final
destination.
sys_IpInUnknownProtos - The number of locally-addressed IP packets received successfully but
discarded because of an unknown or unsupported protocol.
sys_IpInDiscards - The number of input IP packets for which no problems were encountered to prevent
their continued processing, but which were discarded (for example, for lack of buffer space). Note that
this counter does not include any IP packets discarded while awaiting re-assembly.
sys_IpInDelivers - The total number of input IP packets successfully delivered to IP user-protocols
(including ICMP).
sys_IpOutRequests - The total number of IP packets which local IP user-protocols (including ICMP)
supplied to IP in requests for transmission. Note that this counter does not include any IP packets
counted in ipForwDatagrams.
sys_IpOutDiscards - The number of output IP packets for which no problem was encountered to
prevent their transmission to their destination, but which were discarded (for example, for lack of buffer
space). Note that this counter would include IP packets counted in ipForwDatagrams if any such
packets met this (discretionary) discard criterion.
sys_IpOutNoRoutes - The number of IP packets discarded because no route could be found to transmit
them to their destination. Note that this counter includes any packets counted in ipForwDatagrams
which meet this `no-route' criterion.
sys_IpReasmTimeout - The maximum number of seconds which received fragments are held while
they are awaiting reassembly at this entity.
sys_IpReasmReqds - The number of IP fragments received which needed to be reassembled at this
entity.
sys_IpReasmOKs - The number of IP packets successfully re-assembled.
sys_IpReasmFails - The number of failures detected by the IP re-assembly algorithm (for whatever
reason: timed out, errors, etc.). Note that this is not necessarily a count of discarded IP fragments since
some algorithms (notably the algorithm in RFC 815) can lose track of the number of fragments by
combining them as they are received.
sys_IpFragOKs - The number of IP packets that have been successfully fragmented at this entity.
sys_IpFragFails - The number of IP packets that have been discarded because they needed to be
fragmented at this entity but could not be, for example, because their Don't Fragment flag was set.
sys_IpFragCreates - The number of IP packet fragments that have been generated as a result of
fragmentation at this entity.
sys_IcmpInMsgs - The total number of ICMP messages which the entity received. Note that this
counter includes all those counted by icmpInErrors.
sys_IcmpInErrors - The number of ICMP messages which the entity received but determined as having
ICMP-specific errors (bad ICMP checksums, bad length, etc.).
Extreme Networks Policy Manager (EPM) 1.2 User Guide
71
Help Messages
sys_IcmpInDestUnreachs - The number of ICMP Destination Unreachable messages received.
sys_IcmpInTimeExcds - The number of ICMP Time Exceeded messages received.
sys_IcmpInParmProbs - The number of ICMP Parameter Problem messages received.
sys_IcmpInSrcQuenchs - The number of ICMP Source Quench messages received.
sys_IcmpInRedirects - The number of ICMP Redirect messages received.
sys_IcmpInEchos - The number of ICMP Echo (request) messages received.
sys_IcmpInEchoReps - The number of ICMP Echo Reply messages received.
sys_IcmpInTimestamps - The number of ICMP Timestamp (request) messages received.
sys_IcmpInTimestampReps - The number of ICMP Timestamp Reply messages received.
sys_IcmpInAddrMasks - The number of ICMP Address Mask Request messages received.
sys_IcmpInAddrMaskReps - The number of ICMP Address Mask Reply messages received.
sys_IcmpOutMsgs - The total number of ICMP messages which this entity attempted to send. Note that
this counter includes all those counted by icmpOutErrors.
sys_IcmpOutErrors - The number of ICMP messages which this entity did not send due to problems
discovered within ICMP such as a lack of buffers. This value should not include errors discovered
outside the ICMP layer such as the inability of IP to route the resultant datagram. In some
implementations there may be no types of error which contribute to this counter's value.
sys_IcmpOutDestUnreachs - The number of ICMP Destination Unreachable messages sent.
sys_IcmpOutTimeExcds - The number of ICMP Time Exceeded messages sent.
sys_IcmpOutParmProbs - The number of ICMP Parameter Problem messages sent.
sys_IcmpOutSrcQuenchs - The number of ICMP Source Quench messages sent.
sys_IcmpOutRedirects - The number of ICMP Redirect messages sent.
sys_IcmpOutEchos - The number of ICMP Echo (request) messages sent.
sys_IcmpOutEchoReps - The number of ICMP Echo Reply messages sent.
sys_IcmpOutTimestamps - The number of ICMP Timestamp (request) messages sent.
sys_IcmpOutTimestampReps - The number of ICMP Timestamp Reply messages sent.
sys_IcmpOutAddrMasks - The number of ICMP Address Mask Request messages sent.
sys_IcmpOutAddrMaskReps - The number of ICMP Address Mask Reply messages sent.
sys_IcmpInProtoUnreachs - The number of incoming ICMP packets addressed to a not-in-use/
unreachable/ invalid protocol. This message is in the general category of ICMP destination unreachable
error messages.
sys_IcmpInBadLen - The number of incoming bad ICMP length packets.b
72
Extreme Networks Policy Manager (EPM) 1.2 User Guide
Action Modifier Selection Panel
sys_IcmpInBadCode - The number of incoming ICMP packets with a bad code field value.
sys_IcmpInTooShort - The number of incoming short ICMP packets.
sys_IcmpInBadChksum - The number of incoming ICMP packets with bad checksums.
sys_IcmpInRouterAdv - The number of incoming ICMP router advertisements. Router advertisements
are used by IP hosts to discover addresses of neighboring routers.
sys_IcmpOutProtoUnreachs - The number of outgoing ICMP packets addressed to a not-in-use/
unreachable/ invalid protocol. This message is in the general category of ICMP destination unreachable
error messages.
sys_IcmpOutRouterAdv - The number of outgoing ICMP router advertisements. Router advertisements
are used by IP hosts to discover addresses of neighboring routers.
sys_IgmpInQueries - The number of Host Membership Query messages that have been received on this
interface.
sys_IgmpInReports - The number of Host Membership Report messages that have been received on
this interface for this group address.
sys_IgmpInLeaves - The number of incoming IGMP leave requests. sys_IgmpInErrors - The number of
incoming IGMP errors.
sys_IgmpOutQueries - The number of Host Membership Query messages that have been sent on this
interface
sys_IgmpOutReports - The number of Host Membership Report messages that have been sent on this
interface for this group address.
sys_IgmpOutLeaves - The number of outgoing IGMP leave requests.
cvid:
Modifies the C-VID value. In the field, the value must be a positive integer number.
link-aggregation-hash:
Controls which link is used by matching VMAN traffic (egress only). In the field, the value must be a
positive integer number.
qosprofile:
Forwards the packet to the specified QoS profile (ingress only). The profile name must be one of the
default profiles. Values of “QP1” to “QP8” are allowed.
scos:
Modifies the S-COS value. In the field, the value must be a positive integer number.
stag-ethertype:
Modifies the VMAN Ethertype value, also called the S-Tag value. In the field, the value must be a
positive integer number.
Extreme Networks Policy Manager (EPM) 1.2 User Guide
73
Help Messages
svid:
Modifies the S-VID value. In the field, the value must be a positive integer number.
traffic-queue:
Places the traffic on the specified traffic-queue (Black Diamond 12804R only)
uplinkport:
Modifies the uplink port. In the first field, enter “tagged” or “untagged” or leave it empty for all traffic.
In the second field, enter a single number or a list separated by commas.
redirect:
Used to redirect packets (BlackDiamond 10K and BlackDiamond 12804 Only). Packets are forwarded to
the IPv4 address specified, without modifying the IP header. The IPv4 address must be in the IP ARP
cache, otherwise the packet is forwarded normally. Only fast path traffic can be redirected. This
capability can be used to implement Policy Based Routing. You may want to create a static ARP entry
for the redirection IP address, so that there will always be a cache entry.
mirror:
Sends a copy of the packet to the monitor (mirror) port (ingress only).
mirror-cpu:
Mirrors a copy of the packet to the CPU in order to log it.
replace-dscp:
Replace the packets DSCP field with the value from the associated QoS profile.
replace-dot1p:
Replace the packets 802.1p field with the value from the associated QoS profile.
log:
Logs the packet header.
log-raw:
Logs the packet header in hex format.
meter:
The meter keyword allows you to associate a meter with an ACL. The meter must be created outside of
the EPM using the command line.
74
Extreme Networks Policy Manager (EPM) 1.2 User Guide
True Action Selection Panel
True Action Selection Panel
This panel allows you to select from a list of actions for the compare TRUE condition. If the match
conditions are evaluated TRUE, then the actions specified here are executed.
permit
Changes the existing ACL to permit. All packets that match the conditional
statements of the specified ACL are allowed to pass to their destinations.
deny
Changes the existing ACL to deny. All packets that match the conditional
statements of the specified ACL are dropped.
qosprofile
Modifies an existing ACL to set the QoS profile for traffic that matches that
rule.
mirror
This action modifies an existing ACL rule to mirror traffic that matches that
rule, or to stop mirroring that traffic. The mirroring port must be enabled when
mirroring on an ACL rule is turned on. This could be configured earlier, or use
the CLI action to execute CLI commands to configure mirroring at the same
time.
cli
This action executes a CLI command. There is no authentication or checking
the validity of each command. If a command fails, the CLI will log a message
in the EMS log. The message (FieldOne) must be placed in quotes.
snmptrap
This action sends an SNMP trap message to the trap server, with a
configurable ID and message string, when the rule is triggered. The message is
sent periodically with interval <period> seconds. If <period> is 0, or if this
optional parameter is not present, the message is sent only once when the rule
is triggered. The interval must be a multiple of the rule sampling/evaluation
interval, or the value will be rounded down to a multiple of the rule sampling/
evaluation interval. The message (FieldTwo) must be placed in quotes.
syslog
This action sends log messages to the ExtremeXOS EMS sever. The possible
values for message level are: DEBU, INFO, NOTI, WARN, ERRO, and CRIT.
The message is sent periodically with interval <period> seconds. If <period> is
0, or if this optional parameter is not present, the message is sent only once
when the rule is triggered. The interval must be a multiple of the rule
sampling/evaluation interval, or the value will be rounded down to a multiple of
the rule sampling/evaluation interval. The messages are logged on both MSMs,
so if the backup log is sent to the primary MSM, then the primary MSM will
have duplicate log messages. The message (FieldOne) must be placed in
quotes.
Match Condition Selection Panel
This panel allows you to select from a list of match conditions.
global-rule
The global-rule statement is optional and affects how the counters are treated.
An ACL that defines counters can be applied to more than one interface. In
the original release of CLEAR-Flow, however, any counters used in an
expression were only evaluated for that particular interface that the CLEARFlow rule was applied to. Beginning with the ExtremeXOS 11.2 release, you
can specify the global-rule statement so that counters are evaluated for all the
applied interfaces. For example, if a policy that defines a counter is applied to
port 1:1 and 2:1, a CLEAR-Flow rule that used the global-rule statement would
sum up the counts from both ports. Without the global-rule statement, the
CLEAR-Flow rule would only look at the counts received on one port at a time.
Extreme Networks Policy Manager (EPM) 1.2 User Guide
75
Help Messages
76
count
A CLEAR-Flow count expression compares a counter with the threshold value.
Beginning in ExtremeXOS release 11.4, the value of <countThreshold> and
<hysteresis> can be specified as floating point numbers. The count
statement specifies how to compare a counter with its threshold. The
<counterName> is the name of an ACL counter referred to by an ACL rule
entry and the <countThreshold> is the value compared with the counter.
The REL_OPER is selected from the relational operators for greater than,
greater than or equal to, less than, or less than or equal to (>, >=, <, <=). The
hysteresis <hysteresis> statement is optional, and sets a hysteresis value
for the threshold. After the count statement is true, the value of the threshold
is adjusted so that a change smaller than the hysteresis value will not cause
the statement to become false. For statements using the REL_OPER > or >=,
the hysteresis value is subtracted from the threshold; for < or <=, the
hysteresis value is added to the threshold.
delta
A CLEAR-Flow delta expression computes the difference from one sample to
the next of a counter value. This difference is compared with the threshold
value. Beginning in ExtremeXOS release 11.4, the value of
<countThreshold> and <hysteresis> can be specified as floating point
numbers. The delta expression specifies how to compare the difference in a
counter value from one sample to the next with its threshold. The
<counterName> is the name of an ACL counter referred to by an ACL rule
entry and the <countThreshold> is the value compared with the difference
in the counter from one sample to the next. The REL_OPER is selected from
the relational operators for greater than, greater than or equal to, less than, or
less than or equal to (>, >=, <, <=).
ratio
A CLEAR-Flow ratio expression compares the ratio of two counter values with
the threshold value. Beginning in ExtremeXOS release 11.4, the value of
<countThreshold> and <hysteresis> can be specified as floating point
numbers, and the ratio is computed as a floating point number. The ratio
statement specifies how to compare the ratio of two counters with its
threshold. The value of <counterNameA> is divided by the value of
<counterNameB>, to compute the ratio. That ratio is compared with the
<countThreshold>. The REL_OPER is selected from the relational operators
for greater than, greater than or equal to, less than, or less than or equal to (>,
>=, <, <=). The min-value statement is optional, and sets a minimum value for
the counters. If either counter is less than the minimum value, the expression
evaluates to false. If not specified, the minimum value is 1.
delta-ratio
A CLEAR-Flow delta-ratio expression is a combination of the delta and ratio
expressions. The CLEAR-Flow agent computes the difference from one sample
to the next for each of the two counters. The ratio of the differences is then
compared to the threshold value. Beginning in ExtremeXOS release 11.4, the
value of <countThreshold> and <hysteresis> can be specified as
floating point numbers, and the delta-ratio is computed as a floating point
number. The delta-ratio statement specifies how to compare the ratio of
the counter differences with its threshold. The difference of the sample values
of <counterNameA> is divided by the difference of the sample values of
<counterNameB>, to compute the ratio that is compared with the
<countThreshold>. The REL_OPER is selected from the relational operators
for greater than, greater than or equal to, less than, or less than or equal to (>,
>=, <, <=).
rule-true-count
A CLEAR-Flow rule-true-count expression compares how many times a CLEARFlow rule is true with a threshold value. One use is to combine multiple rules
together into a complex rule. The rule-true-count statement specifies how
to compare how many times a CLEAR-Flow rule is true with the expression
threshold. The <ruleName> is the name of the CLEAR-Flow rule to monitor
and the <countThreshold> is the value compared with the number of times
the rule is true. The REL_OPER is selected from the relational operators for
greater than, greater than or equal to, less than, or less than or equal to (>,
>=, <, <=).
Extreme Networks Policy Manager (EPM) 1.2 User Guide
B
Troubleshooting
Introduction
This appendix includes suggestions for dealing with problems that may occur when running the
Extreme Networks Policy Manager (EPM). They are categorized as follows:
●
Connectivity Problems on page 77
●
EXOS Compatibility Problems on page 77
●
Local Client Runtime Problems on page 78
●
Rule and Policy Version Problems on page 78
●
SSH Problems on page 78
Connectivity Problems
When there is failure opening or saving policy file on a switch, check the following:
●
Check the network connection to the switch by pinging the switch
●
Check that the local IP address is correct.
●
Check that the NAT address is set if the client is on the outside of a NAT.
●
Check that the TFTP server is running on the client and listing on port 69.
●
Check that the file staging directory is set to the TFTP server’s root directory.
●
Check that the user running the EPM has read/write permission to the TFTP server’s root directory.
●
Check the client firewalls
●
Check that the SSH image is loaded and that it has been enabled.
●
Check the user name and password. They are case-sensitive.
●
Check the default routes on the switch and client.
EXOS Compatibility Problems
When the policy file loads with an exception or with rules that are disabled, check the following:
●
If there is an exception, attempt to reload the policy file.
●
Look at connectivity problems
●
In the case of a disabled rule, check to see if the rule contains rule pneumonics that might not be
supported by the EPM until an upgrade of EPM is produced. The customer can save the policy;
however, the rules will be commented out.
Extreme Networks Policy Manager (EPM) 1.2 User Guide
77
Troubleshooting
Local Client Runtime Problems
When the EPM becomes unresponsive or does not launch, check the following:
●
Verify that the client has at least 1 GB of memory. The EPM requires up to 512 MB of available
memory but functions better with 1 GB.
●
Terminate any other applications that may be consuming memory and restart the EPM. Verify that it
executes correctly.
●
Verify that the CPU is not “swamped” with other intensive processing tasks. Reduce the other tasks
and restart the EPM. Verify that the EPM executes correctly.
Rule and Policy Version Problems
When the policy does not support CLEAR-Flow, check the following:
●
Verify that the user specified version 3 when opening an external policy file. If not, reopen the policy
with the correct version.
●
Verify that the policy file looks like a reasonable Extreme policy file.
SSH Problems
When the EPM has connection problems, use the following procedure.
To display the status of SSH process:
1 telnet/ssh to the switch
2 show process exsshd
To start SSH process on the switch
1 telnet/ssh to the switch
2 start process exsshd
To terminate SSH process on the switch
1 telnet/ssh to the switch
2 terminate process exsshd graceful
To terminate and restart SSH process during a software upgrade on the switch
1 telnet/ssh to the switch
2 restart process exsshd
78
Extreme Networks Policy Manager (EPM) 1.2 User Guide
Index
Symbols
E
#, definition, 27
editing
rule parameters, 46
rules, 43
EPM
desktop, 20
launching, 15
modes, 15
opening, 15
eSupport Website link, 20
exporting rules, 42
Extreme Networks Policy Manager see EPM
A
Access Control List (ACL) Rules panel, 29
Access Control Lists see ACLs
ACLs, 9
Action Modifier Selection Panel
reference list, 70
Actions tab, 24
activate a policy
example, 55
procedure, 50
activated policy, changing, 47
adding, 44
global and policy variables, 48
rule parameters, 46
rules, 44
Alerts tab, 23
arrow icons, 30
G
global variables, 48
adding, 47
deleting, 47
modifying, 47
H
C
hardware requirements, 11
changing
activated policy, 47
rule parameters, 46
class, definition, 27
CLEAR-Flow (CF)
description, 9
Rules panel, 29
conventions
text, 8
creating
new policies, 37
new rule, 37
I
D
deactivate
policies, 51
deleting
policies, 49
rule parameters, 47
rules, 44
disable rules, 52
Extreme Networks Policy Manager (EPM) 1.2 User Guide
icons
arrows (vertical), 30
notice, 7
toolbar, 23
importing rules, 41
installation procedure, 13
L
launching the EPM, 15
local mode
opening a policy, 30
saving a policy, 39
Log tab, 24
M
marking rules, 44
Match Condition Selection Panel
reference list, 69
menu bar, 21
79
Index
N
name, definition, 27
NAT IP address, setting, 18
O
opening a policy, 30
opening the EPM, 15
organizing rules, 49
P
parsing, 32
policies
activate, 50
creating, 37
deactivate, 51
deleting, 49
invalid, 32
parsing, 32
validating, 40
Policy Information tab, 24
Policy Validation Exception box, 40
policy variables, 48
policy, opening
locally, 30
switch, 31
Predefined CLEAR-Flow System Counters
reference list, 63
R
rank see rule rank
reclassifying a rule, 45
refresh
description, 21, 47
example, 58
related publications, 8
Release Notes, 7
renaming a rule, 45
requirements
hardware, 11
software, 11
SSH, 12
switch, 11
TFTP server, 12
Rule Activity tab, 25
Rule Editing and Viewing Panel, 27
#, 27
class, 27
name, 27
rank, 27
status, 27
TCNT, 27
80
type, 27
Rule Editor Window, 26
Rule Editing and Viewing Panel, 27
Rule Properties Panel, 28
Tree Structure Panel, 27
Rule Information tab, 28
Rule Navigator Window, 29
Access Control List (ACL) Rules panel, 29
CLEAR-Flow (CF) Rules panel, 29
rule parameters
adding, 46
changing, 46
deleting, 47
editing, 46
Rule Parameters tab, 28
Rule Properties Panel, 28
Rule Information tab, 28
Rule Parameters tab, 28
rule rank
definition, 27
recalculate, 49
reorder by, 49
rules, 44
creating, 37
deleting, 44
disable, 52
importing and exporting, 41
marking, 44
organizing, 49
reclassifying, 45
renaming, 45
searching, 33
S
saving a policy, 39
searching for rules in a policy, 33
set file search directory, 19
set file staging directory, 18
software requirements, 11
SSH (Secure Shell) module, 12
Status Bar, 25
Status Panel
Actions tab, 24
Alerts tab, 23
description, 23
Log tab, 24
Policy Information tab, 24
Rule Activity tab, 25
status, definition, 27
switch mode
opening a policy, 31
saving a policy, 39
switch requirements, 11
Extreme Networks Policy Manager (EPM) 1.2 User Guide
Index
Synonyms used for Rule Constants
reference list, 65
T
TCNT, definition, 27
text conventions, 7
TFTP server, 12
toolbar icons, 23
Tree Structure Panel, 27
Trigger Count see TCNT
Trivial File Transfer Protocol see TFTP
troubleshooting, 77
Type Selection Panel
reference, 68
type, definition, 27
V
validate a policy, 40
variables
global, 48
policy, 48
Extreme Networks Policy Manager (EPM) 1.2 User Guide
81
Index
82
Extreme Networks Policy Manager (EPM) 1.2 User Guide