1
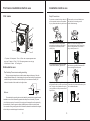
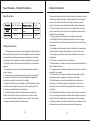
Before using your tumble dryer, please read this
manual carefully and keep it for future reference.
Tumble Dryer
USER’S MANUAL
MD600W
Read This Manual
Inside you will find many helpful hints on how to use
and maintain your tumble dryer properly. Just a little
preventative care on your part can save you a great
deal of time and money over the life of your tumble
dryer. You’ll find many answers to common problems
in the chart of troubleshooting tips. If you review the
chart of troubleshooting tips first, you may not need
to call for service.
Catalogue
Catalogue
Features
2
Features
Part Name
3
1.Unique and luxury design: Design is according to front loading
washing machine with unique appearance.
Installation before use
3
Simple Installation
6
Operation Explanation
7
Features
Predry Actions
7
Inspection on Filter
7
Put in clothes
7
Operation of the control panel
8
The manual of drying clothes
9
How to clean filter, cabinet and inner tub
10
Other Functions Description
11
Warning Function
11
Auto power off
11
Notice
12
Specifications
13
Safety Information
13
2.Front or back air discharge: front air discharge can discharge the
moistures in the clothes directly from the bottom of the front panel
to the ambient space, which can solve the troubles of penetrating
the wall for air outlet when the back side of drying machine is
against the wall, convenient and free of worry; the back air
discharge is to discharge the moistures of the clothes directly from
the back side of the product to the outdoors without influence on
the interior environment. Front or back air discharge can be
selected in accordance with the local conditions.
3.MicroControl: Simple and convenient operation with the help of
PCB board, and it will feel the temperature when drying automatic.
4.Big size door window: See the procedure of drying clearly through
this window.
5.Open the door with 180°:It is very convenient to put in and out
clothes with 180° angle opening range.
6.Compact instruction: Suitable capacity and unique outlook with
anti-dust,anti-humidity, anti shake, long life and low noise design.
2
1
2
Part name Installation before use
Installation before use
Part name
Step2:Precautions
1
Do not store or install the dryer where it
will be exposed to water or the weather.
If yes, please make them dry before use.
Please put dryer to a ventilated place
for better wind circulating and to
avoid hidden damage.
Dank clothes have to be dehydrated
well and then be able to put inside for
drying which could avoid problems
cost by drip.
Make sure combustible sprayer will
not be close to dryer when it is working,
and once the gas leaks, do not touch
plug or start / pause on it.
It is not allowed to dry clothes contains
combustible cleanser , gasoline etc.
Don't operate this dryer if it is damaged,
malfunctioning,partially disassembled
or has missing or broken parts.
10
2
9
8
7
3
6
4
5
1.Top board 2.Control panel 3.Door 4.Front vent cover(Not Applicable to Back
vent Type) 5.Cabinet 6.Filter 7. Flex Tube (Not Applicable to Front vent Type)
8.Power lead 9.Switch 10.Tumbling box
Notice before use
line
Gaso
The first step:Power source and grounding.
Cleanser
Benzene
The dryer employs alternative current with the rated voltage and frequency. When the
voltage fluctuates between 6% of rated voltage, the dryer can work normally. A special power
socket for the dryer had better be set beside the dryer for convenience and safety. The
method of connection of the socket is as the figure below.
~
Grounding
When the dryer is working, the back side
will become hotter. In order to avoid such Please do not use the machine when your
foot or hand with water..
risk, The dryer is not intended for use by
young children or infirm persons without
supervision.
Notices:
The socket and the grounding wire must be installed by an electrician to prevent incorrect
installation or use of the socket and to guarantee the safety of use of electricity. The power
wire of the dryer employs Y connection ,if the supply cord is damaged, it must be replaced by
the manufacturer, its service agent or similarly qualified persons in order to avoid a hazard.
No connection of the grounding wire with the neutral wire,otherwise the cabinet will be charged,
which is likely to cause the danger of electric shock.
3
4
Installation before use Simple installation
Simple installation Operation explanation
Do not try to dry raincoat or fluff clothes
or whatever things contains rubber or
elasticity materials on any heat setting.
Do not to put any heavy or hot article
on the top of dryer to avoid deformation
of control panel.
Simple Installation
>10cm
Step 1: Dryer should be placed in a ventilated area with
not less than 10 cm distance from the wall.If placed in
a room such as bathe room, it is suggested there are no
obstacles within 1.5m in front of dryer and keep ventilated.
Step 2: The horizontal adjustment:
It is not allowed to connect flex tube
with flue directly, this is to avoid dust
and smoke coming through.
Only open door once program is finished
to avoid scalding.
Tie a heavy subject on the string on the front and two sides of the dryer.
Please refer this to below figure, and if A=A, B=B, this means the dryer
is placed horizontally. While the opposite, you could place something
On the grounding.
A
Notice:
If dryer could not be placed horizontally ( the
lean angle is no more than 2), the dryer will
work unbalanced or stop working sometimes.
A´
The heavy
Notice when installing:
Do not install the dryer in the open air or place easily damaged by rain;
This product belongs to type I electronic products and please take note of safety
problem accordingly:
1.It is rule to use power which is buried in the earth and will not touch any
socialequipments such as gas pipe or water pipe etc. Make sure the difference
of different lines and they are not connected.
2.Please use special socket which is according to National Standard and
will endure 10A current.
To be safe, please make improvements as soon as possible according to the
rules and suggestions mentioned above.
Do not place the back of dryer near curtain or something in the wind;
Do not place the dryer near gas or flammable area.
Step 3: Regarding the fixing of flex tube:
Connect one side of flex tube with whorl to the back vent,
then fix it deasilly till tight.
The other end of flex tube will be extended to outdoor, pls
Refer the right assemble way to the below pictures.
If your clothes contain following mark or could not be dried in dryer, please stop
usingyour dryer.
Not used for dryer in the tub
Hang for dry
Drip dry
5
Flat dry
Dry automatically
6
Simple installation Operation explanation
Operation explanation
The reference weight of dry clothes
Operation explanation
1.Preparing before drying
Clothes have to be washed and spun before putting in the dryer.
Put same kind clothes to dry together.
Sort your clothes into loads that take a similar time to dry e.g.
Heavier items form light items, it is suggested change the inner
side of clothes to outside and then put into dryer.
Make sure the decoration and buttons are safe for high
temperatureand will not damage the inner tub of dryer. Make
sure the clothes are well protected.
It is better to turn out the pocket for drying.
Mixed-fabric clothes
(about 800g)
Jacket
(about 800g cotton)
Jeans
(about 800g)
Single bedsheet
(about 600g
cotton)
Work clothes
(about 1120g)
Sleepwear
(about 200g)
Short sleeve shirt
(about 180g cotton)
Towel quilt
(about 900g
cotton)
Long sleeve shirt
(about 300g cotton)
Socks
(about 50g
mixed-weave)
Short pants
(about 70g cotton)
4.Close the door
5.Instruction on control panel
Please check the clothes after washing, and if still dirty on
clothes, those dirty may not disappear after drying.
Please make sure the power socket are well connected and will
not touch conduit of water supply and gas supply etc.
PROGRAM
2.Make sure the filter is well cleaned and in the right position.
3.Put clothes into the dryer.
It is better to put clothes with 1/3-1/2 capacity of inner tub for
drying because drying needs space to make clothes tumble
evenly and overfilling clothes will not get a good result.
When drying big clothes, it is better to fulfill with small pieces of
clothes together.
When drying expensive or little clothes, it is better to add two
towels so as to reach better drying result.
Do not overdry the clothes to avoid crimple, roughness or static
electricity etc.
7
5
1
Power
2
Pause/Start
3
Program (extra / middle / light /1 hour)
4
Heat (full / half / airing)
5
Crease Guard
4
3
2
1
Note:Push Program and Heat at the same time, function could be changed to Lock.
1)Push Power button;
2)Program setting will according to the texture and capacity of clothes. Every
time pushing the Program button, the indication light will shine orderly for a
while, and stop at the program you choose;
8
Operation explanation
Operation explanation
3)Temperature setting will according to the texture and capacity ofclothes.
Every time pushing the Heat button, the indication light will shine orderly for a
while, and stop at the program you choose;
4)For function of Crease Guard, it is better to dry some expensive or easily
creased clothes. When the indication light is on, it works.
5)Push Start / Pause button, it works while push it second time, it stops
working for 3 seconds, and could be adjusted to restart program, and also add
or reduce clothes through the door but to avoid hot steam scalding. Push again,
and it continues working. This button is used for switch between start and
pause. If push Start / Pause button directly, dryer will work with middle dry and
full heat automatically.
6)Lock function could be started when push Program and Heat button at the
same time with indication light on, and this can avoid children's mistake. If
push the two buttons again, dryer will be unlocked.
Note: Push all buttons will cause a short buzzer with shining lights.
6. End of Program
At the end of program, buzzer rings to remind take out clothes
from dryer.
Drying Clothes instruction
Max volume of
Program dry clothings
An hour
dry
Temperature
3.0kg
Full heating√
<3.0kg
Half heating√
2.0kg
Air-dry√
Light
dry
4.0~6.0kg
Middle
dry
4.0~6.0kg
<4.0kg
Half heating√
Extra
dry
4.0~6.0kg
Full heating√
<4.0kg
<4.0kg
Full heating√
Half heating√
Full heating√
Half heating√
Clothings type
Easy to dry and not
need lots of time to
dry on clothings.
Air-cold
10min
Antic- Child- About
rease lock dry time
√
√
60min
Fine fabric and not need
to heat on clothings.
Chemical fiber and
small size clothings.
10min
√
√
100min
Cotton weaving and
jeans
10min
√
√
140min
Bedsheet、cotton
clothings and jeans.
10min
√
√
170min
Note: 1. Cold wind function means there is only cold wind for circulating before
finishingheating 10 minutes';
2. Crease Guard means after programming, it adds extra 30s' one way
running to shake clothes in order to protection of creasing;
3. The inside temperature and humidity will not affect drying time;
4. Check the label attached on clothes and choose the right temperature
and time according to the explanation.
Suggestion: When clothes is less than 0.5kg, please select an hour dry and
full heating for drying.
9
7.Take out the plug
To be safe, please take out the plug after using every time.
8.Clear filter, cabinet and inner tub. Accumulated woolen chips etc will affect air circulate smoothly
and cost long time for drying, it is better to clear it once finishing
working.
Make sure to cut off the power before clearing.
Filter Clean
1) Unbolt filter
The lint filter is located in the door opening,
remove the lint filter and open it out.
2) Cleaning filter
Use wiping cloth wipe with your hand.
3) Install filter
If the filter is cleaned by damp cloth
or in the water, please install after
the sun dry.
Cleaning cabinet and inner tube
Use soft damp cloth wipe when
cleaning cabinet and inner tube.
1.Not to rinse by water direct.
2.Not to use neutral scour wipe.
3.Not to use gasolene and alcohol wipe.
Make sure open the front door for aeration after
cleaning the inner tube.
10
Pull
Notice
Other functions description
Other functions description
Trouble
Step 1: Warning function
Will not start
Indication of fault
Cause of fault
Alarm for
temperature
exceed
If the check
temperature
exceed 63 in any
program,alarm.
Alarm for
the door open
Open the door
after program
start
Alarm for
malfunction of
temperature
sensor
Program start
sensor open
Program start
sensor short
Phenomenon
of fault
Alarm of the
buzzing sound
Solution of alarm
Power off wait the
The buzzer goes heating temperaon buzzing sound ture fall then start
for 10 seconds.
Close the door
"little dry" "middle
If the alarm does solve alarm,reatdry"indication
not be solved ,
art the program.
flash
every 16 minutes
re-buzzs for
"An hour dry"
Power off check
10 seconds.
“light dry"
themachine start
indication flash
it when in normal
"Middle dry"
"strong dry"
indicator flash
"An hour dry"
“middle dry"
indication flash
Step 2:Auto power-off function
1.This machine will auto power-off after 10 minutes when you do not
start any program.
2.This machine will auto power-off after 6 time's buzzer on drying.
External hot or
can smell hot
Cause
Power cut.
Wait for switching on electricity.
The power plug is not plugged tight.
Check the power socket, make sure plug
tight.
The clothes in drier must be after spinning,
and drying clothes can not exceed 7kg.
Dry clothes exceed.
The temperature fuse is cut.
Please career man restore the temperature
fuse.
The lint filter is dirty.
Make sure clean the lint filter in time.
The uptake or exhaust duct is
dirty.
Clean out the stem.
The clothes in machine are too full.
Clothes too dry
Not to take out the clothes in time
when finish.
The clothes don’t assort properly.
The temperature is enacted too high.
Make sure the clothes are not too full.
Take out the clothes immediately when
finish.
See page 7.
Observe the maintenance label on clothes.
Observe the maintenance label on clothes,
if easy to shrink, should examine the
clothes when dry. Take out the clothes
when tiny damp for too dry. Then hang the
clothes until full dry.
Too dry.
Clothes shrink
Hairball on
clothes
Solution
It is right for synthetic fibre and
permanent press fibre causing
hairballs. This is because the ri
-ght rub causing.
Use fabric softener lubricate fibre,
please spray settled gule on cuff
and neckline when iron clothes.
Turn the sarcenet out for reducing
rub.
The sound of dryer when runs can cause
Buzzer of vibration: Due to heavy wet clothes' turning and bumping,
and this will cause noise accordingly.
Air bumping: When drying, machine will generate steam which will
come out from pipe and this will cost bumping with the bottom of
inner tub.
Timer noise when working.
11
12
Specifications Safety Information
Safety Information
Specifications
8.Items such as foam rubber (latex foam), shower caps, waterproof textiles,
rubber backed articles and clothes or pillows fitted with foam rubber pads
should not be dried in the tumble dryer. 9. Fabric softeners, or similar
products, should be used as specified by the fabric softener instructions.
10. The final part of a tumble dryer cycle occurs without heat (cool down
cycle) to ensure that the items are left at a temperature that ensures that
the items will not be damaged.
11. Remove all objects from pockets such as lighters and matches.
12. WARNING: Never stop a tumble dryer before the end of the drying
cycle unless all items are quickly removed and spread out so that the heat
is dissipated.
13.If the supply cord is damaged, it must be replaced by the manufacturer,
its service agent or similarly qualified persons in order to avoid hazard.
14.The maximum mass of dry textile material in kilograms to be used in
the appliance.
15.Do not dryer unwashed items in the tumble dryer.
16.Fabric softeners, or similar products, should be used as specified by the
fabric softener instructions.
17. For appliances with ventilation openings in the base, that a carpet must
not obstruct the openings.
18.That exhaust air must not be discharged into a flue which is used for
exhausting fumes from appliances burning gas or other fuels.
19.That the appliance must not be installed behind a lockable door, a
sliding door or a door with a hinge on the opposite side to that of the
tumble dryer, in such a way that a full opening of the tumble dryer door
is restricted.
20.If the installation instructions state that the tumble dryer can be placed
on top of a washing machine, they shall state which washing machine are
suitable. Instructions shall be given for the assembly of the tumble dryer
and washing machine .The instructions shall state how to obtain any fixing
attachments required, unless they are supplied with the appliance.
33kg
595x550x840(mm)
1700W
Rated volume of
dryer
6.0kg
(Dry clothes)
230V~
Rated frequency
50Hz
Safety Information
1.“This appliance is not intended for use by persons (including children)
with reduced physical, sensory or mental capabilities, or lack of experience
and knowledge, unless they have been given supervision or instruction
concerning use of the appliance by a person responsible for their safety. ”
2.“Children should be supervised to ensure that they do not play with the
appliance.”
3. The tumble dryer is not to be used if industrial chemicals have been
used for cleaning.
4. The lint trap has to be cleaned frequently, lint must not to be allowed
to accumulate around the tumble dryer(not applicable for appliances
intended to be vented to the exterior of the building).
5. Adequate ventilation has to be provided to avoid the back flow of gases
into the room from appliances burning other fuels, including open fires.
6. Do not dry unwashed items in the tumble dryer.
7. Items that have been soiled with substances such as cooking oil,
acetone, alcohol, petrol, kerosene, spot removers, turpentine, waxes
and wax removers should be washed in hot water with an extra amount
of detergent before being dried in the tumble dryer.
13
14
Safety Information
SUD
geprufte
Sicherheit
Correct Disposal of this product:
This marking indicates that this product should not be
disposed with other household wastes throughout the
EU. To prevent possible harm to the environment or
human health from uncontrolled waste disposal, recycle
it responsibly to promote the sustainable reuse of
material resources. To return your used device, please
use the return and collection systems or contact the
retailer where the product was purchased. They can
take this product for environmental safe recycling.
15