1
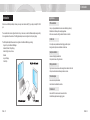
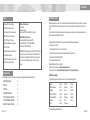
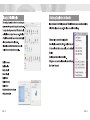
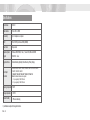
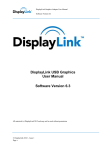
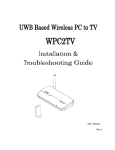
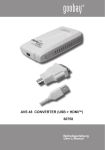
®
VER.5.6
Monitor ,HDTV
Projector ....
VGA Cable -->
Monitor Cable
Safety Instructions
Always read the safety instructions carefully
Keep this User's Manual for future reference
Keep this equipment away from humidity
If any of the following situation arises, get the equipment checked by a service technician:
·The equipment has been exposed to moisture.
·The equipment has been dropped and damaged.
·The equipment has obvious sign of breakage.
·The equipment has not been working well or you cannot get it work according to User's Manual.
Copyright Statement
No part of this publication may be reproduced in any form by any means without the prior written permission. Other
trademarks or brand names mentioned herein are trademarks or registered trademarks of their respective companies.
Disclaimer
Information in this document is subject to change without notice. The manufacturer does not make any representations or
warranties (implied or otherwise) regarding the accuracy and completeness of this document and shall in no event be liable
for any loss of profit or any commercial damage, including but not limited to special, incidental, consequential, or other
damage.
1. Introduction
Applications
Features/ Package Contents
System Requirements
2. Hardware Connect
3. Installing the USB Graphics Software
To Install the Software on Windows 7 Update
To Install the Software on Windows 7/Vista/XP/2000
4. Using the USB Graphics Software
Windows 7 - Controlling the Display
Windows Vista/XP/2000 – Controlling the Display
Windows Vista/XP/2000 – Windows Display Properties
5. USB Graphic Software Update
6. Audio Configure
7. Uninstalling the DisplayLink Graphics Software
8. Additional Information
9. Troubleshooting
10. Mac OS X User Guide
11. Technical Data Overview
Note: Menu items and screen selections are shown in italics.
01
02
03
04
05
07
07
08
10
10
14
17
21
23
25
26
30
31
36
1. Introduction
Introduction
Welcome to use USB Graphics Adapter. It allows you to easily connect extra monitors(TV) to your laptop or desktop PC's USB
port.
The connected monitors can be configured to either mirror your main screen, or extend the Windows desktop allowing visibility
of more applications at the same time. The USB graphics adapter can also be configured to be the primary display
The USB Graphics Adapter Software allows full configuration of all additional USB displays, including:
·Support for up to 6 additional USB Displays
·Extended, Mirrored, Primary Display
·Extend left, right, above, or below
·Rotation
·Layout of displays
·Color Depth
Applications
Office workstation
·View your large spreadsheets across two screens with display continuity
·Multitask more effectively without overlapping windows
·Edit on one screen while surfing the Internet information on the other
On the road
·Do multiple screen presentations without bringing another computer
·Easily provide multiple screen exhibitions in a trade show
Graphics workstation
·Use second display for palettes/tools
·Get a panoramic view of large documents
Editing workstation
·Type documents on one screen while viewing reference material on the other
·Compare two documents simultaneously across two screens
Financial analysis
·Have one monitor per data stream
·View charts and live data at the same time
Entertainment
·View videos/TV on one screen and reviews on the other
·Get additional perspectives when playing games
PAGE·01
PAGE·02
1. Introduction
System Requirements
Features:
·Can easily Mirror the main display
·Extend left, right, above, or below
·Can be rotated left, right, or upside-down
·USB 2.0 Powered - Ultra Low Power
·CRT, LCD, Projector, TV Displays
·Standard and Widescreen ratio aspects
·Uses a virtual driver
·Stackable by design with a small footprint
Model: with Audio output
Audio Output
Microphone Support
Mixed output RCA*2(Left and Right Track) Interface
DisplayLink software can be used on PCs, from Netbooks, Notebooks/Laptops to Desktops. The driver will run on processors
ranging from Atom N270 based PCs, basic single Core CPUs, and of course the latest Dual, Quad Core and Core i3/i5/i7
CPUs.
The performance of the software is dependent upon the processing power available, as well as the operating system in use.
More capable systems offer higher performance.
Model: HDMI output with audio
Output through HDMI cable connect to HDTV
Support LCD Monitor or LCD TV with HDMI input.
Resolution upto 1080P (1920x1080)
DisplayLink software is available for PCs running one of the following Windows operating systems:
Note: USB to HDMI Adapter scaling for all HDTV. When TV doesn't
scale properly then use the function key (noted: different brand of
TV maker may named differently for that function on their remote)
from your TV remote to adjust scaling till it return to the proper
display.
·Completely silent operation
·Onboard power and status indicator LEDs
·Portable, making it easy for travel
Package Contents
Before installation, please check the items in the package. The package should contain the following items:
·USB Graphic Adapter
·Driver CD
·USB Cable
·Quick Installation Guide
·DVI to VGA Adapter (Optional)
·DVI to HDMI Adapter (Optional)
·Audio RCA Adapter (Optional)
x1
x1
x1
x1
x1
x1
x1
·Windows 7 (32-bit or 64-bit)
·Windows Vista with Service Pack 1 or 2 (32-bit or 64-bit)
·Windows XP Home or Professional (including Tablet edition) with Service Pack 2 or 3
·Windows Server 2003, 2008 and 2008 R2
·Windows 2000 with Service Pack 4
Note: 64-bit editions of XP are not supported.
Mac OS X support can be found at http://www.displaylink.com/mac
Linux support can be found at http://libdlo.freedesktop.org/wiki/ or http://www.displaylink.org
Supported Languages
The following languages are supported in version 5.6, on all supported operating systems:
Arabic
Bahasa Indonesian
Bulgarian
Chinese (Traditional)
Chinese (Simplified)
Croatian
Czech
Danish
Dutch
English
Finnish
French
Greek
Korean
German
Hungarian
Italian
Japanese
Norwegian
Polish
Portuguese
Russian
Slovak
Slovenian
Spanish
Swedish
Turkish
Unsupported languages default to English.
PAGE·03
PAGE·04
2. Hardware Connect
Windows 7 / Vista
For Windows 7/Vista, the Windows Experience Index (WEI) is a useful measure of hardware level. The WEI is accessible from
Computer > Properties, or from Control Panel > System.
The recommended typical hardware requirements for the PC are:
·
WEI score of at least 3 in the 'Graphics; Desktop performance for Windows Aero' category.
·
Overall WEI score of at least 3 as recommended by Microsoft.
·
At least one USB 2.0 port
·
30 megabytes (MB) of free disk space.
·
Computer screen for use with the DisplayLink device, if it is not integrated.
Windows XP
·
·
·
·
·
·
For 1-2 monitors, business usage, productivity target. This may not provide full frame rate DVD playback at full
screen:
1.2GHz Single Core CPU, 512MB memory
For 3 monitors where 1 could run DVD video while also targeting productivity and business apps. Will support only 1
video of DVD resolution at full screen:
1.6GHz CPU, 1GB memory
For 6 screens where 1 screen can run full screen DVD video:
1.8GHz Core Duo, 1GB memory
At least one USB 2.0 port, 30 megabytes (MB) of free disk space.
Computer screen for use with the DisplayLink device, if it is not integrated.
Network access for software downloads, or access to a CD-ROM drive.
PAGE·05
Graphics Card Support (Windows Vista/Windows 7)
On Windows Vista and Windows 7, DisplayLink software interacts closely with the primary graphics card. DisplayLink support
and test a single graphics card (GPU) installed in a PC from all major GPU vendors (Intel, ATI, NVidia and Via)
The following GPU configurations may exhibit compatibility issues on Windows 7 and Vista in certain circumstances:
·
Switchable Graphics (ATI/Intel)
·
Switchable Graphics (ATI/ATI)
·
Switchable Graphics (NVIDIA/Intel)
·
NVIDIA SLI in SLI mode
Other GPU configurations, including the following, are currently unsupported and will not function on Windows 7/Vista:
·
Hybrid Graphics
·
Hybrid SLI
·
Hybrid Crossfire
·
Crossfire
·
SLI not in SLI mode
·
Multiple WDDM 1.1 graphics drivers active at once
Graphics Card Support (Windows XP)
All graphics cards are supported on Windows XP.
PAGE·06
2. Hardware Connect
Hardware Connect
Connect the adapter to your computer and monitor (TV)
Connect the smaller end of the USB cable to the adapter. Then connect the
other end of the USB cable to an USB 2.0 port on your computer. If your
monitor is not yet connected to the adapter, make the connection and power
on your monitor
VGA connect via DVI to VGA adapter
for DVI port product
HDMI connect via DVI to HDMI adapter
for DVI port product
Audio connect
* with Audio support product
USB Device Connect
* with USB port product
Connect to CRT, LCD, TV, Project, Speaker, USB …..
USB
VGA Connect
for VGA port product
PAGE·07
DVI connect
for DVI port product
HDMI connect
for HDMI port product
PAGE·08
3. Installing the USB Graphics Software
Installing the USB Graphics Software
Note: The screen may flash or go black during the install.
The following section shows you how to install the USB Graphics Adapter software on different operating systems.
Note: If you have v3.x, R4.1 or R4.2 DisplayLink software installed you must uninstall it, using the Windows
Add/Remove Programs feature, before installing this release. Devices will continue working after this release is installed.
To Install the Software on Windows 7 Update
The preferred method of installation is using Window 7's Windows Update facility.
1. Connect your UGA device via the USB cable to your PC. Windows
detects the new hardware and automatically downloads the driver.
To Install the Software on Windows 7/Vista/XP/2000
Alternatively you may install the software from a website download
or CD-ROM:
Important! Do not connect a UGA device/screen to your PC before
the install.
1. Double click on Setup.exe or click from Autorun setup cover
page.
The Windows User Account Control window opens (if enabled in
the OS).
2. Once downloaded, the install will run
The DisplayLink software end user licence agreement window opens.
3. Click I Accept.
The DisplayLink Core software installs
PAGE·09
2. Click Yes.
The DisplayLink software end user licence agreement window
opens.
3. Click I Accept.
DisplayLink Core software and DisplayLink Graphics installs.
PAGE·10
4. Using the USB Graphics Software
Note: The screen may flash or go black during the install.
No message will be shown at the end of the install.
4. Connect your USB Graphic Adapter via the USB cable to your PC.
Installing device driver message
Using the USB Graphics Software
This section describes how to use DisplayLink's Software. The section is divided into sub-sections relating to your operating
system.
Windows 7 - Controlling the Display
On Windows 7, you can configure a UGA device through the use of Windows Display Properties (WDP). WDP provides a
simple method to attach, rotate, duplicate or extend screens as well as modify screen resolution.
To open WDP
The Windows User Account Control window opens.
5. Click Yes.
DisplayLink automatically installs the device.
The DisplayLink software end user licence agreement window
opens (see above).
6. Click I Accept.
The DisplayLink graphics software installs, without notification
that it has completed.
There are several ways to open WDP.
1. Right-click on the desktop.
2. Select Screen Resolution from the menu.
3. WDP opens.
OR
1. From Start menu > Devices and Printers.
2. Double-click the DisplayLink Device icon.
3. WDP opens.
OR
1. Right click on the DisplayLink icon
2. Click Advanced.
3. WDP opens.
Note: On some machines you may need to reboot before you can use your DisplayLink enabled device.
Setting the Display
Follow this procedure to set the display.
PAGE·11
PAGE·12
4. Using the USB Graphics Software
To control the Display
To set the display
1. Open WDP.
2. Set the display options. Refer to the table below for details on each option.
1. Select the Windows Key + P.
The following menu appears.
Menu
Description
Sub-Menu
Display
Use the drop down list to select a display to be configured.
Use the drop down list and user the slider to choose a
resolution.
Resolution
Orientation
Multiple
displays
Landscape
Sets the display to landscape view.
Portrait
Sets the display to portrait mode.
Landscape (flipped)
Sets the display to upside down landscape mode.
Portrait (flipped)
Sets the display to upside down portrait mode.
Duplicates these displays
Reproduces the main display on the second display.
Extend these displays
Extends the main display onto the secondary display.
Show Desktop only on 1
The desktop appears on the display marked 1. The display
marked 2 becomes blank.
Shows Desktop only on 2
The desktop appears on the display marked 2. The display
marked 1 becomes blank.
2. Click on one of the options.
The display updates to reflect your choice.
Table 1: WDP Options
To control the behaviour of an attached DisplayLink display, it is also possible to use Windows Key+P to display a
menu (and cycle through it) to switch mode.
PAGE·13
PAGE·14
4. Using the USB Graphics Software
The DisplayLink Icon Application
Windows Vista/XP/2000 – Controlling the Display
You can configure the behaviour of the USB Graphics Adapter through the DisplayLink icon
application on the taskbar, where present.
When devices are attached, an icon appears in the taskbar. This gives you access to the DisplayLink manager menu. To use
the DisplayLink Manager Menu
To show the DisplayLink Manager menu
1. From the taskbar, click the Show hidden icons arrow to show all available icons.
1. Click the DisplayLink icon
on the taskbar.
The menu appears as shown below.
2. Click the DisplayLink icon
A menu appears with several options, as described in the following table.
Menu
Description
Check for updates
Connects to the Windows Update and checks for newer versions and
downloads them, if available.
Optimize for Video
Select this option for better movie playback performance on the DisplayLink enabled
displays. Only select this option when playing back video content. Note: Text may appear
less clear when enabled.
Advanced
2. Select an option from the menu, using the following table for
the options available.
Opens the Windows Display Properties (WDP)
Table 2: DisplayLink menu – Windows 7
PAGE·15
PAGE·16
4. Using the USB Graphics Software
Menu Option
Sub-menu option
Check Now
Updates
Screen Rotation
Extend To
Opens the Update Options window where you can configure automatic updates.
Medium (16-bit)
Displays a list of available resolutions. Some resolutions may be enclosed by [ ].
Please see, Inferred Modes.
Changes the colour depth of the extending display to 16 bit
Highest (32-bit)
Changes the colour depth of the extending display to 32bit
Normal
No rotation is applied to the DisplayLink display
Rotated Left
Rotates the extended or mirrored display by 270 degrees.
Rotated Right
Rotates the extended or mirrored display by 90 degrees.
Upside-Down
Rotates the extended or mirrored display by 180 degrees.
Right
Extends the display to the right of the main display.
Setting the Display into Mirror Mode
Left
Extends the display to the left of the main display.
In mirror mode, the monitor attached to the USB Graphics Adapter duplicates what is on the primary display.
Above
Extends the display above of the main display.
Below
Extends the display below the main display.
Extend
Extends your desktop onto the secondary display.
Set as Main Monitor
Sets the secondary display as the main display.
Switches off the display of an attached notebook and makes the DisplayLink
display primary.
Copies what is on the main display and reproduces it on the secondary
display.
Switches off the secondary display.
Configures the secondary display for optimum full screen video performance
output. Note: Text may appear less clear.
Notebook Monitor Off
Mirror
Off
O p t i m i z e for Video
(Vista and Windows 7 Only)
Advanced
Setting the Display into Extend Mode
In extend mode, the monitor attached to the USB Graphics Adapter forms part of the extended Windows desktop. The extra
desktop area is a great productivity aid, allowing more applications or documents to be visible at a time.
Configure
Screen Resolution
Color Quality
Description
Connects to the Update Server to check for newer driver versions and downloads
them, if available.
Opens the Display Settings window.
To set the display into Extend Mode
1. Click on the DisplayLink icon
2. Select Extend.
The device is now extended in the direction it was the last time the display was in this mode. For more control, use the Extend
To submenu and select one of the options. This puts the device into extend mode, and places it to the Left/Right/Above/Below
the main (primary) monitor.
To set the display into Mirror mode
1. Click on the DisplayLink icon
2. Select Mirror.
The resolution, colour depth and refresh rate of the primary screen are replicated on the monitor connected to the USB
Graphics Adapter.
If the monitor connected to the USB Graphics Adapter supports a lower resolution than the primary display, then the primary
graphics device will have its resolution changed automatically to ensure the whole picture fits on the external screen. Where
the monitor connected to the USB Graphics Adapter is of a larger size than the primary screen the image will be letter-boxed to
keep the aspect ratio correct.
Table 3: DisplayLink Software menu – Windows
PAGE·17
PAGE·18
4. Using the USB Graphics Software
Windows Vista/XP/2000 – Windows Display Properties
You can also configure the USB Graphics Adapters from the Windows Display Properties dialog box.
Setting the Display into Extend Mode
Use this procedure when you want to extend the Windows desktop to the DisplayLink display. This allows many different
applications to be spread over multiple displays, to be able to see multiple applications at the same time.
To open the Windows Display Properties on Windows
To set the display to Extend Mode using Windows Display properties
1. Right-click on the Desktop.
2. Click Personalize.
3. Click Display Settings.
The Display Settings window opens.
Select the display to be configured. Its mode, resolution, colour
quality and position can all be controlled from here.
1. Select Extend the desktop onto this monitor checkbox (1 in Figure 1).
2. Arrange the screen resolution using the Resolution slide bar. (2)
3. Select the colour quality from the Colors drop-down list. (3).
4. Arrange its position with respect to the other monitors on the extended desktop in using the drag area (4).
5. Click OK to save your changes.
For more detailed mode setting, including the refresh rate, click Advanced Settings button, then the Adapter tab then on the List
all modes button. All valid combinations of resolution, colour quality and refresh rate are listed. For CRT monitors, it is best to
use a high refresh rate so as to avoid discomfort due to flicker. Flat panel monitors do not flicker and a low refresh rate is
adequate.
To set the display to Extend Mode using the DisplayLink menu
1. From the taskbar, click on the DisplayLink icon
2. Select Extend.
Setting the DisplayLink Display to Mirror the Primary Screen
Mirror mode copies what is on the main display and reproduces it on the secondary display.
To set the display into Mirror Mode
1. Uncheck the Extend the desktop onto this monitor checkbox (1 in Figure 1).
2. Click Apply.
PAGE·19
PAGE·20
4. Using the USB Graphics Software
To set the display into Mirror mode using the DisplayLink menu
1. From the taskbar, click on the DisplayLink icon
2. Select Mirror.
Note: The display resolution of the primary display and the DisplayLink display may be changed to a lower resolution. In mirror
mode, both screens must output the same resolution, which may not be the maximum resolution of the display.
The USB Graphics Adapter stays primary if the PC enters hibernate or suspend mode or is rebooted. If the USB Graphics
Adapter is detached, the main display becomes primary again.
To make the USB Graphics Adapter the Primary Display using the DisplayLink menu
1. From the taskbar, click on the DisplayLink icon
2. Select Set as Main Monitor.
This mode is NOT recommended if using the DisplayLink display as the primary laptop display, as it is unlikely to provide the
optimum resolution for the DisplayLink display. Please see, Setting the DisplayLink display as the Primary Display.
Setting a Laptop Lid to do Nothing (Upon Close)
Setting the DisplayLink display as the Primary Display
To make the USB Graphics Adapter the Primary Display
1. Select the This is my main monitor checkbox (1 in Figure 1).
2. Click Apply.
Note: On some PCs and laptops it is necessary to disable the main display (clear the Extend the desktop onto this monitor
checkbox for the main display) as part of the same settings change. The reason for this is that many primary graphics card
drivers tend to make the laptop screen primary if it is enabled. The only workaround for this is to disable the laptop screen to
allow another screen to be primary. To do this:
It is possible to work conveniently with a laptop by setting its action on lid closed to ‘do nothing’ then making the USB Graphics
Adapter screen primary while disabling the main screen. The laptop lid can then be closed and the laptop used with USB
Graphics Adapter screen and with external keyboard and mouse.
To set a laptop to do nothing
1. Select Start menu > Control Panel > Power Options.
2. Select Choose what closing the lid does.
3. From When I close the lid, select Do nothing from the On battery and Plugged in drop down list.
1. Select the This is my main monitor checkbox (1 in Figure 1) of the DisplayLink display.
2. Select the primary display (Display 1).
3. Uncheck the Extend the desktop onto this monitor checkbox (1 in Figure 1).
4. Click Apply.
PAGE·21
PAGE·22
5. USB Graphic Software Update
USB Graphic Software Update
On Windows 7, the DisplayLink software connects to the Microsoft Windows update site to obtain the latest DisplayLink driver.
On selecting “Check for updates”, the DisplayLink software connects to Windows update, downloads and installs the latest
software.
Using the Updates Wizard
By default, automatic updates is configured to check for updated software on the plugging in of a USB Graphics Adapter, or the
resume or start of your PC, every seven days. When newer software is available, the Updates Wizard launches.
Manual Updates
Automatic Updates
DisplayLink Automatic Updates is a product maintenance
feature from DisplayLink, supported on Windows 2000/XP
and Vista. The automatic update mechanism ensures that
the USB Graphics Adapter has the most up-to-date drivers
and software, providing you with increased performance
and stability.
You can check for updates manually at any time.
To manually check for updates
1. Click on the DisplayLink icon
The DisplayLink menu opens.
2. Select Updates > Check Now.
If you have the most recent software, the dialog box, shown
below, appears. Otherwise the Choose updates to install
dialog opens.
You can be disable this feature during install by clearing the Automatically check for updates checkbox.
PAGE·23
PAGE·24
6. Audio Configure
PAGE·25
PAGE·26
7. Uninstalling the DisplayLink Graphics Software
Uninstalling the DisplayLink Graphics Software
The method for uninstalling differs slightly depending on
your operating system.
To uninstall the USB Graphics Adapter on
Windows
1. From the Start Menu, select Control Panel.
8.Fit to TV
Fit to TV
Why do I need Fit to TV?
If using your DisplayLink product to connect to a TV, all of the Windows desktop
may not be available. This is because TVs can use overscan, which prevents the
edges of the image to be visible. When showing a Windows desktop, overscan
prevents the edges of the screen being visible, which can hide the task bar and
icons.
2. From the Programs item, click Uninstall program.
3. Double click on DisplayLink Core software.
A windows confirmation dialog opens (if enabled)
4. Click Yes.
5. A message may appear to state which software packages
will also be uninstalled.
Click Yes to uninstall the packages that use DisplayLink
Core Software.
The uninstaller automatically uninstalls the software.
6. Once uninstalled, you will be prompted to reboot
Click Yes to complete the uninstall.
PAGE·27
Fit to TV can be used to reduce the size of the Windows desktop on the TV
screen.
Note: Fit to TV only works in extend mode. If choosing the option while in mirror
mode, the DisplayLink screen will change to extend and be placed above the
laptop screen in Windows Display Properties.Fit to TV does not support rotated
modes.
Configuration
1.
To configure Fit to TV, choose the option from the DisplayLink GUI. The
following interface appears
2.
You will also see a red border on the DisplayLink screen
The red border shows the size of the new Windows desktop. Use the “+” and “-”
controls on the Fit to TV GUI to change the size of the red border until it fits on the
TV screen.
Note: Finer configuration of the size of the border can be achieved by holding
down the CTRL key and clicking the “+” and “-”.
3. Once the red border is at the edges of the TV screen, click “Apply” to resize the
Windows desktop.
PAGE·28
8. Additional Information
Additional Information
The following section provides additional information on the use of the USB Graphics Adapter software.
DirectX 10 Game support
This software release contains support for some DirectX 10 games on Windows 7. To improve the gaming experience,it is
recommended that:
Antialiasing (AA) settings are turned OFF
Locking to vsync is turned ON
These options are usually configurable within the DirectX 10 game.
To play 3D games on a DisplayLink screen with reasonable performance the system specs must meet the game
“recommended” hardware specification, not just the minimum specification.
Monitor Calibration
Monitors can be calibrated with applications that use the Display Data Channel Command Interface (DDC/CI). Both the monitor
and application must support DDC/CI for this to work. An example of an application that is now supported is ScreenWhite.
DDC/CI is not supported on displays with integrated DisplayLink technology, for example mini monitors.
Media Playback
On Windows 7, Vista and Windows XP (in extend mode), the USB Graphics Adapter can display media files and DVDs using
the following media players:
·
·
·
·
Windows Media Player 11 (http://www.microsoft.com/windows/windowsmedia/default.mspx)
WinDVD 8 (www.intervideo.com)
PowerDVD 7 (www.cyberlink.com)
RealPlayer 11 (www.real.com)
PAGE·29
The USB Graphics adapter can display media files and DVDs using most media players. Media playback in mirror mode (XP)
or in Basic mode (Vista and Windows 7) is not recommended.
Using Multiple USB Graphics Adapters
The software supports up to six simultaneously USB attached screens. It is also possible that different sets of screens are
being used at different times, for example two in the office and two at home. The software saves each screen's display profile
separately. This allows for different physical positioning, or different resolutions, of connected monitors in the office and the
home.
Standby and Hibernate, Shut down and Restart
If the PC that the USB Graphics Adapter is connected to is placed into standby or hibernate mode, the display goes blank.
When the PC is again powered up (and unlocked if necessary) the connected monitor returns to the same mode as it was
before stand by or hibernation.
If the PC is shut down, restarted and logged in, again the connected display returns to the same mode as it was before
shutdown.
USB Graphics Adapters with Multiple Users
USB Graphics Adapters work with multiple users on the PC. The mode settings are saved for each user so each can use their
own desktop configuration.
Disconnecting the USB Graphics Adapter
If the USB Graphics Adapter is powered off or the USB cable is removed from the computer, the display blanks. All windows
and icons move to the primary screen.
On reconnection or powering up of the USB Graphics Adapter, the display returns to the same mode as it was before
disconnection. However, windows and icons that were previously on the screen will not be moved back.
Supported Screen Modes
There are three components that make up the screen mode:
PAGE·30
Resolution: The number of pixels displayed on screen horizontally and vertically.
Color Quality: The number of different colors that can be shown on the screen at the same time.
Refresh Rate: The speed that the entire screen is rescanned. Higher refresh rates reduce flicker.
Some monitors advertise the supported modes through the VGA or DVI connector. If this is the case, the USB Graphics
Adapter identifies the supported modes from the monitor. If the monitor does not advertise the supported modes, the USB
Graphics Adapter software chooses a set of common screen modes for the monitor.
Inferred Modes
Some modes in the DisplayLink GUI are shown with [ ] around them.
This occurs when connecting a monitor with a preferred mode
higher than the maximum supported resolution of the DisplayLink
device
In this case, the preferred resolution of the monitor cannot be
supported. However we add lower resolutions of the same aspect
ratio to be tried with the monitor. Modes in square brackets [ ] imply
that these are modes not reported by the monitor, but have been
made available by the DisplayLink software for you to try.
Error Messages
DisplayLink Graphics software occasionally displays user messages in a bubble in the notification area. The table below lists
the user messages and their description.
Message
Description
Insufficient system resources
exist to complete the
requested service
This can occur when entering extend mode with low system resources.The PC does not
have enough memory to start an extend display. Close down any unused applications.
The situation may also be improved by rebooting the PC.
The requested allocation
size was too large
This can occur if trying to mirror a primary display with a resolution above
2300x1700 (4:3) or 2600x1500 (16:9).
Incompatible Display Driver
This message will appear if the primary graphics card drivers installed are not WDDM
compatible. Windows 7 is not designed to operate without WDDM drivers.
Download and install the latest Windows 7 (WDDM) drivers for your primary graphics card.
The system cannot write to the
specified device
This warning may be displayed in Windows XP after changing the display mode several
times (e.g. Extend/Dock mode) from the DisplayLink GUI. If this happens, detach and
reattach the device to restore normal operation.
As these are inferred modes from the preferred mode of the monitor,
they are not guaranteed to work with the display.
PAGE·31
PAGE·32
Further Support
http://www.displaylink.com/support .
Troubleshooting
Minor issues can generally be resolved by:
·
unplugging and re-plugging the UGA device,
·
changing the display mode via the DisplayLink GUI,
·
or changing the display mode via Windows Display Properties.
and 10.6(Snow Leopard)
On Windows 7/Vista WDDM (Aero and Basic)
DisplayLink software works closely with the graphics card and there may be interoperability issues with some graphics cards. If
this happens:
1.
2.
3.
4.
Try to upgrade to the latest graphics drivers.
Try to upgrade to latest DisplayLink software.
Report the issue via your support channel.
If necessary, boot into Safe Mode and use Windows' Backup and Restore Center to recover.
PAGE·33
PAGE·34
PAGE·35
PAGE·36
PAGE·37
PAGE·38
Specifications
Host Interface
USB 2.0
Video Interface
VGA or DVI-I or HDMI
Connectivity
Up to 6 adapters on a computer
RAM
8M x 16 DDR Synchronous DRAM (SDRAM)
Power Mode
Bus-powered
Operation System
Support
Windows 2000/XP-32Bit, Vista, 7, Server 2003, 2008 and 2008 R2
MAC OS X / Linux
Supported Modes
Extended Desktop (Default), Mirrored Desktop, Primary Display
Color Depth
Resolution
640x480, 800x600, 1024x768, 1280x720, 1280x960, 1280x1024, 1360x768,1366x768,
1368x768, 1400x1050, 1440x900
*1600x1200, *1680x1050, *1920x1080, **1920x1200, **2048x1152
Note: that interlaced modes are not supported.
* Only supported by 1600x1200 model.
** Only supported by 1900x1200 model.
Operating temperature
10-40°C
Storage temperature
-10~80°C
Relative Humidity
< 85%non-condensing
* Specifications are subject to change without notice.
PAGE·39